20
Avid Media Composer Training Es- sentials 2007-12 for Uzbek Television
Avid Media Composer Training Es-sentials
2007-12 for Uzbek Television
Avid Media Composer Training Essentials
2 2007-12 by Hartmut Altenpohl
Inhaltsverzeichnis
1 Backup............................................................................................................... 3 1.1 Calculation...................................................................................................................................3 1.2 Strategy: bin backup...................................................................................................................4 1.3 Strategy: project backup ............................................................................................................5 1.4 Strategy: consolidation ..............................................................................................................6 1.5 Attic Folder ..................................................................................................................................7 1.6 Restoring a bin from Attic Folder ..............................................................................................8
2 Deleting material............................................................................................... 9
2.1 Basics ..........................................................................................................................................9 2.2 Sequences, subclips.................................................................................................................10 2.3 Deleting within a project...........................................................................................................10 2.4 Deleting across projects...........................................................................................................11 2.5 Deleting project data.................................................................................................................12
3 Main Settings .................................................................................................. 13
3.1 Basics ........................................................................................................................................13 3.2 Customising the keyboard and toolbars.................................................................................13 3.3 Timecode Breaks within Preroll...............................................................................................14 3.4 TC breaks between IN and OUT ...............................................................................................15 3.5 Graphic Import ..........................................................................................................................15 3.6 Starting timecode of a sequence .............................................................................................16 3.7 Calibrating the Audio Tool .......................................................................................................17
4 Audio ............................................................................................................... 18 4.1 Audio Routing ...........................................................................................................................18 4.2 Audio Leveling ..........................................................................................................................19 4.3 Audio Sample Rate ...................................................................................................................20
Avid Media Composer Training Essentials Backup
3 2007-12 by Hartmut Altenpohl
1 Backup
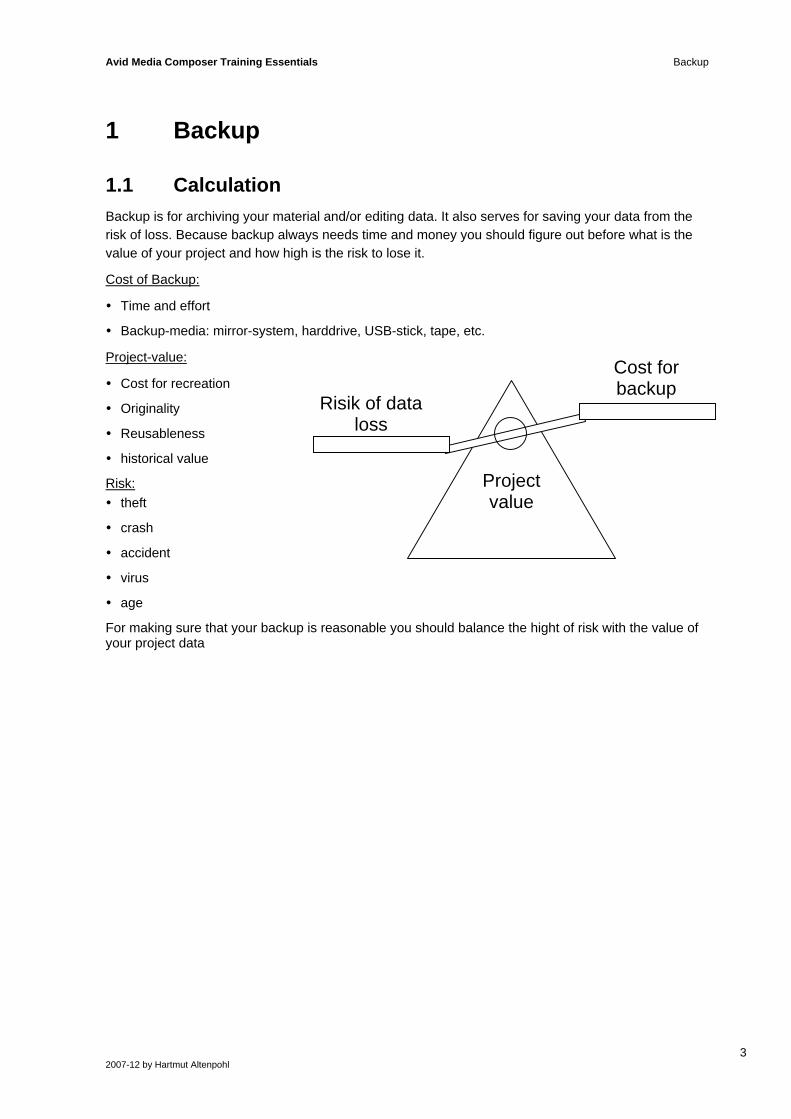
1.1 Calculation Backup is for archiving your material and/or editing data. It also serves for saving your data from the risk of loss. Because backup always needs time and money you should figure out before what is the value of your project and how high is the risk to lose it.
Cost of Backup:
Time and effort
Backup-media: mirror-system, harddrive, USB-stick, tape, etc.
Project-value:
Cost for recreation
Originality
Reusableness
historical value
Risk: theft
crash
accident
virus
age
For making sure that your backup is reasonable you should balance the hight of risk with the value of your project data
Project value
Risik of data loss
Cost for backup

Avid Media Composer Training Essentials Backup
4 2007-12 by Hartmut Altenpohl
1.2 Strategy: bin backup
Description:
Only the bin which includes your sequence is saved by copying it on a USB-stick. The media is kept on the original tapes. For recreating the sequence the material has to be batched. This means Avid re-captures the material based on timecode and tape-name.
simple
cheap
quick
because only the sequence is batched you are limited in making changes
not reasonable with P2 cards
backup for daily work
transfer of a sequence for colour correction or subtitling
project data
media
backup recreation
batching
importing a bin saving a bin on a stick
keeping the rushes

Avid Media Composer Training Essentials Backup
5 2007-12 by Hartmut Altenpohl
1.3 Strategy: project backup
Description:
The entire data of a project is saved to an USB-stick. You can find the projects within Avid_projects-folder on windows-level. This folder has to be pasted into the same location on your recreation-system. After pasting it can be opened as always and the clips can be batched.
simple
cheap
keeping your flexibility
high time investment for batching Application:
simple security backup for your daily work
Archiving a project
project data
media
backup recreation
Avid projects
copying the project folder on a stick project folder batching clips
batching
keeping the rushes
Avid Media Composer Training Essentials Backup
6 2007-12 by Hartmut Altenpohl
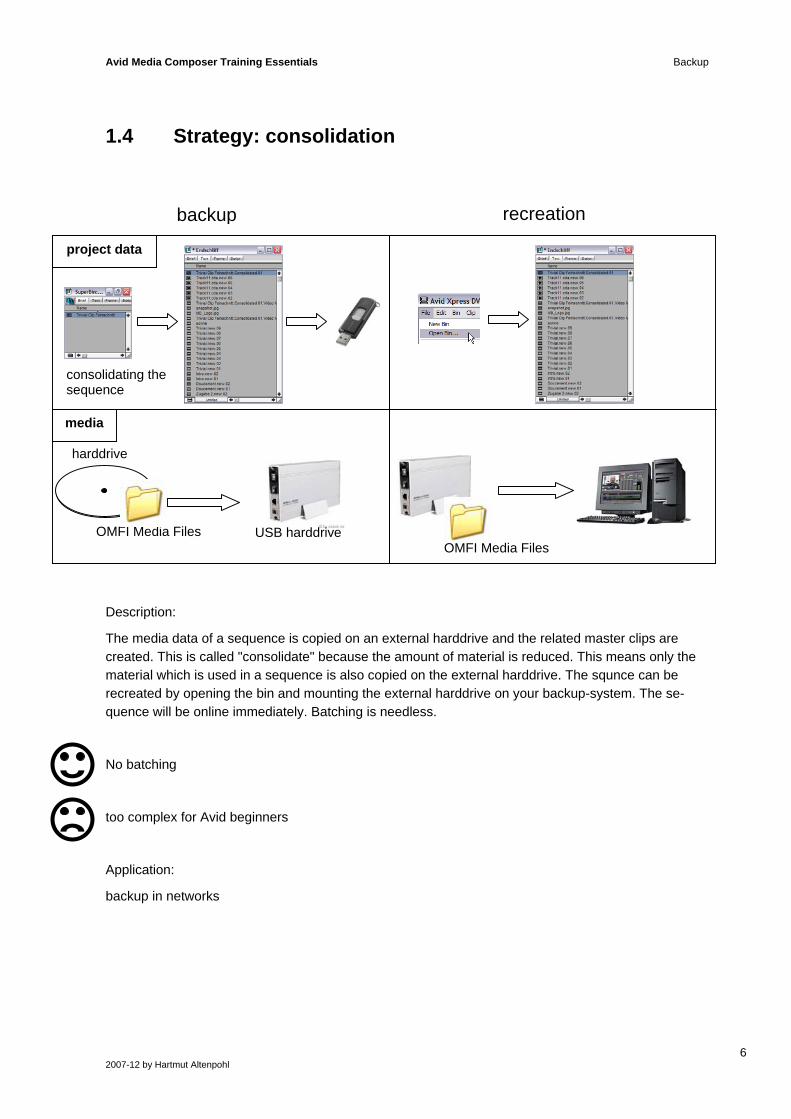
1.4 Strategy: consolidation
Description:
The media data of a sequence is copied on an external harddrive and the related master clips are created. This is called "consolidate" because the amount of material is reduced. This means only the material which is used in a sequence is also copied on the external harddrive. The squnce can be recreated by opening the bin and mounting the external harddrive on your backup-system. The se-quence will be online immediately. Batching is needless.
No batching
too complex for Avid beginners
Application:
backup in networks
project data
media
backup recreation
harddrive
OMFI Media Files USB harddrive
consolidating the sequence
OMFI Media Files

Avid Media Composer Training Essentials Backup
7 2007-12 by Hartmut Altenpohl
1.5 Attic Folder Avid creates a copy of each bin after a time interval which is set in the bin settings. The pro-ject with all bins is found in "Avid Projects"-folder.
On top of that Avid saves earlier versions of bins in the "Avid Attic"-folder. These copies can restore a lost bin or old version for example if you lost something out of confusion.
saving
saving
all projects in "Avid Projects" all bins of one project
earlier versions of one bin sorted by date

Avid Media Composer Training Essentials Backup
8 2007-12 by Hartmut Altenpohl
1.6 Restoring a bin from Attic Folder You can restore an old version of a bin by copying and pasting into your current project. Please copy and don´t cut the bin because it is going to be lost later.
The restored bin will appear in the current project for further use. The added number helps to didtin-guish the attic bin from the original. It is not possible to open the original bin and the attic bin at the same time.
Attic bin
original bin

Avid Media Composer Training Essentials Deleting material
9 2007-12 by Hartmut Altenpohl
2 Deleting material
2.1 Basics Always remember that Avid distinguishes between masterclips and media data.
Clips are:
located in a bin
included in a project
specified by name, timcode, tape name, date, and other metadata
Media data is:
located in the "OMFI Media Files" folder
specified by 1 video and up to 8 audio channels
no metadata
A masterclip is linked with the related mediadata based on timecode and tape name
OMFI Media Files
online
OMFI Media Files
offline
OMFI Media Files
orphan media file
Avid Media Composer Training Essentials Deleting material
10 2007-12 by Hartmut Altenpohl
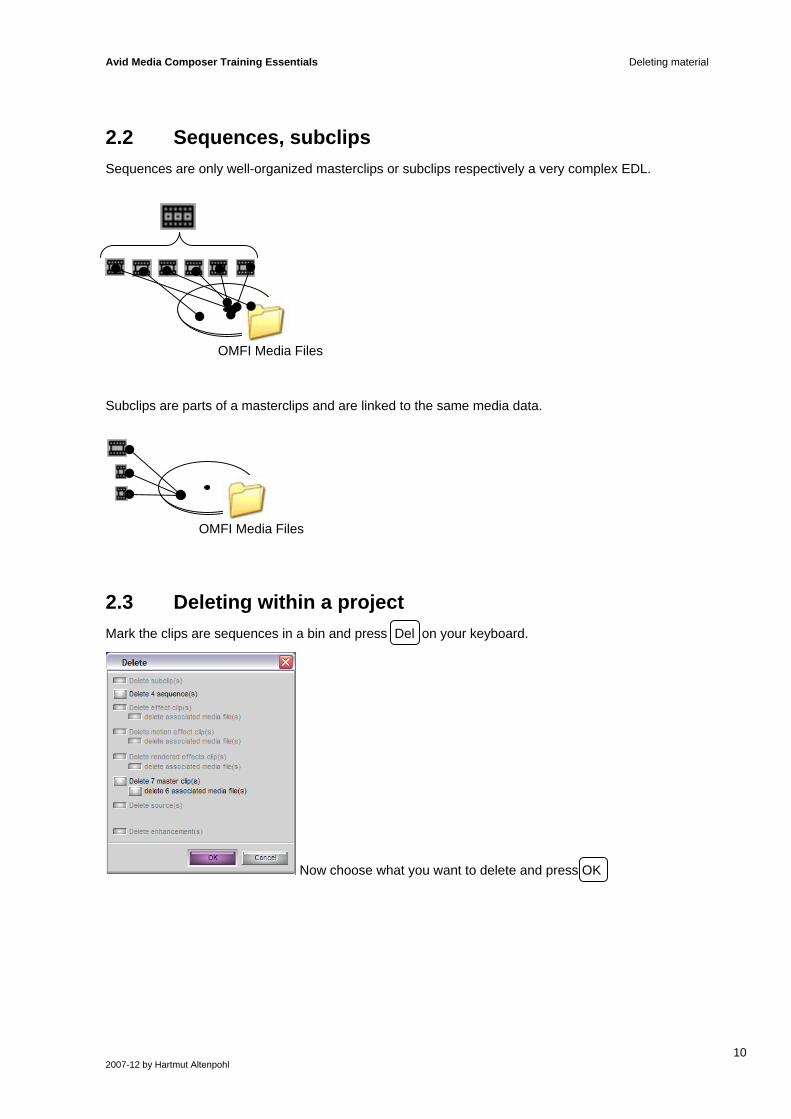
2.2 Sequences, subclips Sequences are only well-organized masterclips or subclips respectively a very complex EDL.
Subclips are parts of a masterclips and are linked to the same media data.
2.3 Deleting within a project Mark the clips are sequences in a bin and press Del on your keyboard.
Now choose what you want to delete and press OK
OMFI Media Files
OMFI Media Files

Avid Media Composer Training Essentials Deleting material
11 2007-12 by Hartmut Altenpohl
You can also delete a bin. Right-click on the bin that you want delet and select "delete selected bins"
2.4 Deleting across projects
Select "Media Tool" from the menu "Tools". Se-lect the drives and the projects in which you want to look for material.
Master Clips shows only Master Clips that are online
Precompute Clips shows render files from ren-der effects
Media Files loads also orphan files
In the Media Tool you can sort each column ascending or descending
The bin is moved into the trash.
Avid Media Composer Training Essentials Deleting material
12 2007-12 by Hartmut Altenpohl
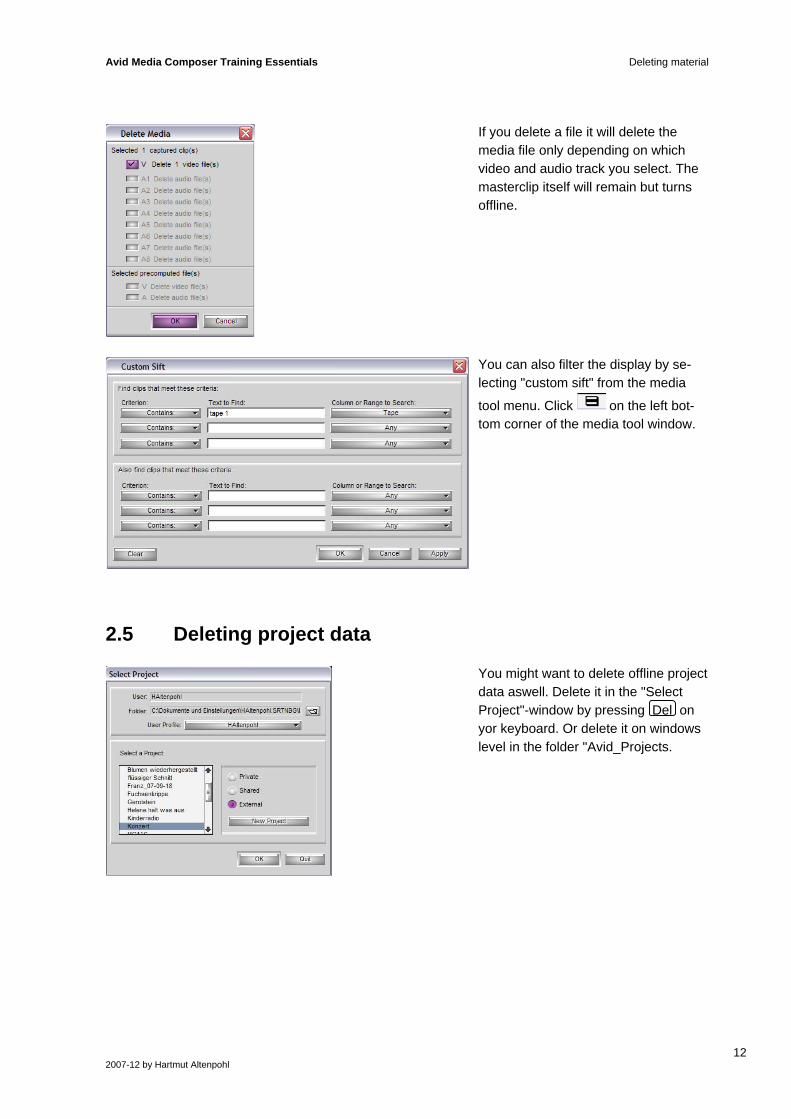
If you delete a file it will delete the media file only depending on which video and audio track you select. The masterclip itself will remain but turns offline.
You can also filter the display by se-lecting "custom sift" from the media
tool menu. Click on the left bot-tom corner of the media tool window.
2.5 Deleting project data
You might want to delete offline project data aswell. Delete it in the "Select Project"-window by pressing Del on yor keyboard. Or delete it on windows level in the folder "Avid_Projects.
Avid Media Composer Training Essentials Main Settings
13 2007-12 by Hartmut Altenpohl
3 Main Settings
3.1 Basics
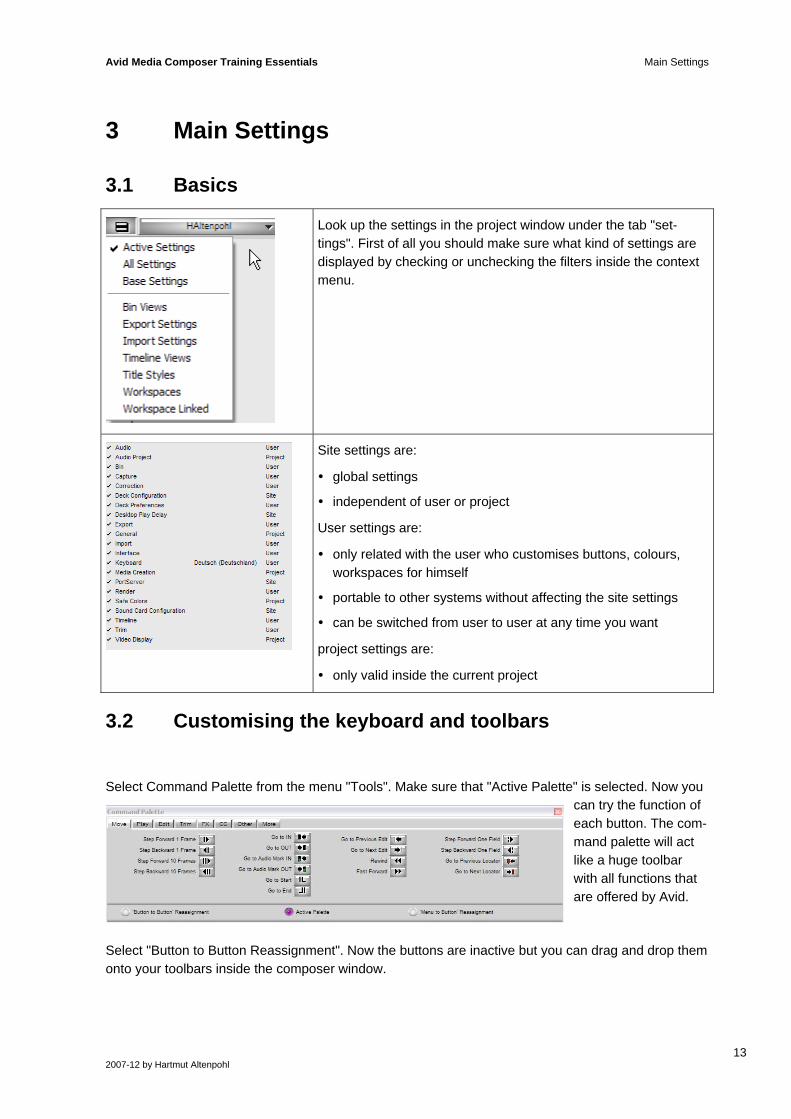
Look up the settings in the project window under the tab "set-tings". First of all you should make sure what kind of settings are displayed by checking or unchecking the filters inside the context menu.
Site settings are:
global settings
independent of user or project
User settings are:
only related with the user who customises buttons, colours, workspaces for himself
portable to other systems without affecting the site settings
can be switched from user to user at any time you want
project settings are:
only valid inside the current project
3.2 Customising the keyboard and toolbars
Select Command Palette from the menu "Tools". Make sure that "Active Palette" is selected. Now you
can try the function of each button. The com-mand palette will act like a huge toolbar with all functions that are offered by Avid.
Select "Button to Button Reassignment". Now the buttons are inactive but you can drag and drop them onto your toolbars inside the composer window.
Avid Media Composer Training Essentials Main Settings
14 2007-12 by Hartmut Altenpohl
If you want to delete a button selct the tab "Other" and drag and drop the "Blank" but-ton onto your toolbar
With "Menu to Button Reassignment" you can create a button of each command of a menu. For ex-ample: Activate "Menu to Button Reassignment". Now click on a free space on your toolbar under the source monitor for highlighting it. Now go to the "Tools" menu and click on "Audio Mix". The button will change and will show "AM" for Audio Mix. Each time you click on it the Audio Mixer will open.
All changes that are done while customising are saved with the user settings after leaving the soft-ware.
3.3 Timecode Breaks within Preroll
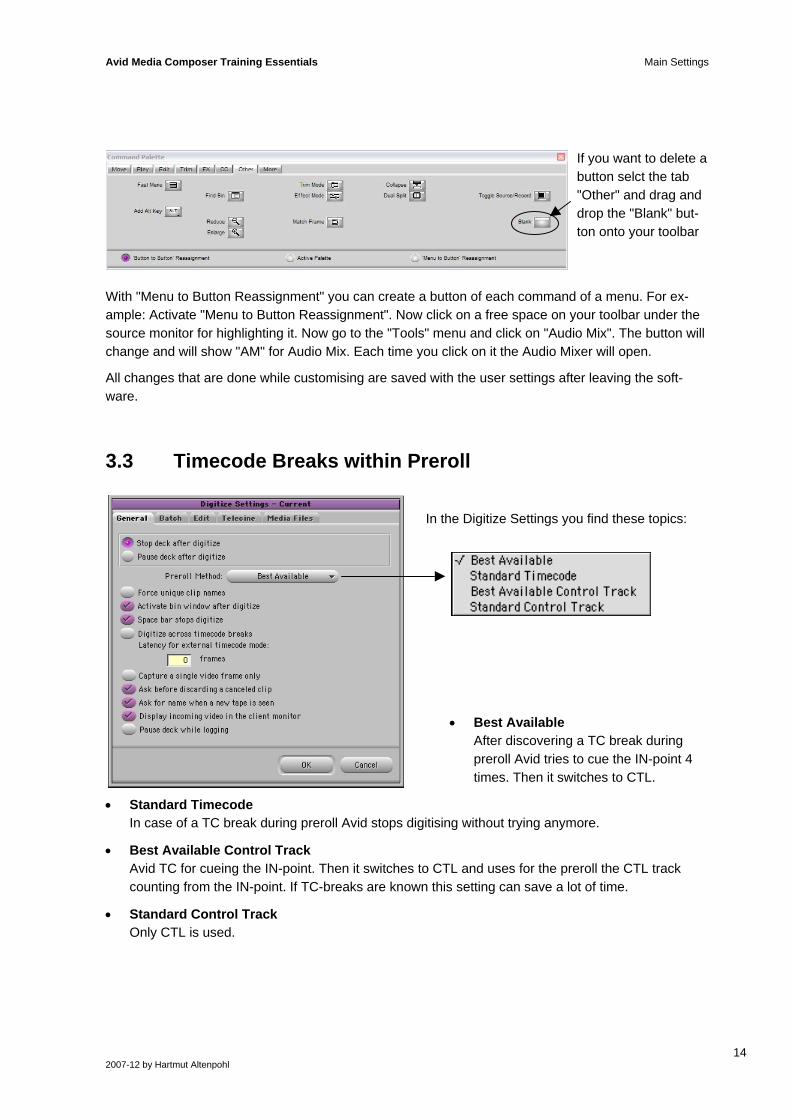
In the Digitize Settings you find these topics:
• Best Available After discovering a TC break during preroll Avid tries to cue the IN-point 4 times. Then it switches to CTL.
• Standard Timecode In case of a TC break during preroll Avid stops digitising without trying anymore.
• Best Available Control Track Avid TC for cueing the IN-point. Then it switches to CTL and uses for the preroll the CTL track counting from the IN-point. If TC-breaks are known this setting can save a lot of time.
• Standard Control Track Only CTL is used.

Avid Media Composer Training Essentials Main Settings
15 2007-12 by Hartmut Altenpohl
3.4 TC breaks between IN and OUT
Check Digitize across timecode breaks and select Best Available Control Track. Result: Avid digitises until a TC-break is found. Then it stops digitising and creates a master clip from IN-point until TC-break. Then digitising will be contin-ued automatically. If mor TC-breaks will be found Avid will create as many masterclips "Best Available Control Track" guarantees that the masterclip starts directly after the TC-break
3.5 Graphic Import
601, non-square
Select this for the import of graphics with a resolution that matches CCIR 601 (720 x 576 non-square pixel). All other graphics will be squeezed or stretched for filling the screen
Maintain, non suare
Use this for graphics with a non-square origine. The original aspect of the graphic will be maintained.
Maintain, square
Use this for graphics with a square origine. The original aspect of the graphic will be maintained.

Avid Media Composer Training Essentials Main Settings
16 2007-12 by Hartmut Altenpohl
Maintain and Resize, square
This is for all pictures where aspect is crucial but size is allowed to increase or decrease. Avid will reesize the picture but maintain the aspect.
RGB
Choose this for graphics that are created in a normal graphic environment such as Photoshop. The RGB levels will be changed to CCIR 601 levels
RGB dithered
This is for maintaining smooth colour gradients.
601
For graphics that match the colour space of CCIR 601
3.6 Starting timecode of a sequence
Usally a new sequence starts with 00:00:30:00 which is an Avid standard. You can change this indi-vidually by right-clicking into the master monitor.
Select "Get Sequence Info" then type another timecode and confirm with "OK".
You can also change the start timecode globally in the General Settings. Every next sequence will start with the timecode that was set.
Avid Media Composer Training Essentials Main Settings
17 2007-12 by Hartmut Altenpohl
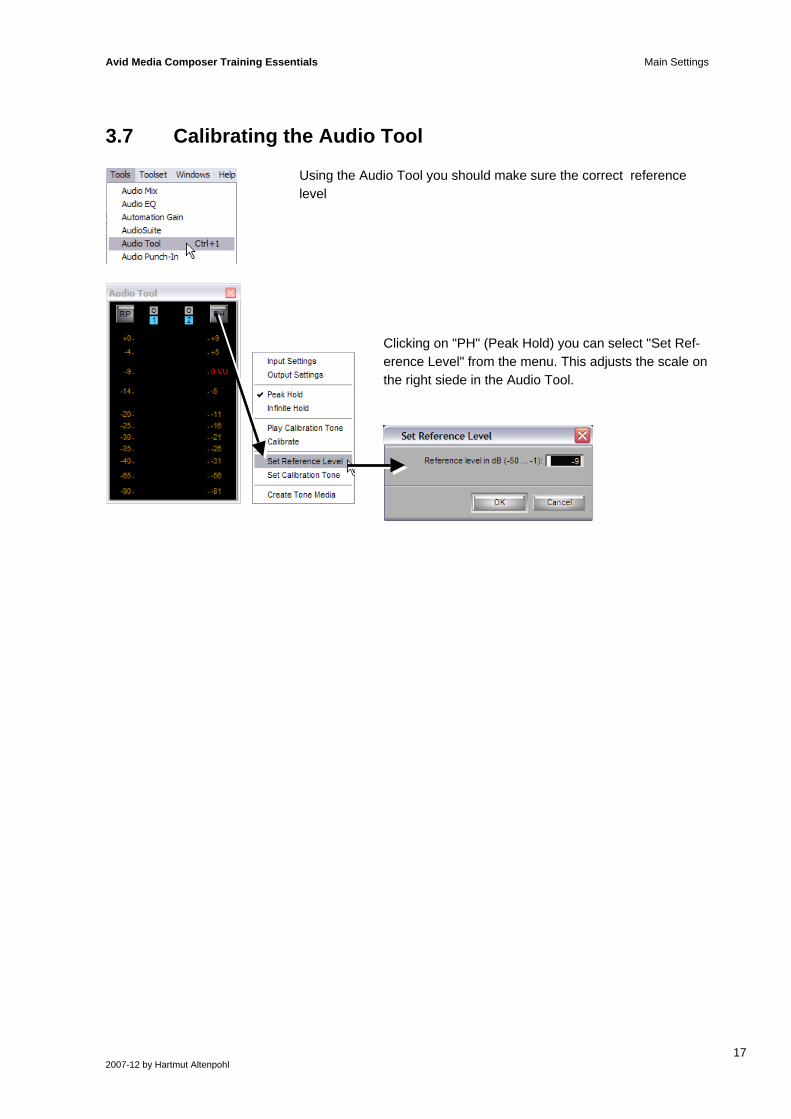
3.7 Calibrating the Audio Tool
Using the Audio Tool you should make sure the correct reference level
Clicking on "PH" (Peak Hold) you can select "Set Ref-erence Level" from the menu. This adjusts the scale on the right siede in the Audio Tool.

Avid Media Composer Training Essentials Audio
18 2007-12 by Hartmut Altenpohl
4 Audio
4.1 Audio Routing Routing is created by the panorama adjustment in the "Audio Mix" -Tool and by the output-setting in the "Audio Project Settings".
Panorama delegates the audio from left to right depending on the percentage that you adjust. 0 percent is "Mid"-adjustment.
Left Right
In the Output settings you can choose between
and
and
Direct Out
Avid Media Composer Training Essentials Audio
19 2007-12 by Hartmut Altenpohl
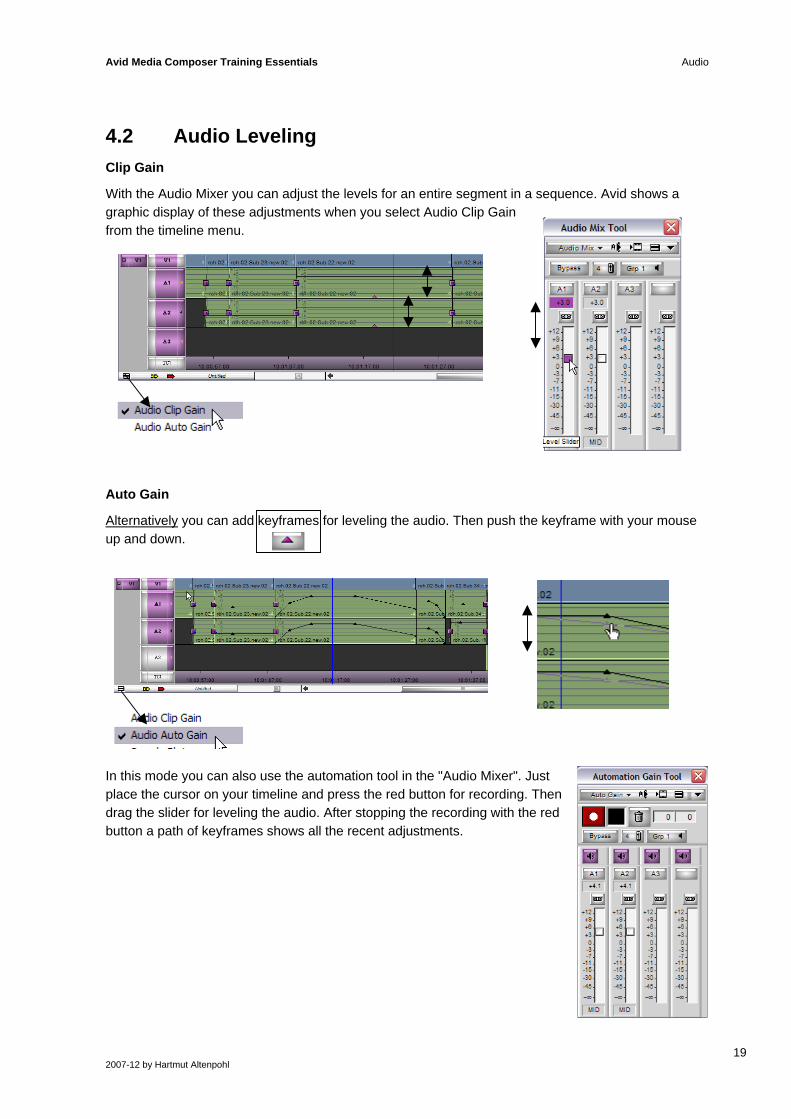
4.2 Audio Leveling Clip Gain
With the Audio Mixer you can adjust the levels for an entire segment in a sequence. Avid shows a graphic display of these adjustments when you select Audio Clip Gain from the timeline menu.
Auto Gain
Alternatively you can add keyframes for leveling the audio. Then push the keyframe with your mouse up and down.
In this mode you can also use the automation tool in the "Audio Mixer". Just place the cursor on your timeline and press the red button for recording. Then drag the slider for leveling the audio. After stopping the recording with the red button a path of keyframes shows all the recent adjustments.
Avid Media Composer Training Essentials Audio
20 2007-12 by Hartmut Altenpohl
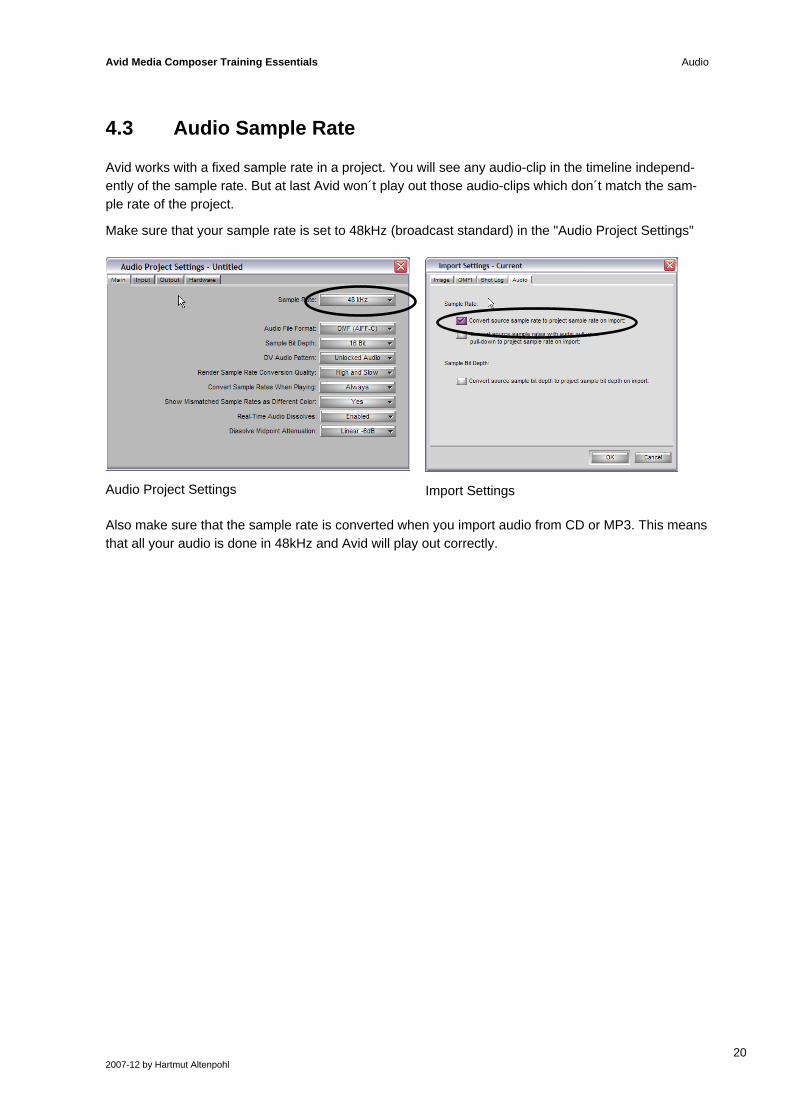
4.3 Audio Sample Rate
Avid works with a fixed sample rate in a project. You will see any audio-clip in the timeline independ-ently of the sample rate. But at last Avid won´t play out those audio-clips which don´t match the sam-ple rate of the project.
Make sure that your sample rate is set to 48kHz (broadcast standard) in the "Audio Project Settings"
Audio Project Settings
Import Settings
Also make sure that the sample rate is converted when you import audio from CD or MP3. This means that all your audio is done in 48kHz and Avid will play out correctly.


