36
AXCELERATE 5 REVIEWER USER GUIDE Headquarters Recommind, Inc. | 650 California Street, San Francisco, CA 94108 | www.recommind.com
AXCELERATE 5 REVIEWER USER GUIDE
Headquarters Recommind, Inc. | 650 California Street, San Francisco, CA 94108 | www.recommind.com
Axcelerate 5: Reviewer User Guide
Recommind, Inc. Proprietary & Confidential | Page 2
CONTENTS
GENERAL NAVIGATION ........................................................................................ 4 1
1.1 Accessing Your Projects ............................................................................................................... 5
1.2 Last Accessed Page, Results ....................................................................................................... 6
1.3 2-Screen Mode ................................................................................................................................ 6
ASSIGNMENTS PAGE ............................................................................................ 7 2
2.1 Pull Batches Feature ...................................................................................................................... 8
RESULTS LIST ........................................................................................................ 9 3
3.1 View Metadata ................................................................................................................................. 9
3.2 Batch Display – Group/Sort ........................................................................................................ 10
3.3 Document Visibility – Hide Reviewed Documents .................................................................... 11
3.4 Document Visibility - Show Associated Results Outside of Batch ......................................... 11
3.5 Associated Results in the Batch ................................................................................................ 12
3.6 Email Threads ............................................................................................................................... 14
3.7 Navigate Associated Results View ............................................................................................. 15
3.8 Tagged Doc Icon .......................................................................................................................... 15
TAGGING .............................................................................................................. 16 4
4.1 Bulk Tag Associated Documents ............................................................................................... 17
4.2 Tagging Rules ............................................................................................................................... 18
VIEWER ................................................................................................................. 20 5
5.1 Pinning a View .............................................................................................................................. 20
5.2 View-specific Notes...................................................................................................................... 21
Axcelerate 5: Reviewer User Guide
Recommind, Inc. Proprietary & Confidential | Page 3
5.3 Download Natives ........................................................................................................................ 21
5.4 Search within a Document .......................................................................................................... 21
5.5 Mark for Redaction ....................................................................................................................... 22
TEXT AND METADATA HIGHLIGHTING ............................................................. 23 6
ANNOTATION AND REDACTION TOOLS ........................................................... 25 7
7.1 Annotations .................................................................................................................................. 26
7.2 Redactions .................................................................................................................................... 27
7.3 Redaction Audit Tool ................................................................................................................... 30
7.4 Background Color Toggle ........................................................................................................... 33
FOLDERING DOCUMENTS .................................................................................. 33 8
PRINTING .............................................................................................................. 35 9
SEARCHING ....................................................................................................... 35 10
USER PREFERENCES ...................................................................................... 36 11
SESSION TIMEOUT ........................................................................................... 36 12

Axcelerate 5: Reviewer User Guide
Recommind, Inc. Proprietary & Confidential | Page 4
INTRODUCTION Axcelerate 5 is a web-based document review and analysis application that requires no plug-ins. Use of Chrome, Internet Explorer 10 or 11, or Firefox is required.
This document provides the Reviewer User a quick reference for the major features and functionality of Axcelerate 5.
GENERAL NAVIGATION 1Axcelerate 5 features are displayed in three main panels, and the panels expand and collapse to offer flexible viewing real estate:
• Batch Results List Panel • Document View Panel • Tagging Panel
Many tools are accessed via stacked menus, which are collapsed by default to provide maximum viewing space.
Axcelerate 5: Reviewer User Guide
Recommind, Inc. Proprietary & Confidential | Page 5
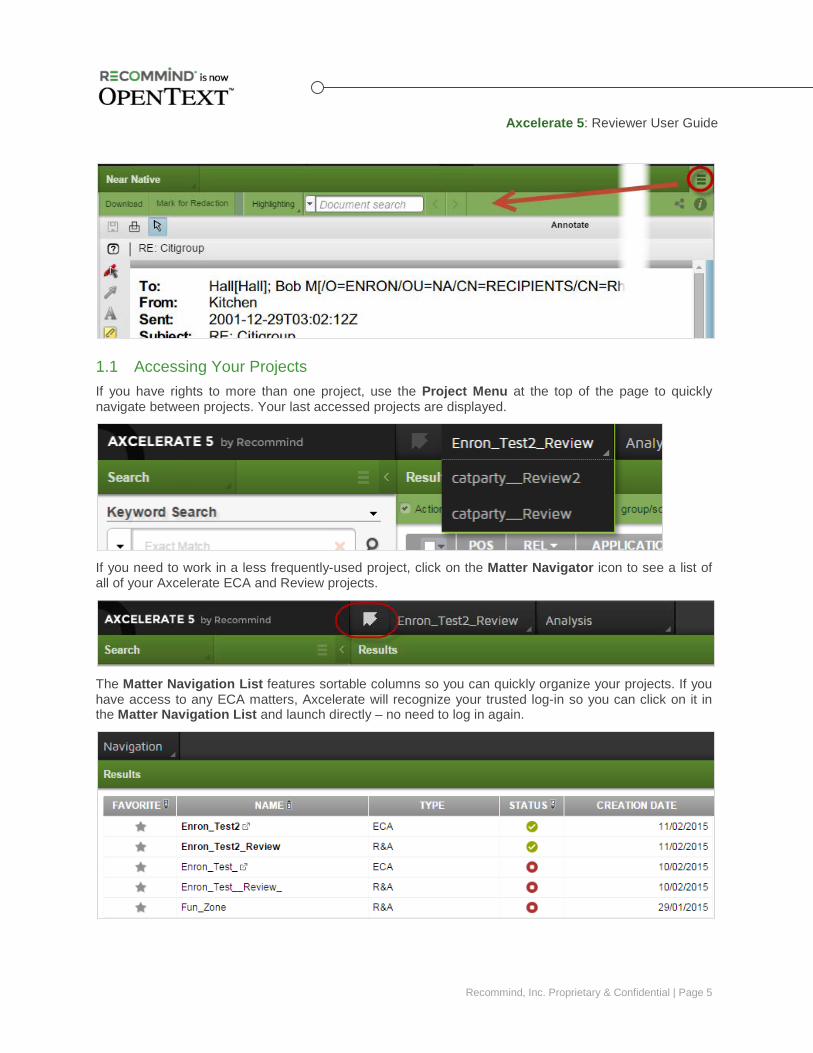
1.1 Accessing Your Projects If you have rights to more than one project, use the Project Menu at the top of the page to quickly navigate between projects. Your last accessed projects are displayed.
If you need to work in a less frequently-used project, click on the Matter Navigator icon to see a list of all of your Axcelerate ECA and Review projects.
The Matter Navigation List features sortable columns so you can quickly organize your projects. If you have access to any ECA matters, Axcelerate will recognize your trusted log-in so you can click on it in the Matter Navigation List and launch directly – no need to log in again.
Axcelerate 5: Reviewer User Guide
Recommind, Inc. Proprietary & Confidential | Page 6
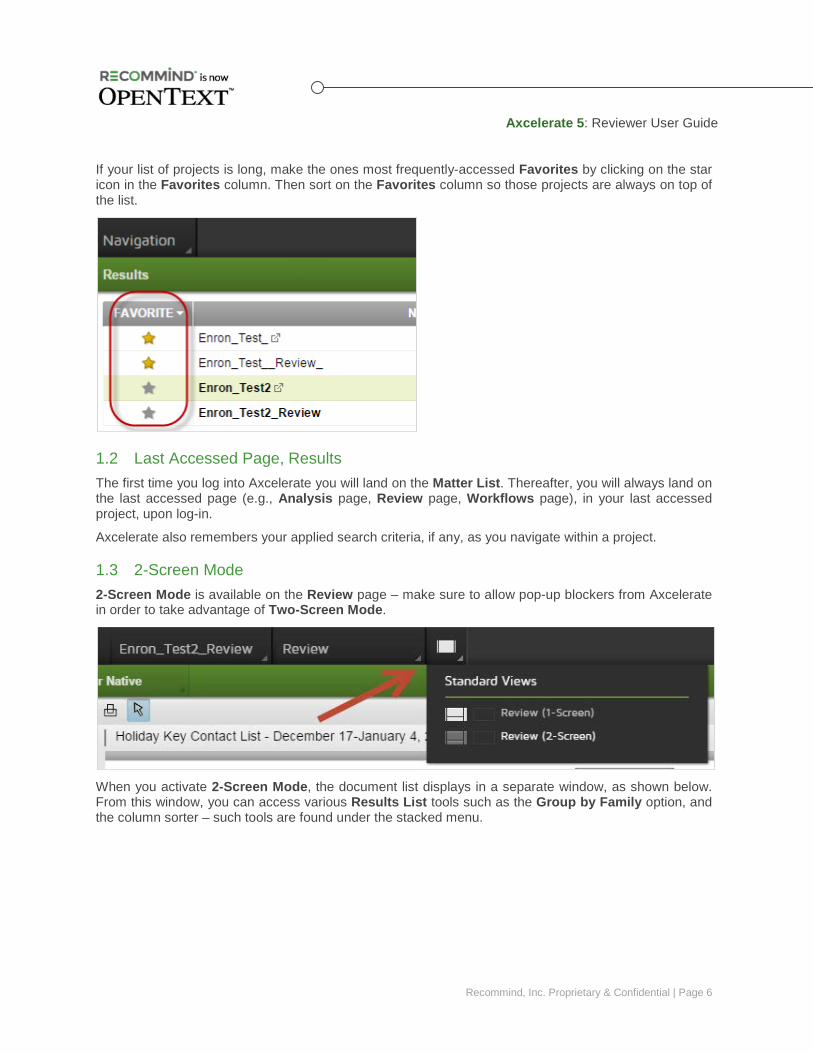
If your list of projects is long, make the ones most frequently-accessed Favorites by clicking on the star icon in the Favorites column. Then sort on the Favorites column so those projects are always on top of the list.
1.2 Last Accessed Page, Results The first time you log into Axcelerate you will land on the Matter List. Thereafter, you will always land on the last accessed page (e.g., Analysis page, Review page, Workflows page), in your last accessed project, upon log-in.
Axcelerate also remembers your applied search criteria, if any, as you navigate within a project.
1.3 2-Screen Mode 2-Screen Mode is available on the Review page – make sure to allow pop-up blockers from Axcelerate in order to take advantage of Two-Screen Mode.
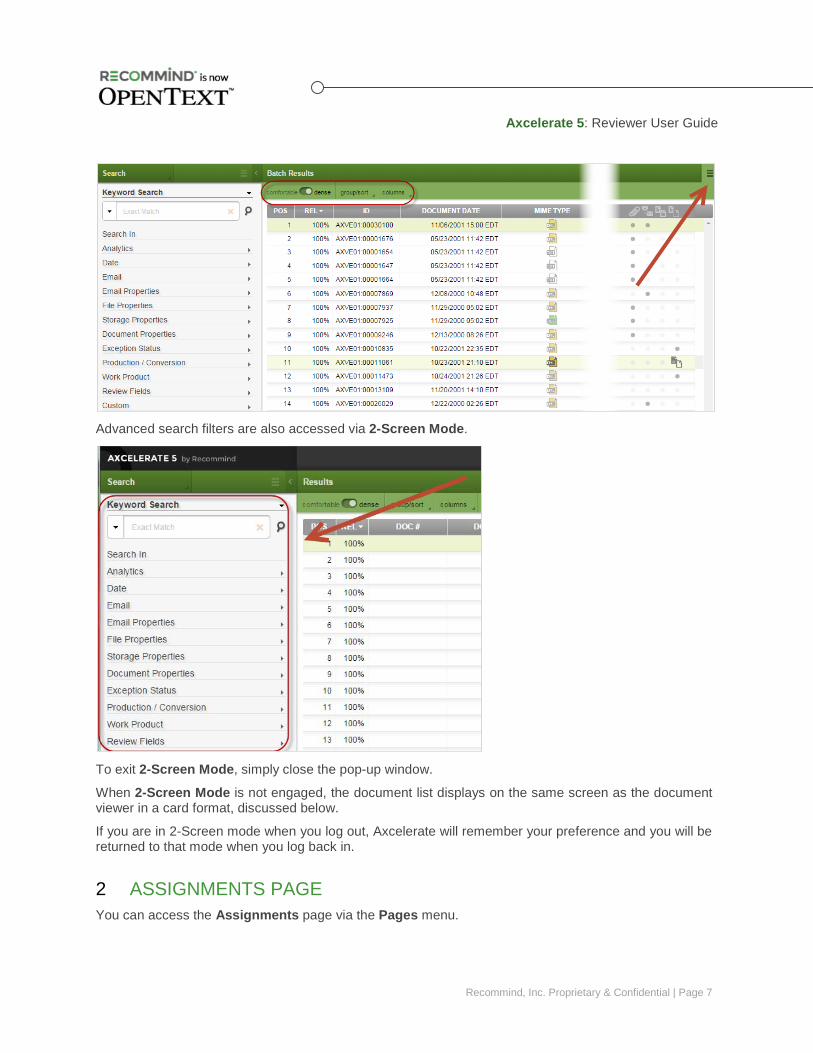
When you activate 2-Screen Mode, the document list displays in a separate window, as shown below. From this window, you can access various Results List tools such as the Group by Family option, and the column sorter – such tools are found under the stacked menu.
Axcelerate 5: Reviewer User Guide
Recommind, Inc. Proprietary & Confidential | Page 7
Advanced search filters are also accessed via 2-Screen Mode.
To exit 2-Screen Mode, simply close the pop-up window.
When 2-Screen Mode is not engaged, the document list displays on the same screen as the document viewer in a card format, discussed below.
If you are in 2-Screen mode when you log out, Axcelerate will remember your preference and you will be returned to that mode when you log back in.
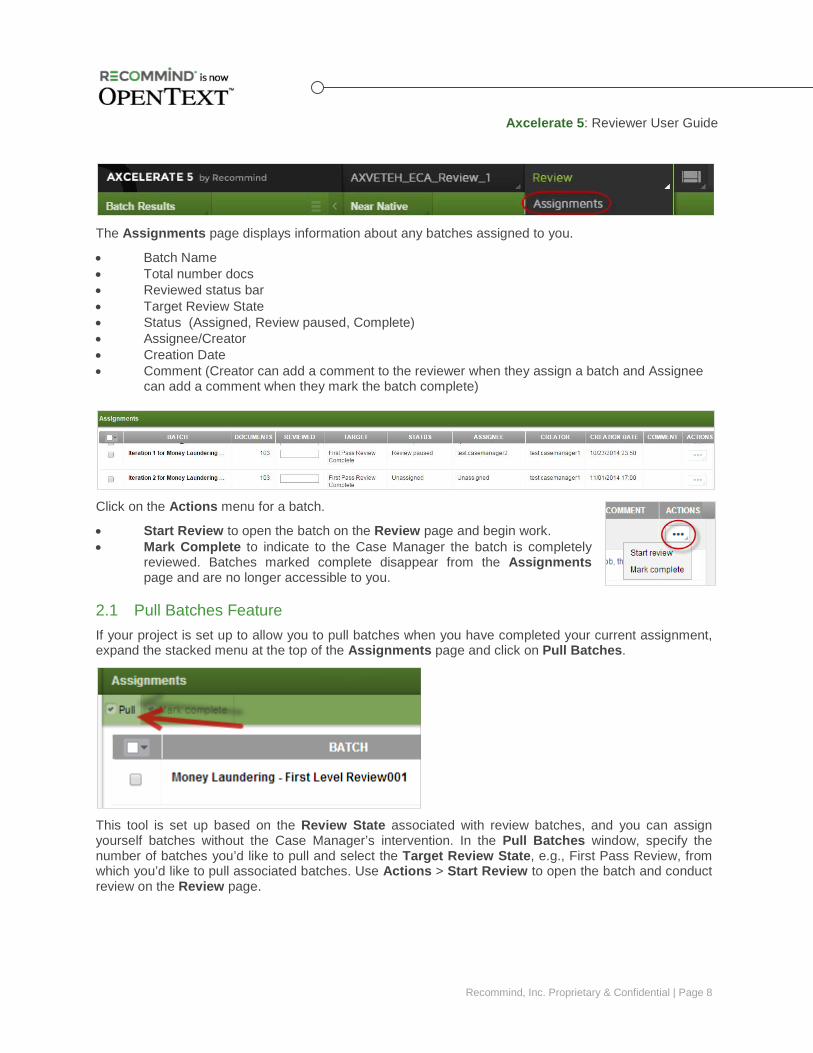
ASSIGNMENTS PAGE 2You can access the Assignments page via the Pages menu.
Axcelerate 5: Reviewer User Guide
Recommind, Inc. Proprietary & Confidential | Page 8
The Assignments page displays information about any batches assigned to you.
• Batch Name • Total number docs • Reviewed status bar • Target Review State • Status (Assigned, Review paused, Complete) • Assignee/Creator • Creation Date • Comment (Creator can add a comment to the reviewer when they assign a batch and Assignee
can add a comment when they mark the batch complete)
Click on the Actions menu for a batch.
• Start Review to open the batch on the Review page and begin work. • Mark Complete to indicate to the Case Manager the batch is completely
reviewed. Batches marked complete disappear from the Assignments page and are no longer accessible to you.
2.1 Pull Batches Feature If your project is set up to allow you to pull batches when you have completed your current assignment, expand the stacked menu at the top of the Assignments page and click on Pull Batches.
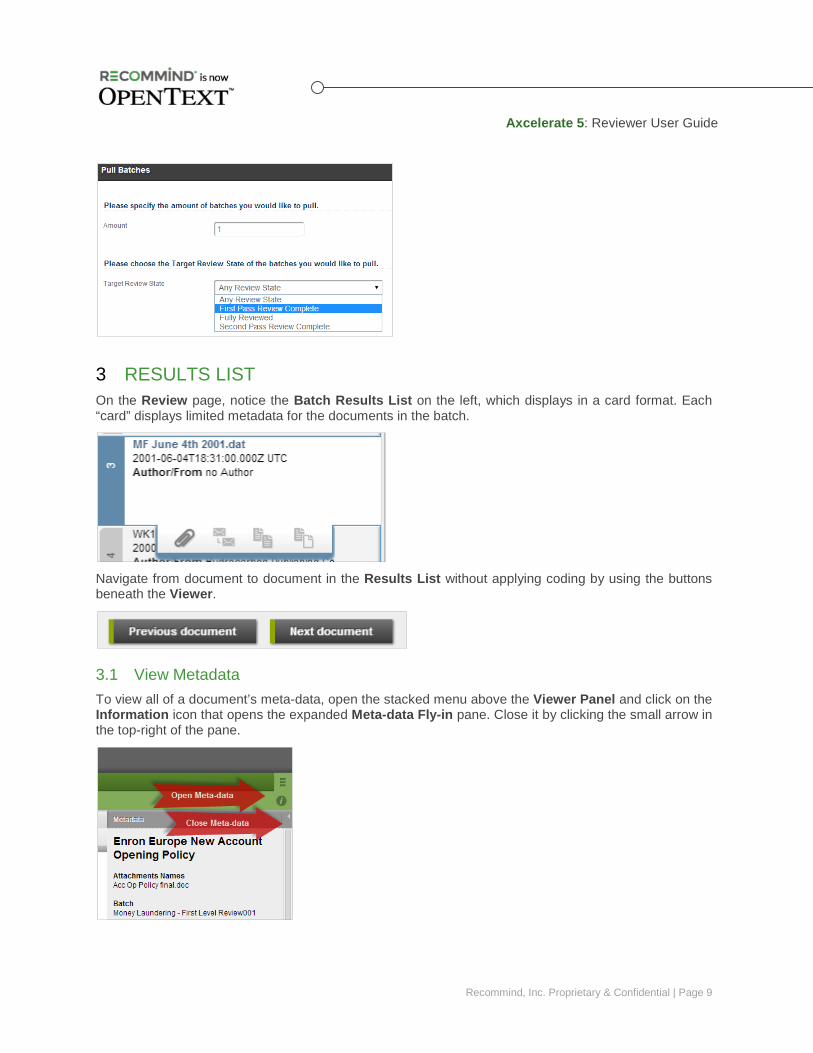
This tool is set up based on the Review State associated with review batches, and you can assign yourself batches without the Case Manager’s intervention. In the Pull Batches window, specify the number of batches you’d like to pull and select the Target Review State, e.g., First Pass Review, from which you’d like to pull associated batches. Use Actions > Start Review to open the batch and conduct review on the Review page.
Axcelerate 5: Reviewer User Guide
Recommind, Inc. Proprietary & Confidential | Page 9
RESULTS LIST 3On the Review page, notice the Batch Results List on the left, which displays in a card format. Each “card” displays limited metadata for the documents in the batch.
Navigate from document to document in the Results List without applying coding by using the buttons beneath the Viewer.
3.1 View Metadata To view all of a document’s meta-data, open the stacked menu above the Viewer Panel and click on the Information icon that opens the expanded Meta-data Fly-in pane. Close it by clicking the small arrow in the top-right of the pane.
Axcelerate 5: Reviewer User Guide
Recommind, Inc. Proprietary & Confidential | Page 10
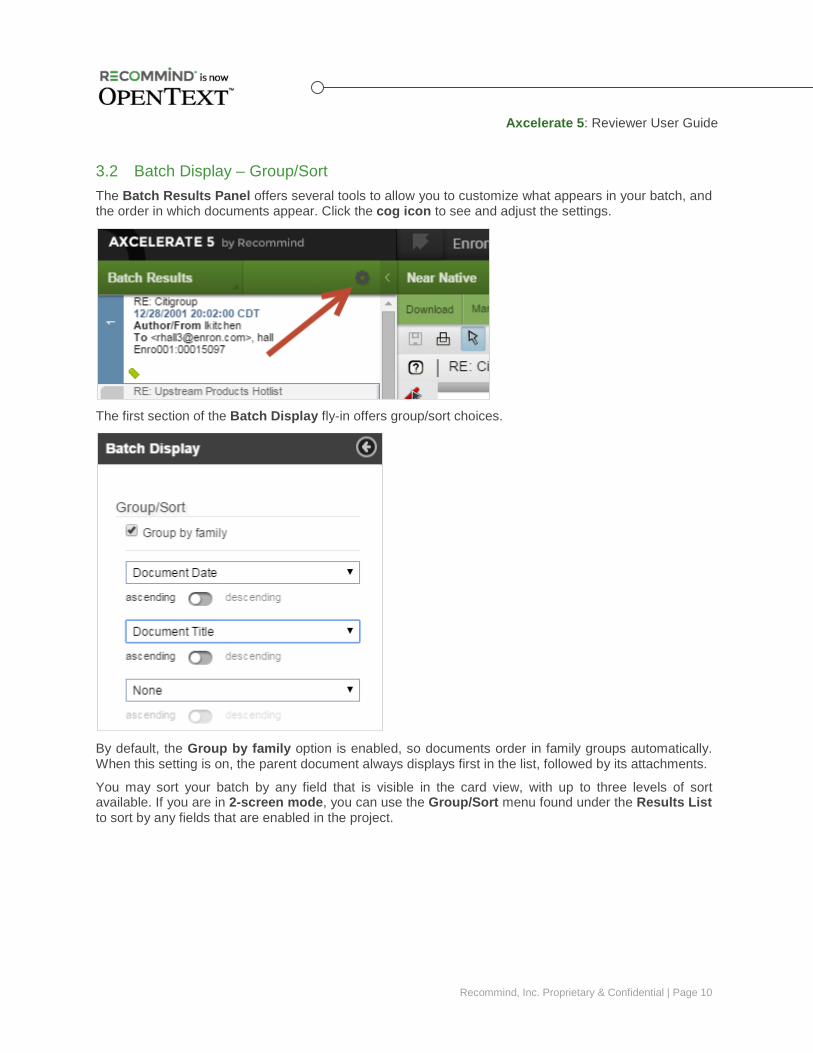
3.2 Batch Display – Group/Sort The Batch Results Panel offers several tools to allow you to customize what appears in your batch, and the order in which documents appear. Click the cog icon to see and adjust the settings.
The first section of the Batch Display fly-in offers group/sort choices.
By default, the Group by family option is enabled, so documents order in family groups automatically. When this setting is on, the parent document always displays first in the list, followed by its attachments.
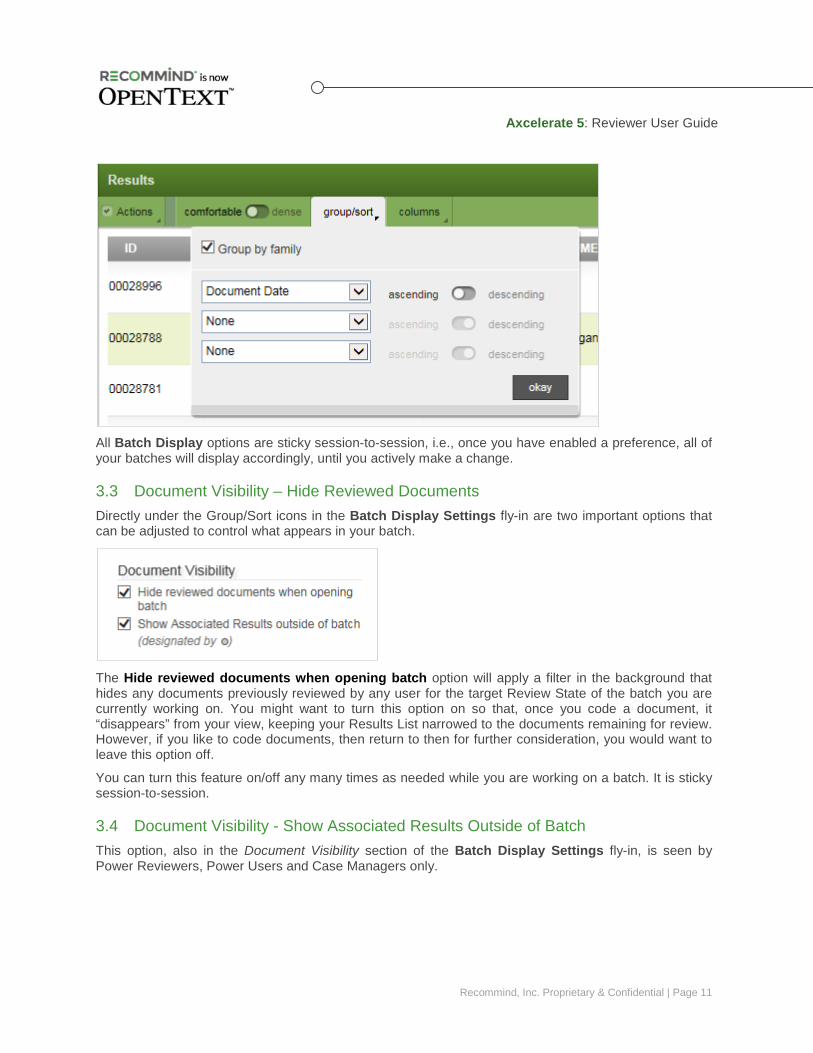
You may sort your batch by any field that is visible in the card view, with up to three levels of sort available. If you are in 2-screen mode, you can use the Group/Sort menu found under the Results List to sort by any fields that are enabled in the project.
Axcelerate 5: Reviewer User Guide
Recommind, Inc. Proprietary & Confidential | Page 11
All Batch Display options are sticky session-to-session, i.e., once you have enabled a preference, all of your batches will display accordingly, until you actively make a change.
3.3 Document Visibility – Hide Reviewed Documents Directly under the Group/Sort icons in the Batch Display Settings fly-in are two important options that can be adjusted to control what appears in your batch.
The Hide reviewed documents when opening batch option will apply a filter in the background that hides any documents previously reviewed by any user for the target Review State of the batch you are currently working on. You might want to turn this option on so that, once you code a document, it “disappears” from your view, keeping your Results List narrowed to the documents remaining for review. However, if you like to code documents, then return to then for further consideration, you would want to leave this option off.
You can turn this feature on/off any many times as needed while you are working on a batch. It is sticky session-to-session.
3.4 Document Visibility - Show Associated Results Outside of Batch This option, also in the Document Visibility section of the Batch Display Settings fly-in, is seen by Power Reviewers, Power Users and Case Managers only.
Axcelerate 5: Reviewer User Guide
Recommind, Inc. Proprietary & Confidential | Page 12
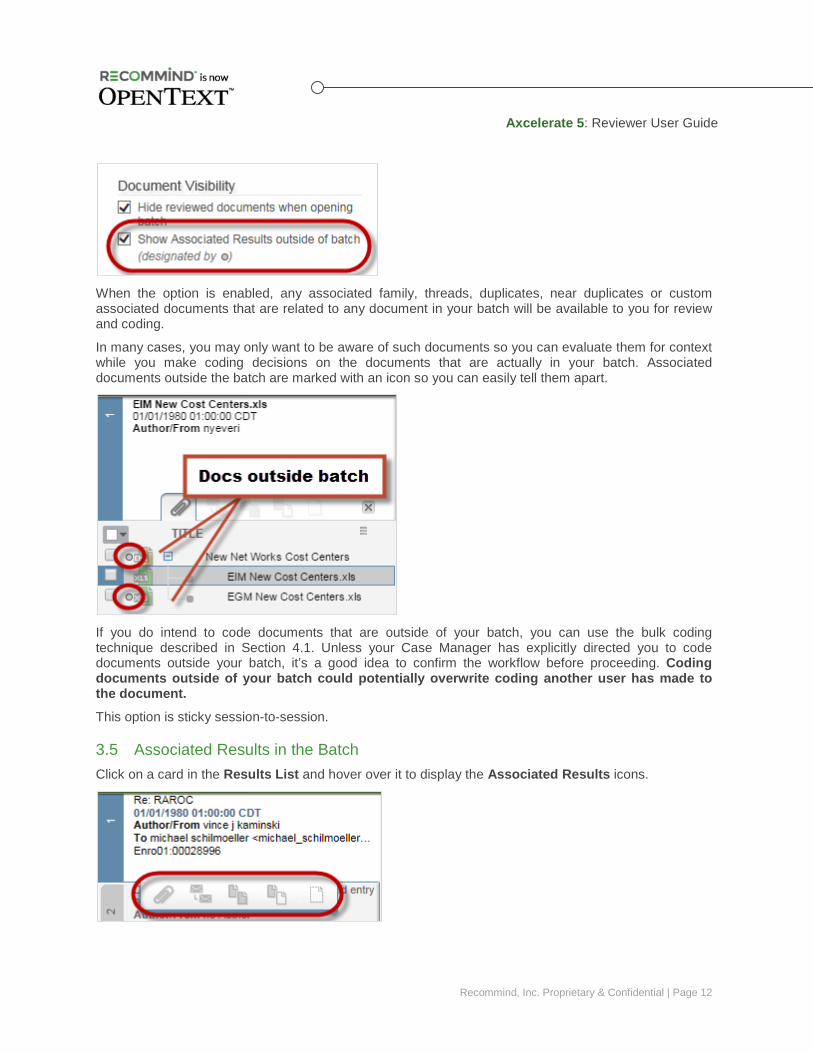
When the option is enabled, any associated family, threads, duplicates, near duplicates or custom associated documents that are related to any document in your batch will be available to you for review and coding.
In many cases, you may only want to be aware of such documents so you can evaluate them for context while you make coding decisions on the documents that are actually in your batch. Associated documents outside the batch are marked with an icon so you can easily tell them apart.
If you do intend to code documents that are outside of your batch, you can use the bulk coding technique described in Section 4.1. Unless your Case Manager has explicitly directed you to code documents outside your batch, it’s a good idea to confirm the workflow before proceeding. Coding documents outside of your batch could potentially overwrite coding another user has made to the document.
This option is sticky session-to-session.
3.5 Associated Results in the Batch Click on a card in the Results List and hover over it to display the Associated Results icons.
Axcelerate 5: Reviewer User Guide
Recommind, Inc. Proprietary & Confidential | Page 13
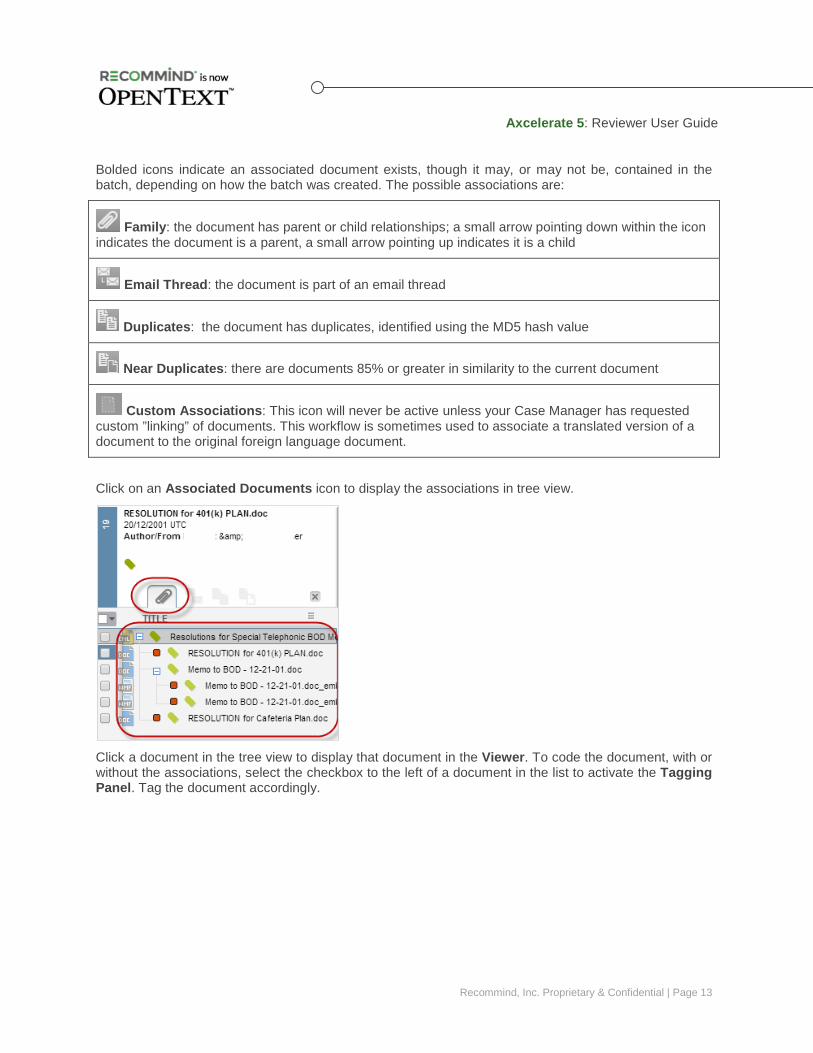
Bolded icons indicate an associated document exists, though it may, or may not be, contained in the batch, depending on how the batch was created. The possible associations are:
Family: the document has parent or child relationships; a small arrow pointing down within the icon indicates the document is a parent, a small arrow pointing up indicates it is a child
Email Thread: the document is part of an email thread
Duplicates: the document has duplicates, identified using the MD5 hash value
Near Duplicates: there are documents 85% or greater in similarity to the current document
Custom Associations: This icon will never be active unless your Case Manager has requested custom ”linking” of documents. This workflow is sometimes used to associate a translated version of a document to the original foreign language document.
Click on an Associated Documents icon to display the associations in tree view.
Click a document in the tree view to display that document in the Viewer. To code the document, with or without the associations, select the checkbox to the left of a document in the list to activate the Tagging Panel. Tag the document accordingly.
Axcelerate 5: Reviewer User Guide
Recommind, Inc. Proprietary & Confidential | Page 14
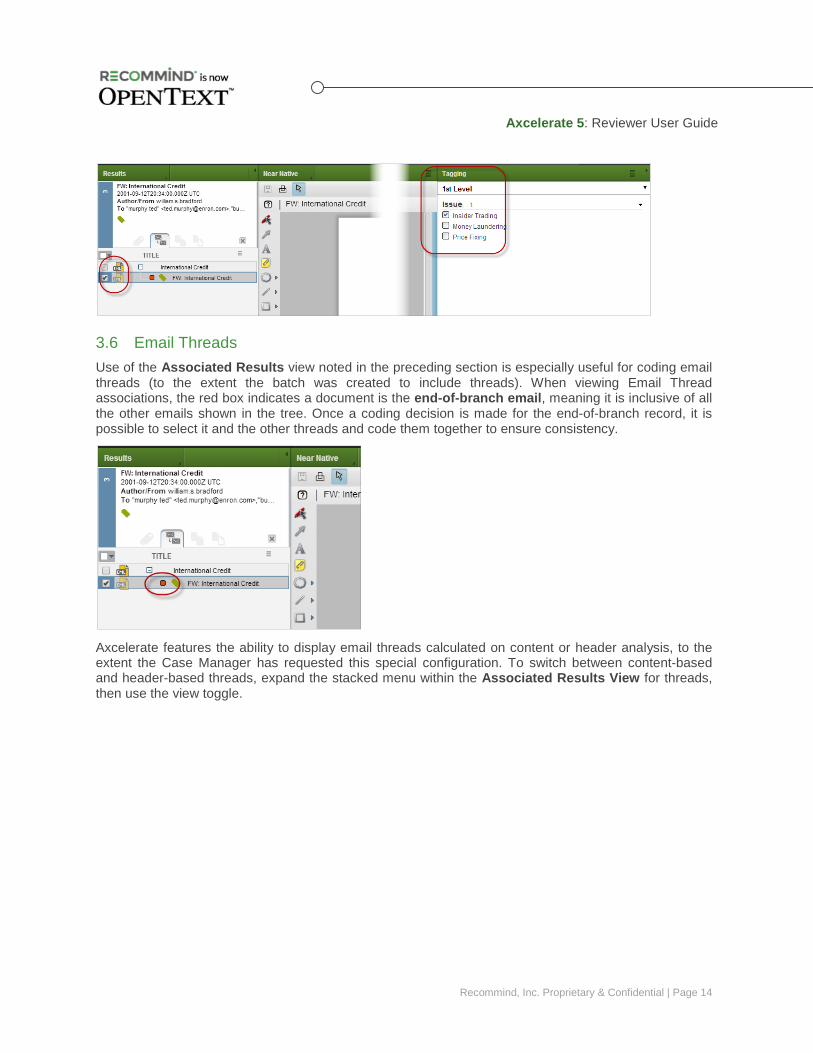
3.6 Email Threads Use of the Associated Results view noted in the preceding section is especially useful for coding email threads (to the extent the batch was created to include threads). When viewing Email Thread associations, the red box indicates a document is the end-of-branch email, meaning it is inclusive of all the other emails shown in the tree. Once a coding decision is made for the end-of-branch record, it is possible to select it and the other threads and code them together to ensure consistency.
Axcelerate features the ability to display email threads calculated on content or header analysis, to the extent the Case Manager has requested this special configuration. To switch between content-based and header-based threads, expand the stacked menu within the Associated Results View for threads, then use the view toggle.
Axcelerate 5: Reviewer User Guide
Recommind, Inc. Proprietary & Confidential | Page 15
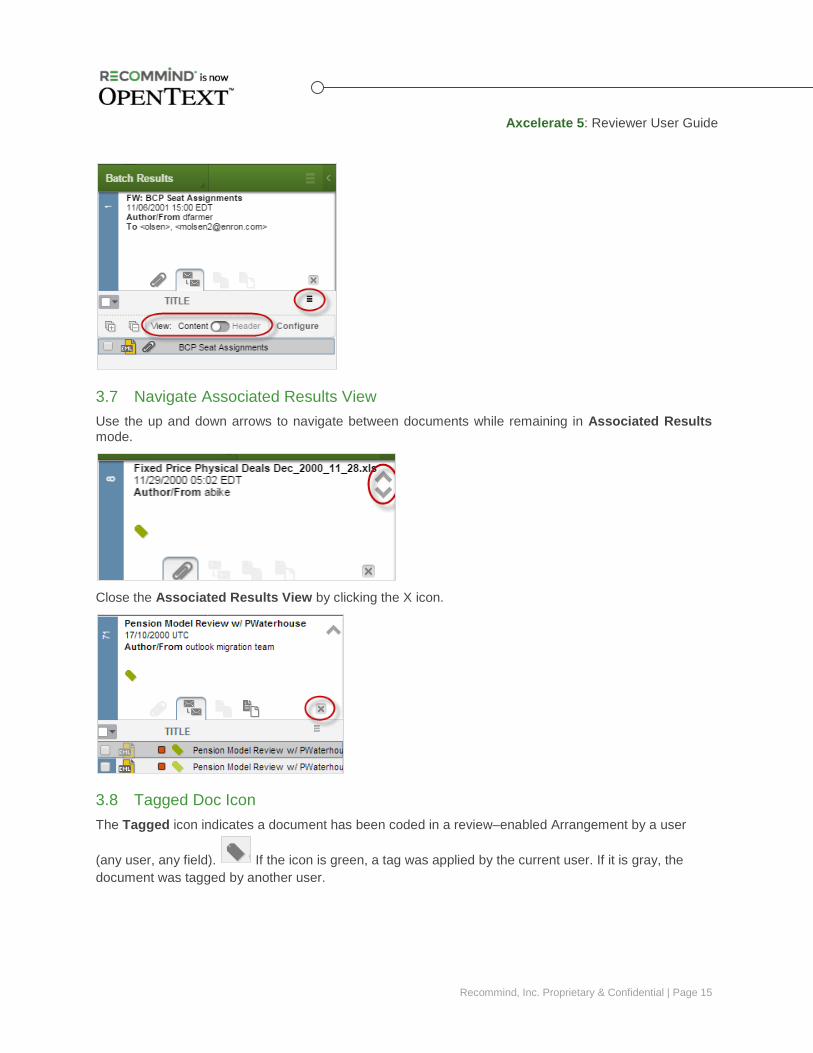
3.7 Navigate Associated Results View Use the up and down arrows to navigate between documents while remaining in Associated Results mode.
Close the Associated Results View by clicking the X icon.
3.8 Tagged Doc Icon The Tagged icon indicates a document has been coded in a review–enabled Arrangement by a user
(any user, any field). If the icon is green, a tag was applied by the current user. If it is gray, the document was tagged by another user.
Axcelerate 5: Reviewer User Guide
Recommind, Inc. Proprietary & Confidential | Page 16
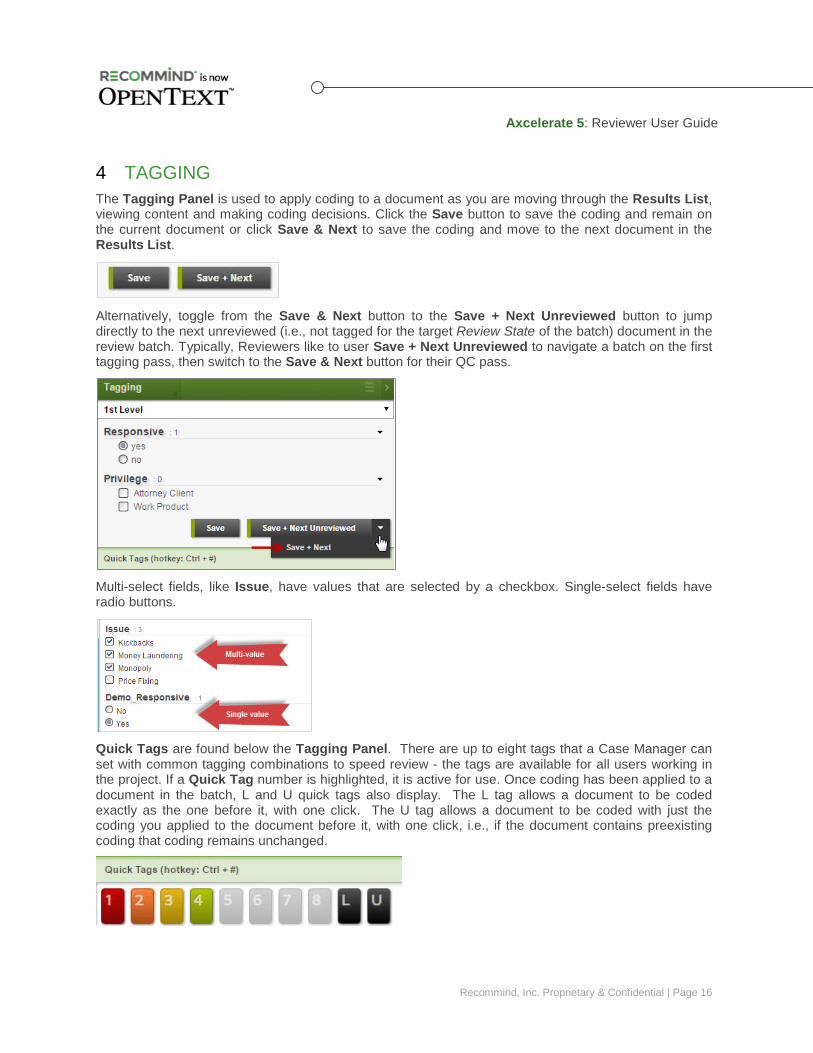
TAGGING 4The Tagging Panel is used to apply coding to a document as you are moving through the Results List, viewing content and making coding decisions. Click the Save button to save the coding and remain on the current document or click Save & Next to save the coding and move to the next document in the Results List.
Alternatively, toggle from the Save & Next button to the Save + Next Unreviewed button to jump directly to the next unreviewed (i.e., not tagged for the target Review State of the batch) document in the review batch. Typically, Reviewers like to user Save + Next Unreviewed to navigate a batch on the first tagging pass, then switch to the Save & Next button for their QC pass.
Multi-select fields, like Issue, have values that are selected by a checkbox. Single-select fields have radio buttons.
Quick Tags are found below the Tagging Panel. There are up to eight tags that a Case Manager can set with common tagging combinations to speed review - the tags are available for all users working in the project. If a Quick Tag number is highlighted, it is active for use. Once coding has been applied to a document in the batch, L and U quick tags also display. The L tag allows a document to be coded exactly as the one before it, with one click. The U tag allows a document to be coded with just the coding you applied to the document before it, with one click, i.e., if the document contains preexisting coding that coding remains unchanged.
Axcelerate 5: Reviewer User Guide
Recommind, Inc. Proprietary & Confidential | Page 17
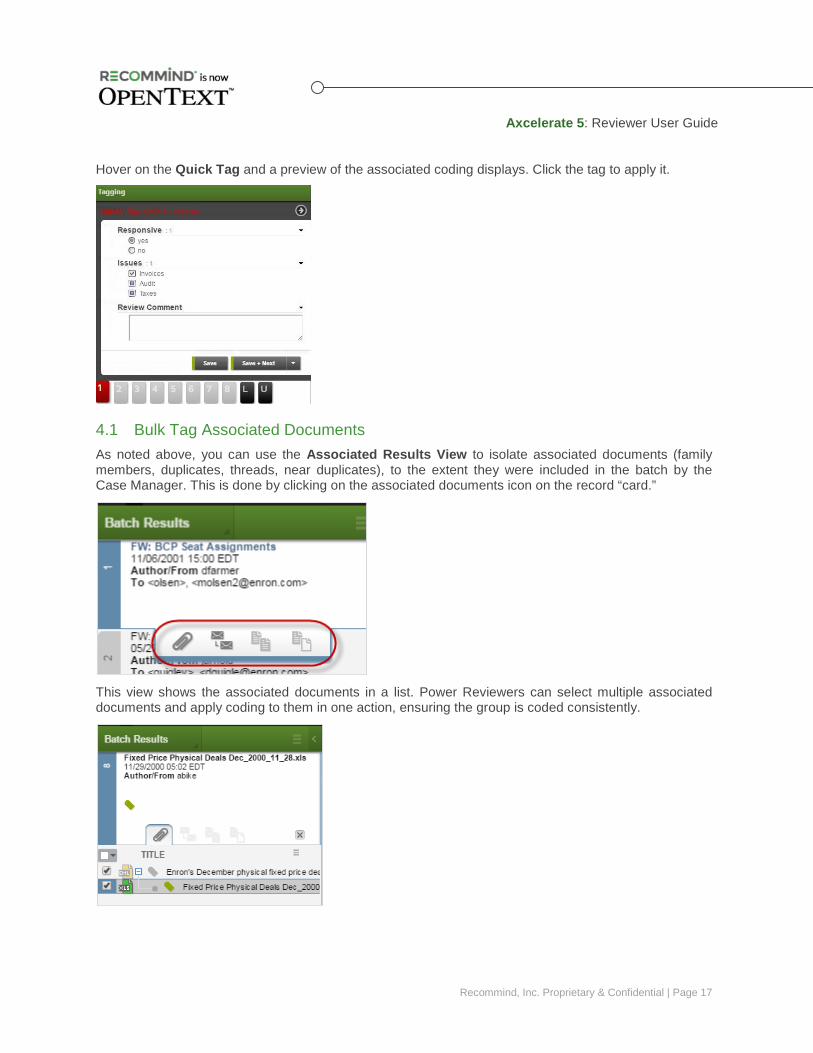
Hover on the Quick Tag and a preview of the associated coding displays. Click the tag to apply it.
4.1 Bulk Tag Associated Documents As noted above, you can use the Associated Results View to isolate associated documents (family members, duplicates, threads, near duplicates), to the extent they were included in the batch by the Case Manager. This is done by clicking on the associated documents icon on the record “card.”
This view shows the associated documents in a list. Power Reviewers can select multiple associated documents and apply coding to them in one action, ensuring the group is coded consistently.
Axcelerate 5: Reviewer User Guide
Recommind, Inc. Proprietary & Confidential | Page 18
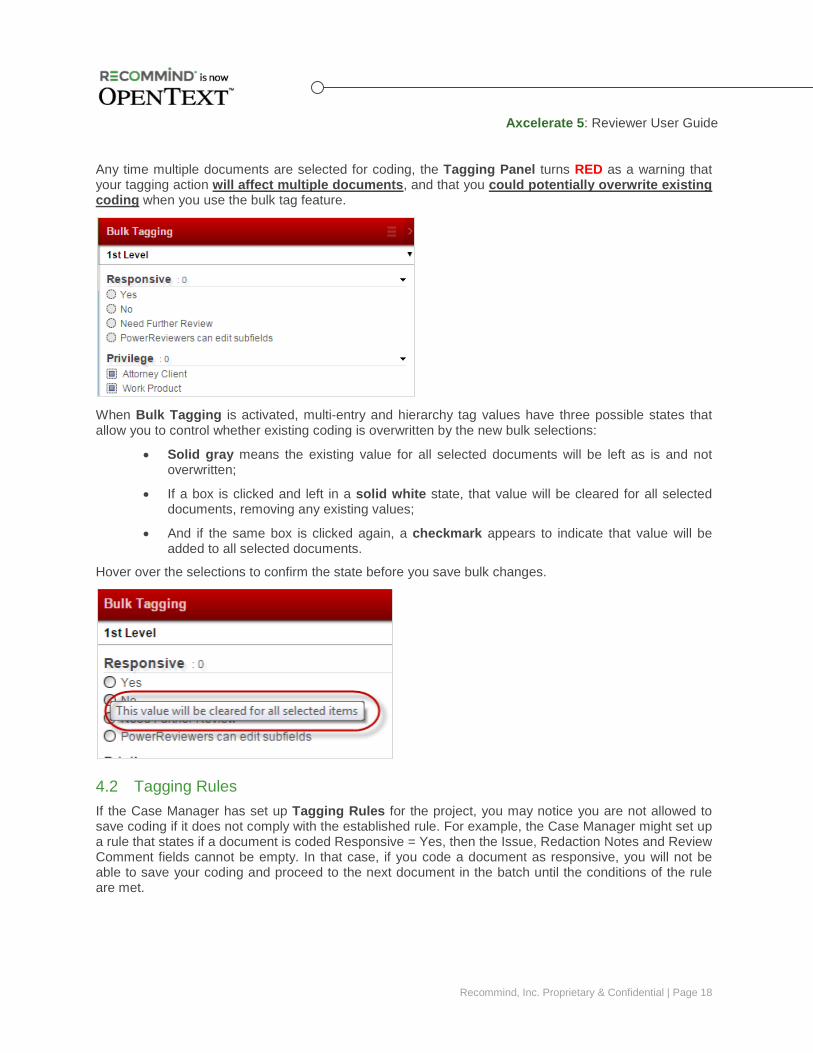
Any time multiple documents are selected for coding, the Tagging Panel turns RED as a warning that your tagging action will affect multiple documents, and that you could potentially overwrite existing coding when you use the bulk tag feature.
When Bulk Tagging is activated, multi-entry and hierarchy tag values have three possible states that allow you to control whether existing coding is overwritten by the new bulk selections:
• Solid gray means the existing value for all selected documents will be left as is and not overwritten;
• If a box is clicked and left in a solid white state, that value will be cleared for all selected documents, removing any existing values;
• And if the same box is clicked again, a checkmark appears to indicate that value will be added to all selected documents.
Hover over the selections to confirm the state before you save bulk changes.
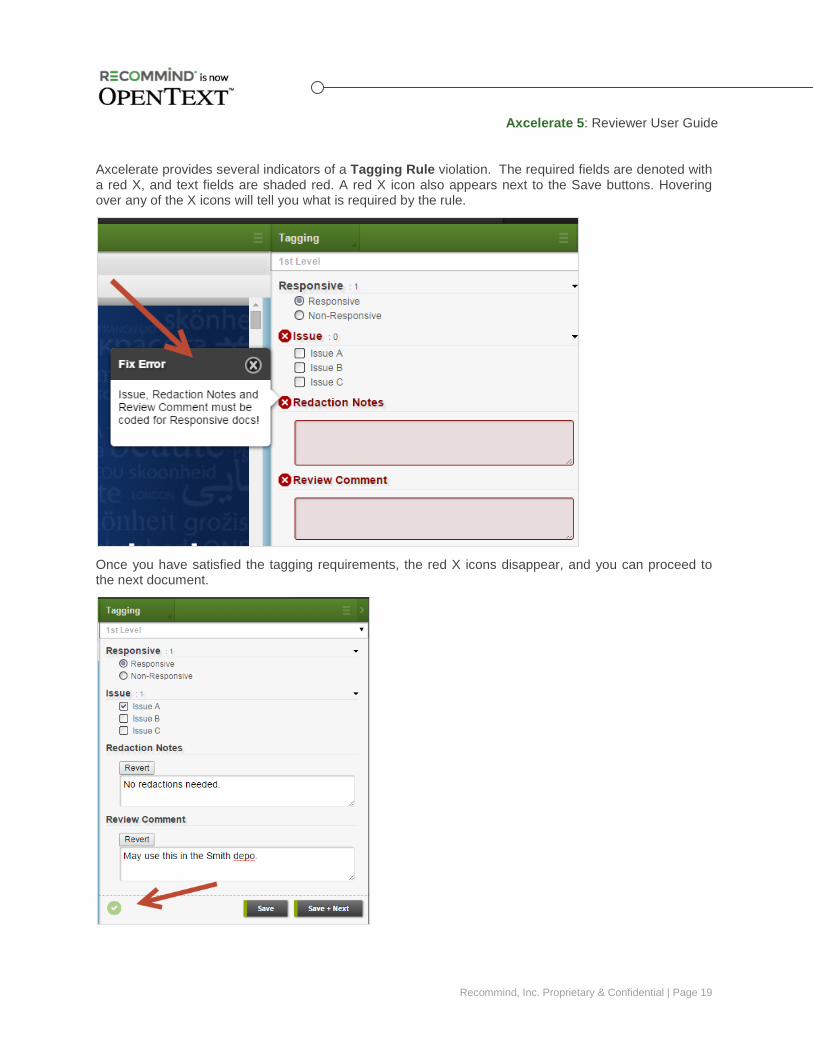
4.2 Tagging Rules If the Case Manager has set up Tagging Rules for the project, you may notice you are not allowed to save coding if it does not comply with the established rule. For example, the Case Manager might set up a rule that states if a document is coded Responsive = Yes, then the Issue, Redaction Notes and Review Comment fields cannot be empty. In that case, if you code a document as responsive, you will not be able to save your coding and proceed to the next document in the batch until the conditions of the rule are met.
Axcelerate 5: Reviewer User Guide
Recommind, Inc. Proprietary & Confidential | Page 19
Axcelerate provides several indicators of a Tagging Rule violation. The required fields are denoted with a red X, and text fields are shaded red. A red X icon also appears next to the Save buttons. Hovering over any of the X icons will tell you what is required by the rule.
Once you have satisfied the tagging requirements, the red X icons disappear, and you can proceed to the next document.
Axcelerate 5: Reviewer User Guide
Recommind, Inc. Proprietary & Confidential | Page 20
VIEWER 5Axcelerate’s document viewer renders files in near-native format. Annotations and redactions can be applied directly to the rendered document – there is no need to TIFF convert first. Axcelerate 5 offers a choice of views, used for different purposes.
Text View Formatted representation of text; displays very quickly and is preferred for general document exploration
Near Native View High-fidelity view of the document featuring annotation tools to make internal notes or call out key material to other reviewers (non-producible mark-ups)
Redaction View
High-fidelity view of the document featuring redaction tools, used to obscure material for purposes of production to an opposing party; production output always comes from this view
Image View Displays only for imported images or slip-sheets; if an image is present, it will also populate the Redaction View
Production View Displays only if a document has been produced before
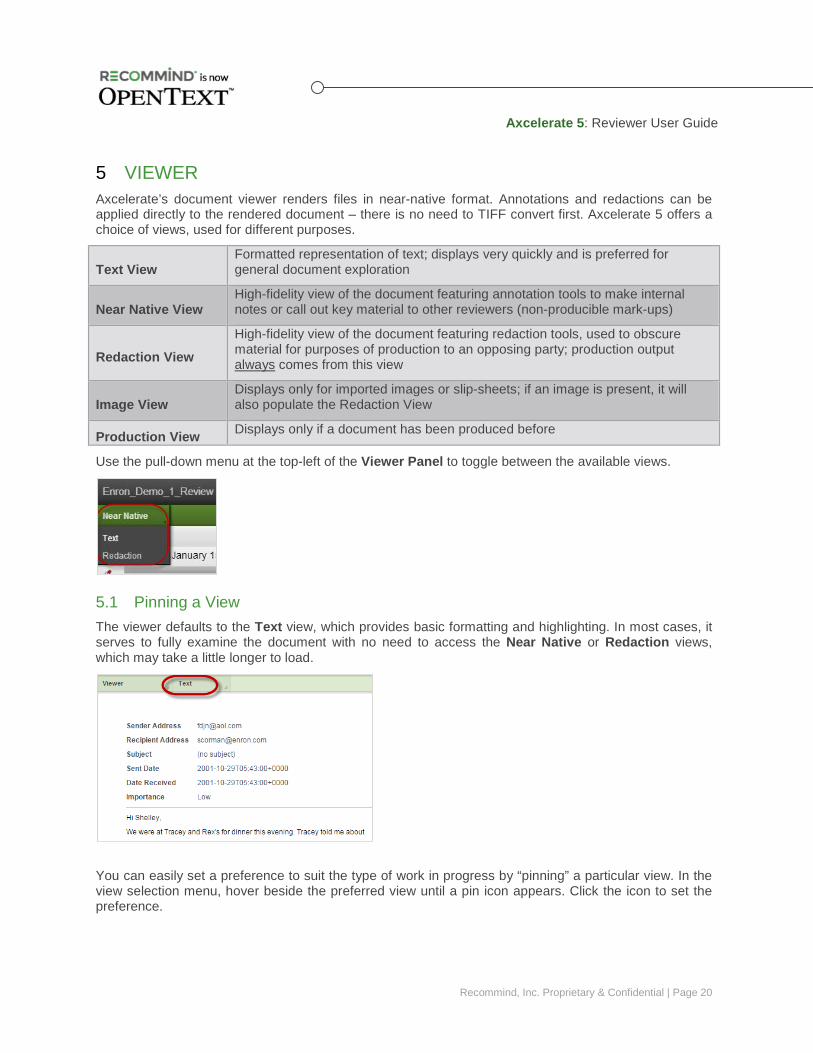
Use the pull-down menu at the top-left of the Viewer Panel to toggle between the available views.
5.1 Pinning a View The viewer defaults to the Text view, which provides basic formatting and highlighting. In most cases, it serves to fully examine the document with no need to access the Near Native or Redaction views, which may take a little longer to load.
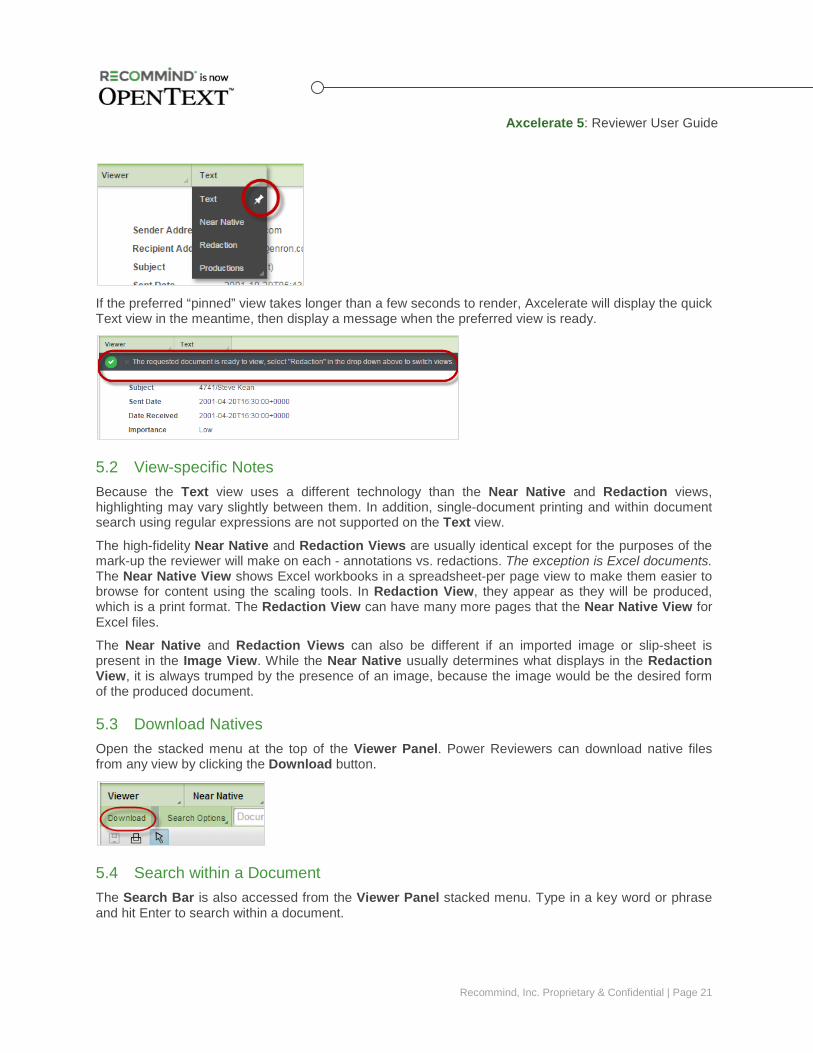
You can easily set a preference to suit the type of work in progress by “pinning” a particular view. In the view selection menu, hover beside the preferred view until a pin icon appears. Click the icon to set the preference.
Axcelerate 5: Reviewer User Guide
Recommind, Inc. Proprietary & Confidential | Page 21
If the preferred “pinned” view takes longer than a few seconds to render, Axcelerate will display the quick Text view in the meantime, then display a message when the preferred view is ready.
5.2 View-specific Notes Because the Text view uses a different technology than the Near Native and Redaction views, highlighting may vary slightly between them. In addition, single-document printing and within document search using regular expressions are not supported on the Text view.
The high-fidelity Near Native and Redaction Views are usually identical except for the purposes of the mark-up the reviewer will make on each - annotations vs. redactions. The exception is Excel documents. The Near Native View shows Excel workbooks in a spreadsheet-per page view to make them easier to browse for content using the scaling tools. In Redaction View, they appear as they will be produced, which is a print format. The Redaction View can have many more pages that the Near Native View for Excel files.
The Near Native and Redaction Views can also be different if an imported image or slip-sheet is present in the Image View. While the Near Native usually determines what displays in the Redaction View, it is always trumped by the presence of an image, because the image would be the desired form of the produced document.
5.3 Download Natives Open the stacked menu at the top of the Viewer Panel. Power Reviewers can download native files from any view by clicking the Download button.
5.4 Search within a Document The Search Bar is also accessed from the Viewer Panel stacked menu. Type in a key word or phrase and hit Enter to search within a document.
Axcelerate 5: Reviewer User Guide
Recommind, Inc. Proprietary & Confidential | Page 22
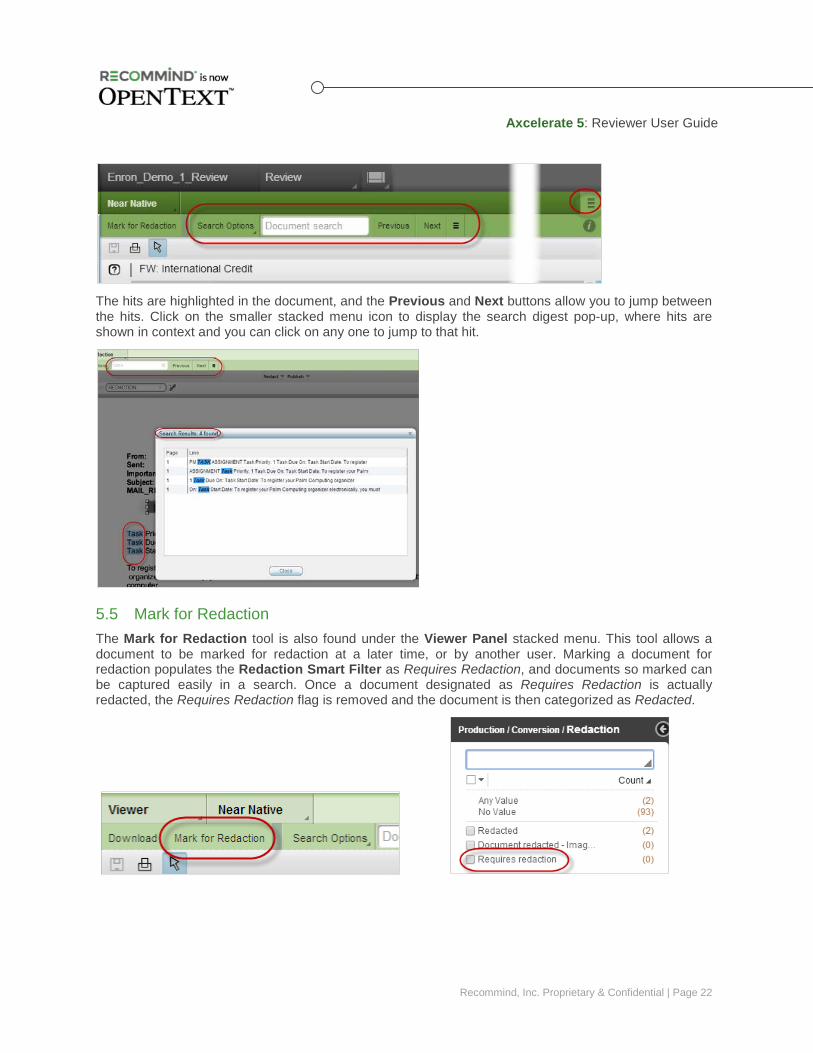
The hits are highlighted in the document, and the Previous and Next buttons allow you to jump between the hits. Click on the smaller stacked menu icon to display the search digest pop-up, where hits are shown in context and you can click on any one to jump to that hit.
5.5 Mark for Redaction The Mark for Redaction tool is also found under the Viewer Panel stacked menu. This tool allows a document to be marked for redaction at a later time, or by another user. Marking a document for redaction populates the Redaction Smart Filter as Requires Redaction, and documents so marked can be captured easily in a search. Once a document designated as Requires Redaction is actually redacted, the Requires Redaction flag is removed and the document is then categorized as Redacted.
Axcelerate 5: Reviewer User Guide
Recommind, Inc. Proprietary & Confidential | Page 23
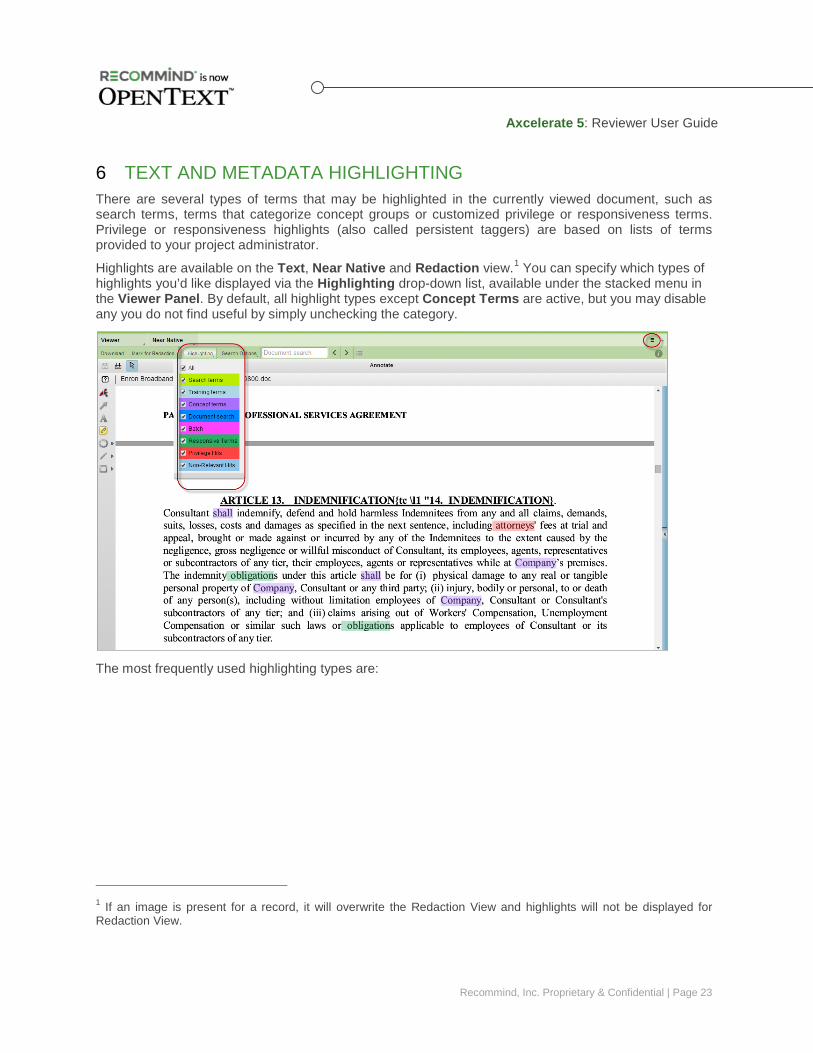
TEXT AND METADATA HIGHLIGHTING 6There are several types of terms that may be highlighted in the currently viewed document, such as search terms, terms that categorize concept groups or customized privilege or responsiveness terms. Privilege or responsiveness highlights (also called persistent taggers) are based on lists of terms provided to your project administrator.
Highlights are available on the Text, Near Native and Redaction view.1 You can specify which types of highlights you’d like displayed via the Highlighting drop-down list, available under the stacked menu in the Viewer Panel. By default, all highlight types except Concept Terms are active, but you may disable any you do not find useful by simply unchecking the category.
The most frequently used highlighting types are:
1 If an image is present for a record, it will overwrite the Redaction View and highlights will not be displayed for Redaction View.
Axcelerate 5: Reviewer User Guide
Recommind, Inc. Proprietary & Confidential | Page 24
Highlight Type Description
Search Terms Search hits are highlighted from Smart Filters, Quick Search, or Advanced Search.
Concept Terms Terms associated with Concept Groups are highlighted.
Document Search Terms entered via the within document search tool (as opposed to global search tools) are highlighted.
Responsive Terms
Customized highlights based on a list of project-specific terms. In addition to highlighting your custom terms with the document view, hits can be searched using the Responsive Hits Smart Filter. Also known as Smart Taggers or persistent highlighting.
Privilege Hits Customized highlights based on a list of project-specific terms. In addition to highlighting your custom terms with the document view, hits can be searched using the Privilege Hits Smart Filter. Also known as Smart Taggers or persistent highlighting.
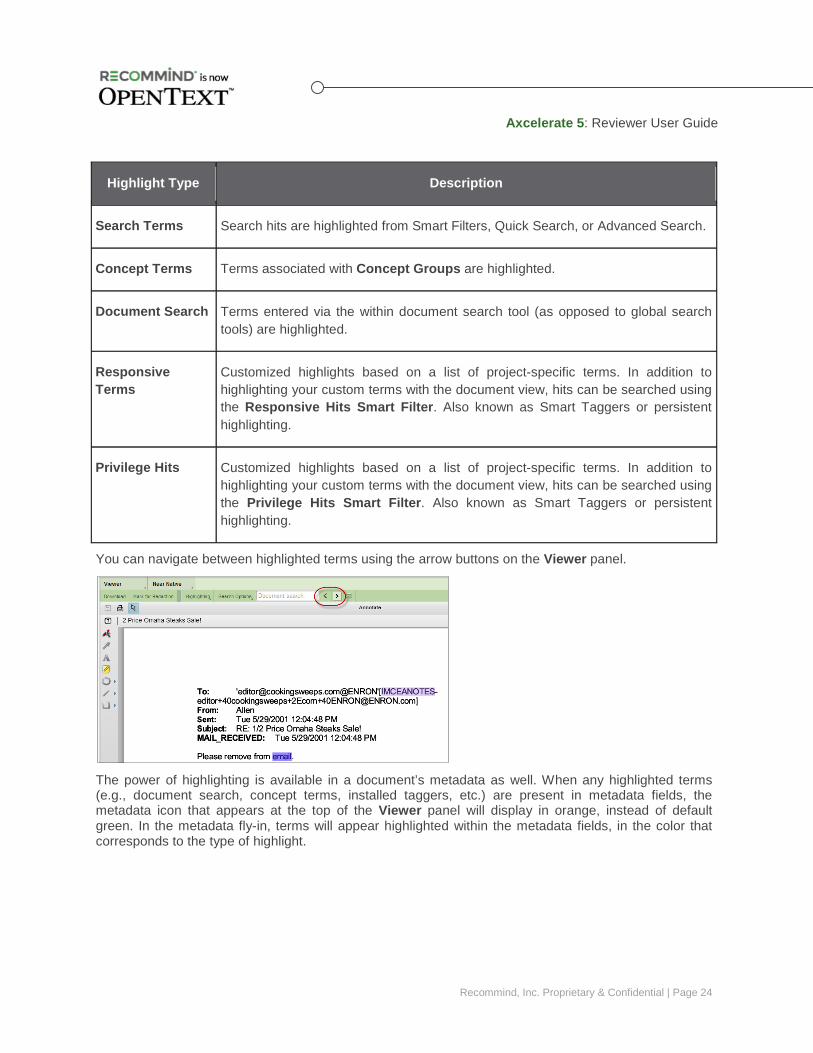
You can navigate between highlighted terms using the arrow buttons on the Viewer panel.
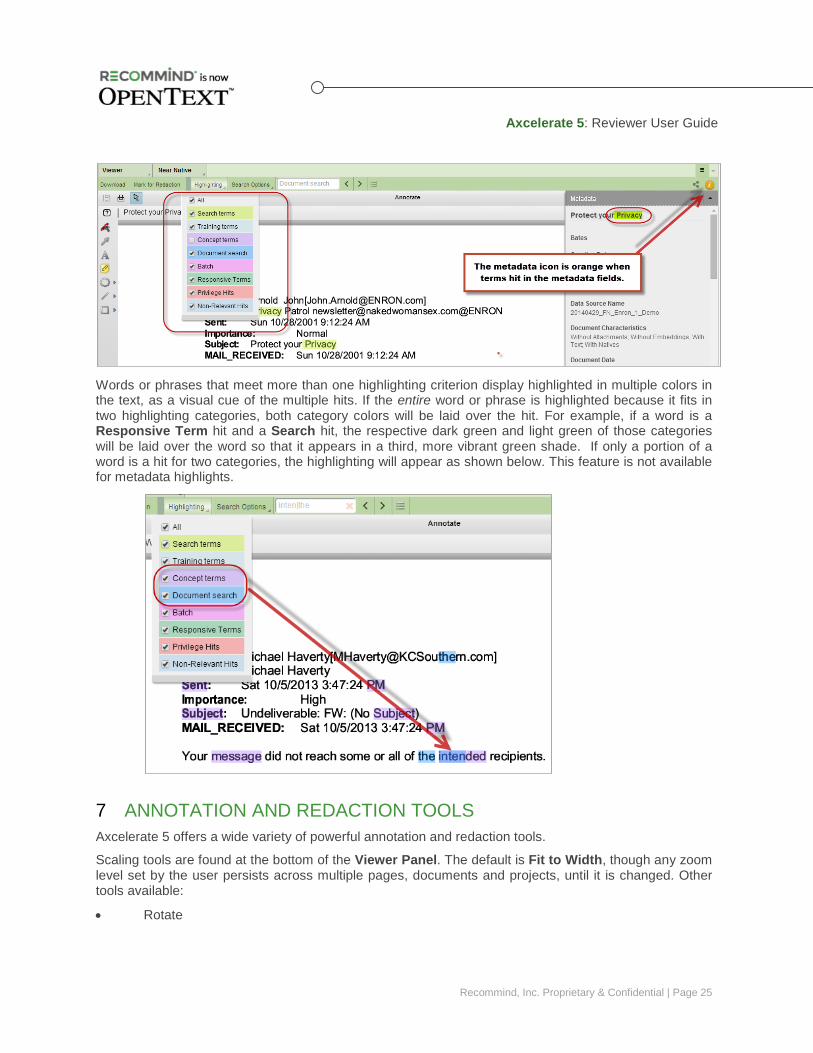
The power of highlighting is available in a document’s metadata as well. When any highlighted terms (e.g., document search, concept terms, installed taggers, etc.) are present in metadata fields, the metadata icon that appears at the top of the Viewer panel will display in orange, instead of default green. In the metadata fly-in, terms will appear highlighted within the metadata fields, in the color that corresponds to the type of highlight.
Axcelerate 5: Reviewer User Guide
Recommind, Inc. Proprietary & Confidential | Page 25
Words or phrases that meet more than one highlighting criterion display highlighted in multiple colors in the text, as a visual cue of the multiple hits. If the entire word or phrase is highlighted because it fits in two highlighting categories, both category colors will be laid over the hit. For example, if a word is a Responsive Term hit and a Search hit, the respective dark green and light green of those categories will be laid over the word so that it appears in a third, more vibrant green shade. If only a portion of a word is a hit for two categories, the highlighting will appear as shown below. This feature is not available for metadata highlights.
ANNOTATION AND REDACTION TOOLS 7Axcelerate 5 offers a wide variety of powerful annotation and redaction tools.
Scaling tools are found at the bottom of the Viewer Panel. The default is Fit to Width, though any zoom level set by the user persists across multiple pages, documents and projects, until it is changed. Other tools available:
• Rotate
Axcelerate 5: Reviewer User Guide
Recommind, Inc. Proprietary & Confidential | Page 26
• Fit All • Zoom In/Out • Pan • Zoom Area
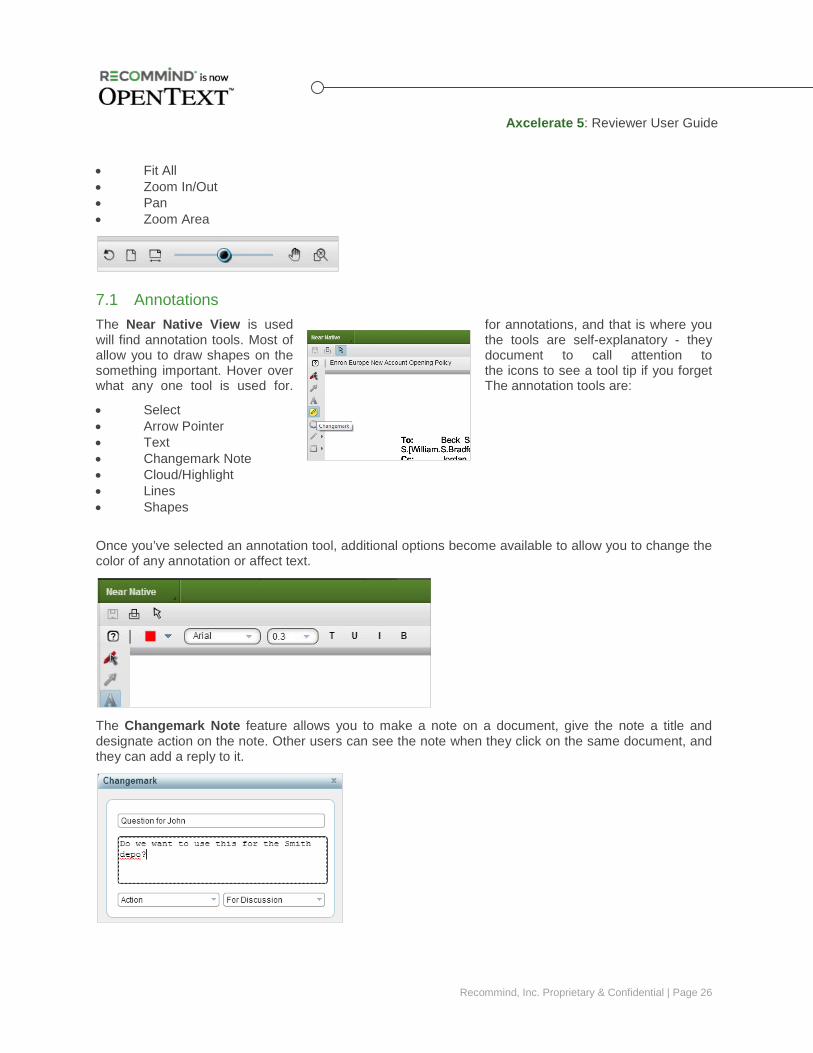
7.1 Annotations The Near Native View is used for annotations, and that is where you will find annotation tools. Most of the tools are self-explanatory - they allow you to draw shapes on the document to call attention to something important. Hover over the icons to see a tool tip if you forget what any one tool is used for. The annotation tools are:
• Select • Arrow Pointer • Text • Changemark Note • Cloud/Highlight • Lines • Shapes
Once you’ve selected an annotation tool, additional options become available to allow you to change the color of any annotation or affect text.
The Changemark Note feature allows you to make a note on a document, give the note a title and designate action on the note. Other users can see the note when they click on the same document, and they can add a reply to it.
Axcelerate 5: Reviewer User Guide
Recommind, Inc. Proprietary & Confidential | Page 27
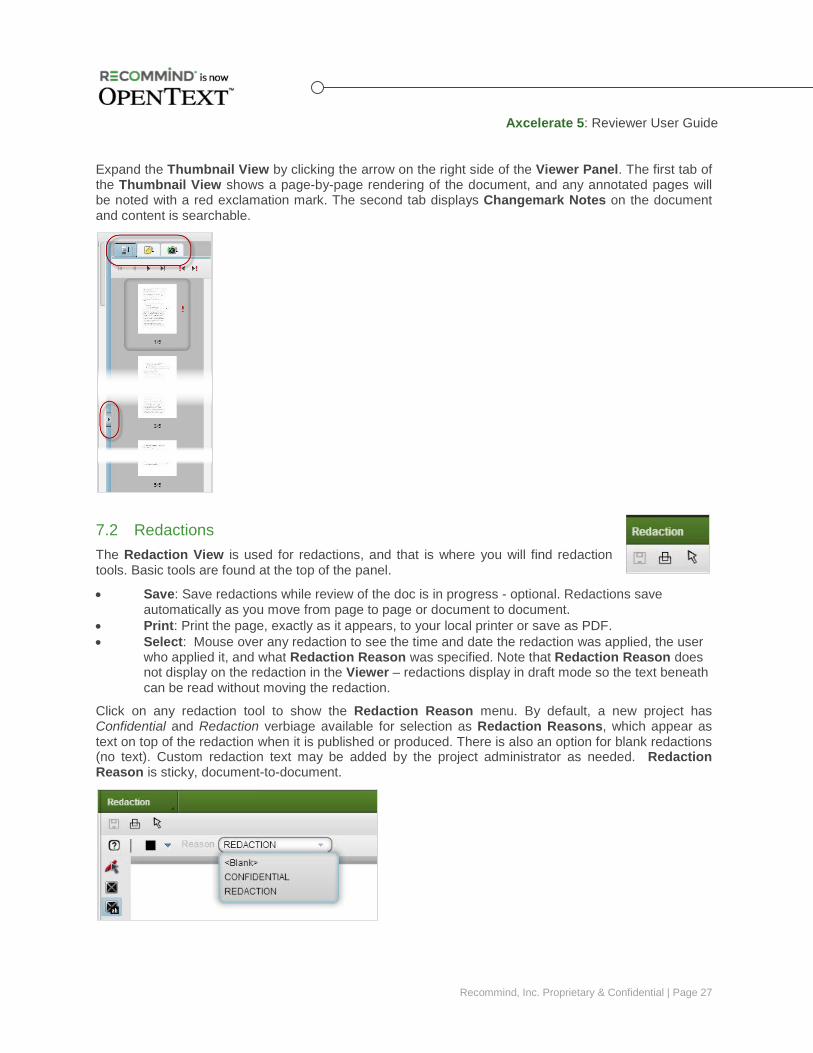
Expand the Thumbnail View by clicking the arrow on the right side of the Viewer Panel. The first tab of the Thumbnail View shows a page-by-page rendering of the document, and any annotated pages will be noted with a red exclamation mark. The second tab displays Changemark Notes on the document and content is searchable.
7.2 Redactions The Redaction View is used for redactions, and that is where you will find redaction tools. Basic tools are found at the top of the panel.
• Save: Save redactions while review of the doc is in progress - optional. Redactions save automatically as you move from page to page or document to document.
• Print: Print the page, exactly as it appears, to your local printer or save as PDF. • Select: Mouse over any redaction to see the time and date the redaction was applied, the user
who applied it, and what Redaction Reason was specified. Note that Redaction Reason does not display on the redaction in the Viewer – redactions display in draft mode so the text beneath can be read without moving the redaction.
Click on any redaction tool to show the Redaction Reason menu. By default, a new project has Confidential and Redaction verbiage available for selection as Redaction Reasons, which appear as text on top of the redaction when it is published or produced. There is also an option for blank redactions (no text). Custom redaction text may be added by the project administrator as needed. Redaction Reason is sticky, document-to-document.
Axcelerate 5: Reviewer User Guide
Recommind, Inc. Proprietary & Confidential | Page 28
The available redaction tools are:
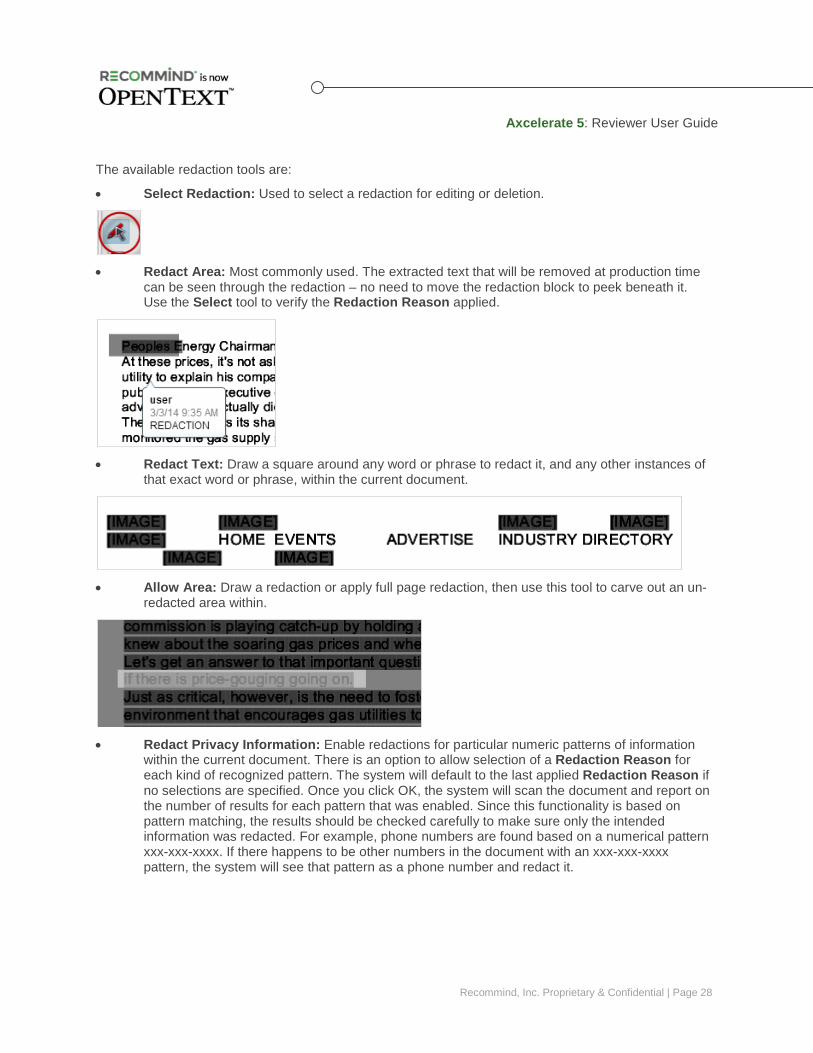
• Select Redaction: Used to select a redaction for editing or deletion.
• Redact Area: Most commonly used. The extracted text that will be removed at production time
can be seen through the redaction – no need to move the redaction block to peek beneath it. Use the Select tool to verify the Redaction Reason applied.
• Redact Text: Draw a square around any word or phrase to redact it, and any other instances of
that exact word or phrase, within the current document.
• Allow Area: Draw a redaction or apply full page redaction, then use this tool to carve out an un-
redacted area within.
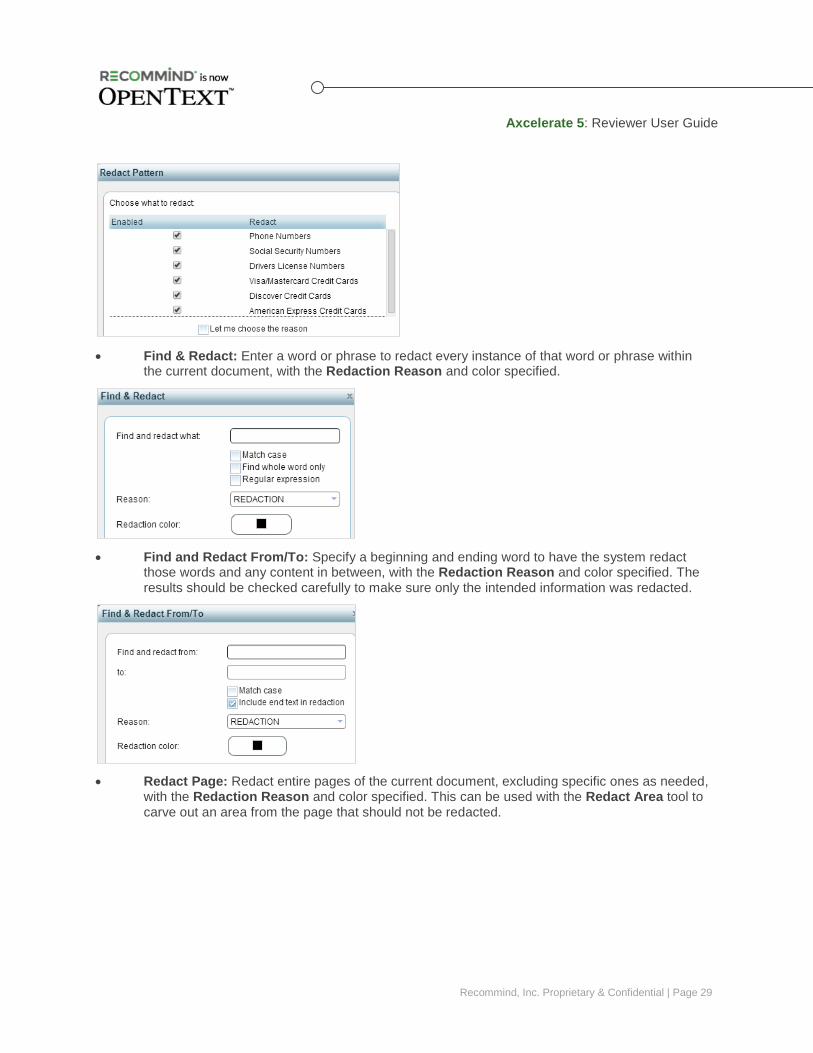
• Redact Privacy Information: Enable redactions for particular numeric patterns of information
within the current document. There is an option to allow selection of a Redaction Reason for each kind of recognized pattern. The system will default to the last applied Redaction Reason if no selections are specified. Once you click OK, the system will scan the document and report on the number of results for each pattern that was enabled. Since this functionality is based on pattern matching, the results should be checked carefully to make sure only the intended information was redacted. For example, phone numbers are found based on a numerical pattern xxx-xxx-xxxx. If there happens to be other numbers in the document with an xxx-xxx-xxxx pattern, the system will see that pattern as a phone number and redact it.
Axcelerate 5: Reviewer User Guide
Recommind, Inc. Proprietary & Confidential | Page 29
• Find & Redact: Enter a word or phrase to redact every instance of that word or phrase within
the current document, with the Redaction Reason and color specified.
• Find and Redact From/To: Specify a beginning and ending word to have the system redact
those words and any content in between, with the Redaction Reason and color specified. The results should be checked carefully to make sure only the intended information was redacted.
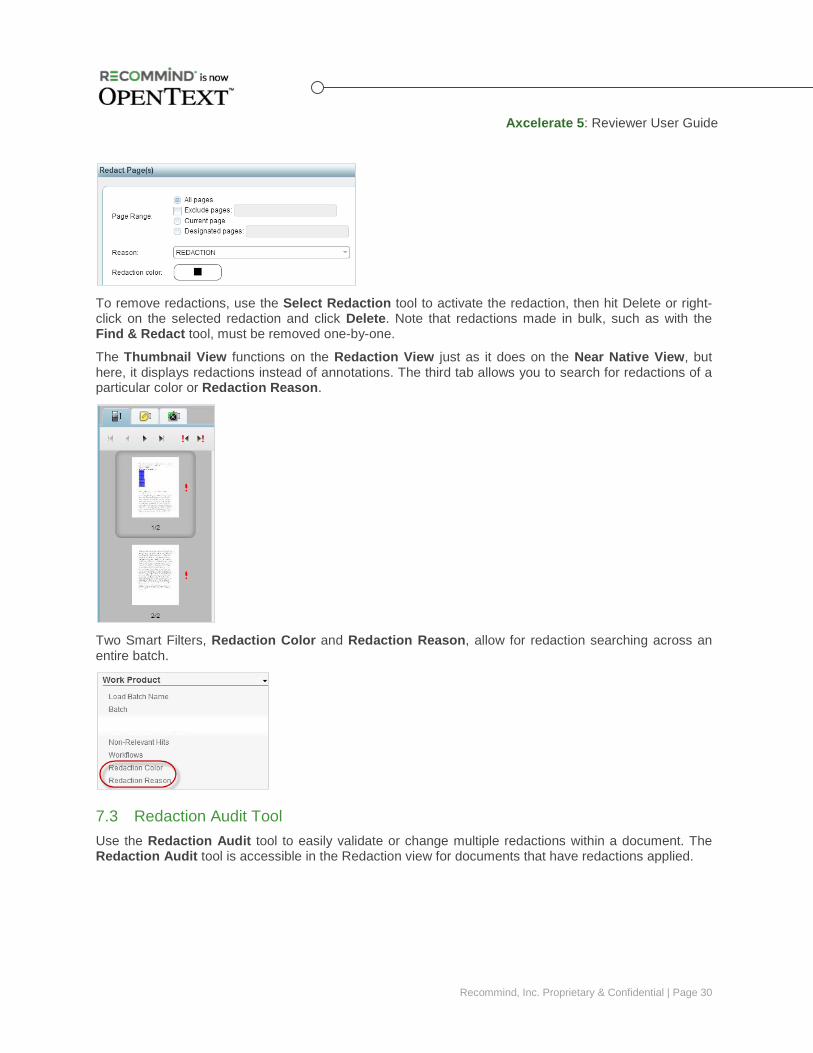
• Redact Page: Redact entire pages of the current document, excluding specific ones as needed,
with the Redaction Reason and color specified. This can be used with the Redact Area tool to carve out an area from the page that should not be redacted.
Axcelerate 5: Reviewer User Guide
Recommind, Inc. Proprietary & Confidential | Page 30
To remove redactions, use the Select Redaction tool to activate the redaction, then hit Delete or right-click on the selected redaction and click Delete. Note that redactions made in bulk, such as with the Find & Redact tool, must be removed one-by-one.
The Thumbnail View functions on the Redaction View just as it does on the Near Native View, but here, it displays redactions instead of annotations. The third tab allows you to search for redactions of a particular color or Redaction Reason.
Two Smart Filters, Redaction Color and Redaction Reason, allow for redaction searching across an entire batch.
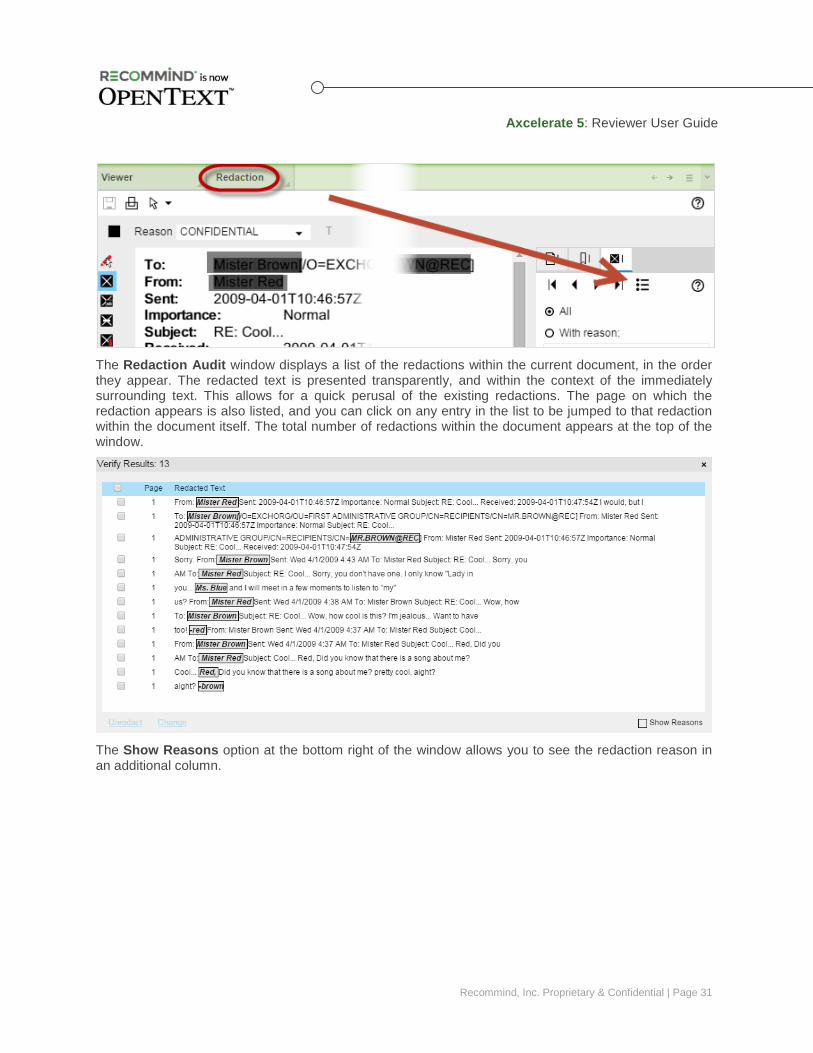
7.3 Redaction Audit Tool Use the Redaction Audit tool to easily validate or change multiple redactions within a document. The Redaction Audit tool is accessible in the Redaction view for documents that have redactions applied.
Axcelerate 5: Reviewer User Guide
Recommind, Inc. Proprietary & Confidential | Page 31
The Redaction Audit window displays a list of the redactions within the current document, in the order they appear. The redacted text is presented transparently, and within the context of the immediately surrounding text. This allows for a quick perusal of the existing redactions. The page on which the redaction appears is also listed, and you can click on any entry in the list to be jumped to that redaction within the document itself. The total number of redactions within the document appears at the top of the window.
The Show Reasons option at the bottom right of the window allows you to see the redaction reason in an additional column.
Axcelerate 5: Reviewer User Guide
Recommind, Inc. Proprietary & Confidential | Page 32
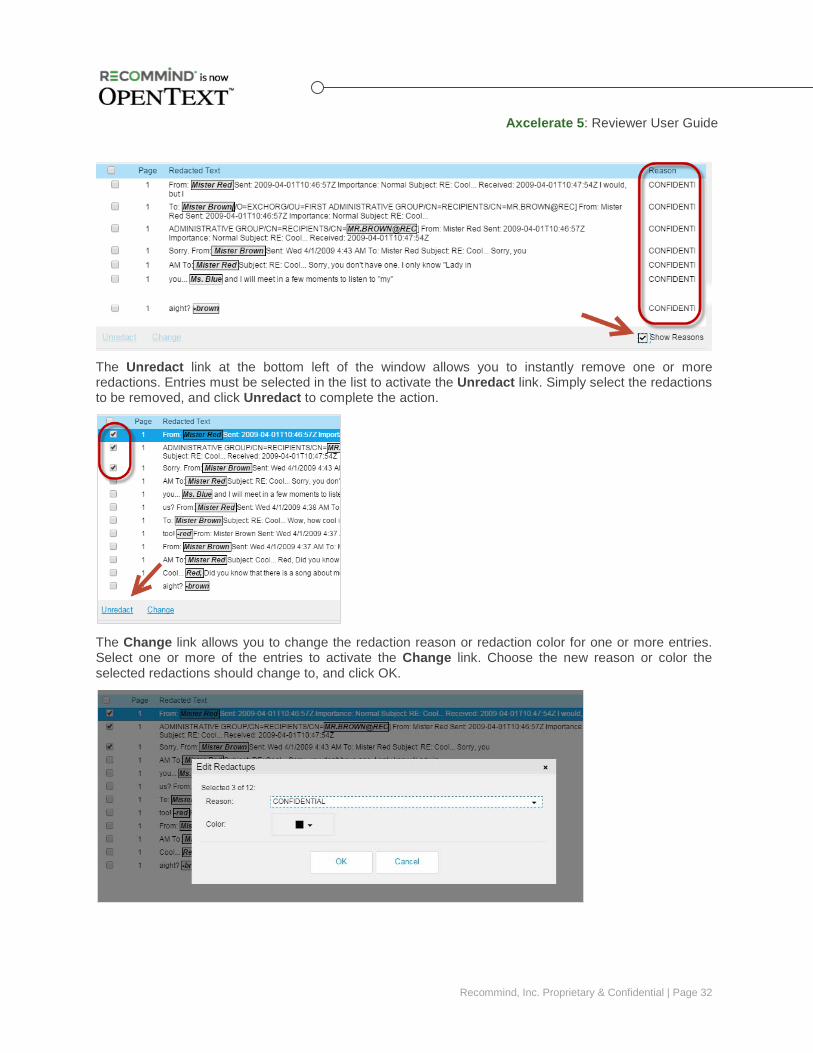
The Unredact link at the bottom left of the window allows you to instantly remove one or more redactions. Entries must be selected in the list to activate the Unredact link. Simply select the redactions to be removed, and click Unredact to complete the action.
The Change link allows you to change the redaction reason or redaction color for one or more entries. Select one or more of the entries to activate the Change link. Choose the new reason or color the selected redactions should change to, and click OK.
Axcelerate 5: Reviewer User Guide
Recommind, Inc. Proprietary & Confidential | Page 33
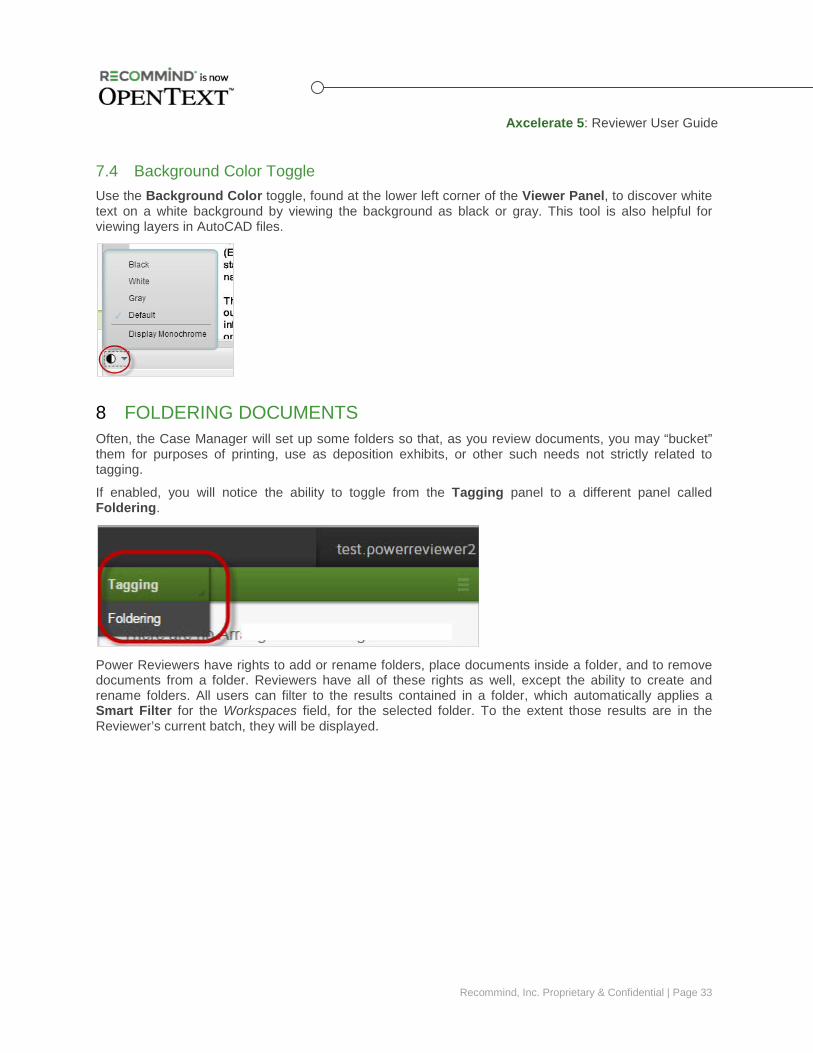
7.4 Background Color Toggle Use the Background Color toggle, found at the lower left corner of the Viewer Panel, to discover white text on a white background by viewing the background as black or gray. This tool is also helpful for viewing layers in AutoCAD files.
FOLDERING DOCUMENTS 8Often, the Case Manager will set up some folders so that, as you review documents, you may “bucket” them for purposes of printing, use as deposition exhibits, or other such needs not strictly related to tagging.
If enabled, you will notice the ability to toggle from the Tagging panel to a different panel called Foldering.
Power Reviewers have rights to add or rename folders, place documents inside a folder, and to remove documents from a folder. Reviewers have all of these rights as well, except the ability to create and rename folders. All users can filter to the results contained in a folder, which automatically applies a Smart Filter for the Workspaces field, for the selected folder. To the extent those results are in the Reviewer’s current batch, they will be displayed.

Axcelerate 5: Reviewer User Guide
Recommind, Inc. Proprietary & Confidential | Page 34
To add a new top-level folder, hover near the top of the panel until the Add icon appears. Click it and type the name of your new top-level folder. Click the checkmark icon to finalize folder creation.
To create a subfolder, click on the stacked menu for the folder you in which you want to nest your new folder.
Placing documents inside of a folder is as simple as selecting them, and clicking the checkmark next to the target folder.
Axcelerate 5: Reviewer User Guide
Recommind, Inc. Proprietary & Confidential | Page 35
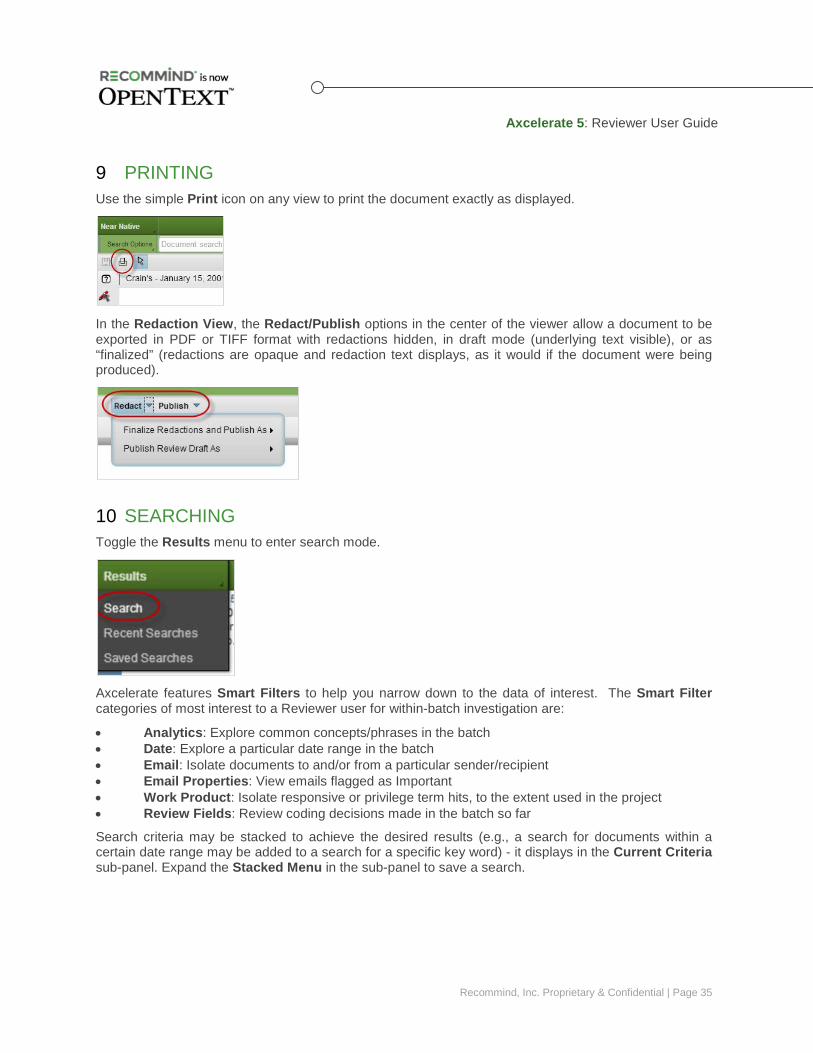
PRINTING 9Use the simple Print icon on any view to print the document exactly as displayed.
In the Redaction View, the Redact/Publish options in the center of the viewer allow a document to be exported in PDF or TIFF format with redactions hidden, in draft mode (underlying text visible), or as “finalized” (redactions are opaque and redaction text displays, as it would if the document were being produced).
SEARCHING 10Toggle the Results menu to enter search mode.
Axcelerate features Smart Filters to help you narrow down to the data of interest. The Smart Filter categories of most interest to a Reviewer user for within-batch investigation are:
• Analytics: Explore common concepts/phrases in the batch • Date: Explore a particular date range in the batch • Email: Isolate documents to and/or from a particular sender/recipient • Email Properties: View emails flagged as Important • Work Product: Isolate responsive or privilege term hits, to the extent used in the project • Review Fields: Review coding decisions made in the batch so far
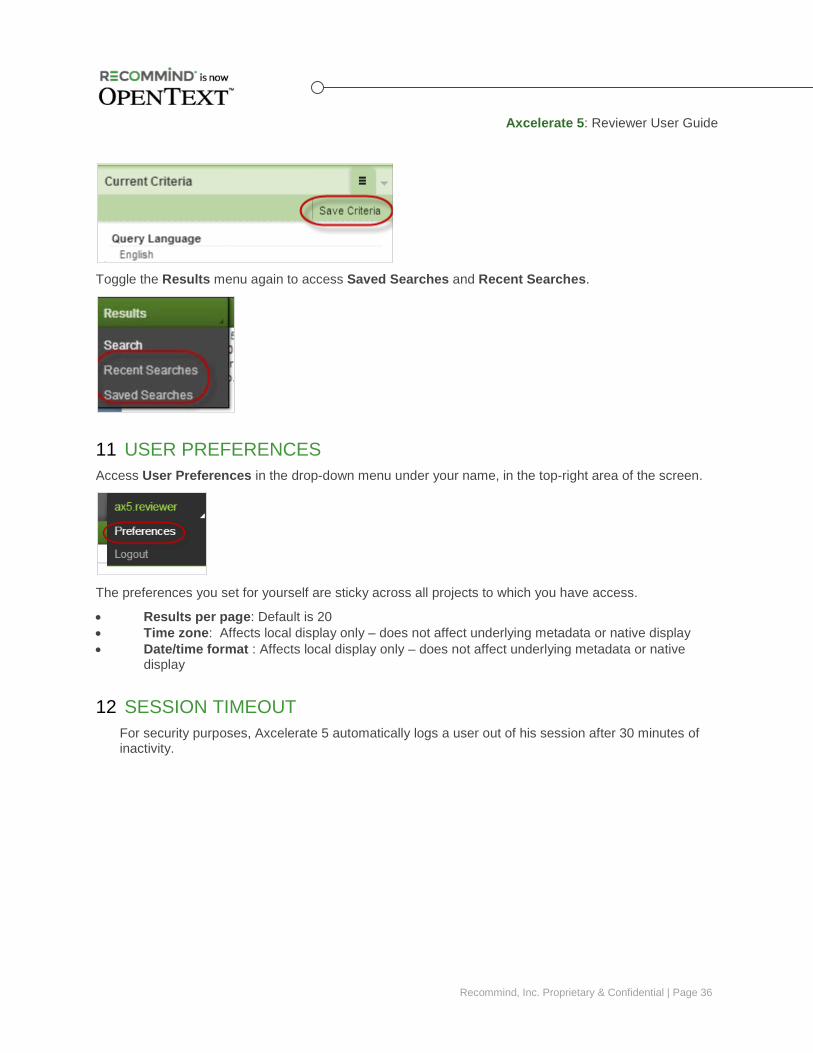
Search criteria may be stacked to achieve the desired results (e.g., a search for documents within a certain date range may be added to a search for a specific key word) - it displays in the Current Criteria sub-panel. Expand the Stacked Menu in the sub-panel to save a search.
Axcelerate 5: Reviewer User Guide
Recommind, Inc. Proprietary & Confidential | Page 36
Toggle the Results menu again to access Saved Searches and Recent Searches.
USER PREFERENCES 11Access User Preferences in the drop-down menu under your name, in the top-right area of the screen.
The preferences you set for yourself are sticky across all projects to which you have access.
• Results per page: Default is 20 • Time zone: Affects local display only – does not affect underlying metadata or native display • Date/time format : Affects local display only – does not affect underlying metadata or native
display
SESSION TIMEOUT 12For security purposes, Axcelerate 5 automatically logs a user out of his session after 30 minutes of inactivity.


![Property 452 Reviewer-[Vena Verga] Property Midterms Reviewer](https://static.documents.pub/doc/80x56/55cf8a9355034654898bef13/property-452-reviewer-vena-verga-property-midterms-reviewer.jpg)

