19
Axel Meyer Project Management with ArchiCAD

Axel Meyer
Project Managementwith ArchiCAD

1
Imprint
© Copyright 2014 by ArchiCoach GmbH. All rights reserved. Production and publishing: BoD – Books on Demand, Norderstedt
No part of this book may be reproduced in any form – copying, rewriting, or translation – without explicit written permission.
Texts including figures have been most carefully produced; nevertheless, errors cannot be ruled out. Publishers, editors, and authors can assume no legal responsibility nor any kind of liability for inaccurate data and possible secondary damage caused by the application of the illustrated concepts.
Nearly all of the hard- and software names mentioned in this book are registered trade-marks. ArchiCAD is a product of the Graphisoft Company. Apple, iPhone, and iPad are registe-red trademarks of Apple Inc. Microsoft Word and Microsoft Excel are registered trademarks of the Microsoft Corporation. Adobe Photoshop and Adobe Acrobat are registered trademarks of Adobe Systems Inc. Artlantis is a registered trademark of Abvent. CINEMA 4D is a registered trademark of MAXON Computer GmbH.
ISBN: 9783735792617 1st edition 2014
Layout and Design Rehbrand GmbH · Agentur für Design & Marketing
Bibliographic information published by the Deutsche Nationalbibliothek:The Deutsche Nationalbibliothek lists this publication in the Deutsche Nationalbibliografie; detailed bibliographic data are available in the Internet at http://dnb.dnb.de
ArchiCoach GmbH Seligenthaler Straße 16 D-84034 Landshut [email protected] www.archi-coach.com/en

2
Contents
Introduction 4
Tip: The Template File 6
Legend 8
1 Company Standards 10
1 1 Basic Software Equipment 12
1 2 ArchiCAD Work Environment 12
1 3 Filing and Folder Structure 14
1 4 Structure and Organization in the Project 16
1 5 Working Instructions and Documentation 16
1 6 Checklists 18
2 Project Organization 20
2 1 Organization by Numbering 22
2 2 Work Environment and Individual Toolbar 24
2 3 Data backup 28
3 File Organization – Workflow 30
3 1 The Navigator 31
Project Map 32
View Map 33
Layout Book 34
Publisher Set 35
Organizer 36
3 2 Story Settings 38
4 File Organization – Attributes 40
4 1 Attributes 42
4 1 1 Pens and Colors 43
Design Development 43
Technical Design 43
Developed Design Construction 45
Developed Design Layout Output 46
Technical Design Construction 47
Technical Design Layout Output 48
Technical Design Layout Output – Hairline 49

3
4 1 2 Fills 50
4 1 3 Lines 52
4 1 4 Materials 53
4 2 Attribute Manager 54
4 3 Layers & Layer Groups 59
”Show all” and ”hide all”: 62
Presentation 64
Design Development 66
Walls and Dimensioning 68
Technical Design, Floor Plans, Sections, Walls and Dimensioning 70
4 4 Libraries 72
4 5 Lists 73
5 Working Methods 78
5 1 Comparison of Three Working Methods 79
The Field Path: Starting again and again 79
The Country Road: Using the Favorites 79
5 2 Working with a Template File 81
6 Visualization 86
6 1 Rendering with ArchiCAD 88
Internal Rendering Engine 89
LightWorks Rendering Engine 90
Sketch 91
6 2 Rendering with external Visualization Software 92
Make use of reference files 94
7 Layout 100
Master Layout 102
8 Tips & Tricks 108
8 1 3D Documents 110
8 2 Modules 114
8 3 Favorites 116
8 4 BIMx: Interactive Plans 120
8 5 Schematic Display of Existing Buildings 124

4
Introduction

5
Project Management with ArchiCAD
During years of giving training courses for students and planning offices as well as accom-plishing numerous projects using ArchiCAD myself, I have developed a special, highly optimi-zed working method which does by far not include the software’s handling alone. With a view to essential practical tasks, it also involves the organization of projects and file management and offers valuable tips and tricks.
In this book, I want to share my long-standing experience with you and impart precisely this working method and efficiency. Optimize your workflows through a predefined, systematic approach with ArchiCAD. On the following pages, you will learn this method as well as the tips and tricks regarding digital office organization, visualization, and presentation options.

6
Tip: The Template File

7
The perfectly organized model for your project
Before delving into the subject on the coming pages, I want to point out the following additi-onal value: you will get to know a very optimized working method with ArchiCAD in this book. Efficiency in your projects begins with the perfect organization and the ideal workflow – ho-wever, it goes far beyond that:
To save valuable time and energy, it is advisable to work with a ”template file” which prevents having to repeat routine work steps in every project. You thus attain a far better and faster performance thanks to numerous attributes, drafts and much more being always at hand and to your template file growing with each project.
Therefore, I offer you a very helpful package for download in addition to this book, which provides an ideal basis for your work and includes among many other features exactly one such template file.
The following components are included in the complete ArchiCoach Package:
Template file An organized project model for a perfect workflow, in which all settings recommended
in this book have been integrated. Moreover, you receive a thoroughly organized project folder with layouts for proposals, design development, technical design etc., positioned drawings with matched set of pens, to mention but a few.
Over 100 model drafts Numerous furnishing variations for the direct use in your projects – both in 2D and 3D.
Make use of the many templates to get to the point of your concepts more quickly: kit-chens and bathrooms from small to luxurious, living room, bedroom, children’s room, recreation room, outdoor facilities, plan graphics for elevations and sections and many more.
Company standards Tidy up your projects: you receive numerous attribute files, a model folder, an optimized
work environment, a standardized layer structure, defined pens and colors, dozens of additional lines etc.
More information and download online at www.archi-coach.com/en

8
Legend

9
To optimally take in knowledge while reading, I have implemented several visual standards in this book which facilitate orientation in the flow of reading with the help of pictograms and graphic highlighting. I would like to illustrate those before starting:
Menu Commands in ArchiCAD
Commands which you carry out in ArchiCAD via the menu bar or via context menus are mar-ked in gray colour as well as bold and in italics. Thus, you see at a glance which commands are to be carried out step by step:
Example: You can create fills yourself in the menu via Options > Element Attributes > Fill Types.
Keyboard Shortcuts
Utilizing keyboard shortcuts for carrying out commands in ArchiCAD saves a lot of time. The-refore, whenever applicable, I will mention equivalent shortcuts in the running text. These will be characterized by means of indicated keys:
Example: Call up the layer menu via Ctrl + L .
Pictograms: Tip, Warning and Download
Important hints in the running text that you should absolutely bear in mind will be highlighted by means of info boxes and three different pictograms at the outer margin:
Tip: Whenever you see the light bulb icon beside a frame, you receive a tip which offers an additional value for your company routine or your working method.
Warning: Framed texts beside a megaphone icon include a warning or an important hint you should pay attention to.
Download: When you see this icon, you can obtain further information or files for down-load at the book’s website http://www.archi-coach.com/en.

10
Chapter 11 Company Standards

11
Do you know the saying that humans are ”creatures of habit”? They feel secure in their fami-liar surroundings and prefer to repeat familiar patterns which have proved to work, thereby practicing speed as well as perfection. This trait is of evolutionary origin and has been safe-guarding the survival of humans and animals since the beginning of time.
Never fear, you haven’t accidentally purchased a book about evolutionary theory. However, the phenomenon of habit also plays a major role in architecture projects: Make use of this effect in your company to facilitate your and your colleagues’ daily work on your projects and thus optimize the whole workflow. For this purpose, defining certain standards for the application of ArchiCAD has been found most helpful.
New colleagues find their way around the company and the range of projects more quickly. There is a sort of tacit agreement about how the company and the handling of projects are run.
This in turn enormously increases the work efficiency in the company, since tedious recurring discussions are avoided and friction points reduced.
Another objective of the implementation of company standards is to enable every col-league to start work immediately on every project at every workstation, attending solely to the project itself since the entire work environment (computer, appearance of Archi-CAD, organisation of the project) is familiar.
As you see: The advantages of this approach are obvious; exploit the ”force of habit” for the benefit of efficiency, flexibility and minimization of errors within your whole range of projects and your infrastructure.
The following standards should exist in every company:
Basic Software Equipment
ArchiCAD Work Environment
Filing and Folder Structure
Structure and Organization in the Project
Working Instructions and Checklists

12
1.1 Basic Software Equipment
Looking at an architecture project as a whole, the work with ArchiCAD is often done in a cross-program way: starting with plan development, organization and presentation via image processing up to spreadsheet analysis, the same programs should ideally be availab-le, respectively.
The following software should therefore be installed on every computer used within the pro-ject team:
ArchiCAD in the up-to-date version
Text processing and spreadsheet (e.g. Microsoft Word, Excel)
Software for creating and organising PDF-files (e.g. Adobe Acrobat Pro)
Image editing software (e.g. Adobe Photoshop)
1.2 ArchiCAD Work Environment
In the ArchiCAD menu bar under Options > Work Environment, you have the possibility to ar-range the whole user interface according to your preferences. Thus, you already lay the cor-nerstone for optimization and efficiency, because thanks to the help of this feature, you are able to design a program surface customized to suit your working method with only a few mouse clicks. This will facilitate the entire realization of projects in ArchiCAD in an efficient manner.
The work environment has to be set up only once (see section 2.2), afterwards it can be saved, exported and loaded on every computer as a working basis. It comprises the arrangement of tools, keyboard shortcuts and customized palette schemes.
Once the same work environment is installed on every computer, new colleages familiarize themselves with ArchiCAD in this optimized company work environment from day one. Expe-rienced colleagues naturally have the freedom to use their own accustomed work environ-ment.
1 Company Standards

13
Fig. 1.1:
In the ArchiCAD menu bar under Options > Work Environment, you have the possibility to arrange the whole graphical interface according to your preferences.Here, you can save and then export profiles to install them on other computers as well.

14
1.3 Filing and Folder Structure
Structure and order are essential foundations for the work on projects of any kind of scale. This applies not only to the organization within ArchiCAD, but also comprehensively to the entire handling of data on your computer or server. The more extensive a project gets, the more data is accumulated: we’re talking here about numerous file links in ArchiCAD as well as important correspondence about project handling between customer and company up to additional calculations, measurements etc.
It is imperative to keep track to have all project components at hand in minimum time as soon as they are needed. Therefore, there should be a consistent filing and folder structure for every new project, independent of ArchiCAD.
This structure is not created within ArchiCAD, but directly in the file manager of your operating system a single time consisting of empty folders. These can be simply copied into the new project directory when needed. This provides highest possible transparency, avoids lengthy search times and determines the links for data import and export (*.pdf, *.dwg etc.) to be defined in ArchiCAD.
These three company standards form the basis for an efficient application of ArchiCAD in every planning office. Thus, you ensure a smooth progression of planning in your daily routine and a qualitatively consistent presentation of plans.
Tip: In many small planning offices, I notice that the organized application of ArchiCAD and the whole project realization do not happen or depend on one dedicated colleague. Should this colleague leave, the ArchiCAD know-how is likely to leave with him/her.
However, if this organized working method is incorporated by all colleagues, the structure and the knowlegde is preserved for the company.
1 Company Standards
15
1
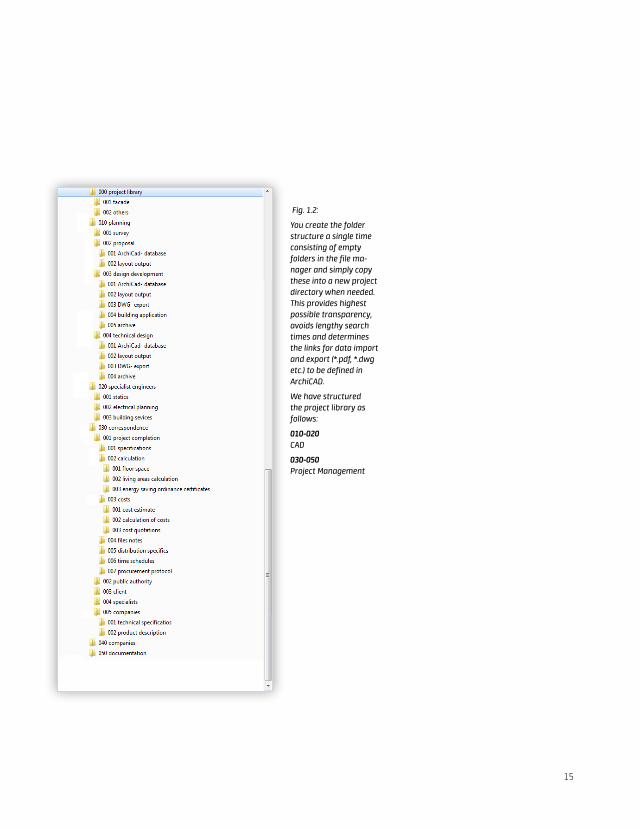
Fig. 1.2:
You create the folder structure a single time consisting of empty folders in the file ma-nager and simply copy these into a new project directory when needed. This provides highest possible transparency, avoids lengthy search times and determines the links for data import and export (*.pdf, *.dwg etc.) to be defined in ArchiCAD.
We have structured the project library as follows:
010-020 CAD
030-050 Project Management

16
1.4 Structure and Organization in the Project
The fixed organization and the recurring structure of a project are the most important pa-rameters when implementing the company standards. Having once defined these for your company, every colleague within every new project will work according to this standard from that day on, which will enable a surplus of efficiency and speed across staff not only individu-ally but for the whole team and thus for the entire company.
Just as all newly implemented standards, it will take some time for this to become second nature. But don’t be put off, you will profit in the long run. Above all, the new processes are logically designed and comprehensible, so that a standardized layer structure and the use of recurring attributes (e.g. pen colors, lines etc.) will shortly be taken for granted.
1.5 Working Instructions and Documentation
Documentation is invaluable. Like every company, yours is able to operate even more effi-ciently when working instructions are available for various tasks in the respective programs. Thereby, new colleagues can quickly be trained and introduced to company specific princip-les – they may even partly be able to familiarize themselves with the work indendently. Such a working instruction should explain the particular procedure step by step, if possible including images or screenshots for visual support.
To enable a uniform work pattern, this instruction should be accessible to the entire company at all times. All colleagues should stick to these instructions. It is thus theoretically possible to allocate whole subareas of a project to someone new in the job without having to overburden them with a flood of verbal explanations.
These instructions should be at every colleague’s disposal via company server or intranet when working on design development, technical design, project booklet and visualization.
I want to substantiate this by means of the following example:
1 Company Standards

17
Roof Construction / Part 01: ArchiCoach®
The roof is drawn on: Story: 5. Roof Framing Plan
The roof consists of 3 layers: · roof cladding – depicted in red · roof framing – blue · interior paneling of the roof – green
Each layer is drawn separately
PROCEDURE
Floor plan Draw the roof pivot line and approximately the outline of a roof area using the roof tool (roof overhangs etc. by changing this outline drawing). The area should thereby be drawn not quite up to the ridge line.
Section Position the roof area in the correct height.
Floor plan Mirror the roof area, thus creating for example a saddle roof. Intersect roof areas. First one with the other, then vice versa. This is done by activating one roof area and making a [Ctrl]+ click on the intersection edge of the other roof area. Activate walls and roof. These can now be adjusted. Tool: ”Crop to Single-plane Roof” (this also works in 3D, but is only worthwhile for a few walls, for example if some have been overlooked).
Warning: There is a button at the top right of the info window ”Show on Stories”. Select ”All stories” here to show the roof area in the stories below as well. It can then be intersected with the walls.
Finally go back to the Home Story. Once the first roof layer is positioned correctly, the procedure can be repeated for the other two layers or they can be copied in and adjusted.
The eaves can be varied in the floor plan by clicking on the edge of the eaves and the context menu.
Fig. 1.3:
Working instruc-tion for a roof contruction. On the basis of the docu-mentation, every colleague can carry out a new construction at any point in time.
The gray button at the top right indicates that this working instruction applies to projects handled with ArchiCAD.
Download tip: You can download this file as a template for your project work at:
http://www.ar-chi-coach.com/en
AC16

18
End of the excerpt?
You would like to read „Project Management with ArchiCAD“ completely? Visit the following website to order the book:
http://www.archi-coach.com


