60
AXEL Platine Terminal AX3000 Models 65, 70, 75, 80 & 85 ADDENDUM for Firmware revision 0922a April 2010 - Ref.: AX3-0922-E-4

AXEL Platine Terminal AX3000 Models 65, 70, 75, 80 & 85
ADDENDUM for Firmware revision 0922a
April 2010 - Ref.: AX3-0922-E-4

The reproduction of this material, in part or whole, is strictly prohibited. For additional information, please contact:
14 Avenue du Québec Bât. K2 EVOLIC - BP 728
91962 Courtabœuf cedex - FRANCE Tel.: 33 1.69.28.27.27 Fax: 33 1.69.28.82.04 Email: [email protected]
The information related to firmware 0922a in this document is subject to change without notice. AXEL assumes no responsibility for any errors that may appear in this document.
All trademarks and registered trademarks are the property of their respective holders.
© - 2009-2010 - AXEL - All Rights Reserved.
TABLE OF CONTENT
INTRODUCTION .................................................................................................1
1 - INTRODUCTION TO THE AX3000................................................................3
1.1 - TERMINAL MODELS ...............................................................................4 1.2 - MAIN FUNCTIONS...................................................................................5
1.2.1 - Network Functions.............................................................................5 1.2.2 - Terminal Function..............................................................................5 1.2.3 - Print and Terminal Server .................................................................5 1.2.4 - Tools and Statistics ...........................................................................6
2 - SETTING-UP THE TERMINAL ......................................................................7
2.1 - FIRST POWER-ON ..................................................................................8 2.1.1 - First Screen .....................................................................................10 2.1.2 - Interface Selection...........................................................................11 2.1.3 - Network Connection ........................................................................12 2.1.4 - Devices............................................................................................13 2.1.5 - Citrix Published Application Desktop ..............................................14 2.1.6 - Citrix (Published Application or Published Server) .........................14 2.1.7 - Serial Connection ............................................................................15 2.1.8 - Set-Up Summary .............................................................................16
2.2 - SETTING-UP ETHERNET OR WIRELESS INTERFACE ......................17 2.2.1 - General Parameters ........................................................................17 2.2.2 - Ethernet Interface............................................................................18 2.2.3 - Wireless Interface............................................................................18
a) Selecting the SSID..............................................................................19 b) Configuring the SSID ..........................................................................20 c) Advanced Settings ..............................................................................23
2.3 - SETTING-UP CITRIX DESKTOP...........................................................24 2.3.1 - Configuration Principles ..................................................................26 2.3.2 - Citrix Destop Activation ...................................................................26 2.3.2 - Browser Settings .............................................................................28 2.3.4 - Desktop Parameters........................................................................29
3 - USING THE AX3000 ...................................................................................31
3.1 - SWITCHING ON THE AX3000...............................................................32 3.1.1 - Session Manager: Classic Mode.....................................................33

3.1.2 - Session Manager: Desktop Mode ...................................................34 3.2 - USING MULTIPLE SESSIONS...............................................................35
3.3.1 - Opening and Switching Sessions....................................................36 3.3.2 - Disconnecting Sessions ..................................................................36
3.3 - CITRIX DESKTOP..................................................................................37 3.3.1 - Authentication..................................................................................37 3.3.2 - Using the Desktop ...........................................................................38 3.3.3 - Closing the Desktop ........................................................................39
3.4 - LOCKING THE SCREEN........................................................................39 3.5 - "COPY/PASTE" FUNCTION...................................................................40
a) Copy....................................................................................................40 b) Paste ...................................................................................................41
3.6 - TURNING OFF THE AX3000..................................................................41 3.7 - AX3000 HOT-KEYS................................................................................43
4 - TOOLS AND STATISTICS...........................................................................45
4.1 - THE PING COMMAND...........................................................................46 4.2 - CONNECTION MANAGEMENT.............................................................46
4.2.1 - Global Connection List. ...................................................................47 9.2.2 - "TCP Server" and "TCP Client" Connection Information.................48
4.3 - INTERFACE INFORMATION .................................................................50 4.3.1 - Ethernet Interface ............................................................................50
a) State....................................................................................................50 b) DHCP/DNS .........................................................................................51 c) Statistic................................................................................................52
4.3.2 - Wireless Interface............................................................................53 a) State....................................................................................................53 b) DHCP/DNS .........................................................................................54 c) Statistic................................................................................................54
4.4 - USB STATISTICS...................................................................................54

Introduction
INTRODUCTION
Firmware 0922a 1

Introduction
2 Firmware 0922a
This manual is an addendum to the AX3000 User's Manual. Only configuration and use of the network interface (Ethernet or wireless) and the Citrix Desktop (similar to Citrix Web interface) are described.
We assume the reader is familiar with the wireless interface management and the AX3000 configuration.
The manual is organized into the following chapters:
Chapter 1: Introduction to the AX3000 Introduction to the AX3000’s main features.
Chapter 2: Setting-up the terminal Quick set-up and interactive set-up procedures (network interface and Citrix Desktop).
Chapter 3: Using the AX3000 How to use the multi-session feature and shutdown the AX3000.
Chapter 4: Tools and Statistics Description of the embedded AX3000 tools (ping, statistics, etc).

Introduction to the AX3000
CHAPTER 1 ---
INTRODUCTION TO THE AX3000
Firmware 0922a 3

Introduction to the AX3000
This chapter introduces the main features of AXEL terminals.
1.1 - TERMINAL MODELS
This manual covers configuration and use of all Axel terminals. The following table lists the main differences between models:
M85
M80F
M75D
M75C
M70F
M70W
M75,
M75E,
M75B
M65C
Connection
Ethernet (TCP/IP) 10/100
BaseT
10/100
BaseT
10/100
BaseT
10/100
BaseT
10/100
BaseT
10/100
BaseT
10/100
BaseT
10/100
BaseT
Wireless (802.11) option --- option --- --- --- --- ---
Serial (RS232) yes USB yes yes --- --- yes yes
Sessions
Text Emulations yes yes yes yes yes --- yes yes
RDP / ICA yes yes yes yes yes yes yes ---
Virtual Desktop yes yes --- --- --- --- --- ---
VNC Client yes yes yes yes yes --- yes ---
Nbr de colors 32bpp 32bpp 16bpp 16bpp 16bpp 16bpp 16bpp ---
Connectors
Parallel Port 1 --- 1 1 --- --- 1 1
Serial port 2 --- 2 2 --- --- 2 2
USB Port 2 4 2 2 2 2 --- ---
Other
USB Driver yes yes Firmware Option MSC --- ---
Smartcard yes yes Firmware Option SCA --- ---
Audio USB USB --- --- --- --- --- ---
4 Firmware 0922a
Introduction to the AX3000
1.2 - MAIN FUNCTIONS
1.2.1 - Network Functions
The Axel terminal supports the following network functions: - DHCP: obtaining an IP address and other parameters - DNS: publishing the terminal name and resolving server names - Routing: WAN connection
In addition for the AX3000 M75D & M85 there is a choice of the active interface, either Ethernet or Wireless. Only one interface can be active but each provides its own IP settings (DHCP, DNS, routers).
1.2.2 - Terminal Function
Each TCP/IP AXEL terminal can support up to six concurrent and independent sessions.
This multi-session capability provides multiple connections across a network. Each session can:
- Connect to any TCP/IP networked server, - Use different protocols (ica, vnc, rdp, telnet, ssh and tty), - Have independent parameters (resolution, emulation, etc.)
Programmable keystrokes are used to open or hotkey between sessions.
The maximum number of sessions is 6 but this can be limited to fewer sessions. (Minimum 1)
Note: the AX3000 can also act as a RS232 serial terminal.
1.2.3 - Print and Terminal Server
The AX3000 auxiliary ports can be managed either: - By a network service: LPD or PRT5250 for printers, TELNET CLIENT for
serial terminals or TTY for other peripherals. - By escape sequences: compatible with serial terminals. (Slave mode)
Firmware 0922a 5

Introduction to the AX3000
6 Firmware 0922a
1.2.4 - Tools and Statistics
Embedded AX3000 tools provide the following features: - Ping, - Remote set-up, - Network Statistics, - Firmware downloading.

Setting-Up the Terminal
CHAPTER 2 ---
SETTING-UP THE TERMINAL
Firmware 0922a 7

Setting-Up the Terminal
This chapter describes quick set-up and interactive set-up features
Two configuration methods are available: - When the AX3000 is powered up for the first time (Quick Set-Up wizard) - Or at any time through the interactive set-up.
2.1 - FIRST POWER-ON
When the terminal is switched on up for the very first time two configuration methods are available:
- Quick Set-Up: a wizard allows the terminal to be set-up in few seconds for typical use.
- Auto-Configuration: used in conjunction with AxRM, this function allows the terminal to automatically receive new firmware and/or a configuration.
IMPORTANT: the auto-configuration must use the Ethernet interface.
The quick set-up is designed for a typical simple environment of: - One server - An optional router - All sessions set identically - An optional printer.
Note: After the ’Quick set-up’ is run all other parameters within the terminal are reset to their factory default values.
The ‘quick set-up’ guides the user through a setup menu in an intuitive manner.
8 Firmware 0922a

Setting-Up the Terminal
The dialog box structure (referred to as a Wizard) is shown below:
SERIAL CONNECTIONMain port (baudrate, data...)
Default printer
NETWORK CONNECTIONIP Settings
Server Settings
FIRST SCREENGraphical Environment
Session Type
Testing Graphical Settings (optional)
CITRIX SESSIONPublished App. or Published Server
SUMMARIZE
CITRIX SESSION Published App.
Desktop
DEVICEPrinter
USB Drive
REBOOT
Other type of sessions
INTERFACEEthernet/Wireless Selection
(802.11 Settings)
Firmware 0922a 9
Setting-Up the Terminal
Note: the following keystrokes are available in the set-up: - <Arrows>: moving selection within menus or dialog boxes - <Enter>: validating a value or a button - <Esc>: cancels current field (same as using 'cancel' button) - <Space>: lists of options - <Tab>: shortcut to buttons on the bottom of the dialog box
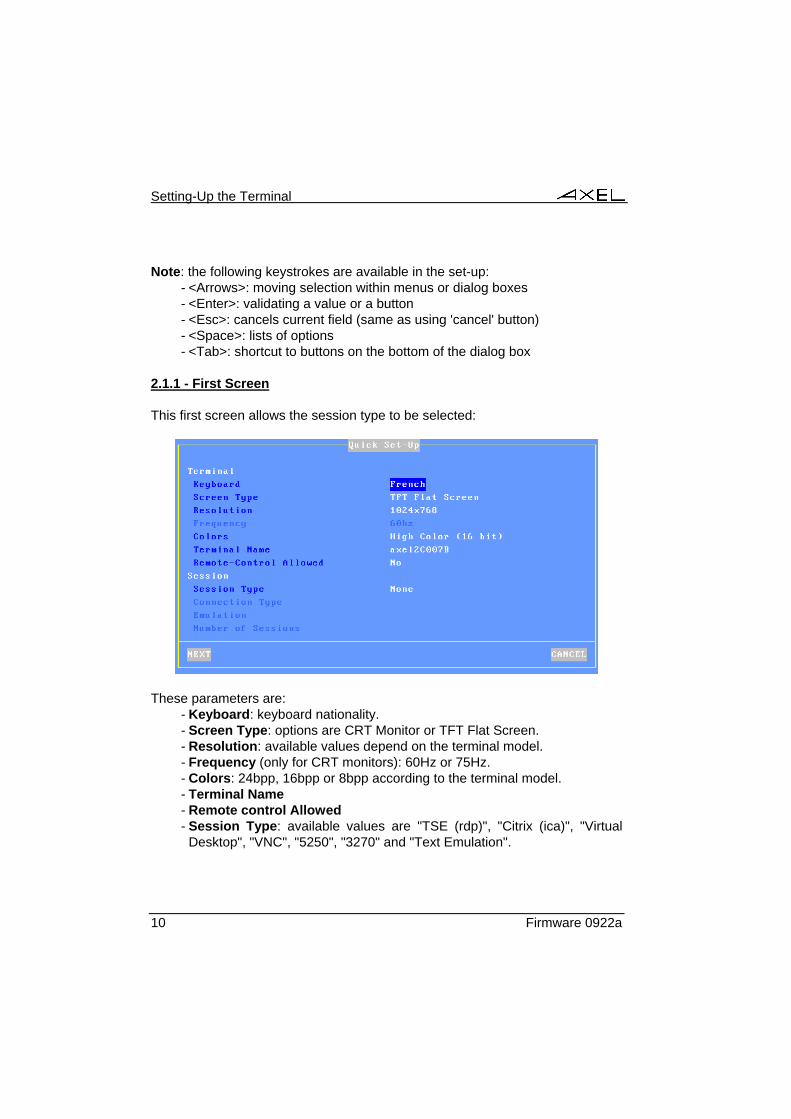
2.1.1 - First Screen
This first screen allows the session type to be selected:
These parameters are: - Keyboard: keyboard nationality. - Screen Type: options are CRT Monitor or TFT Flat Screen. - Resolution: available values depend on the terminal model. - Frequency (only for CRT monitors): 60Hz or 75Hz. - Colors: 24bpp, 16bpp or 8bpp according to the terminal model. - Terminal Name - Remote control Allowed - Session Type: available values are "TSE (rdp)", "Citrix (ica)", "Virtual
Desktop", "VNC", "5250", "3270" and "Text Emulation".
10 Firmware 0922a

Setting-Up the Terminal
- Connection Type: available only for the following Session Types: - "Citrix (ica)": "Server (local list)", "Published Application",
"Published Server" or "Published App. Desktop". - "Text Emulation": "telnet", "aux1" or "ssh". - "Virtual Desktop": "Citrix XEN Desktop" or "VMWARE VDM".
- Emulation: only available if "Text Emulations" is selected. - Number of sessions: only available for Text Sessions. For graphical
sessions this number is 1.
Note: when exiting the dialog box the graphical settings (resolution and frequency) may be tested.
2.1.2 - Interface Selection
The Interface Selection box is shown below:
Firmware 0922a 11

Setting-Up the Terminal
The parameters are: - Active Interface: Two possible values:
- Ethernet: The rest of the parameters are disabled - Wireless: Connection and security settings are requested.
- Other parameters: See Chapter 2.2.3 for more information.
2.1.3 - Network Connection
The Network dialog box is shown below:
The parameters are: - Enable DHCP: two options:
- Yes: the DHCP protocol is run when the set-up is exited and the terminal automatically obtains an IP address and various other DHCP options (netmask, default router, etc).
- No: a Static IP address is required - IP address: mandatory if DHCP is disabled. - Default router: optional router IP address. - 1st DNS Server IP Address: optional DNS server IP address - Server Name (not available for Citrix): DNS name (if the DNS server is
known) or a simple mnemonic name. (A name must be entered) - Server IP address (not available for Citrix): if this field is left blank, DNS
will be used to resolve the hostname. - TCP Port (only for VNC): VNC session number
Note: for a "Virtual Desktop" session, the server is the "Connection Broker"
12 Firmware 0922a
Setting-Up the Terminal
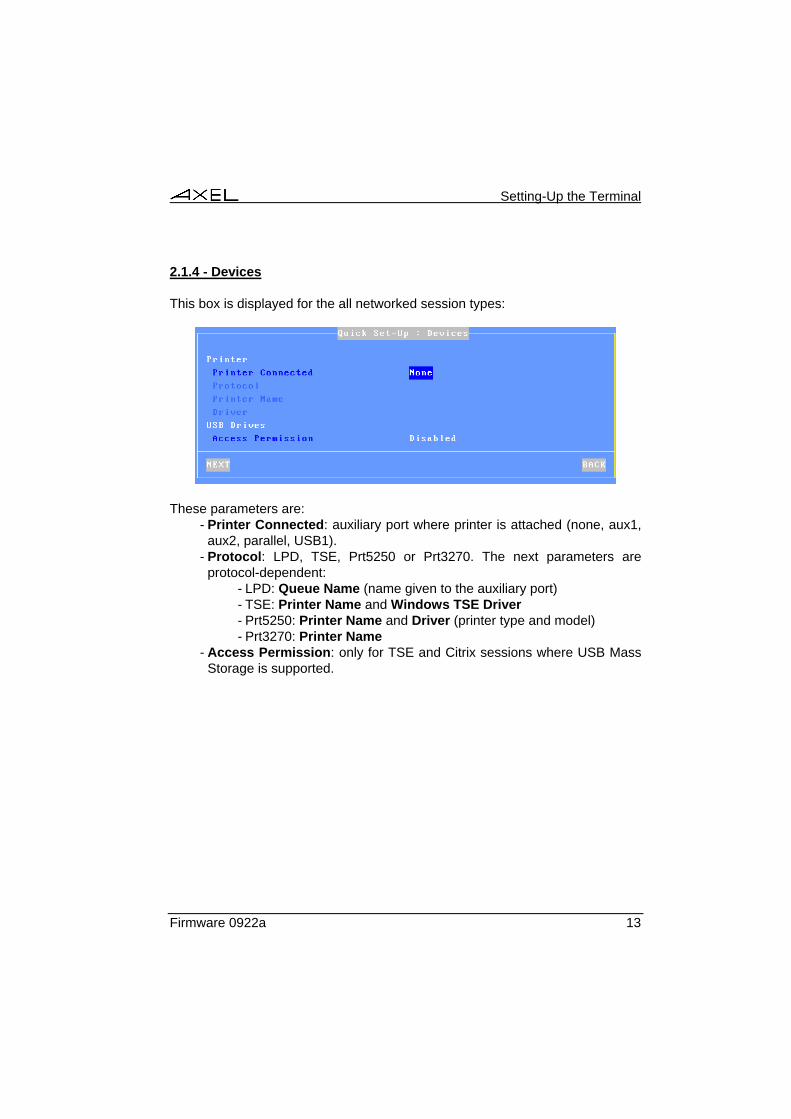
2.1.4 - Devices
This box is displayed for the all networked session types:
These parameters are: - Printer Connected: auxiliary port where printer is attached (none, aux1,
aux2, parallel, USB1). - Protocol: LPD, TSE, Prt5250 or Prt3270. The next parameters are
protocol-dependent: - LPD: Queue Name (name given to the auxiliary port) - TSE: Printer Name and Windows TSE Driver - Prt5250: Printer Name and Driver (printer type and model) - Prt3270: Printer Name
- Access Permission: only for TSE and Citrix sessions where USB Mass Storage is supported.
Firmware 0922a 13
Setting-Up the Terminal
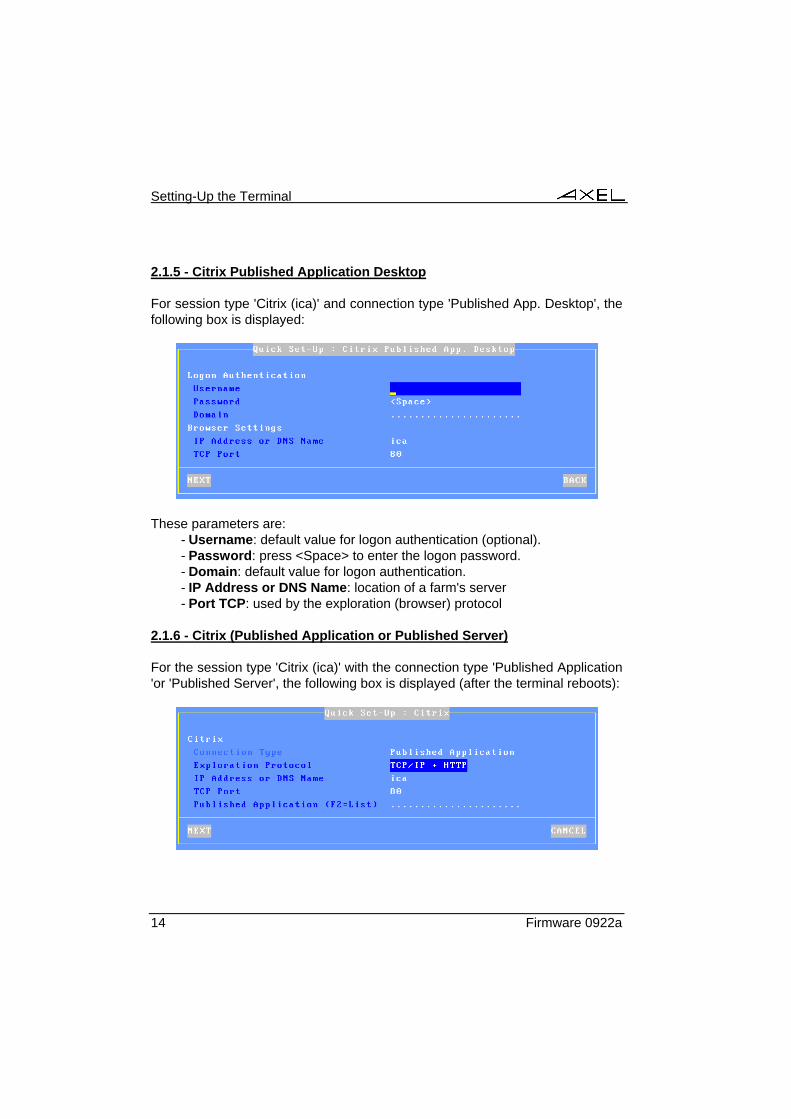
2.1.5 - Citrix Published Application Desktop
For session type 'Citrix (ica)' and connection type 'Published App. Desktop', the following box is displayed:
These parameters are: - Username: default value for logon authentication (optional). - Password: press <Space> to enter the logon password. - Domain: default value for logon authentication. - IP Address or DNS Name: location of a farm's server - Port TCP: used by the exploration (browser) protocol
2.1.6 - Citrix (Published Application or Published Server)
For the session type 'Citrix (ica)' with the connection type 'Published Application 'or 'Published Server', the following box is displayed (after the terminal reboots):
14 Firmware 0922a

Setting-Up the Terminal
These parameters are: - Connection Type: Selected in previous dialog box. - Exploration Protocol: possible values are:
- TCP/IP + HTTP: XML-based exploration - TCP/IP: UDP-based exploration
- TCP Port: used by the exploration protocol - IP Address or DNS Name: location of a server farm, overwrite default of
‘ica’ if necessary - Published Application or Published Server: press <F2> to show the
list from the Citrix farm.
2.1.7 - Serial Connection
Note: Depending on model, if an AUX1 port is available on the terminal rear panel this is the main port, if not a third party USB-COM adaptor is requested. (Note, this component is not supplied by Axel)
Where the session type is 'Text Emulation' and connection type is 'aux1' the following box is displayed:
These parameters are: - Speed: press <Space> to select the baud rate - Format: press <Space> to select the data format - Handshake for reception: press <Space> to select the handshake - Default Port: auxiliary port used for local printings.
Firmware 0922a 15
Setting-Up the Terminal
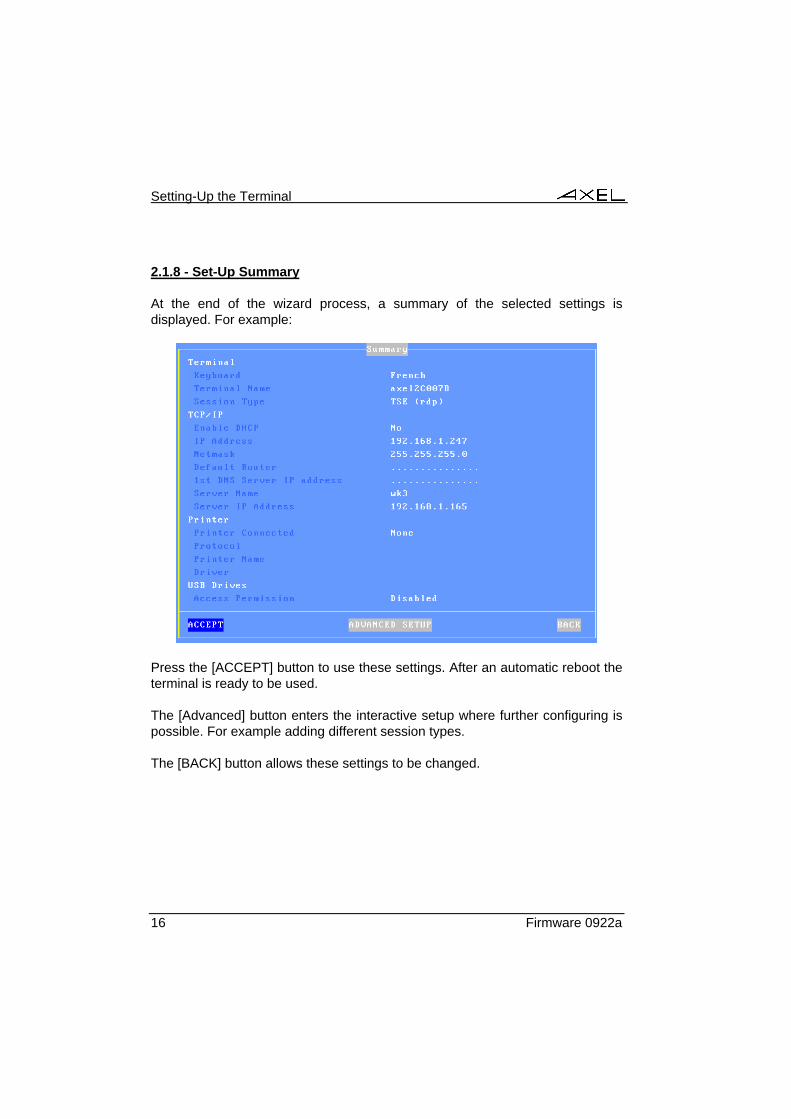
2.1.8 - Set-Up Summary
At the end of the wizard process, a summary of the selected settings is displayed. For example:
Press the [ACCEPT] button to use these settings. After an automatic reboot the terminal is ready to be used.
The [Advanced] button enters the interactive setup where further configuring is possible. For example adding different session types.
The [BACK] button allows these settings to be changed.
16 Firmware 0922a

Setting-Up the Terminal
2.2 - SETTING-UP ETHERNET OR WIRELESS INTERFACE
The following can be used to enter the AX3000 interactive set-up:
The network settings are available through the terminal set-up (<Ctrl><Alt><Esc>). Select [Configuration]-[Network] menu:
The key points of the AX3000 network configuration are: - General Parameters: terminal identification and interface activation - Interface (Ethernet or Wireless): static or dynamic IP address, DNS
protocol and router management
2.2.1 - General Parameters
To set the AX3000 interface and the terminal identification select the [Configuration]-[Network]-[General Parameters] menu. The dialog box below is displayed:
The 'Active Interface' parameter selects which interface to be used. Possible
Firmware 0922a 17

Setting-Up the Terminal
values are: - Ethernet - Wireless - None (serial mode)
2.2.2 - Ethernet Interface
To set the Ethernet interface properties select the [Configuration]-[Network]-[Ethernet Interface]-[IP Parameters] menu. The dialog box below is displayed:
Note: the Ethernet address is displayed as the title box
2.2.3 - Wireless Interface
To set the Wireless interface properties select the [Configuration]-[Network]-[Wireless Interface] menu. The two sub-menus are:
- [Wireless Parameters]: see next page. - [IP Parameters]: same dialog box as Ethernet interface (minus the 'Link'
parameter)
18 Firmware 0922a
Setting-Up the Terminal
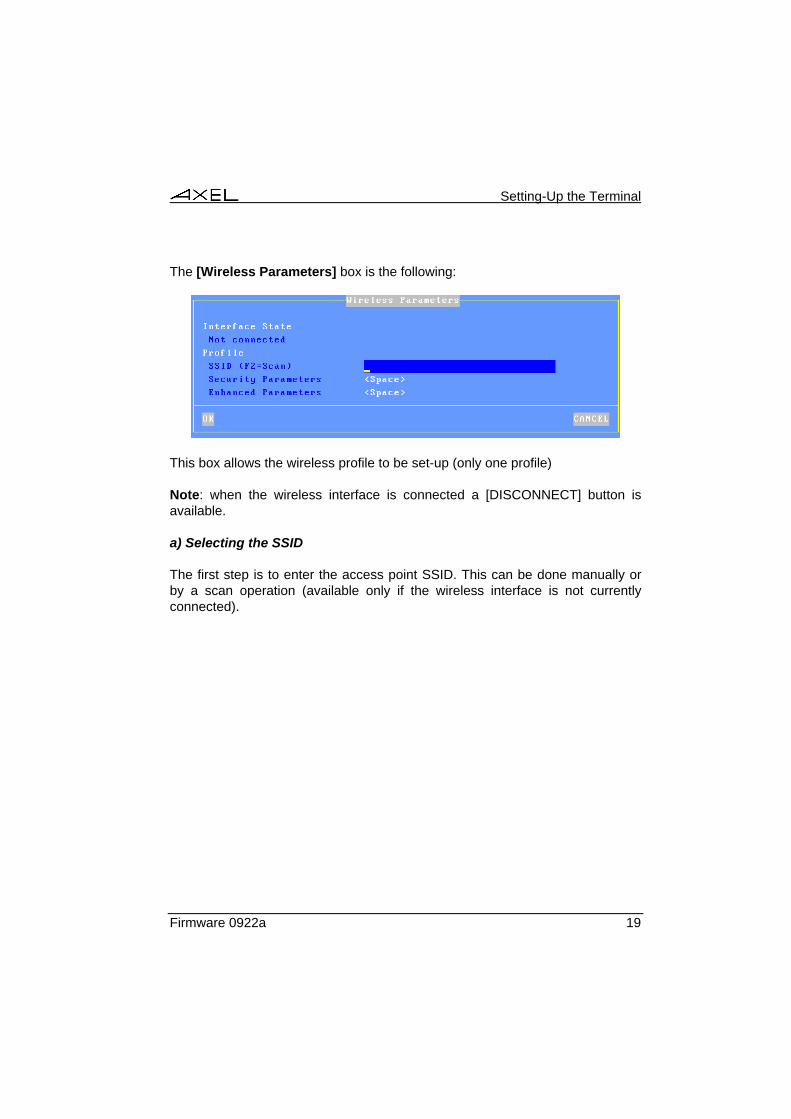
The [Wireless Parameters] box is the following:
This box allows the wireless profile to be set-up (only one profile)
Note: when the wireless interface is connected a [DISCONNECT] button is available.
a) Selecting the SSID
The first step is to enter the access point SSID. This can be done manually or by a scan operation (available only if the wireless interface is not currently connected).
Firmware 0922a 19
Setting-Up the Terminal
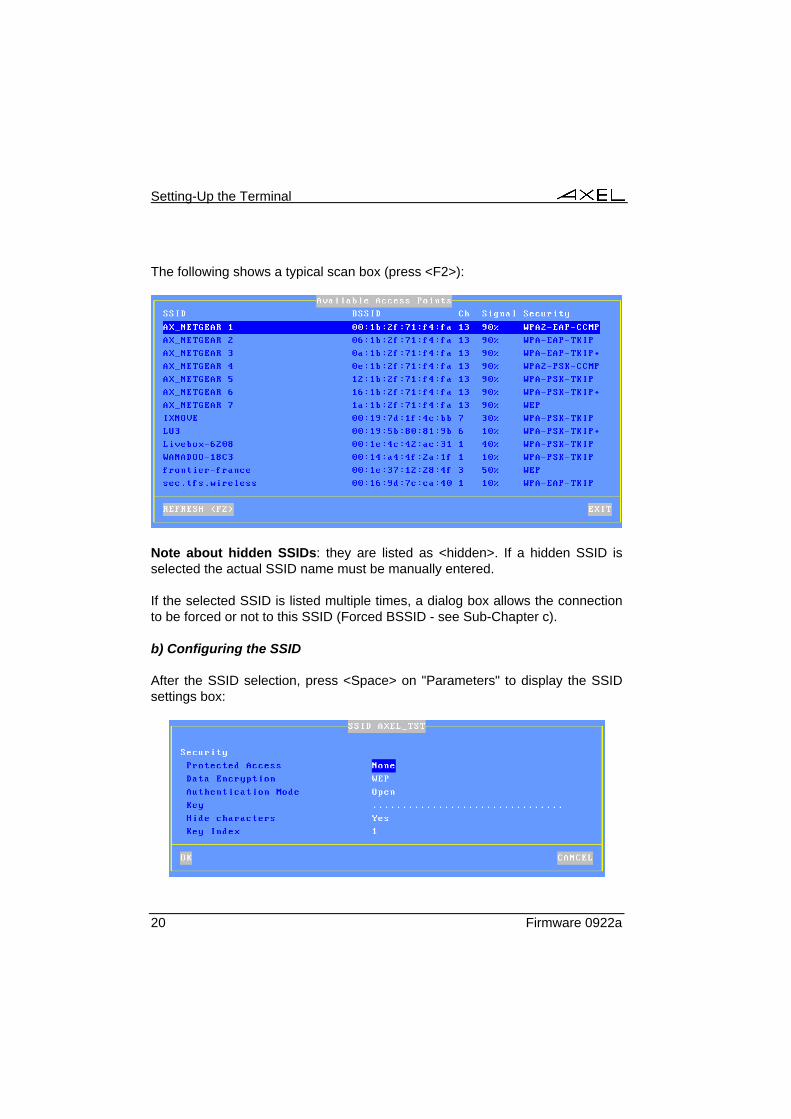
The following shows a typical scan box (press <F2>):
Note about hidden SSIDs: they are listed as <hidden>. If a hidden SSID is selected the actual SSID name must be manually entered.
If the selected SSID is listed multiple times, a dialog box allows the connection to be forced or not to this SSID (Forced BSSID - see Sub-Chapter c).
b) Configuring the SSID
After the SSID selection, press <Space> on "Parameters" to display the SSID settings box:
20 Firmware 0922a

Setting-Up the Terminal
Note: if the SSID had been selected through a scan, SSID security parameters are set.
The dialog box may change depending of the 'Protected Access' value (associated parameters depend of the access type). The possible values of 'Protected Access' are:
- None: encrypted (WEP) or non-encrypted connection - Personal (PSK): encrypted connection (WPA/WPA2) - Enterprise (EAP): authenticated (LEAP/PEAP) and encrypted
(WPA/WPA2) connection - 802.1X: authenticated (LEAP/PEAP) and encrypted (WEP) connection
The following describes each protected access type.
"Protected Access" is "None"
Data Encryption Authentication Mode WEP Key requested Open yes WEP
Shared yes None --- ---
Note 1: a WEP key is a character string. The key encoding is ASCII (length: 5 or 13 characters) or hexadecimal (length: 10 or 26 characters). For example the ASCII key value 12345 is 3132333435 in hexadecimal encoding.
Note 1: only one WEB key is managed. If needed use the "Key Index" option.
Firmware 0922a 21

Setting-Up the Terminal
"Protected Access" is "Personal (PSK)"
Data Encryption Passphrase requested AES (CCMP) yes
TKIP yes
Note: the "Personal (PSK)" protected access is known as WPA or WPA2. The Axel terminal is able to dynamically select one of these two protocols. If needed, a specific protocol (WPA or WPA2) can be forced via the "Wireless PSK/EAP version" in [Configuration]-[Advanced]-[Tunings].
"Protected Access" is "Enterprise (EAP)"
Authentication Mode Data Encryption Authentication requested AES (CCMP) yes LEAP
TKIP yes AES (CCMP) yes PEAP (MS-CHAP v2)
TKIP yes
Notes: - See previous protected access mode for WPA / WPA2 protocols - Both username and password must be entered
22 Firmware 0922a

Setting-Up the Terminal
"Protected Access" is "802.1X"
Authentication Mode Data Encryption Authentication requested LEAP WEP yes
PEAP (MS-CHAP v2) WEP yes
Note: Both username and password must be entered.
c) Advanced Settings
Within the "Wireless Parameters" dialog box, select "Enhanced Settings" and press <Space>:
Forced BSSID: in event of multiple access points with the same SSID, this option allows one to be selected via its MAC address (BSSID).
Roaming: this feature is only for 'mobile' terminals. When a terminal moves
Firmware 0922a 23

Setting-Up the Terminal
from its current access point (and the signal quality becomes too weak), the terminal automatically disconnects its wireless link and attempts to reconnect to the nearest access point (with the same SSID and same security settings). This should be 'invisible' for TCP connections (telnet, RDP, ICA...).The roaming options are:
- RSSI Threshold before Roaming: if the signal quality average is below this value the wireless link is disconnected.
- The three new parameters are used to compute this signal quality average. For more information see the flow chart on the next page.
- Scan all Channels: after a roaming disconnection, available access points are detected by a scanning operation. Scanning all channels takes 3 or 4 seconds (200ms per channel). To reduce this time and to be quickly reconnected, a subset of channels can be specified. Set this parameter to "No" and select/unselect each channel.
Note for Windows servers: to prevent TCP disconnections (RDP or ICA) when roaming, a registry value can be tuned:
- Parameter: HKEY_LOCAL_MACHINE-SYSTEM-CurrentControlSet-Services-Tcpip-parameters-TcpMaxDataRetransmissions
- Default value: 5 - Advised value: 20
24 Firmware 0922a

Setting-Up the Terminal
The following flow chart describes how the terminal computes the current 'Average RSSI'. This value computation is critical because a wireless disconnection will be done if the Average RSSI is lower than the terminal RSSI Threshold:
Initialisations:N=Number of samples (initial)Ts=Sampling PeriodTh=RSSI Threshold before roaming
Average RSSI computation:Sample RSSI «N» times using «Ts» time between samples
Average RSSI < Th?
- Wireless disconnection - Scan channels (200ms/channel)- Connection to the 'best' AP
Same BSSID AP ?
YES
N=Number of samples (fake roaming) N=Number of samples (initial)
NO
NOYES
Firmware 0922a 25
Setting-Up the Terminal
2.3 - SETTING-UP CITRIX DESKTOP
The Citrix Published App. Desktop session is comparable in functionality to the Citrix product Nfuse, WEB Interface or Program Neighborhood.
This feature allows a user, after authentication, to get icons of his published application to be displayed on the terminal local desktop.
Launching a published application is simply done by clicking the associated icon. For managing this application, an ICA session is automatically established.
2.3.1 - Configuration Principles
Configuration Principles: - In opposite to the former implementation, the Citrix Desktop is not a
terminal “session” (i.e. the original 6 sessions are still available for the terminal use).
- Terminal sessions are reserved for the use of Citrix Desktop (one terminal session per running published application).
- The number of published applications (sessions) can be set to between 1 and 6.
- The Citrix published application sessions are always set up descending from session number 6. For example if three sessions are reserved they will be sessions 6, 5 and 4.
To illustrate this principle below are two examples of session setup
Example 1: terminal dedicated to "Citrix Desktop"
Reserved Reserved Reserved Reserved Reserved Reserved
Example 2: "Citrix Desktop", VNC and ANSI sessions
VNC ANSI Reserved Reserved Reserved Reserved
2.3.2 - Citrix Destop Activation
Enter the terminal set-up (<Ctrl><Alt><Esc>) and go to: [Configuration]-
26 Firmware 0922a

Setting-Up the Terminal
[Citrix Desktop] menu:
After setting 'Activation' to 'Yes' the Citrix Desktop options are available: - Browser Settings: press the spacebar to select browser settings. (See
Chapter 2.3.2.) - Connection Properties: press the spacebar to display the ‘Enhanced
Parameters’ dialog box. - Logon Authentication: press spacebar to show a dialog box permitting
the user’s name, password and domain to be entered. This removes the need to enter these details for every logon.
- Desktop Parameters: press spacebar to show a tuning box. See Chapter 2.3.4.
- Number of Sessions: this sets the number of sessions reserved for published applications.
The following parameters are used dynamically by ICA to set up the published applications. - Additional Parameters: press spacebar to show dialog box to set further
settings. - Redirected Resources: press <Space> to set redirected resources
(printers, COM ports, etc.). - Bandwidth: press spacebar to show dialog box for bandwidth
management settings.
Firmware 0922a 27

Setting-Up the Terminal
Notes: - After changing setup parameters it is necessary to reboot the terminal to
ensure the new values are used. - Once "Citrix Desktop" is setup the reserved sessions are inaccessible
from the setup menus. - The setting up of a "Citrix Desktop" activates the status line allowing
sessions to be changed with the mouse.
2.3.2 - Browser Settings
The Browser Settings are used for connection to the Citrix farm. This allows the user to be authenticated and the published application icons to be displayed.
Within the 'Citrix Desktop' box, select 'Browser Settings' and press <Space>. The following box is displayed:
These parameters are: - Exploration Protocol: always TCP/IP + HTTP. - IP Address or DNS Name: when this parameter is left blank, the ICA
request is sent to the DNS name 'ica'. Otherwise it is sent to the entered DNS name or IP address.
- TCP Port: the default value is 80 and can be modified. - Use Alternate Address: set it to 'Yes' when a firewall is present. - Trace Mode: not applicable.
28 Firmware 0922a
Setting-Up the Terminal
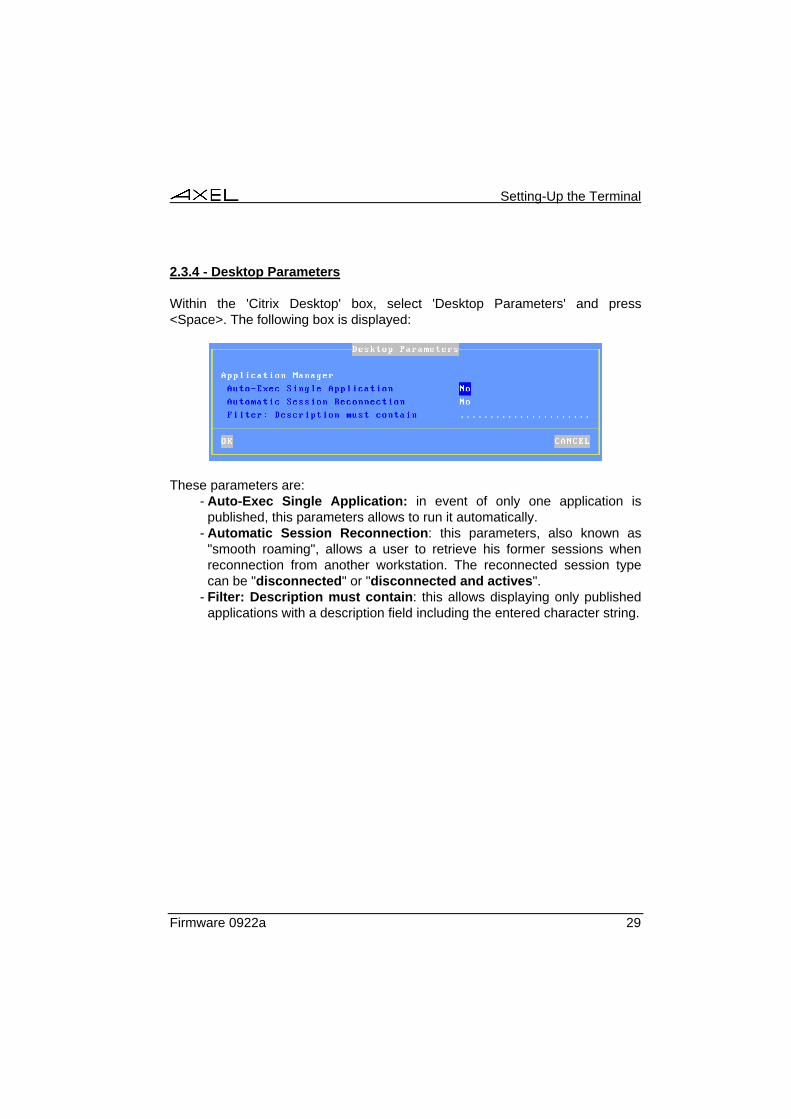
2.3.4 - Desktop Parameters
Within the 'Citrix Desktop' box, select 'Desktop Parameters' and press <Space>. The following box is displayed:
These parameters are: - Auto-Exec Single Application: in event of only one application is
published, this parameters allows to run it automatically. - Automatic Session Reconnection: this parameters, also known as
"smooth roaming", allows a user to retrieve his former sessions when reconnection from another workstation. The reconnected session type can be "disconnected" or "disconnected and actives".
- Filter: Description must contain: this allows displaying only published applications with a description field including the entered character string.
Firmware 0922a 29


Using the AX3000
CHAPTER 3 ---
USING THE AX3000
Firmware 0922a 31
Using the AX3000
This chapter covers use of the AX3000.
3.1 - SWITCHING ON THE AX3000
The following operations are performed when the terminal is turned-on: - Boot: initialization... - Network interface: link established, access point discovered etc - TCP/IP: if DHCP enabled, IP address and other parameters are obtained. - Auto-configuration (optional): checks over the network if a new
firmware/configuration is available. If yes the terminal reboots again for the new firmware/configuration to take effect.
- Auto-Connection: some connections may be opened automatically: - Screen sessions (if the 'auto-connection' parameter is set to 'yes'), - Auxiliary port sessions: if the associated service is a client service
(tty, telnet or prt5250) and if the 'auto-connection' parameter is set to 'yes'.
If multiple screen sessions are auto-connected, the first active screen session is displayed.
- Session Manager: if no screen session is connected, the Session Manager is displayed. Two modes are available:
- Classic mode - Desktop mode
The following chapter covers the session manager modes.
32 Firmware 0922a

Using the AX3000
3.1.1 - Session Manager: Classic Mode
This is the appearance of the classic mode:
The following information is displayed for each session: - The associated keystroke. For example <Alt F1> - The session label. For example "1 TSE" or "2 5250". - The server.
To open a session the user presses the associated keystrokes.
Firmware 0922a 33

Using the AX3000
3.1.2 - Session Manager: Desktop Mode
This is the appearance of the Desktop Mode:
The following information is displayed for each session: - An icon - The indicator and the session label. For example "1 TSE" or "2 5250".
Note: whether enabled or disabled for individual sessions, the status line is always displayed for the session manager.
Possible actions: - Click the icon to open a session. (The associated keystroke is also
available.) See Table 1. - Click a status line icon. See Table 2.
34 Firmware 0922a

Using the AX3000
Table 1 - session type icons
TSE Citrix
Published App.Published Svr.
Citrix Published App.
Desktop
Virtual Desktop (XEN)
Virtual Desktop
(VMWARE)
VNC 5250 3270 Text Emulation
Table 2 - status line icons
Turning off - See Chapter 3.6
Getting terminal information (Firmware/Hardware)
The network status is shown by one of the following icons:
- : Wireless interface available
- : Wireless interface not connected
- : Ethernet cable available
- : Ethernet cable not connected
Disconnecting the current session. See Chapter 3.2.2.
USB drive status. Only displayed if a USB drive is attached
Set Portrait/Landscape mode - See Appendix A.10.2
Displaying the terminal Local Desktop
3.2 - USING MULTIPLE SESSIONS
AXEL terminals provide multiple and concurrent connections. This feature allows simultaneous access to multiple hosts and applications.
Firmware 0922a 35

Using the AX3000
3.3.1 - Opening and Switching Sessions
Opening or switching sessions can be done through: - The keyboard: press <Alt><Fx>. These default keystrokes can be
changed. - The mouse: click left:
- With the session manager (desktop mode): click onto a session icon. - With the status line: click the session label. (The status line must be
enabled).
Note: if the session is 'host free', a dialog box is displayed. The following parameters are required:
- Connection Type: read only information. - Host: press <Space> to select the host - TCP Port: the default value is protocol dependent
3.3.2 - Disconnecting Sessions
A session can be disconnected by one of three ways: - A system command (i.e. logging off the server)
Example: under Unix, exit (or <Ctrl><D>), - <Ctrl><Alt><D>. This keystroke is locally processed by the AX3000 and
works regardless the operating system. - The status line 'Key' icon
If the user closes the current session (<Ctrl><D> in UNIX) the behavior of the terminal depends on how the 'auto-reconnection' parameter is set for the current session.
If this parameter is set to 'yes', a new connection is immediately and automatically established within the current session.
If this parameter is set to 'no', the AX3000 displays the first of the remaining active sessions. If there are no remaining active sessions (for example, because the last active view has been disconnected), the session manager is displayed.
36 Firmware 0922a

Using the AX3000
3.3 - CITRIX DESKTOP
To open the Citrix Desktop, click the associated icon on the terminal Local Desktop. See Chapter 3.1.2.
3.3.1 - Authentication
On establishing the Citrix Desktop, authentication is requested. (Username, password and domain.) A local dialog box requests this information as below:
These authentication parameters are sent to the Citrix servers which permit or deny the user access. The user name (and password) can be entered in the terminal’s setup to remove the need to re-enter on every login.
Firmware 0922a 37

Using the AX3000
3.3.2 - Using the Desktop
On successful authorization the application list and characteristics (name, icons...) is sent to the terminal. The desktop is created locally using this information (the original Citrix Desktop is removed).
Notes: - The ‘Folder’ icon is a standard Citrix offering and can be used to contain
and organize application icons. Sub-folders are supported - The 'Desktop' icon (bottom left) allows the terminal Local Desktop to be
redisplayed at any time for launching next published applications.
When the user clicks on an application icon the terminal uses the first free reserved session to launch an ICA connection. If all the reserved sessions are already in use the terminal will beep.
38 Firmware 0922a

Using the AX3000
General ICA Session Information: - A new ICA connection becomes the current session. - The Citrix server hosting this session is localized with the browser
parameters. - The ICA session uses the general operational parameters specified in the
set-up (encoding, bandwidth...). - The screen resolution and number of colors for all published applications
is set by the Citrix server for that application. If the resolution is not available or is incorrect the desktop resolution is used.
3.3.3 - Closing the Desktop
The ‘Key’ icon is used to shutdown the desktop. All applications must first be closed before the Desktop can be shutdown. If any applications are still open when shutdown is attempted the terminal will emit a beep and not shutdown.
3.4 - LOCKING THE SCREEN
For security reasons, it might be useful for the AX3000 operator to lock the screen rather than logging out.
Note: the lock screen means the AX3000 screen is blanked but the current sessions are still connected and active. There is no way to enter the AX3000 Set-Up or to switch the session. The only way to regain control is to enter the proper password.
The lock screen feature is associated with the screen saver function and must be enabled through the AX3000 Set-Up.
Two methods are available to lock a screen: - Automatically: when the terminal is idle (keyboard or screen) for a
certain time, the AX300 blacks out the monitor display. The display is automatically restored as soon as a key is pressed. A dialog box allowing the screen to be unlocked after password is entered is displayed.
- Manually: the <Ctrl><Alt><S> keystroke allows the screen to be locked immediately.
Firmware 0922a 39

Using the AX3000
An unlock-screen dialog box is displayed. Two operations are possible: - Entering the password to unlock the screen. Two passwords can be
used: the screen saver password and the set-up password. - Resetting the AX3000. If the password is forgotten, the only way is
selecting the [Shutdown] button. After power-cycling it, the AX3000 administrator will be able to modify or remove the screen saver password.
Note: For the highest level of security we recommend setting the terminals ‘Set-Up’ password. (See Chapter 3.2.5)
3.5 - "COPY/PASTE" FUNCTION
The terminal offers a "Copy/Paste" function which operates either in the current session or between different sessions.
For example, text can be copied from a 5250 session and pasted to a Windows session.
a) Copy
From a Windows Session (RDP or ICA): Use the standard 'Copy' function. For example <Ctrl><C>
From a VNC Session: The 'vncconfig' tool must be run. The copy is simply done by selecting a text zone.
From a Text Session (5250, 3270, ANSI, VT...): Press <Ctrl><C> (with 5250 and 3270 emulations) or <Ctrl><Alt><C> (with other emulations) to enter the Copy mode. Use the mouse to select the copy data. Pressing <Enter> validates the selection and the text is copied into a local clipboard. (<Esc> cancels Copy Mode). Note: the Copy function is available only if the mouse is supported by the current session. Note: We are unable to use the “standard” of cont c as this is already used for
40 Firmware 0922a

Using the AX3000
another function within Unix/Linux
b) Paste
To Windows Session (RDP or ICA): Use the standard 'Paste' function. For example <Ctrl><V>
To a VNC Session: The 'vncconfig' tool must be run. Select 'Paste' in the contextual menu of the Linux software.
To a Text Session (5250, 3270, ANSI, VT, WYSE...): Press <Ctrl><V> (with 5250 and 3270 emulations) or <Ctrl><Alt><V> (with other emulations) to paste the contents of the local clipboard. Note: for the 5250 and 3270 sessions, a <Field Exit> function is sent at the end of each line contained in the clipboard.
3.6 - TURNING OFF THE AX3000
A careful check should be made before turning off the TCP/IP AX3000 if TCP/IP connections are active. The operating system cannot detect if a TCP/IP device is turned-off, so the current TCP/IP connections remain active as far as the server is concerned - resulting in various potential issues.
Under UNIX it is advisable not to turn off the TCP/IP AX3000 when a login prompt is displayed (something which is commonly done with serial UNIX terminals). This is because a telnet connection has been opened and will then become an orphan process. The following examples illustrate how the TCP/IP AX3000 differs from a conventional dumb terminal:
- If the 'auto-reconnect' parameter if set to 'yes', a stable stage cannot be reached on the AX3000. New telnet connections will repeatedly be opened.
- Under OS/400, it is impossible to exit the login stage, because there is no way to close the current telnet session.
Firmware 0922a 41

Using the AX3000
To allow graceful shutdown, an AX3000 shutdown function is available. Press <Ctrl><Alt><Del>.
A dialog box allows the next step to be selected: - [SHUTDOWN] button - [REBOOT] button
After selection, all active connections (screen and auxiliary port) are closed.
For the "Shutdown" choice, a few seconds later, the user is informed that the AX3000 may be turned off.
42 Firmware 0922a
Using the AX3000
Firmware 0922a 43
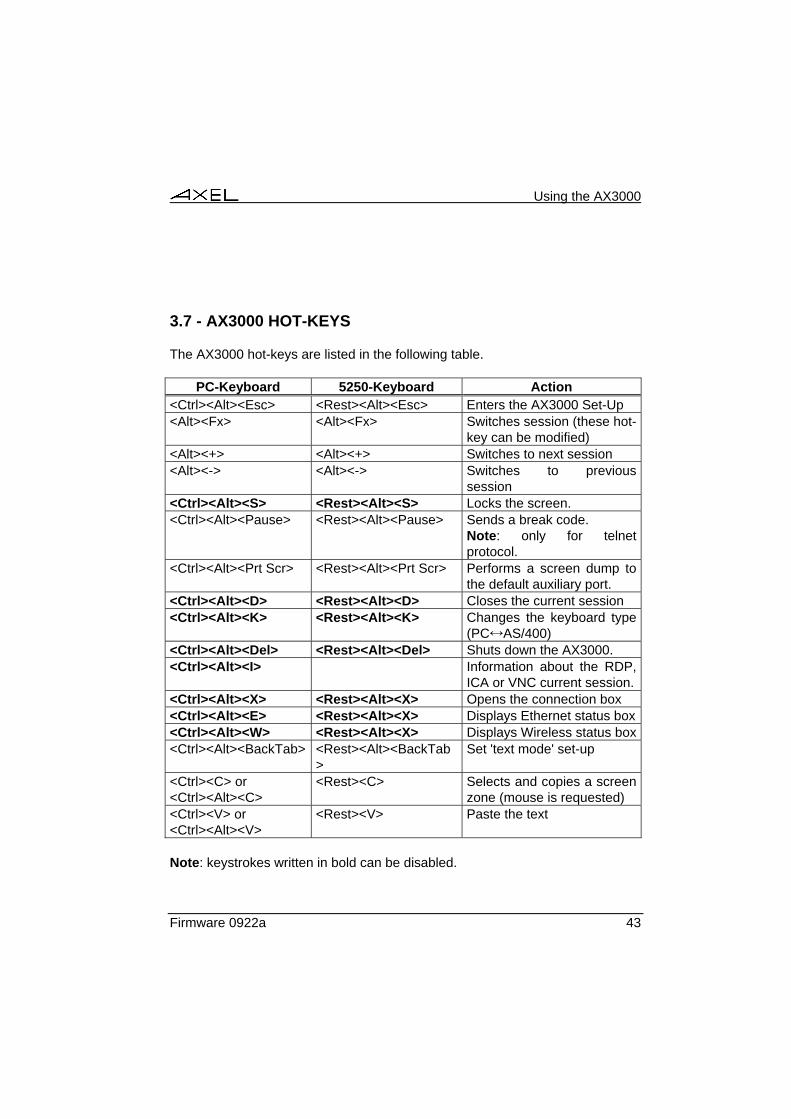
3.7 - AX3000 HOT-KEYS
The AX3000 hot-keys are listed in the following table.
PC-Keyboard 5250-Keyboard Action <Ctrl><Alt><Esc> <Rest><Alt><Esc> Enters the AX3000 Set-Up <Alt><Fx> <Alt><Fx> Switches session (these hot-
key can be modified) <Alt><+> <Alt><+> Switches to next session <Alt><-> <Alt><-> Switches to previous
session <Ctrl><Alt><S> <Rest><Alt><S> Locks the screen. <Ctrl><Alt><Pause> <Rest><Alt><Pause> Sends a break code.
Note: only for telnet protocol.
<Ctrl><Alt><Prt Scr> <Rest><Alt><Prt Scr> Performs a screen dump to the default auxiliary port.
<Ctrl><Alt><D> <Rest><Alt><D> Closes the current session <Ctrl><Alt><K> <Rest><Alt><K> Changes the keyboard type
(PCAS/400) <Ctrl><Alt><Del> <Rest><Alt><Del> Shuts down the AX3000. <Ctrl><Alt><I> Information about the RDP,
ICA or VNC current session. <Ctrl><Alt><X> <Rest><Alt><X> Opens the connection box <Ctrl><Alt><E> <Rest><Alt><X> Displays Ethernet status box <Ctrl><Alt><W> <Rest><Alt><X> Displays Wireless status box <Ctrl><Alt><BackTab> <Rest><Alt><BackTab
> Set 'text mode' set-up
<Ctrl><C> or <Ctrl><Alt><C>
<Rest><C> Selects and copies a screen zone (mouse is requested)
<Ctrl><V> or <Ctrl><Alt><V>
<Rest><V> Paste the text
Note: keystrokes written in bold can be disabled.


Tools and Statistics
CHAPTER 4 ---
TOOLS AND STATISTICS
Firmware 0922a 45

Tools and Statistics
This chapter describes the embedded AX3000 tools.
The AX3000 interactive set-up provides the following administration features: - Ping command - Connection management - Interface information - USB device list
4.1 - THE PING COMMAND
The ping command is used to check for the presence of a live TPC/IP device. Select the [Diagnostics]-[Ping] dialog from the AX3000 set-up, then enter the IP address or the name of the TCP/IP peripheral.
4.2 - CONNECTION MANAGEMENT
Connection failures are often caused by incorrect settings.
46 Firmware 0922a

Tools and Statistics
4.2.1 - Global Connection List.
Select the [Diagnostics]-[Connections] dialog to check the status of all defined connections:
Note: 'outside' the set-up, use <Ctrl><Alt><X> displays this box.
For each session, the following information is displayed: - No: session number. - Type: main values are TSE, ica, telnet, tty, vnc... - State: the possible values are:
- Established: the session is connected, - Closed: the session has ended, - Syn sent: connection request in progress, - Time Wait: connection close in progress.
- Server and IP Addr Host: the associated host. - Port: the TCP port used for the session (this is usually 23 for telnet, 2048
for tty and 59xx for vnc). - Configuration: the associated pre-defined configuration.
Firmware 0922a 47

Tools and Statistics
For each auxiliary port, the following information is displayed: - Port: the name of the port: Aux1, Aux2, PARA (parallel), Usb1, ..., Usb4,
Net1 and Net2 - Service and Other: information about the associated network service:
- lpd: printer port name and optional filter, - rcmd: printer port name, - telnet: associated host, TCP port, TERM and connection flags, - tty: associated host, TCP port and connection flag, - prt5250: associated host, TCP port, printer name and AS/400
connection status, - printd or rtty: TCP port and optional filter.
- State: see above for the possible values.
A connection can be manually closed by selecting the [CLOSE CONNECTION] button.
Note: to refresh the information displayed, select the [REFRESH] button.
9.2.2 - "TCP Server" and "TCP Client" Connection Information
To go further with connection information, two additional statistics dialog boxes are available:
- TCP server: contains information about connections where the AX3000 is acting as a server (lpd, rtty and rcmd).
- TCP client: contains information about connections where the AX3000 is acting as a client (telnet, tty, rdp, ica and vnc).
These statistics show the following: - Information about connections - Values of counters
These dialog boxes are accessed by the [Diagnostics]-[Statistics]-[TCP xxx]-[yyy] menu.
48 Firmware 0922a

Tools and Statistics
Example of a Connection box:
Description of the information given within this box: - Who: AX3000 resource involved in the connection: S1 (session 1), ..., S8
(session 8), Aux1, Aux2, PARA (parallel), Usb1, ..., Usb4, Net1 and Net2. - Type: network service being used (telnet, tty, etc). - State: the possible values are:
- Established: the session is connected, - Closed: the session has ended, - Syn sent: connection request in progress, - Time Wait: connection close in progress.
- Local Socket: IP address and TCP port for the AX3000. - Remote Socket: IP address and TCP port for the host. - Rcv-Q: number of bytes received by the AX3000 and not yet processed - Snd-Q: number of bytes not yet sent to the host
Firmware 0922a 49

Tools and Statistics
Example of a Counter box:
4.3 - INTERFACE INFORMATION
4.3.1 - Ethernet Interface
a) State
The following information is displayed when selecting the [Configuration]-[Network]-[Ethernet Interface]-[State] menu:
Note: this box information is automatically updated every 5 seconds. To force an update use the [REFRESH] button.
50 Firmware 0922a

Tools and Statistics
In the above dialog box, the following information is given: - Link: speed and type the network interface (useful when set in auto-
sense mode). - IP parameters: IP address, netmask and default router - FQDN: terminal full name
b) DHCP/DNS
The DHCP/DNS box is the following:
In the above dialog box, the following information is given: - State: the current DHCP state. The possible states are:
- selecting: searching a DHCP server (broadcast) - requesting: requesting an IP address from the DHCP server
which answered 'selecting' - bound: search has been successfully completed (IP address has
been set) - free: DHCP protocol is not enabled or DHCP protocol failed - renewing: renewing the leased IP address to the DHCP server
which answered 'selecting' - rebinding: renewing the leased IP address to any DHCP server
(broadcast) - DHCP Server: IP address of the DHCP server. - Lease Time (seconds): amount of time of the leased IP address. For
BOOTP protocol, the value is 'infinity'. - Remaining Lease: remaining time before lease expires. For BOOTP
protocol, the value is 'infinity'.
Firmware 0922a 51

Tools and Statistics
- Update Type: information about the DNS server update when updated by the terminal. Main values are:
- None: no update - Direct / Reverse: both types are done by the terminal. - Direct / Reverse (by DHCP): direct update done by the terminal
and reverse update done by the DHCP server - Status: the possible update values are:
- None: no update (not requested) - Done: update succeeded - Failed: update failed - Pending: update in progress - Dhcp: update done by the DHCP server (the terminal had been
informed to forgive the update)
c) Statistic
The statistics box is the following:
Correct Frames: "Output" and "Input" are the number of correct frames (transmitted and received)
Errors: this section gives the type and the number of errors. No errors should be shown in a good working environment/healthy network.
52 Firmware 0922a
Tools and Statistics
4.3.2 - Wireless Interface
a) State
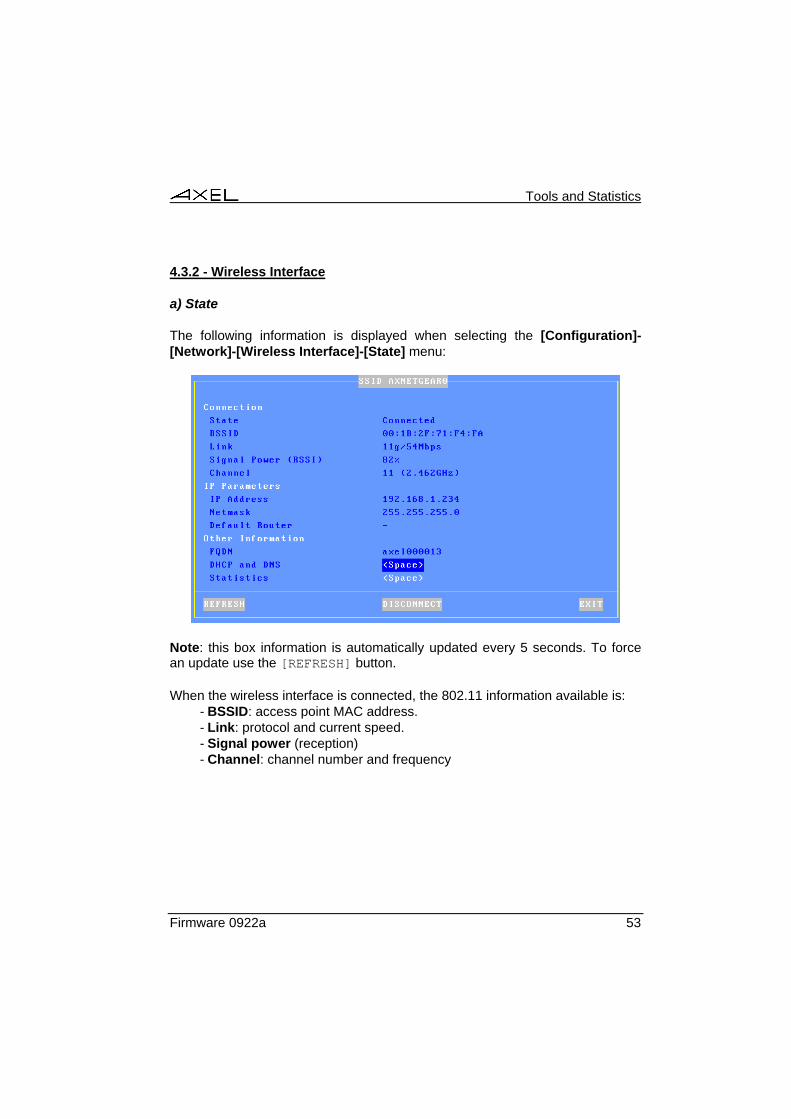
The following information is displayed when selecting the [Configuration]-[Network]-[Wireless Interface]-[State] menu:
Note: this box information is automatically updated every 5 seconds. To force an update use the [REFRESH] button.
When the wireless interface is connected, the 802.11 information available is: - BSSID: access point MAC address. - Link: protocol and current speed. - Signal power (reception) - Channel: channel number and frequency
Firmware 0922a 53

Tools and Statistics
b) DHCP/DNS
The DHCP/DNS box is similar than Ethernet one.
c) Statistic
The statistics box is the following:
4.4 - USB STATISTICS
The [Diagnostics]-[USB] menu lists the connected USB devices. For example
For each line the number is the USB physical port number. The associated label is given by the USB product itself.
If the USB product is supported, more information can obtained by pressing <Enter>. If a beep is sounded the product is not supported.
54 Firmware 0922a

PERSONAL NOTES

14 Avenue du Québec Bât. K2 EVOLIC - BP 728
91962 Courtabœuf cedex - FRANCE Tel.: 33 1.69.28.27.27 - Fax: 33 1.69.28.82.04 - Email: [email protected]


