Date post: | 06-Sep-2018 |
Category: |
Documents |
Upload: | trinhkhuong |
View: | 221 times |
Download: | 0 times |
AygoAudioRHD installation instructions
Model year: 2005
Vehicle code: **B10R-A****W
Part number: • CD Changer: 08601-00911• Woofer: 08691-00834
• CD Changer: 3,75 kg• Woofer: 2,75 kg
• CD Changer: 1 hour• Woofer: 1 hour
Manual ref. no: AIM 000 251
Aygo (RHD) - 3 02/05
PRECAUTIONS
Aygo AUDIO
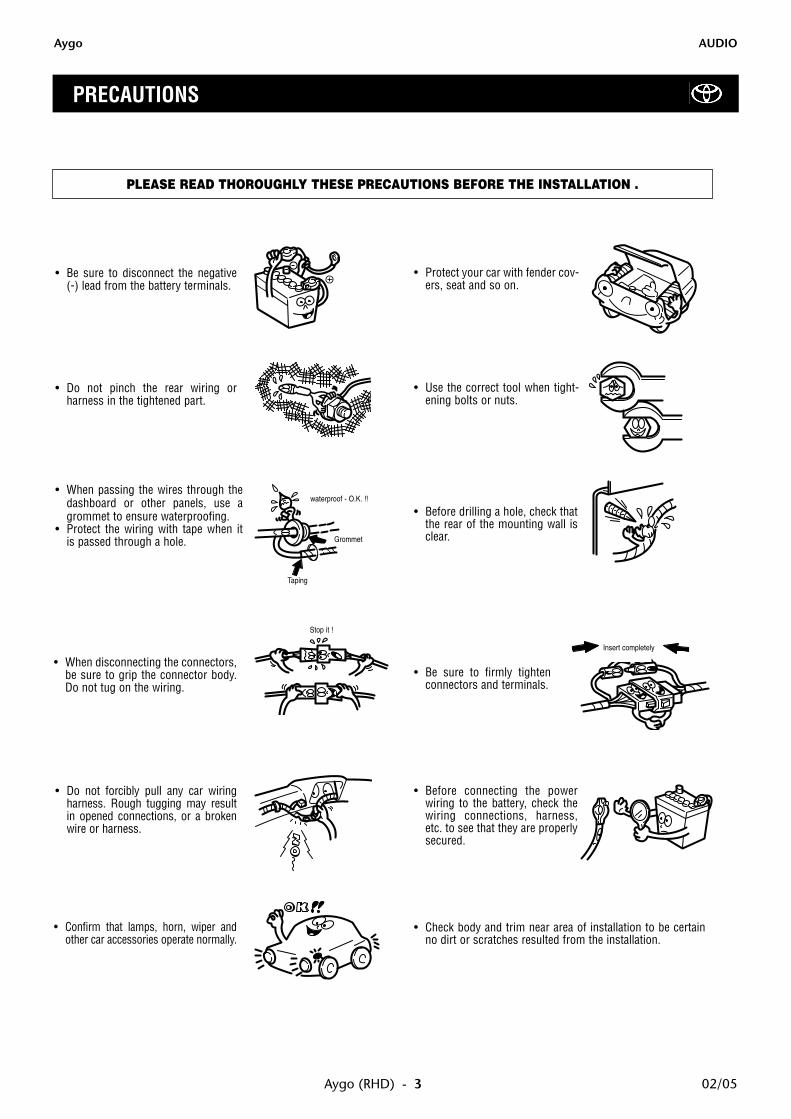
PLEASE READ THOROUGHLY THESE PRECAUTIONS BEFORE THE INSTALLATION .
• Do not pinch the rear wiring or harness in the tightened part.
• Be sure to disconnect the negative (-) lead from the battery terminals.
• When passing the wires through thedashboard or other panels, use agrommet to ensure waterproofing.
• Protect the wiring with tape when it is passed through a hole.
• When disconnecting the connectors,be sure to grip the connector body.Do not tug on the wiring.
• Do not forcibly pull any car wiringharness. Rough tugging may resultin opened connections, or a brokenwire or harness.
• Confirm that lamps, horn, wiper andother car accessories operate normally.
• Protect your car with fender cov-ers, seat and so on.
• Use the correct tool when tight-ening bolts or nuts.
• Before drilling a hole, check thatthe rear of the mounting wall isclear.
• Be sure to firmly tighten connectors and terminals.
• Before connecting the powerwiring to the battery, check thewiring connections, harness,etc. to see that they are properlysecured.
• Check body and trim near area of installation to be certainno dirt or scratches resulted from the installation.
waterproof - O.K. !!
Taping
Grommet
Insert completely
Stop it !
Aygo AUDIO
Aygo (RHD) - 402/05
Revision Record ....................................................................................................................................................................... 2
Precautions............................................................................................................................................................................... 3
Application Chart ...................................................................................................................................................................... 5
Hide-Away CD Changer Installation .......................................................................................................................................... 6
Subwoofer Installation.............................................................................................................................................................. 14
Aygo AUDIO
TABLE OF CONTENTS
3a.Loosen the rear quarter panel on the passen-ger’s side.
6
6
Fig. 3a
Aygo AUDIO
Aygo (RHD) - 602/05
1.a) Remove the knob and the screw .b) Loosen the clips and nail and remove
the upper console cluster .: Screw (1x)
: Clip (4x): Nail (1x)
c) Disconnect the connectors .3
100
2
1001
100
2
3
1
Fig. 1
2.a) Remove the screw and shift knob .
: Screw (1x)b) Remove the under console . 5
101
4101
101
4
5
Fig. 2
In case of 3-doors.
1. HIDE-AWAY CD CHANGER INSTALLATION
Aygo AUDIO
Aygo (RHD) - 7 02/05
7
Fig. 3b
4.a) Loosen the door rubber .b) Remove the cowl side trim .
: Clip (2x): Nail (1x)
9
8
8
9
Fig. 4
In case of 5-doors.
3b.Loosen the center pillar garnish on the passenger’s side.
: Clip (2x): Nail (1x)
7
5.Remove the passenger’s seat .
: Torx screws (4x)102
10
102
10 102
Fig. 5
7.Cut the foam tape (10 pieces).
: Foam tape (1x)104
1041.25” 25mm
104
Fig. 7
Aygo AUDIO
Aygo (RHD) - 802/05
6.Remove the clip and the connector underthe passenger’s seat .
: Clip (1x)103
10
11103 11
103
Fig. 6
Remove while pulling
Aygo AUDIO
Aygo (RHD) - 9 02/05
8. a) Connect the adaptor harness to the CD-
changer harness and tape the connectionwith foam tape .
: Foam tape (1x)b) Tape with foam tape the connector of the
CD-changer harness which is not used.: Foam tape (1x)
c) Route the changer wire with foam tape.: Foam tape (2x)104
12
104
12
104
104
104
12
13
Fig. 8
21
105111
Fig. 9
Watch out for sharp edges!
CAUTION!
9.Loosen the carpet clip and the hook asshown.
: Carpet clip (1x): Hook (1x)
: Carpet21
105
111
105 111
104
12
13
13
14
104
104
12
104
104
Aygo AUDIO
Aygo (RHD) - 1002/05
104
106
104
12
12
14
104
Fig. 10
10. a) Attach the changer wire in the door scuff
by using through clips .b) Bundle up the excess wire and attach to
the vehicle harness .: Foam tape (10x): Through clips (3x)106
104
14
12
106
12
Excess wire
Aygo AUDIO
Aygo (RHD) - 11 02/05
12. Cut the carpet at the changer unit attachmentposition on the passenger’s side floor.
: Changer wire: Vehicle harness14
12
269 mm
152 mm
80 mm
160 mm
14 mm
40 mm
1412
Fig. 12
11. Attach the double sided tape and spacer to the base bracket as shown.
: Screw (4x): Double sided tape (5 mm) (2x)108
107
15
16108
108
108
15
15
16
107
107
108
16
Fig. 11
Fixation hole
Cross member
Aygo AUDIO
Aygo (RHD) - 1202/05
14. Attach the side brackets to the changer unit
as shown.: Flat head screw (M5x8) (4x)109
17
18
109109
109
18
18 18
109109
1718 109
109
Fig. 14
13. Attach the base bracket on the floor.15
15
Fig. 13
Loosen the screws before moving them.Tighten up the screws after the positionhas been changed.
CAUTION!
Aygo AUDIO
Aygo (RHD) - 13 02/05
15
107
12
17
107
Fig. 15
15.Install the changer unit .a) Connect the changer wire to the changer
unit .b) Then attach the changer unit to the base
bracket .: Screws (M5x10) (2x)107
15
17
17
12
17
Re-assemblya) Replace all removed parts and panels. Be sure all panel clips and connectors are properly engaged.
b) When seat re-assembly, fix the torx screw at 22 Nm.
NOTICE!
Aygo AUDIO
Aygo (RHD) - 1402/05
1.a) Attach both brackets on the subwoofer
with screws.b) Attach the double sided tape on the brackets
.: Double sided tape (2x)108
20
1920
108
108
20
19
20
Fig. 1
2.a) Remove the knob and the screw .b) Loosen the clips and nail and remove
the upper console cluster .: Screw (1x)
: Clip (4x): Nail (1x)
c) Disconnect the connectors .3
100
2
1001
100
2
3
1
Fig. 2
3.a) Remove the screw and shift knob .
: Screw (1x)b) Remove the under console . 5
101
4101
101
4
5
Fig. 3
2. SUBWOOFER INSTALLATION
Aygo AUDIO
Aygo (RHD) - 15 02/05
6
Fig. 4a
7
Fig. 4b
4b.Loosen the center pillar garnish on the dri-ver’s side.
: Clip (2x): Nail (1x)
7
4a.Loosen the rear quarter panel on the driver’sside.
6
In case of 3-doors.
In case of 5-doors.
Fig. 5
5.a) Loosen the door rubber .b) Remove the cowl side trim .
: Clip (2x): Nail (1x)
9
8
8
9
Aygo AUDIO
Aygo (RHD) - 1602/05
Aygo AUDIO
7.Remove the clip and disconnect the connectors under the driver’s seat.
: Clip (1x)103
11
10311
103
Fig. 7
6.Remove the driver’s seat .
: Torx screws (4x)102
10
10
102
102
Fig. 6
Remove while pulling
Aygo AUDIO
Aygo (RHD) - 17 02/05
104
8.Cut the foam tape (10 pieces).
: Foam tape (1x)104
104
Fig. 8
9.Cut the carpet as shown in the illustration.
6 cm
5 cm20,5 cm
12 cm
18 cm
19
Fig. 9
19
HIGH CUT GAIN
HIGH CUT GAIN
Fig. 11
11.Before fitting the subwoofer adjust the sensi-tivity to the desired position.
19
Aygo AUDIO
Aygo (RHD) - 1802/05
10.a) Pull back the floor carpet .b) Route and tape the subwoofer wire
harness as shown.c) Bundle up the excess wire.
23
104
21
19
21
23
104
Fig. 10
Excess wire
Aygo AUDIO
Aygo (RHD) - 19 02/05
19
108
22
21
10820
20
Fig. 12
12.a) Tear off the felt from the floor carpet .b) Fit and attach the base brackets (2x) to
the floor using double sided tape .: Double sided tape (5 mm) (2x)
c) Replace the felt and the floor carpet .2122
108
108
20
2122
Fig. 13
2319
13.Connect the subwoofer wire harness to thesubwoofer .19
23
Re-assemblya) Replace all removed parts and panels. Be sure all panel clips and connectors are properly engaged.
b) When seat re-assembly, fix the torx screw at 22 Nm.
NOTICE!