Basic Interface Configuration This chapter includes basic interface configuration including Ethernet settings and Jumbo frame configuration. For multiple context mode, complete all tasks in this section in the system execution space. To change from the context to the system execution space, enter the changeto system command. Note For the Firepower 2100 in Platform mode and Firepower 4100/9300 chassis, you configure basic interface settings in the FXOS operating system. See the configuration or getting started guide for your chassis for more information. Note • About Basic Interface Configuration, on page 1 • Guidelines for Basic Interface Configuration, on page 4 • Default Settings for Basic Interface Configuration, on page 5 • Enable the Physical Interface and Configure Ethernet Parameters, on page 6 • Enable Jumbo Frame Support, on page 8 • Monitoring Interfaces, on page 9 • Examples for Basic Interfaces, on page 9 • History for Basic Interface Configuration, on page 10 About Basic Interface Configuration This section describes interface features and special interfaces. Auto-MDI/MDIX Feature For RJ-45 interfaces, the default auto-negotiation setting also includes the Auto-MDI/MDIX feature. Auto-MDI/MDIX eliminates the need for crossover cabling by performing an internal crossover when a straight cable is detected during the auto-negotiation phase. Either the speed or duplex must be set to auto-negotiate to enable Auto-MDI/MDIX for the interface. If you explicitly set both the speed and duplex to a fixed value, thus disabling auto-negotiation for both settings, then Auto-MDI/MDIX is also disabled. For Gigabit Ethernet, when the speed and duplex are set to 1000 and full, then the interface always auto-negotiates; therefore Auto-MDI/MDIX is always enabled and you cannot disable it. Basic Interface Configuration 1
Transcript
Basic Interface Configuration
This chapter includes basic interface configuration including Ethernet settings and Jumbo frame configuration.
For multiple context mode, complete all tasks in this section in the system execution space. To change fromthe context to the system execution space, enter the changeto system command.
Note
For the Firepower 2100 in Platform mode and Firepower 4100/9300 chassis, you configure basic interfacesettings in the FXOS operating system. See the configuration or getting started guide for your chassis formore information.
Note
• About Basic Interface Configuration, on page 1• Guidelines for Basic Interface Configuration, on page 4• Default Settings for Basic Interface Configuration, on page 5• Enable the Physical Interface and Configure Ethernet Parameters, on page 6• Enable Jumbo Frame Support, on page 8• Monitoring Interfaces, on page 9• Examples for Basic Interfaces, on page 9• History for Basic Interface Configuration, on page 10
About Basic Interface ConfigurationThis section describes interface features and special interfaces.
Auto-MDI/MDIX FeatureFor RJ-45 interfaces, the default auto-negotiation setting also includes the Auto-MDI/MDIX feature.Auto-MDI/MDIX eliminates the need for crossover cabling by performing an internal crossover when astraight cable is detected during the auto-negotiation phase. Either the speed or duplex must be set toauto-negotiate to enable Auto-MDI/MDIX for the interface. If you explicitly set both the speed and duplexto a fixed value, thus disabling auto-negotiation for both settings, then Auto-MDI/MDIX is also disabled. ForGigabit Ethernet, when the speed and duplex are set to 1000 and full, then the interface always auto-negotiates;therefore Auto-MDI/MDIX is always enabled and you cannot disable it.
Basic Interface Configuration1
Management InterfaceThe management interface, depending on your model, is a separate interface just for management traffic.
Management Interface OverviewYou can manage the ASA by connecting to:
• Any through-traffic interface
• A dedicated Management Slot/Port interface (if available for your model)
You may need to configure management access to the interface according to Management Access.
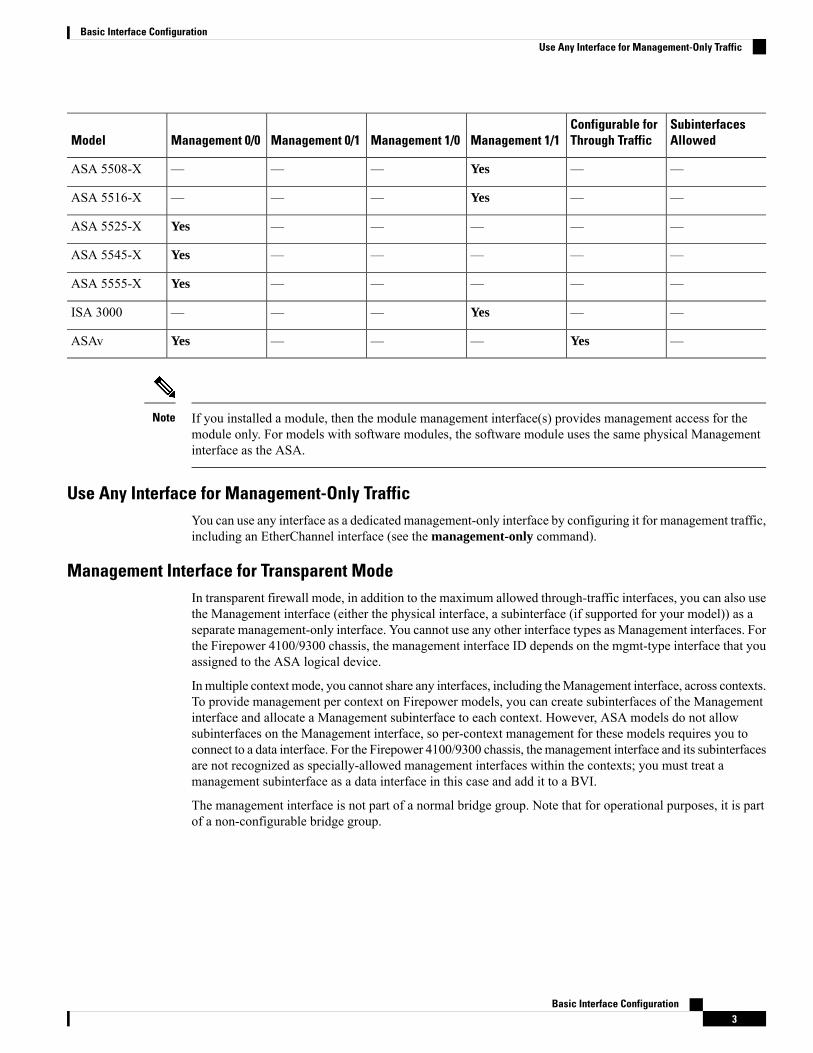
Management Slot/Port InterfaceThe following table shows the Management interfaces per model.
If you installed a module, then the module management interface(s) provides management access for themodule only. For models with software modules, the software module uses the same physical Managementinterface as the ASA.
Note
Use Any Interface for Management-Only TrafficYou can use any interface as a dedicated management-only interface by configuring it for management traffic,including an EtherChannel interface (see the management-only command).
Management Interface for Transparent ModeIn transparent firewall mode, in addition to the maximum allowed through-traffic interfaces, you can also usethe Management interface (either the physical interface, a subinterface (if supported for your model)) as aseparate management-only interface. You cannot use any other interface types as Management interfaces. Forthe Firepower 4100/9300 chassis, the management interface ID depends on the mgmt-type interface that youassigned to the ASA logical device.
In multiple context mode, you cannot share any interfaces, including theManagement interface, across contexts.To provide management per context on Firepower models, you can create subinterfaces of the Managementinterface and allocate a Management subinterface to each context. However, ASA models do not allowsubinterfaces on the Management interface, so per-context management for these models requires you toconnect to a data interface. For the Firepower 4100/9300 chassis, the management interface and its subinterfacesare not recognized as specially-allowed management interfaces within the contexts; you must treat amanagement subinterface as a data interface in this case and add it to a BVI.
The management interface is not part of a normal bridge group. Note that for operational purposes, it is partof a non-configurable bridge group.
Basic Interface Configuration3
Basic Interface ConfigurationUse Any Interface for Management-Only Traffic
In transparent firewall mode, the management interface updates the MAC address table in the same manneras a data interface; therefore you should not connect both a management and a data interface to the sameswitch unless you configure one of the switch ports as a routed port (by default Catalyst switches share aMAC address for all VLAN switch ports). Otherwise, if traffic arrives on the management interface from thephysically-connected switch, then the ASA updates the MAC address table to use the management interfaceto access the switch, instead of the data interface. This action causes a temporary traffic interruption; the ASAwill not re-update the MAC address table for packets from the switch to the data interface for at least 30seconds for security reasons.
Note
No Support for Redundant Management InterfacesRedundant interfaces do not support Management slot/port interfaces as members. You can, however, set aredundant interface comprised of non-Management interfaces as management-only.
Management Interface Characteristics for ASA ModelsThe Management interface for ASA 5500-X models has the following characteristics:
• No through traffic support
• No subinterface support
• No priority queue support
• No multicast MAC support
• The software module shares the Management interface. Separate MAC addresses and IP addresses aresupported for the ASA and module. You must perform configuration of the module IP address withinthe module operating system. However, physical characteristics (such as enabling the interface) areconfigured on the ASA.
Guidelines for Basic Interface ConfigurationTransparent Firewall Mode
For multiple context, transparent mode, each context must use different interfaces; you cannot share an interfaceacross contexts.
Failover
You cannot share a failover or state interface with a data interface.
Additional Guidelines
Some management-related services are not available until a non-management interface is enabled, and thethe ASA achieves a “System Ready” state. The ASA generates the following syslog message when it is in a“System Ready” state:
Basic Interface Configuration4
Basic Interface ConfigurationNo Support for Redundant Management Interfaces
Default Settings for Basic Interface ConfigurationThis section lists default settings for interfaces if you do not have a factory default configuration.
Default State of Interfaces
The default state of an interface depends on the type and the context mode.
In multiple context mode, all allocated interfaces are enabled by default, no matter what the state of theinterface is in the system execution space. However, for traffic to pass through the interface, the interface alsohas to be enabled in the system execution space. If you shut down an interface in the system execution space,then that interface is down in all contexts that share it.
In single mode or in the system execution space, interfaces have the following default states:
• Physical interfaces—Disabled.
• Redundant Interfaces—Enabled. However, for traffic to pass through the redundant interface, the memberphysical interfaces must also be enabled.
• VLAN subinterfaces—Enabled. However, for traffic to pass through the subinterface, the physicalinterface must also be enabled.
• VXLAN VNI interfaces—Enabled.
• EtherChannel port-channel interfaces (ASA models)—Enabled. However, for traffic to pass through theEtherChannel, the channel group physical interfaces must also be enabled.
For the Firepower 4100/9300, you can administratively enable and disable interfaces in both the chassis andon the ASA. For an interface to be operational, the interface must be enabled in both operating systems.Because the interface state is controlled independently, you may have a mismatch between the chassis andthe ASA.
Note
Default Speed and Duplex
• By default, the speed and duplex for copper (RJ-45) interfaces are set to auto-negotiate.
Default Connector Type
Somemodels include two connector types: copper RJ-45 and fiber SFP. RJ-45 is the default. You can configurethe ASA to use the fiber SFP connectors.
Basic Interface Configuration5
Basic Interface ConfigurationDefault Settings for Basic Interface Configuration
Default MAC Addresses
By default, the physical interface uses the burned-inMAC address, and all subinterfaces of a physical interfaceuse the same burned-in MAC address.
Enable the Physical Interface and Configure EthernetParameters
This section describes how to:
• Enable the physical interface
• Set a specific speed and duplex (if available)
• Enable pause frames for flow control
Before you begin
For multiple context mode, complete this procedure in the system execution space. To change from the contextto the system execution space, enter the changeto system command.
Procedure
Step 1 Specify the interface you want to configure:
interface physical_interface
Example:
ciscoasa(config)# interface gigabitethernet 0/0
The physical_interface ID includes the type, slot, and port number as type[slot/]port.
The physical interface types include the following:
• gigabitethernet
• tengigabitethernet
• management
Enter the type followed by slot/port, for example, gigabitethernet0/1. A space is optional between the typeand the slot/port.
Step 2 (Optional) Set the media type to SFP, if available for your model:
media-type sfp
To restore the default RJ-45, enter the media-type rj45 command.
Step 3 (Optional) Set the speed:
speed {auto | 10 | 100 | 1000 | nonegotiate}
Basic Interface Configuration6
Basic Interface ConfigurationEnable the Physical Interface and Configure Ethernet Parameters
Example:
ciscoasa(config-if)# speed 100
For RJ-45 interfaces, the default setting is auto.
For SFP interfaces, the default setting is no speed nonegotiate, which sets the speed to the maximum speedand enables link negotiation for flow-control parameters and remote fault information. The nonegotiatekeyword is the only keyword available for SFP interfaces. The speed nonegotiate command disables linknegotiation.
Step 4 (Optional) Set the duplex for RJ-45 interfaces:
duplex {auto | full | half}
Example:
ciscoasa(config-if)# duplex full
The auto setting is the default. The duplex setting for an EtherChannel interface must be full or auto.
Step 5 (Optional) Enable pause (XOFF) frames for flow control on GigabitEthernet and TenGigabitEthernet interfaces:
flowcontrol send on [low_water high_water pause_time] [noconfirm]
Example:
ciscoasa(config-if)# flowcontrol send on 95 200 10000
If you have a traffic burst, dropped packets can occur if the burst exceeds the buffering capacity of the FIFObuffer on the NIC and the receive ring buffers. Enabling pause frames for flow control can alleviate this issue.Pause (XOFF) and XON frames are generated automatically by the NIC hardware based on the FIFO bufferusage. A pause frame is sent when the buffer usage exceeds the high-water mark. The default high_watervalue is 128 KB (10 GigabitEthernet) and 24 KB (1 GigabitEthernet); you can set it between 0 and 511 (10GigabitEthernet) or 0 and 47 KB (1 GigabitEthernet). After a pause is sent, an XON frame can be sent whenthe buffer usage is reduced below the low-water mark. By default, the low_water value is 64 KB (10GigabitEthernet) and 16 KB (1 GigabitEthernet); you can set it between 0 and 511 (10 GigabitEthernet) or 0and 47 KB (1 GigabitEthernet). The link partner can resume traffic after receiving an XON, or after the XOFFexpires, as controlled by the timer value in the pause frame. The default pause_time value is 26624; you canset it between 0 and 65535. If the buffer usage is consistently above the high-water mark, pause frames aresent repeatedly, controlled by the pause refresh threshold value.
When you use this command, you see the following warning:
Changing flow-control parameters will reset the interface. Packets may be lost during thereset.Proceed with flow-control changes?
To change the parameters without being prompted, use the noconfirm keyword.
Only flow control frames defined in 802.3x are supported. Priority-based flow control is notsupported.
Note
Step 6 Enable the interface:
Basic Interface Configuration7
Basic Interface ConfigurationEnable the Physical Interface and Configure Ethernet Parameters
no shutdown
Example:
ciscoasa(config-if)# no shutdown
To disable the interface, enter the shutdown command. If you enter the shutdown command, you also shutdown all subinterfaces. If you shut down an interface in the system execution space, then that interface is shutdown in all contexts that share it.
Enable Jumbo Frame SupportA jumbo frame is an Ethernet packet larger than the standard maximum of 1518 bytes (including Layer 2header and VLAN header), up to 9216 bytes. You can enable support for jumbo frames for all interfaces byincreasing the amount of memory to process Ethernet frames. Assigning more memory for jumbo framesmight limit the maximum use of other features, such as ACLs. Note that the ASA MTU sets the payload sizenot including the Layer 2 (14 bytes) and VLAN header (4 bytes), so the maximum MTU is 9198, dependingon your model.
Before you begin
• In multiple context mode, set this option in the system execution space.
• Changes in this setting require you to reload the ASA.
• Be sure to set the MTU for each interface that needs to transmit jumbo frames to a higher value than thedefault 1500; for example, set the value to 9198 using the mtu command. In multiple context mode, setthe MTU within each context.
• Be sure to adjust the TCP MSS, either to disable it for non-IPsec traffic (use the sysopt connectiontcpmss 0 command), or to increase it in accord with the MTU.
Procedure
Enable jumbo frame support:
jumbo-frame reservation
Examples
The following example enables jumbo frame reservation, saves the configuration, and reloads theASA:
ciscoasa(config)# jumbo-frame reservationWARNING: this command will take effect after the running-config is savedand the system has been rebooted. Command accepted.
Basic Interface Configuration8
Basic Interface ConfigurationEnable Jumbo Frame Support
Multiple Context Mode ExampleThe following example configures interface parameters in multiple context mode for the system configuration,and allocates the gigabitethernet 0/1.1 subinterface to contextA:
History for Basic Interface ConfigurationTable 2: History for Interfaces
Feature InformationReleasesFeature Name
You can now allow through traffic on theManagement 0/0 interface on the ASAv.Previously, only the ASAv on MicrosoftAzure supported through traffic; now allASAvs support through traffic. You canoptionally configure this interface to bemanagement-only, but it is not configuredby default.
We modified the following command:management-only
9.6(2)Through traffic support on theManagement0/0 interface for the ASAv
You can now enable pause (XOFF) framesfor flow control for Gigabit Ethernetinterfaces on all models.
We modified the following command:flowcontrol.
8.2(5)/8.4(2)Support for Pause Frames for Flow Controlon Gigabit Ethernet Interfaces
You can now enable pause (XOFF) framesfor flow control.
This feature is also supported on the ASA5585-X.
We introduced the following command:flowcontrol.
8.2(2)Support for Pause Frames for Flow Controlon the ASA 5580 Ten Gigabit EthernetInterfaces
The Cisco ASA 5580 supports jumboframes. A jumbo frame is an Ethernetpacket larger than the standard maximumof 1518 bytes (including Layer 2 headerand FCS), up to 9216 bytes. You can enablesupport for jumbo frames for all interfacesby increasing the amount of memory toprocess Ethernet frames. Assigning morememory for jumbo frames might limit themaximum use of other features, such asACLs.
This feature is also supported on the ASA5585-X.
We introduced the following command:jumbo-frame reservation.
8.1(1)Jumbo packet support for the ASA 5580
Basic Interface Configuration10
Basic Interface ConfigurationHistory for Basic Interface Configuration
Feature InformationReleasesFeature Name
The ASA 5510 now supports GE (GigabitEthernet) for port 0 and 1 with the SecurityPlus license. If you upgrade the licensefrom Base to Security Plus, the capacity ofthe external Ethernet0/0 and Ethernet0/1ports increases from the original FE (FastEthernet) (100 Mbps) to GE (1000 Mbps).The interface names will remain Ethernet0/0 and Ethernet 0/1. Use the speedcommand to change the speed on theinterface and use the show interfacecommand to see what speed is currentlyconfigured for each interface.
7.2(3)Gigabit Ethernet Support for the ASA 5510Security Plus License
For the Base license on the ASA 5510, themaximum number of interfaces wasincreased from 3 plus a managementinterface to unlimited interfaces.
7.2(2)Increased interfaces for the Base license onthe ASA 5510
Basic Interface Configuration11
Basic Interface ConfigurationHistory for Basic Interface Configuration
Basic Interface Configuration12
Basic Interface ConfigurationHistory for Basic Interface Configuration