63
Basic Rule Modeling Corticon® Business Rules Modeling Studio 5.3.2

Basic Rule ModelingCorticon® Business Rules Modeling Studio 5.3.2

About this Guide
The Decision Services that you build using Studio may
Note
This Basic Rule Modeling Tutorial provides an introduction to the Corticon Business Rules Modeling Studio 5.3.
You will learn how to capture rules from business specifications model the rules analyze them for logical errors
be deployed as executable, standards-based services available to other software applications via Java, .NET, or SOAP messaging. Corticon Decision Services are in use today across the globe, automating many high-volume decision-intensive processes.
specifications, model the rules, analyze them for logical errors, and test the execution of your rules; all without programming.
Your goal is to create a Decision Service: A group of rules that captures the logic of a single decision-making step completely and unambiguously. In one sense, a Decision Service (when managed with Corticon Studio) is a business friendly model of
See the Server Integration & Deployment Guide or the Server Deployment Tutorial for instructions on how to deploy and integrate the Decision Services you build here.
managed with Corticon Studio) is a business-friendly model of your rules (i.e., your decision-making logic). In another sense, a Decision Service is a powerful asset, allowing you to automatically process the rules as a part of business transactions. This Tutorial is designed for hands-on use. We
recommend that you type along with the instructions d ill t ti t d
Note
and illustrations presented.
© 2013 Progress Software Corporation. All rights reserved.2
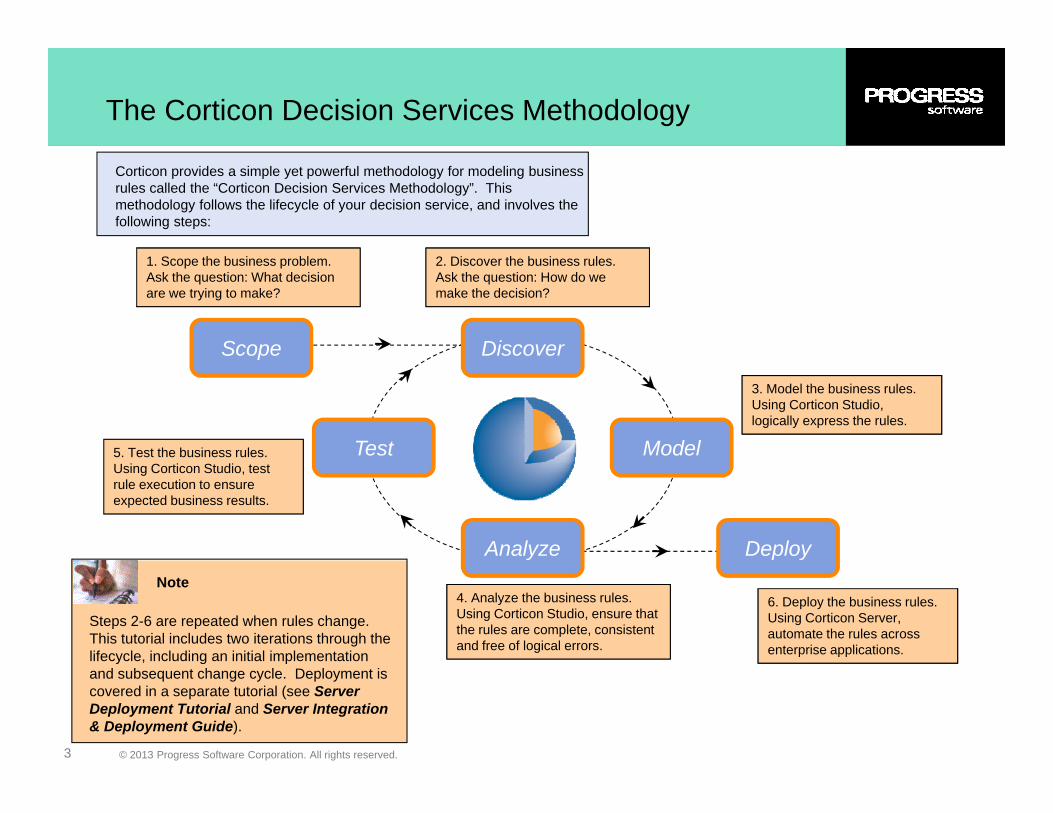
The Corticon Decision Services Methodology
Corticon provides a simple yet powerful methodology for modeling business rules called the “Corticon Decision Services Methodology”. This methodology follows the lifecycle of your decision service, and involves the following steps:
Scope Discover
1. Scope the business problem. Ask the question: What decision are we trying to make?
2. Discover the business rules. Ask the question: How do we make the decision?
ModelTest
Scope Discover
3. Model the business rules. Using Corticon Studio, logically express the rules.
5. Test the business rules.
DeployAnalyze
Using Corticon Studio, test rule execution to ensure expected business results.
4. Analyze the business rules. Using Corticon Studio, ensure that the rules are complete, consistent and free of logical errors.
6. Deploy the business rules. Using Corticon Server, automate the rules across enterprise applications.
Steps 2-6 are repeated when rules change. This tutorial includes two iterations through the lifecycle, including an initial implementation
Note
© 2013 Progress Software Corporation. All rights reserved.3
y g pand subsequent change cycle. Deployment is covered in a separate tutorial (see Server Deployment Tutorial and Server Integration & Deployment Guide).
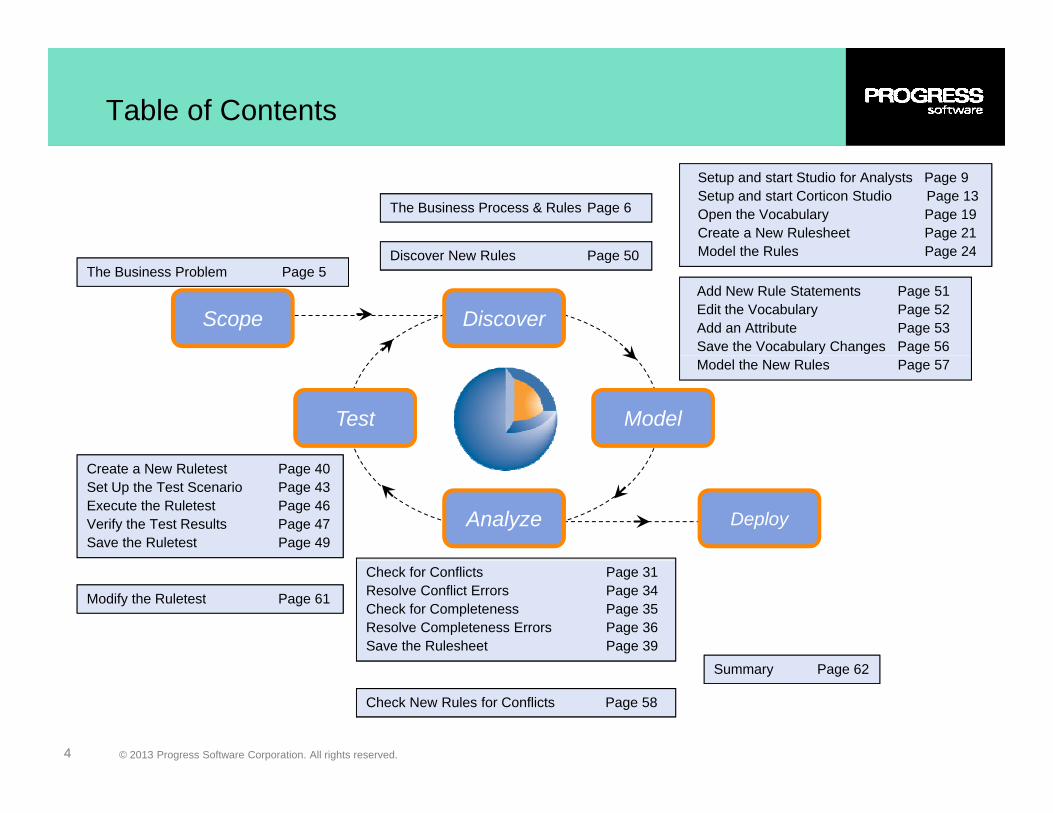
Table of Contents
Setup and start Studio for Analysts Page 9Setup and start Corticon Studio Page 13Open the Vocabulary Page 19Create a New Rulesheet Page 21Model the Rules Page 24
The Business Process & Rules Page 6
Disco er Ne R les Page 50 Model the Rules Page 24
Add New Rule Statements Page 51Edit the Vocabulary Page 52Add an Attribute Page 53Save the Vocabulary Changes Page 56
The Business Problem Page 5
Scope Discover
Discover New Rules Page 50
Model the New Rules Page 57
ModelTest
Create a New Ruletest Page 40Set Up the Test Scenario Page 43Execute the Ruletest Page 46Verify the Test Results Page 47Save the Ruletest Page 49
DeployAnalyze
Check for Conflicts Page 31Resolve Conflict Errors Page 34Check for Completeness Page 35Resolve Completeness Errors Page 36Save the Rulesheet Page 39
Modify the Ruletest Page 61
© 2013 Progress Software Corporation. All rights reserved.4
Check New Rules for Conflicts Page 58
Summary Page 62

The Business Problem Scope
The example used in this Tutorial was developed from a business problem in which an air cargo company loads cargo of various sizes and weights into containers, then onto its fleet of aircraft prior to shipment.
Note
g p p
To operate safely, the company must ensure that an aircraft is never loaded with cargo that exceeds an aircraft’s capabilities. Flight plans are created by the company that assign cargo shipments to containers, then containers to aircraft. Part of the flight plan creation process involves verifying that no plan violates any safety or operational rule.involves verifying that no plan violates any safety or operational rule.
The air cargo company desires to improve the quality and efficiency of the flight planning process by modeling and automating business rules using the Corticon Business Rule Management System.
© 2013 Progress Software Corporation. All rights reserved.5
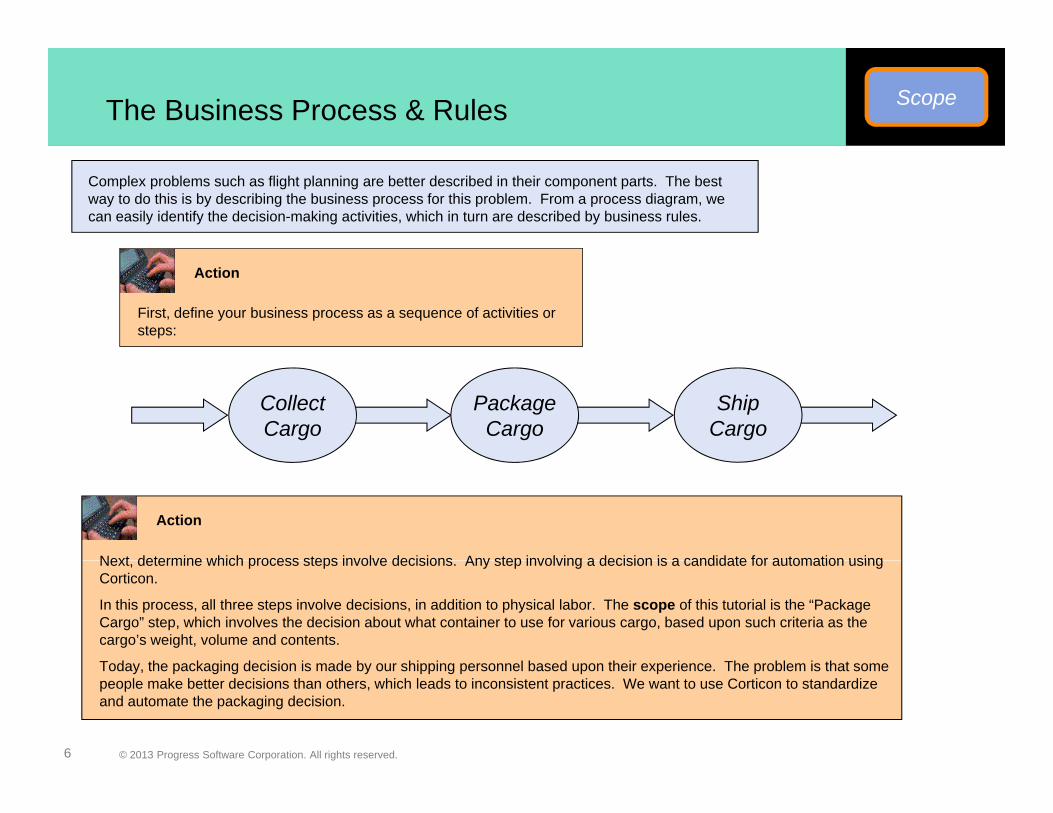
The Business Process & Rules Scope
Complex problems such as flight planning are better described in their component parts. The best way to do this is by describing the business process for this problem. From a process diagram, we can easily identify the decision-making activities, which in turn are described by business rules.
First, define your business process as a sequence of activities or steps:
Action
PackageCargo
CollectCargo
ShipCargo
Next determine which process steps involve decisions Any step involving a decision is a candidate for automation using
Action
Next, determine which process steps involve decisions. Any step involving a decision is a candidate for automation using Corticon.
In this process, all three steps involve decisions, in addition to physical labor. The scope of this tutorial is the “Package Cargo” step, which involves the decision about what container to use for various cargo, based upon such criteria as the cargo’s weight, volume and contents.
T d th k i d i i i d b hi i l b d th i i Th bl i th t
© 2013 Progress Software Corporation. All rights reserved.6
Today, the packaging decision is made by our shipping personnel based upon their experience. The problem is that some people make better decisions than others, which leads to inconsistent practices. We want to use Corticon to standardize and automate the packaging decision.
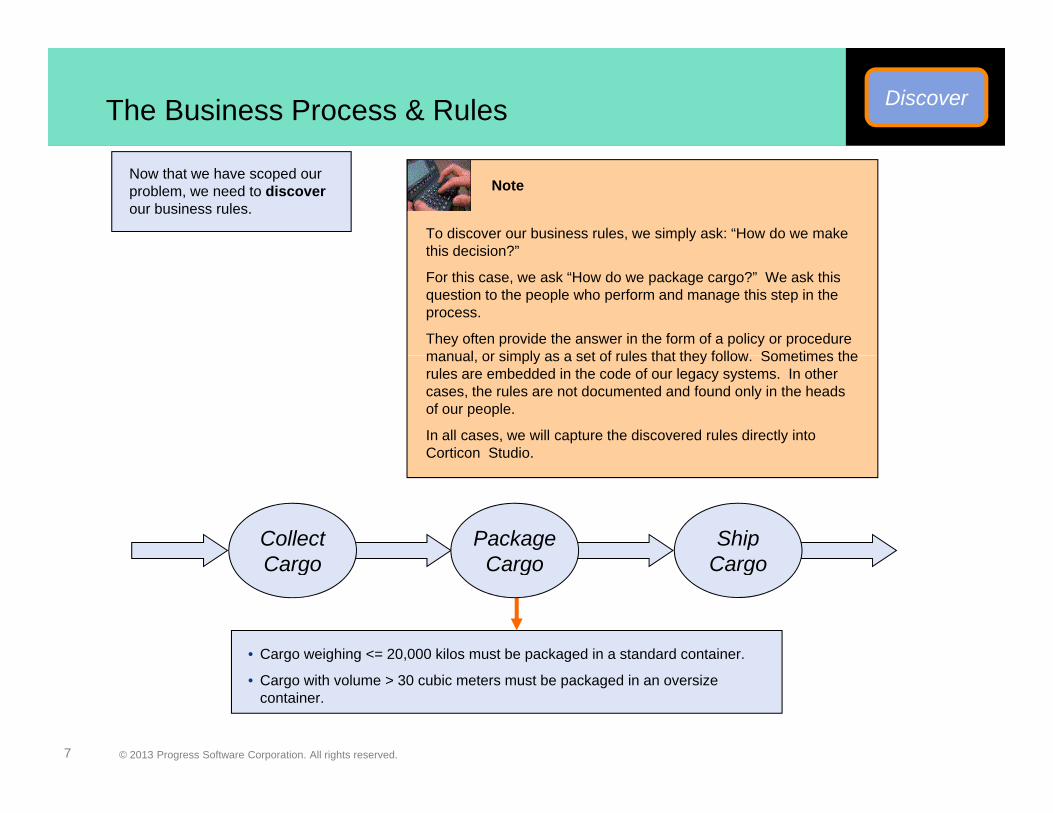
The Business Process & Rules Discover
Now that we have scoped our problem, we need to discoverour business rules.
To discover our business rules, we simply ask: “How do we make this decision?”
Note
this decision?
For this case, we ask “How do we package cargo?” We ask this question to the people who perform and manage this step in the process.
They often provide the answer in the form of a policy or procedure manual or simply as a set of rules that they follow Sometimes themanual, or simply as a set of rules that they follow. Sometimes the rules are embedded in the code of our legacy systems. In other cases, the rules are not documented and found only in the heads of our people.
In all cases, we will capture the discovered rules directly into Corticon Studio.
PackageCargo
CollectCargo
ShipCargo
• Cargo weighing <= 20,000 kilos must be packaged in a standard container.
CargoCargo Cargo
© 2013 Progress Software Corporation. All rights reserved.7
• Cargo with volume > 30 cubic meters must be packaged in an oversize container.

Corticon Licensing
IMPORTANT
About Corticon licensingCorticon embeds a timed evaluation license in each Corticon Studio that lets you evaluate Corticon Studio features. Typically, you do not need to do anything to get started.
But, when you start Studio, if you see a License Warning alert it means that the license file is invalid, corrupted, or ut, e you sta t Stud o, you see a ce se a g a e t t ea s t at t e ce se e s a d, co upted, oexpired. Then, when you create or modify any Corticon files, you get an Asset Locked Warning, indicating that you can just review existing files.
Contact your Progress Corticon Technical Support or your Progress representative to obtain a workable license. Place the license file on your Studio machine, then launch Studio.
Choose Window > Preferences, then expand Progress Corticon > Rule Modeling. Click Browse and then navigate to choose your new, valid, unexpired license. When you click OK, and restart Studio the license update process is complete.
© 2013 Progress Software Corporation. All rights reserved.8

Tutorial set up with Corticon Studio for Analysts Model
Double click on the Studio icon in your Corticon installationOpen Corticon Studio
Action
Corticon installation directory “Install Dir>\Studio for Analysts\Studio.exe”
OR
For Analysts
Choose the Startmenu path All Programs > Progress > Corticon 5.3 > C ti St di
You first need to install the software. Refer to the Studio Installation Guide for d t il d i t ti
Note
Corticon Studio for Analysts
detailed instructions.
Note
For further details and reference information not presented here, you can choose Help > Contents and Index from the Studio menubar or click the icon on the Studio toolbar.
If you are using Corticon Studio for Analysts (the standalone version),
complete the next four slides. If you are using the Eclipse plug-in version
(Corticon Designer) jump to slide 12 for
© 2013 Progress Software Corporation. All rights reserved.9
(Corticon Designer) jump to slide 12 for setup instructions.
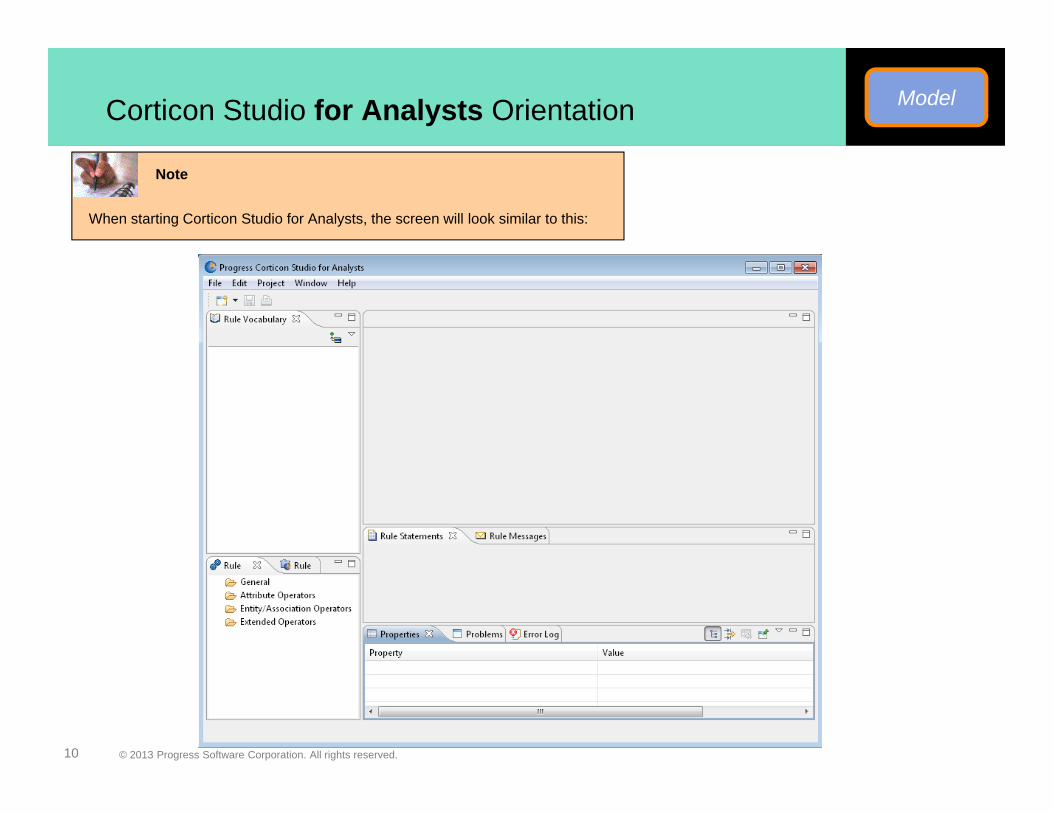
Corticon Studio for Analysts Orientation Model
When starting Corticon Studio for Analysts, the screen will look similar to this:
Note
© 2013 Progress Software Corporation. All rights reserved.10
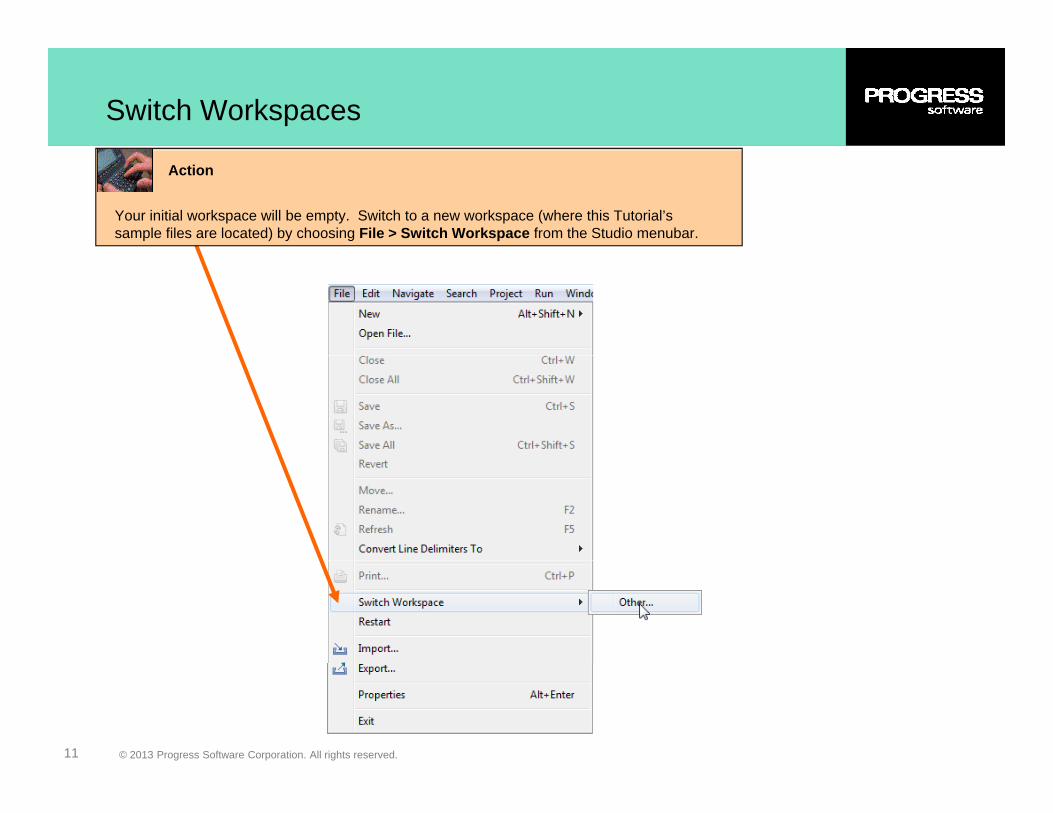
Switch Workspaces
Your initial workspace will be empty. Switch to a new workspace (where this Tutorial’s sample files are located) by choosing File > Switch Workspace from the Studio menubar.
Action
© 2013 Progress Software Corporation. All rights reserved.11
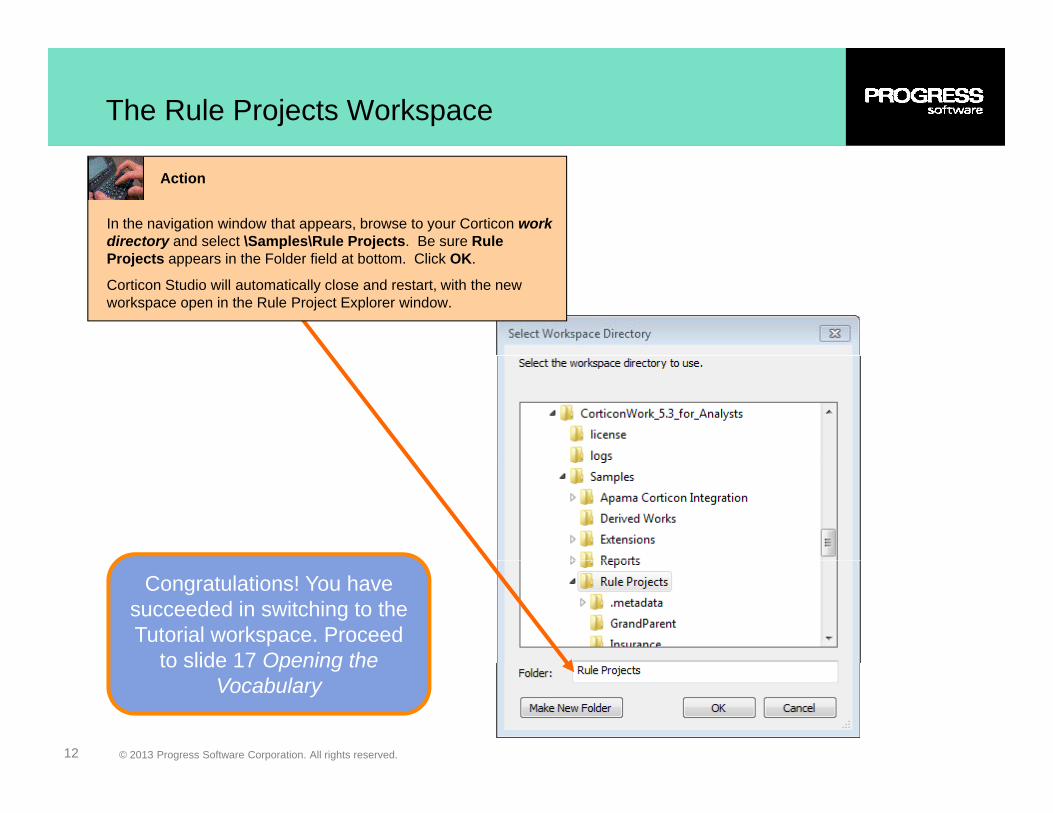
The Rule Projects Workspace
In the navigation window that appears, browse to your Corticon workdirectory and select \Samples\Rule Projects. Be sure Rule
f C O
Action
Projects appears in the Folder field at bottom. Click OK.
Corticon Studio will automatically close and restart, with the new workspace open in the Rule Project Explorer window.
Congratulations! You have succeeded in switching to the Tutorial workspace. Proceed
to slide 17 Opening the
© 2013 Progress Software Corporation. All rights reserved.12
to slide 17 Opening the Vocabulary

Tutorials in Rule Project Explorer
Your screen should now look like this, with the Tutorial project available in the
Note
Rule Project Explorer view.
Congratulations! You have succeeded in switching to the Tutorial workspace. Proceed
t lid 17 O i th
© 2013 Progress Software Corporation. All rights reserved.13
to slide 17 Opening the Vocabulary

Tutorial set up with full Corticon Studio Model
Double click on the Corticon Studio eclipse.exe file in your C ti i t ll ti
Open Corticon Studio
Action
Corticon installation directory “<Install Dir>/ Studio/eclipse/eclipse.exe”
OR
Start menupath All Programs > Progress > Corticon 5 3 > Studio >
You first need to install the software. Refer to the Studio Installation Guide for d t il d i t ti
Note
5.3 > Studio > Corticon Studio
detailed instructions.
Note
For further details and reference information not presented here, you can choose Help > Contents and Index from the Studio menubar or click the icon on the Studio toolbar.
If you are using Corticon Studio, complete the next four
slides. After that the instructions will be the same
© 2013 Progress Software Corporation. All rights reserved.14
instructions will be the same for both Studio installations.

Select Samples from the Progress Developer Studio Welcome page
© 2013 Progress Software Corporation. All rights reserved.15

Select the Tutorial and Open
© 2013 Progress Software Corporation. All rights reserved.16
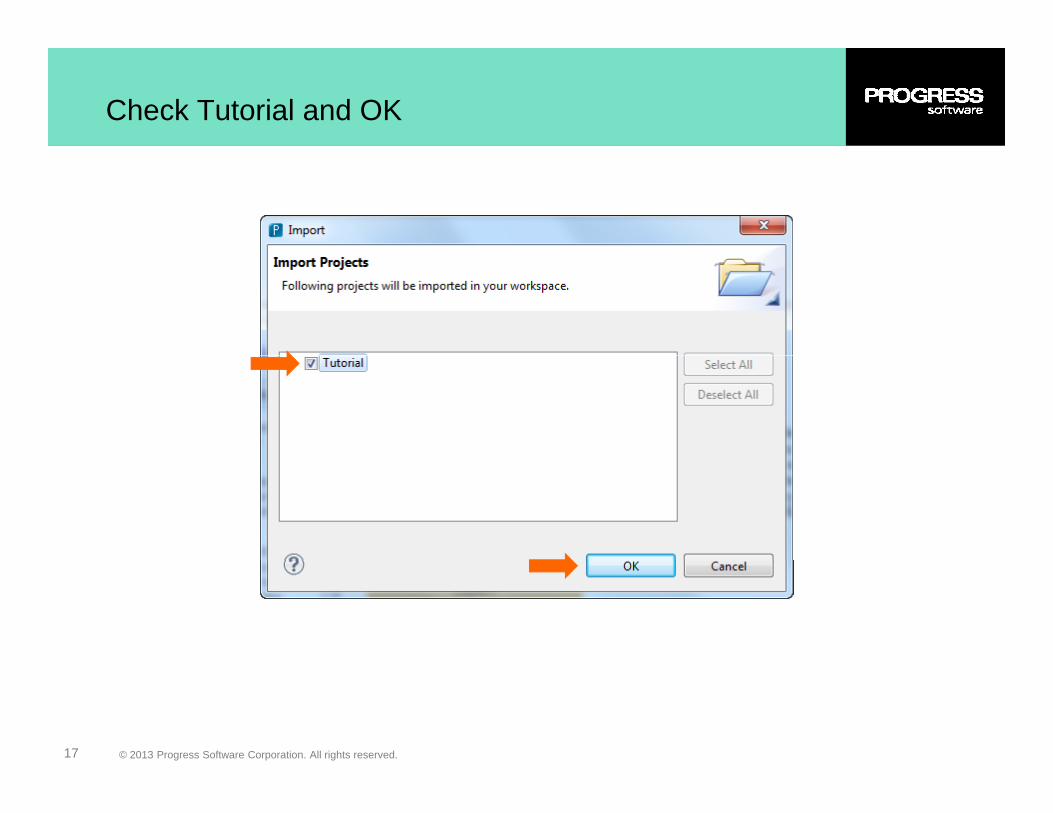
Check Tutorial and OK
© 2013 Progress Software Corporation. All rights reserved.17

Load the project into the workspace
Note: Eclipse allows you to resize, d l imove and close views.
. Tip: Drag the Project Explorer view
to the bottom next to Rule O t Thi illOperators. This way your screen will
look similar to this Tutorial.
You can always select Window > R t P ti t t t thReset Perspective… to return to the
default perspective
© 2013 Progress Software Corporation. All rights reserved.18

ModelOpen the Vocabulary
Slides will use Corticon Studio for A l t f ll t
Note
Analysts for all screen captures moving forward. If you are using Corticon Studio your perspective
might have different default layouts.The first step in modeling business rules is to build a Vocabulary, which includes the terms referenced by our business rules (such as ‘aircraft’ and ‘flight plan’). Using Studio, you can define and edit Vocabularies. In this case, we opened an existing model created in Studio.
Once you open a Vocabulary, you can see it in the upper left Rule y p y, y ppVocabulary window. In addition, you can edit the Vocabulary in the upper right editor window. Later in this Tutorial, we will edit the Vocabulary.
First, we will model some rules using the Vocabulary provided. We model rules using a Rulesheet.
Action
© 2013 Progress Software Corporation. All rights reserved.19
Open an existing Vocabulary by double-clicking Cargo.ecore in the Rule Project Explorer view.

ModelOpen the Vocabulary
Action
Take a moment to explore the Rule Operators, which are located in a tab to the lower left adjacent
Note
which are located in a tab to the lower left, adjacent to the Rule Project Explorer tab.
While the Rule Vocabulary contains our nouns (the things we reference in our business rules), the Rule Operators contain our verbs (the actions we take in our business rules).
Corticon Studio comes with a rich set of operators for manipulating data similar to the Excel function library In addition programmers candata, similar to the Excel function library. In addition, programmers can also extend Corticon's built-in Operator Library by implementing a documented Corticon Operator API (e.g., to perform a new statistical function or to make a call out). See Appendix D of the Rule Language Guide for more information.
© 2013 Progress Software Corporation. All rights reserved.20
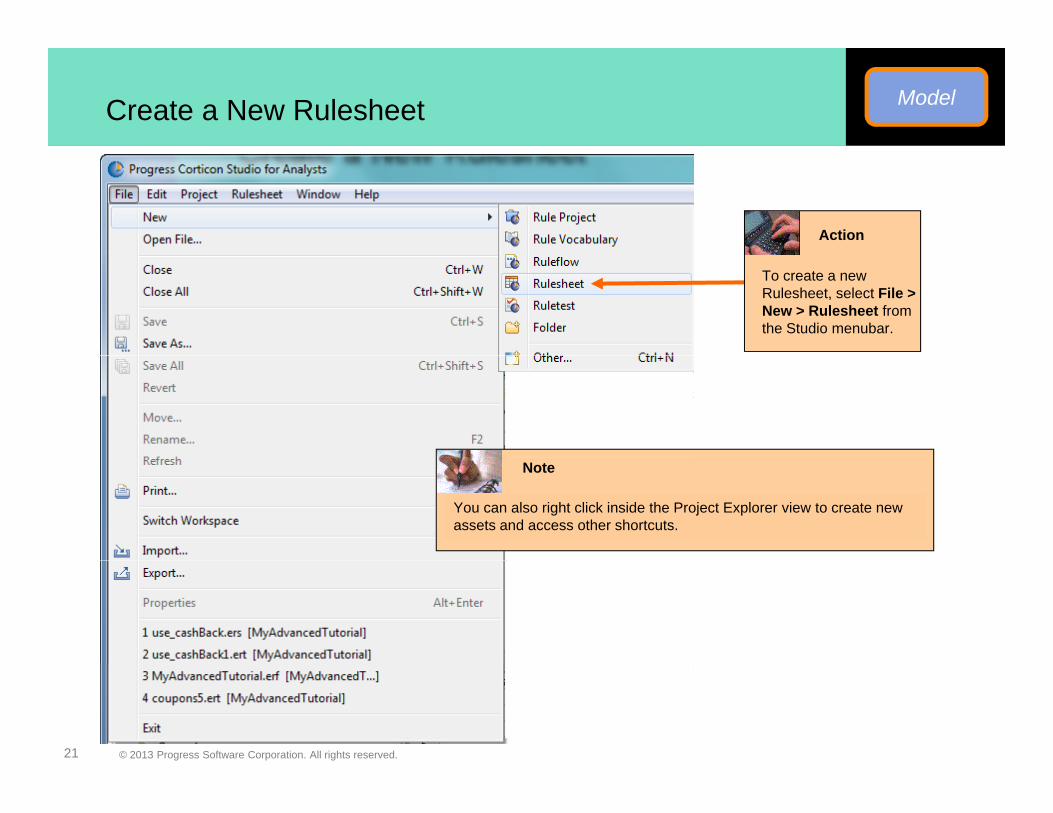
ModelCreate a New Rulesheet
Action
To create a new Rulesheet, select File >New > Rulesheet from the Studio menubar.
You can also right click inside the Project Explorer view to create new assets and access other shortcuts.
Note
© 2013 Progress Software Corporation. All rights reserved.21
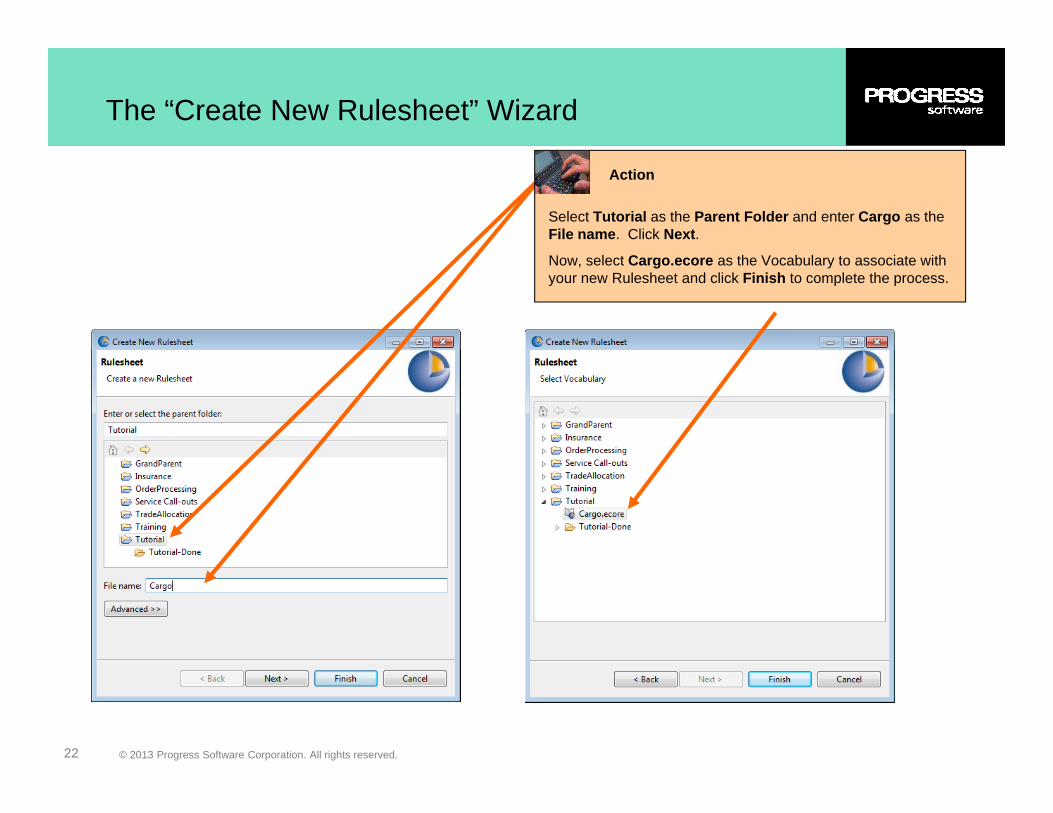
The “Create New Rulesheet” Wizard
Select Tutorial as the Parent Folder and enter Cargo as the File name. Click Next.
Action
Now, select Cargo.ecore as the Vocabulary to associate with your new Rulesheet and click Finish to complete the process.
© 2013 Progress Software Corporation. All rights reserved.22
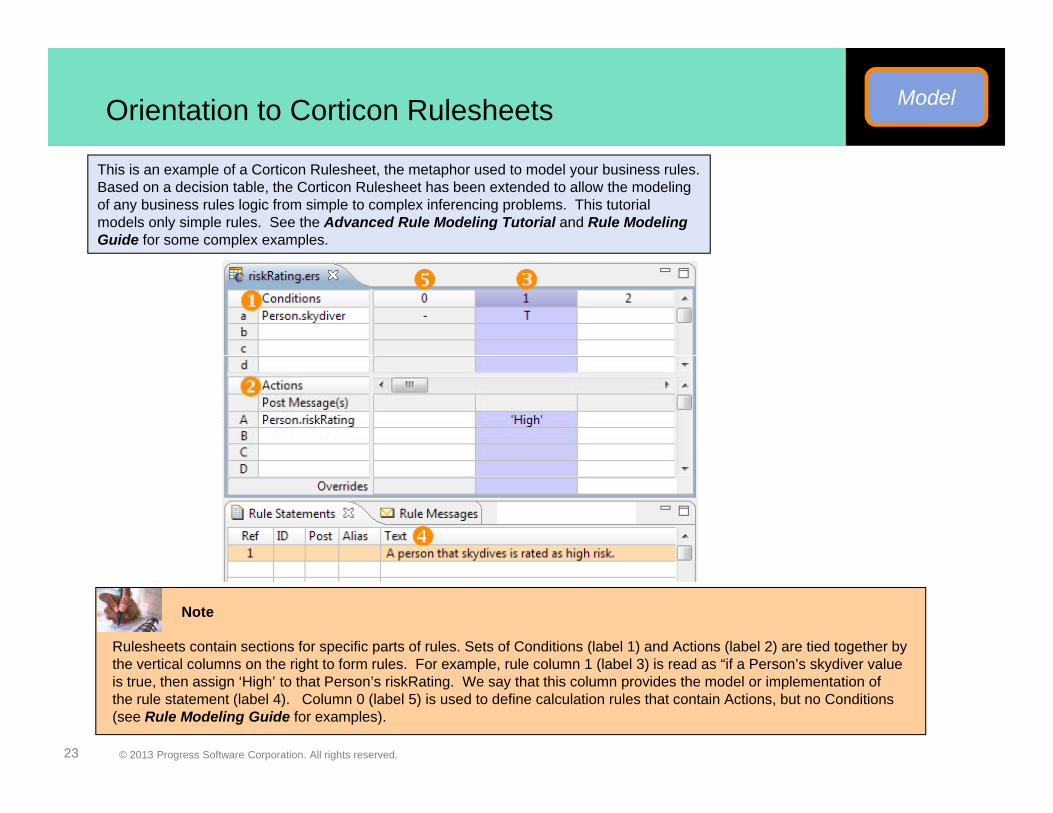
ModelOrientation to Corticon Rulesheets
This is an example of a Corticon Rulesheet, the metaphor used to model your business rules. Based on a decision table, the Corticon Rulesheet has been extended to allow the modeling of any business rules logic from simple to complex inferencing problems. This tutorial models only simple rules. See the Advanced Rule Modeling Tutorial and Rule Modeling Guide for some complex examples.
Rulesheets contain sections for specific parts of rules. Sets of Conditions (label 1) and Actions (label 2) are tied together bythe vertical columns on the right to form rules For example rule column 1 (label 3) is read as “if a Person’s skydiver value
Note
© 2013 Progress Software Corporation. All rights reserved.23
the vertical columns on the right to form rules. For example, rule column 1 (label 3) is read as if a Person s skydiver value is true, then assign ‘High’ to that Person’s riskRating. We say that this column provides the model or implementation of the rule statement (label 4). Column 0 (label 5) is used to define calculation rules that contain Actions, but no Conditions (see Rule Modeling Guide for examples).
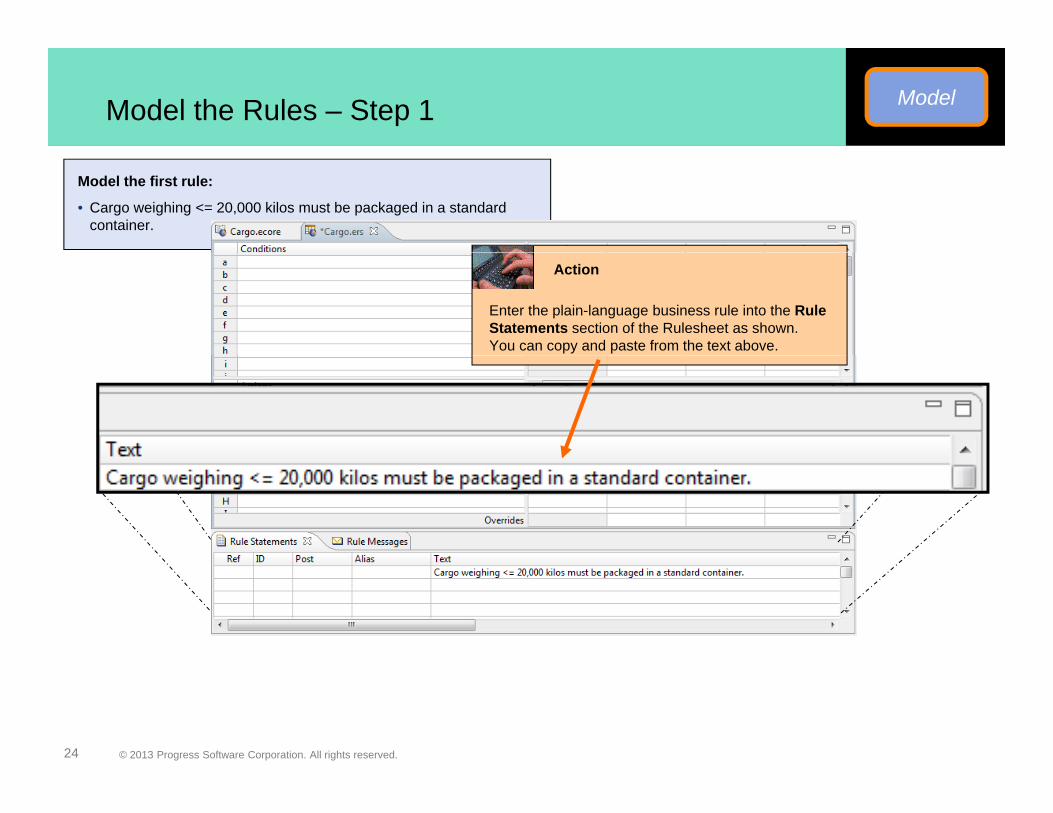
Model the Rules – Step 1 Model
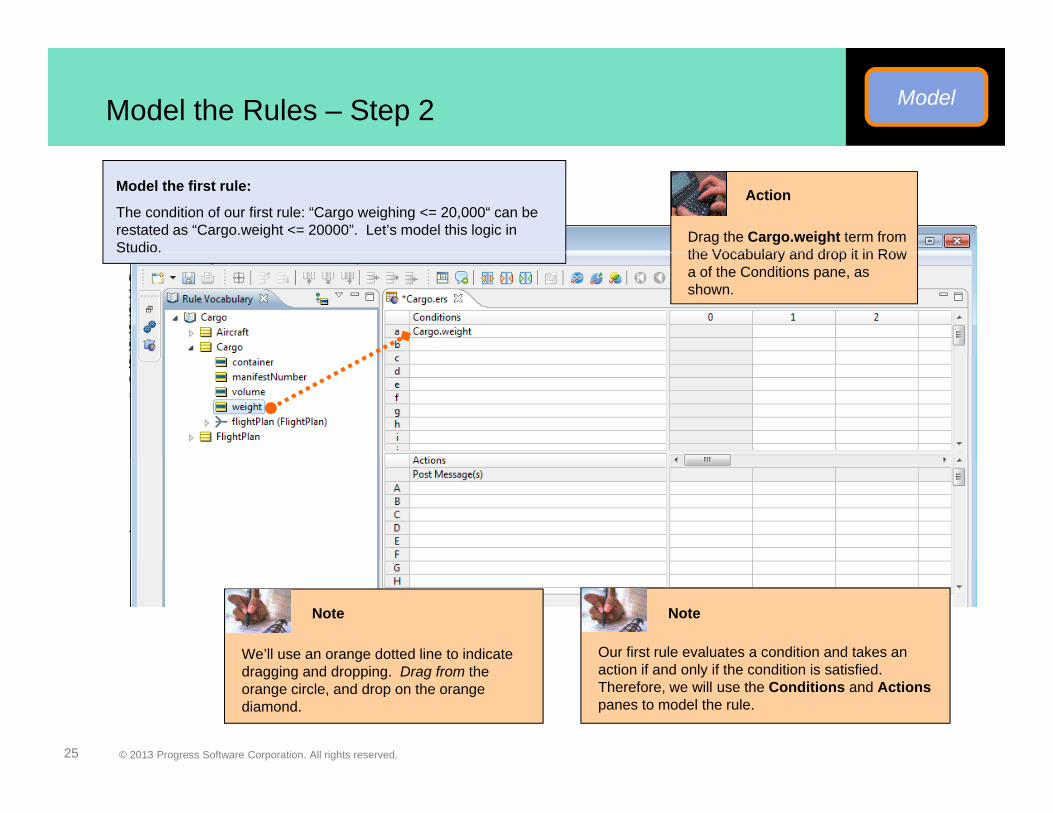
Model the first rule:
• Cargo weighing <= 20,000 kilos must be packaged in a standard container.
Enter the plain-language business rule into the Rule Statements section of the Rulesheet as shown. You can copy and paste from the text above.
Action
© 2013 Progress Software Corporation. All rights reserved.24
ModelModel the Rules – Step 2
Drag the Cargo.weight term from the Vocabulary and drop it in Row
ActionModel the first rule:
The condition of our first rule: “Cargo weighing <= 20,000“ can be restated as “Cargo.weight <= 20000”. Let’s model this logic in Studio. the Vocabulary and drop it in Row
a of the Conditions pane, as shown.
Our first rule evaluates a condition and takes an
Note
We’ll use an orange dotted line to indicate
Note
© 2013 Progress Software Corporation. All rights reserved.25
action if and only if the condition is satisfied. Therefore, we will use the Conditions and Actionspanes to model the rule.
dragging and dropping. Drag from the orange circle, and drop on the orange diamond.
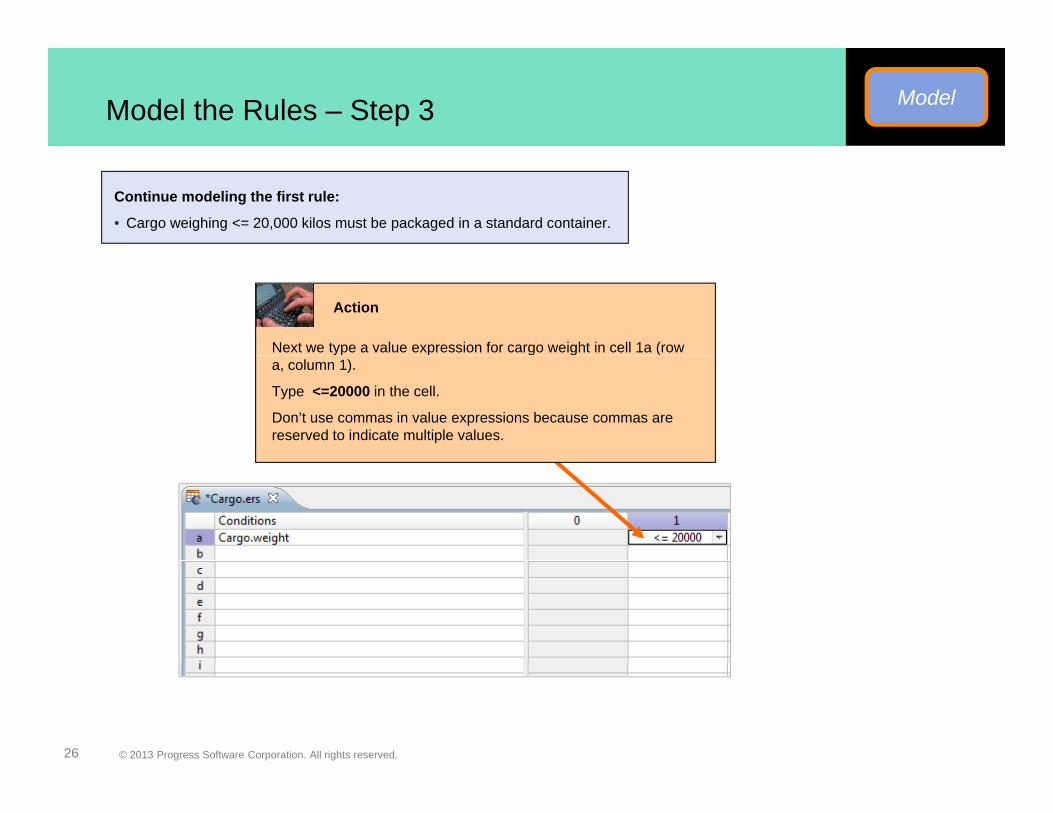
ModelModel the Rules – Step 3
Continue modeling the first rule:
• Cargo weighing <= 20,000 kilos must be packaged in a standard container.
Next we type a value expression for cargo weight in cell 1a (row
Action
a, column 1).
Type <=20000 in the cell.
Don’t use commas in value expressions because commas are reserved to indicate multiple values.
© 2013 Progress Software Corporation. All rights reserved.26

Model the Rules – Step 4 Model
Now drag the appropriate term from the Vocabulary and drop it in row A of
Action
Now drag the appropriate term from the Vocabulary and drop it in row A of the Actions section.
Next, define the action for rule 1 by selecting “standard” in the drop-down menu within Actions row A of column (rule) 1. The drop-down menu options were defined in the Vocabulary, which we will edit later.
Thi ti i th l f “ t d d” t th C t i tt ib tThis action assigns the value of “standard” to the Cargo.container attribute.
© 2013 Progress Software Corporation. All rights reserved.27
ModelModel the Rules – Step 5
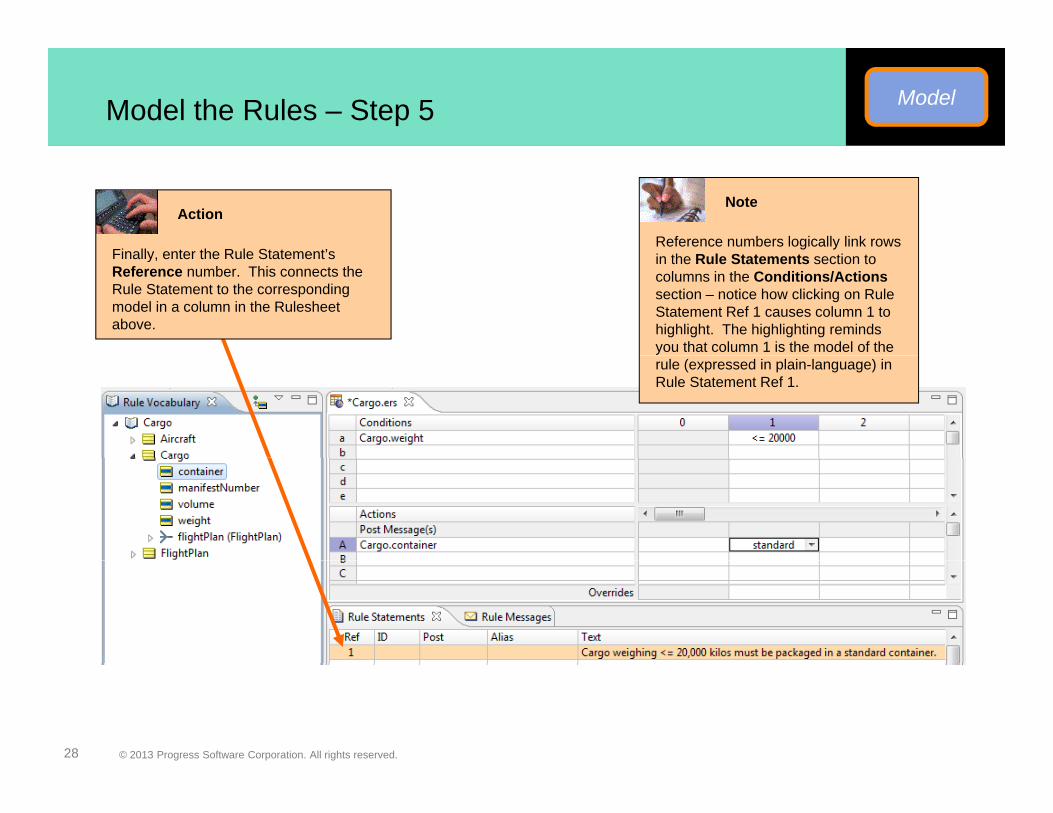
Finally enter the Rule Statement’s
Action
Reference numbers logically link rows
Note
Finally, enter the Rule Statement s Reference number. This connects the Rule Statement to the corresponding model in a column in the Rulesheet above.
in the Rule Statements section to columns in the Conditions/Actionssection – notice how clicking on Rule Statement Ref 1 causes column 1 to highlight. The highlighting reminds you that column 1 is the model of the rule (expressed in plain-language) in Rule Statement Ref 1.
© 2013 Progress Software Corporation. All rights reserved.28

ModelModel the Rules – Step 6
Model the second rule :
• Cargo with volume > 30 cubic meters must be packaged in an oversize container.
When completed your Rulesheet should look like this…
Note
Fi ll R l h t
Action
Finally, save your Rulesheet by selecting File > Save from the Studio menubar (or clicking the Save button).
When saved, Studio places a dash in the empty cells, meaning that the condition is ignored.
Th diti d ti i l “ d d”
Note
© 2013 Progress Software Corporation. All rights reserved.29
The conditions and actions in a column are “anded” together. For example, rule 1 reads: “Cargo weighing less than or equal to 20,000 kilos, ignoring volume, must be packaged in a standard container.”

ModelModel the Rules – Step 7
Next, we will “Post” the Rule Statements to the “Cargo” entity. This will provide an audit trail during rule execution, which you will see during rule testing. To preview the end result of a post, see slide 46 for green Info posts.
Note
result of a post, see slide 46 for green Info posts.
When you define a Post, an icon appears in the Post
Note
ppMessage(s) row of the Rulesheet.
Action
© 2013 Progress Software Corporation. All rights reserved.30
To Post, select the appropriate Severity Level from the drop-down box in the Post column. (in this case, select “Info”) . You must also select an Alias for the Rule Statement to post. The Alias defines what Entity the Rule Statement is posted to (in this case, select “Cargo”, which is the only option).

AnalyzeCheck for Conflicts
Now that we have finished modeling our rules, it is time to analyze our rules for logical errors. Very often, initial business rule specifications are ambiguous and incomplete. By ambiguous, we mean that the rules are conflicting under certain scenarios. By incomplete, we mean that the rules fail to address all possible scenarios.
Prior to automating your rules, it is critical to eliminate logical errors in order to ensure that our decision service provides correct, consistent results. We call this “Rule Referential Integrity”. Studio provides unique and powerful features to help you ensure Rule Referential Integrity. These features will be explored in this Analyze phase of the rule management lifecycle.
OR
Click on the Check for Conflicts icon on the toolbar.
A tiChoose Rulesheet >Logical Analysis >Check for Conflicts from the Studio menubar.
O
Be sure your Cargo.ers tab is selected (colored blue), then Check for
Action
blue), then Check for Conflicts.
© 2013 Progress Software Corporation. All rights reserved.31

AnalyzeIdentify Conflicts
Columns containing conflicts are shaded in pink. This indicates that one or more conflicts exist between the pink
Note
rules.
The total number of conflicts detected is displayed.
Note
© 2013 Progress Software Corporation. All rights reserved.32
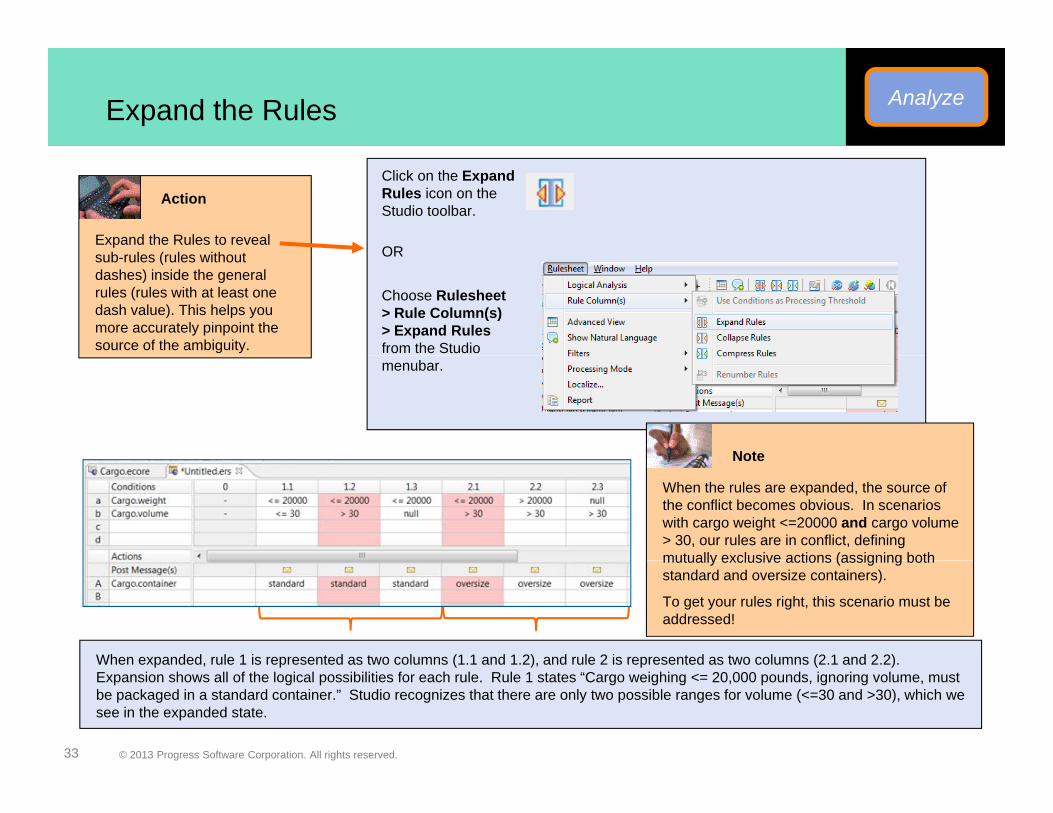
AnalyzeExpand the Rules
Expand the Rules to reveal b l ( l ith t
Action
OR
Click on the Expand Rules icon on the Studio toolbar.
sub-rules (rules without dashes) inside the general rules (rules with at least one dash value). This helps you more accurately pinpoint the source of the ambiguity.
Choose Rulesheet > Rule Column(s) > Expand Rulesfrom the Studio
OR
menubar.
Note
When the rules are expanded, the source of the conflict becomes obvious. In scenarios with cargo weight <=20000 and cargo volume > 30, our rules are in conflict, defining mutually exclusive actions (assigning both
Note
When expanded rule 1 is represented as two columns (1 1 and 1 2) and rule 2 is represented as two columns (2 1 and 2 2)
mutually exclusive actions (assigning both standard and oversize containers).
To get your rules right, this scenario must be addressed!
© 2013 Progress Software Corporation. All rights reserved.33
When expanded, rule 1 is represented as two columns (1.1 and 1.2), and rule 2 is represented as two columns (2.1 and 2.2). Expansion shows all of the logical possibilities for each rule. Rule 1 states “Cargo weighing <= 20,000 pounds, ignoring volume, must be packaged in a standard container.” Studio recognizes that there are only two possible ranges for volume (<=30 and >30), which we see in the expanded state.

AnalyzeResolve Conflict Errors
First, collapse your rules back to the original state by clicking on the Collapse Rules icon on the Studio toolbar
ActionTo resolve the conflict, you can either change your original rules, or decide that one rule should override the other. Let’s implement the override.
on the Studio toolbar.
Action
1
Next, override Rule 1 with Rule 2.
In the Overrides row, from the overriding rule, select the column number of the rule to be overridden. Multiple selections can be made by holding the CTRL key.
Action
2
Now, click the Check for Conflicts button again, and you will see that the conflict has been resolved.
With the override Rule 2 now means “Use
Action
© 2013 Progress Software Corporation. All rights reserved.34
With the override, Rule 2 now means Use oversized containers when volume is >30, even when weight is <=20,000.”
3

AnalyzeCheck for Completeness
Click on the Ch k f
Conflict is one form of logical error. Another form is incompleteness, or loopholes in our logic.
OR
Check for Completeness icon on the Studio toolbar.
Check for logical errors in the
Action
Choose from the Studio menu Rulesheet >Logical Analysis > Check for Completeness
C ec o og ca e o s t eRulesheet.
Completeness
This message window informs us that our rules were incomplete We missed
Action
© 2013 Progress Software Corporation. All rights reserved.35
our rules were incomplete. We missed one scenario.
Click OK to dismiss the window.

Resolve Completeness Errors – Step 1 Analyze
The Completeness Checking algorithm calculates the set of all possiblecalculates the set of all possible mathematical combinations of all values in all conditions. The algorithm then compares this set of possible combinations to those already specified in the Rulesheet and automatically inserts missing combinations of conditions asmissing combinations of conditions as new columns. These new columns are shaded in green.
The Completeness Check adds condition values, but does not choose actions –that’s our job as rule
Note
that s our job as rule modelers.
Let’s define a new Rule Statement for this (formerly) missing scenario:
C i hi 20 000 kil ith l 30 bi t t b k d i h i ht t i
© 2013 Progress Software Corporation. All rights reserved.36
Cargo weighing > 20,000 kilos, with volume <= 30 cubic meters, must be packaged in a heavyweight container.

AnalyzeResolve Completeness Errors – Step 2
First, add the new Rule Statement for rule 3. Next, define an action in rule cell 3A. In this case, select “heavyweight” as the container option. Last, post an Info message to the Cargo entity as we did for the first two rules Your Rulesheet should look like the one below after you Clear Analysis Results
Action
rules. Your Rulesheet should look like the one below after you Clear Analysis Results.
Note
Don’t forget to add enter the Rule Statement
© 2013 Progress Software Corporation. All rights reserved.37
In this example, incompleteness was resolved by specifying an action for column 3, along with adding a new Rule Statement. Once resolved, remove the green highlighting by clicking the Clear Analysis Results button on the Studio toolbar.
Don t forget to add enter the Rule Statement Reference to link it with the corresponding column.

AnalyzeCheck for Completeness
Click on the Check for
A third form of logical error is circular logic.
OR
Logical Loops icon on the Studio toolbar.
Check for logical errors in the R l h t
Action
Choose Rulesheet >Logical Analysis > Check for Logical Loops from the Studio
Rulesheet.
from the Studio menubar.
This is a very simple Rulesheet and contains no logical loops. Of note, while unintended logical loops are problematic, sometimes logical loops are a useful technique for solving complex inferencing
Note
© 2013 Progress Software Corporation. All rights reserved.38
a useful technique for solving complex inferencing problems that require recursive reasoning. You can learn more in the Rule Modeling Guide.
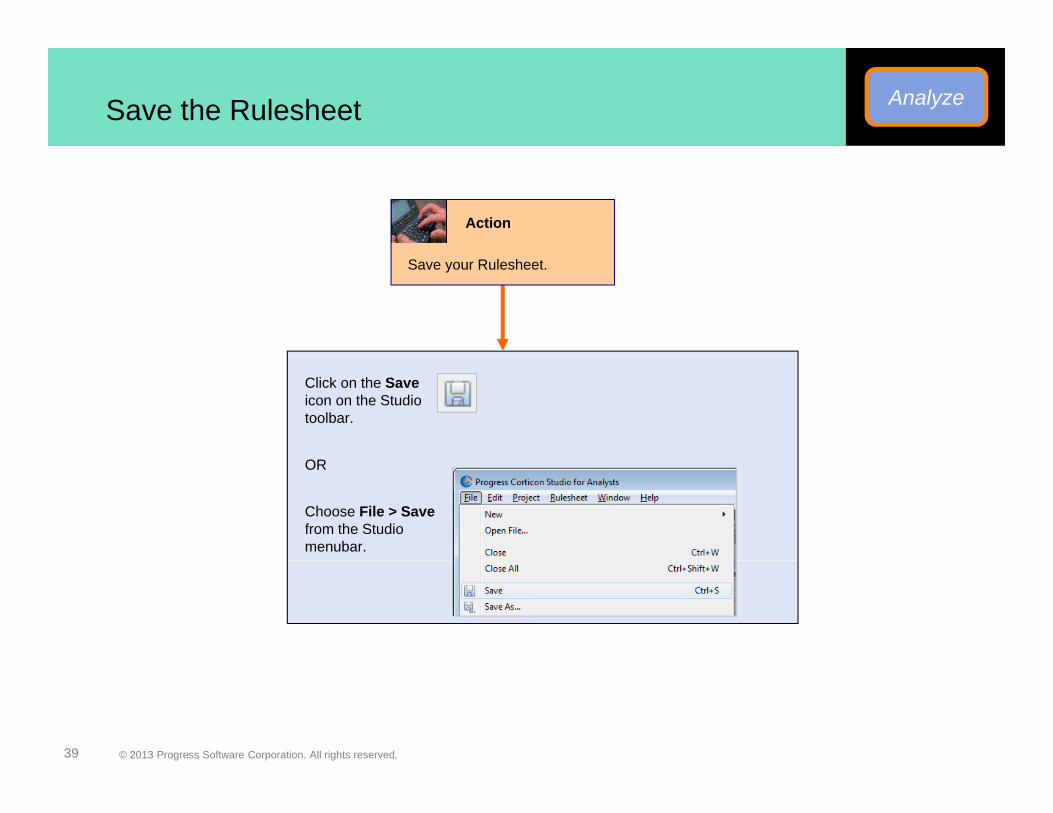
Save the Rulesheet Analyze
Action
Save your Rulesheet.
Click on the Saveicon on the Studio toolbar.
Choose File > Save from the Studio menubar.
OR
© 2013 Progress Software Corporation. All rights reserved.39

Create a New Ruletest Test
The Analyze phase helped to ensure the logical integrity of our rules. The Test phase helps to ensure that our rules give us the correct business results. Let’s move on to testing.
First, we’re going to define a test case for each one of our rules below by defining some input values and expected results. Corticon Studio allows us to pre-define our expected results and then highlights any variances i t t lt Th t bl b l d fi t t f h lin our test results. The table below defines one test case for each rule.
Test Test Test
For test 2 we expect rule 2 to
Note
Test Rule 1
Test Rule 2
TestRule 3
Input Values
Cargo.weight 1000 1000 30000
Cargo.volume 10 40 20
© 2013 Progress Software Corporation. All rights reserved.40
For test 2, we expect rule 2 to override rule 1.
g
Expected Results
Cargo.container standard oversize heavyweight
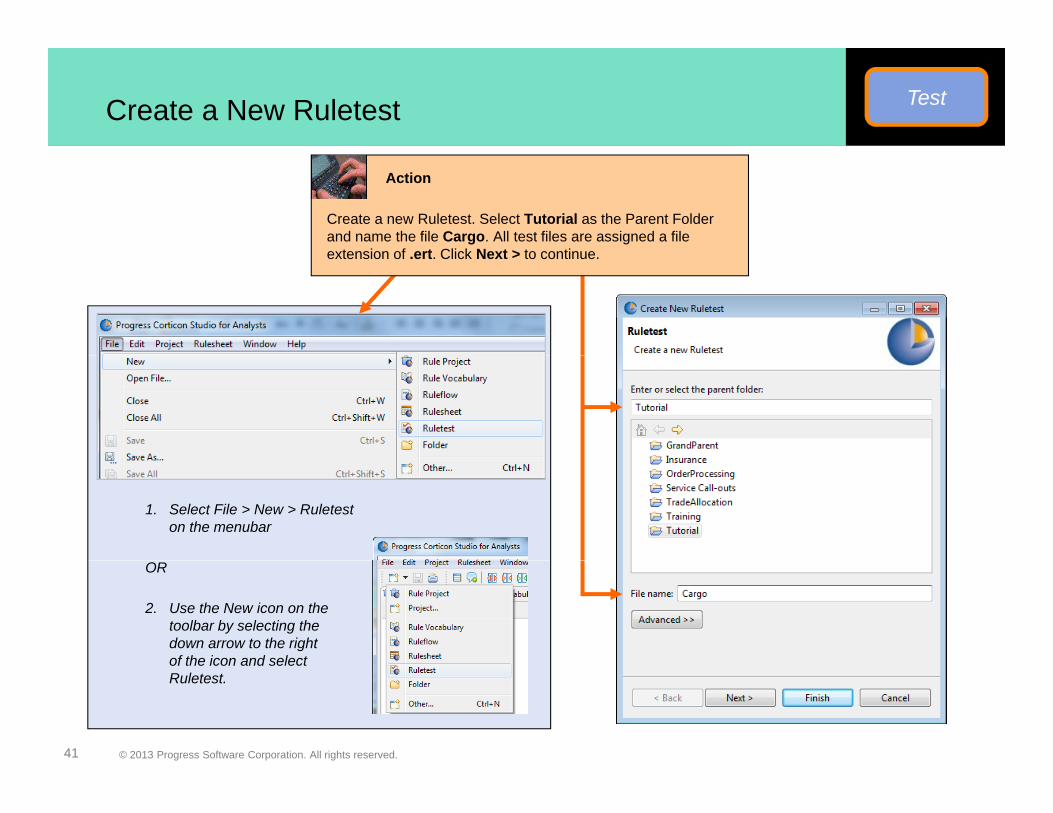
TestCreate a New Ruletest
Create a new Ruletest. Select Tutorial as the Parent Folder and name the file Cargo. All test files are assigned a file extension of ert Click Next > to continue
Action
extension of .ert. Click Next > to continue.
1. Select File > New > Ruleteston the menubar
2. Use the New icon on the toolbar by selecting the down arrow to the right of the icon and select
OR
© 2013 Progress Software Corporation. All rights reserved.41
of the icon and selectRuletest.

Create a New Ruletest Test
Action
Select the appropriate Rulesheet as your Test Subject. For our example, we want to use the Cargo Rulesheet within our Tutorial project directory.
Click Finish to display the new Ruletest.Click Finish to display the new Ruletest.
Note
You can disregard the Remote Servers and Remote Decision Service panes - if you are interested in those, please refer to the Server Deployment Tutorial for more information.
© 2013 Progress Software Corporation. All rights reserved.42
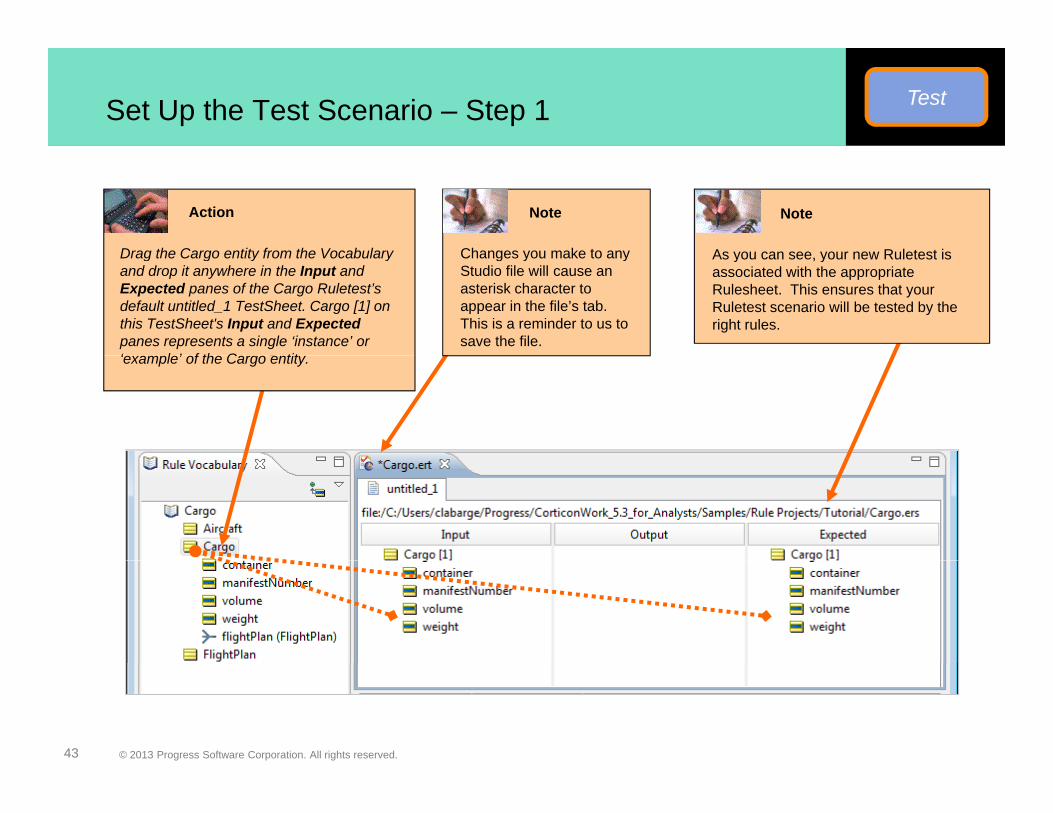
TestSet Up the Test Scenario – Step 1
Changes you make to any
Note
As you can see your new Ruletest is
Note
Drag the Cargo entity from the Vocabulary
Action
Changes you make to any Studio file will cause an asterisk character to appear in the file’s tab. This is a reminder to us to save the file.
As you can see, your new Ruletest is associated with the appropriate Rulesheet. This ensures that your Ruletest scenario will be tested by the right rules.
Drag the Cargo entity from the Vocabulary and drop it anywhere in the Input and Expected panes of the Cargo Ruletest’s default untitled_1 TestSheet. Cargo [1] on this TestSheet's Input and Expectedpanes represents a single ‘instance’ or ‘ l ’ f th C tit‘example’ of the Cargo entity.
© 2013 Progress Software Corporation. All rights reserved.43
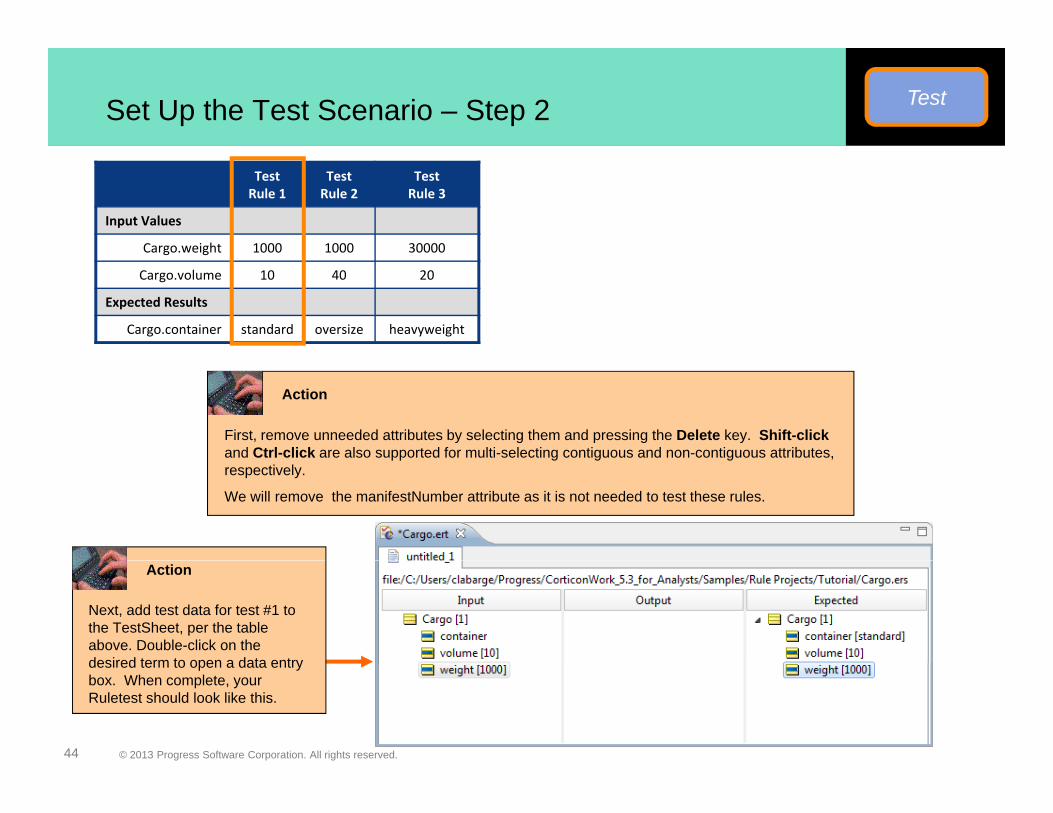
TestSet Up the Test Scenario – Step 2
Test Rule 1
Test Rule 2
TestRule 3
Input Values
Cargo.weight 1000 1000 30000g g
Cargo.volume 10 40 20
Expected Results
Cargo.container standard oversize heavyweight
First, remove unneeded attributes by selecting them and pressing the Delete key. Shift-clickand Ctrl-click are also supported for multi-selecting contiguous and non-contiguous attributes,
Action
pp g g g ,respectively.
We will remove the manifestNumber attribute as it is not needed to test these rules.
Next, add test data for test #1 to the TestSheet, per the table above. Double-click on the desired term to open a data entry
Action
© 2013 Progress Software Corporation. All rights reserved.44
desired term to open a data entry box. When complete, your Ruletest should look like this.

Set Up the Test Scenario – Step 3 Test
Enter the remaining test data as shown to complete
Action Test Rule 1
Test Rule 2
TestRule 3
Input Valuesdata as shown to complete the Input pane of the Ruletest.
You can easily duplicate the first test scenario by selecting Cargo [1], copying
Cargo.weight 1000 1000 30000
Cargo.volume 10 40 20
Expected Results
Cargo.container standard oversize heavyweightg g [ ] py git, then pasting it below. Repeat for both the Input and Expected panes
Also, select the expectedcontainer values from the d d th tdrop-downs that appear when the container attribute is clicked.
Your Ruletest should look like the one below.
© 2013 Progress Software Corporation. All rights reserved.45
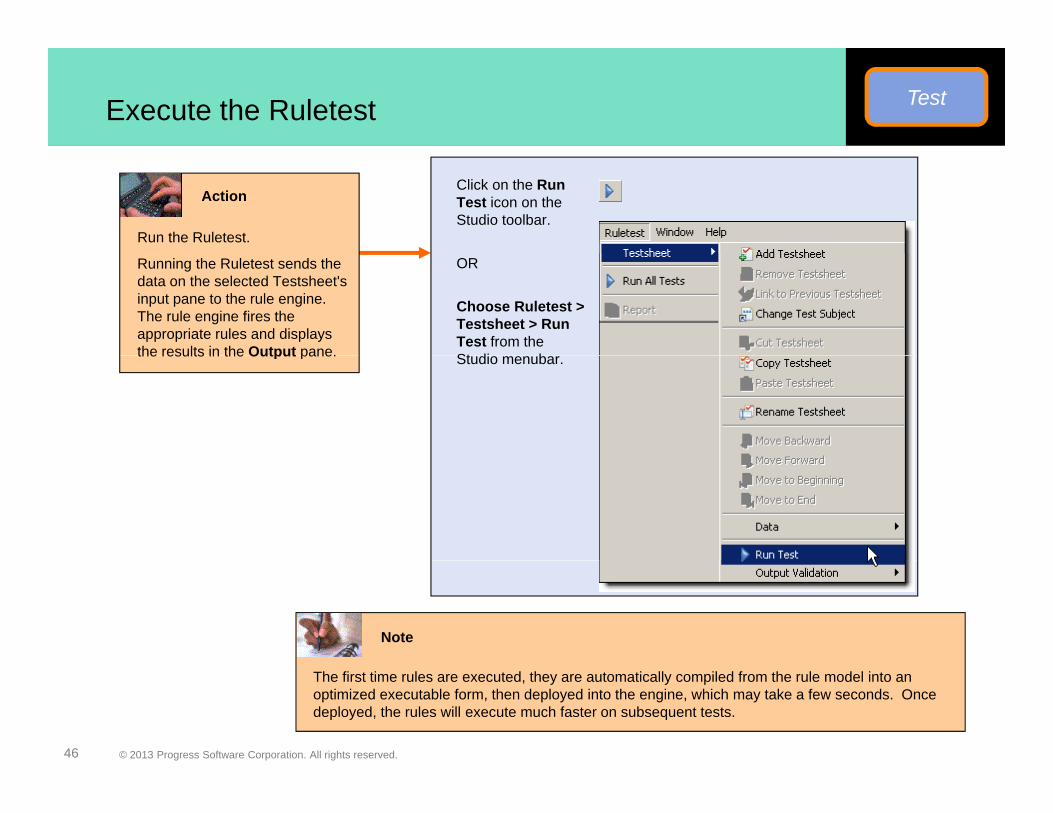
TestExecute the Ruletest
Click on the Run Test icon on the Studio toolbar.
Run the Ruletest.
Action
Choose Ruletest >Testsheet > Run Test from the St di b
ORRunning the Ruletest sends the data on the selected Testsheet's input pane to the rule engine. The rule engine fires the appropriate rules and displays the results in the Output pane. Studio menubar.the results in the Output pane.
Note
© 2013 Progress Software Corporation. All rights reserved.46
The first time rules are executed, they are automatically compiled from the rule model into an optimized executable form, then deployed into the engine, which may take a few seconds. Once deployed, the rules will execute much faster on subsequent tests.

TestVerify the Test Results
Check the outcome of your test in the TestSheet's Output pane
All unchanged terms and values in the
Note
Action
TestSheet's Output pane are displayed in normal style.
Any terms altered by rules, including their parent entities, are shown in bold text.
Note
Messages shown in the Rule Messages pane are produced by using the Post command in your Rule Statements.
Severity indicates whether a message contains information, warnings or violations.
© 2013 Progress Software Corporation. All rights reserved.47
Message contains the Rule Statement text.
Entity shows the entity to which this message is bound or linked. When we select the Cargo[1] entity within TestSheet's Output pane, the third rule message is highlighted, showing the audit trail of rules that fired for that entity (in this case only one rule fired for Cargo[1]).
TestVerify the Test Results
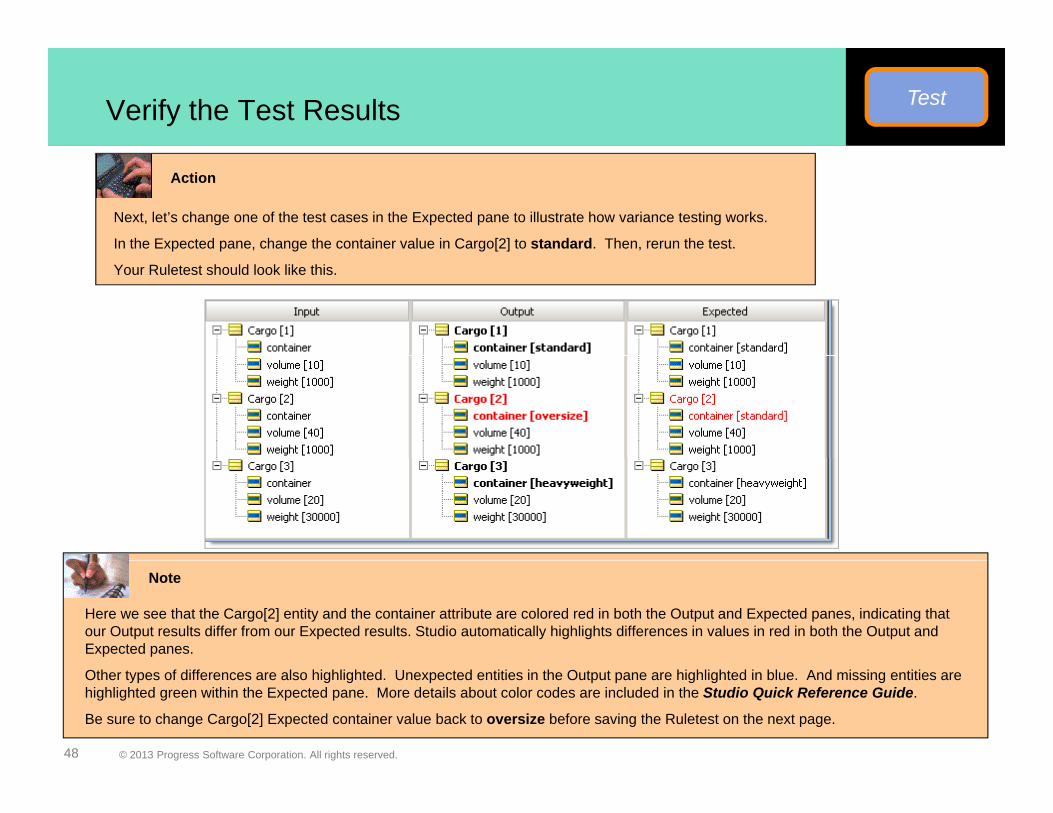
Next, let’s change one of the test cases in the Expected pane to illustrate how variance testing works.
In the Expected pane, change the container value in Cargo[2] to standard. Then, rerun the test.
Action
Your Ruletest should look like this.
Note
Here we see that the Cargo[2] entity and the container attribute are colored red in both the Output and Expected panes, indicating that our Output results differ from our Expected results. Studio automatically highlights differences in values in red in both the Output and Expected panes.
© 2013 Progress Software Corporation. All rights reserved.48
Other types of differences are also highlighted. Unexpected entities in the Output pane are highlighted in blue. And missing entities are highlighted green within the Expected pane. More details about color codes are included in the Studio Quick Reference Guide.
Be sure to change Cargo[2] Expected container value back to oversize before saving the Ruletest on the next page.

TestSave the Ruletest
Action
Save the Test for future use.
OR
Click on the Saveicon on the Studio toolbar.
Choose File > Save from the Studio menubar.
© 2013 Progress Software Corporation. All rights reserved.49

DiscoverDiscover New Business Rules
When the time comes to change your rules, you’ll be glad you decided to model and manage them
Scope Discover
in Corticon Studio.
Let’s go through another development lifecycle, starting with the discovery of a new business rule.
ModelTest
DeployAnalyze
PackageCargo
CollectCargo
ShipCargo
Initial Rules:
CargoCargo Cargo
• Cargo weighing <= 20,000 kilos must be packaged in a standard container.
• Cargo with volume > 30 cubic meters must be packaged in an oversize container.
Added after Completeness Check:
• Cargo weighing > 20,000 kilos, with volume <= 30 cubic meters, must be packaged in a heavyweight container
© 2013 Progress Software Corporation. All rights reserved.50
container.
New Rule (to add now):
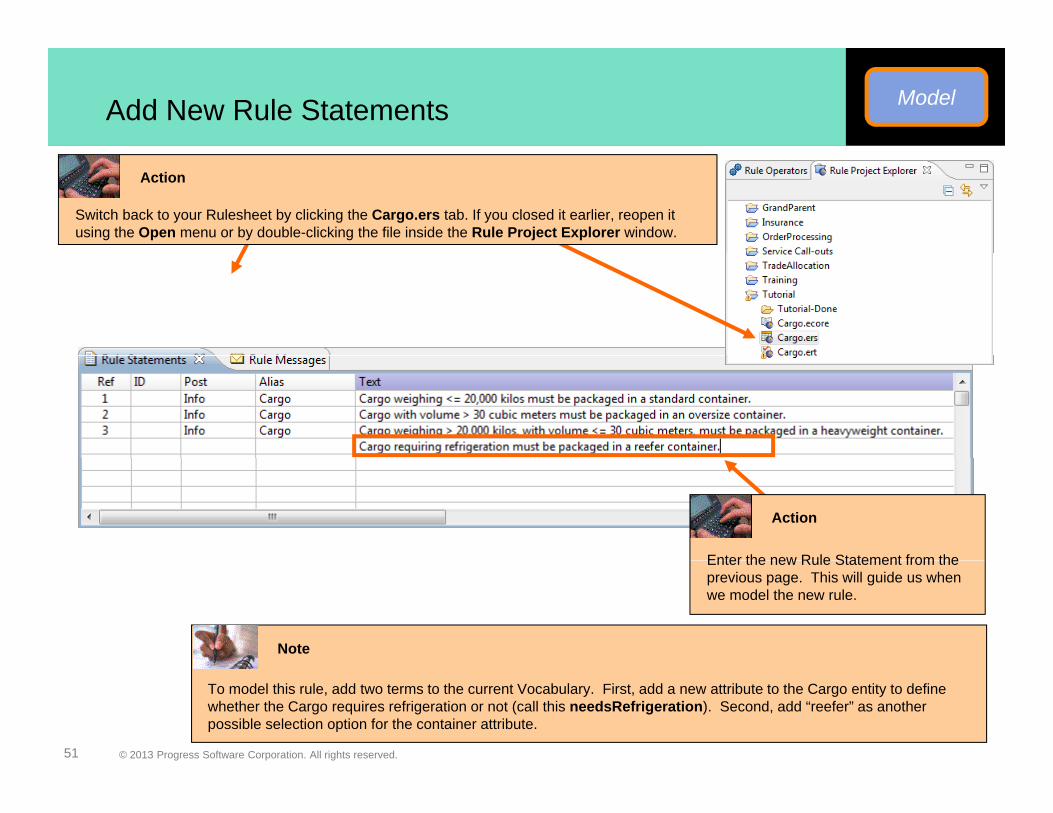
• Cargo requiring refrigeration must be packaged in a reefer container.
ModelAdd New Rule Statements
Switch back to your Rulesheet by clicking the Cargo.ers tab. If you closed it earlier, reopen it using the Open menu or by double-clicking the file inside the Rule Project Explorer window.
Action
Enter the new Rule Statement from the
Action
Note
Enter the new Rule Statement from the previous page. This will guide us when we model the new rule.
© 2013 Progress Software Corporation. All rights reserved.51
To model this rule, add two terms to the current Vocabulary. First, add a new attribute to the Cargo entity to define whether the Cargo requires refrigeration or not (call this needsRefrigeration). Second, add “reefer” as another possible selection option for the container attribute.

ModelOpen and Edit the Vocabulary
If already open , select the Cargo.ecore tab. If not open:
Select Cargo.ecore from the Recent File list at the bottom of the File menubottom of the File menu
OR
Use the File > Open File menu option
OR
Double click on the file in the Rule Project ExplorerDouble-click on the file in the Rule Project Explorer pane.
© 2013 Progress Software Corporation. All rights reserved.52
Add an Attribute – Step 1 Model
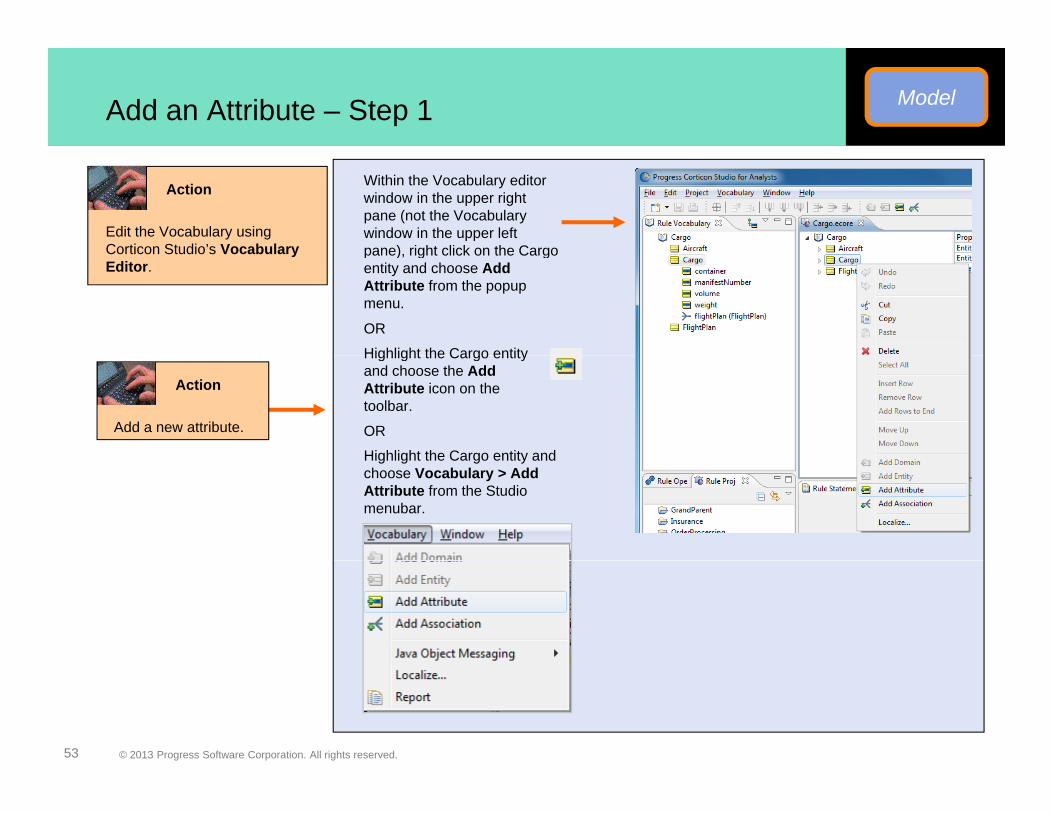
Within the Vocabulary editor window in the upper right pane (not the Vocabulary window in the upper left pane) right click on the Cargo
Edit the Vocabulary using Corticon Studio’s Vocabulary
Action
pane), right click on the Cargo entity and choose Add Attribute from the popup menu.
OR
Highlight the Cargo entity
Corticon Studio s Vocabulary Editor.
OR
Highlight the Cargo entity and
Highlight the Cargo entity and choose the Add Attribute icon on the toolbar.
ActionAdd a new attribute.
Action
Highlight the Cargo entity and choose Vocabulary > Add Attribute from the Studio menubar.
© 2013 Progress Software Corporation. All rights reserved.53
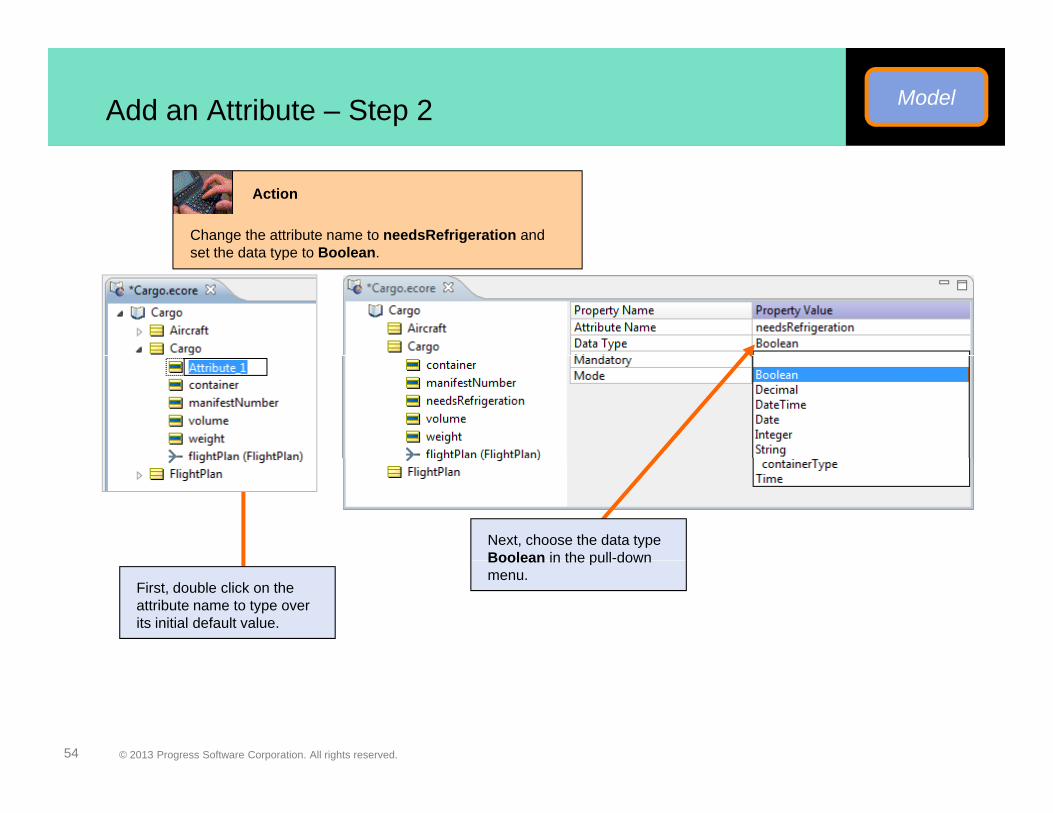
Add an Attribute – Step 2 Model
Change the attribute name to needsRefrigeration and set the data type to Boolean
Action
set the data type to Boolean.
Next, choose the data type Boolean in the pull-down
First, double click on the attribute name to type over its initial default value.
Boolean in the pull down menu.
© 2013 Progress Software Corporation. All rights reserved.54

Modify a Custom Data Type Model
Add “reefer” as another allowable type of container.
Action
Select the container attribute and note the Data Type: containerType. This is a custom data type that defines a set of allowable values for container (an enumerated set).
To define custom data types, you must first click on the “root” node of the Vocabulary, noted
Last, add “reefer” as both a Label and a Value, as above.
Next, click on the containerTypeentry. This will display the enumerated set in the rightmost
Note
by the open book icon table, if available.
© 2013 Progress Software Corporation. All rights reserved.55
Custom data types are a powerful capability that allows you to define rules at the level of the Vocabulary that are reused anywhere the Vocabulary terms are used. You can learn more about custom data types in the Rule Modeling Guide.
Note

Save the Vocabulary Changes Model
OR
Click on the Saveicon on the Studio toolbar.
Action
Choose File > Save from the Studio menubar.
OR
Save the Vocabulary and exit the Vocabulary Editor pane.
Action
© 2013 Progress Software Corporation. All rights reserved.56

Model the New Rules Model
New rule:
• Cargo requiring refrigeration must be packaged in a reefer container.
Action
Now that the Vocabulary contains the new terms required by the new rule, complete the model as shown belowcomplete the model as shown below.
Action
Be sure to include Reference links from the Rule Statements to the columns containing the new rule modelsnew rule models.
And, add Post and Alias.
© 2013 Progress Software Corporation. All rights reserved.57
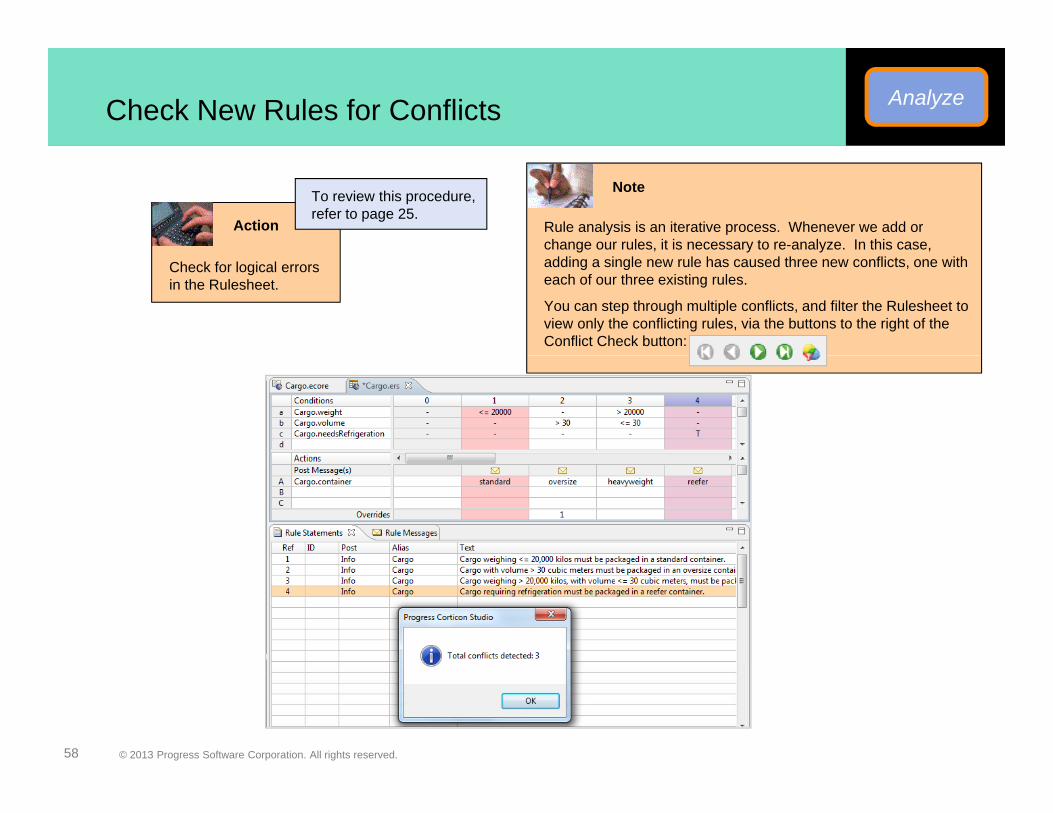
AnalyzeCheck New Rules for Conflicts
Rule analysis is an iterative process. Whenever we add or change our rules, it is necessary to re-analyze. In this case,
Note
Action
To review this procedure, refer to page 25.
adding a single new rule has caused three new conflicts, one with each of our three existing rules.
You can step through multiple conflicts, and filter the Rulesheet to view only the conflicting rules, via the buttons to the right of the Conflict Check button:
Check for logical errors in the Rulesheet.
© 2013 Progress Software Corporation. All rights reserved.58
Check New Rules for Conflicts Analyze
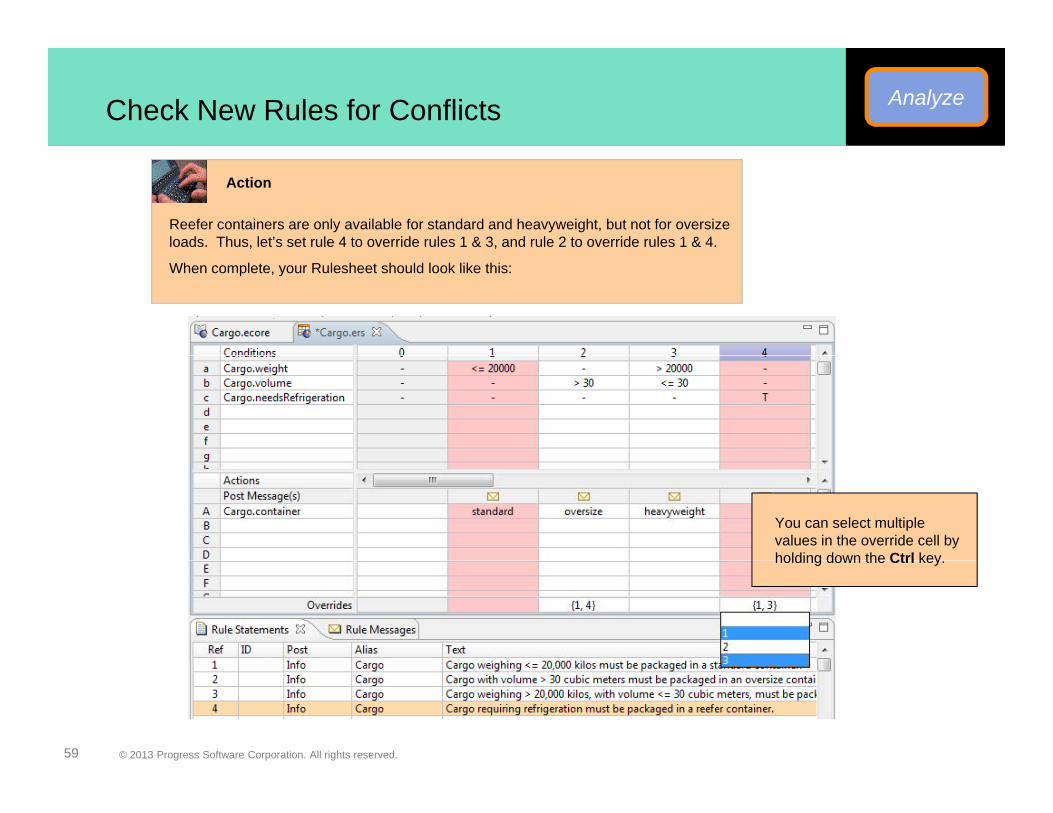
Reefer containers are only available for standard and heavyweight, but not for oversize loads. Thus, let’s set rule 4 to override rules 1 & 3, and rule 2 to override rules 1 & 4.
Action
When complete, your Rulesheet should look like this:
You can select multiple values in the override cell by holding down the Ctrl keyholding down the Ctrl key.
© 2013 Progress Software Corporation. All rights reserved.59

Check New Rules for Completeness Analyze
Ch k f C l t i
Action
Check for Completeness again
© 2013 Progress Software Corporation. All rights reserved.60

TestModify the Ruletest
Your last step is to modify your test
Action
p y ycase to test the new rule. First save your rules.
Next, in Ruletest Cargo.ert, first copy and paste Cargo[1] to create Cargo[4], in both the Input and E t dExpected panes.
Next, drag and drop the needsRefrigeration attribute from your Vocabulary onto both Cargo[4] entities. In both panes, set the value ofset the value of needsRefrigeration to “true”.
Next, in the Expected pane, change the value of container to “reefer”.
Last execute the test YourLast, execute the test. Your Ruletest should look like this:
© 2013 Progress Software Corporation. All rights reserved.61
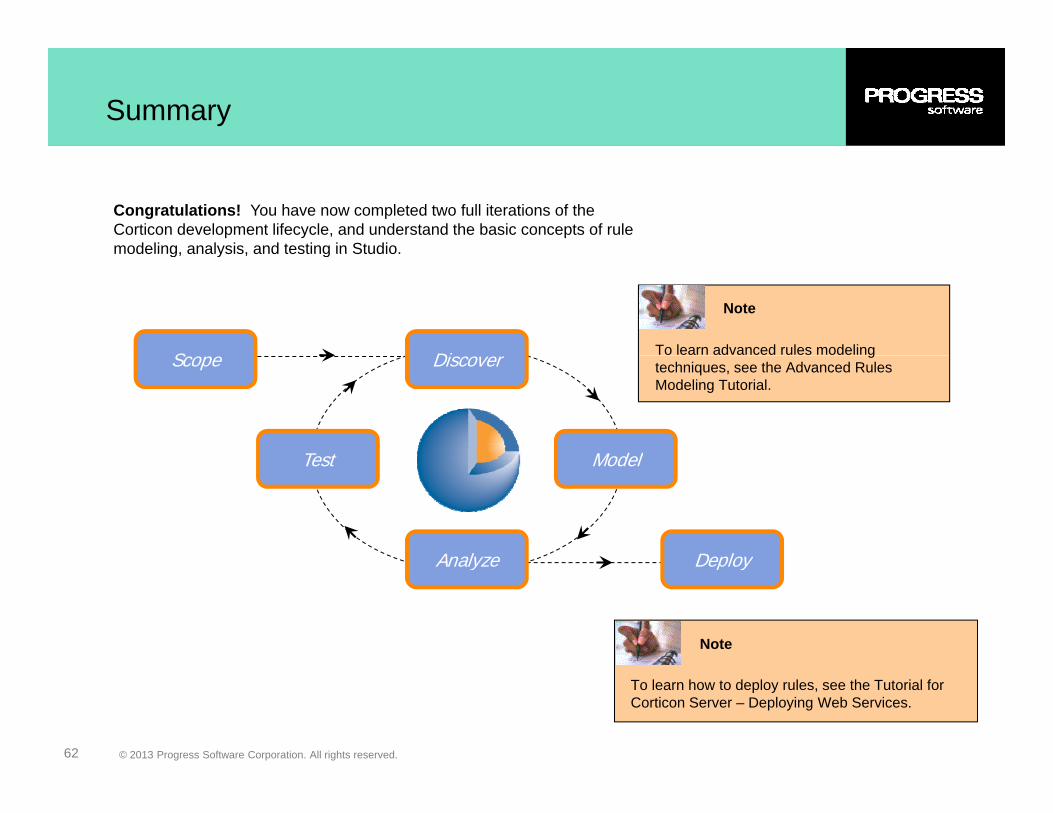
Summary
Congratulations! You have now completed two full iterations of the Corticon development lifecycle, and understand the basic concepts of rule modeling, analysis, and testing in Studio.
S Di
modeling, analysis, and testing in Studio.
To learn advanced rules modeling
Note
ModelTest
Scope Discover gtechniques, see the Advanced Rules Modeling Tutorial.
ModelTest
DeployAnalyze DeployAnalyze
Note
© 2013 Progress Software Corporation. All rights reserved.62
To learn how to deploy rules, see the Tutorial for Corticon Server – Deploying Web Services.
Appendix A: Corticon Technical Publications
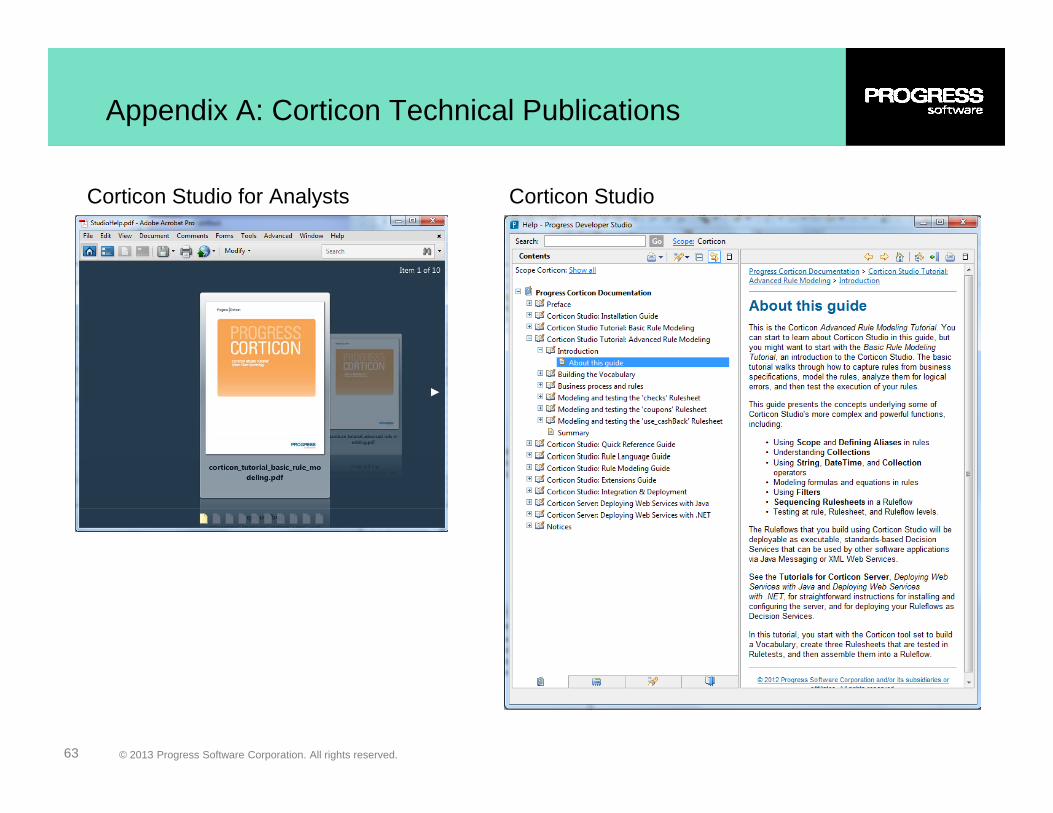
Corticon Studio for Analysts Corticon Studio
© 2013 Progress Software Corporation. All rights reserved.63


![Golden Rule [basic rights]](https://static.documents.pub/doc/80x56/58a29e5b1a28ab0d0a8b4b23/golden-rule-basic-rights.jpg)


