23

Important Safety Information ........................................................................................................................ 2
Front and Back Panels ................................................................................................................................. 3
Install & Connect the DSD 4121 Decoder .................................................................................................... 4
The Remote Control ..................................................................................................................................... 7
DSD 4121 Decoder : Features and menu..................................................................................................... 8
Legal Matters .............................................................................................................................................. 20
Product Warranty ........................................................................................................................................ 21
Help and Information .................................................................................................................................. 22
Page 1 of 22 Table of Contents
BASIC VIEWER’S GUIDE
TABLE OF CONTENTS
The DSD 4121 Basic Viewer’s Guide is the subject of intellectualproperty rights, including copyright, under domestic law andinternational conventions. All rights are reserved.The 4121 Basic Viewer’s Guide supplements the information suppliedwith the packaging of the decoder as well as the detailed informationavailable on our website.Due to software upgrades, the features and functionalities in thisBasic Viewer’s Guide may differ from those on your decoder. Pleasevisit for the latest Viewer’s Guide.
Version 2.0 (August 2010) e&oe
www.uec.com.au
!

This DSD 4121 Decoder meets International Safety Standards. Please read the following recommended safetyprecautions carefully.
This decoder operates within the range 100-250 V AC 47-63 Hz mains supply only. Connect the power cable to thedecoder before connecting the other end to the power outlet. Disconnect the decoder from the power outlet beforeconnecting or disconnecting the decoder from any other equipment.
Keep liquids away from the decoder and do not put anything on top of the decoder which may spill (example : litcandles or containers of liquid). Do not use the decoder in extreme temperature and humid conditions.
Before cleaning the decoder, first disconnect the decoder from the mains. Use a dry cloth to clean the exterior.
Do not block the ventilation holes and ensure that free airflow is maintained around the decoder.Never stand the decoder on soft furnishings or on carpet.Do not use or store the decoder near a heater or where it is exposed to direct sunlight.Never stack other electronic equipment on top of, or below the decoder.
Do not attempt to repair the decoder yourself. You should also never remove the cover of the decoder. Anytampering with the decoder will invalidate the warranty. Refer all servicing to Altech UEC Australia,Tel. +61 2 94255777.
If the decoder is installed in an area subject to intense lightning activity, protection devices for the decoder mainsconnector are recommended.
The earth/grounding system must comply with local regulations.
MAINS SUPPLY
LIQUIDS AND SPILLAGE
CLEANING
VENTILATION
SERVICING
LIGHTNING
EARTHING
IMPORTANT SAFETY INFORMATION
Page 2 of 22Important Safety Information

Smartcard Slot Behind the Front Panel Cover.11
RESET Reboots the decoder, i.e. if decoder freezes etc.8
Page 3 of 22 Front and Back Panels
Front PanelLED Display
Displays the time (Standby Mode) or displays the selectedTV channel.
9
LEDs
Bi-colourRED/GREEN
AMBER
GREEN
Indicates response to remote control commands and/or error mode
RED = Decoder in standby mode or an error condition has occurred.GREEN = Normal operations.
Flashes = when there are incoming messages
Flashes = when RCU command received.
10
SAT IN1 Connect to the LNB on dish
Power Input connector Connect to your home AC mains outlet11Data Services Connects to Rs323 (for software upgrade)10
HDMI Connects to the high definition (HDMI) input on TV or AV home theatre system9Composite Video Connects to the video inputs on TV8
Video =YPbPr Connects to the YPbPr inputs on TV7Audio = Left & Right Connects to the analog inputs on TV6
USB Connects to USB device (for software upgrade)5
R J45 Connects to Ethernet (currently disabled in this version)4
S/PDIF (Coaxial connector) Connects to the Digital Audio coaxial input on TV or AV Home Theater System 3TOSLINK (Optical connector) Connects to the Digital Audio optical input on TV or AV Home Theater System 2
BACK PANEL
FRONT PANEL
STANDBY Button1 Switches the decoder between ON and STANDBY modes.
MENU Opens command menu for changing the setup.7
OK Accepts the selection.6
Increases the volume level.4 VOL
Changes to the previous available channel.2 CH
Decreases the volume level.5 VOL
Changes to the next available channel.3 CH
43 7
81 2 5 6 9 10 11

Page 4 of 22
QUICK START GUIDE FOR EXISTING AURORA INSTALLATIONS
Remove decoder from packaging.Insert supplied batteries into the remote control.Connect to existing TV and dish installation - verify the LNB setup in the menus and adjust and re-scan ifnecessary.Decoder should lock to service and present video. QUICK START GUIDE FOR NEW INSTALLATIONS
Ensure that all connections are secure before connecting the power cable (#11)to the power input connector. Option A: AV Connectors (Standard Definition TV)
Connect the satellite feed to the SAT IN input (#1) on the decoder. Connect the Audio / Video cables to the audio (#6) and video (#8) outputs on the decoder and then to the audio and video inputs on the TV or home theater system.
Option B: HDMI Connector (High Definition TV)
Connect the satellite feed to the SAT IN input (#1) on the decoder. Connect a High Definition cable to the HDMI connector (#9), and then connect the other end of the cable to the HDMI connector on the TV.
Option C: HDMI Connector (AV Home Theater system and a High Definition TV)
Connect the satellite feed to the SAT IN input (#1) on the decoder. Connect a High Definition cable to the HDMI connector (#9), and then connect the other end of the cable to the HDMI input connector of the AV home theater system. Then connect the output HDMI of the AV home theater system to the TV.
1
2
INSTALL & CONNECT THE DSD4121 DECODER
Install & Connect the DSD 4121 Decoder
81 6 9 11
CONNECTING THE DSD4121 DECODER
Page 5 of 22
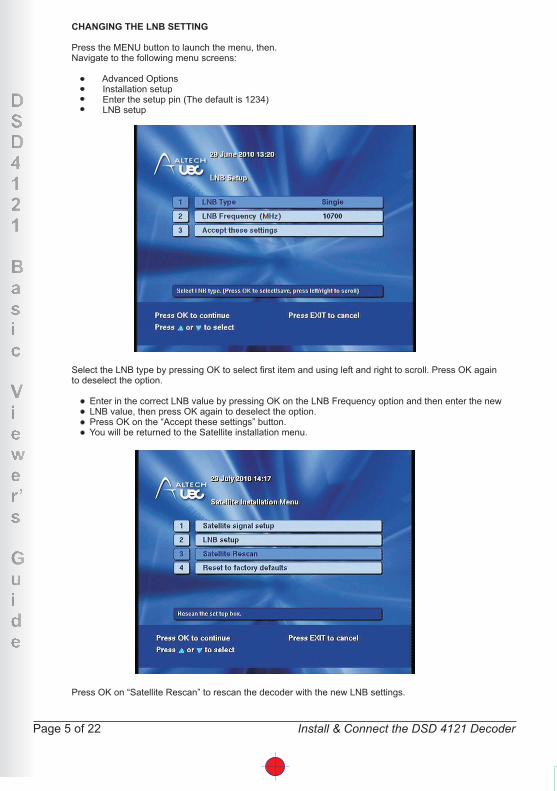
CHANGING THE LNB SETTING
Press the MENU button to launch the menu, then.Navigate to the following menu screens:
Advanced Options Installation setup Enter the setup pin (The default is 1234) LNB setup
Select the LNB type by pressing OK to select first item and using left and right to scroll. Press OK againto deselect the option.
Enter in the correct LNB value by pressing OK on the LNB Frequency option and then enter the new LNB value, then press OK again to deselect the option. Press OK on the “Accept these settings” button. You will be returned to the Satellite installation menu.
Press OK on “Satellite Rescan” to rescan the decoder with the new LNB settings.
Install & Connect the DSD 4121 Decoder

Page 6 of 22
RESTORING FACTORY DEFAULTS
Resetting to factory defaults can be useful if you have changed some settings and lost some functions. Resetting will restore the decoder back to its original configuration and you will lose all personalized settings.The only setting that is not reset is the LNB setting. Please manually edit this setting to the correct value.
ETHERNET
Ethernet functionality is planned for future support. New user manuals will be available on the website whenthis feature is available.
SMART CARD
The smart card is paired to this decoder which means that the smart card provided with your decodercannot be used in any other decoder. Similarly you will not be able to use any other card in your decoder.
RESET BUTTON
There is a reset button on the front panel. This can be used to reset your decoder in the case of a videofreeze for example. The decoder will reboot after a few seconds and display “boot” on the front panel whileit starts up.
MHEG
The ability to launch MHEG applications will be supported by the DSD4121 in the future. User instructions will be available on the website (www.uec.com.au) once this feature becomes available.
Install & Connect the DSD 4121 Decoder

Page 7 of 22
TV and RadioTV: selects TV bouquets and 2ndfunction = Radio: selects bouquets
Standby
Alt/Back andClosed Captions
TV Guide and Aspect Ratio
(ARC)
Shift
Language andParental Control
Information
Mute
Exit
Navigation (4)and OK/Enter
Program up/down
Places set top box into standbymode
ALT: switches between current andprevious channels and 2nd function= Closed Caption: alternatesbetween Closed Caption ON/OFF
TV Guide: Opens Freeview programnd
guide application and 2 functionAspect Ratio switches betweenaspect ratio settings
ndSelect 2 function to buttonsLanguage: selects language where
ndsupported and 2 function = PG :selects Parental Control wheresupported
Selects programme informationsynopsis
Mutes the audioLeaving a menu or function
Menu navigation and selection
Allows channel up and downnavigation
Digits 0-9Numerical data entry of channelnumber, PIN
5 Colouredbuttons
Functions as required by applicationor context
HelpSelects Help function wheresupported
Menu Selects Menu system
Volume up/down Adjust volume up and down
TV
ALT
TV GuideARC
LanguagePG
i
MUTE
EXIT
+P-
+V-
MENU
HELP
Button NameButton
IdentificationFunction
THE REMOTE CONTROL
The Remote Control

Page 8 of 22
I-PLATE
The information plate (i-Plate) displays information about the current and next event at the bottom of the TV screen.
You can open the i-Plate by pressing the ”i” button on the remote. To change to a different channel carry-out the following:
Press the “+P-” button on the remote to change the channel to the next/previous channel respectively, or
When the i-Plate is open, press the “LEFT/RIGHT” arrow buttons on the remote. This allows you to browse the programme information of the other channels without changing the channel you are presently viewing.
You can set the timeout value for the information plate (i-Plate) from the menu.
NOTE: The i-Plate will only timeout when changing channels from the “+P-” button. If you have manually openedthe i-Plate, the “EXIT” button must be pressed to remove it.
DSD4121 DECODER FEATURES AND MENU
Decoder Features and Menu

Page 9 of 22
I-PLATE EXTENDED MODE
The extended i-Plate displays a short description about the currently selected i-Plate programme, see screen below.
To remove the extended i-Plate, you must press the “i” button again or the “EXIT” button to remove both theextended and i-Plates, see diagram below.
i-Plate Toggling Diagram
Decoder Features and Menu

Page 10 of 22
TV GUIDE
The TV Guide offers you programming information for up to 8 days (if supported by the broadcaster). To access the TV Guidepress the “TV GUIDE” button on the remote.
Use the arrow buttons on the remote to scroll through the TV Guide grid.The “P+/P-” buttons will move the grid right/left by 24 hours.Press the “INFO” button to launch the extended information of the highlighted event.
REMINDER POP-UPS
There are two types of reminders - banner and autotune, these are used to either “remind” you of a programme or toautomatically tune the decoder to a channel at a specific time.
Once a reminder is set on the selected programme, the reminder icon will be displayed on the i-Plate indicating to theuser that a reminder is set.
How to Set a Reminder
To set a banner, select the required programme you want to be reminded about (either on the i-Plate or TV Guide)and press the “OK” button, a B icon appears next to your selected programme, confirming that the banner is been set.
To change the reminder from a banner to an autotune, press the “OK” button again, changes the icon to an Aconfirming that an autotune banner is set.
How to Delete Reminder
Highlight the programme which the reminder was set on in the i-Plate, then press the “OK” button until the Cancelreminder appears.
You can also delete a reminder from the TV Guide.
Decoder Features and Menu

Page 11 of 22 Decoder Features and Menu
Banner screen
A banner reminder will display a pop-up 30 seconds before the start of the programme for which the reminder is set.You may ignore the reminder or choose to tune to the selected programme by pressing the “OK” button, see thebanner screen below.
Autotune Reminder screen
An autotune reminder tunes the decoder to another channel, but first displays a pop-up 5 seconds before the start ofthe programme for which the reminder was set. You may cancel the reminder by pressing the “EXIT” button or tuneimmediately to the selected programme by pressing the “OK” button, if you do nothing, the decoder will automaticallytune to the selected channel and the pop-up will timeout, see autotune screen below.

Page 12 of 22
BOUQUET SELECTION POP-UP
NOTE: The Bouquet Options pop-up is only available when there are bouquets in the play-out. When no bouquet play-out’s are detected, the TV button is disabled in the viewing environment.
The Bouquet Selection Pop-up allows you to select the channels from a particular bouquet.
This pop-up allows you to toggle between the different bouquets.
Within each Bouquet, there are TV Services and Audio Services. The decoder’s default is always tuned to a TVservice from that bouquet and not to a radio service.
You can tune to the Audio Services of that Bouquet by using the “Shift-AUDIO” button on the RCU. To return tothe TV Services press the “TV” button.
If you go to a Bouquet that contains no Audio Services, an error banner will appear, stating, “Reserved forfuture use” on an error banner.
If a Bouquet does contain Audio Services, the Audio Service will default to the first channel of the currently selectedBouquet.
Once you have selected the Bouquet, the channels that are allocated to that Bouquet are:
The only channels available when “P+” or “P-” is used to select another channel from the currently viewed service.
The only channels appearing on the i-Plate when activated, and the “LEFT/RIGHT” arrow buttons are used to browse the programme information on the other channels.
The only channels appearing in the TV Guide Grid screen, when “TV GUIDE” button is pressed.
Decoder Features and Menu

Page 13 of 22
SUBTITLES
PG PIN POP-UPS
This decoder has a parental control feature to control viewing in your home. Access to this feature is controlled byentering the PG PIN code.
The default pin for the parental lock is 1234. You can change the default pin in the menus. This PG PIN codewill be blocked if entered incorrectly multiple times. If this occurs you must proceed by carrying out a factoryreset of the STB.
The PG pin code pop-up will appear when changing channels to a parental blocked program or when a parentalblocked program begins.
Subtitles are enabled by pressing SHIFT+ALT on the remote. A banner will appear showing the user that Subtitlesare on. If subtitles are available on the playout, they will be displayed while subtitles are ON.
To disable subtitles, press SHIFT+ALT again. A banner will appear saying “Subtitles OFF”.
Decoder Features and Menu

Page 14 of 22Decoder Features and Menu
You are allowed three attempts at entering the PG pin code.
After the third incorrect pin entry, the pin code is locked, you must then do a factory reset of the STB in the Menus.
After the factory reset, the pin entry attempts is reset to 3 as soon the correct PG pin code is entered.
NOTE-1: All programs that are blocked must comply with the Australian Broadcast standard.
NOTE-2: A valid PG PIN code is required to enter the Parental Control Menu.

Page 15 of 22
VOLUME BAR AND MUTE
The “MUTE” button switches the audio ON or OFF, when the volume is “ON” a blue bar is visible showing the levelyour volume is set too, see right-hand side screen below.
When the volume is “OFF” the blue bar is extinguished, see left-hand side screen below. However, when the“MUTE” button is pressed again, the volume level will be unchanged.
MENU
The menu is used to set up the decoder for the user’s environment and preference.Launch the menu by pressing the MENU button on the remote.
Navigate through the menu using the UP, DOWN, OK and EXIT keys.
Decoder Features and Menu

Page 16 of 22Decoder Features and Menu
TELEVISION SETUP
Video and audio setup options can be found by navigating to:
Advanced Options TV Installation
Edit the TV Installation menu options with the required settings. Press the “Accept these settings” button to save the settings.
If the HD Output Format option has been changed, it will temporarily switch the resolution and launch a popup on thescreen. Press “OK” on this popup to confirm that the settings are correct. Press ‘EXIT” or let the popup time out andthe resolution setting will be restored to the previous setting.

Page 17 of 22
TIME ZONE SETUP
Time zone setup options can be found by navigating to:
Advanced Options Local Time
Select the correct region and the local time will be adjusted automatically.
ASPECT RATIO
There are 2 ways to manipulate the Aspect Ratio:
1. By choosing a default Aspect Ratio setting in the Decoder Menu. 2. By toggling through all the available Aspect Ratio settings by pressing the ARC button (SHIFT+TVGUIDE) on the remote control when watching TV.
If you use the hot key to toggle the aspect ratio, a popup will display in the top right corner of the screen indicatingthe new aspect ratio setting.
Changing the aspect ratio using the hot key will not change the setting in the menu, and will not remain if the decoderrequires a reboot.For a permanent setting, change the aspect ratio on the menu.
Decoder Features and Menu

Page 18 of 22Decoder Features and Menu
SOFTWARE UPGRADE
Software upgrades can be done over the air. When an upgrade is available for your box, the menu option will beaccessible. If there is no upgrade available, the menu option will be greyed out.
Press OK on this option (if it is available) and the new code download will start. Follow the instructions on thedownload screen.
ERROR BANNERS
An error banner is displayed when there is a network error or input error from the user.

Page 19 of 22 Decoder Features and Menu
"Event is PG Blocked “Viewer has set a PG setting to prevent viewing without aPIN. Press OK on the iplate and enter the PG pin tounblock the program.
"Service is reserved for future use”This service does not contain any audio or video at themoment.
"Service is reserved for future use”This service does not contain any audio or video at themoment.
"This channel is closed. Press i or check the 8-dayTV Guide to find out when it will open.”
"No PG status is available. Please enter the PG PIN toview this programme. For further assistance, pleasecontact your nearest contact center.”
"No services found. Please rescan.” Viewer must enter the menu system and rescan the STB.
"There is no signal. This may be due to bad weather or afaulty connection in the installation."
Viewer needs to verify installation of dish, lnb and cablingor wait for storm condition to pass.
"The Smartcard is invalid for this country or network.Please contact your nearest contact center for assistance.”
An invalid smart card has been inserted.
"The smartcard is either invalid or has been inserted upside down.”
"The smart card is either faulty or has been insertedupside down. If it is faulty, please take it to your nearestcontact center.”
"Invalid Smart Card”
Displayed if an invalid smart card is inserted or if the cardis incorrectly inserted. Ensure the card is inserted with thecontacts towards the Set top box and on the underside.
On Screen Error Message Condition/Explanation
"Please insert the smart card”Displayed if there is no smart card inserted and the vieweris attempting to watch encrypted services.
"This channel will be activated in a few seconds, pleasewait...this message still appears after 2 minutes, pleasecontact your nearest contact center for assistance."
Normally displayed after a card activation
"The incorrect programme was broadcast. Please waitwhile we resolve the problem...”
Broadcast error. If the error does not resolve itself, pleaserescan the box.
"The decoder is checking the Smartcard and currentviewing status. Please wait…”
Checking the subscription status...If this message stillappears after 2 minutes, please contact your nearestcontact center for assistance.
The decoder is checking the smart card and the currentviewing status. Audio and video should start soon afterthis message or another message will be displayed ifthere is a problem.
"Service is currently scrambled” The service being viewed is scrambled and the viewer isnot authorized to view this service.
"The Smartcard is not enabled for this channel. It may bethat your account has been suspended. Please contactyour nearest contact center for assistance.”
"Your account has been suspended. Please contact yournearest contact center for assistance.”
"The LNB has shorted. Please check all LNB connectionsor call an accredited installer for assistance.”
The set top box has detected a fault condition in theinstallation and protected the set top box from furtherdamage by switching of the power to drive the LNB
"There is a Smartcard marriage conflict. Please contactyour nearest contact center for assistance.”
There is a conflict with the smart card/set top boxcombination. Contact the contact for help.
"The channel number you selected is no longer available.” This error could be caused by a change in the channelline up. Please rescan the set top box to resolve."The channel you selected does not exist / or is not in the
current viewing environment.
"There is an error tuning to this channel. Please rescanthe decoder. If this does not solve the problem, pleasecontact your nearest contact center for assistance”
"There is an error receiving data for this channel. Pleasereboot the decoder. If this does not resolve the error,rescan the decoder. If the problem persists, please contactyour nearest contact center for assistance.”
ALTECH UEC DSD 4121 SET TOP BOX – Error Codes

Page 20 of 22Legal Matters
Important NOTICE to all purchasers of a DSD 4121 Decoder.
ecoder is designed, manufactured and sold to receive selected network services only. It will therefore not be fully functional unless it is used with the network operator's enabled Smartcard supplied with the DSD 4121 decoder, deployed within the Australian broadcast footprint, and installed so as to receive the network specific signal.
The network operator is entitled to amend the software incorporated in the DSD 4121 Decoder from time to time bymeans of software downloads for a number of reasons, including preventing the DSD 4121 Decoder from being usedto receive services other than the network operator services.
Due to the many potential configurations in each home and the variety of equipment available, it is not possible tocover every potential installation scenario in this Viewer's Guide. An Accredited Installer or the supplier / manufacturerof the specific equipment should be consulted if any doubt exists when doing an installation.
MACROVISION
This product incorporates copyright protection technology that is protected by U. S. patents and other intellectual property rights. Use of this copyright protection technology must be authorised by Macrovision Corporation, and is intended for home and other limited viewing uses only unless otherwise authorised by Macrovision. Reverse engineering or disassembly is prohibited.
ALTECH UEC
Altech UEC and their logo are trade marks and / or registered trade marks of Altech UEC.
DOLBY
Manufactured under license from Dolby Laboratories. Dolby and the double-D symbol are trademarks ofDolby Laboratories.
DVB (DIGITAL VIDEO BROADCASTING)
DVB is a registered trademark of the DVB Project.
The whole of the DSD 4121 Basic Viewer's Guide, including the graphics, menus and information contained hereinare the subject of intellectual property rights, including copyright, under domestic law and international conventions.All rights are reserved.
All intellectual property rights of the DSD 4121 Decoder are owned by Altech UEC.
Hacking of the conditional access system or facilitating anyone else doing so is STRICTLY PROHIBITED. Failure toadhere to this prohibition is a criminal offence.
Some components are licensed under GPL and LGPL licenses. For further information regarding the licenses andwhich components are licensed under these licenses please visit http://www.uec.co.za/DSD4121/License.html.
The source code for these components can be obtained by written request to:
The UEC DSD 4121 OPT team,Altech UEC (PTY) LTDUEC House1 Montgomery DriveMount Edgecombe4300South Africa
Please note that there is a fee associated with the written request to cover shipping, handling, processing and thecost of media. Altech UEC reserves the right to exclude or include GPL/LGPL components from its products as itsees fit.
INTRODUCTION
The DSD 4121d
DIY INSTALLATIONS DISCLAIMER
INTELLECTUAL PROPERTY
LEGAL MATTERS

Page 21 of 22 Legal Matters / Product Warranty
The manufacturer does not directly or indirectly warrant or guarantee or make any representations whatsoever withregards to any equipment, including, but not limited to, any dish, LNB, or cabling used by the installer.Subject to any express warranty or guarantee given by the manufacturer in writing, the manufacturer does not :
Give any warranty or guarantee or make any representation whatsoever in respect of any work carried out by the installer.
Accept any liability for any latent or other defect in any work carried out by the installer.
The smartcard is uniqueto each decoder and cannotbe replaced or changed withanother decoder without firstcontacting the call centre.
! The network operator isentitled to upgrade the softwareby downloads to your decoder,to ensure that only approvedservices are being recieved,and that the decoder remainscompatiable with the networksplatform.
!
The manufacturer warrant that the DSD 4121 Decoder will be free from defects in design, materials and workmanshipfor a period of 12 months from the date of sale of the new DSD4121 Decoder to the consumer.
This warranty will not apply in the event of :
the DSD 4121 Decoder being tampered with or being opened, worked on, repaired or modified, save by an authorised Altech UEC Agent;
the DSD 4121 Decoder not being installed or used in accordance with the manufacturer's specifications;
the DSD 4121 Decoder not being used with the supplied power supply;
malfunctioning or damage caused by the use of the DSD 4121 Decoder in conjunction with equipment or smartcards not supplied by the manufacturer;
In the event of the DSD 4121 Decoder not functioning within the first 60 days of purchase, contact Altech UECAustralia, Agent or the retailer from which the DSD 4121 Decoder was purchased.
Thereafter the Agent will return the DSD 4121 Decoder to the Altech UEC nominated Repair Centre. Themanufacturer, at their sole discretion, will repair or replace the DSD 4121 Decoder which is not functioning and whichis returned within 12 months from the date of sale of the new DSD 4121 Decoder to the consumer.
Any repairs made in these first 12 months must be made by the Altech UEC Repair Centre in order to rely on thiswarranty certificate. This certificate, plus the original purchase receipt showing the date of purchase of the newDSD 4121 Decoder, must be provided when returning the DSD 4121 Decoder for warrantee purposes.
PRODUCT WARRANTY
INSTALLATION INDEMNITY
Installation procedures for satellite dishes are outside the scope of this manual. Please refer to the manuals providedwith your satellite dish and associated equipment if you decide to do the installation yourself. For the DSD 4121Decoder to operate, it is required to correctly install and align a satellite dish and a Low Noise Block (LNB) converter.
Each and every installer acts as an independent contractor and is not an employee, subcontractor or agent of themanufacturer. The manufacturer is therefore not liable for any loss orthe manufacturer. The manufacturer is thereforenot liable for any loss or damage of any nature whatsoever caused by the conduct of the installer, including, but notlimited to :
Any direct, indirect or consequential damages of any nature or any loss of profit or other special damages of any nature which the user may suffer as a result of any breach by the installer of any of its obligations to the user.
Any loss or damage to the property of the user or any third party, situated on the user's premises, as a result of an act or omission on the part of the installer.

Page 22 of 22Product Warranty / Help and Information
WEBSITES
Digital TV from Satellite www.mysattv.com.auManufacturer (Altech UEC) www.uec.com.au
TELEPHONE
Altech UEC Austrailia +61 2 94255777
HELP AND INFORMATION
For the latest DSD 4121Viewer's Guide go to websitewww.uec.com.au.
! If you have comments,suggestions or want to providefeedback on the product, visitwww.uec.com.au.
OBSOLESCENCE DISCLAIMER
DISCLAIMER
FOR YOUR RECORDS
Digital Satellite Technology is rapidly evolving. As a result of this, it is not possible to predict what the requirementswill be in a few years' time. The manufacturer cannot guarantee that this DSD 4121 Decoder will be able to run allavailable services in future.
Altech UEC make no warranties, either expressed or implied, and including, but not limited to, implied warranties ofmerchant ability and fitness of the DSD 4121 Decoder for a particular purpose. This extends to the hardware,software, the DSD 4121 Basic Viewer's Guide and any other written materials accompanying the DSD 4121 Decoderat the time of its sale. The manufacturer specifically make no warranties, expressed or implied, that the DSD 4121decoder is capable, or in the future, will be capable, of receiving services other than VAST services.
Despite anything to the contrary, and save for the above-mentioned remedy in relation to the DSD 4121 Decoderwhich does not function during the period covered by this warranty certificate, the manufacturer will bear no liabilitywhatsoever, whether in contracts, delict or otherwise, for injury, loss or damage, including any loss of business profitsor any other consequential damages arising out of the installation, use or operation of the DSD4121 Decoder or anydefect therein. Altech UEC will not be held responsible for any damage resulting from installations, whether by itsagents, Accredited Installers, through do-it-yourself or through incorrect usage of equipment.
By using your smartcard and Set Top Box you agree that Optus Networks Pty Ltd may write software to that card andor Set Top Box from time to time.
We recommend you complete the following information for your records :
Product Model
Serial Number
Purchaser's Name
Purchaser'sAddress
Authorised Dealer'sName
Date of Purchase
Dealer's Address


