279
BCMS V U ™ S OFTWARE R2 V2 User Guide 585-217-102 Issue 2 June 2000

BCMS VU™ SOFTWARE
R2
Us
V2
er Guide
585-217-102 Issue 2
June 2000

Copyright © 2000, Lucent TechnologiesAll Rights ReservedPrinted in U.S.A.
NoticeEvery effort was made to ensure that the information in this book was complete and accurate at the time of printing. However, information is subject to change.
Your Responsibility for Your System’s SecurityToll fraud is the unauthorized use of your telecommu-nications system by an unauthorized party, for exam-ple, persons other than your company’s employees, agents, subcontractors, or persons working on your company’s behalf. Note that there may be a risk of toll fraud associated with your telecommunications sys-tem and, if toll fraud occurs, it can result in substantial additional charges for your telecommunications ser-vices.
You and your system manager are responsible for the security of your system, such as programming and configuring your equipment to prevent unauthorized use. The system manager is also responsible for read-ing all installation, instruction, and system administra-tion documents provided with this product in order to fully understand the features that can introduce risk of toll fraud and the steps that can be taken to reduce that risk. Lucent Technologies does not warrant that this product is immune from or will prevent unauthorized use of common-carrier telecommunication services or facilities accessed through or connected to it. Lucent Technologies will not be responsible for any charges that result from such unauthorized use.
Lucent Technologies Fraud InterventionIf you suspect that you are being victimized by toll fraud and you need technical support or assistance, call Technical Service Center Toll Fraud Intervention Hot-line at 1-800-643-2353.
TrademarksBCMS Vu, Intuity Message Manager, CentreVu Agent, and CentreVu Supervisor are trademarks of Lucent Technolo-gies.DEFINITY is a registered trademark of Lucent Technolo-gies.DEFINITY ONE is a trademark of Lucent Technologies.IBM is a registered trademark of International Business Machines Corp.INTEL and Pentium are registered trademarks of Intel Cor-poration.Microsoft, MS, MS-DOS, and Windows are registered trademarks of Microsoft Corp.Sun and Solaris are registered trademarks of Sun Microsys-tems, Inc.SPARCserver is a registered trademark of SPARC Interna-tional licensed exclusively to Sun Microsystems, Inc.Symantec and pcANYWHERE are trademarks of Symantec Corp.UNIX is a registered trademark of Novell, Inc. in the United States and other countries, licensed exclusively through X/Open Corporation.All other product names mentioned herein are the trade-marks of their respective owners.
Obtaining ProductsTo learn more about Lucent Technologies products and to order products, contact Lucent Direct, the direct-market organization of Lucent Technologies Business Communications Systems. Access their web site at www.lucentdirect.com, or call 1 800 451-2100. The International fax number is 1 317 322-6699.
CommentsTo comment on this document, return the comment card at the end of the document.
AcknowledgmentThis document was prepared by Global Learning Solutions, Call Center Segment, Lucent Technologies, Holmdel, NJ 07733-3030
Lucent Technologies National Customer Care CenterLucent Technologies provides a telephone number for you to use to report problems or to ask questions about your call center. The support telephone number is 1-800-242-2121. For technical support, customers outside the United States should call their Lucent Technologies Representative or Distributor.
European Union Declaration of ConformityLucent Technologies Business Communications Sys-tems declares that the equipment specified in this doc-ument conforms to the referenced European Union (EU) Directives and Harmonized Standards listed below:EMC Directive 89/336/EECLow Voltage Directive 73/23/EEC
The “CE” mark affixed tothe equipment means thatit conforms to the above Directives.
Heritage StatementLucent Technologies—formed as a result of AT&T’s planned restructuring—designs, builds, and delivers a wide range of public and private networks, communi-cation systems and software, consumer and business telephone systems, and microelectronics components. The world-renowned Bell Laboratories is the research and development arm for the company.
CommentsTo comment on this document, return the “How Are We Doing?” form to:Lucent Technologies 101 Crawfords Corner Rd.Holmdel, NJ 07733-30302G-528a.
AcknowledgmentDeveloped by Lucent Technologies Global Learning Solutions.
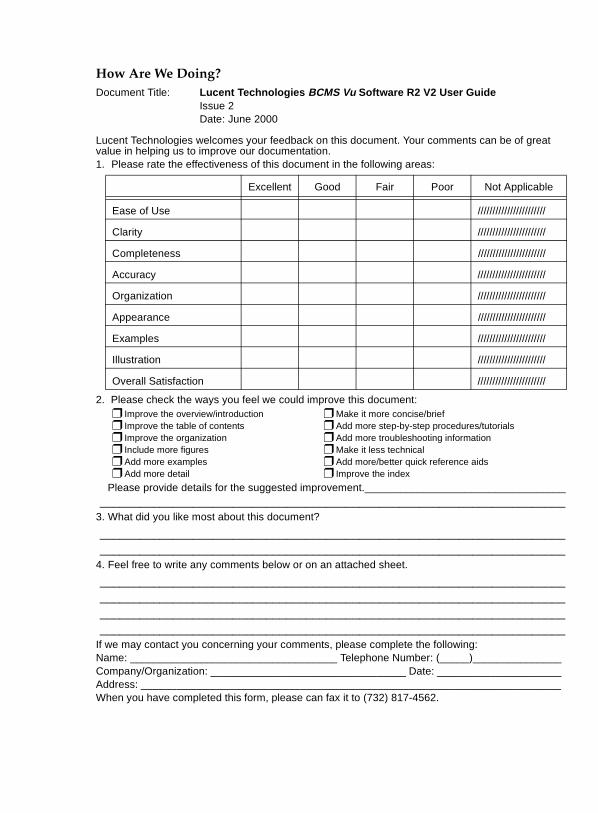
How Are We Doing?Document Title: Lucent Technologies BCMS Vu Software R2 V2 User Guide
Issue 2Date: June 2000
Lucent Technologies welcomes your feedback on this document. Your comments can be of great value in helping us to improve our documentation.1. Please rate the effectiveness of this document in the following areas:
2. Please check the ways you feel we could improve this document:❒ Improve the overview/introduction ❒ Make it more concise/brief❒ Improve the table of contents ❒ Add more step-by-step procedures/tutorials❒ Improve the organization ❒ Add more troubleshooting information❒ Include more figures ❒ Make it less technical❒ Add more examples ❒ Add more/better quick reference aids❒ Add more detail ❒ Improve the index
Please provide details for the suggested improvement.________________________________________________________________________________________________________
3. What did you like most about this document?
____________________________________________________________________________________________________________________________________________
4. Feel free to write any comments below or on an attached sheet.
________________________________________________________________________________________________________________________________________________________________________________________________________________________________________________________________________________________
If we may contact you concerning your comments, please complete the following:Name: ___________________________________ Telephone Number: (_____)_______________Company/Organization: _________________________________ Date: _____________________Address: _______________________________________________________________________When you have completed this form, please can fax it to (732) 817-4562.
Excellent Good Fair Poor Not Applicable
Ease of Use ///////////////////////
Clarity ///////////////////////
Completeness ///////////////////////
Accuracy ///////////////////////
Organization ///////////////////////
Appearance ///////////////////////
Examples ///////////////////////
Illustration ///////////////////////
Overall Satisfaction ///////////////////////
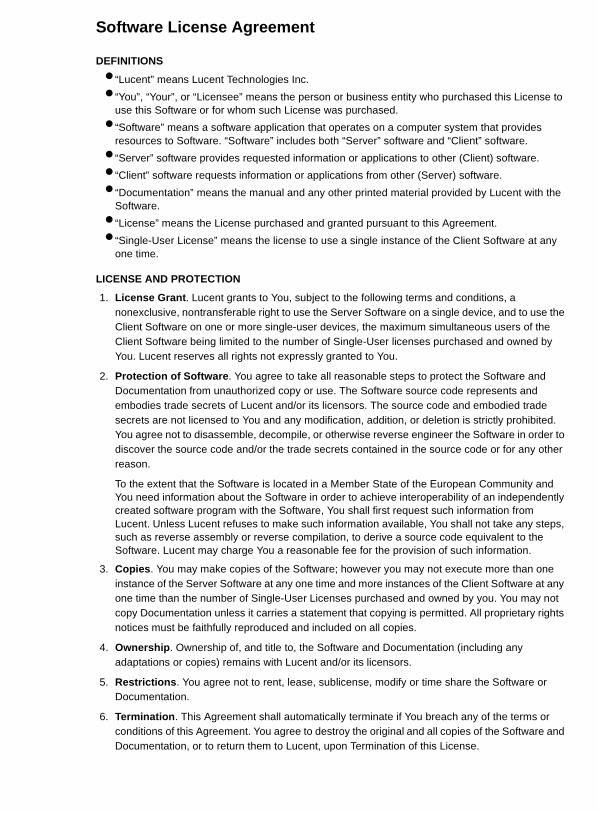
Software License Agreement
DEFINITIONS● “Lucent” means Lucent Technologies Inc.● “You”, “Your”, or “Licensee” means the person or business entity who purchased this License to
use this Software or for whom such License was purchased.● “Software” means a software application that operates on a computer system that provides
resources to Software. “Software” includes both “Server” software and “Client” software.● “Server” software provides requested information or applications to other (Client) software.● “Client” software requests information or applications from other (Server) software.● “Documentation” means the manual and any other printed material provided by Lucent with the
Software.● “License” means the License purchased and granted pursuant to this Agreement.● “Single-User License” means the license to use a single instance of the Client Software at any
one time.
LICENSE AND PROTECTION
1. License Grant. Lucent grants to You, subject to the following terms and conditions, a nonexclusive, nontransferable right to use the Server Software on a single device, and to use the Client Software on one or more single-user devices, the maximum simultaneous users of the Client Software being limited to the number of Single-User licenses purchased and owned by You. Lucent reserves all rights not expressly granted to You.
2. Protection of Software. You agree to take all reasonable steps to protect the Software and Documentation from unauthorized copy or use. The Software source code represents and embodies trade secrets of Lucent and/or its licensors. The source code and embodied trade secrets are not licensed to You and any modification, addition, or deletion is strictly prohibited. You agree not to disassemble, decompile, or otherwise reverse engineer the Software in order to discover the source code and/or the trade secrets contained in the source code or for any other reason.
To the extent that the Software is located in a Member State of the European Community and You need information about the Software in order to achieve interoperability of an independently created software program with the Software, You shall first request such information from Lucent. Unless Lucent refuses to make such information available, You shall not take any steps, such as reverse assembly or reverse compilation, to derive a source code equivalent to the Software. Lucent may charge You a reasonable fee for the provision of such information.
3. Copies. You may make copies of the Software; however you may not execute more than one instance of the Server Software at any one time and more instances of the Client Software at any one time than the number of Single-User Licenses purchased and owned by you. You may not copy Documentation unless it carries a statement that copying is permitted. All proprietary rights notices must be faithfully reproduced and included on all copies.
4. Ownership. Ownership of, and title to, the Software and Documentation (including any adaptations or copies) remains with Lucent and/or its licensors.
5. Restrictions. You agree not to rent, lease, sublicense, modify or time share the Software or Documentation.
6. Termination. This Agreement shall automatically terminate if You breach any of the terms or conditions of this Agreement. You agree to destroy the original and all copies of the Software and Documentation, or to return them to Lucent, upon Termination of this License.

License Agreement
LIMITED WARRANTY AND LIMITED LIABILITY
1. Compatibility. The Software is only compatible with certain computers and operating systems. THE SOFTWARE IS NOT WARRANTED FOR INCOMPATIBLE SYSTEMS.
2. Software. Lucent warrants that if the Software fails to substantially conform to the specifications in the Documentations and if the Software is returned to the place from which it was purchased within one (1) year from the date purchased, then Lucent will either replace the Software or offer to refund the License Fee to You upon return of all copies of the Software and Documentation to Lucent. In the event of a refund, the License shall terminate.
3. DISCLAIMER OF WARRANTIES. Lucent makes NO WARRANTY, REPRESENTATION OR PROMISE NOT EXPRESSLY SET FORTH IN THIS AGREEMENT. LUCENT DISCLAIMS AND EXCLUDES ANY AND ALL IMPLIED WARRANTIES OF MERCHANTABILITY OR FITNESS FOR A PARTICULAR PURPOSE. LUCENT DOES NOT WARRANT THAT THE Software OR DOCUMENTATION WILL SATISFY YOUR REQUIREMENTS OR THAT THE Software OR DOCUMENTATION ARE WITHOUT DEFECT OR ERROR OR THAT THE OPERATION OF THE SOFTWARE WILL BE UNINTERRUPTED. Some states or countries do not allow the exclusion of implied warranties or limitations on how long an implied warranty lasts, so the above limitation may not apply to You. This warranty gives You specific legal rights which vary from state to state.
4. EXCLUSIVE REMEDY. EXCEPT FOR BODILY INJURY CAUSED BY LUCENT’S NEGLIGENCE, LUCENT’S ENTIRE LIABILITY ARISING FROM OR RELATING TO THIS AGREEMENT OR THE Software OR DOCUMENTATION AND YOUR EXCLUSIVE REMEDY IS LIMITED TO DIRECT DAMAGES IN AN AMOUNT NOT TO EXCEED $10,000. LUCENT SHALL NOT IN ANY CASE BE LIABLE FOR ANY SPECIAL INCIDENTAL, CONSEQUENTIAL, INDIRECT OR PUNITIVE DAMAGES EVEN IF LUCENT HAS BEEN ADVISED OF THE POSSIBILITY OF SUCH DAMAGES. LUCENT IS NOT RESPONSIBLE FOR LOST PROFITS OR REVENUE, LOSS OF USE OF THE Software, LOSS OF DATA, COSTS OF RECREATING LOST DATA, THE COST OF ANY SUBSTITUTE EQUIPMENT OR PROGRAM, OR CLAIMS BY ANY PARTY OTHER THAN YOU. Some states or countries do not allow the exclusion or limitation of incidental or consequential damages, so the above limitation or exclusion may not apply to You.
GENERAL CONDITIONS
1. Governing Law. This Agreement shall be governed by, and interpreted in accordance with, the substantive laws of the State of New Jersey of the United States of America.
2. Entire Agreement. This Agreement sets forth the entire understanding and agreement between You and Lucent and may be amended only in a writing or writings signed by You and Lucent. NO VENDOR, DISTRIBUTOR, DEALER, RETAILER, SALES PERSON OR OTHER PERSON IS AUTHORIZED TO MODIFY THIS AGREEMENT OR TO MAKE ANY WARRANTY, REPRESENTATION OR PROMISE WHICH IS DIFFERENT THAN, OR IN ADDITION TO, THE REPRESENTATIONS OR PROMISES OF THIS AGREEMENT ABOUT THE SOFTWARE.
3. Export. Licensee hereby agrees that it will not knowingly, directly or indirectly, without prior written consent, if required, of the Office of Export Licensing of the U.S. Department of Commerce, Washington D.C. 20230, export or transmit any of the Products to any group Q, S, W, Y, or Z country specified in the Export Administration Regulations issued by the U.S. Department of Commerce or to any country which such transmission is restricted by applicable regulations or statutes.

License Agreement
4. U.S. Government Restricted Rights. Use, duplication, or disclosure by the United States Government is subject to restrictions as set forth in FAR 52.227-14 (June 1987) Alternate III (g)(3) (June 1987), FAR 52.227-19 (June 1987), or DFARS 52.227-7013 (c)(1)(ii) (June 1988), as applicable Contractor/Manufacturer is Lucent Technologies Inc., 11900 North Pecos Street, Westminster, Colorado 80234.
5. Assignment. Lucent may without your consent or notice to You, assign this Agreement to an entity to which it transfers ownership of the Software. Upon the effective date of such assignment, You agree that Lucent shall be released and discharged from all obligations and liabilities under this Agreement.

License Agreement
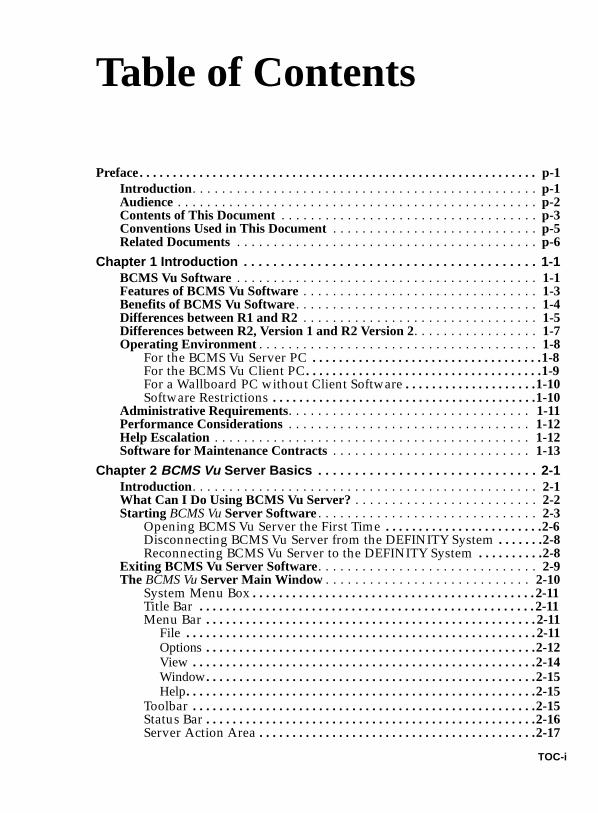
Table of Contents 0
Preface. . . . . . . . . . . . . . . . . . . . . . . . . . . . . . . . . . . . . . . . . . . . . . . . . . . . . . . . . . . . p-1Introduction. . . . . . . . . . . . . . . . . . . . . . . . . . . . . . . . . . . . . . . . . . . . . . . p-1Audience . . . . . . . . . . . . . . . . . . . . . . . . . . . . . . . . . . . . . . . . . . . . . . . . . p-2Contents of This Document . . . . . . . . . . . . . . . . . . . . . . . . . . . . . . . . . . . p-3Conventions Used in This Document . . . . . . . . . . . . . . . . . . . . . . . . . . . . p-5Related Documents . . . . . . . . . . . . . . . . . . . . . . . . . . . . . . . . . . . . . . . . . p-6
Chapter 1 Introduction . . . . . . . . . . . . . . . . . . . . . . . . . . . . . . . . . . . . . . . . 1-1BCMS Vu Software . . . . . . . . . . . . . . . . . . . . . . . . . . . . . . . . . . . . . . . . . 1-1Features of BCMS Vu Software . . . . . . . . . . . . . . . . . . . . . . . . . . . . . . . . 1-3Benefits of BCMS Vu Software. . . . . . . . . . . . . . . . . . . . . . . . . . . . . . . . . 1-4Differences between R1 and R2 . . . . . . . . . . . . . . . . . . . . . . . . . . . . . . . . 1-5Differences between R2, Version 1 and R2 Version 2. . . . . . . . . . . . . . . . . 1-7Operating Environment . . . . . . . . . . . . . . . . . . . . . . . . . . . . . . . . . . . . . . 1-8
For the BCMS Vu Server PC . . . . . . . . . . . . . . . . . . . . . . . . . . . . . . . . . . .1-8For the BCMS Vu Client PC. . . . . . . . . . . . . . . . . . . . . . . . . . . . . . . . . . . .1-9For a Wallboard PC without Client Software . . . . . . . . . . . . . . . . . . . .1-10Software Restrictions . . . . . . . . . . . . . . . . . . . . . . . . . . . . . . . . . . . . . . . .1-10
Administrative Requirements. . . . . . . . . . . . . . . . . . . . . . . . . . . . . . . . . 1-11Performance Considerations . . . . . . . . . . . . . . . . . . . . . . . . . . . . . . . . . 1-12Help Escalation . . . . . . . . . . . . . . . . . . . . . . . . . . . . . . . . . . . . . . . . . . . 1-12Software for Maintenance Contracts . . . . . . . . . . . . . . . . . . . . . . . . . . . 1-13
Chapter 2 BCMS Vu Server Basics . . . . . . . . . . . . . . . . . . . . . . . . . . . . . . 2-1Introduction. . . . . . . . . . . . . . . . . . . . . . . . . . . . . . . . . . . . . . . . . . . . . . . 2-1What Can I Do Using BCMS Vu Server? . . . . . . . . . . . . . . . . . . . . . . . . . 2-2Starting BCMS Vu Server Software . . . . . . . . . . . . . . . . . . . . . . . . . . . . . . 2-3
Opening BCMS Vu Server the First Time . . . . . . . . . . . . . . . . . . . . . . . .2-6Disconnecting BCMS Vu Server from the DEFINITY System . . . . . . .2-8Reconnecting BCMS Vu Server to the DEFINITY System . . . . . . . . . .2-8
Exiting BCMS Vu Server Software. . . . . . . . . . . . . . . . . . . . . . . . . . . . . . 2-9The BCMS Vu Server Main Window . . . . . . . . . . . . . . . . . . . . . . . . . . . . 2-10
System Menu Box . . . . . . . . . . . . . . . . . . . . . . . . . . . . . . . . . . . . . . . . . . . 2-11Title Bar . . . . . . . . . . . . . . . . . . . . . . . . . . . . . . . . . . . . . . . . . . . . . . . . . . . 2-11Menu Bar . . . . . . . . . . . . . . . . . . . . . . . . . . . . . . . . . . . . . . . . . . . . . . . . . . 2-11
File . . . . . . . . . . . . . . . . . . . . . . . . . . . . . . . . . . . . . . . . . . . . . . . . . . . . . 2-11Options . . . . . . . . . . . . . . . . . . . . . . . . . . . . . . . . . . . . . . . . . . . . . . . . . .2-12View . . . . . . . . . . . . . . . . . . . . . . . . . . . . . . . . . . . . . . . . . . . . . . . . . . . .2-14Window . . . . . . . . . . . . . . . . . . . . . . . . . . . . . . . . . . . . . . . . . . . . . . . . . .2-15Help. . . . . . . . . . . . . . . . . . . . . . . . . . . . . . . . . . . . . . . . . . . . . . . . . . . . .2-15
Toolbar . . . . . . . . . . . . . . . . . . . . . . . . . . . . . . . . . . . . . . . . . . . . . . . . . . . .2-15Status Bar . . . . . . . . . . . . . . . . . . . . . . . . . . . . . . . . . . . . . . . . . . . . . . . . . .2-16Server Action Area . . . . . . . . . . . . . . . . . . . . . . . . . . . . . . . . . . . . . . . . . .2-17
TOC-i
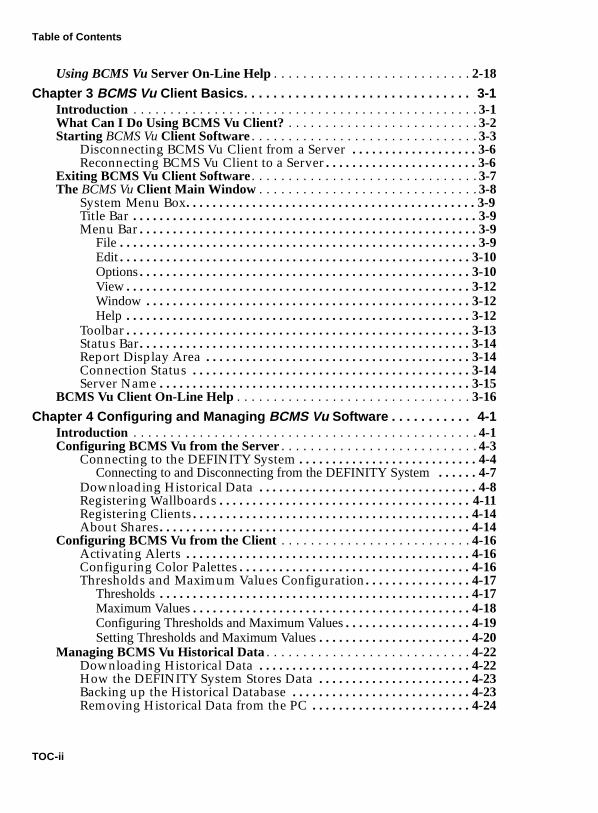
Table of Contents
Using BCMS Vu Server On-Line Help . . . . . . . . . . . . . . . . . . . . . . . . . . . 2-18
Chapter 3 BCMS Vu Client Basics. . . . . . . . . . . . . . . . . . . . . . . . . . . . . . . 3-1Introduction . . . . . . . . . . . . . . . . . . . . . . . . . . . . . . . . . . . . . . . . . . . . . . . 3-1What Can I Do Using BCMS Vu Client? . . . . . . . . . . . . . . . . . . . . . . . . . . 3-2Starting BCMS Vu Client Software . . . . . . . . . . . . . . . . . . . . . . . . . . . . . . . 3-3
Disconnecting BCMS Vu Client from a Server . . . . . . . . . . . . . . . . . . . 3-6Reconnecting BCMS Vu Client to a Server . . . . . . . . . . . . . . . . . . . . . . . 3-6
Exiting BCMS Vu Client Software. . . . . . . . . . . . . . . . . . . . . . . . . . . . . . . 3-7The BCMS Vu Client Main Window . . . . . . . . . . . . . . . . . . . . . . . . . . . . . . 3-8
System Menu Box. . . . . . . . . . . . . . . . . . . . . . . . . . . . . . . . . . . . . . . . . . . . 3-9Title Bar . . . . . . . . . . . . . . . . . . . . . . . . . . . . . . . . . . . . . . . . . . . . . . . . . . . . 3-9Menu Bar . . . . . . . . . . . . . . . . . . . . . . . . . . . . . . . . . . . . . . . . . . . . . . . . . . . 3-9
File . . . . . . . . . . . . . . . . . . . . . . . . . . . . . . . . . . . . . . . . . . . . . . . . . . . . . . 3-9Edit . . . . . . . . . . . . . . . . . . . . . . . . . . . . . . . . . . . . . . . . . . . . . . . . . . . . . 3-10Options . . . . . . . . . . . . . . . . . . . . . . . . . . . . . . . . . . . . . . . . . . . . . . . . . . 3-10View . . . . . . . . . . . . . . . . . . . . . . . . . . . . . . . . . . . . . . . . . . . . . . . . . . . . 3-12Window . . . . . . . . . . . . . . . . . . . . . . . . . . . . . . . . . . . . . . . . . . . . . . . . . 3-12Help . . . . . . . . . . . . . . . . . . . . . . . . . . . . . . . . . . . . . . . . . . . . . . . . . . . . 3-12
Toolbar . . . . . . . . . . . . . . . . . . . . . . . . . . . . . . . . . . . . . . . . . . . . . . . . . . . . 3-13Status Bar. . . . . . . . . . . . . . . . . . . . . . . . . . . . . . . . . . . . . . . . . . . . . . . . . . 3-14Report Display Area . . . . . . . . . . . . . . . . . . . . . . . . . . . . . . . . . . . . . . . . 3-14Connection Status . . . . . . . . . . . . . . . . . . . . . . . . . . . . . . . . . . . . . . . . . . 3-14Server Name . . . . . . . . . . . . . . . . . . . . . . . . . . . . . . . . . . . . . . . . . . . . . . . 3-15
BCMS Vu Client On-Line Help . . . . . . . . . . . . . . . . . . . . . . . . . . . . . . . . 3-16
Chapter 4 Configuring and Managing BCMS Vu Software . . . . . . . . . . . 4-1Introduction . . . . . . . . . . . . . . . . . . . . . . . . . . . . . . . . . . . . . . . . . . . . . . . 4-1Configuring BCMS Vu from the Server . . . . . . . . . . . . . . . . . . . . . . . . . . . 4-3
Connecting to the DEFINITY System . . . . . . . . . . . . . . . . . . . . . . . . . . . 4-4Connecting to and Disconnecting from the DEFINITY System . . . . . . 4-7
Downloading Historical Data . . . . . . . . . . . . . . . . . . . . . . . . . . . . . . . . . 4-8Registering Wallboards . . . . . . . . . . . . . . . . . . . . . . . . . . . . . . . . . . . . . . 4-11Registering Clients . . . . . . . . . . . . . . . . . . . . . . . . . . . . . . . . . . . . . . . . . . 4-14About Shares. . . . . . . . . . . . . . . . . . . . . . . . . . . . . . . . . . . . . . . . . . . . . . . 4-14
Configuring BCMS Vu from the Client . . . . . . . . . . . . . . . . . . . . . . . . . . 4-16Activating Alerts . . . . . . . . . . . . . . . . . . . . . . . . . . . . . . . . . . . . . . . . . . . 4-16Configuring Color Palettes . . . . . . . . . . . . . . . . . . . . . . . . . . . . . . . . . . . 4-16Thresholds and Maximum Values Configuration. . . . . . . . . . . . . . . . 4-17
Thresholds . . . . . . . . . . . . . . . . . . . . . . . . . . . . . . . . . . . . . . . . . . . . . . . 4-17Maximum Values . . . . . . . . . . . . . . . . . . . . . . . . . . . . . . . . . . . . . . . . . . 4-18Configuring Thresholds and Maximum Values . . . . . . . . . . . . . . . . . . . 4-19Setting Thresholds and Maximum Values . . . . . . . . . . . . . . . . . . . . . . . 4-20
Managing BCMS Vu Historical Data . . . . . . . . . . . . . . . . . . . . . . . . . . . . 4-22Downloading Historical Data . . . . . . . . . . . . . . . . . . . . . . . . . . . . . . . . 4-22How the DEFINITY System Stores Data . . . . . . . . . . . . . . . . . . . . . . . 4-23Backing up the Historical Database . . . . . . . . . . . . . . . . . . . . . . . . . . . 4-23Removing Historical Data from the PC . . . . . . . . . . . . . . . . . . . . . . . . 4-24
TOC-ii

Table of Contents
Backing Up Folders and Files . . . . . . . . . . . . . . . . . . . . . . . . . . . . . . . . .4-25Repairing the Database . . . . . . . . . . . . . . . . . . . . . . . . . . . . . . . . . . . . . .4-26Re-indexing the Database . . . . . . . . . . . . . . . . . . . . . . . . . . . . . . . . . . . .4-27Compacting the Database . . . . . . . . . . . . . . . . . . . . . . . . . . . . . . . . . . . .4-28Managing Memory Allocation . . . . . . . . . . . . . . . . . . . . . . . . . . . . . . . .4-28
Opening the Historical Databasein Access 2000 . . . . . . . . . . . . . . . . . . . . . . . . . . . . . . . . . . . . . . . . . . . . 4-30Managing Miscellaneous BCMS Vu Functions . . . . . . . . . . . . . . . . . . . . 4-31
Downloading BCMS Data . . . . . . . . . . . . . . . . . . . . . . . . . . . . . . . . . . . .4-31
Chapter 5 Understanding Real-Time Reports. . . . . . . . . . . . . . . . . . . . . . 5-1Introduction. . . . . . . . . . . . . . . . . . . . . . . . . . . . . . . . . . . . . . . . . . . . . . . 5-1Which Type of Real-Time Report Shall I Use? . . . . . . . . . . . . . . . . . . . . . 5-2About Real-Time Graph Reports . . . . . . . . . . . . . . . . . . . . . . . . . . . . . . . 5-3
Categories of Real-Time Graph Reports . . . . . . . . . . . . . . . . . . . . . . . . .5-4Sample Real-Time Graph Report . . . . . . . . . . . . . . . . . . . . . . . . . . . . . . .5-5Things to Remember About Real-Time Graph Reports . . . . . . . . . . . .5-6Maximum Values and Real-Time Graph Scales . . . . . . . . . . . . . . . . . . .5-7Real-Time Graph Report Attributes . . . . . . . . . . . . . . . . . . . . . . . . . . . . .5-8Creating a Real-Time Graph Report. . . . . . . . . . . . . . . . . . . . . . . . . . . . .5-8
About Real-Time Pie Chart Reports. . . . . . . . . . . . . . . . . . . . . . . . . . . . . 5-9Categories of Real-Time Pie Chart Reports. . . . . . . . . . . . . . . . . . . . . .5-10Sample Real-Time Pie Chart Report. . . . . . . . . . . . . . . . . . . . . . . . . . . . 5-11Real-Time Pie Chart Report Attributes . . . . . . . . . . . . . . . . . . . . . . . . .5-12Creating a Real-Time Pie Chart Report . . . . . . . . . . . . . . . . . . . . . . . . .5-12
About Real-Time Text Reports . . . . . . . . . . . . . . . . . . . . . . . . . . . . . . . . 5-13Categories of Real-Time Text Reports . . . . . . . . . . . . . . . . . . . . . . . . . .5-14Sample Real-Time Text Report . . . . . . . . . . . . . . . . . . . . . . . . . . . . . . . .5-14Creating a Real-Time Text Report. . . . . . . . . . . . . . . . . . . . . . . . . . . . . .5-14Real-Time Text Report Attributes . . . . . . . . . . . . . . . . . . . . . . . . . . . . . .5-15
About Wallboard Displays . . . . . . . . . . . . . . . . . . . . . . . . . . . . . . . . . . . 5-16Categories of Wallboard Displays . . . . . . . . . . . . . . . . . . . . . . . . . . . . .5-16Wallboard Display Features . . . . . . . . . . . . . . . . . . . . . . . . . . . . . . . . . .5-17Types of Wallboards . . . . . . . . . . . . . . . . . . . . . . . . . . . . . . . . . . . . . . . . .5-18Sample Wallboard Display . . . . . . . . . . . . . . . . . . . . . . . . . . . . . . . . . . .5-19Creating a Wallboard Display . . . . . . . . . . . . . . . . . . . . . . . . . . . . . . . . .5-19Wallboard Display Attributes . . . . . . . . . . . . . . . . . . . . . . . . . . . . . . . . .5-20
About Time Trace Reports . . . . . . . . . . . . . . . . . . . . . . . . . . . . . . . . . . . 5-21Categories of Time Trace Reports . . . . . . . . . . . . . . . . . . . . . . . . . . . . . .5-21Characteristics of Time Trace Reports . . . . . . . . . . . . . . . . . . . . . . . . . .5-22Sample Time Trace Report . . . . . . . . . . . . . . . . . . . . . . . . . . . . . . . . . . . .5-23Creating a Time Trace Report . . . . . . . . . . . . . . . . . . . . . . . . . . . . . . . . .5-23Time Trace Report Attributes . . . . . . . . . . . . . . . . . . . . . . . . . . . . . . . . .5-24
Chapter 6 Understanding Historical Reports . . . . . . . . . . . . . . . . . . . . . . 6-1Historical Report Basics. . . . . . . . . . . . . . . . . . . . . . . . . . . . . . . . . . . . . . 6-1Data on the DEFINITY system. . . . . . . . . . . . . . . . . . . . . . . . . . . . . . . . . 6-2Categories of Historical Reports. . . . . . . . . . . . . . . . . . . . . . . . . . . . . . . . 6-3Creating Historical Reports . . . . . . . . . . . . . . . . . . . . . . . . . . . . . . . . . . . 6-4
TOC-iii

Table of Contents
01
2
Sample Historical Report . . . . . . . . . . . . . . . . . . . . . . . . . . . . . . . . . . . . . 6-5Historical Report Attributes . . . . . . . . . . . . . . . . . . . . . . . . . . . . . . . . . . . 6-6
Scheduling Historical Reports . . . . . . . . . . . . . . . . . . . . . . . . . . . . . . . . . 6-7Exporting Historical Reports. . . . . . . . . . . . . . . . . . . . . . . . . . . . . . . . . . . 6-8
Chapter 7 Working with Reports . . . . . . . . . . . . . . . . . . . . . . . . . . . . . . . . 7-1Overview. . . . . . . . . . . . . . . . . . . . . . . . . . . . . . . . . . . . . . . . . . . . . . . . . . 7-1Creating a Real-Time Graph Report . . . . . . . . . . . . . . . . . . . . . . . . . . . . . 7-2Creating a Real-Time Pie Chart Report. . . . . . . . . . . . . . . . . . . . . . . . . . . 7-7Creating a Real-Time Text Report . . . . . . . . . . . . . . . . . . . . . . . . . . . . . . 7-10Creating a Wallboard Display . . . . . . . . . . . . . . . . . . . . . . . . . . . . . . . . . 7-13Creating a Time Trace Report . . . . . . . . . . . . . . . . . . . . . . . . . . . . . . . . . 7-22Creating a Historical Report . . . . . . . . . . . . . . . . . . . . . . . . . . . . . . . . . . 7-26Saving a Report. . . . . . . . . . . . . . . . . . . . . . . . . . . . . . . . . . . . . . . . . . . . 7-34Closing a Report . . . . . . . . . . . . . . . . . . . . . . . . . . . . . . . . . . . . . . . . . . . 7-35Opening a Report . . . . . . . . . . . . . . . . . . . . . . . . . . . . . . . . . . . . . . . . . . 7-36Changing the Properties of a Report . . . . . . . . . . . . . . . . . . . . . . . . . . . . 7-37Printing Reports . . . . . . . . . . . . . . . . . . . . . . . . . . . . . . . . . . . . . . . . . . . 7-38Scheduling the Printing of a Historical Report. . . . . . . . . . . . . . . . . . . . . 7-39Using the Controls on the Historical Report Window. . . . . . . . . . . . . . . . 7-41
Chapter 8 Displaying Information on External Wallboards . . . . . . . . . . 8-1Introduction . . . . . . . . . . . . . . . . . . . . . . . . . . . . . . . . . . . . . . . . . . . . . . . 8-1
Configuring a Wallboard . . . . . . . . . . . . . . . . . . . . . . . . . . . . . . . . . . . . . 8-2Starting BCMS Vu Wallboard Software . . . . . . . . . . . . . . . . . . . . . . . . . 8-2Exiting BCMS Vu Wallboard Software . . . . . . . . . . . . . . . . . . . . . . . . . . 8-2
Sending a Wallboard Display to an External Wallboard . . . . . . . . . . . . . . 8-3Broadcasting a Message on an External Wallboard . . . . . . . . . . . . . . . . . . 8-4Cancelling a Broadcast Message . . . . . . . . . . . . . . . . . . . . . . . . . . . . . . . . 8-7
Chapter 9 BCMS Vu Real-Time and Historical Report Data Items . . . . . 9-1Introduction . . . . . . . . . . . . . . . . . . . . . . . . . . . . . . . . . . . . . . . . . . . . . . . 9-1Data Items — Real-Time Reports . . . . . . . . . . . . . . . . . . . . . . . . . . . . . . . 9-2Data Items — Historical Reports. . . . . . . . . . . . . . . . . . . . . . . . . . . . . . . . 9-9
Chapter 10 Troubleshooting . . . . . . . . . . . . . . . . . . . . . . . . . . . . . . . . . . 10-1Introduction . . . . . . . . . . . . . . . . . . . . . . . . . . . . . . . . . . . . . . . . . . . . . . 10-1Resolving Problems. . . . . . . . . . . . . . . . . . . . . . . . . . . . . . . . . . . . . . . . . 10-2Error Log . . . . . . . . . . . . . . . . . . . . . . . . . . . . . . . . . . . . . . . . . . . . . . . 10-37Connection Log. . . . . . . . . . . . . . . . . . . . . . . . . . . . . . . . . . . . . . . . . . . 10-39Troubleshooting the Data Module . . . . . . . . . . . . . . . . . . . . . . . . . . . . . 10-40
Verifying the COM Port . . . . . . . . . . . . . . . . . . . . . . . . . . . . . . . . . . . . 10-4Setting Up The COM Port. . . . . . . . . . . . . . . . . . . . . . . . . . . . . . . . . . . 10-4Repairing a Corrupted Database . . . . . . . . . . . . . . . . . . . . . . . . . . . . . 10-41Using a Terminal Emulator. . . . . . . . . . . . . . . . . . . . . . . . . . . . . . . . . . 10-4
Opening HyperTerminal and Setting Options . . . . . . . . . . . . . . . . . . . 10-42Error Codes . . . . . . . . . . . . . . . . . . . . . . . . . . . . . . . . . . . . . . . . . . . . . 10-49
Glossary . . . . . . . . . . . . . . . . . . . . . . . . . . . . . . . . . . . . . . . . . . . . . . . . . . gl-1
TOC-iv

Table of Contents
Index . . . . . . . . . . . . . . . . . . . . . . . . . . . . . . . . . . . . . . . . . . . . . . . . . . . . . . ix-1
TOC-v

Table of Contents
TOC-vi
Preface P
Introduction 0
Welcome to the BCMS Vu call center monitoring software from Lucent Technologies. This document explains how to use BCMS Vu software.
This section includes the following topics:
● Audience
● Contents of this document
● Conventions used in this document
● Related documents.
Note In this guide, the term “DEFINITY system” refers to: DEFINITY® ProLogixTM; DEFINITY® ECS Generic 3 Version 4 (G3V4), R5, or later; and DEFINITY® ONETM Communications System R2 (DEFINITY ONE).
Introduction P-1
Preface
Audience 0
You will find this user guide helpful if you are
● A call center manager/server administrator who needs to store and display data from a DEFINITY system.
This guide tells you how to
— Configure BCMS Vu software— Manage the software— Download historical data from the DEFINITY system— Register clients so they can access the server— Register wallboards— Manage data— Inspect the error log.
● A split/skill supervisor who needs to review the present and previous status of a call center.
This guide tells you how to
— Create real-time bar graphs, real-time pie charts, real-time text reports, time traces, wallboard displays and Historical Reports
— Open previously saved reports— Print text and Historical Reports— Schedule printing of Historical Reports— Set thresholds and alerts— Resolve problems with operation of the software— Respond to error messages.
This manual assumes that you are familiar with
● Your computer
● Microsoft*Windows* 95, Windows 98, and Windows NT* 4.0 operating systems
● Standard Windows conventions, such as using the F1 key to activate Help.
*Microsoft, Windows, and Windows NT are registered trademarks of Microsoft corp.
P-2 Audience

Preface
Pre
face
Contents of This Document 0
The BCMS Vu Software R2 User Guide describes what you need to know to use the BCMS Vu software on a daily basis, in particular, how to perform the tasks listed in the section entitled “Audience.”
To install the BCMS Vu software, refer to the BCMS Vu Software R2 V2 Installation Guide.
The user guide is organized into the following chapters:
Chapter 1 IntroductionSpecifies the hardware and software environment needed to run BCMS Vu software and describes the features and benefits of the software
Chapter 2 BCMS Vu Server BasicsDescribes how to start the BCMS Vu Server software and how to access the features of the software
Chapter 3 BCMS Vu Client BasicsDescribes how to start the BCMS Vu Client software and how to access the features of the software
Chapter 4 Configuring and Managing BCMS Vu SoftwareDescribes how to configure BCMS Vu software to use with the DEFINITY system and external wallboards and how to maintain the software and database for maximum results
Chapter 5 Understanding Real-Time ReportsDescribes the types of real-time reports available
Chapter 6 Understanding Historical ReportsDescribes the types of Historical Reports available
Chapter 7 Working with ReportsDescribes how to create, edit, save, open and print reports
Contents of This Document P-3

Preface
Chapter 8 Displaying Information on External WallboardsDescribes how to display the contents of Wallboard Displays on external wallboards and how to broadcast messages to external wallboards
Chapter 9 BCMS Vu Real-Time and Historical Report Data ItemsDefines the data items used in reports
Chapter 10 TroubleshootingProvides possible solutions to common operation problems you may encounter, and explains error messages
Glossary Defines commonly used telecommunications and call center terms that are used in this document and the BCMS Vu software
P-4 Contents of This Document

Preface
Pre
face
Conventions Used in This Document 0
The following conventions are used in this document:
Whenever there are several ways to perform a command (for example, double-click on a file name or highlight the file name and click on OK), the term select is used. You may choose either of the methods.
Another example of different ways to do the same thing is either selecting a command in a menu (for example selecting Save in the File menu) or clicking on the corresponding toolbar button. In this case you are instructed to select Save.
Bold type Menu names, button names, option names, and file paths on a disk are shown in bold type. For example: “Select Save from the File menu.” “The file is located in C:\Program Files\.” Sometimes items are shown in bold type for emphasis.
Italics Italics are used for trademarks, the exact wording of file names, and the titles of referenced documents. For example “BCMS Vu software runs on Microsoft Windows.” “Look for the file bcmsvuclient.” Sometimes words are italicized for emphasis.
Mouse button Unless the secondary mouse button is specified, use the primary mouse button whenever you are instructed to click or select an item.
Terminology Standard call center industry terminology is used in this document, as well as terms such as split/skill, ACD, and AUX. For definitions of terms used in this document, refer to the Glossary.
Conventions Used in This Document P-5
Preface
Related Documents 0
The following documents contain additional information about the BCMS Vu software and DEFINITY system:
● BCMS Vu Software R2 V2 Installation Guide
● BCMS Vu Wallboard Models WB1, WB2, IW1, and IW2 Installation, Programming, and Troubleshooting Instructions
● Wallboard Models WB3 and IW3 Installation, Programming, and Troubleshooting Instructions
● Wallboard Model WB5 Installation, Programming, Troubleshooting Instructions (
● DEFINITY Communications System Generic 3 Basic Call Management System (BCMS) Operations
● DEFINITY Communications System Generic 3 Feature Description
● DEFINITY Enterprise Communications Server Release 8 Administrator’s Guide
● 8400B Plus Data Module User Guide
● 7400B/7400B Plus Data Module User Guide
● Microsoft Access* user documentation.
If you are using a spreadsheet or another application to analyze BCMS Vu historical data, consult the user documentation for that application.
* Access is a registered trademark of Microsoft Corp.
P-6 Related Documents

1
Introduction 1BCMS Vu Software 1
BCMS Vu is a graphical user interface software application that monitors the status and performance of a call center. It uses data collected in the Basic Call Management System (BCMS) on a DEFINITY ProLogix or DEFINITY System G3V4, R5, or later, or a DEFINITY ONE System.
This chapter describes the benefits and features of the BCMS Vu software. It includes the following topics:
● Features of BCMS Vu software● Benefits of BCMS Vu software● When to use BCMS Vu software● Differences between Release 2 and Release 1 of BCMS Vu software● Differences between Release 2, Version 1 and Release 2, Version 2 of
BCMS Vu software● Operating environment● Software restrictions● Administrative requirements● Performance considerations
BCMS Vu Software 1-1

Introduction
● Help escalation● Software for maintenance contracts.
1-2 BCMS Vu Software
Introduction
Cha
pter
1
Features of BCMS Vu Software 1
BCMS Vu software lets you● Receive real-time data from the DEFINITY system and display it in
textual and graphical form on a PC monitor● Print the textual form of this real-time data● Display real-time data as a Wallboard Display that mimics the
display capabilities of external wallboards used in call centers● Select the data items you want to display when you define a real-
time report or Wallboard Display● Redirect the display output of one of the defined Wallboard
Displays to several types of external wallboards● Specify alerts on real-time data items to provide a visual or
visual/audible indication that the item has crossed the threshold alert level
● Download DEFINITY system historical data regularly to a database on the PC
● Display this stored data in a text format and retrieve it through third-party products
● Print this data● Access this data from several DEFINITY systems● Create and print Historical Reports from downloaded historical
data● Schedule printing of Historical Reports.
Features of BCMS Vu Software 1-3
Introduction
Benefits of BCMS Vu Software 1
BCMS Vu software provides the following benefits:● Real-time data can be displayed graphically.● Wallboard displays provide easy monitoring of call center activity.● Multiple reports can be displayed on the screen at the same time.● The ability to set alerts on data items allows “management by
exception.”● Graphical output under Microsoft Windows removes reliance on the
DEFINITY system text-based terminal.● BCMS Vu software lets you store more than the seven days of
historical data a DEFINITY system stores. With BCMS Vu software, you can keep historical data for as long as you want by periodically archiving the historical database.
● The historical database created by the BCMS Vu software can be accessed using other products, such as Microsoft Access.
● BCMS Vu software provides an interface to the DEFINITY system that allows you to create custom real-time reports using the BCMS data that resides on the DEFINITY system.
● The Server/Client architecture allows more real-time monitors of BCMS data than the DEFINITY system supports.
● There is no limit to the number of Historical Reports you can schedule for printing.
● BCMS Vu R2 is Year 2000-compliant.
1-4 Benefits of BCMS Vu Software

Introduction
Cha
pter
1
Differences between R1 and R2 1
Release 2 of BCMS Vu is the response by Lucent Technologies to requests from users for more features than exist in Release 1.
The most obvious difference between Release 1 and Release 2 is the separation of the Server application from the Client application. The Server application is installed on one PC, which is connected to a DEFINITY system. The Server receives data from the DEFINITY system. Client applications are installed on the same PC as the Server or on other PCs, which connect to the Server over a LAN, instead of connecting directly to the DEFINITY system.
With Release 2, users can now● Access real-time data without each BCMS Vu program having a
direct connection to a system management port on the DEFINITY system.
● Create real-time pie chart graphs and time-trace graphs.● Print real-time text reports.● Schedule printing of Historical Reports.● Send displays to wallboards connected to other PCs in the network.
Wallboards need to be registered with but not physically connected to the Server PC.
● Send one report to several wallboards or send different reports to wallboards daisy-chained together.
● Alternate reports and a broadcast message to the same wallboard or wallboards.
● Define four levels of alerts and thresholds in reports.● Define different thresholds for each split/skill, agent, and VDN.● Manage the storage of interval and daily data separately.
Differences between R1 and R2 1-5
Introduction
In addition, BCMS Vu is now licensed for one, five or ten clients.
Note The 486 processor is no longer supported.
1-6 Differences between R1 and R2

Introduction
Cha
pter
1
Differences between R2, Version 1 and R2 Version 2 1
Starting with Release 2, Version 2, BCMS Vu software supports connection to DEFINITY ONE via LAN. For all other DEFINITY systems, a data module is required for connection.
Differences between R2, Version 1 and R2 Version 2 1-7

Introduction
Operating Environment 1
To install BCMS Vu Software R2, you must have at least the following hardware and software:
For the BCMS Vu Server PC 1
❐ A single-processor Pentium.
❐ Windows NT 4.0 Server or Workstation with up to Service Pack 5 installed on the PC.
❐ 64 MB of main memory.
❐ Up to 500 MB (512,000 KB) of disk space*.
❐ A double-speed CD-ROM drive.
❐ One external serial port if a data module is used to connect to a DEFINITY system or a Network Interface Card (NIC) to connect to a DEFINITY ONE system via TCP/IP.
❐ You may need other unused serial ports:
— One to connect to a wallboard. This serial port must be an external port.
— One for remote maintenance if you are using an external modem.
*For splits/skills, agents, VDNs and trunk groups measured by BCMS, the following formula is an approximate guide to the space required in megabytes for each day’s historical data when the interval measured is an hour. (When the interval is a half-hour, use 185 instead of 370 in the formula.)
# splits/skills + # agents + # trunk groups + #VDNs(370) * BCMS interval in hours
Note If you install the software from a remote network drive, the machine on which the software is installed (either Server, Client, or Wallboard) does not need a CD-ROM drive.
1-8 Operating Environment
Introduction
Cha
pter
1
❐ A parallel port to connect the hardware key. A printer may be also connected to this port.
❐ The BCMS Vu R2 software distribution CD-ROM.
❐ A data module, either an 8400B Plus or 7400B/7400B Plus that is capable of accessing the DEFINITY system. The data module does not apply to DEFINITY ONE systems.
❐ A DEFINITY system login name and password for access to BCMS Vu.
— For DEFINITY systems other than DEFINITY ONE, a DEFINITY system telephone number (hunt group extension for Netcon channel) is required to connect via the data module.
— For DEFINITY ONE systems, a DEFINITY ONE hostname/IP address is required to connect via the LAN.
❐ A sound card and speakers if you want to use the training CD-ROM.
❐ The pcANYWHERE CD-ROM.
❐ An internal or external modem for remote maintenance using pcANYWHERE.
❐ The name of the Server PC, the names of all Client PCs on the network, and the names of all wallboards on the network that you want to use.
For the BCMS Vu Client PC 1
❐ A single-processor Pentium
❐ 32 MB of main memory (with Windows 95 or Windows 98 installed) or 64 MB of memory (with Windows NT 4.0 installed)
❐ 5 MB (5,120 KB) of free disk space
❐ A double speed CD-ROM drive
❐ A serial port for each external wallboard connected to the PC, or one port if the wallboards are daisy-chained
❐ Windows 95, Windows 98, or Windows NT 4.0 Workstation or Server with up to Service Pack 5 installed on the PC
Operating Environment 1-9
Introduction
❐ The BCMS Vu R2 software distribution CD-ROM
❐ (Option): One of the wallboards dedicated to BCMS Vu software
❐ The name of the Server you want to connect to
❐ A sound card and speakers if you want to use the training CD-ROM.
For a Wallboard PC without Client Software 1
❐ A single-processor Pentium
❐ Windows 95, Windows 98, or Windows NT 4.0 installed on the PC
❐ 32 MB of RAM
❐ 10 MB of free disk space
❐ A double-speed CD-ROM drive
❐ An available serial port for each non-daisy-chained wallboard.
Software Restrictions 1
Note BCMS Vu software supports English, French, German, Italian, Spanish, Dutch, Portuguese, Japanese, and Chinese languages on Windows 95, Windows 98, and Windows NT 4.0 operating systems.
Note Lucent Technologies certifies that BCMS Vu software has been tested and found to run co-resident with Microsoft Office 95, 97 or 2000, and Symantec pcANYWHERE. Lucent makes no claims whatsoever as to the compatibility of BCMS Vu software with any other software application.
Those who attempt to run BCMS Vu software with any other co-resident application do so at their own risk.
1-10 Operating Environment
Introduction
Cha
pter
1
Administrative Requirements 1
In order to view data on BCMS Vu reports, you must have the login name and password for the DEFINITY system to allow the Server PC to access BCMS data.
.
Note For the PC to be able to access BCMS data on the DEFINITY system, the login must have the following permissions:
Display Admin and Maint DataSystem Measurements
Lack of these permissions prevents reports and/or downloads from functioning properly.
Do not use the craft login or any service Login ID as the BCMS login.
If you need to create these permissions, contact your DEFINITY system administrator.
Note For non-EAS installations: If the System Parameters Customer Options Field, bcms loginIDs, is set to “y,” the Feature-related System Parameters Field, Validate Login IDs, must also be set to “y.”
In this case, if Validate Login IDs is not set to “y,” Agent Reports will not function properly.
Administrative Requirements 1-11
Introduction
Performance Considerations 1
There are three general criteria you should keep in mind when you use the BCMS Vu software:
● The larger the call center, the more disk space is required to store historical data. For example, a small call center with one trunk group, five VDNs, five splits/skills and ten agents using an interval of a minute will require approximately 57 KB a day; a call center with three trunk groups, ten VDNs, 20 splits/skills and 40 agents using an interval of a half-hour requires approximately 400 KB a day. Refer to the formula on page 1-8 for a better method of calculating historical data storage needs.
● The more reports there are running, the slower real-time updates will be.
● Historical downloads take longer at larger call centers.
Help Escalation 1
If errors occur while you are using BCMS Vu software, take the following steps to resolve the error:
1. Consult on-line help.
2. Refer to the “Troubleshooting” chapter to see if the error is discussed there.
3. Contact your Lucent Technologies product distributor. In the United States you can also call the Lucent Technologies Call Center Helpline on 1-800-242-2121.
Note Each DEFINITY system type has a limit to the number of simultaneous system management sessions that can be active at any one time. Each BCMS Vu Server that is currently logged into the DEFINITY system counts as one session.
1-12 Performance Considerations

Introduction
Cha
pter
1
Software for Maintenance Contracts 1
In addition to installing BMCS Vu software, you need to install pcANYWHERE software on the same PC as the Server software. The pcANYWHERE software enables Lucent Technologies Services to log into your PC remotely and perform troubleshooting procedures.
Use the installation procedures in the pcANYWHERE documentation to install your Server PC as a host computer.
Lucent Technologies recommends that pcANYWHERE software be opened only when working with Lucent Technologies Services personnel, to prevent unauthorized remote access to the BCMS Vu Server PC. Remote access is possible only when pcANYWHERE software is open and set up as a host PC.
Caution Because pcANYWHERE software allows a remote PC to access the BCMS Vu Server PC, it is essential that you take the following precautions:
● While installing pcANYWHERE software, do not select the Autoload option. The Autoload option starts pcANYWHERE each time the computer is turned on.
● Do not start pcANYWHERE software unless you are asked to do so by Lucent Technologies Services, and be sure to close it immediately afterwards.
● If you must leave pcANYWHERE software open at all times for your own purposes, use a password that is not related in any way to the passwords you use to access the DEFINITY system or BCMS. Include characters in the password that are not alphabetic (use numbers, special characters). Do not make this password widely known. Refer to the pcANYWHERE user’s guide for instructions on establishing passwords.
Software for Maintenance Contracts 1-13

Introduction
1-14 Software for Maintenance Contracts
2
BCMS Vu Server Basics 2Introduction 2
This chapter describes the main features of BCMS Vu Server software. It includes the following topics:
● What can I do using BCMS Vu Server?
● Starting BCMS Vu Server software.
● Disconnecting BCMS Vu Server from a DEFINITY system.
● Reconnecting BCMS Vu Server to a DEFINITY system.
● Exiting BCMS Vu Server software.
● Understanding the BCMS Vu Server main window.
● Using BCMS Vu Server On-Line Help.
Introduction 2-1

BCMS Vu Server Basics
What Can I Do Using BCMS Vu Server? 2
Use BCMS Vu Server to● Connect to a DEFINITY system● Disconnect from a DEFINITY system● Download historical data from a DEFINITY system● Schedule historical data downloading on a regular basis● Register wallboards● Register Clients● Manage historical data● Perform maintenance on the database● View the error log.
2-2 What Can I Do Using BCMS Vu Server?

BCMS Vu Server Basics
Cha
pter
2
Starting BCMS Vu Server Software 2
The BCMS Vu installation program creates a menu item on your PC’s Start/Programs menu. Refer to BCMS Vu R2 V2 Software Installation Guide for detailed installation instructions.
Note The following procedure presumes that whoever installed BCMS Vu software on the Server accepted the default program locations. If the installer chose to install the program icons in a different location (folder), you will have to go to that location to start BCMS Vu software using the program icon.An alternate method of starting BCMS Vu is to use the Find function of Windows to locate the program file for BCMS Vu Server (BCMSVuServer.exe) and select it.
Note If the hardware key is not attached to the PC before you start BCMS Vu software, the software will be loaded, but the program will run only in simulator mode when you try to start it. To view real-time reports and download historical data from the DEFINITY system, you must attach the hardware key and restart BCMS Vu Server software.
Starting BCMS Vu Server Software 2-3
BCMS Vu Server Basics
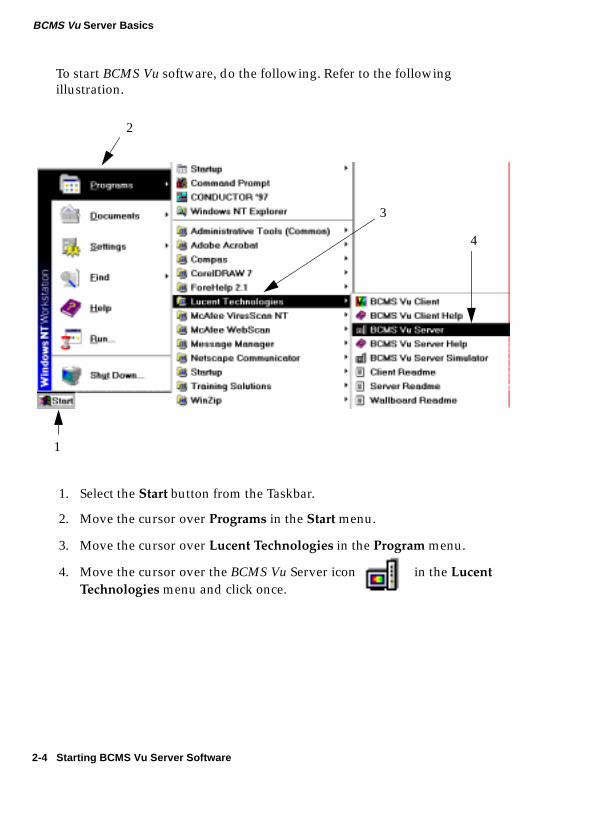
To start BCMS Vu software, do the following. Refer to the following illustration.
1. Select the Start button from the Taskbar.
2. Move the cursor over Programs in the Start menu.
3. Move the cursor over Lucent Technologies in the Program menu.
4. Move the cursor over the BCMS Vu Server icon in the Lucent Technologies menu and click once.
2
3
4
1
2-4 Starting BCMS Vu Server Software
BCMS Vu Server Basics
Cha
pter
2
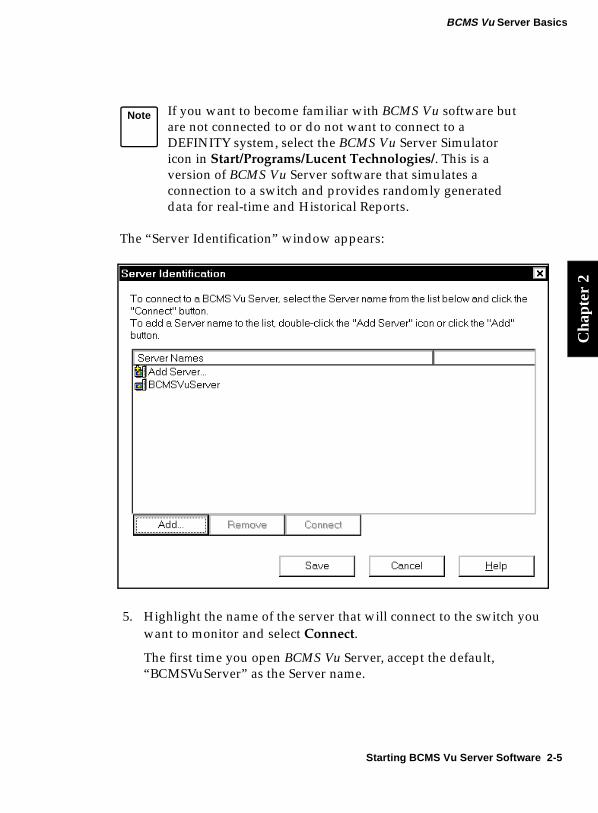
The “Server Identification” window appears:
5. Highlight the name of the server that will connect to the switch you want to monitor and select Connect.
The first time you open BCMS Vu Server, accept the default, “BCMSVuServer” as the Server name.
Note If you want to become familiar with BCMS Vu software but are not connected to or do not want to connect to a DEFINITY system, select the BCMS Vu Server Simulator icon in Start/Programs/Lucent Technologies/. This is a version of BCMS Vu Server software that simulates a connection to a switch and provides randomly generated data for real-time and Historical Reports.
Starting BCMS Vu Server Software 2-5
BCMS Vu Server Basics
6. If the name of the Server to which you want to connect is not in the list of server names, select Add Server... or Add....
A second “Server Identification” window appears.
a. In the second “Server Identification” window, enter the name used to identify the server you want to add to the list.
b. Select OK.
The second “Server Identification” window disappears and the first “Server Identification” window becomes the active window.
c. If you want to keep the name of the Server you just added in the list of Servers, select Save.
d. Highlight the name of the Server you just added to the list and select Connect.
The “Server Identification” window disappears.
Opening BCMS Vu Server the First Time 2
Note The first time you connect to the Server after you install BCMS Vu Server software, a configuration wizard appears. The first window of this wizard, the “Welcome” window gives you some information about what follows. It is shown in the following illustration:
2-6 Starting BCMS Vu Server Software

BCMS Vu Server Basics
Cha
pter
2
Select Next.
The wizard that follows is identical to the wizard you encounter when you chose Options|Configure|First Time. For a description of the wizard, refer to “Configuring BCMS Vu from the Server” on page 4-3.
Starting BCMS Vu Server Software 2-7
BCMS Vu Server Basics
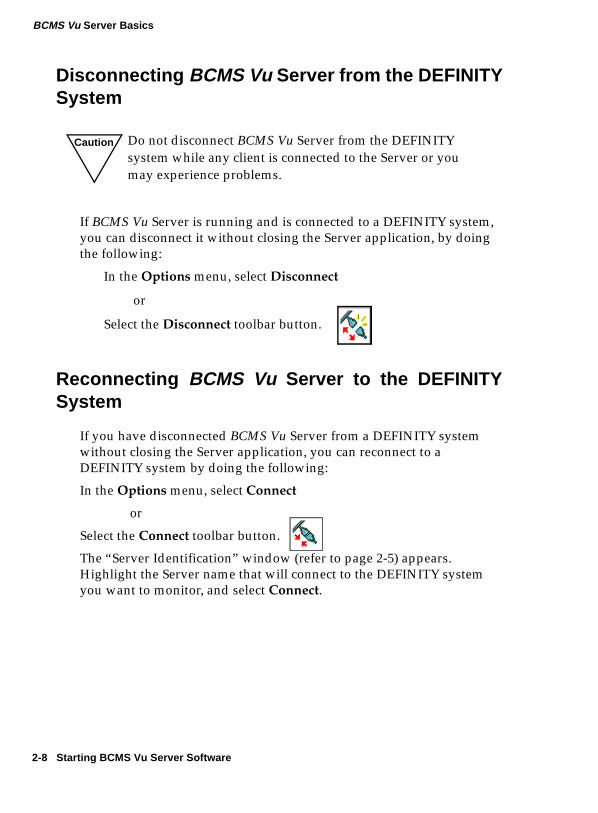
Disconnecting BCMS Vu Server from the DEFINITYSystem 2
If BCMS Vu Server is running and is connected to a DEFINITY system, you can disconnect it without closing the Server application, by doing the following:
In the Options menu, select Disconnect
or
Select the Disconnect toolbar button.
Reconnecting BCMS Vu Server to the DEFINITYSystem 2
If you have disconnected BCMS Vu Server from a DEFINITY system without closing the Server application, you can reconnect to a DEFINITY system by doing the following:
In the Options menu, select Connect
or
Select the Connect toolbar button.
The “Server Identification” window (refer to page 2-5) appears. Highlight the Server name that will connect to the DEFINITY system you want to monitor, and select Connect.
Caution Do not disconnect BCMS Vu Server from the DEFINITY system while any client is connected to the Server or you may experience problems.
2-8 Starting BCMS Vu Server Software

BCMS Vu Server Basics
Cha
pter
2
Exiting BCMS Vu Server Software 2
You can exit BCMS Vu Server software using any of the standard Windows methods, including:
● Select Exit from the File menu.
● Select the Close button in the upper-right corner of the main window.
● Select Close from the System drop-down menu box.
Caution Do not exit BCMS Vu Server while any client is connected to the Server or you may experience problems.
Note BCMS Vu can take a while to shut down. If you experience problems with other applications not working properly, you may want to make sure that the BCMS Vu software shut down completely (and end the task if it did not). To do this, complete the following steps:
1. Press CTRL+ALT+DEL to open the “Windows NT Security” window.
2. Select Task Manager.
3. In the “Windows NT Task Manager” window look for BCMSVu Server.
4. If it is displayed in the list of running applications, highlight it.
5. Select End Process.
Exiting BCMS Vu Server Software 2-9
BCMS Vu Server Basics
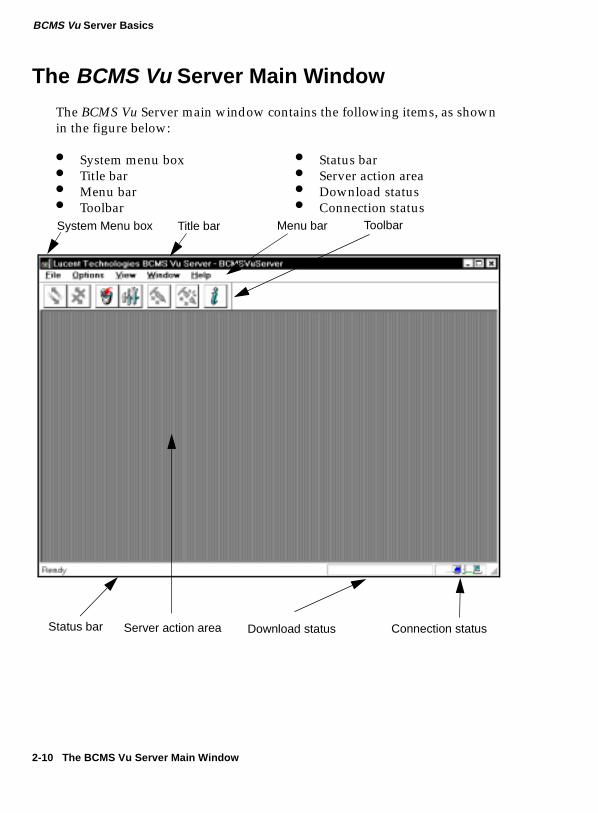
The BCMS Vu Server Main Window 2
The BCMS Vu Server main window contains the following items, as shown in the figure below:
● System menu box ● Status bar● Title bar ● Server action area● Menu bar ● Download status● Toolbar ● Connection status
Menu bar
Server action areaStatus bar
System Menu box
Connection statusDownload status
ToolbarTitle bar
2-10 The BCMS Vu Server Main Window
BCMS Vu Server Basics
Cha
pter
2
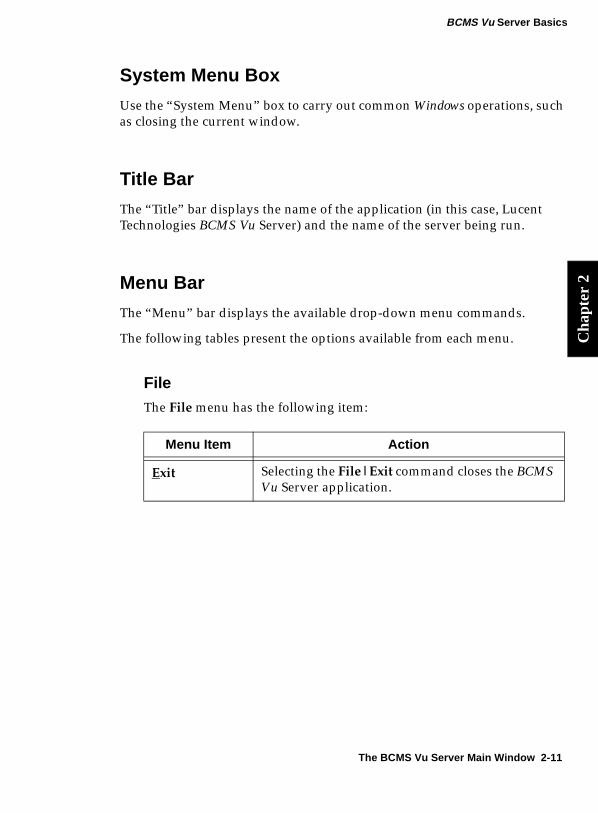
System Menu Box 2
Use the “System Menu” box to carry out common Windows operations, such as closing the current window.
Title Bar 2
The “Title” bar displays the name of the application (in this case, Lucent Technologies BCMS Vu Server) and the name of the server being run.
Menu Bar 2
The “Menu” bar displays the available drop-down menu commands.
The following tables present the options available from each menu.
File 2
The File menu has the following item:
Menu Item Action
Exit Selecting the File|Exit command closes the BCMS Vu Server application.
The BCMS Vu Server Main Window 2-11
BCMS Vu Server Basics
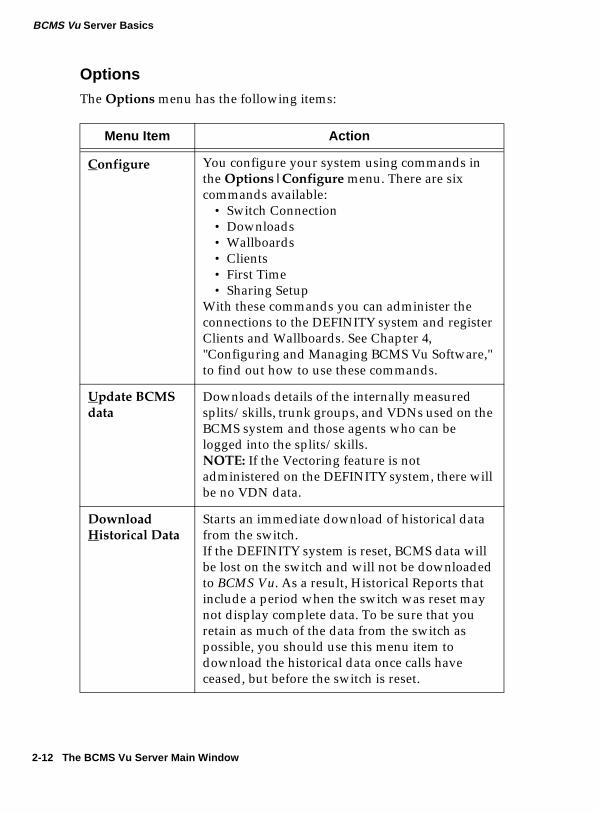
Options 2
The Options menu has the following items:
Menu Item Action
Configure You configure your system using commands in the Options|Configure menu. There are six commands available:
• Switch Connection• Downloads• Wallboards• Clients• First Time• Sharing Setup
With these commands you can administer the connections to the DEFINITY system and register Clients and Wallboards. See Chapter 4, "Configuring and Managing BCMS Vu Software," to find out how to use these commands.
Update BCMS data
Downloads details of the internally measured splits/skills, trunk groups, and VDNs used on the BCMS system and those agents who can be logged into the splits/skills.NOTE: If the Vectoring feature is not administered on the DEFINITY system, there will be no VDN data.
Download Historical Data
Starts an immediate download of historical data from the switch.If the DEFINITY system is reset, BCMS data will be lost on the switch and will not be downloaded to BCMS Vu. As a result, Historical Reports that include a period when the switch was reset may not display complete data. To be sure that you retain as much of the data from the switch as possible, you should use this menu item to download the historical data once calls have ceased, but before the switch is reset.
2-12 The BCMS Vu Server Main Window
BCMS Vu Server Basics
Cha
pter
2
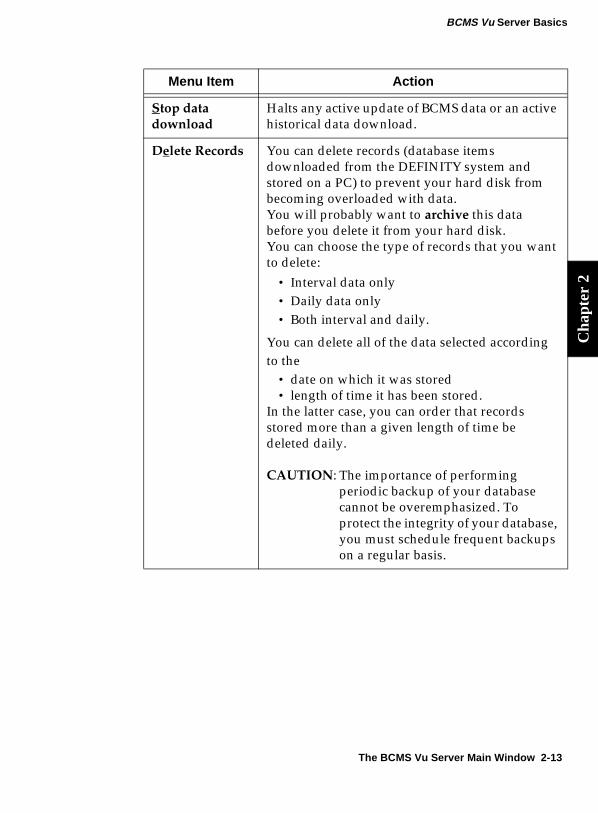
Stop data download
Halts any active update of BCMS data or an active historical data download.
Delete Records You can delete records (database items downloaded from the DEFINITY system and stored on a PC) to prevent your hard disk from becoming overloaded with data.You will probably want to archive this data before you delete it from your hard disk.You can choose the type of records that you want to delete:
• Interval data only• Daily data only• Both interval and daily.
You can delete all of the data selected according to the
• date on which it was stored• length of time it has been stored.
In the latter case, you can order that records stored more than a given length of time be deleted daily.
CAUTION: The importance of performing periodic backup of your database cannot be overemphasized. To protect the integrity of your database, you must schedule frequent backups on a regular basis.
Menu Item Action
The BCMS Vu Server Main Window 2-13
BCMS Vu Server Basics
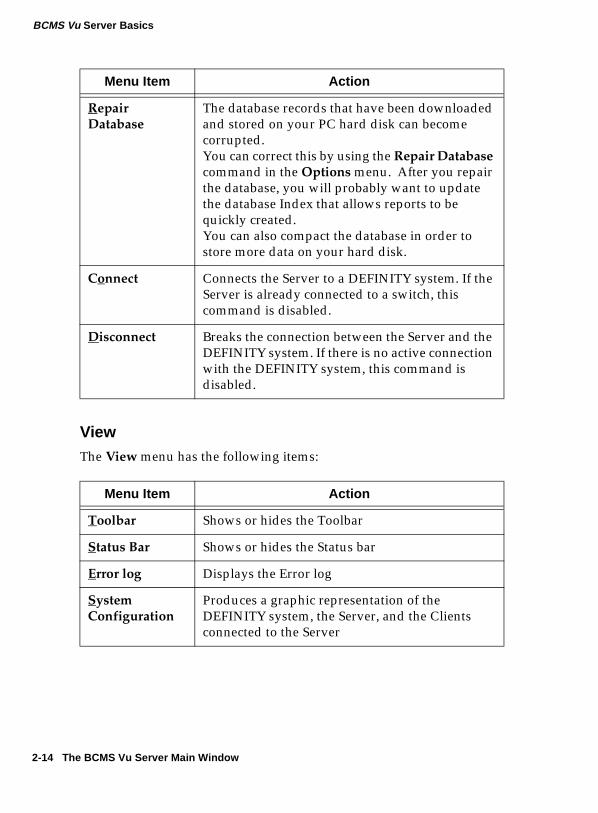
View 2
The View menu has the following items:
Repair Database
The database records that have been downloaded and stored on your PC hard disk can become corrupted.You can correct this by using the Repair Database command in the Options menu. After you repair the database, you will probably want to update the database Index that allows reports to be quickly created.You can also compact the database in order to store more data on your hard disk.
Connect Connects the Server to a DEFINITY system. If the Server is already connected to a switch, this command is disabled.
Disconnect Breaks the connection between the Server and the DEFINITY system. If there is no active connection with the DEFINITY system, this command is disabled.
Menu Item Action
Toolbar Shows or hides the Toolbar
Status Bar Shows or hides the Status bar
Error log Displays the Error log
System Configuration
Produces a graphic representation of the DEFINITY system, the Server, and the Clients connected to the Server
Menu Item Action
2-14 The BCMS Vu Server Main Window
BCMS Vu Server Basics
Cha
pter
2
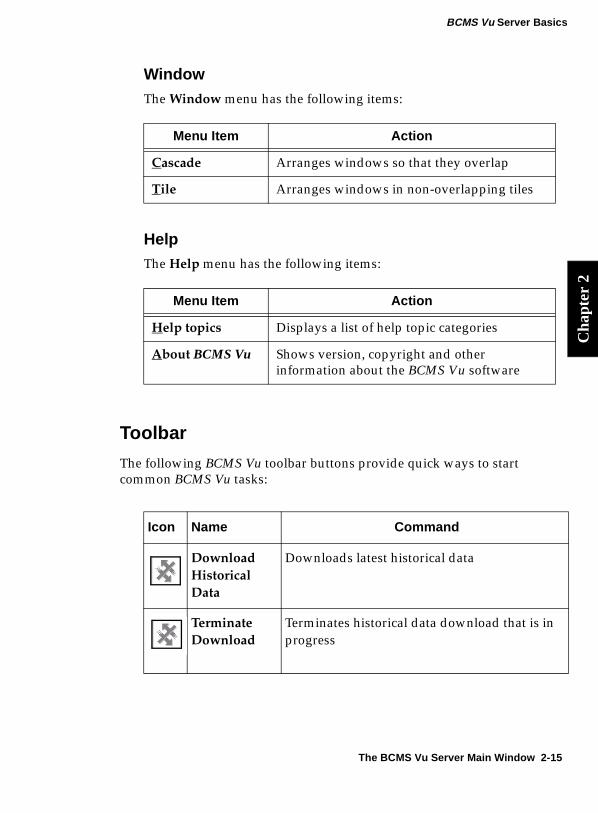
Window 2
The Window menu has the following items:
Help 2
The Help menu has the following items:
Toolbar 2
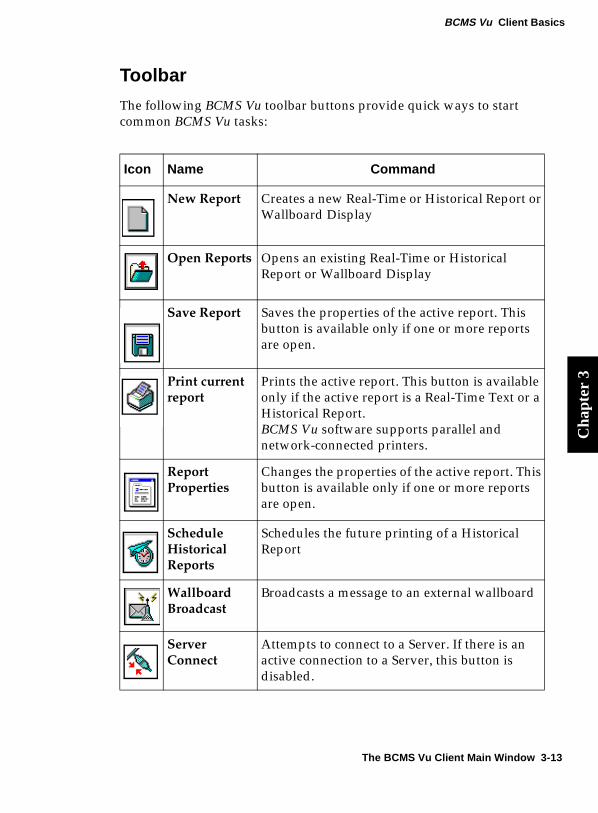
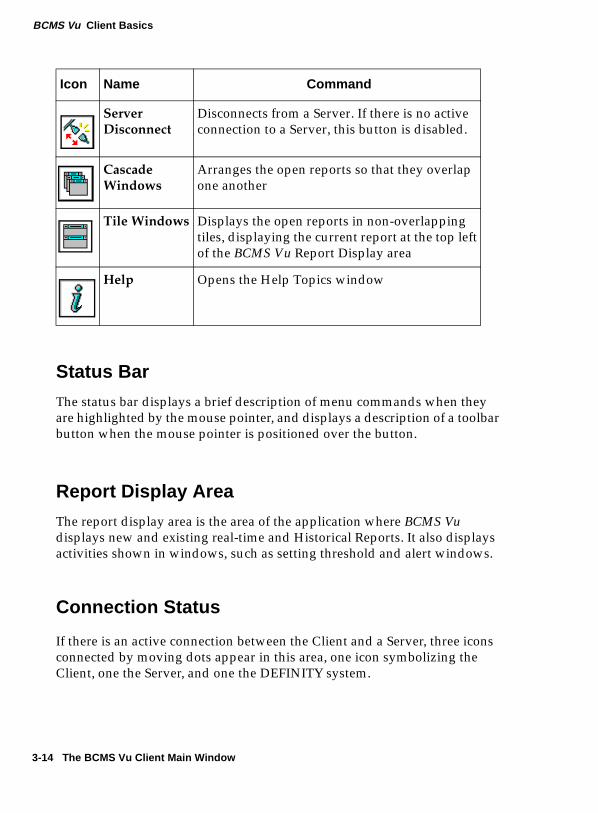
The following BCMS Vu toolbar buttons provide quick ways to start common BCMS Vu tasks:
Menu Item Action
Cascade Arranges windows so that they overlap
Tile Arranges windows in non-overlapping tiles
Menu Item Action
Help topics Displays a list of help topic categories
About BCMS Vu Shows version, copyright and other information about the BCMS Vu software
Icon Name Command
Download Historical Data
Downloads latest historical data
Terminate Download
Terminates historical data download that is in progress
The BCMS Vu Server Main Window 2-15
BCMS Vu Server Basics
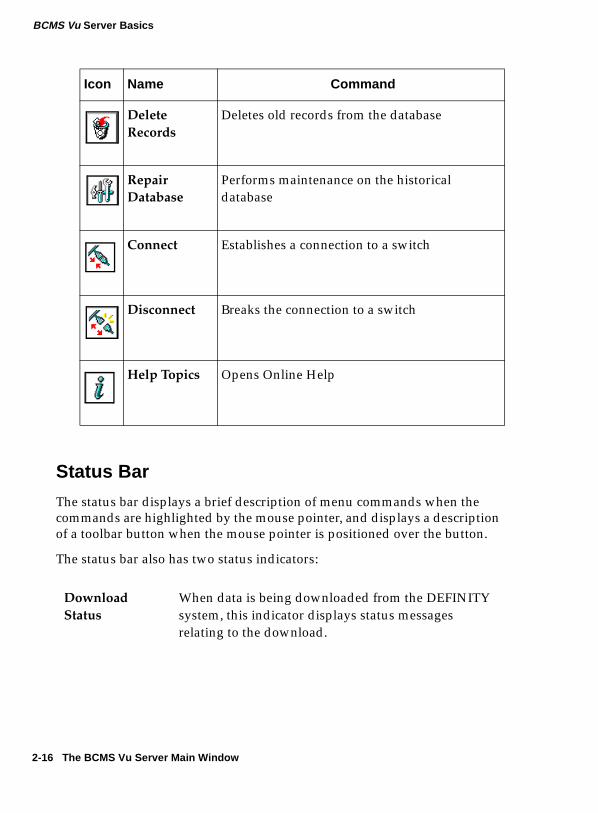
Status Bar 2
The status bar displays a brief description of menu commands when the commands are highlighted by the mouse pointer, and displays a description of a toolbar button when the mouse pointer is positioned over the button.
The status bar also has two status indicators:
Delete Records
Deletes old records from the database
Repair Database
Performs maintenance on the historical database
Connect Establishes a connection to a switch
Disconnect Breaks the connection to a switch
Help Topics Opens Online Help
Download Status
When data is being downloaded from the DEFINITY system, this indicator displays status messages relating to the download.
Icon Name Command
2-16 The BCMS Vu Server Main Window

BCMS Vu Server Basics
Cha
pter
2
The download status and connection status are not visible or active if the Status bar is disabled from the View menu.
Server Action Area 2
The Server Action area is the area of the Server application where windows resulting from menu selections appear.
Connection Status
When BCMS Vu Server is connected to the DEFINITY system, the status bar shows icons of a large and small PC connected by moving colored dots. When BCMS Vu Server is disconnected from the DEFINITY system, only one icon appears.
The BCMS Vu Server Main Window 2-17
BCMS Vu Server Basics
Using BCMS Vu Server On-Line Help 2
You can get on-line help for the following:
● Toolbar buttons and menu options
● The BCMS Vu window you are working in
● A particular BCMS Vu topic or function.
For information about a toolbar button or menu option, move the mouse pointer over the item. Brief information or instructions will appear either in the status bar at the bottom of the BCMS Vu main window or as a tooltip.
For information about any BCMS Vu window you are working in, press the F1 key, or select a Help button if one is displayed in the window.
To select a particular topic or read about BCMS Vu functions, choose Help Topics from the Help menu.
2-18 Using BCMS Vu Server On-Line Help

3
BCMS Vu Client Basics 3Introduction 3
This chapter describes the main features of BCMS Vu Client software. It includes the following topics:
● What can I do using BCMS Vu Client?
● Starting BCMS Vu Client software.
● Disconnecting BCMS Vu Client from a Server.
● Reconnecting BCMS Vu Client software to a Server.
● Exiting BCMS Vu Client software.
● Understanding the BCMS Vu Client main window.
● BCMS Vu Client Online Help.
Introduction 3-1
BCMS Vu Client Basics
What Can I Do Using BCMS Vu Client? 3
Use BCMS Vu Client to● Connect to a server● Receive real-time data from the DEFINITY system and display it in
textual and graphical form on a PC monitor● Print real-time textual reports● Display real-time data
— As Wallboard Displays on a monitor that mimic the display capabilities of external wallboards used in call centers
— On several types of external wallboards● Select the data items you want to display when you define a real-
time report or Wallboard Display● Specify alerts on real-time data items to provide a visual or
visual/audible indication that the item has exceeded or fallen below the threshold alert level
● Create and print Historical Reports from the downloaded historical data
● Schedule the printing of Historical Reports● Save and reopen all types of reports● View the error log● Display stored historical data in a table format using Microsoft
Access or Microsoft Excel*.
* Excel is a registered trademark of Microsoft Corp.
3-2 What Can I Do Using BCMS Vu Client?
BCMS Vu Client Basics
Cha
pter
3
Starting BCMS Vu Client Software 3
The BCMS Vu installation program creates a menu item on your PC’s “Programs” menu. Refer to BCMS Vu R2 Software Installation Guide for detailed installation instructions.
Note The following procedure presumes that whoever installed the BCMS Vu Client software accepted the default program locations. If the installer chose to install the program start icons in a different location (folder), you will have to go to that location to start BCMS Vu using the program start icon.An alternate method of starting BCMS Vu is to use the Find function of Windows to locate the program file for BCMS Vu Client (bcmsvuclient.exe) and select it.
Note Before you can connect a Client to a Server, the Client must be registered with the Server. See “Registering Clients” on page 4-14.
Starting BCMS Vu Client Software 3-3

BCMS Vu Client Basics
To start BCMS Vu Client software, do the following. Refer to the following figure.
1. Select the Start button from the Taskbar.
2. Move the cursor over Programs in the Start menu.
3. Move the cursor over Lucent Technologies in the Program menu.
4. Move the cursor over the BCMS Vu Client icon in the Lucent Technologies menu and click once.
The Lucent Technologies splash window appears for a few seconds. You may clear it quickly by clicking on it.
The “Server Connection” window appears.
1
3
2
4
3-4 Starting BCMS Vu Client Software
BCMS Vu Client Basics
Cha
pter
3
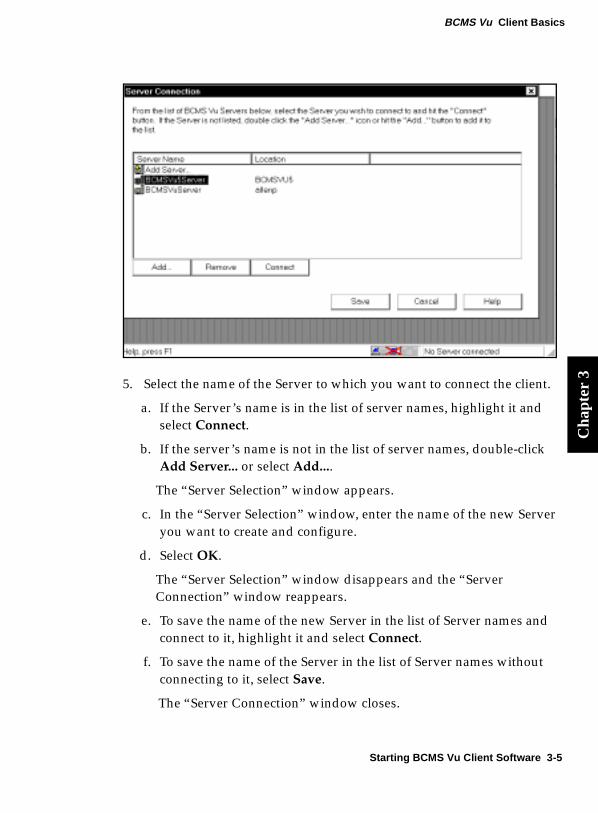
5. Select the name of the Server to which you want to connect the client.a. If the Server’s name is in the list of server names, highlight it and select Connect.
b. If the server’s name is not in the list of server names, double-click Add Server... or select Add....
The “Server Selection” window appears.
c. In the “Server Selection” window, enter the name of the new Server you want to create and configure.
d. Select OK.
The “Server Selection” window disappears and the “Server Connection” window reappears.
e. To save the name of the new Server in the list of Server names and connect to it, highlight it and select Connect.
f. To save the name of the Server in the list of Server names without connecting to it, select Save.
The “Server Connection” window closes.
Starting BCMS Vu Client Software 3-5

BCMS Vu Client Basics
Disconnecting BCMS Vu Client from a Server 3
If BCMS Vu Client is connected to a Server, you can disconnect from the Server without closing the Client application by doing either of the following:
In the Options menu, select Disconnect.
or
Select the Disconnect toolbar button.
Reconnecting BCMS Vu Client to a Server 3
If you have disconnected the Client from a Server without closing the Client application, you can reconnect by doing either of the following:
In the Options menu, select Connect.
or
Select the Connect toolbar button.
The “Server Connection” window appears. (See page 5). Highlight the name of the Server you want to connect to and select Connect.
Caution If BCMS Vu Client is generating reports, do not close the Client application or disconnect the Client from the Server until the reports are displayed or you will lose some of the reports.
3-6 Starting BCMS Vu Client Software

BCMS Vu Client Basics
Cha
pter
3
Exiting BCMS Vu Client Software 3
You can exit BCMS Vu software using any of the standard Windows methods, including:
● Select Exit from the File menu.
● Select the Close button in the upper right corner of the main window.
● Select Close from the Window menu.
Caution If BCMS Vu Client is generating reports, do not close the Client application or disconnect the Client from the Server until the reports start printing or you will lose some of the reports.
Note BCMS Vu can take a while to shut down. If you experience problems with other applications not working properly, you may want to make sure that BCMS Vu has shut down completely (and end the task if it did not). To do this, complete the following steps:
1. Press CTRL+ALT+DEL to open the “Windows NT Security window (Windows NT 4.0) or “Close Program” window (Windows 95 or Windows 98).
2. Select Task Manager (Windows NT 4.0 only).
3. In the “Windows NT Task Manager” window or “Close Program” window look for bcmsvuclient.
4. If it is displayed in the list of running applications, highlight it.
5. Select End Process (Windows NT 4.0) or End Task (Windows 95 or Windows 98).
Exiting BCMS Vu Client Software 3-7

BCMS Vu Client Basics
The BCMS Vu Client Main Window 3
The BCMS Vu Client main window contains the following items, as shown in the figure below:
● System menu box ● Status bar● Title bar ● Report display area● Menu bar ● Connection status● Toolbar ● Server name
Menu bar
Report display area
System menu box ToolbarTitle bar
Connection status Server PC nameStatus bar
3-8 The BCMS Vu Client Main Window

BCMS Vu Client Basics
Cha
pter
3
System Menu Box 3
Use the “System Menu” box to carry out common Windows operations, such as closing the current window.
Title Bar 3
The “Title” bar displays the name of the application (in this case, Lucent Technologies BCMS Vu Client). If one or more reports in the report display area are displayed, the name of the active report is also shown in the title bar.
Menu Bar 3
The “Menu” bar displays the available drop-down menu commands.
The following tables present the options available from each menu.
File 3
The File menu has the following items:
Menu Item Action
New Report Creates a new report
Open Reports Opens an existing report
Close Report Closes an open report
Save Report Saves an open report with the same file name
Save Report As Saves an open report to a different file name
Print Report If a Real-Time Text Report or a Historical Report is active, selecting this menu item displays a standard Windows print window.
The BCMS Vu Client Main Window 3-9
BCMS Vu Client Basics
Edit 3
The Edit menu has the following items:
Options 3
The Options menu has the following items:
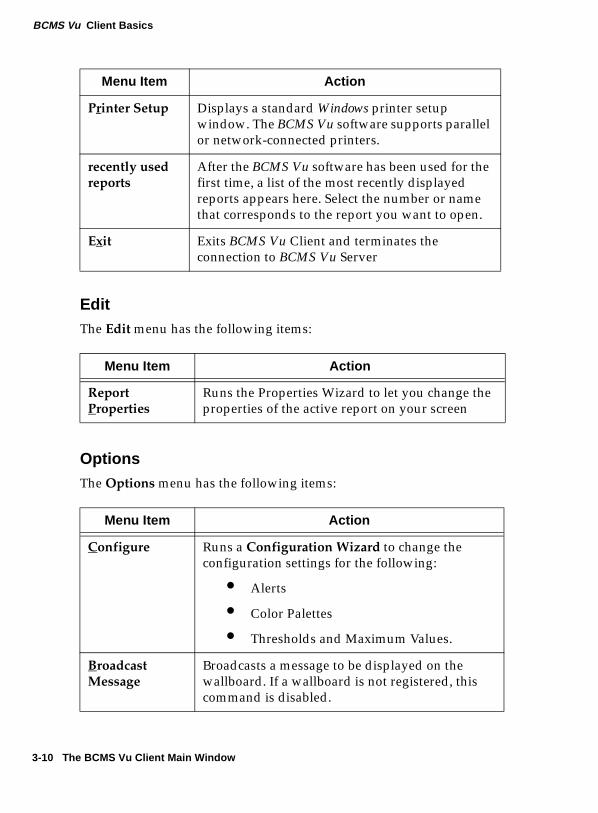
Printer Setup Displays a standard Windows printer setup window. The BCMS Vu software supports parallel or network-connected printers.
recently used reports
After the BCMS Vu software has been used for the first time, a list of the most recently displayed reports appears here. Select the number or name that corresponds to the report you want to open.
Exit Exits BCMS Vu Client and terminates the connection to BCMS Vu Server
Menu Item Action
Report Properties
Runs the Properties Wizard to let you change the properties of the active report on your screen
Menu Item Action
Configure Runs a Configuration Wizard to change the configuration settings for the following:
● Alerts
● Color Palettes
● Thresholds and Maximum Values.
Broadcast Message
Broadcasts a message to be displayed on the wallboard. If a wallboard is not registered, this command is disabled.
Menu Item Action
3-10 The BCMS Vu Client Main Window
BCMS Vu Client Basics
Cha
pter
3
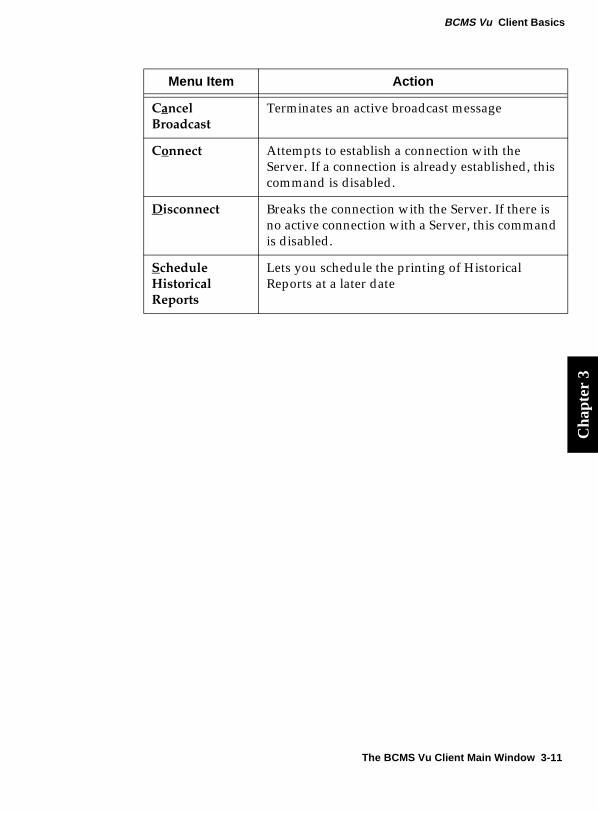
Cancel Broadcast
Terminates an active broadcast message
Connect Attempts to establish a connection with the Server. If a connection is already established, this command is disabled.
Disconnect Breaks the connection with the Server. If there is no active connection with a Server, this command is disabled.
Schedule Historical Reports
Lets you schedule the printing of Historical Reports at a later date
Menu Item Action
The BCMS Vu Client Main Window 3-11

BCMS Vu Client Basics
View 3
The View menu has the following items:
Window 3
The Window menu has the following items:
Help 3
The Help menu has the following items:
Menu Item Action
Toolbar Shows or hides the toolbar
Status Bar Shows or hides the status bar
Error log Displays the error log. Because the error log is stored on the Server, this item is disabled when the client is not connected to a Server.
Menu Item Action
Tile Arranges windows in non-overlapping tiles
Cascade Arranges windows so that they overlap
list of open reports
Goes to a specified report. Available only when one or more reports are open.
Menu Item Action
Help topics Displays a list of help topic categories
About BCMS Vu Displays version and copyright information about BCMS Vu
3-12 The BCMS Vu Client Main Window
BCMS Vu Client Basics
Cha
pter
3
Toolbar 3
The following BCMS Vu toolbar buttons provide quick ways to start common BCMS Vu tasks:
Icon Name Command
New Report Creates a new Real-Time or Historical Report or Wallboard Display
Open Reports Opens an existing Real-Time or Historical Report or Wallboard Display
Save Report Saves the properties of the active report. This button is available only if one or more reports are open.
Print current report
Prints the active report. This button is available only if the active report is a Real-Time Text or a Historical Report.BCMS Vu software supports parallel and network-connected printers.
Report Properties
Changes the properties of the active report. This button is available only if one or more reports are open.
Schedule Historical Reports
Schedules the future printing of a Historical Report
Wallboard Broadcast
Broadcasts a message to an external wallboard
Server Connect
Attempts to connect to a Server. If there is an active connection to a Server, this button is disabled.
The BCMS Vu Client Main Window 3-13
BCMS Vu Client Basics
Status Bar 3
The status bar displays a brief description of menu commands when they are highlighted by the mouse pointer, and displays a description of a toolbar button when the mouse pointer is positioned over the button.
Report Display Area 3
The report display area is the area of the application where BCMS Vu displays new and existing real-time and Historical Reports. It also displays activities shown in windows, such as setting threshold and alert windows.
Connection Status 3
If there is an active connection between the Client and a Server, three icons connected by moving dots appear in this area, one icon symbolizing the Client, one the Server, and one the DEFINITY system.
Server Disconnect
Disconnects from a Server. If there is no active connection to a Server, this button is disabled.
Cascade Windows
Arranges the open reports so that they overlap one another
Tile Windows Displays the open reports in non-overlapping tiles, displaying the current report at the top left of the BCMS Vu Report Display area
Help Opens the Help Topics window
Icon Name Command
3-14 The BCMS Vu Client Main Window
BCMS Vu Client Basics
Cha
pter
3
If there is no connection between the Server and the DEFINITY system, the DEFINITY system icon is covered by a red “X.”
If there is not an active connection between the Client and a Server, an icon covered by a red “X” and the words “No Server connected” appear in this area.
The connection status will not be visible or active if the status bar is disabled from the menu.
Server Name 3
If there is an active connection between the Client and a Server, the Server name and the Server PC name appear in this area.
The BCMS Vu Client Main Window 3-15

BCMS Vu Client Basics
BCMS Vu Client On-Line Help 3
You can get on-line help for the following:
● Toolbar buttons and menu options
● The BCMS Vu window you are working in
● A particular BCMS Vu topic or function.
For information about a toolbar button or menu option, move the mouse pointer over the item. Brief information or instructions will appear either in the status bar at the bottom of the BCMS Vu main window or as a tooltip.
For information about any BCMS Vu window you are working in, press the F1 key, or click a Help button if one is displayed in the window.
To select a particular topic or read about BCMS Vu functions, choose Help Topics from the Help menu.
3-16 BCMS Vu Client On-Line Help

4
Configuring and Managing BCMS Vu Software 4Introduction 4
This chapter is divided into four main sections:● Configuring BCMS Vu software from the Server after it has been
installed on your PC● Configuring BCMS Vu software from the Client after it has been
installed on your PC● Managing historical data from the Server● Managing miscellaneous BCMS Vu software functions.
In BCMS Vu Server you use configuration wizards to● Establish a connection from the Server to the DEFINITY system to
retrieve real-time data● Specify when and where historical data will be downloaded from
the DEFINITY system to your PC● Register external wallboards● Register clients.
Introduction 4-1
Configuring and Managing the BCMS Vu Software
In BCMS Vu Client you use configuration wizards to ● Define alerts● Specify palette colors for real-time reports● Define thresholds and maximum values for items displayed in real-
time reports.
You manage historical data when you ● Download historical data● Back up the historical database● Remove historical data from the PC● Back up folders and files● Repair the database● Re-index the database● Compact the database● Manage memory allocation.
A miscellaneous BCMS Vu function you manage is downloading BCMS data.
After you initially configure BCMS Vu software you can change the configuration options.
4-2 Introduction
Configuring and Managing the BCMS Vu Software
Cha
pter
4
Configuring BCMS Vu from the Server 4
The BCMS Vu Server contains four configuration wizards:● The Switch Connection Configuration Wizard lets you connect to
the DEFINITY system whose activity you want to measure.● The Downloads Configuration Wizard lets you schedule historical
data downloads from the DEFINITY system.● The Wallboards Configuration Wizard lets you register the
wallboards connected to PCs on the network.● The Clients Configuration Wizard lets you register the Clients that
you allow to connect to the Server.
Normally you run each of these wizards individually.
The first time you open BCMS Vu Server, however, you are presented with the Switch Connection, Downloads, and Clients wizards as successive parts of a larger wizard.
You can also access this larger wizard by selecting First Time in the Options|Configure menu. As you finish each of the three individual wizards, you select Next to move to the next wizard, and after the last window of the Clients wizard, you select Finish to close the wizard.
If you want to access only one of the four individual configuration wizards, select it in the Options|Configure menu. A description of the four wizards follows.
Note The user who runs the BCMS Vu Server must be administered as a “Power User.”
Configuring BCMS Vu from the Server 4-3

Configuring and Managing the BCMS Vu Software
Connecting to the DEFINITY System 4
The Switch Connection Configuration Wizard is pages 1-3 of the larger wizard you are presented when you start BCMS Vu Server software the first time and when you choose First Time in the Option|Configure menu. You can also start the Switch Connection Configuration Wizard by itself.
You connect to the DEFINITY system from the Server.
The windows of the Switch Connection Configuration Wizard allow you to set up a connection between your Server PC and the DEFINITY system. This connection allows you to download data from the BCMS database and to see real-time BCMS data.
To connect to a DEFINITY system,
1. From the Options|Configure menu select Switch Connection
or
From the Options|Configure menu select First Time.
The “Enter a login and password” window appears.
2. In the “Login Name:” box, type the login that will be automatically supplied to the DEFINITY system when you connect to the DEFINITY
Note The Server can be physically connected via data modules (through separate serial ports) or a TCP/IP LAN connection to more than one DEFINITY system, but you can access data from only one DEFINITY system at a time. The data modules cannot be used to connect to the DEFINITY ONE system. You specify the connection information for a given DEFINITY system and give this set-up a name through the Switch Connection Configuration Wizard. When you start the Server software, you select the name of the connection you want.
4-4 Configuring BCMS Vu from the Server
Configuring and Managing the BCMS Vu Software
Cha
pter
4
system. The login must match the BCMS Vu login name administered on the DEFINITY system.
3. In the “Login Password:” box, type the password that is associated with Login Name. It must match the password for the BCMS Vu login on the DEFINITY system.
4. Select Next.
The “Specify the Host Name/IP Address and Port for TCP/IP or Phone Number and Serial Port for the data module for BCMS Vu to use to access the switch” window appears.
Note This DEFINITY system login must have the following permissions:
• Display Admin and Maint Data• System Measurements
The DEFINITY system login must not be a “service” login. Refer to “BCMS Vu Login and Password” in Chapter 2 of BCMS Vu Software R2 Installation Guide.
Note If the following conditions exist, you must change the password on the DEFINITY system and in BCMS Vu Server for that login.
• Password aging for the BCMS Vu logon is in effect on the DEFINITY system, and
• Aging is in effect for the login that BCMS Vu Server uses to access the DEFINITY system, and
• The password expires.To eliminate this problem altogether, you may turn off password aging on the DEFINITY system “add login” form. To do this leave the password aging field in the next screen blank. To change login passwords, refer to “BCMS Vu Login and Password” in Chapter 2 of BCMS Vu Software R2 Installation Guide.
Configuring BCMS Vu from the Server 4-5
Configuring and Managing the BCMS Vu Software
5. In the “Mode of Connection:” group box, choose the “TCP/IP” or the “Data Module” radio button. If you choose the “TCP/IP” option, the “Host Name/IP Address:” and “Port:” boxes are enabled and the “Phone Number:” and “Serial Port:” are disabled. If you choose the “Data Module option,” the “Phone Number:” and “Serial Port:” boxes are enabled and the “Host Name/IP Address:” and “Port:” boxes are disabled.
6. If you choose the “TCP/IP” option, follow Steps “a” and “b,” and go to Step 8.
a. Complete the “Host Name/IP address:” box. Type the Host Name or the IP address of the DEFINITY ONE system to which connection is desired.
b. Complete the “Port:” box. The “port” is the port on the switch to which TCP/IP sockets will bind to initiate communications to the switch. For the DEFINITY ONE system, port “22” must be used.
7. If you choose the “Data Module” option, follow Steps “a” and “b.”
a. Use the drop-down list for the “Serial Port:” box to select the serial port that you are using to connect to the data module, if the data module option is chosen. The serial ports that are available in the drop-down list will match the ports available on your PC. If you do not know which serial (COM) port to choose, look at the back of your PC for the port (1 through 8) to which the data module is connected.
b. In the “Phone Number:” box type the hunt group extension for Netcon channels that must be dialed for the data module to connect to the DEFINITY system.
8. Select Next.
In the window that appears you will see a diagram showing the path to the DEFINITY system you are trying to connect to. Select Test Connection to confirm that the connection has been properly set up.
Note If you are configuring for the first time, then the “TCP/IP” radio button is selected by default. Otherwise the option that was used the previous time is selected.
4-6 Configuring BCMS Vu from the Server
Configuring and Managing the BCMS Vu Software
Cha
pter
4
A colored dot moves back and forth between the PC icon and the DEFINITY system icon.
If the connection is established, the words “The test was successful” appear.
If the connection is not successful, BCMS Vu attempts to connect until it times out and tells you why it failed. In this case, select Cancel and correct the problem. Refer to “Troubleshooting the Data Module” on page 10-40, if you are using a data module to connect to the DEFINITY system. For the DEFINITY ONE system, refer to the associated error codes.
9. To exit the Switch Connection Configuration Wizard, select Finish.
If, however, you entered the Switch Connection Configuration Wizard by selecting Options|Configure|First Time or if this is the first time you have gone through the wizard, and you want to continue to the Download Historical Data Wizard, select Next.
Connecting to and Disconnecting from the DEFINITY System 4
BCMS Vu Server normally remains connected for as long as both BCMS Vu Sever and the DEFINITY system are running.
Note If the connection to the DEFINITY system is dropped, for whatever reason, a Communications Error window appears offering you the following options:
• Retry the connection• Cancel the connection.
The program attempts to reconnect. If it does not reconnect and you do not select Cancel, the program attempts to reconnect again after thirty seconds, offering the same options. It tries again after a minute, then after two minutes, four minutes, and so forth. It continues trying to reconnect indefinitely at larger and larger intervals, until it is successful or you select Cancel.
Configuring BCMS Vu from the Server 4-7
Configuring and Managing the BCMS Vu Software
While BCMS Vu Server is connected to the DEFINITY system, you can manually disconnect it. To do this, select Disconnect from the Options menu, or select the Disconnect icon from the toolbar. BCMS Vu Server disconnects.
If BCMS Vu Server is not connected to the DEFINITY system, you can manually connect it. To do this,
1. Select Connect from the Options menu, or select the Connect icon on the toolbar.
The “Server Connection” window appears.
2. Highlight the Server you want to connect to and select Connect.
Provided the PC is properly connected and the DEFINITY system is running, BCMS Vu Server connects to the DEFINITY system. Allow several minutes for the connection to be established.
When BCMS Vu Server is connected to the DEFINITY system, the status bar shows icons of a large and small PC connected by moving colored dots. If BCMS Vu Server is disconnected from the DEFINITY system, only one icon appears.
Downloading Historical Data 4
The Downloads Configuration Wizard in the Server allows you to specify how often, at what time, and where the historical database is downloaded from the DEFINITY system to your PC.
You download historical data from the Server.
Note Downloading historical data regularly and correctly is absolutely necessary for accurately reporting DEFINITY system data. We strongly advise you to download data for half-hour intervals at least twice a day, and for hour intervals at least once a day. Be sure to carefully read “Downloading Historical Data” on page 4-22 and “How the DEFINITY System Stores Data” on page 4-23.
4-8 Configuring BCMS Vu from the Server

Configuring and Managing the BCMS Vu Software
Cha
pter
4
This wizard is pages 4-6 of the wizard you are presented when you start BCMS Vu Server the first time. The same wizard appears when you choose First Time in the Options|Configure menu.
To schedule downloads of historical data,
1. In the Options|Configure menu, select Downloads.
2. In the window that appears, be sure the box next to “Enable Downloading of Historical Data” is checked.
3. Select Next.
The “Specify the time at which ...” window appears.
4. In the Upper box, enter the time of day when you want the first download of the day to occur. Use the time format specified on the “Time” tab of the “Regional Settings” Windows application.
5. In the lower box, enter (in hours) how often you want downloads to occur. For example, if you enter the number “6,” downloads occur every six hours.
6. Be sure that the correct path for the folder where the data is stored appears below the words “Database Location.” If the correct path is not displayed, select the “Browse” button to bring up an Explorer-type window, in which you can specify the correct path.
The “Automatic purging of old data” window appears.
7. Select the kind of purging you want to take place and fill in the interval in the box that opens.
If you do not choose automatic purging, you need to use the Delete records menu command or the corresponding toolbar button periodically to reduce the size of the database.
Note When you install BCMS Vu Server software, the installation program suggests that you store historical data in a default location. If you accept the default location, historical data is stored in C:\Program files\Lucent\BCMS Vu\Server\. You can decide to store the data in another location.
Configuring BCMS Vu from the Server 4-9

Configuring and Managing the BCMS Vu Software
8. To schedule the download and close the configuration wizard, select Finish.
If you entered the Switch Connection Configuration Wizard by selecting Options|Configure|First Time or if this is the first time you have gone through the wizard, and you want to continue to the Client Configuration Wizard, select Next.
Note BCMS Vu software is Year 2000-compliant. You should have no problems with historical data when the year 2000 begins.
Note The amount of data you leave in your historical database is a matter of choice. You will probably want to use a hard disk with a large storage capacity and save at least five years of daily data and six months of interval data in order to track trends effectively. After you decide how long you want to save historical data, use the formula below to determine approximately how much disk space you need.For splits/skills, agents, VDNs and trunk groups measured by BCMS, the following formula is an approximate guide to the space required in megabytes for each day’s historical data:
# splits/skills + # agents + # trunk groups + #VDNs(370) * BCMS interval in hours
When the interval is a half-hour, use 185 instead of 370 in the formula.
4-10 Configuring BCMS Vu from the Server

Configuring and Managing the BCMS Vu Software
Cha
pter
4
Registering Wallboards 4
When you configure a wallboard you register it with the Server. A Client can then send a report or message to any wallboard connected to any PC in the network. BCMS Vu Wallboard software must be installed and running on the PC to which the wallboard is connected.
You register a wallboard from the BCMS Vu Server.
Note Your PC’s inner clock automatically changes from Standard to Daylight Savings Time if you specify this feature in Control Panel/Date/Time in Windows. However, the DEFINITY system does not change automatically. We recommend that you turn off automatic “daylight savings change” on the PC and manually adjust the time on the DEFINITY system and on the PC at the same time when no agents are logged in or call center activity is very low. If you do this, remember that turning back the time on the DEFINITY system clears BCMS data on the DEFINITY system.If agents are logged in at this time, you may receive incorrect data when you switch to Standard Time.Before you change the time, perform a historical data download to minimize data loss.
Note The Wallboard Configuration Wizard is not part of the wizard that appears the first time you run BCMS Vu Server or when you select Options|Configure|First Time.
Note Before you can register a wallboard from the server, it must already be connected to a PC with Wallboard software installed and running. The PC must be on the network.
Configuring BCMS Vu from the Server 4-11
Configuring and Managing the BCMS Vu Software
1. In the Options|Configure menu item, select Wallboards.
The “Wallboard Registration” window appears. Previously registered wallboards are listed under “Wallboard Names.”
2. In the “Wallboard Registration” window, double-click on Add Wallboard... or select Add....
3. In the “Wallboard Name” window, enter the name of the wallboard which you want to be accessible to the Clients. The wallboard name is an arbitrary designation, unique in the network, that you assign to the external wallboard. It is the name by which you select the wallboard when you want to send a display or message to it. You will probably want to give each wallboard a name that describes its characteristics or location.
4. Select OK.
The “Specify the name and model type of the wallboard” window appears.
5. In the “Machine name” box, enter the name of the PC to which the wallboard is physically attached. If you do not know this name, open Start/Settings/Control Panel/Network from Windows. On the Identification tab, the machine name is in the “Computer Name” field.
6. From the “Model of wallboard” pull-down menu, select the model name of the wallboard.
4-12 Configuring BCMS Vu from the Server
Configuring and Managing the BCMS Vu Software
Cha
pter
4
7. In the “Address” box, enter the address of the wallboard. This is a number from zero to 127. Refer to the wallboard user guide to find out how to specify the wallboard address.
8. Select Next.
The “Specify the Serial Port...” window appears.
9. From the pull-down menu, select the name of the port on the PC to which the wallboard is connected.
10. Select Next.
A window appears that allows you to test whether the wallboard is properly registered and physically connected to a PC.
11. Click on the “Test Connection” button.
A window appears with a message asking you if you saw the “Test message” on the wallboard.
If you select “Yes,” you are told that the test was successful, meaning that the wallboard is properly registered and connected to a PC.
Note You address Lucent wallboards using the remote control unit that comes with the wallboard. Refer to the user’s guide that comes with the wallboard. You address a Lucent wallboard using hexadecimal notation. However, when you enter a wallboard address in the BCMS Vu configuration procedure, you must use decimal notation. Furthermore, BCMS Vu accepts wallboard addresses only from 0 to 127 (decimal).For a table that translates hexadecimal addresses into decimal addresses, refer to “Installing the Wallboard” in Chapter 5 of BCMS Vu Software R2 Installation Guide.
Note Only COM Port numbers from 1 through 8 are allowed.
Configuring BCMS Vu from the Server 4-13

Configuring and Managing the BCMS Vu Software
If you select “No,” you are told that the test failed and why it failed. The following conditions will cause a failure:
● The wallboard is not connected to the specified port on the specified PC.
● Wallboard software is not running on the PC to which the wallboard is attached.
● The wallboard is not properly registered.● The wallboard address is not correct.● The wallboard has a poor physical connection.
Registering Clients 4
Client registration is page 7 of the wizard you are presented when you start BCMS Vu Server the first time and when you choose First Time in the Options|Configure menu.
To register a Client with a Server, you must be in the BCMS Vu Server application.
1. In the Options|Configure menu, select Clients.
The “Registered Clients” window appears.
2. If you want to register a Client that is not listed in the Registered Clients column, double-click on Add Client or select Add....
A window entitled “Client Registration” appears.
3. Enter the Windows Login ID of the Client that you want to register.
The “Registered Clients” window reappears.
4. To exit the wizard, select Save.
About Shares 4
Certain configuration information, for example, saved reports and Client and Wallboard configurations, is stored in the Server folder. The historical
4-14 Configuring BCMS Vu from the Server
Configuring and Managing the BCMS Vu Software
Cha
pter
4
database is also stored in the Server folder. Clients operating from other PCs on the network must be able to access these folders. This permission, known as a share, gives Clients read permission for these folders.
A share is permission to access (read) the files in a particular folder. This includes access to all files in all folders below the share folder. To a Client accessing a shared folder from another PC on the network, the shared folder appears to be in the root directory of the server PC. The share name can be an alias, different from the name of the folder on the Server PC.
During the installation of BCMS Vu Server, the folders in which these files are stored are created by default. The folder containing configuration information and the historical database is created in the path C:\Program Files\Lucent\BCMS Vu\Server\ and is named “BCMSVuServer.” You can refuse to accept the default and can create your own folder to store these items.
To find out which folders are shared, select Sharing Setup in the Options|Configure menu item.
Shares is a Windows Network concept and if you want to change the sharing setup you can do so from Windows Explorer. For more information, refer to your Microsoft Windows documentation.
Note If you make changes to the sharing setup, you may prevent clients from creating historical reports and opening and saving reports. Do not change sharing setup unless it is absolutely necessary.
Configuring BCMS Vu from the Server 4-15
4-16 Conf
Configuring and Managing the BCMS Vu Software
Configuring BCMS Vu from the Client 4
Activating Alerts 4
In order for an alert to function, threshold(s) for the alert must be defined and activated. You may define the threshold(s) before or after you activate the alert(s).
To activate an alert:
1. In the Options menu, select Configure.
2. Select Alerts.
The Alerts Wizard appears.
3. Select the radio button next to the type of alert you want to activate. Notice that you cannot choose an audible alert without an accompanying visual alert.
4. To close the Alerts Wizard, select OK.
Configuring Color Palettes 4
A color palette is a set of colors that are applied to different sections of a graph, pie-chart, text report or time trace for easier differentiation between the sections. BCMS Vu R2 lets you choose among four different color schemes and a gray-scale scheme for a total of five different ways to differentiate between various sections of a graph, pie-chart, and time trace.
When you select a new color palette, that set or combination of colors applies to all graphs, pie-charts, and time traces; you cannot apply one set of colors to one kind of report and a different set of colors to another kind of report at the same time.
Note You cannot set different types of alerts for different data items. For example, if you chose visual-only alerts in this wizard, alerts in all reports for this client for all data items will be visual only.
iguring BCMS Vu from the Client
Configuring and Managing the BCMS Vu Software
Cha
pter
4
To configure a color palette,
1. In the Options menu, select Configure.
2. Select Color Palettes.
The “Color Palettes Configuration” window appears.
3. Select the radio button next to the graphic that displays the set of colors you want to activate.
4. To visualize what the colors will look like before you exit the configuration window, select Apply.
5. To close the “Color Palettes Configuration” window, select OK.
Thresholds and Maximum Values Configuration 4
Thresholds 4
BCMS Vu software can display or sound an alert in all reports except Pie Charts and Historical Reports whenever a specified item exceeds or falls below a pre-selected value. Each Client sets its own threshold values, and these values do not apply to reports created by other Clients. Thresholds are set for each data item, not for each report. Therefore, once a Client sets a threshold for a data item, the alert applies to that data item on all graphs, text reports, and Wallboard Displays created by that Client.
For each threshold, you can specify that the alert be visual, visual and audible, or disabled.
Audible alerts - An audible alert is a beep from the PC.
Visual alerts - If the default palette is used, visual alerts appear as follows:
● In a Real-Time Graph Report a visual alert is indicated by the item bar color changing to red when the item is outside either of the set warning threshold values. The item bar color changes to yellow when the item is outside the set caution threshold values.
● In a Real-Time Text Report a visual alert is indicated by the background color of the item text changing to red when the item is outside either of
Configuring BCMS Vu from the Client 4-17
4-18 Conf
Configuring and Managing the BCMS Vu Software
the set warning threshold values. The background color changes to yellow when the item is outside the set caution threshold values.
● In a Wallboard Display, a visual alert is indicated by the item text color changing to red when the item is outside either of the set warning threshold values. The item text color changes to yellow or amber when the item is outside the set caution threshold values.
Palette settings do not affect wallboards.
● In a Time Trace Report, the horizontal bands in the warning zones turn to red when the item is outside the set warning threshold values. The horizontal bands in the caution zones turn to yellow when the item is outside the set caution threshold values.
Thresholds exist for the sole purpose of generating alerts.
After an alert has been triggered, it continues until the item value falls within the threshold range, or until you reset the threshold value or disable the alert.
You can define any or all of the following four limits:
High Warning If the value of the data item goes above this threshold, a warning alert occurs.
High Caution If the value of the data item goes above this threshold, a caution alert occurs.
Low Caution If the value of the data item goes below this threshold, a caution alert occurs.
Low Warning If the value of the data item goes below this threshold, a warning alert occurs.
The value of each item in the above list (except the first value) must be lower in value than the item above it.
Maximum Values 4
Maximum values are used to scale graphs appropriately to the data you expect. The number you specify as the maximum value determines the maximum height to which a bar or trace will extend. You will probably choose as a maximum value, a value that the data item often approaches but seldom exceeds. For example, if the value of Number of ACD Calls, is often
iguring BCMS Vu from the Client
Configuring and Managing the BCMS Vu Software
Cha
pter
4
at least 90 but seldom more than 100, you might select 100 as the maximum value. If you do this, the maximum height of a vertical bar graph or time trace will represent 100. For a value above 100, the bar will extend above the maximum value line and terminate in an apex. The actual value of the item will appear above the point of the apex.
Every data item is assigned a default maximum value. You can change each of these default values through the Options|Configure|Thresholds and Maximum Values menu command.
Configuring Thresholds and Maximum Values 4
You set thresholds and maximum values from a window of the same name. You open this window by selecting Options|Configure| Thresholds and Maximum Values.
The following is a description of this window:
When the tree in the left-hand window is collapsed fully, three categories of measured entities (Split/Skill, Agent summary, and VDN summary) are listed. You cannot set a maximum value or threshold for a category.
If you expand a category, the data items that pertain to that category (for example, Calls Waiting and Oldest Call) are displayed. You can set a maximum value and thresholds for a data item across all members of a category.
For example, you can designate an upper caution value of five minutes for “Average Speed of Answer” for all splits/skills. To do this,
1. Expand Split/Skill (click on the “+” next to the split/skill icon).
2. Highlight Average Speed of Answer.
3. Set the upper caution value to “05:00.”
Note If multiple splits/skills or types of data items are represented on the same report, the maximum height of the graph will be the largest of the maximum thresholds of all the data items selected.
Configuring BCMS Vu from the Client 4-19
4-20 Conf
Configuring and Managing the BCMS Vu Software
A caution alert now appears in reports covering any and all splits/skills where Average Speed of Answer is being measured and the average rises above 5 minutes.
You can also choose to set a unique threshold for each data item for each split/skill, agent or VDN.
For example, you can designate an upper caution value of 5 minutes for Average Speed of Answer for all split/skills except Service, and an upper caution value of 3 minutes for Service. To do this,
1. Under the category Split/Skill, designate an upper caution value of 5 minutes for Average Speed of Answer (see above).
2. Expand Average Speed of Answer (click on “+”).
3. Highlight “Service.”
4. Set the upper caution value to “03:00.”
Now a caution alert will go on when the Average Speed of Answer for calls to Sales exceeds 3 minutes, and when it exceeds 5 minutes for calls to all other splits/skills.
Setting Thresholds and Maximum Values 4
To set Thresholds and Maximum Values,
1. In the Options menu, select Configure.
2. Select Thresholds and Maximum Values.
The “Thresholds and Maximum Values” window appears.
3. In the tree structure in the window on the left side of the wizard window, open either Split/Skill, Agent summary, or VDN summary, (depending on whether you want to set a threshold for a split/skill, agent, or VDN data item) by selecting the “+” next to the name of the category.
4. Select the data item for which you want to set thresholds.
When you have highlighted the name of a data value, the name will appear just above the “Maximum Bar Height” box on the right side of the window.
iguring BCMS Vu from the Client
Configuring and Managing the BCMS Vu Software
Cha
pter
4
5. If you want to change the value in the “Maximum Bar Height” box at this time, type the number that you want a fully extended bar to represent. For example, if you are assigning threshold values for Number of ACD Calls, you might select 100 as the Maximum Bar Height. If you do this, 100 ACD Calls will cause the bar to extend to its maximum length.
6. Check the box next to the type of warning or caution for which you want to define and activate a threshold. If you use the default palette,● The Upper Warning threshold is the value above which the bar on
the graph will appear red. You will probably want to make this threshold number less than the Maximum Bar Height.
● The Upper Caution threshold is the value above which the bar on the graph will appear yellow.
● The Lower Caution threshold is the value below which the bar on the graph will appear yellow.
● The Lower Warning threshold is the value below which the bar on the graph will appear red.
7. Type the threshold value for the type of warning you selected in step 6.
8. Repeat steps 4 through 7 for other types of warnings and cautions you want to define.
9. If you decide you do not want a threshold activated, remove the check from the box next to that type of warning or caution.
10. Unless you activate them, alerts will not function when a threshold is exceeded.
11. To close the Thresholds and Maximum Values Wizard, select Finish.
Note There is a difference between activating a threshold and activating an alert:Checking the box next to a caution or warning threshold in the “Thresholds and Maximum Values” window assigns the value in the adjacent box. However, the alert associated with this threshold does not function unless the alert is turned on through the Options|Configure|Alerts menu item.
Configuring BCMS Vu from the Client 4-21

4-22 Mana
Configuring and Managing the BCMS Vu Software
Managing BCMS Vu Historical Data 4
This section includes the following general data management topics:
● Downloading historical data
● How the DEFINITY system stores data
● Backing up the historical database
● Removing historical data from the PC
● Backing up folders and files
● Repairing the database
● Re-indexing the database
● Compacting the database
● Managing memory allocation.
● Opening the historical database in Access 2000.
Downloading Historical Data 4
Perhaps the most important task in managing your data is being sure it is downloaded regularly and safely from the DEFINITY system. Failure to do this carefully can cause you to lose data irrevocably. Downloading data is described in an earlier section of this chapter.
In order for you to download data in a timely manner and not lose data, you should consider how the DEFINITY system stores data. The following section describes this process.
Note When you install BCMS Vu Server software, the installation program suggests that you store historical data in default locations. If you accept the default location, historical data is stored in C:\Program files\Lucent\BCMS Vu\Server\. You can decide to store the data in another location.
ging BCMS Vu Historical Data

Configuring and Managing the BCMS Vu Software
Cha
pter
4
How the DEFINITY System Stores Data 4
The DEFINITY system stores interval data for only 24 intervals (12 hours of half-hour intervals and 24 hours of hour intervals), and daily data for only seven days. In order to save data for longer periods, you must download it before it is deleted from the DEFINITY system.
Using the Server, you download the data to the hard disk where the database destination location has been defined. You can perform the download immediately, or you can schedule it to take place later on a regular basis.
When you schedule downloads to take place on a regular basis, you choose how frequently the downloads occur. You can specify that they occur as often as every hour, or as infrequently as every twenty-four hours. Remember, however, that the intervals you choose for downloading data from the DEFINITY system are not necessarily the same as the intervals at which data is stored on the DEFINITY system. Be sure that you download data often enough so that none is lost. For example, if the DEFINITY system saves interval data every half-hour, you should download interval data at least every twelve hours (24 intervals) to make sure none is lost.
Backing up the Historical Database 4
If you want to perform periodic archives of the historical database to keep its size reduced, do the following:
1. In the database directory, select the file histdb.mdb.
2. Copy the file to another location. For security, you may want to keep a copy on a different external disk.
3. In the database directory, copy the file empty.mdb to the database directory.
4. Rename the copy of empty.mdb file to histdb.mdb.
Managing BCMS Vu Historical Data 4-23

4-24 Mana
Configuring and Managing the BCMS Vu Software
Removing Historical Data from the PC 4
BCMS Vu stores historical data until you remove it. You may need to periodically remove data to prevent your disk from filling up and to keep the performance of your reports acceptable. This can be done through automatic purging of database records. We suggest that you back up the historical database before removing old database records.
For splits/skills, agents, VDNs and trunk groups measured by BCMS, the following formula is an approximate guide to the space required in megabytes for each day’s historical data:
# splits/skills + # agents + # trunk groups + #VDNs(370) * BCMS interval in hours
When the interval is a half-hour, use 185 instead of 370 in the formula.
For example, a small call center with one trunk group, five VDNs, five splits/skills and ten agents using an interval of 60 minutes will require approximately 57 KB per day.
You can choose the type of records that you delete:
— Interval data only
— Daily data only
— Both interval and daily.
You can delete all of the data selected according to the date on which it was stored, or according to the length of time it has been stored. In the latter case, you can request that records stored more than a given length of time be deleted daily.
To delete historical data:
1. From the Options menu, select Delete records or select the Delete Record toolbar button.
2. From the “Choose the type of records to be removed:” window, select the radio button next to the type of data you want removed.
3. Select Next.
4. From the “Choose the records to be removed:” window, click the box next to the criteria according to which you want the data removed:
ging BCMS Vu Historical Data

Configuring and Managing the BCMS Vu Software
Cha
pter
4
a. Click on the window next to “Remove data by date” if you want data stored before a certain day removed, and type this date into the “Remove stored data before” window.
b. Click on the window next to “Remove data by age” if you want data that has been stored for a certain length of time removed, and type the age (number of days old) of the data you want removed into the “Remove stored data older than (in days):” window.
c. Click in the box labeled “Continue removing records this old” if you want records of this age automatically removed every day.
5. Select Next.
6. To remove the records, select Finish in the “Confirm destruction of historical records” window.
Backing Up Folders and Files 4
Because the BCMS Vu historical database and the reports you create using the BCMS Vu software are stored on your hard drive, it is important for you to establish a backup process to prevent loss of data should problems occur with your PC.
You can use a backup utility on your PC to back up the BCMS Vu data and settings. The information that you should back up includes the following:
● The properties that you define for Historical Reports, Real-Time Reports, and Wallboard Displays
● Your BCMS Vu configuration options
● The historical database.
Archiving the historical database in this manner is useful because it lets you keep historical data for as long as you want, yet lets you keep the
Note If you want to perform periodic archives of the historical database so that it is not so large, refer to “Backing up the Historical Database” on page 4-23.
Managing BCMS Vu Historical Data 4-25

4-26 Mana
Configuring and Managing the BCMS Vu Software
size of the historical database that you are using on a daily basis relatively small.
Once you have archived the historical database, you can retrieve it in one of several ways. You can install Server software in simulator mode on a PC that points to the archived data and have a Client connect to this “Server,” or you can use Microsoft Access, Microsoft Excel, or another database tool to run reports and extract data from the archived database.
If you accepted the BCMS Vu software default file locations during the installation, the folders or files that you must include in your regular BCMS Vu backup are as follows:
Repairing the Database 4
The database records that have been downloaded and stored on your PC hard disk can become corrupted.
Data Location
Historical database \Program Files\Lucent\ BCMS Vu\Server\Server Name
Historical Reports and Real-Time Graph Reports
\Server PC Name\VuShare\Server Name\Client Name
BCMS configuration downloaded from the DEFINITY system
\Server PC Name\Program Files\ Lucent\BCMS Vu\Server\Server Name
Thresholds and alerts configuration settings
\Server PC Name\Program Files\Lucent\BCMS Vu\Server\Client Name
Note The actual locations of the files depend on the paths you specified in the installation of the software.
ging BCMS Vu Historical Data
Configuring and Managing the BCMS Vu Software
Cha
pter
4
You can correct this by using the Repair Database command in the Options menu. After you repair the database, you will probably want to update the database index that allows reports to be quickly created.
You can also compact the database in order to store more data on your hard disk.
To repair a corrupted database,
1. In the Options menu, select Repair Database... or select the Repair Database toolbar button.
2. In the window that appears, select Repair Corrupted Database.
The buttons in the window become gray temporarily. When the operation finishes or fails, the grayed items become normal.
If the operation fails, an error notice appears.
3. To exit the window, select Finish.
Re-indexing the Database 4
After you repair the database, update the database index that allows reports to be quickly created.
To re-index the database,
1. In the Options menu, select Repair Database... or select the Repair Database button on the toolbar.
2. In the window that appears, click on Rebuild the Table Indices.
The buttons in the window become gray temporarily. When the operation finishes or fails, the grayed items become normal.
If the operation fails, an error notice appears.
3. To exit the window, select Finish.
Note To avoid problems, be sure that all Clients are logged out when you repair the database.
Managing BCMS Vu Historical Data 4-27

4-28 Mana
Configuring and Managing the BCMS Vu Software
Compacting the Database 4
A database can become fragmented. It is a good idea to compact the database periodically. This ensures the integrity of the database and regains hard drive disk space by reducing the size of the database.
To compact the database,
1. In the Options menu, select Repair Database... or select the Repair Database button on the toolbar.
2. In the window that appears, select Compact the Database.
The buttons in the window become gray temporarily. When the operation finishes or fails, the grayed items become normal.
If the operation fails, an error notice appears.
3. To exit the window, select Finish.
Managing Memory Allocation 4
Memory errors may occur if you do not allocate sufficient virtual memory for BCMS Vu. We recommend that you allow Windows to manage your memory. When you first install BCMS Vu Server, Client, or Wallboard, perform the following steps. If a memory error occurs subsequently, perform these steps again.
For Windows NT 4.0:
1. Select Start/Control Panel/ System/ Performance.
2. On the “Performance” tab, in the “Virtual Memory” box, select Change.
3. In the box labeled “Total Paging File Size for all Drives,” note the number next to “Recommended.”
4. Enter this number in the box labeled “Maximum Size (MB).”
5. Select Set.
6. Exit the Control Panel.
ging BCMS Vu Historical Data
Configuring and Managing the BCMS Vu Software
Cha
pter
4
For Windows 95 or Windows 98:
1. Select Start/Control Panel/System/Performance.
2. On the “Performance” tab, select “Virtual Memory.”
3. Activate the radio button next to “Let Windows manage my virtual memory settings.”
4. Select OK.
5. Exit Control Panel.
Managing BCMS Vu Historical Data 4-29
Configuring and Managing the BCMS Vu Software
Cha
pter
4
Opening the Historical Databasein Access 2000 4
The BCMS Vu software creates the historical database in the Access 95 or 97 format. This database, however, can be opened in Access 2000. When you try to open this file from Access 2000 you will be asked to select from two options — “Convert database” and “Open Database.” Choose “Open Database,” whichwill let you view all objects in the database. It will not let you change the design of the objects. If you select “Convert Database,” then make sure you save this file with a new name, as directed by Access 2000.
Opening the Historical Database in Access 2000 4-30

Configuring and Managing the BCMS Vu Software
Cha
pter
4
Managing Miscellaneous BCMS Vu Functions 4
Downloading BCMS Data 4
BCMS Vu continually monitors real-time measurements for as long as it is connected to the DEFINITY system. However, it downloads administration and descriptive data, such as agent and split/skill names, only during a historical data download.
If you want to download organizational and descriptive data at any other time, do the following:
Select Update BCMS Data from the Options menu.
The Download Status indicator in the status bar shows the progress of the download.
The following data, which is internally-measured on the DEFINITY system, is downloaded to BCMS Vu:
● Split/Skill names, numbers, and acceptable service levels
● Agent names and numbers
● BCMS/VuStats logical IDs (if Validate = Y on the DEFINITY system) for non-EAS only
● Split members for non-EAS only
● Trunk Group names and numbers
● VDN names, numbers, and acceptable service levels (if Vectoring = Y on the DEFINITY system).
Managing Miscellaneous BCMS Vu Functions 4-31

4-32 Managing Miscellaneous BCMS Vu Functions
Configuring and Managing the BCMS Vu Software
5
Understanding Real-Time Reports 5Introduction 5
This section of this chapter introduces you to Real-Time Reports and tells you how to decide what type of report fulfills a particular need.
The five types of real-time reports available are
● Real-Time Graph Reports
● Real-Time Pie Chart Reports
● Real-Time Text Reports
● Wallboard Displays
● Time Trace Reports.
The remainder of the chapter describes in detail the five types of real-time reports. The sections included in this chapter are● Which type of real-time report shall I use?● About Real-Time Graph Reports.● About Real-Time Pie Chart Reports.● About Real-Time Text Reports.● About Wallboard Displays.● About Time Trace Reports.
Introduction 5-1
Report Basics
Which Type of Real-Time Report Shall I Use? 5
To get the most value from displaying real-time data, you should consider the following:
● Real-Time Graphs, Real-Time Pie Charts and Wallboard Displays are not just different ways of displaying the same data. Each has strengths and weaknesses.
● Real-Time Text reports display the same information that is available on a BCMS SAT screen.
● You can be notified of thresholds being met on all types of real-time reports except Real-Time Pie Charts.
You use a ● Real-Time Text report when you want to report on a large number of
items● Real-Time Graph report, Real-Time Pie Chart report or Wallboard
Display to report on a smaller number of items● Time Trace report when you want a visual display showing how one
item changes over time.
When you decide between a Real-Time Graph, Real-Time Pie Chart or Wallboard Display you should consider the following:
● Real-Time Graphs are easy to monitor for anomalies and imbalances. For example, you can monitor several splits/skills, agents, or VDNs on one graph.
● Real-Time Pie Charts indicate the balance for one split/skill, agent, or VDN by showing the relative values of certain items.
● Wallboard Displays are easy to monitor for actual values and for values that vary widely. For example, you might display “oldest call waiting” values for several splits/skills.
● You can open several Real-Time Graphs, Real-Time Pie Charts and Wallboard Displays at the same time. This means that you can be very flexible about how data are grouped and displayed.
● You can send data from any Wallboard Display to several external wallboards so that your agents or others in the call center can see the information.
5-2 Which Type of Real-Time Report Shall I Use?
Report Basics
Cha
pter
5
About Real-Time Graph Reports 5
BCMS Vu Real-Time Graphs provide periodically updated images of the current status of the call center. The first time you open a BCMS Vu Real-Time Graph report, you use the New Report option in the File menu to create the report. After you have created and saved a Real-Time Graph report, you can access the report using the Open Reports option on the File menu.
You can specify that the bars on a Real-Time Graph Report be either horizontal or vertical. The numeric value of each item will be displayed next to the bar that represents it.
This section includes the following sub-sections:● Categories of Real-Time Graph Reports● Sample Real-Time Graph Report● Things to remember about Real-Time Graph Reports● Maximum values and real-time graph scales● Real-time Graph Report attributes.
About Real-Time Graph Reports 5-3

Report Basics
Categories of Real-Time Graph Reports 5
You can create four categories of Real-Time Graphs. You select the category of Real-Time Graph on the first window of the Graph Properties Wizard. The categories are:● Split/Skill Summary — Summary information about one or more
splits/skills● Split/Skill Details — Detailed information about one split/skill● Agent Summary — Data items for all agents logged into a single
split/skill.
● VDN Summary — Details relating to calls processed by VDNs.
You select how items are grouped on graphs:● By measured entity (split/skill, agent, VDN)● By attribute (for example, average speed of answer, answered calls,
abandoned calls).
Note Real-time agent reports will function only if you select fewer than 100 agents logged into the split/skill for which the report is running.
Note The VDN summary is available only if the Vectoring feature is administered on the DEFINITY system.
5-4 About Real-Time Graph Reports

Report Basics
Cha
pter
5
Sample Real-Time Graph Report 5
The following illustration is an example of how Real-Time Graph Reports appear in BCMS Vu when you choose to group by a measured entity.
The following illustration is an example of how Real-Time Graph reports appear in BCMS Vu when you choose to group by attribute.
About Real-Time Graph Reports 5-5
Report Basics
Things to Remember About Real-Time Graph Reports 5
There are several things you need to remember when planning a Real-Time Graph:● Items appear on the graph in the order in which you select them.● You cannot select some table items in a Real-Time Graph Report
because:
— They are not measurements (for example, Agent extension in the Agent Summary table), or
— BCMS Vu automatically includes them on the graph (for example, the x-axis labels for Agent Summary are Agent Names).
● You should consider the probable range of maximum values when you decide which items of a table to show in a Real-Time Graph. If you include items that vary significantly in their ranges of values, items with smaller ranges will appear not to update when they are displayed. For example, assume you want to monitor a group of items, one of which has typical values of about 100 and varies between 50 and 150, and another that has typical values of about five and varies between two and eight. If both of these items are displayed on the same Real-Time Graph, the changes in the smaller item may not be noticeable.
● Real-Time Graphs update as fast as every ten seconds. Downloading of historical data takes precedence over the updating of real-time data. Therefore, real-time reports will update at a slower rate while historical data are downloading from the DEFINITY system to the historical database.
● If you display too many items in a graph with vertical bars, their values will not appear above the bars. If the label containing the value of the item is wider than the bar, the value is not shown. This prevents numbers from overlapping numbers above adjacent bars.
● If there is no data available from the DEFINITY system, zeros appear above the names of the items.
● You cannot print Real-Time Graph Reports.
5-6 About Real-Time Graph Reports
Report Basics
Cha
pter
5
Maximum Values and Real-Time Graph Scales 5
To determine the scale of a Real-Time Graph, BCMS Vu uses the highest specified maximum value of the items that the graph contains.
To obtain the best results from a Real-Time Graph, you should do the following:● Specify maximum values that are reasonably close to actual values.
See “Thresholds and Maximum Values Configuration” on page 4-17.● Select items whose maximum values are similar.
At installation, BCMS Vu specifies the default maximum values for all measurement items. To change the specified maximum value for any item, select Thresholds and Alerts in the Options|Configure menu. See “Thresholds and Maximum Values Configuration” on page 4-17.
About Real-Time Graph Reports 5-7
Report Basics
Real-Time Graph Report Attributes 5
The following table lists the available categories of Real-Time Graph Reports and the data items that you can choose to measure in each. Data items are defined in Chapter 9, “BCMS Vu Real-Time and Historical Report Data Items.”
Split/Skill Summary Graph Report Split/Skill Details Graph Report
Abandoned Calls Calls WaitingACD Calls Oldest CallAvailable Agents Total ACDAverage Abandoned Time Total ACWAverage After Call Total AUXAverage Speed of Answer Total AvailableAverage Talk Time Total ExtnCalls Waiting Total OtherOldest Call Total Staffed% Within Service Level % Within Service Level
Agent Summary Graph Report VDN Summary Graph Report
ACD Calls Abandoned CallsEXT In Calls ACD CallsEXT Out Calls Average Abandoned Time
Average Speed of AnswerAverage Talk/Hold TimeCalls Busy/DiscCalls WaitingConnected CallsFlow OutOldest Call% Within Service Level
Creating a Real-Time Graph Report 5
To create a Real-Time Graph Report, refer to “Creating a Real-Time Graph Report” on page 7-2.
5-8 About Real-Time Graph Reports
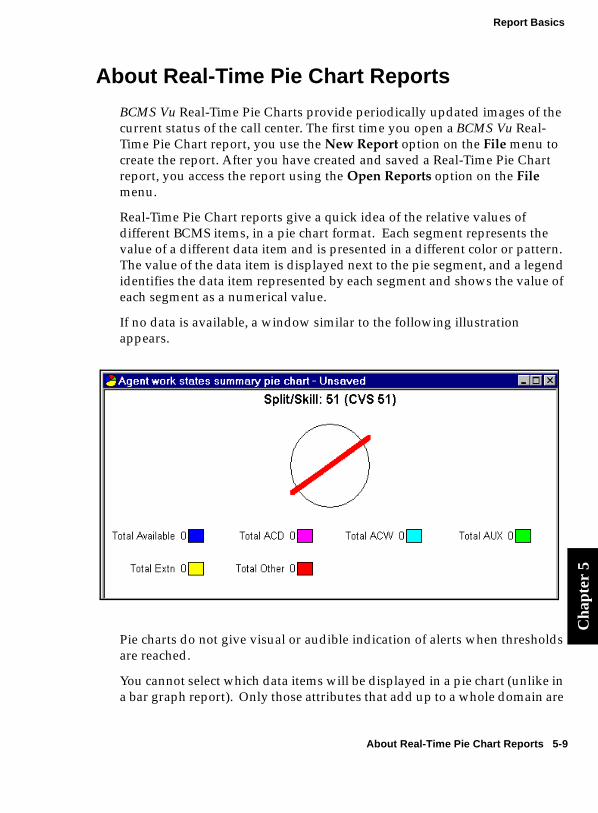
Report Basics
Cha
pter
5
About Real-Time Pie Chart Reports 5
BCMS Vu Real-Time Pie Charts provide periodically updated images of the current status of the call center. The first time you open a BCMS Vu Real-Time Pie Chart report, you use the New Report option on the File menu to create the report. After you have created and saved a Real-Time Pie Chart report, you access the report using the Open Reports option on the File menu.
Real-Time Pie Chart reports give a quick idea of the relative values of different BCMS items, in a pie chart format. Each segment represents the value of a different data item and is presented in a different color or pattern. The value of the data item is displayed next to the pie segment, and a legend identifies the data item represented by each segment and shows the value of each segment as a numerical value.
If no data is available, a window similar to the following illustration appears.
Pie charts do not give visual or audible indication of alerts when thresholds are reached.
You cannot select which data items will be displayed in a pie chart (unlike in a bar graph report). Only those attributes that add up to a whole domain are
About Real-Time Pie Chart Reports 5-9
Report Basics
allowed in pie charts, and there is only one set of such attributes for Agent Work State for Split/Skill, Agent Call Summary, and VDN Call Summary reports.
Real-Time Pie Charts cannot be printed.
This section includes the following sub-sections:
● Categories of Real-Time Pie Chart Reports
● Sample Real-Time Pie Chart Report
● Real-Time Pie Chart Report attributes.
Categories of Real-Time Pie Chart Reports 5
You can create three categories of Real-Time Pie Chart Reports. You select the category of Real-Time Pie Chart Report in the first window of the Graph Properties Wizard. The categories are:● Agent Work States for Split/Skill — Shows a full domain of agent
attributes for one split/skill● Agent Call Summary — Shows a full domain of attributes for one
agent’s work in one split/skill● VDN Call Summary — Shows a full domain of attributes for one
VDN.
Note Real-Time Pie Charts update as fast as every ten seconds. Historical data downloading takes precedence over the updating of real-time data. Therefore, real-time reports update at a slower rate while historical data are downloading from the DEFINITY system to the historical database.
Note The VDN summary is available only if the Vectoring feature is administered on the DEFINITY system.
5-10 About Real-Time Pie Chart Reports
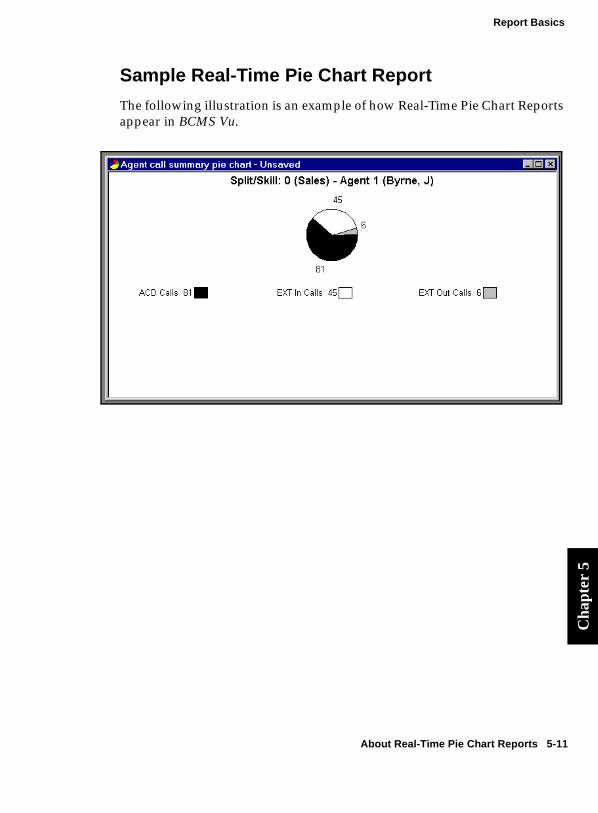
Report Basics
Cha
pter
5
Sample Real-Time Pie Chart Report 5
The following illustration is an example of how Real-Time Pie Chart Reports appear in BCMS Vu.
About Real-Time Pie Chart Reports 5-11
Report Basics
Real-Time Pie Chart Report Attributes 5
The following table lists the categories of Real-Time Pie Charts and the attributes (data items) that are measured in each category. Data items are defined in Chapter 9, “BCMS Vu Real-Time and Historical Report Data Items.”
Agents Work States for Agent Call SummarySplit/Skill Pie Chart Pie Chart
Total Available ACD CallsTotal ACD Ext In CallsTotal ACW Ext Out CallsTotal AUXTotal ExtnTotal Other
VDN Calls SummaryPie Chart
Abandoned CallsACD CallsCalls Busy/DiscConnected CallsFlow Out
Creating a Real-Time Pie Chart Report 5
To create a Real-Time Pie Chart Report, refer to “Creating a Real-Time Pie Chart Report” on page 7-7.
5-12 About Real-Time Pie Chart Reports
Report Basics
Cha
pter
5
About Real-Time Text Reports 5
BCMS Vu Real-Time Text Reports are displays of the standard monitor BCMS SAT forms. You use the New Report option in the File menu to create Real-Time Text Reports. Real-Time Text Reports are predefined to display the data as it appears when you use the “monitor bcms xxx” commands on a BCMS SAT terminal. You can name and save a Real-Time Text Report and open it later, and you can print it when it is open.
Real-Time Text Reports mimic the features of the three monitor CMS SAT forms. If you need detailed information on a large number of items, you will use a Real-Time Text Report.
You can sort the items in a Real-Time Text Report in ascending or descending order, according to the entries in any column, by clicking on the column title.
You can choose which split(s)/skill(s) or VDN(s) to measure in the report, and you can choose whether to sort data according to the name or number of a split/skill, agent, or VDN. However, you cannot choose what attributes are measured.
When the value of an item in a Real-Time Text Report triggers a visual alert, the background of the text changes to yellow (caution) or red (warning).
This section describes the following topics:● Categories of Real-Time Text Reports● Sample Real-Time Text Report● Real-Time Text Report attributes.
Note If there is no data available from the DEFINITY system, zeros appear in this report as the values of items.
About Real-Time Text Reports 5-13
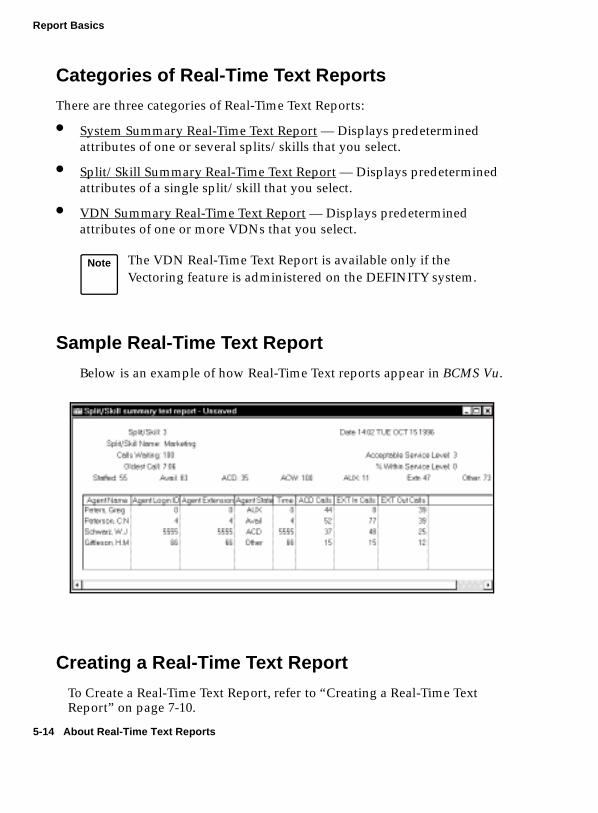
Report Basics
Categories of Real-Time Text Reports 5
There are three categories of Real-Time Text Reports:
● System Summary Real-Time Text Report — Displays predetermined attributes of one or several splits/skills that you select.
● Split/Skill Summary Real-Time Text Report — Displays predetermined attributes of a single split/skill that you select.
● VDN Summary Real-Time Text Report — Displays predetermined attributes of one or more VDNs that you select.
Sample Real-Time Text Report 5
Below is an example of how Real-Time Text reports appear in BCMS Vu.
Creating a Real-Time Text Report 5
To Create a Real-Time Text Report, refer to “Creating a Real-Time Text Report” on page 7-10.
Note The VDN Real-Time Text Report is available only if the Vectoring feature is administered on the DEFINITY system.
5-14 About Real-Time Text Reports
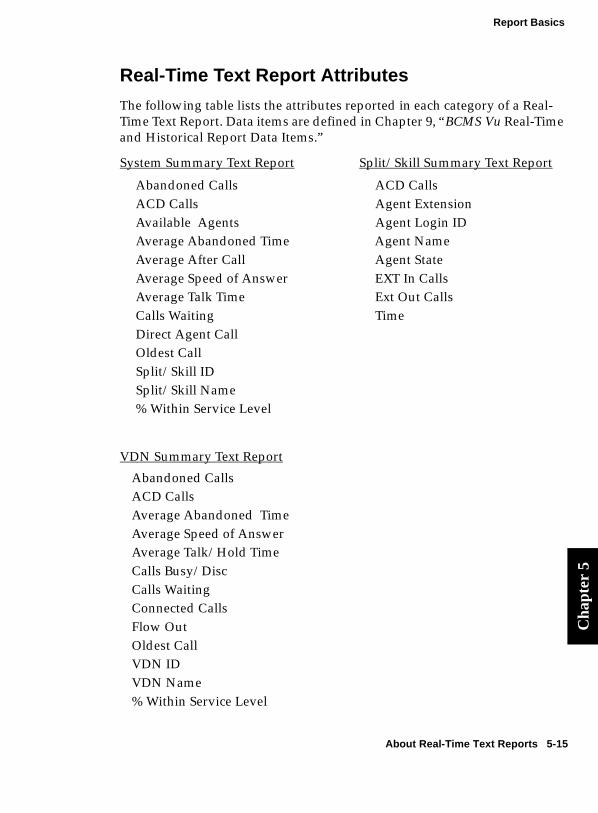
Report Basics
Cha
pter
5
Real-Time Text Report Attributes 5
The following table lists the attributes reported in each category of a Real-Time Text Report. Data items are defined in Chapter 9, “BCMS Vu Real-Time and Historical Report Data Items.”
System Summary Text Report Split/Skill Summary Text Report
Abandoned Calls ACD CallsACD Calls Agent ExtensionAvailable Agents Agent Login IDAverage Abandoned Time Agent NameAverage After Call Agent StateAverage Speed of Answer EXT In CallsAverage Talk Time Ext Out CallsCalls Waiting TimeDirect Agent CallOldest CallSplit/Skill IDSplit/Skill Name% Within Service Level
VDN Summary Text Report
Abandoned CallsACD CallsAverage Abandoned TimeAverage Speed of AnswerAverage Talk/Hold TimeCalls Busy/DiscCalls WaitingConnected CallsFlow OutOldest CallVDN IDVDN Name% Within Service Level
About Real-Time Text Reports 5-15
Report Basics
About Wallboard Displays 5
In BCMS Vu, a Wallboard Display is a window on the PC screen that mimics the behavior of an external wallboard. When you create a display on your monitor, you can send it to be displayed on an external wallboard.
This section includes the following topics:
● Categories of Wallboard Displays
● Wallboard Display features
● Types of wallboards
● Sample Wallboard Display
● Wallboard Display attributes.
Categories of Wallboard Displays 5
There are four categories of Wallboard Displays:
Split/Skill Summary — Displays values of one or more data items over one or more splits/skills. The data items you can choose for this report are different from those in a Split/Skill Details Wallboard Display. See “Wallboard Display Attributes” on page 5-20 for a list of these items.
Split/Skill Details — Displays values of one or more data items for one split/skill. The data items you can choose for this report are different from those in a Split/Skill Summary Wallboard Display. See “Wallboard Display Attributes” on page 5-20 for a list of these items.
Agent Summary — Displays values of one or more data items for one or more agents in one split/skill.
VDN Summary — Displays values of one or more data items for several VDNs.
5-16 About Wallboard Displays

Report Basics
Cha
pter
5
Wallboard Display Features 5
When you define a Wallboard Display, you select the type of data and the data items to display. The Wallboard Display shows default labels for the items that you choose and the current value of the item. You can change the labels in the Wallboard Wizard.
Items are displayed on a Wallboard Display in the order in which you select them.
A Wallboard Display on your monitor shows the data that you will see on an external wallboard. You can have more than one Wallboard Display open on your PC at the same time, and you can send a wallboard displayed on your monitor to several external wallboards or send different displays to different wallboards.
You can change the size of a report window that contains a Wallboard Display. BCMS Vu changes the size of the display text, not the number of characters displayed or the proportion of empty space.
When an item on a wallboard display on your monitor exceeds a threshold, the item name and value are displayed in yellow (caution) or red (warning). If you send the display to an external wallboard, the colors also appear, provided the external wallboard supports these colors.
You can specify how long (from one second to one hour) the lines of a multiple-line display remain on a wallboard before the next line or lines appear.
You can have as many as 35 characters per line in a display on your monitor. Remember, however, that the maximum number of characters that fit on a line on an external wallboard is limited by the wallboard itself. Refer to the table in the following section.
About Wallboard Displays 5-17
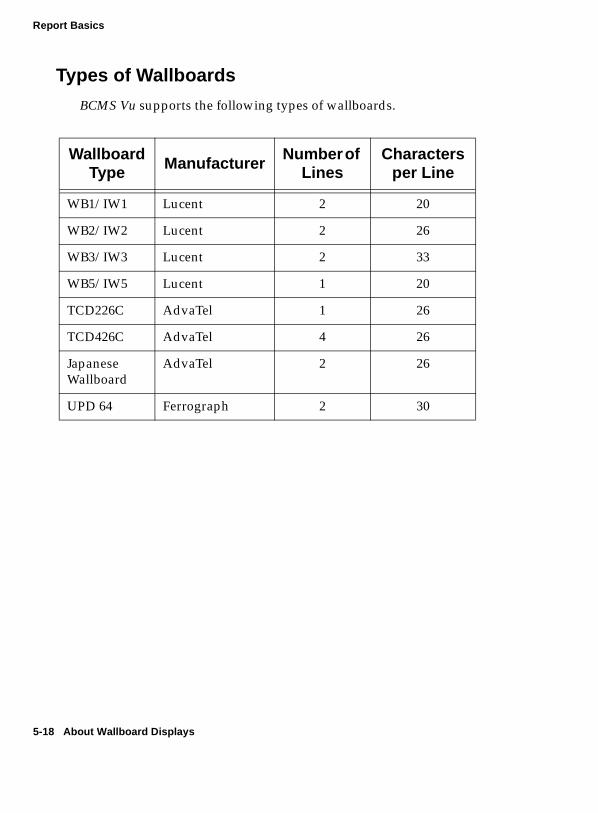
Report Basics
Types of Wallboards 5
BCMS Vu supports the following types of wallboards.
Wallboard Type Manufacturer Number of
LinesCharacters
per Line
WB1/IW1 Lucent 2 20
WB2/IW2 Lucent 2 26
WB3/IW3 Lucent 2 33
WB5/IW5 Lucent 1 20
TCD226C AdvaTel 1 26
TCD426C AdvaTel 4 26
Japanese Wallboard
AdvaTel 2 26
UPD 64 Ferrograph 2 30
5-18 About Wallboard Displays
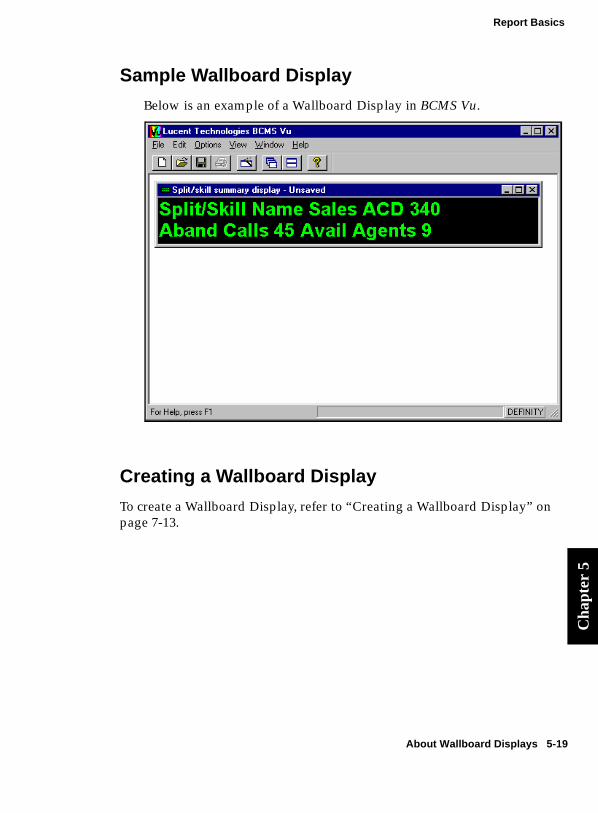
Report Basics
Cha
pter
5
Sample Wallboard Display 5
Below is an example of a Wallboard Display in BCMS Vu.
Creating a Wallboard Display 5
To create a Wallboard Display, refer to “Creating a Wallboard Display” on page 7-13.
About Wallboard Displays 5-19

Report Basics
5-20 About Wallboard Displays
Wallboard Display Attributes 5
The following tables list the data items measured in the different categories of Wallboard Display Reports. Data items are defined in Chapter 9, “BCMS Vu Real-Time and Historical Report Data Items.”
Splits/Skills Summary Split/Skills Details
Available Agents Acceptable Service LevelAbandoned Calls Calls WaitingACD Calls Oldest CallAverage Abandoned time Split/SkillAverage After Call Split/Skill NameAverage Speed of Answer Total ACDAverage Talk Time Total ACWCalls Waiting Total AUXDirect Agent Call Total AvailableOldest Call Total ExtnSplit/Skill Name Total Other% Within Service Level Total Staffed
% Within Service Level
Agent Summary VDN Summary
ACD Calls ACD CallsAgent Extension Abandoned CallsAgent Login ID Average Abandoned TimeAgent Name Average Speed of AnswerAgent State Average Talk/Hold TimeEXT In Calls Calls Busy/DisconnectedEXT Out Calls Calls WaitingSplit/Skill Connected CallsSplit/Skill Name Flow OutTime Oldest Call
VDN Name% Within Service Level
Report Basics
Cha
pter
5
About Time Trace Reports 5
Time Trace Reports show the value of a single attribute (for example, Call Waiting, Average Speed of Answer) for a single measured entity (agent, split/skill, or VDN) over a period of time. The value of the attribute is represented by the height of the trace above the baseline. Time is represented by distance along the baseline.
This section describes the following topics:● Categories of Time Trace Reports● Characteristics of Time Trace Reports● Sample Time Trace Report● Time Trace Report attributes.
Categories of Time Trace Reports 5
The following categories of Time-Trace Reports are available:
Split/Skill Summary Data Time Trace — Shows variations in the value of a single data item for a single split/skill over time. The data items you can choose for this report are different from those in a Split/Skill Details Time Trace. See “Time Trace Report Attributes” on page 5-24 for a list of these items.
Split/Skill Details Time Trace — Also shows variations in the value of a single data item for a single split/skill over time. The data items you can choose for this report are different from those in a Split/Skill Summary Data Time Trace. See “Time Trace Report Attributes” on page 5-24 for a list of these items.
Agent Data Time Trace — Shows variations in the value of a single attribute for a single agent over time.
VDN Data Time Trace — Shows variations in the value of a single attribute for a single VDN over time.
About Time Trace Reports 5-21
Report Basics
Characteristics of Time Trace Reports 5
You can specify time in either of two ways:● As a specified number of data points, in which case the distance
along the baseline represents a fixed period of time, and data older than this time is dropped from the left edge of the graph as new data is displayed at the right edge.
● As the time that has elapsed since the report was newly created or opened. In this case, over a period of time, the scale of the baseline decreases to represent the total period since the report began.
A maximum of twelve hours can be displayed on one time trace.
The baseline is labeled with the clock time at the beginning and end of the trace.
Threshold ranges are represented by colored or patterned horizontal bands. Caution and warning colors are those you select with the Option|Configure|Color Palette command, but the normal band is the default color.
When the trace is at its highest distance above the baseline, it represents the maximum value you set with the Options|Configure|Thresholds and Maximum Value command (or the default maximum value, if you do not choose one).
If no data is available at a particular time, a special character appears on the graph. If you position the cursor over this character, a tool-tip displays “No data available.”
Time trace values greater than the maximum value are indicated by a distinctive mark at the maximum value level.
If you position the cursor over a time trace graph line, the value and time of that point on the graph appears in a pop-up window.
Note If there is no data available from the DEFINITY system, the value of the trace is given as zero.
5-22 About Time Trace Reports

Report Basics
Cha
pter
5
Sample Time Trace Report 5
The following illustration is an example of a Time Trace Report.
Creating a Time Trace Report 5
To create a Time Trace Report, refer to “Creating a Time Trace Report” on page 7-22.
About Time Trace Reports 5-23

Report Basics
Time Trace Report Attributes 5
The following table lists the data items measured by the different categories of Time Trace Reports. Data items are defined in Chapter 9, “BCMS Vu Real-Time and Historical Report Data Items.”
Split/Skill Summary Data Time Trace Split/Skill Details Time Trace
Abandoned Calls Calls Waiting
ACD Calls Oldest Call
Available Agents Total ACD
Average Abandoned Time Total ACW
Average After Call Total AUX
Average Speed of Answer Total Available
Average Talk Time Total Extn
Calls Waiting Total Other
Oldest Call Total Staffed
% Within Service Level % Within Service Level
Agent Data Time Trace VDN Data Time Trace
ACD Calls Abandoned Calls
Ext In Calls ACD Calls
Ext Out Calls Average Abandoned Time
Average Speed of Answer
Average Talk/Hold Time
Calls Busy/Disc
Calls Waiting
Connected Calls
Flow Out
Oldest Call
% Within Service Level
5-24 About Time Trace Reports
6
Understanding Historical Reports 6Historical Report Basics 6
In addition to viewing on-going activity of a DEFINITY system in real-time reports, you can create, view and print reports that describe past status. These reports of past activity are called Historical Reports.
You create Historical Reports in two steps:
• Downloading data from the DEFINITY system and storing it in a database. You do this from BCMS Vu Server.
• Selecting the data for the report and putting it into a report. You do this from BCMS Vu Client.
After a report has been created, you can print it immediately, save it, and schedule it to be printed later. You do this from BCMS Vu Client.
This section describes the following topics:
• Data on the DEFINITY system• Categories of Historical Reports• Creating and opening Historical Reports• Sample Historical Report• Historical Report attributes• Scheduling Historical Reports• Exporting Historical Reports.
Historical Report Basics 6-1

About Historical Reports
Data on the DEFINITY system 6
BCMS stores data on the DEFINITY system in two formats: interval and daily.
Interval data is stored on the DEFINITY system in increments of a half-hour or an hour. (The interval length is set at the DEFINITY system, not from BCMS Vu.) For example, if the DEFINITY system stores data in half-hour intervals, each line of a report created from interval data presents a half-hour’s worth of data. If the DEFINITY system stores data in intervals of an hour, each line of a report created from interval data will present an hour’s worth of data. However, the DEFINITY system can store no more than 24 intervals worth of data before it deletes the oldest data to make room for the most recent. Thus data stored on the DEFINITY system can be no older than 12 hours (if the DEFINITY system stores in half-hour intervals) or 24 hours (if the DEFINITY system stores in hour intervals).
Daily data is stored on the DEFINITY system in increments of one day. Thus, each line of a report created from daily data represents a day’s worth of data. However, the DEFINITY system can store daily data no more than seven days; daily data older than seven days is deleted to make room for new data.
Since BCMS saves data for a limited time, if you want to view old data, you must copy data from the DEFINITY system to a location you can access before it is erased from the DEFINITY system. This is called “downloading data.” To learn how to download historical data, refer to “Downloading Historical Data” on page 4-8.
Note If the DEFINITY system is reset, BCMS data will be lost on the DEFINITY system and will not be downloaded to BCMS Vu. As a result, Historical Reports that include a period when the DEFINITY system was reset may not display complete data.
6-2 Data on the DEFINITY system

About Historical Reports
Cha
pter
6
Categories of Historical Reports 6
There are nine kinds of Historical Reports:
Agent — Displays data for one, several, or all agents. Agent activity data is for all splits/skills that each agent was logged into during the reporting interval. Each agent is allotted a separate line on the report for each time interval, day, week, and so forth, that is measured.
Agent Summary — Displays data for one, several, or all agents. Agent activity data is for all splits/skills that each agent was logged into during the reporting interval. Each agent is allotted one line on the report. The value of each data item is the average or total of the item over the entire time covered by the report.
Split/Skill — Displays data for one or more splits/skills during the reporting interval.
Trunk — Displays data for one or more trunk groups on the DEFINITY system.
VDN — Displays data for one or more VDNs measured by BCMS. (You can create VDN reports only if the Vectoring feature is administered on the DEFINITY system.)
Abandoned Calls Split/Skill — Displays a summary of abandoned calls by split/skill, during the reporting interval.
Abandoned Calls VDN — Displays a summary of abandoned calls by VDN during the reporting interval.
Overflowed Calls Split/Skill — Displays a summary of the overflowed calls, by split/skill, during the reporting interval.
Overflowed Calls VDN — Displays a summary of the overflowed calls, by VDN, during the reporting interval.
On all Historical Reports, you cannot choose the format or kinds of data (items) that the report displays, although you can choose the type, date range, level of detail and other parameters. You can also export historical data to other applications, such as spreadsheets.
Categories of Historical Reports 6-3

About Historical Reports
Creating Historical Reports 6
Historical Reports are reports that you create using the interval and daily data downloaded from the DEFINITY system. In addition to presenting the report in interval and daily increments, BCMS Vu can take daily data and summarize it over a week, month and quarter (three-month) period.
You create a BCMS Vu Historical Report using the New Report option in the File menu. After you have created and saved a Historical Report, you can access the report using the Open Reports option in the File menu.
Historical Reports have predefined formats, and you cannot choose the data items reported in each category of Historical Report. You choose the type, date range, interval, and some other aspects of the report.
To learn how to create, open and print Historical Reports, refer to Chapter 7, "Working with Reports."
6-4 Creating Historical Reports

About Historical Reports
Cha
pter
6
Sample Historical Report 6
The following illustration is an example of a Historical Report.
Note The format of columns that display length of time is minutes:seconds.
Sample Historical Report 6-5

About Historical Reports
Historical Report Attributes 6
The following tables list the data items reported in the different categories of Historical Reports. Data items are defined in Chapter 9, “BCMS Vu Real-Time and Historical Report Data Items.”
Agent and Agent Summary Split/Skill Historical Report Historical Reports
ACD Calls Abandoned Calls
Agent ACD Calls
Agent Name Average Abandoned Time
Average External Time Average Speed of Answer
Average Talk Time Average Staffed
External Calls Average Talk Time
Total After Call Flow In
Total AUX/Other Flow Out
Total Available Time Split/Skill
Total Hold Time Split/Skill Name
Total Time Staffed Total After Call
Total AUX/Other
% Within Service Level
6-6 Historical Report Attributes
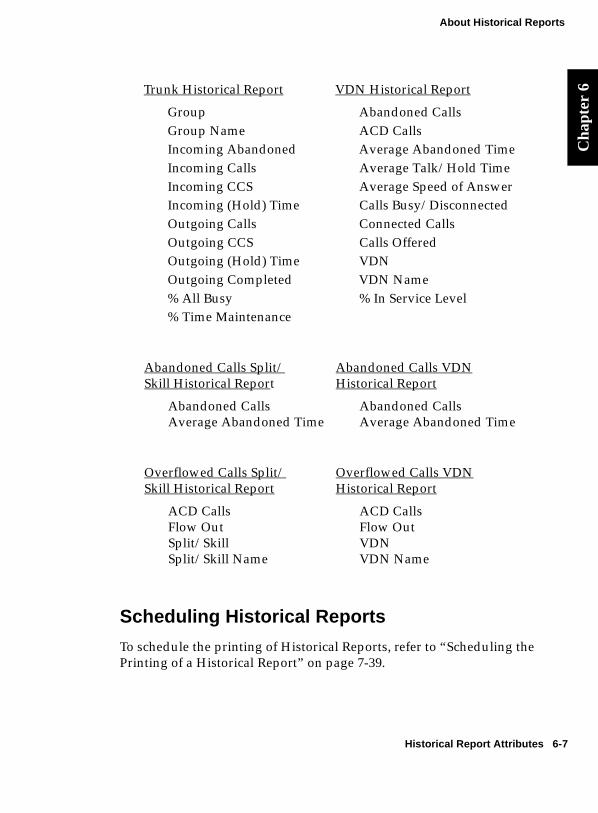
About Historical Reports
Cha
pter
6
Trunk Historical Report VDN Historical ReportGroup Abandoned CallsGroup Name ACD CallsIncoming Abandoned Average Abandoned TimeIncoming Calls Average Talk/Hold TimeIncoming CCS Average Speed of AnswerIncoming (Hold) Time Calls Busy/DisconnectedOutgoing Calls Connected CallsOutgoing CCS Calls OfferedOutgoing (Hold) Time VDNOutgoing Completed VDN Name% All Busy % In Service Level% Time Maintenance
Abandoned Calls Split/ Abandoned Calls VDNSkill Historical Report Historical Report
Abandoned Calls Abandoned CallsAverage Abandoned Time Average Abandoned Time
Overflowed Calls Split/ Overflowed Calls VDN Skill Historical Report Historical Report
ACD Calls ACD CallsFlow Out Flow OutSplit/Skill VDNSplit/Skill Name VDN Name
Scheduling Historical Reports 6
To schedule the printing of Historical Reports, refer to “Scheduling the Printing of a Historical Report” on page 7-39.
Historical Report Attributes 6-7
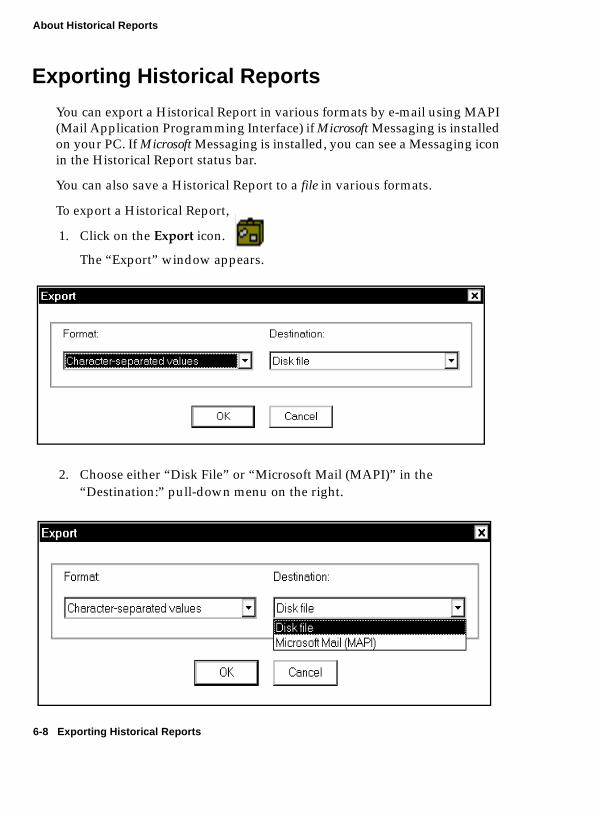
About Historical Reports
Exporting Historical Reports 6
You can export a Historical Report in various formats by e-mail using MAPI (Mail Application Programming Interface) if Microsoft Messaging is installed on your PC. If Microsoft Messaging is installed, you can see a Messaging icon in the Historical Report status bar.
You can also save a Historical Report to a file in various formats.
To export a Historical Report,
1. Click on the Export icon.
The “Export” window appears.
2. Choose either “Disk File” or “Microsoft Mail (MAPI)” in the “Destination:” pull-down menu on the right.
6-8 Exporting Historical Reports
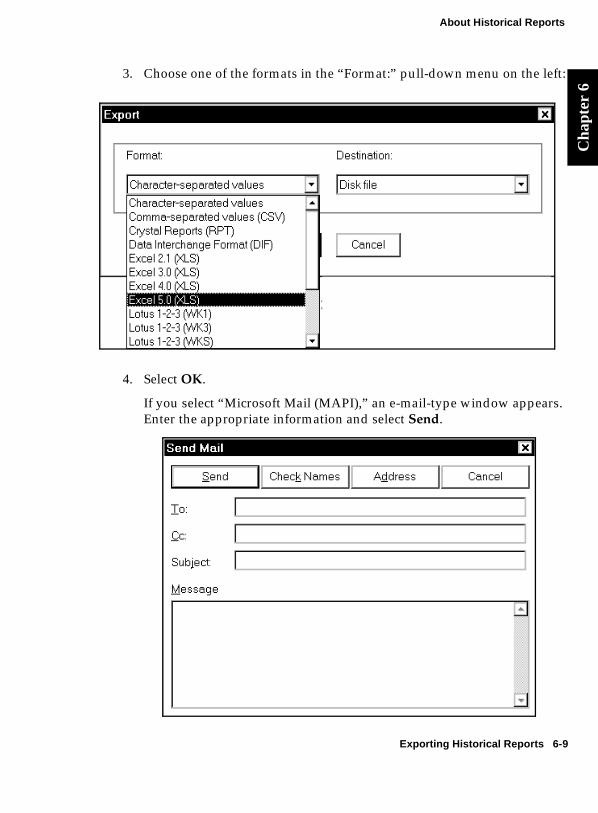
About Historical Reports
Cha
pter
6
3. Choose one of the formats in the “Format:” pull-down menu on the left:
4. Select OK.
If you select “Microsoft Mail (MAPI),” an e-mail-type window appears. Enter the appropriate information and select Send.
Exporting Historical Reports 6-9
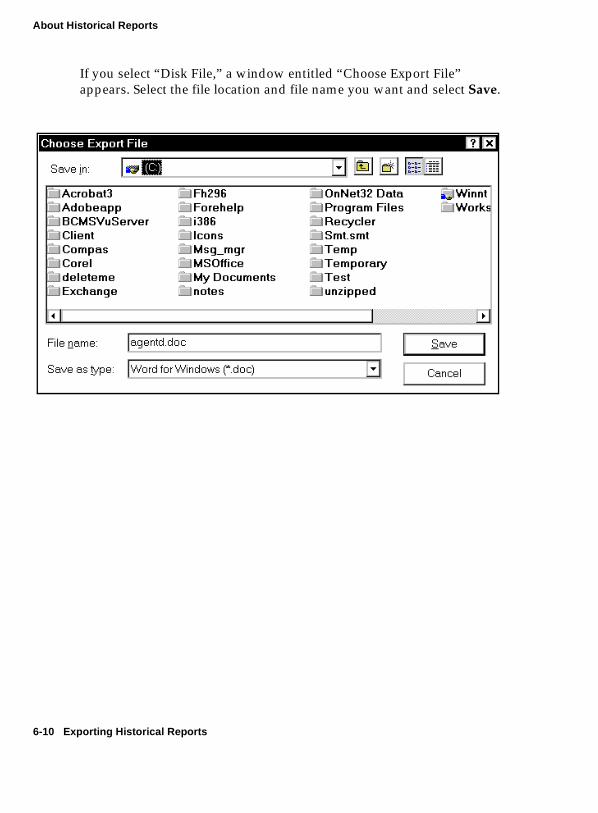
About Historical Reports
If you select “Disk File,” a window entitled “Choose Export File” appears. Select the file location and file name you want and select Save.
6-10 Exporting Historical Reports

7
Working with Reports 7Overview 7
Chapters 5 and 6 described Real-Time and Historical Reports, what they are and what they measure. In this chapter you will learn how to
● Create different types of reports● Save reports● Open previously saved reports● Change the properties of a report● Print reports● Schedule the printing of Historical Reports● Use the controls on the Historical Report window.
Note Reports are created, saved, opened, edited and printed from BCMS Vu Client.
Overview 7-1
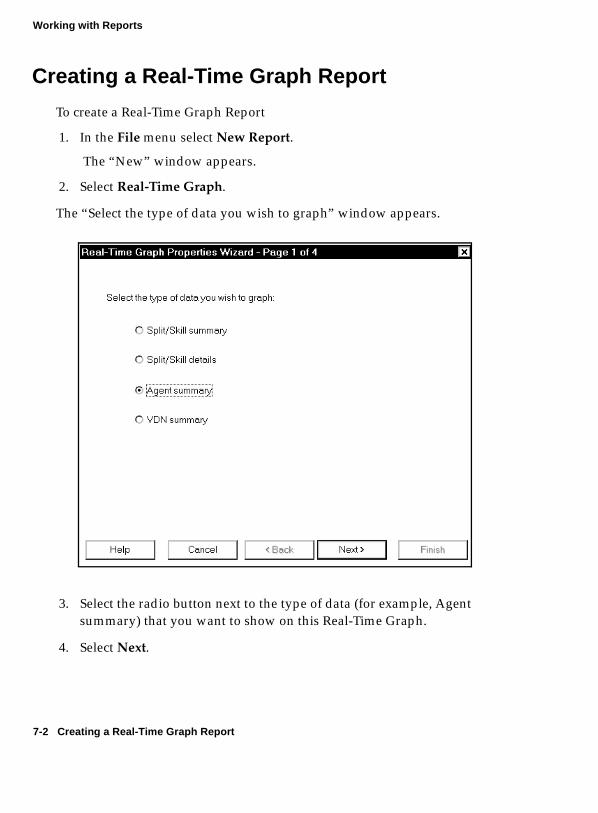
Working with Reports
Creating a Real-Time Graph Report 7
To create a Real-Time Graph Report
1. In the File menu select New Report.
The “New” window appears.
2. Select Real-Time Graph.
The “Select the type of data you wish to graph” window appears.
3. Select the radio button next to the type of data (for example, Agent summary) that you want to show on this Real-Time Graph.
4. Select Next.
7-2 Creating a Real-Time Graph Report
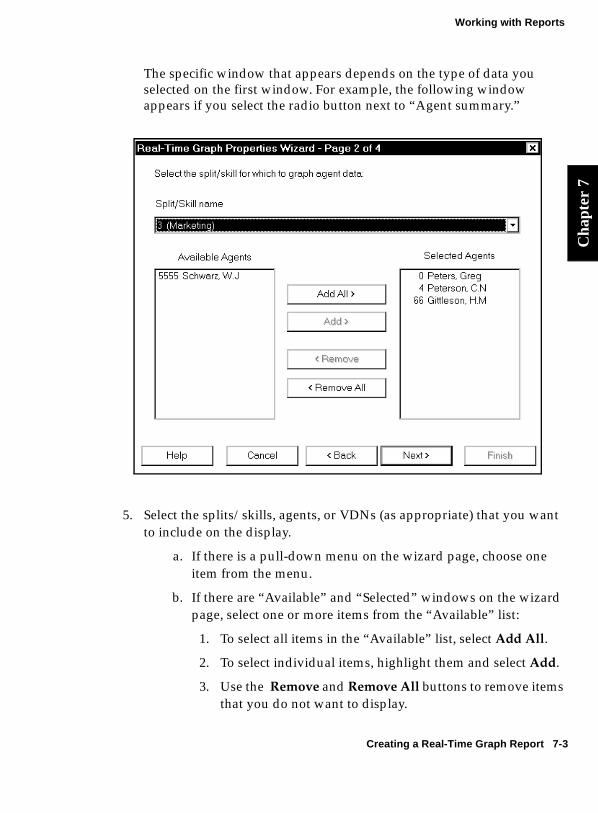
Working with Reports
Cha
pter
7
The specific window that appears depends on the type of data you selected on the first window. For example, the following window appears if you select the radio button next to “Agent summary.”
5. Select the splits/skills, agents, or VDNs (as appropriate) that you want to include on the display.
a. If there is a pull-down menu on the wizard page, choose one item from the menu.
b. If there are “Available” and “Selected” windows on the wizard page, select one or more items from the “Available” list:
1. To select all items in the “Available” list, select Add All.
2. To select individual items, highlight them and select Add.
3. Use the Remove and Remove All buttons to remove items that you do not want to display.
Creating a Real-Time Graph Report 7-3

Working with Reports
6. Select Next.
The next window that appears, which depends on the type of data you selected on the first window, asks you to choose the attributes that you want to measure in the report. For example, the following illustration shows the window that appears if you chose the radio button next to Agent summary.
7. Select the attributes (data items) that you want to include on the display.
a. To select all items in the “Available” list, select Add All.
b. To select individual items, highlight them and select Add.
c. Use the Remove and Remove All buttons to remove attributes that you do not want to display.
7-4 Creating a Real-Time Graph Report
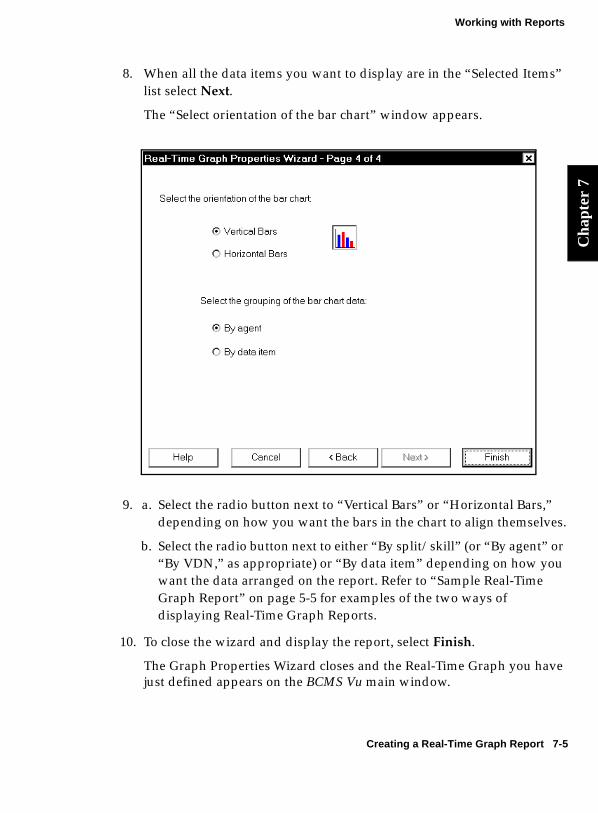
Working with Reports
Cha
pter
7
8. When all the data items you want to display are in the “Selected Items” list select Next.
The “Select orientation of the bar chart” window appears.
9. a. Select the radio button next to “Vertical Bars” or “Horizontal Bars,” depending on how you want the bars in the chart to align themselves.
b. Select the radio button next to either “By split/skill” (or “By agent” or “By VDN,” as appropriate) or “By data item” depending on how you want the data arranged on the report. Refer to “Sample Real-Time Graph Report” on page 5-5 for examples of the two ways of displaying Real-Time Graph Reports.
10. To close the wizard and display the report, select Finish.
The Graph Properties Wizard closes and the Real-Time Graph you have just defined appears on the BCMS Vu main window.
Creating a Real-Time Graph Report 7-5
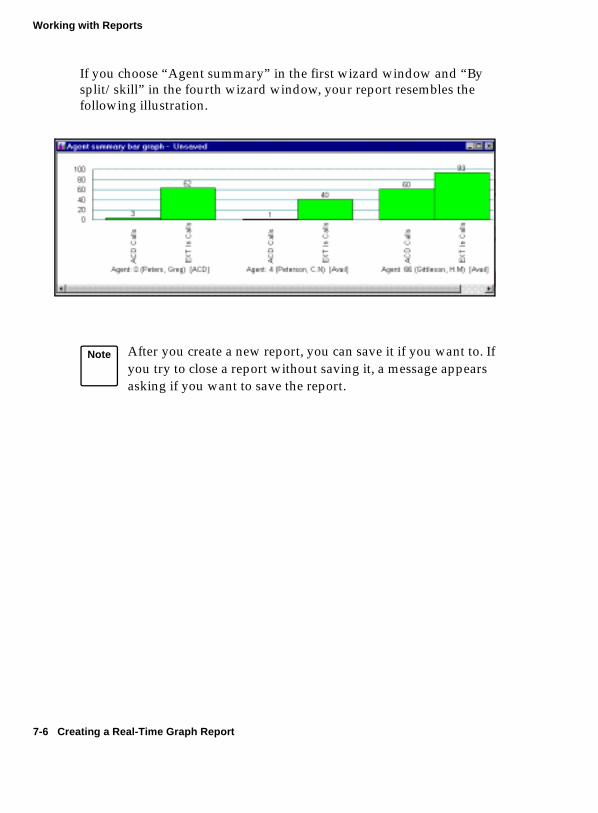
Working with Reports
If you choose “Agent summary” in the first wizard window and “By split/skill” in the fourth wizard window, your report resembles the following illustration.
Note After you create a new report, you can save it if you want to. If you try to close a report without saving it, a message appears asking if you want to save the report.
7-6 Creating a Real-Time Graph Report

Working with Reports
Cha
pter
7
Creating a Real-Time Pie Chart Report 7
To create a Real-Time Pie Chart Report
1. In the File menu select New Report.
The “New” window appears.
2. Select Real-Time Pie Chart.
The “Select the type of data for which to create a pie chart:” window appears.
3. Select the radio button next to the category of data that you want to show on this Real-Time Pie Chart Report.
4. Select Next.
The “Pie Chart Wizard” window, page 2 of 2, appears. This window depends on which type of report you selected in the previous window.
Creating a Real-Time Pie Chart Report 7-7
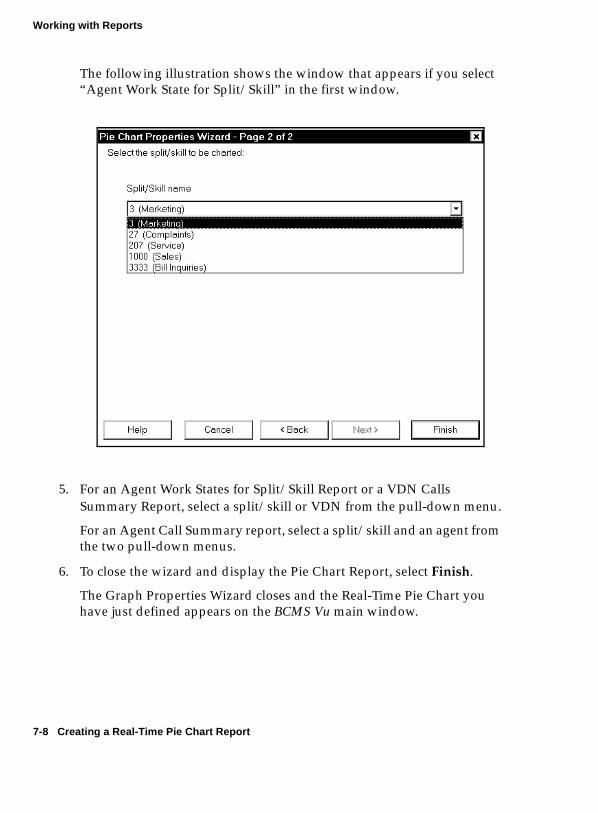
Working with Reports
The following illustration shows the window that appears if you select “Agent Work State for Split/Skill” in the first window.
5. For an Agent Work States for Split/Skill Report or a VDN Calls Summary Report, select a split/skill or VDN from the pull-down menu.
For an Agent Call Summary report, select a split/skill and an agent from the two pull-down menus.
6. To close the wizard and display the Pie Chart Report, select Finish.
The Graph Properties Wizard closes and the Real-Time Pie Chart you have just defined appears on the BCMS Vu main window.
7-8 Creating a Real-Time Pie Chart Report
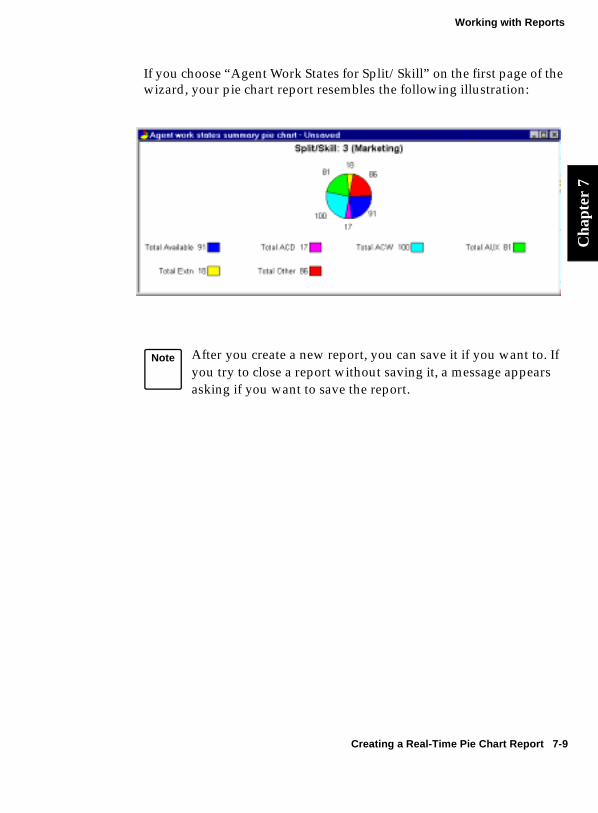
Working with Reports
Cha
pter
7
If you choose “Agent Work States for Split/Skill” on the first page of the wizard, your pie chart report resembles the following illustration:
Note After you create a new report, you can save it if you want to. If you try to close a report without saving it, a message appears asking if you want to save the report.
Creating a Real-Time Pie Chart Report 7-9
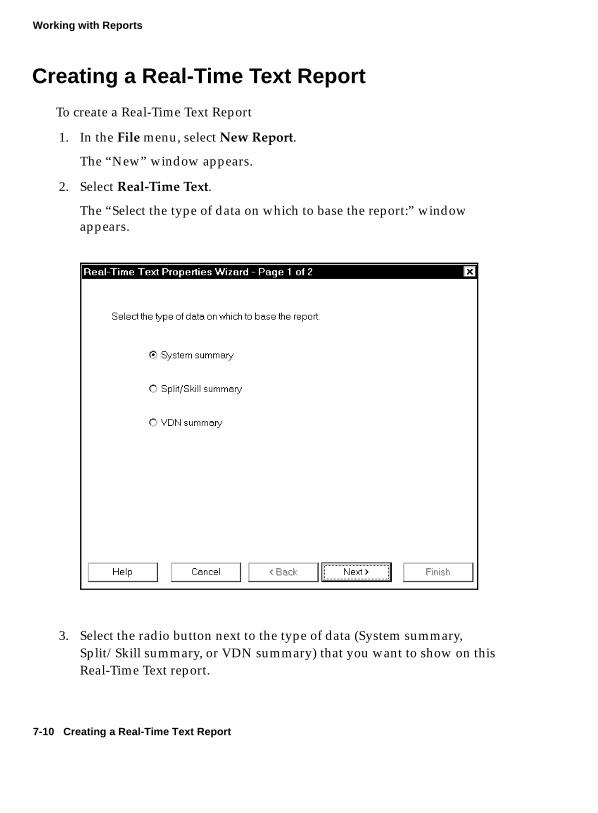
Working with Reports
Creating a Real-Time Text Report 7
To create a Real-Time Text Report
1. In the File menu, select New Report.
The “New” window appears.
2. Select Real-Time Text.
The “Select the type of data on which to base the report:” window appears.
3. Select the radio button next to the type of data (System summary, Split/Skill summary, or VDN summary) that you want to show on this Real-Time Text report.
7-10 Creating a Real-Time Text Report
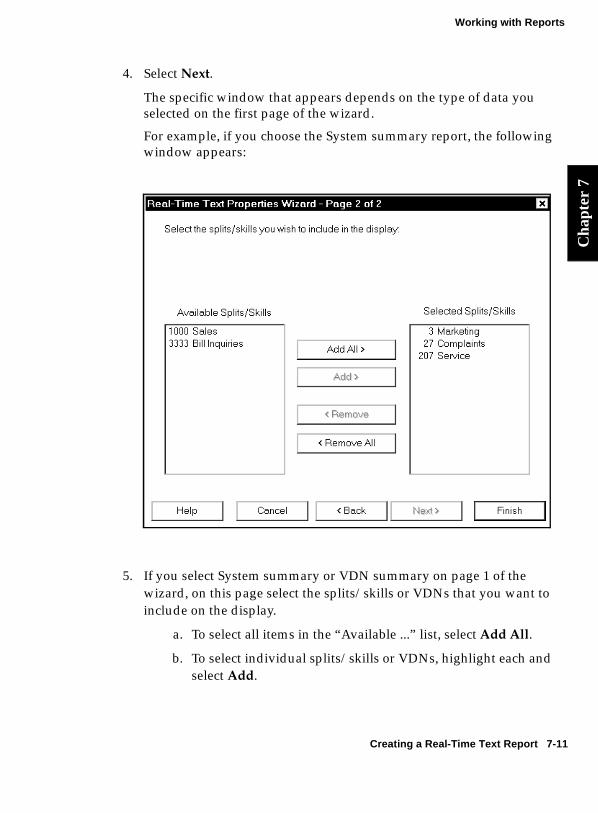
Working with Reports
Cha
pter
7
4. Select Next.
The specific window that appears depends on the type of data you selected on the first page of the wizard.
For example, if you choose the System summary report, the following window appears:
5. If you select System summary or VDN summary on page 1 of the wizard, on this page select the splits/skills or VDNs that you want to include on the display.
a. To select all items in the “Available ...” list, select Add All.
b. To select individual splits/skills or VDNs, highlight each and select Add.
Creating a Real-Time Text Report 7-11
Working with Reports
c. Use the Remove and Remove All buttons to remove splits/skills and VDNs that you do not want to display.
d. When all the splits/skills or VDNs that you want to display are in the “Selected...” list, select Next.
6. If you choose to create a Split/Skill summary report, from the “Split/Skill name” pull-down menu on this page select the split/skill you want to display.
7. To close the wizard and display the Real-Time Text Report, select Finish.
The Real-Time Text Wizard closes and the Real-Time Text report you have just defined appears in the BCMS Vu main window.
Note After you create a new report, you can save it if you want to. If you try to close a report without saving it, a message appears asking if you want to save the report.
7-12 Creating a Real-Time Text Report

Working with Reports
Cha
pter
7
Creating a Wallboard Display 7
To create a Wallboard Display
1. In the “File” menu select New Report.
The “New” window appears.
2. Select Wallboard Display.
Page 1 of the Wallboard Wizard appears.
3. a. If you do not want to display the wallboard report on an external wallboard at this time, select Next.
Page 2 of the Wallboard Wizard appears. Go to step 4.
Creating a Wallboard Display 7-13

Working with Reports
b. If you want to display the wallboard report on an external wallboard, check the box next to “Display data on physical wallboard” and select Next.
Page 1 of the Wallboard wizard changes:
c. From the “Number of lines:” pull-down menu, select the maximum number of rows of text supported on the wallboard(s) you want to use. This is the maximum number of physical rows of text on the external wallboard(s). The names of all registered wallboards connected to PCs on the network that fit this description appear in the “Available Wallboards” list.
d. From the “Available Wallboards” window choose the wallboard(s) on which you want to display the report.
1. To choose all wallboards, select Add All.
7-14 Creating a Wallboard Display
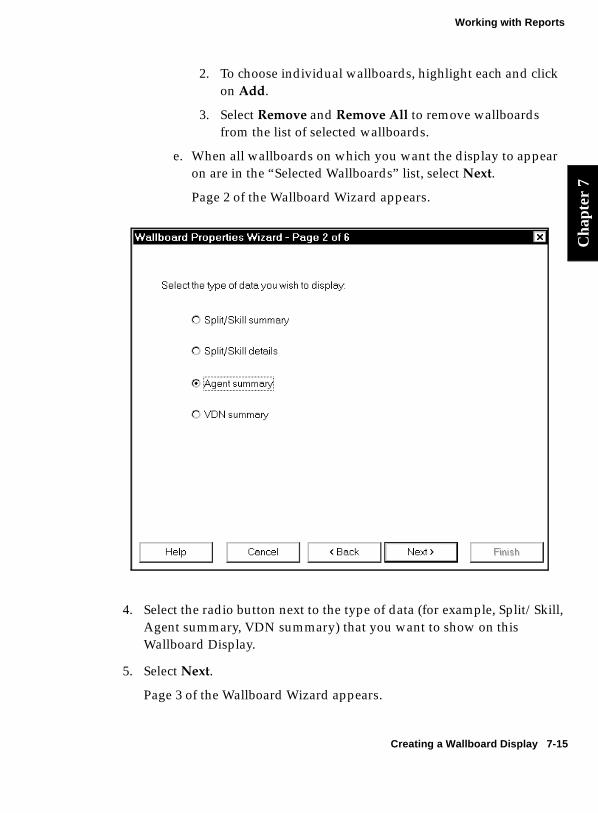
Working with Reports
Cha
pter
7
2. To choose individual wallboards, highlight each and click on Add.
3. Select Remove and Remove All to remove wallboards from the list of selected wallboards.
e. When all wallboards on which you want the display to appear on are in the “Selected Wallboards” list, select Next.
Page 2 of the Wallboard Wizard appears.
4. Select the radio button next to the type of data (for example, Split/Skill, Agent summary, VDN summary) that you want to show on this Wallboard Display.
5. Select Next.
Page 3 of the Wallboard Wizard appears.
Creating a Wallboard Display 7-15
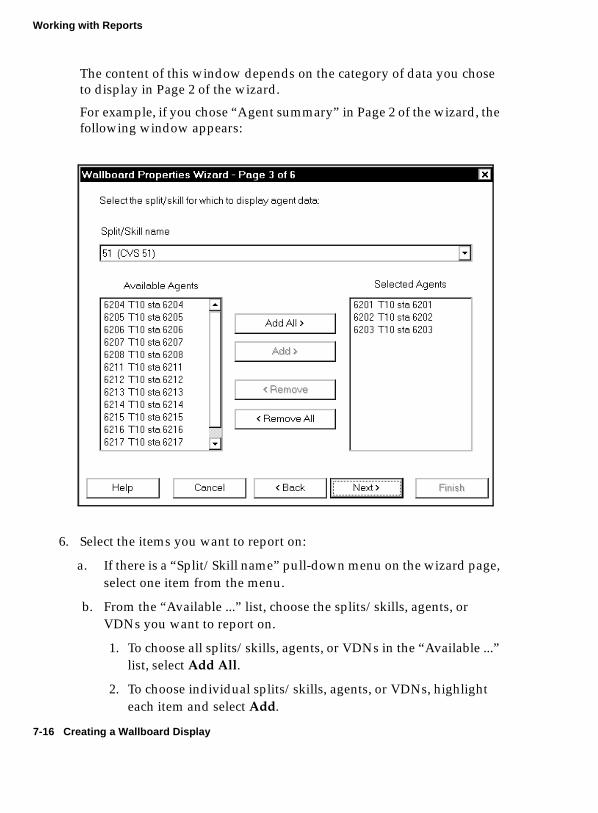
Working with Reports
The content of this window depends on the category of data you chose to display in Page 2 of the wizard.
For example, if you chose “Agent summary” in Page 2 of the wizard, the following window appears:
6. Select the items you want to report on:
a. If there is a “Split/Skill name” pull-down menu on the wizard page, select one item from the menu.
b. From the “Available ...” list, choose the splits/skills, agents, or VDNs you want to report on.
1. To choose all splits/skills, agents, or VDNs in the “Available ...” list, select Add All.
2. To choose individual splits/skills, agents, or VDNs, highlight each item and select Add.
7-16 Creating a Wallboard Display
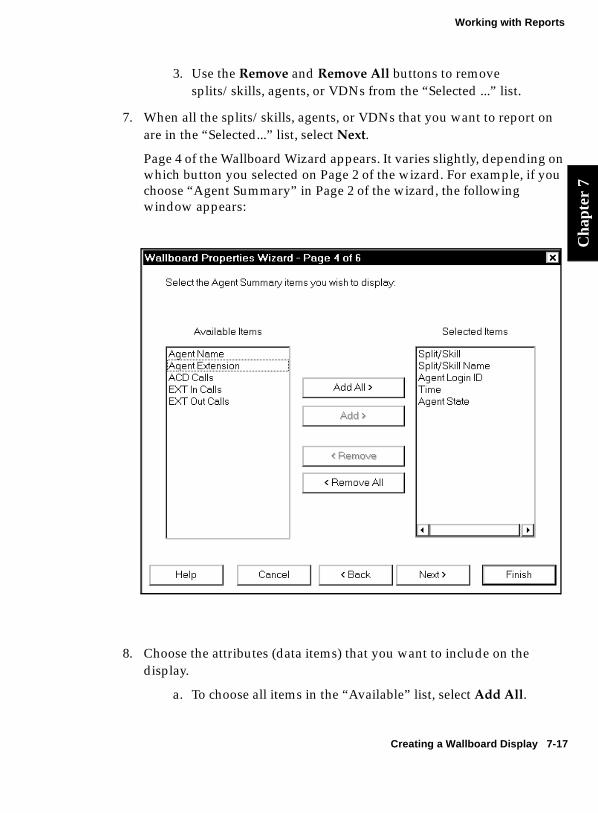
Working with Reports
Cha
pter
7
3. Use the Remove and Remove All buttons to remove splits/skills, agents, or VDNs from the “Selected ...” list.
7. When all the splits/skills, agents, or VDNs that you want to report on are in the “Selected...” list, select Next.
Page 4 of the Wallboard Wizard appears. It varies slightly, depending on which button you selected on Page 2 of the wizard. For example, if you choose “Agent Summary” in Page 2 of the wizard, the following window appears:
8. Choose the attributes (data items) that you want to include on the display.
a. To choose all items in the “Available” list, select Add All.
Creating a Wallboard Display 7-17

Working with Reports
b. To choose individual items, highlight them and select Add.
c. Use the Remove and Remove All buttons to remove attributes that you do not want to display.
9. When all the data items you want to display are in the “Selected Items” list select Next.
Page 5 of the Wallboard Wizard appears.
10. Use the drop-down menu at the top of the wizard page to select how many lines of text you want all the information to occupy. This is not necessarily the same number of rows of text that appear at one time on the external wallboards you selected. Rather, it is the number of lines of
7-18 Creating a Wallboard Display
Working with Reports
Cha
pter
7
text over which all the information will be spread. The more lines of text you choose from the menu, the less packed together the characters will be in the rows of the display.
If you have many items to display, you should choose “Four line wallboard.”
Obviously, if you choose more lines of text from this menu than there are rows on the external wallboard, the lines of text will have to alternate on the external wallboard.
11. If you choose “Three line wallboard,” a check box next to the words “Fixed first line” appears. If you check this box, the first line of text remains on the display while other lines change.
12. In the “Length of time (in seconds) to hold each line of text still,” box type the number of seconds that you want each line of the display to be visible before it changes.
The display at the bottom of the window reflects your choice from the pull-down menu on this page.
13. Select Next.
Creating a Wallboard Display 7-19
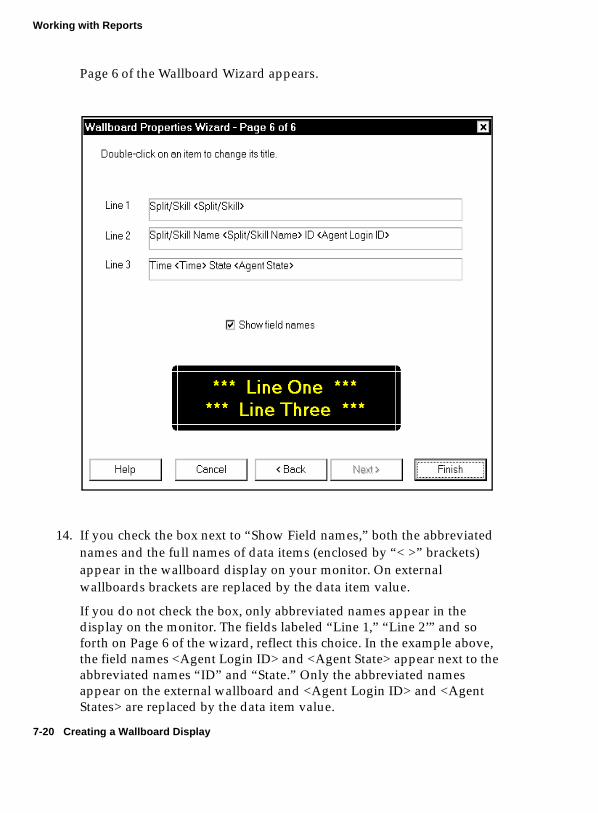
Working with Reports
Page 6 of the Wallboard Wizard appears.
14. If you check the box next to “Show Field names,” both the abbreviated names and the full names of data items (enclosed by “< >” brackets) appear in the wallboard display on your monitor. On external wallboards brackets are replaced by the data item value.
If you do not check the box, only abbreviated names appear in the display on the monitor. The fields labeled “Line 1,” “Line 2’” and so forth on Page 6 of the wizard, reflect this choice. In the example above, the field names <Agent Login ID> and <Agent State> appear next to the abbreviated names “ID” and “State.” Only the abbreviated names appear on the external wallboard and <Agent Login ID> and <Agent States> are replaced by the data item value.
7-20 Creating a Wallboard Display
Working with Reports
Cha
pter
7
The display at the bottom of this wizard reflects the choice you made from the pull-down menu on Page 5 of the wizard.
In the previous example, “Two Lines” was chosen on page 1 of the wizard. This reflects the fact that the targeted extended wallboard is constructed to display only two rows of text.
“Three line wallboard” was selected on page 5 of the wizard. This distributes the reported data items over three lines of text. Since the external wallboard can display only two rows of characters at a time, the three lines of the text must alternate on the external wallboard. If “Fixed first line” is checked on page 5 of the wizard, the first line of text (split/skill) always appears on the top row of the wallboard and lines 2 and 3 of the text alternate on the second row.
If “Display data on physical wallboard” was not checked on page 1 of the wizard, the number of lines chosen on page 5 of the wizard appears in the black window at the bottom of pages 5 and 6.
15. If you are satisfied with the settings you have specified, select Finish.
The Wallboard Properties Wizard closes and the Wallboard Display you have just defined appears in the BCMS Vu main window.
The display also appears on the external wallboard if you selected the “Display data on physical wallboard” checkbox on page 1 of the wizard.
Creating a Wallboard Display 7-21

Working with Reports
Creating a Time Trace Report 7
1. In the File menu select New Report.
2. Select Time Trace.
The “Select the type of data you wish to create a time trace for:” window appears.
3. In the “Select the type of data you wish to create a time trace for:” window, select the radio button next to the category of report you want to create.
4. Select Next.
7-22 Creating a Time Trace Report

Working with Reports
Cha
pter
7
The window that appears now depends on what you selected in the first window. For instance, if you selected “Agent Data,” the following window appears:
5. In the displayed wizard window, in each pull-down menu, select the name of the split/skill, agent (if appropriate), or VDN, and the time-trace data you want to display.
6. Select Next.
Creating a Time Trace Report 7-23
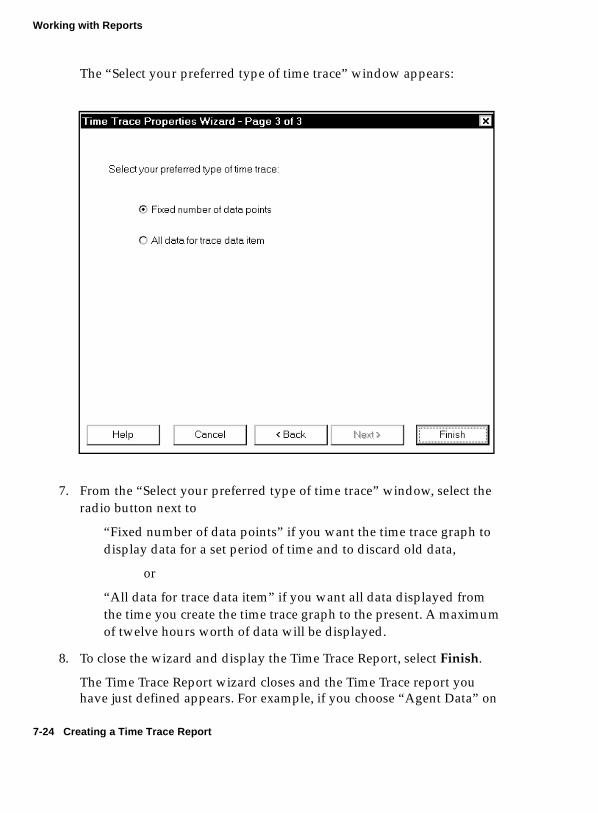
Working with Reports
The “Select your preferred type of time trace” window appears:
7. From the “Select your preferred type of time trace” window, select the radio button next to
“Fixed number of data points” if you want the time trace graph to display data for a set period of time and to discard old data,
or
“All data for trace data item” if you want all data displayed from the time you create the time trace graph to the present. A maximum of twelve hours worth of data will be displayed.
8. To close the wizard and display the Time Trace Report, select Finish.
The Time Trace Report wizard closes and the Time Trace report you have just defined appears. For example, if you choose “Agent Data” on
7-24 Creating a Time Trace Report
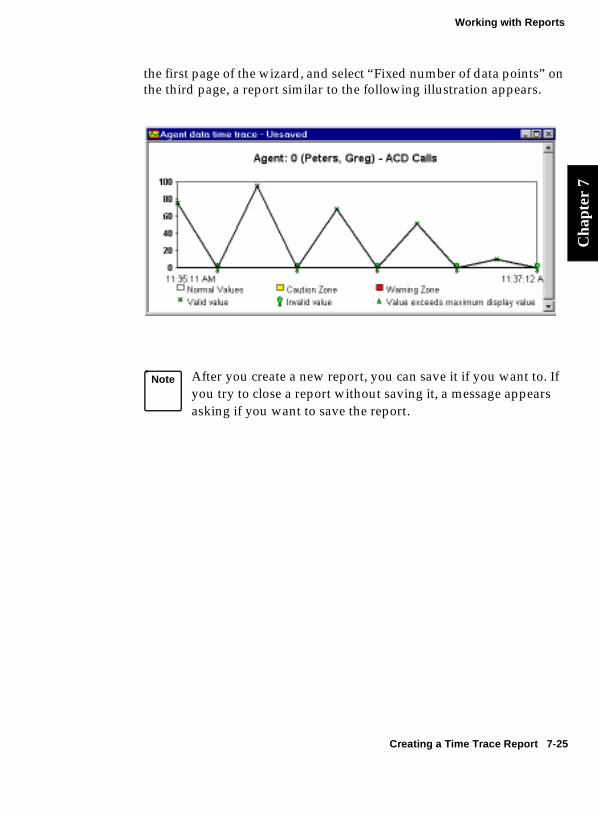
Working with Reports
Cha
pter
7
the first page of the wizard, and select “Fixed number of data points” on the third page, a report similar to the following illustration appears.
Note After you create a new report, you can save it if you want to. If you try to close a report without saving it, a message appears asking if you want to save the report.
Creating a Time Trace Report 7-25
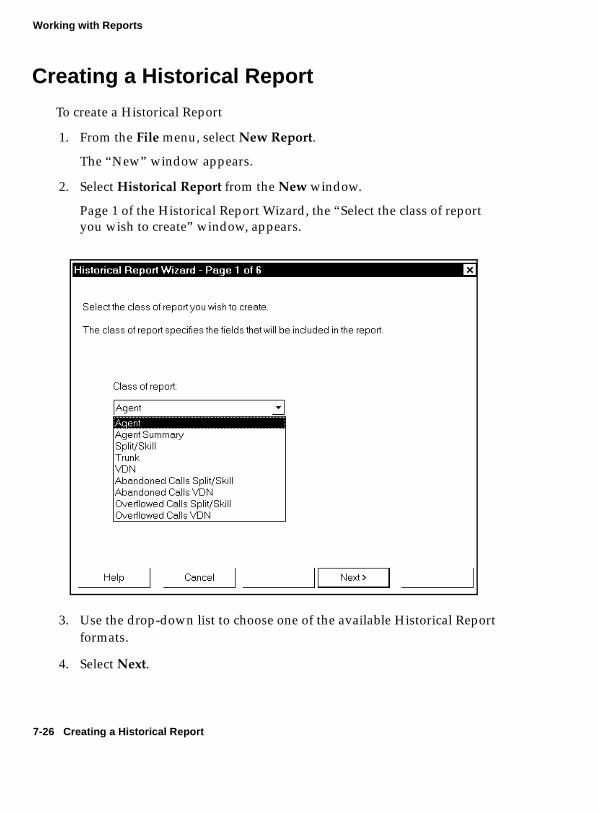
Working with Reports
Creating a Historical Report 7
To create a Historical Report
1. From the File menu, select New Report.
The “New” window appears.
2. Select Historical Report from the New window.
Page 1 of the Historical Report Wizard, the “Select the class of report you wish to create” window, appears.
3. Use the drop-down list to choose one of the available Historical Report formats.
4. Select Next.
7-26 Creating a Historical Report

Working with Reports
Cha
pter
7
Page 2 of the Historical Report Wizard appears. The contents of this window depend on what you selected in step 3, but it will be similar to the window in the following illustration.
5. Depending on what you selected in step 3, select the split(s)/skill(s), agent(s), trunk(s), or VDN(s) you want to report on
a. To choose all items in the “Available...” list, select Add All.
b. To choose individual items, highlight each and select Add.
c. Use the Remove and Remove All buttons to remove items that you do not want to display.
6. When all the agent(s), split(s)/skill(s), trunk(s), or VDN(s) you want to display are in the “Selected...” list, select Next.
Creating a Historical Report 7-27

Working with Reports
The “Select the time period for the report” window appears.
7. Select the radio button next to the time unit that you want the report to include. Available time units are Interval, Daily, Weekly, Monthly, and Quarterly. If you select “Interval,” each line of the report contains summary information covering one interval. If you select “weekly,” each line of the report contains summary information covering one week.
8. Select Next.
a. If you select anything except “Interval” on page 3 of the wizard, the “Select the days to be included in the report” window appears. Go to step 9.
7-28 Creating a Historical Report

Working with Reports
Cha
pter
7
b. If you select “Interval” on page 3 of the wizard, the “Select the start and end times for the interval data for each day” window appears.
1. In the “Start Time” window, enter the time of day for which you want the first entry to appear.
2. In the “End Time” window, enter the time of day for which you want the report to stop reporting.
3. Select Next.
Creating a Historical Report 7-29
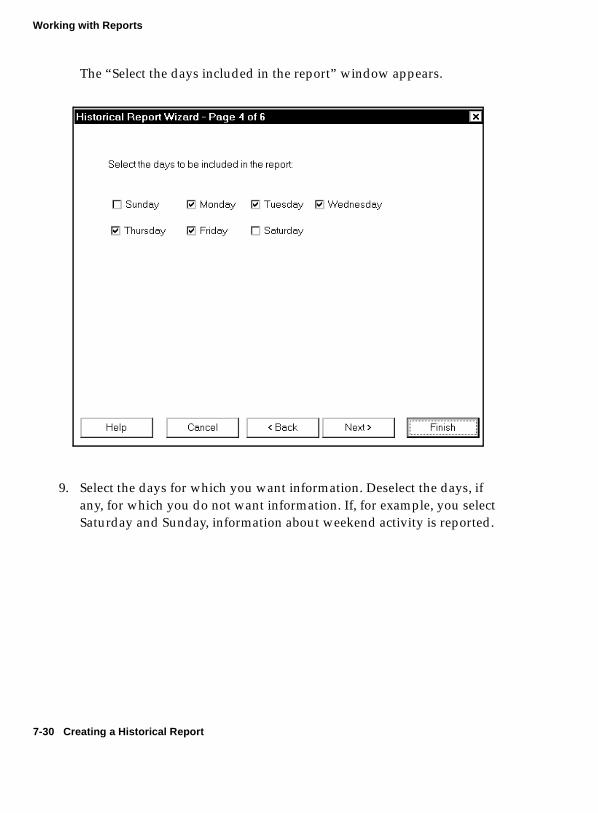
Working with Reports
The “Select the days included in the report” window appears.
9. Select the days for which you want information. Deselect the days, if any, for which you do not want information. If, for example, you select Saturday and Sunday, information about weekend activity is reported.
7-30 Creating a Historical Report

Working with Reports
Cha
pter
7
Page 5 of the wizard appears.
10. Select the radio button next to either “Relative” or “Absolute” to choose how you want to specify the time for which the report is created:
a. Check the radio button next to “Absolute” if you want to specify specific dates for the data included in the report (for example, 4/15/98 to 4/21/98).
b. Check the radio button next to “Relative” if you want to run a report for a specific period of time prior to the time the report is created or, later, prior to the time it is opened (for example, over the last seven days).
11. Select Next.
Creating a Historical Report 7-31
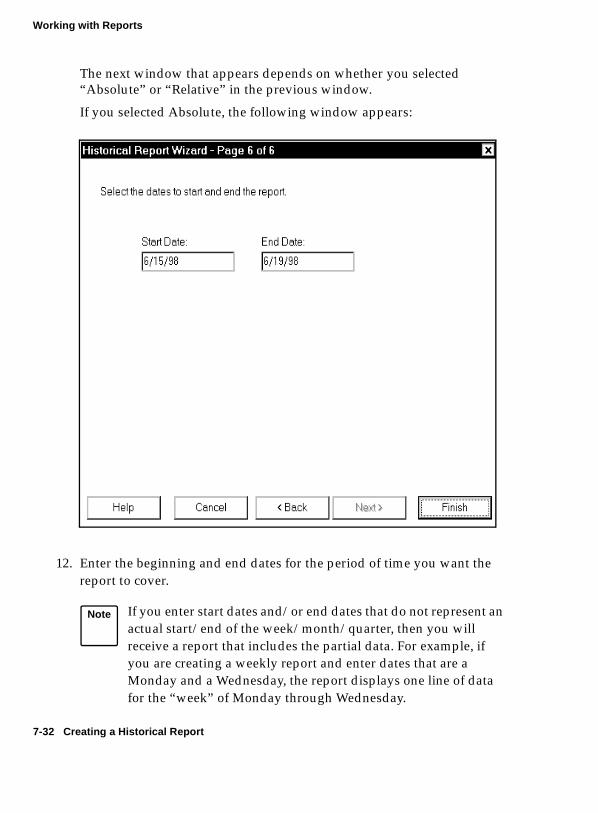
Working with Reports
The next window that appears depends on whether you selected “Absolute” or “Relative” in the previous window.
If you selected Absolute, the following window appears:
12. Enter the beginning and end dates for the period of time you want the report to cover.
Note If you enter start dates and/or end dates that do not represent an actual start/end of the week/month/quarter, then you will receive a report that includes the partial data. For example, if you are creating a weekly report and enter dates that are a Monday and a Wednesday, the report displays one line of data for the “week” of Monday through Wednesday.
7-32 Creating a Historical Report

Working with Reports
Cha
pter
7
If you selected “Relative” in the previous window, the following window appears:
13. Enter “how many days ago” you want the report to start reporting and “how many days ago” you want the report to stop reporting.
14. To close the wizard and display the Historical Report, select Finish.
A report, similar to the one on page 7-41, appears. Note that the format of columns that display length of time is minutes:seconds.
Note If there is no historical data in the database for the dates you select, the report display will appear but will not contain any data.
Creating a Historical Report 7-33

Working with Reports
Saving a Report 7
To save a report, do the following:
1. Select the Save toolbar button.
or
Select Save Report from the File menu.
2. If this is the first time you have saved this report, a dialog box appears showing the contents of the BCMS Vu reports directory.
3. In the Files of type list box, the file extension that matches the type of report you are saving appears. The BCMS Vu report file extensions are as follows:● Real-Time Graph Report (*.gra)● Real-Time Pie Chart Report (*.pie)● Real-Time Text Report (*.trp)● Wallboard Display (*.wal)● Time Trace Report (*.tra)● Historical Report (*.his).
4. Type a file name for the report. This name will be displayed in the title bar of the report window the next time you open the report.
5. Select Save.
7-34 Saving a Report
Working with Reports
Cha
pter
7
Closing a Report 7
To close a report, do the following:
1. Click on the Close button in the upper right corner of the report window
or
Select Close Report from the File menu.
If you have not saved the report since you created it or changed it, a window appears asking you if you want to save the unsaved report.
2. .a. If you want to save the report, select Yes.
b. If you want to exit the report without saving it, select No.
c. If you want to return to the report, select Cancel.
Closing a Report 7-35

Working with Reports
Opening a Report 7
To open a report that you have previously saved, do the following:
1. Select the Open toolbar button.
or
Select Open Reports from the File menu.
2. A dialog box appears, showing the contents of the BCMS Vu reports directory.
3. In the “Files of type” list box, select the type of report you want to open. The available types are as follows:● Real-Time Graph Report (*.gra)● Real-Time Pie Chart Report (*.pie)● Real-Time Text Report (*.trp)● Wallboard Display (*.wal)● Time Trace Report (*.tra)● Historical Report (*.his).
4. From the available files list, highlight the report you want to open.
5. Select Open.
BCMS Vu opens the report.
7-36 Opening a Report
Working with Reports
Cha
pter
7
Changing the Properties of a Report 7
To change the properties of a report after you have created it, do the following:
1. Open the report and make it the active report by clicking on its title bar.
2. Select the Report Properties toolbar button.
or
From the Edit menu, select Report Properties.
The appropriate report Properties Wizard, which is the same wizard you used to create the report, starts.
3. Follow the directions in the Report Properties Wizard.
The changes take effect as soon as you finish working in the wizard. If you select Cancel at any point in the wizard, the changes are discarded.
Changing the Properties of a Report 7-37

Working with Reports
Printing Reports 7
The BCMS Vu software lets you print Real-Time Text Reports and Historical Reports to your local postscript or network printer.
To print a report,
1. Create or open the report.
2. Make the report the current window.
3. Select the Print button on the Historical Report’s window or on the toolbar.
or
From the File menu select Print Report.
The “Print” window appears.
4. Be sure the correct printer is displayed. If it is not, use Print Setup to select a printer.
5. Define a print range, either all pages or a specific number of pages.
6. Select the number of copies you want to print.
7. If you want to print the report to a file, click on the box next to "Print to file." The "Print to file" window appears."
1. Select the file name you want to use.
2. Select the folder in which you want to put the file.
3. Select Save.
8. Select the OK button.
7-38 Printing Reports
Working with Reports
Cha
pter
7
Scheduling the Printing of a Historical Report 7
To schedule a Historical Report for printing at a later date,
1. In the Options menu, select Schedule Historical Reports or select the Schedule Historical Reports toolbar button.
2. The “Schedule Historical Reports” window appears.
3. If you want to change the schedule for printing a report that is found in this window, highlight the file and select Properties.... Go to step 4.
4. If you want to schedule a report that is not in the list,
a. Double-click on Add Scheduled Report or select Add....
b. From the standard “Open” window, find and select the report whose printing you want to schedule.
c. Go to step 4.
5. From the “Select the frequency of printing the report” window, select one of the radio buttons, either Daily, Weekly, or Monthly.
a. If you select “Daily,” the “Select the time of day to print the report” appears. Go to step 6.
b. If you select “Weekly,” the “Select the days of the week on which the report should be printed” window appears. Click next to one or more days of the week. Select Next. The “Select the time of day to print the report” window appears. Go to step 5.
c. If you select “Monthly,” the “Select the day of the month for printing the report” window appears. Type a 1- or 2-digit number in the box specifying the day of the month that you want the report printed. Select Next. The “Select the time of day to print the report” appears. Go to step 5.
Scheduling the Printing of a Historical Report 7-39

Working with Reports
6. In the text box in the “Select the time of day to print the report” window, type in the time of day when you want the report printed.
7. Select Next.
A printer selection window appears.
8. a. To change the printer shown in the wizard window
1. Select Change Printer.
2. Select a different printer.
3. Select OK.
4. Select Finish.
b. To choose the printer shown in the wizard window, select Finish.
9. Select Save.
Note If you schedule a report to print to a file, you will be prompted to enter a file name when the report starts to print. Until you enter a file name, printing is halted and other print jobs are stacked in a queue.
Note You may not receive notification if a scheduled report fails to print. However, an information entry is made in the error log when BCMS Vu Client successfully passes a print job to the print queue. If the error log reports that a job was printed (sent to the print queue) when actually it was not, check to see if the printer was actually offline at the time the report was scheduled to be printed.
7-40 Scheduling the Printing of a Historical Report

Working with Reports
Cha
pter
7
Using the Controls on the Historical Report Window 7
The “Historical Report” window has its own set of controls and indicators which perform the following functions:
Export/E-mail this report.
Save the report in a format suitable for
Print the report.
exporting to a spreadsheet or databaseapplication (using Microsoft Word or Excel).
Move forward or back a page. Move to
first or last page in report.
Current and total pages in report
Change the magnification of the view.
Using the Controls on the Historical Report Window 7-41

Working with Reports
7-42 Using the Controls on the Historical Report Window

8
Displaying Information on External Wallboards 8Introduction 8
BCMS Vu software lets you display information on actual wallboards (external wallboards). There are two different ways you can use the BCMS Vu software to display information on external wallboards:
● You can create a Wallboard Display report on your monitor and send the report to an external wallboard.
● You can type a short message, called a broadcast message, and send it to an external wallboard to be displayed for a set period of time.
Note When you are creating a Wallboard Display, a maximum of 35 characters per line can appear on your monitor. Keep in mind, however, that the maximum number of characters per line on an external wallboard depends on the specifications of the external wallboard. See “Types of Wallboards” on page 5-18.
Introduction 8-1

Displaying Information on External Wallboards
Configuring a Wallboard 8
Before you can show any information from BCMS Vu on an external wallboard, you must first connect the wallboard to a PC and register the wallboard on the BCMS Vu Server. To find out how to do this, see Chapter 5, “Installing a Wallboard” in BCMS Vu Software Installation Guide and“Registering Wallboards” on page 4-11.
Starting BCMS Vu Wallboard Software 8
If a wallboard is connected to a PC running BCMS Vu Server software, you do not need to install or start BCMS Vu Wallboard software on your Server PC; it is automatically installed when you install Server software and it starts automatically when you start Server software.
However, in order to access a wallboard attached to a PC, other than a Server PC, you must start the Wallboard software on that PC. Therefore, if a wallboard is connected to a PC without Server software, you must manually start BCMS Vu Wallboard software on that PC.
To start the BCMS Vu Wallboard software, in Start/Programs/Lucent Technologies, select BCMS Vu Wallboard.
The Wallboard program starts. However, the only indication that it is running is an icon at the right end of the status bar on your screen.
Exiting BCMS Vu Wallboard Software 8
To exit BCMS Vu Wallboard Software,
1. Click with the secondary mouse button on the icon at the right end of the status bar.
2. Follow the menu that appears to close the Wallboard software.
8-2 Introduction

Displaying Information on External Wallboards
Cha
pter
8
Sending a Wallboard Display to an External Wallboard 8
If an external wallboard has been registered with BCMS Vu Server, you can direct the output of one Wallboard Display on your monitor to appear on the external wallboard.
To assign a Wallboard Display to an external wallboard, do the following:
1. If the Wallboard Display Report is already created,
a. Open it. Refer to “Opening a Report” on page 7-36.
b. Select the “Report Properties” toolbar button
or
In Edit, select Report Properties.
c. Page 1 of the Wallboard Wizard opens. It is the same window that opened when you created the Wallboard Display. Refer to “Creating a Wallboard Display” on page 7-13.
d. Check the box next to “Display data on physical wallboard.”
e. Select Finish.
2. If the wallboard display report does not exist, create it, following the instructions in “Creating a Wallboard Display” on page 7-13. Be sure you check the box next to “Display data on physical wallboard” on page 1 of the “Wallboard Properties” wizard.
Note If you try to send a display to a wallboard that is being used, the “Wallboard connection failed” window appears with the following message:
The following wallboards were already in use:<name><name>
Sending a Wallboard Display to an External Wallboard 8-3

Displaying Information on External Wallboards
Broadcasting a Message on an External Wallboard 8
If an external wallboard is registered with BCMS Vu Server, you can send short messages to the wallboard connected to any PC in the network that is running BCMS Vu Wallboard software and from the Server PC. For example, you might broadcast birthday messages or announcements about shift changes.
To broadcast a message on a wallboard, do the following:
1. Choose Broadcast Message from the Options menu.
The “Broadcast Message” window appears.
8-4 Broadcasting a Message on an External Wallboard
Displaying Information on External Wallboards
Cha
pter
8
2. In the pull-down menu, select the “number of lines” supported by the wallboard on which you want the message to appear. This is the maximum number or rows of text that can fit at one time on the external wallboard. A list of registered wallboards connected to PCs in the network that fit this description appears in the “Available Wallboards” list.
3. Select the names of the wallboards on which you want to display the message. These are the names you gave to the wallboards when you registered them with the Server.
a. To select all wallboards in the “Available Wallboards” list, select Add All.
b. To select individual wallboards, highlight each and select Add.
c. Use the Remove and Remove All buttons to remove wallboards that you do not want to select.
4. When all the wallboards you want to choose are in the “Selected Wallboards” list, select Next.
Broadcasting a Message on an External Wallboard 8-5

Displaying Information on External Wallboards
The “broadcast details” window appears.
5. Place your cursor in the first line of the message box.
6. Enter the first line of the message you want to broadcast. If the wallboard accepts more than one line, enter the subsequent line(s) in the message box(es) below.
7. Select the radio button next to the color (green, yellow, or red) in which you want the message displayed.
8. In the “Message hold time:” text box, enter how long (in seconds) you want each line of the message to appear on the external wallboard before the next line appears.
9. In the “Message display time:” text box, enter the period of time (in hr:min:sec:) that you want the entire message to be displayed.
10. To send the message to the wallboard, select Finish.
8-6 Broadcasting a Message on an External Wallboard

Displaying Information on External Wallboards
Cha
pter
8
Cancelling a Broadcast Message 8
To cancel a broadcast message in progress, select Cancel Broadcast from the Options menu.
Cancelling a Broadcast Message 8-7

Displaying Information on External Wallboards
8-8 Cancelling a Broadcast Message

9
BCMS Vu Real-Time and Historical Report Data Items 9Introduction 9
BCMS Vu uses data items that are stored in database tables to build real-time and historical reports.
Real-time data items are retrieved directly from the BCMS on the DEFINITY system. Historical data items previously downloaded from BCMS are stored in a historical database on your PC.
This chapter defines every data item that is used by BCMS Vu to create both real-time and historical reports. It consists of two tables:
Data Items — Real-Time Reports
This table defines data items used in real-time reports.
Data Items — Historical Reports.
This table defines data items used in historical reports.
Note Data items with the same name can have different definitions in different types of reports.
Introduction 9-1

BCMS Vu Real-Time and Historical Data Items
Data Items — Real-Time Reports 9
Data Items — Real-Time Reports
Data Item
Report Type
Definition
% Within Service Level
Split/Skill Detail Graph
Percentage of calls offered to the split/skill that completed during the interval and were answered within the acceptable service level. This represents a target level of service that is a measure of split/skill performance. For example, a split’s service objective might be to answer 90% of calls within 20 seconds (the acceptable service level.) This field is blank if no calls have been recorded for this time interval or if there is no Acceptable Service Level administered on the Hunt Group form.
% Within Level
Split/Skill Summary Graph
Percentage of calls offered to the split/skill that completed during the current interval and were answered within the administered acceptable service level. The calculation is based on the following:
% IN SERV LEVL = acceptable x (100) offered
where “acceptable” are ACD calls answered whose wait time was less than or equal to the administered service level for the split/skill, and
“offered” includes all calls that queued to the split/skill, those that were answered, those that abandoned, those that outflowed and those that were queued to another split/skill and were handled in that split/skill.
9-2 Data Items — Real-Time Reports

BCMS Vu Real-Time and Historical Data Items
Cha
pter
9
% Within Service Leve
VDN The percent of calls offered to the VDN that completed during the current interval and were answered within the acceptable service level defined on the VDN form. The calculation is:
% IN SERV LEVL = acceptable x (100)calls offered
“calls offered” is defined as: acdcalls + outflows + abandoned + connect + busy/disc, and
“acceptable” is the number of ACD and CONNect calls that were answered within the administered service level.
This field is blank if no calls were recorded for this time interval. This field is also blank if no Acceptable Service Level has been administered on the VDN form.
Abandoned Calls
Split/Skill Summary Graph
The total number of ACD calls that have hung up while waiting to be answered. This includes those calls that have abandoned while in queue or while ringing. Calls that abandon before queuing (for example, while listening to a forced first announcement) or that cannot be queued (for example, because the queue is full) are not counted as abandoned for the split/skill.
Abandoned Calls
VDN The number of calls to this VDN that abandoned before being answered during the current period. This includes VDN calls that were routed to an attendant, station, or announcement, and abandoned before being answered.
Acceptable Service Level
(Any) The number of seconds within which a call to a hunt group or VDN must be answered in order for it to be considered “acceptable.” The service level is administered on the hunt group from the DEFINITY system. Timing for a call begins when the call enters the hunt group or when the VDN is encountered.
ACD Calls Agent Summary Graph
The number of agents who are currently on an ACD call for this split/skill. This value also includes agents on Direct Agent calls.
ACD Calls Split/Skill Summary Graph
The number of ACD calls answered by agents that completed during the current interval. This number also includes those calls that flow in from other split/skills.
Data Items — Real-Time Reports
Data Item
Report Type
Definition
Data Items — Real-Time Reports 9-3
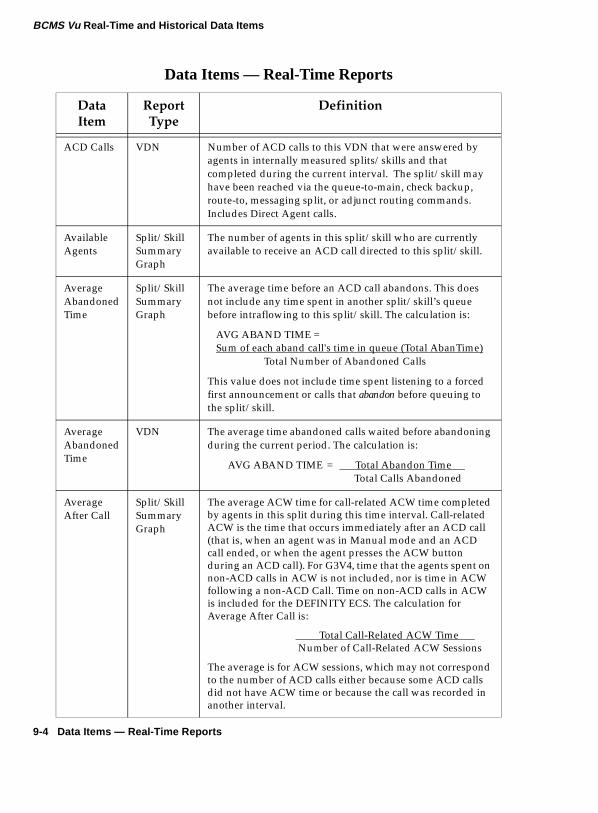
BCMS Vu Real-Time and Historical Data Items
ACD Calls VDN Number of ACD calls to this VDN that were answered by agents in internally measured splits/skills and that completed during the current interval. The split/skill may have been reached via the queue-to-main, check backup, route-to, messaging split, or adjunct routing commands. Includes Direct Agent calls.
Available Agents
Split/Skill Summary Graph
The number of agents in this split/skill who are currently available to receive an ACD call directed to this split/skill.
Average Abandoned Time
Split/Skill Summary Graph
The average time before an ACD call abandons. This does not include any time spent in another split/skill’s queue before intraflowing to this split/skill. The calculation is:
AVG ABAND TIME =Sum of each aband call's time in queue (Total AbanTime)
Total Number of Abandoned Calls
This value does not include time spent listening to a forced first announcement or calls that abandon before queuing to the split/skill.
Average Abandoned Time
VDN The average time abandoned calls waited before abandoning during the current period. The calculation is:
AVG ABAND TIME = Total Abandon Time Total Calls Abandoned
Average After Call
Split/Skill Summary Graph
The average ACW time for call-related ACW time completed by agents in this split during this time interval. Call-related ACW is the time that occurs immediately after an ACD call (that is, when an agent was in Manual mode and an ACD call ended, or when the agent presses the ACW button during an ACD call). For G3V4, time that the agents spent on non-ACD calls in ACW is not included, nor is time in ACW following a non-ACD Call. Time on non-ACD calls in ACW is included for the DEFINITY ECS. The calculation for Average After Call is:
Total Call-Related ACW Time Number of Call-Related ACW Sessions
The average is for ACW sessions, which may not correspond to the number of ACD calls either because some ACD calls did not have ACW time or because the call was recorded in another interval.
Data Items — Real-Time Reports
Data Item
Report Type
Definition
9-4 Data Items — Real-Time Reports

BCMS Vu Real-Time and Historical Data Items
Cha
pter
9
Average Speed of Answer
Split/Skill Summary Graph
The average amount of time it takes before ACD calls are being answered. This value includes time waiting in the queue and time ringing at the agent. The calculation is:
Sum of Each Completed Call’s Time In Queue + Time RingingTotal Number of ACD Calls Answered
Keep the following things in mind:
Calls that flow in from other split(s)/skill(s) do not include time in queue from the other split/skills in this calculation. Also, the AVG SPEED ANS does not include time spent in processing before the call is queued (for example, listening to a forced first announcement).
A completed call may span more than one time period. ACD calls that are in process (have not terminated) are counted in the time period in which they terminate. For example, if an ACD call begins in the 10:00 to 11:00 time period, but terminates in the 11:00 to 12:00 time period, the data for this call is counted in the 11:00 to 12:00 time period.
Average Speed of Answer
VDN The average time to answer ACD and connect calls (see CONN CALLS below) that completed for this VDN during the current period. This includes the time in vector processing, in a split/skill’s queue, and time ringing. The calculation is:
AVG SPEED ANS = Total Answer TimeTotal ACD Calls + Total CONNect CALLS
“Answer time” for a call is recorded when the call ends. If a call originates in interval x, is answered in interval y, and ends in interval z, the associated answer and talk times are recorded in interval z.
Average Talk Time
Split/Skill Summary Graph
Average talk time for answered ACD calls to the split/skill that completed during the current interval. This calculation includes the time each agent spent talking, but does not include time the call spent ringing at an agent. The calculation is:
AVG TALK TIME = Total ACD Talk TimeTotal Number of ACD Calls Answered
Data Items — Real-Time Reports
Data Item
Report Type
Definition
Data Items — Real-Time Reports 9-5
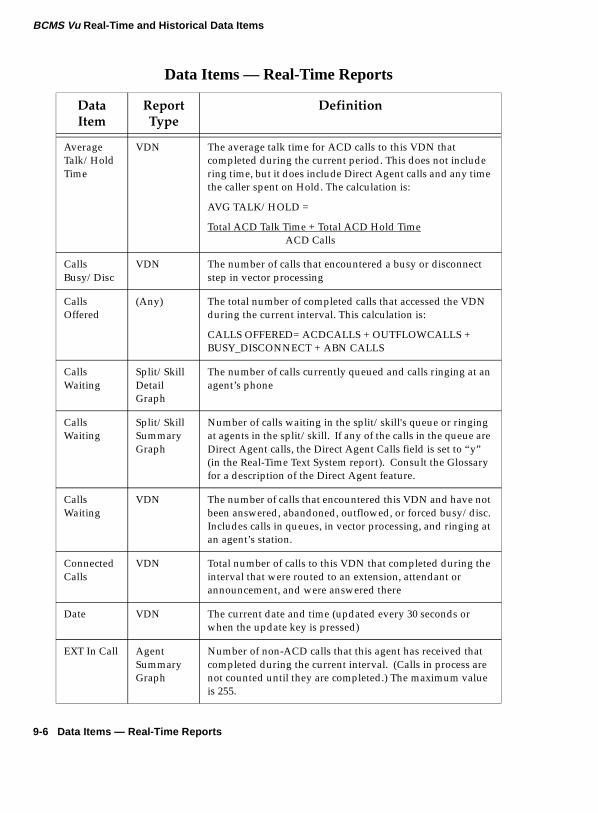
BCMS Vu Real-Time and Historical Data Items
Average Talk/Hold Time
VDN The average talk time for ACD calls to this VDN that completed during the current period. This does not include ring time, but it does include Direct Agent calls and any time the caller spent on Hold. The calculation is:
AVG TALK/HOLD =
Total ACD Talk Time + Total ACD Hold TimeACD Calls
Calls Busy/Disc
VDN The number of calls that encountered a busy or disconnect step in vector processing
Calls Offered
(Any) The total number of completed calls that accessed the VDN during the current interval. This calculation is:
CALLS OFFERED= ACDCALLS + OUTFLOWCALLS +BUSY_DISCONNECT + ABN CALLS
Calls Waiting
Split/Skill Detail Graph
The number of calls currently queued and calls ringing at an agent’s phone
Calls Waiting
Split/Skill Summary Graph
Number of calls waiting in the split/skill's queue or ringing at agents in the split/skill. If any of the calls in the queue are Direct Agent calls, the Direct Agent Calls field is set to “y” (in the Real-Time Text System report). Consult the Glossary for a description of the Direct Agent feature.
Calls Waiting
VDN The number of calls that encountered this VDN and have not been answered, abandoned, outflowed, or forced busy/disc. Includes calls in queues, in vector processing, and ringing at an agent’s station.
Connected Calls
VDN Total number of calls to this VDN that completed during the interval that were routed to an extension, attendant or announcement, and were answered there
Date VDN The current date and time (updated every 30 seconds or when the update key is pressed)
EXT In Call Agent Summary Graph
Number of non-ACD calls that this agent has received that completed during the current interval. (Calls in process are not counted until they are completed.) The maximum value is 255.
Data Items — Real-Time Reports
Data Item
Report Type
Definition
9-6 Data Items — Real-Time Reports
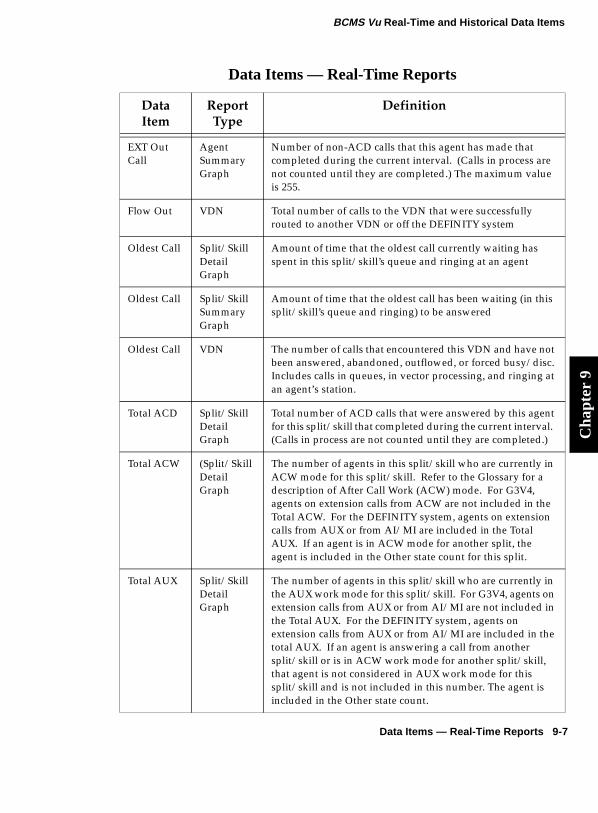
BCMS Vu Real-Time and Historical Data Items
Cha
pter
9
EXT Out Call
Agent Summary Graph
Number of non-ACD calls that this agent has made that completed during the current interval. (Calls in process are not counted until they are completed.) The maximum value is 255.
Flow Out VDN Total number of calls to the VDN that were successfully routed to another VDN or off the DEFINITY system
Oldest Call Split/Skill Detail Graph
Amount of time that the oldest call currently waiting has spent in this split/skill’s queue and ringing at an agent
Oldest Call Split/Skill Summary Graph
Amount of time that the oldest call has been waiting (in this split/skill’s queue and ringing) to be answered
Oldest Call VDN The number of calls that encountered this VDN and have not been answered, abandoned, outflowed, or forced busy/disc. Includes calls in queues, in vector processing, and ringing at an agent’s station.
Total ACD Split/SkillDetail Graph
Total number of ACD calls that were answered by this agent for this split/skill that completed during the current interval. (Calls in process are not counted until they are completed.)
Total ACW (Split/Skill Detail Graph
The number of agents in this split/skill who are currently in ACW mode for this split/skill. Refer to the Glossary for a description of After Call Work (ACW) mode. For G3V4, agents on extension calls from ACW are not included in the Total ACW. For the DEFINITY system, agents on extension calls from AUX or from AI/MI are included in the Total AUX. If an agent is in ACW mode for another split, the agent is included in the Other state count for this split.
Total AUX Split/SkillDetail Graph
The number of agents in this split/skill who are currently in the AUX work mode for this split/skill. For G3V4, agents on extension calls from AUX or from AI/MI are not included in the Total AUX. For the DEFINITY system, agents on extension calls from AUX or from AI/MI are included in the total AUX. If an agent is answering a call from another split/skill or is in ACW work mode for another split/skill, that agent is not considered in AUX work mode for this split/skill and is not included in this number. The agent is included in the Other state count.
Data Items — Real-Time Reports
Data Item
Report Type
Definition
Data Items — Real-Time Reports 9-7
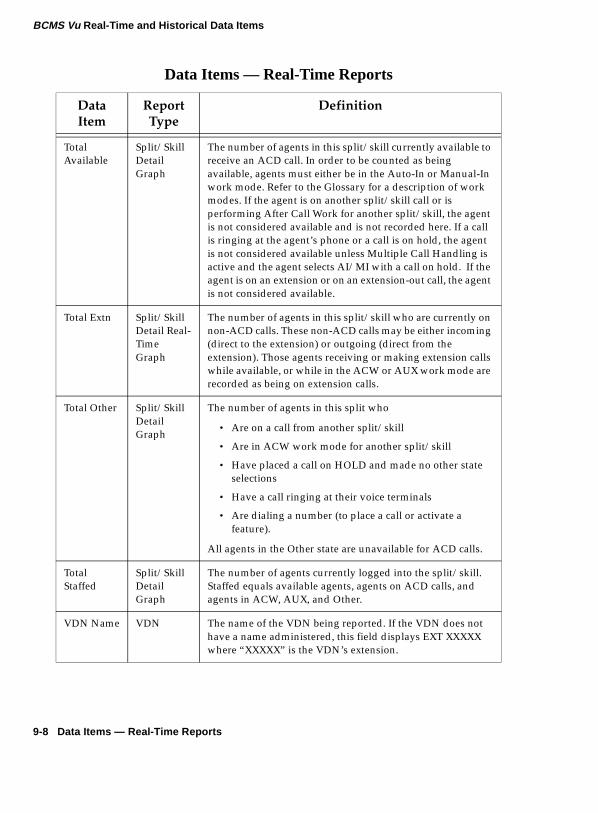
BCMS Vu Real-Time and Historical Data Items
Total Available
Split/SkillDetail Graph
The number of agents in this split/skill currently available to receive an ACD call. In order to be counted as being available, agents must either be in the Auto-In or Manual-In work mode. Refer to the Glossary for a description of work modes. If the agent is on another split/skill call or is performing After Call Work for another split/skill, the agent is not considered available and is not recorded here. If a call is ringing at the agent’s phone or a call is on hold, the agent is not considered available unless Multiple Call Handling is active and the agent selects AI/MI with a call on hold. If the agent is on an extension or on an extension-out call, the agent is not considered available.
Total Extn Split/Skill Detail Real-Time Graph
The number of agents in this split/skill who are currently on non-ACD calls. These non-ACD calls may be either incoming (direct to the extension) or outgoing (direct from the extension). Those agents receiving or making extension calls while available, or while in the ACW or AUX work mode are recorded as being on extension calls.
Total Other Split/SkillDetail Graph
The number of agents in this split who
• Are on a call from another split/skill
• Are in ACW work mode for another split/skill
• Have placed a call on HOLD and made no other state selections
• Have a call ringing at their voice terminals
• Are dialing a number (to place a call or activate a feature).
All agents in the Other state are unavailable for ACD calls.
Total Staffed
Split/SkillDetail Graph
The number of agents currently logged into the split/skill. Staffed equals available agents, agents on ACD calls, and agents in ACW, AUX, and Other.
VDN Name VDN The name of the VDN being reported. If the VDN does not have a name administered, this field displays EXT XXXXX where “XXXXX” is the VDN’s extension.
Data Items — Real-Time Reports
Data Item
Report Type
Definition
9-8 Data Items — Real-Time Reports
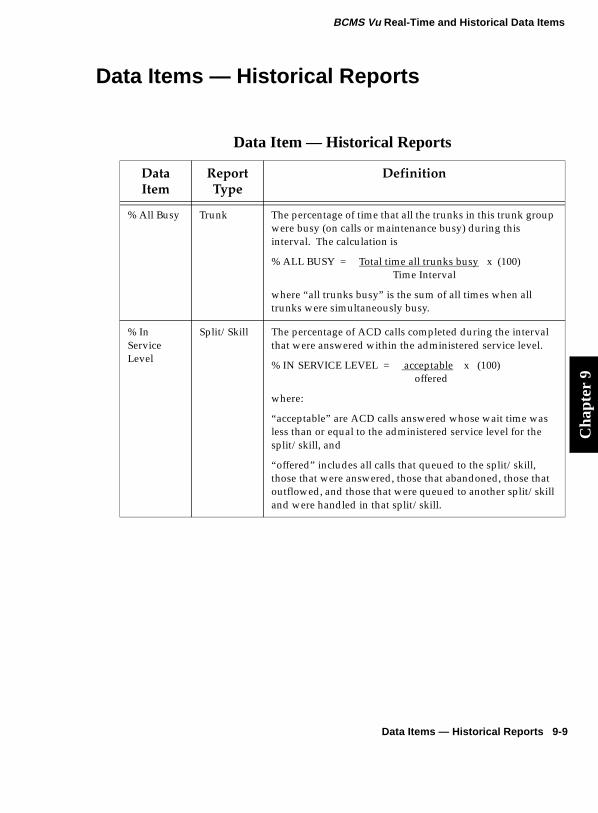
BCMS Vu Real-Time and Historical Data Items
Cha
pter
9
Data Items — Historical Reports 9
Data Item — Historical Reports
Data Item
Report Type
Definition
% All Busy Trunk The percentage of time that all the trunks in this trunk group were busy (on calls or maintenance busy) during this interval. The calculation is
% ALL BUSY = Total time all trunks busy x (100) Time Interval
where “all trunks busy” is the sum of all times when all trunks were simultaneously busy.
% In Service Level
Split/Skill The percentage of ACD calls completed during the interval that were answered within the administered service level.
% IN SERVICE LEVEL = acceptable x (100) offered
where:
“acceptable” are ACD calls answered whose wait time was less than or equal to the administered service level for the split/skill, and
“offered” includes all calls that queued to the split/skill, those that were answered, those that abandoned, those that outflowed, and those that were queued to another split/skill and were handled in that split/skill.
Data Items — Historical Reports 9-9
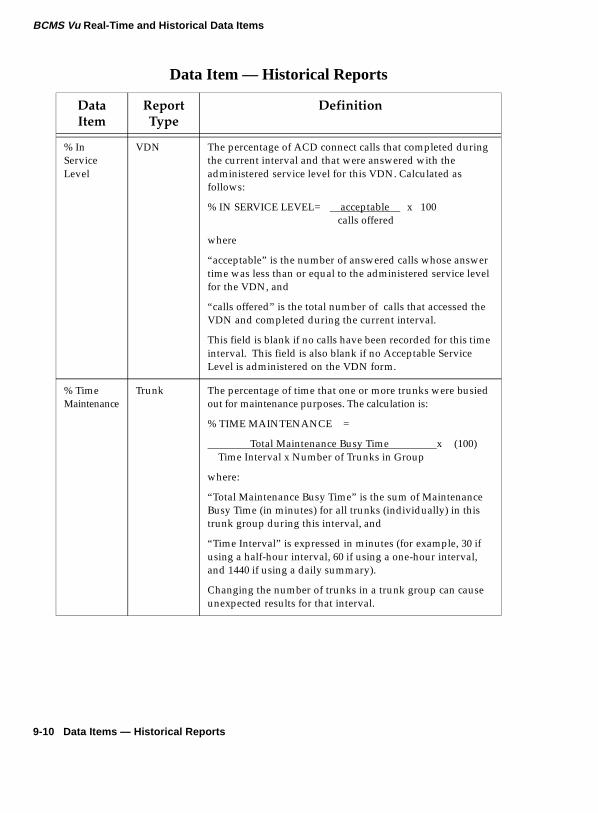
BCMS Vu Real-Time and Historical Data Items
% In Service Level
VDN The percentage of ACD connect calls that completed during the current interval and that were answered with the administered service level for this VDN. Calculated as follows:
% IN SERVICE LEVEL= acceptable x 100calls offered
where
“acceptable” is the number of answered calls whose answer time was less than or equal to the administered service level for the VDN, and
“calls offered” is the total number of calls that accessed the VDN and completed during the current interval.
This field is blank if no calls have been recorded for this time interval. This field is also blank if no Acceptable Service Level is administered on the VDN form.
% Time Maintenance
Trunk The percentage of time that one or more trunks were busied out for maintenance purposes. The calculation is:
% TIME MAINTENANCE =
Total Maintenance Busy Time x (100)Time Interval x Number of Trunks in Group
where:
“Total Maintenance Busy Time” is the sum of Maintenance Busy Time (in minutes) for all trunks (individually) in this trunk group during this interval, and
“Time Interval” is expressed in minutes (for example, 30 if using a half-hour interval, 60 if using a one-hour interval, and 1440 if using a daily summary).
Changing the number of trunks in a trunk group can cause unexpected results for that interval.
Data Item — Historical Reports
Data Item
Report Type
Definition
9-10 Data Items — Historical Reports
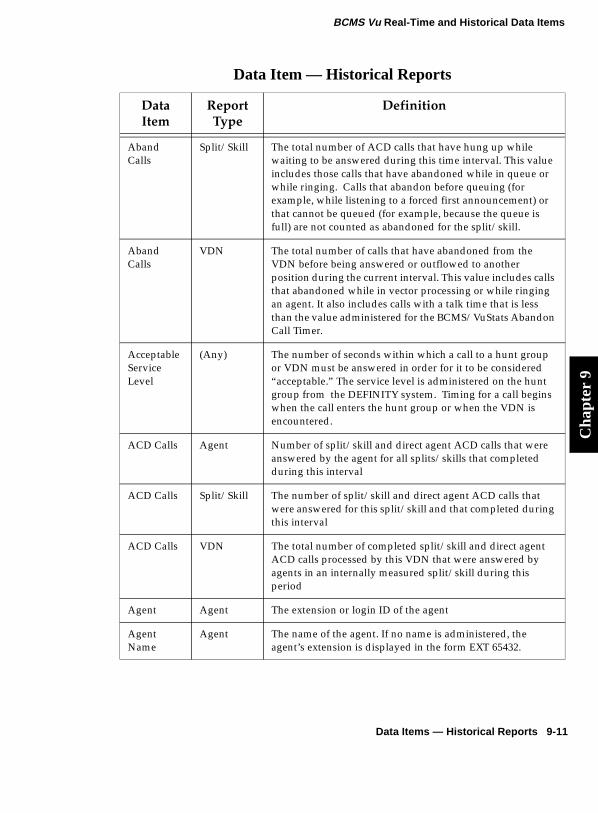
BCMS Vu Real-Time and Historical Data Items
Cha
pter
9
Aband Calls
Split/Skill The total number of ACD calls that have hung up while waiting to be answered during this time interval. This value includes those calls that have abandoned while in queue or while ringing. Calls that abandon before queuing (for example, while listening to a forced first announcement) or that cannot be queued (for example, because the queue is full) are not counted as abandoned for the split/skill.
Aband Calls
VDN The total number of calls that have abandoned from the VDN before being answered or outflowed to another position during the current interval. This value includes calls that abandoned while in vector processing or while ringing an agent. It also includes calls with a talk time that is less than the value administered for the BCMS/VuStats Abandon Call Timer.
Acceptable Service Level
(Any) The number of seconds within which a call to a hunt group or VDN must be answered in order for it to be considered “acceptable.” The service level is administered on the hunt group from the DEFINITY system. Timing for a call begins when the call enters the hunt group or when the VDN is encountered.
ACD Calls Agent Number of split/skill and direct agent ACD calls that were answered by the agent for all splits/skills that completed during this interval
ACD Calls Split/Skill The number of split/skill and direct agent ACD calls that were answered for this split/skill and that completed during this interval
ACD Calls VDN The total number of completed split/skill and direct agent ACD calls processed by this VDN that were answered by agents in an internally measured split/skill during this period
Agent Agent The extension or login ID of the agent
Agent Name
Agent The name of the agent. If no name is administered, the agent’s extension is displayed in the form EXT 65432.
Data Item — Historical Reports
Data Item
Report Type
Definition
Data Items — Historical Reports 9-11
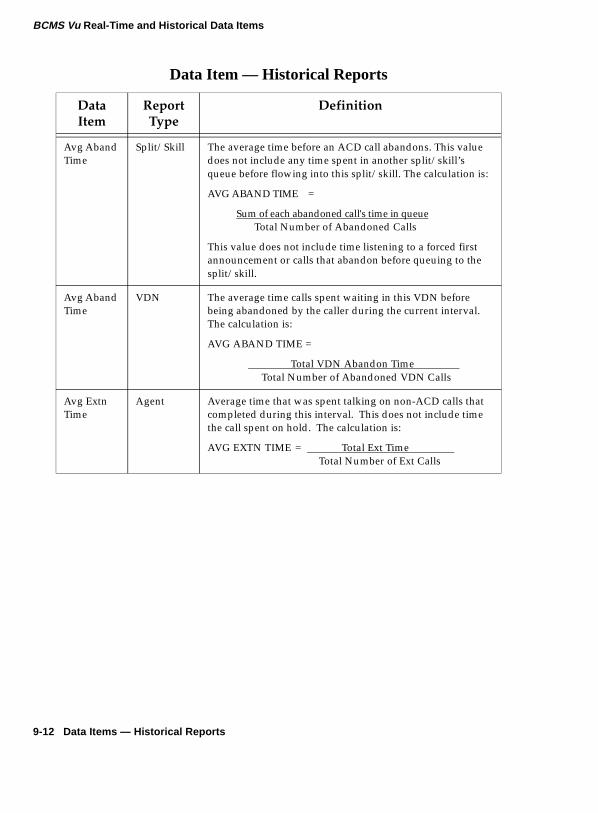
BCMS Vu Real-Time and Historical Data Items
Avg Aband Time
Split/Skill The average time before an ACD call abandons. This value does not include any time spent in another split/skill’s queue before flowing into this split/skill. The calculation is:
AVG ABAND TIME =
Sum of each abandoned call's time in queueTotal Number of Abandoned Calls
This value does not include time listening to a forced first announcement or calls that abandon before queuing to the split/skill.
Avg Aband Time
VDN The average time calls spent waiting in this VDN before being abandoned by the caller during the current interval. The calculation is:
AVG ABAND TIME =
Total VDN Abandon Time Total Number of Abandoned VDN Calls
Avg Extn Time
Agent Average time that was spent talking on non-ACD calls that completed during this interval. This does not include time the call spent on hold. The calculation is:
AVG EXTN TIME = Total Ext Time Total Number of Ext Calls
Data Item — Historical Reports
Data Item
Report Type
Definition
9-12 Data Items — Historical Reports
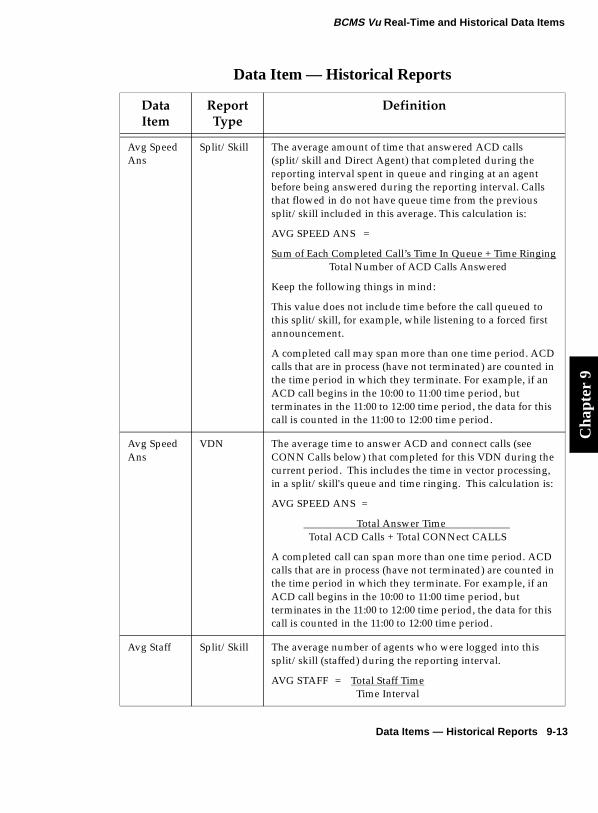
BCMS Vu Real-Time and Historical Data Items
Cha
pter
9
Avg Speed Ans
Split/Skill The average amount of time that answered ACD calls (split/skill and Direct Agent) that completed during the reporting interval spent in queue and ringing at an agent before being answered during the reporting interval. Calls that flowed in do not have queue time from the previous split/skill included in this average. This calculation is:
AVG SPEED ANS =
Sum of Each Completed Call’s Time In Queue + Time Ringing Total Number of ACD Calls Answered
Keep the following things in mind:
This value does not include time before the call queued to this split/skill, for example, while listening to a forced first announcement.
A completed call may span more than one time period. ACD calls that are in process (have not terminated) are counted in the time period in which they terminate. For example, if an ACD call begins in the 10:00 to 11:00 time period, but terminates in the 11:00 to 12:00 time period, the data for this call is counted in the 11:00 to 12:00 time period.
Avg Speed Ans
VDN The average time to answer ACD and connect calls (see CONN Calls below) that completed for this VDN during the current period. This includes the time in vector processing, in a split/skill's queue and time ringing. This calculation is:
AVG SPEED ANS =
Total Answer TimeTotal ACD Calls + Total CONNect CALLS
A completed call can span more than one time period. ACD calls that are in process (have not terminated) are counted in the time period in which they terminate. For example, if an ACD call begins in the 10:00 to 11:00 time period, but terminates in the 11:00 to 12:00 time period, the data for this call is counted in the 11:00 to 12:00 time period.
Avg Staff Split/Skill The average number of agents who were logged into this split/skill (staffed) during the reporting interval.
AVG STAFF = Total Staff Time Time Interval
Data Item — Historical Reports
Data Item
Report Type
Definition
Data Items — Historical Reports 9-13
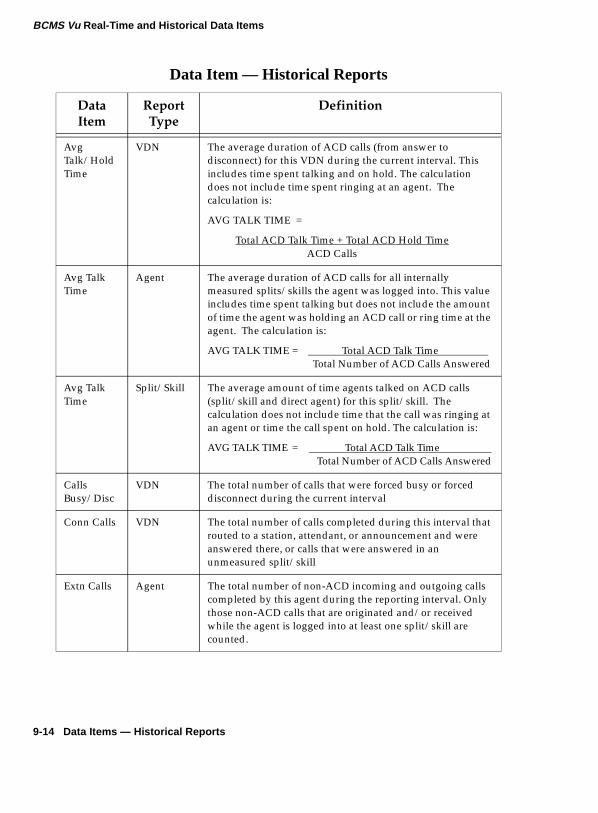
BCMS Vu Real-Time and Historical Data Items
Avg Talk/Hold Time
VDN The average duration of ACD calls (from answer to disconnect) for this VDN during the current interval. This includes time spent talking and on hold. The calculation does not include time spent ringing at an agent. The calculation is:
AVG TALK TIME =
Total ACD Talk Time + Total ACD Hold TimeACD Calls
Avg Talk Time
Agent The average duration of ACD calls for all internally measured splits/skills the agent was logged into. This value includes time spent talking but does not include the amount of time the agent was holding an ACD call or ring time at the agent. The calculation is:
AVG TALK TIME = Total ACD Talk Time Total Number of ACD Calls Answered
Avg Talk Time
Split/Skill The average amount of time agents talked on ACD calls (split/skill and direct agent) for this split/skill. The calculation does not include time that the call was ringing at an agent or time the call spent on hold. The calculation is:
AVG TALK TIME = Total ACD Talk TimeTotal Number of ACD Calls Answered
Calls Busy/Disc
VDN The total number of calls that were forced busy or forced disconnect during the current interval
Conn Calls VDN The total number of calls completed during this interval that routed to a station, attendant, or announcement and were answered there, or calls that were answered in an unmeasured split/skill
Extn Calls Agent The total number of non-ACD incoming and outgoing calls completed by this agent during the reporting interval. Only those non-ACD calls that are originated and/or received while the agent is logged into at least one split/skill are counted.
Data Item — Historical Reports
Data Item
Report Type
Definition
9-14 Data Items — Historical Reports
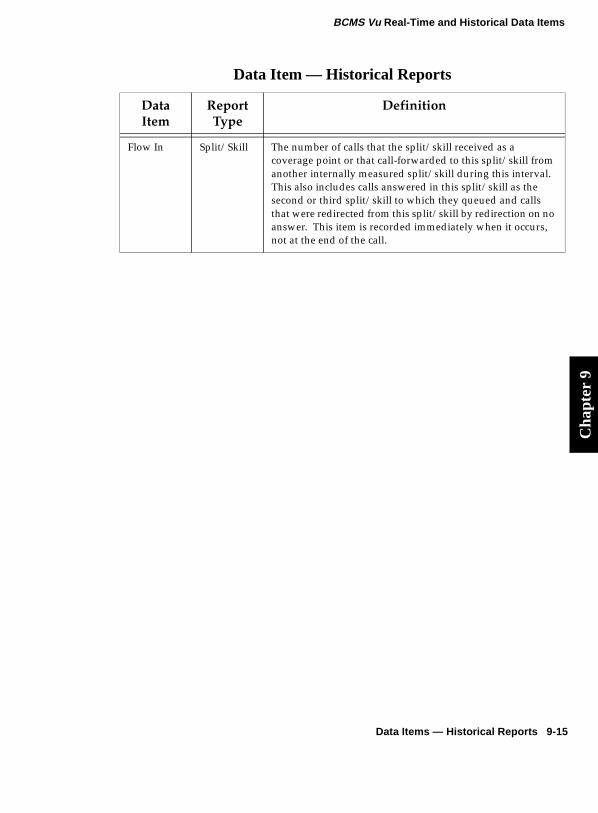
BCMS Vu Real-Time and Historical Data Items
Cha
pter
9
Flow In Split/Skill The number of calls that the split/skill received as a coverage point or that call-forwarded to this split/skill from another internally measured split/skill during this interval. This also includes calls answered in this split/skill as the second or third split/skill to which they queued and calls that were redirected from this split/skill by redirection on no answer. This item is recorded immediately when it occurs, not at the end of the call.
Data Item — Historical Reports
Data Item
Report Type
Definition
Data Items — Historical Reports 9-15
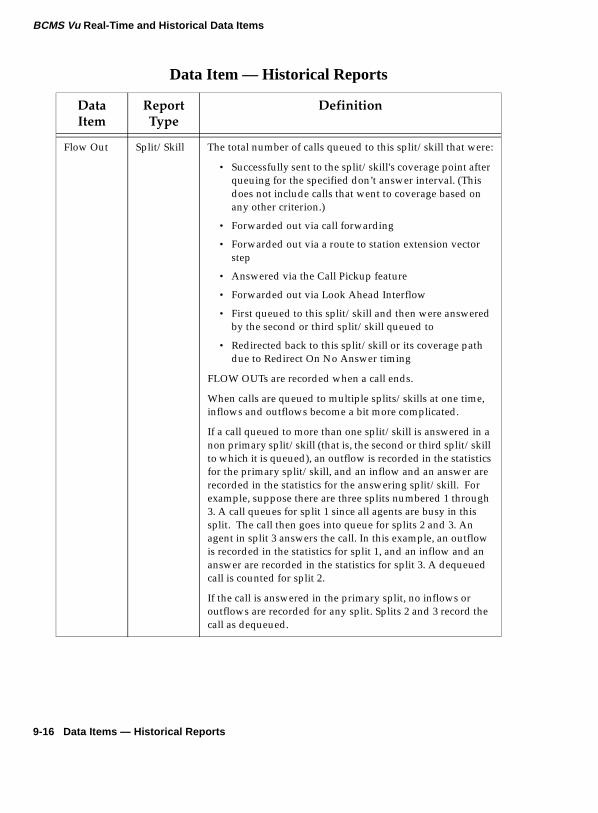
BCMS Vu Real-Time and Historical Data Items
Flow Out Split/Skill The total number of calls queued to this split/skill that were:
• Successfully sent to the split/skill's coverage point after queuing for the specified don’t answer interval. (This does not include calls that went to coverage based on any other criterion.)
• Forwarded out via call forwarding
• Forwarded out via a route to station extension vector step
• Answered via the Call Pickup feature
• Forwarded out via Look Ahead Interflow
• First queued to this split/skill and then were answered by the second or third split/skill queued to
• Redirected back to this split/skill or its coverage path due to Redirect On No Answer timing
FLOW OUTs are recorded when a call ends.
When calls are queued to multiple splits/skills at one time, inflows and outflows become a bit more complicated.
If a call queued to more than one split/skill is answered in a non primary split/skill (that is, the second or third split/skill to which it is queued), an outflow is recorded in the statistics for the primary split/skill, and an inflow and an answer are recorded in the statistics for the answering split/skill. For example, suppose there are three splits numbered 1 through 3. A call queues for split 1 since all agents are busy in this split. The call then goes into queue for splits 2 and 3. An agent in split 3 answers the call. In this example, an outflow is recorded in the statistics for split 1, and an inflow and an answer are recorded in the statistics for split 3. A dequeued call is counted for split 2.
If the call is answered in the primary split, no inflows or outflows are recorded for any split. Splits 2 and 3 record the call as dequeued.
Data Item — Historical Reports
Data Item
Report Type
Definition
9-16 Data Items — Historical Reports
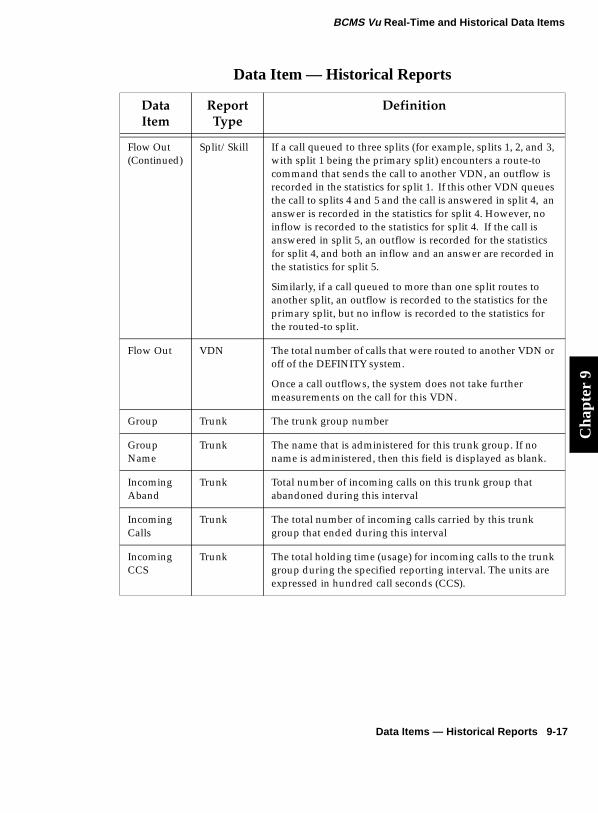
BCMS Vu Real-Time and Historical Data Items
Cha
pter
9
Flow Out (Continued)
Split/Skill If a call queued to three splits (for example, splits 1, 2, and 3, with split 1 being the primary split) encounters a route-to command that sends the call to another VDN, an outflow is recorded in the statistics for split 1. If this other VDN queues the call to splits 4 and 5 and the call is answered in split 4, an answer is recorded in the statistics for split 4. However, no inflow is recorded to the statistics for split 4. If the call is answered in split 5, an outflow is recorded for the statistics for split 4, and both an inflow and an answer are recorded in the statistics for split 5.
Similarly, if a call queued to more than one split routes to another split, an outflow is recorded to the statistics for the primary split, but no inflow is recorded to the statistics for the routed-to split.
Flow Out VDN The total number of calls that were routed to another VDN or off of the DEFINITY system.
Once a call outflows, the system does not take further measurements on the call for this VDN.
Group Trunk The trunk group number
Group Name
Trunk The name that is administered for this trunk group. If no name is administered, then this field is displayed as blank.
Incoming Aband
Trunk Total number of incoming calls on this trunk group that abandoned during this interval
Incoming Calls
Trunk The total number of incoming calls carried by this trunk group that ended during this interval
Incoming CCS
Trunk The total holding time (usage) for incoming calls to the trunk group during the specified reporting interval. The units are expressed in hundred call seconds (CCS).
Data Item — Historical Reports
Data Item
Report Type
Definition
Data Items — Historical Reports 9-17
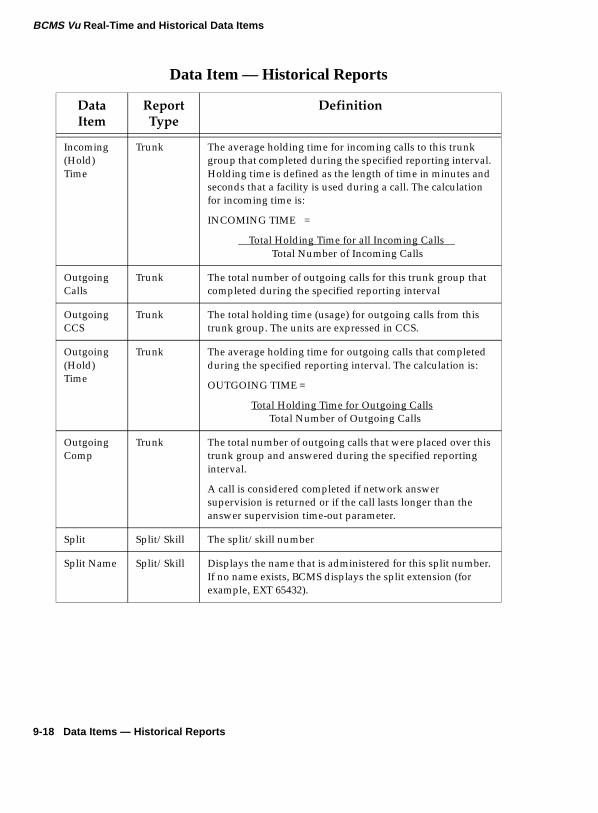
BCMS Vu Real-Time and Historical Data Items
Incoming (Hold) Time
Trunk The average holding time for incoming calls to this trunk group that completed during the specified reporting interval. Holding time is defined as the length of time in minutes and seconds that a facility is used during a call. The calculation for incoming time is:
INCOMING TIME =
Total Holding Time for all Incoming CallsTotal Number of Incoming Calls
Outgoing Calls
Trunk The total number of outgoing calls for this trunk group that completed during the specified reporting interval
Outgoing CCS
Trunk The total holding time (usage) for outgoing calls from this trunk group. The units are expressed in CCS.
Outgoing (Hold) Time
Trunk The average holding time for outgoing calls that completed during the specified reporting interval. The calculation is:
OUTGOING TIME =
Total Holding Time for Outgoing CallsTotal Number of Outgoing Calls
Outgoing Comp
Trunk The total number of outgoing calls that were placed over this trunk group and answered during the specified reporting interval.
A call is considered completed if network answer supervision is returned or if the call lasts longer than the answer supervision time-out parameter.
Split Split/Skill The split/skill number
Split Name Split/Skill Displays the name that is administered for this split number. If no name exists, BCMS displays the split extension (for example, EXT 65432).
Data Item — Historical Reports
Data Item
Report Type
Definition
9-18 Data Items — Historical Reports

BCMS Vu Real-Time and Historical Data Items
Cha
pter
9
Time/Day Agent The time or day interval specified in the command line. Time is always expressed in 24-hour format. Start and stop times are optional. Reports always start at the earliest time interval (either hour or half-hour). If no start time is given, the oldest time interval is the default. A stop time requires an associated start time. If no stop time is given, the last completed time interval (hour or half-hour) is the default. If no start time or stop time is given, the report displays data accrued for the previous 24 time intervals. If you specify day in the command and do not include a start day or stop day, the report displays data accrued for the previous six days and data accrued through the most recently completed interval (hour or half-hour) for the current day.
Total After Call
Agent The total amount of time that the agent spent in ACW work states (whether related to an ACD call or not) for all splits/skills during the reporting interval. This includes time agents spent on extension-in and extension-out calls while in the ACW work mode. For the DEFINITY system, this does NOT include time agents spent on extension calls while in ACW for G3V4. If an agent entered ACW in one interval, but ended ACW in another interval, the appropriate amount of ACW time is credited to each of the intervals.
Total After Call
Split/Skill The amount of time that the agents in this split/skill spent in call-related or noncall-related ACW mode during the reporting interval. This value includes time spent on direct incoming or outgoing calls while in ACW. If an agent entered ACW in one interval, but left ACW in another interval, each interval is credited with ACW time.
Data Item — Historical Reports
Data Item
Report Type
Definition
Data Items — Historical Reports 9-19

BCMS Vu Real-Time and Historical Data Items
Total AUX/Other
Agent The sum of the time that the agent has the AUX button pressed and is not doing anything else for any of the other splits/skills (that is, the sum of the time that the agent is in AUX work mode for all splits/skills). This value does not include time the agent spent in Manual-In, Auto-In, or ACW mode for another split/skill.
For the G3V4, time on AUXIN/AUXOUT calls is not included here. For the DEFINITY system, time on AUXIN/AUXOUT calls is included here.
Note that if the agent was in Other for all logged-in splits, that time is reflected here. For example, ringing calls can cause several seconds of AUX/OTHER time to accrue. Also, any non-ACD call time is also counted in the AVG EXTN TIME column. Two points of contrast are:
• The measurement TOTAL AUX/OTHER is time-interval based, rather than being call-related. For example, if the agent is in AUX from 9:55 to 10:05, five minutes is recorded in the 9:00 to 10:00 time interval and five minutes is recorded in the 10:00 to 11:00 time interval.
• The measurement AVG EXTN TIME is call related. For example, if an agent is on a non-ACD call from 9:55 to 10:05, the call and ten minutes of EXTN time are recorded in the 10:00 to 11:00 time interval.
Because the agent report includes some call-related items and some interval-based items, the sum of all items for a given hour may not exactly equal 60 minutes.
Data Item — Historical Reports
Data Item
Report Type
Definition
9-20 Data Items — Historical Reports

BCMS Vu Real-Time and Historical Data Items
Cha
pter
9
Total AUX/Other
Split/Skill The total amount of time that agents spent in the AUX (auxiliary) work mode or in the Other state in all split/skills. This value does not include the time agents spent on another split/skill’s calls or in ACW for another split.
For the ECS, this value includes time spent on non-ACD calls while in AUX for this split. For G3V4, this value does not include time spent on non-ACD calls while in AUX.
For example, AUX TIME is accumulated whenever any agent logs into the split and:
• Receives an EXTN call while in AUX or AVAIL state
• Makes an EXTN call while in AUX or AVAIL state
• Presses his/her AUX button.
The AUX/Othertime measurement is time-interval based, since it is not directly related to a call. For example, if an agent is in AUX from 9:55 to 10:05, then five minutes is recorded in the 9:00 to 10:00 time interval and five minutes is recorded in the 10:00 to 11:00 time interval.
Total Avail Time
Agent The sum of the time that the agent was available to receive ACD calls during the reporting interval. During this time, the agent:
• Was in Auto-In or Manual-In work mode for at least one split/skill
• Was not in ACW in any split/skill
• Was not on any call or placing any call (unless MCH is active)
• Did not have ringing calls.
Total Hold Time
Agent The total time ACD calls spent on hold at this agent. This time is the caller’s hold time and is independent of the state of the agent. TOTAL HOLD TIME does not include the hold time for non-ACD calls.
Total Time Staffed
Agent The total time that the agent spent logged into at least one split/skill during the reporting interval. Staff time is accumulated for an agent who is in multiple splits/skills as long as the agent is logged into any split/skill. Concurrent times for each split/skill are not totaled.
Data Item — Historical Reports
Data Item
Report Type
Definition
Data Items — Historical Reports 9-21

BCMS Vu Real-Time and Historical Data Items
VDN VDN The extension number of this VDN at this time
VDN Name VDN The name that is administered for this VDN. If no name exists, the VDN extension (for example EXT 64532) is displayed.
Data Item — Historical Reports
Data Item
Report Type
Definition
9-22 Data Items — Historical Reports
10
Troubleshooting 10Introduction 10
This chapter describes procedures to help you identify and resolve problems with the BCMS Vu software. It is divided into the following sections:
● Resolving problems
● Error log
● Connection log
● Troubleshooting the data module
● Using a terminal emulator
● Error messages.
Note In addition to using the above methods to troubleshoot BCMS Vu software, you should always check the Readme files that are delivered with the software. These files include late-breaking changes to and news about the software. You will find them at Start/Programs/Lucent Technologies/Server Readme,
Start/Programs/Lucent Technologies/Client Readme, and
Start/Programs/Lucent Technologies/Wallboard Readme.
Introduction 10-1
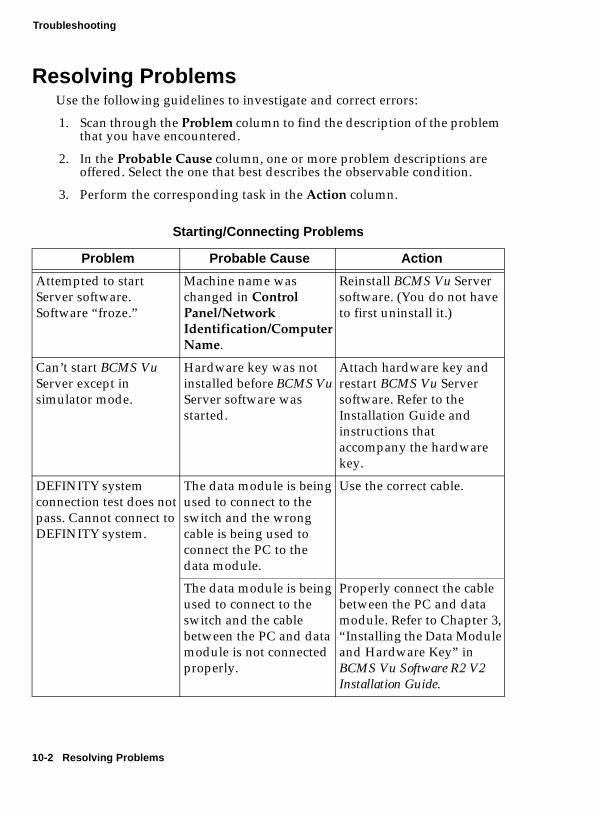
Troubleshooting
Resolving Problems 10
Use the following guidelines to investigate and correct errors:
1. Scan through the Problem column to find the description of the problem that you have encountered.
2. In the Probable Cause column, one or more problem descriptions are offered. Select the one that best describes the observable condition.
3. Perform the corresponding task in the Action column.
Starting/Connecting Problems
Problem Probable Cause Action
Attempted to start Server software. Software “froze.”
Machine name was changed in Control Panel/Network Identification/ComputerName.
Reinstall BCMS Vu Server software. (You do not have to first uninstall it.)
Can’t start BCMS Vu Server except in simulator mode.
Hardware key was not installed before BCMS Vu Server software was started.
Attach hardware key and restart BCMS Vu Server software. Refer to the Installation Guide and instructions that accompany the hardware key.
DEFINITY system connection test does not pass. Cannot connect to DEFINITY system.
The data module is being used to connect to the switch and the wrong cable is being used to connect the PC to the data module.
Use the correct cable.
The data module is being used to connect to the switch and the cable between the PC and data module is not connected properly.
Properly connect the cable between the PC and data module. Refer to Chapter 3, “Installing the Data Module and Hardware Key” in BCMS Vu Software R2 V2 Installation Guide.
10-2 Resolving Problems
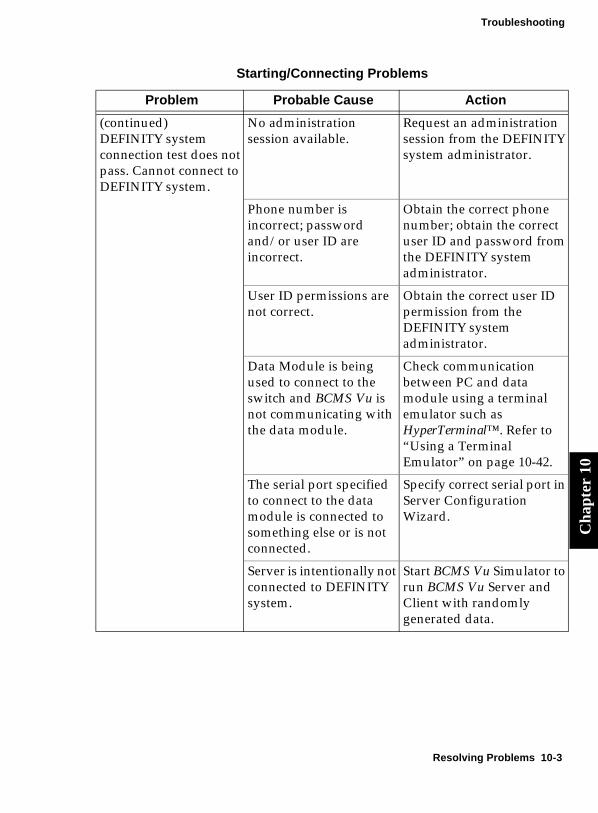
Troubleshooting
Cha
pter
10
(continued) DEFINITY system connection test does not pass. Cannot connect to DEFINITY system.
No administration session available.
Request an administration session from the DEFINITY system administrator.
Phone number is incorrect; password and/or user ID are incorrect.
Obtain the correct phone number; obtain the correct user ID and password from the DEFINITY system administrator.
User ID permissions are not correct.
Obtain the correct user ID permission from the DEFINITY system administrator.
Data Module is being used to connect to the switch and BCMS Vu is not communicating with the data module.
Check communication between PC and data module using a terminal emulator such as HyperTerminal™. Refer to “Using a Terminal Emulator” on page 10-42.
The serial port specified to connect to the data module is connected to something else or is not connected.
Specify correct serial port in Server Configuration Wizard.
Server is intentionally not connected to DEFINITY system.
Start BCMS Vu Simulator to run BCMS Vu Server and Client with randomly generated data.
Starting/Connecting Problems
Problem Probable Cause Action
Resolving Problems 10-3
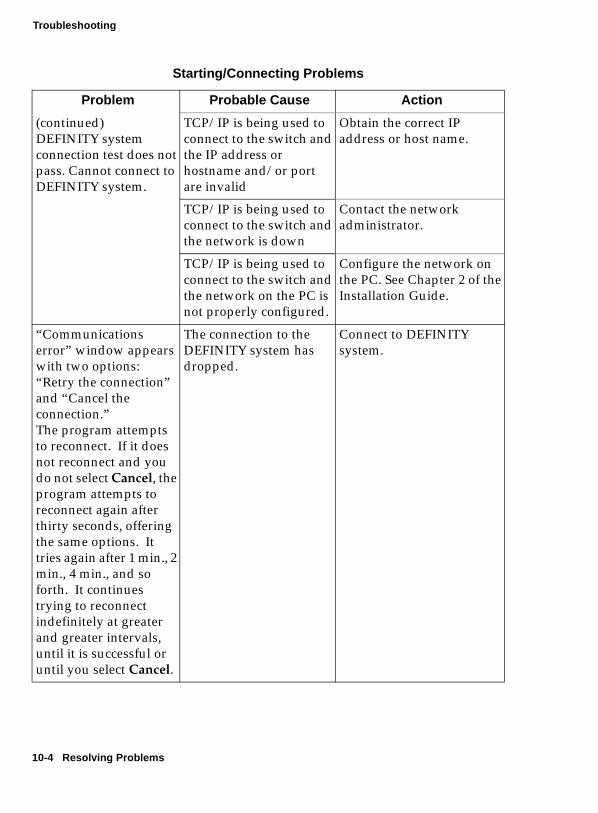
Troubleshooting
(continued) DEFINITY system connection test does not pass. Cannot connect to DEFINITY system.
TCP/IP is being used to connect to the switch and the IP address or hostname and/or port are invalid
Obtain the correct IP address or host name.
TCP/IP is being used to connect to the switch and the network is down
Contact the network administrator.
TCP/IP is being used to connect to the switch and the network on the PC is not properly configured.
Configure the network on the PC. See Chapter 2 of the Installation Guide.
“Communications error” window appears with two options:“Retry the connection” and “Cancel the connection.”The program attempts to reconnect. If it does not reconnect and you do not select Cancel, the program attempts to reconnect again after thirty seconds, offering the same options. It tries again after 1 min., 2 min., 4 min., and so forth. It continues trying to reconnect indefinitely at greater and greater intervals, until it is successful or until you select Cancel.
The connection to the DEFINITY system has dropped.
Connect to DEFINITY system.
Starting/Connecting Problems
Problem Probable Cause Action
10-4 Resolving Problems
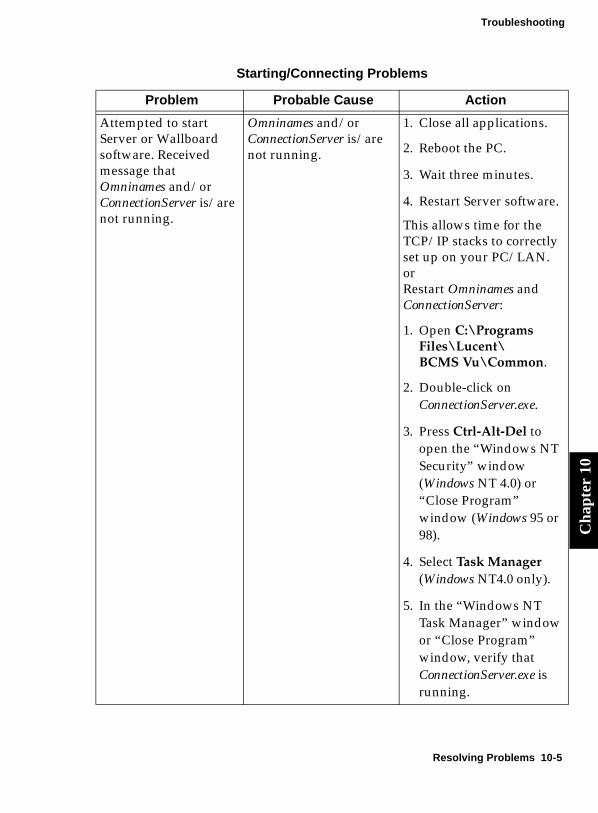
Troubleshooting
Cha
pter
10
Attempted to start Server or Wallboard software. Received message that Omninames and/or ConnectionServer is/are not running.
Omninames and/or ConnectionServer is/are not running.
1. Close all applications.
2. Reboot the PC.
3. Wait three minutes.
4. Restart Server software.
This allows time for the TCP/IP stacks to correctly set up on your PC/LAN.or Restart Omninames and ConnectionServer:
1. Open C:\Programs Files\Lucent\ BCMS Vu\Common.
2. Double-click on ConnectionServer.exe.
3. Press Ctrl-Alt-Del to open the “Windows NT Security” window (Windows NT 4.0) or “Close Program” window (Windows 95 or 98).
4. Select Task Manager (Windows NT4.0 only).
5. In the “Windows NT Task Manager” window or “Close Program” window, verify that ConnectionServer.exe is running.
Starting/Connecting Problems
Problem Probable Cause Action
Resolving Problems 10-5
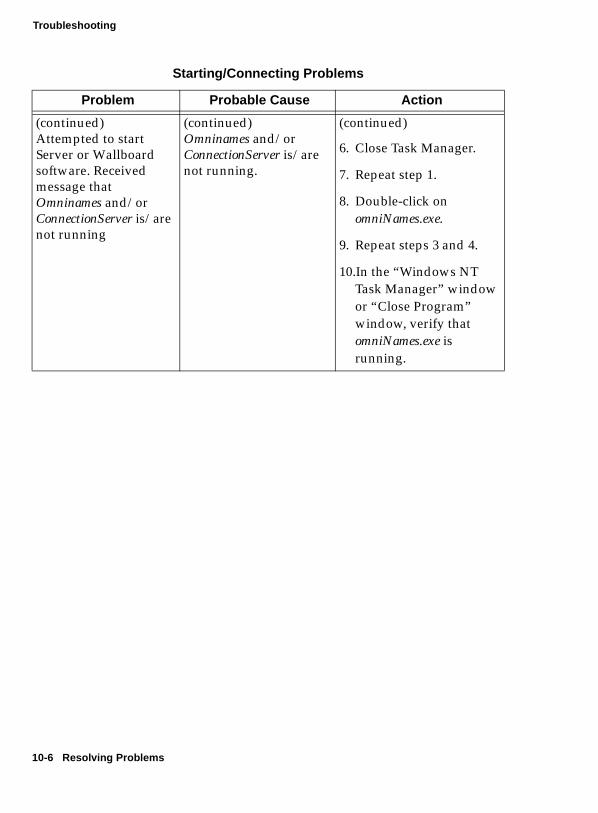
Troubleshooting
(continued)Attempted to start Server or Wallboard software. Received message that Omninames and/or ConnectionServer is/are not running
(continued)Omninames and/or ConnectionServer is/are not running.
(continued)
6. Close Task Manager.
7. Repeat step 1.
8. Double-click on omniNames.exe.
9. Repeat steps 3 and 4.
10.In the “Windows NT Task Manager” window or “Close Program” window, verify that omniNames.exe is running.
Starting/Connecting Problems
Problem Probable Cause Action
10-6 Resolving Problems
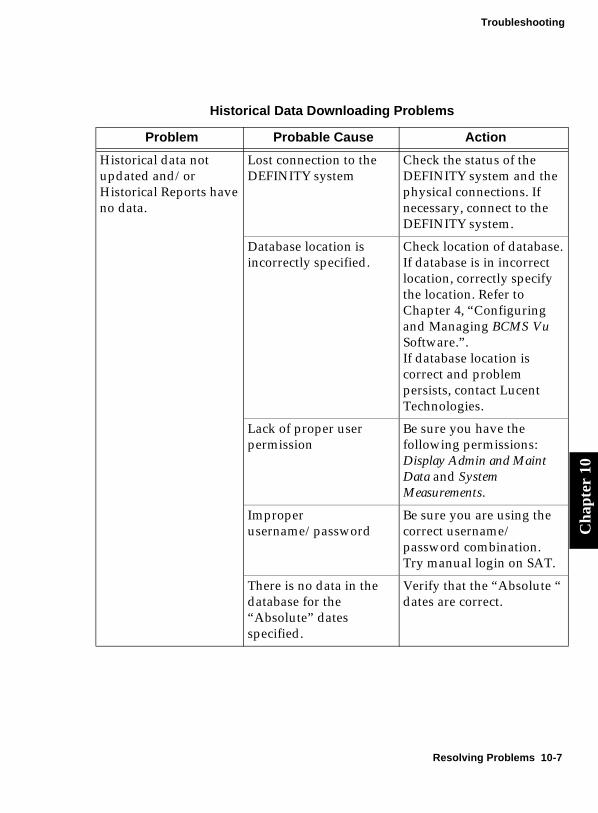
Troubleshooting
Cha
pter
10
Historical Data Downloading Problems
Problem Probable Cause Action
Historical data not updated and/or Historical Reports have no data.
Lost connection to the DEFINITY system
Check the status of the DEFINITY system and the physical connections. If necessary, connect to the DEFINITY system.
Database location is incorrectly specified.
Check location of database. If database is in incorrect location, correctly specify the location. Refer to Chapter 4, “Configuring and Managing BCMS Vu Software.”.If database location is correct and problem persists, contact Lucent Technologies.
Lack of proper user permission
Be sure you have the following permissions: Display Admin and Maint Data and System Measurements.
Improper username/password
Be sure you are using the correct username/ password combination.Try manual login on SAT.
There is no data in the database for the “Absolute” dates specified.
Verify that the “Absolute “ dates are correct.
Resolving Problems 10-7

Troubleshooting
Historical data downloads not occurring at scheduled times.
BCMS Vu user was shut down at scheduled download times.
Find out if BCMS Vu was shut down at time of scheduled download:
1. Log in to the DEFINITY system.
2. Execute command list history.
3. Verify that BCMS Vu user was logged in at the scheduled download times.
If it was not logged in, make sure it is always logged in at scheduled download times.If it was logged in at scheduled download times, make sure database location is correctly specified. See Chapter 4, “Configuring and Managing the BCMS Vu Software.”If database location is correct and problem persists, contact Lucent.
Historical Data Downloading Problems
Problem Probable Cause Action
10-8 Resolving Problems
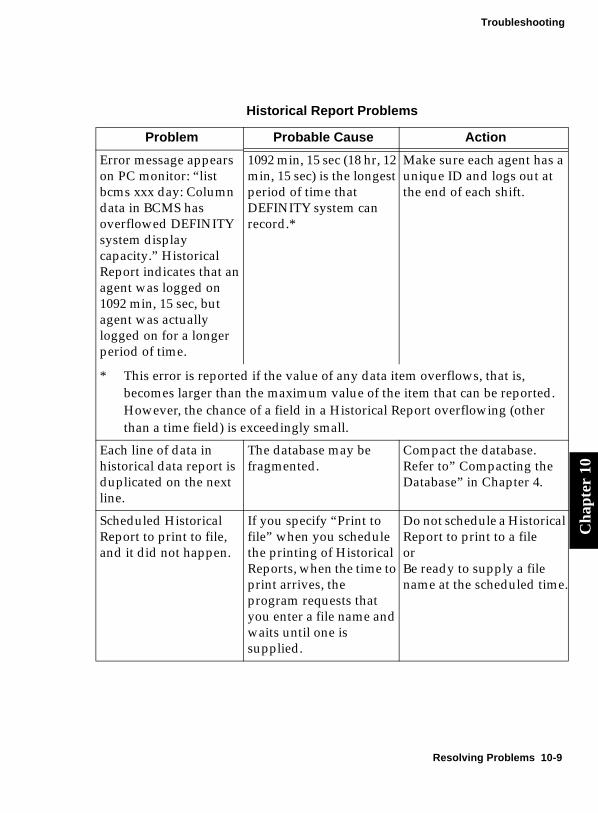
Troubleshooting
Cha
pter
10
Historical Report Problems
Problem Probable Cause Action
Error message appears on PC monitor: “list bcms xxx day: Column data in BCMS has overflowed DEFINITY system display capacity.” Historical Report indicates that an agent was logged on 1092 min, 15 sec, but agent was actually logged on for a longer period of time.
1092 min, 15 sec (18 hr, 12 min, 15 sec) is the longest period of time that DEFINITY system can record.*
Make sure each agent has a unique ID and logs out at the end of each shift.
* This error is reported if the value of any data item overflows, that is, becomes larger than the maximum value of the item that can be reported. However, the chance of a field in a Historical Report overflowing (other than a time field) is exceedingly small.
Each line of data in historical data report is duplicated on the next line.
The database may be fragmented.
Compact the database. Refer to” Compacting the Database” in Chapter 4.
Scheduled Historical Report to print to file, and it did not happen.
If you specify “Print to file” when you schedule the printing of Historical Reports, when the time to print arrives, the program requests that you enter a file name and waits until one is supplied.
Do not schedule a Historical Report to print to a fileorBe ready to supply a file name at the scheduled time.
Resolving Problems 10-9

Troubleshooting
Scheduled Historical Report printing did not occur, and this is not recorded in the error log.
If BCMS Vu Server or Client is closed or if printer is not operating when printing is scheduled, this is not indicated in the error log.Error log records only successful scheduled printing.
Check error log. If printing is recorded, find out if BCMS Vu Server or Client was closed at the scheduled time or if printer was not operating.
Scheduled Historical Report prints on a printer that was removed from the printer list.
If you remove a printer from your printer list, scheduled reports that are targeted to that printer will print if the printer is still on the network, and you will not be informed of this.
Change the printer to which the report is targeted.
Historical Report Problems
Problem Probable Cause Action
10-10 Resolving Problems

Troubleshooting
Cha
pter
10
When you try to open a historical report, the following error message appears:"There is no default printer. To install and select a default printer, open the Start button, choose Settings. Select Printers and then select Add Printer."
No printer is administered for the PC. Before you can open a historical report, a fictitious printer name must be administered and made the default printer, even if no printer is available to the PC.
For Windows 95 or 98:
1. Select "Start/Settings/ Printers."
2. In the "Printers" window select "Add Printer."
3. In the "Add Printer Wizard" window select "Next."
4. Select "Local Printer" and select "Next."
5. Highlight "HP" in the left selection box and "HP LaserJet 4MP" in the right selection box, and select "Next."
6. Highlight "LPT1" and select "Next."
7. In the window with the text "Do you want your Windows-based programs to use this printer as the default printer?" select the radio button next to "Yes" and select "Next."
8. In the window with the text "Would you like to print a test page?" select the radio button next to "No" and select "Finish."
Historical Report Problems
Problem Probable Cause Action
Resolving Problems 10-11

Troubleshooting
(continued)When you try to open a historical report, the following error message appears:"There is no defaultprinter. To install andselect a default printer,open the Start button,choose Settings. SelectPrinters and then selectAdd Printer."
(continued) No printer is administered for the PC. Before you can open a historical report, a fictitious printer name must be administered and made the default printer, even if no printer is available to the PC.
9. If the printer driver is already installed on your hard drive, the printer administration will be completed.
If Windows 95 or 98 was in-stalled on your hard drive from a compact disc, but printer drivers were not in-stalled, insert the compact disc that contains the Win-dows 95 program into your compact disc drive. Be sure the correct path to the drive is in the text window and se-lect "Next." The printer ad-ministration will be completed.
If Windows 95 or 98 was in-stalled on your hard drive from a network drive, enter the path to the network drive directory that contains the Windows 95 or 98 pro-gram and select "Next." The printer administration will be completed.
For PCs using Windows NT 4.0:
1. Select "Start/ Settings/Printers."
2. In the "Printers" window select "Add Printer."
Historical Report Problems
Problem Probable Cause Action
10-12 Resolving Problems
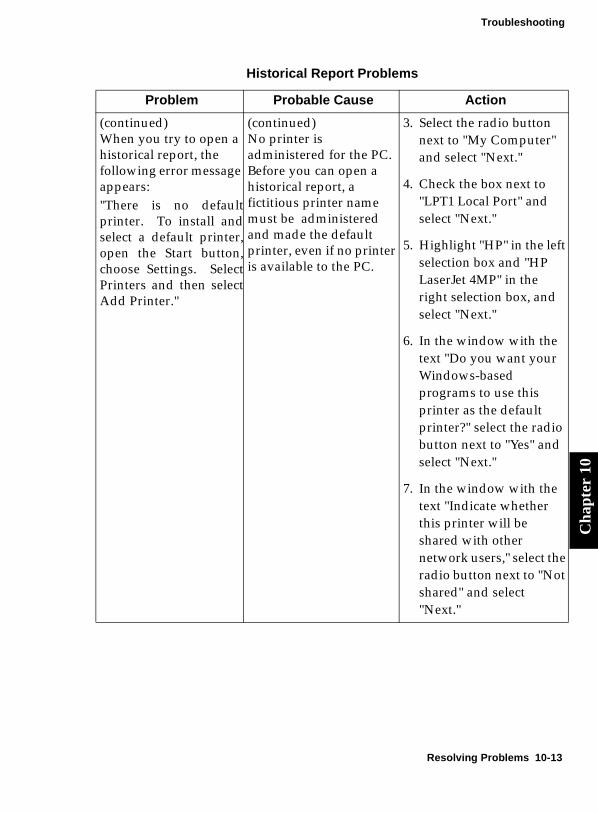
Troubleshooting
Cha
pter
10
(continued)When you try to open a historical report, the following error message appears:"There is no defaultprinter. To install andselect a default printer,open the Start button,choose Settings. SelectPrinters and then selectAdd Printer."
(continued) No printer is administered for the PC. Before you can open a historical report, a fictitious printer name must be administered and made the default printer, even if no printer is available to the PC.
3. Select the radio button next to "My Computer" and select "Next."
4. Check the box next to "LPT1 Local Port" and select "Next."
5. Highlight "HP" in the left selection box and "HP LaserJet 4MP" in the right selection box, and select "Next."
6. In the window with the text "Do you want your Windows-based programs to use this printer as the default printer?" select the radio button next to "Yes" and select "Next."
7. In the window with the text "Indicate whether this printer will be shared with other network users," select the radio button next to "Not shared" and select "Next."
Historical Report Problems
Problem Probable Cause Action
Resolving Problems 10-13

Troubleshooting
(continued)When you try to open a historical report, the following error message appears:"There is no defaultprinter. To install andselect a default printer,open the Start button,choose Settings. SelectPrinters and then selectAdd Printer."
(continued) No printer is administered for the PC. Before you can open a historical report, a fictitious printer name must be administered and made the default printer, even if no printer is available to the PC.
8. In the window with the text "After your printer is installed, you can print a test page so you can confirm that the printer is set up properly," select the radio button next to "No" and select "Finish."
9. If the printer driver is already installed on your hard drive, the printer administration will be completed.
If Windows NT 4.0 was installed on your hard drive from a compact disc, but printer drivers were not installed, insert the compact disc that contains the Windows NT 4.0 program into your compact disc drive. Be sure the correct path to the drive is in the text window and select "Next." The printer administration will be completed.
Historical Report Problems
Problem Probable Cause Action
10-14 Resolving Problems

Troubleshooting
Cha
pter
10
(continued)When you try to open a historical report, the following error message appears:"There is no defaultprinter. To install andselect a default printer,open the Start button,choose Settings. SelectPrinters and then selectAdd Printer."
(continued) No printer is administered for the PC. Before you can open a historical report, a fictitious printer name must be administered and made the default printer, even if no printer is available to the PC.
If Windows NT 4.0 was installed on your hard drive from a network drive, enter the path to the network drive directory that contains the Windows NT 4.0 program and select "Next." The printer administration will be completed.
When you try to export a historical report to Excel 5.0 by selecting "Excel 5.0 (XLS)" in the "Format" box of the "Export" window, the second window that appears (labeled "Choose Export File") allows you to save the file only in Excel 4.0 format in the "Save as type" box.
Crystal Report problem If you choose "Excel 5.0 (XLS)" as the format in the "Format" box of the first window, the file will be saved in Excel 5.0 format, regardless of the format specified in the second window.
Historical Report Problems
Problem Probable Cause Action
Resolving Problems 10-15
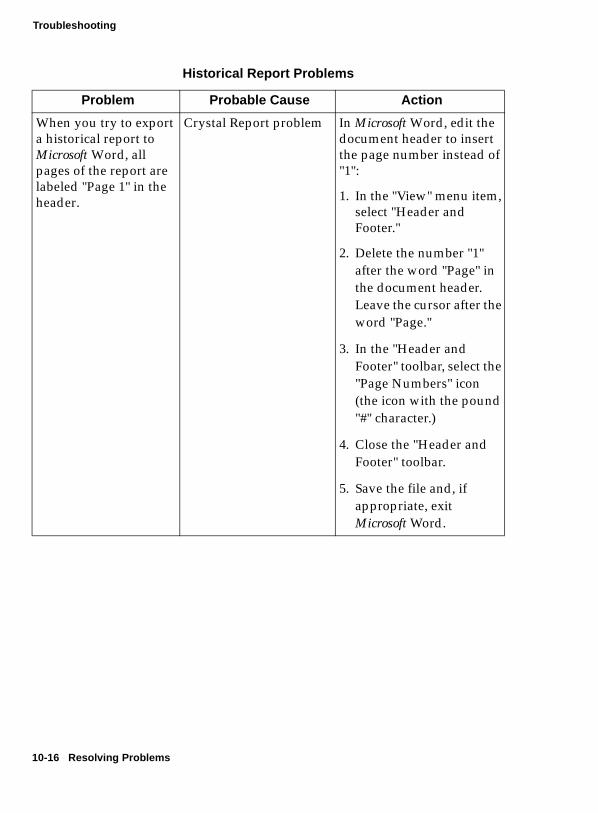
Troubleshooting
When you try to export a historical report to Microsoft Word, all pages of the report are labeled "Page 1" in the header.
Crystal Report problem In Microsoft Word, edit the document header to insert the page number instead of "1":
1. In the "View" menu item, select "Header and Footer."
2. Delete the number "1" after the word "Page" in the document header. Leave the cursor after the word "Page."
3. In the "Header and Footer" toolbar, select the "Page Numbers" icon (the icon with the pound "#" character.)
4. Close the "Header and Footer" toolbar.
5. Save the file and, if appropriate, exit Microsoft Word.
Historical Report Problems
Problem Probable Cause Action
10-16 Resolving Problems

Troubleshooting
Cha
pter
10
A historical report was scheduled to print to a file, but it was printed on a printer connected to the PC or on the network.
The printer that was configured to print to a file was not the application default printer. If you set the port of a printer that is not the application default printer, to print to a file, and you schedule a historical report to be printed on that printer,then the report will be printed on the application default printer, not to a file.
To schedule a historical report to be printed to a file, you must
1. Set the port of a printer to print to a file.
2. Make that printer the default application printer (if it is not already).
3. Schedule the historical report to be printed by the default application printer that you designated in step 2.
CAUTION:If you print to a file, remember that at the time you choose for the report to be printed, your will be prompted to enter a file name. The prompt window remains on the screen, no file is written, and BCMSVu Client is halted until you enter a file name.
(WINDOWS NT 4.0)
1. Select Start/ Settings/ Control Panel.
2. Select "Printers."
3. Position the cursor over the icon that represents the printer that you will designate (or have designated) as the default application printer. Click the secondary mouse button.
4. Select "Properties."
5. Select the "Ports" tab.
6. Under the heading "Port," check the box next to "FILE:".
7. Select "OK."
8. Exit Control Panel.
9. In BCMSVu Client,
a. Select File/Printer Setup.
b. In the "Printer Setup" window, be sure the printer you configured in steps 3 through 6 is in the "Printer Name" box.
c. Select "OK."
Historical Report Problems
Problem Probable Cause Action
Resolving Problems 10-17
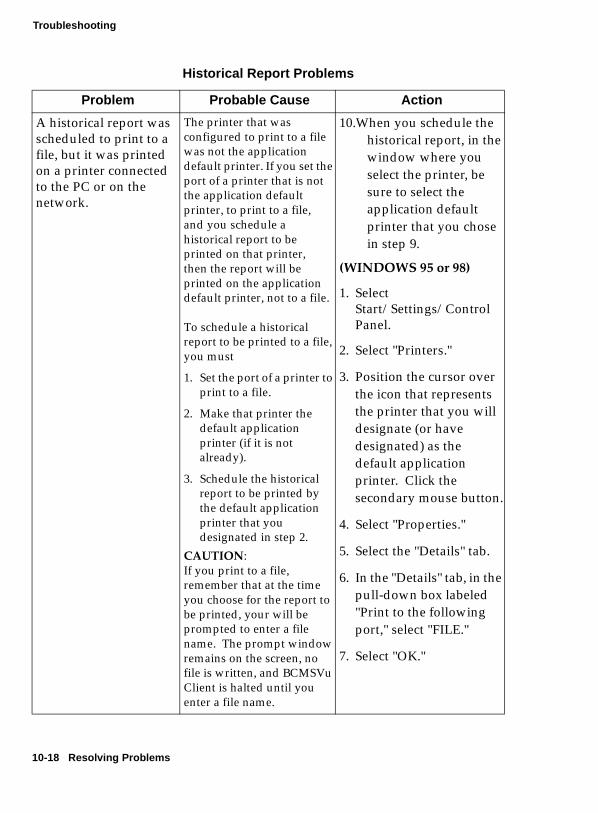
Troubleshooting
A historical report was scheduled to print to a file, but it was printed on a printer connected to the PC or on the network.
The printer that was configured to print to a file was not the application default printer. If you set the port of a printer that is not the application default printer, to print to a file, and you schedule a historical report to be printed on that printer,then the report will be printed on the application default printer, not to a file.
To schedule a historical report to be printed to a file, you must
1. Set the port of a printer to print to a file.
2. Make that printer the default application printer (if it is not already).
3. Schedule the historical report to be printed by the default application printer that you designated in step 2.
CAUTION:If you print to a file, remember that at the time you choose for the report to be printed, your will be prompted to enter a file name. The prompt window remains on the screen, no file is written, and BCMSVu Client is halted until you enter a file name.
10.When you schedule the historical report, in the window where you select the printer, be sure to select the application default printer that you chose in step 9.
(WINDOWS 95 or 98)
1. Select Start/Settings/Control Panel.
2. Select "Printers."
3. Position the cursor over the icon that represents the printer that you will designate (or have designated) as the default application printer. Click the secondary mouse button.
4. Select "Properties."
5. Select the "Details" tab.
6. In the "Details" tab, in the pull-down box labeled "Print to the following port," select "FILE."
7. Select "OK."
Historical Report Problems
Problem Probable Cause Action
10-18 Resolving Problems

Troubleshooting
Cha
pter
10
A historical report was scheduled to print to a file, but it was printed on a printer connected to the PC or on the network.
The printer that was configured to print to a file was not the application default printer. If you set the port of a printer that is not the application default printer, to print to a file, and you schedule a historical report to be printed on that printer,then the report will be printed on the application default printer, not to a file.
To schedule a historical report to be printed to a file, you must
1. Set the port of a printer to print to a file.
2. Make that printer the default application printer (if it is not already).
3. Schedule the historical report to be printed by the default application printer that you designated in step 2.
CAUTION:If you print to a file, remember that at the time you choose for the report to be printed, your will be prompted to enter a file name. The prompt window remains on the screen, no file is written, and BCMSVu Client is halted until you enter a file name.
4. Exit Control Panel.
5. In BCMSVu Client,
a. Select File/Printer Setup.
b. In the "Printer Setup" window, be sure the printer you configured in steps 3 through 6 is in the "Printer Name" box.
c. Select "OK."
6. When you schedule the historical report, in the window where you select the printer, be sure to select the application default printer that you chose in step 9.
Historical Report Problems
Problem Probable Cause Action
Resolving Problems 10-19

Troubleshooting
Real-Time Report Problems
Problem Probable Cause Action
For non-EAS installations:Agent Reports are not functioning properly.
Login ID option is not validated.
Validate Login ID at the DEFINITY system by doing the following:• If the System Customer
Option Field, “bcms login IDs,” is set to “y,” the Feature-related Sys-tem Parameters Field, “Validate loginIDs,” must also be set to “y.”
• If “bcms loginIDs” is set to “n,” call Lucent.
Real-time reports are not changing.
Lost connection to the DEFINITY system.
Check connection on status bar. Try to reconnect to the DEFINITY system if the connection is not active and if the DEFINITY system is still operational.
Reports and/or downloads do not appear to be functioning.
Lack of proper user permission
Make sure the login ID for the DEFINITY system has the following permissions: Display Admin and Maint Data and System Measurements.
Improper username/password
Make sure you are using the correct username/ password combination.Try manual login on SAT.
10-20 Resolving Problems
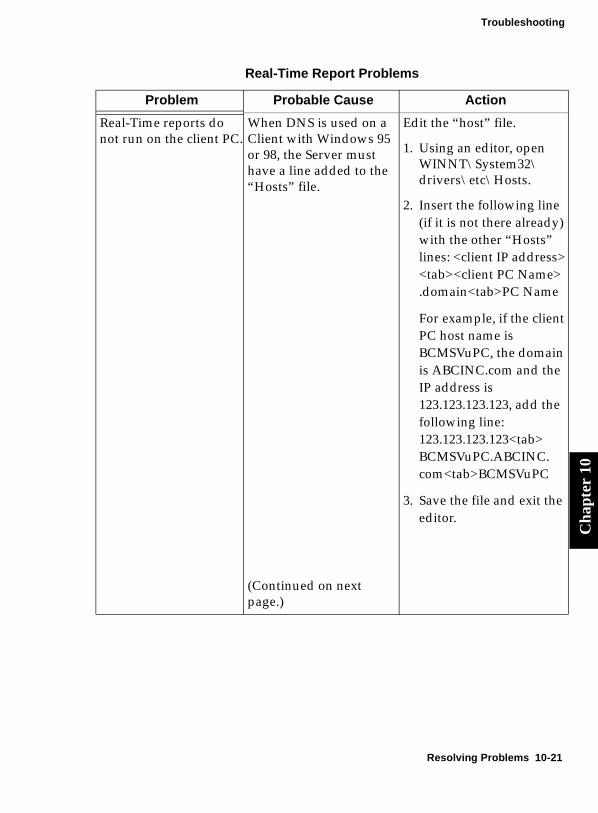
Troubleshooting
Cha
pter
10
Real-Time reports do not run on the client PC.
When DNS is used on a Client with Windows 95 or 98, the Server must have a line added to the “Hosts” file.
(Continued on next page.)
Edit the “host” file.
1. Using an editor, open WINNT\System32\ drivers\etc\Hosts.
2. Insert the following line (if it is not there already) with the other “Hosts” lines: <client IP address> <tab><client PC Name> .domain<tab>PC Name
For example, if the client PC host name is BCMSVuPC, the domain is ABCINC.com and the IP address is 123.123.123.123, add the following line: 123.123.123.123<tab> BCMSVuPC.ABCINC. com<tab>BCMSVuPC
3. Save the file and exit the editor.
Real-Time Report Problems
Problem Probable Cause Action
Resolving Problems 10-21
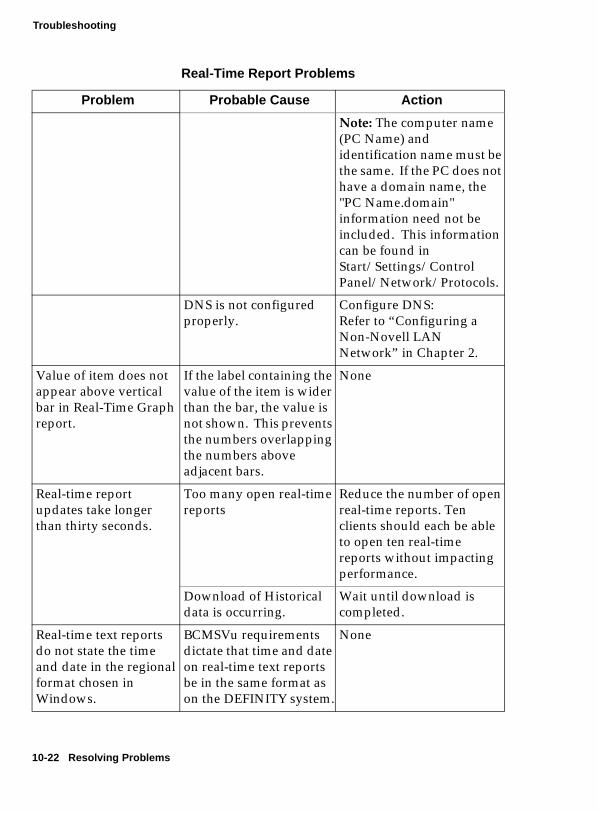
Troubleshooting
Note: The computer name (PC Name) and identification name must be the same. If the PC does not have a domain name, the "PC Name.domain" information need not be included. This information can be found in Start/Settings/Control Panel/Network/Protocols.
DNS is not configured properly.
Configure DNS:Refer to “Configuring a Non-Novell LAN Network” in Chapter 2.
Value of item does not appear above vertical bar in Real-Time Graph report.
If the label containing the value of the item is wider than the bar, the value is not shown. This prevents the numbers overlapping the numbers above adjacent bars.
None
Real-time report updates take longer than thirty seconds.
Too many open real-time reports
Reduce the number of open real-time reports. Ten clients should each be able to open ten real-time reports without impacting performance.
Download of Historical data is occurring.
Wait until download is completed.
Real-time text reports do not state the time and date in the regional format chosen in Windows.
BCMSVu requirements dictate that time and date on real-time text reports be in the same format as on the DEFINITY system.
None
Real-Time Report Problems
Problem Probable Cause Action
10-22 Resolving Problems
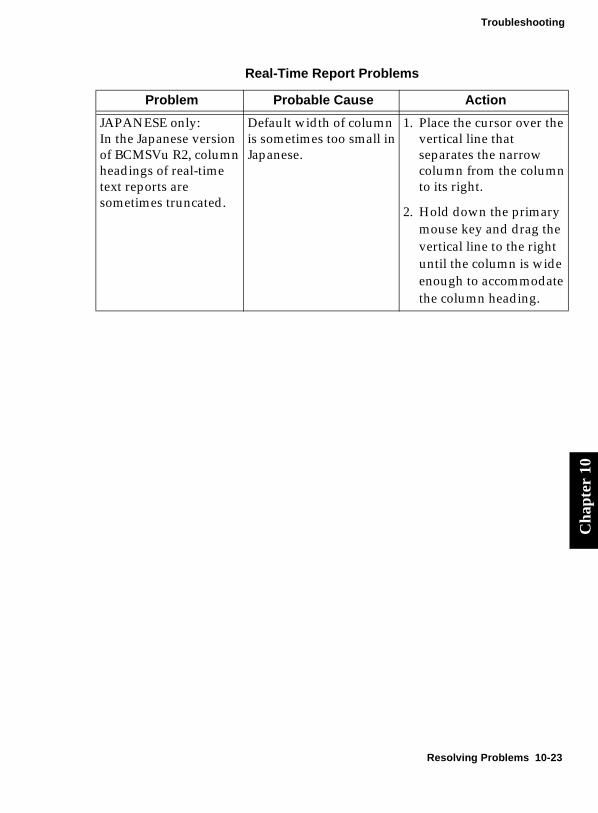
Troubleshooting
Cha
pter
10
JAPANESE only:In the Japanese version of BCMSVu R2, column headings of real-time text reports are sometimes truncated.
Default width of column is sometimes too small in Japanese.
1. Place the cursor over the vertical line that separates the narrow column from the column to its right.
2. Hold down the primary mouse key and drag the vertical line to the right until the column is wide enough to accommodate the column heading.
Real-Time Report Problems
Problem Probable Cause Action
Resolving Problems 10-23

Troubleshooting
Wallboard Problems
Problem Probable Cause Action
Reports and messages do not appear on Wallboard.
• Wallboard is not con-nected to the speci-fied port on the specified PC.
• Wallboard software is not running on the PC to which the wall-board is attached.
• Wallboard is not properly registered.
• Wallboard address is not correct.
• Wallboard has a poor physical connection.
Correct problem.Refer to “Installing a Wallboard” in BCMS Vu Software R2 V2 Installation Guide,, and “Registering Wallboards” on page 4-11.
Wallboard COM Port is not activated in your PC hardware configuration.
Consult your PC user guide or its manufacturer’s technical support to see how to tell if your COM Port has been disabled.
Wallboard is not changing.Data on wallboard indicates zero value and doesn’t update for a long period of time.
Server lost connection to the DEFINITY system.
Check connection on status bar. If the connection is not active and if the DEFINITY system is still operational, try to reconnect to the DEFINITY system Make sure wallboard software is running on the PC to which the wallboard is connected.
10-24 Resolving Problems

Troubleshooting
Cha
pter
10
The wallboard is not updating. When you try to send a test message to the wallboard, you receive the error message, "Address # claimed by two different wallboards."
The physical configuration of the wallboard may have been moved or re-arranged, causing the wallboard and client to disconnect before the client released the wallboard. Therefore, the wallboard address appears to be in use.
IF YOU KNOW WHICH CLIENT LAST ACCESSED THE WALLBOARD, do the following steps, in order, until the wallboard begins to update.
1. Close, then reopen any open report that is accessing the wallboard. If more than one report is open, you can use Report Properties to find the report that is accessing the problem wallboard. Alternately, you can close all reports, then reopen a report and send it to the problem wallboard.
2. Close the Client or disconnect the Client from the Server, then open the Client or reconnect the Client to the Server and send a report to the problem wallboard.
3. Close the Server, restart the Server, and send a report to the problem wallboard.
Wallboard Problems
Problem Probable Cause Action
Resolving Problems 10-25

Troubleshooting
If you have more than one Client and DO NOT KNOW WHICH CLIENT LAST ACCESSED THE WALLBOARD, do the following steps, in order, until the wallboard begins to update:
1. Have all Clients close any wallboard report that is accessing the problem wallboard, then reopen a report from one Client and send it to the problem wallboard. If more than one wallboard report is open, you can use Report Properties to find the report that is accessing the problem wallboard. Alternately, you can simply close all reports, then reopen a report from one Client and send it to the problem wallboard.
2. Close all Clients or disconnect all Clients from the Server, then open all Clients or reconnect all clients to the Server and send a report to the problem wallboard.
Wallboard Problems
Problem Probable Cause Action
10-26 Resolving Problems
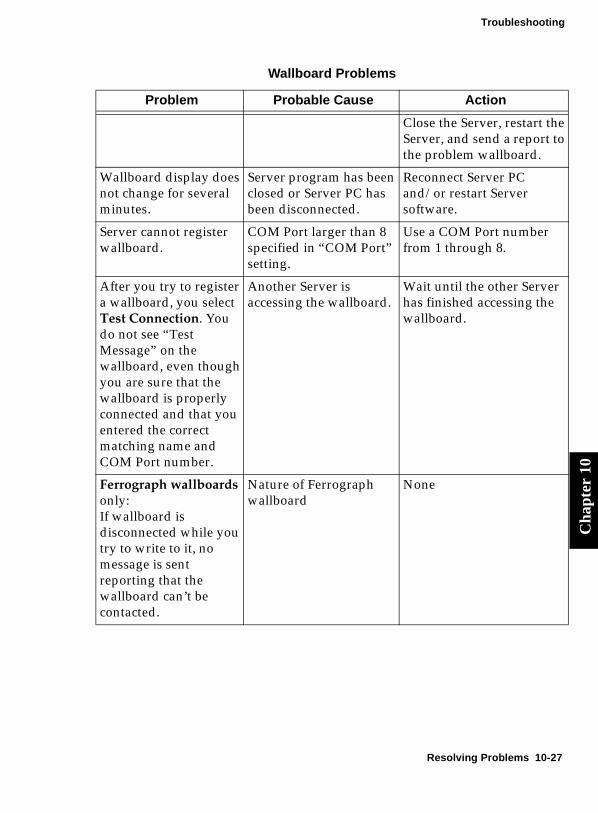
Troubleshooting
Cha
pter
10
Close the Server, restart the Server, and send a report to the problem wallboard.
Wallboard display does not change for several minutes.
Server program has been closed or Server PC has been disconnected.
Reconnect Server PC and/or restart Server software.
Server cannot register wallboard.
COM Port larger than 8 specified in “COM Port” setting.
Use a COM Port number from 1 through 8.
After you try to register a wallboard, you select Test Connection. You do not see “Test Message” on the wallboard, even though you are sure that the wallboard is properly connected and that you entered the correct matching name and COM Port number.
Another Server is accessing the wallboard.
Wait until the other Server has finished accessing the wallboard.
Ferrograph wallboards only:If wallboard is disconnected while you try to write to it, no message is sent reporting that the wallboard can’t be contacted.
Nature of Ferrograph wallboard
None
Wallboard Problems
Problem Probable Cause Action
Resolving Problems 10-27

Troubleshooting
When you try to uninstall the Wallboard software, not every associated file is removed.
Install/Uninstall program
After you uninstall the Wallboard program, look in C:\Program Files\Lucent\ BCMSVu\Common. If the file "Wallboard.dll" is present, remove it.
Wallboard Problems
Problem Probable Cause Action
10-28 Resolving Problems
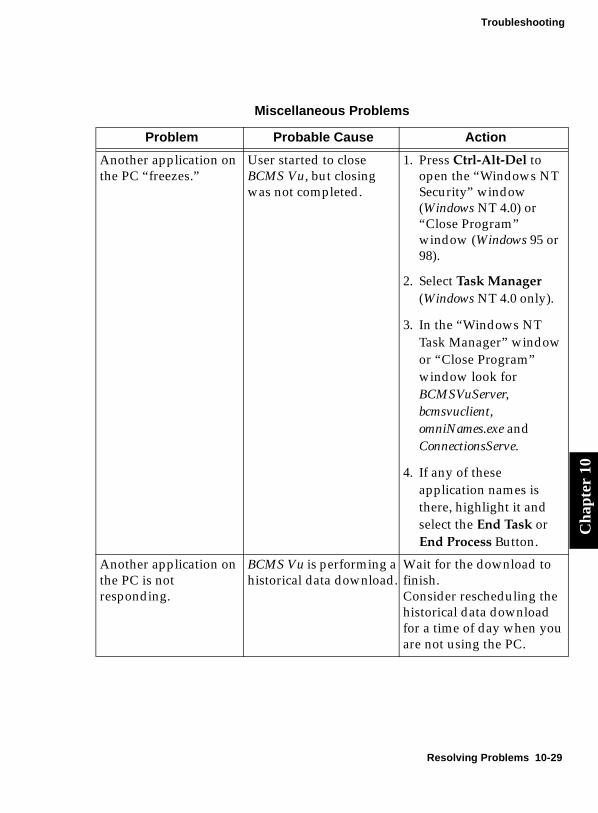
Troubleshooting
Cha
pter
10
Miscellaneous Problems
Problem Probable Cause Action
Another application on the PC “freezes.”
User started to close BCMS Vu, but closing was not completed.
1. Press Ctrl-Alt-Del to open the “Windows NT Security” window (Windows NT 4.0) or “Close Program” window (Windows 95 or 98).
2. Select Task Manager (Windows NT 4.0 only).
3. In the “Windows NT Task Manager” window or “Close Program” window look for BCMSVuServer, bcmsvuclient, omniNames.exe and ConnectionsServe.
4. If any of these application names is there, highlight it and select the End Task or End Process Button.
Another application on the PC is not responding.
BCMS Vu is performing a historical data download.
Wait for the download to finish.Consider rescheduling the historical data download for a time of day when you are not using the PC.
Resolving Problems 10-29
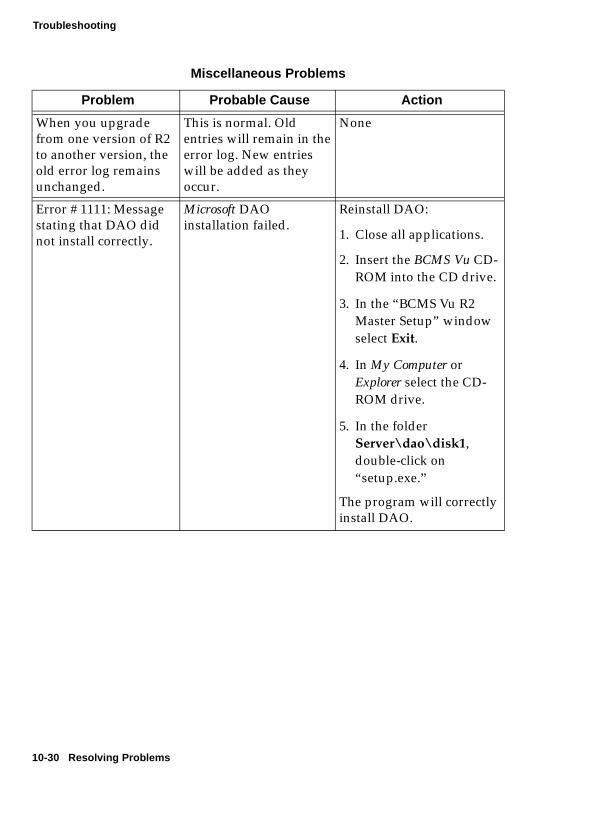
Troubleshooting
When you upgrade from one version of R2 to another version, the old error log remains unchanged.
This is normal. Old entries will remain in the error log. New entries will be added as they occur.
None
Error # 1111: Message stating that DAO did not install correctly.
Microsoft DAO installation failed.
Reinstall DAO:
1. Close all applications.
2. Insert the BCMS Vu CD-ROM into the CD drive.
3. In the “BCMS Vu R2 Master Setup” window select Exit.
4. In My Computer or Explorer select the CD-ROM drive.
5. In the folder Server\dao\disk1, double-click on “setup.exe.”
The program will correctly install DAO.
Miscellaneous Problems
Problem Probable Cause Action
10-30 Resolving Problems
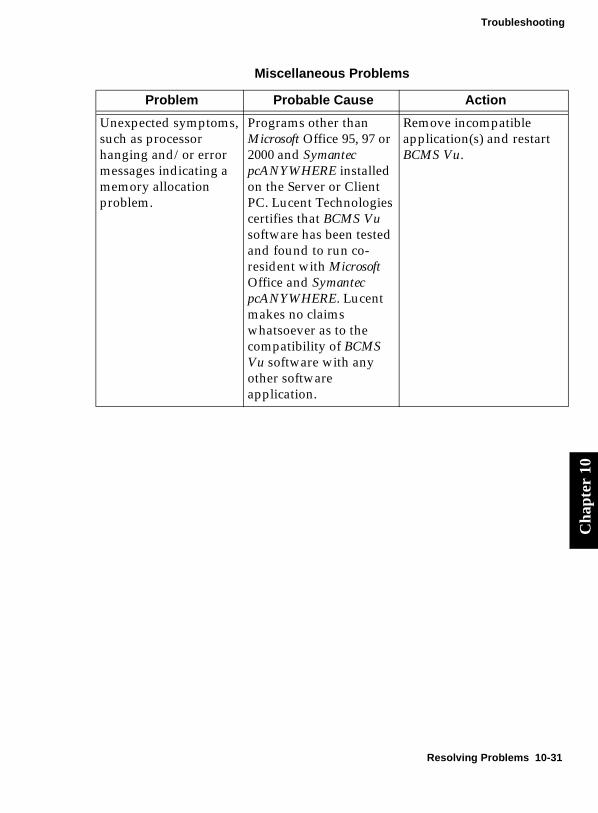
Troubleshooting
Cha
pter
10
Unexpected symptoms, such as processor hanging and/or error messages indicating a memory allocation problem.
Programs other than Microsoft Office 95, 97 or 2000 and Symantec pcANYWHERE installed on the Server or Client PC. Lucent Technologies certifies that BCMS Vu software has been tested and found to run co-resident with Microsoft Office and Symantec pcANYWHERE. Lucent makes no claims whatsoever as to the compatibility of BCMS Vu software with any other software application.
Remove incompatible application(s) and restart BCMS Vu.
Miscellaneous Problems
Problem Probable Cause Action
Resolving Problems 10-31
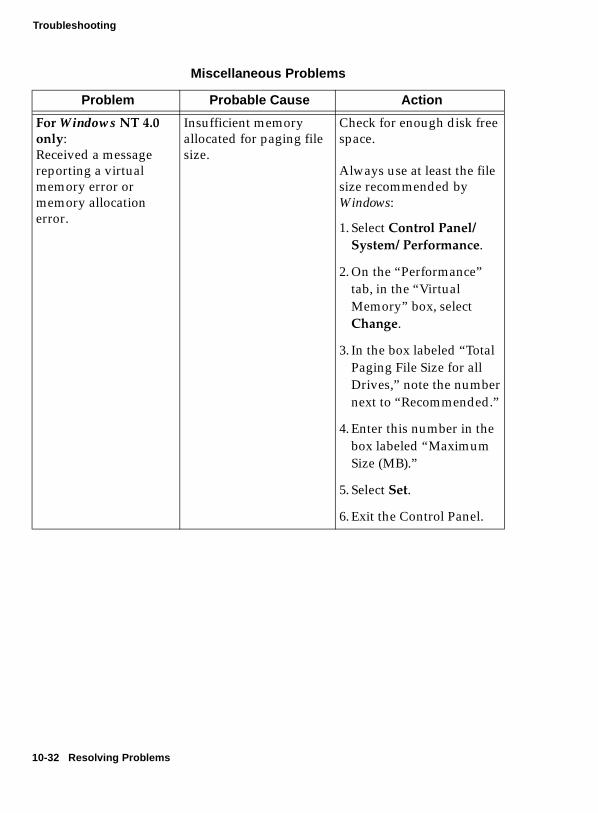
Troubleshooting
For Windows NT 4.0 only:Received a message reporting a virtual memory error or memory allocation error.
Insufficient memory allocated for paging file size.
Check for enough disk free space.
Always use at least the file size recommended by Windows:
1. Select Control Panel/ System/ Performance.
2. On the “Performance” tab, in the “Virtual Memory” box, select Change.
3. In the box labeled “Total Paging File Size for all Drives,” note the number next to “Recommended.”
4. Enter this number in the box labeled “Maximum Size (MB).”
5. Select Set.
6. Exit the Control Panel.
Miscellaneous Problems
Problem Probable Cause Action
10-32 Resolving Problems
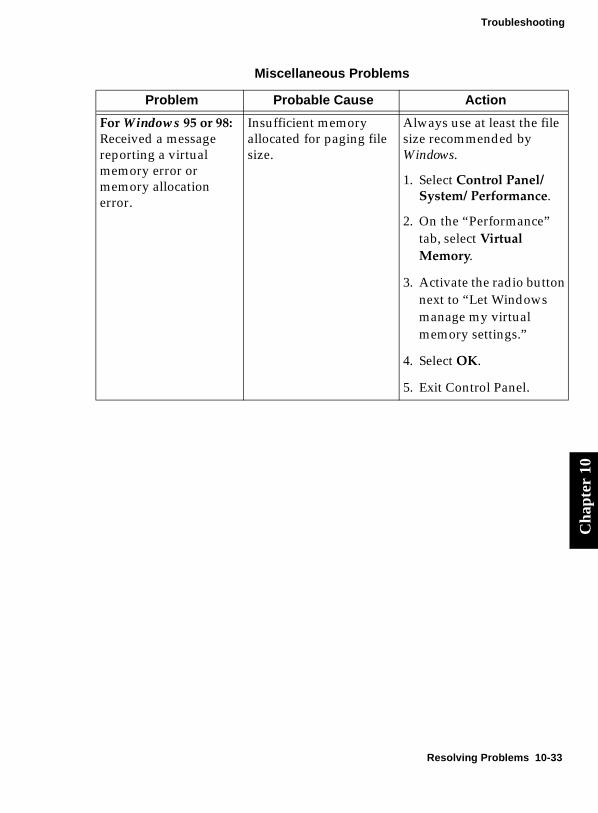
Troubleshooting
Cha
pter
10
For Windows 95 or 98:Received a message reporting a virtual memory error or memory allocation error.
Insufficient memory allocated for paging file size.
Always use at least the file size recommended by Windows.
1. Select Control Panel/ System/ Performance.
2. On the “Performance” tab, select Virtual Memory.
3. Activate the radio button next to “Let Windows manage my virtual memory settings.”
4. Select OK.
5. Exit Control Panel.
Miscellaneous Problems
Problem Probable Cause Action
Resolving Problems 10-33
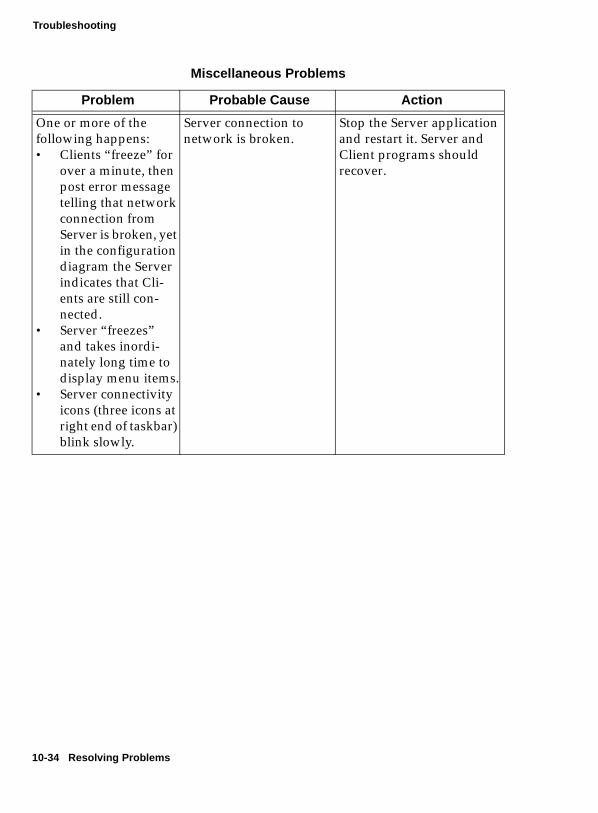
Troubleshooting
One or more of the following happens:• Clients “freeze” for
over a minute, then post error message telling that network connection from Server is broken, yet in the configuration diagram the Server indicates that Cli-ents are still con-nected.
• Server “freezes” and takes inordi-nately long time to display menu items.
• Server connectivity icons (three icons at right end of taskbar) blink slowly.
Server connection to network is broken.
Stop the Server application and restart it. Server and Client programs should recover.
Miscellaneous Problems
Problem Probable Cause Action
10-34 Resolving Problems
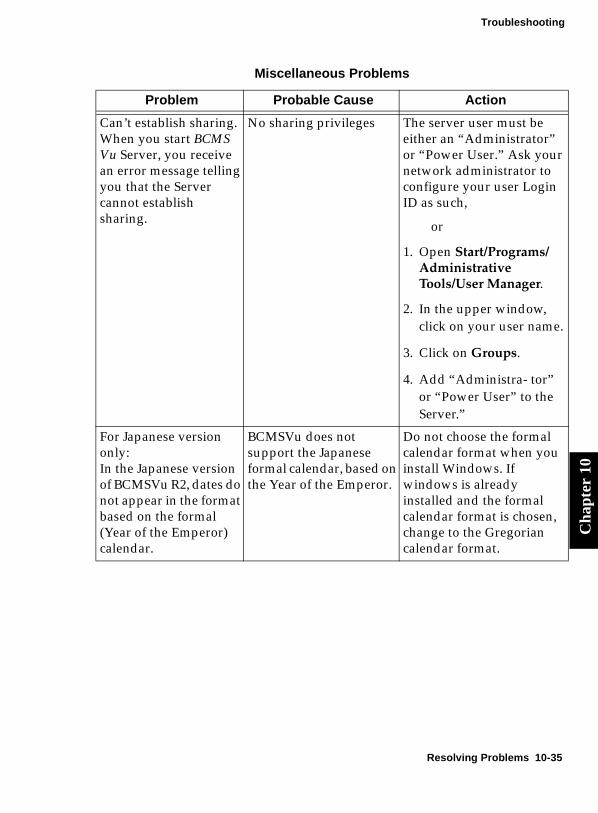
Troubleshooting
Cha
pter
10
Can’t establish sharing.When you start BCMS Vu Server, you receive an error message telling you that the Server cannot establish sharing.
No sharing privileges The server user must be either an “Administrator” or “Power User.” Ask your network administrator to configure your user Login ID as such,
or
1. Open Start/Programs/ Administrative Tools/User Manager.
2. In the upper window, click on your user name.
3. Click on Groups.
4. Add “Administra- tor” or “Power User” to the Server.”
For Japanese version only:In the Japanese version of BCMSVu R2, dates do not appear in the format based on the formal (Year of the Emperor) calendar.
BCMSVu does not support the Japanese formal calendar, based on the Year of the Emperor.
Do not choose the formal calendar format when you install Windows. If windows is already installed and the formal calendar format is chosen, change to the Gregorian calendar format.
Miscellaneous Problems
Problem Probable Cause Action
Resolving Problems 10-35
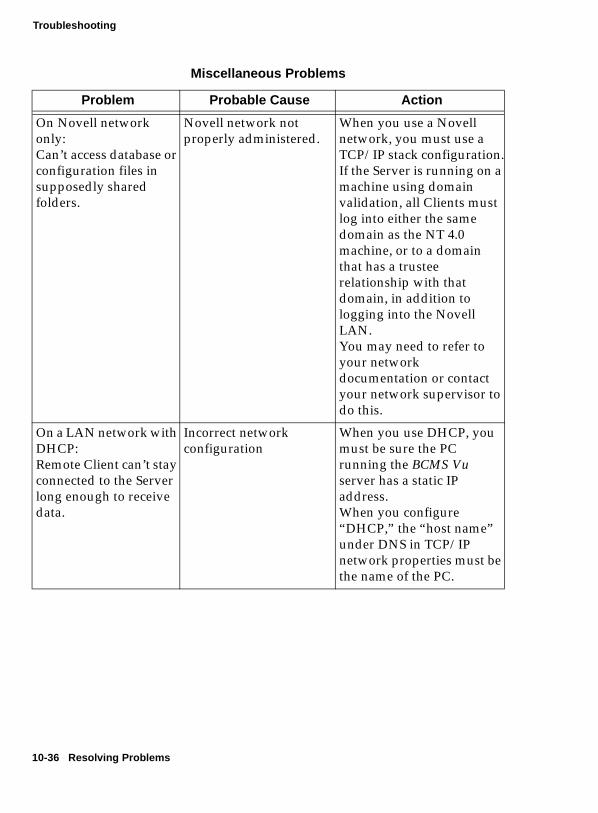
Troubleshooting
On Novell network only:Can’t access database or configuration files in supposedly shared folders.
Novell network not properly administered.
When you use a Novell network, you must use a TCP/IP stack configuration.If the Server is running on a machine using domain validation, all Clients must log into either the same domain as the NT 4.0 machine, or to a domain that has a trustee relationship with that domain, in addition to logging into the Novell LAN.You may need to refer to your network documentation or contact your network supervisor to do this.
On a LAN network with DHCP:Remote Client can’t stay connected to the Server long enough to receive data.
Incorrect network configuration
When you use DHCP, you must be sure the PC running the BCMS Vu server has a static IP address.When you configure “DHCP,” the “host name” under DNS in TCP/IP network properties must be the name of the PC.
Miscellaneous Problems
Problem Probable Cause Action
10-36 Resolving Problems
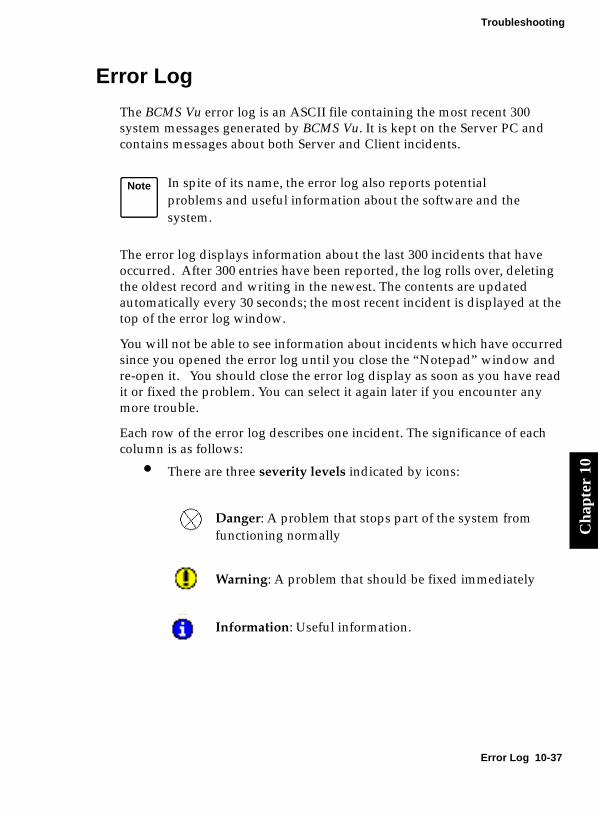
Troubleshooting
Cha
pter
10
Error Log 10
The BCMS Vu error log is an ASCII file containing the most recent 300 system messages generated by BCMS Vu. It is kept on the Server PC and contains messages about both Server and Client incidents.
The error log displays information about the last 300 incidents that have occurred. After 300 entries have been reported, the log rolls over, deleting the oldest record and writing in the newest. The contents are updated automatically every 30 seconds; the most recent incident is displayed at the top of the error log window.
You will not be able to see information about incidents which have occurred since you opened the error log until you close the “Notepad” window and re-open it. You should close the error log display as soon as you have read it or fixed the problem. You can select it again later if you encounter any more trouble.
Each row of the error log describes one incident. The significance of each column is as follows:
● There are three severity levels indicated by icons:
Danger: A problem that stops part of the system from functioning normally
Warning: A problem that should be fixed immediately
Information: Useful information.
Note In spite of its name, the error log also reports potential problems and useful information about the software and the system.
Error Log 10-37
Troubleshooting
● The subsystem name identifies the module of the application in which the problem occurred. For example, the Server, Client, and ConnectionServer.
● The error description is a brief statement about the cause of the error. For more about the cause of the error and how to prevent its happening again, refer to “Error Log” and “Error Codes” in Online Help or “Error Messages” in this guide.
● The date/time stamp identifies the time the error occurred.
To see the latest messages in the error log, do the following:
Select Error log from the View menu.
or
Start Notepad and open the file C:\Program Files\lucent\BCMS Vu\Server\BCMSVuServer\ ERR_xx.txt, where “xx” is the build number of the software version.
By default, the most recent errors are at the top of the error log. You can scroll through the error log to see recent errors.
When you display the error log from BCMS Vu, you can sort the entries according to individual columns. Click on a column heading and the rows are sorted according to the values or alphabetization on the items in the column. To reverse the order or sorting, click on the column heading again.
Note When you update from one version of BCMS Vu Software R2 to a higher version, the error log is not recreated. That is, the old error log is copied verbatim into the directory with the new software and new incidents are added as they occur.
10-38 Error Log
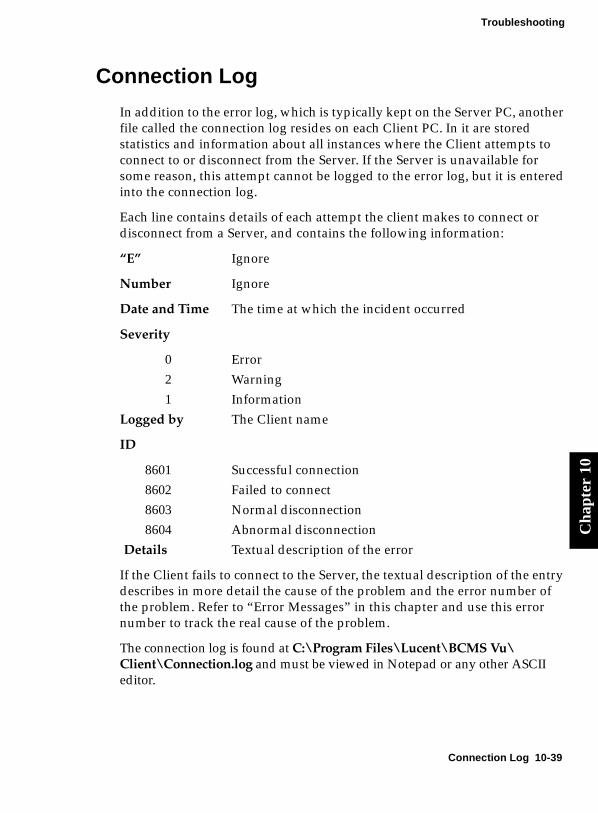
Troubleshooting
Cha
pter
10
Connection Log 10
In addition to the error log, which is typically kept on the Server PC, another file called the connection log resides on each Client PC. In it are stored statistics and information about all instances where the Client attempts to connect to or disconnect from the Server. If the Server is unavailable for some reason, this attempt cannot be logged to the error log, but it is entered into the connection log.
Each line contains details of each attempt the client makes to connect or disconnect from a Server, and contains the following information:
“E” Ignore
Number Ignore
Date and Time The time at which the incident occurred
Severity
0 Error2 Warning1 Information
Logged by The Client name
ID
8601 Successful connection8602 Failed to connect8603 Normal disconnection8604 Abnormal disconnection
Details Textual description of the error
If the Client fails to connect to the Server, the textual description of the entry describes in more detail the cause of the problem and the error number of the problem. Refer to “Error Messages” in this chapter and use this error number to track the real cause of the problem.
The connection log is found at C:\Program Files\Lucent\BCMS Vu\ Client\Connection.log and must be viewed in Notepad or any other ASCII editor.
Connection Log 10-39
Troubleshooting
Troubleshooting the Data Module 10
Verifying the COM Port 10
If the DEFINITY system connection test does not pass,
1. Verify that the cable between the data module and the PC serial port is properly connected.
If it is, go to step 2.
If it is not, correctly connect the cable between the data module and the PC serial port. If the problem still exists, replace the cable to be sure you do not have a faulty cable. If the problem still exists, go to step 2.
2. Verify that you have selected the correct COM Port for the data module.
If you have, go to step 3.
If you have not, change the COM Port selection. Go to “Setting Up The COM Port” on page 10-41 for instructions on how to change the COM Port. If the problem still exists after you change the COM Port selection, go to step 3.
3. Consult your PC user guide or its manufacturer’s technical support to see how to tell if your COM Port has been disabled.
4. Use the terminal emulator to be sure that your PC is communicating with the data module. See “Using a Terminal Emulator” on page 10-42.
5. Connect the data module voice terminal to another PC where BCMS Vu is working properly. If the datamaster voice terminal works properly on the new PC , there is a problem with your PC . Contact your technical support.
10-40 Troubleshooting the Data Module
Troubleshooting
Cha
pter
10
Setting Up The COM Port 10
If you get a message that BCMS Vu cannot start, it may be because you selected the wrong COM Port during installation.
You need to configure the COM Port so that your associated software can create the connections between your PC and your data module. To set up the COM Port, configure the DEFINITY system. See “Connecting to the DEFINITY System” on page 4-4.
Restart your PC .
Repairing a Corrupted Database 10
The database records that have been downloaded and stored on your PC hard disk can become corrupted.
You can correct this by using the Repair Database command in the Options menu. After you repair the database, you will probably want to update the database Index that allows reports to be quickly created.
You can also compact the database in order to store more data on your hard disk.
To repair a corrupted database,
1. In the Options menu, select Repair Database... or select the Repair Database Toolbar button.
2. In the window that appears, click on Repair Corrupted Database.
The buttons in the window become gray temporarily. When the operation finishes or fails, the grayed items become normal.
If the operation fails, an error notice appears.
3. To exit the window, select Finish.
Troubleshooting the Data Module 10-41
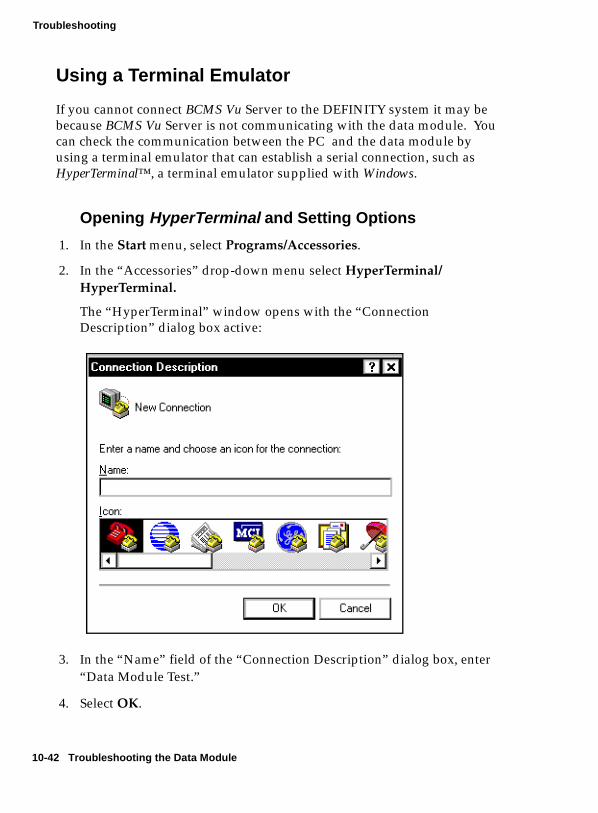
Troubleshooting
Using a Terminal Emulator 10
If you cannot connect BCMS Vu Server to the DEFINITY system it may be because BCMS Vu Server is not communicating with the data module. You can check the communication between the PC and the data module by using a terminal emulator that can establish a serial connection, such as HyperTerminal™, a terminal emulator supplied with Windows.
Opening HyperTerminal and Setting Options 10
1. In the Start menu, select Programs/Accessories.
2. In the “Accessories” drop-down menu select HyperTerminal/ HyperTerminal.
The “HyperTerminal” window opens with the “Connection Description” dialog box active:
3. In the “Name” field of the “Connection Description” dialog box, enter “Data Module Test.”
4. Select OK.
10-42 Troubleshooting the Data Module
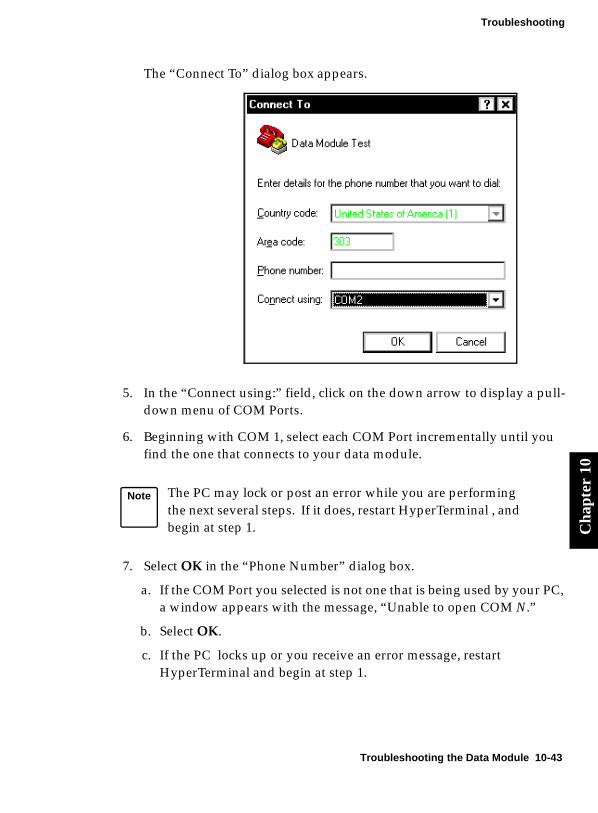
Troubleshooting
Cha
pter
10
The “Connect To” dialog box appears.
5. In the “Connect using:” field, click on the down arrow to display a pull-down menu of COM Ports.
6. Beginning with COM 1, select each COM Port incrementally until you find the one that connects to your data module.
7. Select OK in the “Phone Number” dialog box.
a. If the COM Port you selected is not one that is being used by your PC, a window appears with the message, “Unable to open COM N.”
b. Select OK.
c. If the PC locks up or you receive an error message, restart HyperTerminal and begin at step 1.
Note The PC may lock or post an error while you are performing the next several steps. If it does, restart HyperTerminal , and begin at step 1.
Troubleshooting the Data Module 10-43

Troubleshooting
8. If the COM Port you selected is one that is being used by your PC, the “COM Properties” dialog appears:
9. In the “COM Properties” dialog box, select the following port settings from the pull-down menu:● Bits per second - Choose a baud rate of 9600.● Data bits - Choose 8 ASCII data bits.● Parity - Choose the “None” parity setting.● Stop bits - Choose 1 stop bit.● Flow control - Choose Xon/Xoff for the flow control.
10-44 Troubleshooting the Data Module
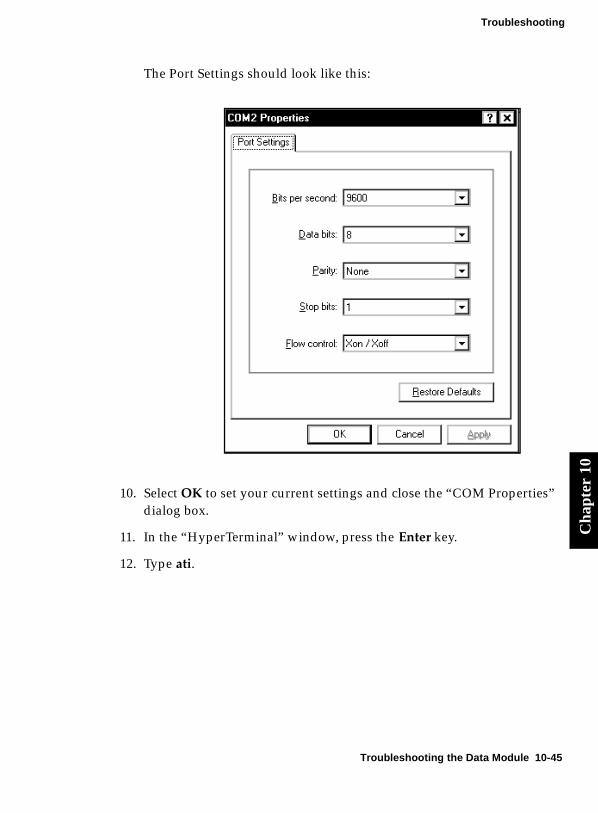
Troubleshooting
Cha
pter
10
The Port Settings should look like this:
10. Select OK to set your current settings and close the “COM Properties” dialog box.
11. In the “HyperTerminal” window, press the Enter key.
12. Type ati.
Troubleshooting the Data Module 10-45

Troubleshooting
13. Press the Enter key again.
If nothing happens repeat steps 9 through 12.
14. Enter atd<extension>where <extension> is the hunt group number. In the following example it is 4444.
15. When the “HyperTerminal” window resembles the following illustration,
press <Enter>.
A Login prompt appears.
Note If you chose a COM Port in step 6 that is being used by your PC, but is not attached to the data module, you cannot type in the “HyperTerminal” window. Check the cabling between the PC and the data module and between the data module and the DEFINITY system. Exit HyperTerminal and restart it before testing the next COM Port.
10-46 Troubleshooting the Data Module

Troubleshooting
Cha
pter
10
16. Enter the BCMS Vu Login ID (The BCMS Vu Login ID administered on the DEFINITY system).
17. Press <Enter>.
18. At the password prompt, enter the BCMS Vu password associated with the BCMS Vu Login ID.
19. Press <Enter>.
Two more lines appear in the open window, which resembles the following illustration:
20. If your screen resembles the one above, you have successfully logged into the DEFINITY system. If, after you enter the password in step 17 and press <Enter> once, the screen displays “Incorrect Login,” a) check the BCMS Vu Login ID and password administered on the DEFINITY system and b) re-enter them and press <Enter>.
21. If this does not correct the problem, check the data module installation and administration. Refer to Chapters 2 and 3 in BCMS Vu Software R2 Installation Guide.
Troubleshooting the Data Module 10-47
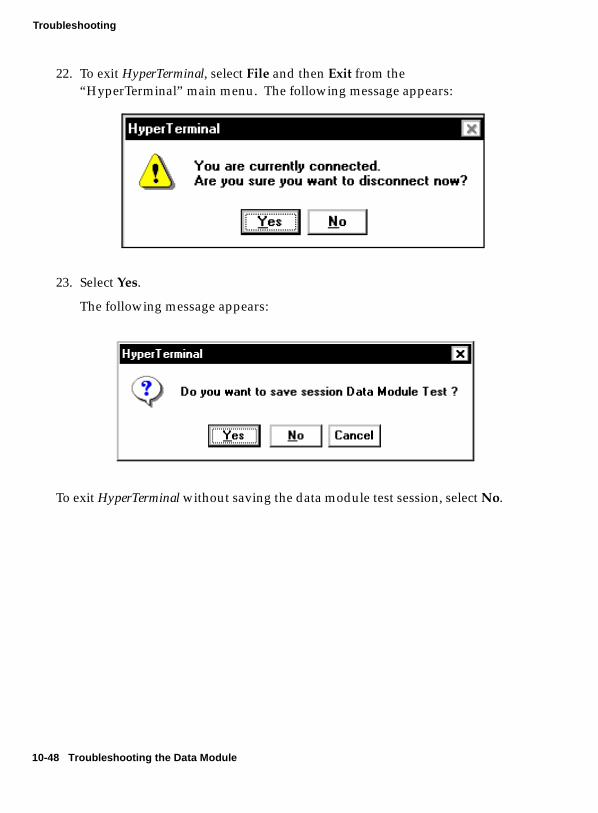
Troubleshooting
22. To exit HyperTerminal, select File and then Exit from the “HyperTerminal” main menu. The following message appears:
23. Select Yes.
The following message appears:
To exit HyperTerminal without saving the data module test session, select No.
10-48 Troubleshooting the Data Module

Troubleshooting
Cha
pter
10
Error Codes 10
Error codes, their descriptions, and error resolutions are listed in the table below.
ID Description Resolution
500 Internal software error Contact Lucent Technologies.
501 Resource error: a resource could not be obtained for some reason.
Under normal circumstances the software tries this operation again. This is a problem only if it happens repeatedly.
502 Internal software error Contact Lucent Technologies.
6xx Problem accessing file Generally advisory only. BCMS Vu will create the file automatically.
1000 Internal software error Contact Lucent Technologies.
1001 A historical download command cannot be executed.
Check that the DEFINITY system connection is functioning.
1002 Missing or incorrect fids in reply from DEFINITY system
BCMS Vu will recover from this problem automatically. If it happens often, check the DEFINITY system connection, serial port, and so forth.
1003 The command scheduler has exited abruptly.
Restart the connection. If this fails, restart the Server.
1101 ODBC reported an error. BCMS Vu may resolve the problem. If not, check the ODBC installation. See “Troubleshooting” in this chapter.
Error Codes 10-49

Troubleshooting
1102 The database could not be found. Check the supposed location of the database in Options| Configure|Sharing Setup and verify that the database is present.
1103 BCMS data does not match DEFINITY system time.
If the difference is more than about a week, this is a DEFINITY system problem. Use list bcms <object> <id> day to check date consistency, and contact your DEFINITY system administrator.
1104 Database could not be opened: It may be corrupt.
Try to repair the database. Refer to “Repairing the Database” in BCMS Vu Software R2 User Guide. Otherwise, investigate your DAO installation.
1106 Bad time conversion Check serial connection to the DEFINITY system.
1107 Column data has overflowed - some historical data is too big to be displayed by the DEFINITY system, and appears as ****:** , which is converted to the maximum possible value.
Make sure agents log out at the end of the shift. If it persists, use list bcms <object> <id> commands to find out which one has the problem, and track it from there.It is not advisable to measure VRU or AUDIX splits/skills, since the “agents” in these splits/skills will be logged in and available 24 hours a day, which will cause this error to be logged.
1108 BCMS Vu passed incomplete data to historical download code.
Contact Lucent Technologies.
ID Description Resolution
10-50 Error Codes

Troubleshooting
Cha
pter
10
1110 Mismatch between a split’s list of agents and the overall list of agents
This may happen when agent definitions are changed on the DEFINITY system. Try another download and see if it goes away. Otherwise, contact Lucent Technologies.
1111 DAO failed to initialize. Reinstall DAO:
1. Close all applications.
2. Insert the BCMS Vu CD-ROM into the CD drive.
3. In the “BCMS Vu R2 Master Setup” window, select Exit.
4. In Windows My Computer or Explorer select the CD-ROM drive.
5. In the folder Server\dao\ disk1 double-click on “setup.exe.”
The program will correctly install DAO.
4000 Attempt to run more than one Server
There are two BCMS Vu Servers running. If one of them is not visible, try looking for it in “Task Manager.”
4001 A client has attempted to log in when the maximum number are already logged in.
This Client cannot be connected to the Server because there are already <number> Clients logged in. You must wait until a Client logs out of the Server. The <number> is determined by the type of hardware key installed.
ID Description Resolution
Error Codes 10-51
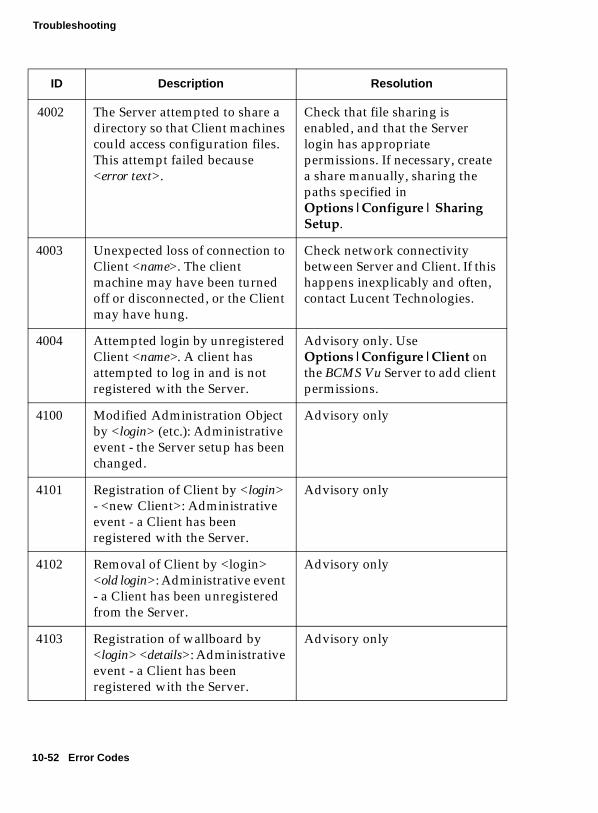
Troubleshooting
4002 The Server attempted to share a directory so that Client machines could access configuration files. This attempt failed because <error text>.
Check that file sharing is enabled, and that the Server login has appropriate permissions. If necessary, create a share manually, sharing the paths specified in Options|Configure| Sharing Setup.
4003 Unexpected loss of connection to Client <name>. The client machine may have been turned off or disconnected, or the Client may have hung.
Check network connectivity between Server and Client. If this happens inexplicably and often, contact Lucent Technologies.
4004 Attempted login by unregistered Client <name>. A client has attempted to log in and is not registered with the Server.
Advisory only. Use Options|Configure|Client on the BCMS Vu Server to add client permissions.
4100 Modified Administration Object by <login> (etc.): Administrative event - the Server setup has been changed.
Advisory only
4101 Registration of Client by <login> - <new Client>: Administrative event - a Client has been registered with the Server.
Advisory only
4102 Removal of Client by <login> <old login>: Administrative event - a Client has been unregistered from the Server.
Advisory only
4103 Registration of wallboard by <login> <details>: Administrative event - a Client has been registered with the Server.
Advisory only
ID Description Resolution
10-52 Error Codes
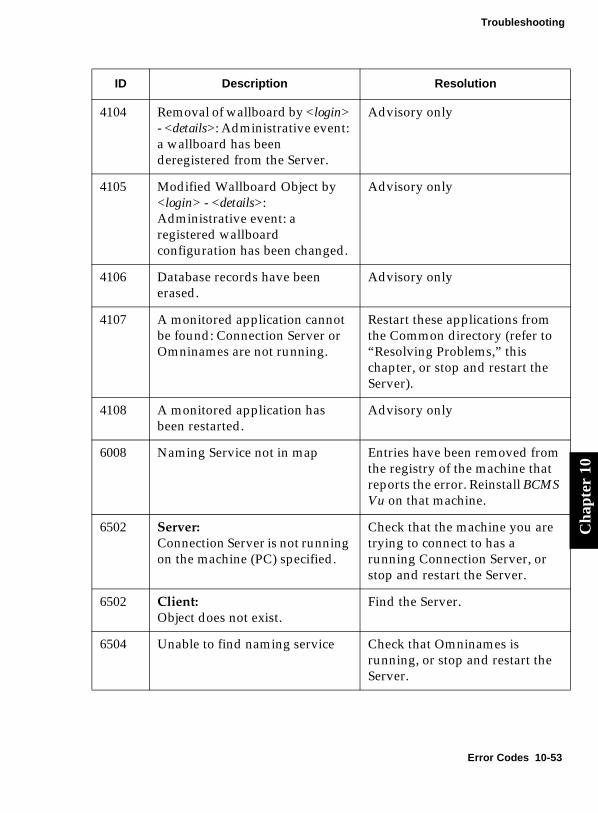
Troubleshooting
Cha
pter
10
4104 Removal of wallboard by <login> - <details>: Administrative event: a wallboard has been deregistered from the Server.
Advisory only
4105 Modified Wallboard Object by <login> - <details>: Administrative event: a registered wallboard configuration has been changed.
Advisory only
4106 Database records have been erased.
Advisory only
4107 A monitored application cannot be found: Connection Server or Omninames are not running.
Restart these applications from the Common directory (refer to “Resolving Problems,” this chapter, or stop and restart the Server).
4108 A monitored application has been restarted.
Advisory only
6008 Naming Service not in map Entries have been removed from the registry of the machine that reports the error. Reinstall BCMS Vu on that machine.
6502 Server:Connection Server is not running on the machine (PC) specified.
Check that the machine you are trying to connect to has a running Connection Server, or stop and restart the Server.
6502 Client:Object does not exist.
Find the Server.
6504 Unable to find naming service Check that Omninames is running, or stop and restart the Server.
ID Description Resolution
Error Codes 10-53
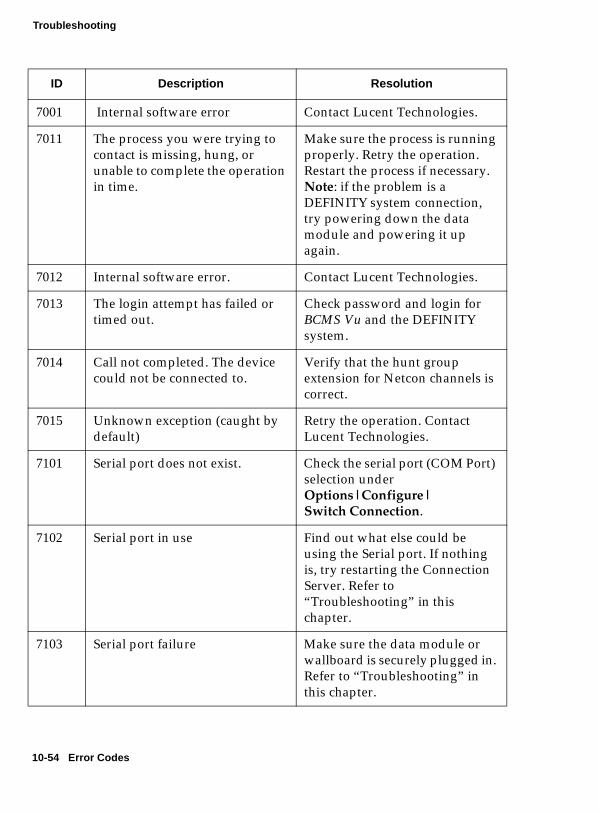
Troubleshooting
7001 Internal software error Contact Lucent Technologies.
7011 The process you were trying to contact is missing, hung, or unable to complete the operation in time.
Make sure the process is running properly. Retry the operation. Restart the process if necessary.Note: if the problem is a DEFINITY system connection, try powering down the data module and powering it up again.
7012 Internal software error. Contact Lucent Technologies.
7013 The login attempt has failed or timed out.
Check password and login for BCMS Vu and the DEFINITY system.
7014 Call not completed. The device could not be connected to.
Verify that the hunt group extension for Netcon channels is correct.
7015 Unknown exception (caught by default)
Retry the operation. Contact Lucent Technologies.
7101 Serial port does not exist. Check the serial port (COM Port) selection under Options|Configure|Switch Connection.
7102 Serial port in use Find out what else could be using the Serial port. If nothing is, try restarting the Connection Server. Refer to “Troubleshooting” in this chapter.
7103 Serial port failure Make sure the data module or wallboard is securely plugged in. Refer to “Troubleshooting” in this chapter.
ID Description Resolution
10-54 Error Codes
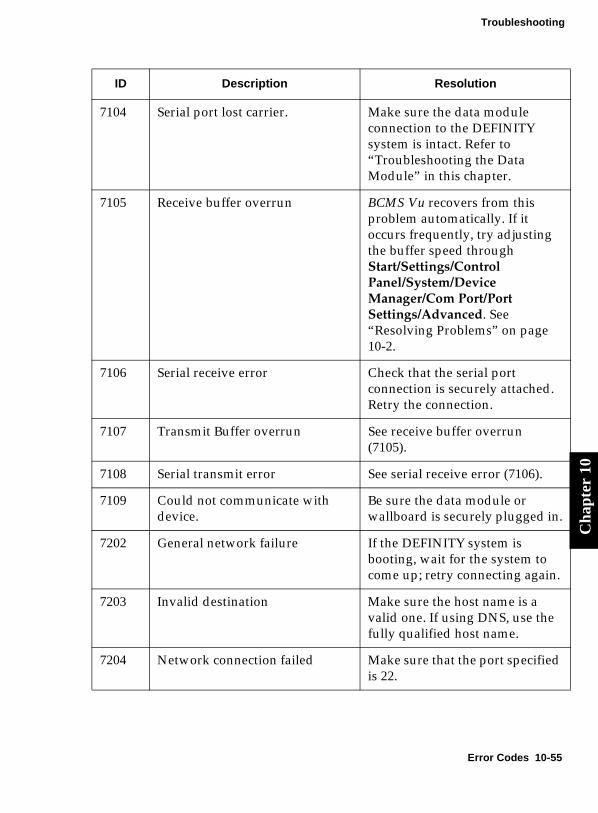
Troubleshooting
Cha
pter
10
7104 Serial port lost carrier. Make sure the data module connection to the DEFINITY system is intact. Refer to “Troubleshooting the Data Module” in this chapter.
7105 Receive buffer overrun BCMS Vu recovers from this problem automatically. If it occurs frequently, try adjusting the buffer speed through Start/Settings/Control Panel/System/Device Manager/Com Port/Port Settings/Advanced. See “Resolving Problems” on page 10-2.
7106 Serial receive error Check that the serial port connection is securely attached. Retry the connection.
7107 Transmit Buffer overrun See receive buffer overrun (7105).
7108 Serial transmit error See serial receive error (7106).
7109 Could not communicate with device.
Be sure the data module or wallboard is securely plugged in.
7202 General network failure If the DEFINITY system is booting, wait for the system to come up; retry connecting again.
7203 Invalid destination Make sure the host name is a valid one. If using DNS, use the fully qualified host name.
7204 Network connection failed Make sure that the port specified is 22.
ID Description Resolution
Error Codes 10-55
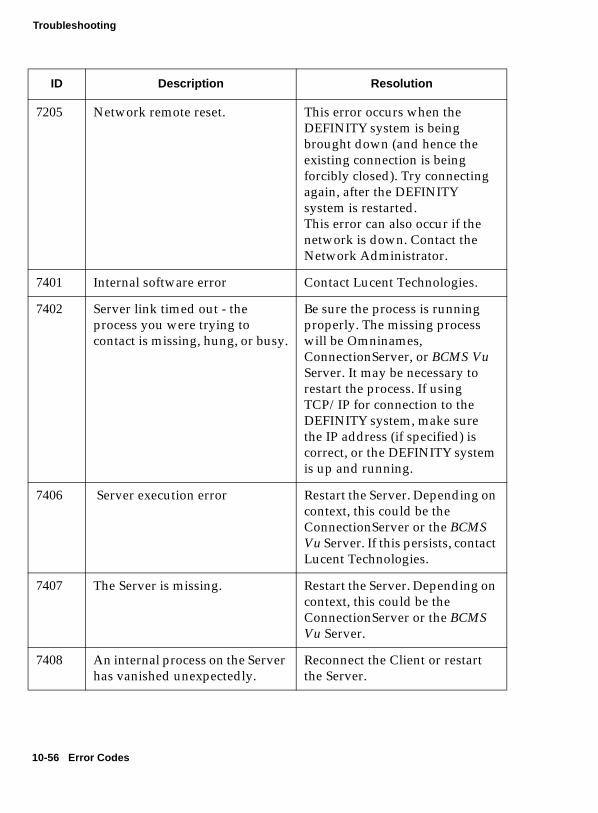
Troubleshooting
7205 Network remote reset. This error occurs when the DEFINITY system is being brought down (and hence the existing connection is being forcibly closed). Try connecting again, after the DEFINITY system is restarted. This error can also occur if the network is down. Contact the Network Administrator.
7401 Internal software error Contact Lucent Technologies.
7402 Server link timed out - the process you were trying to contact is missing, hung, or busy.
Be sure the process is running properly. The missing process will be Omninames, ConnectionServer, or BCMS Vu Server. It may be necessary to restart the process. If using TCP/IP for connection to the DEFINITY system, make sure the IP address (if specified) is correct, or the DEFINITY system is up and running.
7406 Server execution error Restart the Server. Depending on context, this could be the ConnectionServer or the BCMS Vu Server. If this persists, contact Lucent Technologies.
7407 The Server is missing. Restart the Server. Depending on context, this could be the ConnectionServer or the BCMS Vu Server.
7408 An internal process on the Server has vanished unexpectedly.
Reconnect the Client or restart the Server.
ID Description Resolution
10-56 Error Codes
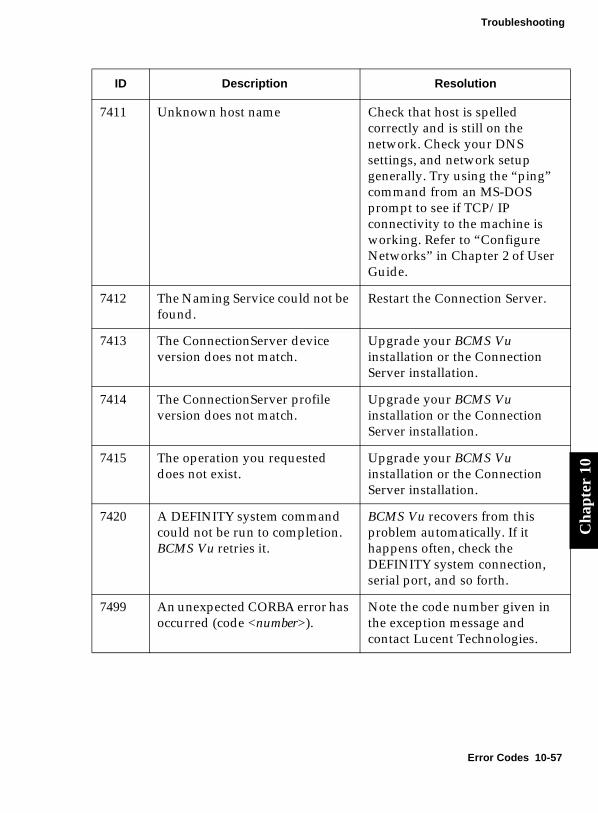
Troubleshooting
Cha
pter
10
7411 Unknown host name Check that host is spelled correctly and is still on the network. Check your DNS settings, and network setup generally. Try using the “ping” command from an MS-DOS prompt to see if TCP/IP connectivity to the machine is working. Refer to “Configure Networks” in Chapter 2 of User Guide.
7412 The Naming Service could not be found.
Restart the Connection Server.
7413 The ConnectionServer device version does not match.
Upgrade your BCMS Vu installation or the Connection Server installation.
7414 The ConnectionServer profile version does not match.
Upgrade your BCMS Vu installation or the Connection Server installation.
7415 The operation you requested does not exist.
Upgrade your BCMS Vu installation or the Connection Server installation.
7420 A DEFINITY system command could not be run to completion. BCMS Vu retries it.
BCMS Vu recovers from this problem automatically. If it happens often, check the DEFINITY system connection, serial port, and so forth.
7499 An unexpected CORBA error has occurred (code <number>).
Note the code number given in the exception message and contact Lucent Technologies.
ID Description Resolution
Error Codes 10-57

Troubleshooting
7500 The session could not be connected.
Check that the connection is not in use already. Otherwise, retry, restart the Connection Server, and if that fails, restart BCMS Vu Server.
8001 Cannot open file: <file full path name>
Use Explorer to check that the file exists in the location given.
8101 Internal software error Contact Lucent Technologies.
8102 Failed to set database location ODBC call failed. Verify that ODBC is set up properly through the ODBC control panel.
8103 Crystal Report errors (strings generated by Crystal Reports)
A possible cause is no printer driver installed. Install a printer. If this does not solve the problem, contact Lucent Technologies.
8104 Error in report definition file: <filename>. The report definition file is present, but unusable.
Remove the file and reinstall BCMS Vu Server.
8501 Not enough information given to locate a server
You must specify both a Server name and the name of the BCMS Vu Server PC.
8502 The current version of the BCMS Vu Server interface (version <Server version>) is not compatible with this version of the BCMS Vu Client interface (version <Client version>).
Upgrade your server or client software to ensure compatibility.
ID Description Resolution
10-58 Error Codes
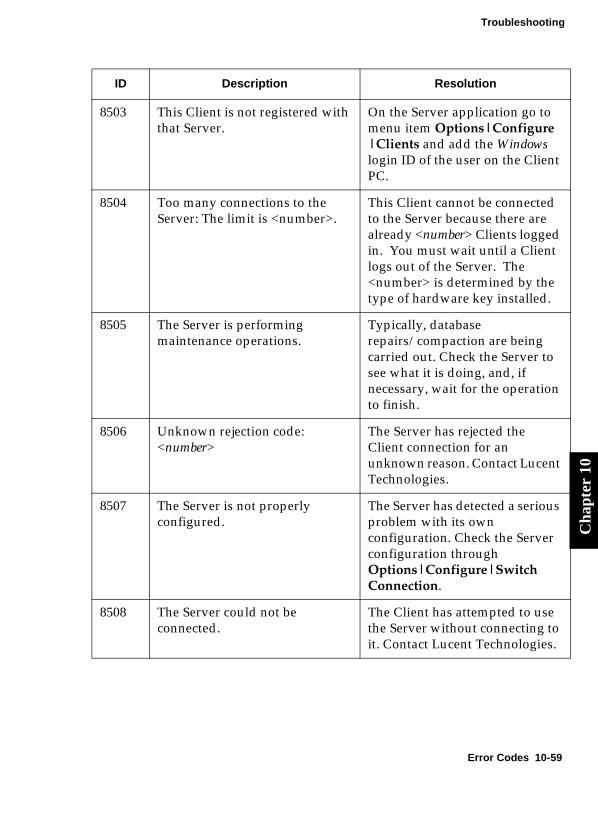
Troubleshooting
Cha
pter
10
8503 This Client is not registered with that Server.
On the Server application go to menu item Options|Configure |Clients and add the Windows login ID of the user on the Client PC.
8504 Too many connections to the Server: The limit is <number>.
This Client cannot be connected to the Server because there are already <number> Clients logged in. You must wait until a Client logs out of the Server. The <number> is determined by the type of hardware key installed.
8505 The Server is performing maintenance operations.
Typically, database repairs/compaction are being carried out. Check the Server to see what it is doing, and, if necessary, wait for the operation to finish.
8506 Unknown rejection code: <number>
The Server has rejected the Client connection for an unknown reason. Contact Lucent Technologies.
8507 The Server is not properly configured.
The Server has detected a serious problem with its own configuration. Check the Server configuration through Options|Configure|Switch Connection.
8508 The Server could not be connected.
The Client has attempted to use the Server without connecting to it. Contact Lucent Technologies.
ID Description Resolution
Error Codes 10-59

Troubleshooting
8509 The historical database was not accessible through the share.
On the Server application go to menu item Options|Configure| Sharing Setup and note the name of the share. Go to menu item Options|Configure| Downloads to find the location of the historical database.On the Client PC use Explorer to check that the historical database is accessible through the share noted above.
8510 The configuration files are not accessible through the share.
On the Server application go to menu item Options|Configure| Sharing Setup and note the name of the share.On the Client PC use Explorer to check that the configuration files are accessible through the share noted above. The configuration files are “BCMSSwitch” and “BCMSFields”.
8511 The Server has detected a problem with the database.
Check the Server to see what sort of problem has occurred. If none is showing, request a download. If this works, try the Client again.
8512 The Server you selected could not be found.
Verify that the BCMS Vu Server you have requested is running.
ID Description Resolution
10-60 Error Codes
BCMS Vu
Glossary 10Acceptable Service Level
A target value set to define the acceptable amount of time for an agent to answer a call. Target values are normally set as objectives by management.
A percentage of calls answered within a set amount of time (for example, 80% of calls answered within 20 seconds).
Note that BCMS Vu calculates the % In Service Level value differently than does BCMS. When there is no activity during an interval, BCMS leaves the value for the service level blank, while BCMS Vu includes a zero value for the service level. This difference does not affect the summary calculation for the % In Serv Levl because the summary calculation is a weighted average and it does not include the intervals for which null (blank) and zero were entered for the service level.
ACD (Automatic Call Distribution).
A DEFINITY system feature using software that channels high-volume incoming and outgoing call traffic to agent groups (splits or skills).
Also an agent state where the extension is engaged on an ACD call.
GL-1
Glossary
ACD Call An ACD call is a call that was queued to a split/skill and then answered by an agent in that split/skill, or a call that queued as a direct agent call and was answered by the agent to whom it was queued.
ACD split/skill See split/skill.
Active document See Active report.
Active report The report whose window is currently selected. To make a report the active report, open it and click on its title bar or anywhere in the report.
ACW (After Call Work).
ACD work done when the agent is not on a call. There are two types of after call work (ACW): call related ACW and ACW not associated with a call.
For G3V4, time the agents spent on non-ACD calls in ACW is not included, nor is time in ACW following a non-ACD call.
Time on non-ACD calls in ACW is included for the DEFINITY system.
AI (Auto-In).
An ACD work mode that makes the agent available to receive calls and allows the agent to receive a new ACD call immediately after disconnecting from the previous call.
Agent The login ID that staffed the extension or VRU port. This term is often extended to mean the person who used the ID to staff the extension.
GL-2
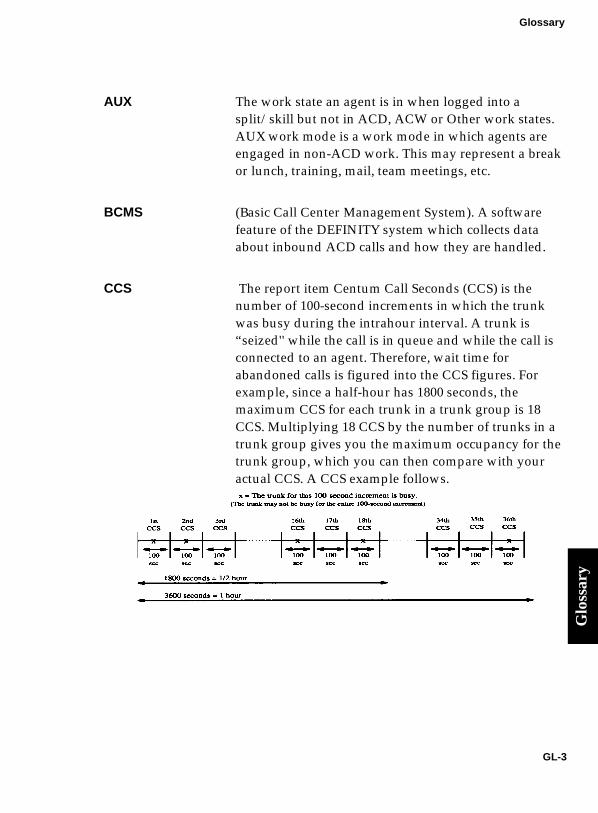
Glossary
Glo
ssar
y
AUX The work state an agent is in when logged into a split/skill but not in ACD, ACW or Other work states. AUX work mode is a work mode in which agents are engaged in non-ACD work. This may represent a break or lunch, training, mail, team meetings, etc.
BCMS (Basic Call Center Management System). A software feature of the DEFINITY system which collects data about inbound ACD calls and how they are handled.
CCS The report item Centum Call Seconds (CCS) is the number of 100-second increments in which the trunk was busy during the intrahour interval. A trunk is “seized'' while the call is in queue and while the call is connected to an agent. Therefore, wait time for abandoned calls is figured into the CCS figures. For example, since a half-hour has 1800 seconds, the maximum CCS for each trunk in a trunk group is 18 CCS. Multiplying 18 CCS by the number of trunks in a trunk group gives you the maximum occupancy for the trunk group, which you can then compare with your actual CCS. A CCS example follows.
GL-3

Glossary
Data module A serial communications device used for the asynchronous transfer of data. BCMS Vu connects to the DEFINITY system through a data module.
BCMS Vu does not work with analog modems, PDMs, or INADS.
DEFINITY system BCMS interval
The period of time, either one hour or one half hour, during which measurements are collected in the DEFINITY system. At the end of the interval, counts are reset to 0.
Direct Agent Calling
An EAS capability that makes it possible for a caller to reach the same agent every time and still include the call in the management tracking of the call center as an ACD call. This is ideal for claims processing, where a client needs to speak with the agent handling the claim.
Document See Report.
Hundred call seconds
See CCS.
Interval See DEFINITY system BCMS interval.
MI (Manual-In).
An ACD work mode. The Manual In (MI) mode makes the agent available to receive an ACD call and automatically places the agent into the ACW state upon release from the call.
Note
GL-4

Glossary
Glo
ssar
y
Other The work state an agent is in when doing work for splits/skills other than the one for which the current report is being run. The agent is also in the Other state when the agent puts a call on hold from the AI or MI work mode.
Primary Skill The first split/skill to which a call queues in a VDN is called the primary split/skill.
Report A name used when referring to Real-Time Graphs, Wallboard Displays, Real-Time Text reports and Historical Reports.
Report class A set of historical data items contained in BCMS Vu Historical Reports. For example, “agent data” comprises a report class.
Secondary Skill The second split/skill to which a call queues in a VDN is called the secondary split/skill.
Service Level See Acceptable Service Level.
Split/skill A group of extensions that are staffed by agents trained to handle a certain type of call.
Tertiary Skill When a call is queued to multiple splits/skills, the third split/skill the call queued to in a VDN is called the tertiary split/skill.
GL-5

Glossary
VDN (Vector Directory Number).
An extension that provides access to the Vectoring feature of the DEFINITY system. Vectoring allows you to specify the treatment of inbound calls based on the dialed number.
GL-6

IN
Index 10AAbandoned Calls Split/Skill Historical Report .
6-3Abandoned Calls VDN Historical Report . . 6-3About BCMS Vu menu. . . . . . . . . . . . 3-12absolute time . . . . . . . . . . . . . . . . . 7-31administering real-time data . . . . . . . . 4-31Agent Historical Report . . . . . . . . . . . . 6-3Agent Summary Historical Report . . . . . . 6-3attributes
Historical Reports . . . . . . . . . . . . . 6-6Real-Time Graph Reports . . . . . . . . . 5-8Real-Time Pie Chart Reports . . . . . . 5-12Real-Time Text Reports . . . . . . . . . 5-15Time Trace Reports . . . . . . . . . . . . 5-24Wallboard Display Reports . . . . . . . 5-20
audience of user guide . . . . . . . . . . . . .p-2
Bbacking up folders and files . . . . . . . . . 4-25backing up the database . . . . . . . . . . . 4-23BCMS . . . . . . . . . . . . . . . . . . . . . . 1-1BCMS data, updating . . . . . . . . . . . . 4-31BCMS Vu Client software
broadcasting a message . . . . . . . 3-10, 8-4cascade windows . . . . . . . . . . . . . 3-14closing . . . . . . . . . . . . . . . . . . . . 3-7configure. . . . . . . . . . . . . . . . . . 3-10connect (to a Server) . . . . . . . . . . . 3-13connection status . . . . . . . . . . . . . 3-14disconnect (from a Server) . . . . . . . . 3-14error log . . . . . . . . . . . . . . . . . . 3-12exiting . . . . . . . . . . . . . . . . . . . . 3-7features . . . . . . . . . . . . . . . . . . . 3-2functions . . . . . . . . . . . . . . . . . . . 3-2Help . . . . . . . . . . . . . . . . . . . . 3-14main window . . . . . . . . . . . . . . . . 3-8menu
About BCMS Vu . . . . . . . . . . . 3-12Broadcast Message . . . . . . . . . . 3-10Cancel Broadcast . . . . . . . . . . . 3-11Cascade . . . . . . . . . . . . . . . . 3-12Close Report. . . . . . . . . . . . . . . 3-9
Configure. . . . . . . . . . . . . . . . 3-10Connect (to Server) . . . . . . . . . . 3-11Disconnect (from Server) . . . . . . . 3-11Edit . . . . . . . . . . . . . . . . . . . 3-10Error Log . . . . . . . . . . . . . . . . 3-12Exit . . . . . . . . . . . . . . . . . . . 3-10File . . . . . . . . . . . . . . . . . . . 3-9Help . . . . . . . . . . . . . . . . . . . 3-12Help Topics . . . . . . . . . . . . . .3-12list of open reports . . . . . . . . . . 3-12New Report . . . . . . . . . . . . . . 3-9Open Report . . . . . . . . . . . . . . 3-9Options . . . . . . . . . . . . . . . . . 3-10Print Report . . . . . . . . . . . . . . 3-9Printer Setup . . . . . . . . . . . . . . 3-10recently used reports . . . . . . . . . 3-10Report Properties . . . . . . . . . . . 3-10Save Report . . . . . . . . . . . . . . 3-9Save Report As. . . . . . . . . . . . . 3-9Schedule Historical Reports . . . . . 3-11Status Bar . . . . . . . . . . . . . . . . 3-12Tile . . . . . . . . . . . . . . . . . . . 3-12Toolbar . . . . . . . . . . . . . . . . . 3-12View . . . . . . . . . . . . . . . . . .3-12Window . . . . . . . . . . . . . . . .3-12
new report . . . . . . . . . . . . . . . . . 3-13open reports . . . . . . . . . . . . . . . . 3-13print current report . . . . . . . . . . . . 3-13report display area . . . . . . . . . . . . 3-14report properties. . . . . . . . . . . . . . 3-13save report . . . . . . . . . . . . . . . . . 3-13schedule Historical Reports . . . . . . . 3-13server name . . . . . . . . . . . . . . . .3-15starting . . . . . . . . . . . . . . . . . . . 3-3status bar . . . . . . . . . . . . . . . . . . 3-14system menu box . . . . . . . . . . . . . 3-9tile menu item . . . . . . . . . . . . . . . 3-12Tile Windows toolbar button. . . . . . . 3-14title bar . . . . . . . . . . . . . . . . . . . 3-9toolbar . . . . . . . . . . . . . . . .3-12, 3-13uses . . . . . . . . . . . . . . . . . . . . . 3-2wallboard broadcast. . . . . . . . . . . . 3-13
IN-1
Index
BCMS Vu Client: See BCMS Vu Client softwareBCMS Vu Server Simulator . . . . . . . . . . 2-5BCMS Vu Server software
cascade windows . . . . . . . . . . . . . 2-15closing . . . . . . . . . . . . . . . . . . . . 2-9configuration wizard . . . . . . . . . . . . 2-6connect status . . . . . . . . . . . . . . . 2-17connect to DEFINITY system . . . 2-14, 2-16delete records . . . . . . . . . . . . 2-13, 2-16disconnect from DEFINITY system2-14, 2-16download status . . . . . . . . . . . . . 2-16downloading historical data. . . . . . . 2-15error log . . . . . . . . . . . . . . . . . . 2-14exiting . . . . . . . . . . . . . . . . . . . . 2-9features . . . . . . . . . . . . . . . . 2-1, 2-2first time . . . . . . . . . . . . . . . . . . . 2-6Help Topics . . . . . . . . . . . . . . . . 2-16main window . . . . . . . . . . . . . . . 2-10menu
About BCMS Vu . . . . . . . . . . . 2-15Cascade Windows . . . . . . . . . . 2-15Configure . . . . . . . . . . . . . . . 2-12Connect . . . . . . . . . . . . . . . . 2-14Delete Records . . . . . . . . . . . . 2-13Disconnect . . . . . . . . . . . . . . . 2-14Downloading Historical Data . . . . 2-12Error Log . . . . . . . . . . . . . . . 2-14Exit . . . . . . . . . . . . . . . . . . . 2-11File . . . . . . . . . . . . . . . . . . . 2-11Help . . . . . . . . . . . . . . . . . . 2-15Help Topics . . . . . . . . . . . . . . 2-15Options . . . . . . . . . . . . . . . . 2-12Repair Database. . . . . . . . . . . . 2-14Status Bar . . . . . . . . . . . . . . . 2-14Stop Data Download . . . . . . . . . 2-13System Configuration . . . . . . . . 2-14Tile . . . . . . . . . . . . . . . . . . . 2-15Toolbar. . . . . . . . . . . . . . . . . 2-14Update BCMS Data. . . . . . . . . . 2-12View . . . . . . . . . . . . . . . . . . 2-14Window . . . . . . . . . . . . . . . . 2-15
menu bar. . . . . . . . . . . . . . . . 2-11, 3-9online help. . . . . . . . . . . . . . . . . 2-18repair database . . . . . . . . . . . 2-14, 2-16server action area . . . . . . . . . . . . . 2-17simulator . . . . . . . . . . . . . . . . . . 2-5starting. . . . . . . . . . . . . . . . . . . . 2-3status bar . . . . . . . . . . . . . . 2-14, 2-16system configuration . . . . . . . . . . . 2-14system menu box . . . . . . . . . . . . . 2-11terminate historical data download . . 2-15
tile windows . . . . . . . . . . . . . . . 2-15title bar . . . . . . . . . . . . . . . . . . 2-11toolbar. . . . . . . . . . . . . . . . 2-14, 2-15
BCMS Vu Server: See BCMS Vu Server softwareBCMS Vu software
benefits . . . . . . . . . . . . . . . . . . . 1-4compatibility with other software . . . 1-10definition . . . . . . . . . . . . . . . . . . 1-1differences between R1 and R2. . . . . . 1-5features . . . . . . . . . . . . . . . . . . . 1-3functions . . . . . . . . . . . . . . . . . . 2-2languages supported . . . . . . . . . . 1-10requirements . . . . . . . . . . . . . . . . 1-8restrictions . . . . . . . . . . . . . . . . 1-10uses . . . . . . . . . . . . . . . . . . . . . 2-2when to use. . . . . . . . . . . . . . . . . 1-5
BCMS Vu Wallboard softwareclosing. . . . . . . . . . . . . . . . . . . . 8-2exiting . . . . . . . . . . . . . . . . . . . . 8-2starting . . . . . . . . . . . . . . . . . . . 8-2
broadcast message . . . . . . . . . . . . . . . 8-1Broadcast Message menu . . . . . . . . . . 3-10broadcasting a message . . . . . . . . . . . . 8-3
CCancel Broadcast menu . . . . . . . . . . . 3-11Cascade menu
Client . . . . . . . . . . . . . . . . . . . 3-12Server . . . . . . . . . . . . . . . . . . . 2-15
cascade windowsClient . . . . . . . . . . . . . . . . . . . 3-14Server . . . . . . . . . . . . . . . . . . . 2-15
Cascade Windows toolbar button . . . . . 3-14changing properties of a report . . . . . . 7-37choosing the appropriate type of report. . . 5-2Close Report menu . . . . . . . . . . . . . . 3-9closing. . . . . . . . . . . . . . . . . . . . . 7-35
a report . . . . . . . . . . . . . . . . . . 7-35BCMS Vu Client software. . . . . . . . . 3-7BCMS Vu Server software . . . . . . . . 2-9BCMS Vu Wallboard software . . . . . . 8-2
configureClient . . . . . . . . . . . . . . . . . . . 3-10external wallboard. . . . . . . . . . . . . 8-2Server . . . . . . . . . . . . . . . . . . . 2-12
Configure menuClient . . . . . . . . . . . . . . . . . . . 3-10Server . . . . . . . . . . . . . . . . . . . 2-12
connectto a DEFINITY system . . . . 2-14, 2-16, 4-8to a Server . . . . . . . . . . . . . . 3-6, 3-13
Connect (to Server) menu. . . . . . . . . . 3-11connection log . . . . . . . . . . . . . . . . 10-39
IN-2

Index
Inde
x
connection statusClient. . . . . . . . . . . . . . . . . . . . 3-14Server . . . . . . . . . . . . . . . . . . . 2-17
ConnectionServer. . . . . . . .10-5, 10-29, 10-53conventions used in user guide . . . . . . . .p-5co-residency with other software . . . . . . 1-10correcting problems . . . . . . . . . . . . . 10-2creating
Historical Reports . . . . . . . . . . 6-4, 7-26Real-Time Graph Reports . . . . . . . . . 7-2Real-Time Pie Chart Reports . . . . . . . 7-7Real-Time Text Reports . . . . . . . . . 7-10Time Trace Reports . . . . . . . . . . . . 7-22Wallboard Display Reports . . . . . . . 7-13
customer options field . . . . . . . . . . . . 1-11
Ddata
daily . . . . . . . . . . . . . . . . . . . . . 6-2how the DEFINITY system stores . . . . 6-2interval. . . . . . . . . . . . . . . . . . . . 6-2loss when DEFINITY system is reset . . . 6-2
data itemsHistorical Reports . . . . . . . . . . . . . 6-6Real-Time Graph Reports . . . . . . . . . 5-8Real-Time Pie Chart Reports . . . . . . 5-12Real-Time Text Reports . . . . . . . . . 5-15Time Trace Reports . . . . . . . . . . . . 5-24Wallboard Display Reports . . . . . . . 5-20
data module, troubleshooting. . . . . . . 10-40database
backing up. . . . . . . . . . . . . . . . . 4-23downloading . . . . . . . . . .2-12, 2-15, 4-8location of . . . . . . . . . . . . . . . . . . 4-9repairing . . . . . . . . . . . . . . . . . 10-41
daylight savings time adjustment . . . . . 4-11DEFINITY system . . . . . . . . . . . . . . . 1-1
connecting to . . . . . . . . . . . . . 4-4, 4-8data storage on . . . . . . . . . . . . . . . 6-2definition . . . . . . . . . . . . . . . . . .p-1disconnecting from . . . . . . . . . . 4-7, 4-8managing the connection . . . . . . . . . 4-7reconnecting to . . . . . . . . . . . . . . . 4-7
delete records . . . . . . . . . . . . . . 2-13, 2-16DHCP . . . . . . . . . . . . . . . . . . . . 10-36disconnect
from a Server . . . . . . . . . . . . . 3-6, 3-14from the DEFINITY system . .2-14, 2-16, 4-8
Disconnect (from Server) menu . . . . . . . 3-11disk space storage requirements . . . . . . 1-12displaying information on wallboards . . . . 8-1DNS . . . . . . . . . . . . . . . . . . . . . 10-36documents, related . . . . . . . . . . . . . . .p-6
download status . . . . . . . . . . . . . . . 2-16downloading historical data . . . 2-12, 2-15, 4-8
terminate . . . . . . . . . . . . . . . . . 2-15
EEdit menu. . . . . . . . . . . . . . . . . . . 3-10end date. . . . . . . . . . . . . . . . . . . . 7-32error description . . . . . . . . . . . . . . . 10-38error log. . . . . . . . . . . . . . . . . 2-14, 10-37Error Log menu . . . . . . . . . . . . . . . 3-12Exit menu
Client . . . . . . . . . . . . . . . . . . . 3-10Server . . . . . . . . . . . . . . . . . . . 2-11
exitingBCMS Vu Client software. . . . . . . . . 3-7BCMS Vu Server software . . . . . . . . 2-9BCMS Vu Wallboard software . . . . . . 8-2
exporting Historical Reports . . . . . . . . . 6-8external wallboard. . . . . . . . . . . . . 8-1, 8-3
broadcast message . . . . . . . . . . . . . 8-1broadcast message to . . . . . . . . . . . 8-4configuring . . . . . . . . . . . . . . . . . 8-2features . . . . . . . . . . . . . . . . . . . 8-1sending a Wallboard Display Report to . 8-3
FFile menu
Client . . . . . . . . . . . . . . . . . . . . 3-9Server . . . . . . . . . . . . . . . . . . . 2-11
Hhardware key. . . . . . . . . . . . . . . . . . 2-3hardware required. . . . . . . . . . . . . . . 1-8Help . . . . . . . . . . . . . . . . . . . . . . 3-14
Customer Service . . . . . . . . . . . . 1-12documentation . . . . . . . . . . . . . . 1-12Online . . . . . . . . . . . . . . . . . . . 1-12
Help menuClient . . . . . . . . . . . . . . . . . . . 3-12Server . . . . . . . . . . . . . . . . . . . 2-15
Help Topics menu itemClient . . . . . . . . . . . . . . . . . . . 3-12Server . . . . . . . . . . . . . . . . . . . 2-15
Help Topics toolbar buttonClient . . . . . . . . . . . . . . . . . . . 3-14Server . . . . . . . . . . . . . . . . . . . 2-16
historical datadaylight savings considerations . . . . 4-11downloading . . . . . . . . . . . . . . . . 4-8location of. . . . . . . . . . . . . . . . . . 4-9preventing loss of . . . . . . . . . . . . . 6-2storage space needed . . . . . . . . . . 4-10
IN-3

Index
Historical Reports . . . . . . . . . . . .6-1, 7-35Abandoned Calls Split/Skill . . . . . . . 6-3Abandoned Calls VDN . . . . . . . . . . 6-3Agent. . . . . . . . . . . . . . . . . . . . . 6-3Agent Summary . . . . . . . . . . . . . . 6-3attributes. . . . . . . . . . . . . . . . . . . 6-6creating . . . . . . . . . . . . . . . .6-4, 7-26data items . . . . . . . . . . . . . . . . . . 6-6exporting . . . . . . . . . . . . . . . . . . 6-8format of time columns . . . . . . . 6-5, 7-33opening . . . . . . . . . . . . . . . .6-4, 7-36Overflowed Calls Split/Skill . . . . . . . 6-3Overflowed Calls VDN . . . . . . . . . . 6-3sample . . . . . . . . . . . . . . . . . . . . 6-5saving . . . . . . . . . . . . . . . . . . . 7-34scheduling printing of . . . . . . . . . . 7-39Split/Skill . . . . . . . . . . . . . . . . . . 6-3Trunk . . . . . . . . . . . . . . . . . . . . 6-3types of . . . . . . . . . . . . . . . . . . . 6-3VDN . . . . . . . . . . . . . . . . . . . . . 6-3
how the DEFINITY system stores data. . . . 6-2
LLAN . . . . . . . . . . . . . . . . . . . . . 10-36languages supported . . . . . . . . . . . . . 1-10list of open reports menu . . . . . . . . . . 3-12location of historical database . . . . . . . . . 4-9Login . . . . . . . . . . . . . . . . . . . . . . . 4-5
MMail Application Programming Interface . . 6-8main window
BCMS Vu Client . . . . . . . . . . . . . . 3-8BCMS Vu Server . . . . . . . . . . . . . 2-10
maintenance, software for . . . . . . . . . . 1-13managing the DEFINITY system connection 4-7MAPI: See Mail Application Programming Interfacemaximum values . . . . . . . . . . . . . . . . 5-7menu bar
Client. . . . . . . . . . . . . . . . . . . . . 3-9Server . . . . . . . . . . . . . . . . . . . 2-11
menu itemClient
About BCMS Vu . . . . . . . . . . . 3-12Broadcast Message . . . . . . . . . . 3-10Cancel Broadcast . . . . . . . . . . . 3-11Cascade . . . . . . . . . . . . . . . . 3-12Close Reports . . . . . . . . . . . . . . 3-9Configure . . . . . . . . . . . . . . . 3-10Connect (to Server) . . . . . . . . . . 3-11Disconnect (from Server) . . . . . . 3-11
Edit . . . . . . . . . . . . . . . . . . 3-10Error Log . . . . . . . . . . . . . . . 3-12Exit . . . . . . . . . . . . . . . . . . 3-10Help . . . . . . . . . . . . . . . . . . 3-12Help Topics. . . . . . . . . . . . . . 3-12list of open reports . . . . . . . . . . 3-12New Report. . . . . . . . . . . . . . . 3-9Open Reports. . . . . . . . . . . . . . 3-9Options . . . . . . . . . . . . . . . . 3-10Print Report . . . . . . . . . . . . . . 3-9Printer Setup . . . . . . . . . . . . . 3-10recently used reports . . . . . . . . 3-10Report Properties . . . . . . . . . . 3-10Save Report . . . . . . . . . . . . . . . 3-9Save Report As . . . . . . . . . . . . . 3-9Schedule Historical Reports . . . . 3-11Status Bar . . . . . . . . . . . . . . . 3-12Tile. . . . . . . . . . . . . . . . . . . 3-12Toolbar . . . . . . . . . . . . . . . . 3-12View. . . . . . . . . . . . . . . . . . 3-12Window. . . . . . . . . . . . . . . . 3-12
ServerCascade windows . . . . . . . . . . 2-15Configure . . . . . . . . . . . . . . . 2-12Connect (to DEFINITY system) . . 2-14Delete Records . . . . . . . . . . . . 2-13Disconnect from DEFINITY system 2-14Downloading Historical Data . . . 2-12Error Log . . . . . . . . . . . . . . . 2-14Exit . . . . . . . . . . . . . . . . . . 2-11Help . . . . . . . . . . . . . . . . . . 2-15Repair Database . . . . . . . . . . . 2-14Status Bar . . . . . . . . . . . . . . . 2-14Stop Data Download . . . . . . . . 2-13System Configuration . . . . . . . . 2-14Tile. . . . . . . . . . . . . . . . . . . 2-15Toolbar . . . . . . . . . . . . . . . . 2-14Update BCMS Data . . . . . . . . . 2-12
message broadcast . . . . . . . . . . . . . . . 8-4Microsoft Office . . . . . . . . . . . . . . . 1-10Millenium-compliant . . . . . . . . . . . . . 1-4miscellaneous problems. . . . . . . . . . . 10-29mouse buttons, use of . . . . . . . . . . . . . p-5
Nnew report . . . . . . . . . . . . . . . . . . 3-13New Report menu . . . . . . . . . . . . . . . 3-9New Report toolbar button . . . . . . . . . 3-13
IN-4
Index
Inde
x
OOmninames . . . . . . . . . . .10-5, 10-29, 10-53Online Help
Client. . . . . . . . . . . . . . . . . . . . 3-16Server . . . . . . . . . . . . . . . . . . . 2-18
Open Report menu . . . . . . . . . . . . . . . 3-9Open Report toolbar button . . . . . . . . . 3-13opening a report . . . . . . . . . . . . 3-13, 7-36Options menu
Client. . . . . . . . . . . . . . . . . . . . 3-10Server . . . . . . . . . . . . . . . . . . . 2-12
Overflowed Calls Split/Skills Historical Report6-3
Overflowed Calls VDN Historical Report . . 6-3
PpcANYWHERE . . . . . . . . . . . . . 1-10, 1-13performance factors . . . . . . . . . . . . . 1-12permissions required. . . . . . . . . . . . . 1-11Print Current Report toolbar button . . . . 3-13Print Report menu . . . . . . . . . . . . . . . 3-9Printer Setup menu. . . . . . . . . . . . . . 3-10printing a report . . . . . . . . . . . . . . . 7-38printing a report to a file . . . . . . . . . . . 7-40problems
downloading (historical) data . . . . . . 10-7miscellaneous . . . . . . . . . . . . . . 10-29real-time reports . . . . . . . . . . . . 10-20starting/connecting . . . . . . . . . . . 10-2wallboards. . . . . . . . . . . . . . . . 10-24
problems, resolving . . . . . . . . . . . . . 10-2
Rreal-time administration data updating . . 4-31Real-Time Graph Reports . . . . . . . . . . . 5-3
attributes. . . . . . . . . . . . . . . . . . . 5-8closing . . . . . . . . . . . . . . . . . . . 7-35creating . . . . . . . . . . . . . . . . . . . 7-2maximum values . . . . . . . . . . . . . . 5-7opening . . . . . . . . . . . . . . . . . . 7-36sample . . . . . . . . . . . . . . . . . . . . 5-5saving . . . . . . . . . . . . . . . . . . . 7-34types of . . . . . . . . . . . . . . . . . . . 5-4
Real-Time Pie Chart Reports . . . . . . . . . 5-9attributes. . . . . . . . . . . . . . . . . . 5-12closing . . . . . . . . . . . . . . . . . . . 7-35creating . . . . . . . . . . . . . . . . . . . 7-7opening . . . . . . . . . . . . . . . . . . 7-36sample . . . . . . . . . . . . . . . . . . . 5-11saving . . . . . . . . . . . . . . . . . . . 7-34types . . . . . . . . . . . . . . . . . . . . 5-10
Real-Time Text Reports . . . . . . . . . . . 5-13
attributes . . . . . . . . . . . . . . . . . 5-15closing. . . . . . . . . . . . . . . . . . . 7-35creating . . . . . . . . . . . . . . . . . . 7-10opening . . . . . . . . . . . . . . . . . . 7-36sample. . . . . . . . . . . . . . . . . . . 5-14saving . . . . . . . . . . . . . . . . . . . 7-34types. . . . . . . . . . . . . . . . . . . . 5-14
recently used reports menu. . . . . . . . . 3-10reconnecting to the DEFINITY system . . . 4-7related documents . . . . . . . . . . . . . . . p-6relative time . . . . . . . . . . . . . . . . . 7-31repair database . . . . . . . . . .2-14, 2-16, 10-41report display area. . . . . . . . . . . . . . 3-14report properties . . . . . . . . . . . . . . . 3-13Report Properties menu. . . . . . . . . . . 3-10Report Properties toolbar button. . . . . . 3-13reports. . . . . . . . . . . . . . . . . . . . . . 7-2
changing properties . . . . . . . . . . . 7-37choosing the appropriate type . . . . . . 5-2closing. . . . . . . . . . . . . . . . . . . 7-35opening . . . . . . . . . . . . . . . . . . 7-36printing . . . . . . . . . . . . . . . . . . 7-38printing to a file . . . . . . . . . . . . . 7-40saving . . . . . . . . . . . . . . . . . . . 7-34See Wallboard Display ReportsSee Historical ReportsSee Real-Time Graph ReportsSee Real-Time Pie Chart reportsSee Real-Time Text ReportsSee Time Trace Reportstypes of . . . . . . . . . . . . . . . . . 5-1, 6-1
requirementsadministrative . . . . . . . . . . . . . . 1-11disk storage space . . . . . . . . . . . . 1-12hardware . . . . . . . . . . . . . . . . 1-8, 1-9non-EAS installations . . . . . . . . . . 1-11permissions. . . . . . . . . . . . . . . . 1-11software. . . . . . . . . . . . . . . . . 1-8, 1-9
resolving problems . . . . . . . . . . . . . 10-2
Ssave report . . . . . . . . . . . . . . . . . . 3-13save report as. . . . . . . . . . . . . . . . . . 3-9Save Report As menu . . . . . . . . . . . . . 3-9Save Report menu . . . . . . . . . . . . . . . 3-9Save Report toolbar button . . . . . . . . . 3-13saving a report . . . . . . . . . . . . . . . . 7-34schedule Historical Reports . . . . . . . . 3-13Schedule Historical Reports menu. . . . . 3-11Schedule Historical Reports toolbar button 3-13scheduling printing of Historical Reports. 7-39sending a display to an external wallboard. 8-3server action area . . . . . . . . . . . . . . 2-17
IN-5

Index
Server Connect toolbar button . . . . . . . 3-13Server Disconnect toolbar button . . . . . . 3-14server name . . . . . . . . . . . . . . . . . . 3-15shares . . . . . . . . . . . . . . . . . . . . . 4-14sharing . . . . . . . . . . . . . . . . . . . . . 4-14simulator mode . . . . . . . . . . . . . . . . . 2-5simulator, BCMS Vu Server . . . . . . . . . . 2-5software
compatibility . . . . . . . . . . . . . . . 1-10required . . . . . . . . . . . . . . . . . . . 1-8restrictions. . . . . . . . . . . . . . . . . 1-10
Split/Skill Historical Report. . . . . . . . . . 6-3start date . . . . . . . . . . . . . . . . . . . . 7-32starting
BCMS Vu Client software . . . . . . . . . 3-3BCMS Vu Server software . . . . . . . . . 2-3BCMS Vu Wallboard software . . . . . . 8-2
static IP address. . . . . . . . . . . . . . . 10-36status bar
Client. . . . . . . . . . . . . . . . . 3-12, 3-14Server . . . . . . . . . . . . . . . . 2-14, 2-16
Status Bar menuClient. . . . . . . . . . . . . . . . . . . . 3-12Server . . . . . . . . . . . . . . . . . . . 2-14
stop historical data download. . . . . . . . 2-13system configuration . . . . . . . . . . . . . 2-14system menu box
Client. . . . . . . . . . . . . . . . . . . . . 3-9Server . . . . . . . . . . . . . . . . . . . 2-11
Ttask manager . . . . . . . . . . . . . . . 2-9, 3-7terminate historical data download . . . . 2-15tile windows
Client. . . . . . . . . . . . . . . . . . . . 3-14Server . . . . . . . . . . . . . . . . . . . 2-15
Tile Windows toolbar button . . . . . . . . 3-14time
adjustment for daylight savings time . 4-11format of in Historical Reports . . . 6-5, 7-33
Time Trace Reports . . . . . . . . . . . . . . 5-21attributes. . . . . . . . . . . . . . . . . . 5-24characteristics of . . . . . . . . . . . . . 5-22closing . . . . . . . . . . . . . . . . . . . 7-35creating . . . . . . . . . . . . . . . . . . 7-22opening . . . . . . . . . . . . . . . . . . 7-36sample . . . . . . . . . . . . . . . . . . . 5-23saving . . . . . . . . . . . . . . . . . . . 7-34types . . . . . . . . . . . . . . . . . . . . 5-21
title barClient. . . . . . . . . . . . . . . . . . . . . 3-9Server . . . . . . . . . . . . . . . . . . . 2-11
toolbar . . . . . . . . . . . . . . . . . . . . . 2-14
Client . . . . . . . . . . . . . . . . 3-12, 3-13Server . . . . . . . . . . . . . . . . . . . 2-15
toolbar buttonClient
Cascade Windows . . . . . . . . . . 3-14Connect (to a Server) . . . . . . . . 3-13Disconnect (from a Server) . . . . . 3-14Help . . . . . . . . . . . . . . . . . . 3-14New Report. . . . . . . . . . . . . . 3-13Open Rreports . . . . . . . . . . . . 3-13Print Current Report . . . . . . . . 3-13Report Properties . . . . . . . . . . 3-13Save Report . . . . . . . . . . . . . . 3-13Schedule Historical Reports . . . . 3-13Tile Windows . . . . . . . . . . . . 3-14Wallboard Broadcast . . . . . . . . 3-13
ServerConnect . . . . . . . . . . . . . . . . 2-16Delete Records . . . . . . . . . . . . 2-16Disconnect . . . . . . . . . . . . . . 2-16Downloading Historical Data . . . 2-15Help Topics. . . . . . . . . . . . . . 2-16Repair Database . . . . . . . . . . . 2-16Terminate Download . . . . . . . . 2-15
Toolbar menu . . . . . . . . . . . . . . . . 3-12troubleshooting the data module . . . . . 10-40Trunk Historical Report. . . . . . . . . . . . 6-3
Uupdating
BCMS data . . . . . . . . . . . . . . . . 4-31real-time administration data . . . . . 4-31
VVDN Historical Report . . . . . . . . . . . . 6-3View menu
Client . . . . . . . . . . . . . . . . . . . 3-12Server . . . . . . . . . . . . . . . . . . . 2-14
Wwallboard broadcast . . . . . . . . . . . . . 3-13Wallboard Broadcast toolbar button. . . . 3-13Wallboard Display Reports . . . . . . . 5-16, 8-1
attributes . . . . . . . . . . . . . . . . . 5-20closing. . . . . . . . . . . . . . . . . . . 7-35creating . . . . . . . . . . . . . . . . . . 7-13features . . . . . . . . . . . . . . . . . . 5-17opening . . . . . . . . . . . . . . . . . . 7-36sample. . . . . . . . . . . . . . . . . . . 5-19saving . . . . . . . . . . . . . . . . . . . 7-34
IN-6

Index
Inde
x
types . . . . . . . . . . . . . . . . . . . . 5-16wallboard, external . . . . . . . . . . . . . . . 8-1
broadcasting a message . . . . . . . . . . 8-3broadcasting a message to . . . . . . . . . 8-4configure. . . . . . . . . . . . . . . . . . . 8-2displaying report . . . . . . . . . . . . . . 8-1features . . . . . . . . . . . . . . . . . . . 8-1models . . . . . . . . . . . . . . . . . . . 5-18problems. . . . . . . . . . . . . . . . . 10-24
sending a display to . . . . . . . . . . . . 8-3Window menu
Client . . . . . . . . . . . . . . . . . . . 3-12Server . . . . . . . . . . . . . . . . . . . 2-15
YYear 2000-compliant. . . . . . . . . . . 1-4, 4-10
IN-7

Index
IN-8


