22
1 Be an Expert: LX Series Controller Programming Christen Brooker Product Manager, Commercial Controllers
1
Be an Expert:
LX Series Controller Programming
Christen Brooker
Product Manager, Commercial Controllers

2
ESP-LX Series Controllers
ESP-LXME Traditionally-Wired ESP-LXD 2-Wire Decoder
ESP-LX Series Controller OptionsFeature Comparison
YesYesUpgradeable to central control satellite
508 or 12Controller base station capacity
44Number of simultaneous programs
754, 8, or 12Station module capacity
YesYesFlow, power, and station management
YesYesUpgradeable to smart controller
8
8
4
4
5
5
200
Two-Wire
Decoder
ESP-LXD
5Number of simultaneous stations per controller
5Number of simultaneous stations per program
1Number of weather sensors
4Number of programs
1Number of master valves
1 (optional)Number of flow sensors
48Maximum station capacity
Traditionally
Wired
Type of controller wiring
ESP-LXMEFeature

3
ESP-LX Series Controller Optional Cartridges Feature Comparison
NoYesNoNoProvides shared weather sensors/MVs
YesNoNoNoProvides barcode scan data entry
YesYesYesNoProvides program/configuration backup
NoYesYesNoProvides site logs and alarms to PC
NoYesYesNoProgram/manual operation from a PC
NoYesYesYesProvides program day cycle adjustments
NoYesYesYesProvides station run time adjustments
LXDLXME/LXDLXME/LXDLXME/LXDCompatible with
None
Individual
Controller
Program/
Backup
PBC-LXD
Program
Backup
Multiple
Network up
to 150
Central
Control
IQNCC
Server &
Client
Satellite
Individual
Controller
Individual
Controller
Controller/Site application
Multiple
Central
Control
IQNCC
Direct
Satellite
PagingCommunication Options
ET–Smart
Controller
Type of cartridge
ETC-LX
ET
Manager
Feature
ESP-LX Series Controller Optional Modules Feature Comparison
N/A
Factory
installed
Double
0
Adds IQ
hardwire
connections
ESP-LXD
IQCM-LXD
Connection
Module
Base
Module
Base
Module
N/AN/AReplaces
Factory
installed
Factory
installed
N/AStation
numbering
label sheet
Terminal
identification labels
DoubleDoubleSingle4 & 8 single,
12 double
Single or double
height module
ESP-LXMEESP-LXMEESP-LXDESP-LXMECompatible with
0
Adds flow
sensing and
IQ hardwire
connections
IQFSCM-
LXME Flow
Smart
Connection
Module
0
Adds flow
sensing
FSM-
LXME
Flow Smart
Module
1, 2, 3, or 41, 2, 3, or 4Installs in module slot
Increases
station
capacity by
75 stations
ESPLXD-
SM75
Station
Module
Increases
station
capacity by 4,
8, or 12
stations
Module function
ESPLXM-
SM4, SM8,
SM12 Station
Modules
Feature

4
ESP-LXD Decoder Controller
Modular Two-Wire - 50 to 200 Stations
Large Display and Extra Simple Programming
with self-prompting display in multiple languages makes
programming fast and easy; Current flow rate displayed if
optional Flow Smart Module installed. Program Review lets
you easily review programming information
Advanced Water Management Features
• Cycle+Soak™ by station
• Water Window by program
• Station Priorities • Rain Delay™
• Calendar Day Off™
• Sensor Input override by station
• Master Valve operation selectable by station
• Normally closed or open Master Valve control• Station Delay by program
• Optional Flow Sensor input
• Flow, Power, and Station Management
• Total program and station run time review
Optional Features
• Flow Smart Module
• ET Manager Cartridge
• IQ Central Control
Communication Cartridges
Enhanced Diagnostic Feedback™ with Alarm
light that is visible through the external cabinet door and
screen messages identifying conditions preventing watering;
RASTER™ wiring test identifies wiring or solenoid problems
4 Independent Programs with Stack
or overlap operation; Simultaneously operate up to 5 stations including multiple stations per
program
Contractor Default Program™
(backup program) with restore timer letsyou save a customized copy of your
programming that can be automatically
recalled up to 90-days in the future; This
allows for a temporary program for seed germination or a quick-fix if someone
accidentally changes the program
Seasonal Adjustment Percentage
by program or by month provides automaticstation run time adjustment for each month
of the year simplifying water savings

5
expandable to 48 stations in
4-station increments with
4, 8, and 12-Station expansion
modules
8 or 12-Station Base ModelOptional Flow Smart Module
add flow sensing capabilities with
Learn Flow Utility, High-Flow and
Low-Flow Detection and Reaction,
and Flow Totalizer Logs
Removable Front Panel
programmable under battery
power. Non-volatile memory
retains programming, date &
time for up to 10+ years
and Metal Pedestal constructed
of powder-coated steel.
Optional Metal Cabinet
ET Manager Smart Controller and IQ Central Control System
Communication Cartridges
Optional Communication Cartridges
with internal primary
power junction box,
bottom and back
knockouts for power, station & options wiring
Spacious Cabinet
Controller Basics
• Move switch to Bypass
if not using a weather
sensor or if you want
the controller to ignore
the sensor.
• Move switch to Active if
using a weather sensor
and you want the
controller to obey the
sensor inputs.
Weather Sensor Switch
Program Switch
• Move switch to the program you are currently programming or reviewing.
• Four programs are available (A, B, C & D). Each can utilize 8 separate start times
and can stack or overlap runtimes.

6
Auto Position
• Date & Time
• Station number
currently running
• GPM is FloWatch is
“ON”
• “FloWatch Off” if this is
set to Off.
• Any active Alarms
occurring in your
system
Display
Functions
• Add or subtract minutes for any station currently running.
• Advance the running program to the next station.
• To CANCEL the program / station running, turn dial to OFF position.
Set Current Date
• Current date and year
set in the controller.
Display
Functions
• Change the date to make it current.
• Use the + and – buttons to adjust the settings.
• Press “next” to highlight the field you want to change.
7
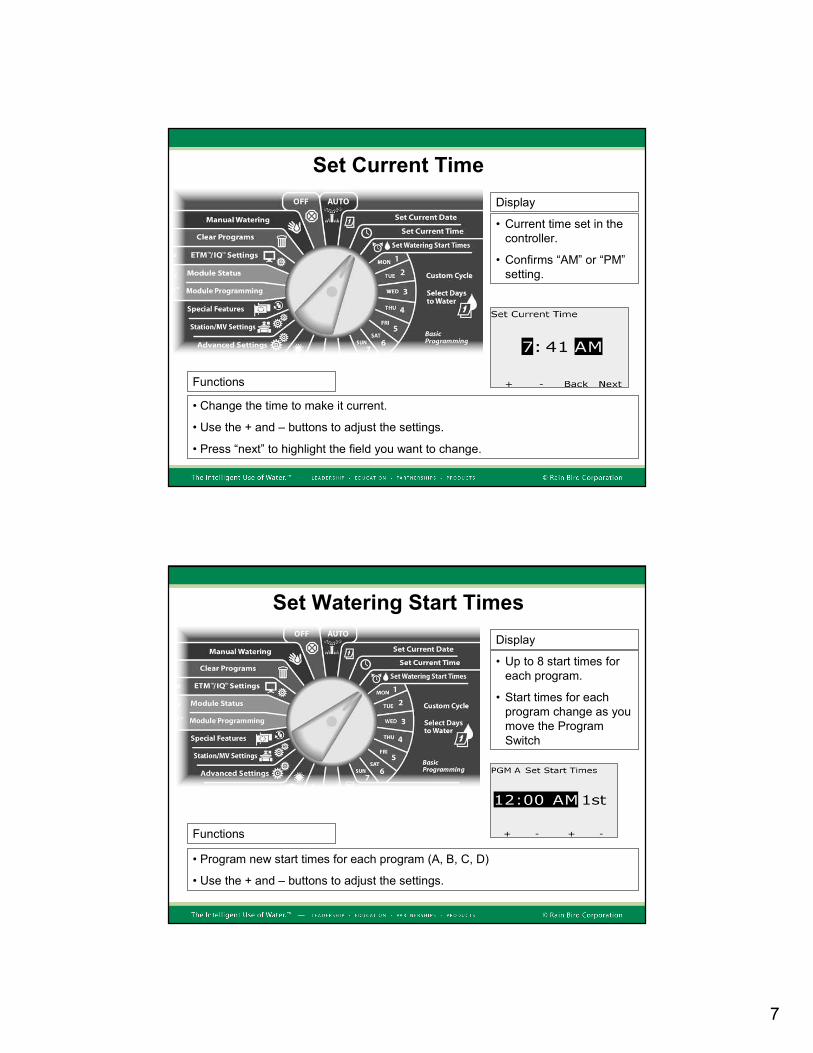
Set Current Time
• Current time set in the
controller.
• Confirms “AM” or “PM”
setting.
Display
Functions
• Change the time to make it current.
• Use the + and – buttons to adjust the settings.
• Press “next” to highlight the field you want to change.
Set Watering Start Times
• Up to 8 start times for
each program.
• Start times for each
program change as you
move the Program
Switch
Display
Functions
• Program new start times for each program (A, B, C, D)
• Use the + and – buttons to adjust the settings.

8
Set Days to Water
• The program and day of
the week being set.
• If you currently allow
watering on that day for
each program.
Display
Functions
• Schedules each day as “allow” or “prevent” for watering start times each day of
the week. (A, B, C, D)
• Repeat this for each day of the week by moving the dial to each day on the
controller.
Set Station Run Times
• The program and
station number being
set.
• Hours and minutes
each station should run.
Display
Functions
• Schedules the duration that each station should irrigate per program (A, B, C, D)
• Move program switch to the four various programs to review or set various run
times.
• Use the + and – buttons to change the station number or run time minutes.

9
Test All Stations / Check System
• Submenus to review
current programming in
controller.
Display
Benefit: Helps to troubleshoot unexpected watering behaviors and review your work!
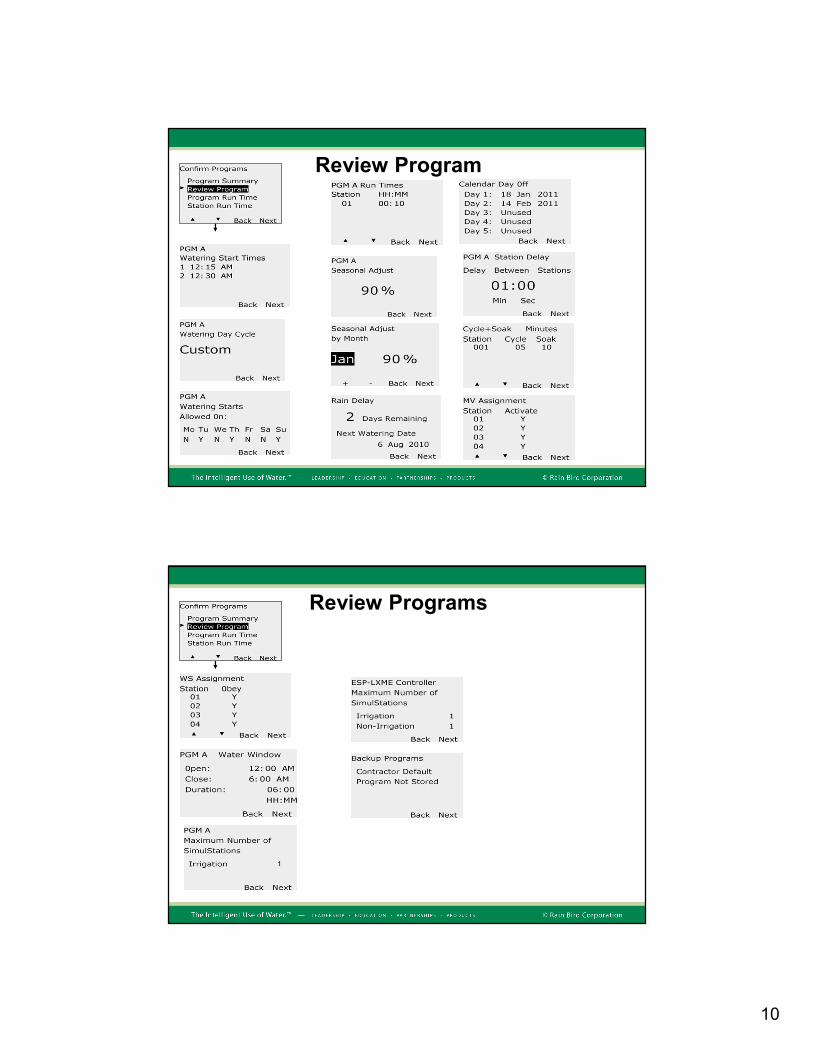
Confirm Programs
• Each of the four programs is shown – A, B, C, D.
• A run time, start time, and water day is required for a program to irrigate. This will
show you any gaps or errors in programming.
10
Review Program
Review Programs

11
Program Run Time
• Change the program switch to toggle between various program totals.
• Any stations setup to run Cycle / Soak will not display the soak time estimated,
only the total cycle time for the station.
• Total program runtime does NOT reflect stations running simultaneously if
Simulstations are designated in the controller.
Station Run Time
• Press the + and – buttons to advance to other stations.
• Any stations setup to run Cycle / Soak will not display the soak time estimated,
only the total cycle time for the station.

12
Test All Stations
• Press the + and – buttons to adjust the test run time for each station.
• Turn the dial to the “Auto” position to see the testing station and advance to the
next station in your test.
Auto Dial Position
Raster Wiring Test
• The RASTER test will begin automatically. Do not remove or insert station
modules during this process.
• Once the test is complete, the results will be displayed. The + and – buttons will
scroll through all stations to display any opens / shorts.
13
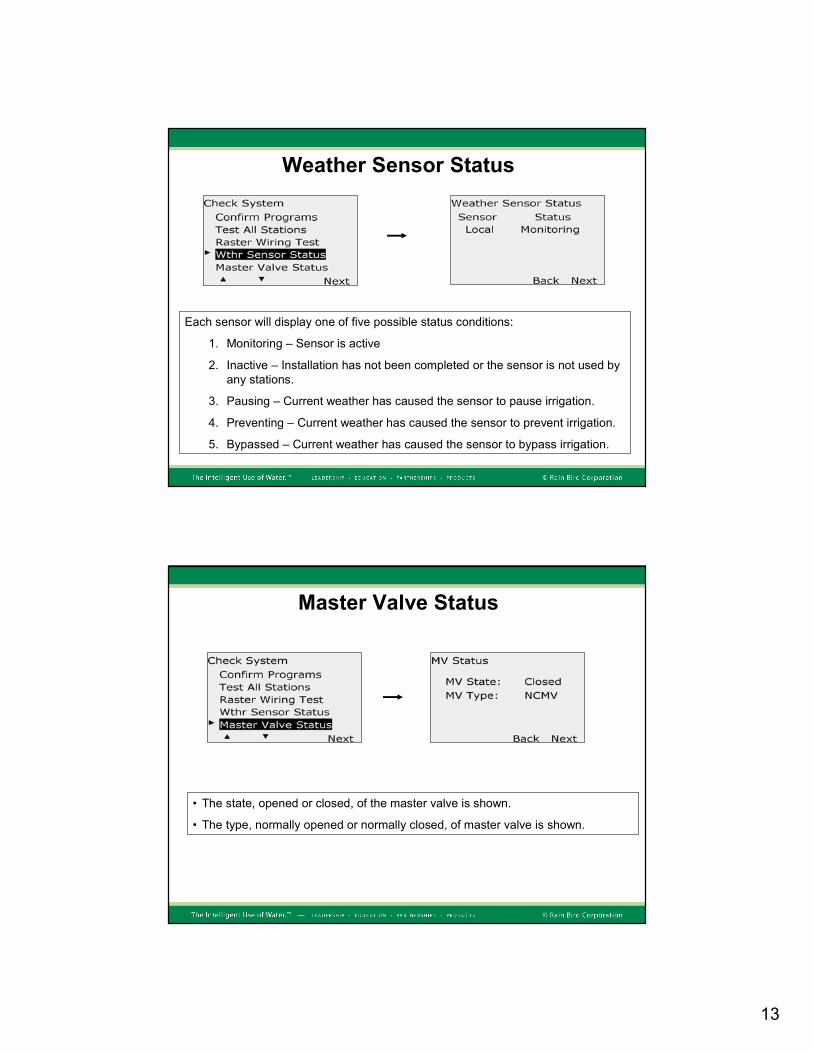
Weather Sensor Status
Each sensor will display one of five possible status conditions:
1. Monitoring – Sensor is active
2. Inactive – Installation has not been completed or the sensor is not used by
any stations.
3. Pausing – Current weather has caused the sensor to pause irrigation.
4. Preventing – Current weather has caused the sensor to prevent irrigation.
5. Bypassed – Current weather has caused the sensor to bypass irrigation.
Master Valve Status
• The state, opened or closed, of the master valve is shown.
• The type, normally opened or normally closed, of master valve is shown.

14
Seasonal Adjust
• Option to choose a
method of seasonal
adjust.
• By Program
• By Month
Display
Functions
• Setting multiple seasonal adjustments compound each other. Consider only
using one method of seasonal adjust.
• Setting seasonal adjust to 0% will cancel all irrigation.
• Do not use seasonal adjust if using an ET Manager Cartridge or IQ ET System.
Seasonal Adjust by Program
• Move the program switch to toggle between the four programs and set a
seasonal adjust for the entire program (A, B, C, D).
• Setting a seasonal adjust will increase or decrease the individual station runtimes
across all those assigned to a program. Seasonal adjust can be set between 0%-
300%. Leaving it at 100% will run the scheduled program time.
Benefit: Allows different watering schedules by program. Each program can be
designated a different plant type / soil type, etc.

15
Seasonal Adjust by Month
• First select the % to adjust each month.
Benefit: Allows different watering schedules by the month of the year.
Seasonal Adjust by Month
• Second, select the programs you want to follow the monthly % adjust. Each
program must be a “YES” or the % Adjust will not affect it.

16
Delay Watering
• Options to override
normally scheduled
irrigation.
Display
Functions
• Each setting will control if and when irrigation should occur, regardless of station
timing and start times. These override irrigation schedules.
Benefit: Control system level settings without the hassle of adjusting every station
on every program.
Rain Delay
• A system Rain Delay will affect all programs with irrigation stations. The only
stations NOT affected are those setup as “Non-Irrigation”
• Rain Delay can be set for 0-14 days. The next watering day will be shown on the
rain delay display and shown in the “Auto” dial position.
Benefit: Shut down irrigation after a heavy rain or manual watering.

17
Calendar Day Off
• Calendar days off can be selected 365 days in advance, up to 5 different days of
the year (this is a great way to turn off irrigation for an outdoor event)
• This will affect ALL programs and stations, including Non-Irrigation stations.
Benefit: Don’t worry about people getting wet during special events. Plan them in
advance!
Program Water Window
• A water window will only allow irrigation to occur within the set time frame.
Irrigation scheduled outside of the water window, or still remaining from the last
cycle, will be PAUSED and will resume when the window opens again.
• Ideally, all irrigation occurs within the set water window.
18
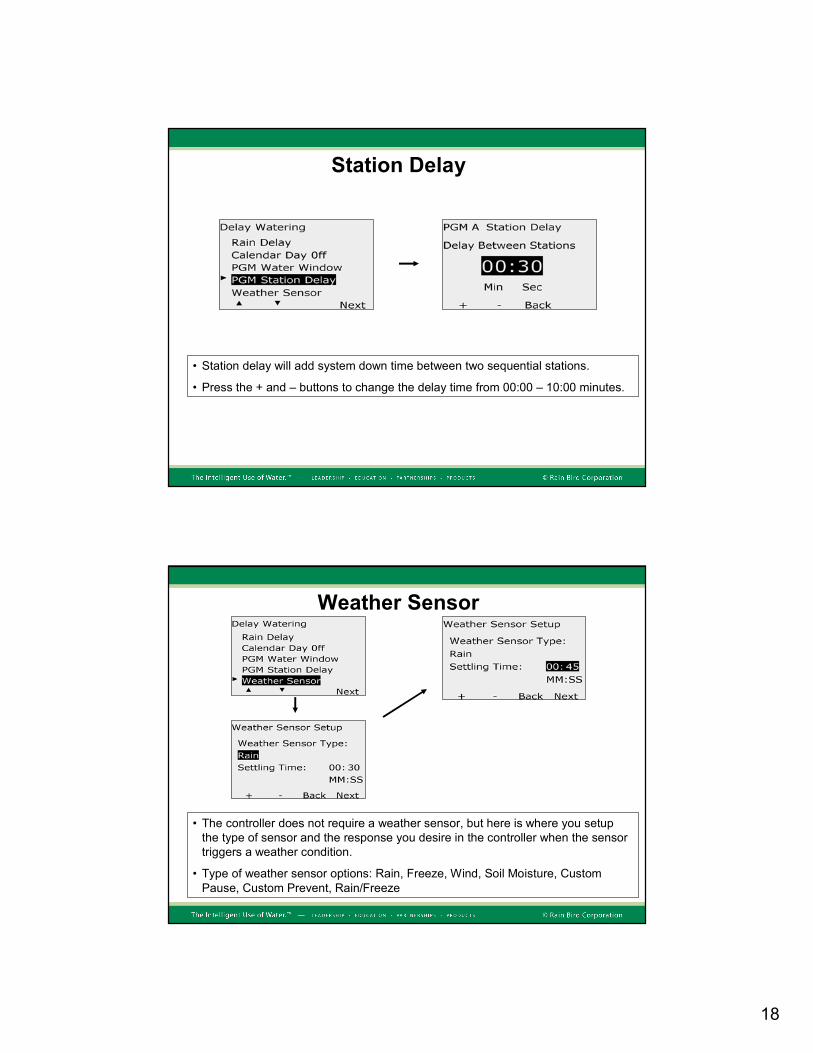
Station Delay
• Station delay will add system down time between two sequential stations.
• Press the + and – buttons to change the delay time from 00:00 – 10:00 minutes.
Weather Sensor
• The controller does not require a weather sensor, but here is where you setup
the type of sensor and the response you desire in the controller when the sensor
triggers a weather condition.
• Type of weather sensor options: Rain, Freeze, Wind, Soil Moisture, Custom
Pause, Custom Prevent, Rain/Freeze

19
Advanced Settings
• Settings Include:
• Day Cycles
• Simulstations
• FloManager
Display
Functions
• The number of simultaneous stations to run at once can be set for the controller
and each program.
• FloManager can be programmed from here.
Benefit: Running multiple stations will cut down the total watering time!
Watering Cycle
• Custom Days / Week will review and change programming days scheduled on
the right hand of the dial. If these are already set, be careful if you change them.
• Cyclical days will allow you to program a number of days between watering.
“Water every X days” and give you a start date to begin the cycle.
• Move the program switch to toggle between the four programs and set days to
water for each.
20
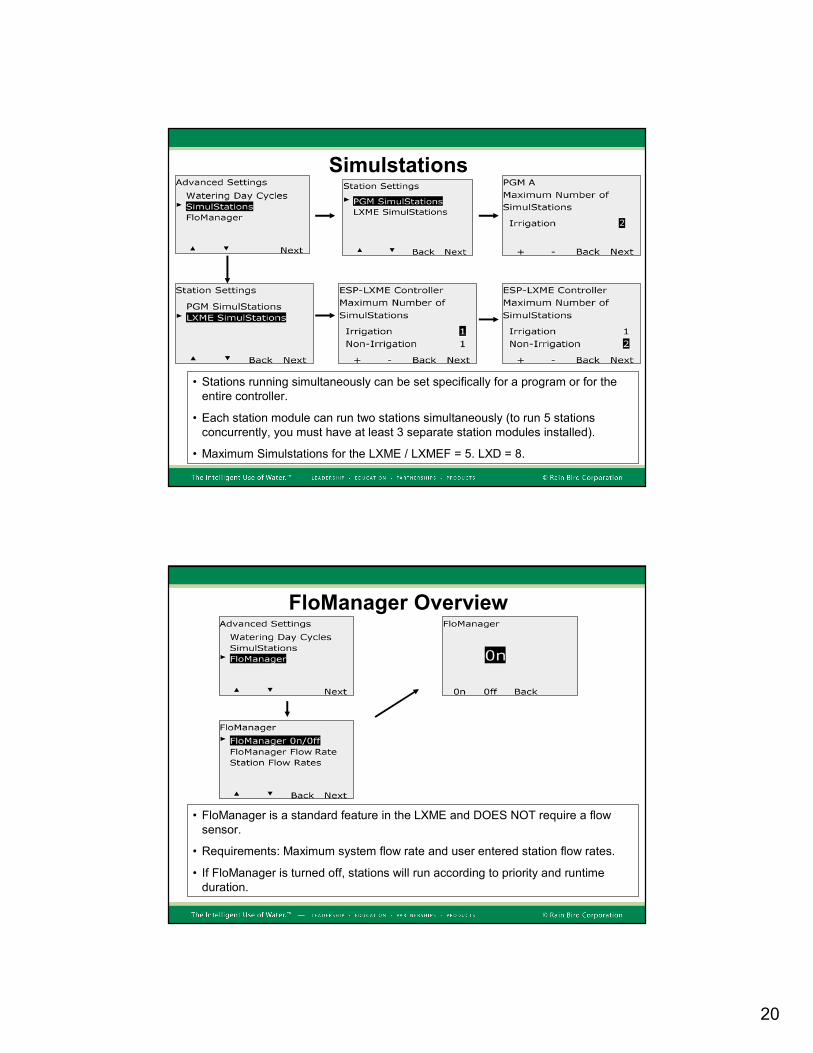
Simulstations
• Stations running simultaneously can be set specifically for a program or for the
entire controller.
• Each station module can run two stations simultaneously (to run 5 stations
concurrently, you must have at least 3 separate station modules installed).
• Maximum Simulstations for the LXME / LXMEF = 5. LXD = 8.
FloManager Overview
• FloManager is a standard feature in the LXME and DOES NOT require a flow
sensor.
• Requirements: Maximum system flow rate and user entered station flow rates.
• If FloManager is turned off, stations will run according to priority and runtime
duration.
21
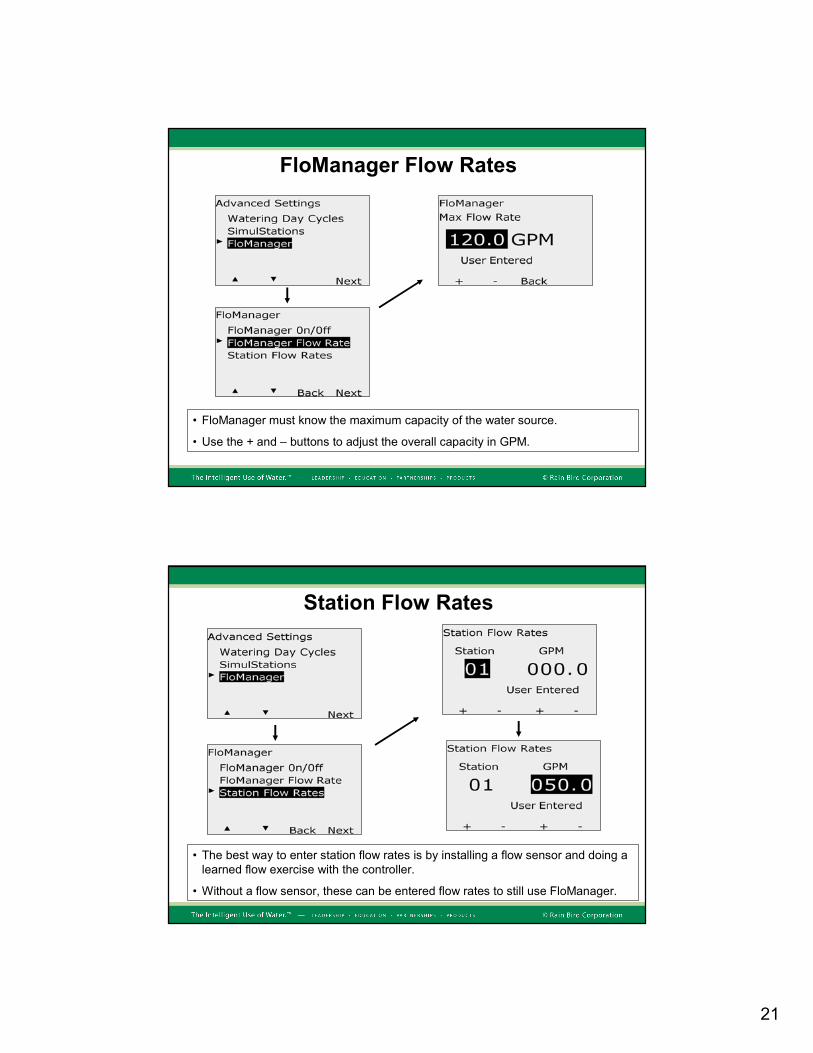
FloManager Flow Rates
• FloManager must know the maximum capacity of the water source.
• Use the + and – buttons to adjust the overall capacity in GPM.
Station Flow Rates
• The best way to enter station flow rates is by installing a flow sensor and doing a
learned flow exercise with the controller.
• Without a flow sensor, these can be entered flow rates to still use FloManager.

22
Station / MV Settings
• Set station priorities
• Use cycle/soak for
sloping areas
• Set cycling for a NOMV
Display
Functions
• Module status will indicate the location and recognition of each station module.
• Station priorities will determine the order in which the stations run. They do not
necessarily run sequentially in order.
• Cycle / Soak should be used to schedule a long irrigation time split up into
multiple shorter runtimes…for areas with difficult soil or sloping hills.
Station Settings
• Enter details for each station setup.
• Set the station priority. Non-Irrigation is the highest priority.
• Specify the master valve and weather sensor for each station.


