80

BEST PRACTICES IN HYSTEROSCOPIC TRAINING
A Tutorial Based on the EVE Realistic Simulator for Hysteroscopy
Marcos Aulete Ribeiro LYRA, M.D.
ProDelphus ltda ME, Pernambuco, Brazil
®

4 Best Practices in Hysteroscopic Training – A Tutorial Based on the EVE Realistic Simulator for Hysteroscopy
Best Practices in Hysteroscopic TrainingA Tutorial Based on the EVE Realistic Simulator for Hysteroscopy
Marcos Aulete Ribeiro Lyra, M.D.ProDelphus ltda ME, Pernambuco, Brazil
Address for correspondence: Marcos A.R. Lyra, M.D.General Manager, ProDelphus ltda ME,Rua Alfeu Rabelo, 169Casa Caiada – OlindaPernambuco, BrazilCEP 53.130-420Phone: +81 34316148Fax: +81 34316148www.prodelphus.comE-mail: [email protected]
All rights reserved.© 2015 ® GmbHP.O. Box, 78503 Tuttlingen, GermanyPhone: +49 (0) 74 61/1 45 90Fax: +49 (0) 74 61/708-529E-mail: [email protected]
No part of this publication may be translated, re-printed or reproduced, transmitted in any form or by any means, electronic or mechanical, now known or hereafter invent ed, including photocopying and recording, or utilized in any information storage or retrieval system without the prior written permission of the copyright holder.
Editions in languages other than English and German are in preparation. For up-to-date information, please contact
® GmbH at the address shown above.
Design and Composing:® GmbH, Germany
Printing and Binding:Straub Druck + Medien AGMax-Planck-Straße 17, 78713 Schramberg, Germany
09.15-0.5
Important notes:
Medical knowledge is ever changing. As new research and clinical experience broaden our knowledge, changes in treat ment and therapymay be required. The authors and editors of the material herein have consulted sources believed to be reliable in their efforts to provide information that is complete and in accord with the standards accept ed at the time of publication. However, in view of the possibili ty of human error by the authors, editors, or publisher, or changes in medical knowledge, neither the authors, editors, publisher, nor any other party who has been involved in the preparation of this booklet, warrants that the information contained herein is in every respect accurate or complete, and they are not responsible for any errors or omissions or for the results obtained from use of such information. The information contained within this booklet is intended for use by doctors and other health care professionals. This material is not intended for use as a basis for treatment decisions, and is not a substitute for professional consultation and/or use of peer-reviewed medical literature.
Some of the product names, patents, and re gistered designs referred to in this booklet are in fact registered trademarks or proprietary names even though specifi c reference to this fact is not always made in the text. Therefore, the appearance of a name without designation as proprietary is not to be construed as a representation by the publisher that it is in the public domain.
The use of this booklet as well as any implementation of the information contained within explicitly takes place at the reader’s own risk. No liability shall be accepted and no guarantee is given for the work neither from the publisher or the editor nor from the author or any other party who has been involved in the preparation of this work. This particularly applies to the content, the timeliness, the correctness, the completeness as well as to the quality. Printing errors and omissions cannot be completely excluded. The publisher as well as the author or other copyright holders of this work disclaim any liability, particularly for any damages arising out of or associated with the use of the medical procedures mentioned within this booklet.
Any legal claims or claims for damages are excluded.
In case any references are made in this booklet to any 3rd party publication(s) or links to any 3rd party websites are mentioned, it is made clear that neither the publisher nor the author or other copyright holders of this booklet endorse in any way the content of said publication(s) and/or web sites referred to or linked from this booklet and do not assume any form of liability for any factual inaccuracies or breaches of law which may occur therein. Thus, no liability shall be accepted for content within the 3rd party publication(s) or 3rd party websites and no guarantee is given for any other work or any other websites at all. ISBN 978-3-89756-456-5

5Best Practices in Hysteroscopic Training – A Tutorial Based on the EVE Realistic Simulator for Hysteroscopy
Content
1.0 Introduction to Realistic Simulation . . . . . . . . . . . . . . . . . . 71.1 A Hands-On Training Concept . . . . . . . . . . . . . . . . . . . . . . . . . 71.2 The R. E. S. T. Simulators (Realistic Endo Surgical Trainers) . . . 7
2.0 Assembly of the EVE Hysterotrainer . . . . . . . . . . . . . . . . . . 92.1 Maintaining Cleanliness at the Training Site . . . . . . . . . . . . . 11
3.0 Standardized Hands-On Training Using Simulators . . . . . 133.1 Importance of a Standardized Teaching Method in
Hysteroscopic Training . . . . . . . . . . . . . . . . . . . . . . . . . . . . . 13a) Familiarity with Instruments and Units . . . . . . . . . . . . . . . 13b) Pace of Movements . . . . . . . . . . . . . . . . . . . . . . . . . . . . . 14c) Range of Motion . . . . . . . . . . . . . . . . . . . . . . . . . . . . . . . 14d) Adherence to Discipline . . . . . . . . . . . . . . . . . . . . . . . . . . 14
3.2 Training of Standard Procedures . . . . . . . . . . . . . . . . . . . . . 15
4.0 Visual Cues for Intrauterine Spatial Orientation . . . . . . . . 17a) ‘Principle of Proportionality’ or ‘Familiar Size Cue’ . . . . . . 17b) Determination of Depth . . . . . . . . . . . . . . . . . . . . . . . . . . 17c) Angle of View . . . . . . . . . . . . . . . . . . . . . . . . . . . . . . . . . 18d) Keeping the Camera in a Fixed Position . . . . . . . . . . . . . . 18e) Panoramic Vision . . . . . . . . . . . . . . . . . . . . . . . . . . . . . . . 19f) Mirrored View . . . . . . . . . . . . . . . . . . . . . . . . . . . . . . . . . 19g) Constant Identifi cation of More Than One Anatomical
Structure . . . . . . . . . . . . . . . . . . . . . . . . . . . . . . . . . . . . . 194.1 Summary of Learning Objectives . . . . . . . . . . . . . . . . . . . . . 19
5.0 Introduction to Hysteroscopic Surgical Techniques . . . . . 215.1 Dynamic Vaginohysteroscopy . . . . . . . . . . . . . . . . . . . . . . . . 215.2 Biopsy Sampling . . . . . . . . . . . . . . . . . . . . . . . . . . . . . . . . . 21
a) Biopsy Through Traction and Countertraction . . . . . . . . . . 21b) Biopsy Excision Using Scissors . . . . . . . . . . . . . . . . . . . . 22c) Biopsy through Electrosurgery . . . . . . . . . . . . . . . . . . . . . 22
5.3 General Principles of Resection . . . . . . . . . . . . . . . . . . . . . . 23a) Surgical Planning and Subdivision into a Sequence of
Steps . . . . . . . . . . . . . . . . . . . . . . . . . . . . . . . . . . . . . . . 23b) Fixation of the Cervix . . . . . . . . . . . . . . . . . . . . . . . . . . . 23c) Margin of the Plane of Resection . . . . . . . . . . . . . . . . . . . 23d) Uniformity of Cutting . . . . . . . . . . . . . . . . . . . . . . . . . . . . 24e) Sequential Methodology . . . . . . . . . . . . . . . . . . . . . . . . . 24f) Unidirectional Trajectory of Cut . . . . . . . . . . . . . . . . . . . . . 24g) Direct Hysteroscopic Vision . . . . . . . . . . . . . . . . . . . . . . . 24
5.4 Recommended Protocol of Standard Exercises in Endometrial Ablation . . . . . . . . . . . . . . . . . . . . . . . . . . . . . . 25
6.0 Hands-on Training of Myomectomy and Related Techniques . . . . . . . . . . . . . . . . . . . . . . . . . . . . . . . . . . . . . 27
6.1 Special Maneuvers . . . . . . . . . . . . . . . . . . . . . . . . . . . . . . . . 27a) Devascularization . . . . . . . . . . . . . . . . . . . . . . . . . . . . . . 27b) Hydrodynamic Massage . . . . . . . . . . . . . . . . . . . . . . . . . 28c) Divulsion . . . . . . . . . . . . . . . . . . . . . . . . . . . . . . . . . . . . . 29d) Bipartition or Quadripartition . . . . . . . . . . . . . . . . . . . . . . 30e) Removal of Myoma from Lateral Implantation Site . . . . . . 31f) Slicing Technique . . . . . . . . . . . . . . . . . . . . . . . . . . . . . . . 32g) Lateral Cut . . . . . . . . . . . . . . . . . . . . . . . . . . . . . . . . . . . 33h) Lever . . . . . . . . . . . . . . . . . . . . . . . . . . . . . . . . . . . . . . . 34i) Mechanical Traction and Countertraction . . . . . . . . . . . . . 35j) Vaporization . . . . . . . . . . . . . . . . . . . . . . . . . . . . . . . . . . . 36k) Retrograde Cutting . . . . . . . . . . . . . . . . . . . . . . . . . . . . . 37l) Tunneling . . . . . . . . . . . . . . . . . . . . . . . . . . . . . . . . . . . . . 38m) Morcellation . . . . . . . . . . . . . . . . . . . . . . . . . . . . . . . . . . 39
6.2 Current Range of Neoderma® Uterus Models and Designated Procedures/Maneuvers . . . . . . . . . . . . . . . . . . . 40
7.0 Survey of Artifi cial Uterus Models – Designated Standard Procedures with Corresponding Level of Diffi culty . . . . . . . . . . . . . . . . . . . . . . . . . . . . . . . . . . . . . . . 41
7.1 Course Level: Basic . . . . . . . . . . . . . . . . . . . . . . . . . . . . . . . 41Recommended instrumentation: . . . . . . . . . . . . . . . . . . . . . 41a) Uterus Model ETH7-AM/2G . . . . . . . . . . . . . . . . . . . . . . . 41b) Uterus Model ETH7-GEST/2G . . . . . . . . . . . . . . . . . . . . . 41c) Uterus Model ETH7–2P/2G . . . . . . . . . . . . . . . . . . . . . . . 42d) Uterus Model ETH7–4P/2G . . . . . . . . . . . . . . . . . . . . . . . 42e) Uterus Model ETH7-S/2G . . . . . . . . . . . . . . . . . . . . . . . . 42f) Uterus Model ETH7-PS/2G . . . . . . . . . . . . . . . . . . . . . . . . 42
7.2 Course Level: Advanced . . . . . . . . . . . . . . . . . . . . . . . . . . . . 43Recommended Simulator, Hysteroscopes and Instrumentation: . . . . . . . . . . . . . . . . . . . . . . . . . . . . . . . . . 43g) Uterus Model ETH7-ADH/2G . . . . . . . . . . . . . . . . . . . . . . 43h) Uterus Model ETH7-ADM/2G . . . . . . . . . . . . . . . . . . . . . . 43i) Uterus Model ETH7-MT0T1/2G . . . . . . . . . . . . . . . . . . . . . 44j) Uterus Model ETH7-MT0T2/2G . . . . . . . . . . . . . . . . . . . . . 44k) Uterus Model ETH7-HYP/2G . . . . . . . . . . . . . . . . . . . . . . 44l) Uterus Model ETH7-ADC/2G . . . . . . . . . . . . . . . . . . . . . . . 44m) Uterus Model ETH9/2G . . . . . . . . . . . . . . . . . . . . . . . . . . 45n) Uterus Model ETH 8 (developed by Marcos Lyra) . . . . . . . 45
References . . . . . . . . . . . . . . . . . . . . . . . . . . . . . . . . . . . . . . . . . . 46
Recommended Instruments and Equipment . . . . . . . . . . . . . . . . 47

Best Practices in Hysteroscopic Training – A Tutorial Based on the EVE Realistic Simulator for Hysteroscopy6
This manual summarizes the essence of the author’s ex-perience as a tutor in the fi eld of endoscopic training since the inception of the fi rst realistic simulator for hysteroscopy in 2002.
Carefully going through the content of this tutorial and practicing on the EVE hysterotrainer in order of diffi culty and complexity will establish in the learner’s mind the basic principles, concepts and maneuvers used in various
procedures of diagnostic and operative hysteroscopy. The trainee is encouraged to shape attitudes, readjust habits and develop new skills that subsequently need to be trans-lated into routine ambulatory or clinical practice. In former times, this could only be achieved by performing real pro-cedures on live patients or human cadavers, which is now feasible by practicing on a realistic life size simulator.
Marcos Lyra
Marcos Lyra, Bachelor of Medicine from the Federal Uni-versity of Pernambuco (Brazil), is a specialist in obstetrics, gynecology, laparoscopy and hysteroscopy. He is an active member of the Brazilian Federation of Gynecology and Obstetrics (FEBRASGO) and the Brazilian Society of Laparoscopic Surgery (SOBRACIL).
Being the CEO of Pro Delphus Surgical Simulators, Marcos Lyra developed and introduced to the market the EVE sys-tem of realistic simulation for hysteroscopy and laparos-copy. He is an educational researcher of adaptive learning and training systems and works in close cooperation with various Brazilian and foreign universities.
Preface
About the Author

7Introduction to Realistic Simulation
Based on the breadth and depth of our expertise as teachers, we draw upon years of experience with realistic simulators. As a result, we have developed and compiled a series of standardized practices, that can be performed in the same way as in a real patient scenario. For those who are interested in learning new techniques, we have set up simplifi ed and standardized procedural principles and concepts. This step-by-step tutorial is intended to serve as a guideline for the student to facilitate the transition from simulation training to real hysteroscopic procedures.
In hands-on training courses, the use of modern and ef-fective teaching methods is geared towards enabling our students to develop a level of skills that allows them to reproduce exercises in a similar or superior manner as presented by a tutor. A good teacher should be able to interact at a student’s level, while the opposite is rarely seen. Modernization of endoscopic training demands the adoption of modern, safe and ethical methods. Great
teachers constantly strive to learn new teaching methods that promote behavioral changes in their trainees.
Don. A. Blackerby, Professor of Neurolinguistics, held a course titled “Rediscover the Joy of Learning.” This slogan in itself connotes the need to review our teaching principles and promotes the development of a safe and effective method suited to build skills and facilitate a change of attitudes that are later translated in the routine practice of a trainee. The success achieved at the end of a course must refl ect what has been imprinted in the mind of the learner. Right from the start, the trainee should be encouraged to become an enthusiastic learner. Being a student or just attending classes does not make a trainee an ardent follower of principles. A true disciple follows and reproduces the lessons and has pleasure in doing so. An ideal professor must have the ability to make disciples; or classes will be full of listeners, only.
1.1 A Hands-On Training ConceptA Chinese proverb says:
The teaching of surgical techniques demands more than holding theoretical lectures. From the author’s point of view, the revision and updating of training courses and
demonstration models used for this purpose is overdue. Ex-cathedra training courses, in which experts speak end-lessly to a passive audience unable to repeat the demon-strated maneuvers are already long outdated.
The hands-on training concept has marked a new teaching era, especially when it comes to surgical training.
1.2 The R. E. S. T. Simulators (Realistic Endo Surgical Trainers)In mid-2001, gynecological endoscopy was observed with critical eyes, by the author, to what at the time represented the laparoscopic and hysteroscopic teaching model. A course of diagnostic and operative hysteroscopy involv-ing the use of the resectoscope was drawn up, while at the same time, there was a quest for new training options that obviated the use of human cadaver specimens. How is it possible to practice hysteroscopy without the need for having available a human uterus?
Many attempts in creating models of an artifi cial uterus have already been made. Uteruses composed of synthetic material, ceramic, rubber, silicone, and other materials, al-lowed the creation of a mock-up of the uterine cavity and the replication of some endometrial pathologies, however it was not possible to resect or cauterize. Furthermore, tactile sensations within the uterine cavity, upon contact with tumors or other lesions, were all but impossible. It was at this moment that the biological model labeled as ETH8 was created. The underlying concept on which this model was based proved to be a milestone and benchmark for
subsequent solutions offered to hundreds of courses worldwide. Observations and feedback of KARL STORZ experts was instrumental in the enhancement and rede-sign of other models used for various training purposes.
When it comes to specifi c surgical procedures, it is pos-sible to practice endometrial ablations with a resectoscope using monopolar or bipolar high frequency current. Tumor removal can also be trained by simulating maneuvers re-quired for polypectomy and myomectomy.
However, in view of the biological material intended for use with the model, there were a few drawbacks with the ETH8 uterus, mainly associated with complicated export procedures imposed by sanitary and hygienic regulations applicable in various countries. This problem was resolved with the change from biological to synthetic material. After seven years of research and development, SURGICAL NEODERMA® was introduced on the market.
“The art of learning leads to the pleasure of teaching”.
“I hear and I forget. I see and I remember. I do and I learn!”
1 Introduction to Realistic Simulation

Best Practices in Hysteroscopic Training – A Tutorial Based on the EVE Realistic Simulator for Hysteroscopy8
Neoderma® is a product that allows the creation of an anatomical model simulating and mimicking the inherent properties and outer structure of a real uterus, which, in fact, is not feasible when using a cow’s tongue for this purpose. Neoderma® – a thermoretractable rubber that is composed of eight different polymers – permits the artifi cial emulation of human organs, which today are a core component of all trainers designated as R. E. S. T. The fi rst realistic hysteroscopy trainer that accommo-dated an artifi cial uterus was named EVE. This tutorial describes the advantages offered by the use of such an endotrainer.
The EVE Trainer, similar to a life size fl ight simulator, is a versatile, dynamic tool that is completely different from virtual simulators, where most visual components are dis-played on a screen using computer graphics.
These special features underpin the differences between the use of a virtual simulator only and a life size mannequin.
EVE permits touch and depth sensation and allows the production of anatomical images of tissues mimicking those seen in humans. Apart from that, the trainer permits the use of the same instruments as in a real surgical situ-ation and makes it possible to add multiple pathologies to the artifi cial anatomical structures utilized for training purposes.
Fig. 1.1 ETH8 – Artifi cial uterus, fashioned by use of a cow’s tongue.
� In Brazil, the use of an artifi cial uterus (ETH8) in op-erative hysteroscopy training courses was introduced in 2001 and proved to be a viable new option suited to replace the use of cadaver specimens of human origin.
� The ETH8 is placed in the EVE ETH/2G trainer. It al-lows for any type of hysteroscopic training, diagnostic or operative, in a similar way as with a human uterus cadaver specimen.
Fig. 1.2 ETH/2G – EVE Hysteroscopic Simulator II Generation (26343)

9Assembly of the EVE Hysterotrainer
Two types of vagina models are available for use with the EVE Hysterotrainer:
� a small-sized vagina (ETH4/2G) for training with a resectoscope,
� a longer vagina (ETH5/2G, recommended for use with small-caliber hysteroscopes) for training vaginohys-teroscopy.
2 Assembly of the EVE Hysterotrainer
Fig. 2.1 The EVE simulator ETH/2G comprises a neutral electrode pad with a connecting cable that is plugged into a designated socket at the AUTO-CON® high frequency (HF) unit. Care must be taken that the other connecting cable – coming from the EVE system – be plugged in the socket of the pad that has been attached to the AUTOCON® HF unit. This is most important, when using biological material with a monopolar circuitry system.
a b
Fig. 2.2a,b Artifi cial uterus ETH7/2G (a) and vagina ETH5/2G (b).

Best Practices in Hysteroscopic Training – A Tutorial Based on the EVE Realistic Simulator for Hysteroscopy10
The item number of each type of Neoderma® vagina is shown on the back side.
There are various uterus models that are designed for train-ing specifi c procedures. At the end of this tutorial, pictures are shown of each uterus model, and recommendations are given regarding the level of training they are suggested for. Subject to the type of use, a gross distinction is made between diagnostic procedures – performed with scissors or forceps during vaginohysteroscopy – and operative pro-cedures, performed with a resectoscope and involving the use of electrosurgery.
Some uterus models can be used in a ‘hybrid state’, i. e., that the Neoderma® model serves as a base that can be loaded with biological material for training electrosurgical procedures with a monopolar or bipolar resectoscope. The assembly instruction of these models is the following:
Fig. 2.3 The opening of the vagina ETH5/2G is located on the back. This is where the artifi cial uterus model and the simulator’s neutral electrode are introduced.
a b
c d
Fig. 2.4 The ETH9/2G is an artifi cial uterus especially equipped with openings that may be used to introduce biological specimens. The use of chicken hearts is recommended to simulate a condition involving the presence of polyps. The presence of myomas can be simulated by the use of bovine tendon or penis, if available. Another option is the use of a swine foot, because of its white color and fi brous texture (a). Using scissors, a circumfer-ential cut is made on the specimen, that will later be implanted in the Neoderma® uterus (b). The chicken heart is attached to the uterine wall with the circumferential cut serving as a notch (c). To avoid leaks, the specimen must be attached to the Neoderma® uterus using a quick-setting glue, such as Loctite® (SuperBond or ThreeBond). This helps the internal portion that needs to be resected to maintain its original position (d).

Assembly of the EVE Hysterotrainer 11
2.1 Maintaining Cleanliness at the Training Site
a b
c d
Fig. 2.5 The specimen should be dried using a clean towel or compress before being glued because otherwise humidity of the meat will impede proper adhesion (a). Once the specimen has been affi xed, the uterus is mounted on a special metal fi tting delivered with the simulator. Care should be taken that the specimen is in contact with the fi tting. The connector of the fi tting must be plugged in one of the sockets of the neutral electrode pad, which is attached to the AUTOCON® HF generator using a connecting cord commonly supplied by the manufacturer of the unit (b). The uterus and neutral electrode set should be introduced from the rear side of the vagina, dilating the Neoderma® model until the cervix is shown to assume its proper anatomical position (c). Endovaginal view with the cervix in its place (d).
Fig. 2.6 EVE is a hysterotrainer that allows realistic training of endometrial abla-tion, myomectomy, and polypectomy. Using specifi c models made of Neoderma®, it is possible to fashion a customized artifi cial uterus that incorporates pathologies of the endometrial cavity, including synechiae, malformations, fi broids, adeno-myosis and neoplasms (a). A 100-liter plastic bag, attached with tape to the EVE trainer, allows the fl uid – simulating the distension medium – to be drained into a receptacle (b).a
b

13Standardized Hands-On Training Using Simulators
It is not enough in hands-on training to provide participants with an endotrainer and an artifi cial uterus model that al-lows the simulation of the presence of pathologies. The trainees should also be instructed about standardized algorithms and training sequences specifi cally designed to gradually increase the level of diffi culty. As a matter of course, hands-on training sessions should take place im-mediately after completion of theoretical lessons.
It is not an easy task at all to teach endoscopic maneuvers to gynecologists who are already familiar with the use of conventional techniques. The force exerted on the mate-rial, the speedy pace of surgical maneuvers and the size of instruments used in an open surgery approach, are ad-ditional sources of diffi culty when presenting a minimally invasive technique using micro-instruments. The earlier a young gynecologist decides to attend a hands-on training course of hysteroscopy, the faster desired results will be achieved.
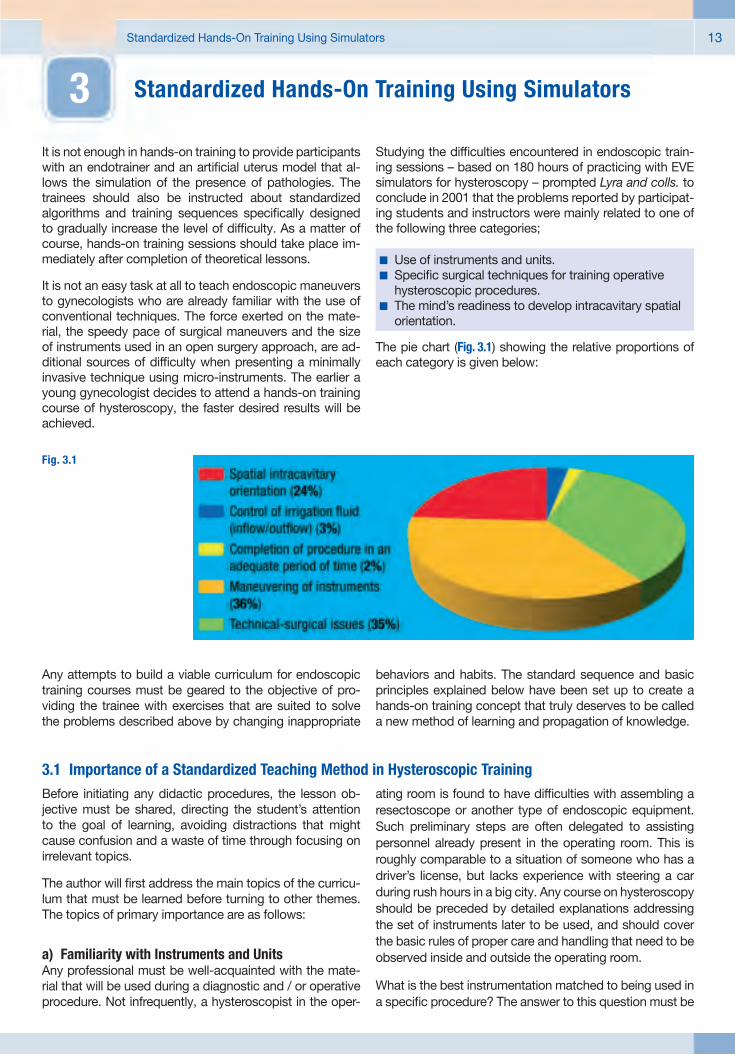
Studying the diffi culties encountered in endoscopic train-ing sessions – based on 180 hours of practicing with EVE simulators for hysteroscopy – prompted Lyra and colls. to conclude in 2001 that the problems reported by participat-ing students and instructors were mainly related to one of the following three categories;
The pie chart (Fig. 3.1) showing the relative proportions of each category is given below:
� Use of instruments and units.� Specifi c surgical techniques for training operative
hysteroscopic procedures.� The mind’s readiness to develop intracavitary spatial
orientation.
3 Standardized Hands-On Training Using Simulators
Fig. 3.1
Any attempts to build a viable curriculum for endoscopic training courses must be geared to the objective of pro-viding the trainee with exercises that are suited to solve the problems described above by changing inappropriate
behaviors and habits. The standard sequence and basic principles explained below have been set up to create a hands-on training concept that truly deserves to be called a new method of learning and propagation of knowledge.
3.1 Importance of a Standardized Teaching Method in Hysteroscopic TrainingBefore initiating any didactic procedures, the lesson ob-jective must be shared, directing the student’s attention to the goal of learning, avoiding distractions that might cause confusion and a waste of time through focusing on irrelevant topics.
The author will fi rst address the main topics of the curricu-lum that must be learned before turning to other themes. The topics of primary importance are as follows:
a) Familiarity with Instruments and UnitsAny professional must be well-acquainted with the mate-rial that will be used during a diagnostic and / or operative procedure. Not infrequently, a hysteroscopist in the oper-
ating room is found to have diffi culties with assembling a resectoscope or another type of endoscopic equipment. Such preliminary steps are often delegated to assisting personnel already present in the operating room. This is roughly comparable to a situation of someone who has a driver’s license, but lacks experience with steering a car during rush hours in a big city. Any course on hysteroscopy should be preceded by detailed explanations addressing the set of instruments later to be used, and should cover the basic rules of proper care and handling that need to be observed inside and outside the operating room.
What is the best instrumentation matched to being used in a specifi c procedure? The answer to this question must be

Best Practices in Hysteroscopic Training – A Tutorial Based on the EVE Realistic Simulator for Hysteroscopy14
given to the learner prior to beginning any practical train-ing, because adequate planning and proper handling of instruments is of paramount importance for success. Any learner must fully understand the signifi cance of acquir-ing familiarity with all instruments used in the course of an operative procedure.
In a patient who appears to have an atrophic and narrowed cervix, attempting to widen the cervical opening with dila-tors to facilitate introduction of a resectoscope may prove to be a mistake. In these cases, vaginohysteroscopy by use of a 2.0 or 2.9-mm hysteroscope would be the best option. However, attempting to remove tumors of more than 2 cm in diameter through a vaginohysteroscopic ap-proach could complicate and prolong a procedure, that otherwise would be of low complexity if a resectoscope was used instead.
Endoscopic instruments and equipment cannot be han-dled in the same manner as conventional medical devices. Endoscopes and videoendoscopic components are fragile and costly. Instruments, like micro-scissors, biopsy and grasping forceps, need to be handled with special care during a surgical procedure. This also applies to cleaning and reprocessing of endoscopes and instruments, which is why some professionals enjoy the advantage of operating with the same devices for years while others are constantly faced with the need to renew them.
b) Pace of MovementsThe surgeon must be aware of the pace of movements at which hysteroscopes and instruments are used. It can be said that “The faster a hysteroscope is used, the more a hysteroscopic procedure will be protracted. The slower the movements, the better the chances for a maneuver not to be repeated”.
c) Range of MotionApart from the importance of working at a reduced pace, the range of motion is another important issue that deserves to be discussed (Fig. 3.2). Most commonly, a hysteroscope of 35 cm in length is used. Once the cervical canal has been passed, an overall picture of the intrauterine cavity is obtained by panning with the hysteroscope from one side to the other. On account of the site of the ‘pivot point’, the internal movements will be much smaller than those con-ducted outside the patient’s body. Based on the fact that the cervix is the ‘pivot point’, the uterine cavity commonly takes up an average of 7–8 cm from the 35 cm, which is the total length of a standard hysteroscope. The portion that is introduced in the intrauterine cavity is much shorter than the exterior portion, from where the scope is guided using the cervix as a fulcrum. External movements must be inherently larger to match with those seen on the video screen. Lifting or lowering the hysteroscope for 10 cm will be translated to a movement of 1–2 cm inside the uterine cavity. Usually, the mind of a beginner of hysteroscopic training does not adjust to this easily.
d) Adherence to DisciplineNot least in importance is adherence to discipline in han-dling and control of instruments. As a rule, a surgeon-in-training is strictly advised to maintain focus on the video screen. The uterine walls are fragile and prone to bleed on contact, which is why care must be taken to preserve the integrity of healthy anatomical structures. By remaining concentrated on the video screen, the hysteroscopist is able to reduce the risk of losing orientation and missing the site where pathology needs to be removed. A trained assistant should take care of the needs of handling in-struments during a simulated operative procedure, while the surgeon-in-training should maintain focus on what is shown on the video screen. It is important to understand that in hysteroscopy there is no improvising. It is very im-portant to have available state-of-the-art, fully operational medical devices and equipment or otherwise the proce-dure will not be completed in a satisfactory manner. The hysteroscope is the extension of vision. An endoscope of low quality, poor illumination, improvised monitors or those of low resolution, will cause diffi culties that can be avoided.
The reader must be able to defi ne the following principles before proceeding to the next step:
a) Familiarity with instruments and units.b) Pace of movements during operative maneuvers in
hysteroscopy.c) Range of motion.d) Adherence to discipline in the use of instruments
and equipment.
Fig. 3.2 External movements of 10 cm are translated to 2 cm internally. This relationship usually increases while advancing the scope toward the uterine fundus.

Standardized Hands-On Training Using Simulators 15
3.2 Training of Standard ProceduresThe author suggests actively memorizing each theoretical principle before moving to practice. This is done fi rst by describing all instruments and devices that will later be used. In a second step, the trainee should explain the an-ticipated course of the exam and verbally describe maneu-vers while actually performing them. This mental or verbal reenactment should cover the entire motion sequence performed with the hysteroscope and enhance awareness for the signifi cance of all movements to be carried out in an unhurried, controlled manner.
Recommended Instruments and Equipment (see ad-dendum section of the tutorial).
� Assembly of instruments and equipment.� Proper adjustment of instruments and equipment.� Mental or verbal reenactment of the logical and
chronological order of the motion sequence prior to commencing a simulated surgical procedure.
� Proper insertion of the hysteroscope during vagino-hysteroscopy in case of a ‘diffi cult cervix’. Use of a specifi c uterus model (ETH7-AM/2G) is recommended for simulating the presence of an atrophic cervix.
� Identifi cation of lesions (a suitable uterus model needs to be chosen for this purpose).
� Proper choice of hysteroscopes, instruments and further equipment.
� Training hysteroscopy using close-up, intermediate and panoramic views.
� Assessment of the actual motion sequence and dis-cussion with mentors.

17Visual Cues for Intrauterine Spatial Orientation
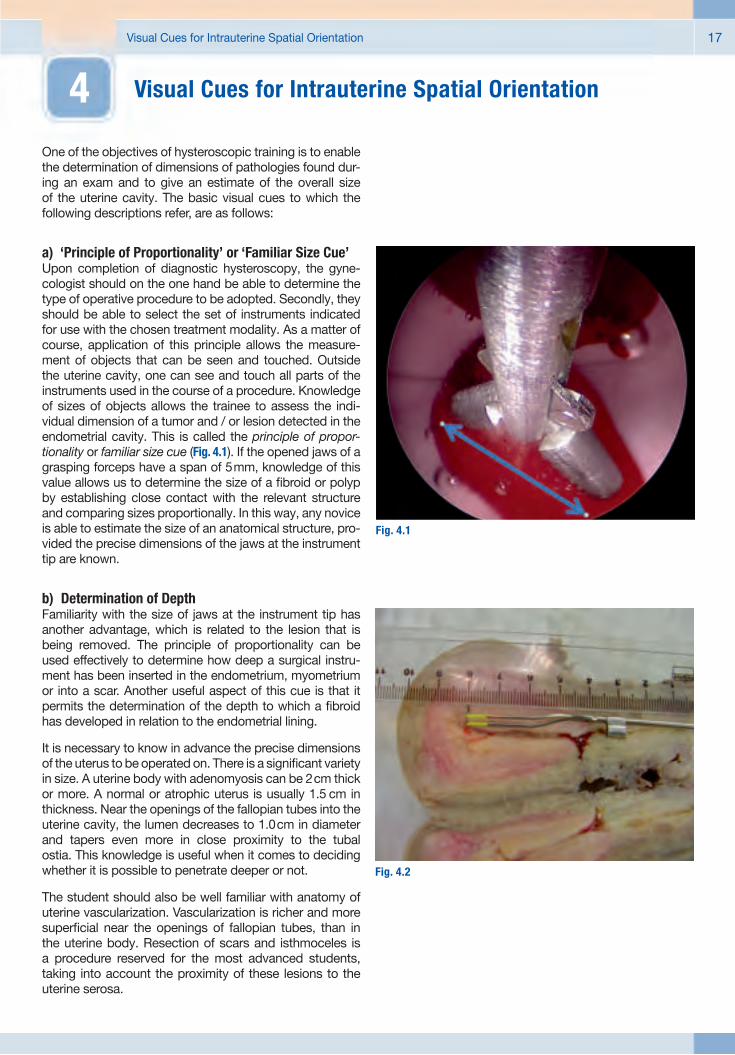
One of the objectives of hysteroscopic training is to enable the determination of dimensions of pathologies found dur-ing an exam and to give an estimate of the overall size of the uterine cavity. The basic visual cues to which the following descriptions refer, are as follows:
a) ‘Principle of Proportionality’ or ‘Familiar Size Cue’Upon completion of diagnostic hysteroscopy, the gyne-cologist should on the one hand be able to determine the type of operative procedure to be adopted. Secondly, they should be able to select the set of instruments indicated for use with the chosen treatment modality. As a matter of course, application of this principle allows the measure-ment of objects that can be seen and touched. Outside the uterine cavity, one can see and touch all parts of the instruments used in the course of a procedure. Knowledge of sizes of objects allows the trainee to assess the indi-vidual dimension of a tumor and / or lesion detected in the endometrial cavity. This is called the principle of propor-tionality or familiar size cue (Fig. 4.1). If the opened jaws of a grasping forceps have a span of 5 mm, knowledge of this value allows us to determine the size of a fi broid or polyp by establishing close contact with the relevant structure and comparing sizes proportionally. In this way, any novice is able to estimate the size of an anatomical structure, pro-vided the precise dimensions of the jaws at the instrument tip are known.
b) Determination of DepthFamiliarity with the size of jaws at the instrument tip has another advantage, which is related to the lesion that is being removed. The principle of proportionality can be used effectively to determine how deep a surgical instru-ment has been inserted in the endometrium, myometrium or into a scar. Another useful aspect of this cue is that it permits the determination of the depth to which a fi broid has developed in relation to the endometrial lining.
It is necessary to know in advance the precise dimensions of the uterus to be operated on. There is a signifi cant variety in size. A uterine body with adenomyosis can be 2 cm thick or more. A normal or atrophic uterus is usually 1.5 cm in thickness. Near the openings of the fallopian tubes into the uterine cavity, the lumen decreases to 1.0 cm in diameter and tapers even more in close proximity to the tubal ostia. This knowledge is useful when it comes to deciding whether it is possible to penetrate deeper or not.
The student should also be well familiar with anatomy of uterine vascularization. Vascularization is richer and more superfi cial near the openings of fallopian tubes, than in the uterine body. Resection of scars and isthmoceles is a procedure reserved for the most advanced students, taking into account the proximity of these lesions to the uterine serosa.
4 Visual Cues for Intrauterine Spatial Orientation
Fig. 4.1
Fig. 4.2

Best Practices in Hysteroscopic Training – A Tutorial Based on the EVE Realistic Simulator for Hysteroscopy18
c) Angle of ViewFamiliarizing the trainee with spatial orientation in the uterus should also include a description of the fi xed angle of view – a distinct feature of any standard hysteroscope. Standard scopes usually come with a 30° or 12° angle of view. Accordingly, the image provided by such a hystero-scope will not show what is located in front of the distal tip, but what is in a more oblique position. Therefore, the trainee must understand the impact of the angle of view of the scope to be used. Only a 0° hysteroscope provides a straight ahead view.
A 30° scope provides a 30 % forward-oblique view, not a straight ahead view. While introducing the scope more deeply, one should not get baffl ed by the image provided on the screen, but should understand how it is formed inside the uterine cavity. Awareness of the fact that the screen image of a 30° scope actually shows a forward-oblique view should enable the user to safely guide the scope further into the cavity to be inspected.
Example: The angle of view is directed upward and there-fore shows a site that is different from where the longi-tudinal axis of the hysteroscope’s instrument channel is directed to. In case the scope has been rotated to the right of the surgeon, the instrument will also be viewed on the right side.
d) Keeping the Camera in a Fixed PositionThe camera must always maintain a fi xed position. On-axis rotation of the camera will result in an upside-down image, which is an unacceptable maneuver! The student must bear in mind that the camera remains in a neutral posi-tion while the endoscope is rotated around the longitudinal axis. This allows for visualization of all uterine angles that need to be inspected.
Fig. 4.3

Visual Cues for Intrauterine Spatial Orientation 19
e) Panoramic VisionWhenever an anatomical site shown on the video screen cannot be identifi ed properly, the scope must resume its previous position by moving it downwards, upwards or sideways and undoing any rotary motion until a panoramic view is restored. These maneuvers can be used effectively to facilitate identifi cation of anatomical structures or le-sions that need to be further inspected or treated.
f) Mirrored ViewAnother diffi culty that frequently arises when viewing a hysteroscopic image is based on the fact that the mind-set of an inexperienced trainee, most commonly, is not prepared for a mirrored view. The hysteroscopic image provided on the video screen is exactly of that kind. When viewing the image of a tubal ostium on the left side of the screen, the correct anatomical orientation is on the right, and vice-versa. While rotating the scope to the left – as seen from outside – the hysteroscopic image actually shows the opposite side, i. e., the right. This also applies when lowering the camera, i. e., anatomical structures on the video screen will ‘scroll up’. It takes some time for the brain to get accustomed to the discrepancy between the anticipated mental image and what is actually seen on the video screen.
g) Constant Identifi cation of More Than One Anatomical Structure
If proper identifi cation of anatomical structures fails during hysteroscopy, this most frequently occurs when the scope is in near contact with the walls of the vagina, cervix or uterus. As a result, the hysteroscopist is faced with the problem of which route to take next. This underpins the necessity of maintaining, as a means of last resort, the chance to resume a previous position and to identify more than one anatomical structure that is situated in the uterus, cervix or vaginal canal. This strategy, ensuingly, helps to restore a panoramic view. Special care should also be
given to the liquid distension medium. If fl ow is blocked or fl uid is fi nished, dilation of the uterine cavity will fail, causing inadequate visualization of anatomical structures because the scope is in near contact with the vaginal canal or uterine wall.
The reader should be able to defi ne the following principles before proceeding:
� Principle of proportionality or familiar size cue� Determination of depth� Angle of view� Keeping the camera in a fi xed position� Panoramic vision� Mirrored view� Constant identifi cation of more than one anato-
mical structure
4.1 Summary of Learning Objectives Successful defi nition of the principles above should enable the trainee:
� to use a uterus simulator for training on measurement of tumors,
� to understand and determine the depth of resection, � to identify the fi xed angle of view of a standard
hysteroscope,� to demonstrate a good panoramic view,� to explain the characteristics of a mirrored image that
is viewed while holding the camera in a fi xed position,� to explain the need for keeping the camera in a fi xed
(neutral) position,� to explain the need for constant identifi cation of more
than one anatomical structure.
Fig. 4.4


21Introduction to Hysteroscopic Surgical Techniques
In the guidelines presented so far, some aspects of hyster-oscopy and associated preliminary measures have been described that are suited to establishing and improving
vision as well as to facilitating the use of instruments and equipment. In the following section, useful information will be given on a series of procedures to be learned.
5.1 Dynamic VaginohysteroscopyThis type of procedure is initiated by introducing the scope in the vagina without using a speculum or a tenaculum for-ceps. This is performed under constant fl uid irrigation pref-erably using an automated irrigation-suction system, (e. g., KARL STORZ HAMOU® ENDOMAT®), and not a gaseous distension medium, because the former causes distension and lavage while the latter may only be employed for dis-tension. The use of CO2 as gaseous distension medium in the era of ‘dynamic vaginohysteroscopy’ is outdated.
A diagnostic vaginohysteroscopic examination must al-ways be the fi rst step prior to planning and initiating any operative treatment. A panoramic vision of the vaginal, cer-vical or uterine walls should enable the trainee to identify the site of a targeted biopsy excision as well as to spot an area that needs to be treated in the course of a more com-plex operative procedure. The exercises below are listed in order of increasing level of complexity and diffi culty.
5.2 Biopsy Sampling
a) Biopsy Through Traction and CountertractionThis exercise fi rst involves the use of a grasping forceps, that assists in accessing the site of biopsy sampling by exposing the tissue to be excised. In a second step, the jaws of a biopsy forceps are advanced for 2 to 3 mm and are fi nally closed to retrieve the tissue to be sampled. The forceps should be rotated to allow removal of the tissue on its endometrial layer. Another similar maneuver, that can be used instead of rotation, would be forward and backward traction and is also intended to remove the lesion from its underlying layer. Any biopsy excision should be performed through the endocervical canal under direct hysteroscopic vision. The tissue fragment captured by the forceps should be located at 2 to 3 mm from the distal tip of the scope. Ad-vancing the outer sheath of the hysteroscope to the target site will create a shielded space that is used to retrieve the collected biopsy sample without compromising integrity of the uterine walls, cervix or vagina.
5 Introduction to Hysteroscopic Surgical Techniques
Fig. 5.1
Best Practices in Hysteroscopic Training – A Tutorial Based on the EVE Realistic Simulator for Hysteroscopy22
b) Biopsy Excision Using Scissors The best time for biopsy sampling is in the proliferative phase of the cycle, allowing, e. g., an adequate amount of tissue to be obtained from a lesion that needs to be exam-ined. A micro-scissors may also be used for this maneuver. Commonly, the tissue sample is excised from the inside of the endometrial cavity with a grasping forceps. Following insertion into the uterine cavity, and subject to the angle of vision, the scope’s position is readjusted in such a way that a good panoramic view is accomplished. The principle of proportionality should be applied to decide whether the size of the tissue to be removed allows it to be retrieved through the cervical canal. The trainee should bear in mind that all principles already explained above, need to be strictly followed during simulated surgical maneuvers. If a tumor is larger than the inner diameter of the cervical canal, it should be divided to allow piecemeal removal.
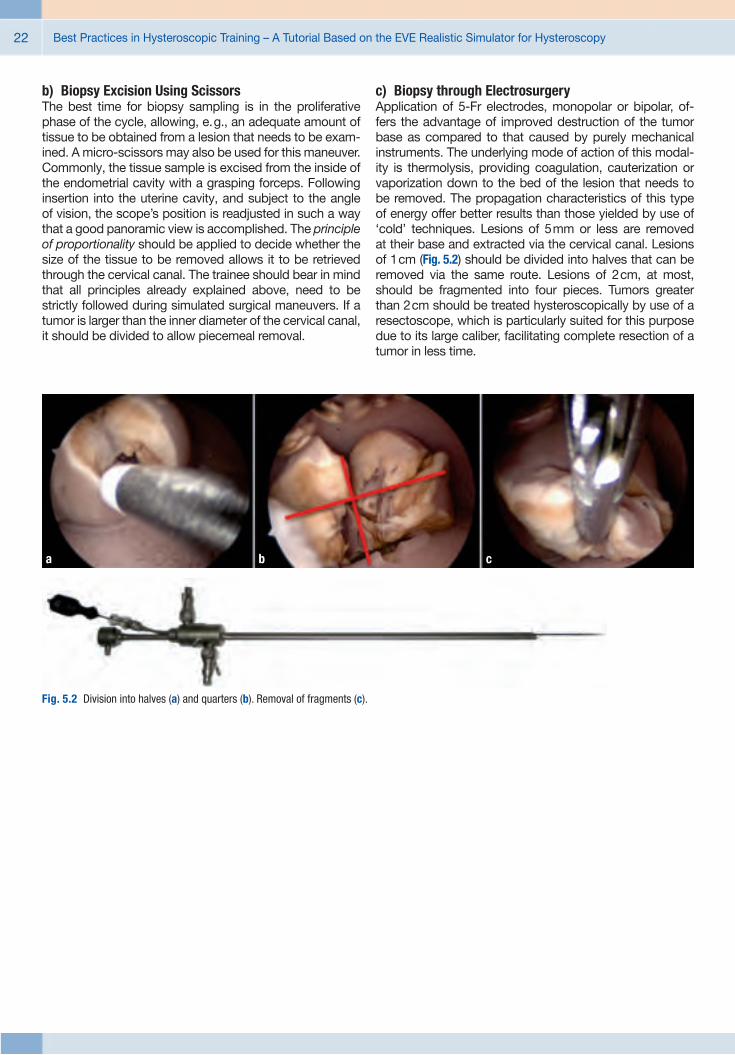
c) Biopsy through ElectrosurgeryApplication of 5-Fr electrodes, monopolar or bipolar, of-fers the advantage of improved destruction of the tumor base as compared to that caused by purely mechanical instruments. The underlying mode of action of this modal-ity is thermolysis, providing coagulation, cauterization or vaporization down to the bed of the lesion that needs to be removed. The propagation characteristics of this type of energy offer better results than those yielded by use of ‘cold’ techniques. Lesions of 5 mm or less are removed at their base and extracted via the cervical canal. Lesions of 1 cm (Fig. 5.2) should be divided into halves that can be removed via the same route. Lesions of 2 cm, at most, should be fragmented into four pieces. Tumors greater than 2 cm should be treated hysteroscopically by use of a resectoscope, which is particularly suited for this purpose due to its large caliber, facilitating complete resection of a tumor in less time.
Fig. 5.2 Division into halves (a) and quarters (b). Removal of fragments (c).
a b c
Introduction to Hysteroscopic Surgical Techniques 23
5.3 General Principles of Resection
a) Surgical Planning and Subdivision into a Sequence of Steps
As in any type of operative procedure, operative hyster-oscopy can be subdivided into a sequence of steps. It is recommended that any decision-making with regard to selection of instrumentation be preceded by an initial diag-nostic examination. Any hysteroscopic training should be geared toward generating self-confi dence in the mind of the participant, who thus will be keen on fi nding the correct solution to a given problem. Nowadays, a standardized and well-structured protocol of practices must be an integral part of any hysteroscopic training course as it signifi cantly helps to promote a modifi cation of behavior on account of growing knowledge and experience. A thorough under-standing of the entire sequence of steps included in an op-erative procedure will generate new habits, determination and commitment to the objectives of the course, whereas a trainee who prefers to adopt an improvising, chaotic ap-proach will go through a longer learning curve and produce less convincing results.
Proper organization of instruments and a structured layout of operating room equipment is another ultimate responsi-bility of the surgeon. Not knowing how to place the neutral electrode of the electrosurgical device, not knowing how to adjust the irrigation pump and lack of understanding which type of electrode should be mounted on the resectoscope, all these defi ciencies in expertise are risk factors contribut-ing to complications, incomplete termination of surgery, fl awed treatment and even malpractice. These occur-rences may also be correlated with insuffi cient knowledge of instruments and the indications they are used for.
Entering the uterine cavity and fi nding a uterine septum should give reason to choose scissors or needle electrodes as ideal instruments, whereas other operative instruments are indicated when faced with a 4 cm myoma. Being able to make the right choice concerning the anticipated operative maneuvers used in the treatment of a specifi c condition is of key importance for the outcome of surgery.
In this chapter, the pros and cons of each type of resecto-scope will not be discussed. The author will focus only on techniques, concepts and principles imparted to attendees
of a hands-on training course on use of the resectoscope in operative hysteroscopy.
b) Fixation of the Cervix It is important to be well-acquainted with adequate stabi-lization of the uterine cervix. Placing a tenaculum or Pozzi forceps on the surface of the cervix is a precautionary measure that may be taken to prevent iatrogenic cervical laceration, an incident that will impede continuation of the procedure. The tenaculum should be placed as deep as possible, taking care not to transfi x the cervical canal. Even though frequently chosen for fi xation of the cervix during operative hysteroscopy involving the use of a re-sectoscope, the 12 o’clock position requires the help of an assistant who constantly keeps the tenaculum in place, and prevents it from falling over the resectoscope. The 9 o’clock position for fi xation of the cervix does not have a drawback of that kind. Deep placement of the tenaculum in the fi brous tissue of the cervix is recommended to avoid injury to the lower branches of uterine vessels. Secondary to this maneuver, cervical dilatation should be performed up to a size of 1 mm above the outer diameter of the resec-toscope to be used.
c) Margin of the Plane of ResectionBy strictly observing the principle of proportionality, the known size of the electrode employed should enable the surgeon-in-training to visually control the depth of penetration to which resection should be carried down to the endometrial base layer or myometrium. If there is an indication suggesting a greater depth of penetration, the electrode should be guided towards the myometrium with due pressure, whereas if a more superfi cial plane of resection should be maintained, the pressure exerted on the electrode must be reduced and adjusted accordingly. If half of the size of a 5 mm electrode has been penetrated into the tissue to be removed, this will result in a resection depth of 2.5 mm. Visual surveillance of resection allows the slice of tissue to be removed in a controlled manner, constantly comparing its size with that of the uterine wall thickness commonly measuring from 1.5 to 2.0 cm in the uterine body.
Best Practices in Hysteroscopic Training – A Tutorial Based on the EVE Realistic Simulator for Hysteroscopy24
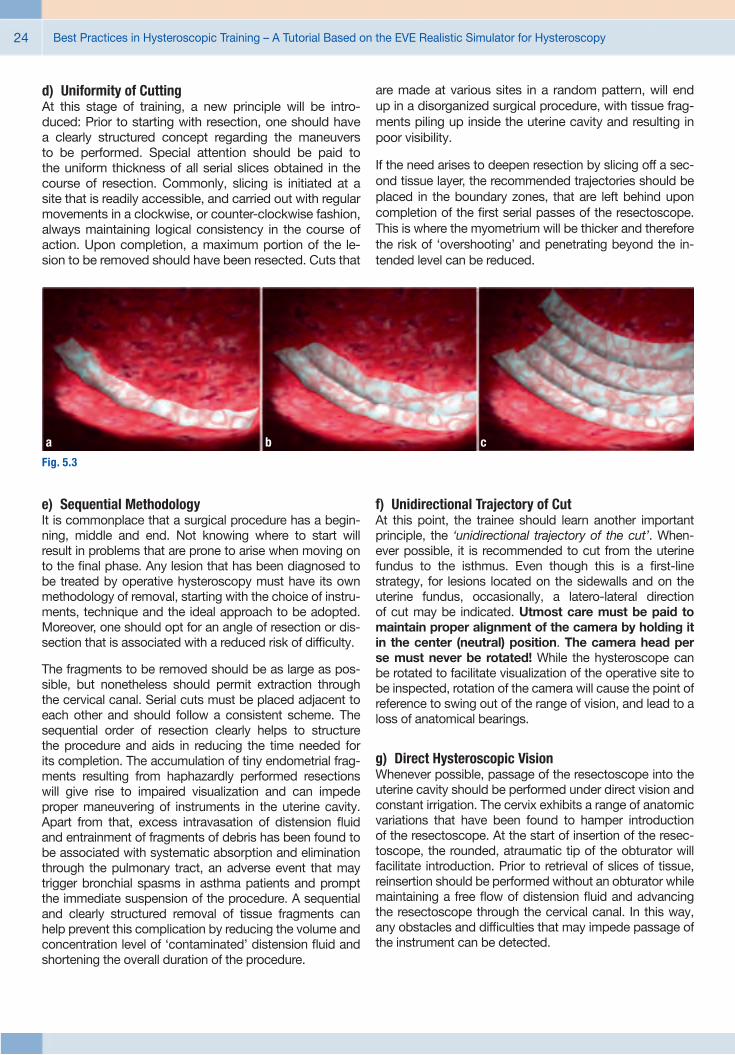
d) Uniformity of CuttingAt this stage of training, a new principle will be intro-duced: Prior to starting with resection, one should have a clearly structured concept regarding the maneuvers to be performed. Special attention should be paid to the uniform thickness of all serial slices obtained in the course of resection. Commonly, slicing is initiated at a site that is readily accessible, and carried out with regular movements in a clockwise, or counter-clockwise fashion, always maintaining logical consistency in the course of action. Upon completion, a maximum portion of the le-sion to be removed should have been resected. Cuts that
are made at various sites in a random pattern, will end up in a disorganized surgical procedure, with tissue frag-ments piling up inside the uterine cavity and resulting in poor visibility.
If the need arises to deepen resection by slicing off a sec-ond tissue layer, the recommended trajectories should be placed in the boundary zones, that are left behind upon completion of the fi rst serial passes of the resectoscope. This is where the myometrium will be thicker and therefore the risk of ‘overshooting’ and penetrating beyond the in-tended level can be reduced.
e) Sequential MethodologyIt is commonplace that a surgical procedure has a begin-ning, middle and end. Not knowing where to start will result in problems that are prone to arise when moving on to the fi nal phase. Any lesion that has been diagnosed to be treated by operative hysteroscopy must have its own methodology of removal, starting with the choice of instru-ments, technique and the ideal approach to be adopted. Moreover, one should opt for an angle of resection or dis-section that is associated with a reduced risk of diffi culty.
The fragments to be removed should be as large as pos-sible, but nonetheless should permit extraction through the cervical canal. Serial cuts must be placed adjacent to each other and should follow a consistent scheme. The sequential order of resection clearly helps to structure the procedure and aids in reducing the time needed for its completion. The accumulation of tiny endometrial frag-ments resulting from haphazardly performed resections will give rise to impaired visualization and can impede proper maneuvering of instruments in the uterine cavity. Apart from that, excess intravasation of distension fl uid and entrainment of fragments of debris has been found to be associated with systematic absorption and elimination through the pulmonary tract, an adverse event that may trigger bronchial spasms in asthma patients and prompt the immediate suspension of the procedure. A sequential and clearly structured removal of tissue fragments can help prevent this complication by reducing the volume and concentration level of ‘contaminated’ distension fl uid and shortening the overall duration of the procedure.
f) Unidirectional Trajectory of CutAt this point, the trainee should learn another important principle, the ‘unidirectional trajectory of the cut’. When-ever possible, it is recommended to cut from the uterine fundus to the isthmus. Even though this is a fi rst-line strategy, for lesions located on the sidewalls and on the uterine fundus, occasionally, a latero-lateral direction of cut may be indicated. Utmost care must be paid to maintain proper alignment of the camera by holding it in the center (neutral) position. The camera head per se must never be rotated! While the hysteroscope can be rotated to facilitate visualization of the operative site to be inspected, rotation of the camera will cause the point of reference to swing out of the range of vision, and lead to a loss of anatomical bearings.
g) Direct Hysteroscopic VisionWhenever possible, passage of the resectoscope into the uterine cavity should be performed under direct vision and constant irrigation. The cervix exhibits a range of anatomic variations that have been found to hamper introduction of the resectoscope. At the start of insertion of the resec-toscope, the rounded, atraumatic tip of the obturator will facilitate introduction. Prior to retrieval of slices of tissue, reinsertion should be performed without an obturator while maintaining a free fl ow of distension fl uid and advancing the resectoscope through the cervical canal. In this way, any obstacles and diffi culties that may impede passage of the instrument can be detected.
Fig. 5.3
a b c

Introduction to Hysteroscopic Surgical Techniques 25
5.4 Recommended Protocol of Standard Exercises in Endometrial Ablation
Considering the general principles outlined above, training of endometrectomy should involve the following sequence of exercises:
Before initiating the surgical procedure itself, the trainee must make sure that all auxiliary devices and technical components that will be used for irrigation, videoendoscopic imaging and electrosurgery, should be in fully operational state and adjusted correctly. As regards the recommended settings to be made on the irrigation-suction system HAMOU® ENDOMAT®, the mean set value of intrauterine pressure should be at 100 mmHg, and irrigation fl ow rate should be adjusted to 200–300 ml/min.
� Place the speculum and visualize the cervix;
� Stabilize the cervix at a 9 o’clock position using a tenaculum forceps that is applied deeply in the cervical fi brous tissue. Next, remove the speculum to allow for a free movement, since slight traction applied to the tenaculum enables the cervix to be mobilized toward the vulvar region. With the speculum inserted in the vagina, this kind of maneuver is not possible.
� Dilate the cervix until it exceeds the internal cervical orifi ce, using dilators up to 1 mm above the outer di-ameter of the resectoscope to be used.
� Introduce the resectoscope until it has passed beyond the internal cervical orifi ce. Make sure that the tip of the resectoscope is not in near contact with the uterine fundus because this will increase the risk of perforation and may put at risk integrity of endometrial anatomy and specifi c landmarks utilized throughout the proce-dure.
Recommended Instruments and Equipment (see ad-dendum section of the tutorial).
� Once the obturator has been removed, the working element is introduced in the internal sheath of the re-sectoscope. Make sure that any air bubbles entrained in the irrigation tubings and channels of the resecto-scope have escaped prior to releasing infl ow of the irrigation / distension fl uid.
� Start with resection in the nearest possible proximity to the uterine fundus, until reaching up to 1 cm above the internal cervical orifi ce. Beginning at a predefi ned point, serial adjacent passes of the resectoscope are made – a technique that helps to reduce the duration of the operative procedure. Once the fi rst cut is made, one should continue laterally using repeated passes until complete resection of the uterine endometrium is accomplished (see Fig. 5.3c).
� Cauterize the uterine fundus with a rollerball electrode. The fundus and the uterotubal junction (or cornual region), forming a funnel-shaped entrance to the fallo-pian tube, should be cauterized, preventing iatrogenic perforations from occurring in this region, where wall thickness is smaller than in the uterine body. Proper endometrial ablation of the cornual region is of crucial importance for the outcome of resection. The region is rich in estrogen and progesterone receptors that account for restoring the endometrium if incompletely removed. The endometrium may also be resected with a loop electrode, however, the author strongly advises a novice against using this method. For advanced gynecologists, the use of simulators can be valuable in training endometrial resection of the uterine fundus and ostium region with loop electrodes. Ablation in this area should be performed at a shallow depth only until myometrial tissue is visualized, confi rming that the basal layer of the endometrium has been reached.


27Hands-on Training of Myomectomy and Related Techniques
6.1 Special ManeuversMa ny authors share the opinion that myomectomy is the most complicated hysteroscopic procedure to be performed. Considering the level of diffi culty, a series of twelve maneuvers – used for training removal of myomas during a hands-on workshop and arranged in approximate order of increasing diffi culty – are given below:
a) DevascularizationIn the presence of large fi broids surrounded by a dense vascular layer (also termed ‘pseudocapsule’), the latter can be cauterized prior to proceeding with myomectomy. The technique offers the benefi t of reduced bleeding and improved visual conditions, thus considerably facilitating tumor dissection.
6 Hands-on Training of Myomectomy and Related Techniques
Fig. 6.1

Best Practices in Hysteroscopic Training – A Tutorial Based on the EVE Realistic Simulator for Hysteroscopy28
b) Hydrodynamic MassageAs described by Professor Hamou (1993), the maneuver is intended to promote migration of a deeply implanted myoma toward the uterine cavity. ‘Massage of the uterus’ should be performed by intermittent suspension of infl ow of the distension medium. As a result, rapid changes in in-trauterine pressure will induce a hydrodynamic motion that will ‘massage’ the myoma, and cause it to migrate toward the endometrial cavity, where it can be resected.
Fig. 6.2
Hands-on Training of Myomectomy and Related Techniques 29
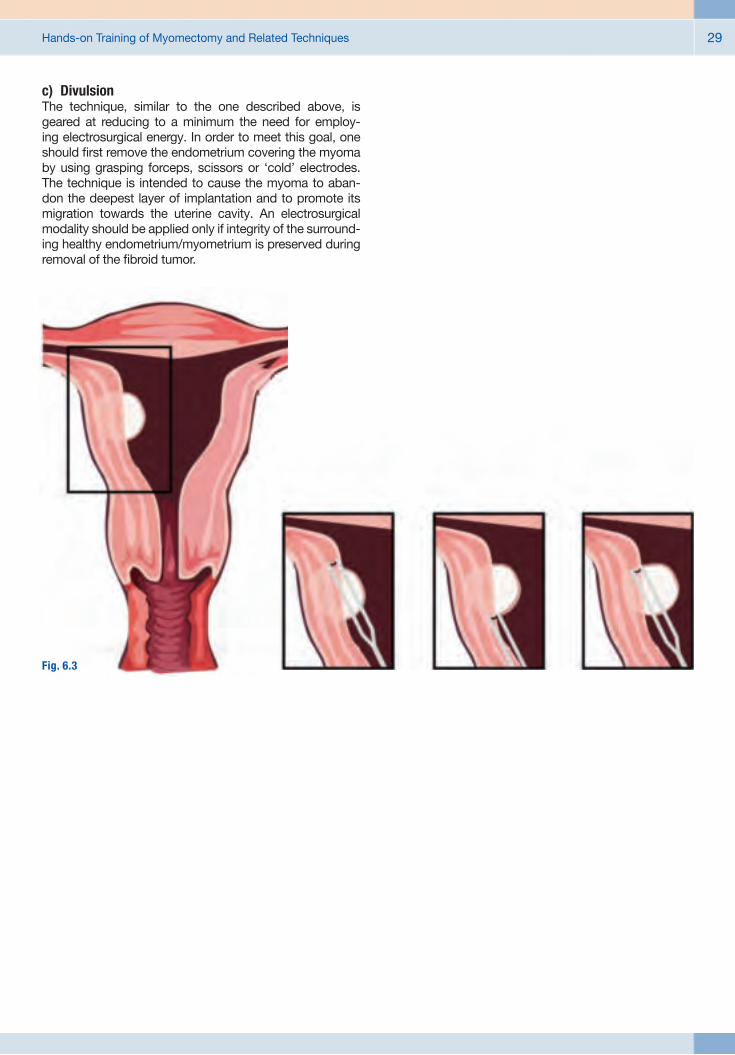
c) DivulsionThe technique, similar to the one described above, is geared at reducing to a minimum the need for employ-ing electrosurgical energy. In order to meet this goal, one should fi rst remove the endometrium covering the myoma by using grasping forceps, scissors or ‘cold’ electrodes. The technique is intended to cause the myoma to aban-don the deepest layer of implantation and to promote its migration towards the uterine cavity. An electrosurgical modality should be applied only if integrity of the surround-ing healthy endometrium/myometrium is preserved during removal of the fi broid tumor.
Fig. 6.3
Best Practices in Hysteroscopic Training – A Tutorial Based on the EVE Realistic Simulator for Hysteroscopy30
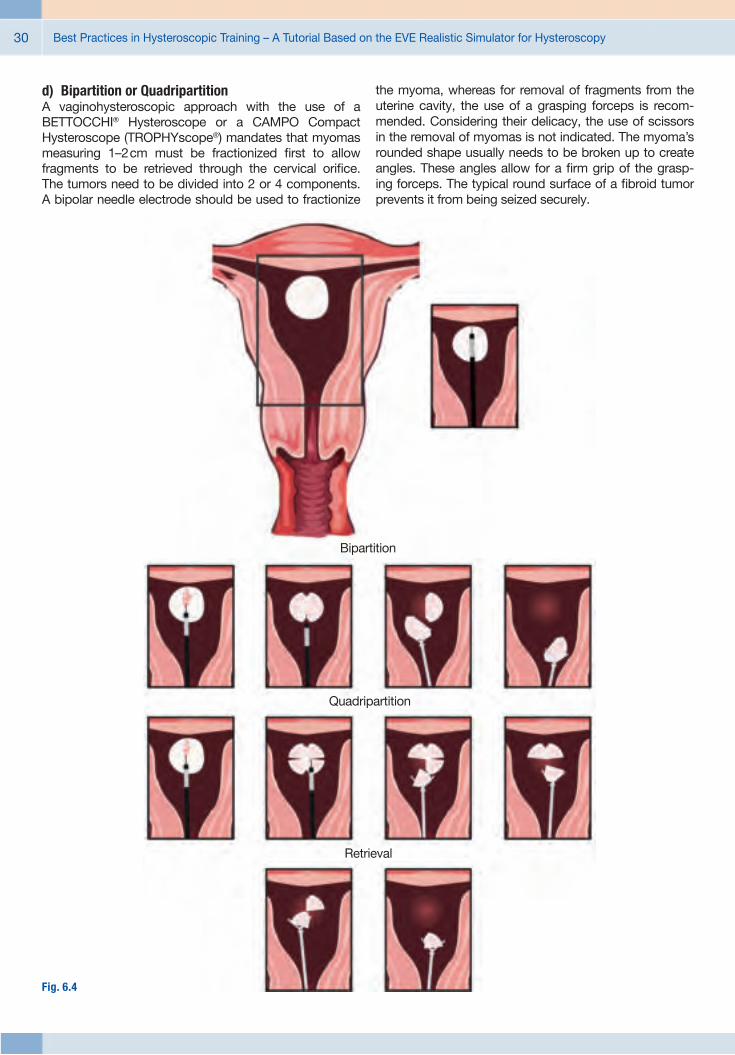
d) Bipartition or QuadripartitionA vaginohysteroscopic approach with the use of a BETTOCCHI® Hysteroscope or a CAMPO Compact Hysteroscope (TROPHYscope®) mandates that myomas measuring 1–2 cm must be fractionized fi rst to allow fragments to be retrieved through the cervical orifi ce. The tumors need to be divided into 2 or 4 components. A bipolar needle electrode should be used to fractionize
the myoma, whereas for removal of fragments from the uterine cavity, the use of a grasping forceps is recom-mended. Considering their delicacy, the use of scissors in the removal of myomas is not indicated. The myoma’s rounded shape usually needs to be broken up to create angles. These angles allow for a fi rm grip of the grasp-ing forceps. The typical round surface of a fi broid tumor prevents it from being seized securely.
Bipartition
Quadripartition
Retrieval
Fig. 6.4
Hands-on Training of Myomectomy and Related Techniques 31
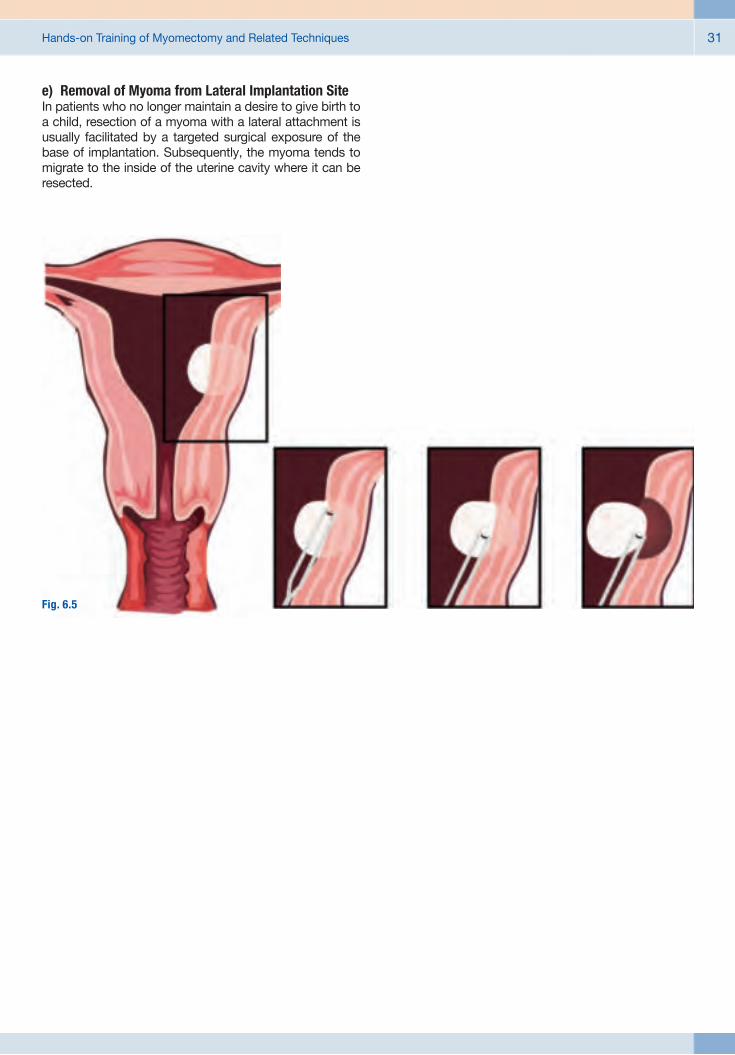
e) Removal of Myoma from Lateral Implantation SiteIn patients who no longer maintain a desire to give birth to a child, resection of a myoma with a lateral attachment is usually facilitated by a targeted surgical exposure of the base of implantation. Subsequently, the myoma tends to migrate to the inside of the uterine cavity where it can be resected.
Fig. 6.5

Best Practices in Hysteroscopic Training – A Tutorial Based on the EVE Realistic Simulator for Hysteroscopy32
f) Slicing TechniqueUsing this technique, serial cuts are made with the elec-trode starting at the distal-most free margin of the myoma. Traction is applied to the electrode that is guided along the surface of the myoma towards the isthmus, while activat-ing the electrical current.
Fig. 6.6

Hands-on Training of Myomectomy and Related Techniques 33
g) Lateral CutFor fi broid tumors deeply implanted in the myometrium of the lateral uterine wall, use of the latero-lateral resection technique is a good choice. Care must be taken not to move the electrode towards the uterine fundus, but rather from the lateral side to the center of the uterus, while it is activated. The cleavage plane that opens up between the myometrium and myoma should become visible, facilitat-ing the visually controlled completion of this maneuver.
Fig. 6.7

Best Practices in Hysteroscopic Training – A Tutorial Based on the EVE Realistic Simulator for Hysteroscopy34
h) LeverUsing this technique a cold electrode is introduced be-tween the myoma and the myometrium once the proper cleavage plane is identifi ed. The method is essentially based on a mechanical disruption of the fi broid’s connec-tion to the myometrium at its base of implantation, causing it to migrate to the center of the uterine cavity where it can be resected safely. The key aspect of this method is that the electrode is not activated. It is a purely mechanical maneuver offering the benefi t of enhanced preservation of healthy tissue.
Fig. 6.8

Hands-on Training of Myomectomy and Related Techniques 35
i) Mechanical Traction and CountertractionThe technique can be used to meet the objective of pre-serving endometrial anatomy for future pregnancy. The smaller the size of a myoma, the more its mobilization is accomplished with ease when using a grasping forceps. Larger myomas need to be treated with special forceps or a tenaculum grasper that is introduced instead of the working element of the resectoscope. The instruments used in this maneuver have been specifi cally designed for this purpose. Mechanical traction and countertraction are applied to facilitate removal of the myoma.
Fig. 6.9
Best Practices in Hysteroscopic Training – A Tutorial Based on the EVE Realistic Simulator for Hysteroscopy36
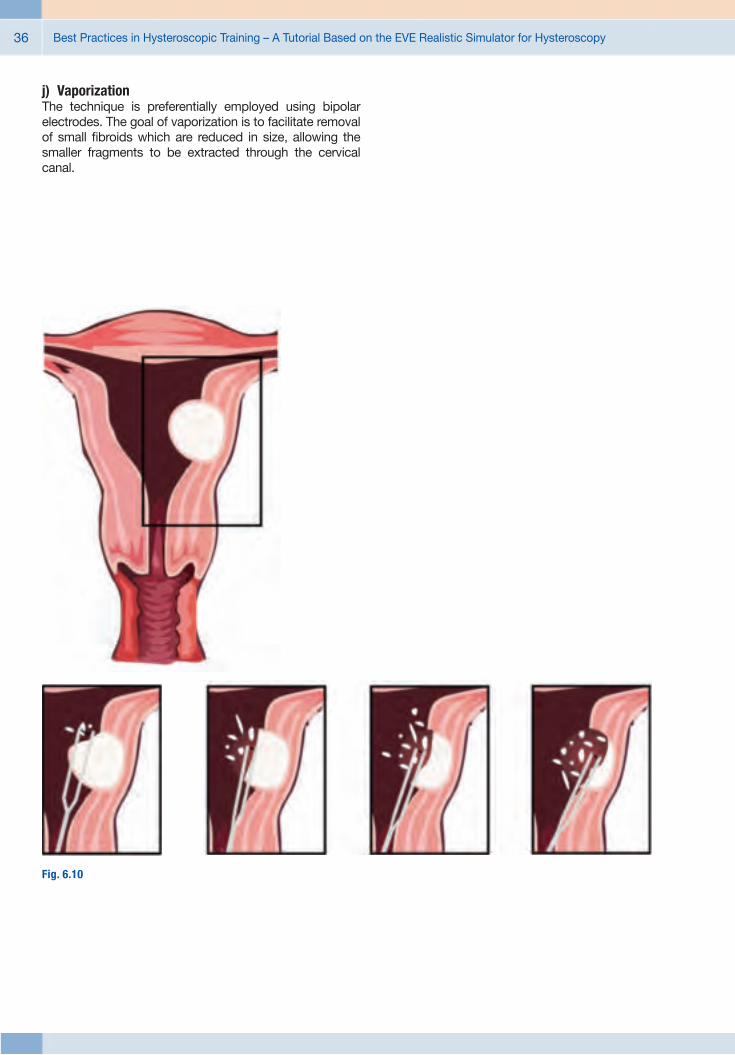
j) VaporizationThe technique is preferentially employed using bipolar electrodes. The goal of vaporization is to facilitate removal of small fi broids which are reduced in size, allowing the smaller fragments to be extracted through the cervical canal.
Fig. 6.10

Hands-on Training of Myomectomy and Related Techniques 37
k) Retrograde CuttingIn the presence of intramural fi broids, embedded up to 0.5 cm away from the serosa, hysteroscopic myomec-tomy should be performed only by an advanced operative gynecologist. The technique initially involves the use of a ‘cold loop’, that is introduced and advanced towards the implantation base, followed by electrosurgical resection of the myoma. Subsequently, a loop electrode is placed deeply between the myoma and myometrium. By acti-vating the high frequency current, the loop is guided in a retrograde fashion along the cleavage plane, moving from the base to the center of the uterus. Electrodes of smaller caliber are better suited for this maneuver.
Fig. 6.11

Best Practices in Hysteroscopic Training – A Tutorial Based on the EVE Realistic Simulator for Hysteroscopy38
l) TunnelingIntramural fi broids of G2 type located in the uterine fundus, close to the ostium of the fallopian tubes, are diffi cult to handle. Using small caliber electrodes, preferably in con-junction with a bipolar electrosurgery unit, the technique can be used effi ciently to dissect the myoma, which is encroached upon centrally using a ‘tunnelling approach’. Accordingly, resection is essentially performed inside the fi broid, which offers a certain degree of safety. Continuing with resection, the hollow space created inside the myoma facilitates its piecemeal removal. Once the myometrial layer is reached, the remaining fi broid pseudocapsule is removed by traction.
Fig. 6.12

Hands-on Training of Myomectomy and Related Techniques 39
m) MorcellationUse of the Intrauterine Bigatti Shaver (IBS®) – which is mainly composed of a wide-angle 6°hysteroscope intro-duced through a 24-Fr operating sheath that houses a uterine morcellator – has been shown to facilitate myoma removal. The IBS® system comprises a rotating shaver blade, shielded by a sheath and connected to an irrigation and suction system that allows microfragments, generated by morcellation of the fi broid, to be evacuated rapidly.
Fig. 6.12

Best Practices in Hysteroscopic Training – A Tutorial Based on the EVE Realistic Simulator for Hysteroscopy40
6.2 Current Range of Neoderma® Uterus Models and Designated Procedures/Maneuvers
The following chapter is dedicated to the description of various types of Neoderma® uterus models and the presen-tation of a series of procedures and maneuvers grouped according to the level of the trainee’s competence, from the simplest to the most complex exercises. The author holds the opinion that advanced courses should not be offered to students who have not completed a basic hysteroscopic training, because this will impede progress of learning and often hampers the trainee’s readiness to maintain a sense of commitment to the learning objectives of the course.
Please note that no more than 3 students should share one EVE simulator during the course.
Recommended Instruments and Equipment (see ad-dendum section of the tutorial).

41Survey of Artifi cial Uterus Models – Designated Standard Procedures with Corresponding Level of Diffi culty
There is a wide range of standard procedures that can been trained on an artifi cial uterus model. In the following, we will describe the various types of Neoderma® uterus
models and a series of standard procedures and maneu-vers that can be practiced with them.
7.1 Course Level: Basic
Recommended instrumentation:
a) Uterus Model ETH7-AM/2G
Simulated Condition:Stenosed and irregular cervix with normal uterine cavity.
Purposes: Suited for novice learners of vaginohysterosco-py. Recommended for teaching the following maneuvers: Insertion of the hysteroscope into a narrowed and tortuous cervix. Demonstration of anatomical landmarks commonly observed in a normal uterine cavity. Biopsy sampling per-formed on the endometrial wall of the uterine cavity. Not recommended for training electrosurgery.
b) Uterus Model ETH7-GEST/2G
Simulated Condition: Stenosed cervix, uterine cavity with an early ectopic preg-nancy implanted in the cervix. The simulated condition is used for differential diagnosis against the presence of polypoid lesions.
Purposes: Recommended for teaching insertion of the hysteroscope into a narrowed and tortuous cervix. Demonstration of an early ectopic pregnancy implanted in the cervix. Not rec-ommended for training electrosurgery. The uterus can be used in simulating multiple conditions to be examined for diagnostic assessment.
� Scissors and grasping forceps, BETTOCCHI® hystero scopy set or CAMPO TROPHYscope® set.
� Use of the ETH5/2G vagina with the EVE simulator is recommended.
7 Survey of Artificial Uterus Models – Designated Standard Procedures with Corresponding Level of Difficulty

Best Practices in Hysteroscopic Training – A Tutorial Based on the EVE Realistic Simulator for Hysteroscopy42
e) Uterus Model ETH7-S/2G
Simulated Condition: Septum into the uterine cavity.
Purposes: Recommended for beginners of vaginohysteroscopy courses who are trained on the following maneuvers: Inser-tion of the hysteroscope into the cervix. Removal of uterine septum. Collection of multiple samples obtained from the uterine wall. Not recommended for training electrosurgery.
c) Uterus Model ETH7–2P/2G
Simulated Condition: Uterine cavity with two polyps.
Purposes: Recommended for teaching the following maneuvers: Insertion of the hysteroscope into the cervix. Resection of polyps with scissors used for bipartition. Removal performed with a grasping forceps. Collection of multiple samples obtained from the uterine wall. Simulated occur-rence of bleeding. Not recommended for training electro-surgery.
d) Uterus Model ETH7–4P/2G
Simulated Condition: Uterine cavity with four polyps.
Purposes: Recommended for teaching the following maneuvers: Insertion of the hysteroscope into the cervix. Resection of polyps with scissors by bipartition or quadripartition. Collection of multiple samples obtained from the uterine wall. Dilation of the cervical canal and removal of all tissue fragments of the polyps with grasping forceps. Simulated occurrence of bleeding. Not recommended for training electrosurgery.
f) Uterus Model ETH7-PS/2G
Simulated Condition: Uterine cavity with one polyp and septum.
Purposes: Recommended for teaching the following maneuvers: In-sertion of the hysteroscope into the cervix. Resection of the polyp with scissors for bipartition and use of a grasping forceps. Removal of uterine septum. Collection of multiple samples obtained from the uterine wall. Simulated occur-rence of bleeding. Not recommended for training electro-surgery.

Survey of Artifi cial Uterus Models – Designated Standard Procedures with Corresponding Level of Diffi culty 43
7.2 Course Level: Advanced
Recommended Simulator, Hysteroscopes and Instrumentation:
g) Uterus Model ETH7-ADH/2G
Simulated Condition: Uterine cavity with adhesions (synechia).
Purposes: Recommended for beginners and students with some experience in vaginohysteroscopy who will be trained on: Differential diagnosis of synechia against a uterine septum. Iatrogenic injury to the uterine wall occurring while retract-ing scissors and grasping forceps.
h) Uterus Model ETH7-ADM/2G
Simulated condition: Uterine cavity with focal adenomyosis.
Purposes: Recommended for teaching the following maneuvers: Insertion of the hysteroscope into the cervix. Focal resec-tion of areas of adenomyosis, using scissors and grasp-ing forceps. Collection of multiple samples obtained from the uterine wall. Simulated occurrence of bleeding while cutting.
� BETTOCCHI® Hysteroscopy Set or CAMPO TROPHY-scope® Set with monopolar or bipolar electrodes for cutting or coagulation, scissors and grasping forceps. EVE hysterotrainer with vagina model ETH5/2G.
� Intrauterine BIGATTI Shaver (IBS®). EVE hysterotrainer with vagina model ETH5/2G.
� Monopolar or bipolar resectoscope. EVE hystero-trainer with vagina model ETH4/2G.
Best Practices in Hysteroscopic Training – A Tutorial Based on the EVE Realistic Simulator for Hysteroscopy44
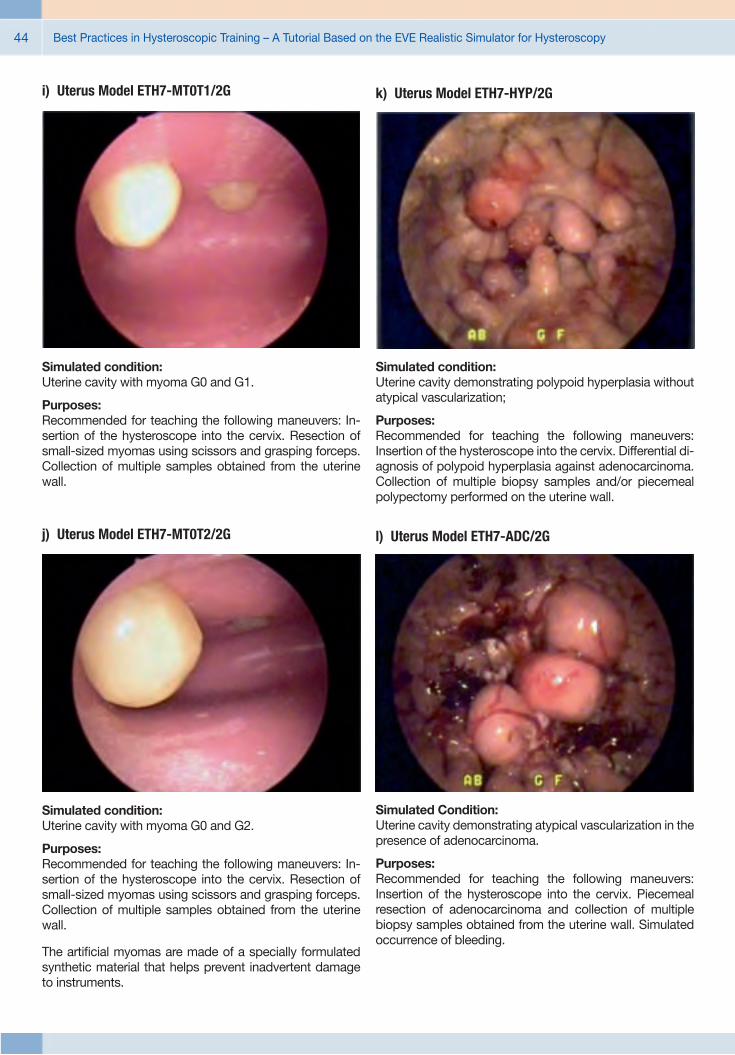
i) Uterus Model ETH7-MT0T1/2G
Simulated condition: Uterine cavity with myoma G0 and G1.
Purposes: Recommended for teaching the following maneuvers: In-sertion of the hysteroscope into the cervix. Resection of small-sized myomas using scissors and grasping forceps. Collection of multiple samples obtained from the uterine wall.
j) Uterus Model ETH7-MT0T2/2G
Simulated condition: Uterine cavity with myoma G0 and G2.
Purposes: Recommended for teaching the following maneuvers: In-sertion of the hysteroscope into the cervix. Resection of small-sized myomas using scissors and grasping forceps. Collection of multiple samples obtained from the uterine wall.
The artifi cial myomas are made of a specially formulated synthetic material that helps prevent inadvertent damage to instruments.
k) Uterus Model ETH7-HYP/2G
Simulated condition: Uterine cavity demonstrating polypoid hyperplasia without atypical vascularization;
Purposes: Recommended for teaching the following maneuvers: Insertion of the hysteroscope into the cervix. Differential di-agnosis of polypoid hyperplasia against adenocarcinoma. Collection of multiple biopsy samples and/or piecemeal polypectomy performed on the uterine wall.
l) Uterus Model ETH7-ADC/2G
Simulated Condition: Uterine cavity demonstrating atypical vascularization in the presence of adenocarcinoma.
Purposes: Recommended for teaching the following maneuvers: Insertion of the hysteroscope into the cervix. Piecemeal resection of adenocarcinoma and collection of multiple biopsy samples obtained from the uterine wall. Simulated occurrence of bleeding.

Survey of Artifi cial Uterus Models – Designated Standard Procedures with Corresponding Level of Diffi culty 45
m) Uterus Model ETH9/2G
Simulated Condition: Uterine cavity demonstrating a condition of polyposis or myomatosis. The model allows biological specimens to be inserted and attached through openings in the uterus (As-sembly, see Figs. 7 to 12);
Purposes: Recommended for advanced courses of vaginohysteros-copy including electrosurgery, use of a monopolar or bipo-lar resectoscope or the Intrauterine Bigatti Shaver (IBS®).Note that only the biological specimens simulating tumors will be resected.
n) Uterus Model ETH 8 (developed by Marcos Lyra)
Simulated Condition: Uterine cavity in the absence of tumors for training endo-metrial ablation.
* Available for sale in Brazil only. Other countries, please contact your local KARL STORZ representative for video demonstration.

Best Practices in Hysteroscopic Training – A Tutorial Based on the EVE Realistic Simulator for Hysteroscopy46
References
1. A RORA H, URIBE J, RALPH W, ZELTSAN M, CUELLAR H, GALLAGHER A, et al. Assessment of construct validity of the endoscopic sinus surgery simulator. Archives of otolaryngology--head & neck surgery 2005; 131(3): 217–21.
2. F ILHO FV, COELHO G, CAVALHEIRO S, LYRA M, ZYMBERG ST. Quality assessment of a new surgical simulator for neuroendo-scopic training. Neurosurgical focus 2011; 30(4): E17.
3. G ALLAGHER AG, MCCLURE N, MCGUIGAN J, CROTHERS I, BROWNING J. Virtual reality training in laparoscopic surgery: a preliminary assessment of minimally invasive surgical trainer virtual reality (MIST VR). Endoscopy 1999; 31(4): 310–3.
4. H AMOU J. Electroresection of fi broids. In: Sutton C, Diamond MP,eds. Endoscopic Surgery for Gynecologists. London: WB Saunders; 1993: 327–30.
5. K OHN LT, CORRIGAN J, DONALDSON MS. To err is human. Building a Safer Health System. Washington, D. C.: National Academy Press; 2000.
6. L YRA MAR. Treinamento em histeroscopia (cap. 19). In: Cavalcanti de Albuquerque Neto L, Mencaglia L, eds. Histeroscopia Cirúrgica. Lisboa: MEDSI, Editora Nova Guanabara, Lda; 2004: 275–91.
7. M ATTHES AG, PERIN LF, RANCATI A, DA FONSECA L, LYRA M.Mastotrainer: new training project for breast aesthetic and reconstructive surgery. Plastic and reconstructive surgery 2012; 130(3): 502e-4e.
8. N OGUEIRA JF, STAMM AC, LYRA M, BALIEIRO FO, LEAO FS. Building a real endoscopic sinus and skull-base surgery simulator. Otolaryngology–head and neck surgery : offi cial journal of American Academy of Otolaryngology-Head and Neck Surgery 2008; 139(5): 727–8.
9. P ARK J, MACRAE H, MUSSELMAN LJ, ROSSOS P, HAMSTRA SJ, WOLMAN S, ET AL. Randomized controlled trial of virtual reality simulator training: transfer to live patients. American journal of surgery 2007; 194(2): 205–11.
10. RODNEY PEYTON JW, SALTZMAN PD. Best Practices in Surgical Education: : The Training of Registrars and Residents. Ohio: Ethicon Endo-Surgery, Inc.; 2009.
11. ZYMBERG S, VAZ-GUIMARAES FILHO F, LYRA M. Neuroendo-scopic training: presentation of a new real simulator. Minimally invasive neurosurgery : MIN 2010; 53(1): 44–6.

Recommended Instruments and Equipment 47
Recommended Instruments and Equipment

Best Practices in Hysteroscopic Training – A Tutorial Based on the EVE Realistic Simulator for Hysteroscopy48
nLYRA Hystero-Trainer Eve II
26346
26346 LYRA Hysteroscopic Trainer EVE, complete
It is recommended to check the suitability of the product for the intended procedure prior to use.
26343
26343 LYRA Hystero-Trainer Eve II including: Neoderm Uterus, for bipolar resection Neoderm Uterus, with polyps Neoderm Uterus, with septum and polyps Neoderm Uterus, with septum without polyps 1 Vaginal Block, for biological organ structures/uteri 2 Vaginal Block, for artificial uteri (Neoderm) Neutral Electrode, for unipolar use Neoderm Uterus, for biological implants Base Body, for EVE Hystero-Trainer, 2nd generation
1 2

Best Practices in Hysteroscopic Training – A Tutorial Based on the EVE Realistic Simulator for Hysteroscopy 49
Basic Instrument Set for Diagnostic Office Hysteroscopy, diameter 5 mmBETTOCCHI® Hysteroscopes based on a 2.9 mm telescope
26120 BA HOPKINS® Forward-Oblique Telescope 30°, diameter 2.9 mm, length 30 cm, autoclavable, fiber optic light transmission incorporated, color code: red
26120 BA
26161 VB/VC
Inflow
Outflow
26161 VB Inner Sheath, diameter 3.8 mm, with 1 LUER-Lock adaptor, for use with Outer Sheath 26161 VC
26161 VC Outer Sheath, diameter 4.5 mm, with 1 LUER-Lock adaptor, for use with Inner Sheath 26161 VB
Telescope
Outflow Outer Sheath
Inner Sheath
Inflow
Without working channel
With working channel
26153 BI
26153 BO
26153 BI BETTOCCHI® Inner Sheath, size 4.3 mm, with channel for semirigid 5 Fr. operating instruments, with 1 stopcock and 1 LUER-Lock adaptor, for use with Outer Sheath 26153 BO
26153 BO BETTOCCHI® Outer Sheath, size 5 mm, with 1 stopcock and 1 LUER-Lock adaptor, for use with Inner Sheath 26153 BI
Telescope
Working Channel
Outflow Outer Sheath Inner Sheath Inflow
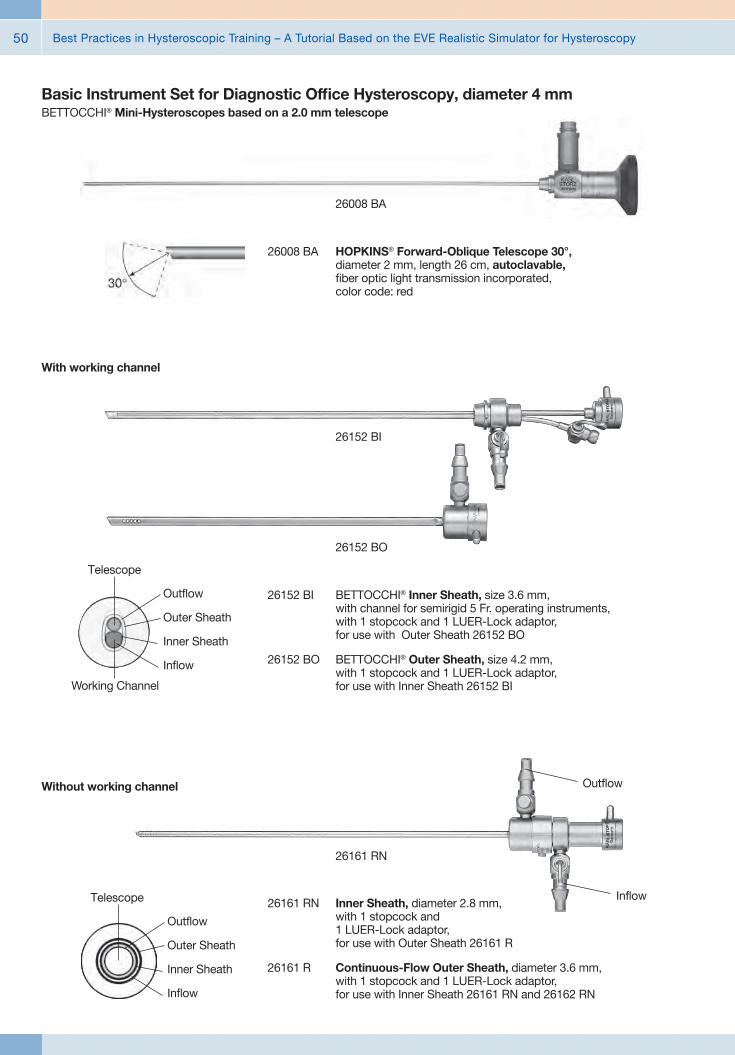
Best Practices in Hysteroscopic Training – A Tutorial Based on the EVE Realistic Simulator for Hysteroscopy50
26008 BA
26008 BA HOPKINS® Forward-Oblique Telescope 30°, diameter 2 mm, length 26 cm, autoclavable, fiber optic light transmission incorporated, color code: red
Telescope
Outflow Outer Sheath
Inner Sheath
Inflow
26161 RN Inner Sheath, diameter 2.8 mm, with 1 stopcock and 1 LUER-Lock adaptor, for use with Outer Sheath 26161 R
26161 R Continuous-Flow Outer Sheath, diameter 3.6 mm, with 1 stopcock and 1 LUER-Lock adaptor, for use with Inner Sheath 26161 RN and 26162 RN
Inflow
Without working channel
26161 RN
Outflow
With working channel
26152 BO
Telescope
Working Channel
Outflow Outer Sheath
Inner Sheath
Inflow
26152 BI
26152 BI BETTOCCHI® Inner Sheath, size 3.6 mm, with channel for semirigid 5 Fr. operating instruments, with 1 stopcock and 1 LUER-Lock adaptor, for use with Outer Sheath 26152 BO
26152 BO BETTOCCHI® Outer Sheath, size 4.2 mm, with 1 stopcock and 1 LUER-Lock adaptor, for use with Inner Sheath 26152 BI
Basic Instrument Set for Diagnostic Office Hysteroscopy, diameter 4 mmBETTOCCHI® Mini-Hysteroscopes based on a 2.0 mm telescope

Best Practices in Hysteroscopic Training – A Tutorial Based on the EVE Realistic Simulator for Hysteroscopy 51
BETTOCCHI® Integrated Office Hysteroscope (B.I.O.H.)™, diameter 4 mmbased on an integrated 2.0 mm telescope
26252 BL
26252 BL BETTOCCHI® B.I.O.H.® Compact Hysteroscope, HOPKINS® telescope 30°, size 4 mm, with channel for semirigid 5 Fr. operating instruments, with suction and irrigation valves for single or continuous-flow use, long handle,
including: Outer Sheath
2x Suction and Irrigation Valve Adapter Monobloc Sealing for instrument ports (10 pcs.)
Recommended accessories
39501 XC Wire Tray, for cleaninig, sterilization and storage of one KARL STORZ B.I.O.H.™ Compact Hysteroscope
26252 SP Sealing Set for B.I.O.H.™ Compact Hysteroscope (5 x Spare Sealing Caps, 3 x 10 Spare O-Rings for valve, 5 x O-Rings for sheath)
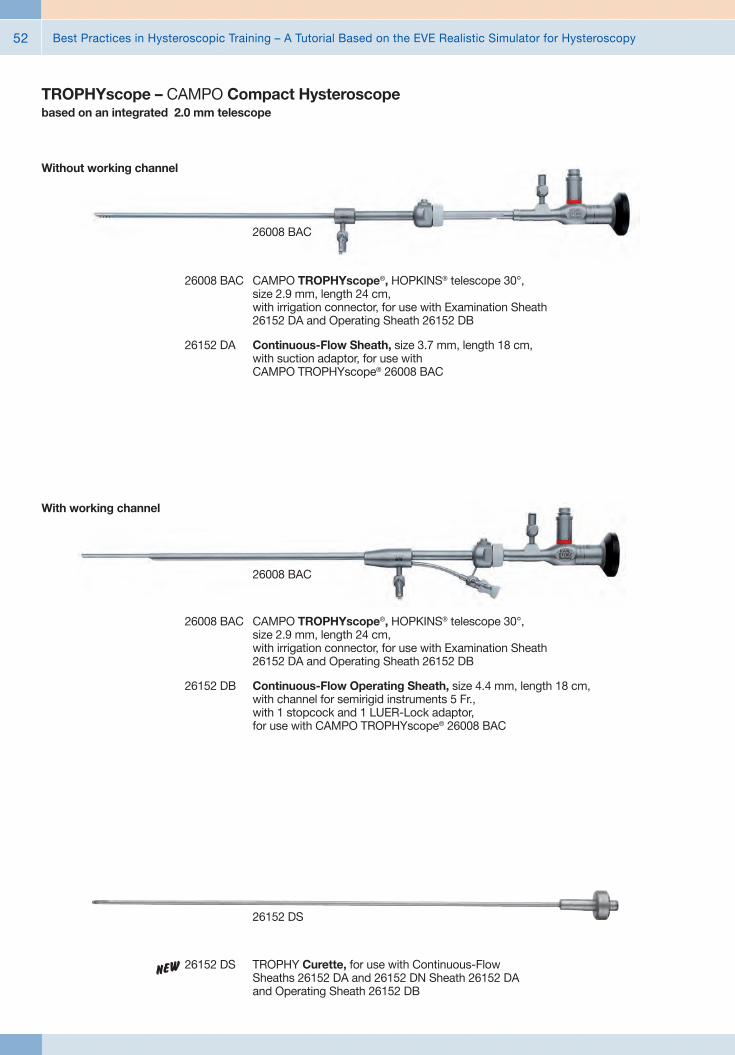
Best Practices in Hysteroscopic Training – A Tutorial Based on the EVE Realistic Simulator for Hysteroscopy52
TROPHYscope – CAMPO Compact Hysteroscopebased on an integrated 2.0 mm telescope
26008 BAC
26008 BAC CAMPO TROPHYscope®, HOPKINS® telescope 30°, size 2.9 mm, length 24 cm, with irrigation connector, for use with Examination Sheath 26152 DA and Operating Sheath 26152 DB
26152 DA Continuous-Flow Sheath, size 3.7 mm, length 18 cm, with suction adaptor, for use with CAMPO TROPHYscope® 26008 BAC
Without working channel
26008 BAC
26008 BAC CAMPO TROPHYscope®, HOPKINS® telescope 30°, size 2.9 mm, length 24 cm, with irrigation connector, for use with Examination Sheath 26152 DA and Operating Sheath 26152 DB
26152 DB Continuous-Flow Operating Sheath, size 4.4 mm, length 18 cm, with channel for semirigid instruments 5 Fr., with 1 stopcock and 1 LUER-Lock adaptor, for use with CAMPO TROPHYscope® 26008 BAC
With working channel
26152 DS
26152 DS TROPHY Curette, for use with Continuous-Flow Sheaths 26152 DA and 26152 DN Sheath 26152 DA and Operating Sheath 26152 DB
n

Best Practices in Hysteroscopic Training – A Tutorial Based on the EVE Realistic Simulator for Hysteroscopy 53
Reusable Bipolar Electrodes, Length 36 cm, 5 Fr. bipolarNaCl
26158 BE
26158 BE Bipolar Dissection Electrode, semirigid, 5 Fr., 90 degree angled, length 36 cm
26159 BE Bipolar Dissection Electrode, semirigid, 5 Fr., length 36 cm
26159 GC GORDTS/CAMPO Bipolar Ball Electrode, semirigid, 5 Fr., length 36 cm
Basic Instrument Set for Diagnostic Office HysteroscopyReusable Mechanical Surgical Instruments, Length 34 cm, 5 Fr.
26159
26159 EHW Scissors, semirigid, blunt, single action jaws, 5 Fr., length 34 cm
26159 SHW Scissors, semirigid, pointed, single action jaws, 5 Fr., length 34 cm
26159 UHW Biopsy and Grasping Forceps, semirigid, double action jaws, 5 Fr., length 34 cm
26159 H HESSELING Tenaculum Grasping Forceps, semirigid, double action jaws, 5 Fr., length 34 cm
26159 DHW Punch, semirigid, through-cutting, single action jaws, 5 Fr., length 34 cm
26159 BHW Biopsy Spoon Forceps, semirigid, double action jaws, 5 Fr., length 34 cm
26159 DS DI SPIEZIO SARDO Grasping Forceps, semirigid, double action jaws, 5 Fr., length 34 cm
26159 HS HESSELING/DI SPIEZIO SARDO Tenaculum Grasping Forceps with Spike, semirigid, double action jaws, 5 Fr., length 34 cm
26159 M BETTOCCHI® Myoma Fixation Instrument, semirigid, 5 Fr., length 34 cm
26159 G BETTOCCHI®/DI SPIEZIO SARDO Palpation Probe, semirigid, millimeter division, 5 Fr., length 34 cm
n
n

Best Practices in Hysteroscopic Training – A Tutorial Based on the EVE Realistic Simulator for Hysteroscopy54
Basic Instrument Set for Operative Hysteroscopy, 26 Fr.Reusable Unipolar Working Element Set
26050 EG Working Element Set, Cutting by means of a spring. Movable thumb ring. In rest position the tipe of the electrode is inside the sheath,
including: Working Element
Cutting Loop, angled Coagulating Electrode, ball end Coagulating Electrode, unipolar, pointed 2x Unipolar High Frequency Cord Protection Tube
26050 E
Reusable Unipolar Electrodes (24 Fr.), for use with 26050 EG
26050 G Cutting Loop, unipolar, angled, 24 Fr., for use with HOPKINS® Telescope 26105 FA, color code: yellow
26050 J Cutting Loop, unipolar, straight, 24 Fr., for use with HOPKINS® Telescope 26105 FA, color code: yellow
26050 N Coagulating Electrode, unipolar, ball end, diameter 3 mm, for use with HOPKINS® Telescope 26105 FA, color code: yellow
26050 L Coagulating Electrode, unipolar, pointed, 24 Fr., for use with HOPKINS® Telescope 26105 FA, color code: yellow
280 Protection Tube, for sterilization and storage of electrodes, curettes and knives
280
unipolar

Best Practices in Hysteroscopic Training – A Tutorial Based on the EVE Realistic Simulator for Hysteroscopy 55
Basic Instrument Set for Operative Hysteroscopy, 26 Fr.Reusable Resectoscopes for intrauterine HF-Surgery
26105 FA
26105 FA HOPKINS® Telescope 12°, enlarged view, diameter 4 mm, length 30 cm, autoclavable, fiber optic light transmission incorporated, color code: black
26050 SL Resectoscope Sheath, including connecting tube for in- and outflow, for continuous irrigation and suction, 26 Fr., oblique beak, rotatable Inner Sheath 26050 XA with ceramic insulation, for use with Working Elements 26050 E, 26050 D, 26050 V, 26040 EB and 26050 EB, color code: yellow
or
26040 SL Resectoscope Sheath, including connecting tube for in- and outflow, for continuous irrigation and suction, 26 Fr., oblique beak, fixed inner sheath 26040 XA with ceramic insulation, for use with Working Elements 26050 E, 26050 D, 26050 V and 26050 EB, color code: yellow
or
26050 SC Resectoscope Sheath, including connecting tubes for in- and outflow, 26 Fr., oblique beak, inner tube with ceramic insulation, quick release lock, for use with resectoscope working elements 26050 E, 26050 D, 26050 V, 26040 EB and 26040 DB, color code: yellow
26040 OC Standard Obturator, for use with Resectoscope Sheaths 26040 SL, 26050 SL and 26050 SC, color code: yellow
26050 SC

Best Practices in Hysteroscopic Training – A Tutorial Based on the EVE Realistic Simulator for Hysteroscopy56
280 Protection Tube, for sterilization and storage of electrodes, curettes and knives
280
Reusable Bipolar Electrodes (24 Fr.), for use with 26040 EBH
26040 GP1 Cutting Loop, bipolar, 24/26 Fr., for use with HOPKINS® Telescopes 26105 FA/BA, color code: yellow
26040 BL1 Coagulating Electrode, bipolar, pointed, 24/26 Fr., for use with HOPKINS® Telescope 26105 FA/BA, color code: yellow
26040 NB1 HALF MOON Coagulation Electrode, bipolar, ball-shaped, 24 Fr., for use with HOPKINS® Telescope 26105 FA, color code: yellow
26040 JB1 Cutting Loop, bipolar, longitudinal, 24/26 Fr., for use with HOPKINS® Telescopes 26105 FA/BA, color code: yellow-orange
Basic Instrument Set for Operative Hysteroscopy, 26 Fr.Reusable Bipolar Working Element Set
26040 EBH Working Element Set, bipolar, Cutting by means of a spring. Movable thumb support. In rest position the electrode tip is inside the sheath,
including: Working element, bipolar
2x Cutting loop, bipolar Coagulation Electrode, bipolar, pointed HALF MOON Coagulation Electrode, bipolar, ball end High frequency cable, bipolar Protection tube
26040 EB
bipolarNaCl

Best Practices in Hysteroscopic Training – A Tutorial Based on the EVE Realistic Simulator for Hysteroscopy 57
Basic Instrument Set for Operative Hysteroscopy, 22 Fr.Reusable Unipolar Slender Working Element Set
26055 ES Working Element Set, unipolar, (Cutting by means of a spring. Movable thumb support. In resting position, the electrode tip is inside the sheath)
including: Working Element
2x Cutting Loop, angled Coagulating Electrode, pointed Coagulating Electrode, ball end, diameter 3 mm 2x High Frequency Cord Protecting Tube
26055 E
Reusable Unipolar Electrodes (21 Fr.), for use with 26055 ES
26055 G Cutting Loop, angled
26055 H Cutting Loop, angled 25°
26055 N Coagulating Electrode, ball end, diameter 3 mm
26055 L Coagulating Electrode, pointed
280 Protection Tube, for sterilization and storage of electrodes, curettes and knives
280
unipolar

Best Practices in Hysteroscopic Training – A Tutorial Based on the EVE Realistic Simulator for Hysteroscopy58
Basic Instrument Set for Operative Hysteroscopy, 22 Fr.Reusable Slender Resectoscopes for intrauterine HF-Surgery
26020 FA
26020 FA HOPKINS® Telescope 12°, diameter 2.9 mm, length 30 cm, autoclavable, fiber optic light transmission incorporated, color code: black
26055 SC
26055 SL Resectoscope Sheath, including connecting tube for in-and outflow, for continuous irrigation and suction, 22 Fr., oblique beak, fixed inner sheath 26055 XB with ceramic insulation, for use with working element 26055 E, color code: white
or
26055 SC Resectoscope Sheath, including connecting tubes for in- and outflow, 22 Fr., oblique beak, inner tube with ceramic insulation, quick release lock, for use with resectoscope working element 26055 E color code: white
or
26055 LD Resectoscope Sheath, including connecting tube for in- and outlow, for continuous irrigation and suction, 22 Fr., oblique beak, rotatable sheath tube 26055 XE with ceramic insulation, for use with working element 26055 E, color code: white
26055 CO Standard Obturator, for use with resectoscope sheaths 26055 SL/SC/LD color code: white

Best Practices in Hysteroscopic Training – A Tutorial Based on the EVE Realistic Simulator for Hysteroscopy 59
Reusable Bipolar Electrodes (21 Fr.), for use with 26055 EBH
26055 GP Cutting Loop, bipolar, 21 Fr., for use with HOPKINS® telescope 26020 FA, color code: white
26055 NB HALF MOON Coagulation Electrode, bipolar, ball end, 21 Fr., for use with HOPKINS® telescopes 26020 FA, color code: white
26055 BL Coagulation Electrode, bipolar, pointed, 21 Fr., for use with HOPKINS® telescopes 26020 FA, color code: white
280 Protection Tube, for sterilization and storage of electrodes, curettes and knives
280
26055 EBH Working Element Set, bipolar, (Cutting by means of a spring. Movable thumb support. In resting position, the electrode tip is inside the sheath)
including: Working element, bipolar
2x Cutting loop, bipolar Coagulation Electrode, bipolar, pointed HALF MOON Coagulation Electrode, bipolar, ball end High frequency cable, bipolar Protection tube Connector with tube
26055 EBH
bipolarNaCl
Basic Instrument Set for Operative Hysteroscopy, 22 Fr.Reusable Bipolar Slender Working Element Set
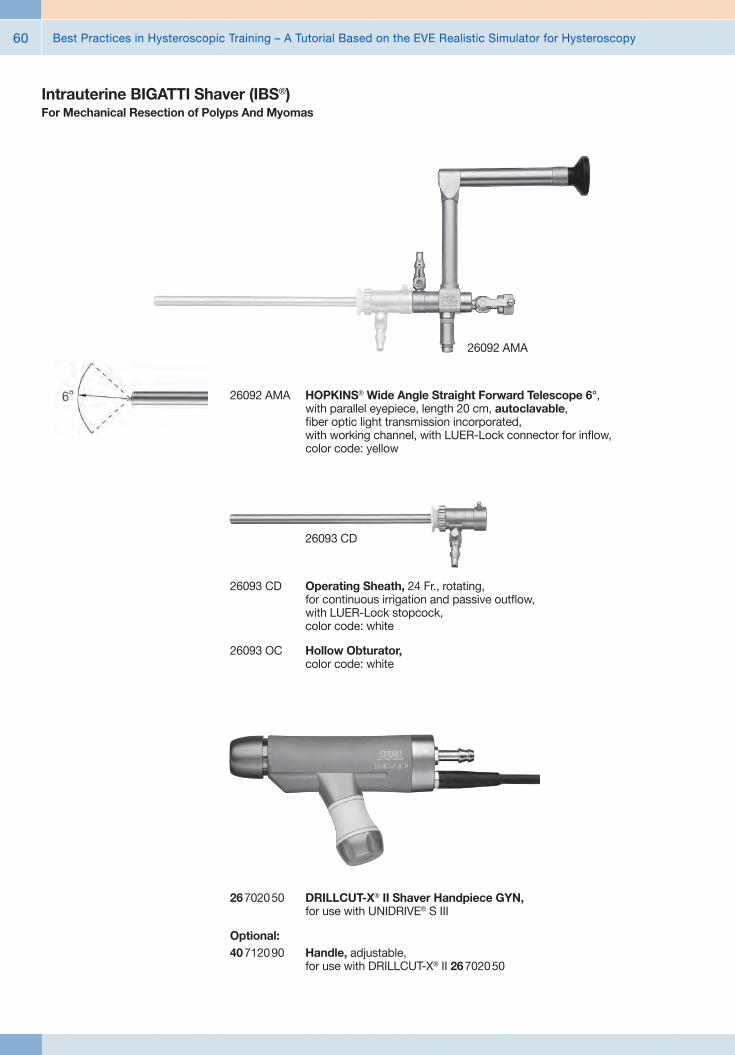
Best Practices in Hysteroscopic Training – A Tutorial Based on the EVE Realistic Simulator for Hysteroscopy60
Intrauterine BIGATTI Shaver (IBS®)For Mechanical Resection of Polyps And Myomas
26092 AMA HOPKINS® Wide Angle Straight Forward Telescope 6°, with parallel eyepiece, length 20 cm, autoclavable, fiber optic light transmission incorporated, with working channel, with LUER-Lock connector for inflow, color code: yellow
26092 AMA
26093 CD Operating Sheath, 24 Fr., rotating, for continuous irrigation and passive outflow, with LUER-Lock stopcock, color code: white
26093 OC Hollow Obturator, color code: white
26093 CD
26702050 DRILLCUT-X® II Shaver Handpiece GYN, for use with UNIDRIVE® S III
Optional: 40712090 Handle, adjustable,
for use with DRILLCUT-X® II 26702050

Best Practices in Hysteroscopic Training – A Tutorial Based on the EVE Realistic Simulator for Hysteroscopy 61
Intrauterine BIGATTI Shaver (IBS®)For Mechanical Resection of Polyps And Myomas
26208 SA Shaver Blade GYN, straight, sterilizable, concave cutting edge, double serrated, oval cutting window, diameter 4 mm, length 32 cm, for use with DRILLCUT-X® II Handpiece 26 7020 50, color code: blue-green
26208 SB Shaver Blade GYN, straight, sterilizable, double serrated cutting edge, rectangular cutting window, diameter 4 mm, length 32 cm, for use with DRILLCUT-X® II Handpiece 26 7020 50, color code: blue-yellow
26208 SA
26208 SZ Coagulation Electrode, bipolar, for use with Intrauterine Bigatti Shaver (IBS)
26176 LE Bipolar High Frequency Cord, length 300 cm, for AUTOCON® II 400 SCB system (111, 113, 115, 122, 125), AUTOCON® II 200, AUTOCON® II 80, Coagulator 26021 B/C/D, 860021 B/C/D, 27810 B/C/D, 28810 B/C/D, AUTOCON® series (50, 200, 350), Erbe-Coagulator, T and ICC series.
26208 SZ
Bipolar High Frequency Cord
KARL STORZ High Frequency Instrument Surgery Unit

Best Practices in Hysteroscopic Training – A Tutorial Based on the EVE Realistic Simulator for Hysteroscopy62
Natural illumination## LED high-performance light source
## Natural colour rendition close to sunlight with a colour temperature of 6400 K
## Up to 30,000 hours lamp operating time
Ordering InformationTP100 EN TELE PACK X LED, endoscopic video
unit for use with all KARL STORZ TELECAM one-chip camera heads and video endoscopes, incl. LED-light source on a similar niveau as the Power LED 175, with integrated digital Image Processing Module, 15" LCD monitor with LED backlight, USB/SD memory module, color systems PAL/NTSC, power supply 100 - 240 VAC, 50/60 Hz,
including: USB Silicone Keyboard
with Touchpad, with US character set
Unique benefits of the KARL STORZ TELE PACK X LED at a glance
Flexible storage possibilities## SD card-slot allows high storage capacity
## USB-slot for external HDDs and flash drives
## Picture gallery for records
## Playback of saved videos
## Print-ready patient report documentation
Crystal clear image## 15" LCD monitor with LED backlight
## Rotatable image display
## 24 Bit color intensity for natural color rendition
## DVI video input for pristine picture quality
## DVI video output for connecting HD monitors
Easy control combined with highest safety## Membrane keyboard approved for wipe disinfection
## Hot-Keys assuring fast and direct adjustment
## Arrow keys for intuitive control
## Pedal control available
Additional information## Sturdy, portable casing
## Ergonomic design allows comfortable transport ## Universal power supply unit: 100 – 240 VAC, 50/60 Hz
## Measurement (H x W x D): 450 mm x 350 mm x 150 mm
## Weight: 7 kg
n

Best Practices in Hysteroscopic Training – A Tutorial Based on the EVE Realistic Simulator for Hysteroscopy 63
Unique benefits of the KARL STORZ TELE PACK X LED at a glanceCompatible camera heads
20 2120 40 PAL TELECAM One-Chip Camera Head, autoclavable, with integrated Parfocal Zoom Lens, f = 14 – 28 mm (2x), 2 freely programmable camera head buttons, including plastic container for sterilization20 2121 40 NTSC
20 2120 30 PAL TELECAM One-Chip Camera Head, with integrated Parfocal Zoom Lens, f = 25 – 50 mm (2x), 2 freely programmable camera head buttons20 2121 30 NTSC
20 2120 34 PALTELECAM C-Mount One-Chip Camera Head, 2 freely programmable camera head buttons
20 2121 34 NTSC
20 2120 32 PAL TELECAM-B Beamsplitter One-Chip Camera Head with 2 freely programmable camera head buttons and rotating CCD sensor, f = 25 mm20 2121 32 NTSC
20 2120 31 PALTELECAM-B Beamsplitter One-Chip Camera Head with 2 freely programmable camera head buttons and rotating CCD sensor, f = 30 mm
202620 30 PALDCI® II One-Chip Camera Head, f = 16 mm, for usewith DCI® HOPKINS® telescopes
20 2621 30 NTSC
ENT
11101 VP PALVideo Rhino-Laryngoscope
11101 VN NTSC
Pneumology
11900 BP PALVideo Bronchoscope
11900 BN NTSC
Urology11272 VP PAL
Video-Cysto-Urethroscope11272 VN NTSC
11272 VPU PAL
11272 VNU NTSC
Compatible Video-Endoscopes
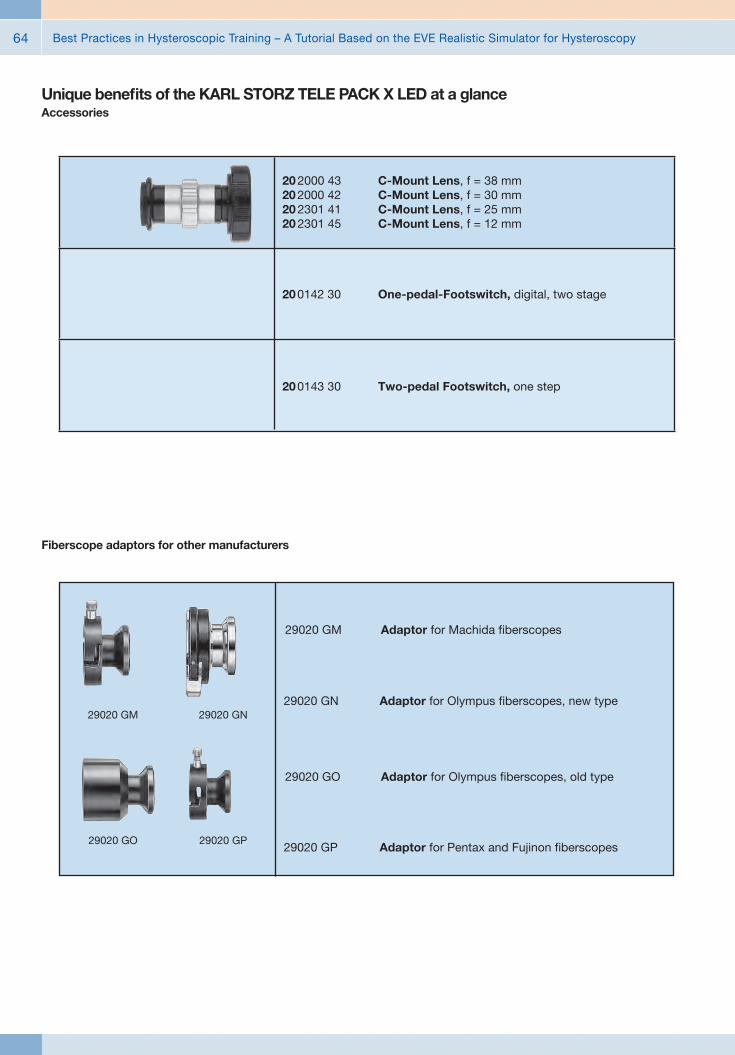
Best Practices in Hysteroscopic Training – A Tutorial Based on the EVE Realistic Simulator for Hysteroscopy64
20 2000 43 C-Mount Lens, f = 38 mm20 2000 42 C-Mount Lens, f = 30 mm20 2301 41 C-Mount Lens, f = 25 mm20 2301 45 C-Mount Lens, f = 12 mm
20 0142 30 One-pedal-Footswitch, digital, two stage
20 0143 30 Two-pedal Footswitch, one step
Unique benefits of the KARL STORZ TELE PACK X LED at a glanceAccessories
29020 GM Adaptor for Machida fiberscopes
29020 GO Adaptor for Olympus fiberscopes, old type
29020 GN
29020 GO 29020 GP29020 GP Adaptor for Pentax and Fujinon fiberscopes
29020 GN Adaptor for Olympus fiberscopes, new type29020 GM
Fiberscope adaptors for other manufacturers

Best Practices in Hysteroscopic Training – A Tutorial Based on the EVE Realistic Simulator for Hysteroscopy 65
Innovative Design## Dashboard: Complete overview with intuitive menu guidance
## Live menu: User-friendly and customizable## Intelligent icons: Graphic representation changes when settings of connected devices or the entire system are adjusted
## Automatic light source control## Side-by-side view: Parallel display of standard image and the Visualization mode
## Multiple source control: IMAGE1 S allows the simultaneous display, processing and documentation of image information from two connected image sources, e.g., for hybrid operations
Dashboard Live menu
Side-by-side view: Parallel display of standard image and Visualization mode
Intelligent icons
Economical and future-proof## Modular concept for flexible, rigid and 3D endoscopy as well as new technologies
## Forward and backward compatibility with video endoscopes and FULL HD camera heads
## Sustainable investment## Compatible with all light sources
IMAGE1 S Camera System n

Best Practices in Hysteroscopic Training – A Tutorial Based on the EVE Realistic Simulator for Hysteroscopy66
Brillant Imaging## Clear and razor-sharp endoscopic images in FULL HD
## Natural color rendition
## Reflection is minimized## Multiple IMAGE1 S technologies for homogeneous illumination, contrast enhancement and color shifting
FULL HD image CHROMA
FULL HD image SPECTRA A *
FULL HD image
FULL HD image CLARA
SPECTRA B **
* SPECTRA A : Not for sale in the U.S.** SPECTRA B : Not for sale in the U.S.
IMAGE1 S Camera System n

Best Practices in Hysteroscopic Training – A Tutorial Based on the EVE Realistic Simulator for Hysteroscopy 67
TC 200EN* IMAGE1 S CONNECT, connect module, for use with up to 3 link modules, resolution 1920 x 1080 pixels, with integrated KARL STORZ-SCB and digital Image Processing Module, power supply 100 – 120 VAC/200 – 240 VAC, 50/60 Hz
including: Mains Cord, length 300 cm DVI-D Connecting Cable, length 300 cm SCB Connecting Cable, length 100 cm USB Flash Drive, 32 GB, USB silicone keyboard, with touchpad, US
* Available in the following languages: DE, ES, FR, IT, PT, RU
Specifications:
HD video outputs
Format signal outputs
LINK video inputs
USB interface SCB interface
- 2x DVI-D - 1x 3G-SDI
1920 x 1080p, 50/60 Hz
3x
4x USB, (2x front, 2x rear) 2x 6-pin mini-DIN
100 – 120 VAC/200 – 240 VAC
50/60 Hz
I, CF-Defib
305 x 54 x 320 mm
2.1 kg
Power supply
Power frequency
Protection class
Dimensions w x h x d
Weight
TC 300 IMAGE1 S H3-LINK, link module, for use with IMAGE1 FULL HD three-chip camera heads, power supply 100 – 120 VAC/200 – 240 VAC, 50/60 Hz, for use with IMAGE1 S CONNECT TC 200ENincluding:Mains Cord, length 300 cm
Link Cable, length 20 cm
For use with IMAGE1 S IMAGE1 S CONNECT Module TC 200EN
IMAGE1 S Camera System n
TC 300 (H3-Link)
TH 100, TH 101, TH 102, TH 103, TH 104, TH 106 (fully compatible with IMAGE1 S) 22 2200 55-3, 22 2200 56-3, 22 2200 53-3, 22 2200 60-3, 22 2200 61-3, 22 2200 54-3, 22 2200 85-3 (compatible without IMAGE1 S technologies CLARA, CHROMA, SPECTRA*)
1x
100 – 120 VAC/200 – 240 VAC
50/60 Hz
I, CF-Defib
305 x 54 x 320 mm
1.86 kg
Camera System
Supported camera heads/video endoscopes
LINK video outputs
Power supply
Power frequency
Protection class
Dimensions w x h x d
Weight
Specifications:
TC 200EN
TC 300
* SPECTRA A : Not for sale in the U.S.** SPECTRA B : Not for sale in the U.S.
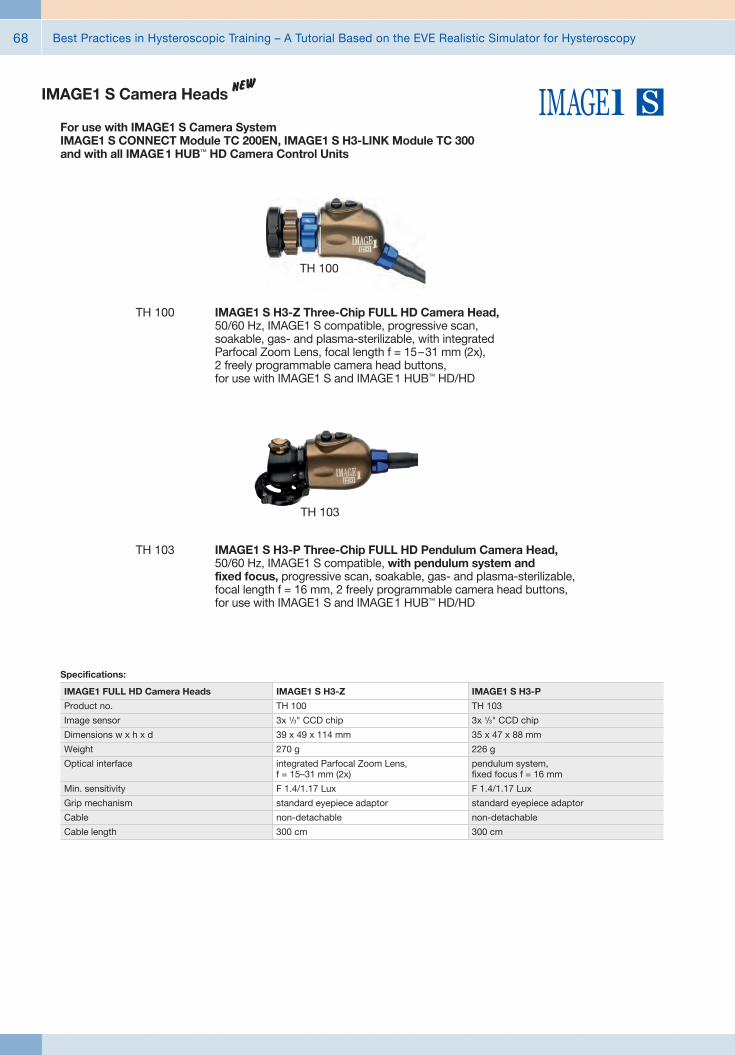
Best Practices in Hysteroscopic Training – A Tutorial Based on the EVE Realistic Simulator for Hysteroscopy68
TH 100 IMAGE1 S H3-Z Three-Chip FULL HD Camera Head, 50/60 Hz, IMAGE1 S compatible, progressive scan, soakable, gas- and plasma-sterilizable, with integrated Parfocal Zoom Lens, focal length f = 15 – 31 mm (2x), 2 freely programmable camera head buttons, for use with IMAGE1 S and IMAGE 1 HUB™ HD/HD
TH 103
TH 103 IMAGE1 S H3-P Three-Chip FULL HD Pendulum Camera Head, 50/60 Hz, IMAGE1 S compatible, with pendulum system and fixed focus, progressive scan, soakable, gas- and plasma-sterilizable, focal length f = 16 mm, 2 freely programmable camera head buttons, for use with IMAGE1 S and IMAGE 1 HUB™ HD/HD
IMAGE1 FULL HD Camera Heads
Product no.
Image sensor
Dimensions w x h x d
Weight
Optical interface
Min. sensitivity
Grip mechanism
Cable
Cable length
IMAGE1 S H3-Z
TH 100
3x 1/3" CCD chip
39 x 49 x 114 mm
270 g
integrated Parfocal Zoom Lens, f = 15–31 mm (2x)
F 1.4/1.17 Lux
standard eyepiece adaptor
non-detachable
300 cm
IMAGE1 S H3-P
TH 103
3x 1/3" CCD chip
35 x 47 x 88 mm
226 g
pendulum system, fixed focus f = 16 mm
F 1.4/1.17 Lux
standard eyepiece adaptor
non-detachable
300 cm
Specifications:
For use with IMAGE1 S Camera System IMAGE1 S CONNECT Module TC 200EN, IMAGE1 S H3-LINK Module TC 300 and with all IMAGE 1 HUB™ HD Camera Control Units
IMAGE1 S Camera Heads n
TH 100

Best Practices in Hysteroscopic Training – A Tutorial Based on the EVE Realistic Simulator for Hysteroscopy 69
9826 NB
9826 NB 26" FULL HD Monitor, wall-mounted with VESA 100 adaption, color systems PAL/NTSC, max. screen resolution 1920 x 1080, image fomat 16:9, power supply 100 – 240 VAC, 50/60 Hzincluding:External 24 VDC Power SupplyMains Cord
9619 NB
9619 NB 19" HD Monitor, color systems PAL/NTSC, max. screen resolution 1280 x 1024, image format 4:3, power supply 100 – 240 VAC, 50/60 Hz, wall-mounted with VESA 100 adaption,including:
External 24 VDC Power SupplyMains Cord
Monitors

Best Practices in Hysteroscopic Training – A Tutorial Based on the EVE Realistic Simulator for Hysteroscopy70
Monitors
Optional accessories:9826 SF Pedestal, for monitor 9826 NB9626 SF Pedestal, for monitor 9619 NB
26"
9826 NB
l
–
l
l
l
l
l
–
l
–
l
l
l
l
l
l
19"
9619 NB
l
–
–
l
l
l
l
l
l
l
–
l
l
l
l
l
KARL STORZ HD and FULL HD Monitors
Wall-mounted with VESA 100 adaption
Inputs:
DVI-D
Fibre Optic
3G-SDI
RGBS (VGA)
S-Video
Composite/FBAS
Outputs:
DVI-D
S-Video
Composite/FBAS
RGBS (VGA)
3G-SDI
Signal Format Display:
4:3
5:4
16:9
Picture-in-Picture
PAL/NTSC compatible
19"
optional
9619 NB
200 cd/m2 (typ)
178° vertical
0.29 mm
5 ms
700:1
100 mm VESA
7.6 kg
28 W
0 – 40°C
-20 – 60°C
max. 85%
469.5 x 416 x 75.5 mm
100 – 240 VAC
EN 60601-1, protection class IPX0
Specifications:
KARL STORZ HD and FULL HD Monitors
Desktop with pedestal
Product no.
Brightness
Max. viewing angle
Pixel distance
Reaction time
Contrast ratio
Mount
Weight
Rated power
Operating conditions
Storage
Rel. humidity
Dimensions w x h x d
Power supply
Certified to
26"
optional
9826 NB
500 cd/m2 (typ)
178° vertical
0.3 mm
8 ms
1400:1
100 mm VESA
7.7 kg
72 W
5 – 35°C
-20 – 60°C
max. 85%
643 x 396 x 87 mm
100 – 240 VAC
EN 60601-1, UL 60601-1, MDD93/42/EEC, protection class IPX2

Best Practices in Hysteroscopic Training – A Tutorial Based on the EVE Realistic Simulator for Hysteroscopy 71
20 5352 01-125 AUTOCON® II 400 High End, Set, SCB power supply 220 - 240 VAC, 50/60 Hz, HF connecting sockets: Bipolar combination, Multifunction, Unipolar 3-pin + Erbe Neutral electrode combination 6.3 mm, jack and 2-pin, System requirements: SCB R-UI Software Release 20090001-43 or higher
including: Mains Cord SCB Connecting Cable, length 100 cm
AUTOCON® II 400 SCB
Fiber Optic Light Cable
495 NT Fiber Optic Light Cable, with straight connector, diameter 2.5 mm, length 180 cm
495 NL Same, diameter 3.5 mm
HAMOU® ENDOMAT® with KARL STORZ SCBSuction and Irrigation System
26 3311 01-1 HAMOU® ENDOMAT® SCB, power supply 100 – 240 VAC, 50/60 Hz
including: Mains Cord 5x HYST Tubing Set*, for single use 5x LAP Tubing Set*, for single use SCB Connecting Cable, length 100 cm VACUsafe Promotion Pack Suction*, 2 l
Subject to the customer’s application-specific requirements additional accessories must be ordered separately.
* This product is marketed by mtp. For additional information, please apply to:
*mtp medical technical promotion gmbh, Take-Off GewerbePark 46, 78579 Neuhausen ob Eck, Germany

Best Practices in Hysteroscopic Training – A Tutorial Based on the EVE Realistic Simulator for Hysteroscopy72
UNIDRIVE® S III SCB
26 7010 01-1 UNIDRIVE® S III SCB, GYN Set, motor system, with KARL STORZ-SCB, power supply 100 –120/230 – 240 VAC, 50/60 Hz,
including: Mains Cord One-Pedal Footswitch, two-stage,
with proportional function and pump switch function SCB Connecting Cable, length 100 cm
20 7010 70 Control Cable, connectors 2x LEMO 5-pol 0°, length 100 cm, for transmission of foot switch control signal between UNIDRIVE® S III 20 7010 20-1 and HYSTEROMAT E.A.S.I.®
20 3303 02-1 ENDOMAT® LC SCB, power supply 100 – 240 VAC, 50/60 Hz,
including: Silicone Tubing Set, for suction, sterilizable SCB Connecting Cable, length 100 cm Control Cable, UNIDRIVE® S III –
KARL STORZ pump systems
ENDOMAT® LC SCB
HYSTEROMAT E.A.S.I.®26 3400 01-1 HYSTEROMAT E.A.S.I.® Set,
power supply 100 – 240 VAC, 50/60 Hz, HYSTEROMAT E.A.S.I.®: SCB ready, compatible from RUI Release 44,
including: Mains Cord SCB Connecting Cable, length 100 cm * Basic Tubing Set, for single use
Recommended accessories: * 031717-10 IRRIGATION tubing set, for single use,
sterile, package of 10, for use with KARL STORZ HYSTEROMAT E.A.S.I.®
* 031217-10 SUCTION tubing set, for single use, sterile, package of 10, for use with KARL STORZ HYSTEROMAT E.A.S.I.®
Optional accessories: 26 3403 30 Two-Pedal Footswitch, one-stage, digital,
for use with HYSTEROMAT E.A.S.I.®
* This product is marketed by mtp. For additional information, please apply to:
*mtp medical technical promotion gmbh, Take-Off GewerbePark 46, 78579 Neuhausen ob Eck, Germany
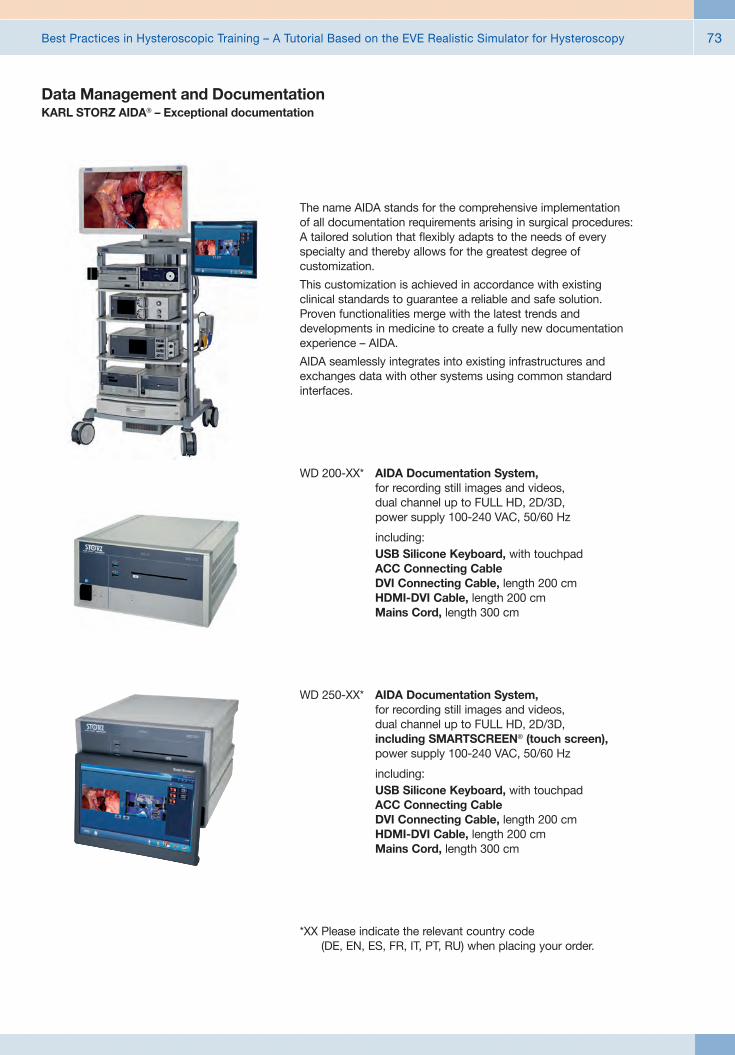
Best Practices in Hysteroscopic Training – A Tutorial Based on the EVE Realistic Simulator for Hysteroscopy 73
Data Management and DocumentationKARL STORZ AIDA® – Exceptional documentation
The name AIDA stands for the comprehensive implementation of all documentation requirements arising in surgical procedures: A tailored solution that flexibly adapts to the needs of every specialty and thereby allows for the greatest degree of customization.
This customization is achieved in accordance with existing clinical standards to guarantee a reliable and safe solution. Proven functionalities merge with the latest trends and developments in medicine to create a fully new documentation experience – AIDA.
AIDA seamlessly integrates into existing infrastructures and exchanges data with other systems using common standard interfaces.
WD 200-XX* AIDA Documentation System, for recording still images and videos, dual channel up to FULL HD, 2D/3D, power supply 100-240 VAC, 50/60 Hz
including: USB Silicone Keyboard, with touchpad ACC Connecting Cable DVI Connecting Cable, length 200 cm HDMI-DVI Cable, length 200 cm Mains Cord, length 300 cm
WD 250-XX* AIDA Documentation System, for recording still images and videos, dual channel up to FULL HD, 2D/3D, including SMARTSCREEN® (touch screen), power supply 100-240 VAC, 50/60 Hz
including: USB Silicone Keyboard, with touchpad ACC Connecting Cable DVI Connecting Cable, length 200 cm HDMI-DVI Cable, length 200 cm Mains Cord, length 300 cm
*XX Please indicate the relevant country code (DE, EN, ES, FR, IT, PT, RU) when placing your order.

Best Practices in Hysteroscopic Training – A Tutorial Based on the EVE Realistic Simulator for Hysteroscopy74
Workflow-oriented use
Patient
Entering patient data has never been this easy. AIDA seamlessly integrates into the existing infrastructure such as HIS and PACS. Data can be entered manually or via a DICOM worklist. All important patient information is just a click away.
Checklist
Central administration and documentation of time-out. The checklist simplifies the documentation of all critical steps in accordance with clinical standards. All checklists can be adapted to individual needs for sustainably increasing patient safety.
Record
High-quality documentation, with still images and videos being recorded in FULL HD and 3D. The Dual Capture function allows for the parallel (synchronous or independent) recording of two sources. All recorded media can be marked for further processing with just one click.
Edit
With the Edit module, simple adjustments to recorded still images and videos can be very rapidly completed. Recordings can be quickly optimized and then directly placed in the report. In addition, freeze frames can be cut out of videos and edited and saved. Existing markings from the Record module can be used for quick selection.
Complete
Completing a procedure has never been easier. AIDA offers a large selection of storage locations. The data exported to each storage location can be defined. The Intelligent Export Manager (IEM) then carries out the export in the background. To prevent data loss, the system keeps the data until they have been successfully exported.
Reference
All important patient information is always available and easy to access. Completed procedures including all information, still images, videos, and the checklist report can be easily retrieved from the Reference module.

Best Practices in Hysteroscopic Training – A Tutorial Based on the EVE Realistic Simulator for Hysteroscopy 75
UG 540 Monitor Swifel Arm, height and side adjustable, can be turned to the left or the right side, swivel range 180°, overhang 780 mm, overhang from centre 1170 mm, load capacity max. 15 kg, with monitor fixation VESA 5/100, for usage with equipment carts UG xxx
UG 540
Equipment Cart
UG 220
UG 220 Equipment Cart wide, high, rides on 4 antistatic dual wheels equipped with locking brakes 3 shelves, mains switch on top cover, central beam with integrated electrical subdistributors with 12 sockets, holder for power supplies, potential earth connectors and cable winding on the outside,
Dimensions: Equipment cart: 830 x 1474 x 730 mm (w x h x d), shelf: 630 x 510 mm (w x d), caster diameter: 150 mm
including: Base module equipment cart, wide Cover equipment, equipment cart wide Beam package equipment, equipment cart high 3x Shelf, wide Drawer unit with lock, wide 2x Equipment rail, long Camera holder

Best Practices in Hysteroscopic Training – A Tutorial Based on the EVE Realistic Simulator for Hysteroscopy76
Recommended Accessories for Equipment Cart
UG 310 Isolation Transformer, 200 V – 240 V; 2000 VA with 3 special mains socket, expulsion fuses, 3 grounding plugs, dimensions: 330 x 90 x 495 mm (w x h x d), for usage with equipment carts UG xxx
UG 310
UG 410 Earth Leakage Monitor, 200 V – 240 V, for mounting at equipment cart, control panel dimensions: 44 x 80 x 29 mm (w x h x d), for usage with isolation transformer UG 310
UG 410
UG 510 Monitor Holding Arm, height adjustable, inclinable, mountable on left or right, turning radius approx. 320°, overhang 530 mm, load capacity max. 15 kg, monitor fixation VESA 75/100, for usage with equipment carts UG xxx
UG 510

Best Practices in Hysteroscopic Training – A Tutorial Based on the EVE Realistic Simulator for Hysteroscopy 77
Notes

Best Practices in Hysteroscopic Training – A Tutorial Based on the EVE Realistic Simulator for Hysteroscopy78
Notes