14
1 Beyond Basics Microsoft Word 2013
1
Beyond Basics
Microsoft Word 2013

2
Beyond Basics Microsoft Word 2013
Inserting Symbols
1. Click the Insert tab; click the down arrow below the Symbol icon in the Symbols group.
2. Choose a symbol from the commonly used list, or click More Symbols to see more options. Many different types
of picture icons/symbols are available in Webdings, Wingdings, Wingdings 2, Wingdings 3.
Inserting Pictures/Online Pictures
1. Click the Insert tab; click the ClipArt icon in the Illustrations group.
2. A dialog box will appear for you to indicate “keywords” you want to search the database for. Once you key the
text for the type of image you are looking for, click the search icon at the right or press Enter. Numerous images
should appear. To insert a specific clipart, double-click the image you wish to add or click the image once and
click the Insert button. Images that are displayed with the Online Pictures icon are located on the Microsoft
website. If you are not connected to the Internet, these will not show up.
3. To insert a saved image, click the Insert tab; click the Pictures icon in the Illustrations group.
Browse to find the picture in the list, then click the Insert button.

3
Using Picture Styles/Tools
1. Click on the image in your document. If the Picture tools ribbon is not showing, click on the Picture Tools icon
located on the Title bar.
2. Numerous options are available to enhance the appearance of the picture.
Creating and Inserting WordArt
1. Click the Insert tab; click the WordArt icon in the Text group. Click the WordArt design you wish
to use. Type your text into the box that appears on your screen. You can change the font, size, etc. as you wish.
2. Just as for images, there are many manipulation options available for WordArt; styles, fill, shadow effects, rotating
options, size, etc.
a. Brightness/Contrast/Recolor – alter the image by making it
brighter, changing the contrast, and recoloring using various
color options.
b. Artistic Effects – allows you to apply artistic options to image.
c. Compress Pictures – makes image smaller in saving size;
helpful when you are sending a file with lots of pictures by e-
mail.
d. Change Picture – allows you to change the picture without
going back to Insert, Picture/ClipArt.
e. Reset Picture – sets the image back to its original setting.
f. Picture Styles – many options for displaying image; i.e., in a
frame, alter shape, add a border, or add special effects such as
beveled edges and shadows to it.
g. Arrange – changes the place image is put. Can put image in
front/behind text, close to text, on a line by itself, align it to a
specific spot on the page, etc. Can group objects together; can
rotate image.
h. Size – can crop parts of the image out. Can set the height and
width of the image.

4
Inserting SmartArt
1. Click the Insert tab; click the SmartArt icon in the Illustrations group. Click the SmartArt design you wish to
use, then click OK.
2. Numerous options are available for manipulating the illustration. Click in each element to type text, add shapes,
delete shapes, change the layout or style, etc.
Inserting Shapes
1. Click the Insert tab; click the down arrow below the Shapes icon in the Illustrations group.
2. Shapes are categorized in groups by what type of shape they are. Click on the one you wish to put into your
document, then click and drag in your document where you want to put it. The shapes can be as large or small you
want them.
3. Numerous options are available for manipulating the shape, i.e., shadow styles, effects, 3-D effects, size, etc.

5
Setting Tabs
Tab stops mark the place where the insertion point will stop when you press the Tab key. Default tabs are set every half
inch and are left-aligned.
Types of Tab Stops:
- Left Tab: Left-aligns selected text at the point indicated on the horizontal ruler.
- Right Tab: Right-aligns selected text at the point indicated on the horizontal ruler.
- Decimal Tab: Aligns selected text on the decimal point at the point indicated on the horizontal ruler.
- Center Tab: Centers selected text at the point indicated on the horizontal ruler.
Other Information:
The tab selector also has a Bar tab, first line indent and hanging indent selections. The Bar tab is not a tab stop. It
inserts a vertical line in the paragraph.
To set a tab:
1. Be sure your insertion point is in the place where you want to begin the tab settings. If the tab selector is not
showing, click the View tab, click in the check box beside Ruler in the Show/Hide group.
2. Click on the tab selector until you have displayed the type of tab you wish to set, then click on the ruler bar where
you want to set the tab.
3. If you make a mistake and set the tab in wrong place, click and drag the tab off the screen. It will disappear from
the ruler bar. Then set the tab where you want.
4. If you wish to set a tab with dot leaders or other specifications, double-click on the ruler bar where you wish to set
a tab. This will open the Tab Set dialog box.
Here you can set the type of alignment for the tab, and the type of dot leader you want to use. Be sure the tab
location is highlighted in the position box; select the correct alignment and dot leader type. Then click the Set
button, then the OK button.
Creating a New Table
1. Click the Insert tab, then click the down arrow below the Table icon, highlight the number of columns and rows
you wish to create. If you don’t choose enough, you can always add colums or rows later.

6
2. Once you have the table created, you can begin typing information into the cells. To move from one cell to
another, press Tab. To go back one cell, press Shift + Tab.
Adding/Inserting Table Rows/Columns
1. To add a table row at the bottom of the table, press Tab.
2. To insert a table row inside the table, highlight the row where you wish to insert a row. Right-click in the
selection, click Insert and choose Insert Rows Above or Insert Rows Below.
3. To insert columns in the table, highlight the column where you wish to insert a column. Right-click in the
selection, click Insert and choose Insert Columns to the Left or Insert Columns to the Right.
Deleting Table Rows/Columns
1. To delete a table row, highlight the row you wish to delete. Right-click in the selection, click Delete Rows.
2. To delete a table column, highlight the column you wish to delete. Right-click in the selection, click Delete
Columns.
7
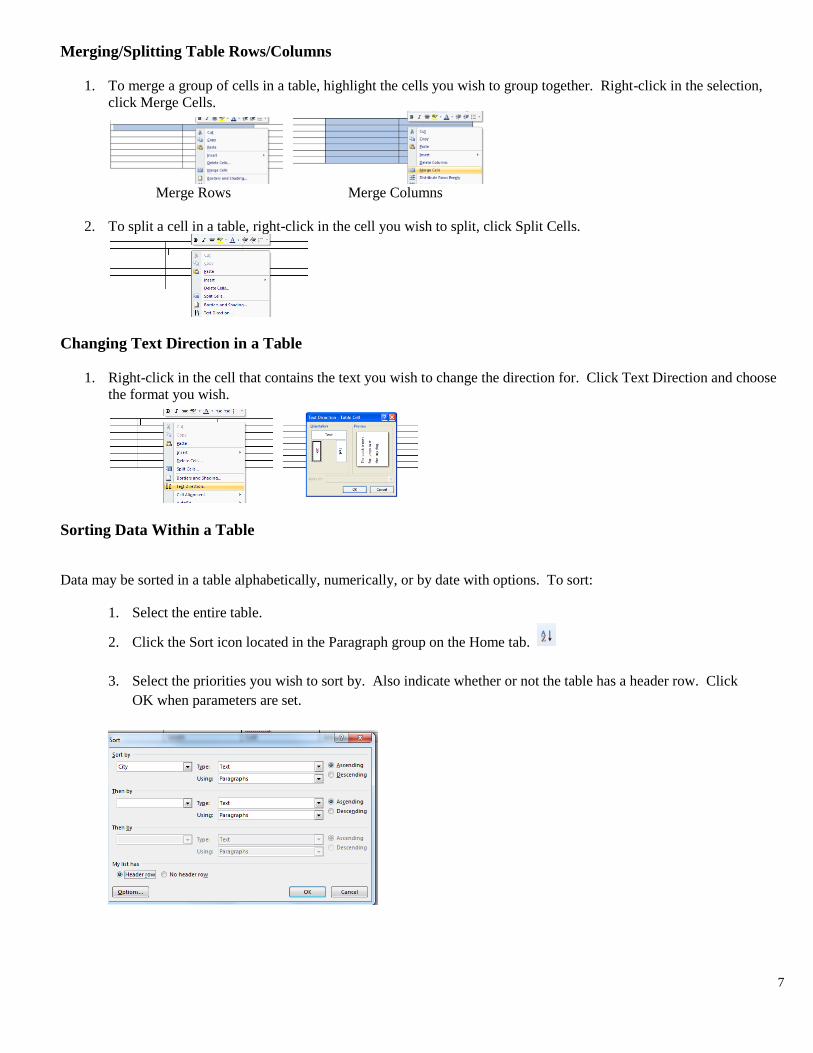
Merging/Splitting Table Rows/Columns
1. To merge a group of cells in a table, highlight the cells you wish to group together. Right-click in the selection,
click Merge Cells.
Merge Rows Merge Columns
2. To split a cell in a table, right-click in the cell you wish to split, click Split Cells.
Changing Text Direction in a Table
1. Right-click in the cell that contains the text you wish to change the direction for. Click Text Direction and choose
the format you wish.
Sorting Data Within a Table
Data may be sorted in a table alphabetically, numerically, or by date with options. To sort:
1. Select the entire table.
2. Click the Sort icon located in the Paragraph group on the Home tab.
3. Select the priorities you wish to sort by. Also indicate whether or not the table has a header row. Click
OK when parameters are set.

8
Adding Table Formats/Borders/Shading
1. Highlight the table you wish to apply the format to. In the Table Tools QuickMenu, there are numerous styles
already set up. To apply one of these, click the appropriate icon.
2. To apply borders to cells or the entire table, click the down arrow beside the Borders icon in the Table Styles
section of the Design Ribbon. Click on the type of border you want.
3. To apply a combination of borders, click the Borders and Shading option at the bottom of the pull-down list.
4. Shading can also be applied to cells: Highlight the cells you wish to apply shading to, click the down arrow beside
the Shading icon in the Table Styles section of the Design Ribbon. Click on the color of your choice.
Paragraph Borders/Shading
1. Highlight the paragraph you wish to put a border around. Click the down arrow to the right of the borders icon
in the Paragraph group of the Home Ribbon. Click the Borders and Shading option at the bottom of the drop-
down list.
2. Choose the type of border you wish to put around the paragraph/selected text, as well as the line thickness, type,
color, etc. Also be sure the “Apply to” option is set to paragraph. Once options are set, click OK. HINT: If the

9
setting doesn’t show up in the Preview box, it is NOT selected.
3. Shading may also be applied to the paragraph/selected text by clicking the Shading tab and setting the options to
whatever you wish. Click OK when finished.
Create Columns
1. Click the Page Layout tab, click the Columns icon in the page setup group.
2. Choose the number of columns you wish or click more columns for more options such as line between, odd sizes,
etc.
3. Be sure to select “whole document” or “from this point forward” to indicate where you want the columns started.
Printing Envelopes
1. Click on the Mailings tab, click on the Envelopes icon in the create group. Key in the return address and mailing
address.

10
2. The size of the envelope and font can be changed by clicking on the options button.
Creating Labels
1. Click on the Mailings tab, click on the Labels icon in the create group. Key in the label information.
2. The type of label and size can be changed by clicking on the Options button.
3. An Avery wizard to do labels that works with Microsoft Word can also be downloaded from the Avery
website.
Inserting Comments
1. Click on the Review tab, click on the Comment icon in the Comments group. Key in the comment in the
box that pops up.
2. Comments can be deleted by clicking on the comment, then clicking the Review tab, click the down arrow below
the Delete icon in the Comments group, then select Delete.
3. You can also view other comments by clicking on the Previous and Next icons in the Review Tab, Comments
group.

11
Using Format Painter
1. Select the information that has the format you wish to copy. Click on the Home tab, click on the Format Painter
icon .
2. Select the information you wish to apply the format to. Once you release the mouse button, the new format will be
applied to your selection.
Page Breaks
1. To force the computer to move to a new page, move the cursor where you want to insert a page break.
2. Ctrl+Enter or Page Layout, Breaks and choose Page.
Viewing/Editing Document Properties
1. To view properties for a document, click the File tab, then select Info. The properties for the open document will
be displayed at the right. Information such as the size of the file, pages, number of words, etc will be displayed.
The user may add title, tags, comments, etc if desired. The document may also be protected by clicking the Protect
Document option.
Tracking Changes in a Document
1. To track changes in a document, click the Track Changes icon in the Tracking group on the Review tab.
Track Changes will track all changes made to the document including insertions, deletions and formatting changes.
2. There are options for how these changes are viewed as well. The user can set these up through the Track Changes
Advanced Options setting.

12
Adding a Watermark
1. To add a watermark to a document, click the Watermark option in the Page Background group on the Design tab.
Watermarks may be a predesigned template or a custom one the user creates.
Merging a Data File with a Main Document
The data file contains the information that varies from document to document. This information may be imported
from an Excel spreadsheet saved as a .csv file or a .txt file. The main document is the file that contains information
that does not change.
Creating the Data File in Word
1. Click the Mailings tab, Select Recipients, Type New List
Information may be entered in each field, create a new entry, or customize the column headings.
2. Once finished, click OK to save the address list. Be sure to note where you saving it and what you name the
file. The file is saved as a .mdb file.
13
3. Next, proceed to the Creating the Main Document section of the instruction packet.
Using an Excel Spreadsheet Data File/Converting to .csv
1. You can use an Excel spreadsheet to key the data to be merged. If you do this, the information should appear
in columns. Be sure you have appropriate column headings for them. Save the information as a .csv file.
File, Save As, Save As Type (choose CSV (comma delimited)).
2. Give the file a name. I usually answer Yes and OK to any popup questions.
3. You can close the Excel workbook at this time.
Creating the Main Document
I usually type the main body of the letter first, then go back and add the codes for merging.
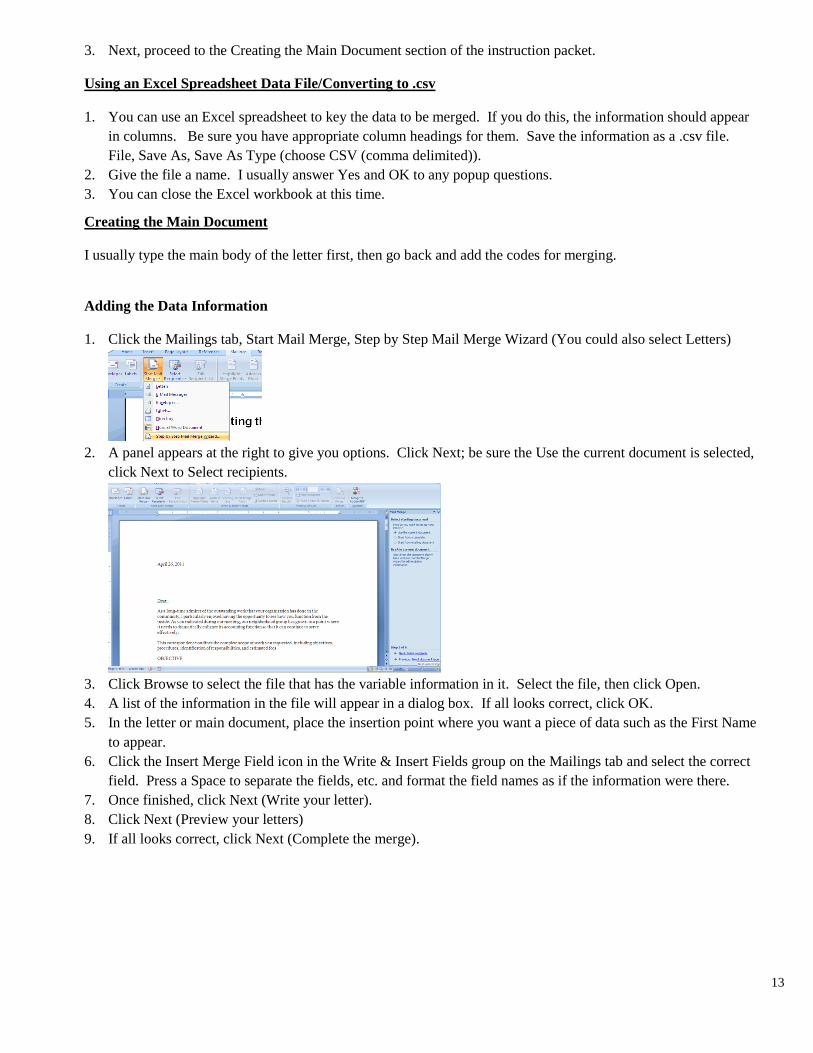
Adding the Data Information
1. Click the Mailings tab, Start Mail Merge, Step by Step Mail Merge Wizard (You could also select Letters)
2. A panel appears at the right to give you options. Click Next; be sure the Use the current document is selected,
click Next to Select recipients.
3. Click Browse to select the file that has the variable information in it. Select the file, then click Open.
4. A list of the information in the file will appear in a dialog box. If all looks correct, click OK.
5. In the letter or main document, place the insertion point where you want a piece of data such as the First Name
to appear.
6. Click the Insert Merge Field icon in the Write & Insert Fields group on the Mailings tab and select the correct
field. Press a Space to separate the fields, etc. and format the field names as if the information were there.
7. Once finished, click Next (Write your letter).
8. Click Next (Preview your letters)
9. If all looks correct, click Next (Complete the merge).

14
10. This will give you letters for all data records in the list.
11. You can print the letters or edit each one individually. This is the file you would save; it has the completed
letters in it.
Fillable Forms
To create a fillable form:
1. Create a table with the information you wish to be displayed. (You can merge and split cells to get the table to
look like you want)
2. Once finished, display the Developer tab (File, Option, Customize Ribbon, Place a check mark beside
Developer on the right side of the dialog box).
3. Click in the area you wish to be fillable. Click the Legacy Tools icon in the Controls group on the Developer
tab. You can use whatever type of fill-in options you wish (text, check box, etc.)
4. Once finished, “Protect” the document to make it fillable only in the areas you wish for users to type in.
5. To do this, click the Restrict Editing feature located on the Developer tab in the Protect group.
6. In Section 2 of the restrictions, put a check mark in the “Allow only this type of editing in the document:” and
choose Filling in forms from the list.
7. Select Yes, Start Enforcing Protection.
8. You can elect to put a password on it or not. Save the document when finished.


