28
The no brainer. Bianco Rainsaver MK3 & MK3E Installation and Operating Instructions

1
Bianco Rainsaver MK3 Installation and Operating Instructions
The nobrainer.
Bianco Rainsaver MK3 & MK3EInstallation andOperating Instructions

Bianco Rainsaver MK3 Installation and Operating Instructions
2
3.
Submersible pumps.
Pumpssuitable to usewith Rainsaver
Switch
Surface mounted pumps.
RS3-JETCOM82MAPCXRS3-INOX60PCA RS3-MULTI900PCA
RS3-DIVERTON1200RS3-JH80003PMPCX
This thing will savewater, money and mostimportantly time.
3
Bianco Rainsaver MK3 Installation and Operating Instructions
Bianco Rainsaver MK3 Installation and Operating Instructions . . . . . . 4
1. Introduction . . . . . . . . . . . . . . . . . . . . . . . . . . . . . . . . . . . . . . . . . . . . . . . . . . . . 4
2.GeneralSpecifications . . . . . . . . . . . . . . . . . . . . . . . . . . . . . . . . . . . . . . . . . . . . 4
3. Operation . . . . . . . . . . . . . . . . . . . . . . . . . . . . . . . . . . . . . . . . . . . . . . . . . . . . . . 4
4. Installation . . . . . . . . . . . . . . . . . . . . . . . . . . . . . . . . . . . . . . . . . . . . . . . . . . . . . . 4
5. Sound Emissions . . . . . . . . . . . . . . . . . . . . . . . . . . . . . . . . . . . . . . . . . . . . . . . . . 9
6. Maintenance . . . . . . . . . . . . . . . . . . . . . . . . . . . . . . . . . . . . . . . . . . . . . . . . . . . . 9
7. Trouble shooting . . . . . . . . . . . . . . . . . . . . . . . . . . . . . . . . . . . . . . . . . . . . . . . . . 9
Installation Dimensions . . . . . . . . . . . . . . . . . . . . . . . . . . . . . . . . . . . . . . . . . . . . . 10
Typical Installations . . . . . . . . . . . . . . . . . . . . . . . . . . . . . . . . . . . . . . . . . . . . . . . . 10
Bianco Rainsaver MK3 addendum for DIVERTRON1200 . . . . . . . . . . . 12
Typical Installation . . . . . . . . . . . . . . . . . . . . . . . . . . . . . . . . . . . . . . . . . . . . . . . . . 12
Bianco Rainsaver MK3E Installation and Operating Instructions . . . . 13
1. Introduction . . . . . . . . . . . . . . . . . . . . . . . . . . . . . . . . . . . . . . . . . . . . . . . . . . . 13
2.GeneralSpecifications . . . . . . . . . . . . . . . . . . . . . . . . . . . . . . . . . . . . . . . . . . . 13
3. Operation . . . . . . . . . . . . . . . . . . . . . . . . . . . . . . . . . . . . . . . . . . . . . . . . . . . . . 13
4. Installation . . . . . . . . . . . . . . . . . . . . . . . . . . . . . . . . . . . . . . . . . . . . . . . . . . . . . 13
5. Sound Emissions . . . . . . . . . . . . . . . . . . . . . . . . . . . . . . . . . . . . . . . . . . . . . . . . 17
6. Maintenance . . . . . . . . . . . . . . . . . . . . . . . . . . . . . . . . . . . . . . . . . . . . . . . . . . . 17
7. Trouble shooting . . . . . . . . . . . . . . . . . . . . . . . . . . . . . . . . . . . . . . . . . . . . . . . . 17
Installation Dimensions . . . . . . . . . . . . . . . . . . . . . . . . . . . . . . . . . . . . . . . . . . . . . 18
Typical Installations . . . . . . . . . . . . . . . . . . . . . . . . . . . . . . . . . . . . . . . . . . . . . . . . 18
Terms & Conditions . . . . . . . . . . . . . . . . . . . . . . . . . . . . . . . . . . . . . . . . . . 20
Contents

Bianco Rainsaver MK3 Installation and Operating Instructions
4
Bianco Rainsaver MK3
1. Introduction
The Bianco Rainsaver MK3 is an Automatic Rainwater / Mains Water Changeover Device designed to provide automatic mains back up for Pressure Pump supply systems.
The Bianco Rainsaver MK3 is designed to be installed in conjunctionwithaPressurePumpsupplysystemthatisfittedwithaFLOAT SWITCH as well as an independent PRESSURE AND FLOW CONTROLLER with LOSS OF PRIME PROTECTION and AUTOMATIC RE-START.
WARNING! The Bianco Rainsaver MK3 is NOT A PUMP CONTROLLER!
2. General Specifications
Maximum water temperature (mains + pump): 400 C. Maximumrecommendedcontinuouspumpflow:100litresperminute. Maximum recommended pump pressure: 800 kPa. Maximum recommended mains inlet pressure: 800 kPa.
3. Operation
The Bianco Rainsaver MK3 supplies clean rainwater from a rainwater tank and associated pressure pump system, to toilets, laundry, garden taps and household.
Mains water is also connected to the Bianco Rainsaver MK3 as an automatic back up.
Whenthepressurepumpceasestosupplywaterbecausethefloatswitchhasdetectedthattherainwaterlevelinthetankistoolow,orif there is a power or pump failure, the Bianco Rainsaver MK3 will automatically change over to supply mains water to meet the household needs.
Whentherainwatersupplyisreplenishedandthefloatswitchesthepumpbackon,orthepowerisrestoredtothepump,thepumpwillpressurise the Bianco Rainsaver MK3 and the unit will switch back automatically to supplying tank water to the household.
4. Installation
4.1 Pump Float Switch installation
SubmersiblepumpssuppliedwiththeRainsaverMK3willhaveapumpmountedfloatswitchandnoadjustmentsshouldbenecessary,however,thesubmersiblepumpshouldbepositionedsothatthefloatswitchcannottouchthesidesoftherainwatertank,orbelessthan200 mm away horizontally from the rainwater tank inlet or outlet. The submersible pump power lead should be taped to the discharge pipe topreventthefloatswitchbecomingtangledwiththepowerlead.
SurfacemountedpumpssuppliedwiththeRainsaverMK3willalsohaveapumpmountedfloatswitchwhichneedstobeinstalledintherain water tank.
Thefloatswitchforthesurfacemountedpumpsissuppliedwithaninlineconnectortoassistshouldthecableberequiredtorunthroughconduit. Check that the conduit size is appropriate for the inline connector.
5
Bianco Rainsaver MK3 Installation and Operating Instructions
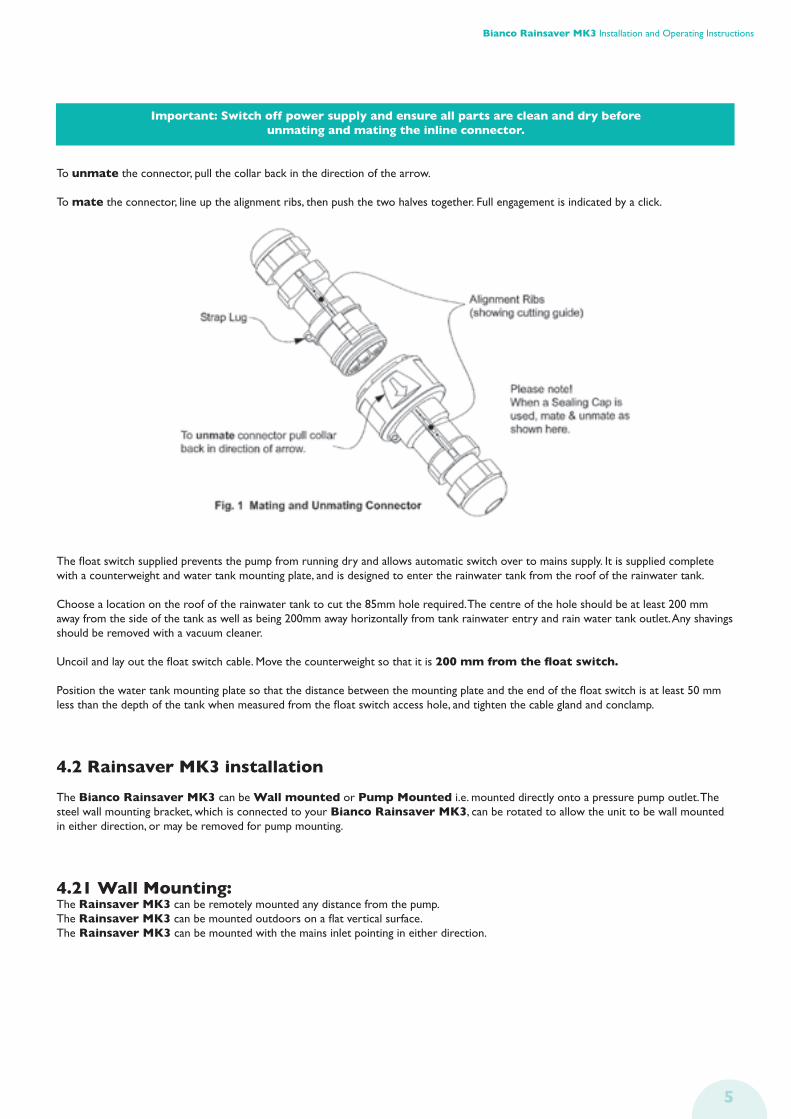
Important: Switch off power supply and ensure all parts are clean and dry before unmating and mating the inline connector.
To unmate the connector, pull the collar back in the direction of the arrow.
To mate the connector, line up the alignment ribs, then push the two halves together. Full engagement is indicated by a click.
Thefloatswitchsuppliedpreventsthepumpfromrunningdryandallowsautomaticswitchovertomainssupply.Itissuppliedcompletewith a counterweight and water tank mounting plate, and is designed to enter the rainwater tank from the roof of the rainwater tank.
Choosealocationontheroofoftherainwatertanktocutthe85mmholerequired.Thecentreoftheholeshouldbeatleast200mmaway from the side of the tank as well as being 200mm away horizontally from tank rainwater entry and rain water tank outlet. Any shavings should be removed with a vacuum cleaner.
Uncoilandlayoutthefloatswitchcable.Movethecounterweightsothatitis200 mm from the float switch.
Positionthewatertankmountingplatesothatthedistancebetweenthemountingplateandtheendofthefloatswitchisatleast50mmlessthanthedepthofthetankwhenmeasuredfromthefloatswitchaccesshole,andtightenthecableglandandconclamp.
4.2 Rainsaver MK3 installation
The Bianco Rainsaver MK3 can be Wall mounted or Pump Mounted i.e. mounted directly onto a pressure pump outlet. The steel wall mounting bracket, which is connected to your Bianco Rainsaver MK3, can be rotated to allow the unit to be wall mounted in either direction, or may be removed for pump mounting.
4.21 Wall Mounting:The Rainsaver MK3 can be remotely mounted any distance from the pump.The Rainsaver MK3canbemountedoutdoorsonaflatverticalsurface.The Rainsaver MK3 can be mounted with the mains inlet pointing in either direction.

Bianco Rainsaver MK3 Installation and Operating Instructions
6
Wall Mounting Instructions- Toreversethemountingdirection,sothat“Mains”inletwillbeontheleftsideand“House”outletontheright,followthefirststepsof
Pump Mounting Instructions below to remove and reverse the mounting bracket. Then continue:-- Remove the Bianco Rainsaver MK3 lid by unscrewing the 4 Phillips head screws- Hold the Bianco Rainsaver MK3 in the desired position and mark the screw centres through the keyhole slots in the mounting
bracket. Return the Bianco Rainsaver MK3 to the box.- Drill and insert mounting hardware into the mounting surface (wall). Insert screws leaving a few millimetres under the head to allow
insertion of the mounting bracket- Mount the Bianco Rainsaver MK3 onto the screws through the keyhole slots in the mounting bracket. Tighten screws to secure
the bracket to the wall- Replace the Bianco Rainsaver MK3 lid and re-tighten the four (4) lid screws.
4.22 Pump Mounting:
Bianco Rainsaver MK3 can be mounted directly onto the outlet of the pump with the adaptor supplied with the Rainsaver–ready pump.Ifanothersizethreadedportisfoundonthepumporcontrolleroutletusequalitystandardplasticthreadedpipefittingstoadapt.
Pump Mounting Instructions- Remove wall mounting bracket by unscrewing the lower (Pump Inlet) union nut using the plastic spanner provided. Remove the union
nut and pipe being careful not to lose any of the internal components.- Unscrew the two bracket holding screws and remove the bracket.

7
Bianco Rainsaver MK3 Installation and Operating Instructions
- REPLACE THE BRACKET HOLDING SCREWS into the housing. This will stop insects creating a nest inside the Rainsaver Unit.- Replace the lower union nut and pipe being sure that internal components are in place and that the o-ring is properly seated.- Leavethelowerunionnutslightlyloosetoallowfittingandalignmenttopump.- Attachthe¾”BSPTmalepipefittingtothepumpoutlet,eitherdirectly,orusingplasticthreadedpipefittingsasrequired,andtighten
using the spanner provided.- Oncethe¾”BSPTpipefittingissecuredtothepumpandtheBianco Rainsaver MK3alignedasrequired,tightenthelowernut
with the plastic spanner provided.
4.4 Filtration and Water Quality
The Bianco Rainsaver MK3 is designed to operate on clean rainwater and clean Mains water supply, and as such, the rainwater tank shouldbefittedwithaninletstrainerandasuitablefirstflushdevice.
The Bianco Rainsaver MK3isfittedwithinternalstrainerstoensurecontinuousreliableservice.Theseinternalstrainersmayrestrictthewaterflowoftheunit,especiallyiftheybecomeclogged,andtheyshouldbecleanedperiodically.
WhiteInternationalstronglyrecommendstheuseofastrainerorfilterupstreamfromboththerainwaterandmainsinletconnectionsofthe Bianco Rainsaver MK3.IfqualityfiltersareinstalledupstreamfromtheRainsaverMK3inlets,thenthesuppliedinternalstrainerscan be removed, at the discretion of the installing plumber.
To access the internal strainers, both prior to installation and afterwards for maintenance, undo the inlet union nuts with the spanner supplied. Pull connection pipe work sideways to reveal the strainer, situated inside the union pipe, and remove for cleaning.
Additionalwaterfiltersmayberequiredattapoutletstoassistinthefiltrationoftanninsetcthatmaydiscolourthewater.Alsocheckthewatertankandfirstflushdevicemanufacturers’instructionsregardingperiodicservicingthatisrequired.
4.5 Plumbing
Plumbing connections should be carried out by a licensed plumber.
Useofflexiblepipeconnectionsandisolationvalesisrecommendedtoassistinalignmentandservicingandtoreduceanytransmittednoise.
Useastandard¾”compressionxF.I.unionorCompressionxF.I.elbowfittingtoconnectbetween¾”coppertubingand¾”BSPTthreadedpipefittingatthe“MAINS”inlet,“PUMPINLET”(ifunitiswallmounted),and“HOUSE”outlets.

Bianco Rainsaver MK3 Installation and Operating Instructions
8
Usestandard¾”BSPfemalethreadedfittingstoconnectto¾”BSPTthreadedpipefittingwhenconnectingothertypesofpiping.
Do NOT remove the union nut and ¾” bspt pipe fitting and attempt to connect pipe work directly to the body of the unit!
Do NOT attempt to connect copper or plastic pipe, using copper or nylon olives, and compression nut directly to the ¾” bspt pipe fitting!
Alwaysusethespannerprovided,orcorrectopenendedspanner,whentighteningfittings.
All pipe-work and outlet fittings from the Bianco Rainsaver MK3 must be labelled to AS3500.The Bianco Rainsaver MK3 control incorporates a dual check valve to prevent cross connection between mains and rainwater. Connectiontoanundergroundrainwatertank,orlocalwatersupplyauthorities,mayrequireadditional,orhighersafetylevel,backflowprevention, and your licensed plumber can advise you on this.
Theincorporationofanadditional“Tee”fittingbetweenthetankwaterpressurepumpsupply,andtheBianco Rainsaver MK3 lower “PUMP INLET”, will allow the householder to use collected rainwater, but NOT mains water supply, to irrigate gardens and lawns, or wash cars.
4.6 Pressure Tank Outlet
The Bianco Rainsaver MK3issuppliedwithanadditionaloutletspecificallydesignedfortheinstallationofapressuretank.
The installation of a pressure tank will:- Reducewearandtearonyourpumpbysignificantlyreducingthenumberofstarts- Reduceyourelectricityconsumptionbysignificantlyreducingthenumberofstarts- Reduce the incidence of “pressure drop” when opening a tap- Stop your pump kicking in every time you open a tap or because of a small leak, like a dripping tap, or toilet cistern.
To install a WATERMARK approved pressure tank:- Turn off both mains water supply pressure and your rainwater tank pump and supply- Open a tap to remove all pressure from the system- Using the spanner supplied, remove the ¾” plug from the “AUX. OUTLET” port. Note that there is an o-ring inside the body of the
Rainsaverwhichcanbeleftinplaceifusinga¾”BSPfitting,orremovedifusinga¾”BSPTfitting.- Useasuitableflexiblereinforcedhosewith¾”BSPorBSPTMALETHREADtoconnectaWATERMARKapprovedpressuretanksuch
as a GWS Energy Saver to your Bianco Rainsaver MK3.- Carefullyfollowthemanufacturer’sinstructionsregardingpressurizationofyourpressuretank.
4.7 Pressure Tank Pre-charge.
Toensureoptimumperformanceandsystemlife,thePressureTankpre-chargeneedstobesetbyfillingthepressuretankwithairthroughthe air valve so that the air pressure is 65% of the pump maximum pressure, according to its maximum performance.
Pre-charge the pressure tank before it is installed by using an air pump or using local service station facilities. C
CAUTIONS
In conjunction with this manual, read and understand the installation and maintenance manual for the water pump that is to be connected to the Bianco Rainsaver MK3.
The Bianco Rainsaver MK3andanypumpconnectedtoitarenottobeusedbychildrenorinfirmpersonsandmustnotbeused as a toy.
A licensed plumber should carry out plumbing connections.
Servicing of the Bianco Rainsaver MK3and,orwaterpumpshouldonlybycarriedoutbyqualifiedpersons.
Do not clean the Bianco Rainsaver MK3withabrasiveorpetroleumbasedfluids,anddonotusehydrocarbonpropelledsprayson or around the Bianco Rainsaver MK3.

9
Bianco Rainsaver MK3 Installation and Operating Instructions
5. Sound Emissions
The Bianco Rainsaver MK3 isvirtuallysilentbutmayemitnoisesassociatedwiththeflowofwaterthroughtheunit.
In any case, the pump, which is connected to the Bianco Rainsaver MK3, may emit sound levels, which may inconvenience you or your neighbours, or may operate during normal sleeping hours, which may be prohibited by local government regulations. If this is the case, your pump can be switched off during the night or may be operated from a time clock. Your Bianco Rainsaver MK3 will automatically supply your house with Mains water supply while the pump is inactive.
6. Maintenance
EnsurethatwaterflowingthroughtheBianco Rainsaver MK3 is as free from dirt and foreign matter as conditions allow.
If you rarely run out of rain water and do not turn your pump off at night, operate the valve within the Bianco Rainsaver MK3 at least monthlybyswitchingoffthepowertoyourpumpandflushingatoilet,oropeningatapconnectedtothesystem,thusallowingmainswatertoflowthroughtheunitforashortperiodoftime.
Periodic inspection and cleaning of the units internal components is highly recommended. Your plumber can perform this work, and can adviseonthemaintenanceperiodsasdictatedbyindividualsituationsandwaterquality.
7. Trouble shooting
Consultthemanualssuppliedwiththewaterpumpanditscontrolleriffittedinadditiontothefollowingguide.
1. MainsflowisnotavailableorlowwhenPumpisswitchedoffornotoperating. a. Isolationvalve,iffitted,isnotopen. b. Debris has jammed the check valve closed or is caught in the moving parts or bleed hole of the internal valve. c. ExternalInletstrainer/filter,iffitted,isblocked. d. Internal inlet strainer is blocked.
2. PumpflowisnotavailableorlowwhenpumpisoperatingthroughBiancoRainsaverMK3. a. Pump has lost its prime. b. Isolationvalve,iffitted,isnotopen. c. Debris has jammed the internal check valve closed, or has blocked the check valve. d. ExternalInletstrainer/filter,iffitted,isblocked. e. Internal inlet strainer is blocked.
For after sales service please contact White International Customer Service: 1300 783 601.

Bianco Rainsaver MK3 Installation and Operating Instructions
10
Installation Dimensions
DAB or BIANCO Surface Mounted Pumps
Typical Installations

11
Bianco Rainsaver MK3 Installation and Operating Instructions
TESLA DIVERMAPCX Submersible Pump
Typical Installations
BIANCO JH8003PMPCX Submersible Pump
Typical Installations
Bianco Rainsaver MK3 Installation and Operating Instructions
12
addendum for DIVERTRON1200
Bianco Rainsaver MK3
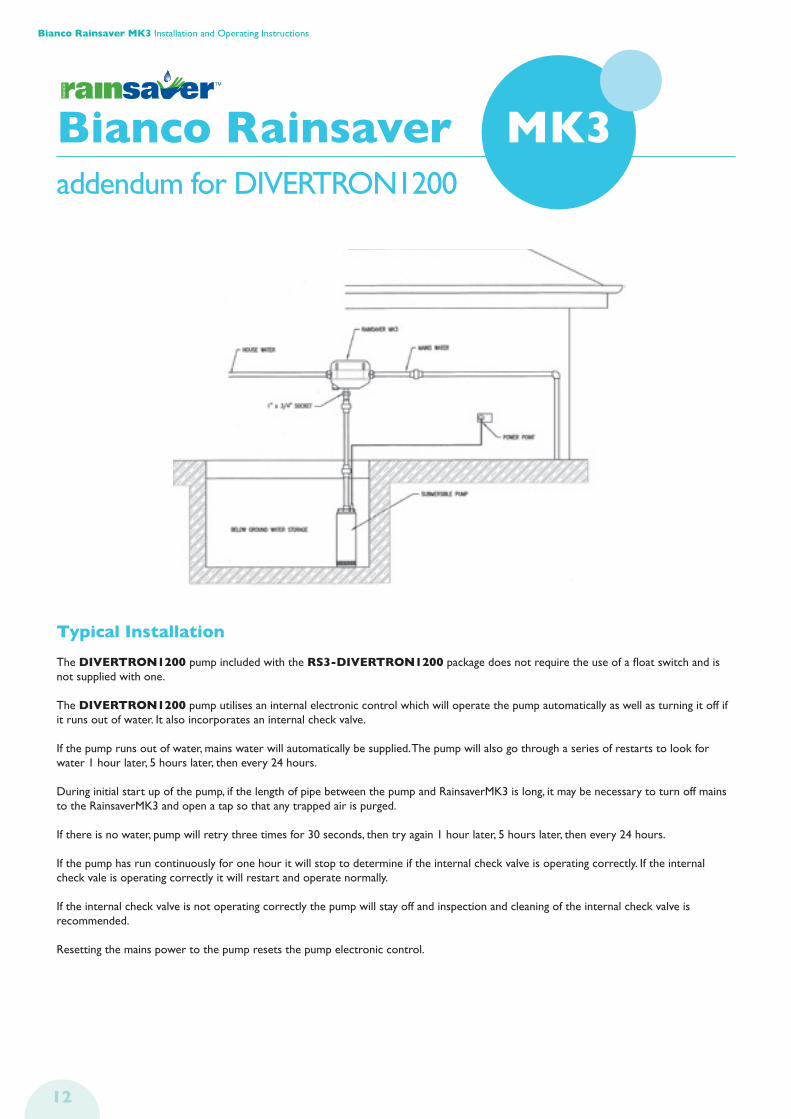
Typical Installation
The DIVERTRON1200 pump included with the RS3-DIVERTRON1200packagedoesnotrequiretheuseofafloatswitchandisnot supplied with one.
The DIVERTRON1200 pump utilises an internal electronic control which will operate the pump automatically as well as turning it off if it runs out of water. It also incorporates an internal check valve.
If the pump runs out of water, mains water will automatically be supplied. The pump will also go through a series of restarts to look for water 1 hour later, 5 hours later, then every 24 hours.
During initial start up of the pump, if the length of pipe between the pump and RainsaverMK3 is long, it may be necessary to turn off mains to the RainsaverMK3 and open a tap so that any trapped air is purged.
If there is no water, pump will retry three times for 30 seconds, then try again 1 hour later, 5 hours later, then every 24 hours.
If the pump has run continuously for one hour it will stop to determine if the internal check valve is operating correctly. If the internal check vale is operating correctly it will restart and operate normally.
If the internal check valve is not operating correctly the pump will stay off and inspection and cleaning of the internal check valve is recommended.
Resetting the mains power to the pump resets the pump electronic control.

13
Bianco Rainsaver MK3 Installation and Operating Instructions
1. Introduction
The Rainsaver MK3E is an Automatic Rainwater / Mains Water Changeover Device designed to provide automatic mains back up for Pressure Pump supply systems.
The Rainsaver MK3E is designed to be installed in conjunction withaPressurePumpsupplysystemthatisfittedwithanindependentPRESSURE AND FLOW CONTROLLER with LOSS OF PRIME PROTECTION and AUTOMATIC RE-START.
WARNING! The Bianco Rainsaver MK3E is NOT A PUMP CONTROLLER!
2. General Specifications
Controls pumps to a maximum 1.5 hp, 1.1 kW 240V. Maximum water temperature (mains + pump): 400 C. Maximumrecommendedcontinuouspumpflow:100litresperminute. Maximum recommended pump pressure: 800 kPa. Maximum recommended mains inlet pressure: 800 kPa.
3. Operation
The RainsaverMK3E supplies clean rainwater from a rainwater tank via an automatic pressure system pump to toilets, laundry and garden taps in a household.
Mains water is also connected to the RainsaverMK3 as an automatic back up should rain water level be too low, or if there is a power or pump* failure).*Should there be a pump failure, mains back up is achieved by turning the RainsaverMK3E off at the power point.
Thelowvoltagefloatswitchsuppliedpreventsthepumpfromrunningdryandallowsautomaticswitchovertomainssupplyshouldtherain water level in the tank be too low.
4. Installation
4.1 Pump Float Switch installation
The10mlowvoltagefloatswitchsuppliedpreventsthepumpfromrunningdryandallowsautomaticswitchovertomainssupply.Itissupplied complete with a counterweight and water tank mounting plate, and is designed to enter the rainwater tank from the roof of the rainwater tank.
Choosealocationontheroofoftherainwatertanktocutthe85mmholerequired.Thecentreoftheholeshouldbeatleast200mmaway from the side of the tank as well as being 200mm away horizontally from tank rainwater entry and rain water tank outlet. Any shavings should be removed with a vacuum cleaner.
Uncoilandlayoutthefloatswitchcable.Movethecounterweightsothatitis300 mm from the float switch. Tighten the cable gland on the counterweight to lock it in position.
Bianco Rainsaver MK3E
Bianco Rainsaver MK3E Installation and Operating Instructions

Bianco Rainsaver MK3 Installation and Operating Instructions
14
Positionthefloatswitchcableinthewatertankmountingplatesothatthedistancebetweenthemountingplateandtheendofthefloatswitch is at least 100 mm less than the depth of the tank when measured from the float switch access hole, and tighten the cable gland and conclamp.
Submersible pumps supplied with the RainsaverMK3Emayhaveapumpmountedfloatswitchwhichneedstobecabletiedsothatitisalways in the vertical position.
4.2 RainsaverMK3E installation.
The RainsaverMK3E can be Wall mounted or Pump Mounted i.e. mounted directly onto a pressure pump outlet. The steel wall mounting bracket, which is connected to your RainsaverMK3E, can be rotated to allow the unit to be wall mounted in either direction, or may be removed for pump mounting.
4.21 Wall Mounting:
The RainsaverMK3Ecanbemountedoutdoorsonaflatverticalsurface.The RainsaverMK3E can be mounted with the mains inlet pointing in either direction.
Wall Mounting Instructions:- Toreversethemountingdirection,sothat“Mains”inletwillbeontheleftsideand“House”outletontheright,followthefirststepsof
Pump Mounting Instructions below to remove and reverse the mounting bracket. Then continue:-- Remove the RainsaverMK3E lid by unscrewing the 4 Phillips head screws- Hold the RainsaverMK3E in the desired position and mark the screw centres through the keyhole slots in the mounting bracket.
Return the RainsaverMK3E to the box.- Drill and insert mounting hardware into the mounting surface (wall). Insert screws leaving a few millimetres under the head to allow
insertion of the mounting bracket- Mount the RainsaverMK3E onto the screws through the keyhole slots in the mounting bracket. Tighten screws to secure the
bracket to the wall- Replace the RainsaverMK3E lid and re-tighten the four (4) lid screws.
Bianco Rainsaver MK3E Installation and Operating Instructions

15
Bianco Rainsaver MK3 Installation and Operating Instructions
4.22 Pump Mounting
RainsaverMK3E can be mounted directly onto the outlet of the pump with the adaptor supplied. If another size threaded port is found on thepumporcontrolleroutletusequalitystandardplasticthreadedpipefittingstoadapt.
Pump Mounting Instructions:- Remove wall mounting bracket by unscrewing the lower (Pump Inlet) union nut using the plastic spanner provided. Remove the union
nut and pipe being careful not to lose any of the internal components.- Unscrew the two bracket holding screws and remove the bracket.- REPLACE THE BRACKET HOLDING SCREWS into the housing. This will stop insects creating a nest inside the Rainsaver Unit.- Replace the lower union nut and pipe being sure that internal components are in place and that the o-ring is properly seated.- Leavethelowerunionnutslightlyloosetoallowfittingandalignmenttopump.- Attachthe¾”BSPTmalepipefittingtothepumpoutlet,eitherdirectly,orusingplasticthreadedpipefittingsasrequired,andtighten
using the spanner provided.- Oncethe¾”BSPTpipefittingissecuredtothepumpandtheRainsaverMK3Ealignedasrequired,tightenthelowernutwiththe
plastic spanner provided.
Surface pump, inline pressure tank.
4.4 Filtration and Water Quality
The RainsaverMK3E is designed to operate on clean rainwater and clean Mains water supply, and as such, the rainwater tank should be fittedwithaninletstrainerandasuitablefirstflushdevice.
The RainsaverMK3Eisfittedwithinternalstrainerstoensurecontinuousreliableservice.Theseinternalstrainersmayrestrictthewaterflowoftheunit,especiallyiftheybecomeclogged,andtheyshouldbecleanedperiodically.
WhiteInternationalstronglyrecommendstheuseofastrainerorfilterupstreamfromboththerainwaterandmainsinletconnectionsofthe RainsaverMK3E.IfqualityfiltersareinstalledupstreamfromtheRainsaverMK3E inlets, then the supplied internal strainers can be removed, at the discretion of the installing plumber.
To access the internal strainers, both prior to installation and afterwards for maintenance, undo the inlet union nuts with the spanner supplied. Pull connection pipe work sideways to reveal the strainer, situated inside the union pipe, and remove for cleaning.
Additionalwaterfiltersmayberequiredattapoutletstoassistinthefiltrationoftanninsetcthatmaydiscolourthewater.Alsocheckthewatertankandfirstflushdevicemanufacturers’instructionsregardingperiodicservicingthatisrequired.
Bianco Rainsaver MK3E Installation and Operating Instructions

Bianco Rainsaver MK3 Installation and Operating Instructions
16
4.5 Plumbing
Plumbing connections should be carried out by a licensed plumber.
Useofflexiblepipeconnectionsandisolationvalesisrecommendedtoassistinalignmentandservicingandtoreduceanytransmittednoise.
Useastandard¾”compressionxF.I.unionorCompressionxF.I.elbowfittingtoconnectbetween¾”coppertubingand¾”BSPTthreadedpipefittingatthe“MAINS”inlet,“PUMPINLET”(ifunitiswallmounted),and“HOUSE”outlets.
Usestandard¾”BSPfemalethreadedfittingstoconnectto¾”BSPTthreadedpipefittingwhenconnectingothertypesofpiping.
Do NOT remove the union nut and ¾” bspt pipe fitting and attempt to connect pipe work directly to the body of the unit!
Do NOT attempt to connect copper or plastic pipe, using copper or nylon olives, and compression nut directly to the ¾” bspt pipe fitting!
Alwaysusethespannerprovided,orcorrectopenendedspanner,whentighteningfittings.
All pipe-work and outlet fittings from the RainsaverMK3E must be labelled to AS3500.
The RainsaverMK3E control incorporates a dual check valve to prevent cross connection between mains and rainwater. Connection to anundergroundrainwatertank,orlocalwatersupplyauthorities,mayrequireadditional,orhighersafetylevel,backflowprevention,andyour licensed plumber can advise you on this.
Theincorporationofanadditional“Tee”fittingbetweenthetankwaterpressurepumpsupply,andtheRainsaverMK3E lower “PUMP INLET”, will allow the householder to use collected rainwater, but NOT mains water supply, to irrigate gardens and lawns, or wash cars.
4.6 Pressure Tank Outlet
The RainsaverMK3Eissuppliedwithanadditionaloutletspecificallydesignedfortheinstallationofapressuretank.
The installation of a pressure tank will:- Reducewearandtearonyourpumpbysignificantlyreducingthenumberofstarts- Reduceyourelectricityconsumptionbysignificantlyreducingthenumberofstarts- Reduce the incidence of “pressure drop” when opening a tap- Stop your pump kicking in every time you open a tap or because of a small leak, like a dripping tap, or toilet cistern.
To install a WATERMARK approved pressure tank:- Turn off both mains water supply pressure and your rainwater tank pump and supply- Open a tap to remove all pressure from the system- Using the spanner supplied, remove the ¾” plug from the “AUX. OUTLET” port. Note that there is an o-ring inside the body of the
Rainsaverwhichcanbeleftinplaceifusinga¾”BSPfitting,orremovedifusinga¾”BSPTfitting.- Useasuitableflexiblereinforcedhosewith¾”BSPorBSPTMALETHREADtoconnectaWATERMARKapprovedpressuretanksuch
as a GWS Energy Saver to your RainsaverMK3E.- Carefully follow the manufacturer’s instructions regarding pressurization of your pressure tank.
4.7 Pressure Tank Pre-charge.
Toensureoptimumperformanceandsystemlife,thePressureTankpre-chargeneedstobesetbyfillingthepressuretankwithairthroughthe air valve so that the air pressure is 65% of the pump maximum pressure, according to its maximum performance.Pre-charge the pressure tank before it is installed by using an air pump or using local service station facilities.
Bianco Rainsaver MK3E Installation and Operating Instructions

17
Bianco Rainsaver MK3 Installation and Operating Instructions
CAUTIONS
In conjunction with this manual, read and understand the installation and maintenance manual for the water pump that is to be connected to the RainsaverMK3E.
The RainsaverMK3Eandanypumpconnectedtoitarenottobeusedbychildrenorinfirmpersonsandmustnotbeusedasatoy.
A licensed plumber should carry out plumbing connections.
Servicing of the RainsaverMK3Eand,orwaterpumpshouldonlybycarriedoutbyqualifiedpersons.
Do not clean the RainsaverMK3Ewithabrasiveorpetroleumbasedfluids,anddonotusehydrocarbonpropelledspraysonoraround the RainsaverMK3E.
5. Sound Emissions
The RainsaverMK3Eisvirtuallysilentbutmayemitnoisesassociatedwiththeflowofwaterthroughtheunit.
In any case, the pump, which is connected to the RainsaverMK3E, may emit sound levels, which may inconvenience you or your neighbours, or may operate during normal sleeping hours, which may be prohibited by local government regulations. If this is the case, your RainsaverMK3 can be switched off during the night or may be operated from a time clock. Your RainsaverMK3E will automatically supply your house with Mains water supply while the pump is inactive.
6. Maintenance
EnsurethatwaterflowingthroughtheRainsaverMK3E is as free from dirt and foreign matter as conditions allow.
Periodicallyinspecttherainwatertankinletstrainerandthefirstflushdevice.PeriodicallyinspectstrainersiffittedupstreamfromtheRainsaverMK3E.
Periodically inspect and clean the internal strainers at “MAINS” inlet and “PUMP INLET”. To access the internal strainers, undo the inlet union nuts with the spanner supplied. Pull connection pipe work sideways to reveal the strainer, situated inside the union pipe, and remove for cleaning.
If you rarely run out of rain water and do not turn your pump off at night, operate the valve within the RainsaverMK3E at least monthly byswitchingoffthepowertoyourpumpandflushingatoilet,oropeningatapconnectedtothesystem,thusallowingmainswatertoflowthrough the unit for a short period of time.
Periodic inspection and cleaning of the units internal components is highly recommended. Your plumber can perform this work, and can adviseonthemaintenanceperiodsasdictatedbyindividualsituationsandwaterquality.
7. Trouble shooting
Consultthemanualssuppliedwiththewaterpumpanditscontrolleriffittedinadditiontothefollowingguide.
1. MainsflowisnotavailableorlowwhenRainsaverMK3E is switched off. a. Isolationvalve,iffitted,isnotopen. b. Debris has jammed the check valve closed or is caught in the moving parts or bleed hole of the internal valve. c. ExternalInletstrainer/filter,iffitted,isblocked. d. Internal inlet strainer is blocked.
2. PumpflowisnotavailableorlowwhenpumpisoperatingthroughRainsaverMK3E. a. Pump has lost its prime. b. Isolationvalve,iffitted,isnotopen. c. Debris has jammed the internal check valve closed, or has blocked the check valve. d. ExternalInletstrainer/filter,iffitted,isblocked. e. Internal inlet strainer is blocked.
Note* Should there be a pump failure, mains back up is achieved by turning the RainsaverMK3E off at the power point.
For after sales service please contact White International Customer Service: 1300 783 601.
Bianco Rainsaver MK3E Installation and Operating Instructions

Bianco Rainsaver MK3 Installation and Operating Instructions
18
Installation Dimensions
DAB or BIANCO surface mounted pumps
Typical Installations
Bianco Rainsaver MK3E Installation and Operating Instructions

19
Bianco Rainsaver MK3 Installation and Operating Instructions
TESLA DIVERxxxMPCX Submersible Pump
Typical Installations
BIANCO JH8003PMPCX Submersible Pump
Typical Installations
Bianco Rainsaver MK3E Installation and Operating Instructions

Bianco Rainsaver MK3 Installation and Operating Instructions
20
Bianco Rainsaver MK3 & MK3E Terms & Conditions
Terms & Conditions 2Subject to the provisions of the Trade Practices Act and Goods and Consumer Protection Legislation of various States)
1) White International Pty Ltd / White International NZ Ltd warrants that the Bianco RAINSAVER MKII and MKIII that we
distribute, are free from defects in workmanship and materials, for 2 years from the date of purchase. Subject to our conditions of
warranty White International will repair any defective products free of charge on site within 25 kilometres of our nearest authorized
in-fieldBiancoRAINSAVERServiceAgent.Intheeventthatserviceisrequiredoutsidethe25kmradiusofthenearestin-fieldBianco
RAINSAVER Service Agent, arrangements for the payment of additional travel cost must be made between the “owner” and the
“service agent” before work is carried out.
2) ThewarrantyincludesinfieldlabourcostswheretheBianco RAINSAVER MKII or MKIII including pump is installed within a 25
kmradiusofanauthorisedin-fieldBiancoRAINSAVERServiceAgent.ThiswarrantyexcludestransportationcoststoandfromWhite
Internationaloritsappointedserviceagents,defectsduetonon-compliancewithinstallationinstructions,neglectormisuse,inadequate
protection against the elements, low voltage or use or operation for purposes other than those for which they were designed or
whereequipmentisnotreadilyaccessible.Forfurtherinformationregardingthesuitabilityofyourintendedapplicationcontactuson
our Sales Hotline.
3) The 2 Year Warranty refers to Bianco RAINSAVER MKII and MKIII after the 1st AUGUST 2009, and is not transferable to
another Bianco Rainsaver product and only applies to the original owner, purchaser or end user, and is subject to the Trade Practices
Act and Goods and Consumer Protection legislation of various states.
4) Ourwarrantycommencesfromthedateofpurchaseoftheabovementionedproduct.Proofofpurchaseisrequiredbefore
consideration under warranty is given. Record your date of purchase in the space below and retain this copy for your records.
Date of Purchase Model Purchased
RA
INSA
VER MKII & KMIII
YE
A
R W A R R A
NT
Y
WHITE INTERNATIONAL Pty Ltd A.B.N. 48 000 119 38052-60 Ashford Ave, MILPERRA NZW 2214 PO Box 4755, MILPERRA BC NSW 1891Ph: (02) 9783 6000 Fax: (02) 9783 6003Customer Service Hotline: 1300 783 601Customer Sales Faxline: (02) 9783 6003
www.whiteint.com.au Sales Enquiries: [email protected] General Info: [email protected]
WHITE INTERNATIONAL NZ Ltd 138 Hugo Johnston DrivePenrose, Auckland, NZPO Box 12704, Penrose, Auckland, NZPh: (09) 579 9777 Fax: (09) 579 7775Customer Service Hotline: 0800 509 506Customer Sales Faxline: 0800 804 344

Bianco Rainsaver MK3 Installation and Operating Instructions
21

22

23

24
25

Bianco Rainsaver MK3 Installation and Operating Instructions
26

27
Bianco Rainsaver MK3 Installation and Operating Instructions

WHITE INTERNATIONAL Pty Ltd A.B.N. 48 000 119 38052-60 Ashford Ave, MILPERRA NZW 2214 PO Box 4755, MILPERRA BC NSW 1891Ph: (02) 9783 6000 Fax: (02) 9783 6003Customer Service Hotline: 1300 783 601Customer Sales Faxline: (02) 9783 6003
www.whiteint.com.au Sales Enquiries: [email protected] General Info: [email protected]
WHITE INTERNATIONAL NZ Ltd 138 Hugo Johnston DrivePenrose, Auckland, NZPO Box 12704, Penrose, Auckland, NZPh: (09) 579 9777 Fax: (09) 579 7775Customer Service Hotline: 0800 509 506Customer Sales Faxline: 0800 804 344


![Launchpad Mini [MK3]](https://static.documents.pub/doc/80x56/61bd4f1261276e740b117f87/launchpad-mini-mk3.jpg)


