8
Contents: - certificate ( removable) for: PORSCHE 911 GT2 clubsport - PORSCHE 911 GT3 clubsport - PORSCHE 911 GT3 RS clubsport - - mounting instructions
| Date post: | 29-Mar-2018 |
| Category: |
Documents |
| Upload: | nguyenlien |
| View: | 221 times |
| Download: | 6 times |

Contents:
- certificate ( removable) for:
PORSCHE 911 GT2 clubsport - PORSCHE 911 GT3 clubsport -
PORSCHE 911 GT3 RS clubsport -
- mounting instructions
The camber may be adjusted only in that range that is released from the
tire manufacturer! It is possible that the original camber
cannot be readjusted again.Check and adjust headlight setting. -
Because the vehicle has been lowered, freedom of movement (clearance) for all wheel/
tire combinations must be checked.
-
All rubber- mounted strut/ damper attachments must not be fully tightened
until AFTER the suspension system is loaded (wheels on the ground). Other mounting
fasteners (for example brackets) must be securely tightened BEFORE load
is placed on the suspension system.
-
-
All diagrams are generalized and not to scale!
brackets, etc. specific to strut are not shown!
Connect the negative battery pole.
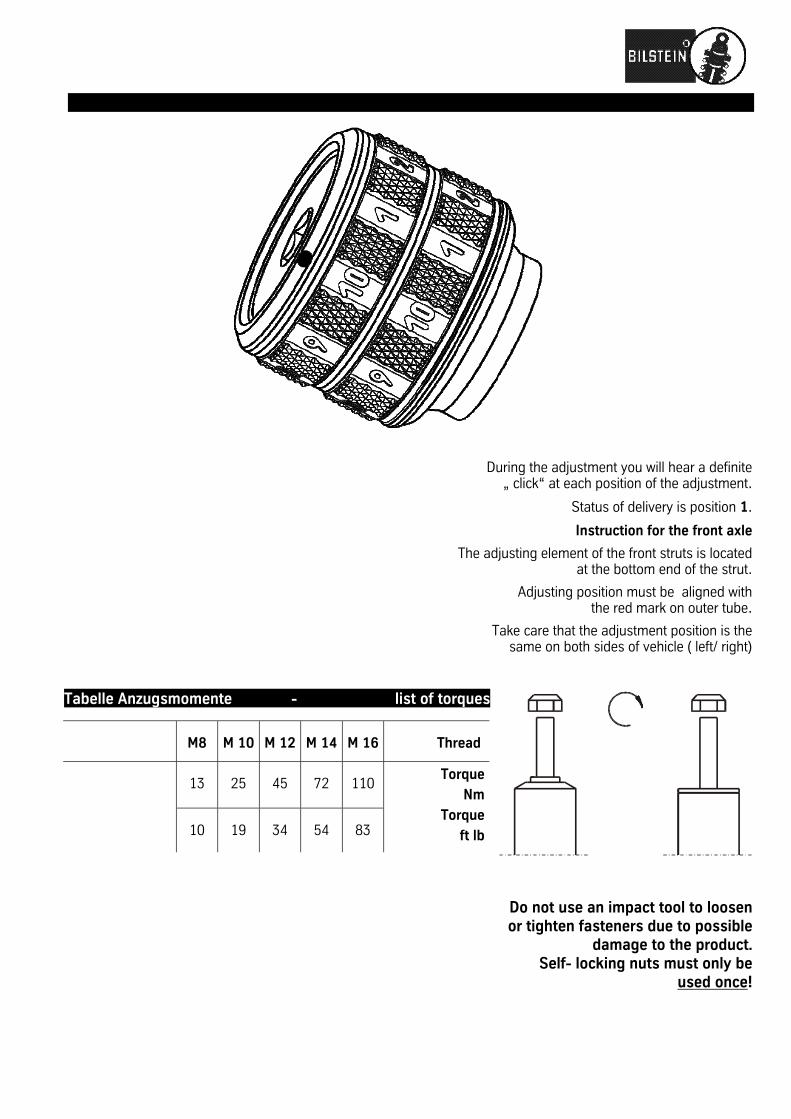
During the adjustment you will hear a definite „ click“ at each position of the adjustment.
Status of delivery is position 1.
Instruction for the front axle
The adjusting element of the front struts is located at the bottom end of the strut.
Adjusting position must be aligned with the red mark on outer tube.
Take care that the adjustment position is the same on both sides of vehicle ( left/ right)
Tabelle Anzugsmomente - list of torques
M8 M 10 M 12 M 14 M 16 Thread
13 25 45 72 110 Torque
Nm
Torque
ft lb
10 19 34 54 83
Do not use an impact tool to loosen or tighten fasteners due to possible
damage to the product. Self- locking nuts must only be
used once!
- Certificate ( removable)
PORSCHE 911 GT2 clubsport - PORSCHE 911 GT3 clubsport -
PORSCHE 911 GT3 RS clubsport -
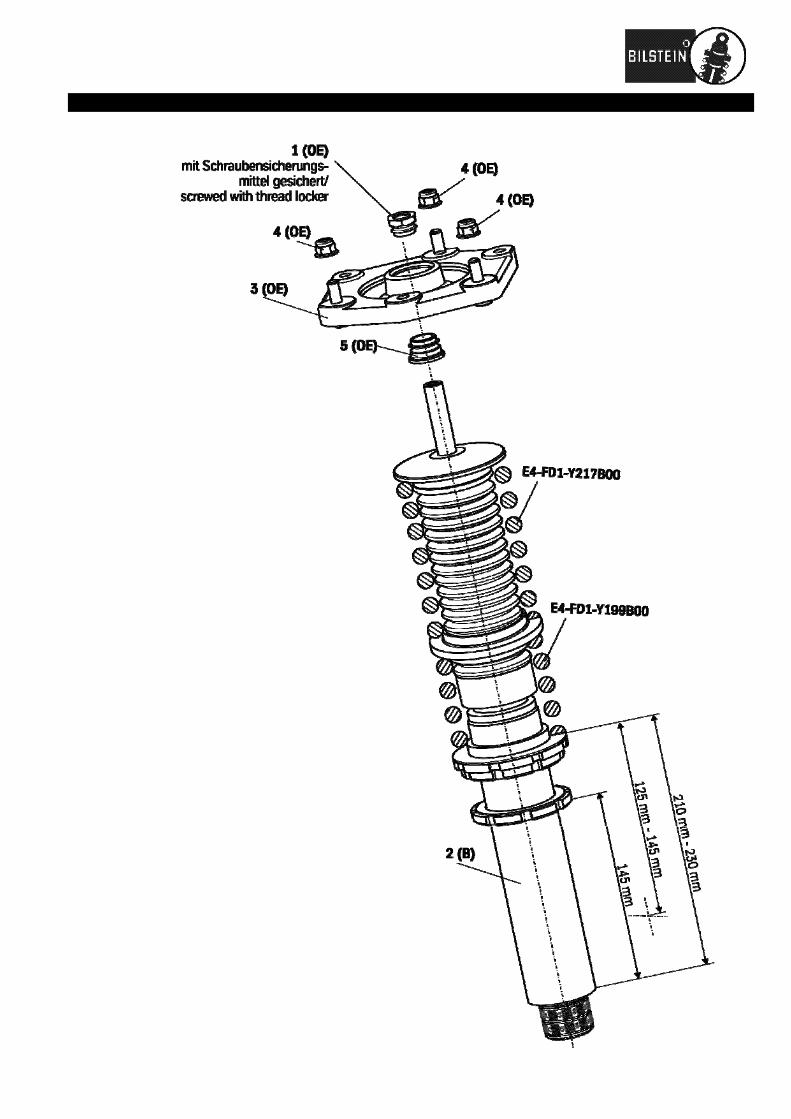
Removal
Place vehicle on a wheel- free car hoist, lift it and remove wheels.
The lower control arm must be supported by suitable means!
Remove bottom mounting.
Remove top fixing nuts (4) from original support bearing (3).
Do not remove central nut (1) at this time!
Remove complete strut and clamp it in an appropriate strut vice.
Using a suitable spring compressor, compress suspension spring until tension
on support bearing is free to move.
Remove the original mounting parts.
Installation
Assemble BILSTEIN strut (2) with the sleeve (5), the original support bearing (3) and central nut (1). The central nut
must be locked with an appropriate, high- strength thread locker.
IMPORTANT! Spring plates must not be adjusted outside the ranges
specified in the certificate!
The correct mounting position of the suspension springs can be determined
by the printing on the springs; install them with the print upright.
Fit assembled BILSTEIN strut to the ve-hicle in reverse order as removal.
Removal
Place vehicle on a wheel- free car hoist, lift it and remove wheels.
The lower control arm must be supported by suitable means!
Remove bottom fixing mounting.
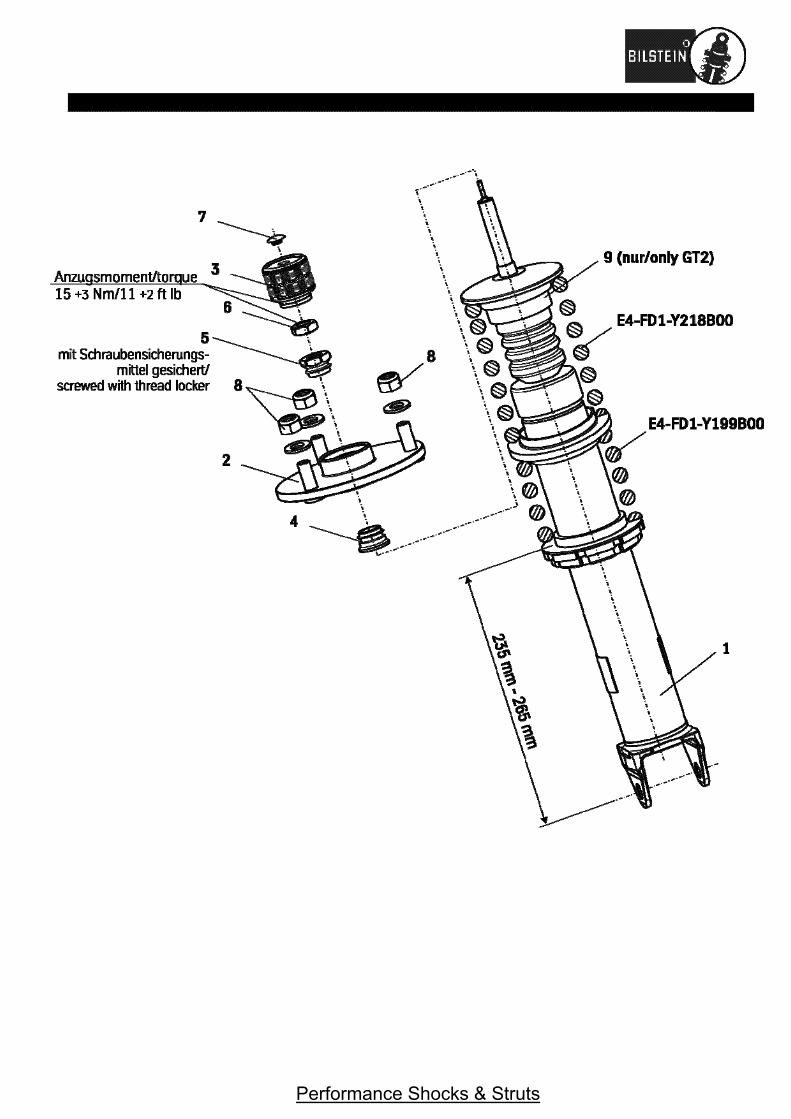
Remove top fixing nuts (8) from original support bearing (2).
Do not remove central nut (5) at this time!
Remove complete shock absorber.
Do not reuse any original parts!
Installation
To fit BILSTEIN support bearing (2) on BIL-STEIN shock absorber (1) remove plastic
cap (7) from top of the adjustment unit (3). Remove the unit and nut (6) by using a hex-
agon socket wrench.
Complete BILSTEIN shock absorber with sleeve (4), BILSTEIN support bearing and central nut
(5) delivered by BILSTEIN. The central nut must be locked with an appropriate, high-
strength screw locker.
When fitting to PORSCHE 911 GT3/ GT3 RS remove disc (9) from
BILSTEIN shock absorber.
Then screw down nut (6) as much as possible.
Fit the adjustment unit and lock it with torque of 11 +2 ft lb. Then lock nut (6) and adjustment
unit with torque of 11 +2 ft lb.
Fit BILSTEIN shock absorber to the vehicle in reverse order as removal.