Page 1
Biochrom Asys Atlantis Microplate Washer v.2.2 Page 1
Biochrom Asys Atlantis Microplate Washer
User’s Manual
Biochrom Ltd 22 Cambridge Science Park, Milton Rd, Cambridge CB4 0FJ UK Tel: +44 (0)1223 423723 Fax: +44 (0)1223 420164 Email: [email protected] www.biochrom.co.uk www.biochrom-us.com
Biochrom US 84 October Hill Road, Holliston, MA 01746-1388 USA Tel: (Toll free): 877-BIO-CHROM (877-246-2476) Fax: 508-429-5732 Email: [email protected]
Page 2
Biochrom Asys Atlantis Microplate Washer v.2.2 Page 2
Table of Contents 1
1 Introduction ...................................................................................................... 4
2 Warnings and Hazards ...................................................................................... 5 2.1.1 Safety symbols ......................................................................................................................... 6
3 Precautions........................................................................................................ 8 3.1 Cleaning the instrument .................................................................................................................... 8
4 Specifications ..................................................................................................... 9 4.1 Metrological specification ................................................................................................................ 9
4.1.1 Rated operating conditions ........................................................................................................... 9 4.1.1 Limits of error and tolerance limits ............................................................................................... 9
4.2 General technical data ...................................................................................................................... 9 4.2.1 Dimensions .................................................................................................................................. 9 4.2.2 Power supply ............................................................................................................................. 10 4.2.3 Interfacing ................................................................................................................................. 10 4.2.4 Options ...................................................................................................................................... 10
4.3 Cleaning ........................................................................................................................................ 10 4.4 General features ............................................................................................................................. 11 4.5 Standard delivery content ............................................................................................................... 12 4.6 Warnings and directions ................................................................................................................. 13 4.7 Unpacking Procedure ..................................................................................................................... 14 4.8 Installation requirements, Environmental operating conditions ........................................................ 14 4.9 Instrument installation procedure .................................................................................................... 15 4.10 Re-packing to prevent damage during transport .............................................................................. 18
5 Theory of Operation ........................................................................................ 19 5.1 Introduction ................................................................................................................................... 19 5.2 Main components ........................................................................................................................... 19 5.3 Hydraulic system ........................................................................................................................... 19
5.3.1 Dispensing system ..................................................................................................................... 19 5.3.2 Aspirating system ...................................................................................................................... 19
6 Warranty ........................................................................................................ 21 6.1 Liability ......................................................................................................................................... 21
7 Software Principle ........................................................................................... 22 7.1 Software Navigation....................................................................................................................... 22 7.2 Programming Sequence .................................................................................................................. 23 7.3 Menus ............................................................................................................................................ 24
7.3.1 Run Procedure ........................................................................................................................... 25 7.3.2 Prime / Rinse ............................................................................................................................. 26 7.3.3 Define Procedure ....................................................................................................................... 27 7.3.4 Define Cycle .............................................................................................................................. 28 7.3.5 Define Plate ............................................................................................................................... 29 7.3.6 Setup ......................................................................................................................................... 30 7.3.7 Service ...................................................................................................................................... 31
7.4 Description of the key functions ..................................................................................................... 32
8 Start-up and system setup ................................................................................ 33 8.1 Start-Up ......................................................................................................................................... 33
Page 3
Biochrom Asys Atlantis Microplate Washer v.2.2 Page 3
8.2 Control of the system setup ............................................................................................................ 34
9 Programming .................................................................................................. 35 9.1 Run Procedure ............................................................................................................................... 35 9.2 Prime/Rinse Menu ......................................................................................................................... 37
9.2.1 Manual Prime/Rinse ................................................................................................................... 37 9.2.2 Automatic Prime/Rinse .............................................................................................................. 38 9.2.3 Periodic Prime/Rinse.................................................................................................................. 39
9.3 Define Procedure Menu .................................................................................................................. 41 9.4 Define Cycle Menu ........................................................................................................................ 46 9.5 Define Plate Menu ......................................................................................................................... 50 9.6 Setup Menu .................................................................................................................................... 61 9.7 Service Menu ................................................................................................................................. 65
10 ERROR MESSAGES....................................................................................... 66 10.1.1 Duplicate Name ..................................................................................................................... 66 10.1.2 Wrong Manifold .................................................................................................................... 66 10.1.3 No Cycle Defined .................................................................................................................. 66 10.1.4 No Plate Defined .............................................................................................................. 67 10.1.5 Waste Full ............................................................................................................................. 67 10.1.6 Liquid Empty ...................................................................................................................... 68 10.1.7 Stop Pressed .......................................................................................................................... 68 10.1.8 Plate Transport Error ............................................................................................................. 68 10.1.9 Manifold Transport Error ....................................................................................................... 69
11 Maintenance .................................................................................................... 70 11.1 Recommended regular inspection ................................................................................................... 70 11.2 Approved parts............................................................................................................................... 70 11.3 Exchanging a Fuse ......................................................................................................................... 70 11.4 Cleaning the instrument .................................................................................................................. 71 11.5 Disinfection Procedure ................................................................................................................... 71
12 Intended Use ................................................................................................... 73 12.1 Quality control ............................................................................................................................... 73
Page 4
Biochrom Asys Atlantis Microplate Washer v.2.2 Page 4
1 Introduction
The Atlantis is a fully automated, programmable 96-well
microplate washer with an 8-way manifold. An optional 16-channel
manifold allows washing of 384-well microplates.
The Atlantis is designed around your application. It incorporates
state of the art technology and software both necessary to allow
optimum performance and easy use.
Easy operation is possible through the menu structure of the on-
board software. The display and the keyboard provides clear access
to all features of the flexible software
The Atlantis can be operated with up to 3 different wash liquids
selected via the software.
Easy plate setup procedure is provided to optimize the movement
of the plate and the manifold according to the different dimensions
of different plate types.
Page 5
Biochrom Asys Atlantis Microplate Washer v.2.2 Page 5
2 Warnings and Hazards
General:
If inflammable, toxic or biologically hazardous substances are
used when operating the equipment; please observe the
instructions and precautions enclosed with such substance.
Never spill fluids in or on the equipment.
Wash your hands thoroughly after handling test fluids. If equipment has been in contact with hazardous substances, it
must be disinfected prior to shipment in accordance with the
effective provisions.
Do not touch the plate during movement of the plate transport
(risk of injury).
The equipment may not be opened other than as described in
chapter 11 Maintenance, since it contains live parts (danger of
life).
Electrical:
Voltages dangerous to human life are present in this device.
Before removing any covers disconnect the device from the
power source.
Ensure that the power cord supplied with the unit is used.
The power cord may only be inserted in a socket outlet
provided with a protective ground (earth) contact. The
protective action must not be negated by use of an extension
cord without a protective grounding contact.
Do not replace fuses without first removing the main power
cord.
Ensure that only fuses with the required rated current and of the
specified type are used for replacement. The use of makeshift
fuses and the short-circuiting of fuse-holders are prohibited.
When the apparatus is connected to the main power source, the
opening of the covers or removal of components is likely to
expose life parts. The device shall be disconnected from all
voltage sources before it is opened for adjustment or repair.
Any adjustment or repair of the opened apparatus under voltage
should be avoided, but, if necessary, it must be carried out by
qualified service personnel who are aware of the hazards
involved.
Page 6
Biochrom Asys Atlantis Microplate Washer v.2.2 Page 6
Magnetic:
The removable plate carriage of this instrument has a very
strong permanent magnet mounted. Be sure to never bring any
other magnets or Ferro-magnetic parts near to the magnet of the
plate carriage (risk of injury).
Never place credit cards or IDs or any other items using
magnet-code (floppy disks, audio- or video tapes,) near to the
magnet of the plate carriage (risk of data loss).
Be careful when placing the plate carriage onto other sensitive
medical devices, which may be influenced by magnetic fields.
2.1.1 Safety symbols
The following safety symbols may be found in several locations on the instrument. Only
persons who fully understand the safety precautions and recognize shock hazards should
operate this instrument.
~ Alternating current
ON
OFF
In Vitro Diagnostic Device
Protective ground terminal
Caution, see enclosed document
Page 7
Biochrom Asys Atlantis Microplate Washer v.2.2 Page 7
The symbol on the product indicates that this product shall not be treated as household waste. Instead it shall be handed over to the applicable collection point for the recycling of electrical and electronic equipment.
Page 8
Biochrom Asys Atlantis Microplate Washer v.2.2 Page 8
3 Precautions
3.1 Cleaning the instrument
This instrument is a precision instrument and it requires regular
cleaning to ensure the continued precision.
Liquid Spills
If any liquid is spilled on the instrument, it should be
IMMEDIATELY removed so that the liquid does not attack the
surface of the housing.
Regular cleaning
The housing of the instrument should be cleaned regularly with a
mild household cleaning agent.
Warning: Do not use aggressive solutions!
The area surrounding the plate carrier should be cleaned with a dry
cloth.
Fittings and tubing
The usual wash buffer tends to crystallize easily on air and can then
block tubing and fittings. Use the automatic rinse program daily
and do not leave the tubing filled with wash buffer for an extended
period of time.
Page 9
Biochrom Asys Atlantis Microplate Washer v.2.2 Page 9
4 Specifications
4.1 Metrological specification
4.1.1 Rated operating conditions
Warming-up time: Ready for operation immediately
after switching-on.
Operating voltage: 100V - 240V,
180V – 250V autosensing Fuses (user exchangeable): 2 pcs. 2.5A, TH 250VAC
Built in Fuse (on power supply): 1 pcs. F 2A, TH 250VAC
Display: 2x16 characters display (with
backlight)
Keyboard: Keyboard with 5 function keys
Ambient temperature: 15°C - +40°C (operation)
-25°C - +50°C (storage)
Relative humidity: 15 - 85% non-condensing
(operation)
< 95% non-condensing (storage)
Air pressure tolerance: 54.000 - 106.000 Pascal
Maximum altitude (operation): up to 5000 m
4.1.1 Limits of error and tolerance limits
Dispense volume: Wash liquid volume adjustable
from 50 - 2000µl in increments of
50µl
Dispensing accuracy: +/- 5% at 300µl across the plate
Residual volume: +/- 1µl per well
The tolerances of the measuring devices are based on the
manufacturer’s information.
4.2 General technical data
4.2.1 Dimensions
Weight: 6,2 kg net
Dimensions (width x length x height): 21 cm x 46 cm x 21 cm
Page 10
Biochrom Asys Atlantis Microplate Washer v.2.2 Page 10
4.2.2 Power supply
Consumption: 65VA (maximum)
Operating voltage: 90-130V, 180-250VAC (autosensing),
frequency range: 47 - 63 Hz
4.2.3 Interfacing
Serial interface (RS232 9-pin male connector) for remote control
of basic wash functions, instrument status and setup by external
PC (with null-modem serial cable used for PC connection).
4.2.4 Options
liquid level sensors for wash and waste bottles 8- and 12-way manifold for 96-well plates
16-way manifold for 384- Serial interface cable
4.3 Cleaning
This instrument is a precision instrument and it requires regular
cleaning to ensure the continued precision.
Liquid spillage
If any liquid is spilled on the instrument, it should be
IMMEDIATELY removed so that the liquid does not attack the
surface of the housing.
Regular cleaning
The housing of the instrument should be cleaned regularly with a
mild household cleaning agent.
Warning: Do not use aggressive solutions!
The area surrounding the plate carrier should be cleaned with a dry
cloth.
Fittings and tubing
The wash buffer tends to crystallize easily on air contact and can
block tubing and fittings. Use the automatic rinse program daily
and do not leave the tubing filled with wash buffer for an extended
period of time.
Page 11
Biochrom Asys Atlantis Microplate Washer v.2.2 Page 11
4.4 General features
The Atlantis incorporates state of the art technology and software
both necessary to allow optimum performance and easy use.
The Atlantis is designed around your application.
Easy operation
Through the menu structure of the on-board software. The display
(2x16 characters) and the keyboard with 5 keys provide clear
access to all features of the flexible software. If desired the washer
may also be operated from a PC using the optional Windows based
software.
8-way manifold
As standard configuration. Additional manifolds are available as
options. The manifold is easily exchanged.
Up to 3 different wash liquids
The basic version incorporates 1 liquid line for wash buffer, rinse
liquid and waste. The 4 liquid line model can access to up to 3
different wash buffers connected to the instrument which can be
selected by software.
Vacuum and pressure free system
Any appropriate container can be used to hold the wash buffer. No
special bottles are required.
Quiet operation
The Atlantis is very quiet due to the special pumps used.
Additionally the pumps are only operating when the washing
procedure is performed.
Automatic periodic rinse
Activate in order to avoid clogging if the washer is not being
operated.
Aerosol Protection
Cover the manifold and the rear plate position. It can easily be
removed for cleaning and maintenance.
Easy access to all tubes and valves
All valves and tubes which may require handling by the user are
easily accessible to assure fast and convenient maintenance.
Page 12
Biochrom Asys Atlantis Microplate Washer v.2.2 Page 12
Plate setup
To optimize the movement of the plate and manifold according to
the specific dimensions of different plate types.
Residual volume is minimized by the crosswise aspirate function
which aspirates at the edges of the well. Up to 20 different plate
types (flat- and round-bottom) can be configured and stored on the
instrument.
Bottom Detection
As part of the plate setup this unique feature supports optimization
of plate specific parameters. The instrument is able to automatically
detect the bottom of the well. This results in improved washing
performance and minimized residual volume without the manifold
touching the bottom of the well (with flat bottom plates only).
Wash cycles and procedures
Wash cycles: Up to 20 may be defined according to specific
requirements and are stored on the instrument. Once a wash
cycle is created it may be used in different wash procedures.
Some of the main features are:
• Bottom and Overflow washing
• Adjustable Dispense volume and speed
• Adjustable aspiration power and time
• Adjustable soak time
• Shaking (3 modes)
Wash procedures: Up to 50 may be created by putting up to 8
previously defined wash cycles in sequence. Washing
procedures can either be performed step by step over the whole
plate (PLATE-mode) or strip by strip (STRIP-mode). The
number of strips to be processed may be defined at the time the
wash procedure is started.
Options
Liquid level detectors to check volumes in wash and waste
bottles.
4.5 Standard delivery content
Washer Atlantis
external tubing set
Manifold (8-way)
1 or 3 wash bottles 2 L (depending on configuration) Rinse bottle 2 L
Page 13
Biochrom Asys Atlantis Microplate Washer v.2.2 Page 13
Waste bottle 2.5 L
Power cord
User manual
Spare fuses
Cleaning tools for needles
4.6 Warnings and directions
If inflammable, toxic or biologically hazardous substances are used
when operating the equipment, please observe the instructions and
precautions enclosed with such substances.
Never spill fluids in or on the equipment. Wash your hands
thoroughly after handling test fluids.
If the equipment has been in contact with hazardous substances, it
must be disinfected prior to shipment in accordance with the
effective provisions.
Do not touch the plate during movement of the plate transport (risk
of injury).
The equipment may not be opened other than as described in the
chapter 11 Maintenance, since it contains live parts (danger to life).
Page 14
Biochrom Asys Atlantis Microplate Washer v.2.2 Page 14
4.7 Unpacking Procedure
1. Visually inspect the container for damage, before opening it.
Note: Report any damage immediately to the forwarding agent or to the delivery
carrier.
2. Place the carton in an upright position and open it.
3. Remove the upper cardboard box carefully.
4. Lift the instrument out of the carton and place it on a flat
surface, free from dust, vibration and away from direct sunlight.
5. Visually inspect the instrument for loose, bent or broken parts.
Note: Report any damage immediately.
6. Compare the instrument's serial number, attached on the rear
panel of the instrument, against the serial number of the
instrument on the delivery (shipping) note and packing list.
6. Check the instrument accessories against the delivery (shipping)
note and packing list.
7. Please save all packing materials, as they may be required
for later transportation.
4.8 Installation requirements, Environmental operating
conditions
Flat, dry, clean and vibration-proof working area (50 cm x 35
cm - length x width)
Additional room for cables, connections, etc.
No direct sunlight Clean ambient air (free of corrosive vapors, smoke and dust)
Ambient temperature between 15°C and 40°C
Humidity between 15% and 85%.
Before the instrument is installed and switched on, it should be
left to stand for at least 2 hours, so there is no possibility of
condensation causing a damage or malfunction.
Use the power cable supplied with the instrument to connect the
instrument's main plug with a power outlet providing protective
earth.
Please Note:
Only use the power cable supplied with the instrument or a power cable with
protective earth connection carrying the CE-mark.
Page 15
Biochrom Asys Atlantis Microplate Washer v.2.2 Page 15
Please ensure that the power outlet used has the applicable technical safety
requirements!
4.9 Instrument installation procedure
The following procedures detail the necessary steps to be followed
when installing the Instrument.
1. Place the instrument into the required position
Note: Ensure the distance between the back panel of the instrument and the wall,
is at least 5 cm.
Remove all packing material and transport lock tapes.
2. Remove all packing material from the manifold. Look for the
two manifold connecting tubes, packed together with the
manifold. Connect the aspiration tube with the red quick fit
connector to the corresponding connector at the top plate of the
washer and slide the other end of the tubing on the red
connector of the manifold. Now connect the thin dispense
tubing with the blue quick fit connector to the corresponding
connector. Press down now the black pinch valve actuator and
slide the dispense tube into the side slot of the pinch valve.
Make sure that the tubing is fully inside the valve. Afterwards
slide the dispense tube on the blue connector of the manifold.
Place the manifold now on the horizontal manifold holder bar so
that the two holding pins are resting in the slots of the manifold
holder.
3. Connect the long aspiration tube with the red fitting to the
connector at the backside of the washer and to the waste bottle.
4. Connect the wash fluid tube with blue fitting to the connector at
the backside of the washer and to the wash bottle.
5. Connect the rinse fluid tube with the white fitting to the
connector at the backside of the washer and to the rinse bottle.
6. Ensure that the mains power switch at the back panel of the
instrument is in the OFF position.
7. Insert the power cable into the mains power socket in the back
panel of the instrument.
8. Switch the washer on.
If the instrument is turned on using the power switch on the rear
side of the device the green power indicator on the left front side of
the device has to be illuminated.
When connecting the instrument with an external computer, ensure
the instrument is switched off (the power indicator is dark). If the
Page 16
Biochrom Asys Atlantis Microplate Washer v.2.2 Page 16
instrument is turned on turn it off using the power switch on the
rear side of the device.
Page 17
Biochrom Asys Atlantis Microplate Washer v.2.2 Page 17
The power indicator is located on the front left side of the unit and
is marked with the following symbol.
The stand-by indicator may show 3 different states:
Green light: Instrument is in stand-by (ready for operation).
Not illuminated: Instrument is not ready for operation.
In order to make sure the instrument is disconnected from power
the main switch on the rear side of the unit has to be switched to
the "OFF-position" indicated with a "0" symbol. Alternatively the
power cord can be disconnected from the unit.
Page 18
Biochrom Asys Atlantis Microplate Washer v.2.2 Page 18
4.10 Re-packing to prevent damage during transport
The original Atlantis packing has been specially designed for this
equipment.
1. Remove the manifold and tubing and the plate carriage and
pack them into the accessories boxes.
2. Lock the holder of the manifold with the foam part as shown in
picture 1.
3. Put the transport lock plate at the location shown in picture 2
and secure the plate with adhesive tape.
4. Place the foam parts left and right on the washer and put the
washer into the transport box. (Picture 3).
5. Place the the bottles and the accessory boxes into the spaces left
and right of the instrument as shown on picture 3.
It is therefore recommended to save the original carton with its foam parts and
accessories box. Warranty claims are void if transport damages are caused by
improper packing!
picture 1 picture 2
picture 3
Page 19
Biochrom Asys Atlantis Microplate Washer v.2.2 Page 19
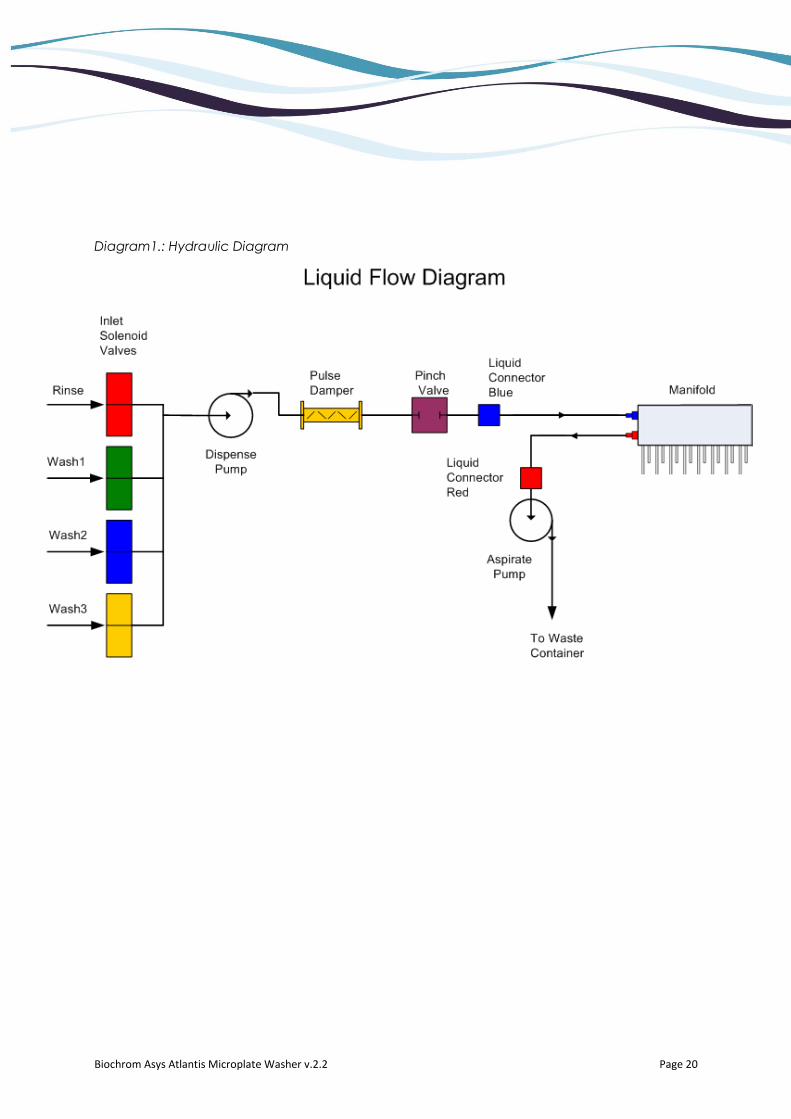
5 Theory of Operation
5.1 Introduction
This chapter gives the description of the main components of the
instrument and describes the hydraulic system.
5.2 Main components
The main components of the washer are the control electronics, the
plate transport mechanism, the manifold transport, the dispensing
and aspirating pumps, the keyboard with the LCD display and the
power supply unit.
5.3 Hydraulic system
5.3.1 Dispensing system
The dispensing system consists of the input selection valves, the
diaphragm pump, the damping tube, the pinch valve and the
manifold. The input selection valves are connecting the respective
liquid reservoirs (wash and rinse solution) to the internal dispense
circuits. The valves are controlled by the washer software to select
the correct liquid. The dispensing pump delivers the liquid to the
manifold, the operating time of the pump together with the
operating time of the pinch valve are controlling the programmed
volume.
5.3.2 Aspirating system
The aspiration is performed by a liquid pump connected to the
aspiration needles of the manifold. Compared to the traditional
vacuum pump operation this method produces much less noise and
does not require sealed bottles. Any kind of container with
sufficient volume can be used for the waste. In addition the risk of
infectious aerosols is much reduced.
Page 20
Biochrom Asys Atlantis Microplate Washer v.2.2 Page 20
Diagram1.: Hydraulic Diagram
Page 21
Biochrom Asys Atlantis Microplate Washer v.2.2 Page 21
6 Warranty
Warranty shall lose effect if:
Atlantis is not used in the defined scope of application,
Atlantis has obviously been damaged by external influences
which are not in accordance with the provisions for the
nominal range of use,
Atlantis has been modified or parts exchanged by a person
other than Biochrom personnel or an authorized servicing
agent,
The warranty seals on the housing of the instrument are
broken,
The parts and subassemblies are implemented, which are
not original from Biochrom,
The Atlantis serial number is no longer legible, has been
removed or altered,
The Atlantis has not been installed in accordance with the
instructions supplied,
The Atlantis has been damaged during return transport due
to wrong packing (e.g. not in original packing material).
The Atlantis was damaged due to wrong operation, not
according to the descriptions in the manual.
The instrument may only be operated by qualified personnel.
If a warranty is brought into operation, Biochrom shall repair or
replace any defects which have resulted from faulty material or
during production as it check fit. No costs shall arise for the client
(except cargo rates).
All components found in the original equipment, or an adequate
and full compatible alternative shall be available for a period of 5
(five) years after production.
This warranty refers to the obligations of Biochrom and can only
be amended upon the written consent of Biochrom.
6.1 Liability
In original condition the instrument meets all safety regulations for
a risk-less operation.
Biochrom cannot warrant damages or any resulting costs caused by
alterations, repairs or modifications of the equipment.
Page 22
Biochrom Asys Atlantis Microplate Washer v.2.2 Page 22
7 Software Principle
7.1 Software Navigation
Drawing 2.: Software Navigation
The software was designed to make navigation through the
different menus as easy as possible. The main menus are organized
like a wheel which can be turned in both directions by means of the
two first keys (function key 1 <F1> and function key 2 <F2>).
When pressing <F1> or <F2> the next respectively the previous
menu will be displayed.
The two function keys may have different functions assigned in the
various sub-menus. The current assignment is always displayed
right above the corresponding key.
The lower right of the display will show the current selection of
different options (e.g. "Proc1" for the procedure with this name).
To change the selection use the <+> and <-> keys. These keys can
also be used for numerical or alphanumerical inputs by means of
in- or decreasing a value or scrolling through the alphabet.
By pressing <enter> the current selection is confirmed and the
software leads to the next menu to allow further selections.
Page 23
Biochrom Asys Atlantis Microplate Washer v.2.2 Page 23
7.2 Programming Sequence
The software offers the possibility to program up to 50 so-called
procedures (a procedure defines a complete wash program). To
define a procedure cycles (defines one part - cycle - of a wash
program; e.g. bottom wash) and plates (defines the shape and
measures of the plate used) are necessary.
Drawing 3. Software Principle
Note: Please make sure to program the cycle and plate BEFORE the procedure!
Page 24
Biochrom Asys Atlantis Microplate Washer v.2.2 Page 24
7.3 Menus
The following flow diagrams give an overview of all menus and
the way of navigating through them. Detailed information for all
menus and their functions can be found in the following chapters.
For details please refer to chapter 9.1 Run Procedure
For details please refer to chapter 9.2 Prime/Rinse Menu
For details please refer to chapter 9.3 Define Procedure Menu
For details please refer to chapter 9.4 Define Cycle Menu
For details please refer to chapter 9.5 Define Plate Menu
For details please refer to chapter 9.6 Setup Menu
For details please refer to chapter 9.7 Service Menu
Run Procedure: << >> Proc1
Prime/Rinse: << >> Automat
Def Procedure: << >> <new>
Def Cycle: << >> <new>
Def Plate: << >> <new>
Setup << >>
Service << >>
Page 25
Biochrom Asys Atlantis Microplate Washer v.2.2 Page 25
7.3.1 Run Procedure
Table 1 Run Procedure
Run
Procedure
Washliquid OK?
Waste empty?
Plate inserted?
>><<
Yes
Yes
Perform
Procedure
Yes
No
No
No
Nr of strips
<-|
Esc
if disabled
if disabled
if disabled
if 'Ask strip
nr' = No
<-|
Stop
For details please refer to chapter 9.1 Run Procedure
Page 26
Biochrom Asys Atlantis Microplate Washer v.2.2 Page 26
7.3.2 Prime / Rinse
Table 2. Prime / Rinse
Prime/Rinse
Manual
Automat
Period
>><<
+/-
+/-
+/-
+/-
Liquid
Liquid Volume
VolumeRinse
interval
Manual
prime/rinse<-|<-|
Esc
Automatic
Rinse<-|<-|
Periodic Rinse<-|<-|
Esc
Esc Esc
Liquid<-|
Esc EscEsc
Stop
For details please refer to chapter 9.2
Page 27
Biochrom Asys Atlantis Microplate Washer v.2.2 Page 27
7.3.3 Define Procedure
Table 3. Define Procedure
D ef P rocedure
N am e
F ina l asp
power
Processing
m ode
P la te
Ask strip n r
D e lay fina l asp
>><<
< -|
C ycle
S to ring
F ina l asp tim e
<-|
< -|
< -|
< -|
< -|
if 'P rocessing
m ode ' = 'S trip '
AN D 'F ina l asp
tim e ' > 0< -|
Esc
Esc
Esc
Esc
Esc
Esc
Esc
<-|
L iqu id
< -|
< -|
1 - 8 C ycles
Esc
if 'F ina l asp tim e ' = 0
Esc<<
<<
<<
<<
<<
<<
<<
<<
For details please refer to chapter 9.3 Define Procedure Menu
Page 28
Biochrom Asys Atlantis Microplate Washer v.2.2 Page 28
7.3.4 Define Cycle
Table 4. Define Cycle
Def Cycle
Nam e
Aspir tim e
Aspir power
Shaking tim e
Shaking
in tensity
Min im um soak
tim e
>><<
<-|
<-|
<-|
<-|
<-|
D isp vo lum e
Disp power
Storing
<-|
<-|
if 'D isp
volum e' = 0
<-|
if 'Aspir tim e' = 0
if 'Shaking
tim e' = 0
<-|
W ash m ode
<-|
<<
<<
<<
<<
<<
<<
<<
<<
Esc
Esc
Esc
Esc
Esc
Esc
Esc
Esc
Esc
For details please refer to chapter 9.4 Define Cycle Menu
Page 29
Biochrom Asys Atlantis Microplate Washer v.2.2 Page 29
7.3.5 Define Plate
Table 5. Define Plate
Def Plate
Nam e
Plate form at
W ell shape
Side pos front
Side pos rear
Center pos
Aspiration Ht
D isp pos
Bottom disp ht
>><<
<-|
<-|
<-|
<-|<-|
<-|
<-|
<-|
Crosswise asp
Storing
<-|
If 'Cross-
wise asp' = No
<-|'Flat' 'Round'
<-|
Esc
Esc
Esc
Esc
Esc
Esc
Esc
Esc
Esc
Esc
Ovflow disp ht
<-|
Esc
<<
<<
<<
For details please refer to chapter 9.5 Define Plate Menu
Page 30
Biochrom Asys Atlantis Microplate Washer v.2.2 Page 30
7.3.6 Setup
Table 6. Setup
Setup
Language
Manifo ld
W ash liquids
W ast fu ll det
R inse em pty
det
W ash1 em pty
det
W ash2 em pty
det
>><<
<-|
<-|
<-|
<-|
<-|
Storing
Esc
Esc
Esc
Esc
Esc
Esc
Esc
<-|
<<
W ash3 em pty
det
Liquid warning
W aste warning
Plate warning
Key click
Esc
Esc
Esc
Esc
Esc
<-|
<-|
<-|
<-|
<-|
<-|
<<
<<
<<
<<
<<
<<
<<
<<
<<
<-|
<<
if 'W ash
liquids' = 1
if ' W ash
liquids' = 2
For details please refer to chapter 9.6 Setup Menu
Page 31
Biochrom Asys Atlantis Microplate Washer v.2.2 Page 31
7.3.7 Service
Table 7. Service
Service
Sensors
Valves
Pumps
PlatInit
PlatPos
>><<
MFInit
<-|
+/-
+/-
+/-
+/-
+/-
Esc
Esc
Esc
Esc
Esc
Esc
MFPos
MFAdjust
PlAdjust
Eeprom
DelParam
+/-
+/-
+/-
+/-
+/-
Esc
Esc
Esc
Esc
Esc
For details please refer to chapter 9.7 Service Menu
Page 32
Biochrom Asys Atlantis Microplate Washer v.2.2 Page 32
7.4 Description of the key functions
<F1> / <F2> - Function Keys: Used to scroll through the different
menus. Depending on the menu, other functions can be assigned
to these keys. The current function is always shown in the
display right above the key.
<+> / <-> - These keys are used for numerical or text input and to
select options from a list (e.g. selection of the procedure to be
started).
<enter> - confirms the text / numerical entry or selection and
proceeds to the next dialogue element.
Page 33
Biochrom Asys Atlantis Microplate Washer v.2.2 Page 33
8 Start-up and system setup
8.1 Start-Up
Place the device on a suitable working surface
Follow the steps described in the chapters 4.8 Installation
requirements, Environmental operating conditions and
4.9 Instrument installation procedure
Connect power cable to standard mains plug
Switch on main switch (rear left side). The Atlantis performs
the complete initialization and shows the main menu after
approx. 10 seconds.Display
Screen 8. Display
Description:
The first line of the display shows the name of the menu or the
current function of a sub-menu.
The second line is split into 3 parts:
<< - current function assigned to the first function key
(e.g. previous menu, escape, ...)
>> - current function assigned to the second function key
(e.g. next menu, escape, ...)
Proc1 - current selection (or field for text or numerical
input); use the <-> and <+> keys to alter a selection or
change a value
Run Procedure: << >> Proc1
Page 34
Biochrom Asys Atlantis Microplate Washer v.2.2 Page 34
8.2 Control of the system setup
Screen 9. Setup Menu
Please make sure to set all options according to your requirements
before programming new procedures, plates or cycles and before
running procedures. For details on this menu please refer to chapter
9.6 Setup Menu
Setup << >>
Page 35
Biochrom Asys Atlantis Microplate Washer v.2.2 Page 35
9 Programming
9.1 Run Procedure
Screen 10. Run Procedure
In this menu you can select the procedure to be started. All
procedures defined in the "Define Procedure Menu" can be
selected.
Function keys:
<F1> or <F2>
Select another menu.
<+> or <->
Select a procedure to be started.
<enter>
Confirm the selection of the procedure and go to the next
screen.
Screen 11. Wash liquid Check
A warning to check the liquid level of the wash bottle is displayed
(this function needs to be activated in the "Setup Menu").
Function keys:
<F1> or <F2>
Select "Yes" or "No". If "No" is selected the instrument will
return to the main menu.
Run Procedure: << >> Proc1
Wash liquid OK? No Yes
Page 36
Biochrom Asys Atlantis Microplate Washer v.2.2 Page 36
Screen 12. Waste Check
A warning to 0check the liquid level of the waste bottle is
displayed (this function needs to be activated in the "Setup Menu").
Function keys:
<F1> or <F2>
Select "Yes" or "No". If "No" is selected the instrument will
return to the main menu.
Warning: If "Yes" is selected without a sufficient volume for waste liquid in the
waste bottle the instrument can be damaged!
Screen 13. Plate Check
A warning to check whether a plate is inserted is displayed (this
function needs to be activated in the "Setup Menu").
Function keys:
<F1> or <F2>
Select "Yes" or "No". If "No" is selected the instrument will
return to the main menu.
Warning: If "Yes" is selected without a plate inserted to the instrument spillage
will be caused which can damage the instrument and/or be harmful to
the ambient (depending on the used wash liquid)!
Screen 14. Nr of stripes check
The display prompts you to enter the right numbers of strips (this
function needs to be activated in the "Setup Menu").
Function keys:
<F1>
Select Esc: the instrument will return to the main menu
<->/<+>
Select number of strips
Waste empty? No Yes
Plate inserted? No Yes
Nr of strips: Esc 12
Page 37
Biochrom Asys Atlantis Microplate Washer v.2.2 Page 37
<enter>
Confirms the selection and starts procedure
After confirmation of the above warnings the selected procedure
will be started. During the run the display will show the currently
performed cycles.
9.2 Prime/Rinse Menu
Screen 15. Prime/rinse Menu
This menu is used to configure a manual, automatic or periodic
prime / rinse cycle(s).
Function keys:
<F1> or <F2>
Select another menu.
<+> or <->
Select the desired mode for prime / rinse. Available options are:
manual, automatic, periodic
<enter>
Confirm the selection of the prime / rinse mode and go to the
next screen.
9.2.1 Manual Prime/Rinse
Screen 16. Liquid Selection
Select the liquid to be used for prime / rinse.
Function keys:
<F1> or <F2>
Select "Esc" to return to the main menu.
<+> or <->
Select the desired liquid.
Prime/rinse: << >> Manual
Liquid: Esc Wash 1
Page 38
Biochrom Asys Atlantis Microplate Washer v.2.2 Page 38
<enter>
Confirm the selection of the liquid and go to the next screen.
Screen 17. Manual Prime/rinse
The prime / rinse can be started with the corresponding function
key ("Go") and will be performed as long as this key is pressed.
Function keys:
<F1> or <F2>
Select "esc" to return to the main menu or "Go" to start the
prime / rinse (keep this key pressed as long as you like the
prime / rinse to be performed).
9.2.2 Automatic Prime/Rinse
Screen 18. Liquid Selection
Select the liquid to be used for prime / rinse.
Function keys:
<F1> or <F2>
Select "Esc" to return to the main menu.
<+> or <->
Select the desired liquid.
<enter>
Confirm the selection of the liquid and go to the next screen.
Screen 19. Volume Selection
Select the liquid volume for prime / rinse.
Manual Pri/Rinse Esc Go
Liquid: Esc Wash 1
Volume: Esc 50 ml
Page 39
Biochrom Asys Atlantis Microplate Washer v.2.2 Page 39
Function keys:
<F1> or <F2>
Select "Esc" to return to the main menu.
<+> or <->
Select the desired volume in 1ml steps (max. 200ml).
<enter>
Confirm the selection of the liquid volume and go to the next
screen.
Screen 20. Start Prime / Rinse
Function keys:
<F1> or <F2>
Select "Esc" to return to the main menu.
<enter>
Press <enter> to start the prime / rinse cycle with the above set
parameters.
Screen 21. Status Message
Function keys:
<F1> or <F2>
Select "Stop" to cancel the current prime / rinse cycle and return
to the main menu.
9.2.3 Periodic Prime/Rinse
Screen 22. Liquid Selection
Select the liquid to be used for prime / rinse.
Start Pri/Rinse Esc
P/R in process Stop
Liquid: Esc Wash 1
Page 40
Biochrom Asys Atlantis Microplate Washer v.2.2 Page 40
Function keys:
<F1> or <F2>
Select "Esc" to return to the main menu.
<+> or <->
Select the desired liquid.
<enter>
Confirm the selection of the liquid and go to the next screen.
Screen 26.Volume Selection
Select the liquid volume for periodic prime / rinse.
Function keys:
<F1> or <F2>
Select "Esc" to return to the main menu.
<+> or <->
Select the desired volume in 1ml steps (max. 200ml).
<enter>
Confirm the selection of the liquid volume and go to the next
screen.
Screen 23.Rinse Period Selection
Select the period of time after which the instrument is rinsed.
Function keys:
<F1> or <F2>
Select "Esc" to return to the main menu.
<+> or <->
Select the desired time period in steps of 1min (max. 200min).
<enter>
Confirm the selection of the time and go to the next screen.
Volume: Esc 50 ml
Rinse Period: esc 10 min
Page 41
Biochrom Asys Atlantis Microplate Washer v.2.2 Page 41
Screen 24. Start Prime / Rinse
Function keys:
<F1> or <F2>
Select "Esc" to return to the main menu.
<enter>
Press <enter> to start the prime / rinse cycle with the above set
parameters.
Screen 25. Status Message
Function keys:
<F1> or <F2>
Select "Stop" to cancel the current prime / rinse cycle and return
to the main menu.
9.3 Define Procedure Menu
Screen 26. Define Procedure Menu
In this menu a procedure can be defined. Every procedure contains
one or more cycles and a plate. The cycles and the plate must be
defined prior to the procedure.
Function keys:
<F1> or <F2>
Select another menu.
<+> or <->
Select "<new>" to define a new procedure or select an existing
procedure to edit it.
<enter>
Confirm the selection of the procedure and go to the next
screen.
Start Pri/Rinse esc
Periodic rinse Stop
Def Procedure: << >> <new>
Page 42
Biochrom Asys Atlantis Microplate Washer v.2.2 Page 42
Screen 27. Procedure Name Entry
The name of the procedure may be changed.
Function keys:
<F1> or <F2>
Select "Chg" to change the name for the procedure.
Screen 28. Procedure Name Entry
Function keys:
<F1> or <F2>
Select "Esc" to return to the main menu without saving any
changes or "Sel" to select the current letter/number.
<+> or <->
Use these keys to scroll through the available letters (A-Z) and
numbers (0-9)
<enter>
Confirm the name of the procedure and go to the next screen.
Screen 29. Wash Liquid Selection
Select the wash liquid to be used for this procedure.
Function keys:
<F1> or <F2>
Select "Esc" to return to the main menu without saving any
changes or "<<" to return to the previous screen.
<+> or <->
Use these keys to enter the wash liquid.
<enter>
Confirm the wash liquid and go to the next screen.
Name: Esc Sel A_
Name: Esc Chg 1
Liquid: << Esc Wash 1
Page 43
Biochrom Asys Atlantis Microplate Washer v.2.2 Page 43
Screen 30. Cycle1 Selection
Select the first cycle to be used for this procedure. The cycles must
be defined in the "Define Cycle Menu" prior to the definition of the
procedure.
Function keys:
<F1> or <F2>
Select "Esc" to return to the main menu without saving any
changes or "<<" to return to the previous screen.
<+> or <->
Use these keys to scroll through the available cycles.
<enter>
Confirm the selection of the first cycle and go to the next
screen.
Screen 31. Cycle2-8 Selection
Select the cycles 2 to 8 to be used for this procedure. The cycles
must be defined in the "Define Cycle Menu" prior to the definition
of the procedure. By selecting “---“the previous cycle will be the
last cycle in the procedure.
Function keys:
<F1> or <F2>
Select "Esc" to return to the main menu without saving any
changes or "<<" to return to the previous screen.
<+> or <->
Use these keys to scroll through the available cycles.
<enter>
Confirm the selection of the cycle and go to the next screen.
Screen 32. Final Aspiration Time Entry
Select the duration of the final aspiration.
Cycle1: << Esc C1
Cycle2: << Esc ---
Final asp time: << Esc 0 sec
Page 44
Biochrom Asys Atlantis Microplate Washer v.2.2 Page 44
Function keys:
<F1> or <F2>
Select "Esc" to return to the main menu without saving any
changes or "<<" to return to the previous screen.
<+> or <->
Use these keys to enter the time for the final aspiration in steps
of 1sec (max. 10 seconds).
<enter>
Confirm the final aspiration time and go to the next screen.
Screen 33. Final Aspiration Power Entry
Select the power for the final aspiration.
Function keys:
<F1> or <F2>
Select "Esc" to return to the main menu without saving any
changes or "<<" to return to the previous screen.
<+> or <->
Use these keys to enter the power for the final aspiration
(“Low”, Medium”, “High”).
<enter>
Confirm the final aspiration power and go to the next screen.
Screen 34. Processing Mode
Select the processing mode to be used for this procedure.
Function keys:
<F1> or <F2>
Select "Esc" to return to the main menu without saving any
changes or "<<" to return to the previous screen.
<+> or <->
Use these keys to scroll through the available modes (“Plate” or
“Strip”).
<enter>
Confirm the selection of the processing mode and go to the next
screen.
Final asp speed: << Esc High
Processing mode: << Esc Plate
Page 45
Biochrom Asys Atlantis Microplate Washer v.2.2 Page 45
Screen 35. Plate Selection
Select the plate to be used for this procedure. The plate must be
defined in the "Define Plate Menu" prior to the definition of the
procedure.
Function keys:
<F1> or <F2>
Select "Esc" to return to the main menu without saving any
changes or "<<" to return to the previous screen.
<+> or <->
Use these keys to scroll through the available plates.
<enter>
Confirm the selection of the plate and go to the next screen.
Screen 36. Ask for Last Strip
Select "Yes" if the selection of a "number of strips" should be
possible every time this procedure is started. This can be useful if
for example full plates and plates with just a few strips are used
subsequently with the same procedure.
Function keys:
<F1> or <F2>
Select "Esc" to return to the main menu without saving any
changes or "<<" to return to the previous screen.
<+> or <->
Use these keys to toggle between "Yes" and "No". If "Yes" is
selected you can define the last strip every time the procedure is
started. "No" means that every time all strips of a plate are
washed.
<enter>
Confirm the selection and go to the next screen.
Screen 37. Delay of Final Aspiration
Select "Yes" to delay the final aspiration of the plate. This is used
in strip mode: The final aspiration is performed only after the last
cycle in the last filled strip is done and the soak time has expired.
Plate: << Esc FB1
Ask strip nr: << Esc No
Delay final asp: << Esc Yes
Page 46
Biochrom Asys Atlantis Microplate Washer v.2.2 Page 46
Function keys:
<F1> or <F2>
Select "Esc" to return to the main menu without saving any
changes or "<<" to return to the previous screen.
<+> or <->
Use these keys to toggle between "Yes" and "No". If "Yes" is
selected the final aspiration is performed after the last cycle for
all strips is finished.
<enter>
Confirm the selection. The set parameters will be stored and the
program returns to the main menu.
9.4 Define Cycle Menu
Screen 38. Define Cycle Menu
This menu defines the parameters of a cycle. A cycle is required to
define a complete wash-procedure.
Function keys:
<F1> or <F2>
Select another menu.
<+> or <->
Select "<new>" to define a new cycle or select an existing cycle
to edit it.
<enter>
Confirm the selection of the cycle and go to the next screen.
Screen 39. Cycle Name Entry
The name of the cycle may be changed.
Function keys:
<F1> or <F2>
Select "Chg" to change the name for the cycle.
Def Cycle: << >> <new>
Name: Esc Chg 1
Page 47
Biochrom Asys Atlantis Microplate Washer v.2.2 Page 47
Screen 40. Cycle Name Entry
Function keys:
<F1> or <F2>
Select "Esc" to return to the main menu without saving any
changes or "Sel" to select the current letter/number.
<+> or <->
Use these keys to scroll through the available letters (A-Z) and
numbers (0-9)
<enter>
Confirm the name of the cycle and go to the next screen.
Screen 41. Aspiration Time Entry
Function keys:
<F1> or <F2>
Select "Esc" to return to the main menu without saving any
changes or "<<" to return to the previous screen.
<+> or <->
Use these keys to change the aspiration time (the time the
manifold remains inside a well during aspiration) in steps of
1sec (range: 0 - 10 seconds).
<enter>
Confirm the selection of the aspiration time and go to the next
screen.
Screen 42. Aspiration Power Entry
Function keys:
<F1> or <F2>
Select "Esc" to return to the main menu without saving any
changes or "<<" to return to the previous screen.
<+> or <->
Use these keys to change the power with which the liquid is
aspirated off a well (“Low”, “Medium”, “High”).
Name: Esc Sel A_
Aspiration time: << Esc 5 sec
Aspir power: << Esc High
Page 48
Biochrom Asys Atlantis Microplate Washer v.2.2 Page 48
<enter>
Confirm the selection of the aspiration power and go to the next
screen.
Screen 43. Dispense Volume Entry
Function keys:
<F1> or <F2>
Select "Esc" to return to the main menu without saving any
changes or "<<" to return to the previous screen.
<+> or <->
Use these keys to change the dispense volume for this cycle in
steps of 50µl (range 0 - 2000µl).
<enter>
Confirm the selection of the volume and go to the next screen.
Screen 44. Dispenser Power Selection
Function keys:
<F1> or <F2>
Select "Esc" to return to the main menu without saving any
changes or "<<" to return to the previous screen.
<+> or <->
Use these keys to change the power (pressure) of the liquid for
dispensing (“Low”, “Medium”, “High”).
<enter>
Confirm the selection of the dispensing power and
go to the next screen.
Screen 45. Wash Mode Selection
Two different wash modes are available:
Bottom: the needles of the manifold are placed into the well (to the
defined position for the used plate) during the wash procedure.
This means that basically only the bottom of the well is washed.
Disp volume: << Esc 1000 µl
Disp power: << Esc High
Wash mode: << Esc Overflow
Page 49
Biochrom Asys Atlantis Microplate Washer v.2.2 Page 49
Overflow: the needles of the manifold are placed to a certain
position above the well (to be also defined in the "Define Plate
Menu"). Therefore the whole well is thoroughly washed as the
wash solution is only aspirated after it fills the well up to the
defined position and reaches the aspiration needles of the
manifold.
Function keys:
<F1> or <F2>
Select "Esc" to return to the main menu without saving any
changes or "<<" to return to the previous screen.
<+> or <->
Use these keys to toggle between "Bottom" and "Overflow".
Screen 46. Shaking Time Entry
Function keys:
<F1> or <F2>
Select "Esc" to return to the main menu without saving any
changes or "<<" to return to the previous screen.
<+> or <->
Use these keys to change to shaking time in steps of 1sec
(range: 0 - 10 seconds).
<enter>
Confirm the selection of the shaking time and go to the next
screen.
Screen 47. Shaking Intensity Entry
Function keys:
<F1> or <F2>
Select "Esc" to return to the main menu without saving any
changes or "<<" to return to the previous screen.
<+> or <->
Use these keys to change the intensity for shaking (“Low”,
“Medium”, “High”).
Shaking time: << Esc 5 sec
Shaking intens: << Esc Medium
Page 50
Biochrom Asys Atlantis Microplate Washer v.2.2 Page 50
<enter>
Confirm the selection of the shaking intensity and go to the next
screen.
Screen 48. Minimum Soaking Time Entry
The minimum soaking time defines the time which must elapse at
least between dispensing and aspirating a well.
Function keys:
<F1> or <F2>
Select "esc" to return to the main menu without saving any
changes or "<<" to return to the previous screen.
<+> or <->
Use these keys to change the minimum soaking time in steps of
10sec (range: 0 - 1000 seconds).
<enter>
Confirm the selection of the minimum soaking time. The set
parameters will be stored and the program returns to the main
menu.
9.5 Define Plate Menu
The following drawings help to find the correct positions of the manifold
and plate. Please note that curved bottom plates do not allow crosswise
aspiration!
Min soak time: << Esc 10 sec
Page 51
Biochrom Asys Atlantis Microplate Washer v.2.2 Page 51
Drawing49.: Aspiration Positions for flat bottom or curved bottom plates
Drawing 50.Wash Positions for flat bottom and curved bottom plates
Page 52
Biochrom Asys Atlantis Microplate Washer v.2.2 Page 52
Screen 51. Define Plate Menu
This menu defines all parameters for a plate. A defined plate is
required to for a complete wash-procedure.
Function keys:
<F1> or <F2>
Select another menu.
<+> or <->
Select "<new>" to define a new plate or select an existing plate
to edit it.
<enter>
Confirm the selection of the plate and go to the next screen.
Screen 52. Plate Name Entry
The name of the plate may be changed.
Function keys:
<F1> or <F2>
Select “Esc” to return to main menu without saving any
changes
Select "Chg" to change the name for the plate.
<enter>
Confirm the existing name and go to the next menu
Screen 53. Plate Name Entry
Function keys:
<F1> or <F2>
Select "Esc" to return to the main menu without saving any
changes or "Sel" to select the current letter/number.
<+> or <->
Use these keys to scroll through the available letters (A-Z) and
numbers (0-9)
<enter>
Confirm the name of the plate and go to the next screen.
Def Plate: << >> <new>
Name: Esc Chg 1
Name: Esc Sel A_
Page 53
Biochrom Asys Atlantis Microplate Washer v.2.2 Page 53
Screen 54. Plate Format Selection
Function keys:
<F1> or <F2>
Select "Esc" to return to the main menu without saving any
changes or "<<" to return to the previous screen.
<+> or <->
Use these keys to toggle between 8-strip, 12-strip and 16-strip
plate.
<enter>
Confirm the selection of plate format and go to the next screen.
Screen 55. Well Shape Selection
Function keys:
<F1> or <F2>
Select "Esc" to return to the main menu without saving any
changes or "<<" to return to the previous screen.
<+> or <->
Use these keys to toggle between flat- and round-bottom plates.
<enter>
Confirm the selection of well shape and go to the next screen.
Screen 56. Center Position Entry
This menu appears only if a round-bottom plate is selected. For
round bottom plates it is recommended to position the aspiration
needle in the center of the well. The center position may be defined
by "teach-in" (move the plate to the correct position with the <+>
and <-> keys).
Plate format: << Esc 8-strip
Well shape: << Esc Flat
Center pos: Esc Mov 0.1 mm
Page 54
Biochrom Asys Atlantis Microplate Washer v.2.2 Page 54
Function keys:
<F1> or <F2>
Select "Esc" to return to the main menu without saving any
changes.
Select “Mov” to position the plate to the current center position
and switch to the “teach-in” mode.
<+> or <->
Use these keys to enter the center position The plate can be
moved in steps of 0.1mm (range: -5.0 – 5.0mm).
<enter>
Confirm the center position and go to the next screen.
Screen 57. Center Position “Teach-in” mode
In this ‘teach-in’ mode the round-bottom plate can be moved to the
correct center position by using <+> or <->.
Function keys:
<F1> or <F2>
Select "" to automatically detect the bottom of the well
(changes to “”).
Select "" to move the manifold up.
Select “Mov” to move the plate transport to the current center
position.
<+> or <->
Use these keys to enter the center position. The plate can be
moved in steps of 0.1mm (range: -5.0 – 5.0mm).
<enter>
Confirm the center position and go to the next screen.
Screen 58. Crosswise Aspiration Selection
If a flat-bottom plate is selected this menu appears. When using
crosswise aspiration the aspiration needle is first moved close to
one wall of the well (side pos front) and aspirates there. After the
defined aspiration time the needle is moved up to avoid scratching
the bottom and is shifted to the opposite wall (side pos rear). There
the needle is moved down and another aspiration sequence takes
place. For a better aspiration result crosswise aspiration is
Center pos:
Mov 0.1 mm
Crosswise Aspir: << Esc Yes
Page 55
Biochrom Asys Atlantis Microplate Washer v.2.2 Page 55
advisable. Crosswise aspiration can only be used for flat-bottom
plates.
Function keys:
<F1> or <F2>
Select "Esc" to return to the main menu without saving any
changes or "<<" to return to the previous screen.
<+> or <->
Use these keys to toggle between "Yes" and "No".
<enter>
Confirm the selection for crosswise aspiration and go to the
next screen.
Screen 59. Side Position Front Entry
In this menu the side position front for a flat-bottom plate is
defined. If you choose crosswise aspiration this is the first
aspiration position. Else this is the aspiration position: for a better
aspiration result it is recommended to position the needle close to
one wall. The side position front may be defined by "teach-in"
(move the plate to the correct position with the <+> and <-> keys).
Function keys:
<F1> or <F2>
Select "Esc" to return to the main menu without saving any
changes.
Select “Mov” to position the plate to the current side position
front and switch to the “teach-in” mode.<+> or <->
Use these keys to enter the side position front. The plate can be
moved in steps of 0.1mm (range: -5.0 – 5.0mm).
<enter>
Confirm the side position front and go to the next screen.
Screen 60. Side Position Front “Teach-in” mode
In this "teach-in" you can move the plate to the correct position
with the <+> and <-> keys.
Side pos front: Esc Mov 0.1 mm
Side pos front:
Mov 0.1 mm
Page 56
Biochrom Asys Atlantis Microplate Washer v.2.2 Page 56
Function keys:
<F1> or <F2>
Select "" to automatically detect the bottom of the well
(changes to “”).
Select "" to move the manifold up.
Select “Mov” to move the plate transport to the current side
position front.
<+> or <->
Use these keys to enter the side position front. The plate can be
moved in steps of 0.1mm (range: -5.0 – 5.0mm).
<enter>
Confirm the side position front and go to the next screen.
Screen 61. Side Position Rear Entry
In this menu the side position rear for a flat-bottom plate is defined.
It is only available if crosswise aspiration is enabled and it defines
the second aspiration position. The side position rear may be
defined by "teach-in" (move the plate to the correct position with
the <+> and <-> keys).
Function keys:
<F1> or <F2>
Select "Esc" to return to the main menu without saving any
changes.
Select “Mov” to position the plate to the current side position
rear and switch to the “teach-in” mode.
<+> or <->
Use these keys to enter the side position rear. The plate can be
moved in steps of 0.1mm (range: -5.0 – 5.0mm).
<enter>
Confirm the side position rear and go to the next screen.
Screen 62. Side Position Rear “Teach-in” mode
In this "teach-in" mode the plate may be moved to the correct
position with the <+> and <-> keys.
Side pos rear: Esc Mov 0.1 mm
Side pos rear:
Mov 0.1 mm
Page 57
Biochrom Asys Atlantis Microplate Washer v.2.2 Page 57
Function keys:
<F1> or <F2>
Select "" to automatically detect the bottom of the well
(changes to “”).
Select "" to move the manifold up.
Select “Mov” to move the plate transport to the current side
position rear.
<+> or <->
Use these keys to enter the side position rear. The plate can be
moved in steps of 0.1mm (range: -5.0 – 5.0mm).
<enter>
Confirm the side position rear and go to the next screen.
Screen 63. Aspiration Height Position
The aspiration height position defines the height of the manifold
during aspirating a well. It may be defined by "teach-in" (move the
manifold to the correct position with the <+> and <-> keys).
Function keys:
<F1> or <F2>
Select "Esc" to return to the main menu without saving any
changes.
Select “Move” to position the manifold to the current aspiration
height and switch to the “teach-in” mode.
<+> or <->
Use these keys to enter the aspiration height in steps of ~0.1mm
(range: 0 – 18.8mm).
<enter>
Confirm the aspiration height and go to the next screen.
Screen 64. Aspiration Height “Teach-in” mode
In this special "teach-in" mode the manifold can be moved to the
correct height with the <+> and <-> keys. This mode features
Aspiration ht: Esc Mov 7.0 mm
Aspiration ht:
0.1 mm
Page 58
Biochrom Asys Atlantis Microplate Washer v.2.2 Page 58
automatic bottom detection. For an optimal aspiration, move the
aspiration needle about 0.5mm up.
Function keys:
<F1> or <F2>
Select "" to automatically detect the bottom of the well.
<+> or <->
Use these keys to move the manifold. The manifold can be
moved in steps of ~0.1mm (range: 0 – 18.8mm).
<enter>
Confirm the aspiration height and go to the next screen.
Screen 65. Dispense Position
For washing the dispensing needle is placed above the well. From
there it dispenses the washing solution into the well. The aspiration
needle aspirates an overflow and prevents liquid spilling on next
wells.
The dispense position defines the position of the plate below the
manifold during washing. The dispensing needle should be above
the well and the aspiration needle within. It may be defined by
"teach-in" (move the plate to the correct position with the <+> and
<-> keys).
Function keys:
<F1> or <F2>
Select "Esc" to return to the main menu without saving any
changes.
Select “Mov” to position the plate to the current dispense
position and switch to the “teach-in” mode.
<+> or <->
Use these keys to enter the dispense position in steps of 0.1mm
(range: -5.0 – 5.0mm).
<enter>
Confirm the dispense position and go to the next screen.
Disp pos: Esc Mov 1.6 mm
Page 59
Biochrom Asys Atlantis Microplate Washer v.2.2 Page 59
Screen 66. Dispense Position “Teach-in’ mode
In this "teach-in" mode the plate can be moved to the correct
position with the <+> and <-> keys. With “Mov” and “” check if
the needles are in correct position.
Function keys:
<F1> or <F2>
Select "" to automatically detect the bottom of the well
(changes to “”).
Select "" to move the manifold up.
Select “Mov” to move the plate transport to the current dispense
position.
<+> or <->
Use these keys to enter the dispense position. The plate can be
moved in steps of 0.1mm (range: -5.0 – 5.0mm).
<enter>
Confirm the dispense position and go to the next screen.
Screen 67. Bottom Dispensing Position
For additional bottom washing the needles are moved upwards to
Bottom dispensing height and then down again to the aspiration
height.
The bottom dispensing height defines the vertical position of the
manifold during dispensing of a bottom wash cycle. The dispensing
height must be higher or equal the aspiration height. It may be
defined by "teach-in" (move the manifold to the correct position
with the <+> and <-> keys).
Function keys:
<F1> or <F2>
Select "Esc" to return to the main menu without saving any
changes.
Select “Mov” to position the manifold to the current bottom
dispense height and switch to the “teach-in” mode.
Disp pos:
Mov 0.1 mm
Bottom disp ht: Esc Mov 0.0mm
Page 60
Biochrom Asys Atlantis Microplate Washer v.2.2 Page 60
<+> or <->
Use these keys to enter the dispense height in steps of ~0.1mm
(range: 0 – 18.8mm).
<enter>
Confirm the bottom dispensing position and go to the next
screen.
Screen 68. Bottom Dispense Height “Teach-in” mode
In this "teach-in" mode you can move the manifold to the correct
height with the <+> and <-> keys.
Function keys:
<F1> or <F2>
Select "" to automatically detect the bottom of the well.
<+> or <->
Use these keys to move the manifold. The manifold can be
moved in steps of ~0.1mm (range: 0 – 18.8mm).
<enter>
Confirm the bottom dispense height and go to the next screen.
Screen 69. Overflow Dispensing Height
It is recommended to use a dispense volume slightly higher than
the well volume to produce an overflow phase. The slight flow rate
variations among dispensing needles are compensated by the
overflow phase.
The overflow dispensing height defines the height of the manifold
for overflow washing. The position must be higher or equal as the
aspiration height. It may be defined by "teach-in" (move the
manifold to the correct position with the <+> and <-> keys).
Function keys:
<F1> or <F2>
Select "Esc" to return to the main menu without saving any
changes.
Bottom disp ht:
0.1 mm
Ovflow disp ht: Esc Mov 4.0mm
Page 61
Biochrom Asys Atlantis Microplate Washer v.2.2 Page 61
Select “Mov” to position the manifold to the current overflow
dispense height and switch to the “teach-in” mode.
<+> or <->
Use these keys to enter the desired overflow dispense height in
steps of ~0.1mm (range: 0 – 18.8mm).
<enter>
Confirm the overflow dispensing height and go to the next
screen.
Screen 70.Overflow Dispense Height “Teach-in’ mode
In this "teach-in" mode you can move the manifold to the correct
height with the <+> and <-> keys.
Function keys:
<F1> or <F2>
Select "" to automatically detect the bottom of the well.
<+> or <->
Use these keys to move the manifold. The manifold can be
moved in steps of ~0.1mm (range: 0 – 18.8mm).
<enter>
Confirm the overflow dispense height. The set parameters will
be stored and the program returns to the main menu.
9.6 Setup Menu
Please make sure to set all options according to your requirements.
Screen 71. Setup Menu
Use the <F1> / <F2> keys to select the setup menu. Confirm the
selection with <enter>.
Ovflow disp ht:
0.1 mm
Setup << >>
Page 62
Biochrom Asys Atlantis Microplate Washer v.2.2 Page 62
Screen 72. Language Setup
Use the <-> / <+> keys to select the language and confirm with
<enter>.
Screen 73.Manifold Setup
Use the <-> / <+> keys to select the manifold and confirm with
<enter>.
Screen 74. Liquids Setup
Use the <-> / <+> keys to select the number of wash liquids
connected to your instrument and confirm with <enter>. Depending
on the model of your instrument you can use up to 3 wash liquids.
Screen 75. Waste Setup
Use the <-> / <+> keys to select whether a liquid level sensor is
attached to the waste bottle and confirm with <enter>. To use this
function a liquid level detector must be connected to the instrument
and the waste bottle.
If activated the liquid level of the waste bottle will be checked
before the procedure is started. In case that the level of the liquid in
the waste bottle is above the sensor a corresponding warning will
be displayed.
Language: Esc English
Manifold: << Esc 8needle
Wash liquids: << Esc 2
Waste full det: << Esc Off
Page 63
Biochrom Asys Atlantis Microplate Washer v.2.2 Page 63
Screen 76. Rinse Setup
Use the <-> / <+> keys to select whether a liquid level sensor is
attached to the rinse bottle and confirm with <enter>. To use this
function a liquid level detector must be connected to the instrument
and the rinse bottle.
If activated the liquid level of the rinse bottle for a started
procedure will be checked before the procedure is started. In case
that the level of the liquid in the rinse bottle is below the sensor a
corresponding warning will be displayed.
Screen 77. Wash1 Setup
Use the <-> / <+> keys to select whether a liquid level sensor is
attached to the wash1 bottle and confirm with <enter>. To use this
function a liquid level detector must be connected to the instrument
and the wash1 bottle.
If activated the liquid level of the wash1 bottle for a started
procedure will be checked before the procedure is started. In case
that the level of the liquid in the wash1 bottle is below the sensor a
corresponding warning will be displayed.
Screen 78. Wash2 Setup
Use the <-> / <+> keys to select whether a liquid level sensor is
attached to the wash2 bottle and confirm with <enter>. To use this
function a liquid level detector must be connected to the instrument
and the wash2 bottle.
If activated the liquid level of the wash2 bottle for a started
procedure will be checked before the procedure is started. In case
that the level of the liquid in the wash2 bottle is below the sensor a
corresponding warning will be displayed.
Rinse empty det: << Esc Off
Wash1 empty det: << Esc Off
Wash2 empty det: << Esc Off
Page 64
Biochrom Asys Atlantis Microplate Washer v.2.2 Page 64
Screen 79. Wash3 Setup
Use the <-> / <+> keys to select whether a liquid level sensor is
attached to the wash3 bottle and confirm with <enter>. To use this
function a liquid level detector must be connected to the instrument
and the wash3 bottle.
If activated the liquid level of the wash3 bottle for a started
procedure will be checked before the procedure is started. In case
that the level of the liquid in the wash3 bottle is below the sensor a
corresponding warning will be displayed.
Screen 80. Liquid Warning Setup
Use the <-> / <+> keys to activate/deactivate the liquid warning
and confirm with <enter>. If activated a reminder to check the level
of the wash bottle(s) is displayed prior to the start of a procedure.
Screen 81. Waste Warning Setup
Use the <-> / <+> keys to activate/deactivate the waste warning
and confirm with <enter>. If activated a reminder to check the level
of the waste bottle is displayed prior to the start of a procedure.
Screen 82. Plate Warning Setup
Use the <-> / <+> keys to activate/deactivate the plate warning and
confirm with <enter>.
Wash3 empty det: << Esc Off
Liquid warning: << Esc On
Waste warning: << Esc On Yes
Plate warning: << Esc On Yes
Page 65
Biochrom Asys Atlantis Microplate Washer v.2.2 Page 65
Screen 83. Keyclick Setup
Use the <-> / <+> keys to activate/deactivate the keyclick and
confirm with <enter>.
Screen 84. Emergency stop Setup
Use the <-> /<+> keys to activate/deactivate the emergency stop
and confirm with <enter>
If a strip of a microplate or the microplate itself is not inserted
correctly the tips of the manifold will hit the bottom. This triggers
the bottom detection sensor and every process will be stopped
immediately.
9.7 Service Menu
Screen 85. Service Menu
This menu checks various functions of the instrument. It is only intended to be used by
trained service personnel.
Keyclick: << Esc On
Emergency stop:? << Esc On
Service << >> Sensors
Page 66
Biochrom Asys Atlantis Microplate Washer v.2.2 Page 66
10 ERROR MESSAGES
10.1.1 Duplicate Name
Screen 86. Duplicate Name
The name for the procedure, cycle or plate is already used
Function keys:
<enter>
Confirm the message.
10.1.2 Wrong Manifold
Screen 87. Wrong Manifold
The wrong manifold for the selected procedure is installed.
Function keys:
<enter>
Confirm the message.
10.1.3 No Cycle Defined
Screen 88. No Cycle Defined
There is no cycle defined.
Duplicate name Press any key
Wrong manifold Press any key
No cycle defined Press any key
Page 67
Biochrom Asys Atlantis Microplate Washer v.2.2 Page 67
Function keys:
<enter>
Confirm the message.
10.1.4 No Plate Defined
Screen 89. No Plate Defined
There is no plate defined.
Function keys:
<enter>
Confirm the message.
10.1.5 Waste Full
Screen 90. Waste Full
The waste is full. Empty the waste bottle.
Function keys:
<enter>
Confirm the message.
No plate defined Press any key
Waste full Press any key
Page 68
Biochrom Asys Atlantis Microplate Washer v.2.2 Page 68
10.1.6 Liquid Empty
Screen 91.Liquid Empty
The selected wash liquid is empty.
Function keys:
<enter>
Confirm the message.
10.1.7 Stop Pressed
Screen 92. Stop Pressed
The user has stopped the instrument.
Function keys:
<enter>
Confirm the message.
10.1.8 Plate Transport Error
Screen 93. Plate Transport Error
The plate transport failed.
Liquid empty Press any key
Stop pressed Press any key
Platetrans error Press any key
Page 69
Biochrom Asys Atlantis Microplate Washer v.2.2 Page 69
Function keys:
<enter>
Confirm the message.
10.1.9 Manifold Transport Error
Screen 94. Manifold Transport Error
The manifold transport failed.
Function keys:
<enter>
Confirm the message.
MF-trans error Press any key
Page 70
Biochrom Asys Atlantis Microplate Washer v.2.2 Page 70
11 Maintenance
11.1 Recommended regular inspection
The Atlantis is designed in a way that during appropriate use no
danger for the user is caused.
Correct functional performance is assured by an automatic check of
the relevant technical parameters during operation. In case of a
problem the instrument reports an error message.
Biochrom recommends that an instrument should be inspected by
an authorized service partner at an interval of about 2 years. During
this inspection the correct function of the instrument can be
verified.
11.2 Approved parts
Except for the parts shown in the following list only parts supplied
by ASYS Hitech or an authorized ASYS Hitech Distributor may be
installed in or used with ASYS Hitech Atlantis:
Fuses: as specified in chapter
4.1.1 Rated operating conditions
Power cable: CE-marked power cable with connected protective
earth and protective earth connector
(see also 4.8 Installation requirements, Environmental
operating conditions)
External Computer controlling the instrument
(see also Error! Reference source not found. Error! Reference
source not found.)
11.3 Exchanging a Fuse
In case of malfunction (the green stand-by indicator is not
illuminated), the fuses located in the mains inlet next to the mains
socket on the rear side of the device can be checked and replaced if
necessary.
Disconnect the instrument from mains by unplugging the power
cable.
Open fuse-carrier next to the mains socket with a screwdriver
Page 71
Biochrom Asys Atlantis Microplate Washer v.2.2 Page 71
Remove fuse
Insert spare included in supply (2 pcs. 2.5 A TH250VAC,
Close fuse-carrier.
Turn device on and check function. In case of malfunction, call
a service technician.
11.4 Cleaning the instrument
This instrument is a precision instrument and requires regular
cleaning to ensure the continued high performance.
Liquid spillage
If any liquid is spilled on the instrument, it should be
IMMEDIATELY removed so that the liquid does not attack the
surface of the housing.
Regular cleaning
The housing of the instrument should be cleaned regularly with a
mild household cleaning agent.
Warning: Do not use aggressive solutions!
The area surrounding the plate carrier should be cleaned with a dry
cloth.
Fittings and tubing
The usual wash buffer tends to crystallize easily on air and can
block tubing and fittings then. Use the automatic rinse program
daily and do not leave the tubing filled with wash buffer for an
extended period of time.
11.5 Disinfection Procedure
If the laboratory has no specific disinfection procedure, the
following procedure should be used to disinfect the instrument.
The instrument should be disinfected using a suitable disinfection
solution.
1. Disconnect the instrument from the mains power supply.
2. Carefully wipe all the outside surfaces of the instrument and the
plate area with a wad of cotton wool that has been soaked in the
disinfection solution.
Note: Ensure that disposable gloves are worn.
Page 72
Biochrom Asys Atlantis Microplate Washer v.2.2 Page 72
3 Place the instrument in to a large plastic bag.
4. Place a wad of cotton wool that has been soaked in the
disinfection solution in to the plastic bag.
Note: Ensure that the wad is not touching the instrument.
5. Close and seal the plastic bag.
6. Leave the instrument to stand in the plastic bag for at least 24
hours.
7. After the standing time, remove the instrument from the plastic
bag and wipe all the outside surfaces of the instrument and the
plate support area with a wad of cotton wool which has been
soaked in a 50% Alcohol solution.
8. Repeat the disinfection procedure on any accessories which are
also being moved or returned.
The pumps can be disinfected by dispensing and aspirating a
sufficient amount of disinfectant fluid. After the disinfection
procedure dispense > 200 ml of distilled water to remove all
disinfectant fluid from the liquid carrying parts.
Page 73
Biochrom Asys Atlantis Microplate Washer v.2.2 Page 73
12 Intended Use
This device is intended to be used to remove non-bound sample-
sera or to remove reagents from 96-well respectively 384-well
microplates or format-identical strips. By means of repeated liquid
exchange down to a defined minimum rest volume, for which the
sample-/reagent-liquid is aspirated from the wells into a "waste"-
bottle and the wash liquid is dispensed from stock-("wash-")bottles
into the wells of the microplate, the concentration of the sample
shall be diluted until no diagnostically-relevant rest remains.
The main field of use is ELISA-testing operated and carried out by
trained specialist stuff (medical and/or laboratory).
The Atlantis microplate washer has been designed to meet the
98/79/EC directive of the EU for in-vitro diagnostic devices.
12.1 Quality control
The quality control criteria of a diagnostic kit have to be described
in the package insert of the kit. For the performance of any reagent
quality control it has to be referred exclusively to those
instructions.
It is the user's responsibility to ensure proper operation according to the
instructions given with each individual test.