CAUTION: Federal law restricts this device to sale, distribution and use by or on the order of a physician.
Table of ContentsSection 1 Clinician Programmer ............................................................................................................................... 2
Text Entry ...................................................................................................................................................................................... 2Set-Up and Communication ..........................................................................................................................................................2System .......................................................................................................................................................................................... 2
Section 2 Pain Mapping and VAS Scores ................................................................................................................ 4Graphic Module .............................................................................................................................................................................4VAS ............................................................................................................................................................................................... 4
Section 3 Patient Files ............................................................................................................................................... 5Case History ................................................................................................................................................................................. 5Getting Started ..............................................................................................................................................................................5Notes ............................................................................................................................................................................................. 5Patient Profile ................................................................................................................................................................................ 5
Section 4 Patient Hardware ...................................................................................................................................... 7Links and Resets ..........................................................................................................................................................................7
Section 5 Programming and Patient Fitting ............................................................................................................ 8High Rate Programming ...............................................................................................................................................................8Options .......................................................................................................................................................................................... 8Remote Control ............................................................................................................................................................................. 8Stimulation Power Button ..............................................................................................................................................................9
Note: A listing of the indications, contraindications warnings, precautions, and adverse events pertinent to prescribing the PrecisionTM SCS System with MultiWave Technology for pain therapy may be found in the Precision SCS System with MultiWave Technology Clinician Manual.
Bionic Navigator™ HR 1.0 Software Guide
90868740-07 Rev A 2 of 84Bionic Navigator HR 1.0 Software Guide
en
Section 1 Clinician Programmer
Text Entry
DescriptionText entry options are provided for ease of data entry. There are two methods for entering patient Profile data and patient Notes using the CP keyboard and Tablet PC Input Panel feature. The text entry icon for the Tablet PC Input feature may be located on the Windows Task Bar.
Access/Exit• To access the [Windows Task Bar], move the pen over the very bottom of the
screen. Click the keypad [Icon].• To exit any text entry tool, click the [X] on the right-hand corner of the tool.
CP Keyboard The CP Keyboard is used to enter patient information using the conventional method.
Tablet PC Input PanelThe Tablet PC Input Panel is a touchable keyboard and writable window.
• Place the cursor on the [Text field]. Enter the appropriate letters or numbers on the keypad or write the text in the text input window.
To erase information, click Back Space (<–).
Additional Information• See Toshiba Portege M400 Tablet PC Series Manuals at www.toshiba.com
for additional instructions.• See the Set-up and Communication section below for more information.
Set-Up and Communication
LEVEL
OFF
MARK
LEVEL
OFF
MARK
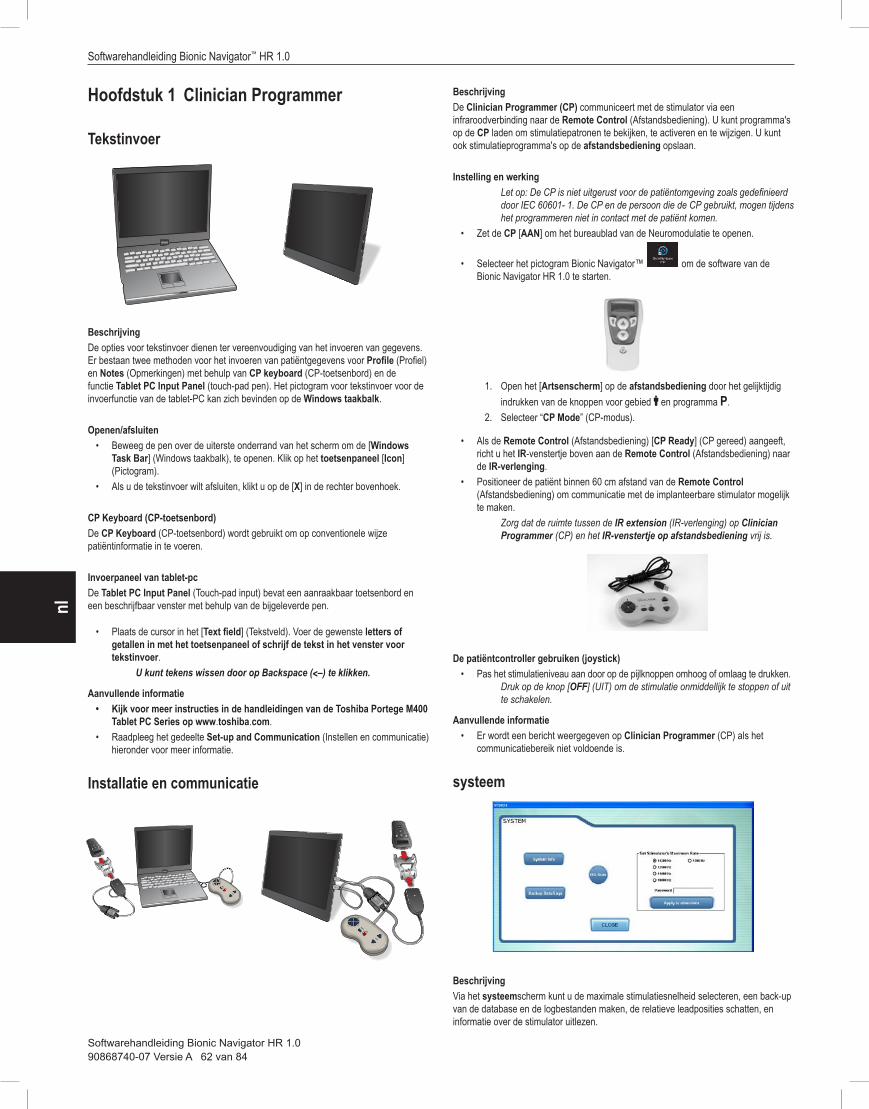
DescriptionThe Clinician’s Programmer (CP) communicates with the stimulator using an infrared link to the Remote Control. Programs can be loaded to the CP for previewing, activating and changing stimulation patterns. Stimulation programs can also be saved to the Remote Control.
Set-up and OperationCaution: The CP is not equipment for the patient environment as defined by IEC 60601- 1. The CP and the person using the CP should not be in contact with the patient while programming.
• Power [ON] the CP to display the Neuromodulation desktop.
• Select the Bionic Navigator™ icon to boot up the Bionic Navigator HR 1.0 Software.
1. Enter the [Clinician’s screen] on the Remote Control by pressing both the Area " and Program P buttons simultaneously.
2. Select “CP Mode”.
• When the Remote Control displays [CP Ready], face the IR window at the top of the Remote Control towards the IR extension.
• Position the patient within two feet of the Remote Control to ensure communication with the implantable stimulator.
Maintain a clear path between the IR extension attached to the Clinician’s Programmer and the Remote Control IR window.
Using the Patient Controller (Joystick) • Adjust the stimulation level by pressing the up and down arrow buttons.
To stop or turn off stimulation immediately, press the [OFF] button.
Additional information • A message will be displayed on the Clinician Programmer if the communication
range is not satisfactory.
System
DescriptionThe system screen provides access to selecting stimulator maximum rate, backing up Database and Logs, estimating relative lead positions, and stimulator information.
Access/Exit• To access “System,” select [System] at the top right-hand corner of the screen,
make adjustments.• To exit, click [Close].
Stimulator Maximum RateClick [Set Stimulator Maximum Rate] to select the maximum rate at which the connected stimulator can operate. Note that changing the maximum rate of the connected stimulator will clear all settings and programs from that stimulator.
Section 1 Clinician Programmer
90868740-07 Rev A 3 of 84Bionic Navigator HR 1.0 Software Guide
en• Select the radio button for desired maximum rate• Type password “ACCELERATE10K” in the password field.• To activate click [Apply to Stimulator]
A message will be displayed stating that all programs will be cleared from the stimulator.
• Click [Yes]. A message will be displayed stating that the Stimulator maximum rate has been updated,
• To exit, click [Close].When programming a patient at 1,200 Hz or below first set the Maximum Rate to 1,200 Hz using Bionic Navigator HR 1.0 Software, and then use Bionic Navigator 1.2 Software to program the patient.
When programming a patient above 1,200 Hz first set the appropriate Maximum Rate using Bionic Navigator HR 1.0 Software and then program the patient with the same software.
System • Click [System Info] to check stimulator and Remote Control information.
To manually create a separate compressed file of database and logs, click [Backup Data/Logs]. To check stimulator and Remote Control information regarding identification, type, version, battery voltage and status, click [System Info]. To display relative lead positions, click [EGL Scan].
Backup Data/Logs To create a compressed file of database and logs.
• Insert [Removable media] to copy database and logs.- This Removable media should not be labeled “CLINIC”
• Click on Backup Data/Logs button- Database is successfully copied when message appears
• Click [OK] to exit.
System Information
• System Information is only available when a stimulator is connected to the Clinician’s Programmer.
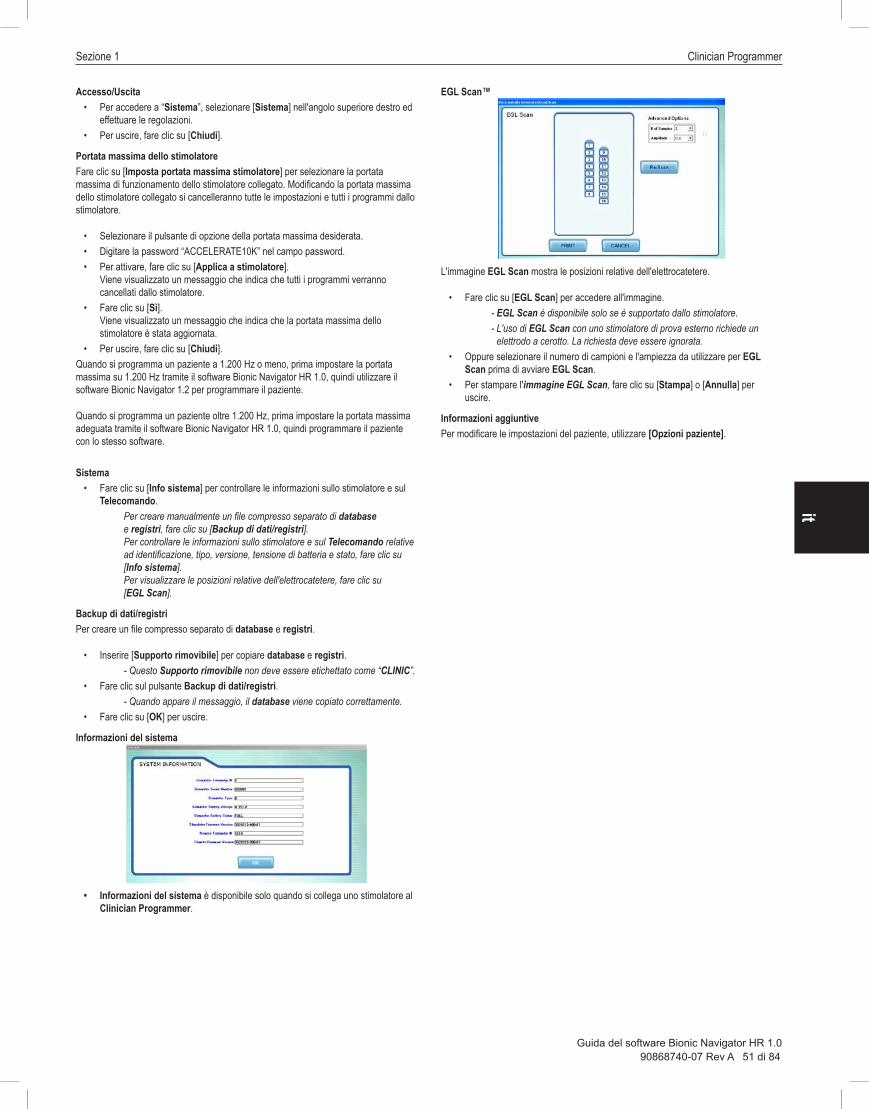
EGL Scan™
The EGL Scan image is a display of relative lead positions.
• Click [EGL Scan] to access image. - EGL Scan is available only if supported by the stimulator. - Use of EGL Scan with an external trial simulator will raise a prompt for
a patch electrode. The prompt should be ignored.• Optionally, select the number of samples and the amplitude to be used for EGL
Scan before initiating EGL Scan.
• To print EGL Scan image, click [Print] or [Cancel] to exit.
Additional InformationTo change patient settings use [Patient Options].
Bionic Navigator™ HR 1.0 Software Guide
90868740-07 Rev A 4 of 84Bionic Navigator HR 1.0 Software Guide
en
Section 2 Pain Mapping and VAS Scores
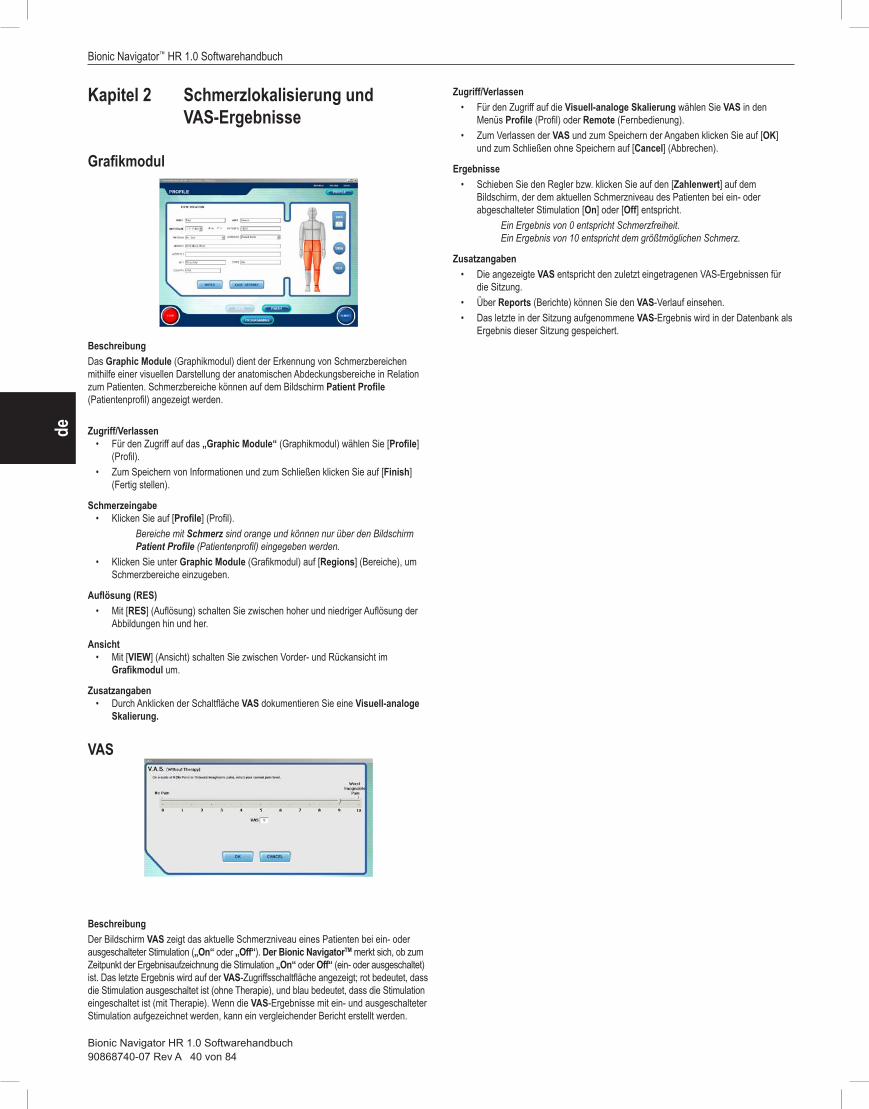
Graphic Module
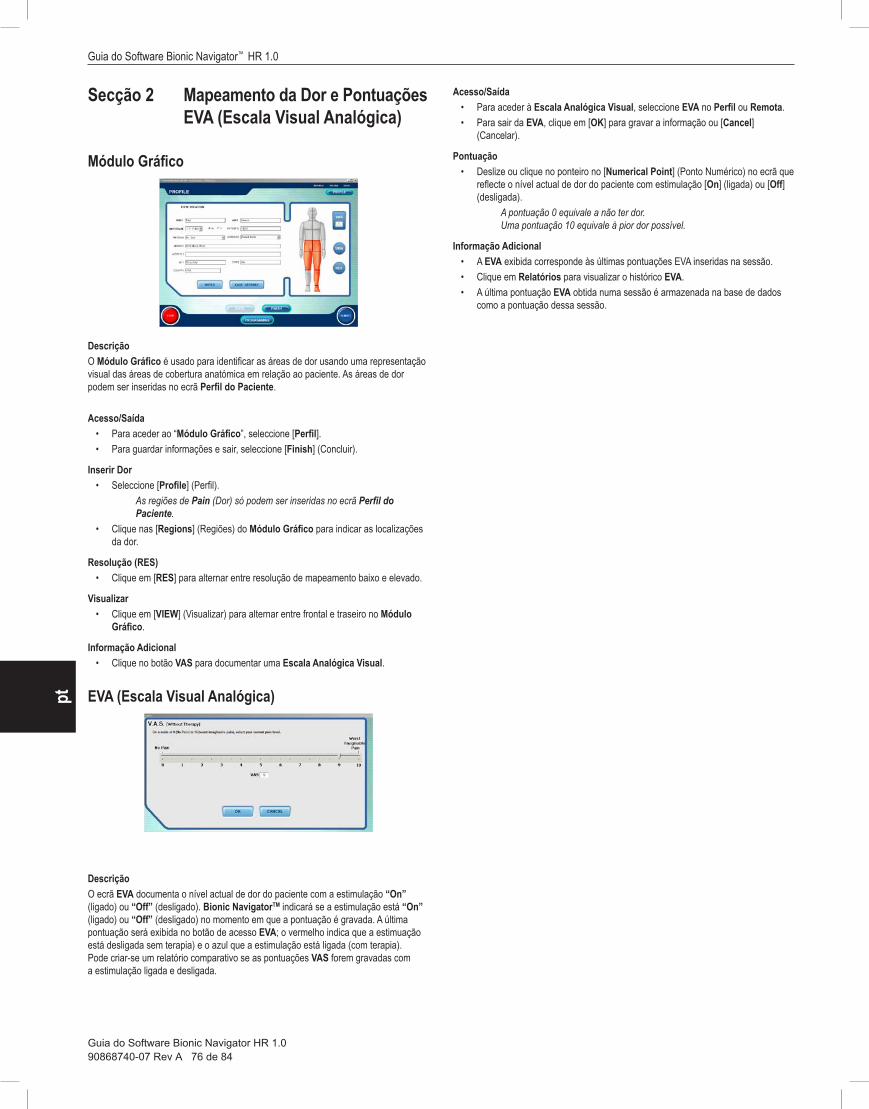
DescriptionThe Graphic Module is used to identify pain areas using a visual representation of anatomical coverage areas in relationship to the patient. Pain areas can be entered on the Patient Profile screen.
Access/Exit• To access the “Graphic Module,” select [Profile].• To save information and exit, select [Finish].
Entering Pain• Select [Profile].
Pain (Orange) regions can only be entered in the Patient Profile screen.• Click on Graphic Module [Regions] to indicate pain locations.
Resolution (RES)• Click [RES] to toggle between low and high resolution mapping.
View• Click [VIEW] to toggle from front to back on the Graphic Module.
Additional Information• Click the VAS button to document a Visual Analog Scale.
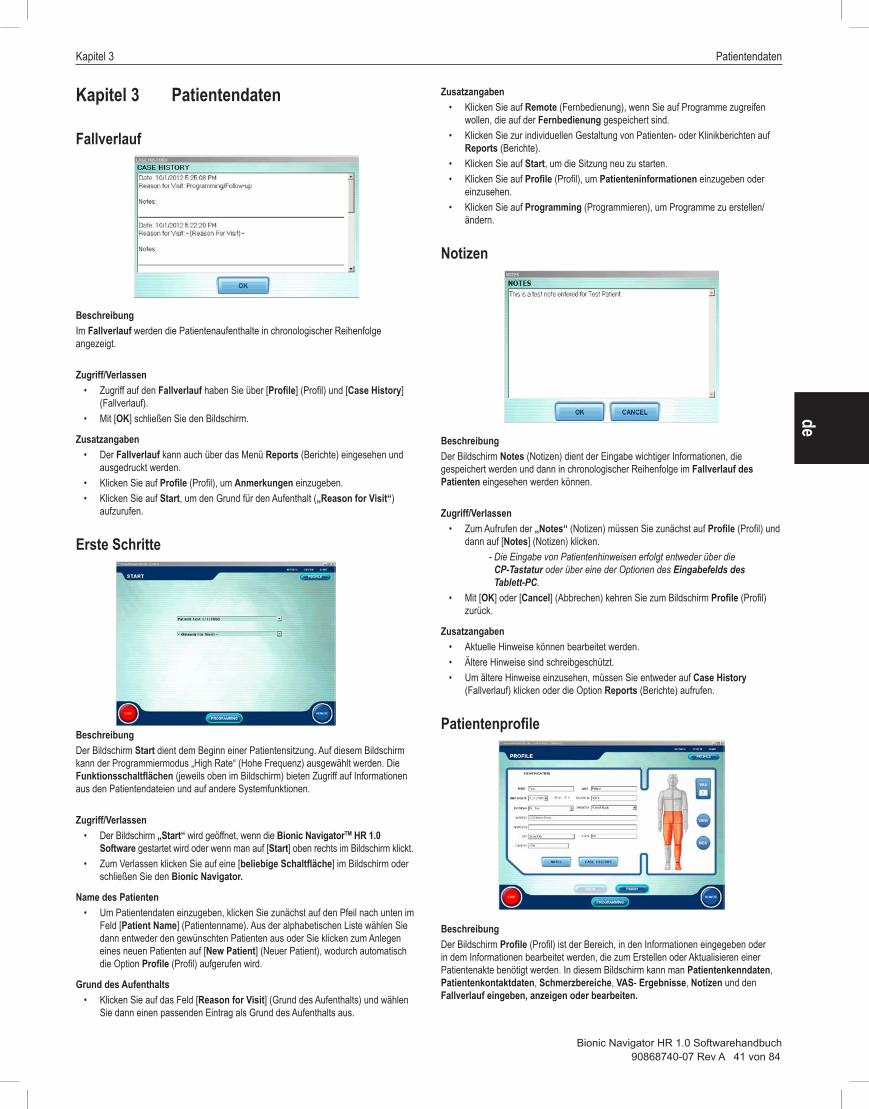
VAS
DescriptionThe VAS screen documents a patient’s current level of pain with either the stimulation “On” or “Off.” Bionic NavigatorTM will note whether stimulation is “On” or “Off” at the time the score is recorded. The last score will be displayed in the VAS access button; red denoting stimulation off (without therapy) and blue denoting stimulation on (with therapy). A comparative report can be created if VAS scores are recorded with both stimulation on and stimulation off.
Access/Exit• To access the Visual Analog Scale, select VAS on Profile, or Remote.• To exit VAS, click [OK] to record information or [Cancel].
Scoring• Slide or click on the pointer to the [Numerical Point] on the screen that reflects
the patient’s current level of pain with stimulation [On] or [Off].
A score of 0 is equivalent to no pain. A score 10 is equivalent to the worst pain possible.
Additional Information• Displayed VAS corresponds to last entered VAS scores for the session.• Click Reports to view VAS history.• Last VAS score taken in a session is stored in the database as that session’s
score.
Section 3 Patient Files
90868740-07 Rev A 5 of 84Bionic Navigator HR 1.0 Software Guide
en
Section 3 Patient Files
Case History
DescriptionThe Case History displays chronologically dated patient visits.
Access/Exit• To access “Case History” information, select [Profile], then [Case History].• To exit, select [OK].
Additional Information• The case history can also be viewed and printed from Reports.• Click Profile to enter Notes.• Click Start to access “Reason for Visit.”
Getting Started
DescriptionThe Start Screen is used to begin a patient session. The High Rate programming mode is selectable from this screen. The functional buttons (located at the top of each screen) provide access to patient file information and other system features.
Access/Exit• The “Start Screen” is opened when the Bionic NavigatorTM HR 1.0 Software is
started, or [Start] is selected from the top right-hand corner of any screen.• To exit, select [any button] located on the screen or close Bionic Navigator.
Patient Name• To enter patient information, select the down arrow in the [Patient Name] field,
then select an appropriate patient from the alphabetized list, or select a [New Patient] which will automatically display Profile.
Reason for Visit• Click on the [Reason for Visit] field, then select an appropriate visit entry.
Additional Information• Click Remote to proceed to patient programs stored on the Remote Control.• Click Reports to customize a patient or clinic report.• Click Start to restart the session.• Click Profile to enter or view patient information.• Click Programming to create/modify programs.
Notes
DescriptionThe Notes screen is used to enter relevant information, which is stored and can be chronologically viewed in the patient’s case history.
Access/Exit• To access “Notes,” select Profile, then [Notes].
- Enter patient notes by using the CP keyboard or either of the Tablet PC Input Panel options.
• To exit, select [OK] or [Cancel] to return to the Profile screen.
Additional Information• Current notes are editable.• Past notes are read only.• Click Case History to view past notes or go to Reports.
Patient Profile
DescriptionThe Profile screen is an area where the user enters or edits information required to generate or update a patient record. This screen allows the user to enter, view, or edit Patient Identification Information, Patient Contact Information, Pain Areas, a VAS score, Notes and Case History Information.
Access• To access “Patient Profile,” select [Profile] in the upper right-hand corner of any
screen.• To enter a new patient from the Start Screen, click the drop down menu from the
[patient name] field, and select [new patient] from the list. • This will automatically forward you to the Profile Screen to enter new patient
information, and will return you to the Start Screen when complete.• To view or edit an existing patient file from the Start Screen, click the drop down
menu from the [Patient Name] field, and select patient from the list. Then click Profile in the upper right-hand corner of the Start Screen.
Entering and Editing Patient Information1. Enter information using the Text Entry, CP Keyboard or Tablet PC Input
Panel.2. Click [Finish] to save information and return to the “Start Screen.”
Bionic Navigator™ HR 1.0 Software Guide
90868740-07 Rev A 6 of 84Bionic Navigator HR 1.0 Software Guide
enAdditional Information
• Patient name and birth date are required fields.• Click on the Graphic Module to identify and document the patient’s pain area.• Click VAS to document a pain intensity level, then select OK.• Click on Notes to enter comments into the patient’s file.• Click on Case History to chronologically view patient file information, including
the visit history and notes.
Section 4 Patient Hardware
90868740-07 Rev A 7 of 84Bionic Navigator HR 1.0 Software Guide
en
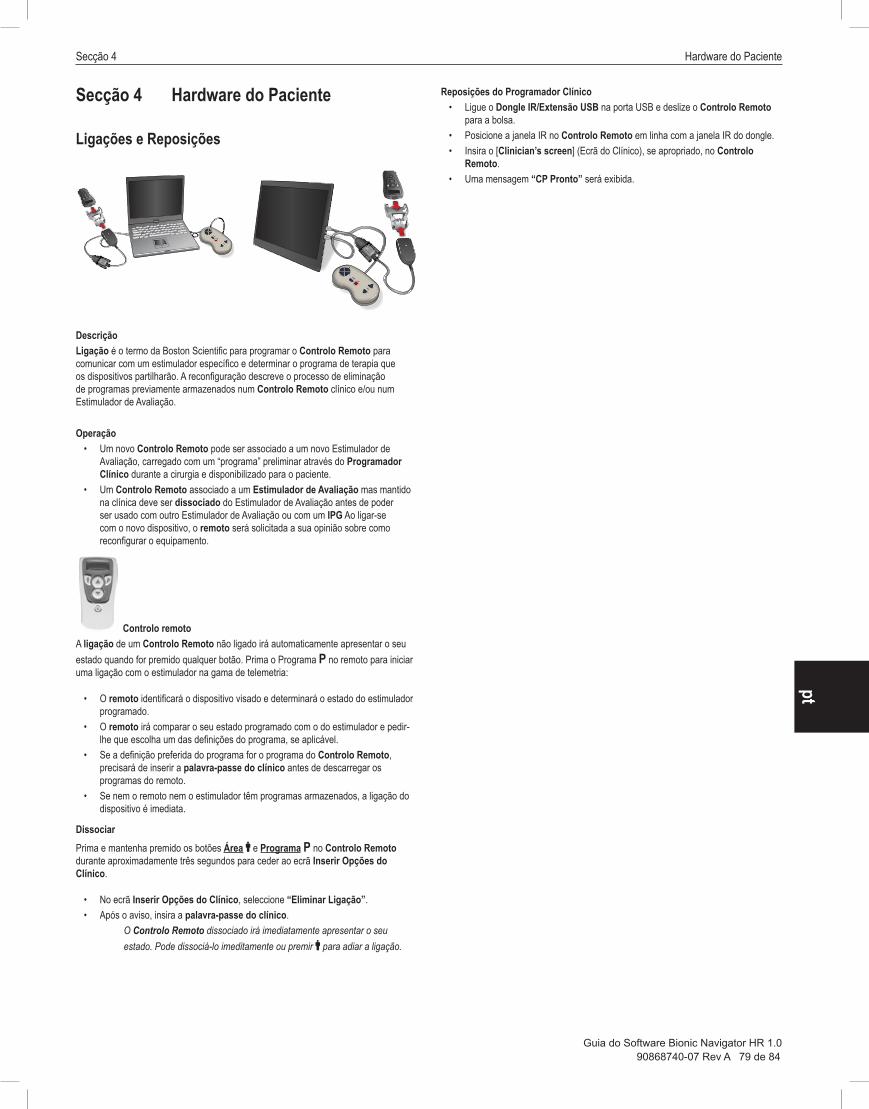
Section 4 Patient Hardware
Links and Resets
LEVEL
OFF
MARK
LEVEL
OFF
MARK
DescriptionLinking is the Boston Scientific term for programming the Remote Control to communicate with a specific stimulator, and determining the therapy program the devices will share. Resetting describes the process of clearing previously stored programs from a clinic Remote Control and /or Trial Stimulator.
Operation• A new Remote Control may be linked to the new Trial Stimulator, loaded with
a preliminary “program” through the Clinician Programmer during the surgery and delivered to the patient.
• A Remote Control linked to a Trial Stimulator but kept at the clinic must be de-linked from the Trial Stimulator before it can be used with another Trial Stimulator or with an IPG. While linking with the new device, the remote will prompt your decision concerning how to reset the equipment.
Remote ControlLinking an unlinked Remote Control will automatically display its status when any button is pressed. Press Program P on the remote to initiate a link with a stimulator within telemetry range:
• The remote will identify the targeted device and determine the stimulator’s programmed status.
• The remote will compare its programmed status against that of the stimulator and prompt you to choose either program set, if applicable.
• If the preferred program set is the Remote Control programs, you will need to enter the clinician password before downloading programs from the remote.
• If neither the remote nor the stimulator has stored programs, device linking is immediate.
De-linkingPress and hold the Area " and Program P buttons on the Remote Control for approximately three seconds to access the Enter Clinician Options screen.
• From the Enter Clinician Options screen, select “To Clear Link”. • At the prompt, enter the clinician password.
The unlinked Remote Control will immediately display its status. You may re-link immediately, or press " to postpone linking.
Resets from the Clinician’s Programmer• Plug the IR Dongle/USB Extension into the USB port and slip Remote Control
into the slip pouch. • Position the IR window of the Remote Control in-line with the IR window of the
dongle. • Enter the [Clinician’s screen] if appropriate on the Remote Control. • A message “CP Ready” will be displayed.
Bionic Navigator™ HR 1.0 Software Guide
90868740-07 Rev A 8 of 84Bionic Navigator HR 1.0 Software Guide
en
Section 5 Programming and Patient Fitting
High Rate Programming
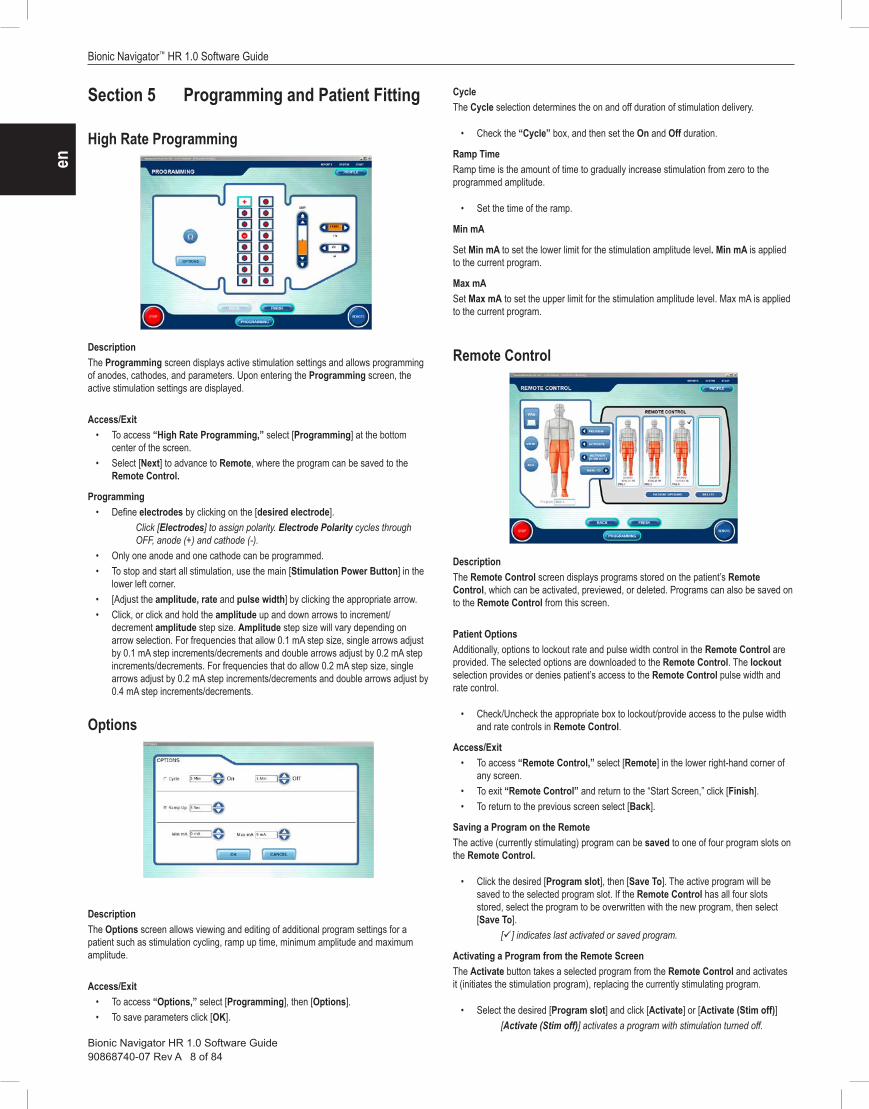
DescriptionThe Programming screen displays active stimulation settings and allows programming of anodes, cathodes, and parameters. Upon entering the Programming screen, the active stimulation settings are displayed.
Access/Exit• To access “High Rate Programming,” select [Programming] at the bottom
center of the screen.• Select [Next] to advance to Remote, where the program can be saved to the
Remote Control.
Programming• Define electrodes by clicking on the [desired electrode].
Click [Electrodes] to assign polarity. Electrode Polarity cycles through OFF, anode (+) and cathode (-).
• Only one anode and one cathode can be programmed.• To stop and start all stimulation, use the main [Stimulation Power Button] in the
lower left corner.• [Adjust the amplitude, rate and pulse width] by clicking the appropriate arrow.• Click, or click and hold the amplitude up and down arrows to increment/
decrement amplitude step size. Amplitude step size will vary depending on arrow selection. For frequencies that allow 0.1 mA step size, single arrows adjust by 0.1 mA step increments/decrements and double arrows adjust by 0.2 mA step increments/decrements. For frequencies that do allow 0.2 mA step size, single arrows adjust by 0.2 mA step increments/decrements and double arrows adjust by 0.4 mA step increments/decrements.
Options
DescriptionThe Options screen allows viewing and editing of additional program settings for a patient such as stimulation cycling, ramp up time, minimum amplitude and maximum amplitude.
Access/Exit• To access “Options,” select [Programming], then [Options].• To save parameters click [OK].
CycleThe Cycle selection determines the on and off duration of stimulation delivery.
• Check the “Cycle” box, and then set the On and Off duration.
Ramp TimeRamp time is the amount of time to gradually increase stimulation from zero to the programmed amplitude.
• Set the time of the ramp.
Min mA
Set Min mA to set the lower limit for the stimulation amplitude level. Min mA is applied to the current program.
Max mASet Max mA to set the upper limit for the stimulation amplitude level. Max mA is applied to the current program.
Remote Control
DescriptionThe Remote Control screen displays programs stored on the patient’s Remote Control, which can be activated, previewed, or deleted. Programs can also be saved on to the Remote Control from this screen.
Patient OptionsAdditionally, options to lockout rate and pulse width control in the Remote Control are provided. The selected options are downloaded to the Remote Control. The lockout selection provides or denies patient’s access to the Remote Control pulse width and rate control.
• Check/Uncheck the appropriate box to lockout/provide access to the pulse width and rate controls in Remote Control.
Access/Exit• To access “Remote Control,” select [Remote] in the lower right-hand corner of
any screen.• To exit “Remote Control” and return to the “Start Screen,” click [Finish]. • To return to the previous screen select [Back].
Saving a Program on the RemoteThe active (currently stimulating) program can be saved to one of four program slots on the Remote Control.
• Click the desired [Program slot], then [Save To]. The active program will be saved to the selected program slot. If the Remote Control has all four slots stored, select the program to be overwritten with the new program, then select [Save To].
[] indicates last activated or saved program.
Activating a Program from the Remote ScreenThe Activate button takes a selected program from the Remote Control and activates it (initiates the stimulation program), replacing the currently stimulating program.
• Select the desired [Program slot] and click [Activate] or [Activate (Stim off)][Activate (Stim off)] activates a program with stimulation turned off.
Section 5 Programming and Patient Fitting
90868740-07 Rev A 9 of 84Bionic Navigator HR 1.0 Software Guide
en• To modify the program:
Go to [Programming], make adjustments, then save it on the Remote Control.
PreviewBefore overwriting the currently stimulating program with a program from the Remote Control, a program in the Remote Control can be previewed. Click on [Preview]. The currently stimulating program will be stopped and the selected program will be activated temporarily until [End Preview] is clicked. When [End Preview] is clicked, the original program is activated. This feature can help in determining which Remote Control program to overwrite when all program slots are filled.
• Click the desired [Program slot] from the Remote Control then select [Preview].• Click, [End Preview] to return to the previous active program.
Delete• Click on a [Program slot].• To erase the program from the Remote Control select [Delete].
Additional Information• Click [Patient Options] to change lockouts.• Click [VAS] to document pain levels.
Stimulation Power Button
DescriptionThe Stimulation (Stim) Power button will stop and start stimulation. When started, stimulation will ramp up to the stored amplitude levels for the active program settings.
Operation• Click the red [Stop] button in the lower left-hand corner of any screen to stop
stimulation.• Click the green [Turn on] button to resume stimulation.
Bionic Navigator™ HR 1.0 Software Guide
90868740-07 Rev A 10 of 84Bionic Navigator HR 1.0 Software Guide
en
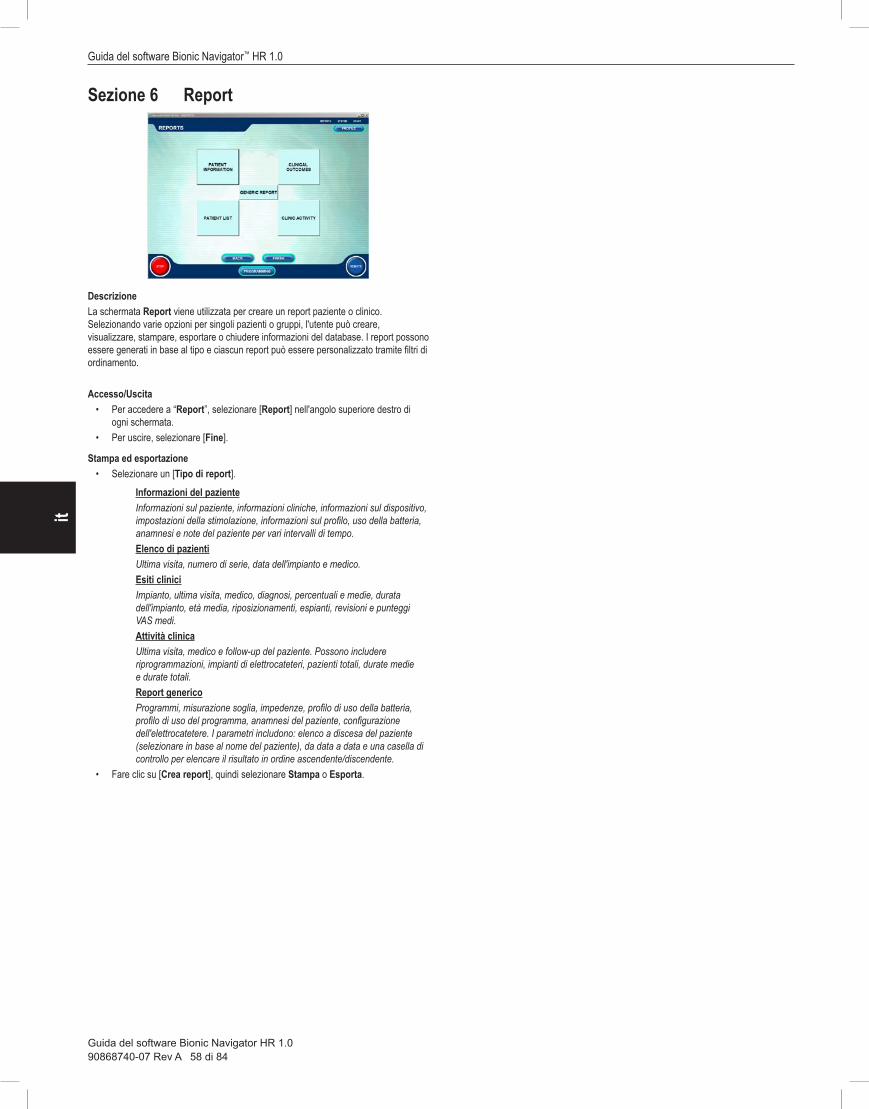
Section 6 Reports
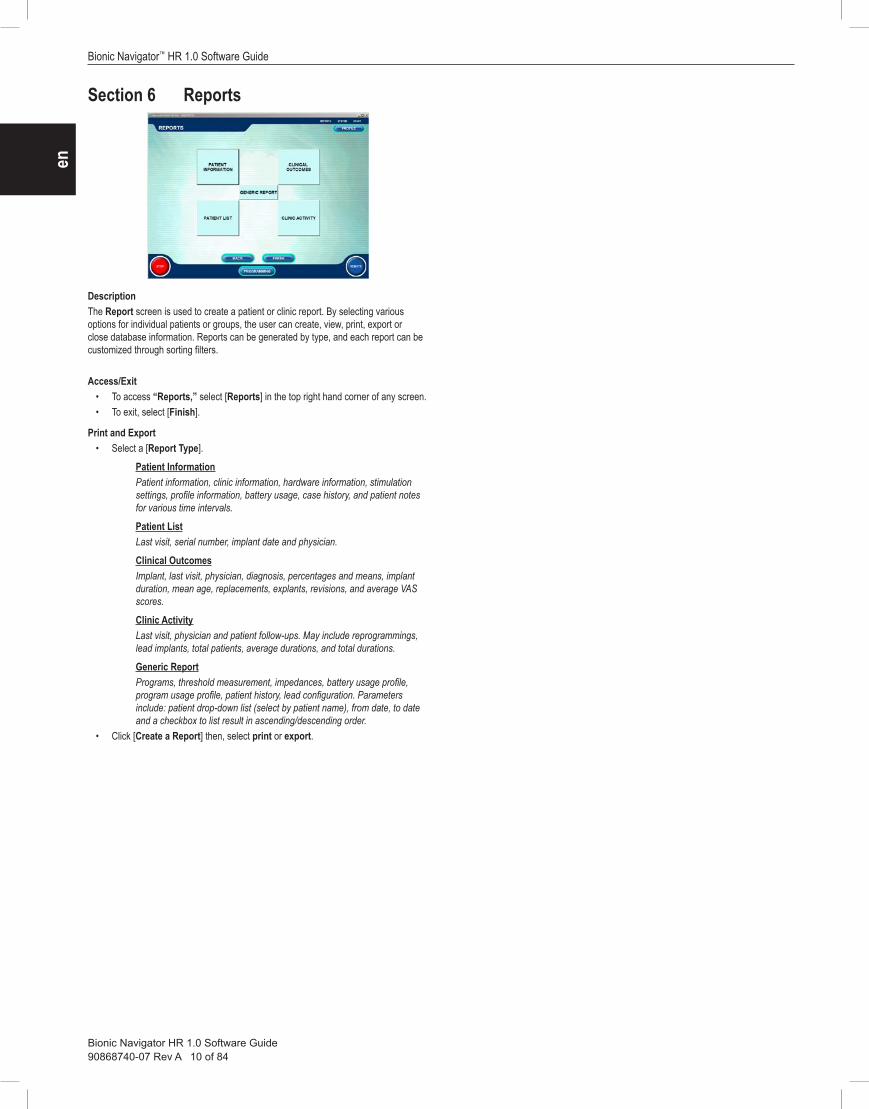
DescriptionThe Report screen is used to create a patient or clinic report. By selecting various options for individual patients or groups, the user can create, view, print, export or close database information. Reports can be generated by type, and each report can be customized through sorting filters.
Access/Exit• To access “Reports,” select [Reports] in the top right hand corner of any screen.• To exit, select [Finish].
Print and Export• Select a [Report Type].
Patient InformationPatient information, clinic information, hardware information, stimulation settings, profile information, battery usage, case history, and patient notes for various time intervals.
Patient ListLast visit, serial number, implant date and physician.
Clinical OutcomesImplant, last visit, physician, diagnosis, percentages and means, implant duration, mean age, replacements, explants, revisions, and average VAS scores.
Clinic ActivityLast visit, physician and patient follow-ups. May include reprogrammings, lead implants, total patients, average durations, and total durations.
Generic ReportPrograms, threshold measurement, impedances, battery usage profile, program usage profile, patient history, lead configuration. Parameters include: patient drop-down list (select by patient name), from date, to date and a checkbox to list result in ascending/descending order.
• Click [Create a Report] then, select print or export.
Section 7 Testing
90868740-07 Rev A 11 of 84Bionic Navigator HR 1.0 Software Guide
en
Section 7 Testing
Impedance
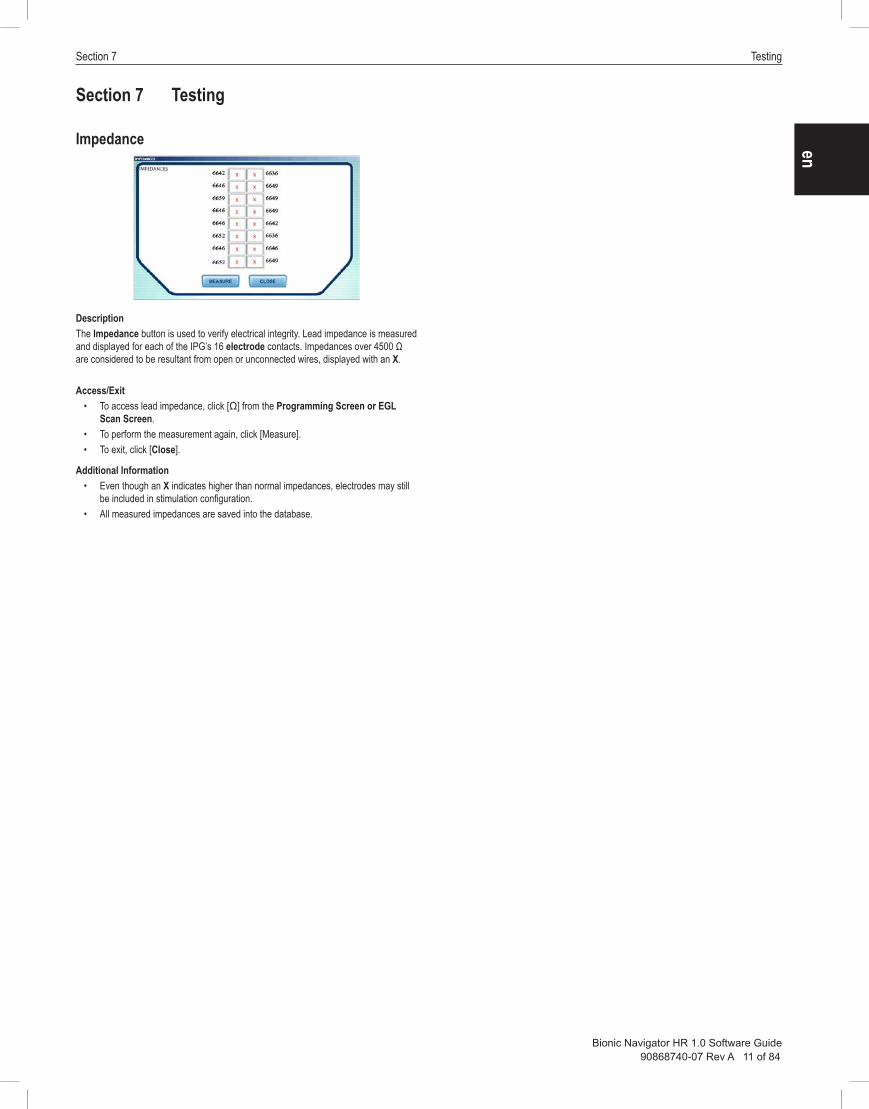
DescriptionThe Impedance button is used to verify electrical integrity. Lead impedance is measured and displayed for each of the IPG’s 16 electrode contacts. Impedances over 4500 Ω are considered to be resultant from open or unconnected wires, displayed with an X.
Access/Exit• To access lead impedance, click [Ω] from the Programming Screen or EGL
Scan Screen.• To perform the measurement again, click [Measure].• To exit, click [Close].
Additional Information• Even though an X indicates higher than normal impedances, electrodes may still
be included in stimulation configuration.• All measured impedances are saved into the database.
Bionic Navigator™ HR 1.0 Software Guide
90868740-07 Rev A 12 of 84Bionic Navigator HR 1.0 Software Guide
en
The Page Intentionally Left Blank
90868740-07 Rev A 13 de 84Guía del software Bionic Navigator HR 1.0
es
Guía del software Bionic Navigator™ HR 1.0Programador clínico NM-7153-13, NM-7153-13R
AVISO: las leyes federales de los Estados Unidos restrigen la venta, distribución y uso de este dispositivo a médicos o bajo prescripción facultativa.
Introducción de texto ...................................................................................................................................................................14Configuración y comunicación ....................................................................................................................................................14Sistema ....................................................................................................................................................................................... 14
Sección 2 Localización de los puntos de dolor y puntuaciones de la escala analógica visual (VAS) ............. 16Módulo gráfico ............................................................................................................................................................................16EVA .............................................................................................................................................................................................16
Sección 3 Archivos del paciente ............................................................................................................................. 17Historia clínica .............................................................................................................................................................................17Para comenzar ............................................................................................................................................................................17Notas ...........................................................................................................................................................................................17Perfil del paciente .......................................................................................................................................................................17
Sección 4 Hardware del paciente ........................................................................................................................... 19Conexiones y restablecimientos .................................................................................................................................................19
Sección 5 Programación y ajuste del paciente ...................................................................................................... 20Programación de alta frecuencia ................................................................................................................................................20Opciones ..................................................................................................................................................................................... 20Control remoto ............................................................................................................................................................................ 20Botón de suministro de energía para la estimulación .................................................................................................................21
Nota: En el Manual del médico del estimulador del sistema de estimulación de la médula espinal (EME) Precision con tecnología MultiWave podrá encontrar un listado de las indicaciones, contraindicaciones, advertencias, precauciones y efectos secundarios relacionados con la prescripción del sistema EME Precision™ con tecnología MultiWave para el tratamiento del dolor.
Guía del software Bionic Navigator™ HR 1.0
90868740-07 Rev A 14 de 84Guía del software Bionic Navigator HR 1.0
es
Sección 1 Programador clínico
Introducción de texto
DescripciónLas opciones de introducción de texto facilitan la introducción de datos. Existen tres métodos para introducir datos del perfil del paciente y notas del paciente mediante las funciones del teclado del Programador clínico y el panel de entrada del Tablet PC. El icono de introducción de texto de la función de entrada del Tablet PC se encuentra en la barra de tareas de Windows.
Acceso/salida• Para acceder a la [barra de tareas de Windows], mueva el lápiz por la parte
inferior de la pantalla. Haga clic en el [Icono] del teclado.• Para salir de cualquier herramienta de introducción de texto, haga clic en la [X] en
la esquina derecha de la herramienta.
Teclado del Programador clínico El teclado del Programador clínico se utiliza para introducir información del paciente mediante el método convencional.
Panel de entrada del Tablet PCEl panel de entrada del Tablet PC es un teclado táctil y una ventana en la que se puede escribir.
• Sitúe el cursor en el [campo de texto]. Introduzca las letras o los números correspondientes en el teclado o escriba el texto en la ventana de introducción de texto.
Para borrar información, haga clic en la tecla de retroceso (<–).
Información adicional• Consulte los manuales de los Tablet PC Toshiba Portege M400 en
www.toshiba.com para obtener instrucciones adicionales.• Consulte la sección Configuración y comunicación, más abajo, para obtener
más información.
Configuración y comunicación
LEVEL
OFF
MARK
LEVEL
OFF
MARK
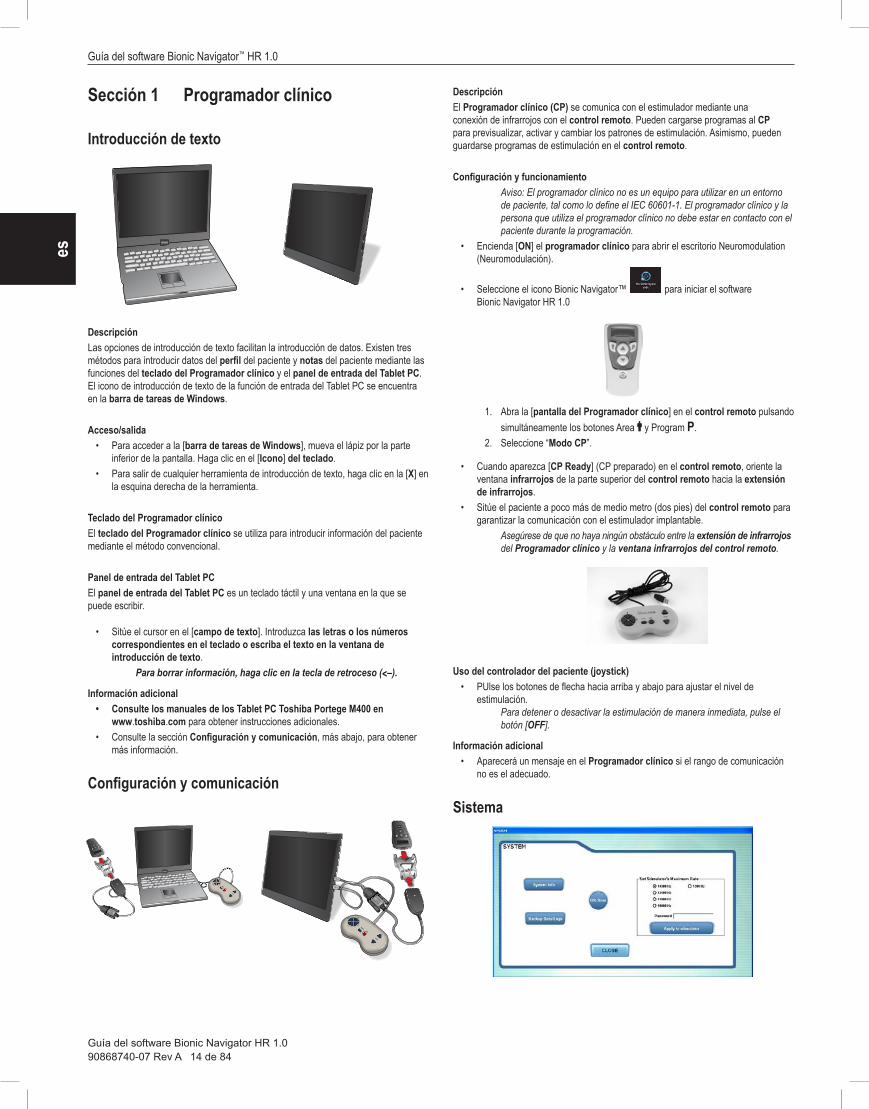
DescripciónEl Programador clínico (CP) se comunica con el estimulador mediante una conexión de infrarrojos con el control remoto. Pueden cargarse programas al CP para previsualizar, activar y cambiar los patrones de estimulación. Asimismo, pueden guardarse programas de estimulación en el control remoto.
Configuración y funcionamientoAviso: El programador clínico no es un equipo para utilizar en un entorno de paciente, tal como lo define el IEC 60601-1. El programador clínico y la persona que utiliza el programador clínico no debe estar en contacto con el paciente durante la programación.
• Encienda [ON] el programador clínico para abrir el escritorio Neuromodulation (Neuromodulación).
• Seleccione el icono Bionic Navigator™ para iniciar el software Bionic Navigator HR 1.0
1. Abra la [pantalla del Programador clínico] en el control remoto pulsando simultáneamente los botones Area " y Program P.
2. Seleccione “Modo CP”.
• Cuando aparezca [CP Ready] (CP preparado) en el control remoto, oriente la ventana infrarrojos de la parte superior del control remoto hacia la extensión de infrarrojos.
• Sitúe el paciente a poco más de medio metro (dos pies) del control remoto para garantizar la comunicación con el estimulador implantable.
Asegúrese de que no haya ningún obstáculo entre la extensión de infrarrojos del Programador clínico y la ventana infrarrojos del control remoto.
Uso del controlador del paciente (joystick) • PUlse los botones de flecha hacia arriba y abajo para ajustar el nivel de
estimulación. Para detener o desactivar la estimulación de manera inmediata, pulse el
botón [OFF].
Información adicional • Aparecerá un mensaje en el Programador clínico si el rango de comunicación
no es el adecuado.
Sistema
Sección 1 Programador clínico
90868740-07 Rev A 15 de 84Guía del software Bionic Navigator HR 1.0
esDescripciónLa pantalla del sistema permite seleccionar la frecuencia máxima del estimulador, realizar copias de seguridad de la base de datos y registros, calcular las posiciones relativas de los electrodos y ofrece información sobre el estimulador.
Acceso/salida• Para acceder a “System” (Sistema), seleccione [System] (Sistema) en la esquina
superior derecha de la pantalla, realice los ajustes necesarios.• Para salir, haga clic en [Close] (Cerrar).
Frecuencia máxima del estimuladorHaga clic en [Set Stimulator Maximum Rate] (Ajustar frecuencia máxima del estimulador) para seleccionar la frecuencia máxima a la que puede funcionar el estimulador conectado. Tenga en cuenta que el cambio de la frecuencia máxima de un estimulador conectado borrará todos los ajustes y programas de ese estimulador.
• Seleccione el botón radio establecer la frecuencia máxima deseada• Escriba la contraseña “ACCELERATE10K” en el campo de contraseña.• Para activar, haga clic en [Apply to Stimulator] (Aplicar a estimlador)
Aparecerá un mensaje que indicará que se borrarán todos los programas del estimulador.
• Haga clic en [Yes] (Sí) Aparecerá un mensaje que indicará que se ha actualizado la frecuencia máxima del estimulador.
• Para salir, haga clic en [Close] (Cerrar).Cuando programe un paciente a una frecuencia igual o inferior a 1200 Hz, primero ajuste la frecuencia máxima a 1200 Hz utilizando el software Bionic Navigator HR 1.0 y, a continuación, utilice el software Bionic Navigator 1.2 para programar el paciente.
Cuando programe un paciente a una frecuencia superior a 1200 Hz, primero ajuste la frecuencia máxima con el software Bionic Navigator HR 1.0 y, a continuación, programe el paciente con el mismo software.
Sistema • Haga clic en [System Info] (Información del sistema) para verificar la información
del estimulador y el control remoto.Para crear manualmente un archivo comprimido de base de datos y registros, haga clic en [Backup Data/Logs] (Copia de seguridad de datos/registros). Para comprobar la información del estimulador y del control remoto en relación con la identificación, el tipo, la versión, el voltaje y estado de la batería, haga clic en [System Info] (Información del sistema). Para mostrar las posiciones relativas de los electrodos, haga clic en [EGL Scan] (Exploración EGL).
Copia de seguridad de datos/registros Para crear un archivo comprimido de bases de datos y registros.
• Introduzca [medios extraíbles] para copiar bases de datos y registros.Los soportes extraíbles no deben marcarse como “CLINIC”
• Haga clic en el botón Backup Data/Logs (Copia de seguridad de datos/registros)- La base de datos se copia correctamente cuando aparece un mensaje
• Haga clic en [OK] (Aceptar) para salir.
Información del sistema
• System Information (Información del sistema) sólo está disponible cuando un estimulador está conectado al Programador clínico.
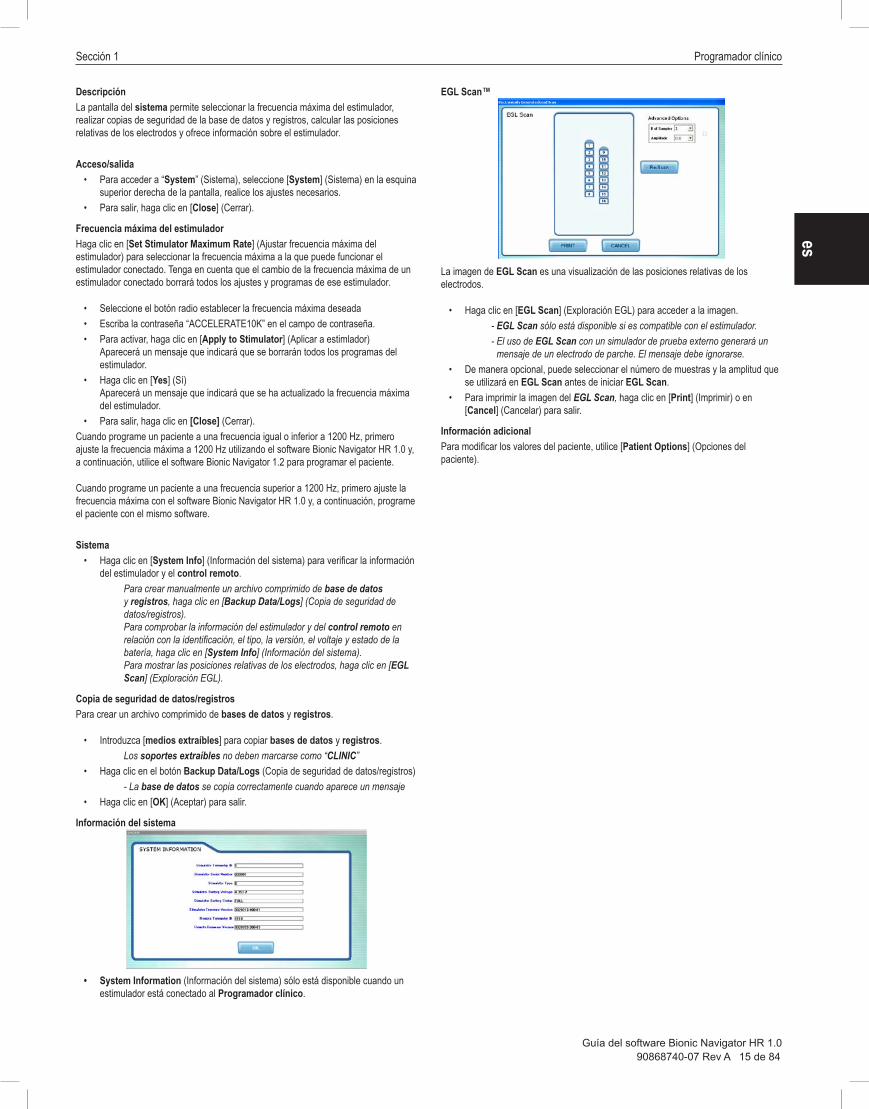
EGL Scan™
La imagen de EGL Scan es una visualización de las posiciones relativas de los electrodos.
• Haga clic en [EGL Scan] (Exploración EGL) para acceder a la imagen. - EGL Scan sólo está disponible si es compatible con el estimulador. - El uso de EGL Scan con un simulador de prueba externo generará un
mensaje de un electrodo de parche. El mensaje debe ignorarse.• De manera opcional, puede seleccionar el número de muestras y la amplitud que
se utilizará en EGL Scan antes de iniciar EGL Scan.• Para imprimir la imagen del EGL Scan, haga clic en [Print] (Imprimir) o en
[Cancel] (Cancelar) para salir.
Información adicionalPara modificar los valores del paciente, utilice [Patient Options] (Opciones del paciente).
Guía del software Bionic Navigator™ HR 1.0
90868740-07 Rev A 16 de 84Guía del software Bionic Navigator HR 1.0
es
Sección 2 Localización de los puntos de dolor y puntuaciones de la escala analógica visual (VAS)
Módulo gráfico
DescripciónEl Graphic Module (Módulo gráfico) se utiliza para identificar los puntos de dolor mediante una representación visual de las áreas de cobertura anatómica en relación con el paciente. Las regiones de dolor (naranja) sólo pueden introducirse en la pantalla Patient Profile (Perfil del paciente).
Acceso/salida• Para acceder a “Graphic Module” (Módulo gráfico), seleccione Profile (Perfil).• Para guardar la información y salir, seleccione [Finish] (Finalizar).
Introducción de las áreas de dolor• Seleccione [Profile] (Perfil).
Las regiones de dolor (naranja) sólo pueden introducirse en la pantalla Patient Profile (Perfil del paciente).
• Haga clic en Graphic Module [Regions] (Módulo gráfico [Regiones]) para indicar las áreas de dolor.
Resolution (RES) (Resolución [RES])• Haga clic en [RES] para alternar entre una resolución alta y baja de la
localización.
View (Vista)• Haga clic en [VIEW] (VISTA) para alternar entre la parte delantera y la trasera en
Graphic Module (Módulo gráfico).
Información adicional• Haga clic en el botón VAS para documentar una escala analógica visual.
EVA
DescripciónLa pantalla VAS documenta el nivel actual de dolor del paciente tanto con la estimulación “On” (Activada) u “Off” (Desactivada). Bionic NavigatorTM detectará si la estimulación está “On” (Activada) u “Off” (Desactivada) en el momento en el que se registra la puntuación. Se mostrará la última puntuación en la pantalla de acceso VAS; el color rojo indica que la estimulación está desactivada (sin terapia) y el color azul indica que la estimulación está activada (con terapia). Es posible crear un informe comparativo si las puntuaciones VAS se graban con la estimulación activada y desactivada.
Acceso/salida• Para acceder a la escala analógica visual, seleccione VAS en Profile (Perfil)
o Remote (Remoto).• Para salir de VAS (EVA), haga clic en [OK] (Aceptar) para registrar la información
o en [Cancel] (Cancelar).
Puntuación• Haga clic en el puntero o arrástrelo hasta el [punto numérico] de la pantalla
que refleje el nivel actual de dolor del paciente con estimulación [On] (Activada) u [Off] (Desactivada).
Una puntuación de 0 es equivalente a ausencia de dolor. Una puntuación de 10 equivale al peor dolor posible.
Información adicional• La VAS que se muestra corresponde a las últimas puntuaciones VAS introducidas
durante esa sesión.• Haga clic en Reports (Informes) para ver el historial de VAS (EVA).• La última puntuación de VAS obtenida en una sesión se almacena en la base de
datos como una puntuación de esa sesión.
Sección 3 Archivos del paciente
90868740-07 Rev A 17 de 84Guía del software Bionic Navigator HR 1.0
es
Sección 3 Archivos del paciente
Historia clínica
DescripciónCase History (Historia clínica) muestra las visitas del paciente ordenadas cronológicamente.
Acceso/salida• Para acceder a la información de “Case History” (Historia clínica), seleccione
[Profile] (Perfil) y después [Case History] (Historia clínica).• Para salir, seleccione [OK] (Aceptar).
Información adicional• La historia clínica también puede consultarse e imprimirse desde Reports
(Informes).• Haga clic en Profile (Perfil) para introducir Notes (Notas).• Haga clic en Start (Inicio) para acceder a “Reason for Visit” (Motivo de la visita).
Para comenzar
DescripciónLa pantalla Start Screen (Pantalla de inicio) se utiliza para iniciar la sesión de un paciente. El modo de programación de Alta frecuencia puede seleccionarse en esta pantalla. Los botones de funciones (situados en la parte superior de cada pantalla) proporcionan acceso a la información de los archivos del paciente y a otras funciones del sistema.
Acceso/salida• La “Start Screen” (Pantalla de inicio) se abre cuando se inicia el software
Bionic NavigatorTM HR 1.0 Software o se selecciona [Start] en la esquina superior derecha de cualquier pantalla.
• Para salir, seleccione [cualquier botón] situado en la pantalla o cierre Bionic Navigator.
Patient Name (Nombre del paciente)• Para introducir información del paciente, seleccione la flecha hacia abajo en
el campo [Patient Name] (Nombre del paciente); a continuación, seleccione el paciente correspondiente de la lista alfabética o seleccione un [New Patient] (Paciente nuevo) del que aparecerá automáticamente su Profile (Perfil).
Reason for Visit (Motivo de la visita)• Haga clic en el campo [Reason for Visit] (Motivo de la visita) y seleccione la
entrada de visita adecuada.
Información adicional• Haga clic en Remote (Remoto) para acceder a programas del paciente
almacenados en el control remoto.• Haga clic en Reports (Informes) para personalizar un informe clínico o de un
paciente.• Haga clic en Start (Iniciar) para volver a iniciar la sesión.• Haga clic en Profile (Perfil) para introducir o ver información del paciente.• Haga clic en Programming (Programación) para crear/modificar programas.
Notas
DescripciónLa pantalla Notes (Notas) se utiliza para introducir información relevante, que se almacena y puede verse ordenada cronológicamente en la historia clínica del paciente.
Acceso/salida• Para acceder a “Notes” (Notas), seleccione Profile (Perfil) y después [Notes]
(Notas).- Introduzca notas del paciente utilizando el teclado del Programador
clínico o con cualquiera de las opciones del panel de entrada del Tablet PC.
• Para salir, seleccione [OK] (Aceptar) o [Cancel] (Cancelar) para volver a la pantalla Profile (Perfil).
Información adicional• Las notas actuales pueden editarse.• Las notas pasadas son de sólo lectura.• Haga clic en Case History (Historia clínica) para ver las notas pasadas o ir
a Reports (Informes).
Perfil del paciente
DescripciónLa pantalla Profile (Perfil) es un área donde el usuario introduce o edita la información necesaria para generar o actualizar el registro de un paciente. Esta pantalla permite al usuario introducir, ver o modificar Información de identificación del paciente, Información de contacto del paciente, Áreas de dolor, una puntuación de VAS, Notas e Información del historial clínico.
Guía del software Bionic Navigator™ HR 1.0
90868740-07 Rev A 18 de 84Guía del software Bionic Navigator HR 1.0
esAcceso
• Para acceder a “Patient Profile” (Perfil del paciente), seleccione [Profile] (Perfil) en la esquina superior derecha de cualquier pantalla.
• Para introducir un paciente nuevo desde la Start Screen (Pantalla de inicio), haga clic en el menú desplegable del campo [patient name] (Nombre del paciente) y seleccione [new patient] (Paciente nuevo) en la lista.
• De esta manera, accederá automáticamente a la pantalla Profile (Perfil) para introducir la información del paciente nuevo, y volverá a la Start Screen (Pantalla de inicio) cuando termine.
• Para ver o editar el archivo de un paciente existente desde la Start Screen (Pantalla de inicio), haga clic en el menú desplegable del campo [Patient Name] (Nombre del paciente) y seleccione el paciente de la lista. A continuación, haga clic en Profile (Perfil) en la esquina superior derecha de la Start Screen (Pantalla de inicio).
Introducción y edición de la información del paciente1. Introduzca información mediante Introducción de texto, el teclado del
Programador clínico y el panel de entrada del Tablet PC.2. Haga clic en [Finish] (Finalizar) para guardar la información y volver a la
“Start Screen” (Pantalla de inicio).
Información adicional• Patient name (Nombre del paciente) y birth date (Fecha de nacimiento) son
campos necesarios.• Haga clic en Graphic Module (Módulo gráfico) para identificar y documentar el
área de dolor del paciente.• Haga clic en VAS para documentar el nivel de intensidad de un dolor y seleccione
OK (Aceptar).• Haga clic en Notes (Notas) para introducir comentarios en el archivo del
paciente.• Haga clic en Case History (Historia clínica) para ver la información de los
archivos del paciente de modo cronológico, incluidos el historial de visitas y las notas.
Sección 4 Hardware del paciente
90868740-07 Rev A 19 de 84Guía del software Bionic Navigator HR 1.0
es
Sección 4 Hardware del paciente
Conexiones y restablecimientos
LEVEL
OFF
MARK
LEVEL
OFF
MARK
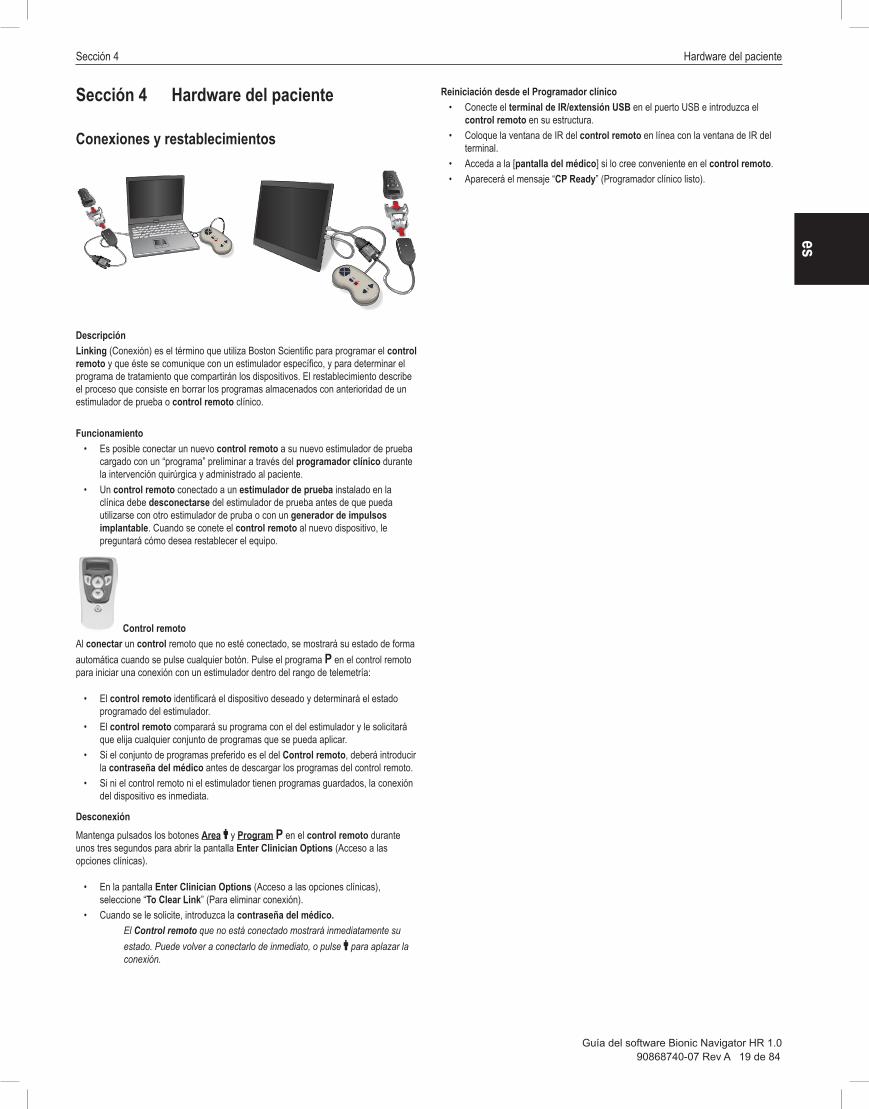
DescripciónLinking (Conexión) es el término que utiliza Boston Scientific para programar el control remoto y que éste se comunique con un estimulador específico, y para determinar el programa de tratamiento que compartirán los dispositivos. El restablecimiento describe el proceso que consiste en borrar los programas almacenados con anterioridad de un estimulador de prueba o control remoto clínico.
Funcionamiento• Es posible conectar un nuevo control remoto a su nuevo estimulador de prueba
cargado con un “programa” preliminar a través del programador clínico durante la intervención quirúrgica y administrado al paciente.
• Un control remoto conectado a un estimulador de prueba instalado en la clínica debe desconectarse del estimulador de prueba antes de que pueda utilizarse con otro estimulador de pruba o con un generador de impulsos implantable. Cuando se conete el control remoto al nuevo dispositivo, le preguntará cómo desea restablecer el equipo.
Control remotoAl conectar un control remoto que no esté conectado, se mostrará su estado de forma automática cuando se pulse cualquier botón. Pulse el programa P en el control remoto para iniciar una conexión con un estimulador dentro del rango de telemetría:
• El control remoto identificará el dispositivo deseado y determinará el estado programado del estimulador.
• El control remoto comparará su programa con el del estimulador y le solicitará que elija cualquier conjunto de programas que se pueda aplicar.
• Si el conjunto de programas preferido es el del Control remoto, deberá introducir la contraseña del médico antes de descargar los programas del control remoto.
• Si ni el control remoto ni el estimulador tienen programas guardados, la conexión del dispositivo es inmediata.
DesconexiónMantenga pulsados los botones Area " y Program P en el control remoto durante unos tres segundos para abrir la pantalla Enter Clinician Options (Acceso a las opciones clínicas).
• En la pantalla Enter Clinician Options (Acceso a las opciones clínicas), seleccione “To Clear Link” (Para eliminar conexión).
• Cuando se le solicite, introduzca la contraseña del médico. El Control remoto que no está conectado mostrará inmediatamente su estado. Puede volver a conectarlo de inmediato, o pulse " para aplazar la conexión.
Reiniciación desde el Programador clínico• Conecte el terminal de IR/extensión USB en el puerto USB e introduzca el
control remoto en su estructura. • Coloque la ventana de IR del control remoto en línea con la ventana de IR del
terminal. • Acceda a la [pantalla del médico] si lo cree conveniente en el control remoto. • Aparecerá el mensaje “CP Ready” (Programador clínico listo).
Guía del software Bionic Navigator™ HR 1.0
90868740-07 Rev A 20 de 84Guía del software Bionic Navigator HR 1.0
es
Sección 5 Programación y ajuste del paciente
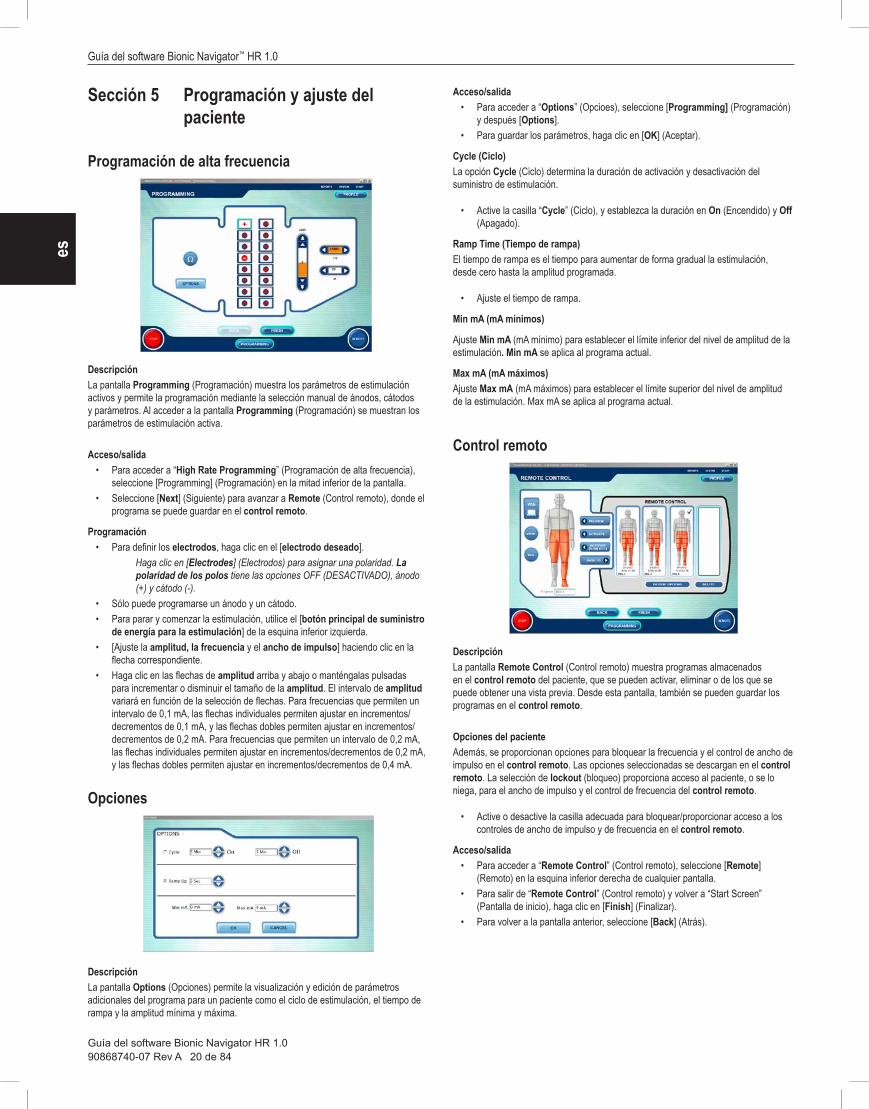
Programación de alta frecuencia
DescripciónLa pantalla Programming (Programación) muestra los parámetros de estimulación activos y permite la programación mediante la selección manual de ánodos, cátodos y parámetros. Al acceder a la pantalla Programming (Programación) se muestran los parámetros de estimulación activa.
Acceso/salida• Para acceder a “High Rate Programming” (Programación de alta frecuencia),
seleccione [Programming] (Programación) en la mitad inferior de la pantalla.• Seleccione [Next] (Siguiente) para avanzar a Remote (Control remoto), donde el
programa se puede guardar en el control remoto.
Programación• Para definir los electrodos, haga clic en el [electrodo deseado].
Haga clic en [Electrodes] (Electrodos) para asignar una polaridad. La polaridad de los polos tiene las opciones OFF (DESACTIVADO), ánodo (+) y cátodo (-).
• Sólo puede programarse un ánodo y un cátodo.• Para parar y comenzar la estimulación, utilice el [botón principal de suministro
de energía para la estimulación] de la esquina inferior izquierda.• [Ajuste la amplitud, la frecuencia y el ancho de impulso] haciendo clic en la
flecha correspondiente.• Haga clic en las flechas de amplitud arriba y abajo o manténgalas pulsadas
para incrementar o disminuir el tamaño de la amplitud. El intervalo de amplitud variará en función de la selección de flechas. Para frecuencias que permiten un intervalo de 0,1 mA, las flechas individuales permiten ajustar en incrementos/decrementos de 0,1 mA, y las flechas dobles permiten ajustar en incrementos/decrementos de 0,2 mA. Para frecuencias que permiten un intervalo de 0,2 mA, las flechas individuales permiten ajustar en incrementos/decrementos de 0,2 mA, y las flechas dobles permiten ajustar en incrementos/decrementos de 0,4 mA.
Opciones
DescripciónLa pantalla Options (Opciones) permite la visualización y edición de parámetros adicionales del programa para un paciente como el ciclo de estimulación, el tiempo de rampa y la amplitud mínima y máxima.
Acceso/salida• Para acceder a “Options” (Opcioes), seleccione [Programming] (Programación)
y después [Options].• Para guardar los parámetros, haga clic en [OK] (Aceptar).
Cycle (Ciclo)La opción Cycle (Ciclo) determina la duración de activación y desactivación del suministro de estimulación.
• Active la casilla “Cycle” (Ciclo), y establezca la duración en On (Encendido) y Off (Apagado).
Ramp Time (Tiempo de rampa)El tiempo de rampa es el tiempo para aumentar de forma gradual la estimulación, desde cero hasta la amplitud programada.
• Ajuste el tiempo de rampa.
Min mA (mA mínimos)
Ajuste Min mA (mA mínimo) para establecer el límite inferior del nivel de amplitud de la estimulación. Min mA se aplica al programa actual.
Max mA (mA máximos)Ajuste Max mA (mA máximos) para establecer el límite superior del nivel de amplitud de la estimulación. Max mA se aplica al programa actual.
Control remoto
DescripciónLa pantalla Remote Control (Control remoto) muestra programas almacenados en el control remoto del paciente, que se pueden activar, eliminar o de los que se puede obtener una vista previa. Desde esta pantalla, también se pueden guardar los programas en el control remoto.
Opciones del pacienteAdemás, se proporcionan opciones para bloquear la frecuencia y el control de ancho de impulso en el control remoto. Las opciones seleccionadas se descargan en el control remoto. La selección de lockout (bloqueo) proporciona acceso al paciente, o se lo niega, para el ancho de impulso y el control de frecuencia del control remoto.
• Active o desactive la casilla adecuada para bloquear/proporcionar acceso a los controles de ancho de impulso y de frecuencia en el control remoto.
Acceso/salida• Para acceder a “Remote Control” (Control remoto), seleccione [Remote]
(Remoto) en la esquina inferior derecha de cualquier pantalla.• Para salir de “Remote Control” (Control remoto) y volver a “Start Screen”
(Pantalla de inicio), haga clic en [Finish] (Finalizar). • Para volver a la pantalla anterior, seleccione [Back] (Atrás).
Sección 5 Programación y ajuste del paciente
90868740-07 Rev A 21 de 84Guía del software Bionic Navigator HR 1.0
esProcedimiento para guardar un programa en el control remotoEl programa activo (de estimulación actual) se puede guardar en una de los cuatro espacios de programa existentes en el control remoto.
• Haga clic en el [espacio de programa] deseado y, a continuación, en [Save To] (Guardar en). El programa activo se guardará en el espacio de programa seleccionado. Si el control remoto tiene los cuatro espacios almacenados, seleccione el programa para que se sustituya con un programa nuevo y, a continuación, seleccione [Save To] (Guardar en).
[] indica el último programa activado o guardado.
Activación de un programa desde la pantalla de control remotoEl botón Activate (Activar) toma el programa seleccionado del Control remoto y lo activa (inicia el programa de estimulación), lo que sustituye el programa de estimulación actual.
• Seleccione la [espacio del programa] deseado y haga clic en [Activate] (Activar) o en [Activate (Stim off)] [Activar (desactivación)]
[Activate (Stim off)] [Activar (desactivación)] activa un programa con la estimulación desactivada.
• Para modificar el programa, realice lo siguiente:Vaya a [Programming] (Programación), realice los ajustes y, a continuación, guárdelos en el Control remoto.
Vista previaAntes de sustituir el programa de estimulación actual con un programa del control remoto, se puede obtener una vista previa de un programa del control remoto. Haga clic en [Preview] (Vista previa). El programa de estimulación actual se detendrá y el programa seleccionado se activará de forma temporal hasta que se haga clic en [End Preview] (Finalizar vista previa). Al hacer clic en [End Preview] (Finalizar vista previa), el programa original se activa. Esta función puede ayudar a determinar el programa del Control remoto que se deberá sustituir cuando estén completos todos los espacios de programa.
• Haga clic en la [Program slot] (Espacio de programa) del Control remoto y, a continuación, seleccione [Preview] (Vista previa).
• Haga clic en [End Preview] (Finalizar vista previa) para volver al programa activo con anterioridad.
Eliminar• Haga clic en una [espacio de programa].• Para borrar el programa del Control remoto, seleccione [Delete] (Eliminar).
Información adicional• Haga clic en [Patient Options] (Opciones de paciente) para cambiar los bloqueos.• Haga clic en [VAS] (EVA) para documentar los niveles de dolor.
Botón de suministro de energía para la estimulación
DescripciónEl botón de suministro de la energía para la estimulación detendrá e iniciará la estimulación. Cuando se inicie la estimulación, subirá hasta los niveles de amplitud almacenados para los parámetros activos del programa.
Funcionamiento• Haga clic en el botón rojo [Stop] (Parar) de la esquina inferior izquierda de cada
pantalla para detener la estimulación.• Haga clic en el botón verde [Turn on] (Encender) para continuar con la
estimulación.
Guía del software Bionic Navigator™ HR 1.0
90868740-07 Rev A 22 de 84Guía del software Bionic Navigator HR 1.0
es
Sección 6 Reports (Informes)
DescripciónLa pantalla Report (Informes) se utiliza para crear un informe clínico o de un paciente. Al seleccionar diversas opciones para pacientes individuales o grupos, el usuario puede crear, ver, imprimir, exportar o cerrar información de la base de datos. Los informes pueden generarse por tipo y cada informe puede personalizarse mediante filtros de ordenación.
Acceso/salida• Para acceder a “Reports” (Informes), seleccione [Reports] (Informes) en la
esquina superior derecha de cualquier pantalla.• Para salir, seleccione [Finish] (Finalizar).
Impresión y exportación• Seleccione un [tipo de informe].
Patient Information (Información del paciente)Información del paciente, información clínica, información de hardware, parámetros de estimulación, información del perfil, uso de la batería, historia clínica y notas del paciente de diversos intervalos de tiempo.
Patient List (Lista del paciente)Última visita, número de serie, fecha del implante y médico.
Clinical Outcomes (Resultados clínicos)Implante, última visita, médico, diagnóstico, porcentajes y medias, duración del implante, edad media, sustituciones, revisiones y puntuaciones medias de VAS (EVA).
Clinic Activity (Actividad clínica)Última visita, médico y seguimiento de los pacientes. Puede incluir reprogramaciones, implantes de electrodos, pacientes totales, duración media y duración total.
Generic Report (Informe genérico)Programas, medición del umbral, impedancias, perfil de uso de la batería, perfil de uso del programa, historial del paciente, configuración de los electrodos. Los parámetros incluyen: lista desplegable de pacientes (seleccionar por nombre del paciente), fecha de inicio, fecha de finalización y una casilla de verificación para incluir los resultados en orden ascendente/descendente.
• Haga clic en [Create a Report] (Crear informe) y, a continuación, seleccione print (Imprimir) o export (Exportar).
Sección 7 Pruebas
90868740-07 Rev A 23 de 84Guía del software Bionic Navigator HR 1.0
es
Sección 7 Pruebas
Impedancia
DescripciónEl botón Impedance (Impedancia) se utiliza para comprobar que la electricidad es correcta. La impedancia de los electrodos se mide y se muestra por cada uno de los 16 contactos de polos del IPG. Las impedancias que estén por encima de 4500 Ω se consideran que proceden de cables abiertos o que no estén conectados y se muestran con una X.
Acceso/salida• Para abrir la impedancia del electrodo, haga clic en [Ω] en la pantalla
Programming (Programación) y EGL Scan (Exploración EGL).• Para realizar de nuevo la medición, haga clic en [Measure] (Medir).• Para salir, haga clic en [Close] (Cerrar).
Información adicional• Aunque una X indica las impedancias que son superiores a lo normal, es posible
que los polos estén incluidos todavía en la configuración de la estimulación.• Todas las impedancias que se han medido se guardan en la base de datos.
Guía del software Bionic Navigator™ HR 1.0
90868740-07 Rev A 24 de 84Guía del software Bionic Navigator HR 1.0
es
Esta página se ha dejado en blanco a propósito.
90868740-07 Rév. A 25 sur 84Guide du logiciel Bionic Navigator HR 1.0
fr
Guide du logiciel Bionic Navigator™ HR 1.0Programmateur du médecin NM-7153-13, NM-7153-13R
ATTENTION : selon la loi fédérale américaine, ce dispositif ne peut être vendu, distribué et utilisé que sur prescription d'un médecin.
Table des matièresSection 1 Programmateur du médecin .................................................................................................................. 26
Saisies de texte ...........................................................................................................................................................................26Réglage et communication .........................................................................................................................................................26Système ......................................................................................................................................................................................26
Section 2 Cartographie de la douleur et scores VAS ............................................................................................ 28Module graphique .......................................................................................................................................................................28VAS ............................................................................................................................................................................................. 28
Section 3 Fichiers patient ........................................................................................................................................ 29Observations médicales ..............................................................................................................................................................29Prise en main ..............................................................................................................................................................................29Notes ...........................................................................................................................................................................................29Profil du patient ...........................................................................................................................................................................29
Section 4 Équipement du patient .......................................................................................................................... 31Associations et réinitialisations ...................................................................................................................................................31
Section 5 Programmation et adaptation au patient .............................................................................................. 32Programmation à un taux élevé ..................................................................................................................................................32Options ........................................................................................................................................................................................ 32Télécommande ...........................................................................................................................................................................32Interrupteur Marche/Arrêt de stimulation ....................................................................................................................................33
Section 6 Rapports .................................................................................................................................................. 34Section 7 Test ........................................................................................................................................................... 35
Remarque : Une liste des indications, contre-indications, précautions et effets indésirables possibles associés à la prescription du système de stimulation médullaire Precision™ dans le traitement de la douleur peut être trouvée dans le Manuel du médecin pour le stimulateur médullaire Precision.
Guide du logiciel Bionic Navigator™ HR 1.0
90868740-07 Rév. A 26 sur 84Guide du logiciel Bionic Navigator HR 1.0
fr
Section 1 Programmateur du médecin
Saisies de texte
DescriptionLes options de saisie de texte permettent de faciliter la saisie de données. Il existe trois méthodes de saisie des données de Profil et de Notes de patient à l’aide du clavier du PM et de la fonctionnalité du Panneau de saisie de la tablette du PM. L'icône de saisie de texte pour la fonction de saisie de la tablette tactile peut être située sur la Barre des tâches Windows.
Accès/Sortie• Pour accéder à la [barre de tâche Windows], placer le stylet en bas de l'écran.
Cliquer sur l’icône [clavier].• Pour quitter un outil de saisie de texte, cliquer sur la [X] située dans le coin
supérieur droit de l’outil.
Clavier du PM Le clavier du PM sert à saisir les informations relatives au patient par la méthode conventionnelle.
Panneau de saisie de la tablette du PMLe Panneau de saisie de la tablette du PM est un clavier tactile et un écran sur lequel il est possible d’écrire.
• Placer le curseur sur le [champ de texte]. Saisir les lettres ou nombres appropriés sur le clavier ou écrire le texte dans la fenêtre d’entrée de texte.
Pour effacer les informations, cliquer sur Retour arrière (<–).
Informations complémentaires• Consulter les manuels des PC tablette Toshiba Portege M400 sur
www.toshiba.com pour des instructions additionnelles.• Voir la section Réglage et communication ci-dessous pour plus de
renseignements.
Réglage et communication
LEVEL
OFF
MARK
LEVEL
OFF
MARK
DescriptionLe Programmateur du médecin (PM) communique avec le stimulateur par le biais d’une liaison infrarouge vers la télécommande. Il est possible de charger des programmes sur le PM pour visionner, activer et modifier des modèles de stimulation. Les programmes de stimulation peuvent également être sauvegardés sur la télécommande.
Réglage et utilisationAttention : le PM n'est pas un équipement pour l'environnement du patient, comme défini par la norme CEI 60601-1. Le PM et la personne utilisant le PM ne doivent pas être en contact avec le patient pendant la programmation.
• Mettre en [Marche] le PM pour afficher le bureau Neuromodulation.
• Sélectionner l'icône Bionic Navigator™ pour démarrer le logiciel Bionic Navigator HR 1.0.
1. Entrer sur [Écran du médecin] à partir de la télécommande, en appuyant simultanément sur les boutons Zone " et Programme P.
2. Sélectionner le « mode PM ».
• Lorsque la télécommande affiche [PM prêt], pointer la fenêtre IR au sommet de la télécommande vers l’extension IR.
• Positionner le patient à 60 cm de la télécommande pour assurer la communication avec le stimulateur implantable.
Maintenir une voie dégagée entre l'extension IR raccordée au (Programmateur du médecin) et la fenêtre IR de la télécommande.
Utilisation de la télécommande patient (Joystick) • Régler le niveau de stimulation en appuyant sur les boutons de flèches vers le
haut et vers le bas. Pour arrêter ou couper immédiatement la stimulation, appuyer sur le bouton
[ARRÊT].
Informations complémentaires • Un message s'affichera sur le Programmateur du médecin si la distance de
communication n’est pas satisfaisante.
Système
DescriptionL'écran du système donne accès à la sélection du taux maximal du stimulateur, à la sauvegarde de la base de données et des journaux, à l'estimation des positions relatives de la sonde et aux informations du stimulateur.
Accès/Sortie• Pour accéder à « Système », sélectionner [Système] dans le coin supérieur droit
de l'écran et procéder aux réglages.• Pour quitter, cliquer sur [Fermer].
Section 1 Programmateur du médecin
90868740-07 Rév. A 27 sur 84Guide du logiciel Bionic Navigator HR 1.0
frTaux maximal du stimulateurCliquer sur [Paramétrer le taux maximal du stimulateur] pour sélectionner le taux maximal auquel le stimulateur connecté peut fonctionner. Noter que la modification du taux maximal du stimulateur connecté supprimera tous les paramètres et programmes de ce stimulateur.
• Sélectionner le bouton pour le taux maximal souhaité• Taper « ACCELERATE10K » dans le champ du mot de passe.• Pour activer, cliquer sur [Appliquer au stimulateur]
Un message s'affichera indiquant que tous les programmes seront supprimés du stimulateur.
• Cliquer sur [Oui]. Un message s'affichera indiquant que le taux maximal du stimulateur a été mis à jour.
• Pour quitter, cliquer sur [Fermer].Lors de la programmation d'un patient à 1 200 Hz ou une valeur inférieure, paramétrer le taux maximal à 1 200 Hz à l'aide du logiciel Bionic Navigator HR 1.0, puis utiliser le logiciel Bionic Navigator 1.2 pour programmer le patient.
Lors de la programmation d'un patient à une valeur supérieure à 1 200 Hz, paramétrer d'abord le taux maximal approprié à l'aide du logiciel Bionic Navigator HR 1.0, puis programmer le patient avec le même logiciel.
Système • Cliquer sur [Informations du système] pour vérifier les informations du
stimulateur et de la télécommande.Pour créer manuellement un fichier compressé séparé de la base de données et des journaux, cliquer sur [Sauvegarde Données/Journaux]. Pour vérifier les informations du stimulateur et de la télécommande concernant l'identification, le type, la version, la tension de la batterie est l'état, cliquer sur [Informations du système]. Pour afficher les positions relatives de la sonde, cliquer sur [EGL Scan].
Données/journaux de sauvegarde Pour créer un fichier compressé de la base de données et des journaux.
• Insérer le [Support amovible] pour copier la base de données et les journaux.- Ce Support amovible ne devrait pas être étiqueté « CLINIQUE »
• Cliquer sur le bouton [Sauvegarde des données/journaux]- La Base de données est copiée avec succès après apparition du
message• Cliquer sur [OK] pour quitter.
Informations système
• Informations système est disponible uniquement lorsqu’un stimulateur est connecté au Programmateur du médecin.
EGL Scan™
L’image EGL Scan indique les emplacements relatifs des sondes.
• Cliquer sur [EGL Scan] pour afficher l’image. - EGL Scan est disponible uniquement si le stimulateur prend en charge
cette fonction. - L'utilisation de EGL Scan avec un simulateur d'essai externe générera
un message concernant une électrode de patch. Ce message doit être ignoré.
• Si nécessaire, sélectionner le nombre d’échantillons et l’amplitude à utiliser pour EGL Scan avant de lancer EGL Scan.
• Pour imprimer l’image EGL Scan, cliquer sur [Imprimer] ou [Annuler] pour quitter.
Informations complémentairesPour modifier les paramètres du patient, utiliser [Options patient].
Guide du logiciel Bionic Navigator™ HR 1.0
90868740-07 Rév. A 28 sur 84Guide du logiciel Bionic Navigator HR 1.0
fr
Section 2 Cartographie de la douleur et scores VAS
Module graphique
DescriptionLe Module graphique sert à identifier les zones de douleur à l’aide d’une représentation visuelle des zones anatomiques liées au patient. Les zones de douleur peuvent être entrées sur l'écran Profil du patient.
Accès/Sortie• Pour accéder au « Module graphique », sélectionner [Profil].• Pour sauvegarder les informations et quitter, sélectionner [Terminer].
Saisie de douleur• Sélectionner [Profil].
Les zones de douleur (orange) peuvent uniquement être saisies depuis l'écran Profil du patient.
• Cliquer sur [Zones] du module graphique pour indiquer les zones de douleur.
Résolution (RES)• Cliquer sur [RES] pour passer d’une résolution de cartographie faible à élevée, et
vice-versa.
Affichage• Cliquer sur [Affichage] pour basculer d’avant en arrière sur le module
graphique.
Informations complémentaires• Cliquer sur le bouton VAS pour documenter une échelle visuelle analogue (VAS
ou Visual Analog Scale).
VAS
DescriptionL’écran VAS documente le niveau actuel de douleur d’un patient avec la stimulation soit activée soit désactivée. Bionic NavigatorTM consignera l'état de la stimulation (activée ou désactivée) au moment de l’enregistrement. Le dernier score sera affiché dans le bouton d'accès au score VAS ; le rouge indiquant une stimulation à l'arrêt (sans traitement) et le bleu indiquant une stimulation en marche (avec traitement). Un rapport comparatif peut être créé si les scores VAS sont enregistrés avec une stimulation à l'arrêt et une stimulation en marche.
Accès/Sortie• Pour accéder à l'échelle visuelle analogue, sélectionner VAS dans Profil ou
Télécommande.• Pour quitter VAS, cliquer sur [OK] pour enregistrer les informations ou sur
[Annuler].
Scores• Faire glisser le curseur jusqu’au [point numérique] à l’écran, ou cliquer sur ce
point, qui reflète le niveau actuel de la douleur du patient, avec la stimulation activée ou désactivée.
Un score de 0 indique une douleur nulle. Un score de 10 indique la douleur la plus élevée possible.
Informations complémentaires• La valeur VAS affichée correspond au dernier score VAS saisi lors de la session.• Cliquer sur Rapports pour voir l’historique de VAS.• Le dernier score VAS consigné lors d’une session est enregistré dans la base de
données comme le score de cette session.
Section 3 Fichiers patient
90868740-07 Rév. A 29 sur 84Guide du logiciel Bionic Navigator HR 1.0
fr
Section 3 Fichiers patient
Observations médicales
DescriptionObservations médicales affiche les visites du patient, par ordre chronologique.
Accès/Sortie• Pour accéder aux informations des observations médicales, sélectionner
[Profil], puis [Observations médicales].• Pour quitter sélectionner [OK].
Informations complémentaires• Les observations médicales peuvent également être consultées et imprimées
à partir de rapports.• Cliquer sur [Profil] pour accéder aux Notes.• Cliquer sur Démarrer pour accéder à « Objet de la visite ».
Prise en main
DescriptionL’écran de démarrage sert à débuter la session d’un patient. Le mode Programmation à un taux élevé peut être sélectionné à partir de cet écran. Les boutons fonctionnels (situés en haut de chaque écran) donnent accès aux informations du fichier du patient ainsi qu’à d’autres fonctionnalités du système.
Accès/Sortie• L’écran de démarrage s’ouvre lors du démarrage du logiciel Bionic NavigatorTM
HR 1.0 ou lorsque [Démarrer] est sélectionné dans le coin supérieur droit d’un écran quelconque.
• Pour quitter, sélectionner [n'importe quel bouton] sur l’écran ou fermer Bionic Navigator.
Nom du patient• Pour saisir les informations relatives au patient, sélectionner la flèche vers le
bas dans le champ [Nom du patient], sélectionner ensuite le patient approprié depuis la liste alphabétique ou sélectionner [Nouveau patient] ce qui affichera automatiquement Profil.
Objet de la visite• Cliquer sur le champ [Objet de la visite], puis sélectionner une entrée.
Informations complémentaires• Cliquer sur Télécommande pour accéder aux programmes de patient stockés sur
la télécommande.• Cliquer sur Rapports pour personnaliser un rapport de patient ou clinique.• Cliquer sur Démarrer pour redémarrer la session.• Cliquer sur Profil pour saisir ou afficher des informations de patient.• Cliquer sur Programmation pour créer ou modifier des programmes.
Notes
DescriptionL’écran Notes sert à saisir les informations pertinentes qui seront stockées. Elles pourront ensuite être consultées chronologiquement dans l'historique du patient.
Accès/Sortie• Pour accéder au « Notes », sélectionner [Profil], puis [Notes].
- Saisir les notes sur le patient via le clavier du PM ou les options du panneau de saisie de la tablette du PM.
• Pour quitter, sélectionner [OK] ou [Annuler] pour revenir à l’écran Profil.
Informations complémentaires• Les notes en cours sont modifiables.• Les notes antérieures sont en lecture seule uniquement.• Cliquer sur Observations médicales pour voir les notes antérieures ou aller dans
Rapports.
Profil du patient
DescriptionL’écran Profil permet de saisir ou de modifier des informations requises pour générer ou mettre à jour le dossier du patient. Cet écran permet à l’utilisateur de saisir, d’afficher ou de modifier les éléments suivants : Informations d’identification du patient, Coordonnées du patient, Zones de douleur, un score VAS, Notes et Informations des Observations médicales.
Accès• Pour accéder au « Profil du patient », sélectionner [Profil] dans le coin supérieur
droit d'un écran quelconque.• Pour entrer un nouveau patient depuis l’écran de démarrage, cliquer sur le menu
déroulant depuis le champ [nom du patient] et sélectionner [nouveau patient] dans la liste.
Guide du logiciel Bionic Navigator™ HR 1.0
90868740-07 Rév. A 30 sur 84Guide du logiciel Bionic Navigator HR 1.0
fr• Ceci va automatiquement ouvrir l’écran Profil pour saisir les informations du
nouveau patient, une fois terminé, on revient à l’écran de démarrage.• Pour afficher ou modifier le fichier d’un patient existant depuis l’écran de
démarrage, cliquer sur le menu déroulant depuis le champ [nom du patient] et sélectionner le patient dans la liste. Cliquer ensuite sur Profil dans le coin supérieur droit de l’écran de démarrage.
Saisir et modifier des informations relatives au patient1. Saisir les informations à l’aide de la saisie de texte, du clavier du PM ou
du panneau de saisie de la tablette du PM.2. Cliquer sur [Terminer] pour sauvegarder les informations et revenir
à l’écran de démarrage.
Informations complémentaires• Les champs nom du patient et date de naissance sont obligatoires.• Cliquer sur Module graphique pour identifier et documenter les zones de douleur
du patient.• Cliquer sur VAS pour documenter le niveau d’intensité de la douleur, puis cliquer
sur OK.• Cliquer sur Notes pour saisir des commentaires dans le dossier du patient.• Cliquer sur Observations médicales pour voir les informations du fichier du
patient, y compris l’historique des visites et les notes.
Section 4 Équipement du patient
90868740-07 Rév. A 31 sur 84Guide du logiciel Bionic Navigator HR 1.0
fr
Section 4 Équipement du patient
Associations et réinitialisations
LEVEL
OFF
MARK
LEVEL
OFF
MARK
DescriptionL'association est le terme propre à Boston Scientific en ce qui concerne la programmation de la télécommande pour qu’elle communique avec un stimulateur particulier et la définition du programme de traitement partagé par les équipements. La réinitialisation décrit le processus d’effacement des programmes stockés au préalable dans une télécommande et/ou un stimulateur d’essai.
Utilisation• Une nouvelle télécommande peut être associée au nouveau stimulateur d'essai,
équipée d'un « programme » préliminaire par le Programmateur du médecin au cours de l'opération et délivrée au patient.
• Une télécommande associée à un stimulateur d'essai mais conservée à la clinique doit être déconnectée du stimulateur d'essai avant qu'elle ne puisse être utilisée avec un autre stimulateur d'essai ou un GIP. Pendant qu'elle sera en train d'être associée au nouvel appareil, la télécommande vous demandera une décision concernant la réinitialisation de l'équipement.
TélécommandeLe fait d'associer une télécommande non associée va automatiquement afficher son état lors de la pression d'un quelconque bouton. Appuyer sur Programme P sur la télécommande pour initier une association avec un stimulateur dans la plage télémétrique :
• La télécommande va identifier l'équipement cible et déterminer l'état de programmation du stimulateur.
• La télécommande va comparer son état de programmation avec celui du simulateur et demandera de choisir l’'un des programmes, le cas échéant.
• Si le programme favori est sur la télécommande, il faudra saisir le mot de passe du médecin avant de télécharger des programmes depuis la télécommande.
• Si ni la télécommande, ni le stimulateur ne disposent de programmes stockés, l’association est immédiate.
DéconnexionAppuyer et maintenir enfoncé les boutons Zone " et Programme P sur la télécommande pendant environ trois secondes pour accéder à l’écran Entrer Options du médecin.
• Depuis l'écran Entrer Options du médecin, sélectionner « Pour annuler l'association ».
• À l'invite, saisir le mot de passe du médecin. La télécommande désassociée affichera immédiatement son état. Il est possible d'associer immédiatement à nouveau ou d'appuyer sur " pour remettre l'association à plus tard.
Réinitialisations depuis le Programmateur du médecin• Brancher la clé IR/l'extension USB dans le port USB et glisser la télécommande
dans sa poche. • Positionner la fenêtre IR de la télécommande en face de celle de la clé IR. • Entrer dans l'[Écran du médecin] si nécessaire, sur la télécommande. • Le message « PM prêt » s’affichera.
Guide du logiciel Bionic Navigator™ HR 1.0
90868740-07 Rév. A 32 sur 84Guide du logiciel Bionic Navigator HR 1.0
fr
Section 5 Programmation et adaptation au patient
Programmation à un taux élevé
DescriptionL’écran Programmation affiche les paramètres de stimulation actifs et permet de programmer des anodes, des cathodes et des paramètres. Lors de l’entrée dans l’écran Programmation, les paramètres de stimulation actifs s’affichent.
Accès/Sortie• Pour accéder à « Programmation à un taux élevé », sélectionner [Manuel] au
bas et au centre de l'écran.• Sélectionner [Suivant] pour aller à la Télécommande, là où il sera possible de
sauvegarder le programme sur la télécommande.
Programmation• Définir des électrodes pour la zone sélectionnée en cliquant sur [électrode
souhaitée].Cliquer sur [Électrodes] pour affecter la polarité. La polarité des électrodes peut prendre les valeurs : OFF, anode (+) et cathode (-).
• Seules une anode et une cathode peuvent être programmées.• Pour arrêter et démarrer toutes les stimulations, utiliser [Interrupteur Marche/
Arrêt de stimulation] situé dans le coin inférieur gauche.• Régler l’amplitude, la fréquence et la durée d’impulsion en cliquant sur la
flèche appropriée.• Cliquer sur les flèches haut et bas de l’amplitude pour l’augmenter ou la diminuer
par incrément. Les incréments de variation d’amplitude dépendent de la flèche choisie. Pour les fréquences permettant un incrément de 0,1 mA, les flèches simples permettent d'augmenter/diminuer par incrément de 0,1 mA et les doubles flèches permettent d'augmenter/diminuer par incrément de 0,2 mA. Pour les fréquences permettant un incrément de 0,2 mA, les flèches simples permettent d'augmenter/diminuer par incrément de 0,2 mA et les doubles flèches permettent d'augmenter/diminuer par incrément de 0,4 mA.
Options
DescriptionL'écran Options patient permet l'affichage et la modification de paramètres de programme supplémentaires pour un patient, comme par exemple : le cycle de stimulation, la durée de montée et l'amplitude minimale et maximale.
Accès/Sortie• Pour accéder aux options, sélectionner [Télécommande] puis [Options patient].• Pour sauvegarder les paramètres, cliquer sur [OK].
CycleLa sélection Cycle détermine les durées d'arrêt et de marche de la stimulation.
• Cocher la case « Cycle » et régler les durées Marche et Arrêt.
Durée de montéeLa durée de montée est la durée au cours de laquelle la stimulation passe de zéro à l'amplitude programmée.
• Paramétrer la durée de montée.
Min mA
Paramétrer Min mA pour définir la limite inférieure de l'amplitude de la stimulation. La valeur Min mA est appliquée au programme en cours.
Max mAParamétrer Max mA pour définir la limite supérieure de l'amplitude de la stimulation. La valeur Max mA est appliquée au programme en cours.
Télécommande
DescriptionL'écran Télécommande affiche les programmes stockés sur la télécommande du patient, lesquels peuvent être activés, prévisualisés ou supprimés. Les programmes peuvent également être sauvegardés sur la télécommande depuis cet écran.
Options patientDe plus, il existe des options permettant de verrouiller les commandes de fréquence et de durée d’impulsion sur la télécommande. Les options sélectionnées sont téléchargées sur la télécommande. La sélection de verrouillage autorise ou interdit l'accès aux commandes de fréquence et de durée d’impulsion de la télécommande par le patient.
• Cocher/décocher la case appropriée pour interdire/autoriser l'accès aux commandes de fréquence et de durée d’impulsion de la télécommande.
Accès/Sortie• Pour accéder à la « Télécommande », sélectionner [Télécommande] dans le
coin inférieur droit d'un écran quelconque.• Pour quitter la « Télécommande » et revenir à l'écran de démarrage, cliquer sur
[Terminer]. • Pour revenir à l’écran précédent, sélectionner [Retour].
Sauvegarde d'un programme sur la télécommandeLe programme actif (en cours de stimulation) peut être sauvegardé dans un des quatre emplacements de programme de la télécommande.
• Cliquer sur l'[emplacement de programme] souhaité puis sélectionner [Enregistrer dans]. Le programme actif va être sauvegardé dans l'emplacement de programme sélectionné. Si les quatre emplacements de la télécommande sont pleins, sélectionner le programme à écraser par le nouveau puis sélectionner [Enregistrer dans].
[] indique le dernier programme activé ou sauvegardé.
Section 5 Programmation et adaptation au patient
90868740-07 Rév. A 33 sur 84Guide du logiciel Bionic Navigator HR 1.0
frActivation d'un programme depuis l'écran de la télécommandeLe bouton Activer prend le programme sélectionné dans la télécommande et lance la stimulation, remplaçant le programme de stimulation en cours.
• Sélectionner l'[emplacement de programme] souhaité et cliquer sur [Activer] ou [Activer (Sans stim.)].
[Activer (Sans stim.)] active un programme avec la stimulation coupée.• Pour modifier le programme :
Aller dans [Programmation], apporter des modifications, puis les sauvegarder sur la télécommande.
AperçuAvant d'écraser le programme de stimulation en cours avec un programme de télécommande, il est possible de prévisualiser un programme de la télécommande. Cliquer sur [Aperçu]. Le programme de stimulation en cours sera arrêté et le programme sélectionné sera temporairement activé jusqu'à ce qu'il soit cliqué sur [Fin de l'aperçu]. Lorsque l'on clique sur [Fin de l'aperçu], le programme d'origine est activé. Cette fonction vous permet de déterminer le programme de la télécommande à écraser lorsque tous les emplacements sont occupés.
• Cliquer sur l'[emplacement de programme] souhaité depuis la télécommande et sélectionner [Aperçu].
• Cliquer sur [Fin de l'aperçu] pour revenir au programme précédemment actif.
Supprimer• Cliquer sur [Emplacement de programme].• Sélectionner [Supprimer] pour effacer ce programme de la télécommande.
Informations complémentaires• Cliquer sur [Options patient] pour modifier les verrouillages.• Cliquer sur [VAS] pour documenter les niveaux de douleur.
Interrupteur Marche/Arrêt de stimulation
DescriptionLe bouton Marche/Arrêt de stimulation va arrêter et lancer une stimulation. Une fois lancée, la stimulation va s'accroître pour atteindre les niveaux d'amplitude stockés pour les paramètres du programme actif.
Utilisation• Cliquer sur le bouton rouge [Arrêt] situé dans le coin inférieur gauche de tous les
écrans pour arrêter la stimulation.• Cliquer sur le bouton vert [Marche] pour relancer la stimulation.
Guide du logiciel Bionic Navigator™ HR 1.0
90868740-07 Rév. A 34 sur 84Guide du logiciel Bionic Navigator HR 1.0
fr
Section 6 Rapports
DescriptionL’écran Rapports sert à créer un rapport clinique ou relatif au patient. En sélectionnant différentes options pour des groupes ou patients individuels, l’utilisateur peut créer, afficher, imprimer, exporter ou fermer des informations de la base de données. Les rapports peuvent être générés par type et chacun peut être personnalisé à l'aide de filtres de tri.
Accès/Sortie• Pour accéder au rapports, sélectionner [Rapports] dans le coin supérieur droit
d'un écran quelconque.• Pour quitter, sélectionner [Terminer].
Impression et exportation• Sélectionner un [Type de rapport].
Informations relatives au patientInformations sur le patient, informations cliniques, informations matérielles, paramètres de stimulation, informations de profil, utilisation de la pile, observations médicales et notes sur le patient, pour différents intervalles de temps.
Inventaire patientDernière visite, numéro de série, date d'implantation et médecin.
Résultats cliniquesImplant, dernière visite, médecin, diagnostic, pourcentages et moyennes, durée de l'implant, âge moyen, remplacements, retraits, révisions et scores VAS moyens.
Activité cliniqueDernière visite, médecin et suivis du patient. Peut comprendre les reprogrammations, les implants de sonde, le nombre total de patients, les durées moyennes et les durées totales.
Rapport génériqueProgrammes, mesure de seuil, impédances, profil d'utilisation de pile, profil d'utilisation de programme, historique du patient, configuration de sonde. Ces paramètres sont, entre autres : zone de liste déroulante de patient (sélectionner par nom de patient), date de début, date de fin ainsi qu'une case à cocher pour afficher les résultats par ordre croissant/décroissant.
• Cliquer sur [Créer un rapport] puis sélectionner Imprimer ou Exporter.
Section 7 Test
90868740-07 Rév. A 35 sur 84Guide du logiciel Bionic Navigator HR 1.0
fr
Section 7 Test
Impédance
DescriptionLe bouton Impédance sert à contrôler l'intégrité électrique. L'impédance de la sonde est mesurée et affichée pour chacun des 16 contacts d'électrodes du GIP. Une impédance supérieure à 4500 Ω est considérée comme le signe d'un circuit ouvert (fils coupés), phénomène indiqué par une X.
Accès/Sortie• Pour accéder à l'impédance de la sonde, cliquer sur [Ω] à partir de l'écran
Programmation ou EGL Scan.• Pour effectuer la mesure à nouveau, cliquer sur [Mesurer].• Pour quitter, cliquer sur [Fermer].
Informations complémentaires• Même si des X indiquent des impédances anormalement élevées, ces électrodes
peuvent toujours être comprises dans la configuration de stimulation.• Toutes les impédances mesurées sont sauvegardées dans la base de données.
Guide du logiciel Bionic Navigator™ HR 1.0
90868740-07 Rév. A 36 sur 84Guide du logiciel Bionic Navigator HR 1.0
fr
La page a volontairement été laissée vide.
90868740-07 Rev A 37 von 84Bionic Navigator HR 1.0 Softwarehandbuch
Kapitel 4 Patientenhardware ................................................................................................................................. 43Verbindungen und Zurücksetzen ................................................................................................................................................43
Kapitel 5 Programmieren und Patienteneinstellung ............................................................................................ 44Programmierung der hohen Frequenz ........................................................................................................................................44Optionen .....................................................................................................................................................................................44Fernbedienung ............................................................................................................................................................................44Stimulation-Hauptschalter ...........................................................................................................................................................45
Hinweis: Eine Liste der Indikationen, Kontraindikationen, Warnhinweise, Vorsichtsmaßnahmen und Nebenwirkungen im Zusammenhang mit der Verschreibung des PrecisionTM SCS Systems mit MultiWave-Technologie zur Schmerztherapie finden Sie im Precision SCS System mit MultiWave-Technologie Ärztehandbuch.
Bionic Navigator™ HR 1.0 Softwarehandbuch
90868740-07 Rev A 38 von 84Bionic Navigator HR 1.0 Softwarehandbuch
de
Kapitel 1 Clinician Programmer
Texteingabe
BeschreibungZur Erleichterung der Dateneingabe gibt es Möglichkeiten zur Texteingabe. Es gibt zwei Methoden zur Eingabe von Daten zu den Profilen von Patienten und zur Eingabe von Anmerkungen zu den Patienten mittels der CP-Tastatur und des Eingabefelds des Tablet-PC. Das Symbol zur Texteingabe mithilfe des Tablet-PC befindet sich in der Windows-Taskleiste.
Zugriff/Verlassen• Um auf die [Windows-Taskleiste] zuzugreifen, müssen Sie den Stift über den
Bereich ganz unten auf dem Bildschirm bewegen. Klicken Sie auf das Tastenfeld [Symbol].
• Zum Verlassen des Texteingabetools klicken Sie auf das [X] in der rechten Ecke des Tools.
Die CP-Tastatur Die CP-Tastatur dient zur Eingabe von Patientendaten auf die konventionelle Weise.
Eingabefeld des Tablet-PCDas Eingabefeld des Tablet-PC besteht aus einer Tastatur zum Berühren und einem Fenster zum Schreiben.
• Klicken Sie zunächst mit dem Mauszeiger in das [Textfeld]. Geben Sie dann die entsprechenden Buchstaben oder Ziffern über das Tastenfeld ein oder schreiben Sie den Text in das Texteingabefeld.
Zum Löschen von Informationen, klicken Sie auf die Rücktaste (<–).
Zusatzangaben• Weitere Anweisungen finden Sie in den Handbüchern zur Toshiba Portege
M400 Tablet-PC Serie unter www.toshiba.com.• Im Kapitel Einrichtung und Kommunikation finden Sie nachstehend ebenfalls
weitere Informationen.
Einrichtung und Kommunikation
LEVEL
OFF
MARK
LEVEL
OFF
MARK
BeschreibungDer Clinician Programmer (CP) ist mit dem Stimulator über eine Infrarotverbindung zur Fernbedienung verbunden. Dabei können Programme auf den CP geladen werden, die eine Vorschau, Aktivierung oder Änderung der Stimulationsmuster ermöglichen. Die Stimulationsprogramme können auch auf der Fernbedienung gespeichert werden.
Einrichtung und BetriebVorsicht: Das CP ist kein Gerät für die Patientenumgebung gemäß IEC 60601-1. Das CP und die Person, die das CP bedient, sollten beim Programmieren nicht mit dem Patienten in Kontakt kommen.
• Schalten Sie den CP mit [ON] ein, um den Neuromodulation-Desktop anzuzeigen.
• Wählen Sie das Symbol Bionic Navigator™ , um die Bionic Navigator HR 1.0 Software zu starten.
1. Öffnen Sie den [Clinician’s screen] (Arztbildschirm) auf der Fernbedienung, indem Sie gleichzeitig die Bereichstaste " und die Programmtaste P drücken.
2. Wählen Sie den „CP Mode“ (CP-Modus) aus.
• Wenn auf der Fernbedienung [CP Ready] (CP bereit) angezeigt wird, können Sie den IR-Sensor oben an der Fernbedienung auf die IR-Antenne richten.
• Der Patient darf sich nicht weiter als sechzig Zentimeter von der Fernbedienung entfernt befinden, damit die Verbindung zum implantierten Stimulator nicht unterbrochen wird.
Der Weg zwischen der IR-Antenne am Clinician Programmer und dem IR-Sensor der Fernbedienung sollte hindernisfrei sein.
Verwenden des Patienten-Controllers (Joystick) • Passen Sie die Stimulationsstufe durch Drücken der Aufwärts- und Abwärts-
Pfeiltasten an. Zum sofortigen Stoppen der Stimulation drücken Sie die Taste [OFF] (AUS).
Zusatzangaben • Bei unzureichender Verbindung wird im Clinician Programmer eine
entsprechende Meldung angezeigt.
System
BeschreibungDer Bildschirm System ermöglicht das Auswählen der maximalen Stimulatorfrequenz, Sicherungs-Datenbank und Protokolle, das Abschätzen der relativen Elektrodepositionen und den Zugang zu Stimulatorinformationen.
Kapitel 1 Clinician Programmer
90868740-07 Rev A 39 von 84Bionic Navigator HR 1.0 Softwarehandbuch
deZugriff/Verlassen
• Klicken Sie für den Zugriff auf „System“ einfach auf [System] oben rechts im Bildschirm und nehmen Sie die Anpassungen vor.
• Zum Verlassen klicken Sie auf [Close] (Schließen).
Maximale StimulatorfrequenzKlicken Sie auf [Set Stimulator Maximum Rate] (Maximale Stimulatorfrequenz einstellen), um die maximale Frequenz einzustellen, mit der der Stimulator arbeiten soll. Bitte beachten Sie, dass alle Einstellungen und Programme vom Stimulator gelöscht werden, wenn die maximale Frequenz des angeschlossenen Stimulators geändert wird.
• Wählen Sie die Optionsschaltfläche für die gewünschte maximale Frequenz.• Geben Sie das Kennwort „ACCELERATE10K“ in das Kennwortfeld ein.• Zum Aktivieren klicken Sie auf [Apply to Stimulator] (Auf Stimulator anwenden).
Es wird eine Meldung angezeigt, die besagt, dass alle Programme vom Stimulator gelöscht werden.
• Klicken Sie auf [Yes] (Ja). Es wird eine Meldung angezeigt, die besagt, dass die maximale Stimulatorfrequenz aktualisiert wurde,
• Zum Verlassen klicken Sie auf [Close] (Schließen).Stellen Sie beim Programmieren eines Patienten auf 1.200 Hz oder weniger erst die maximale Frequenz mithilfe der Bionic Navigator HR 1.0 Software auf 1.200 Hz ein und verwenden Sie anschließend die Bionic Navigator 1.2 Software, um den Patienten zu programmieren.
Stellen Sie beim Programmieren eines Patienten auf über 1.200 Hz erst die maximale Frequenz mithilfe der Bionic Navigator HR 1.0 Software ein und programmieren Sie den Patienten anschließend mit der gleichen Software.
System • Klicken Sie auf [System Info] (Systeminfos), um die Angaben zum Stimulator und
zur Fernbedienung zu überprüfen.Um eine separate, komprimierte Datei der Datenbank und Protokolle zu erstellen, klicken Sie auf [Backup Data/Logs] (Sicherungsdaten/Protokolle). Um die Angaben zum Stimulator und zur Fernbedienung im Hinblick auf Identifizierung, Typ, Version, Akkuspannung und -status zu überprüfen, klicken Sie auf [System Info] (Systeminfos). Um die relativen Elektrodepositionen anzuzeigen, klicken Sie auf [EGL Scan].
Sicherungsdaten/Protokolle So erstellen Sie eine komprimierte Datei aus Datenbank und Protokollen (Logs).
• Legen Sie zunächst einen [Wechseldatenträger] zum Kopieren von Datenbank und Protokollen ein.
- Dieser Wechseldatenträger sollte dabei nicht mit „KLINIK“ benannt werden.• Klicken Sie auf die Schaltfläche Backup Data/Logs (Sicherungsdaten/Protokolle).
- Das erfolgreiche Kopieren einer Datenbank wird durch eine entsprechende Meldung bestätigt.
• Zum Schließen auf [OK] klicken.
Systeminformationen
• Systeminformationen stehen Ihnen nur zur Verfügung, wenn ein Stimulator an das Klinische Programmiergerät angeschlossen ist.
EGL Scan™
Bei einem EGL Scan handelt es sich um ein Bild als Anzeige der relativen Positionen von Elektroden.
• Mit [EGL Scan] haben Sie Zugriff auf das Bild. - Der EGL Scan ist nur verfügbar, wenn er vom Stimulator unterstützt wird. - Durch die Verwendung von EGL Scan mit einem externen Teststimulator
wird eine Eingabeaufforderung für eine Pflasterelektrode angezeigt. Diese Eingabeaufforderung ist zu ignorieren.
• Optional können Sie auch die Zahl der Muster und die für den EGL Scan zu verwendende Amplitude wählen, ehe Sie einen EGL Scan einleiten.
• Klicken Sie zum Ausdrucken eines EGL Scan-Bildes auf [Print] (Drucken) oder zum Verlassen auf [Cancel] (Abbrechen).
ZusatzangabenZum Ändern der Patienteneinstellungen verwenden Sie die [Patient Options] (Patientenoptionen).
Bionic Navigator™ HR 1.0 Softwarehandbuch
90868740-07 Rev A 40 von 84Bionic Navigator HR 1.0 Softwarehandbuch
de
Kapitel 2 Schmerzlokalisierung und VAS-Ergebnisse
Grafikmodul
BeschreibungDas Graphic Module (Graphikmodul) dient der Erkennung von Schmerzbereichen mithilfe einer visuellen Darstellung der anatomischen Abdeckungsbereiche in Relation zum Patienten. Schmerzbereiche können auf dem Bildschirm Patient Profile (Patientenprofil) angezeigt werden.
Zugriff/Verlassen• Für den Zugriff auf das „Graphic Module“ (Graphikmodul) wählen Sie [Profile]
(Profil).• Zum Speichern von Informationen und zum Schließen klicken Sie auf [Finish]
(Fertig stellen).
Schmerzeingabe• Klicken Sie auf [Profile] (Profil).
Bereiche mit Schmerz sind orange und können nur über den Bildschirm Patient Profile (Patientenprofil) eingegeben werden.
• Klicken Sie unter Graphic Module (Grafikmodul) auf [Regions] (Bereiche), um Schmerzbereiche einzugeben.
Auflösung (RES)• Mit [RES] (Auflösung) schalten Sie zwischen hoher und niedriger Auflösung der
Abbildungen hin und her.
Ansicht• Mit [VIEW] (Ansicht) schalten Sie zwischen Vorder- und Rückansicht im
Grafikmodul um.
Zusatzangaben• Durch Anklicken der Schaltfläche VAS dokumentieren Sie eine Visuell-analoge
Skalierung.
VAS
BeschreibungDer Bildschirm VAS zeigt das aktuelle Schmerzniveau eines Patienten bei ein- oder ausgeschalteter Stimulation („On“ oder „Off“). Der Bionic NavigatorTM merkt sich, ob zum Zeitpunkt der Ergebnisaufzeichnung die Stimulation „On“ oder Off“ (ein- oder ausgeschaltet) ist. Das letzte Ergebnis wird auf der VAS-Zugriffsschaltfläche angezeigt; rot bedeutet, dass die Stimulation ausgeschaltet ist (ohne Therapie), und blau bedeutet, dass die Stimulation eingeschaltet ist (mit Therapie). Wenn die VAS-Ergebnisse mit ein- und ausgeschalteter Stimulation aufgezeichnet werden, kann ein vergleichender Bericht erstellt werden.
Zugriff/Verlassen• Für den Zugriff auf die Visuell-analoge Skalierung wählen Sie VAS in den
Menüs Profile (Profil) oder Remote (Fernbedienung).• Zum Verlassen der VAS und zum Speichern der Angaben klicken Sie auf [OK]
und zum Schließen ohne Speichern auf [Cancel] (Abbrechen).
Ergebnisse• Schieben Sie den Regler bzw. klicken Sie auf den [Zahlenwert] auf dem
Bildschirm, der dem aktuellen Schmerzniveau des Patienten bei ein- oder abgeschalteter Stimulation [On] oder [Off] entspricht.
Ein Ergebnis von 0 entspricht Schmerzfreiheit. Ein Ergebnis von 10 entspricht dem größtmöglichen Schmerz.
Zusatzangaben• Die angezeigte VAS entspricht den zuletzt eingetragenen VAS-Ergebnissen für
die Sitzung.• Über Reports (Berichte) können Sie den VAS-Verlauf einsehen.• Das letzte in der Sitzung aufgenommene VAS-Ergebnis wird in der Datenbank als
Ergebnis dieser Sitzung gespeichert.
Kapitel 3 Patientendaten
90868740-07 Rev A 41 von 84Bionic Navigator HR 1.0 Softwarehandbuch
de
Kapitel 3 Patientendaten
Fallverlauf
BeschreibungIm Fallverlauf werden die Patientenaufenthalte in chronologischer Reihenfolge angezeigt.
Zugriff/Verlassen• Zugriff auf den Fallverlauf haben Sie über [Profile] (Profil) und [Case History]
(Fallverlauf).• Mit [OK] schließen Sie den Bildschirm.
Zusatzangaben• Der Fallverlauf kann auch über das Menü Reports (Berichte) eingesehen und
ausgedruckt werden.• Klicken Sie auf Profile (Profil), um Anmerkungen einzugeben.• Klicken Sie auf Start, um den Grund für den Aufenthalt („Reason for Visit“)
aufzurufen.
Erste Schritte
BeschreibungDer Bildschirm Start dient dem Beginn einer Patientensitzung. Auf diesem Bildschirm kann der Programmiermodus „High Rate“ (Hohe Frequenz) ausgewählt werden. Die Funktionsschaltflächen (jeweils oben im Bildschirm) bieten Zugriff auf Informationen aus den Patientendateien und auf andere Systemfunktionen.
Zugriff/Verlassen• Der Bildschirm „Start“ wird geöffnet, wenn die Bionic NavigatorTM HR 1.0
Software gestartet wird oder wenn man auf [Start] oben rechts im Bildschirm klickt.• Zum Verlassen klicken Sie auf eine [beliebige Schaltfläche] im Bildschirm oder
schließen Sie den Bionic Navigator.
Name des Patienten• Um Patientendaten einzugeben, klicken Sie zunächst auf den Pfeil nach unten im
Feld [Patient Name] (Patientenname). Aus der alphabetischen Liste wählen Sie dann entweder den gewünschten Patienten aus oder Sie klicken zum Anlegen eines neuen Patienten auf [New Patient] (Neuer Patient), wodurch automatisch die Option Profile (Profil) aufgerufen wird.
Grund des Aufenthalts• Klicken Sie auf das Feld [Reason for Visit] (Grund des Aufenthalts) und wählen
Sie dann einen passenden Eintrag als Grund des Aufenthalts aus.
Zusatzangaben• Klicken Sie auf Remote (Fernbedienung), wenn Sie auf Programme zugreifen
wollen, die auf der Fernbedienung gespeichert sind.• Klicken Sie zur individuellen Gestaltung von Patienten- oder Klinikberichten auf
Reports (Berichte).• Klicken Sie auf Start, um die Sitzung neu zu starten.• Klicken Sie auf Profile (Profil), um Patienteninformationen einzugeben oder
einzusehen.• Klicken Sie auf Programming (Programmieren), um Programme zu erstellen/
ändern.
Notizen
BeschreibungDer Bildschirm Notes (Notizen) dient der Eingabe wichtiger Informationen, die gespeichert werden und dann in chronologischer Reihenfolge im Fallverlauf des Patienten eingesehen werden können.
Zugriff/Verlassen• Zum Aufrufen der „Notes“ (Notizen) müssen Sie zunächst auf Profile (Profil) und
dann auf [Notes] (Notizen) klicken.- Die Eingabe von Patientenhinweisen erfolgt entweder über die
CP-Tastatur oder über eine der Optionen des Eingabefelds des Tablett-PC.
• Mit [OK] oder [Cancel] (Abbrechen) kehren Sie zum Bildschirm Profile (Profil) zurück.
Zusatzangaben• Aktuelle Hinweise können bearbeitet werden.• Ältere Hinweise sind schreibgeschützt.• Um ältere Hinweise einzusehen, müssen Sie entweder auf Case History
(Fallverlauf) klicken oder die Option Reports (Berichte) aufrufen.
Patientenprofile
BeschreibungDer Bildschirm Profile (Profil) ist der Bereich, in den Informationen eingegeben oder in dem Informationen bearbeitet werden, die zum Erstellen oder Aktualisieren einer Patientenakte benötigt werden. In diesem Bildschirm kann man Patientenkenndaten, Patientenkontaktdaten, Schmerzbereiche, VAS- Ergebnisse, Notizen und den Fallverlauf eingeben, anzeigen oder bearbeiten.
Bionic Navigator™ HR 1.0 Softwarehandbuch
90868740-07 Rev A 42 von 84Bionic Navigator HR 1.0 Softwarehandbuch
deZugriff
• Um auf das „Patient Profile“ (Patientenprofil) zugreifen zu können, klicken Sie zunächst auf [Profile] (Profil) oben rechts auf dem Bildschirm.
• Um einen neuen Patienten vom Bildschirm Start aus einzugeben, klicken Sie zunächst auf das Dropdownmenü des Felds [patient name] (Patientenname) und wählen Sie dann aus der ausgeklappten Liste die Option [new patient] (Neuer Patient).
• Dadurch gelangen Sie automatisch zum Bildschirm Profile (Profil), wo Sie neue Patientendaten eingeben können und nach Abschluss zum Bildschirm Start zurück gelangen.
• Um einen neuen Patienten vom Bildschirm Start einzusehen oder zu bearbeiten, klicken Sie zunächst auf das Dropdownmenü des Felds [Patient Name] (Patientenname) und wählen Sie dann aus der ausgeklappten Liste einen bereits vorhandenen Patienten. Klicken Sie dann auf Profile (Profil) oben rechts im Bildschirm Start.
Eingeben und Bearbeiten von Patientendaten1. Die Eingabe der Daten erfolgt über Texteingabe, CP-Tastatur oder
Eingabefeld des Tablet-PC.2. Klicken Sie auf [Finish] (Fertig stellen), um die Daten zu speichern und zum
Bildschirm „Start“ zurückzukehren.
Zusatzangaben• Patientenname und Geburtsdatum sind Pflichtfelder.• Klicken Sie auf das Graphic Module (Grafikmodul), um Schmerzbereiche beim
Patienten zu finden und zu dokumentieren.• Klicken Sie auf VAS, um die Schmerzintensität zu dokumentieren und wählen Sie
anschließend OK.• Klicken Sie auf Notes (Notizen), um Kommentare und Notizen in die
Patientenakte einzugeben.• Klicken Sie auf Case History (Fallverlauf), um die Daten aus der Patientendatei
einschließlich des Aufenthaltsverlaufs und der Notizen einzusehen.
Kapitel 4 Patientenhardware
90868740-07 Rev A 43 von 84Bionic Navigator HR 1.0 Softwarehandbuch
de
Kapitel 4 Patientenhardware
Verbindungen und Zurücksetzen
LEVEL
OFF
MARK
LEVEL
OFF
MARK
BeschreibungLinking (Verbinden) ist bei Boston Scientific der Fachbegriff für das Programmieren einer Fernbedienung auf einen bestimmten Stimulator und das Festlegen des Behandlungsprogramms, das beide Geräte gemeinsam verwenden werden. Zurücksetzen beschreibt den Vorgang des Löschens zuvor gespeicherter Programme von einer klinischen Fernbedienung bzw. einem Teststimulator.
Betrieb• Eine neue Fernbedienung kann mit einem neuen Teststimulator verbunden,
während der OP über den Clinician Programmer mit einem vorläufigen „Programm“ geladen und dem Patienten ausgehändigt werden.
• Eine Fernbedienung, die mit einem Teststimulator verbunden ist, aber in der Klinik verbleibt, muss vom Teststimulator getrennt werden, bevor sie mit einem anderen Teststimulator oder mit einem IPG verwendet werden kann. Während der Verbindung mit einem neuen Gerät werden Sie von der Fernbedienung nach der Rücksetzung der Geräte gefragt.
FernbedienungBeim Linking (Verbindungsherstellung) einer bislang noch nicht verbundenen Fernbedienung wird automatisch der Status angezeigt, wenn eine Taste gedrückt wird. Drücken Sie die Programmtaste P auf der Fernbedienung, um eine Verbindung zu einem in Telemetriereichweite befindlichen Stimulator herzustellen:
• Die Fernbedienung identifiziert das Zielgerät und bestimmt den programmierten Status des Stimulators.
• Die Fernbedienung vergleicht ihren programmierten Status mit dem des Stimulators und fordert Sie gegebenenfalls zur Auswahl eines der beiden Programme auf.
• Wenn es sich bei dem von Ihnen gewählten Programm um das der Fernbedienung handelt, müssen Sie zuerst das Arztkennwort eingeben, ehe Sie Programme von der Fernbedienung herunterladen können.
• Wenn weder auf der Fernbedienung noch auf dem Stimulator Programme gespeichert sind, erfolgt die Verbindung sofort.
EntkoppelnHalten Sie die Taste Area " (Bereich) und die Programmtaste P auf der Fernbedienung ca. drei Sekunden gedrückt, um den Bildschirm Enter Clinician Options (Eingabe der Klinikoptionen) zu öffnen.
• Im Bildschirm Enter Clinician Options (Eingabe der Klinikoptionen) klicken Sie dann auf „To Clear Link“ (Link löschen).
• In die Eingabemaske geben Sie anschließend das Arztkennwort ein. Eine Fernbedienung ohne Verbindung zeigt sofort ihren Status an. Sie können sofort eine neue Verbindung herstellen oder das Linking durch Drücken von " verschieben.
Zurücksetzen des Klinischen Programmiergeräts• Schließen Sie den IR-Dongle/USB-Stecker an den USB-Anschluss an und
stecken Sie die Fernbedienung in die dafür vorgesehene Aufnahme. • Richten Sie das IR-Feld der Fernbedienung am IR-Feld des Dongles aus. • Rufen Sie gegebenenfalls den [Clinician’s screen] (Arztbildschirm) auf der
Fernbedienung auf. • Die Meldung „CP Ready“ (CP bereit) wird angezeigt.
Bionic Navigator™ HR 1.0 Softwarehandbuch
90868740-07 Rev A 44 von 84Bionic Navigator HR 1.0 Softwarehandbuch
de
Kapitel 5 Programmieren und Patienteneinstellung
Programmierung der hohen Frequenz
BeschreibungDer Bildschirm Programming (Programmieren) zeigt die aktiven Stimulationseinstellungen an und ermöglicht die Programmierung der Anoden, Kathoden und Parameter. Sobald der Bildschirm Programming (Programmieren) aufgerufen wird, werden die aktiven Stimulationseinstellungen angezeigt.
Zugriff/Verlassen• Um den Bildschirm „High Rate Programming“ (Programmieren der hohen
Frequenz) aufzurufen, müssen Sie auf [Programming] (Programmieren) unten in der Mitte des Bildschirms klicken.
• Mit [Next] (Weiter) gelangen Sie zum Punkt Remote (Fernbedienung), wo das Programm auf der Fernbedienung gespeichert werden kann.
Programmieren• Legen Sie die Elektroden durch Klicken auf die [gewünschte Elektrode] fest.
Klicken Sie auf [Electrodes] (Elektroden), um eine Polarität zuzuweisen. Die Elektrodenpolarität schaltet zyklisch von OFF (AUS) auf Anode (+) und Kathode (-).
• Es kann nur eine Anode und eine Kathode programmiert werden.• Zum Stoppen und Starten aller Stimulationen benutzen Sie den [Stimulation
Power Button] (Stimulationsschalter) unten links.• [Passen Sie Amplitude, Frequenz und Pulsbreite] durch Anklicken der
entsprechenden Pfeile an.• Durch Anklicken bzw. Gedrückthalten der Aufwärts- und Abwärts-Pfeile der
Amplitude vergrößern/verkleinern Sie die Größe der Amplitudenschritte. Die Größe der Amplitudenschritte variiert je nach der mit den Pfeilen getroffenen Auswahl. Bei Frequenzen, die Schrittgrößen von 0,1 mA erlauben, erfolgt die Vergrößerung/Verringerung mit den einfachen Pfeilen in Schritten von 0,1 mA und mit den Doppelpfeilen in Schritten von 0,2 mA. Bei Frequenzen, die Schrittgrößen von 0,2 mA erlauben, erfolgt die Vergrößerung/Verringerung mit den einfachen Pfeilen in Schritten von 0,2 mA und mit den Doppelpfeilen in Schritten von 0,4 mA.
Optionen
BeschreibungDer Bildschirm Options (Optionen) ermöglicht das Anzeigen und Bearbeiten zusätzlicher Programmeinstellungen für Patienten, u. a. Stimulationszyklus, Anlaufzeit, Minimalamplitude und Maximalamplitude.
Zugriff/Verlassen• Für den Zugriff auf die „Options“ (Optionen) wählen Sie [Programming]
(Programmieren) und anschließend [Options] (Optionen).• Zum Speichern der Parameter klicken Sie auf [OK].
ZyklusDer Cycle (Zyklus) bestimmt Dauer und Abstände der Stimulation.
• Aktivieren Sie das Kontrollkästchen „Cycle“ (Zyklus) und stellen Sie dann mit On (Ein) und Off (Aus) die Dauer ein.
AnlaufzeitDie Anlaufzeit ist die Zeit, während der die Stimulation kontinuierlich von 0 auf die programmierte Amplitude erhöht wird.
• Stellen Sie die Anlaufzeit ein.
Min mA
Stellen Sie Min mA ein, um den unteren Grenzwert der Stärke der Stimulationsamplitude einzustellen. Min mA wird für das aktuelle Programm übernommen.
Max mAStellen Sie Max mA ein, um den oberen Grenzwert der Stärke der Stimulationsamplitude einzustellen. Max mA wird für das aktuelle Programm übernommen.
Fernbedienung
BeschreibungDer Bildschirm Remote Control (Fernbedienung) zeigt die auf der Fernbedienung des Patienten gespeicherten Programme an. Diese können aktiviert, in einer Vorschau betrachtet oder gelöscht werden. Von diesem Bildschirm aus können Programme auch auf der Fernbedienung gespeichert werden.
PatientenoptionenWeiterhin gibt es hier die Möglichkeit, die optionale Änderung von Impulsbreite und Frequenz über die Fernbedienung freizugeben. Die ausgewählten Optionen werden auf die Fernbedienung heruntergeladen. Mit Lockout (Sperrung) wird der Zugriff der Patienten auf die Pulsbreiten- und Frequenzsteuerung der Fernbedienung geregelt oder gesperrt.
• Durch Aktivieren bzw. Deaktivieren der entsprechenden Kontrollkästchen gewähren oder sperren Sie den Zugriff auf die Pulsbreiten- und Frequenzsteuerung der Fernbedienung.
Zugriff/Verlassen• Um auf „Remote Control“ (Fernbedienung) zugreifen zu können, klicken Sie auf
[Remote] (Fernbedienung) unten rechts auf dem Bildschirm.• Zum Schließen des Bildschirms „Remote Control“ (Fernbedienung) und zur
Rückkehr zum Bildschirm „Start“ klicken Sie auf [Finish] (Fertig stellen). • Wenn Sie zum vorigen Bildschirm zurückkehren wollen, klicken Sie auf [Back]
(Zurück).
Kapitel 5 Programmieren und Patienteneinstellung
90868740-07 Rev A 45 von 84Bionic Navigator HR 1.0 Softwarehandbuch
deSpeichern von Programmen auf der FernbedienungDas aktive (aktuell stimulierende) Programm kann auf einen von vier Speicherplätzen auf der Fernbedienung gespeichert werden.
• Klicken Sie auf den gewünschten Programmspeicherplatz und zum Speichern dann auf [Save To] (Speichern unter). Das aktive Programm wird auf dem ausgewählten Programmplatz gespeichert. Wenn auf der Fernbedienung alle vier Speicherplätze belegt sind, wählen Sie zunächst das Programm aus, das mit einem neuen Programm überschrieben werden soll und klicken Sie zum Speichern dann auf [Save To] (Speichern unter).
[] steht für das zuletzt aktivierte oder gespeicherte Programm.
Aktivieren eines Programms über die FernbedienungMit der Schaltfläche [activate] (Aktivieren) wird ein ausgewähltes Programm von der Fernbedienung genommen, aktiviert und damit eine Stimulation eingeleitet, während das aktuelle Stimulationsprogramm ersetzt wird.
• Wählen Sie zunächst den gewünschten [Programmspeicherplatz] aus und klicken Sie dann auf [Activate] (Aktivieren) oder [Activate (Stim off)] ((Stim. aus) aktivieren).
[Activate (Stim off)] ((Stim. aus) aktivieren) aktiviert ein Programm, ohne die Stimulation einzuschalten.
• So ändern Sie ein Programm:Um Anpassungen vorzunehmen, klicken Sie auf [Programming] (Programmieren) und speichern Sie es anschließend auf der Fernbedienung.
VorschauVor dem Überschreiben des aktuell verwendeten Stimulationsprogramms mit einem Programm von der Fernbedienung kann das Programm der Fernbedienung in einer Vorschau angezeigt werden. Klicken Sie dazu auf [Preview] (Vorschau). Das aktuelle Stimulationsprogramm wird angehalten und das ausgewählte Programm so lange aufgerufen, bis Sie die Vorschau mit [End Preview] (Vorschau beenden) beenden. Wenn Sie auf [End Preview] (Vorschau beenden) geklickt haben, wird das zuvor aktive Programm wieder geöffnet. Diese Funktion soll die Entscheidung darüber erleichtern, welches Programm von der Fernbedienung überschrieben werden kann, wenn alle Programmplätze belegt sind.
• Klicken Sie dazu zunächst auf den gewünschten [Programmspeicherplatz] auf der Fernbedienung und dann auf [Preview] (Vorschau).
• Mit [End Preview] (Vorschau beenden) beenden Sie die Vorschau und rufen Sie das zuvor aktive Programm wieder auf.
Löschen• Klicken Sie auf einen freien Programmspeicherplatz.• Um ein Programm von der Fernbedienung zu löschen, wählen Sie [Delete]
(Löschen).
Zusatzangaben• Klicken Sie auf [Patient Options] (Patientenoptionen), um Sperren zu ändern.• Klicken Sie auf [VAS], um die jeweiligen Schmerzniveaus zu dokumentieren.
Stimulation-Hauptschalter
BeschreibungMit der Schaltfläche Stimulation (Stim) Power (Stimulation-Hauptschalter) werden Stimulationen gestartet und gestoppt. Wenn die Stimulation gestartet wurde, wird sie über die Anlaufzeit hinweg kontinuierlich bis zum Erreichen des gespeicherten Niveaus der Amplitude gesteigert.
Betrieb• Klicken Sie auf die rote [Stop] (Stopp)-Schaltfläche unten links im Bildschirm, um
die Stimulation zu stoppen.• Klicken Sie auf die grüne [Turn on] (Einschalten)-Schaltfläche, um die Stimulation
wieder aufzunehmen.
Bionic Navigator™ HR 1.0 Softwarehandbuch
90868740-07 Rev A 46 von 84Bionic Navigator HR 1.0 Softwarehandbuch
de
Kapitel 6 Berichte
BeschreibungDer Bildschirm Report (Bericht) dient der Erstellung von Patienten- oder Klinikberichten. Durch Auswahl verschiedener Optionen für einzelne Patienten oder Gruppen lassen sich Datenbankinformationen erstellen, einsehen, drucken, exportieren oder schließen. Berichte lassen sich nach Typ erstellen und jeder Bericht kann durch Sortierfilter individuell gestaltet werden.
Zugriff/Verlassen• Um auf die „Berichte“ zugreifen zu können, klicken Sie auf [Reports] (Berichte)
oben rechts auf dem Bildschirm.• Mit [Finish] (Fertig stellen) schließen Sie den Bildschirm.
Drucken und exportieren• Wählen Sie zunächst einen [Report Type] (Berichtstyp).
Patient Information (Patientendaten)Patientendaten, Klinikdaten, Hardwaredaten, Stimulationseinstellungen, Profildaten, Batteriestatus, Fallverlauf und Patientenhinweise aus verschiedenen Zeiträumen.
Patient List (Patientenliste)Letzter Aufenthalt, Seriennummer, Zeitpunkt der Implantation und Arzt
Clinic Activity (Klinische Aktion)Letzter Aufenthalt, Arzt und Nachfolgeuntersuchungen. Hier können auch Informationen über Neuprogrammierungen, Elektronenimplantationen, Gesamtpatientenzahl, Durchschnittsdauer und Gesamtdauer enthalten sein.
Generic Report (Allgemeine Berichte)Programme, Grenzwertmessungen, Impedanzen, Batterienutzungsprofil, Programmnutzungsprofil, Patientenverlauf, Elektrodenkonfiguration. Parameter beinhalten: Dropdownliste mit Patienten (nach Name der Patienten) mit Datum der Aufnahme und der Entlassung sowie ein Kontrollkästchen zum Auflisten der Ergebnisse in aufsteigender bzw. absteigender Reihenfolge.
• Klicken Sie zum Erstellen eines Berichts auf [Create a Report] (Bericht erstellen) und dann zum Drucken oder Exportieren auf print (Drucken) oder export (Exportieren).
Kapitel 7 Tests
90868740-07 Rev A 47 von 84Bionic Navigator HR 1.0 Softwarehandbuch
de
Kapitel 7 Tests
Impedanz
BeschreibungDie Schaltfläche Impedance (Impedanz) dient der Überprüfung der elektrischen Integrität. Das IPG hat 16 Elektrodenkontakte, deren Elektrodenimpedanz jeweils gemessen und angezeigt wird. Impedanzen über 4500 Ω werden dabei als das Ergebnis offener oder nicht verbundener Elektroden angesehen und mit einem X dargestellt.
Zugriff/Verlassen• Für den Zugriff auf die Elektrodenimpedanz klicken Sie auf [Ω] auf dem
Programmierbildschirm oder EGL Scan-Bildschirm.• Zur erneuten Durchführung der Messung klicken Sie auf [Measure] (Messen).• Zum Verlassen klicken Sie auf [Close] (Schließen).
Zusatzangaben• Zwar deutet ein X auf überhöhte Impedanzen jenseits des Normalwerts hin, aber die
Elektroden können dennoch in eine Stimulationskonfiguration einbezogen werden.• Alle gemessenen Impedanzen werden in der Datenbank gespeichert.
Bionic Navigator™ HR 1.0 Softwarehandbuch
90868740-07 Rev A 48 von 84Bionic Navigator HR 1.0 Softwarehandbuch
de
Die Seite wurde absichtlich frei gehalten
90868740-07 Rev A 49 di 84Guida del software Bionic Navigator HR 1.0
it
Guida del software Bionic Navigator™ HR 1.0NM-7153-13, NM-7153-13R Clinician Programmer
ATTENZIONE: la legge federale degli Stati Uniti autorizza la vendita di questo prodotto esclusivamente su prescrizione medica.
Immissione testo ......................................................................................................................................................................... 50Configurazione e comunicazione ................................................................................................................................................50Sistema ....................................................................................................................................................................................... 50
Sezione 2 Mappatura del dolore e punteggi VAS ................................................................................................... 52Modulo grafico ............................................................................................................................................................................52VAS ............................................................................................................................................................................................. 52
Sezione 4 Dispositivo del paziente ........................................................................................................................ 55Collegamento e ripristino ............................................................................................................................................................55
Sezione 5 Programmazione e adattamento al paziente ........................................................................................ 56Programmazione Alta frequenza .................................................................................................................................................56Opzioni ........................................................................................................................................................................................56Telecomando ...............................................................................................................................................................................56Pulsante di accensione/spegnimento stimolazione ....................................................................................................................57
Sezione 6 Report ....................................................................................................................................................... 58Sezione 7 Test ........................................................................................................................................................... 59
Nota: nel Manuale per il medico del sistema SCS PrecisionTM con tecnologia MultiWave è incluso un elenco delle indicazioni, delle controindicazioni, delle precauzioni e degli eventi avversi relativi alla prescrizione del sistema SCS Precision per la terapia del dolore.
Guida del software Bionic Navigator™ HR 1.0
90868740-07 Rev A 50 di 84Guida del software Bionic Navigator HR 1.0
it
Sezione 1 Clinician Programmer
Immissione testo
DescrizioneLe opzioni di immissione di testo vengono fornite per facilitare l'immissione dei dati. Ci sono due metodi per l'immissione dei dati del Profilo paziente e delle Note del paziente usando la Tastiera CP e la funzione del Pannello di input PC tablet. L'icona di immissione testo per la funzione Immissione tablet PC può trovarsi sulla barra delle applicazioni di Windows.
Accesso/Uscita• Per accedere alla [Barra delle attività di Windows], spostare la penna sulla
parte inferiore dello schermo. Fare clic sulla tastiera [Icona].• Per uscire da qualsiasi strumento di immissione di testo, fare clic sulla [X] in alto
a destra dello strumento.
Tastiera CP La Tastiera CP è utilizzata per immettere le informazioni del paziente utilizzando il metodo convenzionale.
Pannello di input PC tabletIl Pannello di input PC tablet è una tastiera touch e finestra scrivibile.
• Collocare il cursore sul [Campo testuale]. Inserire lettere o numeri appropriati sulla tastiera o scrivere il testo nella finestra di immissione del testo.
Per cancellare le informazioni, fare clic sul tasto backspace (<–).
Informazioni aggiuntive• Consultare i manuali Toshiba Portege serie M400 Tablet PC all'indirizzo
www.toshiba.com per istruzioni aggiuntive.• Consultare la sezione Configurazione e comunicazione di seguito per ulteriori
informazioni.
Configurazione e comunicazione
LEVEL
OFF
MARK
LEVEL
OFF
MARK
DescrizioneIl Clinician Programmer (CP) comunica con lo stimolatore attraverso un collegamento a infrarossi con il Telecomando. I programmi possono essere caricati sul CP per l'anteprima, l'attivazione e la modifica dei modelli di stimolazione. I programmi di stimolazione possono anche essere salvati nel Telecomando.
Configurazione e funzionamentoAttenzione: il CP non è un'apparecchiatura per l'ambiente del paziente, come definito da IEC 60601- 1. Il CP e la persona che utilizza il CP non deve essere a contatto con il paziente durante la programmazione.
• Accendere [ON] il CP per visualizzare il desktop di Neuromodulation.
• Selezionare l'icona Bionic Navigator™ per avviare il software Bionic Navigator HR 1.0.
1. Accedere alla [schermata Clinico] sul Telecomando premendo contemporaneamente i pulsanti Area " e Programma P.
2. Selezionare “Modalità CP”.
• Quando sul Telecomando appare [CP pronto], rivolgere la finestra IR sulla parte superiore del Telecomando verso l'estensione IR.
• Posizionare il paziente entro un raggio di 60 cm dal Telecomando per garantire la comunicazione con lo stimolatore impiantabile.
Lasciare libera la via di accesso tra l'estensione IR collegata al Clinician Programmer e la finestra IR del Telecomando.
Utilizzo del controller del paziente (Joystick) • Regolare il livello di stimolazione del paziente premendo i pulsanti freccia su e giù.
Per arrestare o spegnere immediatamente la stimolazione, premere il pulsante [OFF].
Informazioni aggiuntive • Se la distanza di comunicazione non è soddisfacente, sul Clinician Programmer
viene visualizzato un messaggio.
Sistema
DescrizioneLa schermata Sistema garantisce l'accesso per selezionare la portata massima dello stimolatore, eseguire il backup di database e registri, stimare le posizioni relative dell'elettrocatetere e ottenere informazioni sullo stimolatore.
Sezione 1 Clinician Programmer
90868740-07 Rev A 51 di 84Guida del software Bionic Navigator HR 1.0
itAccesso/Uscita
• Per accedere a “Sistema”, selezionare [Sistema] nell'angolo superiore destro ed effettuare le regolazioni.
• Per uscire, fare clic su [Chiudi].
Portata massima dello stimolatoreFare clic su [Imposta portata massima stimolatore] per selezionare la portata massima di funzionamento dello stimolatore collegato. Modificando la portata massima dello stimolatore collegato si cancelleranno tutte le impostazioni e tutti i programmi dallo stimolatore.
• Selezionare il pulsante di opzione della portata massima desiderata.• Digitare la password “ACCELERATE10K” nel campo password.• Per attivare, fare clic su [Applica a stimolatore].
Viene visualizzato un messaggio che indica che tutti i programmi verranno cancellati dallo stimolatore.
• Fare clic su [Sì]. Viene visualizzato un messaggio che indica che la portata massima dello stimolatore è stata aggiornata.
• Per uscire, fare clic su [Chiudi].Quando si programma un paziente a 1.200 Hz o meno, prima impostare la portata massima su 1.200 Hz tramite il software Bionic Navigator HR 1.0, quindi utilizzare il software Bionic Navigator 1.2 per programmare il paziente.
Quando si programma un paziente oltre 1.200 Hz, prima impostare la portata massima adeguata tramite il software Bionic Navigator HR 1.0, quindi programmare il paziente con lo stesso software.
Sistema • Fare clic su [Info sistema] per controllare le informazioni sullo stimolatore e sul
Telecomando.Per creare manualmente un file compresso separato di database e registri, fare clic su [Backup di dati/registri]. Per controllare le informazioni sullo stimolatore e sul Telecomando relative ad identificazione, tipo, versione, tensione di batteria e stato, fare clic su [Info sistema]. Per visualizzare le posizioni relative dell'elettrocatetere, fare clic su [EGL Scan].
Backup di dati/registri Per creare un file compresso separato di database e registri.
• Inserire [Supporto rimovibile] per copiare database e registri.- Questo Supporto rimovibile non deve essere etichettato come “CLINIC”.
• Fare clic sul pulsante Backup di dati/registri.- Quando appare il messaggio, il database viene copiato correttamente.
• Fare clic su [OK] per uscire.
Informazioni del sistema
• Informazioni del sistema è disponibile solo quando si collega uno stimolatore al Clinician Programmer.
EGL Scan™
L'immagine EGL Scan mostra le posizioni relative dell'elettrocatetere.
• Fare clic su [EGL Scan] per accedere all'immagine. - EGL Scan è disponibile solo se è supportato dallo stimolatore. - L'uso di EGL Scan con uno stimolatore di prova esterno richiede un
elettrodo a cerotto. La richiesta deve essere ignorata.• Oppure selezionare il numero di campioni e l'ampiezza da utilizzare per EGL
Scan prima di avviare EGL Scan.• Per stampare l'immagine EGL Scan, fare clic su [Stampa] o [Annulla] per
uscire.
Informazioni aggiuntivePer modificare le impostazioni del paziente, utilizzare [Opzioni paziente].
Guida del software Bionic Navigator™ HR 1.0
90868740-07 Rev A 52 di 84Guida del software Bionic Navigator HR 1.0
it
Sezione 2 Mappatura del dolore e punteggi VAS
Modulo grafico
DescrizioneIl Modulo grafico viene utilizzato per identificare le aree di dolore con una rappresentazione visiva delle aree di copertura anatomica in relazione con il paziente. Le aree di dolore possono essere immesse nella schermata Profilo paziente.
Accesso/Uscita• Per accedere al “Modulo grafico”, selezionare [Profilo].• Per salvare le informazioni e uscire, selezionare [Fine].
Immissione delle aree del dolore• Selezionare [Profilo].
Le aree di dolore (in arancione) possono essere immesse solo nella schermata Profilo paziente.
• Fare clic su Modulo grafico [Regioni] per indicare le aree di dolore.
Risoluzione (RES)• Fare clic su [RES] per passare tra mappatura a bassa e ad alta risoluzione.
Visualizza• Fare clic su [VISUALIZZA] per passare dalla parte anteriore a quella posteriore
sul Modulo grafico.
Informazioni aggiuntive• Fare clic sul pulsante VAS per documentare una Scala analogica visiva.
VAS
DescrizioneLa schermata VAS documenta il livello attuale di dolore di un paziente con la stimolazione “On” o “Off”. Bionic NavigatorTM rileva se la stimolazione è “On” o “Off” al momento della registrazione del punteggio. L'ultimo punteggio viene visualizzato nel pulsante di accesso VAS; il colore rosso indica una stimolazione “Off” (senza terapia), mentre il colore blu una stimolazione “On” (con terapia). È possibile creare un report comparativo se si registrano i punteggi VAS con stimolazione “On” e stimolazione “Off”.
Accesso/Uscita• Per accedere alla Scala analogica visiva, selezionare VAS su Profilo
o Telecomando.• Per uscire da VAS, fare clic su [OK] per registrare informazioni o [Annulla].
Punteggio• Far scivolare o fare clic con il puntatore su [Punto numerico] nella schermata
che riflette il livello di dolore attuale del paziente con stimolazione [On] o [Off].Un punteggio di 0 è equivalente a nessun dolore. Un punteggio di 10 è equivalente al peggior dolore possibile.
Informazioni aggiuntive• Il VAS visualizzato corrisponde agli ultimi punteggi VAS immessi per la sessione.• Fare clic su Report per visualizzare la cronologia VAS.• L'ultimo punteggio VAS preso in una sessione viene memorizzato nel database
come punteggio della sessione.
Sezione 3 File del paziente
90868740-07 Rev A 53 di 84Guida del software Bionic Navigator HR 1.0
it
Sezione 3 File del paziente
Anamnesi
DescrizioneL'opzione Anamnesi visualizza le visite del paziente in ordine cronologico.
Accesso/Uscita• Per accedere alle informazioni di “Anamnesi”, selezionare [Profilo], quindi
[Anamnesi].• Per uscire, selezionare [OK].
Informazioni aggiuntive• È inoltre possibile visualizzare e stampare l'anamnesi da Report.• Fare clic su Profilo per accedere a Note.• Fare clic su Avvio per accedere “Motivo della visita”.
Per iniziare
DescrizioneLa Schermata iniziale viene utilizzata per iniziare una sessione del paziente. Da questa schermata è possibile selezionare la modalità di programmazione Alta frequenza. I pulsanti funzionali (situati nella parte superiore di ogni schermata) garantiscono l'accesso alle informazioni del file del paziente o ad altre funzioni del sistema.
Accesso/Uscita• La “Schermata iniziale” si apre quando si avvia il software Bionic NavigatorTM
HR 1.0 o quando si seleziona [Avvio] dall'angolo superiore destro di una schermata.
• Per uscire, selezionare [qualsiasi pulsante] sulla schermata o chiudere Bionic Navigator.
Nome paziente• Per accedere alle informazioni del paziente, selezionare la freccia giù nel campo
[Nome paziente], quindi selezionare un paziente idoneo dall'elenco in ordine alfabetico o selezionare un [Nuovo paziente] visualizzando automaticamente Profilo.
Motivo della visita• Fare clic sul campo [Motivo della visita], quindi selezionare un adeguato motivo
della visita.
Informazioni aggiuntive• Fare clic su Telecomando per procedere con i programmi del paziente
memorizzati sul Telecomando.• Fare clic su Report per personalizzare un paziente o un report clinico.• Fare clic su Avvio per riavviare la sessione.• Fare clic su Profilo per accedere o visualizzare le informazioni del paziente.• Fare clic su Programmazione per creare/modificare programmi.
Note
DescrizioneLa schermata Note viene utilizzata per accedere alle informazioni di rilievo memorizzate e visualizzate in ordine cronologico nell'anamnesi del paziente.
Accesso/Uscita• Per accedere a “Note”, selezionare Profilo, quindi [Note].
- Immettere le note del paziente tramite la tastiera CP o una delle opzioni del Pannello di input PC tablet.
• Per uscire, selezionare [OK] o [Annulla] per tornare alla schermata Profilo.
Informazioni aggiuntive• Le note attuali sono modificabili.• Le note passate sono di sola lettura.• Fare clic su Anamnesi per visualizzare le note passate o andare a Report.
Profilo paziente
DescrizioneLa schermata Profilo è un'area in cui l'utente immette o modifica le informazioni richieste per generare o aggiornare un registro di un paziente. Questa schermata consente all’utente di accedere, visualizzare o modificare Informazioni di identificazione del paziente, Informazioni di contatto del paziente, Aree di dolore, un punteggio VAS, Note e Informazioni sull'anamnesi.
Accesso• Per accedere a “Profilo paziente”, selezionare [Profilo] nell'angolo superiore
destro di ogni schermata.• Per immettere un nuovo paziente dalla Schermata iniziale, fare clic sul menu
a discesa dal campo [Nome paziente], quindi selezionare [Nuovo paziente] dall'elenco.
• In tal modo si accede alla schermata Profilo per immettere le informazioni sul nuovo paziente e, al temine, si torna alla Schermata iniziale.
Guida del software Bionic Navigator™ HR 1.0
90868740-07 Rev A 54 di 84Guida del software Bionic Navigator HR 1.0
it• Per visualizzare o accedere ad un paziente esistente dalla Schermata iniziale,
fare clic sul menu a discesa dal campo [Nome paziente], quindi selezionare il paziente dall'elenco. Quindi fare clic su Profilo nell'angolo superiore destro della Schermata iniziale.
Immissione e modifica delle informazioni del paziente1. Immettere le informazioni utilizzando Immissione testo, Tastiera CP
o Pannello di input PC tablet.2. Fare clic su [Fine] per salvare le informazioni e tornare alla “Schermata
iniziale”.
Informazioni aggiuntive• Nome paziente e Data di nascita sono campi obbligatori.• Fare clic su Modulo grafico per identificare e documentare l'area di dolore del
paziente.• Fare clic su VAS per documentare il livello di intensità del dolore, quindi
selezionare OK.• Fare clic su Note per immettere commenti nel file del paziente.• Fare clic su Anamnesi per visualizzare in ordine cronologico le informazioni sul
file del paziente, incluse la cronologia delle visite e le note.
Sezione 4 Dispositivo del paziente
90868740-07 Rev A 55 di 84Guida del software Bionic Navigator HR 1.0
it
Sezione 4 Dispositivo del paziente
Collegamento e ripristino
LEVEL
OFF
MARK
LEVEL
OFF
MARK
DescrizioneIl termine collegamento viene utilizzato da Boston Scientific per la programmazione del Telecomando per comunicare con uno stimolatore specifico e determinare il programma di terapia condiviso dai dispositivi. Il ripristino descrive il processo di cancellazione di programmi memorizzati in precedenza da un Telecomando clinico e/o da uno stimolatore di prova.
Funzionamento• Un nuovo Telecomando potrebbe essere collegato al nuovo stimolatore di
prova, caricato con un “programma” preliminare tramite il Clinician Programmer durante l'intervento chirurgico e consegnato al paziente.
• Un Telecomando collegato ad uno stimolatore di prova, ma conservato presso la clinica, deve essere scollegato dallo stimolatore di prova prima di essere utilizzato con un altro stimolatore di prova o con un IPG. Mentre lo si collega al nuovo dispositivo, il Telecomando richiede all'utente la sua decisione circa il modo in cui ripristinare l'apparecchiatura.
TelecomandoIl collegamento ad un Telecomando scollegato visualizzerà automaticamente il suo stato quando si preme un pulsante. Premere Programma P sul telecomando per iniziare un collegamento con uno stimolatore entro il range della telemetria:
• Il Telecomando identifica il dispositivo target e determina lo stato programmato dello stimolatore.
• Il Telecomando confronta il suo stato programmato con quello dello stimolatore e chiede all'utente di scegliere il programma impostato, se applicabile.
• Se la serie di programmi preferiti sono i programmi del Telecomando, è necessario immettere la password del medico prima di scaricare i programmi dal telecomando.
• Se il telecomando e lo stimolatore non hanno programmi memorizzati, il collegamento del dispositivo è immediato.
ScollegamentoTenere premuti i pulsanti Area " e Programma P sul Telecomando per circa tre secondi per accedere alla schermata Immetti opzioni medico.
• Dalla schermata Immetti opzioni medico, selezionare “Eliminare collegamento”.
• Su richiesta, immettere la password del medico. Il Telecomando scollegato mostra immediatamente il suo stato. È possibile ricollegarlo immediatamente oppure premere " per posticipare il collegamento.
Ripristino dal Clinician Programmer• Collegare il Dongle IR/l'estensione USB alla porta USB e far scorrere il
Telecomando nell'apposito alloggiamento. • Posizionare la finestra IR del Telecomando in linea con la finestra IR del dongle. • Se necessario, accedere alla [schermata Medico] sul Telecomando. • Viene visualizzato il messaggio “CP pronto”.
Guida del software Bionic Navigator™ HR 1.0
90868740-07 Rev A 56 di 84Guida del software Bionic Navigator HR 1.0
it
Sezione 5 Programmazione e adattamento al paziente
Programmazione Alta frequenza
DescrizioneLa schermata Programmazione mostra le impostazioni di stimolazione attive e consente la programmazione di anodi, catodi e parametri. All'accesso alla schermata Programmazione, vengono visualizzate le impostazioni di stimolazione attive.
Accesso/Uscita• Per accedere a “Programmazione Alta frequenza”, selezionare
[Programmazione] nella parte centrale inferiore della schermata.• Selezionare [Avanti] per passare a Telecomando, in cui è possibile salvare il
programma nel Telecomando.
Programmazione• Indicare gli elettrodi facendo clic sull'[elettrodo desiderato].
Fare clic su [Elettrodi] per assegnare la polarità. Polarità elettrodi passa tra OFF, anodo (+) e catodo (-).
• È possibile programmare solo un anodo e un catodo.• Per arrestare e avviare tutta la stimolazione, utilizzare il [Pulsante di accensione/
spegnimento stimolazione] principale nell'angolo inferiore sinistro.• [Regolare ampiezza, frequenza e ampiezza impulsi] facendo clic sulla freccia
corretta.• Fare clic o tenere premuti i pulsanti freccia su e giù di ampiezza per aumentare/
ridurre le dimensioni di step dell'ampiezza. Le dimensioni di step dell'ampiezza variano in base alla selezione della freccia. Per le frequenze che consentono dimensioni di step di 0,1 mA, le singole frecce si regolano con incrementi/decrementi di 0,1 mA, mentre le doppie frecce con incrementi/decrementi di 0,2 mA step. Per le frequenze che consentono dimensioni di step di 0,2 mA, le singole frecce si regolano con incrementi/decrementi di 0,2 mA, mentre le doppie frecce con incrementi/decrementi di 0,4 mA step.
Opzioni
DescrizioneLa schermata Opzioni consente la visualizzazione e la modifica delle impostazioni aggiuntive del programma per un paziente, ad esempio il ciclo di stimolazione, il tempo di rampa, l'ampiezza minima e l'ampiezza massima.
Accesso/Uscita• Per accedere a “Opzioni”, selezionare [Programmazione], quindi [Opzioni].• Per salvare i parametri, fare clic su [OK].
CicloLa selezione Ciclo determina la durata di attivazione e disattivazione dell'erogazione della stimolazione.
• Selezionare la casella “Ciclo”, quindi impostare la durata di On e Off.
Tempo di rampaIl tempo di rampa è la quantità di tempo per aumentare gradualmente la stimolazione da zero all'ampiezza programmata.
• Impostare il tempo di rampa.
mA min.
Impostare mA min. per regolare il livello minimo di ampiezza della stimolazione. mA min. viene applicato al programma attuale.
mA max.Impostare mA max. per regolare il livello massimo di ampiezza della stimolazione. mA max. viene applicato al programma attuale.
Telecomando
DescrizioneLa schermata Telecomando mostra i programmi memorizzati sul Telecomando del paziente, che è possibile attivare, visualizzare in anteprima o eliminare. I programmi possono anche essere salvati nel Telecomando da questa schermata.
Opzioni pazienteInoltre, vengono fornite le opzioni di blocco del controllo frequenza e ampiezza impulsi nel Telecomando. Le opzioni selezionate vengono scaricate sul Telecomando. La selezione di blocco fornisce o nega l'accesso del paziente al controllo ampiezza impulsi e frequenza del Telecomando.
• Selezionare/deselezionare la relativa casella per bloccare/garantire l'accesso ai controlli ampiezza impulsi e frequenza nel Telecomando.
Accesso/Uscita• Per accedere a “Telecomando”, selezionare [Telecomando] nell'angolo
superiore destro di ogni schermata.• Per uscire da “Telecomando” e tornare alla “Schermata iniziale”, fare clic su
[Fine]. • Per tornare alla schermata precedente, selezionare [Indietro].
Salvataggio di un programma sul telecomandoIl programma (di stimolazione in corso) attivo può essere salvato su uno dei quattro alloggiamenti del programma sul Telecomando.
• Fare clic sull'[Alloggiamento del programma] desiderato, quindi su [Salva con nome]. Il programma attivo viene salvato nell'alloggiamento del programma selezionato. Se il Telecomando ha tutti e quattro gli alloggiamenti occupati, selezionare il programma da sovrascrivere con il nuovo programma, quindi selezionare [Salva con nome].
[] indica l'ultimo programma attivato o salvato.
Sezione 5 Programmazione e adattamento al paziente
90868740-07 Rev A 57 di 84Guida del software Bionic Navigator HR 1.0
itAttivazione di un programma dalla schermata TelecomandoIl pulsante Attiva prende un programma selezionato dal Telecomando e lo attiva (inizia il programma di stimolazione), sostituendo il programma distimolazione in corso.
• Selezionare l'[Alloggiamento del programma] desiderato e fare clic su [Attiva] o [Attiva (stim. disattivata)].
[Attiva (stim. disattivata)] attiva un programma con la stimolazione disattivata.
• Per modificare il programma:Andare su [Programmazione], effettuare le regolazioni, quindi salvarle sul Telecomando.
AnteprimaPrima di sovrascrivere il programma di stimolazione in corso con un programma del Telecomando, è possibile visualizzare in anteprima un programma del Telecomando. Fare clic su [Anteprima]. Il programma di stimolazione in corso viene interrotto e il programma selezionato viene temporaneamente attivato finché non si fa clic su [Fine anteprima] Facendo clic su [Fine anteprima] si attiva il programma originale. Questa funzione può aiutare a determinare quale programma del Telecomando quando tutti gli alloggiamenti del programma sono pieni.
• Fare clic sull'[Alloggiamento del programma] desiderato dal Telecomando, quindi selezionare [Anteprima].
• Fare clic su [Fine anteprima] per tornare al precedente programma attivo.
Elimina• Fare clic su un [Alloggiamento del programma].• Per cancellare il programma dal Telecomando, selezionare [Elimina].
Informazioni aggiuntive• Fare clic su [Opzioni paziente] per modificare i blocchi.• Fare clic su [VAS] per documentare i livelli di dolore.
Pulsante di accensione/spegnimento stimolazione
DescrizioneIl pulsante di accensione/spegnimento stimolazione (Stim) arresta e avvia la stimolazione. Una volta avviata, la stimolazione aumenta fino ai livelli di ampiezza relativi alle impostazioni del programma attivo.
Funzionamento• Fare clic sul pulsante rosso [Arresta] nell'angolo inferiore sinistro della schermata
per arrestare la stimolazione.• Fare clic sul pulsante verde [Accendi] per riprendere la stimolazione.
Guida del software Bionic Navigator™ HR 1.0
90868740-07 Rev A 58 di 84Guida del software Bionic Navigator HR 1.0
it
Sezione 6 Report
DescrizioneLa schermata Report viene utilizzata per creare un report paziente o clinico. Selezionando varie opzioni per singoli pazienti o gruppi, l'utente può creare, visualizzare, stampare, esportare o chiudere informazioni del database. I report possono essere generati in base al tipo e ciascun report può essere personalizzato tramite filtri di ordinamento.
Accesso/Uscita• Per accedere a “Report”, selezionare [Report] nell'angolo superiore destro di
ogni schermata.• Per uscire, selezionare [Fine].
Stampa ed esportazione• Selezionare un [Tipo di report].
Informazioni del pazienteInformazioni sul paziente, informazioni cliniche, informazioni sul dispositivo, impostazioni della stimolazione, informazioni sul profilo, uso della batteria, anamnesi e note del paziente per vari intervalli di tempo.
Elenco di pazientiUltima visita, numero di serie, data dell'impianto e medico.
Esiti cliniciImpianto, ultima visita, medico, diagnosi, percentuali e medie, durata dell'impianto, età media, riposizionamenti, espianti, revisioni e punteggi VAS medi.
Attività clinicaUltima visita, medico e follow-up del paziente. Possono includere riprogrammazioni, impianti di elettrocateteri, pazienti totali, durate medie e durate totali.
Report genericoProgrammi, misurazione soglia, impedenze, profilo di uso della batteria, profilo di uso del programma, anamnesi del paziente, configurazione dell'elettrocatetere. I parametri includono: elenco a discesa del paziente (selezionare in base al nome del paziente), da data a data e una casella di controllo per elencare il risultato in ordine ascendente/discendente.
• Fare clic su [Crea report], quindi selezionare Stampa o Esporta.
Sezione 7 Test
90868740-07 Rev A 59 di 84Guida del software Bionic Navigator HR 1.0
it
Sezione 7 Test
Impedenza
DescrizioneIl pulsante Impedenza viene utilizzato per verificare l'integrità elettrica. L'impedenza dell'elettrocatetere viene misurata e visualizzata per ciascuno dei 16 contatti dell'elettrodo dell'IPG. Le impedenze superiori a 4500 Ω sono considerate derivanti da cavi aperti o non collegati, visualizzate con una X.
Accesso/Uscita• Per accedere all'impedenza dell'elettrocatetere, fare clic su [Ω] dalla schermata
Programmazione o EGL Scan.• Per eseguire di nuovo la misurazione, fare clic su [Misura].• Per uscire, fare clic su [Chiudi].
Informazioni aggiuntive• Anche se una X indica impedenze più alte del normale, gli elettrodi possono
ancora essere inclusi nella configurazione della stimolazione.• Tutte le impedenze misurate vengono salvate nel database.
Guida del software Bionic Navigator™ HR 1.0
90868740-07 Rev A 60 di 84Guida del software Bionic Navigator HR 1.0
it
La pagina è stata lasciata intenzionalmente vuota.
90868740-07 Versie A 61 van 84Softwarehandleiding Bionic Navigator HR 1.0
Hoofdstuk 4 Apparatuur voor de patiënt ................................................................................................................... 67Verbinden en herstellen ..............................................................................................................................................................67
Hoofdstuk 5 Programmeren en instellen op de patiënt ............................................................................................ 68Programmeren van hoge snelheid ..............................................................................................................................................68Options (Opties) ..........................................................................................................................................................................68Afstandsbediening ......................................................................................................................................................................68Stimulation Power Button (Stimulatie aan/uit) .............................................................................................................................69
Opmerking: Een overzicht van de indicaties, contra-indicaties, waarschuwingen, voorzorgsmaatregelen en bijwerkingen met betrekking tot het voorschrijven van het PrecisionTM-SCS-systeem met MultiWave-technologie voor pijnbehandeling is te vinden in de Artsenhandleiding voor het Precision SCS-systeem met MultiWave-technologie.
Softwarehandleiding Bionic Navigator™ HR 1.0
90868740-07 Versie A 62 van 84Softwarehandleiding Bionic Navigator HR 1.0
nl
Hoofdstuk 1 Clinician Programmer
Tekstinvoer
BeschrijvingDe opties voor tekstinvoer dienen ter vereenvoudiging van het invoeren van gegevens. Er bestaan twee methoden voor het invoeren van patiëntgegevens voor Profile (Profiel) en Notes (Opmerkingen) met behulp van CP keyboard (CP-toetsenbord) en de functie Tablet PC Input Panel (touch-pad pen). Het pictogram voor tekstinvoer voor de invoerfunctie van de tablet-PC kan zich bevinden op de Windows taakbalk.
Openen/afsluiten• Beweeg de pen over de uiterste onderrand van het scherm om de [Windows
Task Bar] (Windows taakbalk), te openen. Klik op het toetsenpaneel [Icon] (Pictogram).
• Als u de tekstinvoer wilt afsluiten, klikt u op de [X] in de rechter bovenhoek.
CP Keyboard (CP-toetsenbord) De CP Keyboard (CP-toetsenbord) wordt gebruikt om op conventionele wijze patiëntinformatie in te voeren.
Invoerpaneel van tablet-pcDe Tablet PC Input Panel (Touch-pad input) bevat een aanraakbaar toetsenbord en een beschrijfbaar venster met behulp van de bijgeleverde pen.
• Plaats de cursor in het [Text field] (Tekstveld). Voer de gewenste letters of getallen in met het toetsenpaneel of schrijf de tekst in het venster voor tekstinvoer.
U kunt tekens wissen door op Backspace (<–) te klikken.
Aanvullende informatie• Kijk voor meer instructies in de handleidingen van de Toshiba Portege M400
Tablet PC Series op www.toshiba.com.• Raadpleeg het gedeelte Set-up and Communication (Instellen en communicatie)
hieronder voor meer informatie.
Installatie en communicatie
LEVEL
OFF
MARK
LEVEL
OFF
MARK
BeschrijvingDe Clinician Programmer (CP) communiceert met de stimulator via een infraroodverbinding naar de Remote Control (Afstandsbediening). U kunt programma's op de CP laden om stimulatiepatronen te bekijken, te activeren en te wijzigen. U kunt ook stimulatieprogramma's op de afstandsbediening opslaan.
Instelling en werkingLet op: De CP is niet uitgerust voor de patiëntomgeving zoals gedefinieerd door IEC 60601- 1. De CP en de persoon die de CP gebruikt, mogen tijdens het programmeren niet in contact met de patiënt komen.
• Zet de CP [AAN] om het bureaublad van de Neuromodulatie te openen.
• Selecteer het pictogram Bionic Navigator™ om de software van de Bionic Navigator HR 1.0 te starten.
1. Open het [Artsenscherm] op de afstandsbediening door het gelijktijdig indrukken van de knoppen voor gebied " en programma P.
2. Selecteer “CP Mode” (CP-modus).
• Als de Remote Control (Afstandsbediening) [CP Ready] (CP gereed) aangeeft, richt u het IR-venstertje boven aan de Remote Control (Afstandsbediening) naar de IR-verlenging.
• Positioneer de patiënt binnen 60 cm afstand van de Remote Control (Afstandsbediening) om communicatie met de implanteerbare stimulator mogelijk te maken.
Zorg dat de ruimte tussen de IR extension (IR-verlenging) op Clinician Programmer (CP) en het IR-venstertje op afstandsbediening vrij is.
De patiëntcontroller gebruiken (joystick) • Pas het stimulatieniveau aan door op de pijlknoppen omhoog of omlaag te drukken.
Druk op de knop [OFF] (UIT) om de stimulatie onmiddellijk te stoppen of uit te schakelen.
Aanvullende informatie • Er wordt een bericht weergegeven op Clinician Programmer (CP) als het
communicatiebereik niet voldoende is.
systeem
BeschrijvingVia het systeemscherm kunt u de maximale stimulatiesnelheid selecteren, een back-up van de database en de logbestanden maken, de relatieve leadposities schatten, en informatie over de stimulator uitlezen.
Hoofdstuk 1 Clinician Programmer
90868740-07 Versie A 63 van 84Softwarehandleiding Bionic Navigator HR 1.0
nlOpenen/afsluiten
• Om “System” (Systeem) te openen, selecteert u [System] (Systeem) in de rechter bovenhoek van het scherm en vult u wijzigingen in.
• Klik om af te sluiten op [Close] (Afsluiten).
Maximumsnelheid van de stimulatorKlik op [Set Stimulator Maximum Rate] (Maximumsnelheid stimulator instellen) om de maximale snelheid van de stimulator in te stellen. Denk erom dat het wijzigen van de maximale snelheid van de aangesloten stimulator alle instellingen en programma's van de betreffende stimulator wist.
• Selecteer de draaiknop voor de gewenste maximumsnelheid• Vul in het wachtwoordveld “ACCELERATE10K” in.• Klik voor het activeren op [Apply to Stimulator] (Op stimulator toepassen). Er
verschijnt een melding dat alle programma's van de stimulator gewist worden.• Klik op [Yes] (Ja).
Er verschijnt een melding dan de maximumsnelheid van de stimulator is aangepast,• Klik om af te sluiten op [Close] (Afsluiten).
Zet via de software van Bionic Navigator HR 1.0 de maximale snelheid eerst op 1.200 wanneer u de snelheid voor een patiënt instelt op 1.200 Hz of lager, en gebruik daarna de software van Bionic Navigator 1.2 om de snelheid voor de patiënt in te stellen.
Zet via de software van Bionic Navigator HR 1.0 de maximale snelheid eerst op de juiste maximumsnelheid wanneer u de snelheid voor een patiënt op hoger dan 1.200 Hz instelt, en stel daarna de snelheid voor de patiënt in.
Systeem • Klik op [System Info] (Systeeminformatie) om de informatie van de stimulator en
de afstandsbediening te controleren.Om handmatig een apart gecomprimeerd bestand voor database en logs aan te maken, klikt u op [Backup Data/Logs] (Back-up maken van database/logbestanden). Om voor de stimulator en de afstandsbediening de informatie te controleren ten aanzien van identificatie, type, versie, batterijvermogen en status, klikt u op [System Info] (Systeeminformatie). Voor het tonen van de relatieve leadposities, klikt u op [EGL Scan].
Backup Data/Logs (Back-up van gegevens/logbestanden) Gecomprimeerd bestand maken van database (database) en logs (logbestanden).
• Plaats een [Removable media] (verwisselbaar medium) om de database en de logbestanden te kopiëren.
Deze verwisselbare media mag niet worden aangeduid als "KLINISCH"• Klik op de knop Backup Data/Logs (Back-up van gegevens/logbestanden)
De database is gekopieerd wanneer hiervan een melding verschijnt• Klik op [OK] om af te sluiten.
System Information (Systeeminformatie)
• System Information (Systeeminformatie) is alleen beschikbaar wanneer een stimulator op Clinician Programmer (CP) is aangesloten.
EGL Scan™
Het EGL Scan beeld is een weergave van relatieve leadposities.
• Klik op [EGL Scan] om het beeld te openen. - EGL Scan is alleen beschikbaar indien de stimulator dit ondersteunt. - Het gebruik van EGL Scan met een externe proefsimulator genereert een
melding voor een patchelektrode. De melding moet worden genegeerd.• U kunt eventueel het aantal samples en de amplitude die voor EGL Scan moeten
worden gebruikt selecteren voordat u de EGL Scan start.• Als u het EGL Scan beeld wilt afdrukken, klikt u op [Print] (Afdrukken) of op
[Cancel] (Annuleren) om af te sluiten.
Aanvullende informatieInstellingen voor de patiënt kunt u wijzigen met behulp van [Patient Options] (Patiëntopties).
Softwarehandleiding Bionic Navigator™ HR 1.0
90868740-07 Versie A 64 van 84Softwarehandleiding Bionic Navigator HR 1.0
nl
Hoofdstuk 2 Pain Mapping en VAS-scores
Graphic Module (Grafische module)
BeschrijvingDe Grafische module wordt gebruikt voor het identificeren van pijn- en paresthesiegebieden door middel van een visuele weergave van anatomische gebieden in relatie tot de patiënt. Pijngebieden kunnen alleen worden ingevoerd in het scherm Patient Profile (Patiëntprofiel).
Openen/afsluiten• Om de “Graphic Module” (Grafische module) te openen, selecteert u [Profile]
(Profiel).• Als u gegevens wilt opslaan en wilt afsluiten, selecteert u [Finish] (Voltooien).
Gebieden voor Pain (Pijn, oranje) kunnen alleen worden ingevoerd in het scherm Patient Profile (Patiëntenprofiel).
• Klik in de Graphic Module (Grafische module) op [Regions] (Gebieden) om pijngebieden aan te geven.
Resolution (RES) (Resolutie)• Klik op [RES] (Resolutie) om te schakelen tussen met lage en hoge resolutie.
View (Aanzicht)• Klik op [VIEW] (Aanzicht) om te schakelen tussen voor- en achterzijde op de
Graphic Module (Grafische module).
Aanvullende informatie• Klik op de knop VAS om een Visual Analog Scale vast te leggen.
VAS
BeschrijvingIn het scherm VAS wordt het huidige pijnniveau van de patiënt geregistreerd bij stimulatie “On” (Aan) of “Off” (Uit). Bionic NavigatorTM houdt bij of de stimulatie ten tijde van de geregistreerde score “On” (Aan) of “Off” (Uit) staat. De laatste score wordt weergegeven in de VAS toegangsknop; rood om aan te geven dat stimulatie uit staat (zonder behandeling) en blauw om aan te geven dat stimulatie aan staat (met behandeling). Er kan een vergelijkingsrapport worden aangemaakt als VAS-scores in beide standen van de stimulatie (aan/uit) worden vastgelegd.
Openen/afsluiten• Om de Visual Analog Scale te openen, selecteert u VAS op Profile, of Remote.• Sluit VAS af door op [OK] te klikken en gegevens op te slaan of door op [Cancel]
(Annuleren) te klikken.
Score• Schuif de aanwijzer naar het [numerieke punt] op het scherm dat overeenkomt
met het huidige pijnniveau van de patiënt bij stimulatie [On] (Aan) of [Off] (Uit) en klik hierop.
Een score van 0 staat gelijk aan geen pijn. Een score van 10 staat gelijk aan de ergste pijn.
Aanvullende informatie• De weergegeven VAS komt overeen met de laatst ingevoerde VAS-scores voor
de sessie.• Klik op Reports (Rapporten) om de VAS-geschiedenis te bekijken.• De laatste VAS-score die tijdens een sessie gemeten is, wordt in de database
vastgelegd als de score van de betreffende sessie.
Hoofdstuk 3 Patiëntendossiers
90868740-07 Versie A 65 van 84Softwarehandleiding Bionic Navigator HR 1.0
nl
Hoofdstuk 3 Patiëntendossiers
Medische geschiedenis
BeschrijvingDe Case History (Medische geschiedenis) geeft een chronologische weergave van patiëntbezoeken.
Openen/afsluiten• U opent de gegevens van “Case History” (Medische geschiedenis) door [Profile]
(Profiel) en vervolgens [Case History] (Medische geschiedenis) te selecteren.• Selecteer [OK] om af te sluiten.
Aanvullende informatie• De case history (medische geschiedenis) kan ook worden bekeken en afgedrukt
vanuit Reports (Rapporten).• Klik op Profile (Profiel) om Notes (Opmerkingen) in te voeren.• Klik op Start (Starten) om naar “Reason for Visit” (Reden voor bezoek) te gaan.
Starten
BeschrijvingHet Start Screen (Startscherm) wordt gebruikt om een patiëntsessie te beginnen. De modus voor het programmeren van hoge snelheid kan vanaf dit scherm geselecteerd worden. De functional buttons (functieknoppen, boven aan ieder scherm) geven toegang tot informatie over patiëntbestanden en andere systeemfuncties.
Openen/afsluiten• Het “Start Screen” (Startscherm) wordt geopend zodra de software van
Bionic NavigatorTM HR 1.0 wordt opgestart of wanneer [Start] wordt geselecteerd in de rechter bovenhoek van een willekeurig scherm.
• Om af te sluiten selecteert u [any button] (een willekeurige knop) op het scherm of sluit u Bionic Navigator.
Patient Name (Naam patiënt)• Voor het invoeren van patiëntinformatie selecteert u het pijltje omlaag in het veld
[Patient Name] (Naam patiënt) en selecteert u vervolgens de betreffende patiënt uit de op alfabet gesorteerde lijst of selecteert u [New Patient] (Nieuwe patiënt) waarna automatisch Profile (Profiel) wordt weergegeven.
Reason for Visit (Reden voor bezoek)• Klik op het veld [Reason for Visit] (Reden voor bezoek) en selecteer de
betreffende informatie.
Aanvullende informatie• Klik op Remote (Afstandsbediening) om naar patiëntprogramma's op de Remote
Control (Afstandsbediening) te gaan.• Klik op Reports (Rapporten) om een klinisch of patiëntrapport aan te passen.• Klik op Start (Starten) om de sessie opnieuw te starten.• Klik op Profile(Profiel) om patient information (patiëntinformatie) in te voeren of
te bekijken.• Klik op Programming (Programmeren) om programma's te maken/aan te passen.
Notes (Opmerkingen)
BeschrijvingHet scherm Notes (Opmerkingen) wordt gebruikt voor het invoeren van relevante informatie, die wordt opgeslagen en chronologisch kan worden bekeken in de patient's case history (medische geschiedenis van patiënt).
Openen/afsluiten• U opent “Notes” (Opmerkingen) door [Profile] (Profiel) en vervolgens [Notes]
(Opmerkingen) te selecteren.- Voer opmerkingen in over de patiënt met behulp van het CP keyboard
(CP-toetsenbord) of de opties van Tablet PC Input Panel (Invoerpaneel tablet-pc).
• Selecteer [OK] of [Cancel] (Annuleren) om af te sluiten en terug te keren naar het scherm Profile (Profiel).
Aanvullende informatie• Huidige opmerkingen kunnen worden bewerkt.• Eerdere opmerkingen kunnen alleen worden gelezen.• Klik op Case History (Medische geschiedenis) om eerdere opmerkingen te
bekijken of ga naar Reports (Rapporten).
Patient Profile (Patiëntenprofiel)
BeschrijvingHet scherm Profile (Profiel) is een gebied waar de gebruiker informatie invoert of bewerkt die nodig is voor het genereren of bijwerken van een patiëntdossier. De gebruiker kan dit scherm gebruiken voor het bekijken of aanpassen van informatie ten aanzien van Patient Identification Information (Patiënt identificatie-informatie), Patient Contact Information (Patiënt contactgegevens), Pain Areas (Pijngebieden), een VAS -score, Opmerkingen en informatie over Casushistorie.
Softwarehandleiding Bionic Navigator™ HR 1.0
90868740-07 Versie A 66 van 84Softwarehandleiding Bionic Navigator HR 1.0
nlOpenen
• U opent “Patient Profile” (Patiëntenprofiel) door [Profile] (Profiel) te selecteren in de rechter bovenhoek van een willekeurig scherm.
• Als u vanuit het Start Screen (Startscherm), een nieuwe patiënt wilt invoeren, klikt u op het keuzemenu van het veld [patient name] (naam patiënt) en selecteert u [new patient] (nieuwe patiënt) in de lijst.
• Hierdoor gaat u automatisch naar het scherm Profile (Profiel), waar u de informatie van de nieuwe patiënt kunt invoeren. Wanneer u klaar bent, keert u terug naar het Start Screen (Startscherm).
• Wanneer u vanuit het Start Screen (Startscherm) een bestaand patiëntbestand wilt bekijken of bewerken, klikt u op het keuzemenu van het veld [Patient Name] (Naam patiënt) en selecteert u de patiënt in de lijst. Vervolgens klikt u in de rechter bovenhoek van het Start Screen (Startscherm) op Profile (Profiel).
Patiëntinformatie invoeren en bewerken1. Voer gegevens in met behulp van Text Entry (Tekstinvoer), CP Keyboard
(CP-toetsenbord) of Tablet PC Input Panel (Invoerpaneel tablet-pc).2. Klik op [Finish] (Voltooien) om de gegevens op te slaan en terug te keren
naar het “Start Screen” (Startscherm).
Aanvullende informatie• Patient name (naam patiënt) en birth date (geboortedatum) zijn verplichte
velden.• Klik op Graphic Module (Grafische module) om het pijngebied van de patiënt te
identificeren en registreren.• Klik op VAS om het intensiteitsniveau van de pijn vast te leggen en klik vervolgens
op OK.• Klik op Notes (Opmerkingen) om opmerkingen in het patient file (patiëntbestand)
in te voeren.• Klik op Case History (Medische geschiedenis) om in chronologische volgorde
patient file information (gegevens uit patiëntbestand) te bekijken, waaronder Visit history (Bezoekgeschiedenis) en Notes (Opmerkingen).
Hoofdstuk 4 Apparatuur voor de patiënt
90868740-07 Versie A 67 van 84Softwarehandleiding Bionic Navigator HR 1.0
nl
Hoofdstuk 4 Apparatuur voor de patiënt
Verbinden en herstellen
LEVEL
OFF
MARK
LEVEL
OFF
MARK
BeschrijvingLinking (Koppelen) is een term van Boston Scientific voor het programmeren van de afstandsbediening voor communicatie met een stimulator en voor het bepalen van het behandelprogramma dat tussen de apparaten wordt uitgewisseld. Met herstellen wordt het proces bedoeld waarbij eerder opgeslagen programma's uit een Remote Control (Afstandsbediening) en/of teststimulator worden verwijderd.
Werking• Een nieuwe afstandsbediening kan gekoppeld worden aan de nieuwe
proefstimulator, geladen met een voorbereidend “programma” via de Clinician Programmer tijdens de operatie en aan de patiënt overhandigd worden.
• Een afstandsbediening die gekoppeld wordt aan een Proefstimulator maar in de kliniek blijft, moet ontkoppeld worden van de Proefstimulator voordat deze gebruikt kan worden voor een andere Proefstimulator of met een IPG. Tijdens het koppelen van het nieuwe apparaat, vraagt de afstandsbediening uw besluit over de manier waarop de apparatuur gereset moet worden.
AfstandsbedieningDoor het koppelen van een niet gekoppelde afstandsbediening wordt automatisch de status weergegeven als op een willekeurige knop wordt gedrukt. Druk op de knop voor programma P op de afstandsbediening om een verbinding met een stimulator binnen telemetrie-afstand tot stand te brengen:
• De remote (afstandsbediening) identificeert het doelapparaat en bepaalt de geprogrammeerde status van de stimulator.
• De remote (afstandsbediening) vergelijkt de eigen geprogrammeerde status met de status van de stimulator en vraagt u indien van toepassing een van beide programma-instellingen te kiezen.
• Als de programma-instellingen van de Remote Control (Afstandsbediening) de voorkeur hebben, moet u het clinician password (wachtwoord behandelaar) invoeren voordat u programma's van de afstandsbediening kunt downloaden.
• Als noch op de afstandsbediening, noch op de stimulator programma's zijn opgeslagen, wordt het apparaat meteen gekoppeld.
De-linking (Verbinding verbreken)Houd de knoppen Gebied " en Program P op de afstandsbediening ongeveer drie seconden ingedrukt om het scherm Enter Clinician Options (Opties van de arts invullen) te openen.
• In het scherm Enter Clinician Options (Klinische opties invoeren) selecteert u “To Clear Link” (Wissen van verbinding).
• Voer het clinician password (wachtwoord behandelaar) in wanneer daarom wordt gevraagd.
Van de Remote Control (Afstandsbediening) waarvan de verbinding is verbroken, wordt onmiddellijk de status weergegeven. U kunt meteen opnieuw een koppeling maken of op " drukken om het koppelen uit te stellen.
Herstellen vanuit Clinician Programmer (CP)• Sluit de IR-dongle/USB-uitbreiding aan op de USB-poort en stop de Remote
Control (Afstandsbediening) in het zakje. • Houd het IR-venstertje van de Remote Control (Afstandsbediening) recht voor
het IR-venstertje van de dongle. • Open indien van toepassing [Clinician's screen] (behandelaarsscherm) op de
Remote Control (Afstandsbediening). • Het bericht “CP Ready” (CP gereed) wordt weergegeven.
Softwarehandleiding Bionic Navigator™ HR 1.0
90868740-07 Versie A 68 van 84Softwarehandleiding Bionic Navigator HR 1.0
nl
Hoofdstuk 5 Programmeren en instellen op de patiënt
Programmeren van hoge snelheid
BeschrijvingHet scherm Programming (Programmeren) geeft actieve stimulatie-instellingen weer. Hier kan ook worden geprogrammeerd door middel van handmatige selectie van anodes, kathodes en parameters. Na het openen van het scherm Programming (Programmeren) worden de actieve stimulatie-instellingen weergegeven.
Openen/afsluiten• Om “High Rate Programming” (Programmeren van hoge snelheid) te openen,
selecteert u [Programming] (Programmeren) in het midden onderin het scherm.• Selecteer [Next] (Volgende) om verder te gaan naar Remote (Afstandsbediening),
waar het programma kan worden opgeslagen op de Remote Control (Afstandsbediening).
Programmeren• Definieer elektroden door op de [desired electrode] (Gewenste elektrode) te
klikken.Klik op [Electrodes] (Elektroden) om de polarity (polariteit) toe te wijzen. De elektrodepolariteit gaat achtereenvolgens van OFF (UIT) naar anode (+) en vervolgens naar kathode (-).
• Slechts één anode en één kathode kunnen geprogrammeerd worden.• Om alle stimulatie te stoppen en te starten, gebruikt u de hoofdknop [Stimulation
Power Button] (Stimulatie aan/uit) in de linker onderhoek.• [Stel amplitude, rate (frequentie) en pulse width (pulsbreedte) in] door op het
bijbehorende pijltje te klikken.• Klik op de pijltjes omhoog en omlaag voor de amplitude om de stapgrootte van
de amplitude te vergroten/verkleinen. U kunt de knop ingedrukt houden tot de gewenste waarde is bereikt. De stapgrootte van de amplitude varieert afhankelijk van het gekozen pijltje. Voor frequenties met stapgroottes van 0,1 mA passen enkele pijltjes de stapjes omhoog/omlaag met 0,1 mA aan en passen dubbele pijltjes de stapjes omhoog/omlaag met 0,2 mA aan. Voor frequenties met stapgroottes van 0,2 mA passen enkele pijltjes de stapjes omhoog/omlaag met 0,2 mA aan en passen dubbele pijltjes de stapjes omhoog/omlaag met 0,4 mA aan.
Options (Opties)
BeschrijvingIn het scherm Options (Opties) kunnen aanvullende programma-instellingen voor een patiënt worden bekeken en bewerkt, zoals de stimulatiecyclus, de versnellingstijd van 0 tot geprogrammeerde stimulatie, minimale amplitude en maximale amplitude.
Openen/afsluiten• Om “Options” (Opties) te openen, selecteert u [Programming] (Programmeren)
en vervolgens [Options] (Opties).• Klik op [OK] om parameters op te slaan.
CyclusDe optie Cycle (Cyclus) bepaalt de in- en uitschakelduur van de stimulatie.
• Vink het vakje “Cycle” (Cyclus) aan en stel vervolgens de schakelduur voor Aan en Uit in.
Ramp Time (Opstarttijd stimulatie)De ramp time (opstarttijd stimulatie) is de hoeveelheid tijd voor het geleidelijk versterken van de stimulatie van nul tot de geprogrammeerde amplitude.
• De versnellingstijd instellen
Min mA
Zet Min mA om de ondergrens voor het amplitudeniveau van de stimulatie in te stellen. Min mA wordt toegepast op het huidige programma.
Max mA Zet Max mA om de bovengrens voor het amplitudeniveau van de stimulatie in te stellen. Max mA wordt toegepast op het huidige programma.
Afstandsbediening
BeschrijvingOp het scherm Remote Control (Afstandsbediening) worden de programma's weergegeven die op de Remote Control (Afstandsbediening) van de patiënt zijn opgeslagen en die kunnen worden geactiveerd, bekeken of verwijderd. Programma's kunnen ook vanuit dit scherm op de afstandsbediening worden opgeslagen.
PatiëntoptiesBovendien zijn opties voorzien voor vergrendeling van de snelheid en pulsbreedte in de Remote Control (Afstandsbediening). De geselecteerde opties worden gedownload naar de Remote Control (Afstandsbediening). Met de selectie lockout (vergrendeling) kunt u de patiënt toegang geven tot de regeling voor pulsbreedte en snelheid in de Remote Control (Afstandsbediening).
• Vink het bijbehorende vakje aan of schakel dit uit om de regeling voor pulsbreedte en snelheid in de afstandsbediening te vergrendelen of de patiënt hier toegang toe te geven.
Openen/afsluiten• U opent “Remote Control” (Afstandsbediening) door [Remote]
(Afstandsbediening) te selecteren in de rechter onderhoek van een willekeurig scherm.
• Klik op [Finish] (Voltooien) als u “Remote Control” (Afstandsbediening) wilt afsluiten en terug wilt keren naar het “Start Screen” (Startscherm).
• U keert terug naar het vorige scherm door op [Back] (Terug) te klikken.
Hoofdstuk 5 Programmeren en instellen op de patiënt
90868740-07 Versie A 69 van 84Softwarehandleiding Bionic Navigator HR 1.0
nlProgramma opslaan op de afstandsbedieningHet actieve (momenteel stimulerende) programma kan worden opgeslagen op een van de vier programmaregels in de Remote Control (Afstandsbediening).
• Klik op de gewenste [Program slot] (Programmaregel) en vervolgens op [Save To] (Opslaan naar). Het actieve programma wordt opgeslagen op de geselecteerde programmaregel. Indien de vier programmaregels in de Remote Control (Afstandsbediening) bezet zijn, selecteert u het programma dat u wilt overschrijven met het nieuwe programma en klikt u vervolgens op [Save To] (Opslaan naar).
[] geeft het laatst geactiveerde of opgeslagen programma weer.
Een programma activeren vanaf de afstandsbedieningMet de knop Activate (Activeren) wordt een geselecteerd programma uit de Remote Control (Afstandsbediening) geactiveerd (stimulatieprogramma wordt gestart). Het gekozen programma vervangt het huidige stimulatieprogramma.
• Selecteer de gewenste [Program slot] (Programmaregel) en klik op [Activate] (Activeren) of [Activate (Stim off)] (Activeren [stim. uit]).
Met [Activate (Stim off)] (Activeren [stim. uit]) activeert u een programma waarin de stimulatie is uitgeschakeld.
• U kunt het programma als volgt bewerken:Ga naar [Programming] (Programmeren), breng wijzigingen aan en sla het programma vervolgens op de afstandsbediening op.
Preview (Voorbeeld)Voordat u het huidige stimulatieprogramma overschrijft met een programma van de afstandsbediening, kunt u een voorbeeld bekijken van het programma in de Remote Control (Afstandsbediening). Klik op [Preview] (Voorbeeld). Het huidige stimulatieprogramma wordt gestopt en het geselecteerde programma wordt tijdelijk geactiveerd tot u op [End Preview] (Voorbeeld beëindigen) klikt. Wanneer u op [End Preview] (Voorbeeld beëindigen) klikt, wordt het oorspronkelijke programma weer geactiveerd. Deze functie kan helpen bepalen welk programma in de Remote Control (Afstandsbediening) moet worden overschreven als alle programmaregels bezet zijn.
• Klik op de gewenste [Program slot] (Programmaregel) in de afstandsbediening en selecteer [Preview] (Voorbeeld).
• Klik op [End Preview] (Voorbeeld beëindigen) om terug te keren naar het vorige actieve programma.
Delete (Verwijderen)• Klik op een [Program slot] (Programmaregel).• Met [Delete] (Verwijderen) wist u het programma uit de afstandsbediening.
Aanvullende informatie• Klik op [Patient Options] (Patiëntopties) om de snelheden te wijzigen.• Klik op [VAS] om pijnniveaus te registreren.
Stimulation Power Button (Stimulatie aan/uit)
BeschrijvingMet de knop Stimulation (Stim) Power (Stimulatie aan/uit) kunt u de stimulatie stoppen en starten. Na het starten wordt een stimulatie opgevoerd naar het opgeslagen amplitudeniveau voor de actieve programma-instellingen.
Werking• Klik op de rode knop [Stop] (Stoppen) in de linker onderhoek van een willekeurig
scherm om de stimulatie te stoppen.• Klik op de groene knop [Turn on] (Inschakelen) om de stimulatie te hervatten.
Softwarehandleiding Bionic Navigator™ HR 1.0
90868740-07 Versie A 70 van 84Softwarehandleiding Bionic Navigator HR 1.0
nl
Hoofdstuk 6 Rapporten
BeschrijvingHet scherm Report (Rapport) wordt gebruikt om een klinisch of patiëntrapport te maken. Door verschillende opties te selecteren voor afzonderlijke patiënten of groepen kan de gebruiker database-informatie maken, bekijken, afdrukken, exporteren of sluiten. Rapporten kunnen per type worden gegenereerd en elk rapport kan worden aangepast aan de hand van sorteerfilters.
Openen/afsluiten• U opent “Reports” (Rapporten) door [Reports] (Rapporten) te selecteren in de
rechter bovenhoek van een willekeurig scherm.• Selecteer [Finish] (Voltooien) om af te sluiten.
Afdrukken en exporteren• Selecteer een [Report Type] (Rapporttype).
Patient Information (Patiëntinformatie)Patient information, clinic information, hardware information, stimulation settings, profile information, battery usage, case history, and patient notes for various time intervals (patiëntinformatie, klinische gegevens, hardwaregegevens, stimulatie-instellingen, profielgegevens, batterijverbruik, medische geschiedenis en opmerkingen over de patiënt over verschillende tijdsintervallen).
Patient List (Patiëntenlijst)Last visit, serial number, implant date and physician (laatste bezoek, serienummer, implantatiedatum en arts).
Clinical Outcomes (Klinische uitkomsten)Implant, last visit, physician, diagnosis, percentages and means, implant duration, mean age, replacements, explants, revisions, and average VAS scores (implantaat, laatste bezoek, arts, diagnose, percentages en gemiddelden, implantatieduur, gemiddelde leeftijd, vervangingen, verwijderingen, revisies en gemiddelde VAS-scores).
Clinic Activity (Klinische activiteit)Laatste bezoek, arts en vervolgonderzoek van patiënt. Hieronder kunnen ook herprogrammeringen, testen, leadimplantaties, totaaloverzicht van de patiënt, gemiddelde duur en totale duur vallen.
Algemeen rapportPrograms, threshold measurement, impedances, battery usage profile, program usage profile, patient history, lead configuration (programma's, drempelmeting, impedanties, profiel batterijverbruik, profiel programmagebruik, patiëntgeschiedenis, leadconfiguratie). De parameters zijn: patient drop-down list (keuzelijst patiënten, selecteren op naam patiënt), from date (begindatum), to date (einddatum) en een selectievakje om de resultaten oplopend/aflopend te sorteren.
• Klik op [Create a Report] (Rapport maken) en selecteer vervolgens Print (Afdrukken) of Export (Exporteren).
Hoofdstuk 7 Testen
90868740-07 Versie A 71 van 84Softwarehandleiding Bionic Navigator HR 1.0
nl
Hoofdstuk 7 Testen
Impedance (Impedantie)
BeschrijvingDe knop Impedance (Impedantie) wordt gebruikt om de elektrische integriteit te controleren. De leadimpedantie wordt gemeten en weergegeven voor elk van de 16 elektrode contacten van de IPG. Impedantiewaarden van meer dan 4500 ohm worden toegeschreven aan open of niet-aangesloten draden en weergegeven met een X.
Openen/afsluiten• Klik voor het openen van een leadimpedantie op [Ω] vanaf het Programming
Screen or EGL Scan Screen (scherm Programmeren of scherm EGL-Scan).• Klik op [Measure] (Meten) om opnieuw te meten.• Klik om af te sluiten op [Close] (Afsluiten).
Aanvullende informatie• Zelfs als een X op een impedantie duidt die hoger is dan normaal, kunnen
elektroden worden opgenomen in de stimulatieconfiguratie.• Alle gemeten impedantiewaarden worden opgeslagen in de database.
Softwarehandleiding Bionic Navigator™ HR 1.0
90868740-07 Versie A 72 van 84Softwarehandleiding Bionic Navigator HR 1.0
nl
De pagina is met opzet leeggelaten.
90868740-07 Rev A 73 de 84Guia do Software Bionic Navigator HR 1.0
pt
Guia do Software Bionic Navigator™ HR 1.0Programador clínico NM-7153-13, NM-7153-13R
CUIDADO: A lei federal só permite a venda, distribuição e utilização deste dispositivo por médicos ou por indicação destes.
Entrada de Texto .........................................................................................................................................................................74Instalação e Comunicação ..........................................................................................................................................................74Sistema .......................................................................................................................................................................................74
Secção 2 Mapeamento da Dor e Pontuações EVA (Escala Visual Analógica) .................................................... 76Módulo Gráfico ............................................................................................................................................................................76EVA (Escala Visual Analógica) ....................................................................................................................................................76
Secção 3 Ficheiros do Paciente ............................................................................................................................. 77Histórico do Caso ........................................................................................................................................................................77Como começar ............................................................................................................................................................................77Notas ...........................................................................................................................................................................................77Seleccione Perfil .........................................................................................................................................................................77
Secção 4 Hardware do Paciente ............................................................................................................................ 79Ligações e Reposições ...............................................................................................................................................................79
Secção 5 Programação e Adaptação do Paciente ................................................................................................ 80Programação de Taxa Elevada ...................................................................................................................................................80Opções (Options) ........................................................................................................................................................................ 80Controlo remoto .......................................................................................................................................................................... 80Botão de Ligar/Desligar de Estimulação .....................................................................................................................................81
Secção 6 Relatórios ................................................................................................................................................. 82Secção 7 Teste ......................................................................................................................................................... 83
Nota: Para obter uma lista das indicações, contra-indicações, advertências, precauções e efeitos secundários pertinentes na prescrição do Sistema Precision™ SCS com Tecnologia MultiWave para terapêutica da dor, consulte o Manual do Médico do Sistema Precision SCS com Tecnologia MultiWave.
Guia do Software Bionic Navigator™ HR 1.0
90868740-07 Rev A 74 de 84Guia do Software Bionic Navigator HR 1.0
pt
Secção 1 Programador clínico
Entrada de Texto
DescriçãoAs opções de entrada de texto são fornecidas para facilitar a entrada de texto. Existem dois métodos para introduzir dados do Perfil do paciente e as Notas do paciente, usando o Teclado CP e a função Painel de Entrada de Tablet PC. O ícone de introdução de texto para a função de introdução do Tablet PC localiza-se na Windows Task Bar (Barra de tarefas do Windows).
Acesso/Saída• Para aceder à [Windows Task Bar] (Barra de tarefas do Windows), desloque
a pen no fundo do ecrã. Clique no [Ícone] teclado numérico.• Para sair da ferramenta de entrada de texto, clique no [X] no canto superior
direito da ferramenta.
Teclado CP O Teclado CP é usado para introduzir informações do paciente pelo método convencional.
Painel de Digitação Tablet PCO Painel de digitação do Tablet é um teclado no qual se pode tocar e uma janela onde é possível escrever.
• Coloque o cursor no [Campo de texto]. Introduza as letras e números adequados no teclado ou escreva o texto na janela de digitação de texto.
Para eliminar informação, clique no Back Space (<–).
Informação Adicional• Consulte os Manuais do Toshiba Portege M400, Série Tablet PC em
www.toshiba.com, para obter instruções adicionais.• Consulte a secção Instalação e Comunicação abaixo, para obter mais
informações.
Instalação e Comunicação
LEVEL
OFF
MARK
LEVEL
OFF
MARK
DescriçãoO Programador Clínico (CP) comunica com o estimulador usando uma ligação infravermelha com o Controlo Remoto. Os programas podem ser carregados para o Programador do clínico pré-visualizar, activar e alterar parâmetros de estimulação. Os programas de estimulação também podem ser guardados no Controlo remoto.
Instalação e OperaçãoCuidado: O CP não é equipamento para o ambiente do paciente conforme definido por IEC 60601-1. O CP e a pessoa que utilizam o CP não deve estar em contacto com o paciente durante a programação.
• Ligue [ON] o CP para visualizar o ambiente de trabalho da Neuromodulação.
• Seleccione o ícone Bionic Navigator™ para iniciar o Sofware Bionic Navigator HR 1.0.
1. Introduza o [Ecrã do Clínico] no Controlo Remoto, premindo os botões Area " e Programa P em simultâneo.
2. Seleccione o “Modo CP”.
• Quando o Controlo Remoto apresenta [CP Ready] (CP Pronto), direccione a janela IR no topo do Controlo Remoto para a Extensão IR.
• Posicione o paciente a sessenta centímetros do Controlo Remoto para garantir a comunicação com o estimulador implantável.
Mantenha o caminho livre entre Extensão IR ligada ao Programador Clínico e à Janela IR do Controlo Remoto.
Utilizar o controlador do paciente (Joystick) • Ajuste o nível de estimulação premindo os botões com setas para cima e para
baixo. Para parar ou desligar a estimulação imediatamente, prima o botão [OFF].
Informação Adicional • Será exibida uma mensagem no Programador Clínico caso a faixa de
comunicação não seja satisfatória.
Sistema
DescriçãoO ecrã sistema proporciona o acesso à selecção da taxa máxima do estimulador, fazendo cópias de segurança da Base de Dados e dos Registos, calculando posições relativas da sonda e informação sobre o estimulador.
Acesso/Saída• Para aceder a “Sistema” seleccione [System] (Sistema) no canto superior direito
do ecrã, faça os ajustes.• Para sair, clique em [Close] (Fechar).
Secção 1 Programador clínico
90868740-07 Rev A 75 de 84Guia do Software Bionic Navigator HR 1.0
ptTaxa Máxima do EstimuladorClique em [Set Stimulator Maximum Rate] (Configurar Taxa Máxima do Estimulador) para seleccionar a taxa máxima a que o estimulador ligado pode funcionar. Note que ao alterar a taxa máxima do estimulador ligado apagará todas as configurações e programas desse estimulador.
• Seleccione o botão rádio para a taxa máxima desejada• Digite a palavra-passe “ACCELERATE10K” no campo palavra-passe.• Para activar, clique em [Apply to Stimulator] (Aplicar ao Estimulador)
Será exibida uma mensagem que indicará que todos os programas serão apagados do estimulador.
• Clique em [Yes] (Sim). Será exibida uma mensagem que indicará que a taxa máxima do Estimulador foi actualizada.
• Para sair, clique em [Close] (Fechar).Ao programar um paciente a 1,200 Hz ou inferior, em primeiro lugar configure a Taxa Máxima para 1,200 Hz usando o Software Bionic Navigator HR 1.0 e depois use o Software Bionic Navigator 1.2 para programar o paciente.
Ao programar um paciente acima de 1,200 Hz, em primeiro lugar configure a Taxa Máxima adequada, usando o Software Bionic Navigator HR 1.0 e depois programe o paciente com o mesmo software.
Sistema • Clique em [System Info] (Info do Sistema) para verificar o estimulador
e informação sobre o Controlo Remoto.Para criar manualmente um ficheiro comprimido separado da base de dados e dos registos, clique em [Backup Data/Logs] (Cópia de Segurança de Dados/Registos). Para verificar o estimulador e a informação do Controlo Remoto sobre a identificação, tipo, versão, voltagem da bateria e estado, clique em [System Info] (Info do Sistema). Para exibir posições relativas da sonda, clique em [EGL Scan] (Análise EGL).
Cópia de Segurança de Dados/Registos (Backup Data/Logs)Para criar um ficheiro comprimido separado da base de dados e registos.
• Insira um [Removable media] (Suporte de dados amovível) para copiar a base de dados e os registos.
- Este suporte de dados amovível não deve ser etiquetado como “CLÍNICA”
• Clique no botão Backup Data/Logs (Cópia de Segurança de Dados/Registos)- A Base de Dados é copiada com sucesso quando a mensagem aparece
• Clique em [OK] para sair.
Informação do Sistema
• A Informação do Sistema só se encontra disponível quando o estimulador está ligado ao Programador Clínico.
EGL Scan™
A imagem Análise EGL exibe as posições relativas da sonda.
• Clique em [EGL Scan] (Análise EGL) para aceder à imagem. - A Análise EGL encontra-se disponível apenas se for suportada pelo
estimulador. - O uso da Análise EGL com um estimulador de avaliação externo
originará um aviso para um pedaço da sonda. O pedaço deve ser ignorado.
• Opcionalmente, seleccione o número de amostras e a amplitude a ser usada na Análise EGL antes de iniciar a a Análise EGL.
• Para imprimir a Imagem de Análise EGL, clique em [Print] (Imprimir) ou [Cancel] (Cancelar) para sair.
Informação AdicionalPara alterar as configurações do paciente use [Patient Options] (Opções do Paciente).
Guia do Software Bionic Navigator™ HR 1.0
90868740-07 Rev A 76 de 84Guia do Software Bionic Navigator HR 1.0
pt
Secção 2 Mapeamento da Dor e Pontuações EVA (Escala Visual Analógica)
Módulo Gráfico
DescriçãoO Módulo Gráfico é usado para identificar as áreas de dor usando uma representação visual das áreas de cobertura anatómica em relação ao paciente. As áreas de dor podem ser inseridas no ecrã Perfil do Paciente.
Acesso/Saída• Para aceder ao “Módulo Gráfico”, seleccione [Perfil].• Para guardar informações e sair, seleccione [Finish] (Concluir).
Inserir Dor• Seleccione [Profile] (Perfil).
As regiões de Pain (Dor) só podem ser inseridas no ecrã Perfil do Paciente.
• Clique nas [Regions] (Regiões) do Módulo Gráfico para indicar as localizações da dor.
Resolução (RES)• Clique em [RES] para alternar entre resolução de mapeamento baixo e elevado.
Visualizar• Clique em [VIEW] (Visualizar) para alternar entre frontal e traseiro no Módulo
Gráfico.
Informação Adicional• Clique no botão VAS para documentar uma Escala Analógica Visual.
EVA (Escala Visual Analógica)
DescriçãoO ecrã EVA documenta o nível actual de dor do paciente com a estimulação “On” (ligado) ou “Off” (desligado). Bionic NavigatorTM indicará se a estimulação está “On” (ligado) ou “Off” (desligado) no momento em que a pontuação é gravada. A última pontuação será exibida no botão de acesso EVA; o vermelho indica que a estimuação está desligada sem terapia) e o azul que a estimulação está ligada (com terapia). Pode criar-se um relatório comparativo se as pontuações VAS forem gravadas com a estimulação ligada e desligada.
Acesso/Saída• Para aceder à Escala Analógica Visual, seleccione EVA no Perfil ou Remota.• Para sair da EVA, clique em [OK] para gravar a informação ou [Cancel]
(Cancelar).
Pontuação• Deslize ou clique no ponteiro no [Numerical Point] (Ponto Numérico) no ecrã que
reflecte o nível actual de dor do paciente com estimulação [On] (ligada) ou [Off] (desligada).
A pontuação 0 equivale a não ter dor. Uma pontuação 10 equivale à pior dor possível.
Informação Adicional• A EVA exibida corresponde às últimas pontuações EVA inseridas na sessão.• Clique em Relatórios para visualizar o histórico EVA.• A última pontuação EVA obtida numa sessão é armazenada na base de dados
como a pontuação dessa sessão.
Secção 3 Ficheiros do Paciente
90868740-07 Rev A 77 de 84Guia do Software Bionic Navigator HR 1.0
pt
Secção 3 Ficheiros do Paciente
Histórico do Caso
DescriçãoO Histórico do Caso exibe as consultas do paciente datadas cronologicamente.
Acesso/Saída• Para aceder à informação do “Histórico do Caso” seleccione [Profile] (Perfil),
depois [Case History] (Histórico do Caso).• Para sair, seleccione [OK].
Informação Adicional• O Histórico do Caso também pode ser visualizado e impresso a partir de
Relatórios.• Clique em Perfil para inserir Notas.• Clique em Iniciar para aceder ao “Motivo da Consulta”.
Como começar
DescriçãoO Ecrã de Início é usado para iniciar uma sessão do paciente. É possível seleccionar o modo de programação de Taxa Elevada a partir deste ecrã. Os botões funcionais (localizados no topo de cada ecrã) proporcionam o acesso à informação do ficheiro do paciente e a outras funcionalidades do sistema.
Acesso/Saída• O “Ecrã Início” abre-se quando se inicia o Software Bionic NavigatorTM HR 1.0,
ou quando é seleccionado [Start] (Início) a partir do canto superior direito em qualquer ecrã.
• Para sair, seleccione [any button] (qualquer botão) localizado no ecrã ou feche o Bionic Navigator.
Nome do Paciente• Para inserir a informação do paciente, selecione a seta para baixo no campo
[Patient Name] (Nome do Paciente), depois seleccione um paciente apropriado na lista por ordem alfabética ou seleccione um [New Patient] (Novo Paciente) e surgirá automaticamente o Perfil.
Motivo da Consulta• Clique no campo [Reason for Visit] (Motivo da Consulta), depois seleccione uma
entrada de consulta adequada.
Informação Adicional• Clique em Remoto para prosseguir para os programas do paciente guardados no
Controlo Remoto.• Clique em Relatórios para personalizar um relatório do paciente ou do clínico.• Clique em Iniciar para reiniciar a sessão.• Clique em Perfil para inserir ou visualizar informação do paciente.• Clique emProgramação para criar/modificar programas.
Notas
DescriçãoO Ecrã de notas é usado para inserir informações relevantes, que estão armazenadas e que podem ser visualizadas cronologicamente no histórico do caso do paciente.
Acesso/Saída• Para aceder às “Notas”, seleccione Perfil, depois [Notes] (Notas).
- Insira as notas do paciente usado o teclado CP ou as opções do Painel de Digitação do Tablet PC.
• Para sair, seleccione [OK] ou [Cancel] (Cancelar) para voltar ao ecrã Perfil.
Informação Adicional• As notas actuais podem ser editadas.• As notas anteriores são apenas de leitura.• Clique em Histórico de Caso para visualizar notas antigas e ir para Relatórios.
Seleccione Perfil
DescriçãoO ecrã Perfil é uma área em que o utulizador insere ou edita informação necessária para gerar ou actualizar os registos do paciente. Este ecrã permite que o utilizador entre, visualize ou edite a Informação de Identificação do Paciente, Informação de Contacto do Paciente, Áreas de Dor, a pontuação EVA, Notas e Informação Histórico do Caso.
Acesso• Para aceder a “Perfil do Paciente”, seleccione [Profile] (Perfil) no canto
superior direito do ecrã.• Para inserir um novo paciente no Ecrã Início, clique no menu pendente no
campo [patient name] (nome do paciente) e seleccione [new patient] (novo paciente) na lista.
• Isto irá reenviá-lo(a) automaticamente para o Ecrã Perfil para inserir a nova informação do paciente e voltará para o Ecrã Início quando estiver concluído.
Guia do Software Bionic Navigator™ HR 1.0
90868740-07 Rev A 78 de 84Guia do Software Bionic Navigator HR 1.0
pt• Para visualizar ou editar um paciente existente no Ecrã Início, clique no menu
pendente no campo [Patient Name] (Nome do Paciente) e seleccione o paciente na lista. Depois clique em Perfil no canto superior direito do Ecrã Início.
Digitar e editar informações do paciente1. Insira a informação usando a Entrada de Texto, Teclado CP ou Painel de
Digitação Tablet PC.2. Clique em [Finish] (Concluir) para guardar a informação e voltar ao “Ecrã
Início”.
Informação Adicional• Nome do Paciente e data de nascimento são campos de preenchimento
obrigatório.• Clique em Módulo Gráfico para identificar e documentar a área de dr do
paciente.• Clique em EVA para documentar o nível de intensidade de dor, depois seleccione
OK.• Clique em Notas para inserir comentários no ficheiro do paciente.• Clique noHistórico do Caso para visualizar cronologicamente a informação do
ficheiro do paciente, incluindo o histórico da consulta e notas.
Secção 4 Hardware do Paciente
90868740-07 Rev A 79 de 84Guia do Software Bionic Navigator HR 1.0
pt
Secção 4 Hardware do Paciente
Ligações e Reposições
LEVEL
OFF
MARK
LEVEL
OFF
MARK
DescriçãoLigação é o termo da Boston Scientific para programar o Controlo Remoto para comunicar com um estimulador específico e determinar o programa de terapia que os dispositivos partilharão. A reconfiguração descreve o processo de eliminação de programas previamente armazenados num Controlo Remoto clínico e/ou num Estimulador de Avaliação.
Operação• Um novo Controlo Remoto pode ser associado a um novo Estimulador de
Avaliação, carregado com um “programa” preliminar através do Programador Clínico durante a cirurgia e disponibilizado para o paciente.
• Um Controlo Remoto associado a um Estimulador de Avaliação mas mantido na clínica deve ser dissociado do Estimulador de Avaliação antes de poder ser usado com outro Estimulador de Avaliação ou com um IPG Ao ligar-se com o novo dispositivo, o remoto será solicitada a sua opinião sobre como reconfigurar o equipamento.
Controlo remotoA ligação de um Controlo Remoto não ligado irá automaticamente apresentar o seu estado quando for premido qualquer botão. Prima o Programa P no remoto para iniciar uma ligação com o estimulador na gama de telemetria:
• O remoto identificará o dispositivo visado e determinará o estado do estimulador programado.
• O remoto irá comparar o seu estado programado com o do estimulador e pedir-lhe que escolha um das definições do programa, se aplicável.
• Se a definição preferida do programa for o programa do Controlo Remoto, precisará de inserir a palavra-passe do clínico antes de descarregar os programas do remoto.
• Se nem o remoto nem o estimulador têm programas armazenados, a ligação do dispositivo é imediata.
DissociarPrima e mantenha premido os botões Área " e Programa P no Controlo Remoto durante aproximadamente três segundos para ceder ao ecrã Inserir Opções do Clínico.
• No ecrã Inserir Opções do Clínico, seleccione “Eliminar Ligação”. • Após o aviso, insira a palavra-passe do clínico.
O Controlo Remoto dissociado irá imediatamente apresentar o seu estado. Pode dissociá-lo imeditamente ou premir " para adiar a ligação.
Reposições do Programador Clínico• Ligue o Dongle IR/Extensão USB na porta USB e deslize o Controlo Remoto
para a bolsa. • Posicione a janela IR no Controlo Remoto em linha com a janela IR do dongle. • Insira o [Clinician’s screen] (Ecrã do Clínico), se apropriado, no Controlo
Remoto. • Uma mensagem “CP Pronto” será exibida.
Guia do Software Bionic Navigator™ HR 1.0
90868740-07 Rev A 80 de 84Guia do Software Bionic Navigator HR 1.0
pt
Secção 5 Programação e Adaptação do Paciente
Programação de Taxa Elevada
DescriçãoO ecrã de Programação exibe as definições de estimulação activa e permite aprogramação de anódos, cátodos e parâmetros. Ao entrar no ecrã Programação, as definições de estimulação activas são exibidas.
Acesso/Saída• Para aceder à “Programação de Taxa Elevada”, seleccione [Programming]
(Programação) ao centro do fundo do ecrã.• Seleccione [Next] (Seguinte) para avançar para Remoto, onde o programa pode
ser guardado no Controlo Remoto.
Programação• Defina eléctrodos clicando no [desired electrode] (eléctrodo desejado).
Clique nos [Electrodes] para atribuir polaridade. A Polaridade do Eléctrodo alterna entre OFF (desligado), anódo (+) e cátodo (-).
• Só pode ser programado um anódo e um cátodo.• Para parar e iniciar toda a estimulação, use o principal [Stimulation Power
Button] (Botão de Estimulação) no canto superior esquerdo.• [Ajuste a amplitude, taxa e largura de pulso] clicando na seta apropriada.• Clique, e/ou clique sem soltar, nas teclas de seta de amplitude para cima
e para baixo, para aumentar/diminuir o valor em graus de amplitude. Os graus de amplitude variam de acordo com a selecção da seta. Para frequências que permitem 0,1 mA graus de amplitude, as setas simples aumentam/diminuem 0,1 mA e as setas duplas aumentam/diminuem 0,2 mA. Para frequências que permitem 0,2 mA graus de amplitude, as setas simples aumentam/diminuem 0,2 mA e as setas duplas aumentam/diminuem 0,4 mA.
Opções (Options)
DescriçãoO ecrã Opções permite visualizar e editar as definições adicionais do programa para um paciente, como a alternância de estimulação, tempo de arranque, amplitude mínima e máxima.
Acesso/Saída• Para aceder às “Opções”, seleccione [Programming] (Programação), depois
[Options] (Opções).• Para guardar os parâmetros clique em [OK].
CicloA selecção do Ciclo determina a duração do tempo em que a estimulação está ligada e desligada.
• Verifique a caixa “Ciclo” e depois configure a duração On (ligado) e Off (desligado).
Tempo de ArranqueO tempo de arranque representa o tempo necessário para aumentar gradualmente a estimulação de zero até à amplitude programada.
• Configure o tempo de arranque.
Min mA
Configure o Min mA para configurar o limite mais baixo para o nível de amplitude de estimulação. Min mA é aplicado ao programa actual.
Max mAConfigure o Max mA para configurar o limite mais alto para o nível de amplitude de estimulação. Max mA é aplicado ao programa actual.
Controlo remoto
DescriçãoO ecrã Controlo Remoto apresenta os programas armazenados no Controlo Remoto, que podem ser activados, pré-visualizados ou eliminados. Os programas também podem ser guardados no Controlo remoto a partir deste ecrã.
Opções do pacienteAdicionalmente, são fornecidas as opções para a taxa de bloqueio e o controlo da largura do pulso no Controlo Remoto. As opções seleccionadas são descarregadas para o Controlo Remoto. A selecção bloqueio proporciona ou impede o acesso do paciente na largura do pulso e taxa de controlo do Controlo Remoto.
• Marque/desmarque a caixa apropriada para bloquear/proporcionar o acesso do paciente na largura do pulso e taxa de controlo do Controlo Remoto.
Acesso/Saída• Para aceder a “Controlo Remoto”, seleccione [Remote] (Remoto) no canto
inferior direito do ecrã.• Para sair do “Controlo Remoto” e voltar ao “Ecrã Início”, clique em [Finish]
(Concluir). • Para voltar ao ecrã anterior seleccione [Back] (Voltar).
Guardar um Programa no RemotoO programa activo (actualmente em estimulação) pode ser guardado num dos quatro programas do Controlo Remoto.
• Clique no [Program slot] (Programa Seleccionado), depois em [Save To] (Guardar em). O programa activo será guardado na entrada do programa seleccionado. Se o Controlo Remoto possui quatro programas seleccionados, seleccione o programa que será eliminado com o novo programa, depois seleccione [Save To] (Guardar em).
[] indica o último programa activado ou guardado.
Secção 5 Programação e Adaptação do Paciente
90868740-07 Rev A 81 de 84Guia do Software Bionic Navigator HR 1.0
ptActivar um Programa no Controlo RemotoO botão Activar escolhe um programa seleccionado do Controlo Remoto e activa-o (inicia o programa de estimulação), substituindo-o pelo programa de estimulação actual.
• Seleccione o [Program slot] (Programa seleccionado) e clique em [Activate] (Activar) ou [Activate (Stim off)] (Activar).
[Activate (Stim off)] (Activar) activa um programa com a estimulação desligada.
• Para modificar o programa:Vá a [Programming] (Programação), faça os ajustes, depois guarde no Controlo Remoto.
Pré-visualizarAntes de eliminar o programa de estimulação actual com um programa do Controlo Remoto, pode pré-visualizar um programa no Controlo Remoto Clique no [Preview] (Pré-Visualizar). O programa de estimulação actual será interrompido e o programa seleccionado será activado temporariamente até que cliquem em [End Preview] (Terminar Pré-Visualização). Quando clicarem em [End Preview] (Terminar Pré-Visualização), o programa original é activado. Esta função pode ajudar a determinar que programa do Controlo Remoto será eliminado quando as vagas dos programas estão preenchidos.
• Clique no [Program slot] (Programa Seleccionado) em Controlo Remoto e depois seleccione [Preview] (Pré-Visualizar).
• Clique em [End Preview] (Terminar Pré-Visualização) para voltar ao programa original activo.
Eliminar• Clique num [Program slot] (Programa seleccionado).• Para eliminar o programa no Controlo Remoto seleccione [Delete] (Eliminar).
Informação Adicional• Clique em [Patient Options] (Opções do Paciente) para alterar os bloqueios.• Clique em [VAS] (EVA) para documentar os níveis de dor.
Botão de Ligar/Desligar de Estimulação
DescriçãoO botão Ligar/Desligar Estimulação (Stim) irão parar e iniciar a estimulação. Depois de iniciada, a estimulação arrancará nos níveis de amplitude armazenados nas definições de programas activos.
Operação• Clique no botão vermelho [Stop] no canto inferior esquerdo de qualquer ecrã
para parar a estimulação.• Clique no botão verde [Turn on] (Ligar) para retomar a estimulação.
Guia do Software Bionic Navigator™ HR 1.0
90868740-07 Rev A 82 de 84Guia do Software Bionic Navigator HR 1.0
pt
Secção 6 Relatórios
DescriçãoO ecrã Relatório é usado para criar um relatório do paciente ou do clínico. A selecção de várias opções para pacientes individuais ou grupos de pacientes permite ao utilizador criar, ver, imprimir, exportar ou fechar informações da base de dados. Os relatórios podem ser gerados por tipo e cada relatório pode ser personalizado através de filtros de ordenação.
Acesso/Saída• Para aceder a “Relatórios”, seleccione [Reports] (Relatórios) no canto superior
direito do ecrã.• Para sair, seleccione [Finish] (Concluir).
Imprimir e Exportar• Seleccione [Report Type] (Tipo de Relatório).
Informações do pacienteInformações do paciente, informações clínicas, informações sobre equipamento, definições de estimulação, informações de perfil, uso da bateria, histórico do caso e notas sobre o paciente respeitantes a diversos intervalos de tempo.
Lista de PacientesÚltima consulta, número de série, data do implante e médico.
Resultados ClínicosImplante, última consulta, médico, diagnóstico, percentagens e médias, duração do implante, idade média, substituições, explantes, revisões e pontuações médias EVA.
Actividade ClínicaÚltima consulta, médico e acompanhamentos do paciente. Pode incluir reprogramações, implantes de sonda, total de pacientes, durações médias e durações totais.
Relatório genéricoProgramas, limiar de estimulação, impedâncias, perfil de uso de bateria, perfil de uso do programa, histórico do paciente econfiguração da sonda. Os parâmetros incluem: lista pendente do paciente (seleccionar pelo nome do paciente), data e uma caixa para listar o resultado por ordem ascendente/descendente.
• Clique em [Create a Report] (Criar um Relatório), de seguida em imprimir ou exportar.
Secção 7 Teste
90868740-07 Rev A 83 de 84Guia do Software Bionic Navigator HR 1.0
pt
Secção 7 Teste
Impedância
DescriçãoO botão Impedância é usado para verificar a integridade eléctrica. A impedância da Sonda é medida e apresentada para cada um dos 16 contactos IPG do eléctrodo. As impedâncias superiores a 4.500 Ω são consideradas como resultantes de fios abertos ou não conectados, apresentados com um X.
Acesso/Saída• Para aceder à impedância da sonda, clique em [Ω] no Ecrã de Programação ou
Ecrã de Análise EGL.• Para executar uma nova medição, clique em [Measure] (Medir).• Para sair, clique em [Close] (Fechar).
Informação Adicional• Embora um X indique impedâncias superiores ao normal, os eléctrodos ainda
podem ser incluídos na configuração da estimulação.• Todas as impedâncias medidas são guardadas na base de dados.
Guia do Software Bionic Navigator™ HR 1.0
90868740-07 Rev A 84 de 84Guia do Software Bionic Navigator HR 1.0
pt
Esta página foi deixada em branco intencionalmente
Boston Scientific Neuromodulation25155 Rye Canyon LoopValencia, CA 91355 USA(866) 789-5899 in US and Canada(661) 949-4000, (661) 949-4022 Fax(866) 789-6364 TTYwww.bostonscientific.comEmail: [email protected]