26
BIOS Boot Hijacking And VMware Vulnerabilities Digging Sun Bing [email protected] POC2007 Seoul Korea 16 th Nov 2007

BIOS Boot HijackingAnd
VMware Vulnerabilities Digging
POC2007 Seoul Korea
16th Nov 2007
PARTI: BIOS Boot Hijacking
In this part, I will disclose a fire-new BIOS Boot hijacking method by using the so-called “Top-Block Swap” mode that is supported by Intel ICHx series south bridge chips. The “Top-Block Swap” mode of ICHx swaps the top block (the Boot Block) in the Firmware Hub (FWH) with another location, which allows for safe update of the Boot Block even if a power failure occurs, however due to a negligence in BIOS designing and coding, it fails to lock down the swap function before handing over the control to operating system once Boot phase successfully completed, which then makes an original security mechanism become a severe security hole, a malicious program can easily exploit this swap function to perform a DOS attacks, which would lead to a Boot failure of the victim computer, or to be even worse it may directly inject a piece of customized codes into the swap block, which enables this codes to gain execution control even before system BIOS and then to compromise the whole system.

Reset Vector
When creating an address, CPU only need to add the offset to the base address located in the invisible part of segment register, regardless of the current CPU mode – real mode or protected mode, and when switching from real mode to protected mode (or being back to real mode from protected mode), the segment base address, limit and right attribute will not change as long as the corresponding segment register has not been reloaded.
Right after CPU power-on, the selector value of CS segment register is 0xF000, EIP is 0x0000FFF0, however the base address at that time is 0xFFFF0000, therefore the first instruction address executed by CPU is at 0xFFFFFFF0 (a.k.a., Reset Vector) other than 0xFFFF0 that is computed by the real mode method (segment register value left shifts 4 bits then plus the offset), but after the first far jump and CS segment reloading, the base address will be altered.
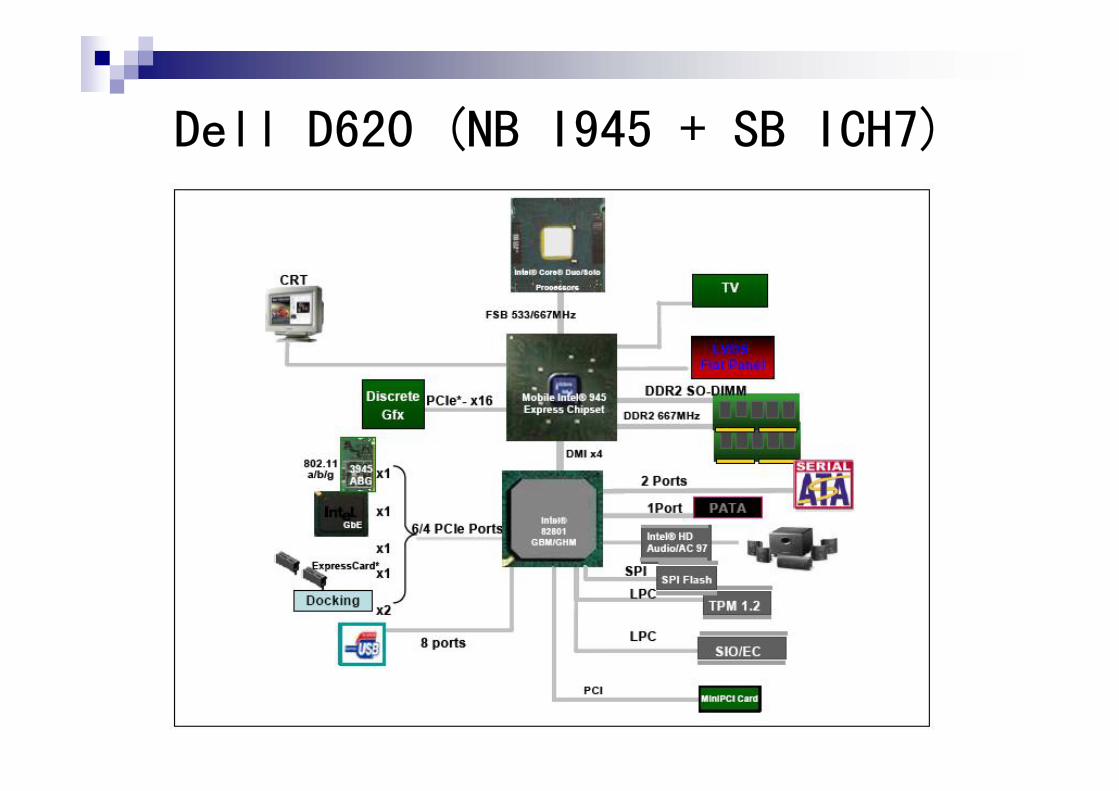
Dell D620 (NB I945 + SB ICH7)
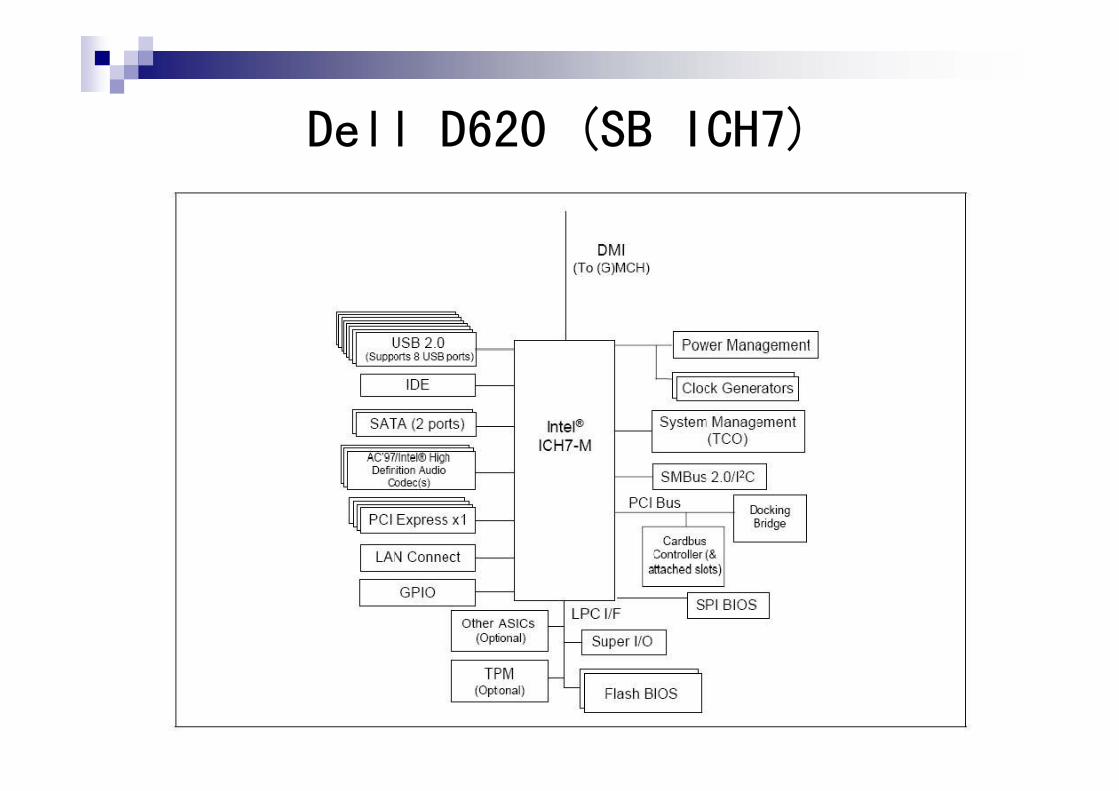
Dell D620 (SB ICH7)

BIOS Memory Address Decoding Map
Right after machine power-on and the very beginning of the Boot stage, the E_segment (0xE0000~0xEFFFF) and F_segment (0xF0000~0xFFFFF) are not claimed by North Bridge, and all accesses to these ranges are actually forwarded to South Bridge and decoded by Firmware Hub (FWH) until subsequently North Bridge RAM shadowing function will be enabled by BIOS code.
E_segment/F_segment and their counterparts in High BIOS Area (topmost 2M in the whole accessible 4G physical memory space) are both decoded by FWH into the last two 64k of BIOS ROM chip, so we can say that E_segment and F_segment alias to 0xFFFE0000~0xFFFEFFFF and 0xFFFF0000~0xFFFFFFFF respectively.
The first instruction that CPU executes upon power-on is at 0xFFFFFFF0 (alias to 0xFFFF0 and both are within BIOS ROM chip) where usually a far jump instruction resides (mostly JMP F000:E05B, and after this jump CS base 0xFFFF0000 will get flushed) , so the next instruction will be fetched from 0xFE05B (alias to 0xFFFFE05B) which is also decoded into BIOS ROM.

Memory Range Decode Map of ICH7
The Working Principle of Swap Mode
The Intel ICHx series South Bridge (since ICH2) supports a “Top-Block Swap” mode that has the ICHx swap the top block in the Firmware Hub (the Boot Block) with another location, which allows for safe update of the Boot Block even when a power failure occurs. When the “TOP_SWAP” Enable bit (BUC.TS) is set, the ICHx will invert the 16th bit of address line A16 for cycles targeting Firmware Hub space, in this way processor accesses to 0xFFFF0000~0xFFFFFFFF will be directed to 0xFFFE0000~0xFFFEFFFF in the Firmware Hub, and vice versa, and this bit can only be cleared by a RTCRST# (Real Time Clock Reset Signal). Moreover ICHx also provides a BIOS Interface Lock-Down bit (GCS.BILD) to prevent “TOP_SWAP” bit from being altered, and a Top Swap Status bit (BIOS_CNTL.TSS) as well to view the current status of Top Swap bit. One thing should be noticed is that the Swap mode has no effect on accesses below 0xFFFE0000.

Top-Block Swap Enable Bit
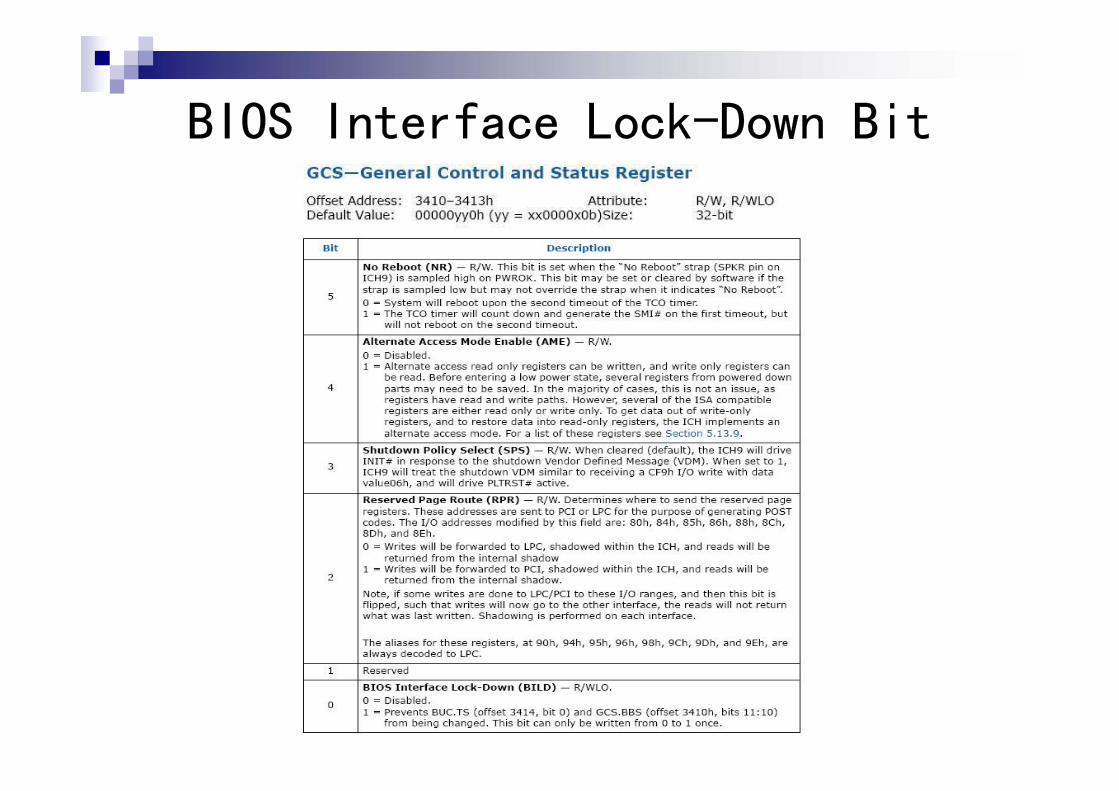
BIOS Interface Lock-Down Bit

Swap Mode Based BIOS Safe Update Scheme
This BIOS update scheme is based on the concept that the top block (0xFFFF0000~0xFFFFFFFF) is reserved as the “boot” block, and the block immediately below the top block (0xFFFE0000~0xFFFEFFFF, “swap” block) is reserved for doing boot-block updates. The algorithm is:
1. Software copies the top block to the block immediately below the top.
2. Software checks that the copied block is correct. This could be done by performing a checksum calculation.
3. Software sets the TOP_SWAP bit, enable the A16 address bit inversion.
4. Software erases the top block.
5. Software writes the new top block.
6. Software checks the new top block.
7. Software clears the TOP_SWAP bit.
8. Software sets the Top_Swap Lock-Down bit.
If a power failure occurs at any point after step 3, the system will be able to boot from the copy of the boot block that is stored in the block below the top. This is because the TOP_SWAP bit is backed in the RTC well.
The Exploitation of Swap Mode
Because most BIOS codes fail to lock down the swap function by setting the BIOS Interface Lock-Down bit in ICHx South Bridge before transferring control to operating system after Boot process finished, a malicious program may therefore exploit this security hole to perform a DOS or code injecting attack against the victim host.
Demonstration:View the result of address inversion under Top Swap mode.

DOS AttackOnly setting “TOP_SWAP” enable bit but not preparing a proper boot code at the location of backup block (the second 64k block below the top of 4G physical memory space) would lead to a kind of DOS attack which results in the boot failure of the victim computer until having discharged its CMOS, the reason is that once set, the “TOP_SWAP” enable bit will be kept permanently within the RTC register until a signal of RTCRST# asserted.
void enable_top_swap(){
unsigned long prcba, gcs;void *p;prcba = retrieve_rcba();p = MapPhysicalAddressRange(prcba + 0x3410, 0x10);gcs = *(unsigned long*)p;// test GCS.BILD bitif (!(gcs & 1)){
// not locked, set BUC.TS*((unsigned char*)p + 4) |= 1;
}UnmapPhysicalAddressRange(p, 0x10);return;
}

Code Injecting Attack (1)
We can achieve an easy BIOS Boot Hijacking with the support of “Top-Block Swap” mode: Firstly, try to write (BIOS flashing) our customized codes into the backup block (0xFFFE0000~0xFFFEFFFF), and next set the “TOP_SWAP” enable bit (and BILD bit as well), eventually upon the next power-on the first instruction fetched by processor at location 0xFFFFFFF0 will be actually redirected to 0xFFFEFFF0, which then gives our customized codes a chance to execute before system BIOS. Comparing with known BIOS execution Hijacking techniques, for example replacing some unneeded procedure(s) in original.tmp or patching the so-called "POST jump table" to include a "jump" into our own procedure, this swap mode based method seems more secret, because the original BIOS entry point is unchanged, and possibly more generic (here the word “generic” means that the Hijacking must be implemented with the precondition of not having the knowledge of the type of Mainboard chipset, BIOS ROM chip, and BIOS image structure etc), if only the backup block is free and not the target of checksum calculating.
Code Injecting Attack (2)In practice, there are still some technical problems need to be resolved first with this code injecting attack scheme:
1. The opportunity to perform the customized code flashing into BIOS: It’s not a safe and stealthy way to perform flashing in the middle of Windows operating system running stage, instead we may adopt a better solution used by IBM BIOS update utility (DOSBOOT.sys): Hooks the system shutdown function“HalReturnToFirmware” exported by HAL.dll, then switch CPU to the real mode and perform the flashing right before system shutdown.
2. The transition method from “Top-Block Swap” mode to non-“Top-Block Swap” mode: Because usually the BIOS will calculate the checksum of the whole image of itself using the high BIOS address other than the low address aliases, we have to reset the “TOP_SWAP” bit before transferring control to the original BIOS entry point (via RAM as a trampoline), and set it again sometime later in our hook routines to avoid the losing control forever.
3. Customized code’s payload: The payload of our customized code is extremely limited because it will be executing before the completion of system initialization, which means no BIOS services can be invoked to interact with VGA and Disk controllers etc, therefore a conceivable solution is to implement something like a self-contained mini-BIOS that has enough knowledge on the underlying hardware it manages, however which is inevitably hardware-specific and non-portable.
Prevention Countermeasures
To prevent these kind of abuses (including SMI handler and ATA password security issues) we have discussed so far in this presentation, there are two methods can be applied:
1. For those configuration registers and control commands which have relevant locking mechanisms, a third-party pre-boot software will be applicable to utilize these mechanisms to freeze the current settings until the next cold boot in case that system BIOS probably hasn’t locked them by default.
2. Deploying a Secure Virtual Machine (SVM) based on modern processor’s hardware virtualization support to intercept and filter out/emulate those insecure registers configuration or device control operations.

PART II: VMware Vulnerabilities Digging
Statement:This is not a complete and well-written research paper, and I don’t plan to disclose any technical detail of VMware 0days I have found so far, my purpose here is just to provide some ideas about client software vulnerabilities digging methods, hope that will be helpful for you.
Agenda:1. VMware Services2. VMware VMX3. VMware Drivers4. VMware Virtual Machine Monitor (VMM)
VMware Services
VMware Services:DHCP/NAT Service: vmnetdhcp.exe, vmnat.exeAuthorization Service: vmware-authd.exeVirtual Mount Manager Extended: vmount2.exe…
Recently Known Vulnerabilities:CVE-2007-0061: malformed packet, corrupt stack memory.CVE-2007-0062: malformed DHCP packet, Integer overflow.CVE-2007-0063: malformed DHCP packet, Integer underflow.…

VMware Service 0day Demo
Demonstration:This is a standard local privilege escalation vulnerability, which can be used to execute ring0 codes or access files that normally require higher access rights. Under some circumstances, this security hole can also be exploited remotely, such as from Windows network neighborhood (SMB).

VMware VMX
VMware VMXvmware-vmx.exe, the user mode virtual machine process living in the Host world, which handles VMware backdoor invocation and most devices emulation.
Recently Known Vulnerabilities:CVE-2007-4496: SVGA_CMD_DEFINE_CURSOR handler integer overflow.CVE-2007-4497: RPC VMXI_Proxy_Msg subcommand 0x1f handler infinite loop and read access violation.…
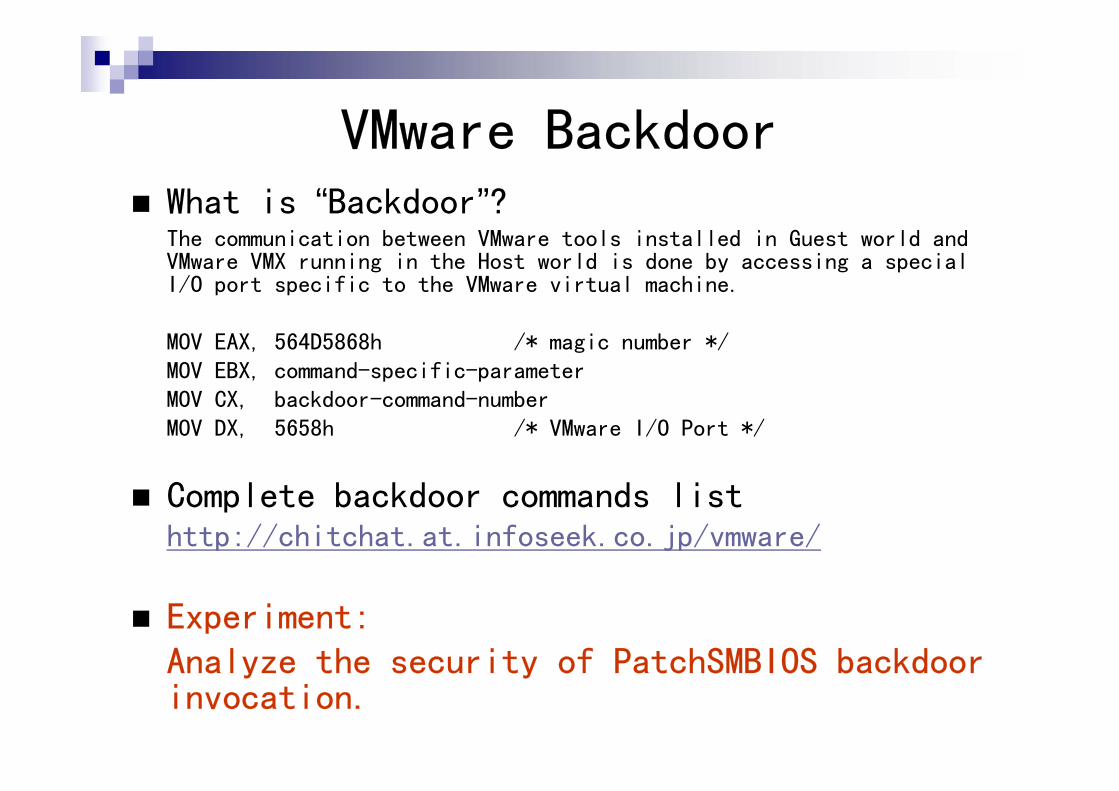
VMware BackdoorWhat is “Backdoor”?The communication between VMware tools installed in Guest world and VMware VMX running in the Host world is done by accessing a special I/O port specific to the VMware virtual machine.
MOV EAX, 564D5868h /* magic number */MOV EBX, command-specific-parameterMOV CX, backdoor-command-numberMOV DX, 5658h /* VMware I/O Port */
Complete backdoor commands listhttp://chitchat.at.infoseek.co.jp/vmware/
Experiment:Analyze the security of PatchSMBIOS backdoor invocation.

VMware VMX 0day Demo
Demonstration:This is a corrupt memory vulnerability, which can be used by an unprivileged Guest user to crash the VMware VMX process in the Host world or to compromise the Guest OS processes or kernel (possibly escalate its privilege), however due to some restrictions, this vulnerability is only conditionally exploitable.

VMware DriversVMware Drivers
vmx86.sysvmnet.sys, vmnetadapter.sys, vmnetbridge.sysvmusb.sys…
Open source code in Linuxvmmonvmnet
Interesting VMX86 IOCTLs that facilitate arbitrary memory manipulation and ring0 code execution:
IOCTL_VMX86_CREATE_VM, IOCTL_VMX86_INIT, IOCTL_VMX86_RUN_VM: a fake crosspage,VMM and VMIOCTL_VMX86_LOOK_UP_MPN, IOCTL_VMX86_LOCK_PAGE, IOCTL_VMX86_WRITE_PAGE…

VMware Virtual Machine Monitor
Where is it?It resides within VMware VMX (vmware-vmx.exe).
How to dump it?Access unimplemented devices regions, such as the reserved IOAPIC registers, which would make VMM panic and to generate a core dump for analysis.
VMware VMM security considerations:A parasitical Rootkits hidden within VMware VMM, which gets executed at ring0 mode in the Guest world.
A feasible way to run ring0 code, which can bypass driver signature verification imposed by Vista.

Acknowledgements
Firstly, I have to say that this paper really refer a lot to the works of many forthgoers in BIOS R&D field, such as the wonderful tutorials by Darmawan, the source codes of Uniflash and LinuxBIOS etc, without their great works, it was impossible for me to complete this paper so smoothly.
Secondly, I would like to thank my friend Icelord who is the author of BIOS Rootkits Iclord. The discussions between us have helped me resolve some problems, and also provided me with many inspirations on technical aspect.
Finally, once again, let me express my most sincere thanks to all people who make contributions to this presentation!

Thank You For Watching!Question & Discussion
Time


