Biweekly Payroll [BIPY] The Biweekly Payroll (BIPY) on-line documentation is divided into the following sections: Section 1 — Introduction to the BIPY Form ● Objectives ● Overview of the Form ● Structure of the Form Section 2 — Initial Use of the BIPY Form ● Getting Ready to Put Employees on the Form ● Pulling up a Blank Form ● Page 1 — Completing the Summary of Totals Screen ● Display Fields on the Summary of Totals Screen ● Page 2 — Completing the Summary of Details Screen ● Entering a SSN More Than Once ● Adding the Form ● Page 2 — Completing the Employee's Detail Card ● Page 3 — Completing the Employee's Detail Card ● Display Fields on the Summary of Details Screen ● Navigating Through Summary of Details Screens ● Submitting the Form Section 3 — What Happens to the BIPY Form ● Approval Cycle of the Form ● Re-Adding a Rejected Form ● What Happens to the Processed Form Section 4 — Subsequent Use of the BIPY Form
Transcript
Biweekly Payroll[BIPY]
The Biweekly Payroll (BIPY) on-line documentation is divided into the following sections:
Section 1 — Introduction to the BIPY Form
● Objectives● Overview of the Form● Structure of the Form
Section 2 — Initial Use of the BIPY Form
● Getting Ready to Put Employees on the Form● Pulling up a Blank Form● Page 1 — Completing the Summary of Totals Screen● Display Fields on the Summary of Totals Screen● Page 2 — Completing the Summary of Details Screen● Entering a SSN More Than Once● Adding the Form● Page 2 — Completing the Employee's Detail Card● Page 3 — Completing the Employee's Detail Card● Display Fields on the Summary of Details Screen● Navigating Through Summary of Details Screens● Submitting the Form
Section 3 — What Happens to the BIPY Form
● Approval Cycle of the Form● Re-Adding a Rejected Form● What Happens to the Processed Form
Section 4 — Subsequent Use of the BIPY Form
● Retrieving the Batch-Created Form● Changing the Summary of Totals Screen● Changing the Detail Cards● Adding Social Security Numbers● Deleting Social Security Numbers● Submitting the Batch-Created Form
Section 5 — Viewing an Employee's BIPY Forms
● Using the IWPC Function
Section 1 — Introduction to the BIPY Form
Objectives
Section 1 — Introduction to the BIPY FormProvides an overview of the Biweekly Timecard Process. This covers the procedure for submitting W-4 cards to the Payroll office, initial and subsequent use of the form, the approval cycle of the form, and the overall structure of the form.
Section 2 — Initial Use of the BIPY FormGives guidelines for using the Biweekly Timecard form. This includes detailed information about each screen of the form, along with step-by-step instructions on how to complete the form. Section 2 also explains how to use the Auxiliary Accounting Bridge with the Biweekly Timecard form.
Section 3 — What Happens to the BIPY FormContains information on the approval cycle of the form, the required approvals for the form, and how to re-add rejected forms. It also explains how the initial Biweekly Timecard form will generate a template for subsequent use.
Section 4 — Subsequent Use of the BIPY FormProvides guidelines for using the Batch-Created Biweekly Timecard form. This section gives step-by-step instructions on retrieving, changing, and submitting the batch-created form. It also explains how to add or delete social security numbers from a Biweekly Timecard form.
Section 5 — Viewing an Employee's BIPY Forms
Contains instructions for using the IWPC (Inquiry BIPY Payroll Cards) function.
Overview of the Form
The Biweekly Timecard (BIPY) Form is used to record time worked and to initiate payment for overtime, holiday time and shift differential for all regular Technical Service employees. It is also used to record and initiate payment for regular time for Technical Service employees in the Department of Housing and Food Services, Nittany Lion Inn, Ritenour Health Center, and the Hershey Medical Center.
For a new employee, a W-4 card (paper form) must be submitted to the Payroll Office. If the W-4 card is received by Payroll before 12:00 PM of any week day, the employee's Social Security Number will be entered in the database by the next day. This means that the Social Security Number is also ready to be entered on a BIPY Form.
There is no limit to the number of employees that can be entered on a BIPY electronic form. The data that is entered for an employee is the same information that was previously written on the paper Biweekly payroll card. Also on the BIPY form is a grid to record hours worked on each day.
After the form completes the approval cycle, a batch program will pull information from the processed BIPY and the employees will be paid.
The batch program will also create a new BIPY form to be used for the next pay period. This new BIPY will contain all of the information from the processed BIPY with the exception of the hours worked. The new batch-created BIPY can be retrieved through the BFMB (Browse Forms By Budget) screen. It can then be changed and submitted for the next pay period.
Structure of the Form
Summary Screens
●
Page 1 — Summary of Totals: ❍ Gross Pay ❍ All Hours Worked ❍ All Hour Rates
Detail Info By Individual: ❍ Budget ❍ Rate ❍ Hours Worked ❍ Overtime/OnCall/Shift Differential
Standard Notepad Area (Page 4)
Section 2 — Initial Use of the BIPY Form
Getting Ready to Put Employees on the Form
For new employees, a W-4 card must be sent to Payroll before their Social Security Number can be entered on a BIPY.
If the W-4 card of a new bipy employee is received at Payroll before 12:00 PM of any day, the employee's Social Security Number will be entered into the database and will be ready to be used on the BIPY the next day.
If a W-4 card is not sent to Payroll, the error message, "Invalid SSN," will appear when trying to enter that Social Security Number.
The method in which an employee's hours worked for each pay period are collected is at the discretion of each department. It is not mandatory to obtain and complete a signature card.
If the department chooses to retain a signature card for each pay period, a paper form can be
developed by the department. A data entry form developed by Systems and Procedures is also available and can be obtained from the Administrative Training and Support Center.
Pulling Up a Blank Form
● Select CCOM (IBIS) from the Net-Pass Activity table to go into the production environment.
● Select IBIS Admin Menus at the Com-Pass screen.
1. At the NEXT FUNCTION line, type BIPY and press Enter.
A blank BIPY form will appear.
> Note:To locate the form within the IBIS menus, follow the steps below:
● At the M1M1 (IBIS Main Menu) menu, enter M2AS (EASY Electronic Approval System) at the Next Function line and press Enter.
● At the M2AS menu, enter M3FM (EASY forms) at the Next Function line and press
Enter.
● At the M3FM menu, enter M4PY (Payroll) at the Next Function line and press Enter.
● At the M4PY menu, enter BIPY (Biweekly Payroll) at the Next Function line to pull up the blank BIPY form.
Page 1 — Completing the Summary of Totals Screen
1. At FORM ACTION, type ADD
2. At BUDGET TO BE USED FOR APPROVAL enter the budget number that the form will route on for approval. This is NOT the field for the pay budget.
> Hint:
● If your budget number is five digits long, you need to make it seven digits by placing a zero in front of, and behind, the first digit of the budget.
Example:142-44 UP will be 01-042-44 UP
> Note:
● If an approval path does not exist for a lower level mnemonic or budget, the BIPY form does not automatically route to the highest level mnemonic. Use a budget under the highest mnemonic if that path is to be used for approval.
3. At PAY PERIOD END DATE, enter the ending date of the pay period that the employees are being paid for. Example:October 5, 1991 would be entered as: 10 05 1991
4. A description of the form can be entered in the DESC field. If several BIPY forms route under the same mnemonic or approval path, the description will distinguish a particular form on the BFMB screen. This field is optional. After the Summary of Totals Screen has been completed, press PF8 to continue to the next page.
> Note:
● Pay class 107 will only show data prior to 10/1/92.
Display Fields on the Summary of Totals Screen
● Form Number — The form number will be generated when the form is added.
● Unit - The unit will appear after the form has been added. This is determined by the budget that was entered in the Budget To Be Used For Approval. The form will route on the approval path associated with the unit.
● Confidential — All BIPY forms are confidential and can only be viewed by individuals on the approval table.
● Prior Approval — This field cannot be modified.
● Status — The status will become NEW after the form has been added.
● Number of Details — This indicates the total number of SSNs on the form.
● Number of Details Paid — This indicates the total number of employee Detail Cards
that were completed to be paid.
● Gross Pay — This indicates the total gross pay of all the employees to be paid on the form.
● All Hours Worked — This indicates the total number of hours entered for all employees on the form. This includes shift, holiday, meals, and overtime hours.
● All Hours Rates — This indicates the sum of all hourly rate of all the employees to be paid on the form. This includes shift, holiday, meals, and overtime hours.
● 106-Non-Exempt and 108-Technical — This indicates the total amount paid to all employees under a particular pay class.
> Note:
● Pay class 107 will only show data prior to 10/1/92.
Page 2 — Completing the Summary of Details Screen
1. At Line 1 of the SSNO field, enter a Social Security Number without any spaces or dashes. After the first Social Security Number has been entered, the cursor will automatically advance to Line 2. When all Social Security Numbers have been entered, press PF12 to add the form.
2. If all 13 lines have been used and more are needed, enter a "Y" at MORE EMPLOYEES TO ADD and press PF12. The message, "Form has been created," will appear. This means that the first 13 Social Security Numbers have been recorded and the form is ready to accept another set. This process can be repeated until all bipy employees have been entered on the form.
Entering a SSN More Than Once
● If the employee is to be paid at more than one rate, separate Detail Cards are prepared for each rate.
● If the employee is to be paid from more than one fund, separate Detail Cards are prepared for each fund.
● If the employee is paid from more than one budget, separate Detail Cards are prepared
for each budget.
● If the employee works in more than one payroll classification, separate Detail Cards are prepared for each classification.
● If the employee needs to be paid for more than one pay period, separate Detail Cards are prepared for each pay period.
● If the employee needs to be paid for both shift code "2" and shift code "3", separate detail cards are prepared for each shift period.
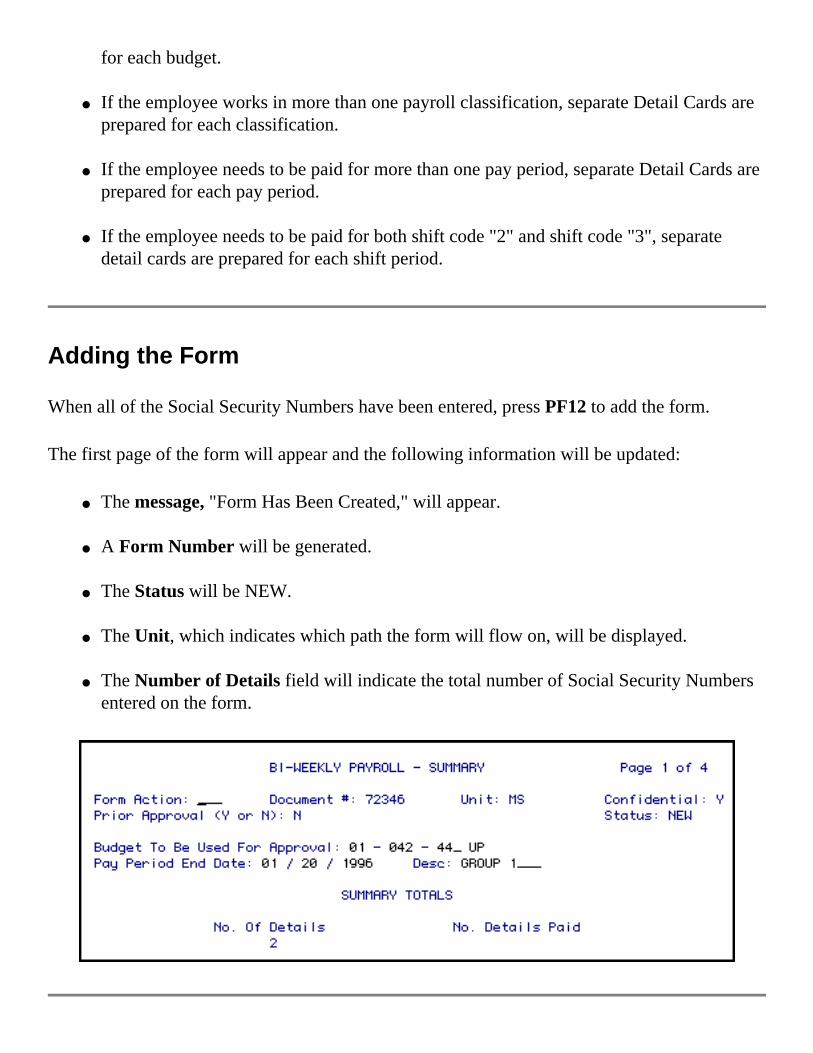
Adding the Form
When all of the Social Security Numbers have been entered, press PF12 to add the form.
The first page of the form will appear and the following information will be updated:
● The message, "Form Has Been Created," will appear.
● A Form Number will be generated.
● The Status will be NEW.
● The Unit, which indicates which path the form will flow on, will be displayed.
● The Number of Details field will indicate the total number of Social Security Numbers entered on the form.
Getting Ready to Complete the Employee's Detail Card
Page 2 — Completing the Employee's Detail Card
At FORM ACTION, type CHG and press PF8. The Summary of Details screen will appear with the employee names filled in next to the appropriate Social Security Numbers.
Press PF8 to advance to Page 2, the Summary of Details screen.
1. At SELECTION NUMBER, type the number that corresponds to the employee name.
Press PF8 to obtain this employee's detail Card.
Page 3 — Completing the Employee's Detail Card
1. At FORM ACTION, type CHG. (If CHG already appears in Form Action, proceed to Step 2.)
2. The PAY PERIOD END DATE will appear as the same date that was entered on the Summary Totals screen. This date can be changed if the employee is being paid for a different pay period.
3. The PREPAID field will default to " N", but can be changed to "Y" if the bipys for this pay period are to be charged to the next fiscal year.
4. The TYPE CARD must be entered. Valid type cards can be displayed by pressing PF1 (HELP) while the cursor is on the type card field. Valid types as of 10/30/92 are:
❍ H: for Housing and Food Services ❍ L: for the Nittany Lion Inn ❍ R: for other departments' shift differential, overtime, on-call and holiday pay.
5. At BUDGET, enter the pay budget to be charged.
> Hint:
●
If the budget you are using is 5 digits long, it will need to be converted to
the expanded format by placing a zero in front of, and behind, the first digit.
Example:142-44 UP expands to 01-042-44 UP
6. At FUND, enter the fund to be charged.
7. At PROJECT, enter the project number to be charged, if applicable.
8. At PAY CLASS, enter the pay classification of the employee.
6. Staff Nonexempt (HY only)
8. Technical Service
9. At RATE, enter the hourly rate. Example: 7.50
10. At REGULAR OVERTIME HOURS, enter the total amount of non-holiday overtime hours worked. For details, see the booklet "Agreement Between the Pennsylvania State University and Teamsters Local Union No. 8."
11. At ON CALL TIME, enter the total number of hours the employee worked on-call. The on-call time should not be included in the Hours Worked columns. All on-call time will be paid at the rate of $1.50/hour.
12. At MEALS, enter the number of meals per day the employee will eat in a University facility.
13. At MEAL HOURS, enter number of hours subject to meals deduction (Housing and Food Services, Nittany Lion Inn, and Ritenour Health Center only).
14. Enter the HOURS PAID-REGULAR TIME for weeks 1 and 2 in their respective days. Enter number of regular hours worked only for Tech Service employees of Housing and Food Services, Ritenour Health Center and Nittany Lion Inn.
> Note:
● Include overtime hours, but do not include on-call time under hours worked.
Fill in the following items if they are appropriate:
15. At REGULAR HOLIDAY PAY, enter the number of regular hours worked on a scheduled holiday. Do not enter these on the grid above for weeks 1 and 2.
16. At OVERTIME HOLIDAY PAY, enter the number of overtime hours worked on a scheduled holiday.
17. At SHIFT CODE, enter according to the time the employee began work each day during the pay period, as defined in detail below:
❍ Leave the block blank if the employee began work between the hours of 5:00 a.m. and 12:59 p.m.
❍ Enter the number "2" in the block if the employee began work between the hours of 1:00 p.m. and 9:59 p.m.
❍ Enter the number "3" in the block if the employee began work between the hours of 10:00 p.m. and 4:59 a.m.
18. At TOTAL SD REGULAR TIME, enter the number of regular hours of shift differential (all Technical Service employees).
19. At TOTAL SD REGULAR HOLIDAY, enter the number of shift differential regular hours worked on a scheduled holiday.
20. At TOTAL SD HOLIDAY OVERTIME, enter the number of shift differential overtime hours worked on a scheduled holiday.
21. At TOTAL SD REGULAR OVERTIME, enter the number of shift differential non-holiday overtime hours worked.
After the Detail Card has been completed, press PF12 to process the information.
The form will then return to the Summary of Details screen, ready for you to enter the selection number of the next employee's Detail Card you want to complete.
The Total Regular Hours will be automatically calculated based on the number of Hours Worked.
Each Detail Card has its own Notepad. To access the notepad for a Detail Card, press PF8 while in a Detail Card.
Display Fields on the Summary of Details Screen
After the first Detail Card has been completed, the form will return to the Summary of Details screen. (The next detail card can be completed at this time by selecting the appropriate number and pressing PF8.)
Notice that the information from the Detail Card just completed has been transferred to the Summary of Details screen:
● Budget Number — The budget number from which the employee will be paid.
● Hours Regular — Shows the number of regular hours worked.
● Hours/Shift Differential — This shows the number of shift differential regular hours to be paid from BIPY.
● Overtime Hours/Regular — This shows the number of regular overtime hours worked.
● Overtime Hours/Shift Differential — This shows the number of shift differential regular overtime hours worked.
● Holiday Hours/Regular — This shows the number of regular holiday hours worked.
● Holiday Hours/Shift Differential — This shows the number of shift differential regular holiday hours worked.
● Rate — Shows the hourly rate of pay.
Navigating Through the Summary of Details Screens
If there are more than 13 employees on a BIPY form, there will be multiple Summary of Details screens.
Only 13 employees can be viewed at one time. If there are more than 13 employees on a BIPY form, there will be multiple Summary of Details screens.
Press Enter to advance to the next 13 employees.
To advance to a specific employee, enter the individual's last name at BEGIN NAME and press Enter.
Submitting the Form
After all of the employee Detail Cards have been completed, press PF5 to go to the Summary of Totals screen. The information from the Detail Cards is now displayed in summary form.
Enter SUB at FORM ACTION and press PF12 to submit the form through the approval path.
Enter FIN at FORM ACTION and press PF12 to exit the form.
> Note:
● The PRT (print) option is not available for the BIPY form. Screens may be printed individually by using the print screen function.
Section 3 — What Happens to the BIPY Form
Approval Cycle of the Form
Approval CycleThe BIPY form will flow through the approval path associated with the budget entered in the Budget To Be Used For Approval field on the first page of the form.
Required ApproversThe minimum approvals required for the BIPY form are the Budget Assistant (to confirm that the program/budget has authorization to accept wage expenses) and the Financial Assistant (to assure that adequate funds exist to cover the hours worked at the stated rate).
> Note:
● If the Budget Assistant cannot vouch for the hours reported, an individual who can verify the hours must be added to the electronic approval path or must approve a paper data entry document.
Completing the Approval CycleAfter the last approver on the path has approved the BIPY form, the status will change to PRO (Processed).
Re-Adding a Rejected Form
If a BIPY form is rejected, it can be re-added to retain the original information.
In order to do this, open the rejected form and type ADD in FORM ACTION. Press PF12 to create a new copy of the BIPY that contains all the information from the rejected form.
Type CHG at FORM ACTION and make any necessary changes. Press PF12 to save the changes.
Type SUB at FORM ACTION and press PF12 to submit the form onto the approval path.
> Note:
● The rejected form will remain in the database and can be viewed through BFMB.
What Happens to the Processed Form
A batch program pulls information from the detail cards of each employee to initiate payment of wages. The payroll checks and vouchers can then be prepared and distributed.
A batch program creates a new BIPY form retaining all pertinent information from the processed form. The new BIPY form is used for the next payroll period. It can be found through BFMB (Browse Forms by Budget) by entering the Budget from the processed form.
Section 4 — Subsequent Use of the BIPY Form
Retrieving the Batch-Created Form
● Logon to CCOM.
● At NEXT FUNCTION, type BFMB (Browse Forms By Budget) and press Enter.
1. Enter the BUDGET YOU WANT TO BROWSE. This is the Budget To Be Used For Approval on the processed form.
> Hint:
● If the budget you are using is 5 digits long, it will need to be converted to the expanded format by placing a zero in front of, and behind, the first digit. Example:142-44 UP expands to 01-042-44 UP.
2. At FORM TYPE YOU WANT TO BROWSE, enter BIPY.
3. At STARTING DATE FOR BROWSE, enter the last pay period date, and press enter.
> Note:
● The date must be entered in the format mm/dd/yyyy. Example:October 8, 1991 = 10/08/1991
How to:
1. At SELECTION NUMBER, type the number that appears to the left of the batch-created form. (Batch-created forms have a status of NEW.) Press enter to bring up the form.
Display Fields:
● Form — Indicates the type of form.
● Document Number — The document number of the form.
● Action — Indicates the current status of the form. BIPY forms for previous pay periods will have an action of PRO (processed). The batch-created form will have an action of NEW. This means it is ready to use for the next pay period.
● Date Entered — Reflects the date the form was added.
● Description — Displays the Budget Number (Budget Used for Approval), Pay Period End Date, and the Description (if a description was entered on the original BIPY form).
Changing the Summary of Totals Screen
At FORM ACTION, type CHG.
The following fields will be filled in, but can be changed, if necessary: Budget To Be Used For Approval, Pay Period End Date, and (if used on original form) Description and Shift Code. Press PF8 to go to the Summary of Details screen.
> Note:
● The Pay Period End Date will reflect the current pay period.
1. At SELECTION NUMBER, type the number that appears to the left of the employee's name whose Detail Card you want to complete. Press PF8 to go to the employee's Detail Card.
Changing the Detail Cards
1. At FORM ACTION, type CHG. (If CHG already appears in Form Action, proceed to step 2)
2. Enter the employee's REGULAR OVERTIME HOURS worked for this pay period, if applicable.
3. Enter the HOURS PAID — REGULAR TIME for week 1 and week 2 in their respective days. Include overtime hours, but do not include on call time under hours worked.
> Note:
● The other information on the Detail Card has been pulled from the previous BIPY form, but can be changed, if necessary.
4. At REGULAR HOLIDAY PAY, enter the number of regular worked on a scheduled holiday.
5. At OVERTIME HOLIDAY PAY, enter the number of overtime hours worked on a scheduled holiday.
6.
At SHIFT CODE, enter according to the time the employee began work each day during the pay period, as defined in detail below:
❍ Leave the block blank if the employee began work between the hours of 5:00 a.m. and 12:59 p.m.
❍ Enter the number "2" in the block if the employee began work between the hours of 1:00 p.m. and 9:59 p.m.
❍ Enter the number "3" in the block if the employee began work between the hours of 10:00 p.m. and 4:59 a.m.
7. At TOTAL SD REGULAR TIME, enter the number of regular hours of shift differential (all Technical Service employees).
8. At TOTAL SD REGULAR HOLIDAY, enter the number of shift differential regular hours worked on a scheduled holiday.
9. At TOTAL SD HOLIDAY OVERTIME, enter the number of shift differential overtime hours worked on a scheduled holiday.
10. At TOTAL SD REGULAR OVERTIME, enter the number of shift differential non-holiday overtime hours worked.
After the Detail Card has been completed, press PF12 to process the information.
The form will then return to the Summary of Details screen, ready for you to enter the selection number of the next employee's Detail Card you want to complete.
> Notes:
● The Total Regular Hours will be automatically calculated based on the number of Hours Worked.
● Each Detail Card has its own Notepad. To access the notepad for a Detail Card, press PF8 while in a Detail Card.
Adding Social Security Numbers
At FORM ACTION, type CHG and press PF8 to go to the Summary of Details screen.
At MORE EMPLOYEES TO ADD, enter a "Y" and press Enter.
Under Ssno, enter as many additional Social Security Numbers as needed.
Press PF12 to add the new numbers to the form.
> Note:
● If the Social Security numbers are added after the form is submitted, the form will resubmit.
Deleting Social Security Numbers
Social Security Numbers can be kept on the BIPY form even if they are not being paid for every pay period. If you want to keep a Social Security Number on the form, but not pay the employee, do not fill out the detail card for that employee.
You may also choose to delete a Social Security Number from the BIPY form:
At FORM ACTION on the first page of the form (Summary of Totals screen) type CHG and press PF8.
On the Summary of Details screen, press the Tab key until the cursor is located on the first digit of the Social Security to be deleted. Type the letter "D" over the first digit and press PF12. The Social Security Number will disappear.
> Note:
● More than one Social Security Number can be deleted at one time.
Submitting the Batch-Created Form
After all of the employee's Detail Cards have been completed, press PF5 to go the first page (Summary of Totals) of the form.
Enter SUB at FORM ACTION.
Press PF12 to submit the form onto the approval path.
Section 5 — Viewing an Employee's BIPY Forms
Using the IWPC Function
Anyone with Human Resource Representative or Financial Officer security access will automatically receive authorization to use the IWPC (Inquiry Wage Payroll Cards) function. Anyone else desiring access to this function, should contact their Access and Security Representative.
Within CCOM:
● At NEXT FUNCTION, type IWPC and press Enter.
Within the IWPC Query screen
1. At SSNO, enter the Social Security Number of the employee whose Wage Timecard
information you want to view. Press Enter.
2. At PAY PERIOD END DATE, enter the end date you want to view and press Enter. The date must be entered in the format: mm/dd/yyyy. For example, October 8, 1991 would be 10/08/1991.
> Note:
● If this field is left blank, all the WAGC forms processed for this employee will be displayed.
Within the IWPC return menu
1. At SELECT NUMBER TO VIEW DETAIL, enter the number that appears to the left of the pay period end date you want to view. Press Enter. A condensed version of the WAGC Detail Card will appear.


![University of Groningen Elucidating excited state ...the paradigm complex [Ru(bipy) 3] 2+ (bipy 5 2,29-bipyridyl). Since the first report of luminescence from this complex by Paris](https://static.documents.pub/doc/80x56/6128f990056a637493495097/university-of-groningen-elucidating-excited-state-the-paradigm-complex-rubipy.jpg)


