271
Printer
| Date post: | 06-Feb-2016 |
| Category: |
Documents |
| Upload: | erica-taylor |
| View: | 72 times |
| Download: | 0 times |

Printer

Contents
1 Introduction
1.1 Welcome .......................................................................................................................................... 1-2
1.1.1 Composition of User's Guide............................................................................................................. 1-21.1.2 User's Guide ...................................................................................................................................... 1-31.2 Conventions used in this manual .................................................................................................. 1-4
1.2.1 Symbols used in this manual ............................................................................................................. 1-41.2.2 Original and paper indications ........................................................................................................... 1-5
2 Overview
2.1 What is the image controller?........................................................................................................ 2-2
2.1.1 Role of the image controller............................................................................................................... 2-22.1.2 Print flows .......................................................................................................................................... 2-32.1.3 Control Panel Layout ......................................................................................................................... 2-42.2 Operating environment................................................................................................................... 2-6
2.2.1 Supported computers and OSs......................................................................................................... 2-62.2.2 Interfaces used for connection .......................................................................................................... 2-72.3 Setup procedure ............................................................................................................................. 2-8
2.3.1 For network connection ..................................................................................................................... 2-82.3.2 For local connection .......................................................................................................................... 2-8
3 Before installing the printer driver
3.1 Introduction ..................................................................................................................................... 3-2
3.2 Printer drivers compatible with respective operating systems.................................................. 3-2
3.3 Connection methods selectable in each operating system........................................................ 3-4
3.3.1 Windows Vista/Server 2008/Server 2008 R2/7.................................................................................. 3-43.3.2 Windows XP/Server 2003 .................................................................................................................. 3-53.3.3 Mac OS X 10.4/10.5/10.6................................................................................................................... 3-63.3.4 NetWare ............................................................................................................................................. 3-6
4 Installing the Windows printer driver
4.1 About installer ................................................................................................................................. 4-2
4.1.1 Operating environment of the installer............................................................................................... 4-24.2 Easy installation procedure using the installer ............................................................................ 4-3
4.2.1 Settings of this machine .................................................................................................................... 4-34.2.2 Installing the printer driver (PCL driver).............................................................................................. 4-44.2.3 Installing the printer driver (PS Plug-in driver) ................................................................................... 4-7
5 Manual Installation Using the Add Printer Wizard
5.1 Windows Vista/Server 2008/Server 2008 R2/7 ............................................................................. 5-2
5.1.1 For network connection (LPR/Port 9100/SMB) ................................................................................. 5-25.1.2 For network connection (IPP/IPPS) ................................................................................................... 5-75.1.3 For network connection (Web service print) ...................................................................................... 5-95.1.4 For local connection ........................................................................................................................ 5-135.2 Windows XP/Server 2003 ............................................................................................................. 5-15
5.2.1 For network connection (LPR/Port9100) ......................................................................................... 5-155.2.2 For network connection (SMB) ........................................................................................................ 5-185.2.3 For network connection (IPP/IPPS) ................................................................................................. 5-215.2.4 For local connection ........................................................................................................................ 5-22
bizhub PRO 951 Contents-1

6 Installation on Macintosh Computers
6.1 Printer Driver for Mac OS............................................................................................................... 6-2
6.1.1 Installing the PS Plug-in driver........................................................................................................... 6-26.1.2 Installing the PS PPD driver ............................................................................................................... 6-36.1.3 Selecting and connecting a printer .................................................................................................... 6-4
7 Installation when Using NetWare
7.1 NetWare ........................................................................................................................................... 7-2
7.1.1 Network Settings ............................................................................................................................... 7-27.1.2 Configuring the Windows client ......................................................................................................... 7-2
8 Uninstalling the Printer Driver
8.1 Windows .......................................................................................................................................... 8-2
8.1.1 Uninstalling by the installer (PCL driver) ............................................................................................ 8-28.1.2 Uninstalling by the uninstallation program (PCL driver)..................................................................... 8-38.1.3 Uninstalling by manual operation (PS Plug-in driver/PPD driver/PCL driver) .................................... 8-48.2 Macintosh ........................................................................................................................................ 8-5
8.2.1 Uninstalling by manual operation (PS Plug-in driver)......................................................................... 8-58.2.2 Uninstalling by manual operation (PS PPD driver)............................................................................. 8-6
9 Basic Printing Methods and Printer Functions
9.1 Print operations............................................................................................................................... 9-2
9.2 Printer Functions............................................................................................................................. 9-4
9.2.1 Setting paper ..................................................................................................................................... 9-49.2.2 Setting a paper tray ........................................................................................................................... 9-69.2.3 Printing a number of sets of an original ............................................................................................. 9-89.2.4 Printing more than one page ........................................................................................................... 9-109.2.5 Setting a front cover, back cover, interleaf, and cover .................................................................... 9-139.2.6 Setting finishing ............................................................................................................................... 9-159.2.7 Setting transparent .......................................................................................................................... 9-179.2.8 Setting an image .............................................................................................................................. 9-189.2.9 Saving and reprinting a job .............................................................................................................. 9-19
10 Print functions of PCL driver for Windows
10.1 Default settings of the printer driver ........................................................................................... 10-2
10.1.1 Displaying the Properties window ................................................................................................... 10-210.1.2 [Configure] tab ................................................................................................................................. 10-310.1.3 [Settings] tab.................................................................................................................................... 10-410.1.4 About tabs provided by OS ............................................................................................................. 10-510.1.5 Registering the default settings ....................................................................................................... 10-610.2 Common Setting ........................................................................................................................... 10-7
10.3 Parameter details.......................................................................................................................... 10-9
10.3.1 My Tab ............................................................................................................................................. 10-910.3.2 [Basic] tab ...................................................................................................................................... 10-1110.3.3 [Layout] tab .................................................................................................................................... 10-1410.3.4 [Finishing] tab................................................................................................................................. 10-1910.3.5 [Cover Mode] tab ........................................................................................................................... 10-2110.3.6 [Stamp/Composition] tab............................................................................................................... 10-2310.3.7 [Quality] tab.................................................................................................................................... 10-2710.3.8 [Other] tab ...................................................................................................................................... 10-29
bizhub PRO 951 Contents-2

11 Print functions of PS Plug-in driver
11.1 Default settings of the printer driver ........................................................................................... 11-2
11.1.1 Displaying the Configure screen...................................................................................................... 11-211.2 Common Setting ........................................................................................................................... 11-4
11.3 Parameter details.......................................................................................................................... 11-5
11.3.1 [General] tab..................................................................................................................................... 11-511.3.2 [Layout] tab ...................................................................................................................................... 11-711.3.3 [Finishing] tab................................................................................................................................... 11-911.3.4 [Output] tab .................................................................................................................................... 11-1011.3.5 [Paper] tab...................................................................................................................................... 11-1111.3.6 [Cover] tab...................................................................................................................................... 11-1211.3.7 [Page Settings] tab......................................................................................................................... 11-1311.3.8 [Tabs] tab ....................................................................................................................................... 11-1511.3.9 [Tab Settings] tab........................................................................................................................... 11-1611.3.10 [Imaging] tab .................................................................................................................................. 11-1711.3.11 [Forms] tab..................................................................................................................................... 11-1911.3.12 [Image Position] tab ....................................................................................................................... 11-2011.3.13 [Stamp] tab..................................................................................................................................... 11-2111.3.14 [WorkFlow] tab ............................................................................................................................... 11-2211.3.15 [Authent.] tab.................................................................................................................................. 11-2311.3.16 [Configure] tab ............................................................................................................................... 11-2511.3.17 [Version] tab ................................................................................................................................... 11-2711.3.18 [Advanced] tab............................................................................................................................... 11-28
12 Print functions of PPD driver for Windows
12.1 Default settings of the printer driver ........................................................................................... 12-2
12.1.1 Displaying the Properties window ................................................................................................... 12-212.1.2 [Device Settings] tab ........................................................................................................................ 12-312.1.3 About tabs provided by OS ............................................................................................................. 12-312.1.4 Registering the default settings ....................................................................................................... 12-412.2 Common Setting ........................................................................................................................... 12-5
12.3 Parameter details.......................................................................................................................... 12-6
12.3.1 [Layout] tab ...................................................................................................................................... 12-612.3.2 [Paper/Quality] tab ........................................................................................................................... 12-712.3.3 [Advanced Options] window............................................................................................................ 12-8
13 Print functions of PPD driver for Mac OS X
13.1 Default settings of the printer driver ........................................................................................... 13-2
13.1.1 Option Settings ................................................................................................................................ 13-213.1.2 Registering the default settings ....................................................................................................... 13-313.2 Common Setting ........................................................................................................................... 13-4
13.3 Adding the Custom Size............................................................................................................... 13-5
13.4 Parameter details.......................................................................................................................... 13-6
13.4.1 [Page Attributes] .............................................................................................................................. 13-613.4.2 [Copies & Pages].............................................................................................................................. 13-713.4.3 [Finishing] ......................................................................................................................................... 13-813.4.4 [Image/Layout] ................................................................................................................................. 13-913.4.5 [Setup]............................................................................................................................................ 13-1113.4.6 [Secure Print].................................................................................................................................. 13-12
14 Function Details
14.1 Secure Print ................................................................................................................................... 14-2
14.1.1 Printer Driver Settings (PCL driver/PS Plug-in driver/PPD driver (Mac OS X)) ................................ 14-2
bizhub PRO 951 Contents-3

14.1.2 Calling a job from the control panel................................................................................................. 14-514.2 Save in User Box ........................................................................................................................... 14-6
14.2.1 Printer Driver Settings (PCL driver/PS Plug-in driver/PPD driver (Mac OS X)) ................................ 14-614.2.2 Calling a job ..................................................................................................................................... 14-814.3 Proof Print/Wait Mode/Hold Print ............................................................................................. 14-10
14.3.1 Printer Driver Settings (PCL driver/PS Plug-in driver/PPD driver (Mac OS X)) .............................. 14-1014.3.2 Calling a job ................................................................................................................................... 14-1314.4 Printing a document on the machine for which user authentication is specified ................ 14-15
14.5 Printing a document on the machine for which Account Track function is enabled ........... 14-17
15 Settings on the Control Panel
15.1 Controller Machine Setting .......................................................................................................... 15-2
15.1.1 Displaying the Controller screen...................................................................................................... 15-215.1.2 Controller Machine Setting Menu screen ........................................................................................ 15-315.2 Basic operations of User Settings............................................................................................. 15-13
15.2.1 Displaying the Utility Menu screen................................................................................................. 15-1315.2.2 Function Setting............................................................................................................................. 15-1415.3 Basic operations in Administrator Settings.............................................................................. 15-15
15.3.1 Displaying the Administrator Settings screen................................................................................ 15-1515.3.2 Administrator Setting screen ......................................................................................................... 15-1615.4 Controller NIC Setting Menu...................................................................................................... 15-17
15.4.1 Displaying the Controller NIC Setting screen ................................................................................ 15-17
16 PageScope Web Connection
16.1 Using PageScope Web Connection ............................................................................................ 16-2
16.1.1 Operating environment .................................................................................................................... 16-216.1.2 Accessing PageScope Web Connection ......................................................................................... 16-216.1.3 Web browser cache ......................................................................................................................... 16-316.1.4 Online help function ......................................................................................................................... 16-316.2 Login and Logout .......................................................................................................................... 16-4
16.2.1 Login and logout flows..................................................................................................................... 16-416.2.2 Logout.............................................................................................................................................. 16-716.2.3 Login ................................................................................................................................................ 16-816.3 Structure of pages ...................................................................................................................... 16-11
16.4 Overview of the user mode ........................................................................................................ 16-13
16.4.1 Information..................................................................................................................................... 16-1316.4.2 Job ................................................................................................................................................. 16-1416.4.3 Box................................................................................................................................................. 16-1516.4.4 Direct print ..................................................................................................................................... 16-1616.5 Administrator mode overview.................................................................................................... 16-17
16.5.1 Maintenance .................................................................................................................................. 16-1716.5.2 Security .......................................................................................................................................... 16-1816.5.3 Box................................................................................................................................................. 16-1816.5.4 Printer Setting ................................................................................................................................ 16-1916.5.5 Scan ............................................................................................................................................... 16-2016.5.6 Network.......................................................................................................................................... 16-21
17 Utility tool
17.1 Font Management Utility .............................................................................................................. 17-2
18 Troubleshooting
18.1 Cannot print................................................................................................................................... 18-2
18.2 Cannot configure the settings/Cannot print according to the settings................................... 18-5
bizhub PRO 951 Contents-4

18.2.1 The printer driver settings have no effect ........................................................................................ 18-518.2.2 Others .............................................................................................................................................. 18-618.2.3 Error message.................................................................................................................................. 18-6
19 Product Specification/Report
19.1 Product specifications.................................................................................................................. 19-2
19.2 Printing reports ............................................................................................................................. 19-5
19.2.1 Configuration Page Print.................................................................................................................. 19-519.2.2 PCL Demo Page Print .................................................................................................................... 19-1119.2.3 PS Demo Page Print ...................................................................................................................... 19-1219.2.4 PCL Font List ................................................................................................................................. 19-1319.2.5 PS font list...................................................................................................................................... 19-16
20 Appendix
20.1 PPD driver (For Linux and applications) ..................................................................................... 20-2
20.1.1 PPD driver types .............................................................................................................................. 20-220.1.2 PPD driver for Linux......................................................................................................................... 20-220.1.3 PPD driver for applications .............................................................................................................. 20-320.2 Glossary ......................................................................................................................................... 20-4
21 Index
21.1 Index by item ................................................................................................................................. 21-2
21.2 Index by button.............................................................................................................................. 21-4
bizhub PRO 951 Contents-5

1 Introduction

1.1 Welcome 1
1 Introduction
1.1 Welcome
Thank you for purchasing this machine.
This User's Guide describes the functions, operating instructions, precautions for correct operation, and sim-ple troubleshooting guidelines of this machine. In order to obtain maximum performance from this product and use it effectively, please read this User's Guide as necessary.
1.1.1 Composition of User's Guide
Printed manuals Overview
[User's Guide - Security] This guide describes the security functions.Please read this guide for comprehension of how to use the Enhanced Security mode and detailed ma-chine operation in Enhanced Security mode.
[Operation Quick Guide] This guide mainly describes how to use frequently used functions. Please read this guide for quick com-prehension of various features available on the ma-chine.
[Safety Information] This guide provides precautions and requests that should be followed to ensure safe usage of this ma-chine.Please be sure to read this guide before using the ma-chine.
User's guide CD manuals Overview
[User's Guide - Copier] This guide describes an outline of the machine and copy operations.• Configuration and specifications of the main body
and options• Turning on/off the machine• Paper information• Making a basic copy and setting procedures• Supplies and disposals• Application, Output Setting, and Job List• Troubleshooting
[User's Guide - POD Administrator's Reference] This guide provides you with detailed information on machine management and how to customize the ma-chine according to your daily use.• Tray Setting• Both Sides Adjust• Controller Setting• Adjustment, Utility Menu Screen• Network Setting• PageScope Web Connection• Web Utilities
[User's Guide - Printer] This guide describes the settings of the printer drivers and utility tools.• PCL driver• PS Plug-in driver• PS PPD driver• PageScope Web Connection
bizhub PRO 951 1-2

1.1 Welcome 1
1.1.2 User's Guide
This User's Guide is intended for users ranging from those using this machine for the first time to administra-tors.
It describes basic operations, functions that enable more convenient operations, maintenance procedures, simple troubleshooting operations, and various setting methods of this machine.
Note that basic technical knowledge about the product is required to enable users to perform maintenance work or troubleshooting operations. Limit your maintenance and troubleshooting operations to the areas ex-plained in this manual.
Should you experience any problems, please contact our service representative.
[User's Guide - Network Scanner ] This guide describes operations of the network scan-ner functions.• Saving on the HDD for main body/Outputting• Sending via e-mail• Saving on the HDD for controllers• Sending to FTP server• Sending to SMB server• Sending to group
[Trademarks/Copyrights] This guide describes trademarks, licenses, and copy-rights concerning this machine.Please be sure to refer to this guide before using the machine.
User's guide CD manuals Overview
bizhub PRO 951 1-3

1.2 Conventions used in this manual 1
1.2 Conventions used in this manual
1.2.1 Symbols used in this manual
Symbols are used in this manual to express various types of information.
The following describes each symbol related to correct and safe usage of this machine.
Safety Information
7 WARNING
- This symbol indicates that a failure to heed the instructions may lead to death or serious injury.
7 CAUTION
- This symbol indicates that negligence of the instructions may lead to mishandling that may cause injury or property damage.
NOTICEThis symbol indicates a risk that may result in damage to this machine or documents. Follow the instructions to avoid property damage.
Procedural instruction
0 This check symbol indicates that it is a precondition for steps or information that you should be noted before performing the steps.
1 This format number "1" represents the first step.
2 This format number represents the order of serial steps.
% This symbol indicates a supplementary explanation of a pro-cedural instruction.
% This symbol indicates transition of the control panel to access a desired menu item.
The relevant image is shown.
The operation proceduresare describedusing instruction.
bizhub PRO 951 1-4

1.2 Conventions used in this manual 1
d Reference
This symbol indicates a reference.
View the reference as required.
Key symbols
[ ] Key names on the touch panel or computer screen, or a name of user's guide are indicated by these brackets.
Bold text Key names on the control panel, part names, product names and option names are indicated in bold text.
1.2.2 Original and paper indications
Paper size
The following explains the indication for originals and paper described in this manual. When indicating the original or paper size, the Y side represents the width and the X side the height.
Note- "X" is defined as "length" in "User's Guide - Copier".
Paper indication
w indicates the paper size with the height (X) being longer than the width (Y).
v indicates the paper size with the height (X) being shorter than the width (Y).
bizhub PRO 951 1-5

2 Overview

2.1 What is the image controller? 2
2 Overview
This chapter describes the overview and connection environment of the image controller that provides the printer function of the machine.
2.1 What is the image controller?
The image controller is a device that enables the printing and network printing functions on the machine.
2.1.1 Role of the image controller
Incorporating the image controller enables the machine to function as a printing system, allowing printing us-ing applications on the computer connected to this printing system. When using the machine as a network printer, you can print using applications on the computer.
1. The machine 2. Image controller 3. Printing system
The image controller provides the following functions.- Printing data sent from a printer driver on a computer- Support of network protocols including TCP/IP (IPv4/IPv6), IPX/SPX, and AppleTalk- Printing via a network using Web service (Windows Vista/Server 2008/Server 2008 R2/7), SMB (Win-
dows), LPR or IPP printing- Configuring settings for the machine and the image controller from a client computer via the network
(using a Web browser)- Control of the number of pages to be printed (the User Authentication and Account Track functions)
3
2
1
bizhub PRO 951 2-2

2.1 What is the image controller? 2
2.1.2 Print flows
The following outlines the flow of operations for using this printing system as a printer.
Print data sent from an application is received by the printer driver.
The data is sent to the image controller via the USB interface for USB connection or via Ethernet (TCP/IP, etc.) for network connection. Then the data is passed from the image controller to the machine. The image controller rasterizes images (expands output target characters and images to bitmap data). This data is print-ed from the machine.
While this machine is operating as a printer, originals can be scanned using the copy function or network scan function. To use the copy function of this machine, press the [Copy] key on the touch panel.
When a print job is received during copying, the data is stored in the memory of the machine. When the cop-ying is completed, the print job is automatically printed.
Used with a USBconnection
Used with a networkconnection
Application Application
Printer Driver Printer Driver
USB
Image processing
Computer
Printing system
Rasterizing
Hard disk
Secure PrintHold Print
TCP/IP etc.
bizhub PRO 951 2-3

2.1 What is the image controller? 2
2.1.3 Control Panel Layout
No. Name Description
1 Keypad Enters numeric values.
2 Reset Restores the machine to the initial settings.
3 Power LED Lights up in red when the main power switch is turned on, then turns green when the sub power switch is turned on.
4 Data LED Flashes while the machine is receiving print data.
5 Interrupt Stops copying/printing/scanning in progress to allow another copying job of settings newly specified.
6 Stop Suspends the current output job or stops the machine operation.
7 Proof Copy Used to print a single set or the first page to verify the copy settings.
8 Start Activates various machine operations.
9 Start LED Lights up in blue when the machine is ready to oper-ate.It turns orange when any operation cannot be started.
10 C (Clear) Allows change in entered numeric value.
11 Access Sets the machine to allow the operation only when the next user is authenticated, if user authentication or account track function is activated and an authenti-cated user has used the machine.
12 Mode Check Used to the Mode Check Screen to check the current copy settings.
bizhub PRO 951 2-4

2.1 What is the image controller? 2
7 CAUTION
Do not press hard or pointed objects against the touch panel on the control panel.- Otherwise, the glass may be scratched or break and you may be injured. Use fingers to operate the
touch panel.
7 CAUTION
Stop the operation immediately when the Service Call Screen is displayed and copying cannot be continued any more.- Otherwise, an unexpected trouble may be caused. Write down the report code as stated on the 2nd
line of the message, turn off the sub power switch and main power switch in this order, then discon-nect from the power socket. Contact your service representative and inform them of the report code.
NOTICEThe main power switch should normally be kept turned on. Be sure not to turn off/on the main power switch in usual operation.
Be sure not to turn off the main power switch before turning off the sub power switch.
Be sure not to turn off the main power switch while the following messages are displayed after turning off the sub power switch.
[Cooling in progress / After cooling, power off automatically]
[Power off in progress / Please do not turn the main power off]
Turning off the main power switch with these messages displayed may cause serious machine trouble such as toner fixation.
d Reference
For details on turning off the power supply, refer to "User's Guide (POD Administrator's Reference)".
13 Utility/Counter Displays the Utility Menu Screen and various counters.
14 Mode Memory Registers/Recalls the desired copy settings. Also re-calls previous copy settings.
15 Accessibility Adjusts the response time in touch panel and control panel key operation.
16 Help Displays the Help Screen that provides information on how to operate the screen currently displayed on the touch panel.Also provides information on various supplies and disposals when pressed with the Machine Screen dis-played.
17 Brightness adjustment dial Turned to adjust the brightness of the touch panel.
18 Power Save Enables temporary use of the machine when the Power Save LED is lit. Also, activates power-saving mode when pressed while the machine is inactive.
19 Power Save LED Lights when any power-saving mode is activated, or machine power is off due to the weekly timer function.
20 Touch panel Displays various screens to allow the function setting.
No. Name Description
bizhub PRO 951 2-5

2.2 Operating environment 2
2.2 Operating environment
This section describes the system requirements for using this printing system and the interfaces used for connection.
2.2.1 Supported computers and OSs
Make sure that the computer to be connected meets the following conditions.
Windows
Macintosh
Operating system The supported OS varies depending on the type of printer driver. For details, re-fer to page 3-2.
CPU Any processor of the same or higher specifications as recommended for your operating system
Memory Memory capacity as recommended for your operating systemSufficient memory resource is required for your operating system and the appli-cations to be used.
Drive CD-ROM drive
Operating system Mac OS X (10.4, 10.5, 10.6)
CPU PowerPC, Intel Processor
Memory Memory capacity as recommended for your operating system
Drive CD-ROM drive
bizhub PRO 951 2-6

2.2 Operating environment 2
2.2.2 Interfaces used for connection
To connect this printing system to a computer, the following interfaces can be used.
Ethernet
Use this interface to use this printing system via a network connection. It supports 1000Base-T, 100Base-TX, and 10Base-T standards. In addition, TCP/IP (LPD/LPR, IPP, SMB), Web services, IPX/SPX (NetWare), AppleTalk (EtherTalk) protocols are supported.
USB interface
Use this interface to use this printing system via a USB connection. The USB interface can be connected to a computer running Windows. A USB cable is required for connection. Use a type A (4 pin, male) or type B (4 pin, male) USB cable. A USB cable measuring three meters or less is recommended.
Connection diagram
The printer cables are connected to the each port of the image controller.
Back side of the machine
1. Ethernet port (1000Base-T/100Base-TX/10Base-T) 2. USB port
1
2
bizhub PRO 951 2-7

2.3 Setup procedure 2
2.3 Setup procedure
To use this printing system, you must complete the setup in advance.
The setup refers to a series of procedures for connecting the printing system to the computer and installing the printer driver to the computer.
Perform the setup using the following procedures.
2.3.1 For network connection
1 Connect this printing system to the computer.
2 Check that the computer to be used is connected to the network.
3 Specify the IP address of the machine, and then connect it to the network.
4 Change the network settings for this printing system according to the connection method or protocol.
% LPR: In [LPD Setting], enable LPD printing.% Port9100: In [TCP/IP Settings], enable the RAW port number (initial setting: [9100]).% SMB: Configure settings of [Print Settings] in [SMB Settings].% IPP/IPPS: In [IPP Settings], enable IPP printing. To use IPPS printing, install the certificate into the
machine in advance.% Web Service Print: In [Web Service Settings], enable the print function.% Bonjour: In [Bonjour Setting], enable Bonjour.% AppleTalk: In [AppleTalk Settings], enable AppleTalk.
5 Install the printer driver.
% Specify the network port for the printer driver according to the connection method or protocol.
6 Install the screen fonts.
% The "Screen Font" or "Screen Fonts" folder in the Driver CD-ROM contains the screen fonts.% Install the screen fonts using the standard function for the OS of adding fonts. For details, refer to
Help of the Operating System.% Macintosh fonts are compressed. Decompress them before installing.
Reference- After installing the printer driver, perform test print to make sure that the connections are made prop-
erly.
d Reference
For details on the connectable interfaces, refer to page 2-7.
For details on the network settings, refer to "User's Guide - POD Administrator's Reference".
The procedure for installing the printer driver varies depending on the connection method with the machine, operating system of the computer, and printer driver. For details, refer to page 3-2.
To update an existing printer driver, uninstall it first. For details, refer to page 8-2.
2.3.2 For local connection
1 Connect this printing system to the computer.
2 Install the printer driver.
3 Install the screen fonts.
% The CD-ROM contains the European TrueType fonts as "screen fonts". The "ScreenFont" or "Screen Fonts" folder in the CD-ROM contains the screen fonts.
% Install the screen fonts using the standard function for the OS of adding fonts. For details, refer to Help of the Operating System.
bizhub PRO 951 2-8

3 Before installing the printer
driver

3.1 Introduction 3
3 Before installing the printer driver
The following describes the information necessary for selecting a printer driver.
3.1 Introduction
This chapter describes the information you should keep in mind before installing the printer driver.
The procedure for installing the printer driver varies depending on how this machine is connected to the com-puter, operating system installed on the computer, and type of the printer driver to be installed.
To determine the printer driver to be installed and connection method, check the operating system of the computer and connection environment.
Select the installation method according to the printer driver and connection method.
3.2 Printer drivers compatible with respective operating systems
Before using this printing system, you must install the printer driver.
The following lists the printer drivers included on the CD and the supported operating systems. Select the required printer driver.
Printer driver Page de-scription lan-guage
Supported Operating Systems
PCL Driver PCL Windows XP Home Edition (Service Pack 3)*Windows XP Professional (Service Pack 3)*Windows XP Professional e64 Edition (Service Pack 2)Windows Server 2003, Standard Edition (Service Pack 2)*Windows Server 2003, Enterprise Edition (Service Pack 2)Windows Vista Business (Service Pack 2) *Windows Vista Enterprise (Service Pack 2) *Windows Vista Home Basic (Service Pack 2) *Windows Vista Home Premium (Service Pack 2) *Windows Vista Ultimate (Service Pack 2) *Windows Server 2008, Standard Edition (Service Pack 2) *Windows Server 2008, Enterprise Edition (Service Pack 2) *Windows Server 2008 R2 Standard (Service Pack 1) *Windows Server 2008 R2 Enterprise (Service Pack 1)Windows 7 Home Basic (Service Pack 1)Windows 7 Home Premium (Service Pack 1) *Windows 7 Professional (Service Pack 1) *Windows 7 Enterprise (Service Pack 1) *Windows 7 Ultimate (Service Pack 1) ** Supports 32-bit (e86)/64-bit (e64) environment.
bizhub PRO 951 3-2

3.2 Printer drivers compatible with respective operating systems 3
Reference- Select the page description language according to the application used for printing.- Either the installer or Add Printer Wizard can be used for installing the PS Plug-in driver and PCL driver
for Windows.
PS Plug-in Driver PostScript 3 Emulation
Windows XP Home Edition (Service Pack 3)*Windows XP Professional (Service Pack 3)*Windows XP Professional e64 Edition (Service Pack 2)Windows Server 2003, Standard Edition (Service Pack 2)*Windows Server 2003, Enterprise Edition (Service Pack 2)*Windows Vista Business (Service Pack 2) *Windows Vista Enterprise (Service Pack 2) *Windows Vista Home Basic (Service Pack 2) *Windows Vista Home Premium (Service Pack 2) *Windows Vista Ultimate (Service Pack 2) *Windows Server 2008, Standard Edition (Service Pack 2) *Windows Server 2008, Enterprise Edition (Service Pack 2) *Windows Server 2008 R2 Standard (Service Pack 1) *Windows Server 2008 R2 Enterprise (Service Pack 1)Windows 7 Home Basic (Service Pack 1)Windows 7 Home Premium (Service Pack 1) *Windows 7 Professional (Service Pack 1) *Windows 7 Enterprise (Service Pack 1) *Windows 7 Ultimate (Service Pack 1) ** Supports 32-bit (e86)/64-bit (e64) environment.
Mac OS X 10.4/10.5/10.6
PostScript PPD driver (PS-PPD)
PostScript 3 Emulation
Windows XP Home Edition (Service Pack 3)*Windows XP Professional (Service Pack 3)*Windows XP Professional e64 Edition (Service Pack 2)Windows Server 2003, Standard Edition (Service Pack 2)*Windows Server 2003, Enterprise Edition (Service Pack 2)Windows Vista Business (Service Pack 2) *Windows Vista Enterprise (Service Pack 2) *Windows Vista Home Basic (Service Pack 2) *Windows Vista Home Premium (Service Pack 2) *Windows Vista Ultimate (Service Pack 2) *Windows Server 2008, Standard Edition (Service Pack 2) *Windows Server 2008, Enterprise Edition (Service Pack 2) *Windows Server 2008 R2 Standard (Service Pack 1) *Windows Server 2008 R2 Enterprise (Service Pack 1)Windows 7 Home Basic (Service Pack 1)Windows 7 Home Premium (Service Pack 1) *Windows 7 Professional (Service Pack 1) *Windows 7 Enterprise (Service Pack 1) *Windows 7 Ultimate (Service Pack 1) ** Supports 32-bit (e86)/64-bit (e64) environment.
Mac OS X (10.4, 10.5, 10.6)
Printer driver Page de-scription lan-guage
Supported Operating Systems
bizhub PRO 951 3-3
3.3 Connection methods selectable in each operating system 3
3.3 Connection methods selectable in each operating system
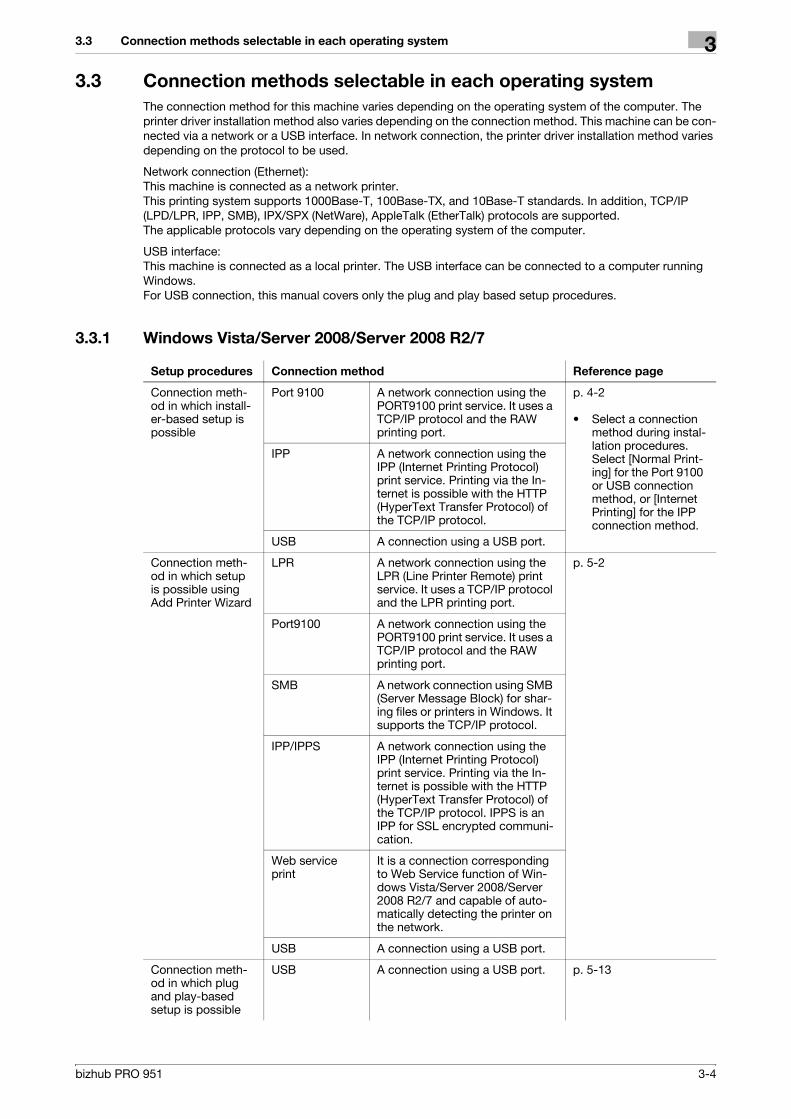
The connection method for this machine varies depending on the operating system of the computer. The printer driver installation method also varies depending on the connection method. This machine can be con-nected via a network or a USB interface. In network connection, the printer driver installation method varies depending on the protocol to be used.
Network connection (Ethernet): This machine is connected as a network printer. This printing system supports 1000Base-T, 100Base-TX, and 10Base-T standards. In addition, TCP/IP (LPD/LPR, IPP, SMB), IPX/SPX (NetWare), AppleTalk (EtherTalk) protocols are supported. The applicable protocols vary depending on the operating system of the computer.
USB interface: This machine is connected as a local printer. The USB interface can be connected to a computer running Windows. For USB connection, this manual covers only the plug and play based setup procedures.
3.3.1 Windows Vista/Server 2008/Server 2008 R2/7
Setup procedures Connection method Reference page
Connection meth-od in which install-er-based setup is possible
Port 9100 A network connection using the PORT9100 print service. It uses a TCP/IP protocol and the RAW printing port.
p. 4-2
• Select a connection method during instal-lation procedures. Select [Normal Print-ing] for the Port 9100 or USB connection method, or [Internet Printing] for the IPP connection method.
IPP A network connection using the IPP (Internet Printing Protocol) print service. Printing via the In-ternet is possible with the HTTP (HyperText Transfer Protocol) of the TCP/IP protocol.
USB A connection using a USB port.
Connection meth-od in which setup is possible using Add Printer Wizard
LPR A network connection using the LPR (Line Printer Remote) print service. It uses a TCP/IP protocol and the LPR printing port.
p. 5-2
Port9100 A network connection using the PORT9100 print service. It uses a TCP/IP protocol and the RAW printing port.
SMB A network connection using SMB (Server Message Block) for shar-ing files or printers in Windows. It supports the TCP/IP protocol.
IPP/IPPS A network connection using the IPP (Internet Printing Protocol) print service. Printing via the In-ternet is possible with the HTTP (HyperText Transfer Protocol) of the TCP/IP protocol. IPPS is an IPP for SSL encrypted communi-cation.
Web service print
It is a connection corresponding to Web Service function of Win-dows Vista/Server 2008/Server 2008 R2/7 and capable of auto-matically detecting the printer on the network.
USB A connection using a USB port.
Connection meth-od in which plug and play-based setup is possible
USB A connection using a USB port. p. 5-13
bizhub PRO 951 3-4

3.3 Connection methods selectable in each operating system 3
Reference- Log on to the computer using a user name with the Administrator privilege, and then install the printer
driver.
d Reference
To use this machine in the network environment, you must configure network settings for this machine in ad-vance. For details, refer to "User's Guide - POD Administrator's Reference".
You cannot set up IPPS connection (Secure Print) using the installer. To use IPPS connection, use the Add Printer Wizard. For details, refer to page 5-7.
3.3.2 Windows XP/Server 2003
Reference- Log on to the computer using a user name with the Administrator privilege, and then install the printer
driver.- The installer does not support installation in the IPv6 environment of Windows XP/Server 2003.
d Reference
To use this machine in the network environment, you must configure network settings for this machine in ad-vance. For details, refer to "User's Guide - POD Administrator's Reference".
Setup procedures Connection method Reference page
Connection meth-od in which install-er-based setup is possible
Port9100 A network connection using the PORT9100 print service. It uses a TCP/IP protocol and the RAW printing port.
p. 4-2
• Select a connection method during instal-lation procedures. Select [Normal Print-ing] for the Port9100 or USB connection method, [Internet Printing] for the IPP connection method, or [Secure Printing] for the IPPS connec-tion method.
IPP/IPPS A network connection using the IPP (Internet Printing Protocol) print service. Printing via the In-ternet is possible with the HTTP (HyperText Transfer Protocol) of the TCP/IP protocol. IPPS is an IPP for SSL encrypted communi-cation.
USB A connection using a USB port.
Connection meth-od in which setup is possible using Add Printer Wizard
LPR A network connection using the LPR (Line Printer Remote) print service. It uses a TCP/IP protocol and the LPR printing port.
Windows XP/ Server 2003 :p. 5-15
Port9100 A network connection using the PORT9100 print service. It uses a TCP/IP protocol and the RAW printing port.
SMB A network connection using SMB (Server Message Block) for shar-ing files or printers in Windows. It supports the TCP/IP protocol.
IPP/IPPS A network connection using the IPP (Internet Printing Protocol) print service. Printing via the In-ternet is possible with the HTTP (HyperText Transfer Protocol) of the TCP/IP protocol. IPPS is an IPP for SSL encrypted communi-cation.
USB A connection using a USB port.
Connection meth-od in which plug and play-based setup is possible
USB A connection using a USB port. Windows XP/ Server 2003 :p. 5-22
bizhub PRO 951 3-5

3.3 Connection methods selectable in each operating system 3
3.3.3 Mac OS X 10.4/10.5/10.6
Reference- AppleTalk connection supports Mac OS X 10.4/10.5 only.
d Reference
To use this machine in the network environment, you must configure network settings for this machine in ad-vance. For details, refer to "User's Guide - POD Administrator's Reference".
3.3.4 NetWare
d Reference
For details on the NetWare functions, refer to the NetWare operation manual. To use this machine in the NetWare environment, you must configure the network settings for this machine in advance. For details, refer to "User's Guide - POD Administrator's Reference".
Setup procedures Connection method Reference page
Connection meth-od in which setup is possible
Bonjour A network connection using Bon-jour.
p. 6-2
• Install your desired driver using the in-staller and specify the connection meth-od when selecting the printer.
AppleTalk A network connection using Ap-pleTalk.
LPR A network connection using the LPR print service.
IPP A network connection using the IPP print service.
NetWare version Protocol used Connection method
NetWare 4.x IPX Bindery Pserver Nprinter/Rprint-er
NetWare 5.x IPX NDS Pserver Nprinter/Rprinter
TCP/IP NDPS
NetWare 6.x IPX NDS Pserver
TCP/IP NDPS
bizhub PRO 951 3-6

4 Installing the Windows printer
driver

4.1 About installer 4
4 Installing the Windows printer driver
This chapter describes the procedure for installing the Windows printer driver using the installer.
4.1 About installer
The installer automatically detects the printer on the same TCP/IP network as your computer or the machine connected via USB to your computer, and allows you to install the required printer driver. You can also install the printer driver by manually specifying the connection destination.
NOTICEThe installer installs the PS Plug-in driver and PCL driver.
4.1.1 Operating environment of the installer
Reference- Installing the driver to Windows XP/Server 2003/Vista/Server 2008/Server 2008 R2/7 based computers
requires the administrator authority.- If a wizard window for adding new hardware opens when using USB connection, click [Cancel].- The installer supports installation in both IPv4/IPv6 environments of Windows Vista/Server 2008/Server
2008 R2/7 only. Note that it does not support [Secure Printing] (IPPS) in Windows Vista/Server 8/Server 2008 R2/7 and [Internet Printing] (IPP) in the IPv6 environment.
Operating system Windows XP Home Edition (Service Pack 3) *1Windows XP Professional (Service Pack 3) *1Windows XP Professional e64 Edition (Service Pack 2)Windows Server 2003, Standard Edition (Service Pack 2)Windows Server 2003, Enterprise Edition (Service Pack 2)Windows Vista Business (Service Pack 2) *2Windows Vista Enterprise (Service Pack 2) *2Windows Vista Home Basic (Service Pack 2) *2Windows Vista Home Premium (Service Pack 2) *2Windows Vista Ultimate (Service Pack 2) *2Windows Server 2008 Standard (Service Pack 2) *2Windows Server 2008 Enterprise (Service Pack 2) *2Windows Server 2008 R2 Standard (Service Pack 1) *Windows Server 2008 R2 Enterprise (Service Pack 1)Windows 7 Home Basic (Service Pack 1)Windows 7 Home Premium (Service Pack 1) *2Windows 7 Professional (Service Pack 1) *2Windows 7 Enterprise (Service Pack 1) *2Windows 7 Ultimate (Service Pack 1) *2*1 The operating environment required for the printer driver is service pack 1 or later.*2 Supports 32-bit (e86)/64-bit (e64) environment.
CPU Any processor of the same or higher specifications as recommend-ed for your operating system
Memory Memory capacity as recommended for your operating systemSufficient memory resource is required for your operating system and the applications to be used.
bizhub PRO 951 4-2

4.2 Easy installation procedure using the installer 4
4.2 Easy installation procedure using the installer
4.2.1 Settings of this machine
To connect the network environment, you must configure network settings for this machine in advance.
d Reference
You can set the network settings for this machine in the screen that is displayed by selecting [Utility/Counter] - [Administrator Setting] - [Network Setting] - [Controller NIC Setting Menu].
For details, refer to "User's Guide - POD Administrator's Reference".
TCP/IP settings for this machine
In [TCP/IP Settings] of this machine, specify the IP address.
d Reference
When this machine is connected through the network, you must previously specify the IP address on this machine so that it can be detected automatically. For details, refer to [User's Guide - POD Administrator's Reference].
RAW port number/IPP setting for this machine
Change the network settings for this machine according to the connection method or protocol.- Port9100: In [TCP/IP Settings], enable the RAW port number (initial setting: [9100]).- IPP/IPPS: In [HTTP Server Setting], enable IPP printing.
d Reference
For details on TCP/IP setting and IPP setting for this machine, refer to "User's Guide - POD Administrator's Reference".
Before you can use IPPS printing, you must register a certificate with this machine. You can use the self-signed certificate that is preinstalled in this machine. For details, refer to "User's Guide - POD Administrator's Reference".
bizhub PRO 951 4-3

4.2 Easy installation procedure using the installer 4
4.2.2 Installing the printer driver (PCL driver)
1 Insert the Driver CD-ROM for PCL into the CD-ROM drive.
% If the [User Account Control] window appears, click [Yes] or [Continue].% Confirm the CD menu is displayed, go to Step 2.% If the CD menu is not displayed, double-click [AutoRun.exe] on the CD-ROM, and then go to Step 2.
2 Select the required printer driver according to the screen.
The installer of the printer driver starts.
3 Click [AGREE].
% If you disagree, you will not be able to install the driver.% In the language display box, you can change the language used with the installer as required.
4 Select [Install printers/MFPs] and click [Next].
% When Printers/MFPs are detected on both IPv4 and IPv6, you can specify [IPv4 Priority] or [IPv6 Pri-ority].
bizhub PRO 951 4-4

4.2 Easy installation procedure using the installer 4
5 Select this machine from the list, and click [Next].
% From among the connected printers/MFPs, the models corresponding to the printer driver appears in the list. If multiple models appears, check the IP address.
% If the connection with this machine is not detected, no model appears in the list. In this case, select the [Specify the Printer/MFP Except for the Above. (IP Address, Host Name...)] at the lower part of the screen.
6 Select the component to be installed and click [Next].
bizhub PRO 951 4-5

4.2 Easy installation procedure using the installer 4
7 Confirm the installation summary and click [Install].
8 Click [Finish].
The installation is complete.% You can confirm the installed items and settings on [Installation Completed] screen.
[Review] You can review the installed items and configuration.
[Rename Printer] You can change the printer name.
[Property] You can set the property of the printer. For details, refer to page 10-2.
[Print Setting] You can open the [Properties] screen for the printer driver and spec-ify several settings. For details, refer to page 10-9.
[Print Test page] You can print test page.
bizhub PRO 951 4-6

4.2 Easy installation procedure using the installer 4
4.2.3 Installing the printer driver (PS Plug-in driver)
1 Insert the Driver CD-ROM for PS Plug-in into the CD-ROM drive.
% When installing the driver on a Windows Vista/Server 2008/Server 2008 R2/7 based computer, click [Allow] or [Continue] if the [User Account Control] window appears.
% Confirm the CD menu is displayed, go to Step 2.% If the CD menu is not displayed, double-click [AutoRun.exe] on the CD-ROM, and then go to Step 2.
2 Select the required printer driver according to the screen.
The installer of the printer driver starts.
3 Click [Next].
4 Input the printer name or IP address and press [Next].
% If you want to connect to the other printer, select [Other Connection] and click [Next].
% [Network printer name or IP address] : This machine is set as a Windows printer. The printer is created with the Ipr port used. (E.g.: myprinter:print.)
% [Other Connection]: You can specify the other printer connection (NetBIOS or port9100).
bizhub PRO 951 4-7

4.2 Easy installation procedure using the installer 4
5 Selecting [Other Connection], specify the printer connection and click [Next].
% If you use DNS in the network, the administrator has to check whether the network name specified to this machine is matched with the network name stored in the DNS.
6 Select the printer name and click [Next].
% It displays all printers that you can install. If there is no desired printer name, click [Have Disk] and select the [Setup.inf] file.
bizhub PRO 951 4-8
4.2 Easy installation procedure using the installer 4
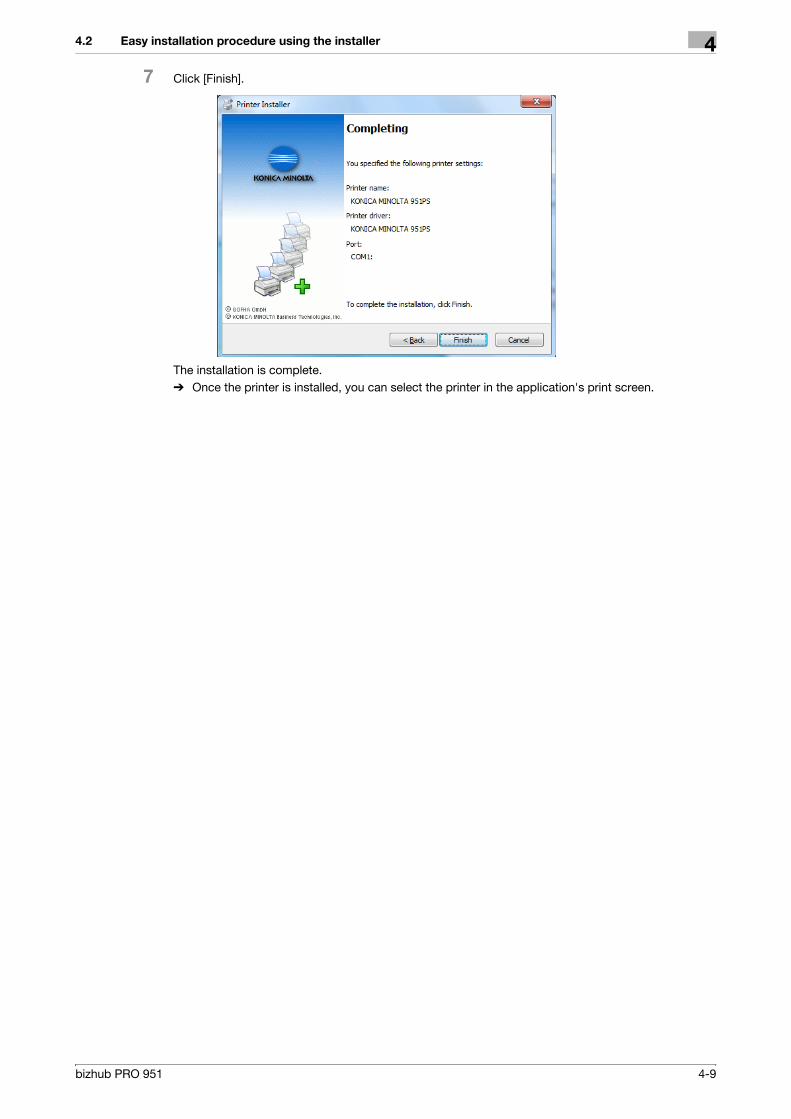
7 Click [Finish].
The installation is complete.% Once the printer is installed, you can select the printer in the application's print screen.
bizhub PRO 951 4-9

5 Manual Installation Using the
Add Printer Wizard

5.1 Windows Vista/Server 2008/Server 2008 R2/7 5
5 Manual Installation Using the Add Printer Wizard
This chapter describes the procedure for installing the Windows printer driver using the standard Windows Add Printer function, without using the installer.
5.1 Windows Vista/Server 2008/Server 2008 R2/7
5.1.1 For network connection (LPR/Port 9100/SMB)
In Windows Vista/Server 2008/Server 2008 R2/7, you can install the printer driver either by searching for the printer on the network, or by creating a new printer port.
Settings of this machine
To use Port 9100, LPR, or SMB printing, you must configure the network settings for the machine in advance.
d Reference
For details on the network settings for this machine, refer to "User's Guide - POD Administrator's Reference".
To use SMB printing in the IPv6 environment, [Direct Hosting Setting] for the machine should be enabled. For details, refer to "User's Guide - POD Administrator's Reference".
Installing the printer driver by searching for the printer using the Add Printer
Wizard.
0 Installing the driver to Windows Vista/Server 2008/Server 2008 R2/7 based computers requires the ad-ministrator authority.
0 Since the printer is searched for during the installation, be sure to connect this machine to the network before turning it on.
1 Insert the Driver CD-ROM into the CD-ROM drive.
2 Click [Start] and then [Devices and Printers].
% In Windows Vista/Server 2008/Server 2008 R2, click [Printers] under [Control Panel] - [Hardware and Sound]. When [Control Panel] is displayed in Classic View, double-click [Printers].
Items to be configured Description
IP Address In [TCP/IP Settings] of this machine, specify the IP address.
RAW port number To use Port 9100 printing : In [TCP/IP Setting] for the machine, enable the RAW port number (default value : [9100]).
LPD Setting To use LPR printing : In [LPD Setting] for the machine, enable LPD printing.
SMB Setting To use SMB printing : In [SMB Setting] - [Print Settings], specify NetBIOS Name, Print Service Name, and Workgroup.
bizhub PRO 951 5-2

5.1 Windows Vista/Server 2008/Server 2008 R2/7 5
3 On the toolbar, select [Add a printer].
% In Windows Vista/Server 2008/Server 2008 R2, click [Add a printer] on the toolbar.The [Add Printer] Wizard appears.
4 Click [Add a network, wireless or Bluetooth printer].
Connected printers are detected.% If no printer is detected, turn this machine off, then on again.
In this case, turn off the printer, and then wait approximately 10 seconds before turning it on again. If you turn this machine on immediately after turning it off, it may not function correctly.
5 Select this machine from the list, and then click [Next].
% To use the LPR/Port9100 protocol, select the printer with its IP address.% To use the SMB connection, select the printer with its "\\NetBIOS name\print service name". You
can check the NetBIOS name and print service name by selecting [Administrator Setting] - [Network Setting] - [Controller NIC Setting Menu] - [SMB Setting] - [Print Setting]. In the default setting, the last six characters of the NetBIOS name correspond to the low-order three bytes of the MAC ad-dress. To check the MAC address, select [Configuration Page]. For details on how to output [Configuration Page], refer to page 15-4.
bizhub PRO 951 5-3

5.1 Windows Vista/Server 2008/Server 2008 R2/7 5
% For the SMB connection, click [Next], and then click [OK] in the [Connect to Printer] page that ap-pears.
% It may take some time to finish searching the entire list of printers.
6 Click [Have Disk...].
7 Click [Browse...].
8 Select a desired printer driver folder in the CD-ROM, and then click [Open].
% Select a folder according to the printer driver, operating system, and language to be used. Available printer drivers : PS Plug-in driver, PPD driver, PCL driver
9 Click [OK].
The [Printers] list appears.
10 Click [Next].
% To use the SMB connection, click [OK].
bizhub PRO 951 5-4

5.1 Windows Vista/Server 2008/Server 2008 R2/7 5
11 Follow the instructions on the pages that follow.
% If the [User Account Control] window appears, click [Continue] or [Yes].% If the [Windows Security] window for verifying the publisher appears, click [Install this driver soft-
ware anyway].
12 Click [Finish].
13 After finishing the installation, make sure that the icon for the installed printer is displayed in the [Devic-es and Printers] or [Printers] window.
14 Remove the CD-ROM from the CD-ROM drive.
This completes the printer driver installation.
Installing the printer driver by creating a printer port
0 Installing the driver to Windows Vista/Server 2008/Server 2008 R2/7 based computers requires the ad-ministrator authority.
0 Since the printer is searched for during the installation, be sure to connect this machine to the network before turning it on.
1 Insert the Driver CD-ROM into the CD-ROM drive.
2 Click [Start] and then [Devices and Printers].
% In Windows Vista/Server 2008/Server 2008 R2, click [Printers] under [Control Panel] - [Hardware and Sound]. When [Control Panel] is displayed in Classic View, double-click [Printers].
3 On the toolbar, select [Add a printer].
% In Windows Vista/Server 2008/Server 2008 R2, click [Add a printer] on the toolbar.[Add Printer Wizard] appears.
4 Click [Add a local printer].
5 Click [Create a new port:], and then select the port type.
bizhub PRO 951 5-5

5.1 Windows Vista/Server 2008/Server 2008 R2/7 5
% To use the LPR/Port9100 protocol, select [Standard TCP/IP Port].% To use the SMB connection, select [Local Port].
6 Click [Next].
7 Specify the IP address and port.
% To use the LPR/Port9100 protocol, select [TCP/IP Device], and then enter the IP address.% To use the SMB connection, enter [\\NetBIOS name\print service name] in the "Port Name" box.% Enter the same NetBIOS name and print service name specified in [SMB Setting] - [Print Setting].
8 Click [Next].
% If [Additional Port Information Required] or [More Port Information Required] dialog box appears, go to Step 10.
% If the [Install the printer driver] dialog box appears, go to Step 13.
9 Select [Custom], and then click [Settings...].
10 Change the settings according to the port, and then click [OK].
% For LPR connection, select [LPR], and then enter "Print" in the [Queue Name:] box.% You must discriminate between upper and lower case letters when entering it.% For Port9100, select [Raw], and then enter a RAW port number (initial setting: [9100]) in the [Port
Number:] box.% If both LPR and Port 9100 are enabled on this machine, the printer driver is connected to this ma-
chine using LPR.
11 Click [Next].
The [Install the printer driver] page appears.
12 Click [Have Disk...].
13 Click [Browse...].
14 Select a desired printer driver folder in the CD-ROM, and then click [Open].
% Select a folder according to the printer driver, operating system, and language to be used. Available printer drivers: PS Plug-in driver, PPD driver , PCL driver
15 Click [OK].
bizhub PRO 951 5-6

5.1 Windows Vista/Server 2008/Server 2008 R2/7 5
16 Click [Next].
17 Follow the instructions on the pages that follow.
% If the [User Account Control] window appears, click [Continue] or [Yes].% If the [Windows Security] window for verifying the publisher appears, click [Install this driver soft-
ware anyway].
18 Click [Finish].
19 After finishing the installation, make sure that the icon for the installed printer is displayed in the [Devic-es and Printers] or [Printers] window.
20 Remove the CD-ROM from the CD-ROM drive.
This completes the printer driver installation.
5.1.2 For network connection (IPP/IPPS)
Settings of this machine
To use IPP printing, you must configure the network settings for the machine in advance.
d Reference
For details on the network settings for this machine, refer to [User's Guide - POD Administrator's Reference].
Before you can use IPPS printing, you must register a certificate with this machine. You can use the self-signed certificate that is preinstalled in this machine. For details, refer to "User's Guide - POD Administrator's Reference".
Installing the printer driver using the Add Printer Wizard
0 Installing the driver to Windows Vista/Server 2008/Server 2008 R2/7 based computers requires the ad-ministrator authority.
1 Insert the Driver CD-ROM into the CD-ROM drive.
2 Click [Start] and then [Devices and Printers].
% In Windows Vista/Server 2008/Server 2008 R2, click [Printers] under [Control Panel] - [Hardware and Sound]. When [Control Panel] is displayed in Classic View, double-click [Printers].
Items to be configured Description
IP Address In [TCP/IP Settings] of this machine, specify the IP address.
IPP Setting In [HTTP Server Setting] for the machine, enable IPP printing.
bizhub PRO 951 5-7

5.1 Windows Vista/Server 2008/Server 2008 R2/7 5
3 On the toolbar, select [Add a printer].
% In Windows Vista/Server 2008/Server 2008 R2, click [Add a printer] on the toolbar.The [Add Printer] Wizard appears.
4 Click [Add a network, wireless or Bluetooth printer].
Connected printers are detected.
5 In the window showing the search result, click [The printer that I want isn't listed].
6 In the [Select a shared printer by name] box, enter the URL for the machine in the following format, and then click [Next].
% http://<IP address for the machine>/ipp Example : When the IP address for the machine is 192.168.1.20, http://192.168.1.20/ipp
% When specifying to use IPPS printing, enter "https://<host name>.<domain name>/ipp". For <Host name>. <domain name>, specify the host name and domain name registered for the DNS server being used.
% If the certificate for the machine is not the one issued by the certifying authority, you must register the certificate for the machine on the Windows Vista/Server 2008/Server 2008 R2/7 system as the certificate by "Trusted Root Certification Authorities" for the computer account.
% When registering a certificate to this machine, confirm that <host name>.<domain name> is dis-played as the common name of the certificate.
7 Click [Have Disk...].
8 Click [Browse...].
9 Select a desired printer driver folder in the CD-ROM, and then click [Open].
% Select a folder according to the printer driver, operating system, and language to be used. Available printer drivers: PS Plug-in driver, PPD driver , PCL driver
10 Click [OK].
11 Click [OK].
bizhub PRO 951 5-8
5.1 Windows Vista/Server 2008/Server 2008 R2/7 5
12 Follow the instructions on the pages that follow.
% If the [User Account Control] window appears, click [Continue] or [Yes].% If the [Windows Security] window for verifying the publisher appears, click [Install this driver soft-
ware anyway].
13 Click [Finish].
14 After finishing the installation, make sure that the icon for the installed printer is displayed in the [Devic-es and Printers] or [Printers] window.
15 Remove the CD-ROM from the CD-ROM drive.
This completes the printer driver installation.
Once the settings for the printer have been configured, you can use the printer in the same way as a general local printer.
5.1.3 For network connection (Web service print)
In Windows Vista/Server 2008/Server 2008 R2/7, printers supporting the Web service print function on the network can be located and installed.
Note- To use Web service in Windows Server 2008 R2, enable "Print and Document Services".
d Reference
To install a different printer driver in the computer where one has already been installed, you must uninstall the whole package of the currently installed printer driver. For details, refer to page 8-4.
Settings of this machine
To use the Web service print, you must configure the network settings for the machine in advance.
d Reference
For details on the network settings for this machine, refer to "User's Guide - POD Administrator's Reference".
Making the printer driver known from the Network window
To use Web service print in Windows Vista/Server 2008/Server 2008 R2/7, install the printer driver before making it known to the computer with plug and play.
0 Installing the driver to Windows Vista/Server 2008/Server 2008 R2/7 based computers requires the ad-ministrator authority.
1 Install the printer driver for this machine.
% Install the printer driver using the installer or Add Printer Wizard. The printer driver can be installed in any port. For details, refer to page 4-7 or page 5-2.
2 Turn on the power of the machine while it is connected to the network. Since the printer is searched for, be sure to connect this machine to the network.
3 To use the Web service print, check that [Network discovery] is enabled in [Network and Sharing Cent-er] - [Change advanced sharing settings] on the computer.
4 Open the [Network] window.
% In Windows Vista/Server 2008/Server 2008 R2, click [Start], and [Network].
Items to be configured Description
IP Address In [TCP/IP Setting] of this machine, specify the IP address.
Web Service Settings In [Web Service Setting] for the machine, enable the print function.
bizhub PRO 951 5-9

5.1 Windows Vista/Server 2008/Server 2008 R2/7 5
% In Windows 7, open [Computer] and click [Network]. If [Network] is not displayed in [Computer], click the [Network and Internet] category on the [control panel], and also click [View network computers and devices].
Connected computers and devices are detected.
5 Right click the device name and select [Install].
% To check the device name, select [Network Setting] - [Controller NIC Setting] - [Web Service Setting] - [Print Setting] in [Administrator Settings] of this machine. In the default setting, the last six charac-ters of [printer name] correspond to the low-order three bytes of the MAC address. To check the MAC address, select [Configuration Page]. For details on how to output [Configuration Page], refer to page 15-4.
The printer driver for this machine is detected and this machine is ready to print.
6 After finishing the installation, make sure that the icon for the installed printer is displayed in the [Devic-es and Printers] or [Printers] window.
Reference- If the printer driver is not correctly installed, the driver must be updated using [Update Driver ...]. For
details, refer to page 5-14.- In Windows Vista/Server 2008/Server 2008 R2, you can continue the task and specify the printer driver
installation disk to install the printer driver if it is not installed in advance. When the [Found New Hard-ware] window appears, follow the displayed messages to perform the procedure. For details, refer to Steps 11 through 20 in the succeeding section.
- In Windows 7/Server 2008 R2, you cannot specify the installation disk after the machine is connected to the computer. Install the printer driver in advance (Step 1).
Installing the printer driver by specifying the IP address using the Add Printer
Wizard
In Windows Vista/Server 2008/Server 2008 R2, you can add a Web service device using the adding printer function of the after connecting this machine.
Reference- In Windows 7, a window for specifying an installation disk does not appear after the machine is con-
nected to the computer. Install the printer driver in advance and connect the driver as described in "Making the printer driver known from the Network window".
0 Installing the driver to Windows Vista/Server 2008/Server 2008 R2 based computers requires the ad-ministrator authority.
1 Turn on the power of the machine while it is connected to the network. Since the printer is searched for during the installation, be sure to connect this machine to the network before turning it on.
2 To use the Web service print, check that [Network discovery] is enabled in [Network and Sharing Cent-er] on the computer.
3 Insert the Driver CD-ROM into the CD-ROM drive.
4 Click [Start], and then select [Control Panel].
% In Windows Vista/Server 2008/Server 2008 R2, click [Printers] under [Control Panel] - [Hardware and Sound]. When [Control Panel] is displayed in Classic View, double-click [Printers].
5 Click [Printers] under [Hardware and Sound].
% When [Control Panel] is displayed in Classic View, double-click [Printers].
6 Click [Add a printer] on the toolbar.
% In Windows Vista:
bizhub PRO 951 5-10

5.1 Windows Vista/Server 2008/Server 2008 R2/7 5
% <Windows Server 2008/Server 2008 R2>
[Add Printer Wizard] appears.
7 Click [Add a local printer].
8 Click [Create a new port:], and then select the port type.
% Select [Standard TCP/IP Port].
9 Click [Next].
bizhub PRO 951 5-11

5.1 Windows Vista/Server 2008/Server 2008 R2/7 5
10 Select [Web Services Device], enter the IP address, and click [Next].
A printer of the entered IP address that is compatible with the Web service print function is located, and then the [Found New Hardware] dialog box appears.
11 Click [Locate and install driver software (recommended)].
12 If a dialog box to confirm whether to search online appears, click [Don't search online].
13 Click [Browse my computer for driver software (advanced)].
14 Click [Browse...].
15 Select a desired printer driver folder in the CD-ROM, and then click [Open].
% Select a folder according to the printer driver, operating system, and language to be used. Available printer drivers: PS Plug-in driver, PPD driver , PCL driver
16 Click [Next].
17 Follow the instructions on the pages that follow.
% If the [User Account Control] window appears, click [Continue].% If the [Windows Security] window for verifying the publisher appears, click [Install this driver soft-
ware anyway].
18 Click [Close].
19 After finishing the installation, make sure that the icon for the installed printer is displayed in the [Print-ers] window.
20 Remove the CD-ROM from the CD-ROM drive.
This completes the printer driver installation.
bizhub PRO 951 5-12

5.1 Windows Vista/Server 2008/Server 2008 R2/7 5
5.1.4 For local connection
Making the installed printer driver known to the computer
To connect this machine using the USB port in Windows Vista/Server 2008/Server 2008 R2/7, install the printer driver before making it known to the computer with plug and play.
1 Install the printer driver for this machine.
% Install the printer driver using the installer or Add Printer Wizard. To use the Add Printer Wizard, select the USB port to be connected in the [Choose a printer port] page. For details, refer to page 4-7 or page 5-5.
2 Connect this machine to the computer using a USB cable.
3 Turn on the power of this machine.
The printer driver for this machine is detected and this machine is ready to print.% If no printer driver is detected, turn this machine off, then on again. In this case, turn off this machine,
and then wait approximately 10 seconds before turning it on again. If you turn this machine on im-mediately after turning it off, it may not function correctly.
4 After finishing the installation, make sure that the icon for the installed printer is displayed in the [Devic-es and Printers] or [Printers] window.
Reference- If the printer driver is not correctly installed, the driver must be updated using [Update Driver ...]. For
details, refer to page 5-14.
Installing the printer driver when connecting the machine
In Windows Vista/Server 2008/Server 2008 R2, you can install the printer driver after connecting this ma-chine.
Reference- In Windows 7, a window for specifying an installation disk does not appear after the machine is con-
nected to the computer. Install the printer driver in advance and connect the driver as described in "Making the installed printer driver known to the computer".
1 Connect this machine to the computer using a USB cable.
NOTICEWhen starting up the computer, do not plug in or unplug the cable.
2 Turn on the power of this machine.
The [Found New Hardware] dialog box appears.% The [Found New Hardware] dialog box appears. In this case, turn off this machine, and then wait
approximately 10 seconds before turning it on again. If you turn this machine on immediately after turning it off, it may not function correctly.
3 Click [Locate and install driver software (recommended)].
The dialog box requesting the disk (CD-ROM) appears.% If you do not have the disk (CD-ROM), click [I don't have the disc, show me other options]. On the
next page, select [Browse my computer for driver software (advanced)], and then specify a desired printer driver folder.
% Select a folder according to the printer driver, operating system, and language to be used.
4 Insert the Driver CD-ROM into the CD-ROM drive.
The information on the disk is searched for, and then the list of the software supported by this machine appears.
5 Select a desired printer driver name, and then click [Next].
% Available printer drivers: PS Plug-in driver, PPD driver , PCL driver
bizhub PRO 951 5-13

5.1 Windows Vista/Server 2008/Server 2008 R2/7 5
6 Follow the instructions on the pages that follow.
% If the [User Account Control] window appears, click [Continue].
7 When the installation completes, click [Close].
8 After finishing the installation, make sure that the icon for the installed printer is displayed in the [Print-ers] window.
% If the [Windows Security] window for verifying the publisher appears, click [Install this driver soft-ware anyway].
9 Remove the CD-ROM from the CD-ROM drive.
This completes the printer driver installation.
Updating the driver after connecting this machine
In Windows 7, if this machine is connected without first installing the printer driver, the printer driver will not be correctly identified. In this case, the driver must be updated using [Update Driver ...].
1 Click [Start] and then [Devices and Printers].
2 Right-click the device name of the machine that is under [Unspecified] and then click [Properties].
% If [Unknown Device] appears instead of the device name of this machine, right-click to remove the device, and install the printer driver. To connect this machine as described in "Making the printer driver known to the compute". For details, refer to page 5-9 or page 5-13.
3 In the [Hardware] tab, click [Properties].
4 In the [General] tab, click [Change Settings].
5 In the [Driver] tab, click [Update Driver ...].
6 In the page in which to select how to search the driver software, click [Browse my computer for driver software anyway].
7 Click [Browse...].
8 Select a desired printer driver folder in the CD-ROM, and then click [OK].
% Select a folder according to the printer driver, operating system, and language to be used. Available printer drivers: PS Plug-in driver, PPD driver , PCL driver
9 Click [Next].
10 Follow the instructions on the pages that follow.
% If the [Windows Security] window for verifying the publisher appears, click [Install this driver soft-ware anyway].
11 Click [Close].
12 After finishing the installation, make sure that the icon for the installed printer is displayed in the [Devic-es and Printers] window.
13 Remove the CD-ROM from the CD-ROM drive. This completes the printer driver updating.
Reference- In Windows Vista/Server 2008/Server 2008 R2, [Update Driver ...] is also available. In Windows Vis-
ta/Server 2008/Server 2008 R2, you can specify [Update Driver...] by opening [Properties] for this ma-chine that is listed in [Other Devices] under [Device Manager]. To select [Device Manager], right-click [Computer] and then click [Properties]. Select it in the [Tasks] pane that appears.
bizhub PRO 951 5-14
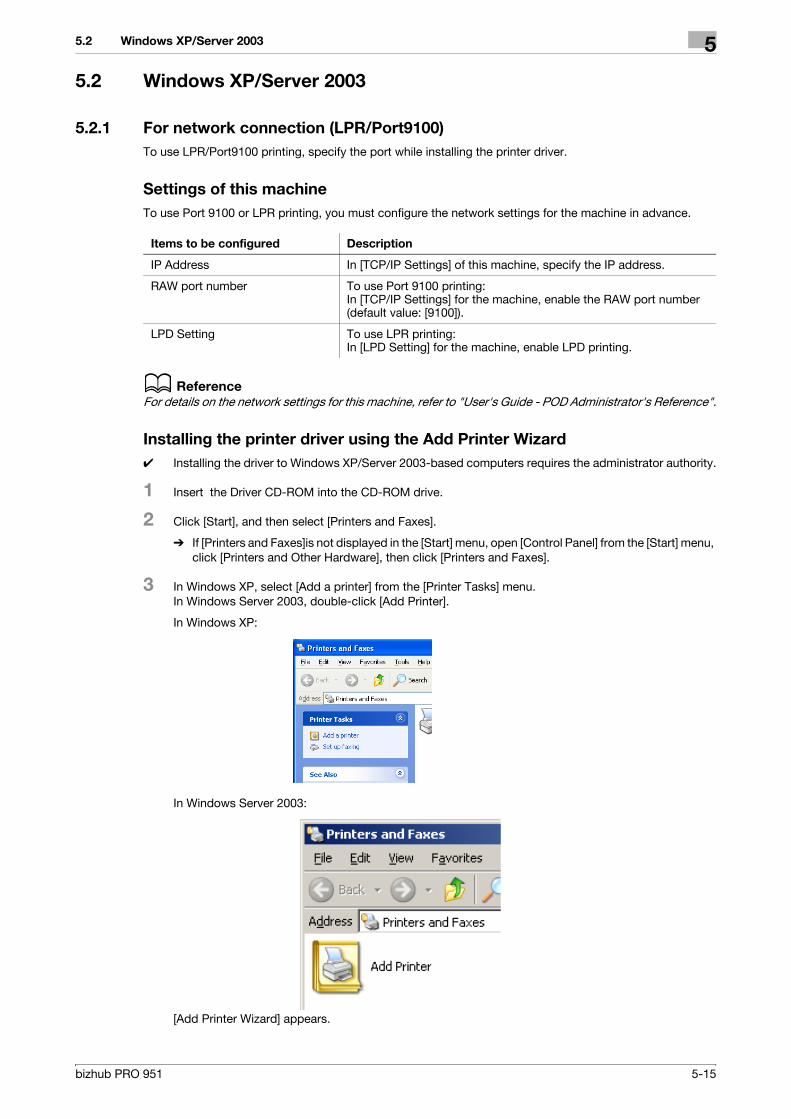
5.2 Windows XP/Server 2003 5
5.2 Windows XP/Server 2003
5.2.1 For network connection (LPR/Port9100)
To use LPR/Port9100 printing, specify the port while installing the printer driver.
Settings of this machine
To use Port 9100 or LPR printing, you must configure the network settings for the machine in advance.
d Reference
For details on the network settings for this machine, refer to "User's Guide - POD Administrator's Reference".
Installing the printer driver using the Add Printer Wizard
0 Installing the driver to Windows XP/Server 2003-based computers requires the administrator authority.
1 Insert the Driver CD-ROM into the CD-ROM drive.
2 Click [Start], and then select [Printers and Faxes].
% If [Printers and Faxes]is not displayed in the [Start] menu, open [Control Panel] from the [Start] menu, click [Printers and Other Hardware], then click [Printers and Faxes].
3 In Windows XP, select [Add a printer] from the [Printer Tasks] menu. In Windows Server 2003, double-click [Add Printer].
In Windows XP:
In Windows Server 2003:
[Add Printer Wizard] appears.
Items to be configured Description
IP Address In [TCP/IP Settings] of this machine, specify the IP address.
RAW port number To use Port 9100 printing: In [TCP/IP Settings] for the machine, enable the RAW port number (default value: [9100]).
LPD Setting To use LPR printing: In [LPD Setting] for the machine, enable LPD printing.
bizhub PRO 951 5-15

5.2 Windows XP/Server 2003 5
4 Click [Next >].
5 Select [Local printer attached to this computer], and then click [Next >].
% Clear the [Automatically detect and install my Plug and Play printer] check box.
6 Select [Create a new port:], and then select [Standard TCP/IP Port] as the [Type of port:].
7 Click [Next >].
8 Click [Next >].
9 In the [Printer Name or IP Address :], enter the IP address for this machine, and then click [Next >].
% If the [Additional Port Information Required] dialog box appears, go to Step 10.% If the [Finish] page appears, go to Step 13.
bizhub PRO 951 5-16

5.2 Windows XP/Server 2003 5
10 Select [Custom], and then click [Settings:].
11 Change the settings according to the port, and then click [OK].
% For LPR connection, select [LPR], and then enter "Print" in the [Queue Name:] box.% You must discriminate between upper and lower case letters when entering it.% For Port9100, select [Raw], and then enter a RAW port number (initial setting: [9100]) in the [Port
Number:] box.
12 Click [Next >].
13 Click [Finish].
14 Click [Have Disk...].
15 Click [Browse...].
16 Select a desired printer driver folder in the CD-ROM, and then click [Open].
% Select a folder according to the printer driver, operating system, and language to be used. Available printer drivers : PCL driver, PS Plug-in driver, PPD driver
17 Click [OK].
The [Printers] list appears.
18 Click [Next >].
19 Follow the instructions on the pages that follow.
% To use a network connection, perform a test print after the network settings have been configured.
20 Click [Finish].
% If the "Windows logo testing" or [Digital Signature] window appears, click [Continue Anyway] or [Yes].
21 After finishing the installation, make sure that the icon for the installed printer is displayed in the [Printers and Faxes] window.
22 Remove the CD-ROM from the CD-ROM drive.
This completes the printer driver installation.
bizhub PRO 951 5-17

5.2 Windows XP/Server 2003 5
5.2.2 For network connection (SMB)
To use SMB printing, specify the port by specifying the printer while installing the printer driver. The printer can be specified either by searching for the printer on the network, or by entering the printer name directly.
Settings of this machine
To use the SMB printing, you must configure the network settings for the machine in advance.
d Reference
For details on the network settings for this machine, refer to "User's Guide - POD Administrator's Reference".
To use SMB printing in the IPv6 environment, [Direct Hosting Setting] for the machine should be enabled. For details, refer to "User's Guide - POD Administrator's Reference".
Installing the printer driver by specifying the printer using the Add Printer
Wizard
0 Installing the driver to Windows XP/Server 2003-based computers requires the administrator authority.
1 Insert the Driver CD-ROM into the CD-ROM drive.
2 Click [Start], and then select [Printers and Faxes].
% If [Printers and Faxes]is not displayed in the [Start] menu, open [Control Panel] from the [Start] menu, click [Printers and Other Hardware], then click [Printers and Faxes].
3 In Windows XP, select [Add a printer] from the [Printer Tasks] menu. In Windows Server 2003, double-click [Add Printer].
In Windows XP:
In Windows Server 2003:
[Add Printer Wizard] appears.
4 Click [Next >].
Items to be configured Description
IP Address In [TCP/IP Settings] of this machine, specify the IP address.
SMB Setting To use SMB printing: In [SMB Settings] - [Print Settings], specify NetBIOS Name, Print Service Name, and Workgroup.
bizhub PRO 951 5-18

5.2 Windows XP/Server 2003 5
5 Select [Local printer attached to this computer], and then click [Next >].
% Clear the [Automatically detect and install my Plug and Play printer] check box.
6 Click [Create a new port:], select [Local Port] as the [Type of port:], and then click [Next >].
7 Enter [\\NetBIOS name\print service name] in the "Port Name" box.
% Enter the same NetBIOS name and print service name specified in[SMB Setting] - [Print Setting].
8 Click [OK].
9 Click [Have Disk...].
10 Click [Browse...].
11 Select a desired printer driver folder in the CD-ROM, and then click [Open].
% Select a folder according to the printer driver, operating system, and language to be used. Available printer drivers : PCL driver, PS Plug-in driver, PPD driver
12 Click [OK].
bizhub PRO 951 5-19

5.2 Windows XP/Server 2003 5
13 Click [Next >].
14 Follow the instructions on the pages that follow.
% To use a network connection, perform a test print after the network settings have been configured.
15 Click [Finish].
% If the "Windows logo testing" or [Digital Signature] window appears, click [Continue Anyway] or [Yes].
16 After finishing the installation, make sure that the icon for the installed printer is displayed in the [Printers and Faxes] window.
17 Remove the CD-ROM from the CD-ROM drive.
This completes the printer driver installation.
bizhub PRO 951 5-20
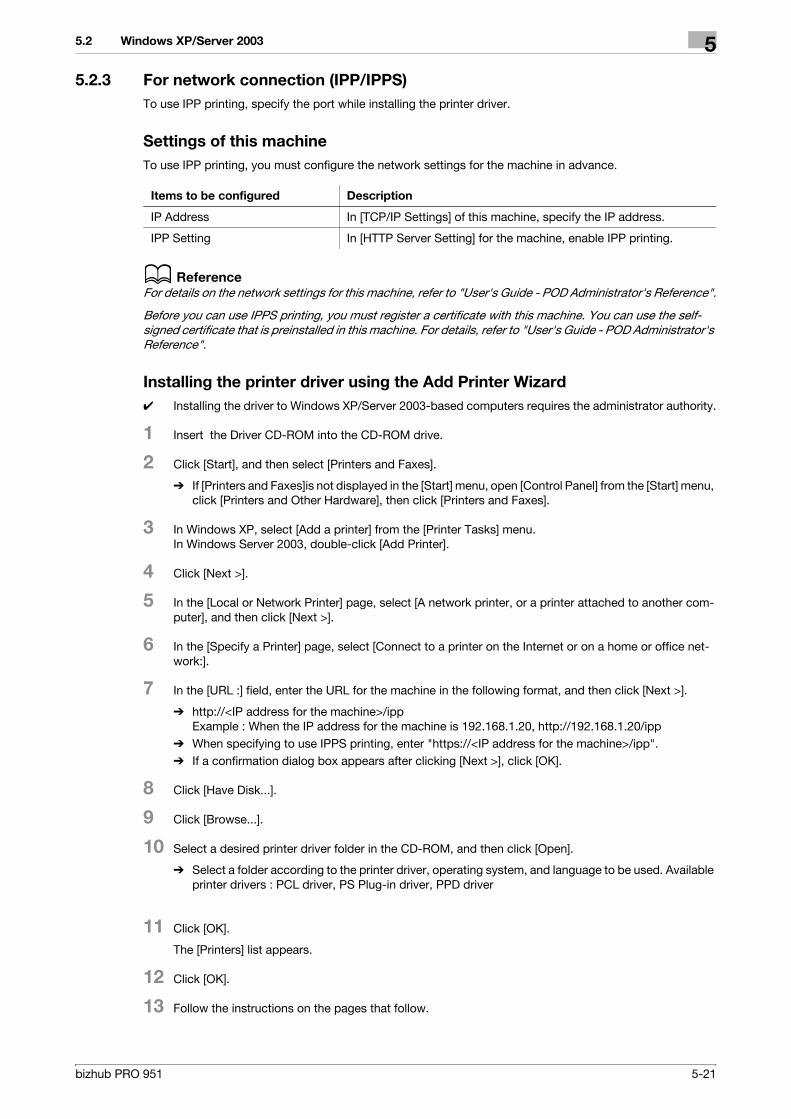
5.2 Windows XP/Server 2003 5
5.2.3 For network connection (IPP/IPPS)
To use IPP printing, specify the port while installing the printer driver.
Settings of this machine
To use IPP printing, you must configure the network settings for the machine in advance.
d Reference
For details on the network settings for this machine, refer to "User's Guide - POD Administrator's Reference".
Before you can use IPPS printing, you must register a certificate with this machine. You can use the self-signed certificate that is preinstalled in this machine. For details, refer to "User's Guide - POD Administrator's Reference".
Installing the printer driver using the Add Printer Wizard
0 Installing the driver to Windows XP/Server 2003-based computers requires the administrator authority.
1 Insert the Driver CD-ROM into the CD-ROM drive.
2 Click [Start], and then select [Printers and Faxes].
% If [Printers and Faxes]is not displayed in the [Start] menu, open [Control Panel] from the [Start] menu, click [Printers and Other Hardware], then click [Printers and Faxes].
3 In Windows XP, select [Add a printer] from the [Printer Tasks] menu. In Windows Server 2003, double-click [Add Printer].
4 Click [Next >].
5 In the [Local or Network Printer] page, select [A network printer, or a printer attached to another com-puter], and then click [Next >].
6 In the [Specify a Printer] page, select [Connect to a printer on the Internet or on a home or office net-work:].
7 In the [URL :] field, enter the URL for the machine in the following format, and then click [Next >].
% http://<IP address for the machine>/ipp Example : When the IP address for the machine is 192.168.1.20, http://192.168.1.20/ipp
% When specifying to use IPPS printing, enter "https://<IP address for the machine>/ipp".% If a confirmation dialog box appears after clicking [Next >], click [OK].
8 Click [Have Disk...].
9 Click [Browse...].
10 Select a desired printer driver folder in the CD-ROM, and then click [Open].
% Select a folder according to the printer driver, operating system, and language to be used. Available printer drivers : PCL driver, PS Plug-in driver, PPD driver
11 Click [OK].
The [Printers] list appears.
12 Click [OK].
13 Follow the instructions on the pages that follow.
Items to be configured Description
IP Address In [TCP/IP Settings] of this machine, specify the IP address.
IPP Setting In [HTTP Server Setting] for the machine, enable IPP printing.
bizhub PRO 951 5-21

5.2 Windows XP/Server 2003 5
14 Click [Finish].
% If the "Windows logo testing" or [Digital Signature] window appears, click [Continue Anyway] or [Yes].
15 After finishing the installation, make sure that the icon for the installed printer is displayed in the [Printers and Faxes] window.
16 Remove the CD-ROM from the CD-ROM drive.
This completes the printer driver installation.
Once the settings for the printer have been configured, you can use the printer in the same way as a general local printer.
5.2.4 For local connection
When this machine is connected via a USB port, the printer driver can be installed with plug and play.
Reference- When a USB connection is used, the printer driver is installed easily with the plug and play feature. How-
ever, it can also be installed using the Add Printer Wizard. To use the Add Printer Wizard, select the USB port to be connected in the [Choose a printer port] page.
1 Connect this machine to the computer using a USB cable.
NOTICEWhen starting up the computer, do not plug in or unplug the cable.
2 Insert the Driver CD-ROM into the CD-ROM drive.
3 Turn on the power of this machine.
The [Found New Hardware Wizard] window appears.% If the [Found New Hardware Wizard] window does not appear, turn this machine off, then on again.
In this case, turn off this machine, and then wait approximately 10 seconds before turning it on again. If you turn the printer on immediately after turning it off, it may not function correctly.
% If a page with a message saying "Windows connect to Windows Update" appears, select [No, not this time].
4 Select [Install from a list or specific location (Advanced)], and then click [Next >].
5 Under [Search for the best driver in these locations.], select [Include this location in the search:], and then click [Browse].
6 Select a desired printer driver folder in the CD-ROM, and then click [OK].
% Select a folder according to the printer driver, operating system, and language to be used. Available printer drivers : PCL driver, PS Plug-in driver, PPD driver
7 Click [Next >], and then follow the instructions on the pages that follow.
8 Click [Finish].
% If the "Windows logo testing" or [Digital Signature] window appears, click [Continue Anyway] or [Yes].
9 After finishing the installation, make sure that the icon for the installed printer is displayed in the [Printers and Faxes] window.
10 Remove the CD-ROM from the CD-ROM drive.
This completes the printer driver installation.
bizhub PRO 951 5-22

6 Installation on Macintosh
Computers

6.1 Printer Driver for Mac OS 6
6 Installation on Macintosh Computers
This chapter describes the settings necessary when using Macintosh and the procedure for installing printer drivers for Macintosh.
6.1 Printer Driver for Mac OS
The following 2 printer drivers support Mac OS.- PS Plug-in Driver- PS PPD driver
6.1.1 Installing the PS Plug-in driver
0 When the PS Plug-in driver has been installed, you must delete it before you install. For details on de-leting the printer driver, refer to page 8-5.
1 Start the Macintosh computer.
2 Insert the Driver CD-ROM into the CD-ROM drive.
% Exit all running applications, if any.
3 Open the folder in the CD-ROM that contains the desired printer driver.
% Select a folder according to the printer driver, operating system, and language to be used.
4 Copy [bizhub PRO 951PS.pkg] on the desktop.
5 Double-click the file copied onto the desktop.
The installer starts.% To cancel installation, press [Cancel].
6 Click [Continue] following the instructions on the pages that follow until the [Installation] page appears.
% When the name and password prompt appears during the procedure, enter the administrator name and password.
7 In the [Installation] page, click [Install].
The printer driver is installed in the computer. When the installation is completed, a message appears.
% For OS X 10.4, when the printer driver is installed for the second and subsequent times, [Install] may change to [Upgrade].
% In [Install] screen, we do not use [Change] at this time although it becomes available when you use multiple internal hard disks.
bizhub PRO 951 6-2

6.1 Printer Driver for Mac OS 6
8 Click [Close].
This completes the printer driver installation.
Then select printer and connect to it. (Refer to page 6-4.)
6.1.2 Installing the PS PPD driver
0 When the PS Plug-in driver has been installed, you must delete it before you install. For details on de-leting the printer driver, refer to page 8-5.
1 Start the Macintosh computer.
2 Insert the Driver CD-ROM into the CD-ROM drive.
% Exit all running applications, if any.
3 Open the folder in the CD-ROM that contains the desired printer driver.
% Select a folder according to the printer driver, operating system, and language to be used.
4 Select the printer driver to use according to OS and copy it on the desktop
Three digit number at the end of the package file name for the printer driver represents compatible OS. For example, [106] means that it is compatible with OS X 10.6.% KONICAMINOLTA_951_xxx.pkg
5 Double-click the file copied onto the desktop.
The installer starts.% To cancel installation, press [Cancel].
6 Click [Continue] following the instructions on the pages that follow until the [Installation] page appears.
% When the name and password prompt appears during the procedure, enter the administrator name and password.
7 In the [Installation] page, click [Install].
The printer driver is installed in the computer. When the installation is completed, a message appears.% For OS X 10.4, when the printer driver is installed for the second and subsequent times, [Install] may
change to [Upgrade].
8 Click [Close].
This completes the printer driver installation.
Next, select a printer. (Refer to page 6-4.)
bizhub PRO 951 6-3

6.1 Printer Driver for Mac OS 6
6.1.3 Selecting and connecting a printer
The printer can be connected with Bonjour, LPR (LPD), or IPP.
In OS X 10.4/10.5, the printer can also be connected using AppleTalk.
After configuring the network setting for this machine, selecting this machine as the printer to be used in the [Print & Fax] window enables printing.
Configuring the Bonjour settings
Configuring the Bonjour Setting for this machine
To use Bonjour, enable Bonjour in [Bonjour Setting] for this machine and then enter the Bonjour name.
d Reference
For details on [Bonjour Setting] for this machine, refer to "User's Guide - POD Administrator's Reference".
Adding a printer
1 In the [Apple Menu], select [System Preferences...].
2 Click the [Print & Fax] icon.
3 Click [+] on the [Print & Fax] window.
4 Click [Default].
Connected printers are detected.% If no printer is detected, turn this machine off, then on again.
In this case, turn off this machine, and then wait approximately 10 seconds before turning it on again. If you turn the printer on immediately after turning it off, it may not function correctly.
5 From the [Printer Name] list, select the desired Bonjour-connected model name.
The printer driver corresponding to the selected printer name is automatically selected.% You can check the printer name by selecting [Administrator Setting] - [Network Setting] - [Controller
NIC Setting Menu] - [Bonjour Setting]. In the default setting, the contents enclosed in parentheses ( ) suffixed in [Bonjour Name] correspond to the low-order three bytes of the MAC address. The fol-lowing window shows an example where the printer name is changed to "Printer Name(Bonjour)".
% After the printer driver is selected, go to Step 7.% If an incorrect printer driver is selected, go to Step 6.
6 Select the desired printer driver manually.
% When OS X 10.6 is used, select [Select Printer Software...] from [Print Using:], and then select the printer driver of the desired model name from the list that is displayed in another window.
% When OS X 10.5 is used, select the [Select a driver to use...] from the [Print Using:], and then select the printer driver of the desired model name from the list.
bizhub PRO 951 6-4
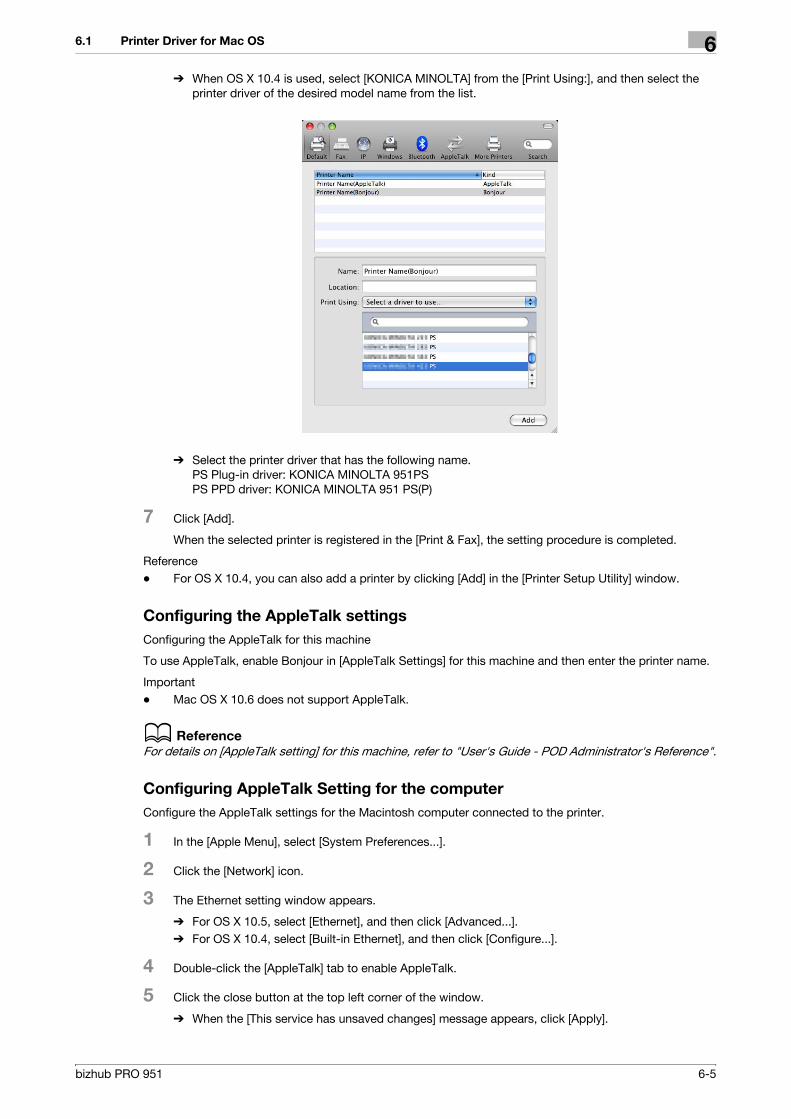
6.1 Printer Driver for Mac OS 6
% When OS X 10.4 is used, select [KONICA MINOLTA] from the [Print Using:], and then select the printer driver of the desired model name from the list.
% Select the printer driver that has the following name. PS Plug-in driver: KONICA MINOLTA 951PS PS PPD driver: KONICA MINOLTA 951 PS(P)
7 Click [Add].
When the selected printer is registered in the [Print & Fax], the setting procedure is completed.
Reference- For OS X 10.4, you can also add a printer by clicking [Add] in the [Printer Setup Utility] window.
Configuring the AppleTalk settings
Configuring the AppleTalk for this machine
To use AppleTalk, enable Bonjour in [AppleTalk Settings] for this machine and then enter the printer name.
Important- Mac OS X 10.6 does not support AppleTalk.
d Reference
For details on [AppleTalk setting] for this machine, refer to "User's Guide - POD Administrator's Reference".
Configuring AppleTalk Setting for the computer
Configure the AppleTalk settings for the Macintosh computer connected to the printer.
1 In the [Apple Menu], select [System Preferences...].
2 Click the [Network] icon.
3 The Ethernet setting window appears.
% For OS X 10.5, select [Ethernet], and then click [Advanced...].% For OS X 10.4, select [Built-in Ethernet], and then click [Configure...].
4 Double-click the [AppleTalk] tab to enable AppleTalk.
5 Click the close button at the top left corner of the window.
% When the [This service has unsaved changes] message appears, click [Apply].
bizhub PRO 951 6-5

6.1 Printer Driver for Mac OS 6
Adding a printer
1 In the [Apple Menu], select [System Preferences...].
2 Click the [Print & Fax] icon.
3 Click [+] on the [Print & Fax] window.
4 Click [Default].
Connected printers are detected.% If no printer is detected, turn this machine off, then on again.
In this case, turn off this machine, and then wait approximately 10 seconds before turning it on again. If you turn the printer on immediately after turning it off, it may not function correctly.
5 From the [Printer Name] list, select the desired AppleTalk-connected model name.
The printer driver corresponding to the selected printer name is automatically selected.% You can check the printer name by selecting [Administrator Setting] - [Network Setting] - [Controller
NIC Setting Menu] - [AppleTalk Setting]. In the Default setting, the last six letters of [Printer Name] correspond to the low-order three bytes of the MAC address. The following window shows an ex-ample where the printer name is changed to "Printer Name(AppleTalk)".
% After the printer driver is selected, go to Step 7.% If an incorrect printer driver is selected, go to Step 6.
6 Select the desired printer driver manually.
% When OS X 10.5 is used, select the [Select a driver to use...] from the [Print Using:], and then select the printer driver of the desired model name from the list.
% When OS X 10.4 is used, select [KONICA MINOLTA] from the [Print Using:], and then select the printer driver of the desired model name from the list.
bizhub PRO 951 6-6

6.1 Printer Driver for Mac OS 6
% Select the printer driver that has the following name. PS Plug-in driver: KONICA MINOLTA 951PS PS PPD driver: KONICA MINOLTA 951 PS(P)
7 Click [Add].
When the selected printer is registered in the [Print & Fax], the setting procedure is completed.
Reference- For OS X 10.4, you can also add a printer by clicking [Add] in the [Printer Setup Utility] window.
Configuring the LPR settings
Configuring the TCP/IP Setting for this machine
Specify the IP address for this machine.
Configuring the LPD Setting for this machine
To use LPR printing, enable LPR printing in [LPD Setting] for this machine.
d Reference
For details on specifying the IP address for the machine, refer to "User's Guide - POD Administrator's Refer-ence".
For details on [LPD Setting]for this machine, refer to "User's Guide - POD Administrator's Reference".
Configuring TCP/IP Setting for the computer
Configure the TCP/IP settings for the Macintosh computer connected to the printer.
1 In the [Apple Menu], select [System Preferences...].
2 Click the [Network] icon.
3 The Ethernet setting window appears.
% For OS X 10.5/10.6, select [Ethernet], and then click [Advanced...].% For OS X 10.4, select [Built-in Ethernet], and then click [Configure...].
4 Click the [TCP/IP] tab.
5 Configure the settings including the IP address and subnet mask according to the settings of the net-work to which the Macintosh computer is connected.
6 Click the close button at the top left corner of the window.
bizhub PRO 951 6-7

6.1 Printer Driver for Mac OS 6
% When the [This service has unsaved changes] message appears, click [Apply].
Adding a printer
1 In the [Apple Menu], select [System Preferences...].
2 Click the [Print & Fax] icon.
3 Click [+] on the [Print & Fax] window.
4 Click [IP] or [IP Printer].
5 In [Protocol:], select [Line Printer Daemon - LPD].
6 In [Address:], enter the IP address for this machine.
The printer driver corresponding to this machine being identified with its IP address is automatically se-lected.% After the printer driver is selected, go to Step 8.% If an incorrect printer driver is selected, go to Step 7.
7 Select the desired printer driver manually.
% When OS X 10.6 is used, select [Select Printer Software...] from [Print Using:], and then select the printer driver of the desired model name from the list that is displayed in another window.
% When OS X 10.5 is used, select the [Select a driver to use...] from the [Print Using:], and then select the printer driver of the desired model name from the list.
% When OS X 10.4 is used, select [KONICA MINOLTA] from the [Print Using:], and then select the printer driver of the desired model name from the list.
bizhub PRO 951 6-8

6.1 Printer Driver for Mac OS 6
% Select the printer driver that has the following name. PS Plug-in driver: KONICA MINOLTA 951PS PS PPD driver: KONICA MINOLTA 951 PS(P)
8 Click [Add].
When the selected printer is registered in the [Print & Fax], the setting procedure is completed.
Reference- For OS X 10.4, you can also add a printer by clicking [Add] in the [Printer Setup Utility] window.
Configuring the IPP settings
Configuring the TCP/IP Setting for this machine
Specify the IP address for this machine.
Configuring HTTP Server Setting for this machine
In [HTTP Server Setting] for the machine, enable IPP printing.
d Reference
For details on specifying the IP address for the machine, refer to "User's Guide - POD Administrator's Refer-ence".
For details on [HTTP Server Setting] for this machine, refer to "User's Guide - POD Administrator's Refer-ence".
bizhub PRO 951 6-9

6.1 Printer Driver for Mac OS 6
Configuring TCP/IP Setting for the computer
Configure the TCP/IP settings for the Macintosh computer connected to the printer.
1 In the [Apple Menu], select [System Preferences...].
2 Click the [Network] icon.
3 The Ethernet setting window appears.
% For OS X 10.5/10.6, select [Ethernet], and then click [Advanced...].% For OS X 10.4, select [Built-in Ethernet], and then click [Configure...].
4 Click the [TCP/IP] tab.
5 Configure the settings including the IP address and subnet mask according to the settings of the net-work to which the Macintosh computer is connected.
6 Click the close button at the top left corner of the window.
% When the [This service has unsaved changes] message appears, click [Apply].
Adding a printer
1 In the [Apple Menu], select [System Preferences...].
2 Click the [Print & Fax] icon.
3 Click [+] on the [Print & Fax] window.
[Printer Browser] appears.
4 Click [IP] or [IP Printer].
5 In [Protocol:], select [Internet Printing Protocol - IPP].
6 In [Address:], enter the IP address for this machine. In [Queue:], enter "ipp".
The printer driver corresponding to this machine being identified with its IP address is automatically se-lected.% After the printer driver is selected, go to Step 8.% If an incorrect printer driver is selected, go to Step 7.
7 Select the desired printer driver manually.
% When OS X 10.6 is used, select [Select Printer Software...] from [Print Using:], and then select the printer driver of the desired model name from the list that is displayed in another window.
% When OS X 10.5 is used, select the [Select a driver to use...] from the [Print Using:], and then select the printer driver of the desired model name from the list.
bizhub PRO 951 6-10

6.1 Printer Driver for Mac OS 6
% When OS X 10.4 is used, select [KONICA MINOLTA] from the [Print Using:], and then select the printer driver of the desired model name from the list.
% Select the printer driver that has the following name. PS Plug-in driver: KONICA MINOLTA 951PS PS PPD driver: KONICA MINOLTA 951 PS(P)
8 Click [Add].
When the selected printer is registered in the [Print & Fax], the setting procedure is completed.
Reference- For OS X 10.4, you can also add a printer by clicking [Add] in the [Printer Setup Utility] window.
bizhub PRO 951 6-11

7 Installation when Using
NetWare

bizhub PRO 951 7-2
7.1 NetWare 7
7 Installation when Using NetWare
This chapter describes the settings necessary when using NetWare and the procedure for installing printer drivers for the Windows client.
7.1 NetWare
7.1.1 Network Settings
In the [NetWare Settings] screen for this machine, specify [IPX Setting] and [NetWare Print Mode].
d Reference
For details on "NetWare Setting" for this machine, refer to User's Guide - POD Administrator's Reference.
7.1.2 Configuring the Windows client
For the Windows client that uses a printer, install the printer driver using the [Add Printer Wizard].
0 Administrator authority is required for installation.
1 Insert the Driver CD-ROM into the CD-ROM drive.
2 Open the [Devices and Printers], [Printers], or [Printers and Faxes] window.
3 Click [Add printer] or [Install printer].
[Add Printer Wizard] appears.
4 In the port settings, browse the network and specify the name of the created queue (or NDPS printer name).
5 From the printer model list, specify the desired folder in the CD-ROM that contains the printer driver.
% Select a folder according to the printer driver, operating system, and language to be used. Available printer drivers : Windows XP/Server 2003 : PCL driver, PS Plug-in driver, PPD driver Windows Vista/Server 2008/Server 2008 R2/7 : PS Plug-in driver, PPD driver, PCL driver
6 Follow the instructions on the pages that follow to complete the installation.

8 Uninstalling the Printer Driver

8.1 Windows 8
8 Uninstalling the Printer Driver
This chapter describes the procedure for uninstalling the printer driver.
8.1 Windows
When you have to remove the printer driver, for example, when reinstallation of the printer driver is necessary, remove the Windows driver using the following procedure.
8.1.1 Uninstalling by the installer (PCL driver)
The printer driver can be deleted by the installer.
1 Insert the Printer Driver CD-ROM for Windows into the CD-ROM drive of the computer.
% Make sure that the installer starts, and then go to Step 2.% If the installer does not start, open the printer driver folder on the CD-ROM, double-click [Set-
up.exe], and then go to Step 3.
2 Click [Install Printer Driver].
The installer of the printer driver starts.
3 Click the [AGREE].
4 In the setup selection dialog box, select the [Uninstall Printer Driver], and then click the [Next].
bizhub PRO 951 8-2

8.1 Windows 8
5 Select the component to be deleted, and then click the [Uninstall].
% Follow the on-screen instructions.
6 If the restart screen appears, click [OK] to restart the computer.
8.1.2 Uninstalling by the uninstallation program (PCL driver)
If the printer driver was installed with an installer, the uninstallation program is implemented to the computer.
1 Select [Start] - [Programs] (or [All Programs]) - [KONICA MINOLTA] - [bizhub PRO 951] - [Uninstall PCL printer driver].
2 Select the component to be uninstalled and click [Uninstall].
% Follow the on-screen instructions.
3 If the restart screen appears, click [OK] to restart the computer.
bizhub PRO 951 8-3

8.1 Windows 8
8.1.3 Uninstalling by manual operation (PS Plug-in driver/PPD driver/PCL driver)
1 Open the [Devices and Printers], [Printers], or [Printers and Faxes] window.
2 Select the icon for the printer to be uninstalled.
3 Remove the printer driver.
% In Windows XP/Server 2003/Vista/Server 2008/Server 2008 R2, press the Delete key on the com-puter keyboard.
% In Windows 7, click [Remove device] on the toolbar.
4 From then on, follow the instructions on the pages that follow.
Once the printer driver is deleted, the icon disappears from the [Devices and Printers], [Printers], or [Printers and Faxes] window.In Windows XP/Server 2003/Vista/Server 2008/Server 2008 R2/7, go on to remove the printer driver from the server properties.
5 Open [Server Properties].
% In Windows Vista/Server 2008/Server 2008 R2, right-click on the area that has nothing displayed in the [Printers] window, click [Run as administrator] - [Server Properties].
% In Windows 7, select other printer, and click [Print Server Properties] on the toolbar.% In Windows XP/Server 2003, click the [File] menu and then click [Server Properties].% If the [User Account Control] window appears, click [Continue] or [Yes].
6 Click the [Driver] tab.
7 From the [Installed printer drivers:] list, select the printer driver to be removed, and then click [Re-move...].
% In Windows Vista/Server 2008/Server 2008 R2/7, go to Step 8.% In Windows XP/Server 2003, go to Step.
8 Select [Remove driver and driver package.] or [Remove driver and driver package.] in the dialog box for confirming deletion target, and then click [OK].
9 In the dialog box for confirming if you are sure to remove the printer, click [Yes].
% In Windows Vista/Server 2008/Server 2008 R2/7, the dialog box appears to reconfirm if you are sure. Click [Uninstall].
10 Close the open windows, and then restart the computer.
% Be sure to restart the computer.This completes removing the printer driver.
Reference- In Windows XP/Server 2003, even if the printer driver is deleted using the preceding method, the model
information file will remain in the computer. For this reason, when reinstalling the same version of the printer driver, the driver may not be rewritten. In this case, remove the following files as well.
- Confirm "C:\WINDOWS\system32\spool\drivers\w32e86"folder (in case of e64 system, "C:\WIN-DOWS\system32\spool\drivers\e64" folder) and remove the applicable model if any. If more than one printer driver is installed, the model information for all drivers is deleted. To leave other drivers, do not remove the folder.
- From the "C:\WINDOWS\inf" folder, remove "oem*.inf" and "oem*.PNF" ( "*" included in the file name indicates a number, which differs depending on the computer environment). Before removing these files, open the inf file, and then check the model name described on the last few lines to confirm it is the file for the corresponding model. The number of the PNF file is the same as that of the inf file.
- When you have deleted a file using [Remove driver and driver package.] or [Remove driver and driver package.] in Windows Vista/Server 2008/Server 2008 R2/7, this operation is not required.
bizhub PRO 951 8-4

8.2 Macintosh 8
8.2 Macintosh
When the printer driver has fault or is to be updated, the printer driver should be removed. Delete the printer driver according to the following procedure.
8.2.1 Uninstalling by manual operation (PS Plug-in driver)
1 Open the [Print & Fax] (or [Printer Setup Utility]) window.
% The [Print & Fax] window can be opened from [System Preferences...] in [Apple Menu] (OS X 10.4/10.5/10.6).
% The [Printer Setup Utility] window can be opened from [Macintosh HD] - [Applications] - [Utilities] (OS X 10.4).
2 Select the printer name to be deleted, and then click [-] (or [Delete]).
The selected printer is deleted.
3 Close the [Print & Fax] (or [Printer Setup Utility]) window.
4 Drag the following files, which are located in [Library] - [Printers] - [PPDs] - [Contents] - [Resources] for the installed [Macintosh HD], to the [Trash] icon.
% [KOI951J.ppd]% [KOI951_.ppd]Reference You can find easy by entering [KOI] in the text box for search and selecting "Resources" as search place.
5 Delete unnecessary files from [Library] - [Printers].
Drag the following files, which are located in [Library] - [Printers] - [KONICA_MINOLTA], to the [Trash] icon.% pstobizhub_PRO_951% bizhub_PRO_951.plugin% bizhub_PRO_951.icns
6 For OS X 10.4/10.5, drag [bizhub PRO 951PS.pkg], which is located in [Library] - [Receipts], to the [Trash] icon.
7 Drag the following files, which are located in [Macintosh HD] - [Users] - [User Name] - [Library] - [Pref-erences] to the [Trash] icon.
% com.apple.print.custompapers.plist% com.apple.print.custompresets.plistFor 10.6% bizhub PRO 951Printer Driver x86_64 PreferencesFor 10.5/10.4 (Intel Processor)% bizhub PRO 951 Printer Driver x86 PreferencesFor 10.5/10.4 (Compatible to Power PC)% bizhub PRO 951 Printer Driver PPC Preferences
bizhub PRO 951 8-5

8.2 Macintosh 8
<Note>Depending on the driver setting, the above file may not be displayed.[User Name] is the account name selected at the time of login.
8 Restart the computer.
This completes removing the printer driver.
8.2.2 Uninstalling by manual operation (PS PPD driver)
1 Open the [Print & Fax] (or [Printer Setup Utility]) window.
% The [Print & Fax] window can be opened from [System Preferences...] in [Apple Menu] (OS X 10.5/10.6).
% The [Printer Setup Utility] window can be opened from [Macintosh HD] - [Applications] - [Utilities] (OS X 10.4).
2 Select the printer name to be deleted, and then click [-] (or [Delete]).
The selected printer is deleted.
3 Close the [Print & Fax] (or [Printer Setup Utility]) window.
4 Drag the following files, which are located in [Library] - [Printers] - [PPDs] - [Contents] - [Resources] - [en.lproj] for the installed [Macintosh HD], to the [Trash] icon.
% "KONICAMINOLTA951.gz"Reference You can find easy by entering [KONICAMINOLTA].
5 Delete unnecessary files from [Library] - [Printers].
% Drag the following files, which are located in [Library] - [Printers] - [KONICAMINOLTA] - [951], to the [Trash] icon.
% pstokm951% KONICA MINOLTA 951 Security.plugin% KONICA MINOLTA 951 Finishing.plugin% KONICA MINOLTA 951 ImageLAyout.plugin% KONICA MINOLTA 951 Setup.plugin
6 Drag the following files, which are located in [Library] - [Receipt], to the [Trash] icon.
% KONICAMINOLTA_951_xxx.pkg
7 Restart the computer.
This completes removing the printer driver.
bizhub PRO 951 8-6

9 Basic Printing Methods and
Printer Functions

9.1 Print operations 9
9 Basic Printing Methods and Printer Functions
This chapter describes the basic printing methods from an application and the printer functions.
9.1 Print operations
Print jobs are specified from the application software.
Basic printing method (Windows)
1 Open the data in the application, and click [File]. Then click [Print] from the menu.
% If the menu is not available, click [Print].
2 Check that the printer name has been selected in [Printer Name] (or [Select Printer]).
% If the printer is not selected, click to select the printer.% The [Print] dialog box differs depending on the application.% The printer name varies depending on the installation method. You can also change the printer
name. The following window shows an example where the printer name is changed to "Printer Name PS".
3 Specify the print range and the number of copies to print.
4 Click [Properties] (or [Preferences]) to change the printer driver settings as necessary.
% Clicking [Properties] or [Preferences] in the [Print] window displays the [Printing Preferences] page of the printer driver where you can configure various functions. For details, refer to page 11-2, page 12-2, and page 10-2.
% [Printing Preferences] of the printer driver changed in the [Print] window are not saved, and the orig-inal settings are restored when you exit the application.
5 Click [Print].
The printing is started.
Reference- You can check a job that was scanned using this machine in the [Job List] screen. For details, refer to
page 16-14.
bizhub PRO 951 9-2

9.1 Print operations 9
Basic printing method (Mac OS X)
1 Open the data in the application, and click [File]. Then click [Print] from the menu.
% If the menu is not available, click [Print].The [Print] window appears.
2 Check that the desired printer name is selected in [Printer:].
% If the target printer is not selected, select it.
% If the printer does not appear, select the printer from [Print & Fax] or [Printer Setup Utility]. For de-tails, refer to page 6-4.
% The [Print] window varies depending on the application software.% You can also change the printer name. The following window shows an example where the printer
name is changed to "Printer Name".
3 Specify the print range and the number of copies to print.
% When the setting items are not displayed in OS X 10.5/10.6, click on the right side of [Printer:].
4 Switch the setting window as necessary to change the printer driver settings.
% For PS Plug-in driver, when you select [bizhub PRO 951PS] from the pane pop-up menu and click the [Set], Printing Preferences screen appears. You can specify several settings on this screen. For details, refer to page 11-3.
% For PPD driver, when you change the pane pop-up menu, other setting screen for printer driver ap-pears. You can specify several settings on this screen. For details, refer to page 13-2.
5 Click [Print].
The printing is started.
Reference- You can check a job that was scanned using this machine in the [Job List] screen. For details, refer to
page 16-14.
Setting items
Print options
bizhub PRO 951 9-3

9.2 Printer Functions 9
9.2 Printer Functions
This section describes various printer functions. For details on each function, refer to the corresponding page shown in "Reference".
9.2.1 Setting paper
Setting the print orientation
In this printing system, you can set the printing orientation of the output paper either in [Portrait] or [Land-scape].
Setting the paper size for the output paper
In this printing system, you can set the output paper in various sizes.
Setting the paper type
In this printing system, you can set the output paper in various paper types.
Operating system Printer driver Reference
Windows PCL Driver p. 10-11
PS Plug-in Driver p. 11-5
PostScript PPD driver p. 12-6
Mac OS X PS Plug-in Driver p. 11-5
PostScript PPD driver p. 13-6
ABCD ABCDEF
Portrait Landscape
Operating system Printer driver Reference
Windows PCL Driver p. 10-11
PS Plug-in Driver p. 11-5
PostScript PPD driver p. 12-8
Mac OS X PS Plug-in Driver p. 11-5
PostScript PPD driver p. 13-6
Operating system Printer driver Reference
Windows PCL Driver p. 10-11
PS Plug-in Driver p. 11-11
PostScript PPD driver p. 12-7
Mac OS X PS Plug-in Driver p. 11-11
PostScript PPD driver p. 13-11
bizhub PRO 951 9-4

9.2 Printer Functions 9
Setting paper color
In this printing system, you can specify the color of paper for printing.
Setting the pre-punched paper
In this printing system, you can specify the pre-punched paper for printing.
Enlarging/reducing an original by specifying a value
In this printing system, you can specify the magnification scale with a value for printing.
Operating system Printer driver Reference
Windows PCL Driver p. 10-11
PS Plug-in Driver p. 11-11
PostScript PPD driver p. 12-8
Mac OS X PS Plug-in Driver p. 11-11
PostScript PPD driver p. 13-11
Operating system Printer driver Reference
Windows PCL Driver p. 10-11
PS Plug-in Driver p. 11-11
PostScript PPD driver p. 12-8
Mac OS X PS Plug-in Driver p. 11-11
PostScript PPD driver p. 13-11
Operating system Printer driver Reference
Windows PCL Driver p. 10-11
PS Plug-in Driver p. 11-7
PostScript PPD driver p. 12-8
Mac OS X PS Plug-in Driver p. 11-7
PostScript PPD driver p. 13-6
ABCD
ABCD ABCD
ABCD
Enlargement
Reduction
Document
bizhub PRO 951 9-5

9.2 Printer Functions 9
9.2.2 Setting a paper tray
Setting a paper source unit
In this printing system, you can register an optional paper source unit (a large capacity tray) in a printer driver.
Setting a paper tray
In this printing system, you can select a paper tray to use from a list.
Operating system Printer driver Reference
Windows PCL Driver p. 10-3
PS Plug-in Driver p. 11-25
PostScript PPD driver p. 12-3
Mac OS X PS Plug-in Driver p. 11-25
PostScript PPD driver p. 13-2
Output tray
Finisher Paper tray Paper source unit
Operating system Printer driver Reference
Windows PCL Driver p. 10-11
PS Plug-in Driver p. 11-5
PostScript PPD driver p. 12-7
Mac OS X PS Plug-in Driver p. 11-5
Output tray
Finisher Paper tray Paper source unit
bizhub PRO 951 9-6

9.2 Printer Functions 9
Setting a paper output unit
In this printing system, you can register an optional paper output unit in a printer driver.
Setting an output tray
In this printing system, you can select an output tray to use from a list.
Operating system Printer driver Reference
Windows PCL Driver p. 10-3
PS Plug-in Driver p. 11-25
PostScript PPD driver p. 12-3
Mac OS X PS Plug-in Driver p. 11-25
PostScript PPD driver p. 13-2
Output tray
Finisher Paper tray Paper source unit
Operating system Printer driver Reference
Windows PCL Driver p. 10-19
PS Plug-in Driver p. 11-9
PostScript PPD driver p. 12-8
Mac OS X PS Plug-in Driver p. 11-9
PostScript PPD driver p. 13-8
Output tray
Finisher Paper tray Paper source unit
bizhub PRO 951 9-7

9.2 Printer Functions 9
9.2.3 Printing a number of sets of an original
Setting a number of copies
In this printing system, you can set a number of copies in the property screen.
Printing an original by set (Sort)
In this printing system, you can print a complete set of an original and repeat the printing of the set for a spec-ified number of times if you want to print more than one set of the original.
Printing an original in a collating order
In this printing system, you can print a specified number of sets of an original page by page.
Operating system Printer driver Reference
Windows PCL Driver p. 10-11
PS Plug-in Driver p. 9-2
PostScript PPD driver p. 9-2
Mac OS X PS Plug-in Driver p. 9-3
PostScript PPD driver p. 13-7
Operating system Printer driver Reference
Windows PCL Driver p. 10-11
PS Plug-in Driver p. 11-9
PostScript PPD driver p. 9-2
Mac OS X PS Plug-in Driver p. 11-9
PostScript PPD driver p. 13-8
ABCD
3
ABCD
2
ABCD
1ABCD
3
ABCD
2
ABCD
1
Operating system Printer driver Reference
Windows PCL Driver p. 10-11
PS Plug-in Driver p. 11-9
PostScript PPD driver p. 9-2
Mac OS X PS Plug-in Driver p. 11-9
PostScript PPD driver p. 13-8
ABCD
1
ABCD
1
ABCD
1ABCD
2
ABCD
2
ABCD
2
bizhub PRO 951 9-8

9.2 Printer Functions 9
Offsetting outputted copies by each unit (Offset)
In this printing system, you can offset the outputted copies back and forth in a unit of set or page group when printing more than one set of an original.
Operating system Printer driver Reference
Windows PCL Driver p. 10-11
PS Plug-in Driver p. 11-9
PostScript PPD driver p. 12-8
Mac OS X PS Plug-in Driver p. 11-9
PostScript PPD driver p. 13-8
ABCDABCDABCDABCDABCDABCDABCDABCDABCD
Offset Copies
bizhub PRO 951 9-9

9.2 Printer Functions 9
9.2.4 Printing more than one page
Setting a 2-sided printing
In this printing system, you can print a sequence of pages in both front and back sides of paper.
Printing more than one page in a sheet of paper (Combination/Layout)
In this printing system, you can print 2, 4, 6, 8, 9 or 16 pages in a sheet of paper.
Reference- Only "PS Plug-in driver" can impose 8 pages per one page.
Operating system Printer driver Reference
Windows PCL Driver p. 10-14
PS Plug-in Driver p. 11-7
PostScript PPD driver p. 12-8
Mac OS X PS Plug-in Driver p. 11-7
PostScript PPD driver p. 13-8
Double Sides/Left Binding
Double Sides/Top Binding
Double Sides/Right Binding
Operating system Printer driver Reference
Windows PCL Driver p. 10-14
PS Plug-in Driver p. 11-7
PostScript PPD driver p. 12-6
Mac OS X PS Plug-in Driver p. 11-7
2 in 1 4 in 1 6 in 1
8 in 1 9 in 1 16 in 1
1 2 1 2
3 4
1 2
4 5
3
6
1 2
5 6
3
7
4
8
1 2
4 5
3
6
7 8 9
1 2
5 6
3
7
9 10 11
4
8
12
13 14 15 16
bizhub PRO 951 9-10

9.2 Printer Functions 9
Printing 2 pages in a double-sized sheet of paper (Combination)
In this printing system, you can print 2 pages in a sheet of which size is double than that specified as the output paper.
Printing a booklet for folding into two (Booklet)
In this printing system, you can print an original in order of pages for creating a booklet when it is folded into two.
Printing in chapters (Chapter)
You can print an original with the specified page to be a front side at 2-sided printing.
Operating system Printer driver Reference
Windows PCL Driver p. 10-14
PS Plug-in Driver p. 11-7
PostScript PPD driver p. 12-8
Mac OS X PS Plug-in Driver p. 11-7
PostScript PPD driver p. 13-9
ABCD
1ABCD
2
2 in 1 2 Repeat 2 Repeat Reversal
ABCD
1ABCD
1 ABCD
1 ABCD
1
Operating system Printer driver Reference
Windows PCL Driver p. 10-14
PS Plug-in Driver p. 11-7
PostScript PPD driver p. 12-8
Mac OS X PS Plug-in Driver p. 11-7
PostScript PPD driver p. 13-9
Operating system Printer driver Reference
Windows PCL Driver p. 10-14
PS Plug-in Driver p. 11-13
Mac OS X PS Plug-in Driver p. 11-13
1’st page of a chapter
bizhub PRO 951 9-11
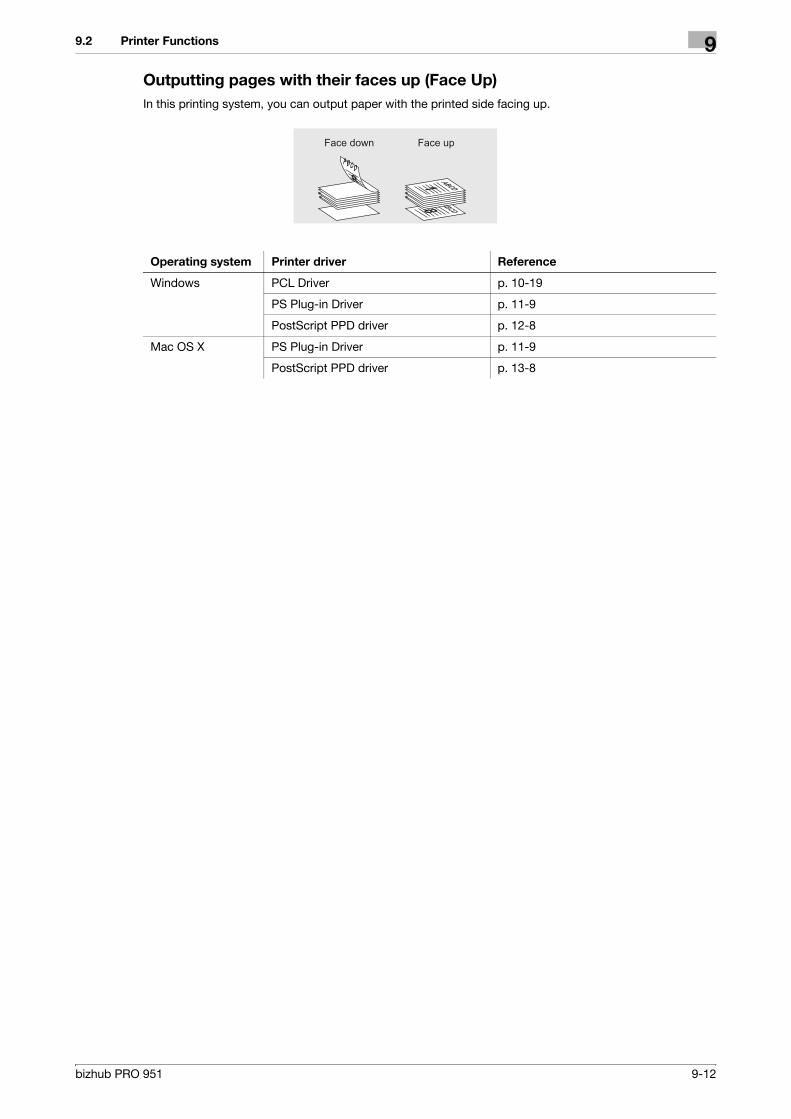
9.2 Printer Functions 9
Outputting pages with their faces up (Face Up)
In this printing system, you can output paper with the printed side facing up.
Operating system Printer driver Reference
Windows PCL Driver p. 10-19
PS Plug-in Driver p. 11-9
PostScript PPD driver p. 12-8
Mac OS X PS Plug-in Driver p. 11-9
PostScript PPD driver p. 13-8
ABCD8ABCD1 ABCD1 ABCD1 ABCD1 ABCD1 ABCD1 ABCD1
Face upFace down
ABCD
bizhub PRO 951 9-12

9.2 Printer Functions 9
9.2.5 Setting a front cover, back cover, interleaf, and cover
Setting a front cover
In this printing system, you can set a paper type (e.g. color paper) for a front page that is different with the paper type for other pages.
Setting a back cover
In this printing system, you can set a paper type (e.g. color paper) for a back page that is different with the paper type for other pages.
Operating system Printer driver Reference
Windows PCL Driver p. 10-21
PS Plug-in Driver p. 11-12
PostScript PPD driver p. 12-8
Mac OS X PS Plug-in Driver p. 11-12
PostScript PPD driver p. 13-11
ABCDABCDABCDABCDABCDABCDABCDABCDABCDABCDABCDABCD
ABCD
ABCDABCDABCDABCDABCDABCD
Front Cover - Off Front Cover - Blank
Front Cover - Printed
Operating system Printer driver Reference
Windows PCL Driver p. 10-21
PS Plug-in Driver p. 11-12
PostScript PPD driver p. 12-8
Mac OS X PS Plug-in Driver p. 11-12
PostScript PPD driver p. 13-11
ABCDABCDABCDABCDABCDABCDABCDABCDABCDABCD ABCD
ABCDABCDABCDABCDABCDABCDABCD
Back Cover - Off Back Cover - Blank
Back Cover - Printed
bizhub PRO 951 9-13

9.2 Printer Functions 9
Inserting a tab
In this printing system, you can set a tab as an interleaf.
Setting a cover
In this printing system, you can output paper that is different with the specified output paper, such as thick paper, as a cover.
Operating system Printer driver Reference
Windows PCL Driver p. 10-22
PS Plug-in Driver p. 11-15
Mac OS X PS Plug-in Driver p. 11-15
ABCDABCDABCDABCDABCDABCDABCDABCDABCDABCDABCDABCD
ABCDABCDABCDABCDABCDABCD
ABCD
ABCDABCDABCDABCDABCDABCD
Insertion sheet - Blank
Insertion sheet - Printed
Operating system Printer driver Reference
Windows PCL Driver p. 10-21
PS Plug-in Driver p. 11-12
PostScript PPD driver p. 12-8
Mac OS X PS Plug-in Driver p. 11-12
PostScript PPD driver p. 13-11
bizhub PRO 951 9-14

9.2 Printer Functions 9
9.2.6 Setting finishing
Setting stapling
In this printing system, you can staple the output paper.
Setting a punch kit
In this printing system, you can register an optional multi folder in a printer driver.
Setting hole punching
In this printing system, you can hole punch 2, 4, and multi holes on output paper.
Operating system Printer driver Reference
Windows PCL Driver p. 10-19
PS Plug-in Driver p. 11-9
PostScript PPD driver p. 12-8
Mac OS X PS Plug-in Driver p. 11-9
PostScript PPD driver p. 13-8
ABCD ABCDEF
Operating system Printer driver Reference
Windows PCL Driver p. 10-3
PS Plug-in Driver p. 11-25
PostScript PPD driver p. 12-3
Mac OS X PS Plug-in Driver p. 11-25
PostScript PPD driver p. 13-8
Operating system Printer driver Reference
Windows PCL Driver p. 10-19
PS Plug-in Driver p. 11-9
PostScript PPD driver p. 12-8
Mac OS X PS Plug-in Driver p. 11-9
PostScript PPD driver p. 13-11
ABCD ABCDEF
bizhub PRO 951 9-15
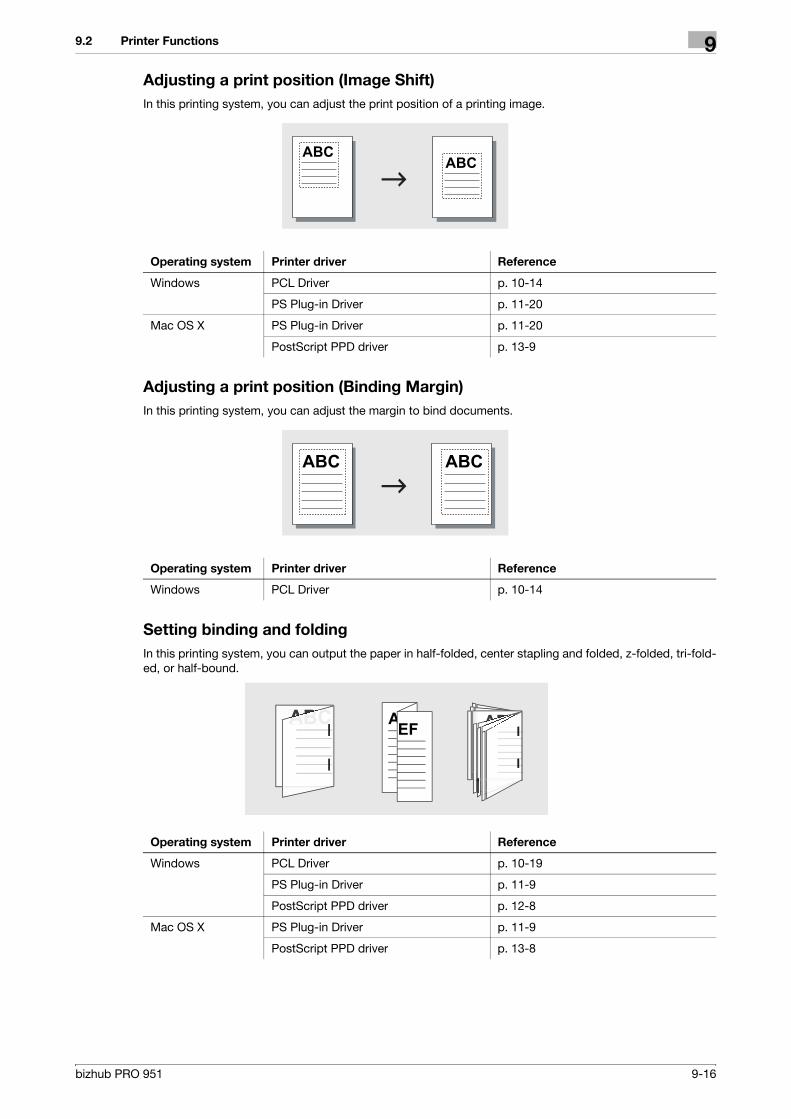
9.2 Printer Functions 9
Adjusting a print position (Image Shift)
In this printing system, you can adjust the print position of a printing image.
Adjusting a print position (Binding Margin)
In this printing system, you can adjust the margin to bind documents.
Setting binding and folding
In this printing system, you can output the paper in half-folded, center stapling and folded, z-folded, tri-fold-ed, or half-bound.
Operating system Printer driver Reference
Windows PCL Driver p. 10-14
PS Plug-in Driver p. 11-20
Mac OS X PS Plug-in Driver p. 11-20
PostScript PPD driver p. 13-9
ABCABC
Operating system Printer driver Reference
Windows PCL Driver p. 10-14
ABC ABC
Operating system Printer driver Reference
Windows PCL Driver p. 10-19
PS Plug-in Driver p. 11-9
PostScript PPD driver p. 12-8
Mac OS X PS Plug-in Driver p. 11-9
PostScript PPD driver p. 13-8
ABEFABCABCABC ABABCABCABCABCABCABC
bizhub PRO 951 9-16
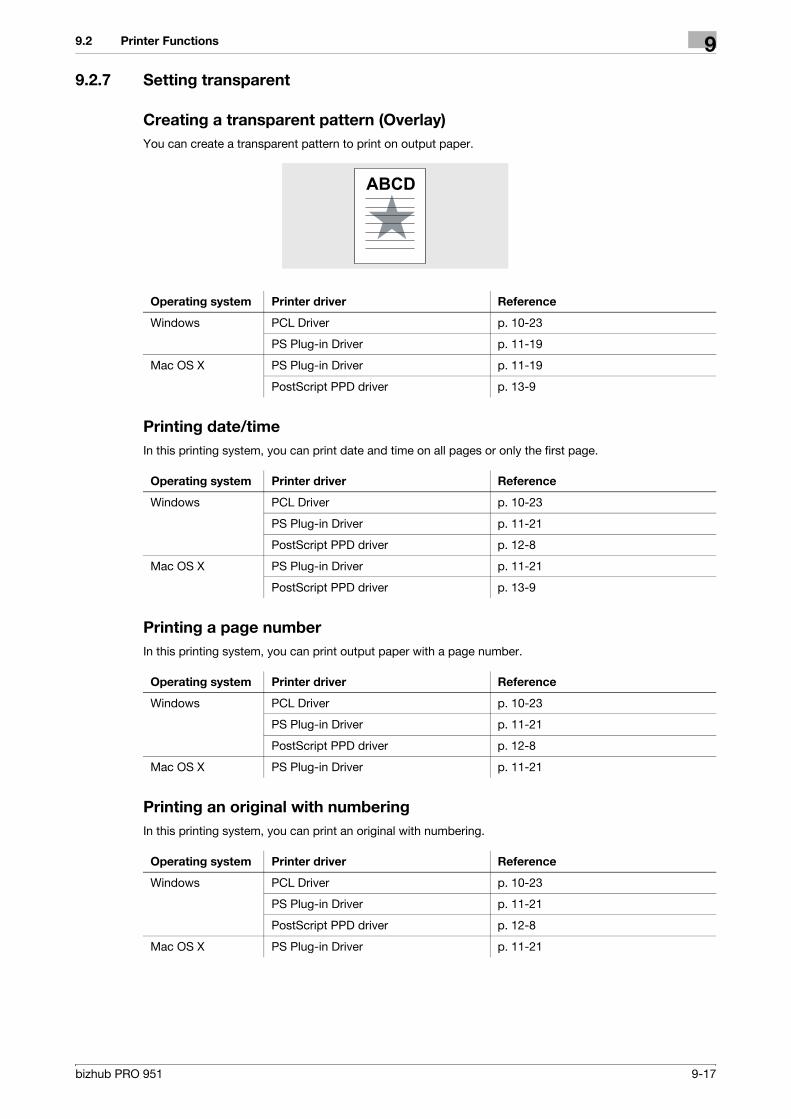
9.2 Printer Functions 9
9.2.7 Setting transparent
Creating a transparent pattern (Overlay)
You can create a transparent pattern to print on output paper.
Printing date/time
In this printing system, you can print date and time on all pages or only the first page.
Printing a page number
In this printing system, you can print output paper with a page number.
Printing an original with numbering
In this printing system, you can print an original with numbering.
Operating system Printer driver Reference
Windows PCL Driver p. 10-23
PS Plug-in Driver p. 11-19
Mac OS X PS Plug-in Driver p. 11-19
PostScript PPD driver p. 13-9
ABCD
Operating system Printer driver Reference
Windows PCL Driver p. 10-23
PS Plug-in Driver p. 11-21
PostScript PPD driver p. 12-8
Mac OS X PS Plug-in Driver p. 11-21
PostScript PPD driver p. 13-9
Operating system Printer driver Reference
Windows PCL Driver p. 10-23
PS Plug-in Driver p. 11-21
PostScript PPD driver p. 12-8
Mac OS X PS Plug-in Driver p. 11-21
Operating system Printer driver Reference
Windows PCL Driver p. 10-23
PS Plug-in Driver p. 11-21
PostScript PPD driver p. 12-8
Mac OS X PS Plug-in Driver p. 11-21
bizhub PRO 951 9-17

9.2 Printer Functions 9
9.2.8 Setting an image
Printing a line smoothly
You can print the curved section of characters, images, and figure smoothly
Setting a resolution at printing
You can select a resolution either [1200dpi] or [600dpi].
Operating system Printer driver Reference
Windows PCL Driver p. 10-27
PS Plug-in Driver p. 11-17
PostScript PPD driver p. 12-8
Mac OS X PS Plug-in Driver p. 11-17
PostScript PPD driver p. 13-9
Smoothing
Operating system Printer driver Reference
Windows PCL Driver p. 10-27
PS Plug-in Driver p. 11-17
PostScript PPD driver p. 12-8
Mac OS X PS Plug-in Driver p. 11-17
PostScript PPD driver p. 13-9
bizhub PRO 951 9-18
9.2 Printer Functions 9
9.2.9 Saving and reprinting a job
Saving and printing a job (Save, Print/Save)
You can save a print job in an internal hard disk in the printing system and reprint it as necessary.
Setting a password for a print job (Secure Print)
You can set a password for a confidential print job for protection.
Operating system Printer driver Reference
Windows PCL Driver p. 10-11
PS Plug-in Driver p. 11-22
PostScript PPD driver p. 12-8
Mac OS X PS Plug-in Driver p. 11-22
PostScript PPD driver p. 13-12
Operating system Printer driver Reference
Windows PCL Driver p. 10-11
PS Plug-in Driver p. 11-22
Mac OS X PS Plug-in Driver p. 11-22
PostScript PPD driver p. 13-12
bizhub PRO 951 9-19

10 Print functions of PCL driver
for Windows

10.1 Default settings of the printer driver 10
10 Print functions of PCL driver for Windows
This chapter describes the functions of the PCL printer driver for Windows.
For detailed information on the basic print methods, refer to page 9-2.
10.1 Default settings of the printer driver
After installing the printer driver, you have to configure installable options in the [Configure] screen before printing.
NOTICEAny options that are installed in this machine but not configured in the [Configure] tab cannot be used in the [Printing Preferences] screen of the printer driver. Be sure to set the optional device if there is any.
10.1.1 Displaying the Properties window
1 Open the [Printers] or [Devices and Printers] window.
% In Windows Vista/Server 2008/Server 2008 R2, click [Start], open [Control Panel], and then click [Printers] in [Hardware and Sound]. When [Control Panel] is displayed in Classic View, double-click [Printers].
% In Windows 7, click [Start], then [Devices and Printers].% In Windows 7, if [Devices and Printers] is not displayed in the [Start] menu, open [Control Panel] from
the [Start] menu, and select [View devices and printers] under [Hardware and Sound].% In Windows XP/Server 2003, click [Start], then [Printers and Faxes].% In Windows XP/Server 2003, if [Printers and Faxes] is not displayed in the [Start] menu, open [Con-
trol Panel] from the [Start] menu, select [Printers and Other Hardware], then [Printers and Faxes]. When [Control Panel] is displayed in Classic View, double-click [Printers].
2 Open [Printer Properties] or [Properties].
% In Windows Vista/Server 2008/Server 2008 R2, right-click the icon of the installed printer, and click [Properties].
% In Windows 7, right-click the icon of the installed printer, and click [Printer Properties].
bizhub PRO 951 10-2

10.1 Default settings of the printer driver 10
10.1.2 [Configure] tab
You can configure the device options and the settings of User Authentication and Account Track and enable functions of this machine from the printer driver.
Reference- The device options displayed in [Device Option] are updated when the [Auto] is checked in the [Acquire
Settings...]. If the [Auto] is not checked, use the [Acquire Device Information] or set manually.- The [Acquire Device Information] function cannot be used unless you are connected and able to com-
municate with this machine.
Item Name Function
[Device Option] Using this tab, you can configure the installed device options and settings of the User Authentication or Account Track for this ma-chine. Specify the settings for each item in [Setting].
[Paper Tray Information] Indicates the condition of the paper type specified for each paper tray.Click the [Paper Tray Settings...] to specify the settings for each pa-per tray.
[Acquire Device Informa-tion]
Communicates with this machine to acquire the condition of the in-stalled device options.
[Acquire Settings...] Specifies the conditions to execute [Acquire Device Information] such as the destination to connect.To acquire device Information automatically, check [Auto].To specify SNMP community name used on acquirement of device information, enter the community name in [Read Community Name].
[Software Tools] Starts up software tools such as PageScope Web Connection.
bizhub PRO 951 10-3

10.1 Default settings of the printer driver 10
10.1.3 [Settings] tab
Using this tab, you can change the default settings on display of message and authentication dialog box.
Item Name Function
[EMF Spool] Set this to enable meta file (EMF) spool.If you enable this setting when [User Authentication] or [Account Track] is set, you can not print.
[Display Constraint Mes-sage]
Set this to enable to display message when you select functions that can not be combined at the same time in the printer driver.
[Display paper set in Print Server Properties]
Uses the paper added in [Server Properties] of the printer folder.
[[Output Method] when printing is preserved]
Set this to reflect the output method configured on printing docu-ments to the [Output Method] on [Basic] tab.The reflected values become the initial value for the next printing.
[Use Shared Folder (Overlay Printing)]
Set this to enable share of the overlay file saved in the shared folder on the network.To set the share folder, click the [Shared Folder Settings] and specify the share folder.
[Authentication Setting] Configure the [User Authentication] or [Account Track] settings for this machine.
[Verify Authentication settings before printing]When you enable this function, you can confirm whether the user and account information is recognized or not by clicking the [Verify] on the [Authentication Settings] dialog box displayed from [Basic] tab.
[Popup Authentication Dialog when printing]Set this to prompt to input the user name or account name by dis-playing the [User Authentication/Account Track] dialog box when the user specifies the print command.
[Secure Print Settings] You can specify the secure print settings.
[Fix Secure Print]Set this to fix the [Output Method] to [Secure Print].
[Popup the User Settings dialog at Secure Print]Set this to prompt to input the ID and password in the [Secure Print] dialog box when specifying a secure print job.
bizhub PRO 951 10-4

10.1 Default settings of the printer driver 10
Reference- The custom paper size can be set on [Custom Size] within the following range :– Width : from 95.0 to 324.0 mm, Height : from 133.0 to 483.3 mm
d Reference
For details on the function of the My Tab, refer to page 10-9.
10.1.4 About tabs provided by OS
Windows provides [General], [Sharing], [Port], [Advanced], [Color Management] and [Security] tabs.
Using these tabs, you can print a test page and specify the shared printer and the printer port.
For details, please refer to the Windows User’s Guide.
[My Tab Settings] You can specify the settings for the [Display My Tab] of the printer driver.
[Display My Tab] : You can set whether [My Tab] is displayed or not.When you check, [My Tab] is displayed. When you remove the check mark, the [Share My Tab], [Prohibit Editing] and [Display Note] are disabled and [My Tab] is not displayed.
[Share My Tab] : You can set whether the customized [My Tab] can be shared or not. When you check, the customized [My Tab] that is specified on Server is carried on the [My Tab] for the client when the client install the printer driver and specify the shared printer of serv-er. In addition, you can also set the [Edit My Tab...] invisible to pro-hibit the client user from editing.
[Prohibit Editing] : You can enable/disable the client user's editing.When you check, [Edit My Tab...] is not displayed to prohibit the cli-ent users from editing.
[Display Note] : You can set whether the description field on the [My Tab] is displayed or not.When you check, the description field on the My Tab is displayed.
[Save Custom Size] You can register the custom paper sizes.
Item Name Function
95.0mm 324.0mm
133.0mm
483.3mm
bizhub PRO 951 10-5

10.1 Default settings of the printer driver 10
10.1.5 Registering the default settings
The settings for the machine functions configured when printing can only be applied while using the applica-tion. When you exit the application, the settings return to their default settings.
To register the settings, change the printer driver basic settings (default settings).
1 Open the [Devices and Printers], [Printers], or [Printers and Faxes] window.
% In Windows Vista/Server 2008/Server 2008 R2, click [Start], open [Control Panel], and then click [Printers] in [Hardware and Sound]. When [Control Panel] is displayed in Classic View, double-click [Printers].
% In Windows 7, click [Start], then [Devices and Printers].% In Windows 7, if [Devices and Printers] is not displayed in the [Start] menu, open [Control Panel] from
the [Start] menu, and select [View devices and printers] under [Hardware and Sound].
2 Right-click the icon of the installed printer, and click [Printing Preferences...].
The [Printing Preferences] dialog box of the printer appears.
3 Change the settings of the function, and then click [OK] to exit the function.
The changed settings are applied when the printer is used by all of the application software.
d Reference
For details on the function and settings of the printer driver, refer to page 10-9.
The printer driver has the [Favorite Setting] function to save configured settings. For details, refer to page 10-7.
bizhub PRO 951 10-6
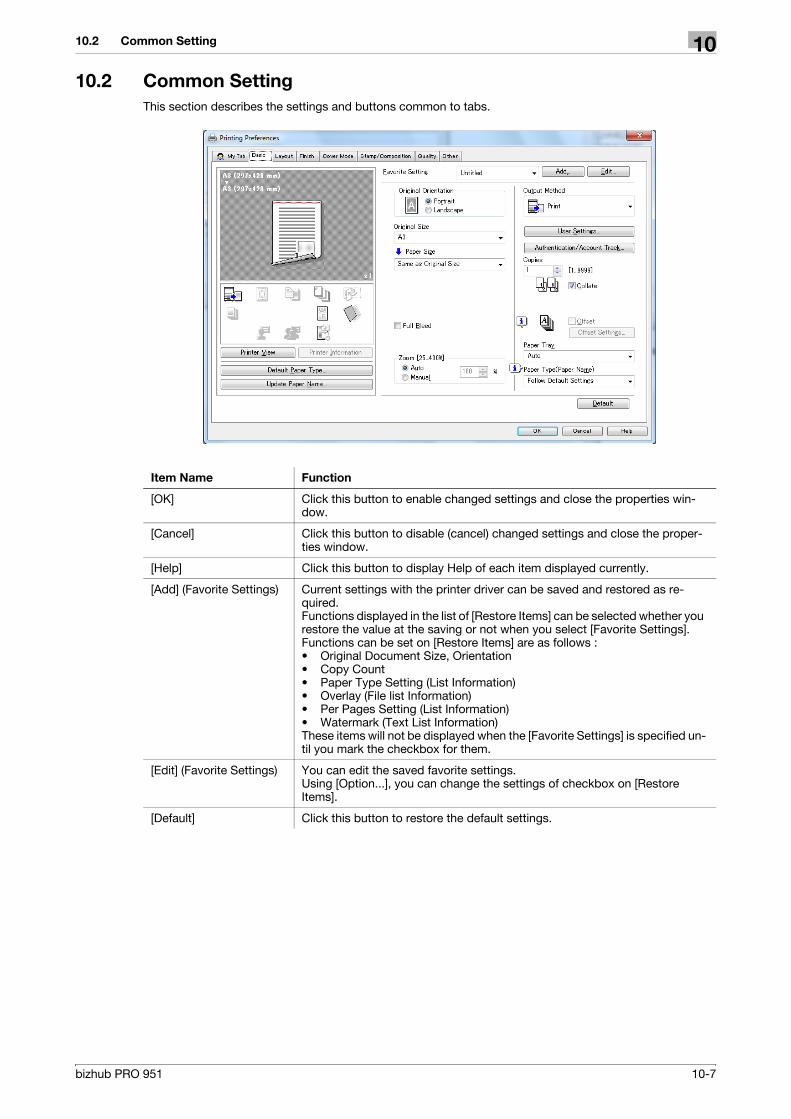
10.2 Common Setting 10
10.2 Common Setting
This section describes the settings and buttons common to tabs.
Item Name Function
[OK] Click this button to enable changed settings and close the properties win-dow.
[Cancel] Click this button to disable (cancel) changed settings and close the proper-ties window.
[Help] Click this button to display Help of each item displayed currently.
[Add] (Favorite Settings) Current settings with the printer driver can be saved and restored as re-quired.Functions displayed in the list of [Restore Items] can be selected whether you restore the value at the saving or not when you select [Favorite Settings].Functions can be set on [Restore Items] are as follows :• Original Document Size, Orientation• Copy Count• Paper Type Setting (List Information)• Overlay (File list Information)• Per Pages Setting (List Information)• Watermark (Text List Information)These items will not be displayed when the [Favorite Settings] is specified un-til you mark the checkbox for them.
[Edit] (Favorite Settings) You can edit the saved favorite settings.Using [Option...], you can change the settings of checkbox on [Restore Items].
[Default] Click this button to restore the default settings.
bizhub PRO 951 10-7
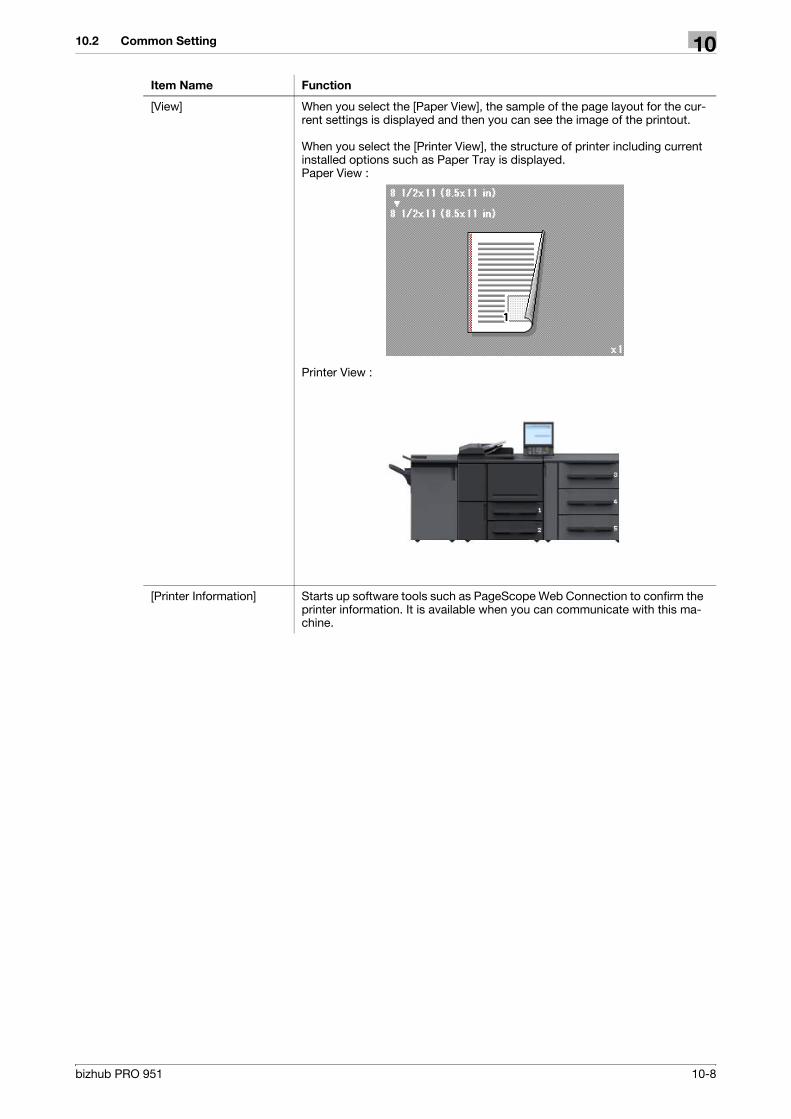
10.2 Common Setting 10
[View] When you select the [Paper View], the sample of the page layout for the cur-rent settings is displayed and then you can see the image of the printout.
When you select the [Printer View], the structure of printer including current installed options such as Paper Tray is displayed.Paper View :
Printer View :
[Printer Information] Starts up software tools such as PageScope Web Connection to confirm the printer information. It is available when you can communicate with this ma-chine.
Item Name Function
bizhub PRO 951 10-8

10.3 Parameter details 10
10.3 Parameter details
The Printing Preferences window is the window to configure the printer driver functions. To open this window, in the Print dialog box, click [Properties] (or [Preferences]), or right-click the printer icon in the [Printers] or [Devices and Printers] window and then select [Printing Preferences].
10.3.1 My Tab
The items of the My Tab to be displayed can be customized. When you register frequently used functions on the My Tab screen, you can get the better usability of printer driver because you will be able to change set-tings on one screen.
Reference- When the [Display Note] is disabled on the [My Tab Settings] of the [Settings] tab, the [More Details]
and the [Do not display from] are not displayed.- When the [Prohibit Editing] is enabled on the [My Tab Settings] of the [Settings] tab, the [Edit My Tab...]
is not displayed.- Other items to be displayed are different depending on the registration which is customized on [Edit My
Tab...].
d Reference
For details on the [Settings], refer to page 10-4.
Function Name Option Description
[More Details] - Displays the Help of the My Tab.
[Do not display from next]
Off, On When you check, this description field including [More Details] will not be displayed from next.
[Edit My Tab...] - You can register the function to be displayed on the My Tab and remove those from the My Tab.For details, refer to page 10-10.
bizhub PRO 951 10-9

10.3 Parameter details 10
Edit [My Tab]
0 When the [Prohibit Editing] is enabled on the [My Tab Settings] of the [Settings] tab, the [Edit My Tab...] is not displayed.
1 Click the [Edit My Tab...] on the [My Tab].
2 Select the function you want to add to the [My Tab] and click the [to the LEFT] or [to the RIGHT].
% You can select the function from every tab of the [Control List].% When you click the [to the LEFT], you can display the selected function on the left side of the [My
Tab]. When you click the [to the RIGHT], you can display it to the right side of the [My Tab].% The [LEFT side] icon and the [RIGHT side] icon appears in the Control List before the name of func-
tion which has been registered already in the [My Tab].
3 You can change the position of the registered function.
% To change the position, select the function to be moved and click the [Up], [Down] or [Left/Right].% To delete from the [My Tab], select the function to be deleted and click the [Delete].
4 Click [OK].
bizhub PRO 951 10-10

10.3 Parameter details 10
10.3.2 [Basic] tab
You can specify the basic print function such as the paper size, paper type and output method.
Function Name Option Description
[Default Paper Type]
[Paper Type] No Setting
Plain Paper
Fine Select this to use non-coated paper used mainly on offset printing.
Book/News Select this to use paper such as book or newspaper.
Embossed Select this to use rough-textured paper.
Blank Insert Select this to insert paper such as Tab paper.
[Weight] No Setting, 40-49g/m2
50-61g/m2
62-74g/m2
75-91g/m2
92-135g/m2
136-162g/m2
163-216g/m2
217-244g/m2
245-300g/m2
301-350g/m2
(In case of the "Unit for Paper Weight" is g/m2)
Set weight of output paper.You can not use 301-350g/m2 when the Paper Source Unit is not specified in the [Configure] tab.
[Color] [No Setting], [White], [Clear], [Yellow], [Pink], [Blue], [Green]
Specify color of output paper.
[Pre-Punched] Off, On Select this check box to print on pre-punched paper.
bizhub PRO 951 10-11

10.3 Parameter details 10
[Weight Unit] [g/m2], [Duodecimo], [A-Book], [B-Book], [Octa-vo], [Bond], [Book], [Bris-tol], [Cover], [Index], [Tag]
Set a unit of weight.
[Restore Device Status]
When you click the [Restore Device Status], replace the information displayed in [Pa-per Settings for Each Tray] with the contents displayed in [Device Status].
[Update Paper Type]
When you click the [Acquire Device Information] in the [Update Paper Name], commu-nicates with the machine and updates the paper name information registered in the device.
[Original Orienta-tion]
[Portrait], [Land-scape]
Select the orientation for the original.
[Original Size] The paper sizes registered as the standard pa-per sizes and custom sizes
Select the paper size of the original.
[Custom Size] Set a custom paper size.
[Paper Size] The available pa-per sizes regis-tered as the standard paper sizes and custom sizes
Set a paper size to print. When the original size is different size and the [Auto] is specified as Zoom, enlarges or reduces accord-ing to the paper size.
[Custom Size] You can register the custom paper sizes.
[Full bleed] Off, On Prints in the original image without blank borders.
[Zoom] 25% - 400% Select an enlarge or reduce ratio.
[Output Method] [Print] When the [Print] is selected, the print job is printed without it be-ing stored in a hard disk.
[Secure Print] When the [Secure Print] is selected, you can not output until you input the Secure Print ID and password on the control panel on this machine. Select this to print a confidential documents for protection.For details on the Secure Print refer to page 14-2.
[Save in User Box]
You can store the printing documents in the internal hard disk of this machine.For details on the HDD Store, refer to page 14-6.
[Save in User Box/Print]
You can store the printing documents in the internal hard disk of this machine and also print simultaneously.For details on the HDD Store, refer to page 14-6.
[Wait Mode] When the [Wait Mode] is selected, you can pause the printing job to checks current setting from the control panel on this machine.
[Proof Print] When the [Proof Print] is selected, you can print one copy to check the output.Use this when you print a large volume document, such as mul-tiple sets of pages to prevent misprints.
[Proof and Print (1st sheet)]
When the [Proof and Print (1st sheet)] is selected, you can print the first page to check the output.Use this when you print a large volume document, such as large number pages to prevent misprints.
[Hold Print] When the [Hold Print] is selected, you can store the print job temporarily as a hold job. Use this when you want to print at once at night.
[User Settings] - Specify the Secure Print ID and password for [Secure Print] and the file name and user box number for [Save in User Box].
[User Authentica-tion/Account Track]
- Specify the user name and password when the [User Authenti-cation] is enabled in this machine and the account name and password when the [Account Track] is enabled in the machine.For details, refer to page 14-15 or page 14-17.
[Copies] 1 - 9999 You can specify the number of copies.
Function Name Option Description
bizhub PRO 951 10-12

10.3 Parameter details 10
Reference- The custom paper size can be set on [Custom Size] within the following range:– Width: from 95.0 to 324.0 mm, Height: from 133.0 to 483.3 mm
[Collate] Off, On Select this check box to collate pages sequentially when printing multiple sets of copies.
[Offset] Off, On You can stagger the output slightly by one copy when you out-put multiple copies.
[Offset Settings] [Offset by number of copies]
Stagger after each set of copies specified.
[Offset by number of sheets]
Stagger after the number of pages specified.
[Paper Tray] Auto, Tray 1-5 Select a paper tray to be used.Selectable items vary depending on the option installation sta-tus.
[Paper Type (Pa-per Name)]
- You can specify the paper name that is registered in this ma-chine.
Function Name Option Description
95.0mm 324.0mm
133.0mm
483.3mm
bizhub PRO 951 10-13

10.3 Parameter details 10
10.3.3 [Layout] tab
Function Name Option Description
[Combination] [2-in-1], [4-in-1], [6-in-1], [9-in-1], [16-in-1][2 x 2], [3 x 3], [4 x 4]
Prints multiple pages onto a single sheet by reducing the size of the document. Or prints one page onto mul-tiple sheets by enlarging the size of the document.
[Combination De-tails]
- Select the condition of combination.For details, refer to page 10-16.
[Imposition] [2 Repeat], [2 Repeat Re-versal (U)], [2 Repeat Re-versal (D)], [2 Repeat Reversal (L)], [2 Repeat Reversal (R)], [2 in 1]
Set this to perform an imposition printing.Outputs onto paper in twice the size specified in the [Original Size].For example : When the [Paper Size] is A4, the docu-ment is printed with A3 sheet.
[Rotate 180] Off, On Select this check box to rotate the document 180 to print.
[Skip Blank Pag-es]
Off, On Set this not to print blank pages.
[Chapters] Off, On Set this to print page on the front side of paper. It can be specified when Print Type is [2-Sided].
[Print Position Settings]
[Top], [Center], [Bottom] Specify the print position.It can be specified when the page size is the wide size such as [A4W] and the custom paper size.
[Print Type] [1-Sided], [2-Sided] , [Booklet], [Booklet (Origi-nal Size x 2)]
Select a print type.
[Adhesive bind-ing]
Off, On Set this to use the [Adhesive binding] function.You can print the original with the page order that is ar-ranged so that folding each sheet in half and collecting them creates a booklet.It can be specified when the[2-Sided] is specified in the [Print Type].
[Binding Position] [Auto], [Left Bind], [Right Bind], [Top Bind]
Specify the binding position.
[Binding Margin] Off, On Set this to use the binding margin. You can specify the width of the binding margin in the [Binding Margin Set-tings...].
[Binding Margin Settings...]
- You can specify detail settings of the binding margin.For details, refer to page 10-17.
bizhub PRO 951 10-14

10.3 Parameter details 10
Reference- The position of the binding moves in accordance with the [Binding Position].
[Image Shift] Off, On Set this to print shifting the position of the entire image within the paper.You can specify the shift width in the[Image Shift Set-tings...].
[Image Shift Set-tings...]
- You can specify detail settings of the image shift. For details, refer to page 10-18.
[Tab Image Shift] Off, On Set this to print shifting the position of the entire image within the tab paper.Use this function in combination with per page settings. It can be specified when the original size is A4, or Let-ter.You can specify the detail of the shift width in the[Tab Image Shift settings...]
[Tab Image Shift settings...]
[Shift Settings] Specify the shift width to print shifting the position of the entire image within the tab paper.
Function Name Option Description
bizhub PRO 951 10-15

10.3 Parameter details 10
Combination Detail
Function Name Option Description
Combination [2 in 1], [4 in 1], [6 in 1], [9 in 1], [16 in 1], [2 x 2], [3 x 3], [4 x 4]
Prints multiple pages onto a single sheet by reducing the size of the document. Or prints one page onto mul-tiple sheets by enlarging the size of the document.
Layout Order [Left-to-Right], [Right-to-Left] [Sideways from Up-per -Left], [Downward from Upper -Left], [Side-ways from Upper -Right], [Downward from Upper -Right]
Specify the order of the page arrangement. It can be set when the N in 1 is specified in the Combination.
Border [Frame], [Line] Specify whether you use the border or not. If you use, specify the border type. It can be set when the N in 1 is specified in the Combination.
Overlap width line Off, On Set this to print a reference line for taping together printed pages. It can be set when the N in N is specified in the Combination.
bizhub PRO 951 10-16

10.3 Parameter details 10
Binding Margin Settings
Function Name Option Description
Shift Mode [Parallel Shift], [Auto Re-duction]
Specify how the image is shifted to create space for binding margin.[Parallel Shift] :Moves the image horizontally within the paper without reduction. If the document does not have sufficient margins, some portion of the image may beyond the range of the sheet.[Auto Reduction] :The image is printed being reduced so that it does not beyond the range of the sheet.
Front Side/Back Side
0 to 50 mm Specify the width of the binding margin. When you re-move the check from the [Same value for front and back ] on 2-Sided printing, you can specify the width to the front and the back respectively.
Unit [mm], [inch] Select the measurement units for the size settings.
bizhub PRO 951 10-17
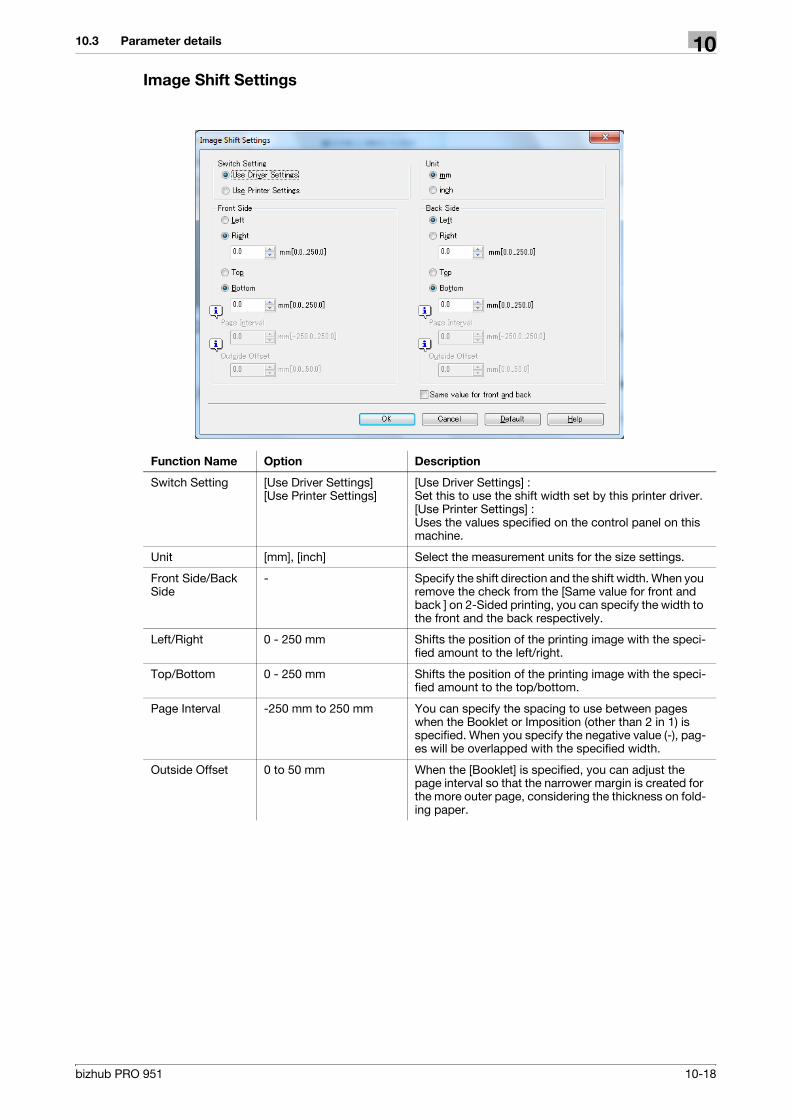
10.3 Parameter details 10
Image Shift Settings
Function Name Option Description
Switch Setting [Use Driver Settings][Use Printer Settings]
[Use Driver Settings] :Set this to use the shift width set by this printer driver.[Use Printer Settings] :Uses the values specified on the control panel on this machine.
Unit [mm], [inch] Select the measurement units for the size settings.
Front Side/Back Side
- Specify the shift direction and the shift width. When you remove the check from the [Same value for front and back ] on 2-Sided printing, you can specify the width to the front and the back respectively.
Left/Right 0 - 250 mm Shifts the position of the printing image with the speci-fied amount to the left/right.
Top/Bottom 0 - 250 mm Shifts the position of the printing image with the speci-fied amount to the top/bottom.
Page Interval -250 mm to 250 mm You can specify the spacing to use between pages when the Booklet or Imposition (other than 2 in 1) is specified. When you specify the negative value (-), pag-es will be overlapped with the specified width.
Outside Offset 0 to 50 mm When the [Booklet] is specified, you can adjust the page interval so that the narrower margin is created for the more outer page, considering the thickness on fold-ing paper.
bizhub PRO 951 10-18
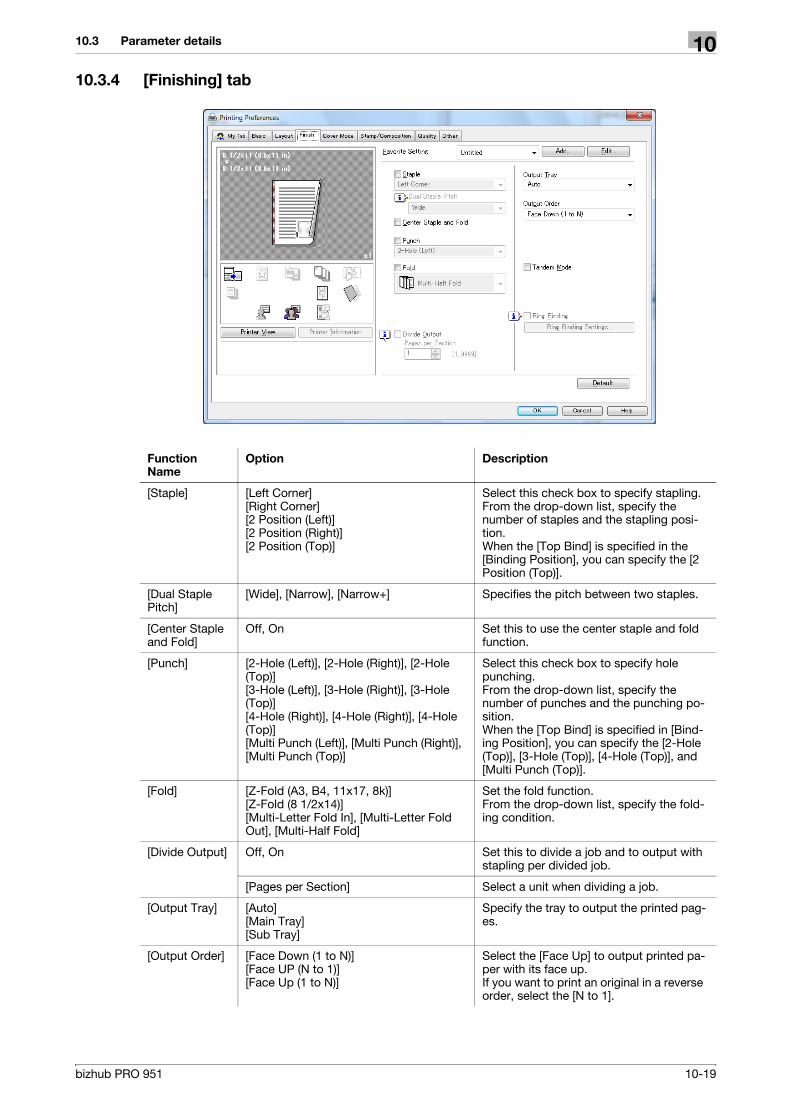
10.3 Parameter details 10
10.3.4 [Finishing] tab
Function Name
Option Description
[Staple] [Left Corner][Right Corner][2 Position (Left)][2 Position (Right)][2 Position (Top)]
Select this check box to specify stapling.From the drop-down list, specify the number of staples and the stapling posi-tion.When the [Top Bind] is specified in the [Binding Position], you can specify the [2 Position (Top)].
[Dual Staple Pitch]
[Wide], [Narrow], [Narrow+] Specifies the pitch between two staples.
[Center Staple and Fold]
Off, On Set this to use the center staple and fold function.
[Punch] [2-Hole (Left)], [2-Hole (Right)], [2-Hole (Top)][3-Hole (Left)], [3-Hole (Right)], [3-Hole (Top)][4-Hole (Right)], [4-Hole (Right)], [4-Hole (Top)][Multi Punch (Left)], [Multi Punch (Right)], [Multi Punch (Top)]
Select this check box to specify hole punching.From the drop-down list, specify the number of punches and the punching po-sition.When the [Top Bind] is specified in [Bind-ing Position], you can specify the [2-Hole (Top)], [3-Hole (Top)], [4-Hole (Top)], and [Multi Punch (Top)].
[Fold] [Z-Fold (A3, B4, 11x17, 8k)][Z-Fold (8 1/2x14)][Multi-Letter Fold In], [Multi-Letter Fold Out], [Multi-Half Fold]
Set the fold function.From the drop-down list, specify the fold-ing condition.
[Divide Output] Off, On Set this to divide a job and to output with stapling per divided job.
[Pages per Section] Select a unit when dividing a job.
[Output Tray] [Auto][Main Tray][Sub Tray]
Specify the tray to output the printed pag-es.
[Output Order] [Face Down (1 to N)][Face UP (N to 1)][Face Up (1 to N)]
Select the [Face Up] to output printed pa-per with its face up.If you want to print an original in a reverse order, select the [N to 1].
bizhub PRO 951 10-19

10.3 Parameter details 10
Reference- The [Staple] function is available only when an optional [Staple Finisher] is installed.– The details of [Dual Staple Pitch] are as follows:
Wide........about 165mm Narrow.....about 140mm Narrow+...about 120mm
- The [Center Staple and Fold] function is available only when an optional [Saddle Stitcher] is installed.- The [Punch] function is available only when an optional [Punch Unit] or [Multi Hole Punch Unit] is in-
stalled.- The [Fold] function is available only when an optional [Z-Fold Unit] or [Saddle Stitcher] is installed.- The [Ring Binding] function is available only when an optional [Ring Binder] is installed.
[Tandem Mode]
Off, On Set this to output from two printers using the tandem connection.
[Ring Binding] Off, On Set this to bind the output using ring-shaped binder.
[Ring Binding Settings]
[Printed Side for Top Sheet] Specify the printed side of the top sheet when the [Ring Binding] is specified.[Outside Print] : Prints document on out-side of the top sheet.[Inside Print] : Prints document on inside of the top sheet.
[Printed Side for Last Sheet] Specify the printed side of the last sheet when the [Ring Binding] is specified.[Outside Print] : Prints document on out-side of the last sheet.[Inside Print] : Prints document on inside of the last sheet.
Function Name
Option Description
bizhub PRO 951 10-20
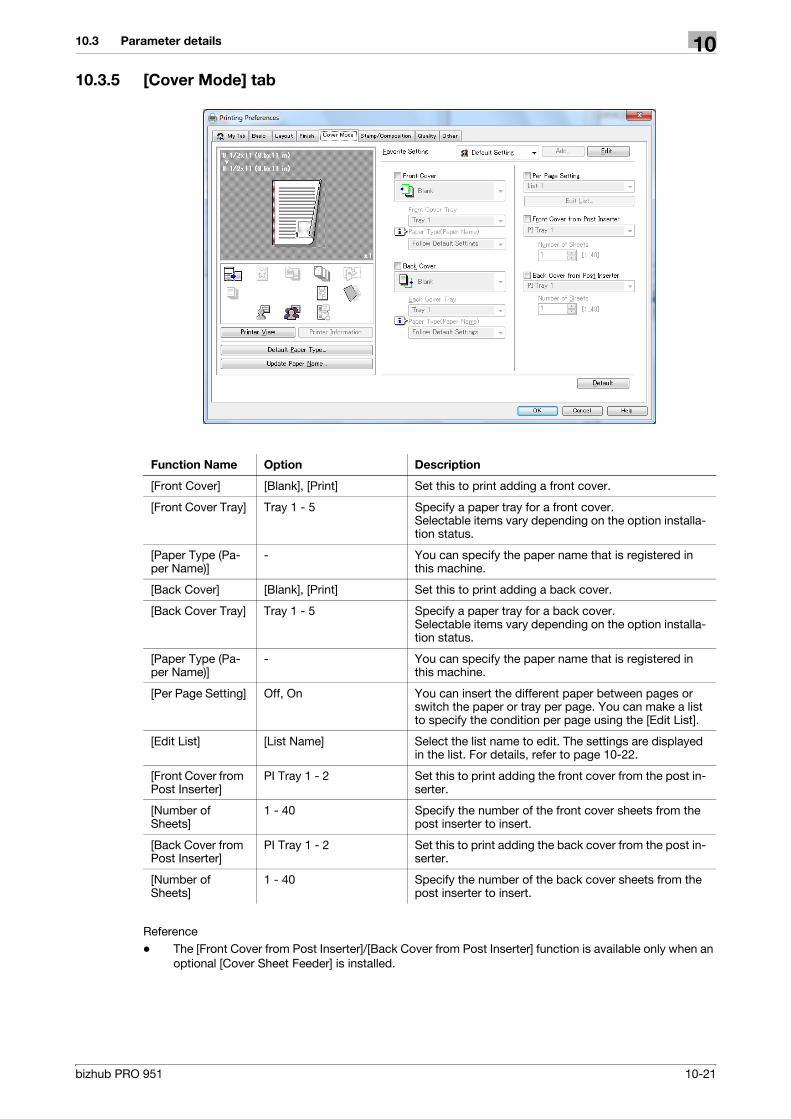
10.3 Parameter details 10
10.3.5 [Cover Mode] tab
Reference- The [Front Cover from Post Inserter]/[Back Cover from Post Inserter] function is available only when an
optional [Cover Sheet Feeder] is installed.
Function Name Option Description
[Front Cover] [Blank], [Print] Set this to print adding a front cover.
[Front Cover Tray] Tray 1 - 5 Specify a paper tray for a front cover.Selectable items vary depending on the option installa-tion status.
[Paper Type (Pa-per Name)]
- You can specify the paper name that is registered in this machine.
[Back Cover] [Blank], [Print] Set this to print adding a back cover.
[Back Cover Tray] Tray 1 - 5 Specify a paper tray for a back cover.Selectable items vary depending on the option installa-tion status.
[Paper Type (Pa-per Name)]
- You can specify the paper name that is registered in this machine.
[Per Page Setting] Off, On You can insert the different paper between pages or switch the paper or tray per page. You can make a list to specify the condition per page using the [Edit List].
[Edit List] [List Name] Select the list name to edit. The settings are displayed in the list. For details, refer to page 10-22.
[Front Cover from Post Inserter]
PI Tray 1 - 2 Set this to print adding the front cover from the post in-serter.
[Number of Sheets]
1 - 40 Specify the number of the front cover sheets from the post inserter to insert.
[Back Cover from Post Inserter]
PI Tray 1 - 2 Set this to print adding the back cover from the post in-serter.
[Number of Sheets]
1 - 40 Specify the number of the back cover sheets from the post inserter to insert.
bizhub PRO 951 10-21
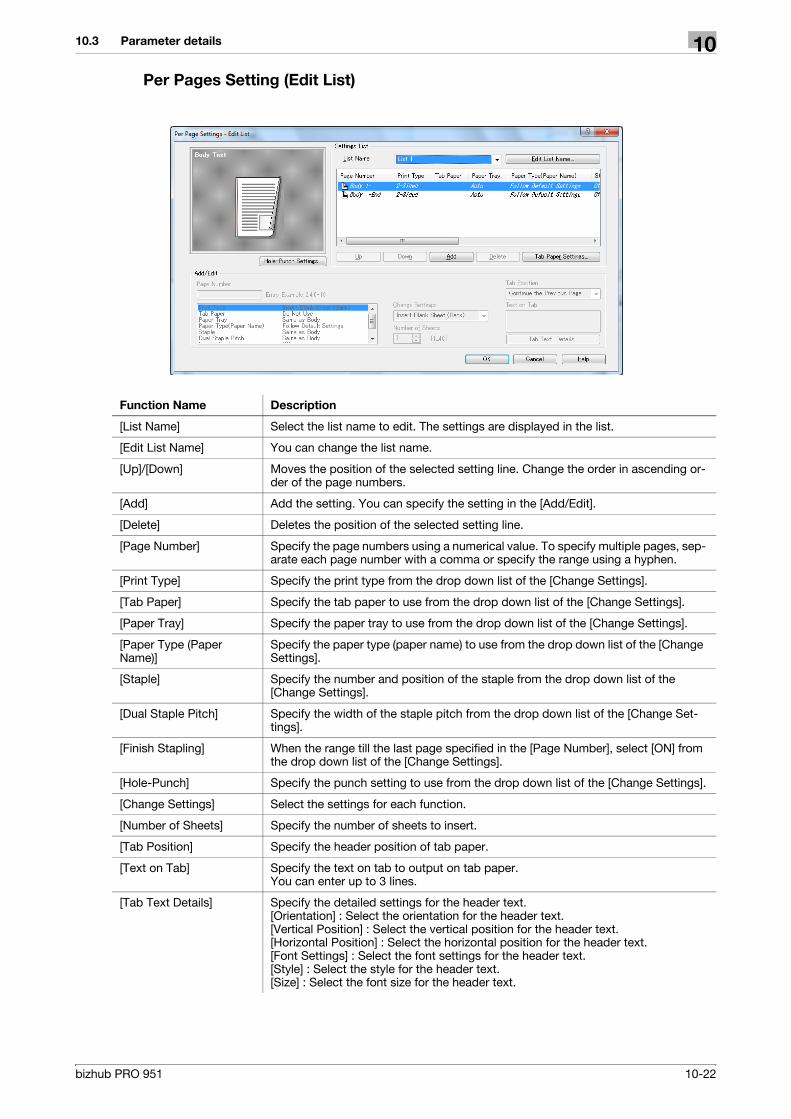
10.3 Parameter details 10
Per Pages Setting (Edit List)
Function Name Description
[List Name] Select the list name to edit. The settings are displayed in the list.
[Edit List Name] You can change the list name.
[Up]/[Down] Moves the position of the selected setting line. Change the order in ascending or-der of the page numbers.
[Add] Add the setting. You can specify the setting in the [Add/Edit].
[Delete] Deletes the position of the selected setting line.
[Page Number] Specify the page numbers using a numerical value. To specify multiple pages, sep-arate each page number with a comma or specify the range using a hyphen.
[Print Type] Specify the print type from the drop down list of the [Change Settings].
[Tab Paper] Specify the tab paper to use from the drop down list of the [Change Settings].
[Paper Tray] Specify the paper tray to use from the drop down list of the [Change Settings].
[Paper Type (Paper Name)]
Specify the paper type (paper name) to use from the drop down list of the [Change Settings].
[Staple] Specify the number and position of the staple from the drop down list of the [Change Settings].
[Dual Staple Pitch] Specify the width of the staple pitch from the drop down list of the [Change Set-tings].
[Finish Stapling] When the range till the last page specified in the [Page Number], select [ON] from the drop down list of the [Change Settings].
[Hole-Punch] Specify the punch setting to use from the drop down list of the [Change Settings].
[Change Settings] Select the settings for each function.
[Number of Sheets] Specify the number of sheets to insert.
[Tab Position] Specify the header position of tab paper.
[Text on Tab] Specify the text on tab to output on tab paper.You can enter up to 3 lines.
[Tab Text Details] Specify the detailed settings for the header text.[Orientation] : Select the orientation for the header text.[Vertical Position] : Select the vertical position for the header text.[Horizontal Position] : Select the horizontal position for the header text.[Font Settings] : Select the font settings for the header text.[Style] : Select the style for the header text.[Size] : Select the font size for the header text.
bizhub PRO 951 10-22

10.3 Parameter details 10
10.3.6 [Stamp/Composition] tab
Function Name Option Description
[Watermark] [URGENT][CIRCULAR][WITHDRAW][NO REPRODUCTION][TOP SECRET][INTERNAL USE][IMPORTANT][Proof][Confidential][DRAFT][COPY]
Prints a document overlapping a watermark (text stamp). The default watermarks described in the left column are prepared.When you want to create a watermark with another name, use [Edit...] to create new name and add the wa-termark to the list.
[Edit...] - Edit watermarks.You can create, change, and delete watermarks.For details, refer to page 10-24.
[Overlay] [None] Set this not to use the overlay function.
[Create Overlay File] Create the data for overlay by printing after specifying the document in this setting. The data created is saved in the computer.
[Create Shared Overlay File]
Create the overlay file in the shared folder that is spec-ified in the [Use Shared Folder (Overlay Printing)] on the [Settings] tab.For details, refer to page 10-4.
[Print in Overlay] Prints a document overlapping with the data for the overlay created in the [Create Overlay File].Set this to enable to select from the list for overlay saved in computer.
[Edit...] - Edit the overlay printing.You can edit the condition for the overlay printing.For details, refer to page 10-25.
[Copy Protect] Off, On Set this to combines the selected document with the copy protect pattern to protect from unauthorized cop-ying
bizhub PRO 951 10-23

10.3 Parameter details 10
Editing Watermark
[Edit...] [Preset Stamp] Select the preset stamp that is used on settings for the [Copy Protect] from among [Copy], [Invalid], [Illegal copy], or [Invalid copy].
[Background Pattern] Select the background pattern that is used on settings for the [Copy Protect] from among [Cherry], [Ara-besque], or [Check].
[Date/Time] Off, On Set this to print adding date and time.
[Page Number] Off, On Set this to print adding page number.
[Edit...] - Edit Date/Time/PageNumber.For details, refer to page 10-26.
[Distribution Number Stamp-ing]
Off, On Set this to print adding distribution number.
[Edit...] - Edit Distribution Number Stamping.For details, refer to page 10-26.
Function Name Option Description
Function Name Description
Watermark List The following watermarks are available.[URGENT][CIRCULAR][WITHDRAW][NO REPRODUCTION][TOP SECRET][INTERNAL USE][IMPORTANT][Proof][Confidential][DRAFT][COPY]
[Watermark Name] Enter the name of the watermark.You can enter up to 30 characters.
[Watermark Text] Enter the text to be printed as the watermark.You can enter up to 30 characters.
[Add] Click this button to create a new watermark.
[Delete] Click this button to delete the selected watermark.You cannot delete the default watermarks.
bizhub PRO 951 10-24
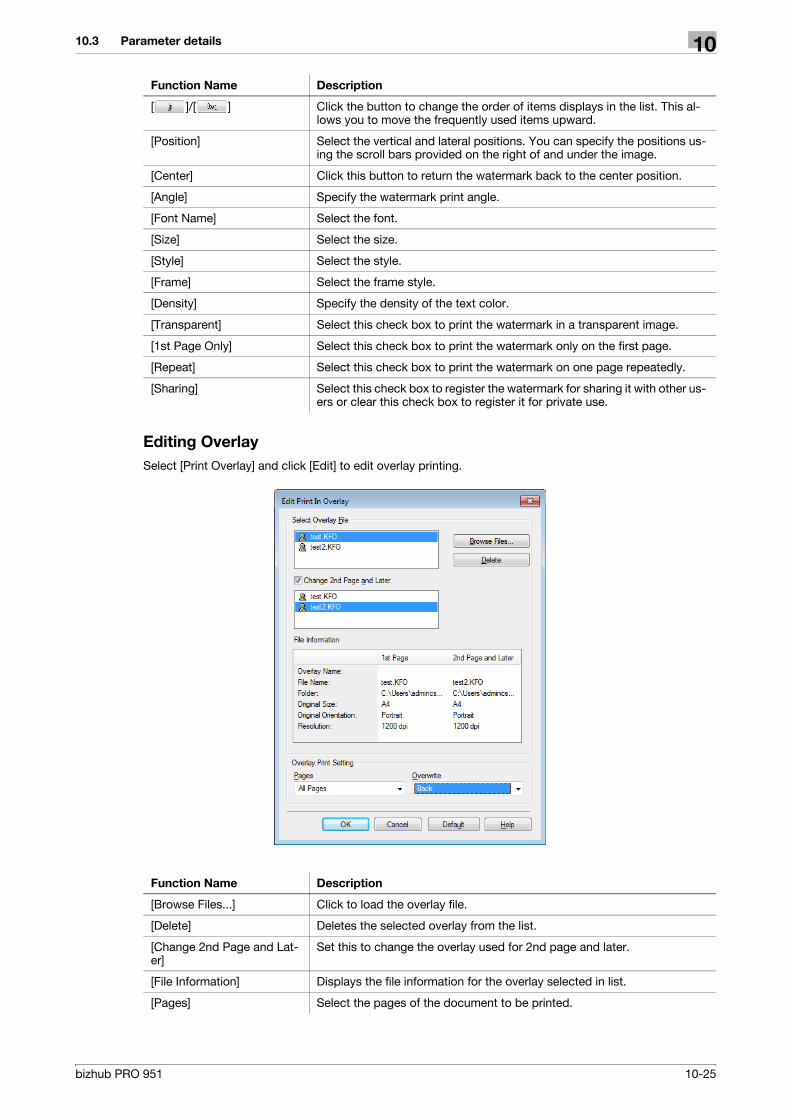
10.3 Parameter details 10
Editing Overlay
Select [Print Overlay] and click [Edit] to edit overlay printing.
[ ]/[ ] Click the button to change the order of items displays in the list. This al-lows you to move the frequently used items upward.
[Position] Select the vertical and lateral positions. You can specify the positions us-ing the scroll bars provided on the right of and under the image.
[Center] Click this button to return the watermark back to the center position.
[Angle] Specify the watermark print angle.
[Font Name] Select the font.
[Size] Select the size.
[Style] Select the style.
[Frame] Select the frame style.
[Density] Specify the density of the text color.
[Transparent] Select this check box to print the watermark in a transparent image.
[1st Page Only] Select this check box to print the watermark only on the first page.
[Repeat] Select this check box to print the watermark on one page repeatedly.
[Sharing] Select this check box to register the watermark for sharing it with other us-ers or clear this check box to register it for private use.
Function Name Description
Function Name Description
[Browse Files...] Click to load the overlay file.
[Delete] Deletes the selected overlay from the list.
[Change 2nd Page and Lat-er]
Set this to change the overlay used for 2nd page and later.
[File Information] Displays the file information for the overlay selected in list.
[Pages] Select the pages of the document to be printed.
bizhub PRO 951 10-25

10.3 Parameter details 10
Editing Date/Time/Page Number
Editing Distribution Number
[Overwrite] Specify the order to overlap between the document and overlay data to print.
Function Name Description
Function Name Description
[Date/Time] - [Pages to Print]
Select the pages to print date and time from [All Pages] or [1st Page Only].
[Page Number] - [Pages to Print]
Select the pages to print page number from among [All Pages], [Not Front Cover] or[Not Front-Back Cover].
[Page Number] - [Starting Page]
Specify the starting page number to print page number.
[Page Number] - [Starting Number]
Specify the starting number to print page number.
Function Name Description
[Type] Specify the numbering type from the [Stamp] or [Watermark].
[Pages to Print] Select the pages to print distribution number from [All Pages] or [1st Page Only].
[Starting Number] Specify the starting number to print distribution number.
bizhub PRO 951 10-26

10.3 Parameter details 10
10.3.7 [Quality] tab
Function Name Option Description
[Print with Black] [All], [Text Only], [Text And Graphics]
Prevents faint printing of colored text, lines and figures according to the selected settings.
[Quality Adjust-ment...]
- Set this to adjust the image quality. For details, refer to page 10-28.
[Smoothing] [Type 1][Type 2][Type 3]
Select this check box to set smoothing. [Smoothing] is available only when [600 dpi] and Thinning are select-ed.• [Type 1] : Performs processing appropriate for diag-
onal lines in general text and diagram.• [Type 2] : Performs processing appropriate for
curves in general text.• [Type 3] : Performs processing appropriate for
curves in dingbat and small letters
[Fine line Preci-sion]
[Level 1][Level 2][Level 3][Level 4]
When you print small letters, printing result might be-come illegible depending on the contents of the original documents.In this case, setting [Fine line Precision] enables to read small letters. The higher you set the level, the line becomes thinner.
[Object] [Text ][All-image]
Specify the target when the [Fine line Precision] is set.
[Resolution] [1200 dpi (High Quality)], [600 dpi (High Quality)], [1200 dpi (Standard)], [600 dpi (Standard)]
Select a resolution for printing.In only case of using Acrobat 7 or later, the printing quality becomes higher than [Standard] by selecting [High Quality].However, the speed becomes slow a little.
[Pattern] [Fine], [Coarse] Specify fineness of the graphic patterns.
[Toner Save] Off, On Controls the print density to reduce toner consumption.It corresponds with [Quality Adjustment] - [-2].
[Draft Print] Off, On Prints thinly the portion of the original other than letters.It corresponds with [Quality Adjustment] - [-4].
[Font Settings] − Specify the font settings.For details, refer to page 10-28.
bizhub PRO 951 10-27

10.3 Parameter details 10
Quality Adjustment
Font Settings
Function Name Option Description
[Density] -5 - +1 Adjust the print density.Move the slider toward plus to deepen the density and move the slider toward minus to lighten the density.
Function Name Option Description
[Download Font Format]
[Outline][Bitmap]
Select the font type downloaded to the printer.
[Use Printer Fonts]
Off, On The speed can be increased by using printer fonts.However, the data image and the print result may be different because it prints replacing with printer fonts.When you use True Type fonts, you can get the same print result with the data image because data of True Type fonts you used is transferred directly to the print-er.
[True Type Font Substitution Ta-ble]
- Displays the list contains True Type Font and Printer Font to use/not to use.
[Printer Font to Use]
- Specify whether you replace the selected font in the True Type Font Substitution Table or not.
bizhub PRO 951 10-28

10.3 Parameter details 10
10.3.8 [Other] tab
Reference- The [Excel Job Control], [Remove White Background] settings are not available in Windows Vista e64,
Windows 7 e64, Windows Server 2008 e64, and Windows Server 2008 R2.- You can change the [Excel Job Control] setting only when the printer driver setting dialog is displayed
from the [ Printers] ([Devices and Printers] in Windows 7/Server 2008 R2) window.
Function Name Option Description
[Excel Job Con-trol]
Off, On When multiple Microsoft Excel sheets with different page settings are printed at one time, the sheets may be divided into jobs per sheet. Set this to minimize such job dividing.
[Remove White Background]
Off, On When an overlay file is printed on top of Microsoft Pow-erPoint data, white areas are removed so that the white background of the PowerPoint data does not hide the overlay file. When you remove the check from this, prints the original data as is without removing the back-ground.
[Thin Line Sup-port]
Off, On Prints without erasing the thin line when the reduction print is done.
[Check Driver Version...]
- Displays the printer driver version information.
bizhub PRO 951 10-29

11 Print functions of PS Plug-in
driver

11.1 Default settings of the printer driver 11
11 Print functions of PS Plug-in driver
This chapter describes functions of the PS Plug-in driver using Windows 7 screens.
For basic print method, refer to page 9-2 (Windows) or page 9-3 (Mac OS X).
11.1 Default settings of the printer driver
After installing the printer driver, you have to set an optional device in the [Configure] screen before printing.
NOTICEYou cannot use functions of the optional device until setting it in the [Configure] screen. Be sure to set the optional device if there is any.
11.1.1 Displaying the Configure screen
For Windows
1 Open the data in the application, and click [File]. Then click [Print] from the menu.
2 Select the printer name and click [Preferences].
3 Click [Configure] tab
bizhub PRO 951 11-2
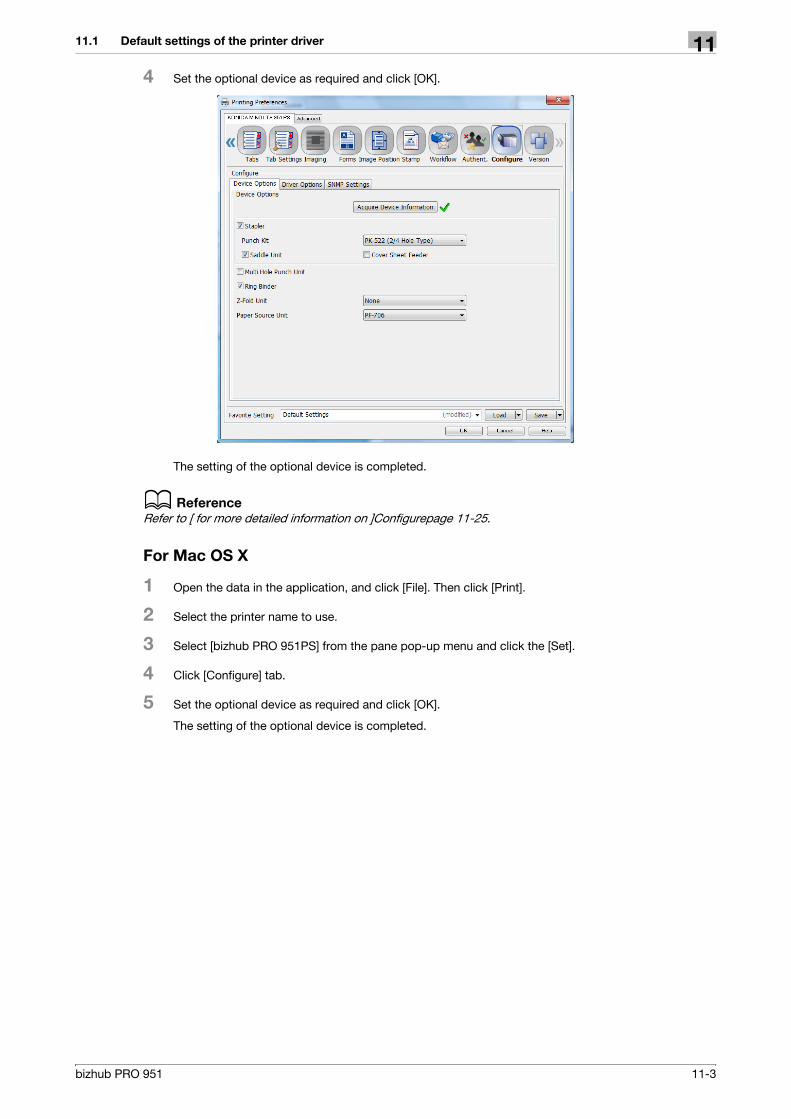
11.1 Default settings of the printer driver 11
4 Set the optional device as required and click [OK].
The setting of the optional device is completed.
d Reference
Refer to [ for more detailed information on ]Configurepage 11-25.
For Mac OS X
1 Open the data in the application, and click [File]. Then click [Print].
2 Select the printer name to use.
3 Select [bizhub PRO 951PS] from the pane pop-up menu and click the [Set].
4 Click [Configure] tab.
5 Set the optional device as required and click [OK].
The setting of the optional device is completed.
bizhub PRO 951 11-3

11.2 Common Setting 11
11.2 Common Setting
This section describes the settings and buttons common to tabs.
Reference- [Save]– Save the current settings as the Favorite Setting.- [Saves for All Users] (Windows only)– When multiple user use one computer, save the current setting as the Favorite Setting shared by all user
who use the same computer.– Only the user with administrator privilege can use.- [Save to File] (Windows only)– Save the current settings as a file.- [Load]– Load the registered settings using [Save].- [Load from File] (Windows only)– Load the saved settings using [Save to File].
Item Name Function
[OK] Click this button to enable changed settings and close the properties win-dow.
[Cancel] Click this button to disable (cancel) changed settings and close the proper-ties window.
[Help] Click this button to display Help of the items.
[Load]/[Save](Favorite Setting)
Input a name in the [Favorite Setting] field and click [Save] to register the cur-rent setting. To recall the setting, select the name from the [Favorite Setting] pull-down menu and click [Load].
bizhub PRO 951 11-4

11.3 Parameter details 11
11.3 Parameter details
The Printing Preferences window is the window to configure the printer driver functions. To open this window, in the Print dialog box, click [Properties] (or [Preferences]), or right-click the printer icon in the [Printers], [De-vices and Printers], or [Printers and Faxes] window. Then select [Printing Preferences...].
11.3.1 [General] tab
Function Name Option Description
[Original Size] The paper sizes regis-tered as the standard pa-per sizes and custom sizes
Select the paper size of the original.When you select the [PostScript Custom Paper Size], the original size that is entered in [PostScript Custom Paper Size] on the [Custom Size Settings] is used. In addition, when you register the Custom Paper Size Name using the [Custom Size] - [Add Custom Size], you can select the name of the original.
[Custom Size...] Enter or add the size.You can add the original size as [PostScript Custom Paper Size].In addition, when you want to register the name for the original size, you can register the name and the original size in the [Add Custom Size].
[Original Orienta-tion]
[Portrait], [Landscape] Select the orientation for the original.
[Paper Tray] Auto, Tray 1 - 5 Select a paper tray to be used.Selectable items vary depending on the option installa-tion status.
[Staple] [Off], [Corner], [2 Posi-tions (Wide)], [2 Positions (Narrow)], [2 Positions (Narrow+)], [Left Corner], [Right Corner]
Select this check box to specify stapling.From the drop-down list, specify the number of staples and the stapling position.When [Binding Position] is [Top Bind], [Left Corner] and [Right Corner] can be specified.
[Punch] [Off], [2-Hole], [3-Hole], [4-Hole], [Multi Punch]
Select this check box to specify hole punching.From the drop-down list, specify the number of punch-es and the punching position.
bizhub PRO 951 11-5

11.3 Parameter details 11
Reference- The custom paper size can be set on [Custom Size] within the following range:– Width: from 95.0 to 324.0 mm, Height: from 133.0 to 483.3 mm
- The [General] tab can be customized. For details, refer to page 11-26.
95.0mm 324.0mm
133.0mm
483.3mm
bizhub PRO 951 11-6

11.3 Parameter details 11
11.3.2 [Layout] tab
Function Name Option Description
[2-Sided] Off, On Set this to perform a 2-sided printing.
[Imposition] [Off], [Adhesive Binding], [Booklet], [2 in 1 (Full Size)], [2 in 1 (Full Size Reverse)], [2 Repeat], [2 Repeat Reversal (Left)], [2 Repeat Reversal (Right)]
Set this to perform an imposition printing.
[Combination] [Off][2 in 1][2 in 1 (Reverse)][4 in 1][4 in 1 (Reverse)][6 in 1][6 in 1 (Reverse)][8 in 1][8 in 1 (Reverse)][9 in 1][9 in 1 (Reverse)][16 in 1][16 in 1 (Reverse)]
Combine more than one pages onto one sheet of paper for printing.
[Binding Position] [Left Bind], [Right Bind], [Top Bind]
Specify the binding position.
[Page Interval] -250 to 250 mm Set the interval between book spread pages when set-ting the imposition function.
[Creep Adjust-ment]
0 - 5 mm Set this to adjust the page position if the outer and inner pages do not match at folding using the imposition function.
bizhub PRO 951 11-7

11.3 Parameter details 11
Reference- The custom paper size can be set on [Custom Size] within the following range:– Width: from 95.0 to 324.0 mm, Height: from 133.0 to 483.3 mm
[Original Size] The paper sizes regis-tered as the standard pa-per sizes and custom sizes
Select the paper size of the original.When you select the [PostScript Custom Paper Size], the original size that is entered in [PostScript Custom Paper Size] on the [Custom Size Settings] is used.In addition, when you register the Custom Paper Size Name using the [Custom Size] - [Add Custom Size], you can select the name of the original.
[Custom Size...] Enter or add the size.You can add the original size as [PostScript Custom Paper Size]. For the setting values of [PostScript Cus-tom Page Size], the specified values are reflected to the [Paper Size] - [PostScript Custom Page Size]. The both values of [PostScript Custom Page Size] in the [Original Size] and the [Paper Size] are common and the value entered newly are reflected to both values.In addition, when you want to register the name for the original size, you can register the name and the original size in the [Add Custom Size].
[Original Orienta-tion]
[Portrait], [Landscape] Select the orientation for the original.
[Paper Size] The paper sizes regis-tered as the standard pa-per sizes and custom sizes
Set a paper size.When you select the [PostScript Custom Page Size], the paper size registered using the [Custom Size]. In addition, when you register the Custom Paper Size Name using the [Custom Size] - [Add Custom Size], you can select the name of the paper.
[Custom Size] Specifies or registers the size.You can register the paper size as [PostScript Custom Paper Size]. For the setting values of [PostScript Cus-tom Page Size], the specified values are reflected to the [Paper Size] - [PostScript Custom Page Size]. The both values of [PostScript Custom Page Size] in the [Original Size] and the [Paper Size] are common and the value entered newly are reflected to both values.In addition, when you want to register the name for the paper size, you can register the name and the paper size in the [Add Custom Size].
[Fit to Paper Size] Off, On Set this to print an original fitting to paper if their sizes are different.
[Zoom] 1 to 1000% Select an enlarge or reduce ratio.
[Full bleed] Off, On Prints in the original image without blank borders.
[180º Rotate] Off, On Select this check box to rotate the document 180 to print.
Function Name Option Description
95.0mm 324.0mm
133.0mm
483.3mm
bizhub PRO 951 11-8

11.3 Parameter details 11
11.3.3 [Finishing] tab
Reference- Depending on the settings in [Configure] tab - [Device Options], the [Finishing] tab may not be dis-
played.
Function Name Option Description
[Binding Position] [Left Bind], [Right Bind], [Top Bind]
Specify the binding position.
[Staple] [Off], [Corner], [2 Posi-tions (Wide)], [2 Positions (Narrow)], [2 Positions (Narrow+)], [Left Corner], [Right Corner]
Select this check box to specify stapling.From the drop-down list, specify the number of staples and the stapling position.When [Binding Position] is [Top Bind], [Left Corner] and [Right Corner] can be specified.
[Divide Output] Off, On Set this to output a job with it divided.
[Pages per Section] Select a unit when dividing a job.
[Punch] [Off], [2-Hole], [3-Hole], [4-Hole], [Multi Punch]
Select this check box to specify hole punching.From the drop-down list, specify the number of punch-es and the punching position.
[Ring Binding] [Printed Side for Top Sheet]
Set this to bind the output using ring-shaped binder.[Inside] : Prints document on inside of the top sheet.[Outside] : Prints document on outside of the top sheet.
[Printed Side for Last Sheet]
Set this to bind the output using ring-shaped binder.[Inside] : Prints document on inside of the last sheet.[Outside] : Prints document on outside of the last sheet.
[Fold] [Off],[Z-Fold (A3/B4/Tab-loid/8K)][Z-Fold (Legal)][Multi Tri-Fold][Multi Half-Fold]
Set the fold function.From the drop-down list, specify the folding condition.
[Folding Direction] Set the folding direction.
[Multi Half Fold Details] When [Multi Half-Fold] is selected, [Fold and Staple] can be set.
bizhub PRO 951 11-9

11.3 Parameter details 11
Reference- The [Staple] function is available only when an optional stapler is installed.– The details of [Staple 2positions] are as follows:
Wide........about 165mm Narrow.....about 140mm Narrow+...about 120mm
- The [Punch] function is available only when an optional [Punch Unit] or [Multi Hole Punch Unit] is in-stalled.
- The [Ring Binding] function is available only when an optional Ring Binder is installed.- The [Fold] function is available only when an optional [Saddle Unit] or [Z-Fold Unit] is installed.
11.3.4 [Output] tab
Function Name Option Description
[Output Tray] [Auto], [Stapler Main Tray], [Stapler Sub Tray].
Specify the tray to output the printed pages.Selectable items vary depending on the option installa-tion status.
[Sort/Group] [Sort], [Group] Specify whether multiple copies jobs are output per copy (sort) or per page(group).
[Output Order] [Face Up] Select [Face Up] to output printed paper with its face up.When you remove the check mark, the document is output with its face down.
[N to 1] If you want to print an original in a reverse order, select [N to 1].
[Offset Output Copies ]
Off, On Stagger after each set of copies specified.
[Offset Output Sheets ]
Off, On Stagger after the number of pages specified.
bizhub PRO 951 11-10

11.3 Parameter details 11
11.3.5 [Paper] tab
Tray Settings
Reference- You can specify a unit of weight in the [Configure] tab. For details, refer to page 11-25.
Function Name Option Description
[Acquire Tray and Paper Data]
- Acquires the paper tray information set and the paper profile information defined in this machine.When appears at the right of [Acquire Tray and Pa-per Data], it means that the information has been ac-quired.
[Paper Tray] Automatically Select, Tray 1 - 5
Displays the paper tray information set in this machine.Selectable items vary depending on the option installa-tion status.
[Type] [No Setting], [Plain Pa-per], [Fine], [Book/News], [Embossed], [Blank In-sert]
Specify a paper type.
[Weight] No Setting, 40-49g/m2
50-61g/m2
62-74g/m2
75-91g/m2
92-135g/m2
135-162g/m2
163-216g/m2
217-244g/m2
245-300g/m2
301-350g/m2
(In case of the "Unit for Paper Weight" is g/m2)
Set weight of output paper.
[Color] [White], [Clear], [Yellow], [Pink], [Blue], [Green]
Specify color of output paper.
[Pre-Punched] Off, On Select this check box to print on pre-punched paper.
bizhub PRO 951 11-11
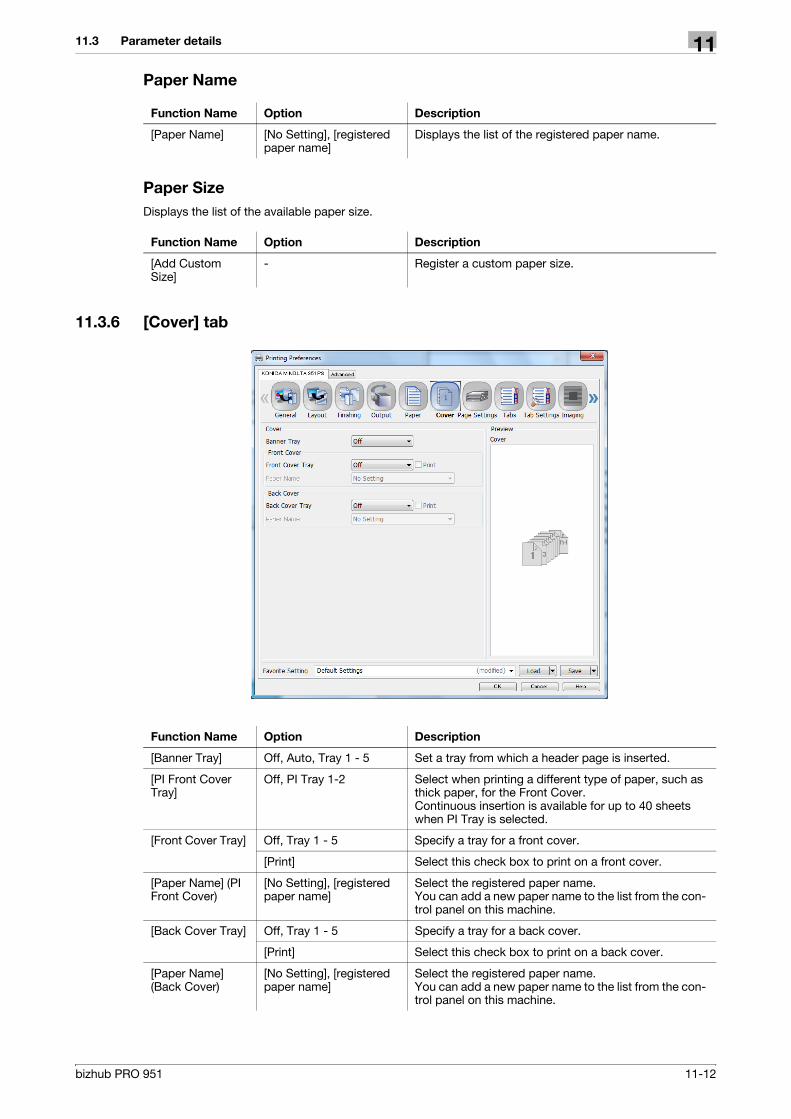
11.3 Parameter details 11
Paper Name
Paper Size
Displays the list of the available paper size.
11.3.6 [Cover] tab
Function Name Option Description
[Paper Name] [No Setting], [registered paper name]
Displays the list of the registered paper name.
Function Name Option Description
[Add Custom Size]
- Register a custom paper size.
Function Name Option Description
[Banner Tray] Off, Auto, Tray 1 - 5 Set a tray from which a header page is inserted.
[PI Front Cover Tray]
Off, PI Tray 1-2 Select when printing a different type of paper, such as thick paper, for the Front Cover.Continuous insertion is available for up to 40 sheets when PI Tray is selected.
[Front Cover Tray] Off, Tray 1 - 5 Specify a tray for a front cover.
[Print] Select this check box to print on a front cover.
[Paper Name] (PI Front Cover)
[No Setting], [registered paper name]
Select the registered paper name.You can add a new paper name to the list from the con-trol panel on this machine.
[Back Cover Tray] Off, Tray 1 - 5 Specify a tray for a back cover.
[Print] Select this check box to print on a back cover.
[Paper Name] (Back Cover)
[No Setting], [registered paper name]
Select the registered paper name.You can add a new paper name to the list from the con-trol panel on this machine.
bizhub PRO 951 11-12

11.3 Parameter details 11
11.3.7 [Page Settings] tab
You can set paper and print settings for each page.
[PI Back Cover Tray]
Off, PI Tray 1-2 Select when printing a different type of paper, such as thick paper, for the Back Cover.Continuous insertion is available for up to 40 sheets when PI Tray is selected.
Function Name Option Description
Function Name Option Description
[Chapters] Off, On Select this check box to specify the page to be printed on the front side.When you check the [Chapters], [2-Sided] is turned on automatically.To specify a page or page range, separate each page number with a comma or specify the range using a hy-phen.(For example : 2,5 7-10)
bizhub PRO 951 11-13

11.3 Parameter details 11
Page Setting [Type] Set a print type for a page specified in [Page Number].Select [Same as Body] to apply the setting for the orig-inal.
[Page Number] Set the page number for setting Page Settings.
[Paper Tray] Set a print tray for a page specified in [Page Number].When [Auto] is selected, paper is supplied according to the tray priority specified on the control panel.
[Paper Name] Set a paper name for a page specified in [Page Number].
[Number of Sheets] Set a number of white sheets to insert in a page speci-fied in [Page Number].
[Punch] Set a punch hole for a page specified in [Page Number].Select [Same as Body] to apply the setting for the orig-inal.
[Staple] Set a staple for a page specified in [Page Number].Select [Same as Body] to apply the setting for the orig-inal.
[Finish Stapling] Check when sectioning staples.
[Clear] Clear the selected page settings.
[Clear All] Clear all page settings.
Function Name Option Description
bizhub PRO 951 11-14

11.3 Parameter details 11
11.3.8 [Tabs] tab
Function Name Option Description
[Pages] - Specify a page to insert a tab.To apply the setting, click [Update].
[Current Page] - You can change the page for the selected tab.
[Print Mode] [Print on Tab], [Print on Body]
Specify whether to print on tab or body.
[Insert] [Off], [Before], [After] Specify whether to insert a blank tab before or after the page.
[Insertions] - Specify a number of blank tabs to insert.
[Tab Type] [Tab 1], [Tab 2] Specify the tab type.
[Tab Position] Auto, 1/15 - 15/15 Specify the tab position.Specify the number of tabs in the [Tab Settings] tab.
[Text on Tab] - Input a text on a tab.You can enter up to 3 lines.
bizhub PRO 951 11-15

11.3 Parameter details 11
11.3.9 [Tab Settings] tab
Space Above
Space Below
Tab Height
Function Name Option Description
[Tab Image Shift] Off, On Select this check box to shift an image on a tab to the right.It can be set from 10.0 mm to 15.0 mm (in 0.1 mm in-crements).
[Tab 1]/[Tab 2] - You can define 2 types of tab.For example, 5 for [Tab 1] and 15 for [Tab 2].
[Paper Tray] Tray 1 - 5 Select a paper tray for a tab.
[Paper Size] [A4 Tab], [Letter tab] Select a paper size for a tab.
[Number of Tabs] - Specify a number of tabs.
[Space Above] - Input the value for [Space Above].
[Tab Height] - Input the value for [Tab Height].
[Space Below] Input the value for [Space Below].
[Font Name] - Specify a font for a tab character.
[Font Style] [Bold], [Italic], [point] Specify a style for a tab character.
bizhub PRO 951 11-16

11.3 Parameter details 11
11.3.10 [Imaging] tab
[Line Spacing] - Specify a spacing between tab characters.
[Orientation] [Normal], [Flipped], [Hori-zontal], [Vertical]
Specify a direction of a tab character.
[Vertical Position] [Top], [Center], [Bottom] Specify a vertical position of a tab character.
[Horizontal Posi-tion]
- Specify a horizontal position of a tab character.By default, the tab character is placed at the center to the tab.
Function Name Option Description
Function Name Option Description
[Acquire Image Controller De-fault]
- Communicate with the machine to acquire the default screening information of the image controller.
[Resolution] [600dpi], [1200dpi] Select a resolution.
[Screening Meth-od]
[Photo], [Text], [Text/Photo], [Dot Screen]
Specify the screening method.
[Screen Frequen-cy]
[40 lpi] to [300 lpi] Specify the screen frequency when you select the [Dot Screen] in the [Screening Method].
[Screen Angle] [0.0°] to [172.5°] Specify the screen angle when you select the [Dot Screen] in the [Screening Method].
bizhub PRO 951 11-17

11.3 Parameter details 11
[Dot Shape] [Simple Dot][Inverted Simple Dot][Double Dot][Inverted Double Dot][Cosine Dot][Double][Inverted Double][Line][Line X][Line Y][Round][Ellipse][Ellipse A][Inverted Ellipse A][Ellipse B][Ellipse C][Inverted Ellipse C][Square][Cross][Rhomboid][Diamond]
Specify the dot shape when you select the [Dot Screen] in the [Screening Method].Refer to help information of printer driver to confirm the dot shape.
[Tone Curve] - Select the tone curve acquired from the image control-ler.You can specify the tone curve settings using the "ToneCurve Utility" application.
[Print Quality] [Normal], [Draft Print], [Toner Save]
Specify the print quality.[Draft Print] corresponds with [Image Density Selection] - [-2] and [Toner Save] corresponds with [Image Density Selection] - [-4].
[Image Density Selection]
[-5] to [-1][Standard], [+1]
Specify the print density.Move the slider toward plus to deepen the density and move the slider toward minus to lighten the density.
[Smoothing] [Off][Type 1][Type 2][Type 3]
Select this check box to set smoothing. [Smoothing] is available only when [600 dpi] and Thinning are select-ed.• [Type 1]: Performs processing appropriate for diag-
onal lines in general text and diagram.• [Type 2]: Performs processing appropriate for
curves in general text.• [Type 3]: Performs processing appropriate for
curves in dingbat and small letters
[Fine line Preci-sion]
[Off][Level 1][Level 2][Level 3][Level 4]
When you print small letters, printing result might be-come illegible depending on the contents of the original documents.In this case, setting [Fine line Precision] enables to read small letters. The higher you set the level, the line becomes thinner.
[Object] [Text ][All-image]
Specify the target when the [Fine line Precision] is set.
[Use CIE Color] Off, On Select this check box to use a CIE color space at print-ing in gray scale.However, if you use this function, the printing speed becomes slightly slower.
Function Name Option Description
bizhub PRO 951 11-18

11.3 Parameter details 11
11.3.11 [Forms] tab
The form image file can be superimposed.
Select [WorkFlow] tab - [Print Mode] - [From] to save a form file. For details, refer to page 11-22.
Function Name Option Description
[Acquire Form Data]
- Communicate with the machine to acquire the form in-formation saved in the image controller.When appears at the right of [Acquire Form Data], it means that the form information has been acquired.
[Form] [Off], [Registered form name.]
Set the form function.
[Forms Print Mode]
[Repeated], [Once] Select [Repeated] to overlay all form pages repeatedly in order from the first page on a printing document.Select [Once] to overlay all forms pages only once in or-der from the first page on a printing document.
[Per Page Set-tings]
[Form], [Page Number] You can set an overlay on a page basis.However, the maximum number will be different de-pending on the selected form and page.
[Prepend] [Off], [Registered form name.]
Set the selected form before the current job.
[Append] [Off], [Registered form name.]
Set the selected form after the current job.
[Copy to Clip-board]
- Click to copy the preview page to the clipboard.You can check a layout by pasting the image from the clipboard onto a printing document.
[Clear Form] - Click to clear the selected form from the image control-ler. You need to input a password to clear the form.The password is set in the machine. For details, refer to page 15-10.
bizhub PRO 951 11-19

11.3 Parameter details 11
11.3.12 [Image Position] tab
Function Name Option Description
[Image Shift] [Off], [Use Main Body Settings], [Use Driver Settings]
Specify the position of printing image.When you output using the settings of the [Image Shift] specified in the machine, select the [Use Main Body Setting].When you specify on this printer driver, select the [Use Driver Settings].
[Shift Front/Back Separately]
Off, On When you use the same settings for front side and back side, mark this check box.
[Right] - The printing image on the front side shifts horizontally. (Positive value: shift to the right, negative value: shift to the left)When you check the [Shift Front/Back Separately], the printing image on Back side also shifts.
[Bottom] - The printing image on the front side shifts vertically. (Positive value: shift to the bottom, negative value: shift to the top)When you check the [Shift Front/Back Separately], the printing image on Back side also shifts.
[Right (Back Side)]
- The printing image on the back side shifts horizontally. (Positive value: shift to the right, negative value: shift to the left)
[Bottom (Back Side)]
- The printing image on the back side shifts vertically. (Positive value: shift to the bottom, negative value: shift to the top)
[Image Position] [Lead Edge], [Center], [Rear Edge]
When you select a wide size or custom size as paper size setting, you need to specify the image position.
bizhub PRO 951 11-20

11.3 Parameter details 11
11.3.13 [Stamp] tab
Function Name Option Description
[Date/Time] [Off], [All Pages], [1st Page Only]
Select [1st Page Only] or [All Pages] when printing [Date/Time].
[Page Number] [Off], [All Pages], [Other than 1st Page], [Other than 1st/Last Page]
Specify [All Pages], [Other than 1st Page], or [Other than 1st/Last Page] when printing [Page Number].
[Starting Page] - Specify a page to start printing the number when print-ing [Page Number]. 1-9999 page(s) can be input.
[Starting Page Number]
- Specify the starting page number when printing [Page Number]. 1-9999 page(s) can be input.
[Numbering] [Off], [Stamp for All Pag-es], [Stamp for 1st Page Only], [Watermark for All Pages]
To output [Numbering], select the [Stamp for All Pages], [Stamp for 1st Page Only], [Watermark for All Pages].
[Starting Number] - Specify a starting number when printing [Numbering]. 1-9999 page(s) can be input.
[Copy Protect] Off, On Set this to combines the selected document with the copy protect pattern to protect from unauthorized cop-ying
[Back Pattern] [Cherry Blossoms], [Ara-besque], [Lattice]
Select the background pattern that is used on settings for the [Copy Protect].
[Preset Stamp] [Copy], [Invalid], [Illegal copy], [Invalid Copy]
Select the text pattern that is used on settings for the [Copy Protect].
bizhub PRO 951 11-21

11.3 Parameter details 11
11.3.14 [WorkFlow] tab
Function Name Option Description
[Tandem Mode] Off, On Set this to output from two printers using the tandem connection.
[Send E-mail] [Off], [On Error], [Always] Set this to send an E-mail to a specified address after completing a print job.
[Print Mode] [Print][Proof Print][Proof Print (1st sheet)][Wait Mode][Hold Print][Secure Print]
Select a print method.[Print] :The print job is printed without it being stored in a hard disk.
[Proof Print] :You can print one copy to check the output.
[Proof Print (1st sheet)]:You can print the first page to check the output.
[Wait Mode]:You can pause the printing job to checks current set-ting from the control panel on this machine.
[Hold Print] :You can store the print job temporarily as a hold job. Use this when you want to print at once at night.
[Secure Print]:You can not output until you input the Secure Print ID and password on the control panel on this machine. Select this to print a confidential documents for protec-tion.For details on this procedures, refer to page 14-2.
bizhub PRO 951 11-22

11.3 Parameter details 11
NOTICEEven If you select the [Default Settings] in the [Favorite Setting], the settings of the [ID] and [Password] spec-ified in the [Secure Print].is kept.
11.3.15 [Authent.] tab
[Output Method] [Print][Save in User Box][Save in User Box and Print][Form]
Select the output method.[Print] :The print job is printed without it being stored in a hard disk.
[Save in User Box]:The print job is stored in the hard disk in the main body. Specify the box number and file name to store in the hard disk. For details on this procedures, refer to page 14-6.
[Save in User Box and Print] :The print job is stored in the hard disk in the main body and then printed. Specify the box number and file name to store in the hard disk For details, refer to page 14-6.
[Form]:You can save an image file to the image controller and use it as a background in the [Form] tab for this driver.Refer to page 11-19 for more detailed information on [From].
Function Name Option Description
Function Name Option Description
[Acquire Authen-tication Informa-tion]
- Communicates with this machine and acquire the infor-mation for User Authentication or Account Track.
[Verify] - You can confirm whether the user and account infor-mation is recognized or not by clicking the Verify on the Authentication Settings dialog box displayed from Ba-sic tab.
bizhub PRO 951 11-23

11.3 Parameter details 11
Important- Even If you select the [Default Settings] in the [Favorite Setting], the settings of the [User Authentication]
and [Account Track Setting] are kept.
[User Authentica-tion]
[Off], [Main Body], [Exter-nal Server], [Enhanced Server]
When the User Authentication function is enabled, se-lect the [Main Body], [External Server], or [Enhanced Server] as the Authentication server.For details, refer to page 14-15.
[Server Setting] [Off] When there are multiple Authentication servers, select the Authentication server to be used for authentication from among authentication servers registered in the printer.
[Public User] Off, On Set this to access to the image controller as a public user.For details, refer to page 14-15.
[User Name] - Specify the user name to access to the image controller as a registered user.For details, refer to page 14-15.
[Password] - Specify the password to access to the image controller as a registered user.For details, refer to page 14-15.
[Account Track] Off, On Set an account name and password to a print job if the user authentication function is enabled in the machine.This identification information is used to track the number of printouts.You need to input the account name and password to print if [Account Track] is checked.For details, refer to page 14-17.
[Account Name] - Specify the account name to print when you enable the [Account Track] check box.For details, refer to page 14-17.
[Password] - Specify the password to print when you enable the [Ac-count Track] check box.For details, refer to page 14-17.
[Reenter] - Reenter the password for confirmation to print when you enable the [Account Track] check box.For details, refer to page 14-17.
Function Name Option Description
bizhub PRO 951 11-24

11.3 Parameter details 11
11.3.16 [Configure] tab
[Device Options] tab
d Reference
For details on the paper sizes loadable in the paper trays, refer to [User's Guide (Copier)].
Item Name Function
[Acquire Device Informa-tion]
Press this to detect an optional device installed on this machine.When appears at the right of [Acquire Device Information], it means that the device information has been acquired.
[Stapler] You can use the staple function.
[Punch Kit] You can use the punch function.
[Saddle Unit] You can use functions such as [Multi Tri-Fold], [Multi Half-Fold], and [Fold and Staple].
[Cover Sheet Feeder] Select this to insert the PI Front/Back Cover.
[Multi Hole Punch Unit] You can use the multi-hole punch function.
[Ring Binder] You can bind the output using ring-shaped binder.
[Z-Fold Unit] You can use the z-folding and punch function.
[Paper Source Unit] You can use the tray 3 - 5 as the paper tray.
[Unit] Specify a unit.
[Language] Specify a language.[Language] is only for Windows.
bizhub PRO 951 11-25

11.3 Parameter details 11
[Driver Options] tab
[SNMP] tab
Note- When SNMP setting is specified on the image controller, it is necessary to enter the name or other in-
formation to the corresponding fields. For information to be entered, contact the administrator of the machine.
Item Name Function
[Normalize PostScript] Set this to use the applications that have their own PostScript driver based on a PPD.
[MacOS Keychain] User Name and Password can be registered with key chain access when set-ting [User Authentication] and [Account Track].[MacOS Keychain] is only for Mac.
[Unit] Specify a unit.
[Weight Unit] Set a unit of weight.
[Language] Specify a language.
[Customize General Pan-el]
You can set the item to be displayed on the [General] tab.
Item Name Function
[SNMP Version] Specify the SNMP version.
[Read Community Name] Specify the community name. Reenter the community name for confirmation in Reenter field.
[Context Name] Specify the context name.
[Read User Name] Specify the user name.
[Security Level] Select the security level.[Auth-Password] : The password is necessary to be authenticated.[Auth-Password/Priv-Password] : The encrypted password is necessary to be authenticated.
[Read User Auth-Pass-word]
Specify the auth-password. Reenter the auth-password for confirmation in Reenter field.
[Read UserPriv-Pass-word]
Specify the encrypted auth-password. Reenter the encrypted auth-pass-word for confirmation in the Reenter field.
bizhub PRO 951 11-26

11.3 Parameter details 11
11.3.17 [Version] tab
You can check the version of this driver.
bizhub PRO 951 11-27

11.3 Parameter details 11
11.3.18 [Advanced] tab
You can set options for PostScript in the [Advanced] tab.
Function Name Option Description
[TrueType Font] [Substitute with Device Font], [Download as Softfont]
Set this to substitute a font with a TrueType fontSelect [Substitute with Device Font] if you want the printer to select a similar font instead of downloading the font set. It can shorten the printing time; however, a special character that is not included in the substituted font may be garbled.Select [Download as Softfont] to download the Tru-eType font to the printer.
[Advanced Print-ing Features]
[Enabled], [Disabled] Specify whether to enable or disable the advanced printing features.
[TrueType Font Download Op-tion]
[Automatic], [Outline], [Bitmap], [Native Tru-eType]
Specify the download mode of a TrueType font.
[PostScript Lan-guage Level]
1 - 3 Specify a PostScript language level.The higher the PostScript language level is, the more functions become available. You may achieve an prop-er compatibility by lowering the PostScript language level if you print an incompatible document.
[Send PostScript Error Handler]
[Yes], [No] Specify whether to send a PS error message or not. Se-lect [Yes] to output an error message from a printer at a print error.
[Mirrored Output] [Yes], [No] Specify whether to perform a mirrored print or not.
[Negative Output] [Yes], [No] Specify whether to perform a negative print or not.
bizhub PRO 951 11-28

12 Print functions of PPD driver
for Windows
12.1 Default settings of the printer driver 12
12 Print functions of PPD driver for Windows
This chapter describes the functions of the PPD printer driver for Windows.
For detailed information on the basic print methods, refer to page 9-2.
12.1 Default settings of the printer driver
After installing the printer driver, you have to configure installable options in the [Device Setting] screen before printing.
NOTICEAny options that are installed in this machine but not configured in the [Device Setting] tab cannot be used in the [Printing Preferences] screen of the printer driver. Be sure to set the optional device if there is any.
12.1.1 Displaying the Properties window
1 Open the [Printers], [Devices and Printers], or [Printers and Faxes] window.
% In Windows Vista/Server 2008/Server 2008 R2, click [Start], open [Control Panel], and then click [Printers] in [Hardware and Sound]. When [Control Panel] is displayed in Classic View, double-click [Printers].
% In Windows 7, click [Start], then [Devices and Printers].% In Windows 7, if [Devices and Printers] is not displayed in the [Start] menu, open [Control Panel] from
the [Start] menu, and select [View devices and printers] under [Hardware and Sound].% In Windows XP/Server 2003, click [Start], then [Printers and Faxes].% In Windows XP/Server 2003, if [Printers and Faxes] is not displayed in the [Start] menu, open [Con-
trol Panel] from the [Start] menu, select [Printers and Other Hardware], then [Printers and Faxes]. When [Control Panel] is displayed in Classic View, double-click [Printers].
2 Open [Printer Properties] or [Properties].
% In Windows XP/Vista/Server 2008/Server 2008 R2, right-click the icon of the installed printer, and click [Properties].
% In Windows 7, right-click the icon of the installed printer, and click [Printer Properties].
bizhub PRO 951 12-2

12.1 Default settings of the printer driver 12
12.1.2 [Device Settings] tab
Specify the Installable Options settings.
12.1.3 About tabs provided by OS
Windows provides [General], [Sharing], [Port], [Advanced], [Color Management] and [Security] tabs.
Using these tabs, you can print a test page and specify the shared printer and the printer port.
For details, please refer to the Windows User’s Guide.
[Paper Source Unit] You can use the tray 3 - 5 as the paper tray.
[Saddle Unit] You can use functions such as [Multi Tri-Fold], [Multi Half-Fold], and [Fold and Staple].
[Stapler Finisher] You can use the staple function.
[Multi Hole Punch Unit] You can use the multi-hole punch function.
[Ring Binder] You can bind the output using ring-shaped binder.
[Punch Z-Fold Unit] You can use the Fold and Punch functions.
[Cover Sheet Feeder] Select this to insert the PI Front/Back Cover.
bizhub PRO 951 12-3

12.1 Default settings of the printer driver 12
12.1.4 Registering the default settings
The settings for the machine functions configured when printing can only be applied while using the applica-tion. When you exit the application, the settings return to their default settings.
To register the settings, change the printer driver basic settings (default settings).
1 Open the [Devices and Printers], [Printers], or [Printers and Faxes] window.
% In Windows Vista/Server 2008/Server 2008 R2, click [Start], open [Control Panel], and then click [Printers] in [Hardware and Sound]. When [Control Panel] is displayed in Classic View, double-click [Printers].
% In Windows 7, click [Start], then [Devices and Printers].% In Windows 7, if [Devices and Printers] is not displayed in the [Start] menu, open [Control Panel] from
the [Start] menu, and select [View devices and printers] under [Hardware and Sound].% In Windows XP/Server 2003, click [Start], then [Printers and Faxes].% In Windows XP/Server 2003, if [Printers and Faxes] is not displayed in the [Start] menu, open [Con-
trol Panel] from the [Start] menu, select [Printers and Other Hardware], then [Printers and Faxes]. When [Control Panel] is displayed in Classic View, double-click [Printers].
2 Right-click the icon of the installed printer, and click [Printing Preferences...].
The [Printing Preferences] dialog box of the printer appears.
3 Change the settings of the function, and then click [OK] to exit the function.
The changed settings are applied when the printer is used by all of the application software.
d Reference
For details on the function and settings of the printer driver, refer to page 12-6.
bizhub PRO 951 12-4

12.2 Common Setting 12
12.2 Common Setting
This section describes the settings and buttons common to tabs.
Item Name Function
[OK] Click this button to enable changed settings and close the properties win-dow.
[Cancel] Click this button to disable (cancel) changed settings and close the proper-ties window.
[Apply] Check this button to save the current tab setting.
bizhub PRO 951 12-5

12.3 Parameter details 12
12.3 Parameter details
The Printing Preferences window is the window to configure the printer driver functions. To open this window, in the Print dialog box, click [Properties] (or [Preferences]), or right-click the printer icon in the [Printers], [De-vices and Printers], or [Printers and Faxes] window. Then select [Printing Preferences...].
12.3.1 [Layout] tab
You can set the print orientation, page order, and number of pages per sheet.
Function Name Option Description
[Orientation] [Portrait], [Landscape], [Rotated Landscape]
Select the orientation for the original.
[Page Order] [Front to Back], [Back to Front]
Specify a page order to print.
[Pages per Sheet] 1, 2, 4, 6, 9, 16 Specify a number of pages allocated on one sheet.
[Draw Borders] Set a border between allocated pages.
[Advanced...] Press this button to display the Advanced Options win-dow.
bizhub PRO 951 12-6

12.3 Parameter details 12
12.3.2 [Paper/Quality] tab
You can set a paper source and paper type.
Function Name Option Description
[Paper Source] Tray 1 - 5 Select a paper tray.
[Media] [Plain Paper], [Fine], [Book/News], [Em-bossed], [Blank Insert]
Specify a paper type.
[Advanced...] Display the [Advanced Options] window.
bizhub PRO 951 12-7

12.3 Parameter details 12
12.3.3 [Advanced Options] window
You can specify the printer's advanced functions.
Function Name Option Description
[Paper Size] All paper sizes available in this ma-chine
Set a paper size.
[Print Quality] [600dpi], [1200dpi] Select a resolution.
[Scaling] 1 to 1000% Select an enlarge or reduce ratio.
[TrueType Font] [Substitute with Device Font], [Down-load as Softfont]
Specify an output method of a TrueType font.
[Advanced Print-ing Features]
[Enabled], [Disabled] Set this to enable the [Pages per Sheet Layout] function.
[Pages per Sheet Layout]
[Right then Down], [Down then Right], [Left then Down], [Down then Left]
Set this to enable the [Pages per Sheet Layout] function.
[PostScript Out-put Option]
[Optimize for Speed], [Optimize for Portability], [Encapsulated Post-Script (EPS)], [Archive Format]
Configure an output option for Post-Script. For details, refer to the PostScript guide.
[TrueType Font Download Op-tion]
[Automatic], [Outline], [Bitmap], [Na-tive TrueType]
Set an download option for a TrueType font.
[PostScript Lan-guage Level]
1 - 3 Set a PostScript language level.
[Send PostScript Error Handler]
[Yes], [No] Set whether to send a PostScript error handler or not.
[Mirrored Output] [Yes], [No] Set [Mirrored Output].
[Negative Output] [Yes], [No] Set [Negative Output].
[Offset] [Off], [On] Stagger after each set of copies speci-fied.
[Image Position] [Off], [Top], [Center], [Bottom] Specify the print position.
bizhub PRO 951 12-8

12.3 Parameter details 12
[Paper Weight] No Setting, 40-49g/m2
50-61g/m2
62-74g/m2
75-91g/m2
92-135g/m2
136-162g/m2
163-216g/m2
217-244g/m2
245-300g/m2
301-350g/m2
(In case of the "Unit for Paper Weight" is g/m2)
Set weight of output paper.
[Paper Color] [No Setting], [White], [Clear], [Yellow], [Pink], [Blue], [Green]
Specify color of output paper.
[Pre-Punched] [Off], [On] Select this check box to print on pre-punched paper.
[Output Tray] [Auto], [Stapler Main Tray], [Stapler Sub Tray].
Select an output tray.
[Output Order] [Face Down], [Face Up] Set this to output printed paper with its face up.
[N to 1] [Off], [On] Set this to print an original in a reverse or-der.
[Binding Position] [Left Bind], [Top Bind], [Right Bind], [Left Bind], [Top Bind], [Right Bind]
Set a position to bind when using a func-tion such as [Staple] and [Punch].
[2-Sided] [Off], [On] Select whether to print in 2-sided mode.
[Imposition] [Off], [Booklet], [Adhesive Binding], [2 in 1], [Repeat], [2 Repeat Reversal (Left)], [2 Repeat Reversal (Right)], [2 Repeat Reversal (Top)], [2 Repeat Reversal (Bottom)]
Set this to perform an imposition printing.
[Staple] [Off], [Left Corner], [Right Corner], [2 Positions (Wide)], [2 Positions (Nar-row)], [2 Positions (Narrow+)]
Set this to staple paper.
[Punch] [Off], [2-Hole], [3-Hole], [4-Hole], [Multi Punch]
Set this to punch paper.
[Fold] [Off], [Z-Fold (A3/B4/Tabloid/8K)], [Z-Fold (Legal)], [Fold and Staple], [Multi Tri-Fold - Inside], [Multi Tri-Fold - Outside], [Multi Half-Fold]
Set the fold function.
[Image Shift] [Off], [On] Specify the position of printing image.
[Front Cover] [Off], [Print], [Blank] Set this to add the front cover.
[Front Cover Tray] Off, Tray 1 - 5 Specify a tray for a front cover.
[Back Cover] [Off], [Print], [Blank] Set this to add a back cover.
[Back Cover Tray] Off, Tray 1 - 5 Specify a tray for a back cover.
[PI Front Cover Tray]
Off, PI Tray 1-2 Set this to print a front cover on paper that is different with the output paper, such as thick paper.
[PI Back Cover Tray]
Off, PI Tray 1-2 Set this to print a back cover on paper that is different with the output paper, such as thick paper.
Function Name Option Description
bizhub PRO 951 12-9

12.3 Parameter details 12
[Print Mode] [Print][Wait Mode][Proof Print][Proof Print (1st sheet)][Hold Print]
Select a print method.[Print]:The print job is printed without it being stored in a hard disk.
[Proof Print]:You can print one copy to check the out-put.
[Proof Print (1st sheet)]:You can print the first page to check the output.
[Wait Mode]:You can pause the printing job to checks current setting from the control panel on this machine.
[Hold Print]:You can store the print job temporarily as a hold job. Use this when you want to print at once at night.
[Secure Print]:You can not output until you input the Se-cure Print ID and password on the control panel on this machine. Select this to print a confidential document for protection.
[Smoothing] [Off], [Type 1], [Type 2], [Type 3] Select this check box to set smoothing. [Smoothing] is available only when [600 dpi] and Thinning are selected.• [Type 1]: Performs processing appro-
priate for diagonal lines in general text and diagram.
• [Type 2]: Performs processing appro-priate for curves in general text.
• [Type 3]: Performs processing appro-priate for curves in dingbat and small letters
[Fine line Preci-sion]
[Off][Level 1][Level 2][Level 3][Level 4]
Select this check box to set thinning. It can prevent a small character becoming unreadable.
[Object] [Text ][All-image]
Specify the target when the [Fine line Pre-cision] is set.
[Date/Time] [Off], [All Pages], [1st Page Only] Set this when printing date/time.
[Copy Protect] [Off], [On] Set this to combines the selected docu-ment with the copy protect pattern to pro-tect from unauthorized copying
[Preset Stamp] [Off], [Copy], [Invalid], [Illegal Copy], [Invalid Copy]
Select the background pattern that is used on settings for the [Copy Protect].
[Back Pattern] [Off], [Cherry Blossoms], [Ara-besque], [Lattice]
Select the background pattern that is used on settings for the [Copy Protect].
[Image Density Selection]
[+1], [Standard][-5] to [-1][Toner Save], [Draft Print]
Specify the print density.
[180° Rotate] [Off], [On] Set this to rotate the document 180 de-gree and print.
[Tandem Mode] [Off], [On] Set this to output from two printers using the tandem connection.
[Ring Binding] [Off], [On] Set this to bind the output using ring-shaped binder.
Function Name Option Description
bizhub PRO 951 12-10

12.3 Parameter details 12
Reference- The [Staple] function is available only when an optional [Staple Finisher] is installed.– The details of [Staple 2positions] are as follows:
Wide........about 165mm Narrow.....about 140mm Narrow+...about 120mm
- The [Punch] function is available only when an optional [Punch Z-Fold Unit] or [Multi Hole Punch Unit] is installed.
- The [Ring Binding] function is available only when an optional [Ring Binder] is installed.- The [Fold] function is available only when an optional [Saddle Unit] or [Punch Z-Fold Unit] is installed.
d Reference
For details on the paper sizes loadable in the paper trays, refer to "User's Guide (Copier)".
[Printed Side for Top Sheet]
[Outside], [Inside] Specify the printed side of the top sheet when the [Ring Binding] is specified.[Inside] : Prints document on inside of the top sheet.[Outside] : Prints document on outside of the top sheet.
[Printed Side for Last Sheet]
[Inside], [Outside] Specify the printed side of the last sheet when the [Ring Binding] is specified.[Inside]: Prints document on inside of the last sheet.[Outside]: Prints document on outside of the last sheet.
Function Name Option Description
bizhub PRO 951 12-11

13 Print functions of PPD driver
for Mac OS X
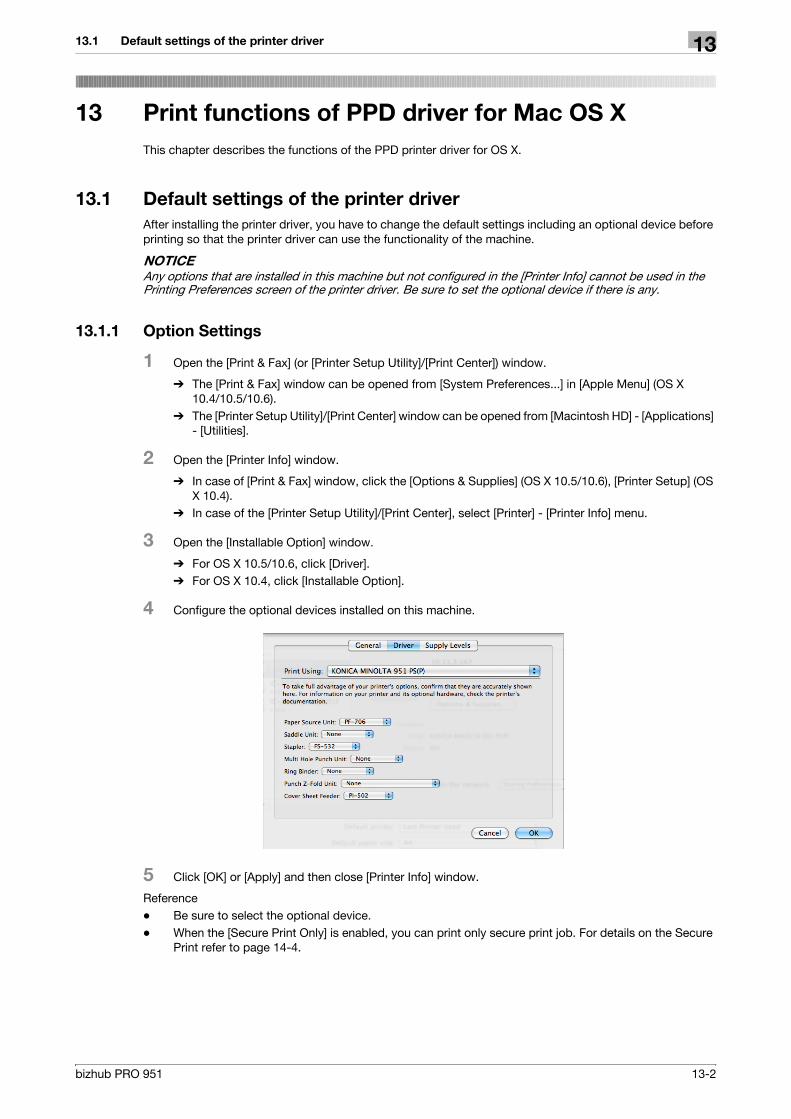
13.1 Default settings of the printer driver 13
13 Print functions of PPD driver for Mac OS X
This chapter describes the functions of the PPD printer driver for OS X.
13.1 Default settings of the printer driver
After installing the printer driver, you have to change the default settings including an optional device before printing so that the printer driver can use the functionality of the machine.
NOTICEAny options that are installed in this machine but not configured in the [Printer Info] cannot be used in the Printing Preferences screen of the printer driver. Be sure to set the optional device if there is any.
13.1.1 Option Settings
1 Open the [Print & Fax] (or [Printer Setup Utility]/[Print Center]) window.
% The [Print & Fax] window can be opened from [System Preferences...] in [Apple Menu] (OS X 10.4/10.5/10.6).
% The [Printer Setup Utility]/[Print Center] window can be opened from [Macintosh HD] - [Applications] - [Utilities].
2 Open the [Printer Info] window.
% In case of [Print & Fax] window, click the [Options & Supplies] (OS X 10.5/10.6), [Printer Setup] (OS X 10.4).
% In case of the [Printer Setup Utility]/[Print Center], select [Printer] - [Printer Info] menu.
3 Open the [Installable Option] window.
% For OS X 10.5/10.6, click [Driver].% For OS X 10.4, click [Installable Option].
4 Configure the optional devices installed on this machine.
5 Click [OK] or [Apply] and then close [Printer Info] window.
Reference- Be sure to select the optional device.- When the [Secure Print Only] is enabled, you can print only secure print job. For details on the Secure
Print refer to page 14-4.
bizhub PRO 951 13-2

13.1 Default settings of the printer driver 13
13.1.2 Registering the default settings
The settings for the machine functions configured when printing can only be applied while using the applica-tion. When you exit the application, the settings return to their default settings.
To register the settings, save the printer driver settings. For OS X, you can register the paper settings as the default settings, but it is necessary to save the other print functions using the [Presets] pop-up menu so that you can retrieve the functions when you want use.
You can save the settings of the [Page Setup] window by selecting [Save as Default] from [Settings] pop-up menu.
Selecting [Save as] on the [Presets] pop-up menu enables you to save the settings you configured in the [Print] window.
When you use this settings, select it from [Presets] pop-up menu.
Reference- The list of the [Per Page Setting] can not be saved.
d Reference
For details on the function and settings of the printer driver, refer to page 13-6.
bizhub PRO 951 13-3

13.2 Common Setting 13
13.2 Common Setting
This section describes about the common setting items displayed on the unique functions of this machine specified in [Print] window.
OS X 10.5/10.6 :
OS X 10.4 :
Reference- The [Acquire Device Information] on the Printer Information dialog box communicates with this machine
to acquire the settings of this machine. The function cannot be used unless you are connected and able to communicate with this machine.
Item Name Function
[Cancel] Click this button to disable (cancel) changed settings and close the proper-ties window.
[Print] Click this button to enable changed settings and print.
bizhub PRO 951 13-4

13.3 Adding the Custom Size 13
13.3 Adding the Custom Size
You can register the custom paper size other than standard paper size, if you need.
1 Select [File] - [Page Setup] menu.
2 Open the Add Custom Size screen.
% For OS X 10.4/10.5/10.6, select the [Manage Custom Size] from the paper size list.
3 Click [+].
4 Enter the paper name.
You can not specify the present standard paper name such as A4 or Custom.
5 Set each items.
% Page Size (Paper Size) : Specify the paper size that you want to use.% Printer margin : Sets the margins of the output paper.
6 Click [OK].
The custom paper size is registered and then you can select it from the Paper Size on the [Page At-tributes].
Reference- For OS X 10.5/10.6, you can also select [Manage Custom Size] from the [Paper Size] on the [Print] win-
dow.
bizhub PRO 951 13-5

13.4 Parameter details 13
13.4 Parameter details
The function of the printer driver can be set in [Page Attributes] selected from [Page Setup] screen and [Out-put Method], [Layout/Finishing], [Paper Tray/Output Tray], [Cover Sheet/OHP Inserts], [Per Page Settings], [Stamp/Page Printing], and [Image Quality] selected from [Print] window.
13.4.1 [Page Attributes]
Select [File] - [Page Setup] menu.
Reference- The paper size of [12e18] is 304.8e457.2 that is slightly larger than A3.- You can register the custom paper size other than standard paper size, if you need. For details on add-
ing custom paper size, refer to page 13-5.- To print data corresponding to the full area of the standard paper, select "W" of each standard paper.
It enables to print the image centering on the sheet that is larger than the original. For example, when you print the A4 size data centered on the A3 paper, create the data with "A4W" paper size settings and select [A4W] in [Paper Size] and [Paper Tray] to use. For the machine, set A3 paper into the tray to use and select the tray to use on [Basic Settings (Paper)] screen. Then select the [Change Set] - [Wide Paper] - [A4W]. Confirm that [Auto Detect] in [Selected Size] is specified and A3 is displayed. When 12 1/4 e 18 is set, from [Selected Size] you need to select [12 1/4e18]. When the paper to print is the custom paper size, use the bypass tray and select [Change Set] - [Wide Paper] - [A4W]. Then enter the paper size to use in [Change Size].
- For OS X 10.5/10.6, you can also specify [Paper Size] and [Orientation] on the Print window.
d Reference
For details on the paper sizes loadable in the paper trays, refer to [User's Guide - Copier].
Function Name Option Description
[Paper Size] The available paper sizes registered as the stand-ard paper sizes and cus-tom sizes
Set a paper size to print.
Manage Custom Size (OS X 10.4/10.5/10.6)
[Orientation] Portrait, Landscape Select the orientation for the original.
[Scale] −(According to the OS X version, it varies )
Select an enlarge or reduce ratio.
bizhub PRO 951 13-6

13.4 Parameter details 13
13.4.2 [Copies & Pages]
Select [File] - [Print] menu.
Reference- For OS X 10.5, [Paper Size] and [Orientation] are also displayed. These are same functions with those
on [Page Attributes].- When the setting items are not displayed in OS X 10.5, click on the right side of [Printer].
Function Name Option Description
[Copies] 1 - 9999 Specify the number of copies to print.
[Collated] ON/OFF Do not specify this function.Use [Collate] in the [Output Method].
[Page] − You can specify the print range.
bizhub PRO 951 13-7

13.4 Parameter details 13
13.4.3 [Finishing]
Function Name Option Description
[Sort] ON/OFF Select this check box to collate pages sequentially when printing multiple sets of copies.
[Offset] ON/OFF You can stagger the output slightly by one copy when you output multiple copies.
[Tandem Mode] [Off], [On] Set this to output from two printers using the tandem connection.
[Output Tray] [Auto], [Stapler Main Tray], [Stapler Sub Tray].
Select an output tray.
[Output Order] [Face Down], [Face Up] Set this to output printed paper with its face up.
[N to 1] [Off], [On] Set this to print an original in a reverse order.
[Binding Position] [Left Bind], [Top Bind], [Right Bind], [Left Bind], [Top Bind], [Right Bind]
Set a position to bind when using a function such as [Staple] and [Punch].
[2-Sided] [Off], [On] Select whether to print in 2-sided mode.
[Staple] [Off], [Left Corner], [Right Corner], [2 Positions (Wide)], [2 Positions (Narrow)], [2 Po-sitions (Narrow+)]
Set this to staple paper.
[Punch] [Off], [2-Hole], [3-Hole], [4-Hole], [Multi Punch]
Set this to punch paper.
[Fold] [Off], [Z-Fold (A3/B4/Tabloid/8K)], [Z-Fold (Legal)], [Fold and Staple], [Multi Tri-Fold - Inside], [Multi Tri-Fold - Outside], [Multi Half-Fold]
Set the fold function.
[Ring Binding] [Off], [On] Set this to bind the output using ring-shaped binder.
[Printed Side for Top Sheet]
[Outside], [Inside] Specify the printed side of the top sheet when the [Ring Binding] is specified.[Inside] : Prints document on inside of the top sheet.[Outside] : Prints document on outside of the top sheet.
[Printed Side for Last Sheet]
[Inside], [Outside] Specify the printed side of the last sheet when the [Ring Binding] is specified.[Inside]: Prints document on inside of the last sheet.[Outside]: Prints document on outside of the last sheet.
bizhub PRO 951 13-8

13.4 Parameter details 13
Reference- The [Staple] function is available only when an optional [Staple Finisher] is installed.– The details of [Staple 2positions] are as follows:
Wide........about 165mm Narrow.....about 140mm Narrow+...about 120mm
- The [Punch] function is available only when an optional [Punch Z-Fold Unit] or [Multi Hole Punch Unit] is installed.
- The [Ring Binding] function is available only when an optional [Ring Binder] is installed.- The [Fold] function is available only when an optional [Saddle Unit] or [Punch Z-Fold Unit] is installed.
d Reference
For details on the paper sizes loadable in the paper trays, refer to "User's Guide (Copier)".
13.4.4 [Image/Layout]
Function Name Option Description
[Imposition] [Off], [Booklet], [Adhe-sive Binding], [2 in 1], [Repeat], [2 Repeat Re-versal (Left)], [2 Repeat Reversal (Right)], [2 Re-peat Reversal (Top)], [2 Repeat Reversal (Bot-tom)]
Set this to perform an imposition printing.
[Image Shift] [Off], [On] Specify the position of printing image.
[Image Pos.] [Off], [Top], [Center], [Bottom]
Specify the print position.
[Date/Time] [Off], [All Pages], [1st Page Only]
Set this when printing date/time.
[Resolution] [600dpi], [1200dpi] Select a resolution.
[Image Density] [+1], [Standard][-5] - [-1][Toner Save], [Draft Print]
Specify the print density.Move the slider toward plus to deepen the density and move the slider toward minus to lighten the density.[Draft Print] corresponds with [Image Density] - [-2] and [Toner Save] corresponds with [Image Density] - [-4].
bizhub PRO 951 13-9

13.4 Parameter details 13
[Smoothing] [Off], [Type 1], [Type 2], [Type 3]
Select this check box to set smoothing. [Smoothing] is available only when [600 dpi] and Thinning are select-ed.• [Type 1]: Performs processing appropriate for diag-
onal lines in general text and diagram.• [Type 2]: Performs processing appropriate for
curves in general text.• [Type 3]: Performs processing appropriate for
curves in dingbat and small letters
[Fine line Preci-sion]
[Off][Level 1][Level 2][Level 3][Level 4]
When you print small letters, printing result might be-come illegible depending on the contents of the original documents.In this case, setting [Fine line Precision] enables to read small letters. The higher you set the level, the line be-comes thinner.
[Object] [Text ][All-image]
Specify the target when the [Fine line Precision] is set.
[Copy Protect] [Off], [On] Set this to combines the selected document with the copy protect pattern to protect from unauthorized cop-ying
[Preset Stamp] [Off], [Copy], [Invalid], [Il-legal Copy], [Invalid Copy]
Select the background pattern that is used on settings for the [Copy Protect].
[Back Pattern] [Off], [Cherry Blossoms], [Arabesque], [Lattice]
Select the background pattern that is used on settings for the [Copy Protect].
Function Name Option Description
bizhub PRO 951 13-10

13.4 Parameter details 13
13.4.5 [Setup]
Function Name Option Description
[Paper Type] [Plain Paper], [Fine], [Book/News], [Em-bossed], [Blank Insert]
Specify a paper type.
[Weight] No Setting, 40-49g/m2
50-61g/m2
62-74g/m2
75-91g/m2
92-135g/m2
136-162g/m2
163-216g/m2
217-244g/m2
245-300g/m2
301-350g/m2
(In case of the "Unit for Paper Weight" is g/m2)
Set weight of output paper.
[Color] [No Setting], [White], [Clear], [Yellow], [Pink], [Blue], [Green]
Specify color of output paper.
[Pre-Punched] Off, On Select this check box to print on pre-punched paper.
[180° Rotate] Off, On Set this to rotate the document 180 degree and print.
[Front Cover] [Off], [Print], [Blank] Set this to add the front cover.
[Front Cover Tray] Off, Tray 1 - 5 Specify a tray for a front cover.
[Back Cover] [Off], [Print], [Blank] Set this to add a back cover.
[Back Cover Tray] Off, Tray 1 - 5 Specify a tray for a back cover.
[PI Front Cover Tray]
Off, PI Tray 1-2 Set this to print a front cover on paper that is different with the output paper, such as thick paper.
[PI Back Cover Tray]
Off, PI Tray 1-2 Set this to print a back cover on paper that is different with the output paper, such as thick paper.
bizhub PRO 951 13-11

13.4 Parameter details 13
13.4.6 [Secure Print]
Function Name Option Description
[Print Mode] [Print][Secure Print][Save in User Box][Save in User Box and Print][Wait Mode][Proof Print][Proof Print (1st sheet)][Hold Print]
Select a print method.[Print]:The print job is printed without it being stored in a hard disk.
[Secure Print]:You can not output until you input the Secure Print ID and password on the control panel on this machine. Select this to print a confidential documents for protec-tion.For details on this procedures, refer to page 14-2.
[Save in User Box]:The print job is stored in the hard disk in the main body. Specify the box number and file name to store in the hard disk.For details on this procedures, refer to page 14-6.
[Save in User Box and Print]:The print job is stored in the hard disk in the main body and then printed. Specify the box number and file name to store in the hard disk.For details, refer to page 14-6.
[Wait Mode]:You can pause the printing job to checks current set-ting from the control panel on this machine.
[Proof Print]:You can print one copy to check the output.
[Proof Print (1st sheet)] :You can print the first page to check the output.
[Hold Print]:You can store the print job temporarily as a hold job. Use this when you want to print at once at night.
bizhub PRO 951 13-12

14 Function Details
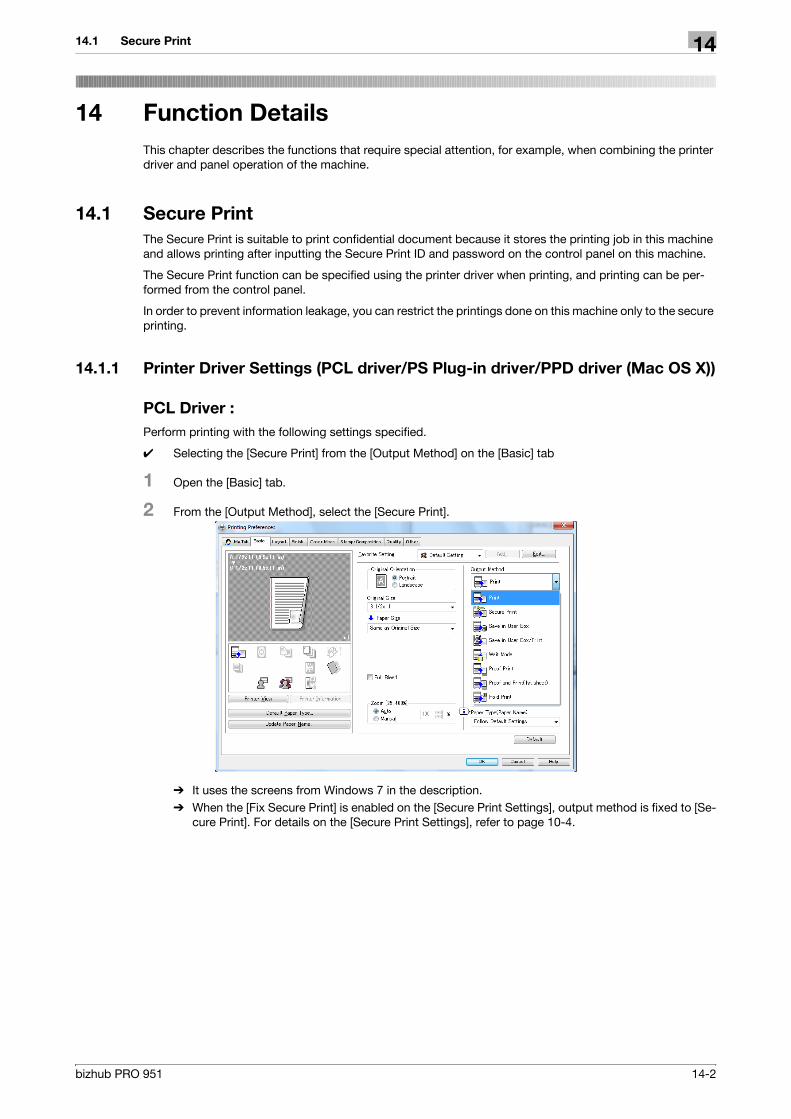
14.1 Secure Print 14
14 Function Details
This chapter describes the functions that require special attention, for example, when combining the printer driver and panel operation of the machine.
14.1 Secure Print
The Secure Print is suitable to print confidential document because it stores the printing job in this machine and allows printing after inputting the Secure Print ID and password on the control panel on this machine.
The Secure Print function can be specified using the printer driver when printing, and printing can be per-formed from the control panel.
In order to prevent information leakage, you can restrict the printings done on this machine only to the secure printing.
14.1.1 Printer Driver Settings (PCL driver/PS Plug-in driver/PPD driver (Mac OS X))
PCL Driver :
Perform printing with the following settings specified.
0 Selecting the [Secure Print] from the [Output Method] on the [Basic] tab
1 Open the [Basic] tab.
2 From the [Output Method], select the [Secure Print].
% It uses the screens from Windows 7 in the description.% When the [Fix Secure Print] is enabled on the [Secure Print Settings], output method is fixed to [Se-
cure Print]. For details on the [Secure Print Settings], refer to page 10-4.
bizhub PRO 951 14-2
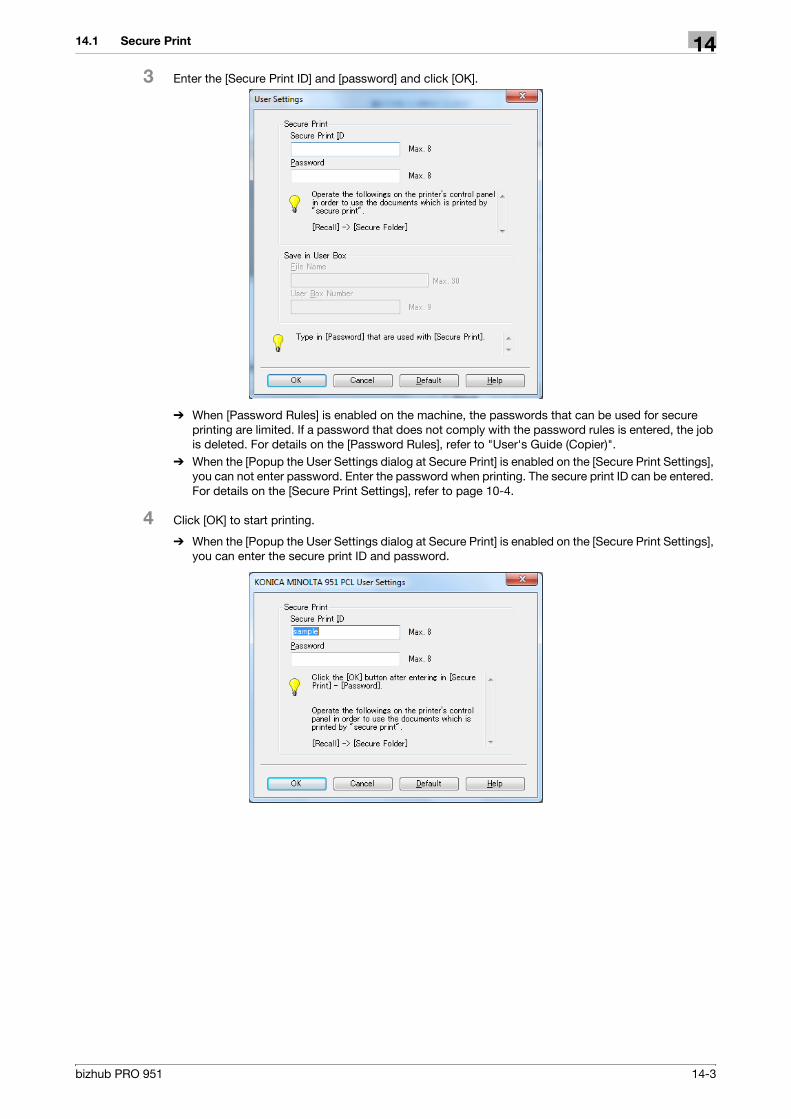
14.1 Secure Print 14
3 Enter the [Secure Print ID] and [password] and click [OK].
% When [Password Rules] is enabled on the machine, the passwords that can be used for secure printing are limited. If a password that does not comply with the password rules is entered, the job is deleted. For details on the [Password Rules], refer to "User's Guide (Copier)".
% When the [Popup the User Settings dialog at Secure Print] is enabled on the [Secure Print Settings], you can not enter password. Enter the password when printing. The secure print ID can be entered. For details on the [Secure Print Settings], refer to page 10-4.
4 Click [OK] to start printing.
% When the [Popup the User Settings dialog at Secure Print] is enabled on the [Secure Print Settings], you can enter the secure print ID and password.
bizhub PRO 951 14-3

14.1 Secure Print 14
PS Plug-in Driver
Perform printing with the following settings specified.
0 Selecting the [Secure Print] from the [Print Mode] on the [Workflow] tab.
1 Display the [WorkFlow] tab.
2 Select the [Secure Print] from the [Print Mode].
% It uses the screens from Windows 7 in the description.
3 Enter the [Secure Print ID] and [password] and then reenter the password for confirmation in [Reenter].
% The default value of the [Secure Print ID] is "NoName".% Enter the password with 1 to 8 alphanumeric characters.% When [Password Rules] is enabled on the machine, the passwords that can be used for secure
printing are limited. If a password that does not comply with the password rules is entered, the job is deleted. For details on the [Password Rules], refer to [User's Guide (Copier)].
4 Click [OK] to start printing.
PPD Driver (Mac OS X)
Perform printing with the following settings specified.
0 Selecting the [Secure Print] from the [Print Mode] on the [Security] window
1 Select the [Security].
2 Select the [Secure Print] from the [Print Mode].
3 Enter the [Secure Print ID] and [Password].
% Enter the password with 1 to 8 alphanumeric characters.
bizhub PRO 951 14-4

14.1 Secure Print 14
% When [Password Rules] is enabled on the machine, the passwords that can be used for secure printing are limited. If a password that does not comply with the password rules is entered, the job is deleted. For details on the [Password Rules], refer to "User's Guide (Copier)".
14.1.2 Calling a job from the control panel
The job to be output using the [Security Print] function is stored to the [Secure Folder] on the [RECALL] tab.
d Reference
For details on the functions of the keys on the control panel, refer to "User's Guide (Copier)".
Print from the Secure Folder
1 Press [RECALL] and then press [Secure Folder] on the touch panel of the machine.
2 Select a User box (ID), enter the [password] and then press[OK].
3 Select the file to print and press [Print].
4 Specify the number of copies to print, enter the page to print if necessary and then click [OK].
d Reference
You can check the output settings before printing and combine the files to be printed.
For details, refer to "User's Guide (Network Scanner)".
bizhub PRO 951 14-5

14.2 Save in User Box 14
14.2 Save in User Box
The Save in User Box function stores print job in the hard disk in the machine.
The Save in User Box function can be specified using the printer driver when printing.
d Reference
For details on the Save in User Box function, refer to "User's Guide (Network Scanner)".
14.2.1 Printer Driver Settings (PCL driver/PS Plug-in driver/PPD driver (Mac OS X))
Perform printing with the following settings specified.- Print Mode : [Save in User Box] or [Save in User Box/Print]
PCL Driver
1 Open the [Basic] tab.
2 From the [Output Method], select the [Save in User Box] and [Save in User Box/Print].
% It uses the screens from Windows 7 in the description.% To save in hard disk and print at the same time, select the [Save in User Box/Print].
3 Enter the [File Name] and [User Box Number] and click [OK].
bizhub PRO 951 14-6

14.2 Save in User Box 14
4 Click [OK] to start printing.
PS Plug-in Driver
1 Display the [WorkFlow] tab.
2 From the [Output Method], select the [Save in User Box] or [Save in User Box and Print].
% To save in hard disk and print at the same time, select the [Save in User Box and Print].
3 Enter the [User Box Number] and [File Name] and click OK.
4 Click [OK].
PPD Driver (Mac OS X)
1 Select the [Security].
2 Select the [Save in User Box] or [Save in User Box and Print]] from the [Print Mode].
% To save in hard disk and print at the same time, select the [Save in User Box and Print].
3 Enter the [File Name] and [User Box Number].
4 Click [Print].
bizhub PRO 951 14-7
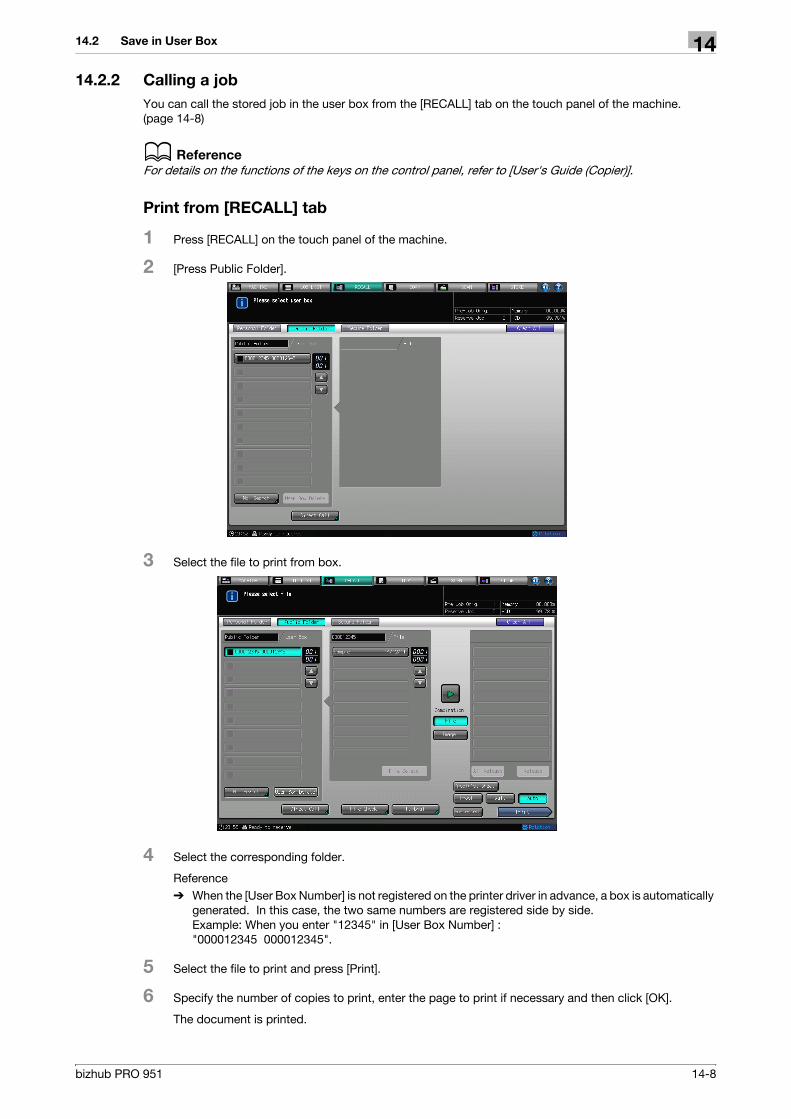
14.2 Save in User Box 14
14.2.2 Calling a job
You can call the stored job in the user box from the [RECALL] tab on the touch panel of the machine. (page 14-8)
d Reference
For details on the functions of the keys on the control panel, refer to [User's Guide (Copier)].
Print from [RECALL] tab
1 Press [RECALL] on the touch panel of the machine.
2 [Press Public Folder].
3 Select the file to print from box.
4 Select the corresponding folder.
Reference% When the [User Box Number] is not registered on the printer driver in advance, a box is automatically
generated. In this case, the two same numbers are registered side by side. Example: When you enter "12345" in [User Box Number] : "000012345 000012345".
5 Select the file to print and press [Print].
6 Specify the number of copies to print, enter the page to print if necessary and then click [OK].
The document is printed.
bizhub PRO 951 14-8

14.2 Save in User Box 14
d Reference
You can check the output settings before printing and combine the files to be printed.
For details, refer to "User's Guide (Network Scanner)".
bizhub PRO 951 14-9

14.3 Proof Print/Wait Mode/Hold Print 14
14.3 Proof Print/Wait Mode/Hold Print
You can check the current setting before printing or confirm the result of printing with test print.
Use this before printing a large volume document.
14.3.1 Printer Driver Settings (PCL driver/PS Plug-in driver/PPD driver (Mac OS X))
Perform printing with the following settings specified.- Print Mode : [Proof Print], [Proof and Print (1st sheet)], [Wait Mode], or [Hold Print]
d Reference
When you print selecting [Hold Print], the job is displayed in [Suspend] on the [JOB LIST]. For details, refer to the "User's Guide - Copier".
PCL Driver
1 Open the [Basic] tab.
2 From the [Wait Mode], select the [Proof Print], [Proof and Print (1st sheet)], [Wait Mode], or [Hold Print].
% To print one copy and confirm the current settings, select the [Proof Print].% To print the first sheet and confirm the current settings, select the [Proof and Print (1st sheet)].% To confirm the current settings on the touch panel of the machine before printing, select the [Wait
Mode].% To send once to printer as holding job, select the [Hold Print].
3 Click [OK] to start printing.
bizhub PRO 951 14-10

14.3 Proof Print/Wait Mode/Hold Print 14
PS Plug-in Driver
1 Display the [WorkFlow] tab.
2 From the [Print Mode], select the [Proof Print], [Proof Print (1st sheet)], [Wait Mode], or [Hold Print].
% To print one copy and confirm the current settings, select the [Proof Print].% To print the first sheet and confirm the current settings, select the [Proof Print (1st sheet)].% To confirm the current settings on the touch panel of the machine before printing, select the [Wait
Mode].% To send once to printer as holding job, select the [Hold Print].
3 Click [OK] to start printing.
bizhub PRO 951 14-11

14.3 Proof Print/Wait Mode/Hold Print 14
PPD driver (Windows)
1 Display the [Advanced Options] window.
2 From the [Wait Mode], select the [Proof Print], [Proof Print (1st Sheet)], [Wait Mode], or [Hold Print].
% To print one copy and confirm the current settings, select the [Proof Print].% To print the first sheet and confirm the current settings, select the [Proof Print (1st sheet)].% To confirm the current settings on the touch panel of the machine before printing, select the [Wait
Mode].% To send once to printer as holding job, select the [Hold Print].
3 Click [OK].
4 Click [OK] to start printing.
PPD Driver (Mac OS X)
1 Select the [Security].
2 From the [Print Mode], select the [Wait Mode], [Proof Print], [Proof Print (1st sheet)], or [Hold Print].
% To confirm the current settings on the touch panel of the machine before printing, select the [Wait Mode].
% To print one copy and confirm the current settings, select the [Proof Print].% To print the first sheet and confirm the current settings, select the [Proof Print (1st sheet)].% To send once to printer as holding job, select the [Hold Print].
3 Click [Print].
bizhub PRO 951 14-12

14.3 Proof Print/Wait Mode/Hold Print 14
14.3.2 Calling a job
Calling a job sent by Proof Print/Proof and Print (1st sheet)/Wait Mode
When the [Proof Print], [Proof and Print (1st sheet)], or [Hold Print] is specified, the machine is stopped tem-porarily and the Mode Check screen is displayed.- When the [Proof Print] is specified, one copy is printed and the machine is stopped temporarily.- When the [Proof and Print (1st sheet)] is specified, the first page is printed and the machine is stopped
temporarily.- When the [Wait Mode] is specified, the first page is printed and the machine is stopped temporarily.
Print from [RECALL] tab
1 Confirm the current settings on the touch panel of the machine.
2 To change the settings, select the setting item, change it on the displayed screen and then press [OK].
3 To confirm again, press [Proof Copy]. To hold, press [Suspended].
% Reference: For details on the [Suspended], refer to the "User's Guide - Copier".
4 Press [Start].
Starts to print the rest of the print job.
bizhub PRO 951 14-13

14.3 Proof Print/Wait Mode/Hold Print 14
Calling a job sent by Hold Print
When the [Hold Print] is specified, the job is displayed in the [Suspend] list on the [JOB LIST] on the touch panel of the machine.
d Reference
For details on the functions of the keys on the control panel, refer to [User's Guide (Copier)].
Select a job from the [JOB LIST] tab
1 Press the [JOB LIST] in the control panel.
2 Select the file to print from the [Suspend] list.
% When you press the [Release], you can move the job to the [Active] list and print.% When you press the [All Release], you can move all job that are suspended to the [Active] list and
print.% When you press the [Ticket Edit], you can check and change the output settings on authentication
dialog box.
3 Press the [Release] or [All Release] to print the holding job.
bizhub PRO 951 14-14

14.4 Printing a document on the machine for which user authentication is specified 14
14.4 Printing a document on the machine for which user authentica-
tion is specified
When [User Authentication] is specified on the machine, a user name and password must be entered when printing.
The following 3 printer drivers support this feature.- PS Plug-in driver for Windows- PS Plug-in driver for Mac OS X- PCL driver for Windows
Reference- If you enter an incorrect user name or password for the [User Authentication] settings of this machine
or have not enabled [User Authentication], you will not be authenticated by this machine and the job will be discarded when printing. When the [Enhanced Security Mode] is configured on the main body, enter only the user name because you need to enter the user name and password on the main body. It is not necessary to enter the pass-word.
- Even a registered user cannot print a document if the user is not allowed to print. For [user authentica-tion], contact the administrator of the machine.
Setting a user authentication (PCL driver)
1 Open the [Basic] tab and click the [Authentication/Account Track].
2 Select the [Recipient User] in the [User Authentication].
3 Enter [User Name] and [Password] that are registered.
bizhub PRO 951 14-15
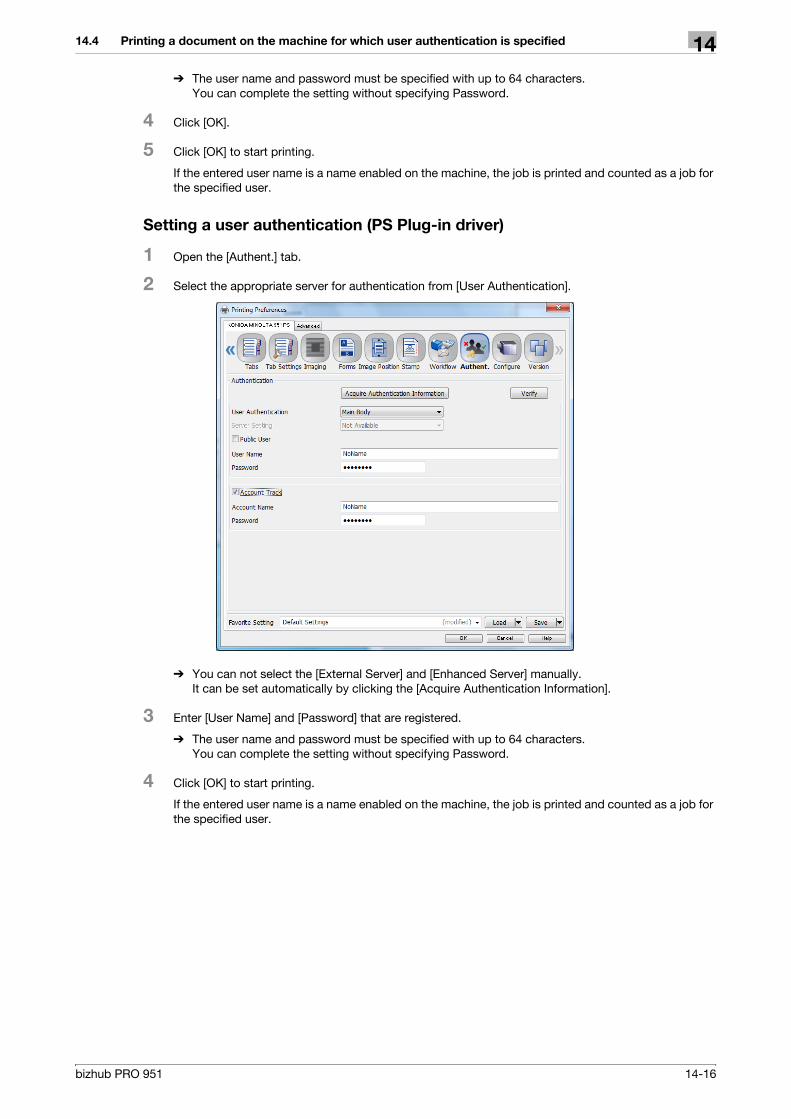
14.4 Printing a document on the machine for which user authentication is specified 14
% The user name and password must be specified with up to 64 characters. You can complete the setting without specifying Password.
4 Click [OK].
5 Click [OK] to start printing.
If the entered user name is a name enabled on the machine, the job is printed and counted as a job for the specified user.
Setting a user authentication (PS Plug-in driver)
1 Open the [Authent.] tab.
2 Select the appropriate server for authentication from [User Authentication].
% You can not select the [External Server] and [Enhanced Server] manually. It can be set automatically by clicking the [Acquire Authentication Information].
3 Enter [User Name] and [Password] that are registered.
% The user name and password must be specified with up to 64 characters. You can complete the setting without specifying Password.
4 Click [OK] to start printing.
If the entered user name is a name enabled on the machine, the job is printed and counted as a job for the specified user.
bizhub PRO 951 14-16

14.5 Printing a document on the machine for which Account Track function is enabled 14
14.5 Printing a document on the machine for which Account Track
function is enabled
When the [Account Track] settings are configured on the machine, you must enter the account name and password when printing.
The following 3 printer drivers support this feature.- PS Plug-in driver for Windows- PS Plug-in driver for Mac OS X- PCL driver for Windows
Reference- If you enter an incorrect password for the [Account Track] settings on the machine or have not enabled
[Account Track], you will not be authenticated by the printer and the job will be discarded when printing.- Even a registered account cannot print a document if the account is not allowed to print.- For account track, contact the administrator of the machine.
Setting an account track (PCL Driver)
1 Open the [Basic] tab and click the [Authentication/Account Track].
2 Enter an [Account Name] and [Password] that are registered with the machine.
% The account name and password must be specified with up to 8 characters. You can complete the setting without specifying Password.
NoteTo set the account track, enable the device option manually on the [Configure] tab in advance. For de-tails, refer to page 10-3.
bizhub PRO 951 14-17

14.5 Printing a document on the machine for which Account Track function is enabled 14
3 Click [OK].
4 Click [OK] to start printing.
If the entered account name is a name enabled on the machine, the job is printed and counted as a job for the specified user.
Setting an account track (PS Plug-in Driver)
1 Open the [Authent.] tab.
2 Enable the [Account Track] check box.
3 Enter an [Account Name] and [Password].
% The account name and password must be specified with up to 8 characters. You can complete the setting without specifying Password.
4 Click [OK] to start printing.
If the entered account name is a name enabled on the machine, the job is printed and counted as a job for the specified user.
bizhub PRO 951 14-18

15 Settings on the Control Panel
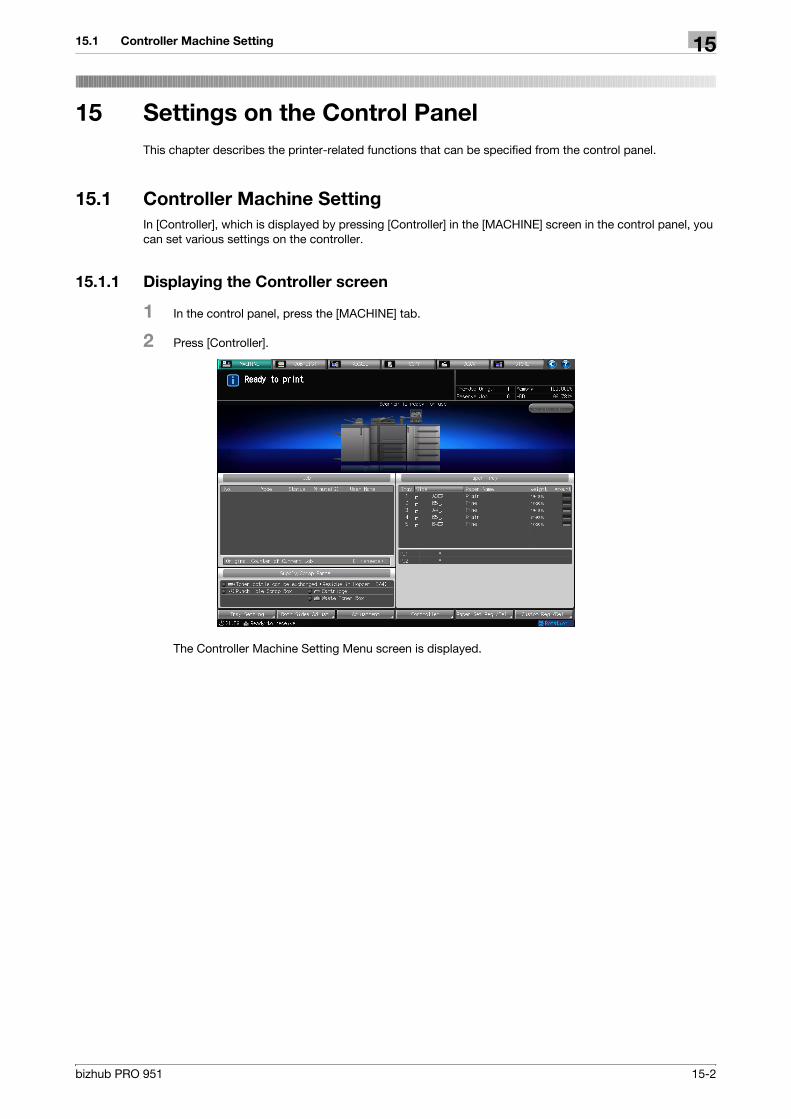
15.1 Controller Machine Setting 15
15 Settings on the Control Panel
This chapter describes the printer-related functions that can be specified from the control panel.
15.1 Controller Machine Setting
In [Controller], which is displayed by pressing [Controller] in the [MACHINE] screen in the control panel, you can set various settings on the controller.
15.1.1 Displaying the Controller screen
1 In the control panel, press the [MACHINE] tab.
2 Press [Controller].
The Controller Machine Setting Menu screen is displayed.
bizhub PRO 951 15-2

15.1 Controller Machine Setting 15
15.1.2 Controller Machine Setting Menu screen
In the Controller Machine Setting Menu screen, you can set the following functions.
Item Description Reference page
Report Type Outputs [Configuration Page Print], [PS Demo Page Print], [PCL Font List], and [PS Font List].
page 15-4
Direct Print Setting You can configure several output settings including the [Basic Set-ting] for direct printing.
page 15-5
Select Printer Setting Assigns the default output setting for the default port and default setting number for each port.
page 15-9
Spool Print Jobs in HDD be-fore RIP
Select a job spool setting from [Auto], [Enable], or [Disable]. page 15-9
I/F Timeout You can set the time until a communication timeout occurs. page 15-10
Plug-in Form Password Input a password for the form function for a PS Plug-in driver. page 15-10
Scan Setting You can set settings on network scanning. For details, refer to "Us-er's Guide (Network Scanner)".
page 15-11
Administrator Settings You can set the memory switch and machine default setting as an administrator.
page 15-12
bizhub PRO 951 15-3
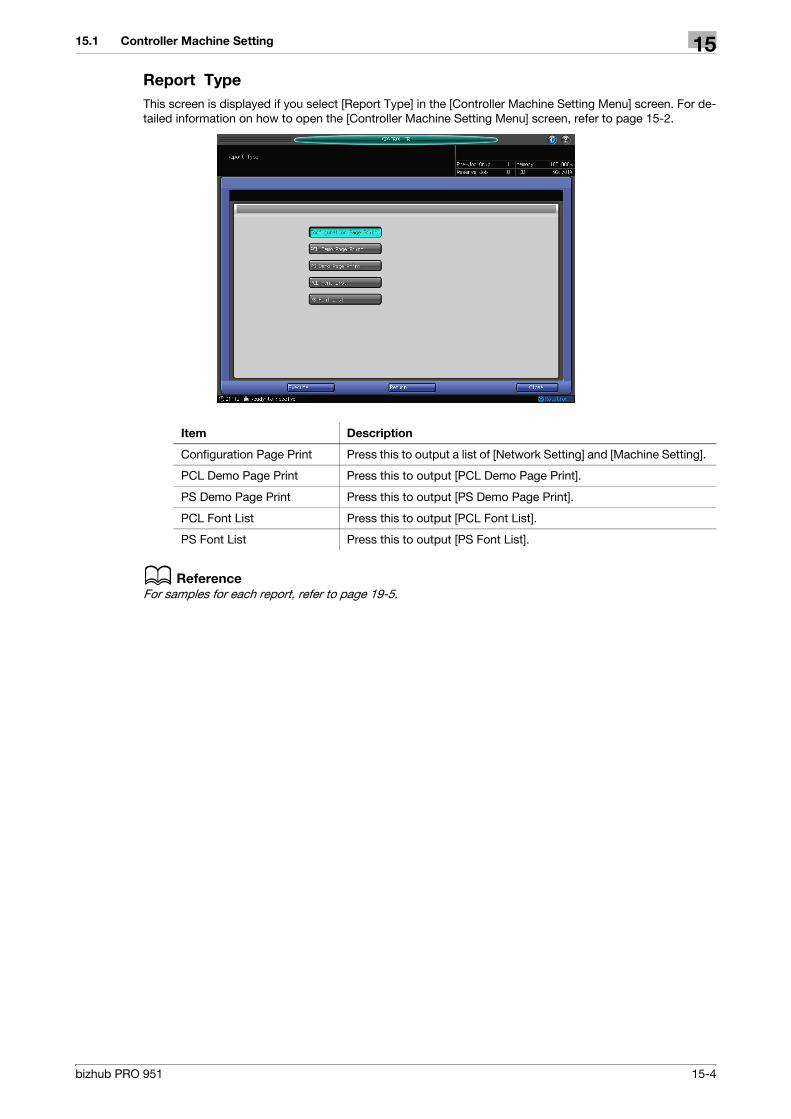
15.1 Controller Machine Setting 15
Report Type
This screen is displayed if you select [Report Type] in the [Controller Machine Setting Menu] screen. For de-tailed information on how to open the [Controller Machine Setting Menu] screen, refer to page 15-2.
d Reference
For samples for each report, refer to page 19-5.
Item Description
Configuration Page Print Press this to output a list of [Network Setting] and [Machine Setting].
PCL Demo Page Print Press this to output [PCL Demo Page Print].
PS Demo Page Print Press this to output [PS Demo Page Print].
PCL Font List Press this to output [PCL Font List].
PS Font List Press this to output [PS Font List].
bizhub PRO 951 15-4

15.1 Controller Machine Setting 15
Direct Print Setting
This screen is displayed if you select [Direct Print Setting] in the [Controller Machine Setting Menu] screen. For detailed information on how to open the [Controller Machine Setting Menu] screen, refer to page 15-2.
Direct Print Setting - Basic Settings
This screen is displayed if you select [Direct Print Setting] - [Basic Setting] in the [Controller Machine Setting Menu] screen. For detailed information on how to open the [Controller Machine Setting Menu] screen, refer to page 15-2.
Item Description
[Setting Number (1-6)] Select the setting number (1 - 6).
[Basic Setting] Press this to set the basic settings such as [PDL], [Paper Tray Set-ting], [Output Tray Setting].
[PCL Setting] Specify basic settings such as [Font Setting] and [Symbol Set].
[PS Setting] Specify whether to print PS Error Print.
[TIFF Setting] You can set [Auto Paper Select] and [Image Position].
Item Description
[PDL] Configure settings for the Page Description Language.
[Paper Tray Setting] Specify the default paper tray setting.
[Output Tray Settings] Specify the default output tray setting.
bizhub PRO 951 15-5
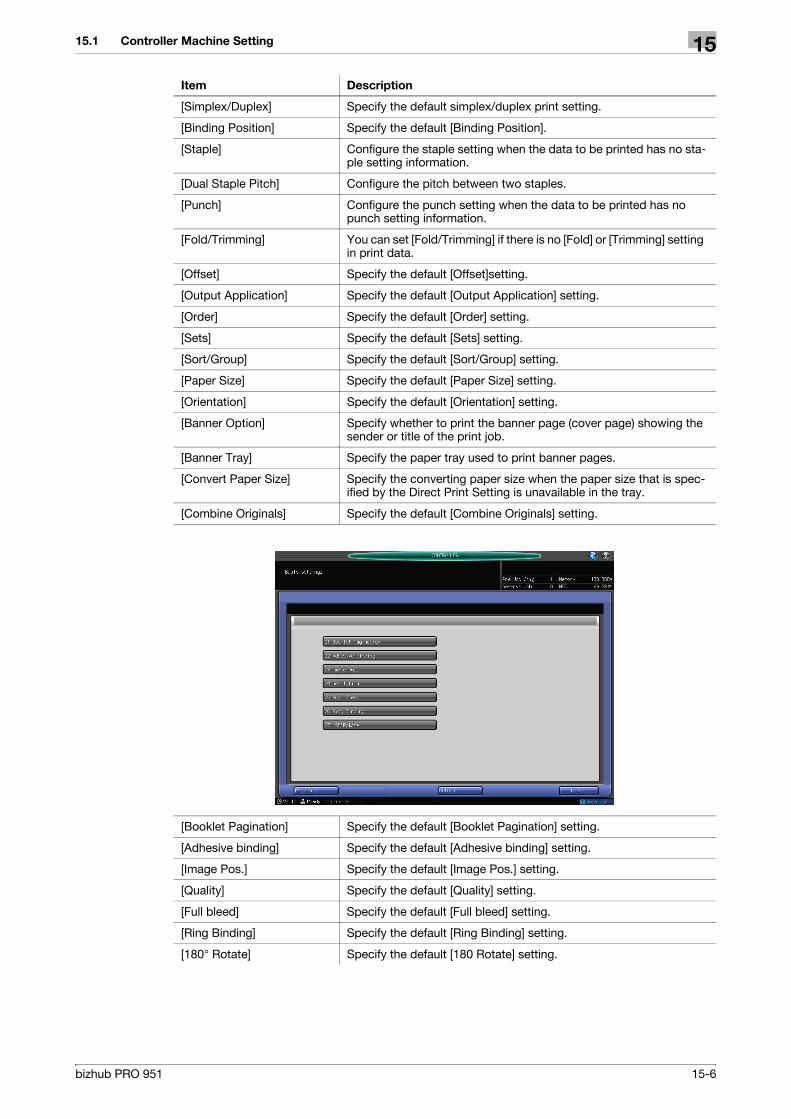
15.1 Controller Machine Setting 15
[Simplex/Duplex] Specify the default simplex/duplex print setting.
[Binding Position] Specify the default [Binding Position].
[Staple] Configure the staple setting when the data to be printed has no sta-ple setting information.
[Dual Staple Pitch] Configure the pitch between two staples.
[Punch] Configure the punch setting when the data to be printed has no punch setting information.
[Fold/Trimming] You can set [Fold/Trimming] if there is no [Fold] or [Trimming] setting in print data.
[Offset] Specify the default [Offset]setting.
[Output Application] Specify the default [Output Application] setting.
[Order] Specify the default [Order] setting.
[Sets] Specify the default [Sets] setting.
[Sort/Group] Specify the default [Sort/Group] setting.
[Paper Size] Specify the default [Paper Size] setting.
[Orientation] Specify the default [Orientation] setting.
[Banner Option] Specify whether to print the banner page (cover page) showing the sender or title of the print job.
[Banner Tray] Specify the paper tray used to print banner pages.
[Convert Paper Size] Specify the converting paper size when the paper size that is spec-ified by the Direct Print Setting is unavailable in the tray.
[Combine Originals] Specify the default [Combine Originals] setting.
[Booklet Pagination] Specify the default [Booklet Pagination] setting.
[Adhesive binding] Specify the default [Adhesive binding] setting.
[Image Pos.] Specify the default [Image Pos.] setting.
[Quality] Specify the default [Quality] setting.
[Full bleed] Specify the default [Full bleed] setting.
[Ring Binding] Specify the default [Ring Binding] setting.
[180° Rotate] Specify the default [180 Rotate] setting.
Item Description
bizhub PRO 951 15-6

15.1 Controller Machine Setting 15
Direct Print Setting - PCL Setting
This screen is displayed if you select [Direct Print Setting] - [ PCL Setting] in the [Controller Machine Setting Menu] screen. For detailed information on how to open the [Controller Machine Setting Menu] screen, refer to page 15-2.
Item Description
[Font Settings] Specify the default font settings. (Default : Courier)
[Symbol Set] Specify the default symbol set settings. (Default : ROMAN8)
[Line/Page] Specify the number of lines per page when printing text. (Default : 64 lines)
[Points] Specify proportional font size in points. (Default : 12.00)
[Pitch] Specify width of fixed-width font in pitch. (Default : 10.00)
[CR/LF Mapping] Specify how to replace CR (Carriage Return), LF (Line Feed) and FF (Form Feed) when printing text data. (Default : Off)
bizhub PRO 951 15-7

15.1 Controller Machine Setting 15
Direct Print Setting - PS Setting
This screen is displayed if you select [Direct Print Setting] - [ PS Setting] in the [Controller Machine Setting Menu] screen. For detailed information on how to open the [Controller Machine Setting Menu] screen, refer to page 15-2.
Direct Print Setting - TIFF Setting
This screen is displayed if you select [Direct Print Setting] - [ TIFF Setting] in the [Controller Machine Setting Menu] screen. For detailed information on how to open the [Controller Machine Setting Menu] screen, refer to page 15-2.
Item Description
[PS Error Print] Set whether to print error information when an error occurs during PS rasterization.
Item Description
[Auto Paper Select] It sets whether to print automatically on appropriate paper size in ac-cordance with size of the TIFF image.
[Image Pos.] It sets the print position for the TIFF image.• Select [Left] or [Center].
bizhub PRO 951 15-8
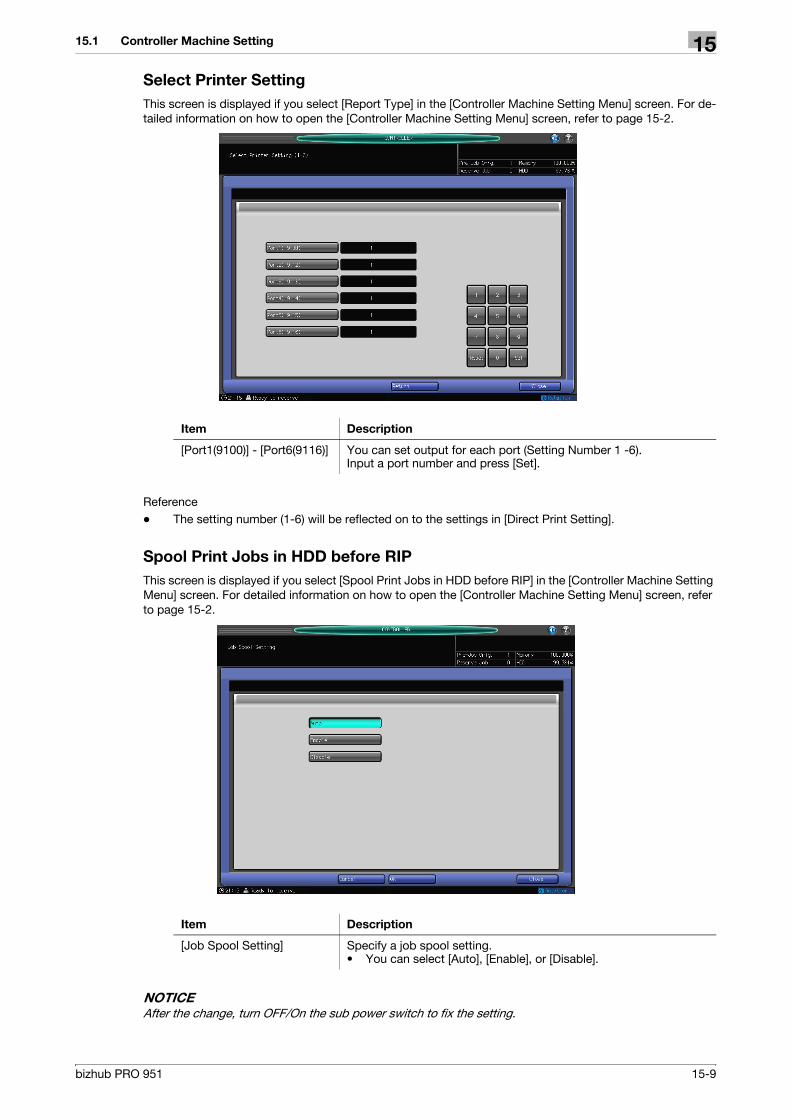
15.1 Controller Machine Setting 15
Select Printer Setting
This screen is displayed if you select [Report Type] in the [Controller Machine Setting Menu] screen. For de-tailed information on how to open the [Controller Machine Setting Menu] screen, refer to page 15-2.
Reference- The setting number (1-6) will be reflected on to the settings in [Direct Print Setting].
Spool Print Jobs in HDD before RIP
This screen is displayed if you select [Spool Print Jobs in HDD before RIP] in the [Controller Machine Setting Menu] screen. For detailed information on how to open the [Controller Machine Setting Menu] screen, refer to page 15-2.
NOTICEAfter the change, turn OFF/On the sub power switch to fix the setting.
Item Description
[Port1(9100)] - [Port6(9116)] You can set output for each port (Setting Number 1 -6).Input a port number and press [Set].
Item Description
[Job Spool Setting] Specify a job spool setting.• You can select [Auto], [Enable], or [Disable].
bizhub PRO 951 15-9
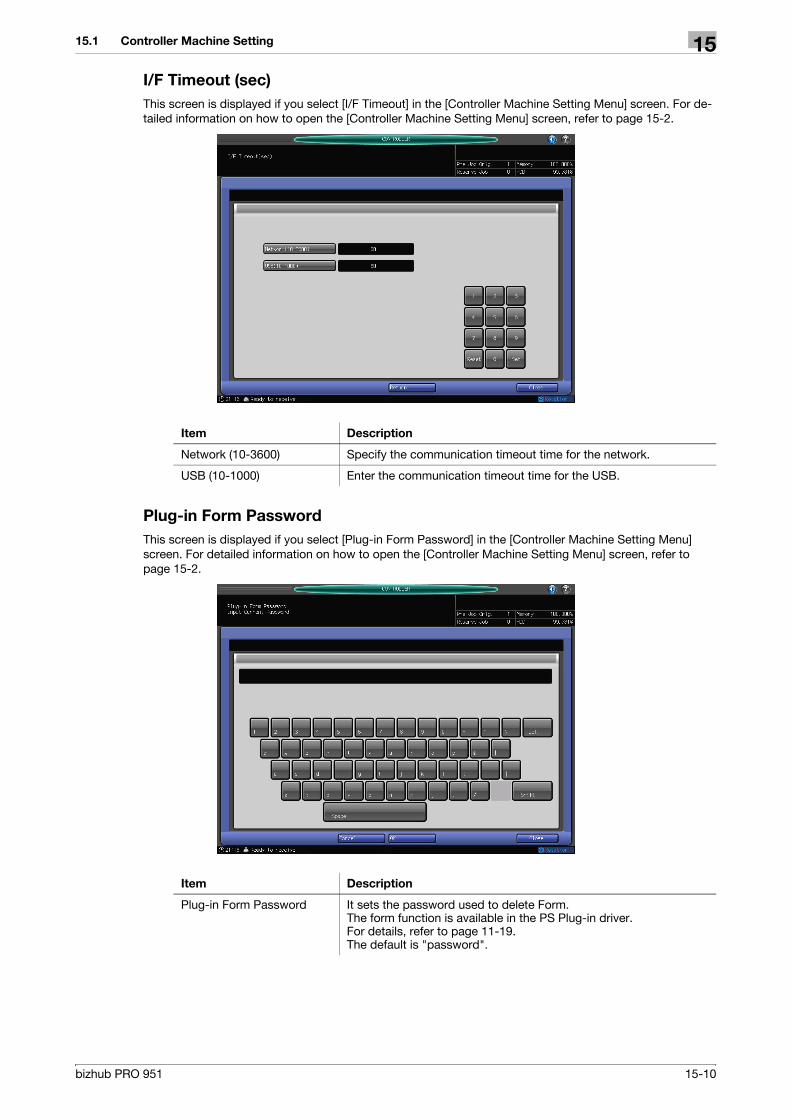
15.1 Controller Machine Setting 15
I/F Timeout (sec)
This screen is displayed if you select [I/F Timeout] in the [Controller Machine Setting Menu] screen. For de-tailed information on how to open the [Controller Machine Setting Menu] screen, refer to page 15-2.
Plug-in Form Password
This screen is displayed if you select [Plug-in Form Password] in the [Controller Machine Setting Menu] screen. For detailed information on how to open the [Controller Machine Setting Menu] screen, refer to page 15-2.
Item Description
Network (10-3600) Specify the communication timeout time for the network.
USB (10-1000) Enter the communication timeout time for the USB.
Item Description
Plug-in Form Password It sets the password used to delete Form.The form function is available in the PS Plug-in driver.For details, refer to page 11-19.The default is "password".
bizhub PRO 951 15-10

15.1 Controller Machine Setting 15
Scan Setting
This screen is displayed if you select [Scan Setting] in the [Controller Machine Setting Menu] screen. For de-tailed information on how to open the [Controller Machine Setting Menu] screen, refer to page 15-2.
Item Description
[Auto Delete Document] Specify the setting on Auto Delete Document. For details, refer to "User's Guide (Network Scanner)".
[File Name] Specify the setting on File Name. For details, refer to "User's Guide (Network Scanner)".
bizhub PRO 951 15-11

15.1 Controller Machine Setting 15
Administrator Settings
This screen is displayed if you select [Administrator Settings] in the [Controller Machine Setting Menu] screen. For detailed information on how to open the [Controller Machine Setting Menu] screen, refer to page 15-2.
Reference- [For details on Memory Switch, refer to User's Guide - POD Administrator's Reference]"".
Item Description
[Memory Switch] Specify the Memory Switch.
[Machine Default Setting] Initialize the each setting.
bizhub PRO 951 15-12

15.2 Basic operations of User Settings 15
15.2 Basic operations of User Settings
15.2.1 Displaying the Utility Menu screen
1 Press [Utility/Counter].
The Utility Menu screen is displayed.
% Press [Exit] to complete the setting.% To return through the hierarchy of the Utility menu, press [Close] until the desired screen appears.
bizhub PRO 951 15-13

15.2 Basic operations of User Settings 15
15.2.2 Function Setting
You can configure several functions for printing using the [Utility Menu] screen - [Function Setting].
1 Press the [Function Setting] on the Utility Menu screen.
% For details on displaying the Function Setting screen, refer to page 15-13.
2 Press the item to specify.
You can configure the following items on the Function Setting screen.- [Paper Tray Setting] : Specify the paper tray settings.- [Individual Function Change] : Specify the [Page Margin Decimal Point], [Page Margin Input Data Hold],
[Printer Prohibit Timer], [, Needless Tab Paper Exit], [Auto Image Shift (Tab Print)] and other settings re-spectively.
- [Lead Edge Image Erase] : Specify the width to erase of lead edge image for standard paper size and wide/custom paper size individually.
- [Density Setting] : Specify the density to print.- [Set Zoom Ratio Setting] : Register the zoom ratio.
bizhub PRO 951 15-14

15.3 Basic operations in Administrator Settings 15
15.3 Basic operations in Administrator Settings
15.3.1 Displaying the Administrator Settings screen
1 Press the [Utility/Counter] key.
2 Press [Administrator Setting].
3 Enter the password, and then press [OK].
% For details on setting or changing the password, refer to the [User's Guide (Copier)].The Administrator Setting screen appears.% Press [Exit] to complete the setting.% To return through the hierarchy of the Utility menu, press [Close] until the desired screen appears.
bizhub PRO 951 15-15
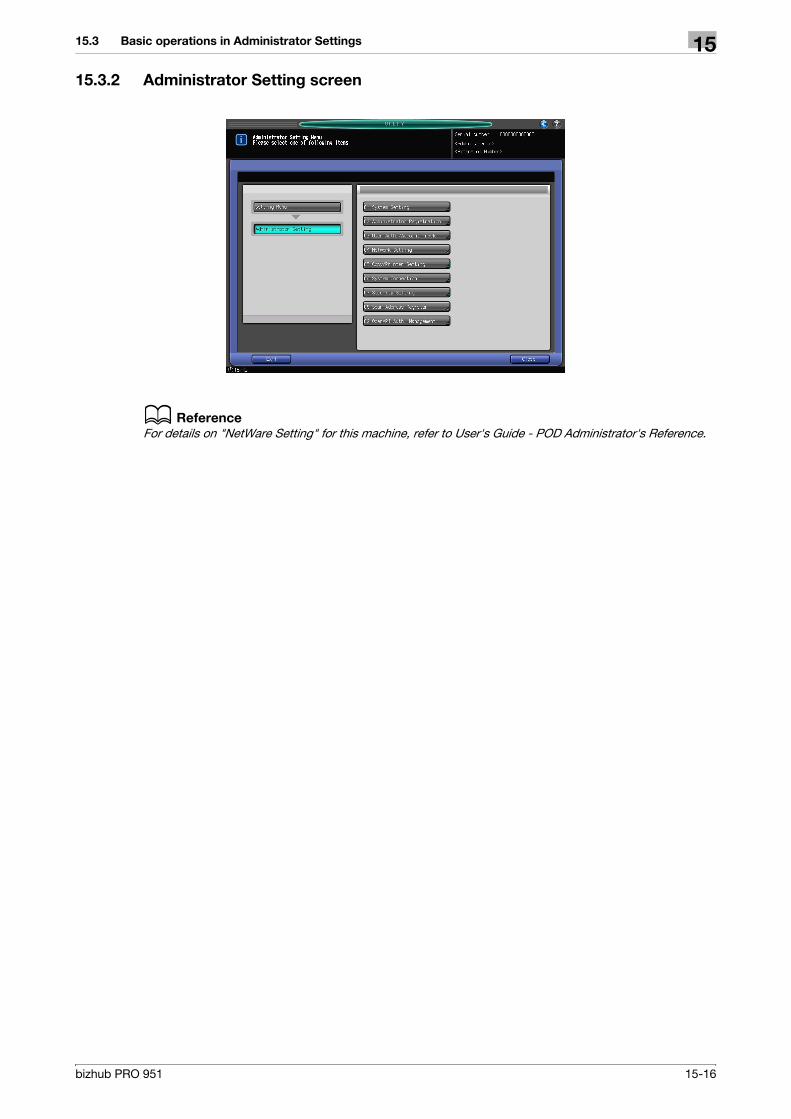
15.3 Basic operations in Administrator Settings 15
15.3.2 Administrator Setting screen
d Reference
For details on "NetWare Setting" for this machine, refer to User's Guide - POD Administrator's Reference.
bizhub PRO 951 15-16

15.4 Controller NIC Setting Menu 15
15.4 Controller NIC Setting Menu
You can set the network settings on the controller in the [Controller NIC Setting Menu] screen, which is dis-played by pressing [Utility/Counter] - [Administrator Setting] - [Network Setting] - [Controller NIC Setting].
15.4.1 Displaying the Controller NIC Setting screen
1 Press [Utility/Counter] in the control panel.
2 Press [Administrator Setting].
3 Press [Network Setting].
bizhub PRO 951 15-17

15.4 Controller NIC Setting Menu 15
4 Press [Controller NIC Setting].
Item Description
TCP/IP Setting Specify settings on TCP/IP.For details, refer to "User's Guide - POD Administrator's Reference".
NetWare Setting Specify settings on Netware.For details, refer to "User's Guide - POD Administrator's Reference".
HTTP Server Setting Specify settings on an HTTP server. For details, refer to "User's Guide - POD Administrator's Reference".
FTP Setting Specify settings on FTP. For details, refer to "User's Guide - POD Administrator's Reference".
SNMP Setting Specify settings on SNMP. For details, refer to "User's Guide - POD Administrator's Reference".
SMB Setting Specify settings on SMB. For details, refer to "User's Guide - POD Administrator's Reference".
AppleTalk Setting Specify settings on AppleTalk. For details, refer to "User's Guide - POD Administrator's Reference".
Bonjour Setting Specify settings on Bonjour. For details, refer to "User's Guide - POD Administrator's Reference".
E-mail Setting Specify settings on an E-mail. For details, refer to "User's Guide - POD Administrator's Reference".
TCP Socket Setting Specify settings on TCP Socket. For details, refer to "User's Guide - POD Administrator's Reference".
CSRC Setting Specify settings on CSRC. For details, refer to "User's Guide - POD Administrator's Reference".
OpenAPI Setting Specify settings on OpenAPI. For details, refer to "User's Guide - POD Administrator's Reference".
Web Service Setting Specify settings on Web service. For details, refer to "User's Guide - POD Administrator's Reference".
JSP Setting Specify settings on JSP. For details, refer to "User's Guide - POD Administrator's Reference".
LDAP Setting Specify settings on LDAP. For details, refer to "User's Guide - POD Administrator's Reference".
IEEE802.1x Setting Specify settings on an IEEE802.1X authentication. For details, refer to "User's Guide - POD Administrator's Reference".
Detail Setting Specify detail settings on an MAC address, network speed, and net-work protocol for the controller. For details, refer to "User's Guide - POD Administrator's Reference".
bizhub PRO 951 15-18

16 PageScope Web Connection
16.1 Using PageScope Web Connection 16
16 PageScope Web Connection
16.1 Using PageScope Web Connection
PageScope Web Connection is a device control utility provided by the HTTP server built in the image con-troller. Using a Web browser on a computer connected to the network, you can change machine settings and check the status of the machine.
16.1.1 Operating environment
16.1.2 Accessing PageScope Web Connection
0 Start the Web browser to access PageScope Web Connection.0 If User Authentication is enabled, enter the user name and password. For details, refer to page 16-9.0 For details on specifying the IP address for the machine, refer to "User's Guide - POD Administrator's
Reference".0 PageScope Web Connection has two view modes: Flash and HTML. For details, refer to page 16-8.
1 Start the Web browser.
2 Enter the IP address of the machine in the URL field, and then press [Enter].
http://<IP address of the machine>/
Example : When the IP address of this machine is 192.168.1.20 :- http://192.168.1.20/
When IPv6 is set to [ON] while a browser other than Internet Explorer 6 is used:- Enter the IPv6 address enclosed in brackets [ ] to access PageScope Web Connection.– http://<IP address of the machine>/
Example : When the IPv6 address of this machine is fe80::220:6bff:fe10:2f16:- http://[fe80::220:6bff:fe10:2f16]/- If IPv6 is set to [ON], add "fe 220::6:10bff:fe:2:6f IPv:1_MFP" to the hosts file in advance, and specify
the address with the domain name.
The main menu or login page appears.
Network Ethernet (TCP/IP)
Applications on compu-ter
<Windows XP/Server 2003/Vista/Server 2008/Server 2008 R2/7>• Microsoft Internet Explorer 8 or later (Recommended) (JavaScript and
Cookies enabled)• Mozilla Firefox 3.6 or later (Recommended) (JavaScript and Cookies en-
abled)<Macintosh Mac OS X>• Mozilla Firefox 3.6 or later (Recommended) (JavaScript and Cookies en-
abled)<Linux>• Mozilla Firefox 3.6 or later (Recommended) (JavaScript and Cookies en-
abled)Adobe® Flash® Player:• When you select the Flash as the display method, Flash Player is neces-
sary to be installed.• To install the Flash Player, be sure the system requirement in advance.
bizhub PRO 951 16-2

16.1 Using PageScope Web Connection 16
16.1.3 Web browser cache
The Web browser has the cache function; therefore, the latest information may not be shown in the page dis-played using PageScope Web Connection. Using the cache function may result in an operation failure. When using PageScope Web Connection, disable the cache function on the Web browser.
Reference- Some Web browser versions may provide different menus and item names. For details, refer to the Help
for the Web browser.- With the cache function enabled, timeout occurs in the administrator mode, and after that, how many
time you try to access, just timeout recurs. It results in the control panel of this machine being locked, and you cannot handle the control panel. In this case, turn the main power off, and then turn it on again. To avoid this problem, disable the cache function.
For Internet Explorer
0 Open the Internet Option and select [General] - [History] - [Settings] - [Check for newer versions of stored pages:] - [Every visit to the page].
1 Select [Internet Options] in the [Tools] menu.
2 In the [General] tab, select [Temporary Internet files] - [Settings].
3 Select [Every visit to the page], and click [OK].
For Mozilla Firefox
0 From the Tool menu, select [Option] - [Advanced] - [Network] - [Offline data], check [Limit the Cache Size] and then specify "0MB".
1 Select [Options] in the [Tools] menu.
2 Select [Privacy], and then click [Settings] in the Private Data section.
3 Select the [Cache] check box under [Private Data] select the [Clear private data when closing Firefox] check box under [Settings], and then click [OK].
16.1.4 Online help function
After logging in to PageScope Web Connection, click ; you can display the online help for the currently configured function.
Reference- To display the online help, connect your computer to the Internet.
bizhub PRO 951 16-3

16.2 Login and Logout 16
16.2 Login and Logout
16.2.1 Login and logout flows
Accessing with PageScope Web Connection displays the login page when User Authentication or Account Track is enabled, and displays the login page in the public user mode when User Authentication or Account Track is not enabled. When re-logging in to this machine as a different user or as an administrator, log out once, and log in again.
When user authentication or account track is not enabled
You are automatically logged in as a public user.
To log in as an administrator, log out once.
bizhub PRO 951 16-4

16.2 Login and Logout 16
When User Authentication or Account Track is enabled
Login as an administrator again.
The User Authentication or Account Track page appears. Enter the required items to log in.
To log in as a different user or as an administrator, log out once.
bizhub PRO 951 16-5
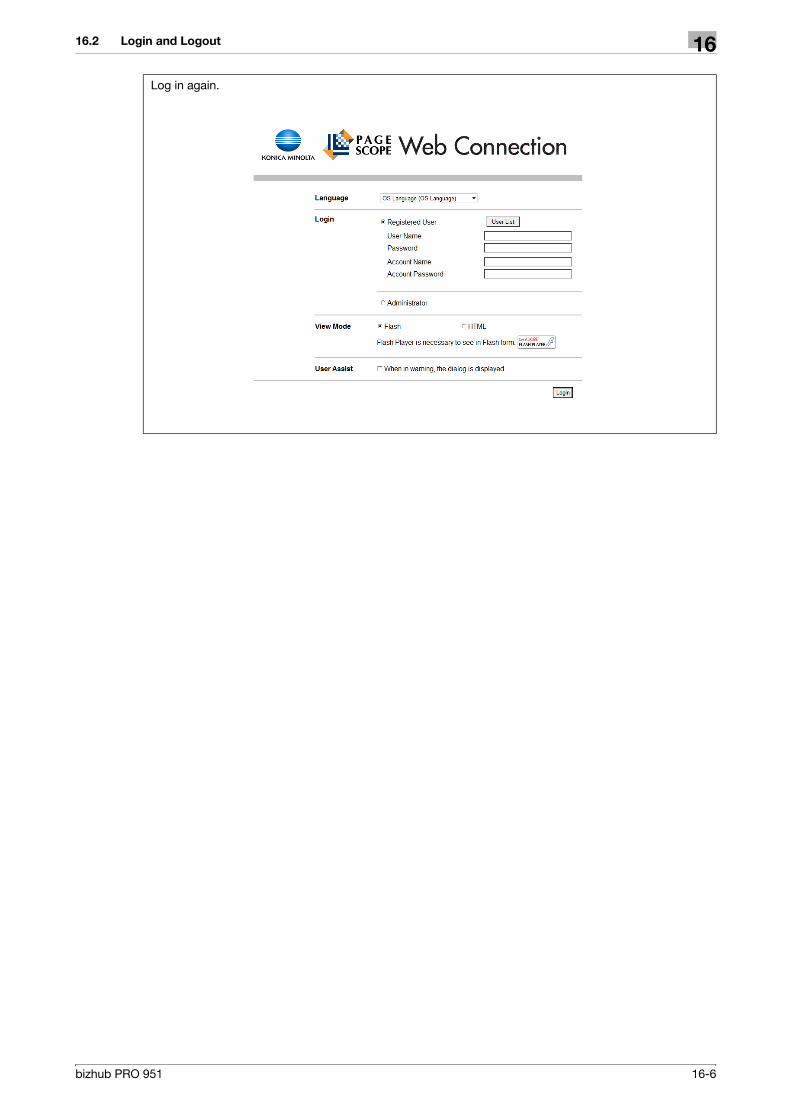
16.2 Login and Logout 16
Log in again.
bizhub PRO 951 16-6

16.2 Login and Logout 16
16.2.2 Logout
Click [Logout] on the upper right of the screen to display a logout confirmation screen. Click [OK] to return to the login page.
Reference- The login page that appears differs depending on whether Authentication is enabled in this machine.- If timeout occurred because no operation was performed for the specified period during login or if au-
thentication setting was changed using the control panel while logging in to the user mode, you will au-tomatically log out of the mode.
- For details on how to specify the timeout period of the user or administrator modes, refer to page 16-18.
bizhub PRO 951 16-7

16.2 Login and Logout 16
16.2.3 Login
PageScope Web Connection provides the user or administrator mode depending on how to log in.
Login options
You can select items as required when logging in.
Reference- If [Flash] is selected in [View Mode], the following items are displayed using Flash.– Status icons and messages– Status of [Paper Tray] in [Information] - [Device Information]– Page display of [Job]
Logging in as a public user
If user authentication is not enabled on the machine, you will be logging in as a public user. In the login page, select [Public User Access], and click [Login].
Item Description
[Language] Select the display language.
[View Mode] Select Flash or HTML.• If the screen reader software is used, we recommend selecting [HTML] as the
view mode.• Flash Player is required when selecting [Flash].
[User Assist] Select the [Display dialog box in case of warning.] check box to display the dialog box when a warning has occurred or during operation after login.
bizhub PRO 951 16-8

16.2 Login and Logout 16
Logging in as a registered user.
Specify the registered user name and password to log in when User Authentication is enabled in this ma-chine.
% In the login page, enter the user name and the password, and click [Login].
Reference- If Account Track is enabled, also enter the account name and password.
bizhub PRO 951 16-9

16.2 Login and Logout 16
Logging in to the administrator mode
To configure the system or network setting, log in to the administrator mode.
1 Select [Administrator], and then click [Login].
2 Enter the administrator password, and then click [OK].
% Logging in to the administrator mode locks the control panel of this machine, and you will not be able to use it.
% Depending on the status of this machine, you may not be able to log in to the administrator mode.% The password entry page varies depending on the machine settings.
bizhub PRO 951 16-10

16.3 Structure of pages 16
16.3 Structure of pages
Logging in to PageScope Web Connection displays the page that is configured as shown below. The fol-lowing shows an example of the page displayed when Device Information is selected in the Information tab.
Reference- The contents of the PageScope Web Connection pages vary depending on the options installed in
this machine or the settings of this machine.
No. Item Description
1 KONICA MINOLTA logo Click this logo to jump to the Konica Minolta Web site at the follow-ing URL. http://www.konicaminolta.com/
2 PageScope Web Con-nection logo
Click this logo to display the version information of PageScope Web Connection.
3 Login user name Displays the icon of the current mode and the name of the user who is logged on (public, administrator, registered user, or account). Click the user name to display the login user name.
4 Status display Displays the status of the printer and scanner sections of this ma-chine with icons and messages. Clicking the desired icon when an error occurs displays the information (Consumable Info, Paper Tray) associated with the icon to enable you to check the status.
5 Message display Displays the operating status of this machine.
6 [Logout] Click this button to log out the current mode and log in again.
7 Help You can display the online help for the currently configured function. For the specified pages, refer to [Online Assistance] in page 16-13.
8 Refresh Click this icon to refresh the information displayed in the page.
21
98
3 6 74 5
10
11
bizhub PRO 951 16-11

16.3 Structure of pages 16
9 Tab Select the category of the item to be displayed. The following icons are displayed in the user mode.• Information• Job• Box• Direct Print
10 Menu Displays information and setting for the selected tab. The menu that appears in this area varies depending on which tab was selected.
11 Information and settings Displays the details of the item selected in the menu.
No. Item Description
bizhub PRO 951 16-12

16.4 Overview of the user mode 16
16.4 Overview of the user mode
After logging in to PageScope Web Connection in the user mode, the following functions can be specified.
16.4.1 Information
d Reference
For details on the user mode, refer to the online help for PageScope Web Connection. For details on the online help, refer to page 16-3.
Item Description
[Device Informa-tion]
Enables you to check the components, options, consumables, and meter counts of this machine.
[Online Assist-ance]
Enables you to check the online assistance about this product.
[Network Setting Information]
Enables you to check the network settings of this machine.
[Print Setting In-formation]
The Print Setting Information related to the machine's image controller can be checked.
[Print Information] Prints font or configuration information.
bizhub PRO 951 16-13

16.4 Overview of the user mode 16
16.4.2 Job
Item Description
[Current Jobs] Enables you to check the currently executed job or queued jobs.
[Job History] Enables you to check the executed jobs.
bizhub PRO 951 16-14

16.4 Overview of the user mode 16
16.4.3 Box
Item Description
[Folder Name] Enter the Folder Name of Box.
[Folder Pass-word]
Enter the password that is specified to the folder.
[New] Click this button to create a new folder
[Go] Displays the list of boxes on the selected page.
bizhub PRO 951 16-15

16.4 Overview of the user mode 16
16.4.4 Direct print
Reference- When you select [Utility] - -[Administrator Setting] - [User Authentication Setting] - [Print Without Au-
thentication] - [Restrict] and the User Authentication is other than [OFF] or the [Account Track] is [ON], an alert is displayed and [Direct Print] is not available.
Item Description
[Direct Print] Specify a file saved in the computer to print it using this machine.
bizhub PRO 951 16-16

16.5 Administrator mode overview 16
16.5 Administrator mode overview
Logging in to the administrator mode enables you to use the following functions.
Reference- For details on the administrator mode, refer to "User's Guide (POD Administrator's Reference)".
16.5.1 Maintenance
Item Description
[Meter Count] Enables you to check the meter count of this machine.
[ROM Version] Enables you to check the ROM version.
[Import/Export] Saves (exports) setting information, User Authentication/Account Track information, or Meter Count information of this machine as a file, or writes (import) it from a file to this machine.
[Status Notifica-tion Setting]
Configure the function to be reported to a registered user when an error has oc-curred in this machine. Specify the destination and items to notify a registered user of an error.
[Machine Setting] Changes the registration information of this machine.
[Online Assist-ance]
Specify support information (such as contact name, corporate URL, or online man-ual URL) of this machine. To display this information, select [Information] - [Online Assistance].
[Initialize] Return the Network Settings to the factory default.
[Memory Switch] Specify the Memory Switch.
bizhub PRO 951 16-17

16.5 Administrator mode overview 16
16.5.2 Security
16.5.3 Box
The function of the Box screen for the administrator mode is the same with the user mode.
For details, refer to page 16-15.
Item Description
[Authentication Setting]
Configure the User Authentication or Account Track setting in this machine. To en-able authentication, configure the number of assigned counters or the When Number of Jobs Reach Maximum setting.In addition, the Initial Setting Limit for non registered user who is authorized by the external authentication server can be specified in [Default Function Permission].
[User Registra-tion]
When the Main Body is specified for the authentication server and User Authentica-tion or Account Track setting is enabled, register the user and specify the user set-tings.
[Account Track Registration]
When enabling Account Track, register and edit the target account.
[PKI Setting] Specify the settings for certificates.
[Cert. Verification Set.]
Specify the items to validate a certificate.
[Auto Logout] Specify the time to automatically log out the administrator or user mode.
[Administrator Password Set-ting]
Specify the password to log in to the administrator mode.
bizhub PRO 951 16-18

16.5 Administrator mode overview 16
16.5.4 Printer Setting
Item Description
[Machine Default Setting]
6 patterns of printer default settings for print can be registered. The settings selected by [Default Setting] radio button can be displayed at the [Information] - [Printer Set-ting Information].
[Job Spool Set-ting]
Specify whether to set the job spool setting or not.
[Interface Setting] Specify the timeout period of the interface.
[Select Printer Setting]
Specify the output setting for each port.
bizhub PRO 951 16-19

16.5 Administrator mode overview 16
16.5.5 Scan
Item Description
[Subject] Register up to 5 subjects to be used when sending an E-mail.
[Text] Register up to 5 body messages to be used when sending an E-mail.
[Scan Settings] Specify settings on the scanner function.
bizhub PRO 951 16-20

16.5 Administrator mode overview 16
16.5.6 Network
Item Description
[TCP/IP Setting] Configure the TCP/IP setting when connecting this machine via network.
[Time Adjustment Setting]
Specify whether to adjust time using an NTP server or not.
[E-mail Setting] Configure the settings to send or receive E-mails, and specify the extension function such as E-mail authentication.
[LDAP Setting] Configure the settings to register the LDAP server.
[IPP Setting] Configure the IPP print setting.
[FTP Setting] Configure the settings to use this machine as an FTP client or server.
[SNMP Setting] Configure SNMP settings.
[SMB Setting] Configure the SMB client, WINS, SMB print, or Direct Hosting setting.
[Web Service Set-tings]
Configure the settings to perform scanning or printing using Web services.
[Bonjour Setting] Configure Bonjour settings.
[NetWare Setting] Configure NetWare settings.
[AppleTalk Set-ting]
Configure AppleTalk settings.
[OpenAPI Set-tings]
Configure the OpenAPI settings.
[TCP Socket Set-ting]
Configure the TCP Socket settings to have a data communication between this ma-chine and the application software in your computer.
bizhub PRO 951 16-21

16.5 Administrator mode overview 16
[IEEE802.1x Au-thentication Set-ting]
Configure IEEE802.1X authentication settings.
[JSP Setting] Specify settings on JSP.
Item Description
bizhub PRO 951 16-22

17 Utility tool

bizhub PRO 951 17-2
17.1 Font Management Utility 17
17 Utility tool
17.1 Font Management Utility
You can use "Font Management Utility" to add or delete a PostScript font to the image controller.
d Reference
For details, refer to User's Guide in "Font Management Utility" in the [PAGESCOPE UTILITIES] CD-ROM.

18 Troubleshooting

18.1 Cannot print 18
18 Troubleshooting
18.1 Cannot print
This section describes how to solve issues and problems that you may encounter while using the printer.
If you cannot print even when you have completed the printing procedure, check the following items in order from beginning to end.
Problem Possible Cause Remedy
A message saying "Printer is not connected" or "Print Error" ap-pears on the computer screen.
The printer driver specified when printing may not be sup-ported by the image controller.
Check the specified printer name.
The network or USB cable may be disconnected.
Check that the cable is correctly connected.
An error may have occurred on this machine.
Check the control panel of this machine.
Memory may be insufficient. Perform a test printing to check whether printing is possible.
A postscript error appears on the computer screen.
Memory of the computer may be insufficient.
Perform a test printing to check whether printing is possible.
There may be an error in the ap-plication software settings.
Refer to the user's manual of the application software to check the settings.
The file printing settings may be incorrect.
Change the settings and try to print again.
bizhub PRO 951 18-2

18.1 Cannot print 18
Print processing on the compu-ter finished, but printing does not start.
The printer driver specified when printing may not be sup-ported by the image controller.
Check the specified printer name.
The network or USB cable may be disconnected.
Check that the cable is correctly connected.
An error may have occurred on this machine.
Check the control panel of this machine.
Unprocessed jobs may remain on this machine and be waiting to be processed.
Check the processing order for the job using [Job List] on the control panel of this machine.
When executing the print job, [Save] may have been specified.
Using [Job List] - [Suspend] on the control panel of this machine, check whether the job is held or not.
[Secure Print Only] may be specified on the machine.
Use [Secure Print] when execut-ing the print job.
User authentication or account track may be disabled on the printer driver.
Acquire the authentication infor-mation using the printer driver.
When the account track is ena-bled, you may have entered an unregistered account track code or password.
Enter the correct account name and password.
When the user authentication is enabled, you may have entered an unregistered user name or password.
Enter the correct user name or password.
Memory of the computer may be insufficient.
Perform a test printing to check whether printing is possible.
Network connection with the im-age controller is not established (when connecting via the net-work).
Contact your network administra-tor.
Secure print is not available. The password rules may be en-abled on the machine.
Specify a password according to the password rules.
Different encryption passphras-es may be specified for the printer driver and the machine.
Specify the same encryption passphrase for the machine and the printer driver.
Printing in the user authentica-tion or account track mode is not available.
The user name, account name or password is incorrect.
Enter the correct user name, ac-count name and password.
User authentication or account track may be disabled on the printer driver.
Enable user authentication or ac-count track on the printer driver.
Different encryption passphras-es may be specified for the printer driver and the machine.
Specify the same encryption passphrase for the machine and the printer driver.
The entered user name or ac-count name may not be author-ized.
Check with the administrator whether the user name or ac-count name concerned is author-ized for printing.
Problem Possible Cause Remedy
bizhub PRO 951 18-3

18.1 Cannot print 18
When the above troubleshooting does not eliminate the problem, refer to the [User's Guide - Copier].
Printing is not available when you have selected [Public User] in user authentication.
Printing by public users may be prohibited on the machine.
Check with the administrator whether printing by public users is permitted.
Problem Possible Cause Remedy
bizhub PRO 951 18-4
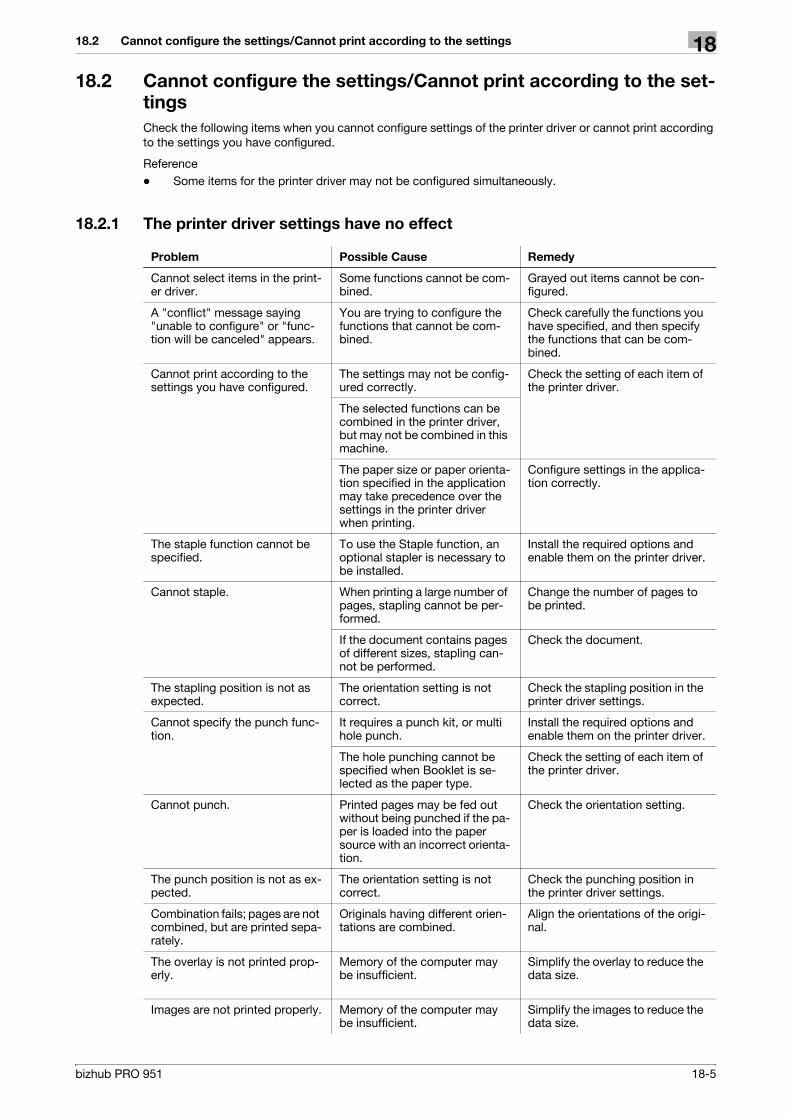
18.2 Cannot configure the settings/Cannot print according to the settings 18
18.2 Cannot configure the settings/Cannot print according to the set-
tings
Check the following items when you cannot configure settings of the printer driver or cannot print according to the settings you have configured.
Reference- Some items for the printer driver may not be configured simultaneously.
18.2.1 The printer driver settings have no effect
Problem Possible Cause Remedy
Cannot select items in the print-er driver.
Some functions cannot be com-bined.
Grayed out items cannot be con-figured.
A "conflict" message saying "unable to configure" or "func-tion will be canceled" appears.
You are trying to configure the functions that cannot be com-bined.
Check carefully the functions you have specified, and then specify the functions that can be com-bined.
Cannot print according to the settings you have configured.
The settings may not be config-ured correctly.
Check the setting of each item of the printer driver.
The selected functions can be combined in the printer driver, but may not be combined in this machine.
The paper size or paper orienta-tion specified in the application may take precedence over the settings in the printer driver when printing.
Configure settings in the applica-tion correctly.
The staple function cannot be specified.
To use the Staple function, an optional stapler is necessary to be installed.
Install the required options and enable them on the printer driver.
Cannot staple. When printing a large number of pages, stapling cannot be per-formed.
Change the number of pages to be printed.
If the document contains pages of different sizes, stapling can-not be performed.
Check the document.
The stapling position is not as expected.
The orientation setting is not correct.
Check the stapling position in the printer driver settings.
Cannot specify the punch func-tion.
It requires a punch kit, or multi hole punch.
Install the required options and enable them on the printer driver.
The hole punching cannot be specified when Booklet is se-lected as the paper type.
Check the setting of each item of the printer driver.
Cannot punch. Printed pages may be fed out without being punched if the pa-per is loaded into the paper source with an incorrect orienta-tion.
Check the orientation setting.
The punch position is not as ex-pected.
The orientation setting is not correct.
Check the punching position in the printer driver settings.
Combination fails; pages are not combined, but are printed sepa-rately.
Originals having different orien-tations are combined.
Align the orientations of the origi-nal.
The overlay is not printed prop-erly.
Memory of the computer may be insufficient.
Simplify the overlay to reduce the data size.
Images are not printed properly. Memory of the computer may be insufficient.
Simplify the images to reduce the data size.
bizhub PRO 951 18-5

18.2 Cannot configure the settings/Cannot print according to the settings 18
18.2.2 Others
18.2.3 Error message
Paper is not fed from the speci-fied paper source.
Paper will not be fed from the specified paper source if that paper source is loaded with pa-per of a different size or orienta-tion.
Load the paper of the appropriate size and orientation into the de-sired paper source.
The user authentication or ac-count track setting field is grayed out and cannot be spec-ified.
User authentication or account track may be disabled on the printer driver.
Acquire the authentication infor-mation using the printer driver.
Problem Possible Cause Remedy
Problem Possible Cause Remedy
Cannot install the printer driver. It has already been installed in Windows Vista/Server 2008/Server 2008 R2/7 as a printer compatible with the Web service print function.
If you try to install a printer driver in Windows Vista/Server 2008/Server 2008 R2/7 by use of the Web service print function, it is recognized as installed before the actual installation is complet-ed. Uninstall the printer in the [Network] Window, and then in-stall it again.
Message Cause and remedy
A connection to the network was not able to be established.
A connection to the network was not able to be established. Make sure that the network cable is correctly connected. In addition, make sure that [Network Settings] in [Administrator Settings] have been cor-rectly configured.
bizhub PRO 951 18-6

19 Product Specification/Report

19.1 Product specifications 19
19 Product Specification/Report
19.1 Product specifications
Item Specifications
Type Built-in printer controller
RAM 2 GB
HDD 250 GB
SSD 2 GB
I/F Ethernet (1000Base-T/100Base-TX/10Base-T)USB 2.0
Frame type Ethernet 802.2 Ethernet 802.3 Ethernet II Ethernet SNAP
Supported protocols TCP/IP (IPv4/IPv6), BOOTP, ARP, ICMP, DHCP, DHCPv6, AutoIP, SLP, SNMP, FTP, LPR/LPD, RAW Socket, SMB over, TCP/IP, IPP, HTTP, POP, SMTP, LDAP, NTP, SSL, IPX/SPX, AppleTalk, Bonjour, NetBEUI, WebDAV, DPWS, IPsec, DNS, DynamicDNS, LLMNR, LLTD
Page description lan-guage
Adobe PostScript 3 (PS3019)PDF Direct Print (PDF Ver. 1.7)TIFF Direct Print (TIFF 6.0 compliant)PPML (Ver. 2.2)PCL5ePCL XL (PCL6) compatible
Operating environment conditions
Temperature: 10 to 30 degrees CentigradeHumidity: 15 to 85%RH
Resolution 1200 dpi e 1200 dpi600 dpi e 600 dpi
Fonts (Built-in fonts) <Postscript 3>European 136 fonts<PCL>Agfa Micro Type 80 fontsLine Printer 1 font
Compatible computer IBM PC or compatible, and Macintosh (PowerPC, Intel Processor)
bizhub PRO 951 19-2

19.1 Product specifications 19
Item Specifications
Printer driver PCL Driver Windows XP Home Edition (Service Pack 3)*Windows XP Professional (Service Pack 3)*Windows XP Professional e64 Edition (Service Pack 2)Windows Server 2003, Standard Edition (Serv-ice Pack 2)*Windows Server 2003, Enterprise Edition (Service Pack 2)*Windows Vista Business (Service Pack 2) *Windows Vista Enterprise (Service Pack 2) *Windows Vista Home Basic (Service Pack 2) *Windows Vista Home Premium (Service Pack 2) *Windows Vista Ultimate (Service Pack 2) *Windows Server 2008, Standard Edition (Serv-ice Pack 2) *Windows Server 2008, Enterprise Edition (Service Pack 2) *Windows Server 2008 R2 Standard (Service Pack 1) *Windows Server 2008 R2 Enterprise (Service Pack 1)Windows 7 Home Basic (Service Pack 1)Windows 7 Home Premium (Service Pack 1) *Windows 7 Professional (Service Pack 1) *Windows 7 Enterprise (Service Pack 1) *Windows 7 Ultimate (Service Pack 1) ** Supports 32-bit (e86)/64-bit (e64) environ-ment.
PS Plug-in Driver Windows XP Home Edition (Service Pack 3)*Windows XP Professional (Service Pack 3)*Windows XP Professional e64 Edition (Service Pack 2)Windows Server 2003, Standard Edition (Serv-ice Pack 2)*Windows Server 2003, Enterprise Edition (Service Pack 2)*Windows Vista Business (Service Pack 2) *Windows Vista Enterprise (Service Pack 2) *Windows Vista Home Basic (Service Pack 2) *Windows Vista Home Premium (Service Pack 2) *Windows Vista Ultimate (Service Pack 2) *Windows Server 2008, Standard Edition (Serv-ice Pack 2) *Windows Server 2008, Enterprise Edition (Service Pack 2) *Windows Server 2008 R2 Standard (Service Pack 1) *Windows Server 2008 R2 Enterprise (Service Pack 1)Windows 7 Home Basic (Service Pack 1)Windows 7 Home Premium (Service Pack 1) *Windows 7 Professional (Service Pack 1) *Windows 7 Enterprise (Service Pack 1) *Windows 7 Ultimate (Service Pack 1) ** Supports 32-bit (e86)/64-bit (e64) environ-ment.
Mac OS X 10.4/10.5/10.6
bizhub PRO 951 19-3

19.1 Product specifications 19
Printer driver PPD driver Windows XP Home Edition (Service Pack 3)*Windows XP Professional (Service Pack 3)*Windows XP Professional e64 Edition (Service Pack 2)Windows Server 2003, Standard Edition (Serv-ice Pack 2)*Windows Server 2003, Enterprise Edition (Service Pack 2)*Windows Vista Business (Service Pack 2) *Windows Vista Enterprise (Service Pack 2) *Windows Vista Home Basic (Service Pack 2) *Windows Vista Home Premium (Service Pack 2) *Windows Vista Ultimate (Service Pack 2) *Windows Server 2008, Standard Edition (Serv-ice Pack 2) *Windows Server 2008, Enterprise Edition (Service Pack 2) *Windows Server 2008 R2 Standard (Service Pack 1) *Windows Server 2008 R2 Enterprise (Service Pack 1)Windows 7 Home Basic (Service Pack 1)Windows 7 Home Premium (Service Pack 1) *Windows 7 Professional (Service Pack 1) *Windows 7 Enterprise (Service Pack 1) *Windows 7 Ultimate (Service Pack 1) ** Supports 32-bit (e86)/64-bit (e64) environ-ment.
Mac OS X (10.4, 10.5, 10.6)
Utility PageScope Web Connection <Windows XP/Server 2003/Vista/Server 2008/7>• Microsoft Internet Explorer 8 or later (Recommended) (JavaScript and
Cookies enabled)• Mozilla Firefox 3.6 or later (Recommended) (JavaScript and Cookies en-
abled)<Macintosh Mac OS X>• Mozilla Firefox 3.6 or later (Recommended) (JavaScript and Cookies en-
abled)<For Linux>• Mozilla Firefox 3.6 or later (Recommended) (JavaScript and Cookies en-
abled)Adobe® Flash® Player:• When you select the Flash as the display method, Flash Player is nec-
essary to be installed.• To install the Flash Player, be sure the system requirement in advance.
Citrix operating environ-ment
The operation of this driver has been confirmed only in the following envi-ronments.Citrix Version: XenAPP6.0Server OS: Windows Server 2003/2008Client OS : Windows XP SP2 (32/64bit)/Windows 7 SP1 (32/64bit)* For operating in an environment other than those described above, con-sult the dealer.
Item Specifications
bizhub PRO 951 19-4

19.2 Printing reports 19
19.2 Printing reports
19.2.1 Configuration Page Print
bizhub PRO 951 19-5

19.2 Printing reports 19
bizhub PRO 951 19-6

19.2 Printing reports 19
bizhub PRO 951 19-7

19.2 Printing reports 19
bizhub PRO 951 19-8

19.2 Printing reports 19
bizhub PRO 951 19-9

19.2 Printing reports 19
bizhub PRO 951 19-10

19.2 Printing reports 19
19.2.2 PCL Demo Page Print
bizhub PRO 951 19-11

19.2 Printing reports 19
19.2.3 PS Demo Page Print
bizhub PRO 951 19-12

19.2 Printing reports 19
19.2.4 PCL Font List
bizhub PRO 951 19-13

19.2 Printing reports 19
bizhub PRO 951 19-14

19.2 Printing reports 19
bizhub PRO 951 19-15

19.2 Printing reports 19
19.2.5 PS font list
bizhub PRO 951 19-16

19.2 Printing reports 19
bizhub PRO 951 19-17

19.2 Printing reports 19
bizhub PRO 951 19-18

19.2 Printing reports 19
bizhub PRO 951 19-19

20 Appendix

20.1 PPD driver (For Linux and applications) 20
20 Appendix
20.1 PPD driver (For Linux and applications)
20.1.1 PPD driver types
The PPD driver contains the PPD information for Linux and applications.- Driver for Linux: Install for use with Linux (Contains PPD for Linux and PPD for OpenOffice)- Driver for applications: Install when using applications such as Adobe PageMaker that require the PPD
driver.
20.1.2 PPD driver for Linux
Operating environment The PPD driver operates in the environment where systems are combined as follows.- OS:Red Hat Enterprise Linux 4 -CupsVersion:1.1- OS:SuSE Linux 10.1 -CupsVersion:1.2- OpenOffice v1.1.5
Registering the PPD driver for Linux
1 Copy the PPD file to the CUPS model directory. (/usr/share/cups/model for major Linux)
2 In [Add Printer] of the CUPS printing system, specify PPD to add this machine.
% For details on CUPS, refer to [Help] in the CUPS Web management page.
Configuring the PPD driver for Linux
In [Configure Printer] of the CUPS printing system, configure the functions.
Registering the PPD driver for OpenOffice
1 In [Add Printer] of the CUPS printing system, specify PPD to add this machine.
2 Open the OpenOfficePrinterAdministrator tool.
3 Click [New Printer].
4 In the [Choose a device type] window, select [add a printer], and then click [Next].
5 In the [Choose a driver] window, click [import].
6 Select [KOC****opn.ppd], and then click [OK].
7 From the [Please Select a Suitable driver.] list, select [KOC****opn.ppd], and then click [Next].
8 In the [Choose a command line] window, select the printer registered to CUPS, and then click [Next].
9 Click [Finish].
bizhub PRO 951 20-2

20.1 PPD driver (For Linux and applications) 20
Printing with OpenOffice
1 In OpenOffice, select File-Print.
2 Select [KOC****opn.ppd] in [Printer name].
3 Click [Properties].
4 Select the desired setting in [Page size], and then click [OK].
To configure settings other than Page Size, click [Configure Printer] in CUPS.
5 Click [OK] in the OpenOffice print window to print.
20.1.3 PPD driver for applications
PPD registration destination (Example: Adobe PageMaker)- For PageMaker 6.0:
Copy the PPD file to RSRCPPD4 under the folder to which PageMaker is installed.- For PageMaker 6.5 and 7.0:
Copy the PPD file to RSRC<Language>PPD4 under the folder to which PageMaker is installed.
How to print
1 Select [File] - [Print].
2 From the [PPD] box in the print window, select this machine.
3 Configure the [Paper] and [Features] settings for the printer.
4 Click the [Print] button to print.
bizhub PRO 951 20-3

20.2 Glossary 20
20.2 Glossary
Item Description
10Base-T/ 100Base-TX/ 1000Base-T
Standard for the Ethernet and one of the specifications. Cables made of 2 stranded copper wire rods are used. Communication speed is 10Mbps with 10Base-T, 100Mbps with 100Base-TX, and 1000Mbps with 1000Base-T.
Adobe® Flash® Software or its file format developed by Adobe Systems Inc. (formerly by Macrome-dia, Inc.), used to create a content by compiling vector-graphic animations and sounds.The software allows handling interactive contents using keyboard or mouse. The files can be kept relatively compact and accessed from a Web browser with dedi-cated plug-in software.
AppleTalk The generic name for the protocol suite developed by Apple Computer for compu-ter networking.
bit The abbreviation for binary digit. The smallest unit of information (data quantity) handled by a computer or printer. A bit uses only a 0 or a 1 to indicate data.
BMP The abbreviation for bitmap. This is a file format for saving image data. (Extension: ".bmp")Commonly used on Windows platforms. BMP covers the color depth from mono-chrome (2 values) to full color (16,777,216 colors). BMP images are not suitable for compressed storage.
Bonjour A Macintosh network technology, automatically detecting a device connected to the network for automatic configuration. Previously called "Rendezvous", and has been changed to "Bonjour" since Mac OS X v10.4.
BOOTP The abbreviation for Bootstrap Protocol. The protocol is used for a client computer on the TCP/IP network to load network configuration automatically from a server. Instead of BOOTP, DHCP, an advanced protocol based on BOOTP, is typically used today.
Brightness Brightness of a display or other screen.
Byte A byte indicates a unit of information (data quantity) handled by a computer or print-er. A byte consists of eight bits.
client A computer using services provided by servers via the network.
Default Gateway A device, such as a computer or router, used as a "gateway" to access computers on different LANs.
DHCP The acronym for Dynamic Host Configuration Protocol. The protocol is used for a client computer on the TCP/IP network to load network configuration automatically from a server. Just using a DHCP server to centrally manage IP addresses of the DHCP clients enables you to construct a network without IP address conflicts or other troubles.
DNS Abbreviation of Domain Name Systems. DNS allows for obtaining the IP address corresponding to a host name in network environments. This system enables a user to access other computers on the network by specifying host names instead of elu-sive and non-intuitive IP addresses.
DPI (dpi) Abbreviation of Dots Per Inch. Unit of resolution used with printers, scanners, etc. This indicates the number of dots used to represent an inch. The higher this value, the higher the resolution.
Driver Software to act intermediately between the computer and peripheral devices.
Ethernet Standard for the LAN transmission line.
Frame type A type of communication format used in NetWare environments. For mutual com-munication, the same frame type is required.
FTP Abbreviation of File Transfer Protocol. A protocol used to transfer files on the TCP/IP network such as Internet, Intranet, etc.
Gateway Hardware or software serving as a point connecting networks. Not only connect-ing, it converts the format, address, protocol, etc. of the data according to the net-work to be connected.
Gray Scale A form of presenting monochrome image by using the gradation information shifting from black to white.
Hard disk Mass storage device to save data.The data is retained even after the power is turned off.
bizhub PRO 951 20-4

20.2 Glossary 20
Host Name Name of a device on the network.
HTTP Abbreviation of HyperText Transfer Protocol. A protocol used to transmit or receive data between a web server and client (web browser, etc.). Files of image, voice, animation, etc. correlated with the document can be exchanged including the ex-pression form and other information.
Install To incorporate the hardware, OS, application, printer driver, etc. to a computer sys-tem.
IP Address A code (address) to identify individual network devices on the Internet. IPv4 (Inter-net Protocol version 4), a protocol widely used today, adopts a 32-bit number for an IP address separated into four sections. An example of an IPv4 IP address is: 192.168.1.10. On the other hand, IPv6 (Internet Protocol version 6), the next gener-ation protocol, adopts 128-bit IP addresses. An IP address is allocated to all com-puters and other devices connected to the Internet.
IPP The acronym for Internet Printing Protocol. This is a protocol used to send or re-ceive print data or control printers via the Internet or other TCP/IP network. IPP can also send and print data to printers in remote areas via the Internet.
IPX One of the protocols used for NetWare. IPX runs in the network layer of the OSI ref-erence model.
IPX/SPX The abbreviation for Internetwork Packet Exchange/Sequenced Packet Exchange. This is a protocol developed by Novell, Inc., typically used in NetWare environ-ments.
LAN The acronym for Local Area Network. This is a network constructed by connecting computers on the same floor, in the same building, or in neighboring buildings.
Local printer A printer connected to a parallel or USB port of a computer.
LPD The acronym for Line Printer Daemon. This is a platform-independent printer proto-col running on the TCP/IP network. The protocol was originally developed for BSD UNIX, and has become one of the printing protocols typically used among general computers.
LPR/LPD The acronym for Line Printer Request/Line Printer Daemon. This is a printing meth-od implemented via networks, used for Windows NT or UNIX based systems. It uses TCP/IP to output printing data from Windows or UNIX to a printer on the net-work.
MAC address MAC is the acronym for Media Access Control. A MAC address is an ID number unique to each Ethernet card, enabling sending or receiving data to or from other Ethernet cards. A Mac address is a 48-bit number. The first 24 bits are controlled by IEEE and used to allocate a unique number to each manufacture, whereas the latter 24 bits are used by each manufacturer to assign a unique number to each card.
Memory Unit to save data temporarily. Some types of memory retain data even after the power is turned off, while others not.
NDPS The acronym for Novell Distributed Print Services. This provides a high perform-ance printing solution in NDS environments. Using NDPS for the print server simpli-fies and automates complicated management activities related to printer use. For example, you can print to a desired printer or automatically download the printer driver for a newly installed printer. NDPS print servers also integrate management related to the network printers.
NDS The acronym for Novell Directory Services. This allows the centralized management in a hierarchical structure of shared resources such as servers, printers and users information on the network, as well as the access privilege and other information related to the users.
NetBEUI The abbreviation for NetBIOS Extended User Interface. This is a network protocol developed by IBM. NetBEUI enables you to construct a small-scale network simply by configuring computer names.
NetBIOS Abbreviation of Network Basic Input Output System. This is a communication inter-face developed by IBM.
NetWare A network operating system developed by Novell. This uses NetWare IPX/SPX for the communication protocol.
Nprinter/ Rprinter
A remote printer support module used when using a printer server in NetWare en-vironments. Rprinter is used for NetWare 3.x, and Nprinter for NetWare 4.x.
Item Description
bizhub PRO 951 20-5

20.2 Glossary 20
OHP/OHT A transparent sheet used for OHP (Overhead projector). This is used for presenta-tions.
OS Abbreviation of Operating System. Basic software to control the computer system. Windows, MacOS, and Unix are examples.
Outline font A type of fonts represented using lines and curves to display an outline of a char-acter. Larger-size characters can be displayed on a screen or printed with no jag-ged edges.
PDF Abbreviation of Portable Document Format. One of electronic documents (Exten-sion: .pdf). PDF is a PostScript based format, and can be viewed using Adobe Ac-robat Reader, a free viewer software.
PDL The acronym for Page Description Language. This is a language used to instruct a page printer about images being printed on each page.
Peer-to-peer A type of network where the connected devices can be communicate with each other without using a dedicated server.
Plug and play A mechanism used to immediately detect a peripheral device when it is plugged into a computer, and search for an appropriate driver automatically, so that the de-vice becomes operable.
PostScript Representative page description language generally used for printing requiring spe-cifically high quality, developed by US Adobe.
PPD The acronym for PostScript Printer Description. This is a file with the description of resolution, available paper sizes, and other information specific to a PostScript printer model.
Preview A function allowing you to view a result image before being actually processed for printing or scanning.
Print job A print request transmitted from a computer to a printing device.
Print queue A software system used by a spooler to save generated print jobs.
Printer buffer A memory area temporarily used for processing data of print jobs.
Printer driver Software acting as an intermediate between the computer and printer.
Property Attribute information. When using a printer driver, different functions can be config-ured by utilizing its properties. By using properties of a file, you can check the at-tribute information about the file.
Protocol Rules by which a computer communicates with other computer or peripheral de-vice.
Proxy server A server that is installed to act as an intermediary connection between each client and different servers to effectively ensure security over the entire system for Internet connections.
PServer A print server module available in NetWare environments. This module monitors, changes, pauses, restarts, or cancels print jobs.
Queue name A logical printer name required for LPD/LPR printing.
Resolution Degree how correctly the details of images or prints can be reproduced.
RGB The acronym for Red, Green, and Blue. The RGB are the primary three colors used for monitor and other devices, producing any of the full colors by changing their brightness ratio.
RIP The acronym for Raster Image Processor. RIP extracts picture images from text data created using PostScript or other page description language. This processor is usually integrated into a printer.
Samba UNIX server software which uses SMB (Server Message Block) to make UNIX sys-tem resources available to Windows environments.
Screen font A type of fonts used for displaying characters and symbols on a CRT or other mon-itor.
Shared printer A printer connected to a server on the network and configured to be used by mul-tiple computers.
SLP The acronym for Service Location Protocol. This is a protocol that provides capa-bilities such as finding services or automatic client configuration on the TCP/IP net-work.
Item Description
bizhub PRO 951 20-6
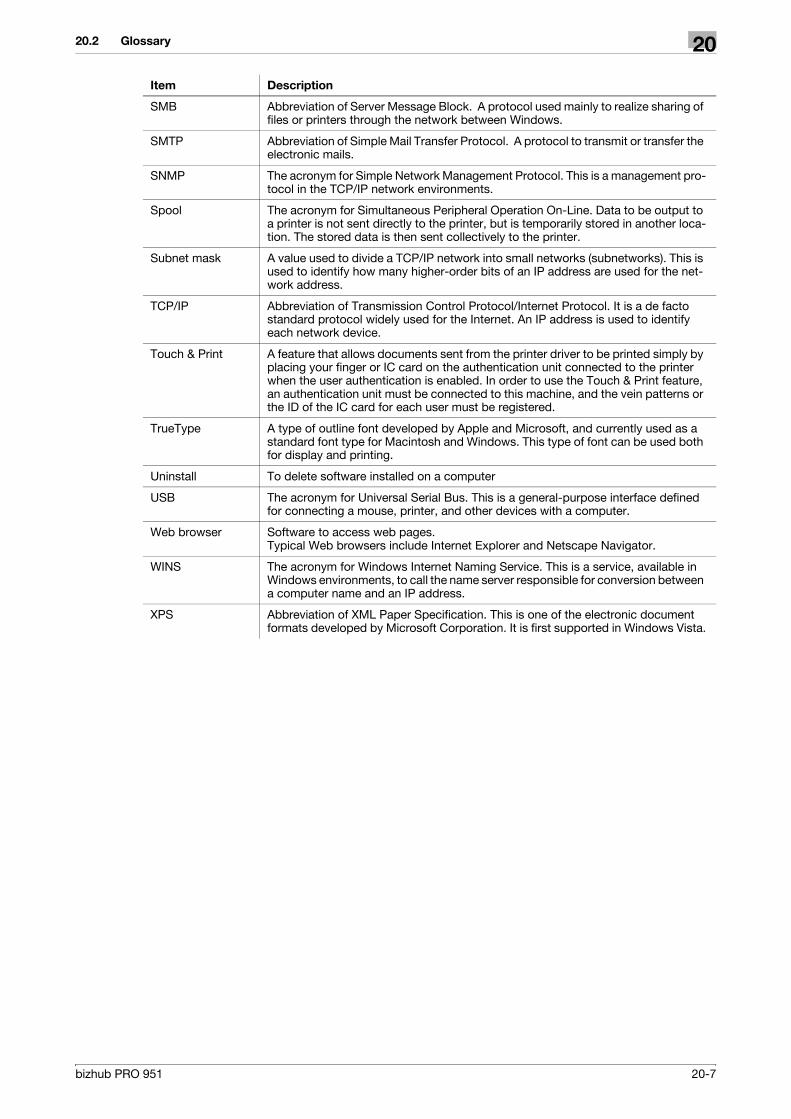
20.2 Glossary 20
SMB Abbreviation of Server Message Block. A protocol used mainly to realize sharing of files or printers through the network between Windows.
SMTP Abbreviation of Simple Mail Transfer Protocol. A protocol to transmit or transfer the electronic mails.
SNMP The acronym for Simple Network Management Protocol. This is a management pro-tocol in the TCP/IP network environments.
Spool The acronym for Simultaneous Peripheral Operation On-Line. Data to be output to a printer is not sent directly to the printer, but is temporarily stored in another loca-tion. The stored data is then sent collectively to the printer.
Subnet mask A value used to divide a TCP/IP network into small networks (subnetworks). This is used to identify how many higher-order bits of an IP address are used for the net-work address.
TCP/IP Abbreviation of Transmission Control Protocol/Internet Protocol. It is a de facto standard protocol widely used for the Internet. An IP address is used to identify each network device.
Touch & Print A feature that allows documents sent from the printer driver to be printed simply by placing your finger or IC card on the authentication unit connected to the printer when the user authentication is enabled. In order to use the Touch & Print feature, an authentication unit must be connected to this machine, and the vein patterns or the ID of the IC card for each user must be registered.
TrueType A type of outline font developed by Apple and Microsoft, and currently used as a standard font type for Macintosh and Windows. This type of font can be used both for display and printing.
Uninstall To delete software installed on a computer
USB The acronym for Universal Serial Bus. This is a general-purpose interface defined for connecting a mouse, printer, and other devices with a computer.
Web browser Software to access web pages.Typical Web browsers include Internet Explorer and Netscape Navigator.
WINS The acronym for Windows Internet Naming Service. This is a service, available in Windows environments, to call the name server responsible for conversion between a computer name and an IP address.
XPS Abbreviation of XML Paper Specification. This is one of the electronic document formats developed by Microsoft Corporation. It is first supported in Windows Vista.
Item Description
bizhub PRO 951 20-7

21 Index

21.1 Index by item 21
21 Index
21.1 Index by item
Numerics
180º Rotate ................................................................11-8
A
Accessing ..................................................................16-2Account track ................................................ 14-17, 16-5Adding a printer ................................................. 5-2, 5-15Administrator mode ..................................... 16-10, 16-17Administrator settings ..............................................15-15AppleTalk ............................................................. 3-6, 6-5
B
Back Cover ..............................................................10-21Back Cover from Post Inserter ................................10-21Bonjour ................................................................ 3-6, 6-4
C
Calling a job ...............................................................14-8Cannot configure the settings ...................................18-5Cannot print ...............................................................18-2Chapters ..................................................................10-14Checking jobs ..........................................................16-14Collated .....................................................................13-7Combination .................................................. 10-14, 11-7Configure .................................................................11-25Connection diagram ....................................................2-7Connection methods ...................................................3-4Controller Machine Setting Menu screen ..................15-3Copies .......................................................................13-7Copies & Pages .........................................................13-7Custom Size ..............................................................13-5
D
Date/Time ................................................................10-24Default settings ............................. 10-2, 11-2, 12-2, 13-2Direct printing ..........................................................16-16Distribution Number Stamping ................................10-24
E
Editing Overlay ........................................................10-25Editing Watermark ...................................................10-24Error message ...........................................................18-6Ethernet .......................................................................2-7
F
Finishing ....................................................................13-8Front Cover ..............................................................10-21Front Cover from Post Inserter ................................10-21
G
Glossary .....................................................................20-4
I
Image/Layout ............................................................13-9Installer ........................................................................ 4-2Installing ................................................4-4, 4-7, 6-2, 6-3Interfaces ..................................................................... 2-7IPP .......................................................3-4, 5-7, 5-21, 6-9IPP setting ................................................................... 4-3IPPS ............................................................ 3-4, 5-7, 5-21
L
Linux ..........................................................................20-2Local connection ...................................... 2-8, 5-13, 5-22Logging in .........................................................16-4, 16-8Logging out ......................................................16-4, 16-7LPD .............................................................................. 6-7LPR ......................................................3-4, 5-2, 5-15, 6-7
M
Mac .............................................................................. 3-6Macintosh ..................................................... 2-6, 6-2, 8-5Maintenance ............................................................ 16-17
N
NetWare ...............................................................3-6, 7-2Network ................................................................... 16-21Network connection .................................................... 2-8Network window .......................................................... 5-9
O
Offset .........................................................................13-8Operating environment .......................................4-2, 16-2Option ........................................................................13-2Orientation .................................................................13-6Original orientation ...........................................11-5, 11-8Original size .......................................... 10-12, 11-5, 11-8OS ............................................................................... 2-6OS 10.4 ....................................................................... 3-6OS 10.5 ....................................................................... 3-6OS 10.6 ....................................................................... 3-6OS X ...................................................................2-6, 13-2Other ........................................................................ 10-29Output tray ...................................................10-19, 11-10Overlay .................................................................... 10-23
P
Page ..........................................................................13-7Page Attributes ..........................................................13-6Page Number .......................................................... 10-24PageScope Web Connection ....................................16-2Paper Size .................................................................13-6
bizhub PRO 951 21-2

21.1 Index by item 21
Parameter details .......................... 10-9, 11-5, 12-6, 13-6Pattern .....................................................................10-27Per Page Setting ......................................................10-21Plug and play ................................................... 5-13, 5-22Port 9100 ....................................................3-4, 5-2, 5-15PPD driver ........................................................ 12-2, 20-2Print ................................................................... 2-6, 11-2Printer driver ...................................................... 4-7, 18-5printer driver ................................................................4-4Printer drivers ..............................................................3-2Printer setting ..........................................................16-19Printing reports ..........................................................19-5Product specifications ...............................................19-2Properties ........................................................ 10-2, 12-2PS font list ...............................................................19-16Public user .................................................................16-8Punch ............................................................. 10-19, 11-9
Q
Quality tab ...............................................................10-27
R
RAW port .....................................................................4-3registered user ...........................................................16-9Ring Binding .........................................11-9, 12-10, 13-8Rotate 180 ...............................................................10-14
S
Scale ..........................................................................13-6Secure Print ...............................................................14-2Security ....................................................................16-18Selecting a printer ........................................................6-4Separating chapters ................................................11-13Settings ......................................................................15-2Setup ...........................................................................2-8SMB ............................................................3-4, 5-2, 5-18Sort ............................................................................13-8Stamp/Composition ................................................10-23Staple ............................................................. 10-19, 11-9Structure of pages ...................................................16-11
T
Tabs .........................................................................11-15TCP/IP settings ............................................................4-3Troubleshooting .........................................................17-2
U
USB ..................................................................... 2-7, 3-4User authentication ....................................... 14-15, 16-5User mode ...............................................................16-13Utility Menu screen ..................................................15-13
V
Viewing information .................................................16-13
W
Watermark ...............................................................10-23Web browser .............................................................16-3
Web service ..........................................................3-4, 5-9Windows ...............................................................2-6, 8-2Windows Server 2003 ........................................3-5, 5-15Windows Server 2008 ..........................................3-4, 5-2Windows Vista ......................................................3-4, 5-2Windows XP .......................................................3-5, 5-15
X
XPS driver ..................................................................10-2
bizhub PRO 951 21-3

21.2 Index by button 21
21.2 Index by button
A
Add a printer ................................................................5-2Administrator Settings .............................................15-15
E
Editing Watermark ...................................................10-24
L
Login ..........................................................................16-8Logout .......................................................................16-7
P
Printer Install .......................................................4-4, 4-7
Q
Quality Adjustment ..................................................10-27
T
To Login Screen ........................................................16-7
U
User Settings ...........................................................15-13Utility/Counter .........................................................15-13
bizhub PRO 951 21-4

http://konicaminolta.com
2012 2012. 5A4EW9551-IC-11


