130
BlackBerry Enterprise Server for Microsoft Exchange Version 4.1 System Administration Guide
| Date post: | 07-Apr-2015 |
| Category: |
Documents |
| Upload: | gaborovitch |
| View: | 260 times |
| Download: | 6 times |

BlackBerry Enterprise Server for Microsoft ExchangeVersion 4.1 System Administration Guide

BlackBerry Enterprise Server Version 4.1 for Microsoft Exchange System Administration Guide
Last modified: 8 November 2006
Part number: SWD_X_BES(EN)-142.004
At the time of publication, this documentation is based on BlackBerry Enterprise Server Version 4.1 for Microsoft Exchange.
Send us your comments on product documentation: https://www.blackberry.com/DocsFeedback.
©2006 Research In Motion Limited. All Rights Reserved. The BlackBerry and RIM families of related marks, images, and symbols are the exclusive properties of Research In Motion Limited. RIM, Research In Motion, BlackBerry, “Always On, Always Connected” and the “envelope in motion” symbol are registered with the U.S. Patent and Trademark Office and may be pending or registered in other countries.
Adobe and Acrobat are either registered trademarks or trademarks of Adobe Systems Incorporated in the United States and/or other countries. Corel and WordPerfect are either registered trademarks or trademarks of Corel Corporation and/or its subsidiaries in Canada, the United States and/or other countries. IBM and Sametime are either registered trademarks or trademarks of International Business Machines Corporation in the United States, other countries, or both. Java and JavaScript are either registered trademarks or trademarks of Sun Microsystems, Inc. in the U.S. or other countries. Active Directory, Microsoft, Excel, Outlook, PowerPoint, and Windows are either registered trademarks or trademarks of Microsoft Corporation in the United States and/or other countries. Novell and GroupWise are either registered trademarks or trademarks of Novell Inc. in the United States and other countries. RSA and SecurID are either a registered trademarks or trademarks of RSA Security Inc. in the United States and/or other countries. All other brands, product names, company names, trademarks and service marks are the properties of their respective owners.
The BlackBerry device and/or associated software are protected by copyright, international treaties, and various patents, including one or more of the following U.S. patents: 6,278,442; 6,271,605; 6,219,694; 6,075,470; 6,073,318; D445,428; D433,460; D416,256. Other patents are registered or pending in various countries around the world. Visit www.rim.com/patents for a list of RIM [as hereinafter defined] patents.
This document is provided “as is” and Research In Motion Limited and its affiliated companies (“RIM”) assume no responsibility for any typographical, technical, or other inaccuracies in this document. In order to protect RIM proprietary and confidential information and/or trade secrets, this document may describe some aspects of RIM technology in generalized terms. RIM reserves the right to periodically change information that is contained in this document; however, RIM makes no commitment to provide any such changes, updates, enhancements, or other additions to this document to you in a timely manner or at all. RIM MAKES NO REPRESENTATIONS, WARRANTIES, CONDITIONS, OR COVENANTS, EITHER EXPRESS OR IMPLIED (INCLUDING WITHOUT LIMITATION, ANY EXPRESS OR IMPLIED WARRANTIES OR CONDITIONS OF FITNESS FOR A PARTICULAR PURPOSE, NON-INFRINGEMENT, MERCHANTABILITY, DURABILITY, TITLE, OR RELATED TO THE PERFORMANCE OR NON-PERFORMANCE OF ANY SOFTWARE REFERENCED HEREIN OR PERFORMANCE OF ANY SERVICES REFERENCED HEREIN). IN CONNECTION WITH YOUR USE OF THIS DOCUMENTATION, NEITHER RIM NOR ITS RESPECTIVE DIRECTORS, OFFICERS, EMPLOYEES, OR CONSULTANTS SHALL BE LIABLE TO YOU FOR ANY DAMAGES WHATSOEVER BE THEY DIRECT, ECONOMIC, COMMERCIAL, SPECIAL, CONSEQUENTIAL, INCIDENTAL, EXEMPLARY, OR INDIRECT DAMAGES, EVEN IF RIM HAS BEEN ADVISED OF THE POSSIBILITY OF SUCH DAMAGES, INCLUDING WITHOUT LIMITATION, LOSS OF BUSINESS REVENUE OR EARNINGS, LOST DATA, DAMAGES CAUSED BY DELAYS, LOST PROFITS, OR A FAILURE TO REALIZE EXPECTED SAVINGS.
This document might contain references to third-party sources of information, hardware or software, products or services and/or third-party web sites (collectively the “Third-Party Information”). RIM does not control, and is not responsible for, any Third-Party Information, including, without limitation the content, accuracy, copyright compliance, compatibility, performance, trustworthiness, legality, decency, links, or any other aspect of Third-Party Information. The inclusion of Third-Party Information in this document does not imply endorsement by RIM of the Third-Party Information or the third-party in any way. Installation and use of Third-Party Information with RIM's products and services may require one or more patent, trademark, or copyright licenses in order to avoid infringement of the intellectual property rights of others. Any dealings with Third-Party Information, including, without limitation, compliance with applicable licenses and terms and conditions, are solely between you and the third-party. You are solely responsible for determining whether such third-party licenses are required and are responsible for acquiring any such licenses relating to Third-Party Information. To the extent that such intellectual property licenses may be required, RIM expressly recommends that you do not install or use Third-Party Information until all such applicable licenses have been acquired by you or on

your behalf. Your use of Third-Party Information shall be governed by and subject to you agreeing to the terms of the Third-Party Information licenses. Any Third-Party Information that is provided with RIM's products and services is provided “as is”. RIM makes no representation, warranty or guarantee whatsoever in relation to the Third-Party Information and RIM assumes no liability whatsoever in relation to the Third-Party Information even if RIM has been advised of the possibility of such damages or can anticipate such damages.
Published in Canada
Research In Motion Limited 295 Phillip Street Waterloo, ON N2L 3W8 Canada
Research In Motion UK Limited Centrum House, 36 Station Road Egham, Surrey TW20 9LF United Kingdom


Contents1 Mapping roles in your organization to BlackBerry roles ..............................................................................13
Administrative roles......................................................................................................................................... 13Adding database users to administrative roles ...........................................................................................14
Add a database user to an administrative role ....................................................................................14Set how the BlackBerry Manager authenticates with the database server............................................15
Use database authentication credentials.............................................................................................15Managing administrative roles ......................................................................................................................15
Manage an administrative role...............................................................................................................15
2 Setting up the BlackBerry environment ..........................................................................................................17Selecting an encryption algorithm................................................................................................................ 17
Set an encryption type............................................................................................................................. 17Extending BlackBerry device data encryption.............................................................................................18
Protect data using the PGP Support Package .....................................................................................18Protect data using the S/MIME Support Package ..............................................................................18
3 Setting up user accounts on the BlackBerry Enterprise Server ..................................................................21Adding user accounts...................................................................................................................................... 21
Add a user account................................................................................................................................... 21Managing user groups ....................................................................................................................................21
Create a group ......................................................................................................................................... 22Assign a user to a group ......................................................................................................................... 22
Customizing PIM synchronization................................................................................................................ 22Configure PIM synchronization for all user accounts........................................................................ 23Configure PIM synchronization for a specific user account ............................................................. 23Set the PIM synchronization type for all user accounts .................................................................... 24Set the PIM synchronization type for a specific user account ......................................................... 24Set how PIM data conflicts are resolved for all user accounts ......................................................... 24Set how PIM data conflicts are resolved for a specific user account .............................................. 25
4 Controlling the BlackBerry environment ....................................................................................................... 27Controlling which BlackBerry devices can connect to the BlackBerry Enterprise Server ................... 27
Enable the Enterprise Service Policy .................................................................................................... 27

Permit a user account to override the Enterprise Service Policy ..................................................... 28Controlling BlackBerry device and desktop software behavior ............................................................... 28
Change the default behavior .................................................................................................................29Revert to the default behavior...............................................................................................................29
Controlling custom applications...................................................................................................................29Create an IT policy ..........................................................................................................................................29Assign an IT policy to a user account or group .........................................................................................30Managing IT policies ......................................................................................................................................30
Change a rule setting in an IT policy....................................................................................................30Create an IT policy rule for a custom application................................................................................31Change or delete IT policy rules for custom applications ................................................................. 32Delete an IT policy................................................................................................................................... 32Resend an IT policy to a BlackBerry device manually........................................................................ 32Resend an IT policy to a BlackBerry device automatically................................................................ 33
5 Making device software and applications available to users .....................................................................35Software configurations................................................................................................................................. 35Adding software to a network drive .............................................................................................................36
Choose a network drive ..........................................................................................................................36Add the software and tools to the network drive ...............................................................................36
Making applications available to users ....................................................................................................... 37Create the software index ...................................................................................................................... 37Re-index the software applications ...................................................................................................... 37Share the network drive ......................................................................................................................... 37
Creating software configurations................................................................................................................. 38Create a software configuration ........................................................................................................... 38Define an application control policy ....................................................................................................39Assign a software configuration to a user account or group............................................................39
Sending applications to BlackBerry devices wirelessly ............................................................................40Send an application to a BlackBerry device ........................................................................................40
6 Implementing BlackBerry devices....................................................................................................................41Loading users’ messages onto BlackBerry devices .....................................................................................41
Change how a user’s messages are loaded onto a BlackBerry device .............................................41Prevent a user’s messages from loading onto a BlackBerry device................................................. 42
Option 1: Implementing BlackBerry devices using the BlackBerry Manager ........................................ 42Assign a BlackBerry device to a user account..................................................................................... 42

Option 2: Implementing BlackBerry devices wirelessly............................................................................ 42Send PIM data to BlackBerry devices through the BlackBerry Router ........................................... 43Wireless enterprise activation passwords............................................................................................44
Option 3: Implementing BlackBerry devices using the desktop manager.............................................45Implement a BlackBerry device using the desktop manager ...........................................................45
Protecting lost or stolen BlackBerry devices ..............................................................................................45Protect a lost BlackBerry device............................................................................................................46Protect a stolen BlackBerry device .......................................................................................................46
Issuing existing BlackBerry devices to new users......................................................................................46Prepare a BlackBerry device for redistribution ...................................................................................46Redistribute the BlackBerry device to a user ...................................................................................... 47
7 Making BlackBerry MDS Studio Applications available to users ............................................................. 49Setting up BlackBerry MDS Services ...........................................................................................................49
Assign a BlackBerry MDS Services server to a BlackBerry Enterprise Server ...............................49Configure the BlackBerry MDS Services to use a proxy server to connect to Web Services .......50Permit BlackBerry MDS Studio Applications that use HTTPS to access Web Services .................51Establish a trusted connection between the BlackBerry Enterprise Server and a BlackBerry MDS Services server that uses HTTPS ..............................................................................51
Configuring which BlackBerry MDS Studio Applications can be installed on BlackBerry devices.....51Manage a trusted certificate ................................................................................................................. 52Permit unsigned BlackBerry MDS Studio Applications to be installed on BlackBerry devices... 52
Preparing BlackBerry devices to install BlackBerry MDS Studio Applications ..................................... 53Define and manage a device policy to control BlackBerry device access to BlackBerry MDS Studio Applications........................................................................................................................ 53Assign a device policy to a user account or group ............................................................................. 53
Sending BlackBerry MDS Studio Applications to BlackBerry devices ....................................................54Install a BlackBerry MDS Studio Application on a BlackBerry device.............................................55Upgrade a BlackBerry MDS Studio Application on a BlackBerry device ........................................56
Removing BlackBerry MDS Studio Applications ........................................................................................ 57Remove a BlackBerry MDS Studio Application from the repository................................................ 57Remove a BlackBerry MDS Studio Application from a BlackBerry device......................................58
Monitoring BlackBerry MDS Services messages........................................................................................59Set up monitoring of BlackBerry MDS Studio Application messages .............................................59View BlackBerry MDS Studio Application messages .........................................................................60Remove all monitored messages from the BlackBerry MDS Services server .................................60Filter communication from a Web Services host.................................................................................60

Manage the connection between the BlackBerry MDS Services and the connection service.............61
8 Customizing BlackBerry messaging................................................................................................................63Managing message redirection ....................................................................................................................63
Manage message redirection to a BlackBerry device ........................................................................63Managing redirection filters .........................................................................................................................64
Create a global filter ...............................................................................................................................64Create a user filter...................................................................................................................................65Manage a global filter............................................................................................................................ 66Manage a user filter ................................................................................................................................67
Managing wireless message reconciliation................................................................................................67Turn off wireless message reconciliation.............................................................................................68Reconcile permanently deleted messages ..........................................................................................68
Using signatures and disclaimers in messages .........................................................................................68Add a signature to messages sent from a user’s BlackBerry device................................................68Add a disclaimer to messages sent from all users’ BlackBerry devices ......................................... 69
Monitoring messages that users send from their BlackBerry devices................................................... 69Blind carbon copy a recipient on all messages.................................................................................. 69
Managing the message queue..................................................................................................................... 69Purge pending messages from the messaging queue ...................................................................... 69
Managing the wireless backup and restore of PIM data .......................................................................... 70Delete a user’s PIM data from the BlackBerry Enterprise Server..................................................... 70Turn off wireless backup......................................................................................................................... 70
Setting address book fields for synchronization and lookups .................................................................. 71Map an address book field in the desktop messaging program to an address book field on all BlackBerry devices ...................................................................................................... 71Map an address book field in the desktop messaging program to an address book field on a specific BlackBerry device ........................................................................................... 71Map a user-defined address book field to an address book field on all BlackBerry devices ........ 71Map a user-defined address book field to an address book field on a specific BlackBerry device .................................................................................................................................... 72
Customizing how BlackBerry devices look up users in the global address list ..................................... 72Use LDAP to search for users in the global address list.................................................................... 72Create a custom field for LDAP address lookups................................................................................ 73
Restricting address lookup support ............................................................................................................. 73Enable addresses from the same company to display when users look up addresses on BlackBerry devices ............................................................................................................................. 73

Sending messages to users ........................................................................................................................... 73Send a message to selected users ........................................................................................................ 74Send a message to all users................................................................................................................... 74
Managing instant messaging........................................................................................................................ 74Configure the connection to the instant messaging server.............................................................. 74Control an instant messaging session.................................................................................................. 75
9 Customizing attachment viewing.................................................................................................................... 77Configuring how the BlackBerry Enterprise Server connects to the attachment service ................... 77
Connect the BlackBerry Enterprise Server to the attachment service............................................ 77Connect the attachment service to the BlackBerry Enterprise Server............................................ 78
Controlling how the attachment service converts attachments ............................................................. 78Customize how the attachment service converts attachments........................................................79
Configuring support for attachment file formats ......................................................................................79Remove support for an attachment file format...................................................................................80Add support for additional attachment file format extensions ........................................................80
Controlling attachment file sizes .................................................................................................................80Set the maximum file size for an attachment .....................................................................................80Set the maximum size for an image attachment .................................................................................81
10 Customizing wireless access to enterprise applications ............................................................................83Set the central push server............................................................................................................................ 83Configuring the connection service to use a proxy server .......................................................................84
Access web servers using a PAC file ....................................................................................................84Access web servers through a proxy server ........................................................................................85
Customizing how BlackBerry devices authenticate with proxy and web servers .................................85Configure how BlackBerry devices authenticate with web servers .................................................86Configure the connection service to authenticate with a proxy server on behalf of BlackBerry devices..................................................................................................................86Configure the connection service to authenticate with servers that use NTLM ........................... 87Configure the connection service to authenticate with servers that use Kerberos ...................... 87Configure the connection service to authenticate with servers that use LTPA ............................. 87Configure the connection service to authenticate with the RSA Authentication Manager ........88
Restricting users’ access to web content ....................................................................................................88Restrict web content requests from BlackBerry devices ...................................................................88Create and assign a rule to a type of web content request ..............................................................89Assign a rule to a user account or group .............................................................................................90

Control how the connection service manages web requests from BlackBerry devices .......................90Customizing how applications make trusted connections to external web servers ..............................91
Configure the connection service to query LDAP servers for trusted application certificates ...91Configure the connection service to retrieve the status of a certificate from an OCSP server ...91Permit BlackBerry devices to connect to untrusted web servers .....................................................92Permit BlackBerry devices to connect to trusted web servers..........................................................92Permit the connection service to accept an SSL connection with a push application to send content to BlackBerry devices ............................................................................93
Restricting the resources that push applications can access ..................................................................93Restrict push application access to resources on a BlackBerry Enterprise Server........................93Create and assign a rule to a push application ..................................................................................94Assign a rule to a user account or group .............................................................................................95Associate a push initiator with BlackBerry MDS Services.................................................................95
Managing push application requests ......................................................................................................... 96Permit the transfer of application reliable push requests between BlackBerry devices and the connection service on device ports ....................................................................................... 96Store push application requests in the configuration database .................................................... 96Delete push requests from the configuration database................................................................... 96Configure the number of simultaneous push application requests the connection service can process..................................................................................................................................97Clear the push queue manually.............................................................................................................97
Configure how the connection service connects to BlackBerry devices ................................................98
11 Managing user accounts .................................................................................................................................. 99Managing user groups .................................................................................................................................. 99
Change properties for a group ............................................................................................................ 99Manage a group ..................................................................................................................................... 99
Managing users............................................................................................................................................. 100Move or delete a user account............................................................................................................. 100Update a user account manually ........................................................................................................ 101
12 Managing device software and wireless applications ............................................................................... 103Managing applications on BlackBerry devices ........................................................................................ 103
Upgrade an application on a BlackBerry device............................................................................... 103Remove an application from a BlackBerry device ........................................................................... 103Change or delete an application control policy ............................................................................... 104

Managing software configurations ............................................................................................................ 104Manage a software configuration....................................................................................................... 104
13 Managing a BlackBerry Domain .................................................................................................................... 107Monitoring the BlackBerry services and components in a BlackBerry Domain...................................107
Customize how the BlackBerry Controller monitors BlackBerry services......................................107Accessing log files for BlackBerry services ................................................................................................ 110
Customize how BlackBerry services creates log files........................................................................ 110Customize how the connection service creates a log file ................................................................. 111Customize how the collaboration service creates a log file ............................................................ 113Monitor PIN messages, SMS messages, and phone calls in a BlackBerry Domain ..................... 113
Managing different BlackBerry Domains................................................................................................... 114Connect the BlackBerry Manager to a different BlackBerry Domain ........................................... 115
Managing license keys.................................................................................................................................. 115Add or remove a license key ................................................................................................................ 115Copy a license key to a text file ........................................................................................................... 116
A Appendix: Role matrix....................................................................................................................................... 117Domain tasks ...................................................................................................................................................117Server tasks..................................................................................................................................................... 118Group tasks .....................................................................................................................................................122User tasks........................................................................................................................................................124Device management tasks .......................................................................................................................... 126Tools menu ..................................................................................................................................................... 126
B Appendix: Wireless backup and restore ........................................................................................................127BlackBerry device data that the BlackBerry Enterprise Server does not back up wirelessly .............127

1
Mapping roles in your organization to BlackBerry roles
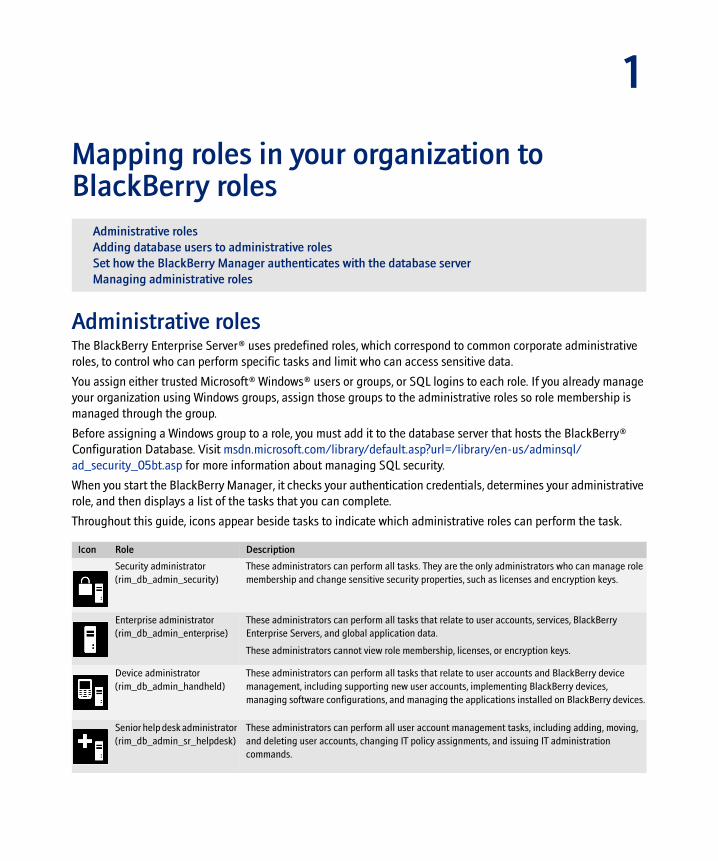
Administrative roles The BlackBerry Enterprise Server® uses predefined roles, which correspond to common corporate administrative roles, to control who can perform specific tasks and limit who can access sensitive data.
You assign either trusted Microsoft® Windows® users or groups, or SQL logins to each role. If you already manage your organization using Windows groups, assign those groups to the administrative roles so role membership is managed through the group.
Before assigning a Windows group to a role, you must add it to the database server that hosts the BlackBerry® Configuration Database. Visit msdn.microsoft.com/library/default.asp?url=/library/en-us/adminsql/ad_security_05bt.asp for more information about managing SQL security.
When you start the BlackBerry Manager, it checks your authentication credentials, determines your administrative role, and then displays a list of the tasks that you can complete.
Throughout this guide, icons appear beside tasks to indicate which administrative roles can perform the task.
Administrative rolesAdding database users to administrative rolesSet how the BlackBerry Manager authenticates with the database serverManaging administrative roles
Icon Role Description
Security administrator (rim_db_admin_security)
These administrators can perform all tasks. They are the only administrators who can manage role membership and change sensitive security properties, such as licenses and encryption keys.
Enterprise administrator (rim_db_admin_enterprise)
These administrators can perform all tasks that relate to user accounts, services, BlackBerry Enterprise Servers, and global application data.
These administrators cannot view role membership, licenses, or encryption keys.
Device administrator (rim_db_admin_handheld)
These administrators can perform all tasks that relate to user accounts and BlackBerry device management, including supporting new user accounts, implementing BlackBerry devices, managing software configurations, and managing the applications installed on BlackBerry devices.
Senior help desk administrator (rim_db_admin_sr_helpdesk)
These administrators can perform all user account management tasks, including adding, moving, and deleting user accounts, changing IT policy assignments, and issuing IT administration commands.

14
BlackBerry Enterprise Server for Microsoft Exchange System Administration Guide
Adding database users to administrative rolesAssign database users to administrative roles based on the existing distribution of responsibility in your organization.
To create SQL logins using the BlackBerry Manager, you require System Administrator permission on the database server.
Do not add a database user to more than one administrative role. The configuration database uses the most restrictive settings to determine which tasks the BlackBerry Manager displays, so a database user who is both an enterprise administrator and a junior help desk administrator sees only the tasks for the junior help desk administrator.
Add a database user to an administrative role1. In the BlackBerry Manager, in the left pane, click BlackBerry Domain.
2. On the Role Administration tab, click a role name.
3. Perform one of the following actions:
4. Click OK.
Junior help desk administrator (rim_db_admin_jr_helpdesk)
These administrators can perform user account management tasks, including creating and sending wireless enterprise activation passwords, and resending service books or IT policies. These administrators cannot add, move, or delete user accounts or issue certain IT administration commands.
— (rim_db_admin_audit_<role>) These administrators can view all the tasks and properties associated with their role, but cannot perform any tasks or change the properties. Use this view-only access to each role when training new administrators.
Action Procedure
Add an existing database user to the administrative role. 1. Click List Administrators.
2. Click the database users to add to the role.
3. Click OK.
Create a new database user and assign it to the administrative role.
1. Click Add Administrators.
2. Type a new login name.
3. Type a new password.
4. Confirm the new password.
Icon Role Description

15
1: Mapping roles in your organization to BlackBerry roles
Set how the BlackBerry Manager authenticates with the database serverBy default, the BlackBerry Manager automatically accepts the Windows authentication credentials you supply when you log in to your computer. If you are assigning SQL logins to administrative roles, you must change the type of authentication credentials the BlackBerry Manager accepts.
Use database authentication credentials1. In the BlackBerry Manager, on the Tools menu, click Options.
2. Click Database.
3. In the Authentication drop-own list, click Database Authentication.
4. Click OK.
5. Close and re-open the BlackBerry Manager.
Managing administrative rolesAs organizational changes occur, you might need to remove a database user from an administrative role or move a database user to a new administrative role.
If you move a database user to a new administrative role, the database permissions change immediately. Database users must restart the BlackBerry Manager to update the tasks associated with their new administrative role. If they do not restart the BlackBerry Manager, unpredictable effects occur.
Manage an administrative role1. In the BlackBerry Manager, in the left pane, click BlackBerry Domain.
2. On the Role Administration tab, click the role to which the database user is assigned.
3. Perform one of the following actions:
4. Click OK.
Action Procedure
Move a database user to another administrative role.
1. Click List Administrators.
2. Click the new administrative role for the database user.
3. Select the database user.
4. Click OK.
5. Instruct the database user to restart the BlackBerry Manager.
Remove a database user from an administrative role.
1. Click Remove Administrators.
2. In the drop-down list, click the database user.
3. Click OK.

16
BlackBerry Enterprise Server for Microsoft Exchange System Administration Guide

2
Setting up the BlackBerry environment
Selecting an encryption algorithm
Set an encryption typeIf you change the encryption algorithm, you must re-activate all BlackBerry devices in the BlackBerry Domain to enable users to send and receive messages on BlackBerry devices again. See Chapter 5, “Implementing BlackBerry devices” for more information.
1. In the BlackBerry Manager, in the left pane, click a BlackBerry Enterprise Server.
2. On the Server Configuration tab, click Edit Properties.
3. Click General.
4. In the Security section, click Encryption Algorithm.
5. In the drop-down list, click an encryption type:
• Triple DES
• AES
• Triple DES and AES
6. Click OK.
Selecting an encryption algorithmExtending BlackBerry device data encryption
Encryption type Description Notes
Triple DES Enables Triple Data Encryption Standard (Triple DES, or 3DES) for all BlackBerry devices on the BlackBerry Enterprise Server
• The default encryption method
AES Enables Advanced Encryption Standard (AES) for all BlackBerry devices on the BlackBerry Enterprise Server
• Designed to use a longer encryption key to provide a better combination of security and performance than Triple DES
• Requires BlackBerry Desktop Software version 4.0 or later and BlackBerry Device Software version 4.0 or later
Triple DES and AES Enables both Triple DES and AES for all BlackBerry devices on the BlackBerry Enterprise Server
• Provides Triple DES encryption on BlackBerry devices that do not support AES (BlackBerry devices running device software versions earlier than 4.0)
• Provides AES encryption by default on BlackBerry devices that support AES

18
BlackBerry Enterprise Server for Microsoft Exchange System Administration Guide
Extending BlackBerry device data encryptionFrom the time the user sends a message until the BlackBerry Enterprise Server receives the message, the message is encrypted by BlackBerry standard encryption. Additional digital signature and encryption technology is designed to enable sender-to-recipient authentication and confidentiality and help maintain data integrity and privacy from the time that the originator of the message sends it over the wireless network until the message is decoded and read by the message recipient.
Protect data using the PGP Support PackageTo digitally sign, encrypt, or digitally sign and encrypt data that the BlackBerry device sends to the BlackBerry Enterprise Server using the PGP Support Package, you must set the PGP Universal Server Address IT policy rule in the IT policy you assign to the users, and each user must install the PGP Support Package on their BlackBerry device and enroll with the PGP Universal Server
When the BlackBerry Enterprise Server pushes the IT policy to the BlackBerry devices to which you have applied the IT policy, with the PGP Universal Server Address rule set to the PGP Universal Server URL, the users that have installed the PGP Support Package are prompted to enroll with PGP. See the PGP Support Package White Paper for more information.
Protect data using the S/MIME Support PackageTo digitally sign, encrypt, or digitally sign and encrypt data that the BlackBerry device sends to the BlackBerry Enterprise Server using the S/MIME Support Package
• you must enable S/MIME message processing on the BlackBerry Enterprise Server
• the user must install the S/MIME Support Package on their BlackBerry device and add the Certificate Synchronization Manager to their BlackBerry Desktop Manager
Enable S/MIME message processing on the BlackBerry Enterprise Server1. In the BlackBerry Manager, in the left pane, click Servers.
2. On the Server Configuration tab, click Edit Properties.
3. Click Messaging.
4. In the Secure Messages section, click Enable S/MIME Message Processing.
5. In the drop-down list, click True.
6. Click OK.
Set additional S/MIME encryption options1. In the BlackBerry Manager, in the left pane, click Servers.
2. On the Server Configuration tab, click Edit Properties.
3. Click Messaging.
4. In the Secure Messages section, set desired encryption options.

19
2: Setting up the BlackBerry environment
5. Click OK.
See the S/MIME Support Package White Paper for more information.

20
BlackBerry Enterprise Server for Microsoft Exchange System Administration Guide

3
Setting up user accounts on the BlackBerry Enterprise Server
Adding user accountsWhen you add a user account to the BlackBerry Enterprise Server, the user’s Microsoft Exchange mailbox does not have to be in the same Microsoft Exchange site or routing group as the BlackBerry Enterprise Server.
Add a user account to only one BlackBerry Enterprise Server at a time.
If you add a user account who was previously on another BlackBerry Enterprise Server in a different BlackBerry Domain, or the user previously used the BlackBerry Desktop Redirector, you must implement the BlackBerry device. See Chapter 5, “Implementing BlackBerry devices”.
Add a user account1. In the BlackBerry Manager, in the left pane, click a BlackBerry Enterprise Server.
2. On the Server Configuration tab, click Common.
3. Click Add Users.
4. In the Show Names from the drop-down list, click an address group.
5. In the user list, click a user.
6. Click Select.
7. Click OK.
Managing user groupsCreate groups of user accounts in the BlackBerry Domain to apply common configuration properties for the group or perform administrative tasks on all user accounts in the group. User accounts in a group can exist on different BlackBerry Enterprise Servers in the BlackBerry Domain. After you create a group, set the properties that you want to apply to all user accounts in the group. When you add user accounts to a group, the user accounts are automatically assigned the group properties.
You can copy properties from an existing group to a new group.
Adding user accountsManaging user groupsCustomizing PIM synchronization

22
BlackBerry Enterprise Server for Microsoft Exchange System Administration Guide
Create a group1. In the BlackBerry Manager, in the left pane, click User Groups.
2. Click Create Group.
3. In the Group Name field, type a name.
4. In the Description field, type a description.
5. Click OK.
6. Perform one of the following actions:
7. Click OK.
Assign a user to a group1. In the BlackBerry Manager, in the left pane, click a BlackBerry Enterprise Server.
2. On the Users tab, click a user account.
3. Click Account.
4. Click Assign User to Group.
5. Click a group name.
6. Click OK.
See “Customizing PIM synchronization” on page 22 for more information on configuring PIM synchronization.
Customizing PIM synchronizationYou synchronize personal information management (PIM) items such as tasks, memos, and contacts so that the entries on a user’s BlackBerry device and the entries on the desktop messaging program are consistent.
You can set synchronization options globally, for all user accounts in the BlackBerry Domain, or you can set synchronization options for a specific user account. By default, wireless synchronization of all PIM applications is enabled for a user account.
Action Procedure
Add properties to the group. 1. Click Edit Group Template.
2. Set the desired properties. See Chapter 6, “Customizing the BlackBerry messaging environment” for more information.
Copy the properties from an existing group. 1. In the Group Name list, click the group to copy properties from.
2. Click Copy Properties to Another Group.
3. Click the group to copy the properties to.

23
3: Setting up user accounts on the BlackBerry Enterprise Server
Configure PIM synchronization for all user accounts1. In the BlackBerry Manager, in the left pane, click BlackBerry Domain.
2. On the Global tab, click Edit Properties.
3. Click Global PIM Sync.
4. Perform one of the following actions:
5. Click OK.
Configure PIM synchronization for a specific user account1. In the BlackBerry Manager, in the left pane, click a BlackBerry Enterprise Server.
2. On the Users tab, double-click a user account.
3. Click PIM Sync.
4. Perform one of the following actions:
Action Procedure
Turn off message filter synchronization. 1. In the Message Filters section, click Synchronization enabled.
2. In the drop-down list, click False.
Turn off tasks synchronization. 1. In the Tasks section, click Synchronization enabled.
2. In the drop-down list, click False.
Turn off message setting synchronization. 1. In the Message Settings section, click Synchronization enabled.
2. In the drop-down list, click False.
Turn off memo synchronization. 1. In the Memos section, click Synchronization enabled.
2. In the drop-down list, click False.
Turn off address book synchronization. 1. In the Address Book section, click Synchronization enabled.
2. In the drop-down list, click False.
Turn off PIM synchronization for a specific user account.
1. Click Wireless Synchronization Enabled.
2. In the drop-down list, click False.
Action Procedure
Turn off message filter synchronization. 1. In the Message Filters section, click Synchronization enabled.
2. In the drop-down list, click False.
Turn off tasks synchronization. 1. In the Tasks section, click Synchronization enabled.
2. In the drop-down list, click False.
Turn off message setting synchronization. 1. In the Message Settings section, click Synchronization enabled.
2. In the drop-down list, click False.
Turn off memo synchronization. 1. In the Memos section, click Synchronization enabled.
2. In the drop-down list, click False.
Turn off address book synchronization. 1. In the Address Book section, click Synchronization enabled.
2. In the drop-down list, click False.

24
BlackBerry Enterprise Server for Microsoft Exchange System Administration Guide
5. Click OK.
Set the PIM synchronization type for all user accounts1. In the BlackBerry Manager, in the left pane, click BlackBerry Domain.
2. On the Global tab, click Edit Properties.
3. Click Global PIM Sync.
4. Locate a PIM application in the list.
5. Select one of the following synchronization types:
• Server to Device: synchronizes data from the BlackBerry Enterprise Server to the BlackBerry device only.
• Device to Server: synchronizes data from the BlackBerry device to the BlackBerry Enterprise Server only.
• Bidirectional: synchronizes data from the BlackBerry device to the BlackBerry Enterprise Server and from the BlackBerry Enterprise Server to the BlackBerry device.
6. Click OK.
Set the PIM synchronization type for a specific user account1. In the BlackBerry Manager, in the left pane, click a BlackBerry Enterprise Server.
2. On the Users tab, double-click a user account.
3. Click PIM Sync.
4. Locate a PIM application in the list.
5. Select one of the following synchronization types:
• Server to Device: synchronizes data from the BlackBerry Enterprise Server to the BlackBerry device only.
• Device to Server: synchronizes data from the BlackBerry device to the BlackBerry Enterprise Server only.
• Bidirectional: synchronizes data from the BlackBerry device to the BlackBerry Enterprise Server and from the BlackBerry Enterprise Server to the BlackBerry device.
6. Click OK.
Set how PIM data conflicts are resolved for all user accounts1. In the BlackBerry Manager, in the left pane, click BlackBerry Domain.
2. On the Global tab, click Edit Properties.
3. Click Global PIM Sync.
Turn off PIM synchronization. 1. Click Wireless Synchronization Enabled.
2. In the drop-down list, click False.
Action Procedure

25
3: Setting up user accounts on the BlackBerry Enterprise Server
4. For each PIM application in the list, select one of the following conflict resolution types:
• Server Wins: the BlackBerry Enterprise Server information overrules the BlackBerry device information.
• Device Wins: the BlackBerry device information overrules the BlackBerry Enterprise Server information.
5. Click OK.
Set how PIM data conflicts are resolved for a specific user account1. In the BlackBerry Manager, in the left pane, click a BlackBerry Enterprise Server.
2. On the User List tab, double-click a user account.
3. Click PIM Sync.
4. For each PIM application in the list, select one of the following conflict resolution types:
• Server Wins: the BlackBerry Enterprise Server information overrules the BlackBerry device information.
• Device Wins: the BlackBerry device information overrules the BlackBerry Enterprise Server information.
5. Click OK.

26
BlackBerry Enterprise Server for Microsoft Exchange System Administration Guide

4
Controlling the BlackBerry environment
Controlling which BlackBerry devices can connect to the BlackBerry Enterprise ServerTurn on the Enterprise Service Policy to control which BlackBerry devices can connect to the BlackBerry Enterprise Server. After you turn on the Enterprise Service Policy, the BlackBerry Enterprise Server still permits connections from BlackBerry devices previously added to the BlackBerry Enterprise Server, but prevents connections from newly-added BlackBerry devices by default.
Define BlackBerry device criteria in an “approval list” to turn on and turn off BlackBerry Enterprise Server access for BlackBerry devices. BlackBerry devices that meet the approval list criteria can complete wireless enterprise activation on that BlackBerry Enterprise Server.
You can define the following types of criteria:
• specific, permitted BlackBerry device PINs, as a string
• a permitted range of BlackBerry device PINs
You can also control access based on specific manufacturers and models of BlackBerry devices. The BlackBerry Manager includes lists of permitted manufacturers and models based on the properties of BlackBerry devices already added to the BlackBerry Enterprise Server. You can uncheck items on these lists to prevent further connections from BlackBerry devices of a specific manufacturer or model.
You can permit a specific user account to override the Enterprise Service Policy. If you then configure the approval list with criteria that excludes that user’s BlackBerry device, the user account can still connect to the BlackBerry Enterprise Server.
Enable the Enterprise Service Policy1. In the BlackBerry Manager, in the left pane, click BlackBerry Domain.
2. In the right pane, click Service Control & Customization.
Controlling which BlackBerry devices can connect to the BlackBerry Enterprise ServerControlling BlackBerry device and desktop software behaviorControlling custom applicationsCreate an IT policyAssign an IT policy to a user account or groupManaging IT policies
Note: The Enterprise Service Policy also applies to BlackBerry Connect™ devices and BlackBerry Built-In™ devices.

28
BlackBerry Enterprise Server for Microsoft Exchange System Administration Guide
3. Click Enable Enterprise Service Policy.
4. Click OK.
5. On the Global tab, click Edit Properties.
6. Click Enterprise Service Policy.
7. Set the desired properties.
8. Click OK.
Permit a user account to override the Enterprise Service Policy1. In the BlackBerry Manager, in the left pane, click a BlackBerry Enterprise Server.
2. On the Users tab, click a user account.
3. Click Edit Properties.
4. Click ES Policy Override
5. In the drop-down list, click True.
6. Click OK.
Controlling BlackBerry device and desktop software behaviorUse one or more IT policies to control the behavior of BlackBerry devices and desktop software in your organization.
An IT policy is a collection of one or more IT policy rules. The Default IT policy includes all standard IT policy rules on the BlackBerry Enterprise Server. When a new user account in a BlackBerry Domain completes activation on the BlackBerry Enterprise Server, the BlackBerry Enterprise Server automatically pushes the Default IT policy to their BlackBerry device. The standard IT policy rules do not enforce the default BlackBerry device or desktop software behavior.
You can use either of the following methods to change the default behavior of BlackBerry devices and desktop software in your organization:
• set the values of IT policy rules in the Default IT policy
• create a new IT policy, set its IT policy rule values, and assign one or more user accounts or user groups to the new IT policy
You must resend the IT policy from the BlackBerry Enterprise Server to the BlackBerry device to update the BlackBerry device and desktop software behavior wirelessly. By default, the BlackBerry Enterprise Server does not send updated IT policies to BlackBerry devices automatically.
You can resend an IT policy to the user account of a specific BlackBerry device manually, and you can configure the BlackBerry Enterprise Server to resend IT policies to BlackBerry devices on that specific BlackBerry Enterprise Server at a scheduled interval. When the BlackBerry device receives an updated Default IT policy or a new IT policy, the BlackBerry device and desktop software apply the configuration changes.

29
4: Controlling the BlackBerry environment
Change the default behaviorAn IT policy rule enables you to customize and control BlackBerry device or desktop software functionality by
• setting a rule to a True or False value
• typing a string which simultaneously turns on a rule and provides the parameters for its use
• selecting a predefined permitted value to assign to a rule
You can add a standard rule to, remove a standard rule from, or change the assigned value of a standard rule in an IT policy. You cannot add, remove, or change the permitted values for a standard rule. You also cannot delete the standard rules.
You can add a new rule to, remove a new rule from, or change the assigned value of a new rule in an IT policy the same way that you change a standard rule in an IT policy.
Revert to the default behaviorYou can set a rule to Default, if that setting is available, or delete the value you previously set for a rule to revert to the default behavior for the functionality that that rule customizes or controls.
If you have assigned user accounts to a new IT policy, you can delete the new IT policy to revert those user accounts to the default behavior for all functionality on the BlackBerry device and desktop software. The BlackBerry Enterprise Server automatically reassigns those user accounts to the Default IT policy and resends the Default IT policy to the BlackBerry device, enforcing the default settings. You cannot delete the Default IT policy.
Controlling custom applicationsCreate new rules to control custom applications that your company develops to run in BlackBerry environments. After you create a new rule, you can add it and assign a value to it in any new or existing IT policy. Only your own custom applications can use new rules you create. You cannot create new rules to control standard BlackBerry device functionality.
Create an IT policy1. In the BlackBerry Manager, in the left pane, click BlackBerry Domain.
2. On the Global tab, click Edit Properties.
3. Click IT Policy.
4. In the IT Policy Administration section, double-click IT Policies.
5. Click New.
6. Double-click IT Policy Name.
7. Type a name for the new policy.

30
BlackBerry Enterprise Server for Microsoft Exchange System Administration Guide
8. Configure the policy rules by performing the following actions:
• In the left pane, click a policy group.
• In the right pane, double-click the rule. Set a value for the rule.
9. Click OK.
Assign an IT policy to a user account or group
Managing IT policies
Change a rule setting in an IT policy1. In the BlackBerry Manager, in the left pane, click BlackBerry Domain.
2. On the Global tab, click Edit Properties.
3. Click IT Policy.
4. In the IT Policy Administration section, double-click IT Policies.
5. In the list of policies, click an IT policy.
6. Click Properties.
Action Procedure
Assign an IT policy to a user account. 1. In the BlackBerry Manager, in the left pane, click BlackBerry Domain.
2. On the Global tab, click Edit Properties.
3. Click IT Policy.
4. In the IT Policy Administration section, double-click IT Policy to User Mapping.
5. In the left pane, click a user account.
6. In the right pane, select the desired IT policy.
7. Click OK.
Assign an IT policy to a group. 1. In the BlackBerry Manager, in the left pane, click User Groups List.
2. In the Group Name list, click a group.
3. Click Edit Group Template.
4. Click IT Policy.
5. In the right pane, select the IT Policy Name option to override any user exceptions to the IT policy rules.
6. In the drop-down list, click an IT policy.
7. Click Reapply Template.
8. Click Yes.
9. Click OK.

31
4: Controlling the BlackBerry environment
7. Configure the policy rules by performing the following actions:
• In the left pane, click a policy group.
• In the right pane, click a rule. Set a value for the rule.
8. Click OK.
See the Policy Reference Guide for more information.
Create an IT policy rule for a custom application1. In the BlackBerry Manager, in the left pane, click BlackBerry Domain.
2. On the Global tab, click Edit Properties.
3. Click IT Policy.
4. In the IT Policy Administration section, double-click IT Policies.
5. Click the desired IT policy.
6. Click Properties.
7. In the Properties list, click User Defined Items.
8. Double-click IT Policy Template.
9. Click New.
10. Perform the following actions:
11. Click OK.
12. In the Policy Item Settings section, provide a value for the rule in this IT policy.
13. Click OK.
14. Click OK again.
15. Click OK again.
Action Procedure
Define the rule name. > Type a name for the custom rule.
Explain how the rule can be used. > Type a description for the custom rule.
Identify the type of values that the rule uses.
> In the drop-down list, click Boolean, Integer, String, Bitmask, or Multiline String.
Identify where the rule is enforced. > In the drop-down list, click Handheld, Desktop, or Both.
Set the minimum integer value. > Type the minimum value that an integer rule can accept.
Set the maximum integer value. > Type the maximum value that an integer rule can accept.
Set bitmask data. > Type the data that a bitmask rule can accept. Include up to 8 related boolean values. You can assign a bit option name for one, some, or all of the 8-bit values.
For example, you might create a bitmask IT policy rule called Allowed Features with 3 boolean bit values where bit 0 is named Phone, bit 1 is named Browser, and bit 2 is named Third-Party Apps.

32
BlackBerry Enterprise Server for Microsoft Exchange System Administration Guide
Change or delete IT policy rules for custom applications1. In the BlackBerry Manager, in the left pane, click BlackBerry Domain.
2. On the Global tab, click Edit Properties.
3. Click IT Policy.
4. In the IT Policy Administration section, double-click IT Policies.
5. Click Default.
6. Click Properties.
7. In the Properties list, click User Defined Items.
8. Double-click IT Policy Template.
9. Click a rule.
10. Perform one of the following actions:
11. Click OK.
Delete an IT policy1. In the BlackBerry Manager, in the left pane, click BlackBerry Domain.
2. On the Global tab, click Edit Properties.
3. Click IT Policy.
4. In the IT Policy Administration section, double-click IT Policies.
5. Click the custom IT policy to delete.
6. Click Remove.
7. Click OK.
Resend an IT policy to a BlackBerry device manually1. In the BlackBerry Manager, in the left pane, click a BlackBerry Enterprise Server.
2. On the Users tab, click a user account.
3. Click IT Admin.
4. Click Resend IT Policy.
Action Procedure
Edit a custom rule. 1. Click Properties.
2. Change the desired values.
Delete a custom rule. > Click Remove.

33
4: Controlling the BlackBerry environment
Resend an IT policy to a BlackBerry device automatically1. In the BlackBerry Manager, in the left pane, click a BlackBerry Enterprise Server.
2. On the Server Configuration tab, click Edit Properties.
3. In the IT Admin section, double-click Policy Resend Interval.
4. Type the interval, in hours, at which you want the automatic resends to occur.
5. Click OK.

34
BlackBerry Enterprise Server for Microsoft Exchange System Administration Guide

5
Making device software and applications available to users
Software configurationsA software configuration defines the applications that you want installed on certain BlackBerry devices and gives you control over those applications. Software configurations create more uniformity in the applications that are installed on BlackBerry devices in your organization. They also require less interaction with the BlackBerry Manager when you install applications on BlackBerry devices.
Define software configurations to perform the following tasks:
• Load device software and applications onto BlackBerry devices using the BlackBerry Manager
• Assign application control policies to user accounts to control applications installed on BlackBerry devices
• Wirelessly send and administer BlackBerry MDS Java Applications, the Enterprise Messenger, and the BlackBerry MDS Runtime™ on BlackBerry devices
• Monitor the versions of device software and applications that are running on BlackBerry devices in your organization
When a BlackBerry device is not running the most current version of the device software and applications as defined in the software configuration, the BlackBerry Manager informs you that applications need to be installed or upgraded on the BlackBerry device.
Before you can create a software configuration and assign it to a user account, you must install and share the appropriate device software and applications on a network drive. When you specify the location of the device software and applications in the shared network drive, the software configuration displays the applications that are available to install or administer on BlackBerry devices.
Software configurationsAdding software to a network driveMaking applications available to usersCreating software configurationsSending applications to BlackBerry devices wirelessly
Note: See “Making BlackBerry MDS Studio Applications available to users” on page 49 for more information on making BlackBerry MDS Studio Applications available to users.

36
BlackBerry Enterprise Server for Microsoft Exchange System Administration Guide
Adding software to a network driveAdd device software, Java™ applications, the Enterprise Messenger, or the BlackBerry MDS Runtime to the network drive to enable you to install applications on BlackBerry devices that are connected to the BlackBerry Manager and to send applications to BlackBerry devices wirelessly using software configurations.
Choose a network driveWhen you store applications on a network drive that users can access, you no longer need to manually send and install applications to user computers in order to load the applications on BlackBerry devices. See the BlackBerry Enterprise Server Upgrade Guide for more information on upgrading device software.
Choose a central network drive to store the software and tools that you use to create software configurations and install and manage the BlackBerry device software, and applications on BlackBerry devices. Choose a network drive that all user computers in your organization can access to support future device software upgrades. Also, consider a network drive that is in close proximity to users to decrease bandwidth over the corporate LAN when users install applications on BlackBerry devices.
Add the software and tools to the network driveIf the third-party vendor requires you to install the application before you can copy the files, complete the installation as instructed by the third-party vendor, and then copy the required application and module files to the Applications folder.
> Perform any of the following actions:
Note: You can maintain only one version of each application or tool in the network drive at a time. Delete old versions of applications or tools as part of your regular maintenance tasks.
Warning: You are solely responsible for the selection, implementation, and performance of any third-party applications that you use with the BlackBerry device or BlackBerry Desktop Software. Research In Motion® (RIM®) does not in any way endorse or guarantee the security, compatibility, performance, or trustworthiness of any third-party application and shall have no liability to you or any third-party for issues arising from such third-party applications.
Action Procedure
Install the BlackBerry Device Software.
1. Obtain the device software installation file from your service provider.
2. Copy the device software installation file to the network drive.
3. On the network drive, double-click the .exe file.
4. Complete the installation.
5. Verify that the files are located in <drive:>\Program Files\Common Files\Research In Motion\Shared\Loader Files\.
Add Java applications.
1. On the network drive, create the network path <drive:>\Program Files\Common Files\Research In Motion\Shared\Applications\.
2. In the Applications folder, copy the .alx, .cod, and .dll files to a subfolder to preserve the structure of the Java application.

37
5: Making device software and applications available to users
Making applications available to usersBefore you can install most applications on BlackBerry devices, you must create a software index in the network drive. To index the software, you create a specification.pkg and PkgDBCache.xml index file for each application. The index files inform the software configuration and the BlackBerry Application Loader of the applications that are available to install on BlackBerry devices.
Not all files require indexing. If you added device software version 4.0 or later for Java-based BlackBerry devices or device software version 2.7 or later for C++-based BlackBerry devices to the network location, the index files were created automatically.
Create the software index1. At the command prompt, type cd <drive:>\Program Files\Common Files\Research In Motion\Apploader.
2. Type loader.exe /index. The application loader builds the software index structure in the network drive and adds any missing index files.
Re-index the software applicationsIf you modify an .alx file after creating a software index, re-index the applications.
1. At the command prompt, type <drive:>\Program Files\Common Files\Research In Motion\Apploader.
2. Type loader.exe /reindex. The application loader updates the software index structure in the network drive and adds any missing index files.
Share the network drive1. Share <drive:>\Program Files\Common Files\Research In Motion.
2. Set the permission attributes to Read-only.
Add the Enterprise Messenger.
1. On the network drive, create the network path <drive:>\Program Files\Common Files\Research In Motion\Shared\Applications\.
2. On the BlackBerry Enterprise Server product CD, in the IM folder, perform one of the following actions:
• Double-click lcs.zip to use BlackBerry Instant Messaging for Microsoft Live Communications Server.
• Double-click sametime.zip to use BlackBerry Instant Messaging for IBM Sametime®.
• Double-click groupwise.zip to use BlackBerry Instant Messaging for Novell® GroupWise®.
3. Extract the .alx, and .cod files to the network path that you created in step 1.
Add the BlackBerry MDS Runtime.
1. On the network drive, create the network path <drive:>\Program Files\Common Files\Research In Motion\Shared\Applications\.
2. Create a folder for the application.
3. On the BlackBerry Enterprise Server product CD, in the MDS Runtime Environment folder, copy MdsRuntime.alx and the appropriate device software version folder to the folder that you created in step 2.
Tip: Visit www.blackberry.com/developers to obtain the most recent version of the BlackBerry MDS Runtime.
Action Procedure

38
BlackBerry Enterprise Server for Microsoft Exchange System Administration Guide
Creating software configurationsYou must create a software configuration for each BlackBerry device series in your organization. When you create a software configuration, you can define application control policies to specify the resources that Java applications, the Enterprise Messenger, and the BlackBerry MDS Runtime can access on BlackBerry devices from behind the corporate firewall. You can also use application control policies to make sure that certain applications remain installed on, or removed from, BlackBerry devices. You can only define application control policies for BlackBerry devices that are running device software version 4.0 or later.
After you create a software configuration and define any application control policies, assign the software configuration to a user account or group to apply the configuration attributes, to monitor the applications installed on BlackBerry devices, and to control the applications installed on the BlackBerry device.
Create a software configuration1. In the BlackBerry Manager, in the left pane, click BlackBerry Domain.
2. On the Software Configurations tab, click Add New Configuration.
3. In the Configuration Name field, type a name.
4. In the Configuration Description field, type a description.
5. Define the location of the device software by clicking Change.
6. Type the location of the device software.
7. Click OK.
8. In the Application Name list, select the check box beside the BlackBerry device series for which to configure device software.
9. Expand the BlackBerry device series device software application tree (for example, 7100 Series Software).
10. Perform any of the following actions:
11. Click OK.
Action Procedure
Install applications on BlackBerry devices. > Select the check box beside the application.
Do not install applications on BlackBerry devices or remove applications from BlackBerry devices.
> Clear the check box beside the application.

39
5: Making device software and applications available to users
Define an application control policy1. In the BlackBerry Manager, in the left pane, click BlackBerry Domain.
2. On the Software Configurations tab, perform the following actions:
3. Click OK.
Assign a software configuration to a user account or group1. In the BlackBerry Manager, perform one of the following actions:
2. Click Assign Software Configuration.
3. Click the software configuration to assign.
4. Click OK.
Action Procedure
Define an application control policy.
1. Click Manage Application Policies.
2. Click New.
3. Type a new policy name.
4. Customize the application control policy properties. See the Policy Reference Guide for more information.
Assign an application control policy to an application.
1. In the Configuration Name list, click a software configuration.
2. Click Edit Configuration.
3. Expand the Application Software application tree.
4. In the Policy drop-down list, click an application control policy to assign to the application.
• To assign an application control policy to all applications that are not assigned to an application control policy, click an application control policy at the application software level.
• To assign the application control policy that is assigned at the application software level, click <default>. An asterix is added to the policy name.
• To assign the default application control policy rules that are preconfigured on the BlackBerry device, click <none>.
Action Procedure
Assign a software configuration to a user account.
1. In the left pane, click a BlackBerry Enterprise Server.
2. In the Name list, click the user account to assign the software configuration to.
3. In the lower pane, click Device Management.
Assign a software configuration to a group. 1. In the left pane, click a group.
2. In the right pane, click Device Management.

40
BlackBerry Enterprise Server for Microsoft Exchange System Administration Guide
Sending applications to BlackBerry devices wirelesslyYou can wirelessly send Java applications, the Enterprise Messenger, and the BlackBerry MDS Runtime to BlackBerry devices with 16 MB of flash memory that are running device software version 4.0 or later. The wireless download to BlackBerry devices can take up to 4 hours to complete.
Send an application to a BlackBerry device1. Verify that your corporate IT policy permits the application on the BlackBerry device. See “Change a rule
setting in an IT policy” on page 30 for more information.
2. In the BlackBerry Manager, in the left pane, click BlackBerry Domain.
3. On the Software Configurations tab, in the Configuration Name list, click a software configuration.
4. Click Edit Configuration.
5. Expand the application.
6. Select the application to send wirelessly.
7. In the Delivery drop-down list, click Wireless.
8. Click OK.
Tip: To make sure that the application remains installed on a BlackBerry device, create and assign an application control policy. In the Disposition drop-down list, click Required.

6
Implementing BlackBerry devices
Loading users’ messages onto BlackBerry devicesAs part of the BlackBerry device implementation process, you can configure the BlackBerry Enterprise Server to load messages from previous days onto BlackBerry devices running device software 4.0 or later. The BlackBerry Enterprise Server can load messages for new users and for users whose PIN changes when they receive a replacement device. By default, the BlackBerry Enterprise Server loads 200 message headers over a 5-day period for a user. The BlackBerry Enterprise Server can load up to 350 messages that it receives over a 7-day period for a user if you set the BlackBerry Enterprise Server to load message bodies and message headings onto a BlackBerry device.
When the BlackBerry Enterprise Server adds messages to a BlackBerry device, it adheres to the message filter rules and redirection settings for a specific user account. See “Managing message redirection” on page 63 for more information.
Change how a user’s messages are loaded onto a BlackBerry device1. In the BlackBerry Manager, in the left pane, click a BlackBerry Enterprise Server.
2. On the Server Configuration tab, click Edit Properties.
3. Click Messaging.
4. In the Message Prepopulation section, perform any of the following actions:
5. Click OK.
Loading users’ messages onto BlackBerry devicesOption 1: Implementing BlackBerry devices using the BlackBerry ManagerOption 2: Implementing BlackBerry devices wirelesslyOption 3: Implementing BlackBerry devices using the desktop managerProtecting lost or stolen BlackBerry devicesIssuing existing BlackBerry devices to new users
Action Procedure
Load message headings only on to the BlackBerry device. > In the Send Headers Only drop down list, click True.
Load message headings and the message body onto the BlackBerry device.
> In the Send Headers Only drop down list, click False.
Set the number of previous days for which to load messages. > In the Prepopulation By Message Age field, type a number.
Set the maximum number of messages to load. > In the Prepopulation By Message Count field, type a number.

42
BlackBerry Enterprise Server for Microsoft Exchange System Administration Guide
Prevent a user’s messages from loading onto a BlackBerry device1. In the BlackBerry Manager, in the left pane, click a BlackBerry Enterprise Server.
2. On the Server Configuration tab, click Edit Properties.
3. Click Messaging.
4. In the Message Prepopulation section, in the Prepopulation By Message Age field, type 0.
5. In the Message Prepopulation section, in the Prepopulation By Message Count field, type 0.
6. Click OK.
Option 1: Implementing BlackBerry devices using the BlackBerry ManagerIf you want to control the activation and initial implementation of BlackBerry devices, connect BlackBerry devices to the computer on which the BlackBerry Manager is installed and assign them to user accounts.
When you assign a BlackBerry device to a user account, you associate the BlackBerry device with the user’s messaging account and install service books on the BlackBerry device.
Assign a BlackBerry device to a user account1. Connect the BlackBerry device to the computer on which the BlackBerry Manager is installed.
2. In the BlackBerry Manager, in the left pane, click a BlackBerry Enterprise Server.
3. On the Users tab, click the user account to assign the BlackBerry device to.
4. Click Device Management.
5. Click Assign Handheld.
6. Click the BlackBerry device to assign to the user account.
7. Click OK.
Option 2: Implementing BlackBerry devices wirelesslyImplement BlackBerry devices wirelessly to enable users who receive a new BlackBerry device in the office or purchase a new or replacement BlackBerry device to implement their BlackBerry device without a physical connection to the corporate network. Wireless enterprise activation, with message pre-loading and automatic wireless backup, enables users who have lost their BlackBerry devices to get up and running quickly with a replacement BlackBerry device.
You implement BlackBerry devices wirelessly by sending wireless enterprise activation passwords to user accounts. The users receive a message on their computers that provides the wireless enterprise activation password.

43
6: Implementing BlackBerry devices
Using PIM synchronization IT policies, you can configure whether users must connect their BlackBerry devices to their computers during the implementation process or can complete the implementation process wirelessly using PIM synchronization IT policies. To save bandwidth, force the transfer of PIM data to BlackBerry devices during the implementation process through the BlackBerry Router. The BlackBerry Router is designed to route data over the corporate LAN to BlackBerry devices that are connected to user computers using the device manager.
Send PIM data to BlackBerry devices through the BlackBerry RouterBy default, the BlackBerry Enterprise Server sends the initial bulk load of PIM data during the BlackBerry device implementation process over the wireless network. To save bandwidth, you can set the bulk load of PIM data to occur through the BlackBerry Router, over the corporate LAN. PIM data is transferred when users connect their BlackBerry devices to their computers. Users must have the device manager installed.
1. In the BlackBerry Manager, in the left pane, click BlackBerry Domain.
2. On the Global tab, click Edit Properties.
3. Click IT Policy.
4. In the IT Policy Administration section, double-click IT Policies.
5. Perform one of the following actions:
6. Click OK.
7. Instruct users to connect their BlackBerry devices to their computers and start the device manager. See the BlackBerry Enterprise Server Upgrade Guide for more information on sending the device manager to user computers.
Action Procedure
Turn off the wireless initial PIM synchronization using the default IT policy.
1. In the list of policies, click Default.
2. Click Properties.
3. Click PIM Sync Policy Group.
4. Click the Disable Wireless Bulk Loads policy rule.
5. In the drop-down list, click True.
Create a new IT policy, turn off the wireless initial PIM synchronization, and send the policy to user accounts.
1. Click New.
2. Type a policy name.
3. Click PIM Sync Policy Group.
4. Click the Disable Wireless Bulk Loads policy rule.
5. In the drop-down list, click True.
6. Click OK.
7. Click OK again.
8. In the IT Policy Administration section, double-click IT Policies.
9. In the left pane, click a user account.
10. In the right pane, click the new policy.

44
BlackBerry Enterprise Server for Microsoft Exchange System Administration Guide
Wireless enterprise activation passwordsThe wireless enterprise activation password is specific to a user account. The wireless enterprise activation password expires after 48 hours by default or when the user unsuccessfully enters the wireless enterprise activation password five times on the BlackBerry device. If a user has received a wireless enterprise activation password, you cannot generate a new wireless enterprise activation password for the user until the active password has expired.
After the user types a wireless enterprise activation password on a BlackBerry device once, the password becomes inactive.
Customize the wireless enterprise activation password and messageCustomize the default wireless enterprise activation message that users receive in their desktop messaging program to make sure the message conforms to your corporate messaging policy or to provide support contact information to help users troubleshoot the device activation.
1. In the BlackBerry Manager, in the left pane, click BlackBerry Domain.
2. On the Global tab, click Edit Properties.
3. Click General.
4. In the Administration section, perform the following tasks:
5. Click OK.
Send a wireless enterprise activation password to a user account1. In the BlackBerry Manager, in the left pane, click a BlackBerry Enterprise Server.
2. On the Users tab, click a user account.
3. Click Service Access.
4. Perform one of the following actions:
Action Procedure
Customize the wireless enterprise activation message.
1. Double-click Custom Activation Email Message.
2. Type the desired parameters, subject, and message.
Set the wireless enterprise activation password length.
1. Double-click Auto-generated password length.
2. Type a wireless enterprise activation length.
Set the wireless enterprise activation type. > In the Auto-generated password type drop-down list, click a password type.
Tip: Click the 7100 Friendly password type for users who have the BlackBerry 7100 Series. The password consists of characters that require only one tap on a specific key at a time.
Action Procedure
Generate the wireless enterprise activation password and send it to the user in a message.
1. Click Generate and Email Activation Password.
2. Click OK.

45
6: Implementing BlackBerry devices
Send a wireless enterprise activation password to a group1. In the BlackBerry Manager, in the left pane, click User Groups.
2. On the User Groups List tab, click a group.
3. Click Service Access.
4. Click Generate and Email Activation Password.
5. Click OK.
Option 3: Implementing BlackBerry devices using the desktop managerConnect BlackBerry devices to user computers on which the desktop manager is installed to permit users to control the initial activation and implementation of BlackBerry devices.
When the BlackBerry device is connected to user computers during the implementation process, PIM data is sent to the BlackBerry device over the LAN through the BlackBerry Router instead of over the wireless network. If the connection to the BlackBerry Router is interrupted, the transfer of data continues over the wireless network.
Implement a BlackBerry device using the desktop manager1. Verify that the desktop manager is installed on the user’s computer.
2. Instruct the user to start the desktop manager and connect the BlackBerry device to the computer.
A message prompts the user to assign the BlackBerry device to their mail account. A second message prompts the user to generate an encryption key to activate the BlackBerry device. When the activation completes, messages and PIM data are loaded onto the BlackBerry device.
Protecting lost or stolen BlackBerry devicesIf a user misplaces a BlackBerry device or has a BlackBerry device stolen, you can protect the data on the BlackBerry device by using the BlackBerry Manager to issue IT commands to lock the BlackBerry device or make the BlackBerry device unavailable.
Define the activation password and set the password expiration time.
1. Click Set Activation Password.
2. Type a wireless enterprise activation password.
Note: Accented characters are not supported.
3. Retype the password to confirm it.
4. In the Password Expires in drop-down list, click an expiration time.
5. Click OK.
6. Notify the user of the new password.
Action Procedure

46
BlackBerry Enterprise Server for Microsoft Exchange System Administration Guide
Protect a lost BlackBerry device1. In the BlackBerry Manager, in the left pane, click a BlackBerry Enterprise Server.
2. On the Users tab, click a user account.
3. Click IT Admin.
4. Click Set Password and Lock Handheld.
5. In the New Password and New Password Again fields, type a password that is 4 to 14 characters long.
6. Click OK.
Protect a stolen BlackBerry device1. In the BlackBerry Manager, in the left pane, click a BlackBerry Enterprise Server.
2. On the Users tab, click a user account.
3. Click IT Admin.
4. Click Erase Data and Disable Handheld.
5. Click Yes.
Issuing existing BlackBerry devices to new usersTo issue an existing BlackBerry device to a new user, prepare the BlackBerry device for redistribution by deleting the previous user’s application data from the BlackBerry device and adding or removing applications. To remove all applications and data from the BlackBerry device, return the BlackBerry device to its default application configuration.
Prepare a BlackBerry device for redistribution> Perform any of the following actions:
Warning: Do not use special characters when you create the password in case the BlackBerry device does not accept special characters.
Action Procedure
Delete the previous user’s application data wirelessly and make the BlackBerry device unavailable.
> Make the BlackBerry device unavailable, and delete BlackBerry device data. See “Protect a stolen BlackBerry device” on page 46 for more information.
Delete the previous user’s application data using the BlackBerry Manager.
1. Connect the BlackBerry device to the computer on which the BlackBerry Manager is installed.
2. In the BlackBerry Manager, in the left pane, click Local Ports (Device Management).
3. In the Connection list, click a connection.
4. Click Wipe Device File System.
5. Click Yes.
6. If prompted, type the BlackBerry device password to complete the task.

47
6: Implementing BlackBerry devices
Redistribute the BlackBerry device to a user> When a user receives a replacement BlackBerry device, implement the BlackBerry device to register the new
PIN for message redirection. See “Option 2: Implementing BlackBerry devices wirelessly” on page 42 for more information.
Install or remove applications from the BlackBerry device.
1. Connect the BlackBerry device to the computer on which the BlackBerry Manager is installed.
2. In the BlackBerry Manager, in the left pane, click Local Ports (Device Management).
3. In the Connection list, click a connection.
4. Click Load Device (Interactive).
5. Click a software configuration.
6. Click OK.
7. In the Device Software Configuration Screen, perform one of the following actions:
• Clear the check boxes beside the applications to remove.
• Select the check boxes beside the applications to install.
8. Complete the application loader wizard.
Return a BlackBerry device to the factory default state.
1. Connect the BlackBerry device to the computer on which the BlackBerry Manager is installed.
2. In the BlackBerry Manager, in the left pane, click Local Ports (Device Management).
3. In the Connection list, click a connection.
4. Click Nuke Device.
5. Click Yes.
6. Click Load Device (Interactive).
7. Click a software configuration.
8. Click OK.
9. Complete the application loader wizard.
Note: You can turn off message prepopulation if a user backs up the previously-received messages on the computer before receiving a replacement BlackBerry device. See “Prevent a user’s messages from loading onto a BlackBerry device” on page 42 for more information.
Action Procedure

48
BlackBerry Enterprise Server for Microsoft Exchange System Administration Guide

7
Making BlackBerry MDS Studio Applications available to users
Setting up BlackBerry MDS ServicesConfigure a connection between the BlackBerry Enterprise Server and a BlackBerry MDS Services server to make BlackBerry MDS Studio Applications available to users. BlackBerry MDS Studio Applications are published in the BlackBerry MDS Studio Application Repository by developers. See the BlackBerry MDS Studio Developer Guide for more information. Notify developers of changes made to the BlackBerry MDS Services server and repository.
Assign a BlackBerry MDS Services server to a BlackBerry Enterprise Server
1. In the BlackBerry Manager, in the left pane, click a BlackBerry Enterprise Server.
2. On the Server Configuration tab, click Edit Properties.
3. Click MDS Services.
4. Click BlackBerry MDS Services Server URL.
5. In the drop-down list, click the BlackBerry MDS Services server.
6. Click OK.
Setting up BlackBerry MDS ServicesConfiguring which BlackBerry MDS Studio Applications can be installed on BlackBerry devicesPreparing BlackBerry devices to install BlackBerry MDS Studio ApplicationsSending BlackBerry MDS Studio Applications to BlackBerry devicesRemoving BlackBerry MDS Studio ApplicationsMonitoring BlackBerry MDS Services messagesManage the connection between the BlackBerry MDS Services and the connection service
Notes: If your BlackBerry MDS Services server has an HTTP URL, you are prompted to install a Secure Sockets Layer (SSL) certificate the first time you select the BlackBerry MDS Services server in the BlackBerry Manager. See “Establish a trusted connection between the BlackBerry Enterprise Server and a BlackBerry MDS Services server that uses HTTPS” on page 51 for more information.
If the BlackBerry MDS Connection Service uses a proxy server, you must configure the connection service to connect directly to the BlackBerry MDS Services server. See “Configuring the connection service to use a proxy server” on page 84 for more information.

50
BlackBerry Enterprise Server for Microsoft Exchange System Administration Guide
Configure the BlackBerry MDS Services to use a proxy server to connect to Web ServicesConfigure the BlackBerry MDS Services property file to permit the BlackBerry MDS Services to connect to Web Services through a proxy server.
BlackBerry MDS Services support authentication with proxy servers that use basic HTTP and NT LAN Manager (NTLM) authentication. BlackBerry MDS Services detect which authentication method the proxy server uses. If the proxy server uses NTLM authentication, configure the user name in the proxy.properties file using the format domain/username. You can configure BlackBerry MDS Services to authenticate with the proxy server using an existing user account or an account specifically assigned to BlackBerry MDS Services.
By default, the BlackBerry MDS Services connect directly to the localhost. You can configure a proxy exclusion list to permit the BlackBerry MDS Services to connect to specified hosts directly.
1. In <drive:>\Program Files\Research In Motion\BlackBerry MDS Services 4.1.0\config, open proxy.properties.
2. Complete the following actions:
3. Save the file.
4. In the BlackBerry Manager, in the left pane, click a BlackBerry MDS Services server.
5. On the MDS Services tab, click Common.
6. Click Stop Service.
7. When the status displays “Stopped,” click Start Service.
Warning: Do not remove any of the properties in the proxy.properties file. If a property is removed from the file, the BlackBerry MDS Services will not process the information in the file.
Action Procedure
Activate the proxy.properties file. > Remove the comment signs from the beginning of each proxy server property in the file.
Configure the proxy server host. > Set proxyHost to the name of the computer where the proxy server is installed.
Configure the proxy server port. > Set proxyPort to the port number of the proxy server on the host.
If the proxy server requires BlackBerry MDS Services to authenticate with it, configure a user name.
> Set proxyUsername to the user name the BlackBerry MDS Services use to authenticate with the proxy server.
If the proxy server requires BlackBerry MDS Services to authenticate with it, configure a password.
> Set proxyPassword property to the password the BlackBerry MDS Services use to authenticate with the proxy server.
Note: When you save the file, the password is removed.
Configure a proxy exclusion list. > Set nonProxyHosts to the host names or URLs of servers that the BlackBerry MDS Services can connect to directly.
Note: You can use wildcards when you add server hosts to the proxy exclusion list. Use the pipe (|) symbol to separate multiple entries.
Permit BlackBerry MDS Services to connect to Web Services through the proxy server.
> Set proxyEnabled to yes.

51
7: Making BlackBerry MDS Studio Applications available to users
Permit BlackBerry MDS Studio Applications that use HTTPS to access Web ServicesConfigure whether BlackBerry MDS Studio Applications that use HTTPS to connect to Web Services on web servers can be installed on BlackBerry devices.
1. In the BlackBerry Manager, in the left pane, click a BlackBerry MDS Services server.
2. On the MDS Services tab, click Edit Properties.
3. Click General.
4. Click Allow Web Services Access over SSL.
5. In the drop-down list, click True.
6. Click OK.
7. Click Common.
8. Click Stop Service.
9. When the status displays “Stopped,” click Start Service.
Establish a trusted connection between the BlackBerry Enterprise Server and a BlackBerry MDS Services server that uses HTTPSIf a BlackBerry MDS Services server has an HTTPS URL, you are prompted to view and install an SSL certificate. This certificate is required to permit BlackBerry MDS Studio Applications that use HTTPS to access Web Services to be installed on BlackBerry devices. See “Permit BlackBerry MDS Studio Applications that use HTTPS to access Web Services” on page 51 for more information.
1. In the BlackBerry Manager, in the left pane, click a BlackBerry MDS Services server with an HTTPS URL.
2. In the certificate installation dialog box, click View Certificate.
3. Review the certificate information.
4. Click Install Certificate.
5. Complete the installation wizard by accepting the default settings.
6. At the login prompt, click Cancel.
Configuring which BlackBerry MDS Studio Applications can be installed on BlackBerry devicesBlackBerry MDS Studio Application developers can sign BlackBerry MDS Studio Applications with a digital certificate. You manage trusted certificates that the BlackBerry MDS Services use to authenticate BlackBerry MDS Studio Applications. If BlackBerry MDS Studio Applications do not have trusted certificates, configure whether unsigned BlackBerry MDS Studio Applications published in the repository can be installed on BlackBerry devices.

52
BlackBerry Enterprise Server for Microsoft Exchange System Administration Guide
Manage a trusted certificate1. In the BlackBerry Manager, in the left pane, click a BlackBerry MDS Services server.
2. Perform any of the following actions:
Permit unsigned BlackBerry MDS Studio Applications to be installed on BlackBerry devices1. In the BlackBerry Manager, in the left pane, click a BlackBerry MDS Services server.
2. On the MDS Services tab, click Edit Properties.
3. Click General.
4. Click Allow Unsigned Applications.
5. In the drop-down list, click True.
6. Click OK.
7. Click Common.
8. Click Stop Service.
9. When the status displays “Stopped,” click Start Service.
Action Procedure
Add a certificate to the BlackBerry MDS Services server.
1. Click Add Certificate.
2. In the Alias field, type a certificate name.
3. In the Certificate file field, type the path to the certificate and the .cer file name.
4. Click OK.
Remove a certificate from the BlackBerry MDS Services server.
1. On the MDS Services tab, click Edit Properties.
2. Click Certificate.
3. Double-click BlackBerry MDS Services Certificate Definition.
4. Click a certificate.
5. Click Remove.
6. Click OK.
7. Click OK again.

53
7: Making BlackBerry MDS Studio Applications available to users
Preparing BlackBerry devices to install BlackBerry MDS Studio ApplicationsUsers must install and activate the BlackBerry MDS Runtime on the BlackBerry device before BlackBerry MDS Studio Applications can be installed. You can install the BlackBerry MDS Runtime wirelessly or instruct users to install the BlackBerry MDS Runtime using the application loader. See “Sending applications to BlackBerry devices wirelessly” on page 40 for more information.
Create and assign device policies to user accounts and user groups to:
• control a user’s ability to discover, install, and remove BlackBerry MDS Studio Applications on the BlackBerry device
• control whether BlackBerry MDS Studio Applications can access other data and applications on the BlackBerry device
• configure local storage capacity for BlackBerry MDS Studio Application messages on the BlackBerry device
Define and manage a device policy to control BlackBerry device access to BlackBerry MDS Studio Applications1. In the BlackBerry Manager, in the left pane, click a BlackBerry MDS Services server.
2. On the MDS Services tab, click Edit Properties.
3. Click Device Policies.
4. Double-click BlackBerry MDS Services Device Policy Definition.
5. Perform one of the following actions:
Assign a device policy to a user account or groupDepending on your administrator role, you can assign device policies to user accounts and user groups. A user group must contain at least one user account before you can assign a device policy to the group and all user accounts in a group must be connected to the same BlackBerry MDS Services server.
Action Procedure
Create a device policy. 1. Click New.
2. Double-click Policy Name.
3. Type a device policy name.
4. Set the device policy settings. See the Policy Reference Guide for more information.
5. Click OK.
Remove a device policy. 1. Click the device policy name.
2. Click Remove.
3. Click OK.

54
BlackBerry Enterprise Server for Microsoft Exchange System Administration Guide
1. In the BlackBerry Manager, in the left pane, perform one of the following actions:
2. Click Assign Device Policy.
3. In the Device Policy drop-down list, click a policy.
4. Click OK.
Sending BlackBerry MDS Studio Applications to BlackBerry devices Depending on your administrator role, you can send BlackBerry MDS Studio Applications and upgrades to users and user groups.
Action Procedure
Assign a device policy to a group of user accounts.
1. Click a user group.
2. On the Users tab, right-click a column heading.
3. In the Available columns list, click MDS Services Server URL.
4. Click Insert.
5. Click OK.
6. Click the MDS Services Server URL column heading to sort user accounts by the BlackBerry MDS Services server.
7. Click user accounts connected to the same BlackBerry MDS Services server.
8. On the Group Configuration tab, click MDS Services.
Assign a device policy to a user account. 1. Click a BlackBerry MDS Services server.
2. Click Devices Registered.
3. On the Devices Registered tab, click a user account.
4. Click Common.

55
7: Making BlackBerry MDS Studio Applications available to users
Install a BlackBerry MDS Studio Application on a BlackBerry device1. In the BlackBerry Manager, in the left pane, perform one of the following actions:
2. Click Next.
3. Perform the following actions:
Action Procedure
Install a BlackBerry MDS Studio Application on BlackBerry devices for a group of user accounts that use the same BlackBerry MDS Services.
1. Click a group.
2. On the Users tab, right-click a column heading.
3. In the Available columns list, click MDS Services Server URL.
4. Click Insert.
5. Click OK.
6. Click the MDS Services Server URL column heading to sort users by the BlackBerry MDS Services server.
7. Click user accounts connected to the same BlackBerry MDS Services server.
8. On the Group Configuration tab, click MDS Services.
9. Click Install on Device.
10. Click the BlackBerry MDS Studio Application to install.
Install a BlackBerry MDS Studio Application on a single BlackBerry device.
1. Click a BlackBerry MDS Services server.
2. Click Application Registry.
3. Click a BlackBerry MDS Studio Application.
4. Click Device Management.
5. Click Install on Device.
6. In the Install application on devices drop-down list, click without application installed.
7. Clear the Select all check box.
8. Click the PIN of the BlackBerry device to push the BlackBerry MDS Studio Application to.
Action Procedure
Set the number of BlackBerry devices to send the BlackBerry MDS Studio Application to at one time.
> In the Group size for pushing field, type a number.
Set how frequently, in minutes, to send the BlackBerry MDS Studio Application installation request to BlackBerry devices.
> In the Push interval (minute) field, type a number.
Set a specific time at which to send the BlackBerry MDS Studio Application to BlackBerry devices.
1. Select the Schedule check box.
2. In the Start at drop-down list, click a date.
3. Set the start time.
Note: If you do not schedule a start time, the BlackBerry MDS Services send the BlackBerry MDS Studio Application immediately.
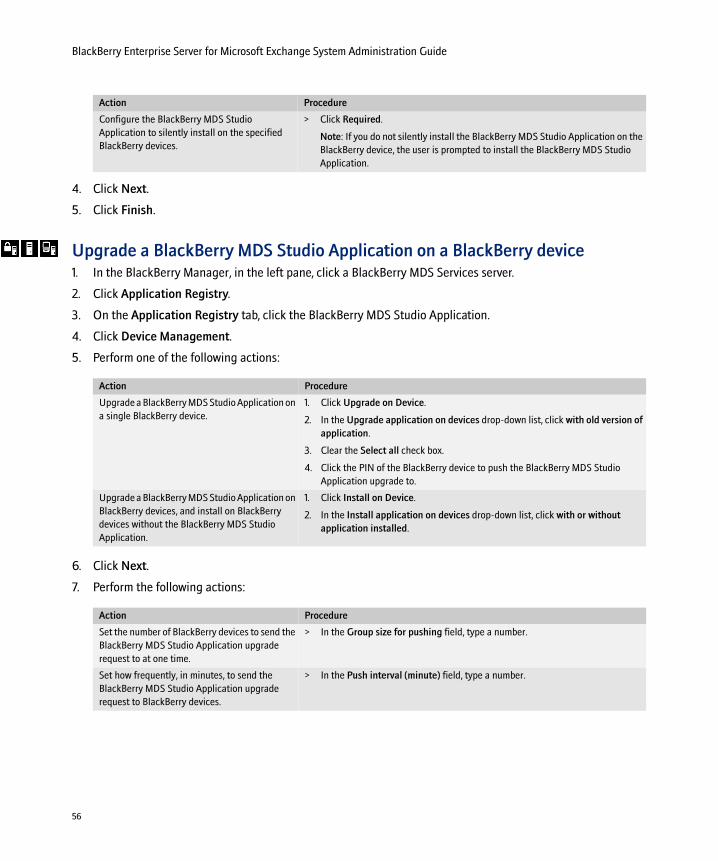
56
BlackBerry Enterprise Server for Microsoft Exchange System Administration Guide
4. Click Next.
5. Click Finish.
Upgrade a BlackBerry MDS Studio Application on a BlackBerry device1. In the BlackBerry Manager, in the left pane, click a BlackBerry MDS Services server.
2. Click Application Registry.
3. On the Application Registry tab, click the BlackBerry MDS Studio Application.
4. Click Device Management.
5. Perform one of the following actions:
6. Click Next.
7. Perform the following actions:
Configure the BlackBerry MDS Studio Application to silently install on the specified BlackBerry devices.
> Click Required.
Note: If you do not silently install the BlackBerry MDS Studio Application on the BlackBerry device, the user is prompted to install the BlackBerry MDS Studio Application.
Action Procedure
Upgrade a BlackBerry MDS Studio Application on a single BlackBerry device.
1. Click Upgrade on Device.
2. In the Upgrade application on devices drop-down list, click with old version of application.
3. Clear the Select all check box.
4. Click the PIN of the BlackBerry device to push the BlackBerry MDS Studio Application upgrade to.
Upgrade a BlackBerry MDS Studio Application on BlackBerry devices, and install on BlackBerry devices without the BlackBerry MDS Studio Application.
1. Click Install on Device.
2. In the Install application on devices drop-down list, click with or without application installed.
Action Procedure
Set the number of BlackBerry devices to send the BlackBerry MDS Studio Application upgrade request to at one time.
> In the Group size for pushing field, type a number.
Set how frequently, in minutes, to send the BlackBerry MDS Studio Application upgrade request to BlackBerry devices.
> In the Push interval (minute) field, type a number.
Action Procedure

57
7: Making BlackBerry MDS Studio Applications available to users
8. Click Next.
9. Click Finish.
Removing BlackBerry MDS Studio ApplicationsDevelopers publish BlackBerry MDS Studio Applications in the repository. You manage the BlackBerry MDS Studio Applications in the repository. Multiple versions of a BlackBerry MDS Studio Application can be published in the repository. Depending on your administrator role, you can remove BlackBerry MDS Studio Applications from the repository and from BlackBerry devices.
If you remove a BlackBerry MDS Studio Application from the repository, the application continues to function on the BlackBerry devices on which the BlackBerry MDS Studio Application is installed. If you do not want a previously installed BlackBerry MDS Studio Application to be used by users, remove the BlackBerry MDS Studio Application from the repository and then uninstall the BlackBerry MDS Studio Application from BlackBerry devices.
Remove a BlackBerry MDS Studio Application from the repository1. In the BlackBerry Manager, in the left pane, click a BlackBerry MDS Services server.
2. Click Application Registry.
3. On the Application Registry tab, click the BlackBerry MDS Studio Application to remove.
4. Click Application Management.
5. Click Delete Application.
6. Click Yes.
Set a specific time at which to send the BlackBerry MDS Studio Application upgrade request to BlackBerry devices.
1. Select the Schedule check box.
2. In the Start at drop-down list, click a date.
3. Set the start time.
4. In the Expire at drop-down list, click a date.
5. Set the expire time.
Note: If you do not schedule a start time, the BlackBerry MDS Services send the BlackBerry MDS Studio Application immediately.
Configure the BlackBerry MDS Studio Application to silently upgrade on the specified BlackBerry devices.
> Click Required.
Note: If you do not silently upgrade the BlackBerry MDS Studio Application on the BlackBerry device, the user is prompted to upgrade the BlackBerry MDS Studio Application.
Action Procedure

58
BlackBerry Enterprise Server for Microsoft Exchange System Administration Guide
Remove a BlackBerry MDS Studio Application from a BlackBerry device1. In the BlackBerry Manager, in the left pane, perform one of the following actions:
2. Click Next.
3. Perform the following actions:
Action Procedure
Remove a BlackBerry MDS Studio Application from BlackBerry devices of a group of user accounts that use the same BlackBerry MDS Services.
1. Click a user group.
2. On the Users tab, right-click a column heading.
3. In the Available columns list, click MDS Services Server URL.
4. Click Insert.
5. Click OK.
6. Click the MDS Services Server URL column heading to sort users by the BlackBerry MDS Services server.
7. Click users connected to the same BlackBerry MDS Services server.
8. On the Group Configuration tab, click MDS Services.
9. Click Uninstall on Device.
10. Click the BlackBerry MDS Studio Application to uninstall.
Remove a BlackBerry MDS Studio Application from a single BlackBerry device.
1. Click a BlackBerry MDS Services server.
2. Click Applications Installed.
3. On the Applications Installed tab, click the BlackBerry MDS Studio Application to remove from the BlackBerry device.
4. Click Device Management.
5. Click Uninstall on Device.
6. In the Uninstall application on devices drop-down list, click with application installed.
7. Clear the Select all check box.
8. Click the PIN of the BlackBerry device from which to remove the BlackBerry MDS Studio Application.
Action Procedure
Set the number of BlackBerry devices to send the BlackBerry MDS Studio Application uninstall request to at one time.
> In the Group size for pushing field, type a number.
Set how frequently, in minutes, to send the BlackBerry MDS Studio Application uninstall request to BlackBerry devices.
> In the Push interval (minute) field, type a number.

59
7: Making BlackBerry MDS Studio Applications available to users
4. Click Next.
5. Click Finish.
Monitoring BlackBerry MDS Services messagesMonitor the message traffic between the BlackBerry MDS Services and BlackBerry devices, and the message traffic generated by BlackBerry MDS Studio Applications. Monitored messages display in the BlackBerry Manager. An excessive number of messages from a specific BlackBerry MDS Studio Application or messages of a particular type might indicate that a problem exists with a BlackBerry device, a BlackBerry MDS Studio Application, or Web Services.
Create filters to block notifications sent too frequently from Web Services hosts. When you create a filter for a specific host, the BlackBerry MDS Services does not process or send the messages from that host to BlackBerry devices.
Set up monitoring of BlackBerry MDS Studio Application messages1. In the BlackBerry Manager, in the left pane, click a BlackBerry MDS Services server.
2. On the MDS Services tab, click Edit Properties.
3. Click Message Monitors.
4. Double-click BlackBerry MDS Services Monitor Definition.
5. Click New.
6. Perform one of the following actions:
7. Click OK.
8. Click OK again.
Set a specific time at which to send the BlackBerry MDS Studio Application uninstall request to BlackBerry devices.
1. Click the Schedule check box.
2. In the Start at drop-down list, click a date.
3. Set the start time.
4. In the Expire at drop-down list, click a date.
5. Set the expire time.
Note: If you do not schedule a start time, the BlackBerry MDS Services send the removal request immediately.
Action Procedure
Monitor messages transmitted to and from a BlackBerry device.
> In the PIN field, type the PIN of the BlackBerry device to monitor.
Note: If monitoring multiple BlackBerry devices, use commas to separate PINs.
Monitor messages generated by a BlackBerry MDS Studio Application.
> In the Application drop-down list, click the BlackBerry MDS Studio Application name and version.
Action Procedure

60
BlackBerry Enterprise Server for Microsoft Exchange System Administration Guide
View BlackBerry MDS Studio Application messages1. In the BlackBerry Manager, in the left pane, click a BlackBerry MDS Services server.
2. Click Monitor Messages.
3. On the Monitor Messages tab, perform any of the following actions:
4. Click Search.
Remove all monitored messages from the BlackBerry MDS Services server1. In the BlackBerry Manager, in the left pane, click a BlackBerry MDS Services server.
2. Click Monitor Messages.
3. On the Monitor Messages tab, click Purge Messages.
Filter communication from a Web Services host1. In the BlackBerry Manager, in the left pane, click a BlackBerry MDS Services server.
2. On the MDS Services tab, click Edit Properties.
3. Click Filters.
4. Double-click BlackBerry MDS Services Filter Definition.
5. Perform any of the following actions:
6. Click OK.
Action Procedure
View all messages sent to and from a specific BlackBerry device.
> In the Device field, type the PIN.
View all messages sent to and from a specific BlackBerry MDS Studio Application.
> In the Application drop-down list, click the BlackBerry MDS Studio Application name.
Filter displayed messages for a specific BlackBerry device or BlackBerry MDS Studio Application in the message list by date and time.
1. In the Start time drop-down list, click the date.
2. Click the numbers in the time field, and use the arrow buttons to set the time in hours, minutes, and seconds.
3. Click End time to set a date and time after which messages are not displayed.
Action Procedure
Block communication from a Web Services host. 1. Click New.
2. In the Host/Address field, type the URL for the Web Services host.
3. Click OK.
Permit communication from a Web Services host that was previously blocked.
1. Click a filter.
2. Click Remove.

61
7: Making BlackBerry MDS Studio Applications available to users
Manage the connection between the BlackBerry MDS Services and the connection service1. In the BlackBerry Manager, in the left pane, click a BlackBerry MDS Services server.
2. On the MDS Services tab, click Edit Properties.
3. Click Connection Service.
4. Double-click BlackBerry MDS Connection Service Definition.
5. Perform any of the following actions:
Action Procedure
Add a new connection service to the list of connection services available to the BlackBerry MDS Services.
1. Click New.
2. Double-click URL.
3. Type the full URL or domain name and port number for the connection service.
4. Click OK.
5. Click OK again.
Remove a connection service from the list of connection services available to the BlackBerry MDS Services.
1. Click a connection service URL.
2. Click Remove.
3. Click OK.

62
BlackBerry Enterprise Server for Microsoft Exchange System Administration Guide

8
Customizing BlackBerry messaging
Managing message redirectionYou can control which messages the BlackBerry Enterprise Server redirects to BlackBerry devices, and when. Managing message redirection helps control the size of the messaging queue and the load on the messaging agent to process redirection requests. By default, message redirection is turned on when user accounts are first added to the BlackBerry Enterprise Server.
Define whether the BlackBerry Enterprise Server holds or forwards messages to which no filters apply. You can specify the Inbox which subfolders from which the BlackBerry Enterprise Server can redirect messages.
You can also stop message redirection to a BlackBerry device temporarily, for example, if a user is traveling outside of a wireless coverage area and does not want the BlackBerry Enterprise Server to forward messages to the BlackBerry device during that time. When you turn off message redirection for a user account, the user can send messages, but cannot receive them. The user can manually re-enable redirection on the BlackBerry device.
Manage message redirection to a BlackBerry device1. In the BlackBerry Manager, in the left pane, click a BlackBerry Enterprise Server.
2. Click the Users tab.
Managing message redirectionManaging redirection filtersManaging wireless message reconciliationUsing signatures and disclaimers in messagesMonitoring messages that users send from their BlackBerry devicesManaging the message queueManaging the wireless backup and restore of PIM dataSetting address book fields for synchronization and lookupsCustomizing how BlackBerry devices look up users in the global address listRestricting address lookup supportSending messages to usersManaging instant messaging

64
BlackBerry Enterprise Server for Microsoft Exchange System Administration Guide
3. Perform any of the following actions:
Managing redirection filtersRedirection filters define which messages the BlackBerry Enterprise Server redirects to BlackBerry devices. When a user receives a message, the BlackBerry Enterprise Server applies filters to determine how to direct the message: forward, forward with priority, or do not forward to the BlackBerry device.
Filters that you set on the BlackBerry Enterprise Server take precedence over the filters that users define using the desktop manager.
There are two types of filters that you can create on the BlackBerry Enterprise Server:
• Global filters apply to all user accounts on the BlackBerry Enterprise Server
• User filters apply to specific user accounts
Users cannot view global filters. If you define global filters, inform users so that they understand why some of their filter rules might apply to incoming messages.
If you change global filters, the BlackBerry Enterprise Server reads the filter changes immediately.
Create a global filterThe BlackBerry Enterprise Server applies filters to messages based on the order in which the filters appear.
1. In the BlackBerry Manager, in the left pane, click a BlackBerry Enterprise Server.
Action Procedure
Forward messages to the BlackBerry device when no filter rules apply.
1. Double-click a user account.
2. In the left pane, click Filters.
3. In the Default Action section, click Forward messages to BlackBerry device.
4. In the drop-down list, click True.
5. Click OK.
Redirect messages to subfolders in the Inbox to the BlackBerry device.
1. Click a user account.
2. Click Service Access.
3. Click Choose Folders for Redirection.
4. Select the check box beside the folders to redirect messages from.
5. Click OK.
Do not synchronize sent messages between the BlackBerry device and the desktop messaging program.
1. Double-click a user account.
2. Click Redirection.
3. Click Do Not Save Sent Messages.
4. In the drop-down list, click True.
5. Click OK.
Turn off message redirection. 1. Click a user account.
2. Click Service Access.
3. Click Disable Redirection.
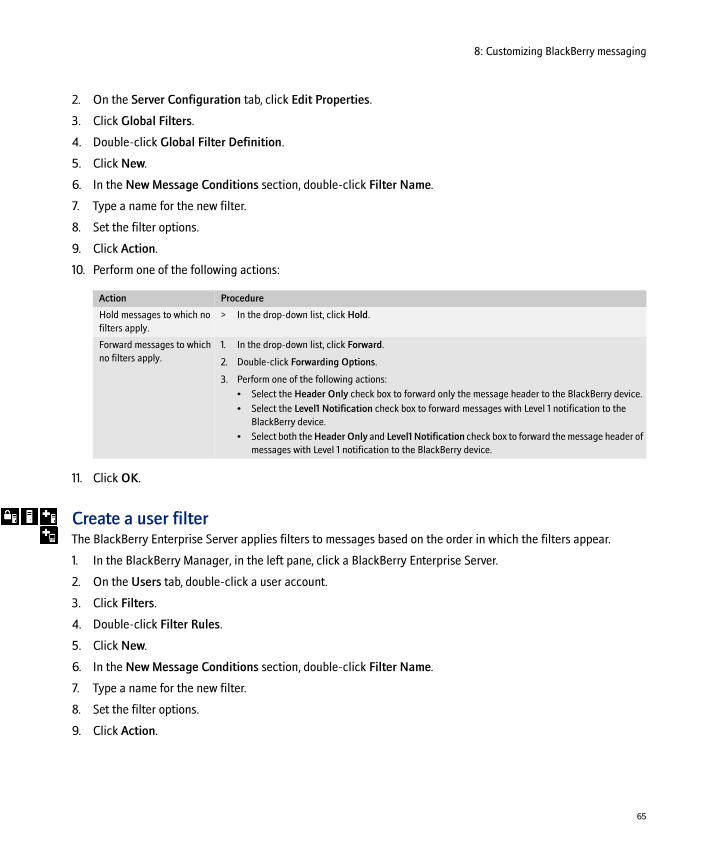
65
8: Customizing BlackBerry messaging
2. On the Server Configuration tab, click Edit Properties.
3. Click Global Filters.
4. Double-click Global Filter Definition.
5. Click New.
6. In the New Message Conditions section, double-click Filter Name.
7. Type a name for the new filter.
8. Set the filter options.
9. Click Action.
10. Perform one of the following actions:
11. Click OK.
Create a user filterThe BlackBerry Enterprise Server applies filters to messages based on the order in which the filters appear.
1. In the BlackBerry Manager, in the left pane, click a BlackBerry Enterprise Server.
2. On the Users tab, double-click a user account.
3. Click Filters.
4. Double-click Filter Rules.
5. Click New.
6. In the New Message Conditions section, double-click Filter Name.
7. Type a name for the new filter.
8. Set the filter options.
9. Click Action.
Action Procedure
Hold messages to which no filters apply.
> In the drop-down list, click Hold.
Forward messages to which no filters apply.
1. In the drop-down list, click Forward.
2. Double-click Forwarding Options.
3. Perform one of the following actions:
• Select the Header Only check box to forward only the message header to the BlackBerry device.
• Select the Level1 Notification check box to forward messages with Level 1 notification to the BlackBerry device.
• Select both the Header Only and Level1 Notification check box to forward the message header of messages with Level 1 notification to the BlackBerry device.

66
BlackBerry Enterprise Server for Microsoft Exchange System Administration Guide
10. Perform one of the following actions:
11. Click OK.
Manage a global filter1. In the BlackBerry Manager, in the left pane, click a BlackBerry Enterprise Server.
2. On the Server Configuration tab, click Edit Properties.
3. In the left pane, click Global Filters.
4. Double-click Global Filter Definition.
5. In the Filter Name list, click a filter.
6. Perform one of the following actions:
7. Click OK.
Action Procedure
Hold messages to which no filters apply.
> In the drop-down list, click Hold.
Forward messages to which no filters apply.
1. In the drop-down list, click Forward.
2. Double-click Forwarding Options.
3. Perform one of the following actions:
• Select the Header Only check box to forward only the message header to the BlackBerry device.
• Select the Level1 Notification check box to forward messages with Level 1 notification to the BlackBerry device.
• Select both the Header Only and Level1 Notification check box to forward the message header of messages with Level 1 notification to the BlackBerry device.
Action Procedure
Turn on a filter. 1. Click Properties.
2. Click Enabled.
3. In the drop-down list, click True.
Edit a filter. 1. Click Properties.
2. Click Edit.
3. Change the desired settings.
4. Click OK.
Change the order of filters. 1. Click Move Up or Move Down to move the filter higher or lower in the list.
2. Click OK.
Note: The BlackBerry Enterprise Server applies filters to new messages in the order in which the filters appear. Make sure the filters appear from least to most restrictive.
Delete a filter. > Click Remove.

67
8: Customizing BlackBerry messaging
Manage a user filter1. In the BlackBerry Manager, in the left pane, click a BlackBerry Enterprise Server.
2. On the Users tab, double-click a user account.
3. In the left pane, click Filters.
4. Double-click Filter Rules.
5. In the Filter Name list, click a filter.
6. Perform one of the following actions:
7. Click OK.
Managing wireless message reconciliationWireless message reconciliation enables users on the BlackBerry Enterprise Server to wirelessly manage their messages, so that message status changes are automatically synchronized between the BlackBerry device, and the desktop messaging program. Wireless message reconciliation is turned on by default on the BlackBerry Enterprise Server.
Turn off wireless message reconciliation if you only want messages to be reconciled when the user connects their device to the desktop manager.
The hard delete feature enables users to wirelessly remove a message from BlackBerry devices when they permanently delete a message from their mailbox by pressing SHIFT+DELETE, moving a message to a personal folder, or archiving a message in Microsoft Outlook. Turn on the hard delete feature to enable users to manage messages on BlackBerry devices by reconciling permanently deleted messages between the desktop messaging program and BlackBerry devices.
Action Procedure
Turn on a filter. 1. Click Properties.
2. Click Enabled.
3. In the drop-down list, click True.
Edit a filter. 1. Click Properties.
2. Click Edit.
3. Change the desired settings.
4. Click OK.
Change the order of filters. 1. Click Move Up or Move Down to move the filter higher or lower in the list.
2. Click OK.
Note: The BlackBerry Enterprise Server applies filters to new messages in the order in which the filters appear. Make sure the filters appear from least to most restrictive.
Delete a filter. > Click Remove.

68
BlackBerry Enterprise Server for Microsoft Exchange System Administration Guide
Turn off wireless message reconciliation1. In the BlackBerry Manager, in the left pane, click a BlackBerry Enterprise Server.
2. On the Server Configuration tab, click Edit Properties.
3. Click Messaging.
4. In the Messaging Options section, click Wireless Message Reconciliation Enabled.
5. In the drop-down list, click False.
6. Click OK.
Reconcile permanently deleted messages1. In the BlackBerry Manager, in the left pane, click a BlackBerry Enterprise Server.
2. Click Edit Properties.
3. Click Messaging.
4. In the Messaging Options section, click Hard Deletes Reconciliation.
5. In the drop-down list, click True.
6. Click OK.
7. On the computer on which the BlackBerry Dispatcher is installed, in Windows Services, restart the BlackBerry Dispatcher.
Using signatures and disclaimers in messagesYou can add a standard disclaimer or other text to appear below user signatures on all messages that users on a BlackBerry Enterprise Server send from BlackBerry devices. Users cannot change the disclaimer. You can also set a signature for an individual user account to appear on all messages that the user on a BlackBerry Enterprise Server sends from the BlackBerry device. Users can change their signatures on the BlackBerry devices or in the desktop manager. To enforce any signature format policies in your organization, add the signature to the corporate disclaimer.
Add a signature to messages sent from a user’s BlackBerry device1. In the BlackBerry Manager, in the left pane, click a BlackBerry Enterprise Server.
2. On the Users tab, double-click a user account.
3. Click Redirection.
4. In the Signature field, type the signature to appear in messages sent from the user’s BlackBerry device.
5. Click OK.
6. Click OK again.

69
8: Customizing BlackBerry messaging
Add a disclaimer to messages sent from all users’ BlackBerry devices1. In the BlackBerry Manager, in the left pane, click a BlackBerry Enterprise Server.
2. On the Server Configuration tab, click Edit Properties.
3. Click Messaging.
4. In the Messaging Options section, double-click Disclaimer Text.
5. Type a disclaimer.
6. Click OK.
7. Click OK again.
Monitoring messages that users send from their BlackBerry devicesIf your corporate policy requires you to monitor messages the users send from BlackBerry devices, set a BCC address to retain a copy of all messages that users on a BlackBerry Enterprise Server send from BlackBerry devices.
Set the auto blind carbon copy (BCC) feature of the BlackBerry Enterprise Server to force all messages that are sent from BlackBerry devices to be blind carbon copied to specified recipients. This feature does not populate the BCC field of the original message, so the sender is unaware that the message is being BCCed.
Blind carbon copy a recipient on all messages1. In the BlackBerry Manager, in the left pane, click a BlackBerry Enterprise Server.
2. On the Server Configuration tab, click Edit Properties.
3. Click Messaging.
4. In the Messaging Options section, double-click Auto BCC Addresses.
5. Type the addresses, separated by a semicolon (;).
6. Click OK.
Managing the message queueYou can remove messages in the messaging queue to maintain user accounts that have high pending message counts. When you purge pending messages from the messaging queue, you prevent the BlackBerry Enterprise Server from sending the messages to the user’s BlackBerry device. Messages still appear in the user’s inbox.
Purge pending messages from the messaging queue1. In the BlackBerry Manager, in the left pane, click a BlackBerry Enterprise Server.
2. On the Users tab, click a user account.

70
BlackBerry Enterprise Server for Microsoft Exchange System Administration Guide
3. Click Service Control & Customization.
4. Click Purge Pending Messages.
5. Click OK.
Managing the wireless backup and restore of PIM dataAutomatic wireless backup is designed to back up user account settings and data from the BlackBerry device to the BlackBerry Enterprise Server automatically, without user involvement. Wireless backup on the BlackBerry Enterprise Server enables you to synchronize PIM data to new BlackBerry devices without impacting the performance of the messaging server.
See “Appendix: Wireless backup and restore” on page 127 for more information.
If the BlackBerry Enterprise Server is not writing a user’s PIM data from the BlackBerry device to the configuration database correctly, the existing backed up PIM data on the BlackBerry Enterprise Server might be corrupt. Delete the PIM data from the BlackBerry Enterprise Server. Deleting the PIM data forces the user’s BlackBerry device to synchronize with the BlackBerry Enterprise Server wirelessly.
Delete a user’s PIM data from the BlackBerry Enterprise Server1. In the BlackBerry Manager, in the left pane, click a BlackBerry Enterprise Server.
2. On the Users tab, click a user account.
3. Click Service Control & Customization.
4. Click Clear PIM Sync Backup Data.
5. Click OK.
Turn off wireless backup1. In the BlackBerry Manager, in the left pane, click a BlackBerry Enterprise Server.
2. On the Users tab, double-click a user account.
3. Click PIM Sync.
4. Click Automatic Wireless Backup Enabled.
5. In the drop-down list, click False.
6. Click OK.
Note: If the user account has wireless calendar synchronization turned on, pending calendar messages are also purged. However, those messages are resent later. Pending IT policies or IT admin commands are not purged.

71
8: Customizing BlackBerry messaging
Setting address book fields for synchronization and lookupsMap fields in the address book so that the fields in a contact on the user’s desktop messaging program synchronize to the fields you set on the user’s BlackBerry device. There are two types of field mappings that you can create on the BlackBerry Enterprise Server:
• Global field mappings apply to all user accounts in the BlackBerry Domain
• User field mappings apply to specific user accounts
You can map up to four custom fields that users define in a contact entry to BlackBerry devices. When users request a remote address look up from the Global Address List, the fields you set display on BlackBerry devices.
Map an address book field in the desktop messaging program to an address book field on all BlackBerry devices1. In the BlackBerry Manager, in the left pane, click BlackBerry Domain.
2. On the Global tab, click Service Control & Customization.
3. Click PIM Sync Global Field Mapping.
4. In the Desktop Field column, click a field.
5. In the Device Field column, in the drop-down list, click the BlackBerry device address book field to map to the desktop field.
6. Click OK.
Map an address book field in the desktop messaging program to an address book field on a specific BlackBerry device1. In the BlackBerry Manager, in the left pane, click a BlackBerry Enterprise Server.
2. On the Users tab, click a user account.
3. Click Service Control & Customization.
4. Click PIM Sync Field Mapping.
5. In the Desktop Field column, click a field.
6. In the Device Field column, in the drop-down list, click the BlackBerry device address book field to map to the desktop field.
7. Click OK.
Map a user-defined address book field to an address book field on all BlackBerry devices1. In the BlackBerry Manager, in the left pane, click BlackBerry Domain.
2. On the Global tab, click Service Control & Customization.

72
BlackBerry Enterprise Server for Microsoft Exchange System Administration Guide
3. Click Edit PIM Sync Global Field Mapping.
4. In the Desktop Field column, click User Defined String 1.
5. In the Device Field column, in the drop-down list, click a the custom BlackBerry device address book field to map to the desktop address book field.
6. Click OK.
Map a user-defined address book field to an address book field on a specific BlackBerry device1. In the BlackBerry Manager, in the left pane, click a BlackBerry Enterprise Server.
2. On the Users tab, click a user account.
3. In the lower pane, click Service Control & Customization.
4. Click Edit PIM Sync Field Mapping.
5. In the Desktop Field column, click User Defined String 1.
6. In the Device Field column, in the drop-down list, click a the custom BlackBerry device address book field to map to the desktop address book field.
7. Click OK.
Customizing how BlackBerry devices look up users in the global address listTo enable users to perform more comprehensive searches for addresses in the global address list, you can set the BlackBerry Enterprise Server to look up user addresses using Lightweight Directory Access Protocol (LDAP). LDAP uses an LDAP field as a filter for retrieving users with a specific company name. You can either select an existing LDAP field, or you can create a custom field.
Use LDAP to search for users in the global address list1. At the command prompt, browse to HKEY_LOCAL_MACHINE\Software\Research In Motion\BlackBerry
Enterprise Server\Agents.
2. Right-click Agents. Click New > DWORD Value.
3. Type LDAPSearch.
4. Double-click the new value.
5. In the Value data field, type 1.
6. Click OK.
7. On the computer on which the BlackBerry Enterprise Server is installed, in Windows Services, restart the BlackBerry Controller service.

73
8: Customizing BlackBerry messaging
Create a custom field for LDAP address lookups1. At the command prompt, type regedit.
2. In the left pane, browse to HKEY_LOCAL_MACHINE\Software\Research In Motion\BlackBerry Enterprise Server\Agents.
3. Create a String value called LDAPCompanyField.
4. Set the value to a string which represents the LDAP field that you want to use as the company name field.
5. On the computer on which the BlackBerry Enterprise Server is installed, in the Services window, restart the BlackBerry Controller service.
Restricting address lookup supportYou can restrict users from different organizations who reside on the same BlackBerry Enterprise Server from finding user addresses on BlackBerry devices that are not in their organization.
To use this feature, all users must have the same Company field name in their address profile in Microsoft Active Directory® to be able to look up each other on BlackBerry devices. If a user looks up a user address who has a different company name in the Company field, the address will not display on the BlackBerry device.
Enable addresses from the same company to display when users look up addresses on BlackBerry devices1. Verify that the users in the same organization have the same name in the Company field in their address
profile on the messaging server.
2. At the command prompt, browse to HKEY_LOCAL_MACHINE\Software\Research In Motion\BlackBerry Enterprise Server\Agents.
3. Right-click Agents. Click New > DWORD Value.
4. Type HostedServer.
5. Double-click the new value.
6. In the Value data field, type 1.
7. Click OK.
8. On the computer on which the BlackBerry Enterprise Server is installed, in the Services window, restart the BlackBerry Controller service.
Sending messages to usersUse the BlackBerry Manager to send a message or PIN message to users in the BlackBerry Domain. Because the messaging server does not process PIN messages, the PIN messaging feature is useful for informing users about messaging server outages.
BlackBerry devices do not filter PIN messages that are sent from the BlackBerry Manager.

74
BlackBerry Enterprise Server for Microsoft Exchange System Administration Guide
Send a message to selected users1. In the BlackBerry Manager, in the left pane, click a BlackBerry Enterprise Server.
2. On the Users tab, click a user account.
3. In the lower pane, click Account.
4. Click Send Message.
5. Complete the message wizard.
Send a message to all users1. In the BlackBerry Manager, in the left pane, click a BlackBerry Enterprise Server.
2. On the Server Configuration tab, click Account.
3. Click Send Message.
4. Complete the message wizard
Managing instant messagingThe collaboration service is designed to provide an encrypted connection between the instant messaging server and the instant messaging application on the BlackBerry device.
Set the number of open instant messaging sessions permitted between the collaboration service and the instant messaging server to control bandwidth and resource consumption in your environment. The collaboration service supports up to 2000 instant messaging session connections to the Live Communications Server or Sametime server for BlackBerry Instant Messaging. The number of instant messaging session connections that the collaboration service supports to the GroupWise instant messaging server is limited to the number of Windows sockets that are available.
You can control whether users using Sametime can see an instant messaging location icon (from a BlackBerry device or desktop computer) beside a session participant’s name. By default, Sametime users can see when session participants in their contact list are using BlackBerry Instant Messaging for Sametime on BlackBerry devices.
Configure the connection to the instant messaging server1. In the BlackBerry Manager, in the left pane, click a BlackBerry Enterprise Server.
2. On the Collaboration Service tab, click Edit Properties.
3. Click General.
4. In the Connection section, perform the following actions:
Action Procedure
Change the host name of the instant messaging server.
1. Double-click Host.
2. Type the host name.

75
8: Customizing BlackBerry messaging
5. Click OK.
Control an instant messaging session1. In the BlackBerry Manager, in the left pane, click a BlackBerry Enterprise Server.
2. On the Collaboration Service tab, click Edit Properties.
3. Click General.
4. In the Service section, perform any of the following actions:
5. Click OK.
Change the port number of the instant messaging server.
1. Double-click Port.
2. Type the port number.
Change the protocol that the collaboration service uses to connect to the instant messaging server (applies only to Live Communications Server).
> In the Transport Protocol drop-down list, click a protocol type:
• TLS: Use TLS if you want to support up to 2000 instant messaging sessions at the same time and you want increased security between the collaboration service and the Live Communications Server using certificates.
• TCP: Use TCP if you do not want to configure certificates on the Live Communications Server and you do not want to support up to 2000 instant messaging sessions at the same time.
Action Procedure
Set how many instant messaging sessions can be open at the same time. 1. Double-click Maximum Simultaneous Sessions.
2. Type a number.
Set how long, in seconds, an instant messaging session can remain idle before it is closed to permit a new session if the Maximum Simultaneous Sessions number is reached.
1. Double-click Idle Timeout.
2. Type a number.
Set how long, in milliseconds, an instant messaging session can remain inactive before it is closed.
1. Double-click Inactivity timeout.
2. Type a number.
Hide the location icon on BlackBerry devices. By default, Sametime users can see when session participants in their contact list are using BlackBerry Instant Messaging for Sametime on BlackBerry devices (for Sametime only).
1. Click Show Mobile Icon.
2. In the drop-down list, click False.
Set your organization’s Windows domain name so that users do not have to type their user names when they provide their SIP login account to log in to the enterprise messenger application on BlackBerry devices.
1. Double-click Default Domain Name.
2. Type the Windows domain address.
Action Procedure

76
BlackBerry Enterprise Server for Microsoft Exchange System Administration Guide
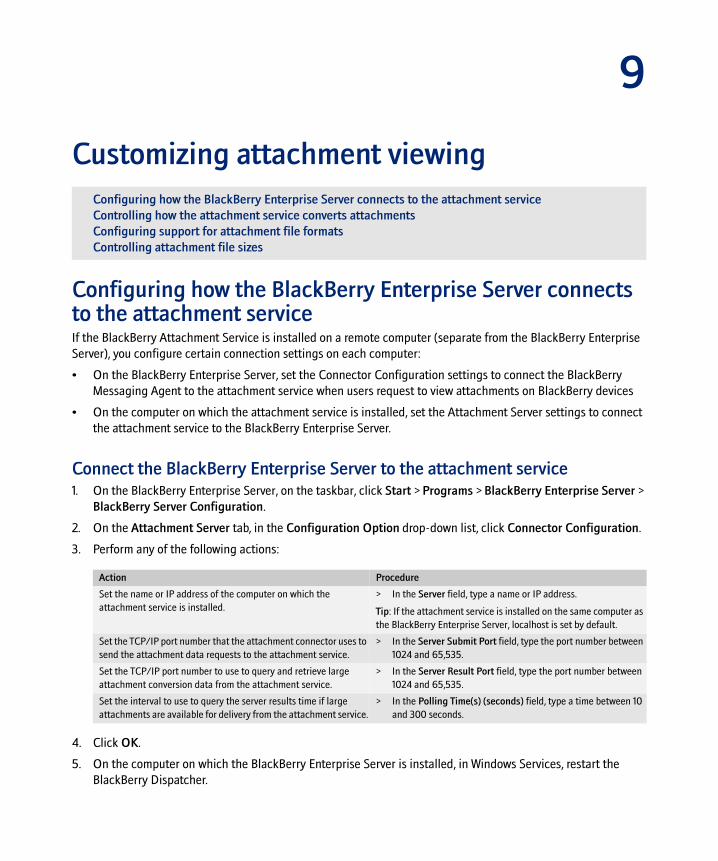
9
Customizing attachment viewing
Configuring how the BlackBerry Enterprise Server connects to the attachment serviceIf the BlackBerry Attachment Service is installed on a remote computer (separate from the BlackBerry Enterprise Server), you configure certain connection settings on each computer:
• On the BlackBerry Enterprise Server, set the Connector Configuration settings to connect the BlackBerry Messaging Agent to the attachment service when users request to view attachments on BlackBerry devices
• On the computer on which the attachment service is installed, set the Attachment Server settings to connect the attachment service to the BlackBerry Enterprise Server.
Connect the BlackBerry Enterprise Server to the attachment service1. On the BlackBerry Enterprise Server, on the taskbar, click Start > Programs > BlackBerry Enterprise Server >
BlackBerry Server Configuration.
2. On the Attachment Server tab, in the Configuration Option drop-down list, click Connector Configuration.
3. Perform any of the following actions:
4. Click OK.
5. On the computer on which the BlackBerry Enterprise Server is installed, in Windows Services, restart the BlackBerry Dispatcher.
Configuring how the BlackBerry Enterprise Server connects to the attachment serviceControlling how the attachment service converts attachmentsConfiguring support for attachment file formatsControlling attachment file sizes
Action Procedure
Set the name or IP address of the computer on which the attachment service is installed.
> In the Server field, type a name or IP address.
Tip: If the attachment service is installed on the same computer as the BlackBerry Enterprise Server, localhost is set by default.
Set the TCP/IP port number that the attachment connector uses to send the attachment data requests to the attachment service.
> In the Server Submit Port field, type the port number between 1024 and 65,535.
Set the TCP/IP port number to use to query and retrieve large attachment conversion data from the attachment service.
> In the Server Result Port field, type the port number between 1024 and 65,535.
Set the interval to use to query the server results time if large attachments are available for delivery from the attachment service.
> In the Polling Time(s) (seconds) field, type a time between 10 and 300 seconds.

78
BlackBerry Enterprise Server for Microsoft Exchange System Administration Guide
Connect the attachment service to the BlackBerry Enterprise Server1. On the taskbar, click Start > Programs > BlackBerry Enterprise Server > BlackBerry Server Configuration.
2. On the Attachment Server tab, in the Configuration Option drop-down list, click Attachment Server.
3. Perform any of the following actions:
4. Click OK.
5. On the computer on which the attachment service is installed, in Windows Services, restart the attachment service.
Controlling how the attachment service converts attachmentsYou can control how the attachment service converts attachments to optimize attachment service performance, configure the Attachment Server settings to control the retrieval, distillation, and conversion of attachment data. You can modify the Attachment Server settings only on the computer on which the attachment service is installed.
Every attachment conversion process allocates memory on startup, uses memory on conversion, and caches the attachment Document Object Model (DOM) locally on the computer on which the attachment service is installed. A larger cache size means that more memory is allocated to each running conversion process. The maximum file size of attachments affects the cached memory used. Use the Attachment Server settings to control the amount of memory used by the attachment service.
When the BlackBerry Enterprise Server receives an attachment, the attachment service converts the attachment into a Document Object Model (DOM) and caches the DOM locally. When users request to view the attachment on BlackBerry devices, the attachment service accesses the DOM to process the request. All cached data is kept in memory only and the original document is never cached.
Action Procedure
Set the TCP/IP port number that the attachment service uses to receive document submissions and for which it returns conversion results.
> In the Submit Port field, type the same port number you set in the Server Submit Port field on the BlackBerry Enterprise Server.
Set the TCP/IP port number that the attachment service uses to send large attachment conversion data when polled from the attachment connector on the BlackBerry Enterprise Server.
> In the Result Port field, type the same port number you set in the Server Result Port field on the BlackBerry Enterprise Server.
Set the TCP/IP port number to use for configuration and administrative purposes.
> In the Configuration Port field, type a port number between 1024 and 65,535.

79
9: Customizing attachment viewing
Customize how the attachment service converts attachments1. On the taskbar, click Start > Programs > BlackBerry Enterprise Server > BlackBerry Server Configuration.
2. On the Attachment Server tab, in the Configuration Option drop-down list, click Attachment Server.
3. Perform any of the following actions:
4. Click OK.
5. On the computer on which the attachment service is installed, in Windows Services, restart the attachment service.
Configuring support for attachment file formatsThe attachment service uses distillers to convert attachments in supported file formats for display on the BlackBerry device. All supported distillers are turned on by default.
Turn off a distiller to prevent users from viewing attachments on BlackBerry devices in specific file formats. For example, if you turn off the .pdf distiller, users can no longer view Adobe® .pdf attachments on the BlackBerry device. When you turn off a distiller for an attachment file format, remove the file format extension from the format list in the Connector Configuration settings so the Open Attachment option does not display on the BlackBerry device.
Action Procedure
Prevent multiple requests for the same attachment from using the first cached copy of the attachment Document Object Model (DOM) in a conversion process for a user.
> In the Concurrent Caching drop-down list, click Disabled.
Note: The cache is maintained for 25 minutes (the default recycle time) or until a new request exceeds the cache limit for that process and the least recently used document in the cache is removed.
Set the maximum number of converted documents that might reside in the document cache (as DOM) for an individual conversion process.
> In the Document Cache Size (docs) field, type a number between 1 and 128.
Set the number of conversion requests that the attachment service can process concurrently.
> In the Conversion Processes field, type a number between 1 and 64.
Note: Set a value in relation to available memory and competing services on the computer on which the attachment service is installed.
Set the number of documents that can be converted concurrently in a single conversion process.
> In the Max. Threads Per Process field, type a number between 2 and 32.
Tip: Use this setting to control thread saturation and to manage attachment service workload in conjunction with the Busy Threshold (seconds) setting.
Set the timeout for the BBConvert process recycling to stop any processes that are consuming CPU that have not completed or failed processing when the timeout occurs.
> In the Recycle Time(s) (seconds) field, type a time between 300 and 3600 seconds.
Tip: The attachment service uses process recycling to reclaim space and prevent failed processes from keeping memory allocated.
Set the threshold to determine whether the attachment service is busy with conversions and should not accept new requests.
> In the Busy Threshold(s) (seconds) field, type a time between 60 and 270 seconds.
Note: The attachment service monitors the running conversion threads to check whether all conversion processes are busy when a new request arrives.
80
BlackBerry Enterprise Server for Microsoft Exchange System Administration Guide
Remove support for an attachment file format1. On the taskbar, click Start > Programs > BlackBerry Enterprise Server > BlackBerry Server Configuration.
2. On the Attachment Server tab, in the Configuration Option drop-down list, click Connector Configuration.
3. In the Format Extension field, remove the file format extension.
4. On the Attachment Server tab, in the Configuration Option drop-down list, click Attachment Server.
5. In the Distiller Settings section, clear the check box beside the file format to remove.
6. Click OK.
7. On the computer on which the BlackBerry Enterprise Server is installed, in Windows Services, restart the BlackBerry Dispatcher.
8. On the computer on which the attachment service is installed, in Windows Services, restart the attachment service.
Add support for additional attachment file format extensionsIf your messaging server is connected to a document management system that enforces file format extension renaming, add the extensions to the format list to support arbitrary extensions.
1. On the taskbar, click Start > Programs > BlackBerry Enterprise Server > BlackBerry Server Configuration.
2. On the Attachment Server tab, in the Configuration Option drop-down list, click Connector Configuration.
3. In the Format Extension field, type the file format extension.
4. Click OK.
5. On the computer on which the BlackBerry Enterprise Server is installed, in Windows Services, restart the BlackBerry Dispatcher.
Controlling attachment file sizesYou can change the maximum attachment file size that can be converted for each distiller type to manage the processing load on the attachment service.
Set the maximum file size for an attachment1. On the taskbar, click Start > Programs > BlackBerry Enterprise Server > BlackBerry Server Configuration.
2. On the Attachment Server tab, in the Configuration Option drop-down list, click Attachment Server.
3. In the Distiller Settings section, in the Max. File Size (Kb) column, click the value beside the distiller that you are modifying. See “Recommended file sizes for heavy use environments” on page 81 for more information.
Tip: To enable users to view all image formats on BlackBerry devices, select the Image Attachments check box.

81
9: Customizing attachment viewing
4. Type a value in kilobytes.
5. Click OK.
Set the maximum size for an image attachmentYou can control the physical size of image attachments that users can view on BlackBerry devices. By default, for image attachments, the attachment service sets a maximum width of 5000 pixels and a height of 4000 pixels.
1. On the computer on which the attachment service is installed, at the command prompt, type regedit.
2. Browse to HKLM\Software\Research In Motion\BBAttachEngine\Distillers\LoadImageDistiller\.
3. In the Name list, double-click the MaxWidth key.
4. In the Value data field, set the maximum width in pixels.
5. Click OK.
6. Browse to HKLM\Software\Research In Motion\BBAttachEngine\Distillers\LoadImageDistiller\.
7. In the Name list, double-click the MaxHeight key.
8. In the Value data field, set the maximum height in pixels.
9. Click OK.
10. On the computer on which the attachment service is installed, in Windows Services, restart the attachment service.
Recommended file sizes for heavy use environmentsA BlackBerry Enterprise Server environment that experiences the following demands on the attachment service to convert attachments is a heavy usage environment:
• multiple users requesting conversions for large or complex attachments (especially PDF and ASCII text files larger than 2 MB)
• multiple users requesting large or complex documents in the same time frame (0 to 10 minutes) while large conversions are being processed
Tip: The default value of 0 permits an unlimited file size.
Warning: If you are permitting the attachment service to convert larger image attachments, the attachment service might consume large amounts of memory and CPU on the computer on which the attachment service is installed and might slow down attachment conversion. Research In Motion® (RIM®) recommends that you install the attachment service on a remote computer if you plan to convert images that are larger than the default size.

82
BlackBerry Enterprise Server for Microsoft Exchange System Administration Guide
Use the Max File Size (Kilobytes) setting for individual attachment formats to control the amount of memory used by the attachment service. In a heavy use environment, RIM recommends the following file sizes:
File format Recommended size
Adobe Acrobat® versions 1.1, 1.2, 1.3, and 1.4 less than 2000 KB
Microsoft Excel® versions 97, 2000, 2003, and XP less than 2000 KB
Microsoft PowerPoint® versions 97, 2000, 2003, and XP less than 2000 KB
Microsoft Word versions 97, 2000, 2003, and XP less than 2000 KB
Corel WordPerfect® versions 6.0, 7.0, 8.0, 9.0 (2000), and 10.0 less than 2000 KB
ASCII text less than 100 KB
HTML less than 100 KB
ZIP archives less than 2000 KB
Images less than 2000 KB
10
Customizing wireless access to enterprise applications
Set the central push serverDesignate a connection service on a BlackBerry Enterprise Server as the central push server. The push server receives push requests from applications. It establishes a connection to the BlackBerry device through which data is sent.
Only one connection service in a BlackBerry Domain can be the central push server. When you designate a connection service as the central push server, the designation is dropped for any other connection service previously identified as the central push server. If you change the central push server, notify your push application developers.
1. In the BlackBerry Manager, in the left pane, click a BlackBerry Enterprise Server.
2. On the Connection Service tab, click Common.
3. Click Set as Push Server.
Set the central push serverConfiguring the connection service to use a proxy serverCustomizing how BlackBerry devices authenticate with proxy and web serversRestricting users’ access to web contentControl how the connection service manages web requests from BlackBerry devicesCustomizing how applications make trusted connections to external web serversRestricting the resources that push applications can accessManaging push application requestsConfigure how the connection service connects to BlackBerry devices
Warnings: Do not unset a push server before assigning the central push server designation to another connection service.
Do not modify the central push server through a means other than the BlackBerry Manager. The change will not be pushed to BlackBerry devices and applications will not function.
If you turn off the connection service, the BlackBerry Collaboration Service also turns off.

84
BlackBerry Enterprise Server for Microsoft Exchange System Administration Guide
Configuring the connection service to use a proxy serverConfigure the connection service to connect to a proxy server using the method consistent with how other applications and servers within your organization access URLs on the Internet and intranet. Because corporate proxy servers do not permit traffic between servers on the same side of the firewall, you can configure the connection service to use a proxy auto-configuration (.pac) file or to access the Internet directly through a single proxy server. You can also configure proxy servers other than the default proxy server to handle traffic to specific URLs, and configure a proxy exclusion list that contains URLs which can be accessed by the browser without passing through a proxy server.
BlackBerry MDS Services push applications and data to users through the central push server. The connection service cannot communicate with BlackBerry MDS Services through a proxy server. If you configure the connection service to use a proxy server and if you have BlackBerry MDS Services installed, you must configure a direct connection between the connection service and BlackBerry MDS Services.
Before you configure a default proxy server for BlackBerry internet traffic, configure the connection service to authenticate with the proxy server using HTTP Basic. See “Configure the connection service to authenticate with a proxy server on behalf of BlackBerry devices” on page 86 for more information.
Access web servers using a PAC file
1. In the BlackBerry Manager, in the left pane, click a BlackBerry Enterprise Server.
2. On the Connection Service tab, click Edit Properties.
3. Click Proxy.
4. Click HTTP Proxy Enabled.
5. In the drop-down list, click True.
6. Click Proxy Auto Configuration.
7. In the drop-down list, click True.
8. In the Auto Proxy section, perform one of the following actions:
Warning: If you have BlackBerry MDS Services installed, modify the .pac file to permit the connection service to connect to the BlackBerry MDS Services server directly.
Action Procedure
Detect the proxy server automatically. 1. Click Auto Detect.
2. In the drop-down list, click True.
Specify the location of the .pac file. > In the URL field, type the URL for the proxy server.
85
10: Customizing wireless access to enterprise applications
Access web servers through a proxy server
1. In the BlackBerry Manager, in the left pane, click a BlackBerry Enterprise Server.
2. On the Connection Service tab, click Edit Properties.
3. Click Proxy.
4. Click HTTP Proxy Enabled.
5. In the drop-down list, click True.
6. Click Proxy Auto Configuration.
7. In the drop-down list, click False.
8. In the Manual Proxy section, perform any of the following actions:
Customizing how BlackBerry devices authenticate with proxy and web serversConfigure whether BlackBerry devices authenticate with a proxy server or content web server directly, or whether the connection service authenticates with the proxy server or web server on behalf of BlackBerry devices.
If you configure BlackBerry devices to authenticate directly with proxy and web servers, once authenticated, users are prompted to provide login credentials every 30 minutes.
Warning: If you have BlackBerry MDS Services installed, create a proxy exclusion list that contains the BlackBerry MDS Services server. This permits the connection service to connect to the BlackBerry MDS Services Server directly.
Action Procedure
Configure the connection service to use the default corporate proxy server.
1. In the Host Name field, type the proxy server host name or IP address.
2. In the Port field, type the port number.
3. If your proxy server supports SSL, in the SSL Port field, type the proxy SSL port number.
Create a proxy exclusion list. 1. Double-click Proxy Mappings.
2. Click New.
3. Double-click Universal Resource Locator.
4. Type the URL using the format <scheme://host name: port/path/?query>.
5. Click OK.
Assign a URL to a group a of proxy servers or a proxy server that is not the default corporate proxy server.
1. Double-click Proxy Mappings.
2. Click New.
3. Double-click Universal Resource Locator.
4. Type the URL using the format <scheme://host name: port/path/?query>.
5. Double-click Proxy String.
6. Type the host name and port of the proxy server that the URL should route through using the format <host name:port>.
7. Click OK.

86
BlackBerry Enterprise Server for Microsoft Exchange System Administration Guide
If you configure the connection service to authenticate with web servers on behalf of BlackBerry devices, you must configure the connection service to communicate with web servers using their native authentication method. The connection service supports authentication with servers that use HTTP Basic, NTLM, Kerberos, and Lightweight Third-Party Authentication (LTPA) methods.
The connection service also supports SecurID® authentication with the RSA® Authentication Manager. When you turn on RSA authentication, users must type their RSA SecurID login and password on the BlackBerry device before the connection service accesses content on the Internet or intranet. The first time a user receives a SecurID token, they must also type a new PIN. The user may have the option to create their PIN, or might be assigned one automatically by the ACE/Server software. Once the PIN is accepted, the user is prompted to type their user name and passcode. RSA authentication is supported for wireless applications that use the RIM IP proxy protocol (IPPP) layer. The RIM IPPP layer controls how the connection service manages connections to BlackBerry devices.
Configure how BlackBerry devices authenticate with web servers1. In the BlackBerry Manager, in the left pane, click a BlackBerry Enterprise Server.
2. On the Connection Service tab, click Edit Properties.
3. Click HTTP.
4. Perform one of the following actions:
5. Double-click Authentication Timeout.
6. Type how long, in milliseconds, authentication information remains on the web server.
7. Click OK.
Configure the connection service to authenticate with a proxy server on behalf of BlackBerry devicesThe connection service must support HTTP Basic authentication before you can configure the connection service to use HTTP Basic to authenticate with a proxy server. See “Configure how BlackBerry devices authenticate with web servers” on page 86 for more information.
1. In the BlackBerry Manager, in the left pane, click a BlackBerry Enterprise Server.
2. On the Connection Service tab, click Edit Properties.
3. Click Proxy.
4. In the HTTP Proxy Enabled drop-down list, click True.
Action Procedure
Configure BlackBerry devices to authenticate directly with web servers.
1. Click Support HTTP Authentication.
2. In the drop-down list, click False.
Configure the connection service to authenticate with web servers on behalf of BlackBerry devices using HTTP Basic.
1. Click Support HTTP Authentication.
2. In the drop-down list, click True.

87
10: Customizing wireless access to enterprise applications
5. Perform one of the following actions:
6. Click OK.
Configure the connection service to authenticate with servers that use NTLM> In <drive:>\Program Files\Research In Motion\BlackBerry Enterprise Server\MDS\Servers\
ServerInstance\config, configure the MDSLogin.conf file and the Java Authentication and Authorization Service (JAAS) configuration file.
Visit http://java.sun.com/j2se/1.5.0/docs/guide/security/jgss/tutorials/LoginConfigFile.html for information on the JAAS configuration file.
Configure the connection service to authenticate with servers that use Kerberos> In <drive:>\Program Files\Research In Motion\BlackBerry Enterprise Server\MDS\Servers\
ServerInstance\config, configure the Kerberos 5 configuration file (krb5.conf).
Visit http://web.mit.edu/kerberos/www/krb5-1.3/krb5-1.3.3/doc/krb5-admin.html#krb5.conf for information on the Kerberos 5 file.
Configure the connection service to authenticate with servers that use LTPATurn on cookie storage to permit the connection service to authenticate with web servers that use LTPA.
1. In the BlackBerry Manager, in the left pane, click a BlackBerry Enterprise Server.
2. On the Connection Service tab, click Edit Properties.
3. Click HTTP.
4. Click Support HTTP Cookie Storage.
5. In the drop-down list, click True.
6. Click OK.
Action Procedure
Configure the connection service to authenticate with the proxy server on behalf of the BlackBerry device.
1. In the MDS Authentication section, click Enabled.
2. In the drop-down list, click True.
3. In the User Name field, type a user name.
4. In the Password field, type a password.
5. In the Password (Confirmation) field, type the password again.
Configure the connection service to prompt users to log in when requesting data from the BlackBerry device.
1. In the MDS Authentication section, click Enabled.
2. In the drop-down list, click False.

88
BlackBerry Enterprise Server for Microsoft Exchange System Administration Guide
Configure the connection service to authenticate with the RSA Authentication ManagerWhen configured, users must enter login credentials from the BlackBerry device before accessing intranet or Internet content. Once authenticated, if proxy authentication is configured, users are prompted to authenticate with the proxy server.
1. In the BlackBerry Manager, in the left pane, click a BlackBerry Enterprise Server.
2. On the Connection Service tab, click Edit Properties.
3. Click RSA Authentication.
4. Perform the following actions:
5. Click OK.
Restricting users’ access to web contentCreate pull access control rules to restrict the web servers that the connection service accesses on behalf of a user. You assign users to pull rules to control which web servers content can be requested from. The connection service transmits the content that users request from their BlackBerry devices.
Restrict web content requests from BlackBerry devicesConfigure whether access control rules are applied to web content requests from the BlackBerry device. Turn on pull authorization to restrict the web content that users can receive on BlackBerry devices.
1. In the BlackBerry Manager, in the left pane, click a BlackBerry Enterprise Server.
2. On the Connection Service tab, click Edit Properties.
3. Click Access Control.
4. Click Pull Authorization.
5. In the drop-down list, click True.
6. Click OK.
Action Procedure
Turn on RSA authentication. 1. Click Enable RSA Authorization Support.
2. In the drop down list, click True.
Set the length of time, in minutes, that a BlackBerry device can be connected to the corporate network before the user must log in again.
1. Double-click RSA Authentication Timeout.
2. Type a number.
Set the length of time, in minutes, that a BlackBerry device can be inactive while connected to the corporate network before the user must log in again.
1. Double-click RSA Inactivity Timeout.
2. Type a number.

89
10: Customizing wireless access to enterprise applications
Create and assign a rule to a type of web content request1. In the BlackBerry Manager, in the left pane, click BlackBerry Domain.
2. On the Global tab, click Edit Properties.
3. In the left pane, click Access Control.
4. Perform the following actions:
Action Procedure
Create a pull rule. 1. Double-click Pull Rules.
2. Click New.
3. Double-click Name.
4. Type a name for the rule.
5. Double-click Description.
6. Type a description for the rule.
7. Click OK.
8. Click OK again.
Create a URL pattern. 1. Double-click URL Patterns.
2. Click New.
3. Double-click URL pattern.
4. Type the URL pattern of the web server that the pull rule will control access to.
5. In the Service Name drop-down list, click one of the following:
• http: Rule applies when users request a connection to an HTTP site on their BlackBerry devices.
• https: Rule applies when users request a connection to an HTTPS site on their BlackBerry devices when you enable SSL or TLS in proxy mode.
• ldap: Rule applies when users access a user profile or certificate from their BlackBerry devices. The connection service retrieves the user profile or certificate from the LDAP directory.
• ocsp: Rule applies when users verify the revocation status of a certificate from their BlackBerry devices. The connection service retrieves the certificate revocation status from the OCSP server.
• tcp: Rule applies when users request a connection to the Internet or corporate intranet from their BlackBerry devices using other standard Internet protocols.
6. Double-click Description.
7. Type a description for the URL pattern.
8. Click OK.
9. Click OK again.
Assign a rule to a URL pattern and define whether access is enabled for the URL.
1. Double-click URL Pattern Rules.
2. In the left pane, click the pull rule.
3. In the right pane, perform one of the following actions:
• To prevent the user assigned to the rule from accessing a URL matching the URL pattern, select the Deny option.
• To permit the user assigned to the rule to access a URL matching the URL pattern, select the Allow option.
4. Click OK.

90
BlackBerry Enterprise Server for Microsoft Exchange System Administration Guide
Assign a rule to a user account or group1. In the BlackBerry Manager, in the left pane, perform one of the following actions:
2. Click OK.
Control how the connection service manages web requests from BlackBerry devices1. In the BlackBerry Manager, in the left pane, click a BlackBerry Enterprise Server.
2. On the Connection Service tab, click Edit Properties.
3. Click HTTP.
4. Perform the following actions:
Action Procedure
Assign a pull rule to a single user account.
1. Click BlackBerry Domain.
2. On the Global tab, click Edit Properties.
3. In the left pane, click Access Control.
4. Double-click User Rules.
5. In the left pane, click a rule.
6. In the right pane, select the radio button for a user account.
7. Click OK.
Assign a pull rule to users in a group.
1. Click a group.
2. On the Group Configuration tab, click Edit Group Template.
3. Click Access Control.
4. Double-click Pull Rule Set.
5. Select the pull rule check box to assign to the group.
6. Click OK.
7. Select the check box beside Pull Rule Set.
8. Click Reapply Template.
9. Click Yes.
Action Procedure
Cache cookies on behalf of BlackBerry devices and enable the connection service to add cookie information to HTTP requests from BlackBerry devices.
Note: If the BlackBerry device requires JavaScript™ support in its HTTP requests, cookies are processed on the BlackBerry device.
1. Click Support HTTP Cookie Storage.
2. In the drop-down list, click True.
Set the length of time, in milliseconds, that the HTTP connection waits for the BlackBerry device to send data.
1. Double-click HTTP Device Connection Timeout.
2. Type a number.
Set the length of time, in milliseconds, that the HTTP connection waits for the web server to send data.
1. Double-click HTTP Server Connection Timeout.
2. Type a number.

91
10: Customizing wireless access to enterprise applications
5. Click OK.
Customizing how applications make trusted connections to external web serversConfigure how applications on BlackBerry devices retrieve certificate information for trusted and untrusted external web servers. The connection service supports Lightweight Directory Access Protocol (LDAP), Online Certificate Status Protocol (OCSP), SSL, and Transport Layer Security (TLS). Certificates authenticate applications with the connection service.
Configure a key store file to permit BlackBerry devices and applications to connect to untrusted servers when there is no certificate stored for the server on the computer where the connection service is installed. The key store file permits a push application to establish an HTTP over SSL connection with the connection service when pushing content to a BlackBerry device.
Configure the connection service to query LDAP servers for trusted application certificates
1. In the BlackBerry Manager, in the left pane, click a BlackBerry Enterprise Server.
2. On the Connection Service tab, click Edit Properties.
3. Click LDAP.
4. Set the LDAP server settings.
5. Click OK.
Configure the connection service to retrieve the status of a certificate from an OCSP server1. In the BlackBerry Manager, in the left pane, click a BlackBerry Enterprise Server.
2. On the Connection Service tab, click Edit Properties.
3. Click OCSP.
Set the maximum number of HTTP redirections that the connection service supports.
Note: HTTP redirection occurs when the BlackBerry Browser requests a web page from a web server and the web server returns a redirection status code that indicates a new URL for the web page.
1. Double-click Maximum Number of Redirects.
2. Type a number.
Warning: Do not change the default LDAP port parameters unless there is a port conflict with another service on the same computer. If you change port or host information, you must stop and restart the connection service to reload the configuration information.
Action Procedure

92
BlackBerry Enterprise Server for Microsoft Exchange System Administration Guide
4. Perform any of the following actions:
5. Click OK.
Permit BlackBerry devices to connect to untrusted web servers A web server is untrusted if there is no certificate for the web server stored on the BlackBerry Enterprise Server.
1. In the BlackBerry Manager, in the left pane, click a BlackBerry Enterprise Server.
2. On the Connection Service tab, click Edit Properties.
3. Click TLS/HTTPS.
4. Perform one of the following actions:
Permit BlackBerry devices to connect to trusted web serversUse the keytool to add a certificate for a web server to the BlackBerry Enterprise Server key store and permit connections to the trusted web server.
1. Copy the certificate from a secure web site to a .cer file.
2. On the computer on which the connection service is installed, copy the .cer file into the <drive:>\Program Files\Java\jre1.5.0_04\lib\security folder.
3. Go to <drive:>\Program Files\Java\jre1.5.0_04\bin and at a command prompt, type
keytool -import -trustcacerts -alias <alias_name> -file <cert_filename> -keystore cacerts
4. Type the key store password.
Action Procedure
Set the OCSP handler to accept OCSP responders that are specified by the BlackBerry device.
1. Click Use Device Responders.
2. In the drop-down list, click True.
Set the OCSP handler to use the OCSP responder extension in a certificate.
1. If a certificate is present, click Use Certificate Extension Responders.
2. In the drop-down list, click True.
Set the default OCSP responder’s URL. 1. Double-click Default Responder URL.
2. Type the URL of the OCSP responder.
Set the URL of the server when the certificate revocation list (CRL) is located.
1. Double-click Default CRL Server URL.
2. Type the URL of the CRL server.
Set the URL of the server where PGP information is located.
1. Double-click Default PGP Key Server URL.
2. Type the URL of the PGP server.
Action Procedure
Allow outbound requests from the BlackBerry device that the connection service encrypts with HTTPS.
1. Click Allow Untrusted HTTPS Connections.
2. In the drop-down list, select True.
Allow outbound requests from the BlackBerry device that the connection service encrypts with TLS.
1. Click Allow Untrusted TLS Connections.
2. In the drop-down list, select True.

93
10: Customizing wireless access to enterprise applications
5. At the prompt, click Yes to add the certificate to the key store.
Visit http://java.sun.com/j2se/1.5.0/docs/tooldocs/windows/keytool.html for more information on using the keytool.
Permit the connection service to accept an SSL connection with a push application to send content to BlackBerry devices
1. On the taskbar, click Start > Programs > BlackBerry Enterprise Server > BlackBerry Server Configuration.
2. On the Mobile Data Service tab, configure the key store information.
3. Click Create Keystore File.
4. If a message prompts you, click Yes to overwrite the existing key store file.
5. Click OK.
Restricting the resources that push applications can accessControl which push applications can send content to BlackBerry devices without the content first being requested by users. Push access control rules allow you to assign users and push applications to push rules to control which push applications can send requests to users.
Restrict push application access to resources on a BlackBerry Enterprise Server1. In the BlackBerry Manager, in the left pane, click a BlackBerry Enterprise Server.
2. On the Connection Service tab, click Edit Properties.
3. Click Access Control.
4. Perform the following actions:
5. Click OK.
Warning: Only one key store file can exist. The file must be called webserver.keystore and must be located in <drive:>\Program Files\Research in Motion\BlackBerry Enterprise Server\MDS\webserver.
Action Procedure
Restrict push applications from accessing the connection service to push content to users.
1. Click Push Authentication.
2. In the drop-down list, click True.
Restrict push applications from pushing content to specific BlackBerry devices.
1. Click Push Authorization.
2. In the drop-down list, click True.
Encrypt push requests using SSL or TLS. 1. Click Push Encryption.
2. In the drop-down list, click True.

94
BlackBerry Enterprise Server for Microsoft Exchange System Administration Guide
Create and assign a rule to a push application If the BlackBerry MDS Services is installed, create a push initiator and password for the BlackBerry MDS Services to communicate with the connection service. Make the push initiator available to BlackBerry MDS Services. See “Associate a push initiator with BlackBerry MDS Services” on page 95 for more information.
1. In the BlackBerry Manager, in the left pane, click BlackBerry Domain.
2. On the Global tab, click Edit Properties.
3. In the left pane, click Access Control.
4. Perform the following actions:
Action Procedure
Create a push rule. 1. Double-click Push Rules.
2. Click New.
3. Double-click Name.
4. Type a name for the rule.
5. Double-click Description.
6. Type a description for the rule.
7. Click OK.
8. Click OK again.
Create a push initiator for a push application.
1. Double-click Push Initiators.
2. Click New.
3. Double-click Push Principal Name.
4. Type the name of the application that a push rule will control push requests from.
5. Double-click Credentials.
6. Type the password for the application.
7. Double-click Description.
8. Type a description for the application.
9. Click OK.
10. Click OK again.
Assign a push rule to a push initiator.
1. Double-click Push Initiator Rules.
2. In the left pane, click a rule.
3. In the right pane, select the radio button for a push initiator.
4. Click OK.
95
10: Customizing wireless access to enterprise applications
Assign a rule to a user account or group1. In the BlackBerry Manager, in the left pane, perform one of the following actions:
2. Click OK.
Associate a push initiator with BlackBerry MDS ServicesAdd the connection service that has a BlackBerry MDS Services push initiator access control rule defined to the list of connection services available to the BlackBerry MDS Services.
1. In the BlackBerry Manager, in the left pane, click a BlackBerry MDS Services server.
2. On the MDS Services tab, click Edit Properties.
3. Click Connection Service.
4. Double-click BlackBerry MDS Connection Service Definition.
5. Click New.
6. Double-click URL.
7. Type the full URL or domain name and port number for the connection service.
8. In the Push Initiator field, type the name of the BlackBerry MDS Services push initiator.
9. In the Push Initiator Password field, type the credentials for the push initiator.
10. Click OK.
11. Click OK again.
Action Procedure
Assign a push rule to a single user account.
1. Click BlackBerry Domain.
2. On the Global tab, click Edit Properties.
3. In the left pane, click Access Control.
4. Double-click User Rules.
5. In the left pane, click a rule.
6. In the right pane, select the radio button for a user account.
7. Click OK.
Assign a push rule to users in a group.
1. Click a group.
2. On the Group Configuration tab, click Edit Group Template.
3. Click Access Control.
4. Double-click Push Rule Set.
5. Select the push rule check box to assign to the group.
6. Click OK.
7. Select the check box beside Push Rule Set.
8. Click Reapply Template.
9. Click Yes.

96
BlackBerry Enterprise Server for Microsoft Exchange System Administration Guide
Managing push application requestsThe connection service sends push application requests to BlackBerry devices. Configure how the BlackBerry Enterprise Server manages push application requests.
Permit the transfer of application reliable push requests between BlackBerry devices and the connection service on device portsConfigure the connection service to permit application reliable push requests between BlackBerry devices and the connection service on device ports. Applications that use reliable push requests to notify the connection service about whether a push request was successfully received on the BlackBerry device have unique port numbers. Contact your application developers for the port value defined for an application.
1. In the BlackBerry Manager, in the left pane, click a BlackBerry Enterprise Server.
2. On the Connection Service tab, click Edit Properties.
3. Click Push/PAP.
4. Double-click Device Ports Enabled for Reliable Pushes.
5. Type the device port number. Use commas to separate multiple port numbers.
6. Click OK.
Store push application requests in the configuration database
1. In the BlackBerry Manager, in the left pane, click a BlackBerry Enterprise Server.
2. On the Connection Service tab, click Edit Properties.
3. Click Push/PAP.
4. Click Store Push Submissions.
5. In the drop-down list, click True.
6. Click OK.
Delete push requests from the configuration database1. In the BlackBerry Manager, in the left pane, click BlackBerry Domain.
2. On the Global tab, click Edit Properties.
3. Click Push Control.
Note: You must store push requests if push requests that use result notification are sent to a group that has users on multiple BlackBerry Enterprise Servers within the BlackBerry Domain.

97
10: Customizing wireless access to enterprise applications
4. Perform the following actions:
5. Click OK.
Configure the number of simultaneous push application requests the connection service can processConfigure how many active push connections the connection service can process before queuing the connections or sending a service unavailable message to the BlackBerry device.
1. In the BlackBerry Manager, in the left pane, click a BlackBerry Enterprise Server.
2. On the Connection Service tab, click Edit Properties.
3. Click Push/PAP.
4. Perform any of the following actions:
5. Click OK.
Clear the push queue manuallyAn automated process runs daily to clear the push queue. You can also manually clear the queue.
1. In the Microsoft SQL Server Enterprise Manager, open Console Root\Microsoft SQL Servers\SQL Server Group\<configuration database server>\Management\SQL Server Agent\Jobs.
2. Start the RIMPurgeMDSMsg<database_name> process.
Action Procedure
Set the maximum number of push messages to store in the configuration database.
1. Double-click Maximum Stored Push Messages.
2. Type a number.
Set the maximum length of time, in minutes, to store a push message before it is eligible to be purged from the configuration database.
1. Double-click Maximum Push Message Age.
2. Type a number.
Action Procedure
Set the maximum number of push connections to process simultaneously before queuing connections.
1. Double-click Maximum number of Active Connections.
2. Type a number.
Set the maximum number of push connections enabled in the queue before sending a service unavailable message to the BlackBerry device.
1. Double-click Maximum number of Queued Connections.
2. Type a number.

98
BlackBerry Enterprise Server for Microsoft Exchange System Administration Guide
Configure how the connection service connects to BlackBerry devicesConfigure whether BlackBerry devices can establish persistent connections with the connection service and the maximum number of persistent connections that is permitted. Change the default port parameters only if there is a port conflict with another service on the same computer. If you change host or port information, the you must restart the connection service to reload the configuration information.
1. In the BlackBerry Manager, in the left pane, click a BlackBerry Enterprise Server.
2. On the Connection Service tab, click Edit Properties.
3. Click General.
4. Perform any of the following actions:
Action Procedure
Set the maximum amount of data, in KB, that can be sent to the BlackBerry device by the connection service.
1. Double-click Maximum KB/Connection.
2. Type a number.
Set the length of time, in milliseconds, that the BlackBerry device has to send an acknowledgement before the connection service discards all pending content for the device.
1. Double-click Flow Control Timeout.
2. Type a number.
Permit Java applications on BlackBerry devices to make persistent TCP socket connections with the connection service.
1. Double-click Use Persistent Socket.
2. Click True.
Set the maximum number of threads the connection service can process at the same time before the connection service rejects processing requests.
1. Double-click Thread Pool Size.
2. Type a number.
Set the maximum number of persistent TCP connections that can be open simultaneously between BlackBerry devices and the connection service before the connection service rejects processing requests.
1. Double-click Maximum Simultaneous Persistent Sockets.
2. Type a number.
Modify the port on which the web server listens for requests from push applications.
Note: Notify push application developers if you change this setting.
1. Double-click Web Server Listen Port.
2. Type the port number.
Modify the port on which the web server receives HTTPS requests from BlackBerry devices.
1. Double-click Web Server SSL Listen Port.
2. Type the port number.
Set the frequency that the connection service polls the configuration database for changes to connection service and collaboration service administrative settings.
1. Double-click Admin Configuration Cycle Timer.
2. Type the interval.

11
Managing user accounts
Managing user groupsYou can have exceptions in a group by changing a single user account’s properties after the user account is added to a group. If you have user account property exceptions in a group and you change and apply the group properties, the updated group properties override any user account property exception that were set for individual user accounts. See Chapter 6, “Customizing the BlackBerry messaging environment” for more information on changing the properties for individual user accounts.
If you remove a user account from a group, the user account remains in the global users list, but does not appear in the user group lists.
Change properties for a group 1. In the BlackBerry Manager, in the left pane, click User Groups.
2. On the User Groups List tab, click a group.
3. Click Edit Group Template.
4. Change the desired settings.
5. Save the changes by clicking Apply.
6. Select the check boxes beside the properties that you modified.
7. Click Reapply Template.
8. Click Yes.
9. Click OK.
Manage a group 1. In the BlackBerry Manager, in the left pane, click User Groups.
2. On the User Groups List tab, click a group.
3. Click Group Admin.
Managing user groupsManaging users
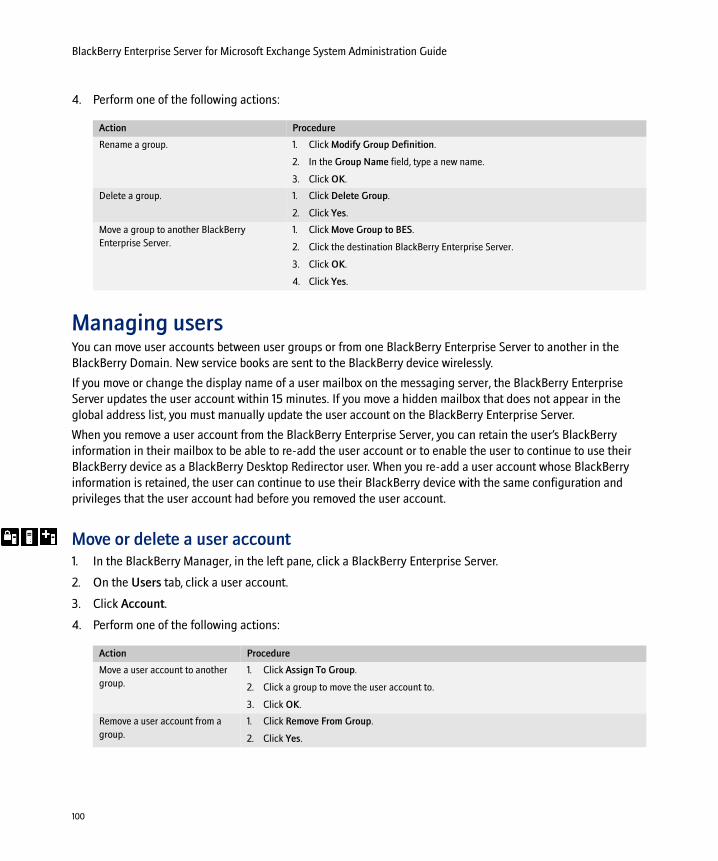
100
BlackBerry Enterprise Server for Microsoft Exchange System Administration Guide
4. Perform one of the following actions:
Managing usersYou can move user accounts between user groups or from one BlackBerry Enterprise Server to another in the BlackBerry Domain. New service books are sent to the BlackBerry device wirelessly.
If you move or change the display name of a user mailbox on the messaging server, the BlackBerry Enterprise Server updates the user account within 15 minutes. If you move a hidden mailbox that does not appear in the global address list, you must manually update the user account on the BlackBerry Enterprise Server.
When you remove a user account from the BlackBerry Enterprise Server, you can retain the user’s BlackBerry information in their mailbox to be able to re-add the user account or to enable the user to continue to use their BlackBerry device as a BlackBerry Desktop Redirector user. When you re-add a user account whose BlackBerry information is retained, the user can continue to use their BlackBerry device with the same configuration and privileges that the user account had before you removed the user account.
Move or delete a user account1. In the BlackBerry Manager, in the left pane, click a BlackBerry Enterprise Server.
2. On the Users tab, click a user account.
3. Click Account.
4. Perform one of the following actions:
Action Procedure
Rename a group. 1. Click Modify Group Definition.
2. In the Group Name field, type a new name.
3. Click OK.
Delete a group. 1. Click Delete Group.
2. Click Yes.
Move a group to another BlackBerry Enterprise Server.
1. Click Move Group to BES.
2. Click the destination BlackBerry Enterprise Server.
3. Click OK.
4. Click Yes.
Action Procedure
Move a user account to another group.
1. Click Assign To Group.
2. Click a group to move the user account to.
3. Click OK.
Remove a user account from a group.
1. Click Remove From Group.
2. Click Yes.

101
11: Managing user accounts
Update a user account manually 1. In the BlackBerry Manager, in the left pane, click a BlackBerry Enterprise Server.
2. On the Users tab, click a user account.
3. Click Account.
4. Click Reload User.
5. Click OK.
Move a user account to a different BlackBerry Enterprise Server.
1. Click Move User.
2. Click the destination BlackBerry Enterprise Server.
3. Click OK.
Remove a user account from the BlackBerry Enterprise Server.
1. Click Delete User.
2. Click Yes.
3. Perform one of the following actions:
• To retain the BlackBerry information in the user’s mailbox, click No.
• To remove the BlackBerry information from the user’s mailbox, click Yes.
Action Procedure

102
BlackBerry Enterprise Server for Microsoft Exchange System Administration Guide

12
Managing device software and wireless applications
Managing applications on BlackBerry devicesYou can upgrade or remove Java applications, the Enterprise Messenger, and the BlackBerry MDS Runtime from BlackBerry devices wirelessly. The BlackBerry Enterprise Server might take 4 hours to wirelessly upgrade or remove the applications from BlackBerry devices.
You can update application control policies to change the access applications installed on BlackBerry devices have to the BlackBerry device and resources behind the corporate firewall or remove application control policies that you no longer require.
Upgrade an application on a BlackBerry device1. Add or upgrade the application in the network drive. See “Add the software and tools to the network drive” on
page 36 for more information.
2. Re-index the application. See “Re-index the software applications” on page 37 for more information.
Remove an application from a BlackBerry device 1. In the BlackBerry Manager, in the left pane, click BlackBerry Domain.
2. On the Software Configurations tab, click Manage Application Policies.
3. Double-click an application control policy.
4. In the Disposition drop-down list, click Disallowed.
Managing applications on BlackBerry devicesManaging software configurations
You are solely responsible for the selection, implementation, and performance of any third-party applications that you use with the BlackBerry device or desktop software. RIM does not in any way endorse or guarantee the security, compatibility, performance, or trustworthiness of any third-party application and shall have no liability to you or any third-party for issues arising from such third-party applications.
Note: Applications assigned an application control policy with a Disposition set to Required will still receive the application upgrade wirelessly.

104
BlackBerry Enterprise Server for Microsoft Exchange System Administration Guide
5. Click OK.
6. Click OK again.
7. Click OK again.
Change or delete an application control policy 1. In the BlackBerry Manager, in the left pane, click BlackBerry Domain.
2. Click the Software Configurations tab.
3. Click Manage Application Policies.
4. Click the application policy.
5. Perform one of the following actions:
6. Click OK.
Managing software configurationsYou manage software configurations using the computer on which the BlackBerry Manager is installed. You can change a software configuration to update or change the applications to install on BlackBerry devices and you can assign a different software configuration to users.
Manage a software configuration> In the BlackBerry Manager, in the left pane, perform one of the following actions:
Action Procedure
Change an application control policy. 1. Click Properties.
2. Modify the application control policy properties.
3. Click OK.
Delete an application control policy. > Click Remove.
Action Procedure
Change a software configuration.
1. Click BlackBerry Domain.
2. On the Software Configurations tab, in the Configuration Name list, click a software configuration.
3. Click Edit Configuration.
4. In the Application Name list, perform one of the following actions:
• Select the check box beside the applications to install on BlackBerry devices.
• Clear the check box beside the applications to remove from BlackBerry devices.
5. Click OK.

105
12: Managing device software and wireless applications
Assign a different software configuration to a user.
1. Click a BlackBerry Enterprise Server.
2. In the Users list, click a user to assign the software configuration to.
3. Click Device Management.
4. Click Assign Software Configuration.
5. Click a software configuration.
6. Click OK.
Unassign a software configuration from a user.
1. Click a BlackBerry Enterprise Server.
2. In the Users list, click a user to assign the software configuration to.
3. Click Device Management.
4. Click Assign Software Configuration.
5. Click <none>.
6. Click OK.
Delete a software configuration.
1. Click BlackBerry Domain.
2. On the Software Configurations tab, in the Configuration Name list, click a software configuration.
3. Click Delete Configuration.
4. Click OK.
Create a new software configuration from an existing software configuration.
1. Click BlackBerry Domain.
2. On the Software Configurations tab, in the Configuration Name list, click a software configuration.
3. Click Copy Configuration.
4. Double-click the copied software configuration.
5. In the Configuration Name field, rename the software configuration.
6. Change the software configuration properties as desired. See “Create a software configuration” on page 38 for more information.
7. Click OK.
Action Procedure

106
BlackBerry Enterprise Server for Microsoft Exchange System Administration Guide

13
Managing a BlackBerry Domain
Monitoring the BlackBerry services and components in a BlackBerry DomainIn the case of a failed operation, the BlackBerry Controller detects and restarts the appropriate processes by default, which enables the BlackBerry Enterprise Server to continue to function in the event of non-responsive threads or inactive services.
The BlackBerry Controller monitors the following BlackBerry services and components:
• BlackBerry Dispatcher
• BlackBerry Router
• BlackBerry Messaging Agent
• BlackBerry Attachment Service
• BlackBerry Collaboration Service
• Live Communications Server connector
• BlackBerry Synchronization Service
• BlackBerry Policy Service
• BlackBerry MDS Connection Service
• BlackBerry MDS Services
• BlackBerry Database Consistency Service
By default, the registry keys that control the BlackBerry Controller are not visible. To customize how the BlackBerry Controller monitors the BlackBerry services, you must create the registry keys that govern the BlackBerry Controller and change the default values.
Customize how the BlackBerry Controller monitors BlackBerry services1. On the computer on which the BlackBerry service is installed, start the Registry Editor.
Monitoring the BlackBerry services and components in a BlackBerry DomainAccessing log files for BlackBerry servicesManaging different BlackBerry DomainsManaging license keys
Warning: Do not restart the BlackBerry Controller. Restarting the BlackBerry Controller restarts the messaging agents, which might take a long time to start. Users cannot send or receive messages on BlackBerry devices while the messaging agents are restarting.
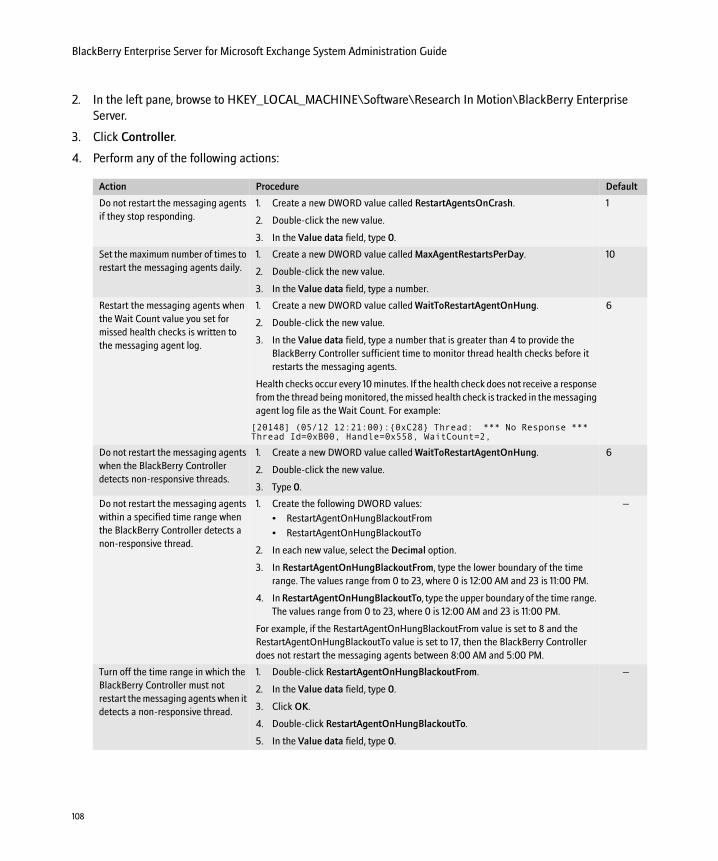
108
BlackBerry Enterprise Server for Microsoft Exchange System Administration Guide
2. In the left pane, browse to HKEY_LOCAL_MACHINE\Software\Research In Motion\BlackBerry Enterprise Server.
3. Click Controller.
4. Perform any of the following actions:
Action Procedure Default
Do not restart the messaging agents if they stop responding.
1. Create a new DWORD value called RestartAgentsOnCrash.
2. Double-click the new value.
3. In the Value data field, type 0.
1
Set the maximum number of times to restart the messaging agents daily.
1. Create a new DWORD value called MaxAgentRestartsPerDay.
2. Double-click the new value.
3. In the Value data field, type a number.
10
Restart the messaging agents when the Wait Count value you set for missed health checks is written to the messaging agent log.
1. Create a new DWORD value called WaitToRestartAgentOnHung.
2. Double-click the new value.
3. In the Value data field, type a number that is greater than 4 to provide the BlackBerry Controller sufficient time to monitor thread health checks before it restarts the messaging agents.
Health checks occur every 10 minutes. If the health check does not receive a response from the thread being monitored, the missed health check is tracked in the messaging agent log file as the Wait Count. For example:
[20148] (05/12 12:21:00):{0xC28} Thread: *** No Response *** Thread Id=0xB00, Handle=0x558, WaitCount=2,
6
Do not restart the messaging agents when the BlackBerry Controller detects non-responsive threads.
1. Create a new DWORD value called WaitToRestartAgentOnHung.
2. Double-click the new value.
3. Type 0.
6
Do not restart the messaging agents within a specified time range when the BlackBerry Controller detects a non-responsive thread.
1. Create the following DWORD values:
• RestartAgentOnHungBlackoutFrom
• RestartAgentOnHungBlackoutTo
2. In each new value, select the Decimal option.
3. In RestartAgentOnHungBlackoutFrom, type the lower boundary of the time range. The values range from 0 to 23, where 0 is 12:00 AM and 23 is 11:00 PM.
4. In RestartAgentOnHungBlackoutTo, type the upper boundary of the time range. The values range from 0 to 23, where 0 is 12:00 AM and 23 is 11:00 PM.
For example, if the RestartAgentOnHungBlackoutFrom value is set to 8 and the RestartAgentOnHungBlackoutTo value is set to 17, then the BlackBerry Controller does not restart the messaging agents between 8:00 AM and 5:00 PM.
—
Turn off the time range in which the BlackBerry Controller must not restart the messaging agents when it detects a non-responsive thread.
1. Double-click RestartAgentOnHungBlackoutFrom.
2. In the Value data field, type 0.
3. Click OK.
4. Double-click RestartAgentOnHungBlackoutTo.
5. In the Value data field, type 0.
—

109
13: Managing a BlackBerry Domain
Restart the messaging agents and do not generate a Userdump file when the BlackBerry Controller detects non-responsive threads.
1. Create a new DWORD value called RestartAgentOnHung.
2. Double-click the new value.
3. In the Value data field, type 0.
The WaitToRestartAgentOnHung value takes precedence over this value.
To use this data collection option, download and install the User Mode Process Dump application included in the Microsoft Original Equipment Manufacturer (OEM) Support Tools. Visit http://support.microsoft.com for more information.
1
Set the maximum number of Userdump files to generate for each BlackBerry Enterprise Server daily, before the BlackBerry Controller restarts the messaging agents.
1. Create a new DWORD value called MaxUserDumpPerDay.
2. Double-click the new value.
3. In the Value data field, type a number.
To use this data collection option, download and install the User Mode Process Dump application included in the Microsoft Original Equipment Manufacturer (OEM) Support Tools. Visit http://support.microsoft.com for more information.
3
Set the number of 10 minute intervals in which to restart the messaging agents if the BlackBerry Controller does not receive health checks from the messaging agents.
1. Create a DWORD value called MissedHeartbeatThreshold.
2. Double-click the new value.
3. In the Value data field, type a number.
Health checks occur every 10 minutes. For example, if the MissedHeartbeatThreshold value is set to 3, then the BlackBerry Controller does not restart the messaging agents for 30 minutes.
2
Do not restart the messaging agents if the BlackBerry Controller does not receive health checks from the messaging agents.
1. Create a DWORD value called MissedHeartbeatThreshold.
2. Double-click the new value.
3. In the Value data field, type 0.
—
Do not restart the BlackBerry Dispatcher if it stops responding.
1. Create a new DWORD value called RestartDispatcherOnCrash.
2. Double-click the new value.
3. In the Value data field, type 0.
1
Do not restart the collaboration service if it stops responding.
1. Create a DWORD value called RestartBBIMOnCrash.
2. Double-click the new value.
3. In the Value data field, type 0.
1
Do not restart the Live Communication Server connector if it stops responding.
1. Create a new DWORD value called RestartLCSOnCrash.
2. Double-click the new value.
3. In the Value data field, type 0.
1
Do not restart the BlackBerry Router if it stops responding.
1. Create a new DWORD value called RestartRouterOnCrash.
2. Double-click the new value.
3. In the Value data field, type 0.
1
Do not restart the policy service if it stops responding.
1. Create a new DWORD value called RestartPolicyServerOnCrash.
2. Double-click the new value.
3. In the Value data field, type 0.
1
Do not restart the synchronization service if it stops responding.
1. Create a new DWORD value called RestartSyncServerOnCrash.
2. Double-click the new value.
3. In the Value data field, type 0.
1
Action Procedure Default

110
BlackBerry Enterprise Server for Microsoft Exchange System Administration Guide
5. Click OK.
Accessing log files for BlackBerry servicesUse log files to monitor the daily activities that the BlackBerry services perform and to find errors or information when you troubleshoot BlackBerry service issues. Each BlackBerry service creates its own log file. By default, BlackBerry service log files are written to C:\Program Files\Research In Motion\BlackBerry Enterprise Server\Logs\ and the BlackBerry Enterprise Server organizes the log files into daily folders. You can change the location to save the log files to if desired.
By default, the BlackBerry services create log files using the format <ServerName_IdentifierName_Instance_YYYYMMDD_Log#.txt> (for example, BBServer01_MAGT_01_20051020_0001.txt). Events that BlackBerry services write to the log file use a 5-digit number (for example, 30126). The first digit represents the logging level.
Use logs to monitor when and how frequently users are sending PIN messages and SMS messages from, and making phone calls on BlackBerry devices. By default, phone call logging is enabled and PIN and SMS message logging is turned off on the BlackBerry Enterprise Server.
Customize how BlackBerry services creates log files1. On the taskbar, click Start > Programs > BlackBerry Enterprise Server > BlackBerry Server Configuration.
2. On the Logging tab, perform any of the following actions:
Do not restart the connection service if it stops responding.
1. Create a new DWORD value called RestartMDSOnCrash.
2. Double-click the new value.
3. In the Value data field, type 0.
1
Do not restart the attachment service if it stops responding.
1. Create a new DWORD value called RestartAttachmentServerOnCrash.
2. Double-click the new value.
3. In the Value data field, type 0.
1
Do not restart the BlackBerry MDS Services if they stop responding.
1. Create a new DWORD value called RestartMDSServicesOnCrash.
2. Double-click the new value.
3. In the Value data field, type 0.
1
Do not restart the BlackBerry Database Consistency Service if it stops responding.
1. Create a new DWORD value called RestartDBConsistencyOnCrash.
2. Double-click the new value.
3. In the Value data field, type 0.
1
Action Procedure
Set the root location in which the BlackBerry services write the log files.
1. Click Browse.
2. Navigate to a location on a local drive.
Set a prefix to use for all log files. > In the Log file prefix field, type a prefix.
Store all log files in the root folder. > Clear the Create daily log folder check box.
Action Procedure Default

111
13: Managing a BlackBerry Domain
3. In the BlackBerry Service Log Settings pane, click a BlackBerry service.
4. Perform any of the following actions:
5. Click OK.
6. On the computer on which the BlackBerry service is installed, in Windows Services, restart the BlackBerry service.
Customize how the connection service creates a log file 1. In the BlackBerry Manager, in the left pane, click a BlackBerry Enterprise Server.
2. On the Connection Service tab, click Edit Properties.
3. Click Logs.
Action Procedure
Change the four character identifier name that appears in the BlackBerry service log file name.
1. Click Debug log identifier.
2. In the Setting column, type a new identifier name to associate the BlackBerry service with the log file it writes to.
Do not create a new log file every day.
1. Click Debug daily log file.
2. In the Setting column, in the drop-down list, click No, which means that the log file name does not contain the date.
Set the logging level. 1. Click the Debug log level setting.
2. In the Setting column, in the drop-down list, click one of the following logging levels:
• 1: Error
• 2: Warning
• 3: Information, which enables you to monitor the daily activities the BlackBerry service performs
• 4: Debug, which provides additional information to help you troubleshoot the BlackBerry service
• 5: Verbose, which logs all events associated with the service or component
Set a maximum log file size. 1. Click Debug log size.
2. In the Setting column, type the maximum log file size in MB. A value of 0 means no limit is enforced.
If Debug log auto-roll is turned on, a new file is created when the file size reaches the maximum. If Debug log auto-roll is turned off, the existing file is overwritten.
Create a new log file when the BlackBerry service is restarted or the log file reaches the maximum size.
1. Click Debug log auto-roll.
2. In the Setting column, in the drop-down list, click Yes.
Set the age after which log files are deleted.
1. Click Debug log maximum daily file age.
2. In the Setting column, type the number of days after which log files are deleted. A value of 0 means no limit is enforced.
Restore the default logging settings for all listed BlackBerry services.
> Click Reset All.

112
BlackBerry Enterprise Server for Microsoft Exchange System Administration Guide
4. Perform any of the following actions:
5. Double-click Logs.
6. Click Destination.
7. Perform any of the following actions:
Action Procedure
Monitor activity at the Server Relay Protocol (SRP) network layer. 1. Click SRP logging enabled.
2. Click True.
Monitor activity at the IPPP network layer. 1. Click IPPP logging enabled.
2. Click True.
Monitor activity at the UDP network layer. 1. Click UDP logging enabled.
2. Click True.
Monitor activity at the General Message Envelope (GME) network layer.
1. Click GME logging enabled.
2. Click True.
Monitor HTTP headers for response messages that are sent from the web server when users retrieve content from the Internet and corporate intranet.
1. Click HTTP logging enabled.
2. Click True.
Monitor HTTP headers and the body of response messages that are sent from the web server when users retrieve content from the Internet and corporate intranet.
1. Click Verbose HTTP logging enabled.
2. Click True.
Monitor encrypted data sent to and from the origin web server using TLS.
1. Click TLS logging enabled.
2. Click True.
Monitor the certificate revocation status that is retrieved from the OCSP server.
1. Click OCSP logging enabled.
2. Click True.
Monitor requests to access a user profile or certificate from the LDAP directory.
1. Click LDAP logging enabled.
2. Click True.
Monitor certificate revocation lists that are retrieved from the CRL server.
1. Click CRL logging enabled.
2. Click True.
Monitor BlackBerry device PGP key status and revocation information that is retrieved from the PGP server.
1. Click PGP logging enabled.
2. Click True.
Action Procedure
Set the logging level. 1. In the File section, click Log Level.
2. Click one of the following logging levels:
• Event
• Error
• Warning
• Informational: Enables you to monitor normal BlackBerry MDS data flow.
• Debug: Enables you to troubleshoot the connection service.
Set the location in which the connection service writes the log file.
1. In the file File section, double-click Location.
2. Type the location.

113
13: Managing a BlackBerry Domain
8. Click OK.
Customize how the collaboration service creates a log file 1. In the BlackBerry Manager, in the left pane, click a BlackBerry Enterprise Server.
2. On the BlackBerry Collaboration Services tab, click Edit Properties.
3. Click Logs.
4. Perform one of the following actions:
5. Click OK.
Monitor PIN messages, SMS messages, and phone calls in a BlackBerry Domain 1. In the BlackBerry Manager, in the left pane, click a BlackBerry Enterprise Server.
2. On the Server Configuration tab, click Edit Properties.
3. Click Sync Server.
Set the interval at which the connection service writes information to the log file.
1. In the File section, double-click Log Timer Interval.
2. Type the interval, in milliseconds.
Set the level of logging to write to the UDP log file.
1. In the UDP section, click Log Level.
2. Click the logging level.
Set the port that the BlackBerry Enterprise Server SNMP agent to which the connection service connects to send a UDP log message.
1. In the UDP section, double-click Location.
2. Type the port to use to connect to the SNMP agent, using the following format: <hostname:port>.
Set the level of logging to write to the TCP log file.
1. In the TCP section, click Log Level.
2. Click the logging level.
Set the location to which the connection service connects to send the TCP log message.
1. In the TCP section, double-click Location.
2. Type the location to which the BlackBerry MDS Connection Service connects to send the log message using the following format: <hostname:port>.
Set the level of logging to write to the EventLog. 1. In the EventLog section, click Log Level.
2. Click the logging level.
Action Procedure
Do not monitor activity at the BlackBerry Instant Messaging network layer.
1. Click BBIM logging enabled.
2. In the drop-down list, click False.
Do not monitor activity at the SRP network layer. 1. Click SRP logging enabled.
2. In the drop-down list, click False.
Monitor activity at the GME network layer. 1. Click GME logging enabled.
2. In the drop-down list, click True.
Action Procedure

114
BlackBerry Enterprise Server for Microsoft Exchange System Administration Guide
4. Double-click Audit Root Directory.
5. Type the absolute path to the location you want to save the log files to if desired.
6. Click OK.
7. In the BlackBerry Manager, in the left pane, click BlackBerry Domain.
8. On the Global tab, click Edit Properties.
9. Click IT Policy.
10. In the IT Policy Administration section, double-click IT Policies.
11. In the list of policies, click a policy.
12. Click Properties.
13. Click PIM Sync Policy Group.
14. Perform any of the following actions:
15. Click OK.
16. Click OK.
17. Click OK again.
18. On the computer on which the synchronization service is installed, in Windows Services, restart the synchronization service. The BlackBerry Enterprise Server creates the log files using the following formats:
• PINLog_<YYYYMMDD>.csv
• SMSLog_<YYYYMMDD>.csv
• PhoneCallLog_<YYYYMMDD>.csv
Managing different BlackBerry DomainsManage a different BlackBerry Domain by connecting the BlackBerry Manager to a different configuration database.
Action Procedure
Monitor SMS messages users send from BlackBerry devices. 1. Click Disable SMS Messages Wireless Sync.
2. In the drop-down list, click False.
Monitor PIN messages users send from BlackBerry devices. 1. Click Disable PIN Messages Wireless Sync.
2. In the drop-down list, click False.
Do not monitor phone calls users make on BlackBerry devices. 1. Click Disable Phone Call Log Wireless Sync.
2. In the drop-down list, click True.

115
13: Managing a BlackBerry Domain
Connect the BlackBerry Manager to a different BlackBerry Domain 1. In the BlackBerry Manager, on the Tools menu, click Options.
2. Click Database.
3. Perform the following actions:
4. Click OK.
5. Close and re-open the BlackBerry Manager.
Managing license keysClient access license keys control how many user accounts can exist on a BlackBerry Enterprise Server at the same time. When you exceed the number of permitted user accounts, the license manager informs you that you require more client access licenses.
To help you migrate client access license keys to computers in different BlackBerry Domains or troubleshoot client access license key issues, you can copy the license keys from the BlackBerry Manager to a text file.
Add or remove a license key 1. In the BlackBerry Manager, in the left pane, click BlackBerry Domain.
2. On the Global tab, click Account.
3. Click License Management.
4. Perform one of the following actions:
Action Procedure
Set the database server to connect to. 1. Double-click Database Server Name.
2. Type the name of the database server the configuration database resides on.
Set the configuration database to connect to. 1. Double-click Database Name.
2. Type the configuration database name.
Set the authentication type to use to connect to the configuration database.
> In the Authentication drop-down list, click an authentication type.
Turn on verbose logging for all calls to the configuration database.
> In the Log Database Calls drop-down list, click True.
Warning: If you use a temporary evaluation version client access license key and the key expires, the BlackBerry Dispatcher turns off automatically, stopping all synchronization between the BlackBerry Enterprise Server and BlackBerry devices. You must purchase a new client access license key before you can restart it. If you use a temporary evaluation license key, you cannot reuse that key after you purchase a permanent client access license key.
Action Procedure
Add a client access license key. 1. Type the new license key information.
2. Click Add License.
3. Click Close.

116
BlackBerry Enterprise Server for Microsoft Exchange System Administration Guide
Copy a license key to a text file 1. In the BlackBerry Manager, in the left pane, click BlackBerry Domain.
2. On the Global tab, click Account.
3. Click License Management.
4. Right-click a license key. Click Copy Key.
5. Open a text editor application.
6. Paste the license key.
7. Save the file.
Remove a client access license key. 1. Right-click the license key to remove. Click Remove License Key.
2. Click Close.
Action Procedure
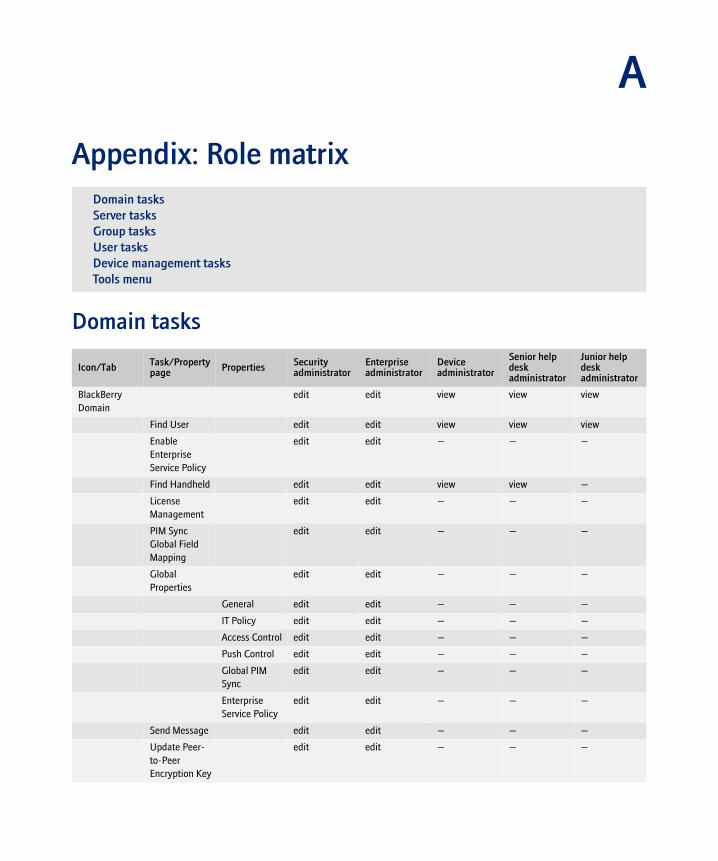
A
Appendix: Role matrix
Domain tasks
Domain tasksServer tasksGroup tasksUser tasksDevice management tasksTools menu
Icon/Tab Task/Property page Properties Security
administratorEnterprise administrator
Device administrator
Senior help desk administrator
Junior help desk administrator
BlackBerry Domain
edit edit view view view
Find User edit edit view view view
Enable Enterprise Service Policy
edit edit — — —
Find Handheld edit edit view view —
License Management
edit edit — — —
PIM Sync Global Field Mapping
edit edit — — —
Global Properties
edit edit — — —
General edit edit — — —
IT Policy edit edit — — —
Access Control edit edit — — —
Push Control edit edit — — —
Global PIM Sync
edit edit — — —
Enterprise Service Policy
edit edit — — —
Send Message edit edit — — —
Update Peer-to-Peer Encryption Key
edit edit — — —

118
BlackBerry Enterprise Server for Microsoft Exchange System Administration Guide
Server tasks
Role Administration
edit — — — —
Add Administrators
edit — — — —
List Administrators
edit — — — —
Remove Administrators
edit — — — —
Icon/Tab Task/Property page Properties Security
administratorEnterprise administrator
Device administrator
Senior help desk administrator
Junior help desk administrator
Servers edit edit view view view
Add Users edit edit — edit —
Clear Statistics edit edit — — —
Import Users From Legacy Server
edit edit — edit —
Disable BlackBerry MDS Connection Service
edit edit — — —
Server Properties
edit edit — — —
BES Alert edit edit — — —
Global Filters edit edit — — —
General edit edit — — —
IT Admin edit edit — — —
Messaging edit edit — — —
Sync Server edit edit — — —
MDS Services edit edit — — —
Remove BlackBerry Enterprise Server
edit edit — — —
Restart BlackBerry Enterprise Server
edit edit — — —
Send Message edit edit — edit —
Icon/Tab Task/Property page Properties Security
administratorEnterprise administrator
Device administrator
Senior help desk administrator
Junior help desk administrator

119
Appendix: Role matrix
Set Polling Interval
edit edit — — —
State Database Pruning
edit edit — — —
Connection Services
edit edit — — —
Clear Statistics edit edit — — —
BlackBerry MDS Connection Service Properties
edit edit — — —
General edit edit — — —
HTTP edit edit — — —
LDAP edit edit — — —
Access Control edit edit — — —
Logs edit edit — — —
OCSP edit edit — — —
Push/PAP edit edit — — —
Proxy edit edit — — —
RSA Authentication
edit edit — — —
Stats edit edit — — —
TLS/HTTPS edit edit — — —
Restart Service edit edit — — —
Set as Push Server
edit edit — — —
Unset as Push Server
edit edit — — —
Start Service edit edit — — —
Stop Service edit edit — — —
Collaboration Services
edit edit — — —
Start Service edit edit — — —
Stop Service edit edit — — —
Restart Service edit edit — — —
Clear Statistics edit edit — — —
BlackBerry Collaboration Service Properties
edit edit — — —
General edit edit — — —
Icon/Tab Task/Property page Properties Security
administratorEnterprise administrator
Device administrator
Senior help desk administrator
Junior help desk administrator

120
BlackBerry Enterprise Server for Microsoft Exchange System Administration Guide
Stats edit edit — — —
Local Access Control
edit edit — — —
Logs edit edit — — —
<MDS Services server name>
edit edit view view view
<MDS Services server name> Properties
edit edit — — —
General edit edit — — —
Filters edit edit — — —
Device Policies edit edit — — —
Certificate edit edit — — —
Connection Services
edit edit — — —
Message Monitors
edit edit — — —
Security edit — — — —
Start Service edit edit — — —
Stop Service edit edit — — —
Add Certificate edit edit — — —
Applications Installed
edit view view view view
Remove Application from List
edit edit edit — —
Quarantine Application
edit edit edit — —
Reinstate Application
edit edit edit — —
Uninstall on Device
edit edit edit — —
Quarantine on Device
edit edit edit — —
Reinstate on Device
edit edit edit — —
Application Registry
edit edit edit view view
Delete Application
edit edit edit — —
Install on Device
edit edit edit — —
Icon/Tab Task/Property page Properties Security
administratorEnterprise administrator
Device administrator
Senior help desk administrator
Junior help desk administrator

121
Appendix: Role matrix
Upgrade on Device
edit edit edit — —
Devices Registered
edit edit edit edit edit
Device Registered Properties
edit edit edit edit edit
Device Policy edit edit edit edit edit
Applications edit edit edit edit edit
Assign Device Policy
edit edit edit edit —
Monitor Messages
edit edit edit — —
Purge All Messages
edit edit edit — —
Icon/Tab Task/Property page Properties Security
administratorEnterprise administrator
Device administrator
Senior help desk administrator
Junior help desk administrator
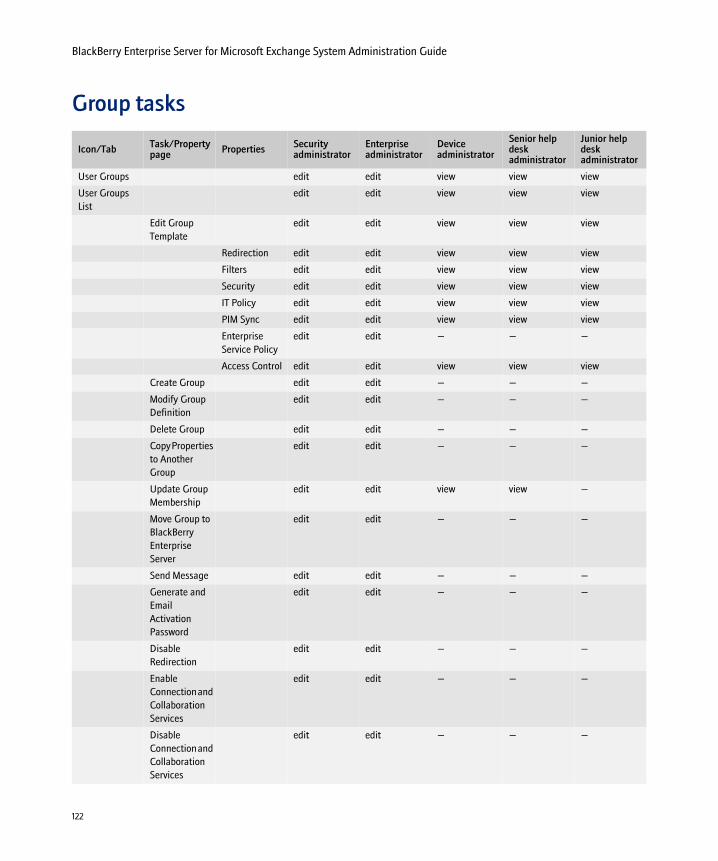
122
BlackBerry Enterprise Server for Microsoft Exchange System Administration Guide
Group tasks
Icon/Tab Task/Property page Properties Security
administratorEnterprise administrator
Device administrator
Senior help desk administrator
Junior help desk administrator
User Groups edit edit view view view
User Groups List
edit edit view view view
Edit Group Template
edit edit view view view
Redirection edit edit view view view
Filters edit edit view view view
Security edit edit view view view
IT Policy edit edit view view view
PIM Sync edit edit view view view
Enterprise Service Policy
edit edit — — —
Access Control edit edit view view view
Create Group edit edit — — —
Modify Group Definition
edit edit — — —
Delete Group edit edit — — —
Copy Properties to Another Group
edit edit — — —
Update Group Membership
edit edit view view —
Move Group to BlackBerry Enterprise Server
edit edit — — —
Send Message edit edit — — —
Generate and Email Activation Password
edit edit — — —
Disable Redirection
edit edit — — —
Enable Connection and Collaboration Services
edit edit — — —
Disable Connection and Collaboration Services
edit edit — — —

123
Appendix: Role matrix
Resend IT Policy
edit edit — — —
Assign IT Policy edit edit — — —
Resend Peer-to-Peer Key
edit edit — — —
Resend Service Book
edit edit — — —
Reset PIM Sync Field Mapping
edit edit — — —
Clear PIM Sync Backup Data
edit edit — — —
Purge Pending Messages
edit edit — — —
Clear Statistics edit edit — — —
Export Stats To File
edit edit — — —
Assign Device Policy
edit edit — — —
Install on Device
edit edit — — —
Uninstall on Device
edit edit — — —
Assign Software Configuration
edit edit edit — —
Update Configuration Check Status
edit edit edit — —
Export Asset Summary Data
edit edit edit — —
Software Configurations
edit edit edit — —
Add New Configuration
edit edit edit — —
Edit Configuration
edit edit edit — —
Copy Configuration
edit edit edit — —
Delete Configuration
edit edit edit — —
Manage Application Policies
edit edit edit — —
Icon/Tab Task/Property page Properties Security
administratorEnterprise administrator
Device administrator
Senior help desk administrator
Junior help desk administrator

124
BlackBerry Enterprise Server for Microsoft Exchange System Administration Guide
User tasks
Explorer Icon/Tab
Task/Property page Properties Security
administratorEnterprise administrator
Device administrator
Senior help desk administrator
Junior help desk administrator
Users edit edit edit edit edit
Set Activation Password
edit edit — edit edit
Reload User edit edit — edit edit
Clear In-Cradle Flag
edit edit — edit edit
Choose Folders for Redirection
edit edit — — —
Add Users edit edit — edit —
Assign To Group
edit edit — edit —
Remove From Group
edit edit — edit —
Change Directory Server
edit edit — edit —
Clear Statistics edit edit — edit —
Delete User edit edit — edit —
Export To Legacy Server
edit edit — edit edit
Export Stats To File
edit edit — edit edit
Find User edit edit — edit edit
Generate and Email Activation Password
edit edit — edit edit
Assign IT Policy edit edit — edit —
Resend IT Policy
edit edit — edit edit
Erase Data and Disable Handheld
edit edit — edit —
Disable Connection and Collaboration Services
edit edit — edit —
Move User edit edit — edit —
Resend Peer-to-Peer Key
edit edit — edit edit

125
Appendix: Role matrix
Clear PIM Sync Backup Data
edit edit — edit —
Edit PIM Sync Field Mapping
edit edit — edit —
Reset PIM Sync Field Mapping
edit edit — edit —
User Properties edit edit edit edit edit
Filters edit edit — edit edit
IT Policy edit edit — edit —
PIM Sync edit edit — edit —
Redirection edit edit — edit edit
Security edit edit — edit edit
Enterprise Service Policy
edit edit — — —
BlackBerry device (read-only)
view view view view —
Advanced edit edit — — —
Purge Pending Messages
edit edit — edit edit
Disable Redirection
edit edit — edit edit
Send Message edit edit — edit edit
Resend Service Book
edit edit — edit edit
Set Owner Information
edit edit — edit —
Set Password and Lock Handheld
edit edit — edit edit
Assign Device edit edit edit — —
Assign Software Configuration
edit edit edit — —
Export Asset Summary Data
edit edit edit — —
Update Configuration Check Status
edit edit edit — —
Explorer Icon/Tab
Task/Property page Properties Security
administratorEnterprise administrator
Device administrator
Senior help desk administrator
Junior help desk administrator
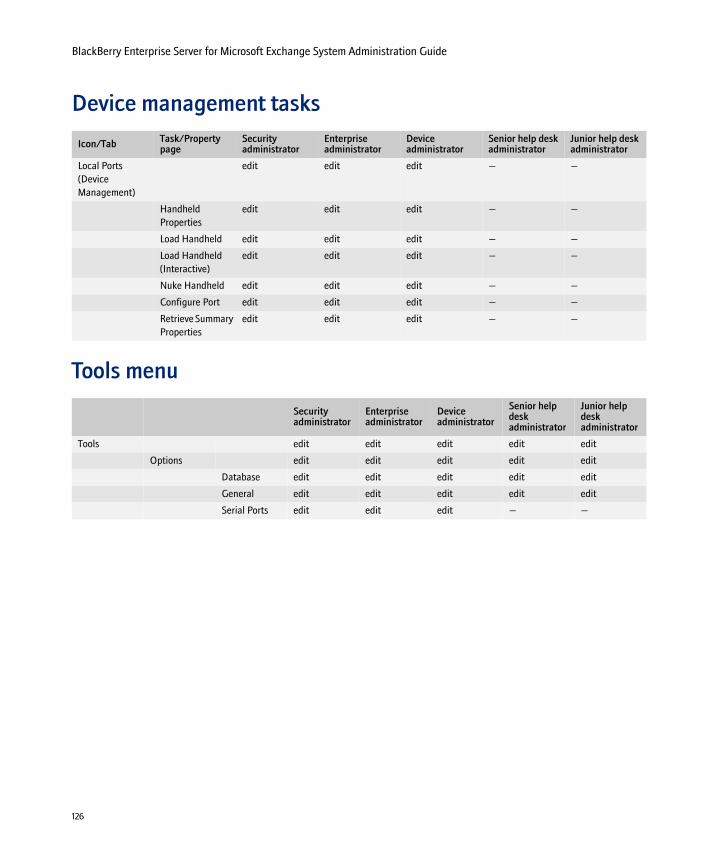
126
BlackBerry Enterprise Server for Microsoft Exchange System Administration Guide
Device management tasks
Tools menu
Icon/Tab Task/Property page
Security administrator
Enterprise administrator
Device administrator
Senior help desk administrator
Junior help desk administrator
Local Ports (Device Management)
edit edit edit — —
Handheld Properties
edit edit edit — —
Load Handheld edit edit edit — —
Load Handheld (Interactive)
edit edit edit — —
Nuke Handheld edit edit edit — —
Configure Port edit edit edit — —
Retrieve Summary Properties
edit edit edit — —
Security administrator
Enterprise administrator
Device administrator
Senior help desk administrator
Junior help desk administrator
Tools edit edit edit edit edit
Options edit edit edit edit edit
Database edit edit edit edit edit
General edit edit edit edit edit
Serial Ports edit edit edit — —

B
Appendix: Wireless backup and restore
BlackBerry device data that the BlackBerry Enterprise Server does not back up wirelessly
BlackBerry device data that the BlackBerry Enterprise Server does not back up wirelessly
Data Description
messages messages that were received on the BlackBerry device before the specified prepopulation date, not marked as saved, located in folders not set for redirection, or that have message filters assigned to prevent redirection to the BlackBerry device
content store saved images and ring tones
service books all service books
group addresses group addresses that users create on the BlackBerry device are stored locally; they are not synchronized
RMS databases third-party Java applications that developers created in Java ME
Java applications Java applications (that developers created in the BlackBerry Java Development Environment) that you send to BlackBerry devices wirelessly
Enterprise Messenger the Enterprise Messenger that you send to BlackBerry devices wirelessly
BlackBerry MDS Studio Applications
BlackBerry MDS Studio Applications that you push to BlackBerry devices wirelessly

128
BlackBerry Enterprise Server for Microsoft Exchange System Administration Guide


©2006 Research In Motion Limited
Published in Canada.


