40
Blackboard/WebCT Instructor Manual Radford University Ashlee Cossaboon, Writer Tara Riley, Editor
Blackboard/WebCT Instructor Manual
Radford University
Ashlee Cossaboon, Writer Tara Riley, Editor
Blackboard/WebCT Instructor Manual
Version 1.1 ii
TABLE OF CONTENTS
Section Page
Chapter One: Getting Acquainted with Blackboard/WebCT.................................... 1
Can my computer run Blackboard/WebCT?.......................................................... 1 What skills do I need before getting started? ........................................................ 1 What tools does Blackboard/WebCT offer? .......................................................... 1
Chapter Two: Building a Course ................................................................................ 3 How do I log-in to Blackboard/WebCT?................................................................. 3 How do I select Course Tools?............................................................................... 4 How do I add and delete content and folders from Course Content?................. 5 How do I link to Course Tools?............................................................................... 6
Chapter Three: Adding and Deleting Users .............................................................. 7 How do I add a student? ......................................................................................... 7 How do I delete a user?........................................................................................... 8 How do I add a Teaching Assistant?...................................................................... 8
Chapter Four: Adding a Syllabus and Calendar ......................................................11 How do I add a syllabus? .......................................................................................11 How do I add a calendar? ......................................................................................12
Chapter Five: Creating an Assignment.....................................................................14 How do I create an assignment?...........................................................................14 How do I publish an assignment?..........................................................................15
Chapter Six: Creating and Working with Groups.....................................................16 How do I create a custom group?..........................................................................16 How do I create multiple groups?..........................................................................17 How do I create groups with a sign-up sheet?.....................................................20
Chapter Seven: Working with Discussions...............................................................22 How do I create a discussion category?...............................................................22 How do I create a discussion topic?......................................................................23 How do I limit a discussion topic to members of a group?..................................27
Chapter Eight: Creating an Online Assessment ......................................................28 How do I organize the question database into categories?................................28 How do I create an online assessment?...............................................................29 How do I add questions to the assessment?........................................................30
Chapter Nine: Posting Student Grades ....................................................................33 How do I post student grades?..............................................................................33 How do I use grading forms?.................................................................................35
Blackboard/WebCT Instructor Manual
Version 1.1 1
Chapter One: Getting Acquainted with Blackboard/WebCT
Blackboard/WebCT has many options, which can be overwhelming for beginners. However, if you decide to use Blackboard/WebCT for your course, the attributes outweigh the difficulties, and it can help you communicate with your students and organize your course.
Can my computer run Blackboard/WebCT?
To teach a course using Blackboard/WebCT you must have regular and reliable access to a computer with Internet access. Your computer must be able to run an up-to-date Web browser and download files in a reasonable amount of time. A Pentium-class (or its Apple equivalent) computer with at least 16 MB of RAM is required. Your Internet modem should be at least 28.8 kbps.
Your computer must have a word processor, such as Microsoft Word, to create assignments and syllabi. Some tools may require you to download JAVA. Also, Blackboard/WebCT uses pop-ups, so pop-ups from http://webct6.radford.edu must not be blocked.
All Radford University on-campus computers can support Blackboard/WebCT.
What skills do I need before getting started?
You do not need any special computer skills to operate Blackboard/WebCT, but you must possess basic computer skills. You should know how to use e-mail. This includes sending, opening, replying, and saving attachments. You should know basic Web browsing, such as navigating, searching, and downloading Web pages. You should also be able to operate a word processor. Lastly, you will need to know your RU username and password to log-in.
What tools does Blackboard/WebCT offer?
Blackboard/WebCT offers a multitude of tools. This manual will review the following:
How to log-in to Blackboard/WebCT
How to select tools
How to add and delete folders from Course Content
How to link to Course tools
How to add a syllabus
Blackboard/WebCT Instructor Manual
Version 1.1 2
How to add a calendar
How to add/enroll users
How to delete/unenroll users
How to add a Teaching Assistant
How to create an assignment
How to publish an assignment
How to create different kinds of groups
How to set up a discussion
How to create an online assessment
How to use the Grade Book tool
How to use the Grading Form tool
If you have a question about a tool or option not discussed in this manual, please contact the Technology in Learning Center by telephone 831-5974 or e-mail [email protected].
Blackboard/WebCT Instructor Manual
Version 1.1 3
Chapter Two: Building a Course
In this chapter, you will learn how to log-in to Blackboard/WebCT, how to select Course Tools, how to add and delete content and folders from Course Content, and how to link to Course Tools.
How do I log-in to Blackboard/WebCT?
There are two ways to log-in to a Blackboard/WebCT course.
To log-in to Blackboard/WebCT through the Radford University portal:
1. Open your Internet browser.
2. Direct your browser to https://www.portal.radford.edu.
3. Type in your RU username and password.
4. Click the Login button.
5. Click the WebCT button.
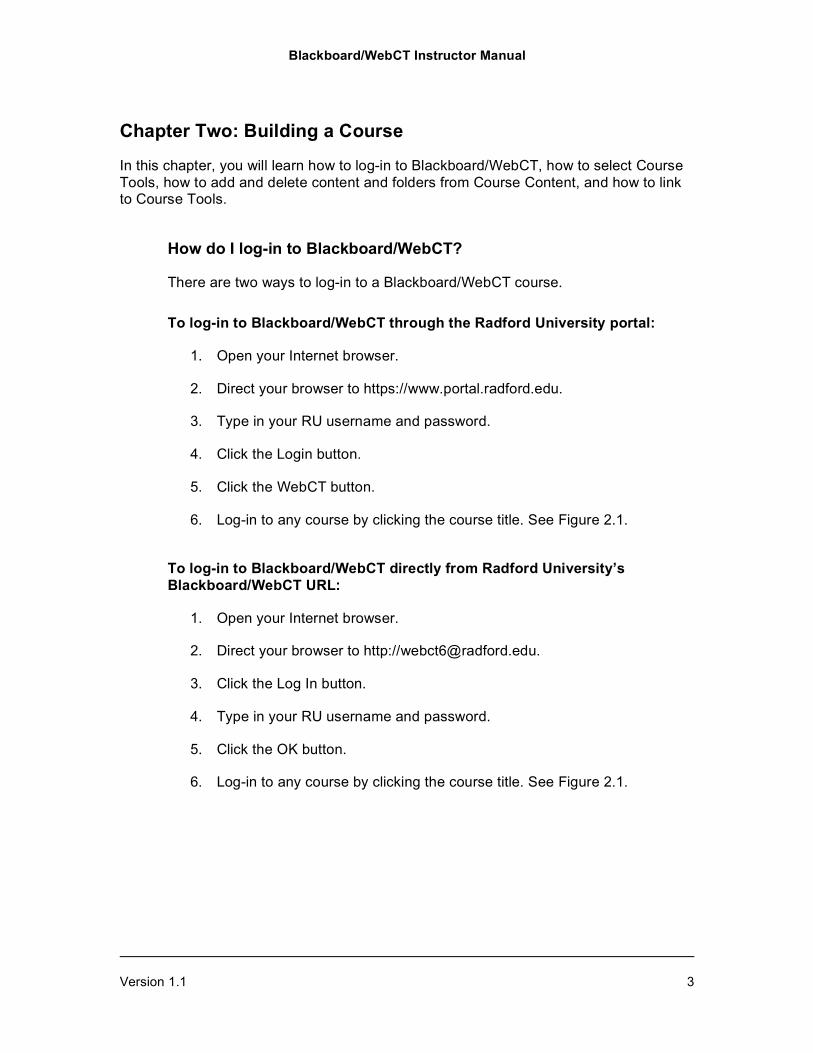
6. Log-in to any course by clicking the course title. See Figure 2.1.
To log-in to Blackboard/WebCT directly from Radford University’s Blackboard/WebCT URL:
1. Open your Internet browser.
2. Direct your browser to http://[email protected].
3. Click the Log In button.
4. Type in your RU username and password.
5. Click the OK button.
6. Log-in to any course by clicking the course title. See Figure 2.1.
Blackboard/WebCT Instructor Manual
Version 1.1 4
Figure 2.1
How do I select Course Tools?
The first time you log-in to your course you must select which Course Tools will be available to your users. You can revisit this step to make more or less tools available at any time. It is best to limit your initial selection so that you do not overwhelm your users. A typical Blackboard/WebCT course will include the following Course Tools in Table 2.1.
Table 2.1
Web Links Allows you to link Internet resources of interest to your course page.
My Grades Allows users to check their performance on assignments.
Calendar Allows you to display important course dates and deadlines.
Search Allows users to look for content within the course page.
Announcements Allows you to post important information for a specified amount of time in a central location.
Discussions Allows users to post and respond to message boards.
Roster Allows you to see a list of users.
Assignments Allows you to assign graded tasks; tasks can be assigned on the basis of name, group membership, prerequisite criteria, or date criteria.

Blackboard/WebCT Instructor Manual
Version 1.1 5
To alter your available Course Tools at anytime:
1. Log-in to your course.
2. Click the Build tab.
3. Click the Manage Course tab.
4. Click the Tools tab.
How do I add and delete content and folders from Course Content?
Course Content can contain individual items, such as links to specific files or discussions, and it can contain folders.
To add a file to your Course Content:
1. Log-in to your course.
2. Click the Build tab.
3. Click the Course Content tab.
4. Click the Add File button.
5. Select the file you wish to add.
6. An icon for your file will appear on the course page. See Figure 2.2.
Figure 2.2
Blackboard/WebCT Instructor Manual
Version 1.1 6
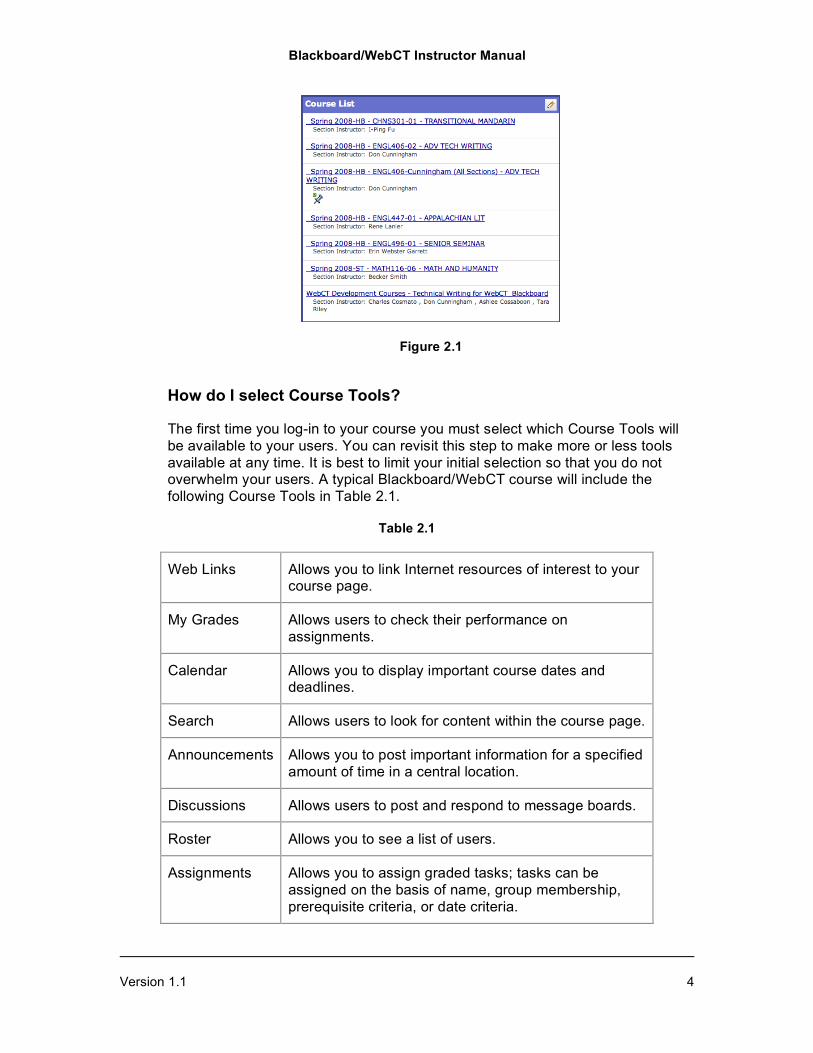
How do I add a folder to my Course Content?
1. Log-in to your course.
2. Click the Build tab.
3. Click the Course Content tab.
4. Click the Create Folder button.
5. Type in the desired name of your folder.
6. Click the Save button. See Figure 2.3.
7. Click the folder to add files or subfolders.
Figure 2.3
How do I link to Course Tools?
It is helpful to provide a direct link to some Blackboard/WebCT tools so that your users can easily find a particular discussion or assignment.
To provide a direct link to Course Tools:
1. Log-in to your course.
2. Click the Build tab.
3. Click the Course Content tab.
4. Click the Add Content Link button.
5. Select the Course Tool you wish to link.
Blackboard/WebCT Instructor Manual
Version 1.1 7
Chapter Three: Adding and Deleting Users
Students can only be officially enrolled or unenrolled in a course through the Radford University Registrar. The Registrar automatically changes the Blackboard/WebCT roster. You can manually add or delete a user at any point. However, if you add or delete a user, they are not officially enrolled or unenrolled until it goes through the Registrar.
How do I add a student?
You must know the student’s RU username before you begin.
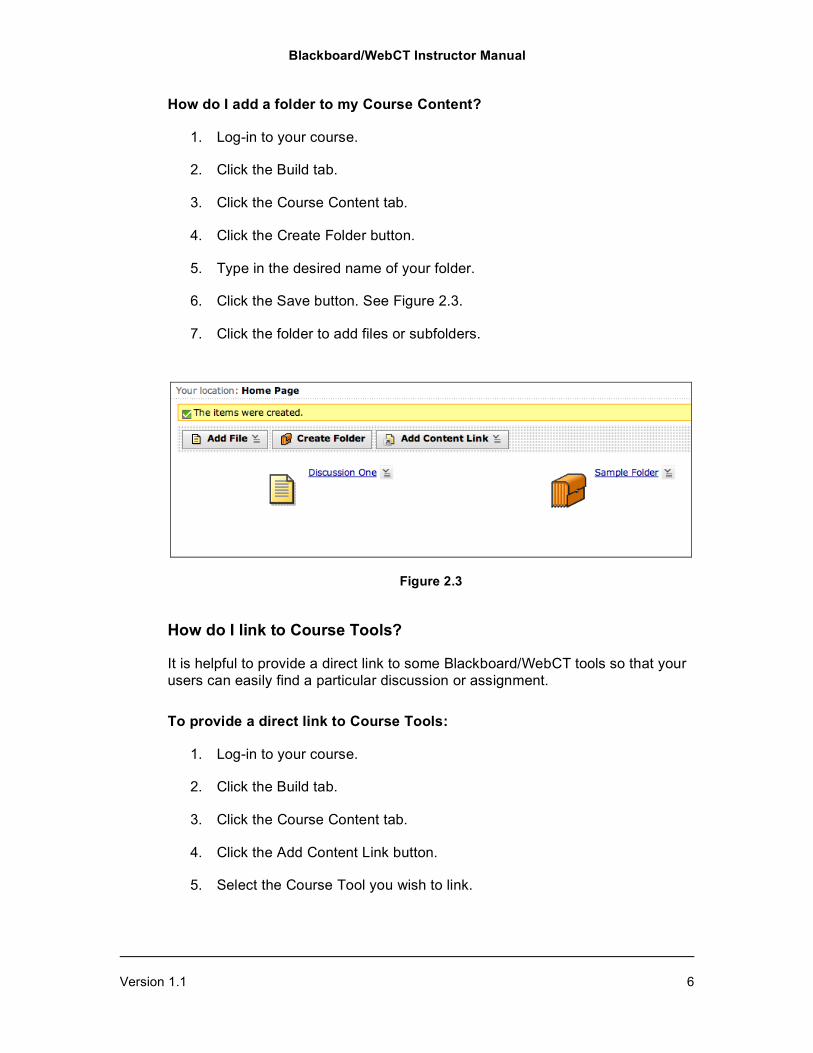
To add a student to your Blackboard/WebCT course:
1. Log-in to your course.
2. Click the Teach tab.
3. Click the Instructor Tools tab.
4. Click the Grade Book tab.
5. Click the Enroll Members button.
6. Type in the student’s RU username.
7. Assign the user to the Student role. See Figure 3.1.
Figure 3.1
Blackboard/WebCT Instructor Manual
Version 1.1 8
How do I delete a user?
You must know the student’s RU username before you begin.
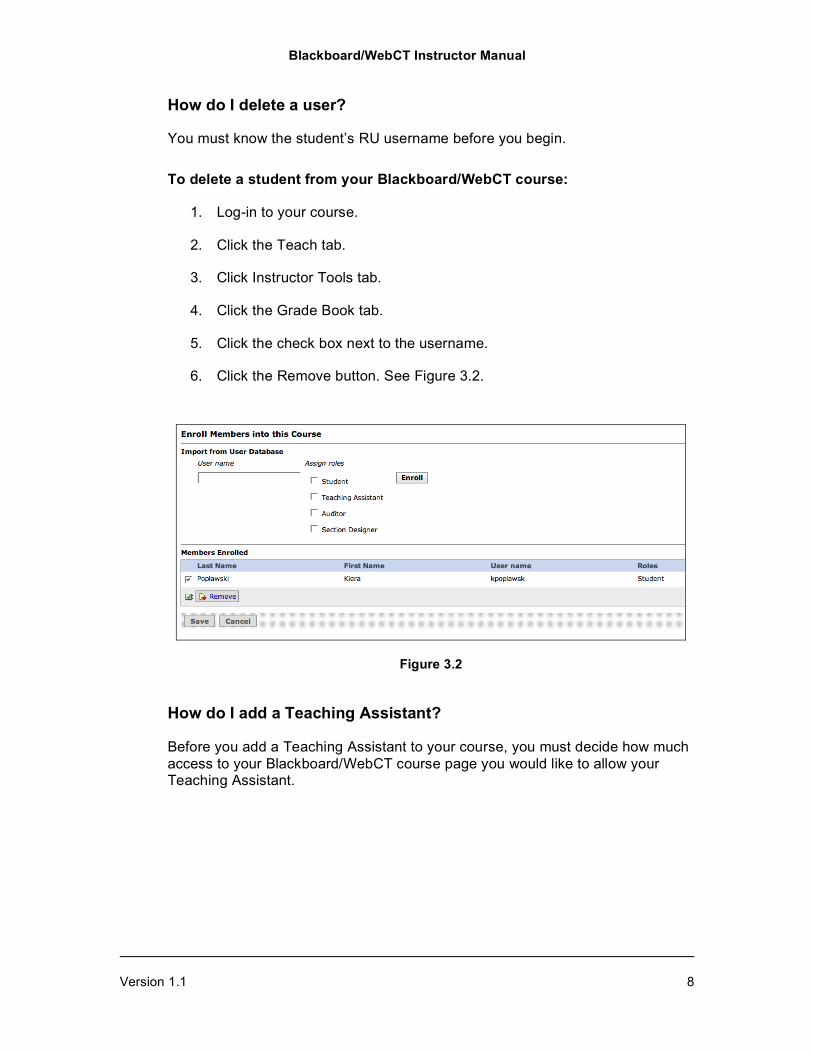
To delete a student from your Blackboard/WebCT course:
1. Log-in to your course.
2. Click the Teach tab.
3. Click Instructor Tools tab.
4. Click the Grade Book tab.
5. Click the check box next to the username.
6. Click the Remove button. See Figure 3.2.
Figure 3.2
How do I add a Teaching Assistant?
Before you add a Teaching Assistant to your course, you must decide how much access to your Blackboard/WebCT course page you would like to allow your Teaching Assistant.
Blackboard/WebCT Instructor Manual
Version 1.1 9
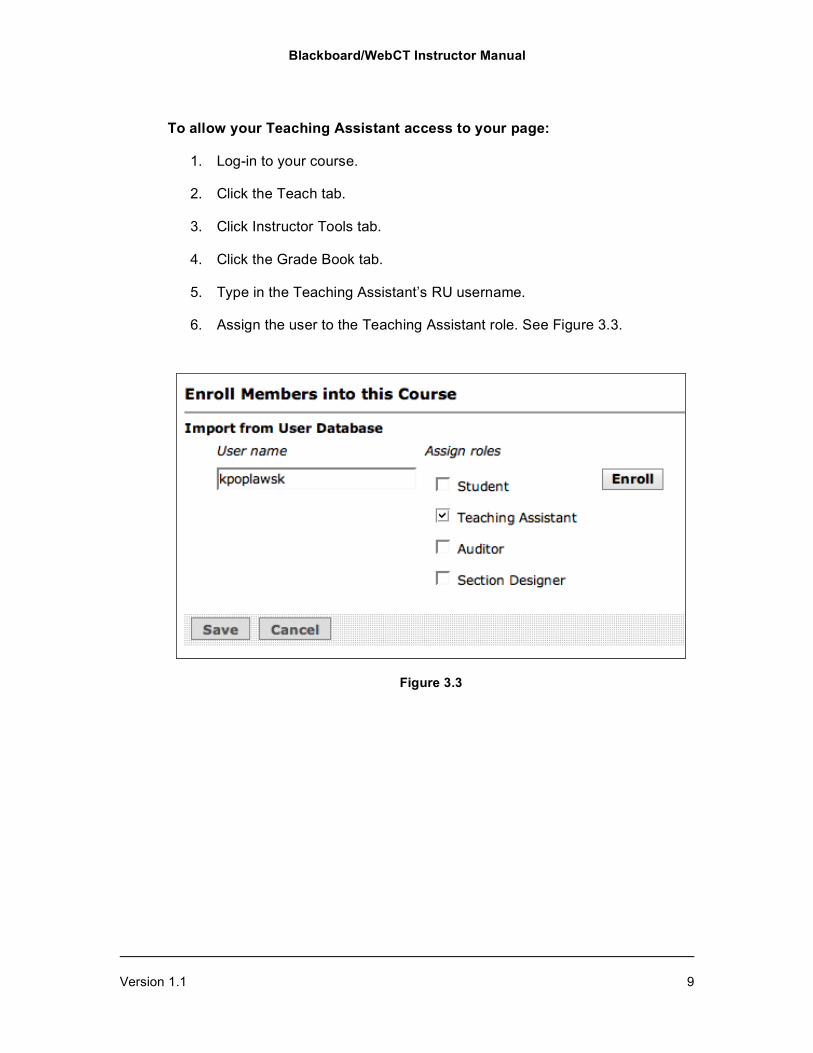
To allow your Teaching Assistant access to your page:
1. Log-in to your course.
2. Click the Teach tab.
3. Click Instructor Tools tab.
4. Click the Grade Book tab.
5. Type in the Teaching Assistant’s RU username.
6. Assign the user to the Teaching Assistant role. See Figure 3.3.
Figure 3.3
Blackboard/WebCT Instructor Manual
Version 1.1 10
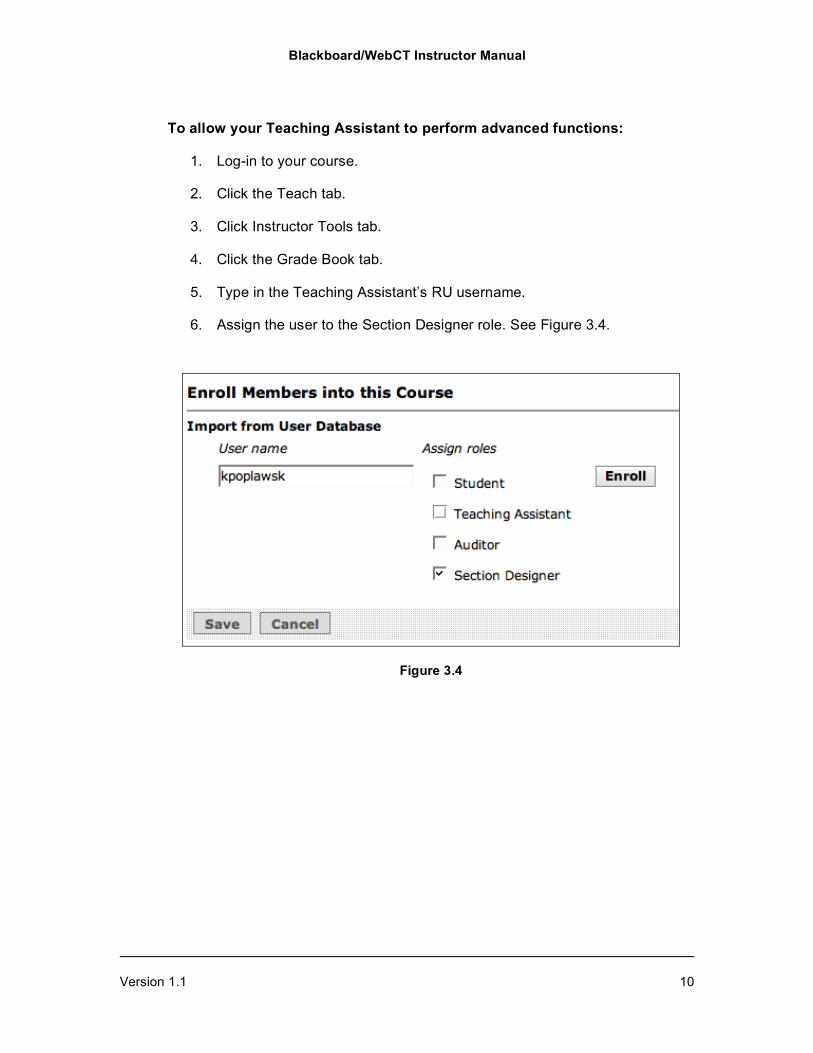
To allow your Teaching Assistant to perform advanced functions:
1. Log-in to your course.
2. Click the Teach tab.
3. Click Instructor Tools tab.
4. Click the Grade Book tab.
5. Type in the Teaching Assistant’s RU username.
6. Assign the user to the Section Designer role. See Figure 3.4.
Figure 3.4
Blackboard/WebCT Instructor Manual
Version 1.1 11
Chapter Four: Adding a Syllabus and Calendar
Posting your course syllabus and calendar to your Blackboard/WebCT course page allows easy access to students. It also allows you to constantly update your syllabus and calendar throughout the course duration if necessary.
How do I add a syllabus?
The Syllabus tool on Blackboard/WebCT is one of the most utilized by Radford University professors. It is easy to add your course syllabus to your course page.
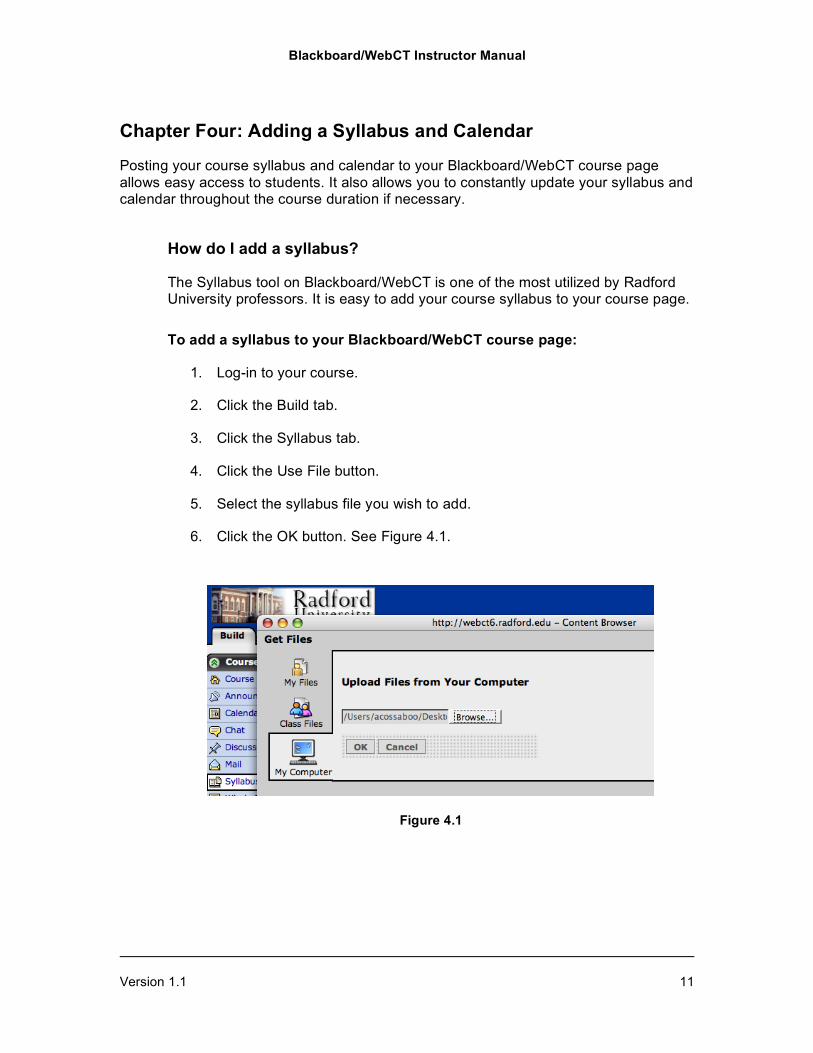
To add a syllabus to your Blackboard/WebCT course page:
1. Log-in to your course.
2. Click the Build tab.
3. Click the Syllabus tab.
4. Click the Use File button.
5. Select the syllabus file you wish to add.
6. Click the OK button. See Figure 4.1.
Figure 4.1
Blackboard/WebCT Instructor Manual
Version 1.1 12
To make sure that your users can view your course syllabus:
1. Click the Student View tab.
2. Click the Syllabus tab.
How do I add a calendar?
The Calendar tool helps your users track assignments, quizzes, deadlines, and other important course dates.
To add a calendar:
1. Log-in to your course.
2. Click the Build tab.
3. Click the Calendar tab.
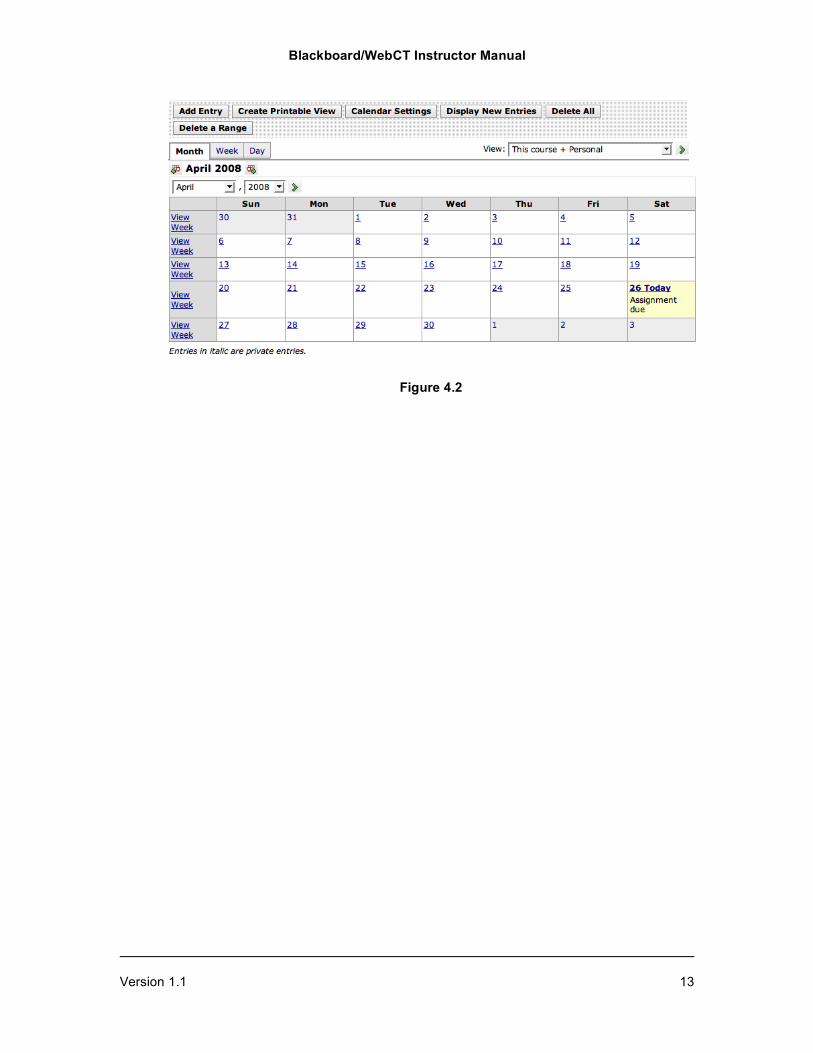
4. Click the Add Entry button.
5. Type your desired title name in the Title box.
6. Select a Start Date.
7. Click the Save button.
8. Entry should appear on the calendar. See Figure 4.2.
Blackboard/WebCT Instructor Manual
Version 1.1 13
Figure 4.2
Blackboard/WebCT Instructor Manual
Version 1.1 14
Chapter Five: Creating an Assignment
Creating and posting assignments on Blackboard/WebCT allows you to save paper and allows students easy access to assignments from computers with Internet access.
How do I create an assignment?
Creating an assignment is one of the easiest ways to post and receive assignments from students. By using Blackboard/WebCT you avoid students e-mailing assignments, which can expose your computer to viruses.
To create an assignment on Blackboard/WebCT:
1. Log-in to your course.
2. Click the Build tab.
3. Click the Assignments tab.
4. Click the Create Assignment button.
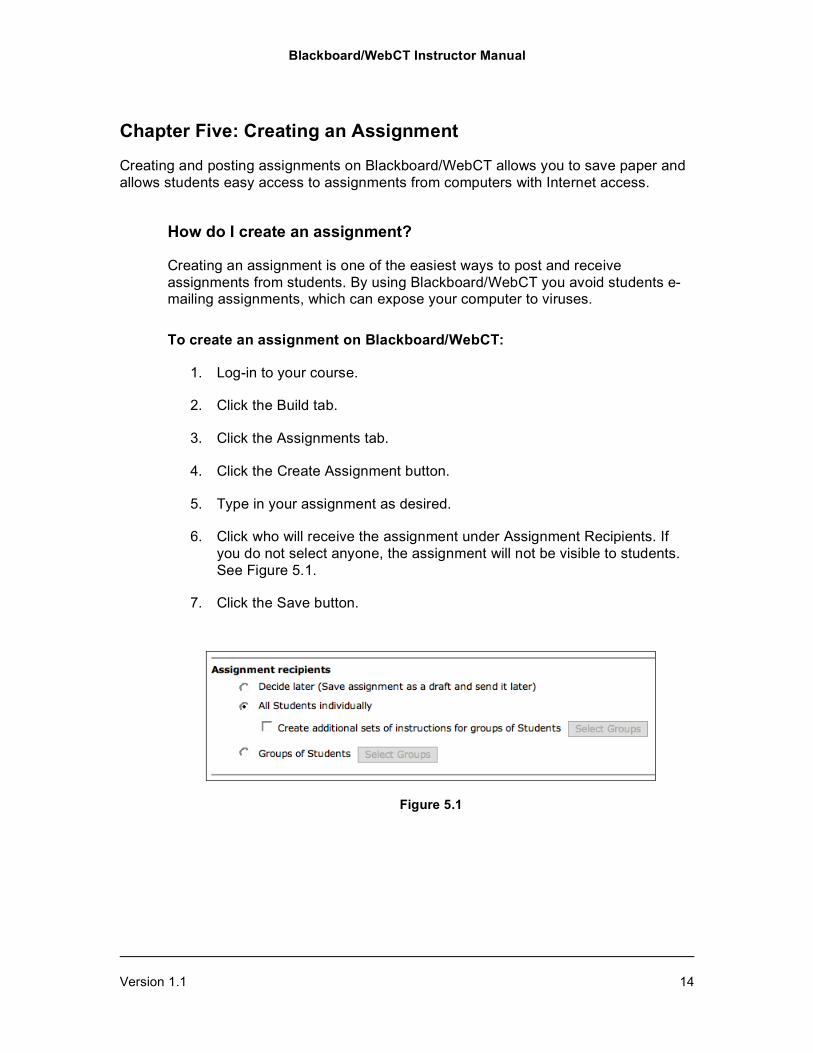
5. Type in your assignment as desired.
6. Click who will receive the assignment under Assignment Recipients. If you do not select anyone, the assignment will not be visible to students. See Figure 5.1.
7. Click the Save button.
Figure 5.1
Blackboard/WebCT Instructor Manual
Version 1.1 15
How do I publish an assignment?
Publishing an assignment allows all users to view a student‘s or a group’s posted assignments. This application is especially helpful when you would like all users to access and learn from another student’s assignment.
To publish an assignment:
1. Log-in to your course.
2. Click the Build tab.
3. Click the Assignments tab.
4. Click the Create Assignment button.
5. Type in your assignment as desired.
6. Click who will receive the assignment under Assignment Recipients. If you do not select anyone, the assignment will not be visible to students.
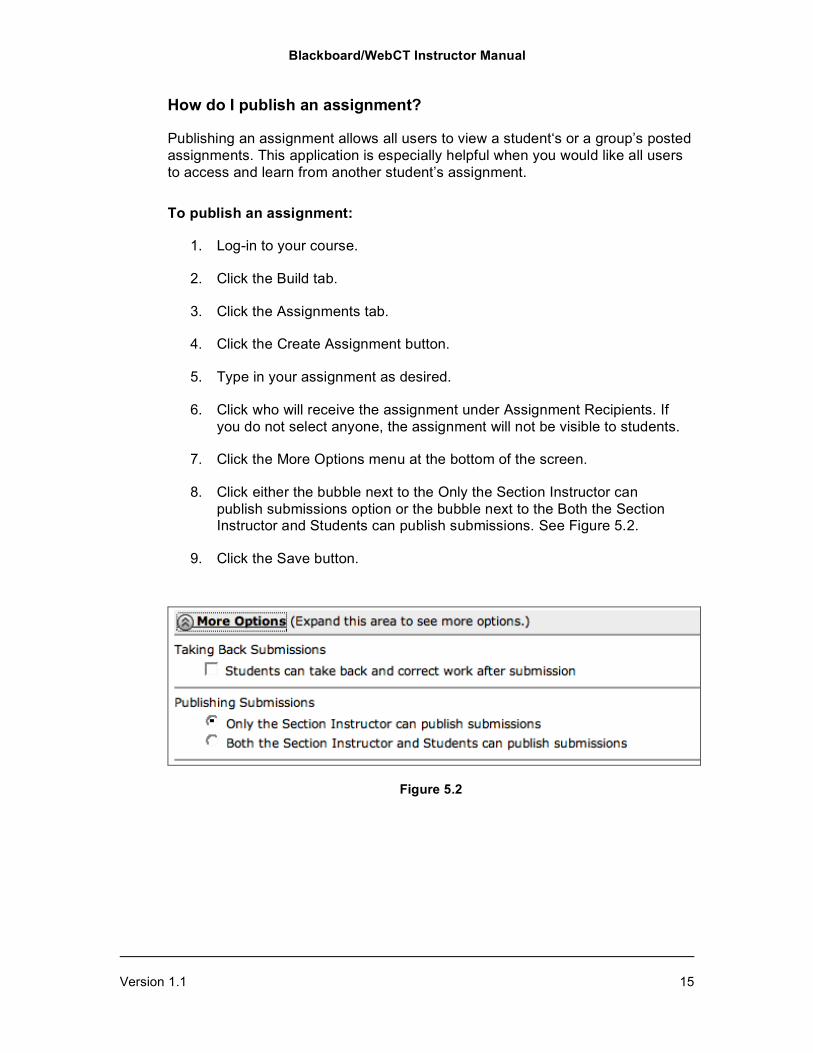
7. Click the More Options menu at the bottom of the screen.
8. Click either the bubble next to the Only the Section Instructor can publish submissions option or the bubble next to the Both the Section Instructor and Students can publish submissions. See Figure 5.2.
9. Click the Save button.
Figure 5.2
Blackboard/WebCT Instructor Manual
Version 1.1 16
Chapter Six: Creating and Working with Groups
Blackboard/WebCT allows you to create groups of students who can post one completed assignment. This group application can also allow students within a group to have a discussion or chat independently from other groups. You can create many different kinds of groups and can even create multiple groups at once.
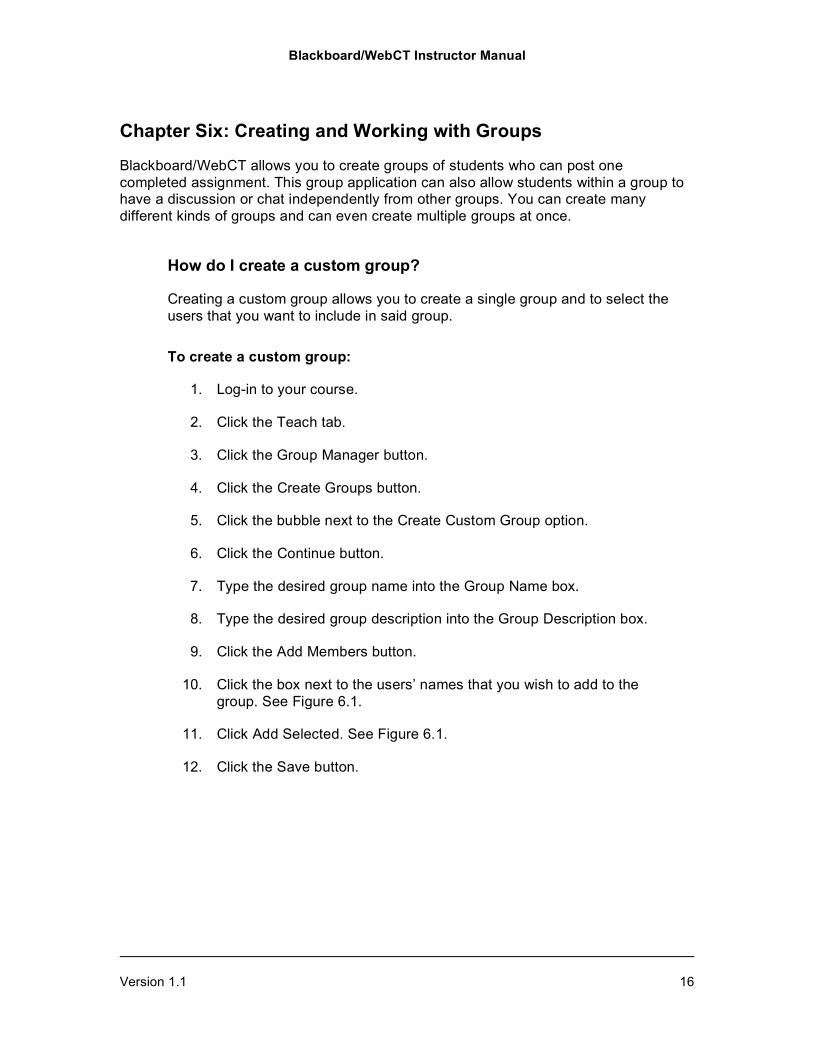
How do I create a custom group?
Creating a custom group allows you to create a single group and to select the users that you want to include in said group.
To create a custom group:
1. Log-in to your course.
2. Click the Teach tab.
3. Click the Group Manager button.
4. Click the Create Groups button.
5. Click the bubble next to the Create Custom Group option.
6. Click the Continue button.
7. Type the desired group name into the Group Name box.
8. Type the desired group description into the Group Description box.
9. Click the Add Members button.
10. Click the box next to the users’ names that you wish to add to the group. See Figure 6.1.
11. Click Add Selected. See Figure 6.1.
12. Click the Save button.
Blackboard/WebCT Instructor Manual
Version 1.1 17
Figure 6.1
How do I create multiple groups?
Creating multiple groups allows you to create empty groups to which you can add users later. You can also create groups in which users are randomly distributed.
To create empty groups and add users later:
1. Log-in to your course.
2. Click the Teach tab.
3. Click the Group Manager button.
4. Click the Create Groups button.
5. Click the bubble next to the Create Multiple Groups option.
6. Click the Continue button.
7. Type the desired group title into the Word or Phrase All Group Names Start With box. Next, Blackboard/WebCT will automatically number the groups according to this title. For example, if you type in “History Assignment Group,” Blackboard/WebCT will automate the titles History Assignment Group 1, History Assignment Group 2, etc.
Blackboard/WebCT Instructor Manual
Version 1.1 18
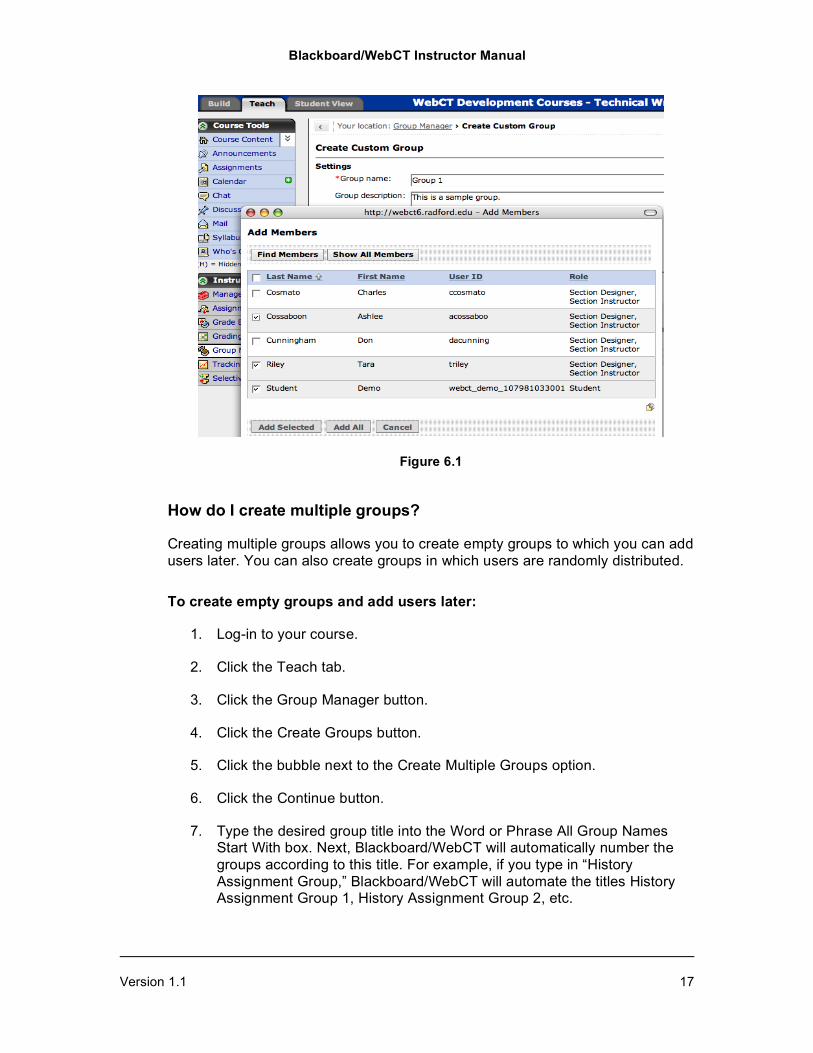
8. Type your desired default description into the Default Description box. This description can be edited later if desired.
9. Click the Create Empty Groups button. See Figure 6.2.
10. Type the desired number of groups into the Number of Groups box. See Figure 6.2.
11. Click the Continue button.
12. Click the Save button.
Figure 6.2
To create groups in which users are randomly distributed:
1. Log-in to your course.
2. Click the Teach tab.
3. Click the Group Manager button.
4. Click the Create Groups button.
5. Click the bubble next to the Create Multiple Groups option.
6. Click the Continue button.
7. Type the desired group title into the Word or Phrase All Group Names Start With box. Next, Blackboard/WebCT will automatically number the groups according to this title. For example, if you type in “History Assignment Group,” Blackboard/WebCT will automate the titles History Assignment Group 1, History Assignment Group 2, etc.
8. Type your desired default description into the Default Description box. This description can be edited later if desired.
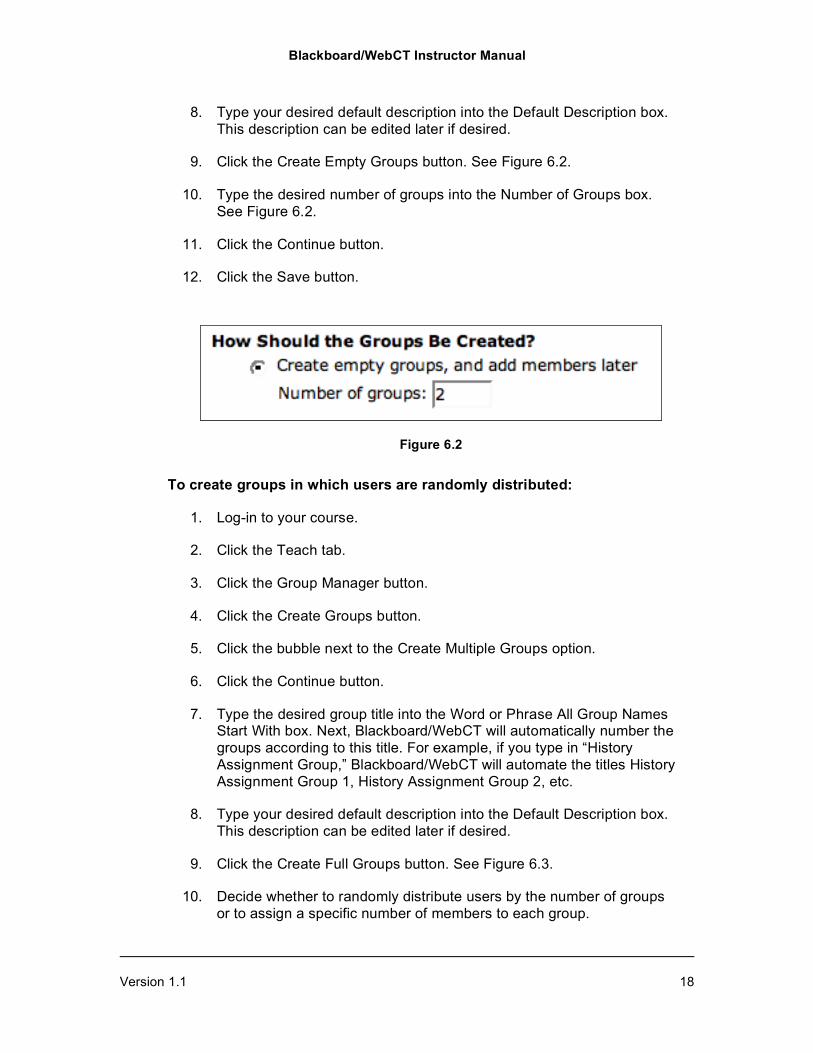
9. Click the Create Full Groups button. See Figure 6.3.
10. Decide whether to randomly distribute users by the number of groups or to assign a specific number of members to each group.
Blackboard/WebCT Instructor Manual
Version 1.1 19
Figure 6.3
To randomly distribute users by the number of groups:
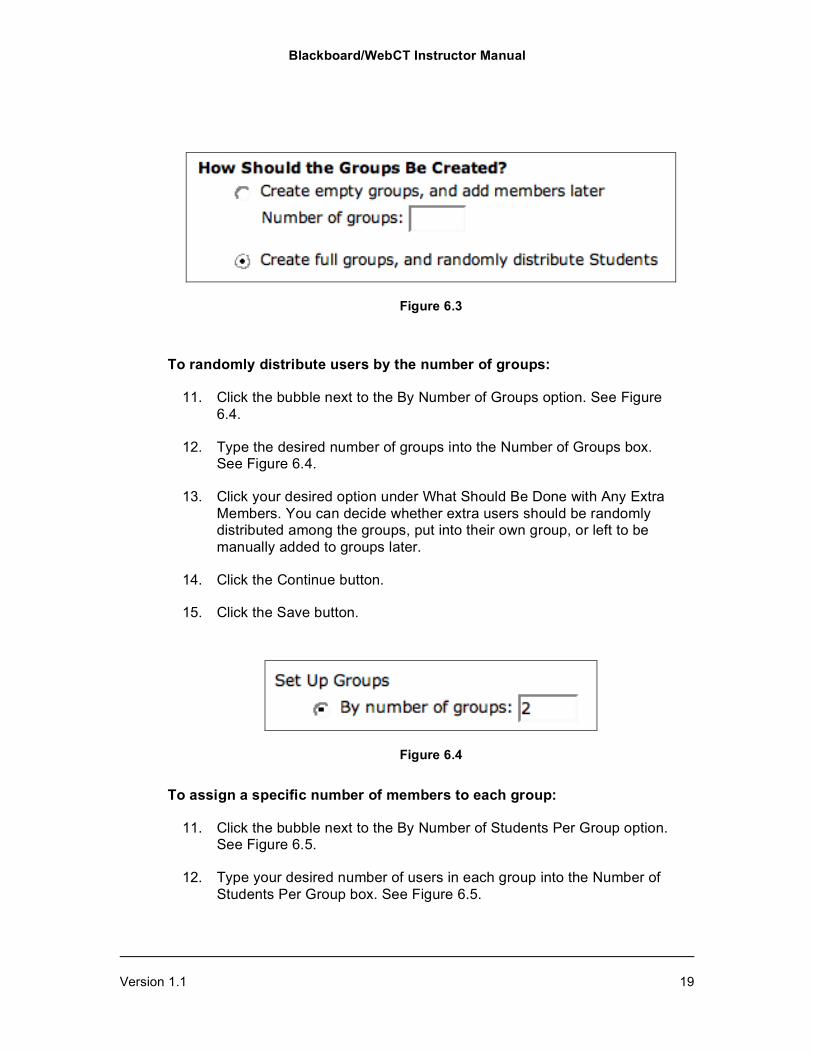
11. Click the bubble next to the By Number of Groups option. See Figure 6.4.
12. Type the desired number of groups into the Number of Groups box. See Figure 6.4.
13. Click your desired option under What Should Be Done with Any Extra Members. You can decide whether extra users should be randomly distributed among the groups, put into their own group, or left to be manually added to groups later.
14. Click the Continue button.
15. Click the Save button.
Figure 6.4
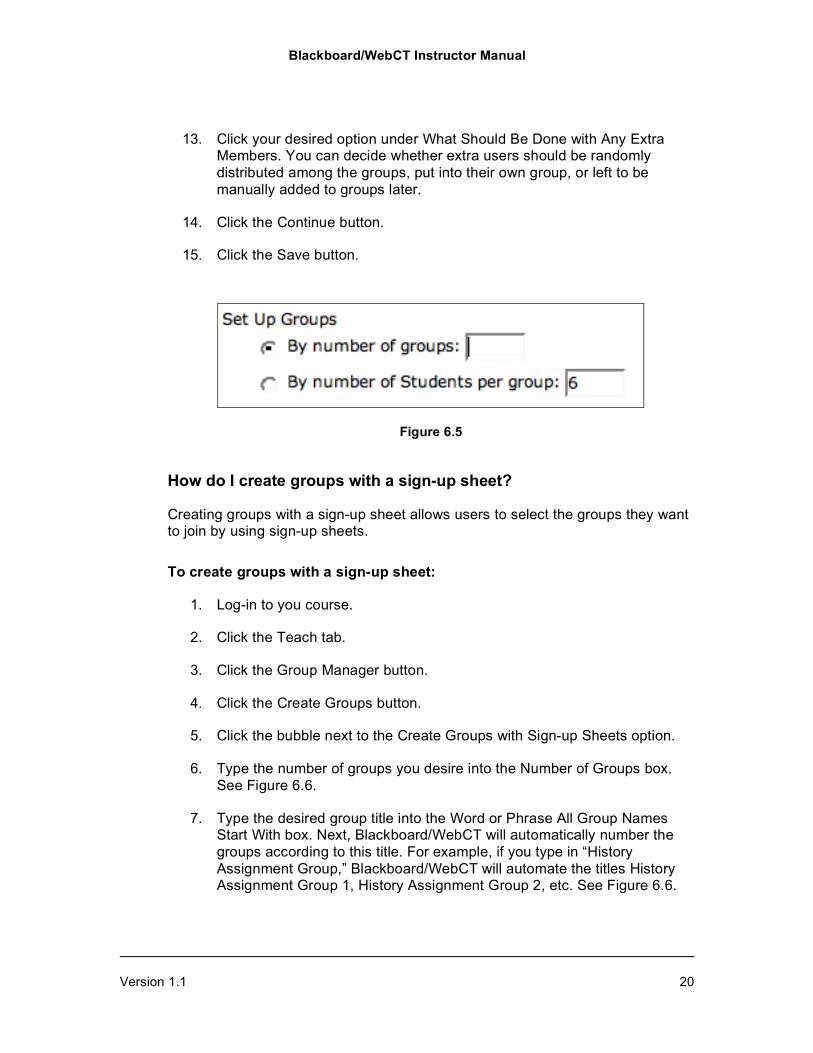
To assign a specific number of members to each group:
11. Click the bubble next to the By Number of Students Per Group option. See Figure 6.5.
12. Type your desired number of users in each group into the Number of Students Per Group box. See Figure 6.5.
Blackboard/WebCT Instructor Manual
Version 1.1 20
13. Click your desired option under What Should Be Done with Any Extra Members. You can decide whether extra users should be randomly distributed among the groups, put into their own group, or left to be manually added to groups later.
14. Click the Continue button.
15. Click the Save button.
Figure 6.5
How do I create groups with a sign-up sheet?
Creating groups with a sign-up sheet allows users to select the groups they want to join by using sign-up sheets.
To create groups with a sign-up sheet:
1. Log-in to you course.
2. Click the Teach tab.
3. Click the Group Manager button.
4. Click the Create Groups button.
5. Click the bubble next to the Create Groups with Sign-up Sheets option.
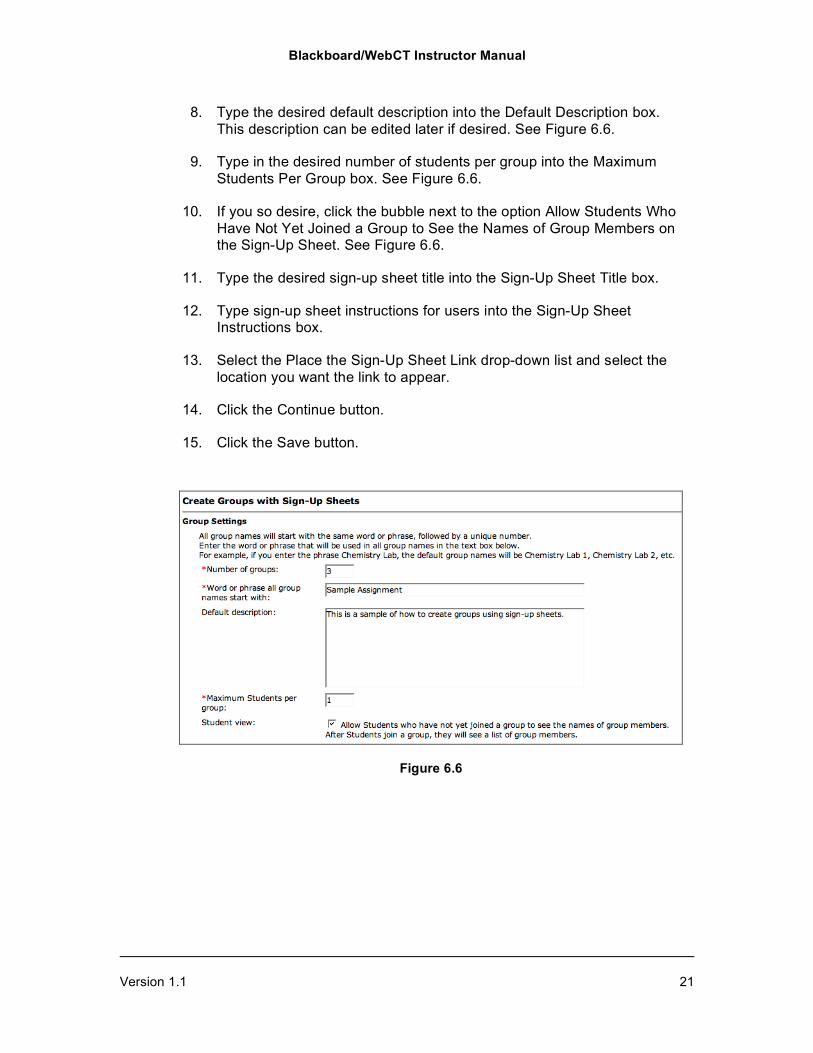
6. Type the number of groups you desire into the Number of Groups box. See Figure 6.6.
7. Type the desired group title into the Word or Phrase All Group Names Start With box. Next, Blackboard/WebCT will automatically number the groups according to this title. For example, if you type in “History Assignment Group,” Blackboard/WebCT will automate the titles History Assignment Group 1, History Assignment Group 2, etc. See Figure 6.6.
Blackboard/WebCT Instructor Manual
Version 1.1 21
8. Type the desired default description into the Default Description box. This description can be edited later if desired. See Figure 6.6.
9. Type in the desired number of students per group into the Maximum Students Per Group box. See Figure 6.6.
10. If you so desire, click the bubble next to the option Allow Students Who Have Not Yet Joined a Group to See the Names of Group Members on the Sign-Up Sheet. See Figure 6.6.
11. Type the desired sign-up sheet title into the Sign-Up Sheet Title box.
12. Type sign-up sheet instructions for users into the Sign-Up Sheet Instructions box.
13. Select the Place the Sign-Up Sheet Link drop-down list and select the location you want the link to appear.
14. Click the Continue button.
15. Click the Save button.
Figure 6.6
Blackboard/WebCT Instructor Manual
Version 1.1 22
Chapter Seven: Working with Discussions
Blackboard/WebCT allows you to create online discussions about relevant course topics. In these discussions, enrolled users can post and reply to messages. The messages and responses are permanently displayed in a hierarchical outline for easy review.
Using the discussion tool you can ask questions and encourage students to share feedback and ideas. Section instructors can assign grades for participation in a discussion topic. In addition to these features, discussion topics can be assigned to each member of the class or to groups of students.
How do I create a discussion category?
If you plan to have more than one Blackboard/WebCT discussion, it is a good idea to organize discussion topics into categories. You can create categories based on content or dates. You can also use categories as a way to aid in the organization of group discussion topics.
To create a discussion category:
1. Log-in to your course.
2. Click the Build tab.
3. Click the Discussions button.
4. Click the Create Category button.
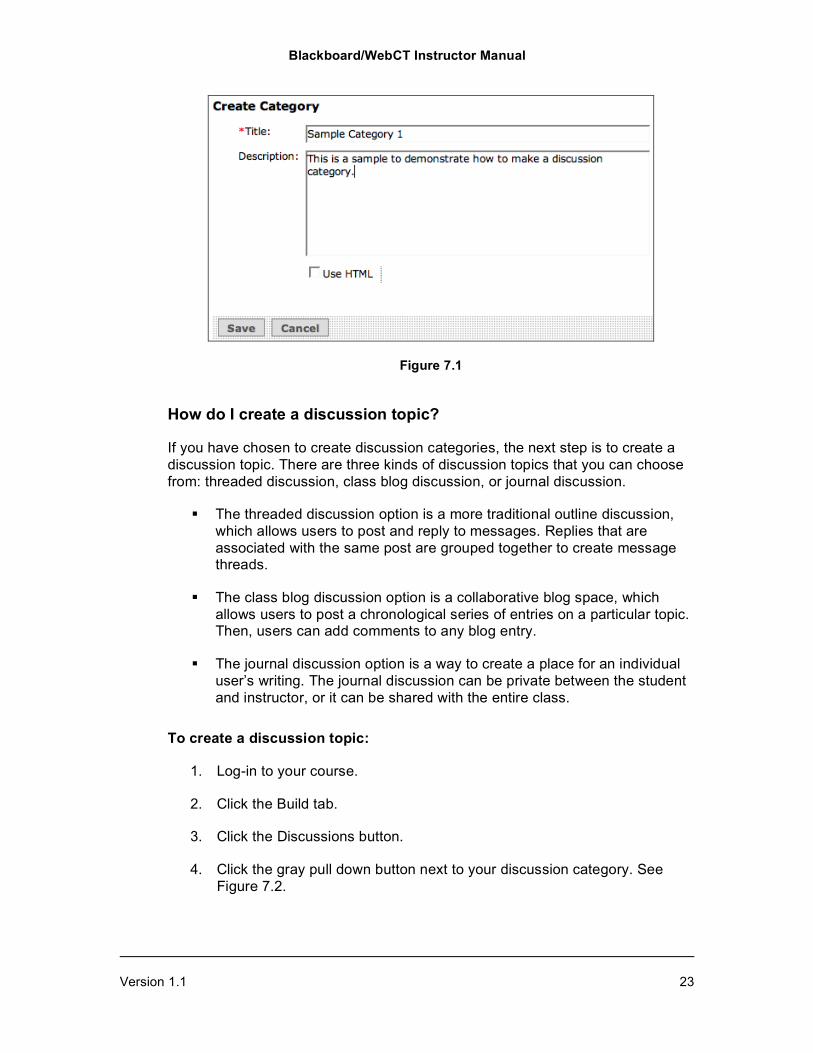
5. Type in the desired category title. See Figure 7.1.
6. If desired, add a description. See Figure 7.1.
7. Click the Save button. See Figure 7.1.
Blackboard/WebCT Instructor Manual
Version 1.1 23
Figure 7.1
How do I create a discussion topic?
If you have chosen to create discussion categories, the next step is to create a discussion topic. There are three kinds of discussion topics that you can choose from: threaded discussion, class blog discussion, or journal discussion.
The threaded discussion option is a more traditional outline discussion, which allows users to post and reply to messages. Replies that are associated with the same post are grouped together to create message threads.
The class blog discussion option is a collaborative blog space, which allows users to post a chronological series of entries on a particular topic. Then, users can add comments to any blog entry.
The journal discussion option is a way to create a place for an individual user’s writing. The journal discussion can be private between the student and instructor, or it can be shared with the entire class.
To create a discussion topic:
1. Log-in to your course.
2. Click the Build tab.
3. Click the Discussions button.
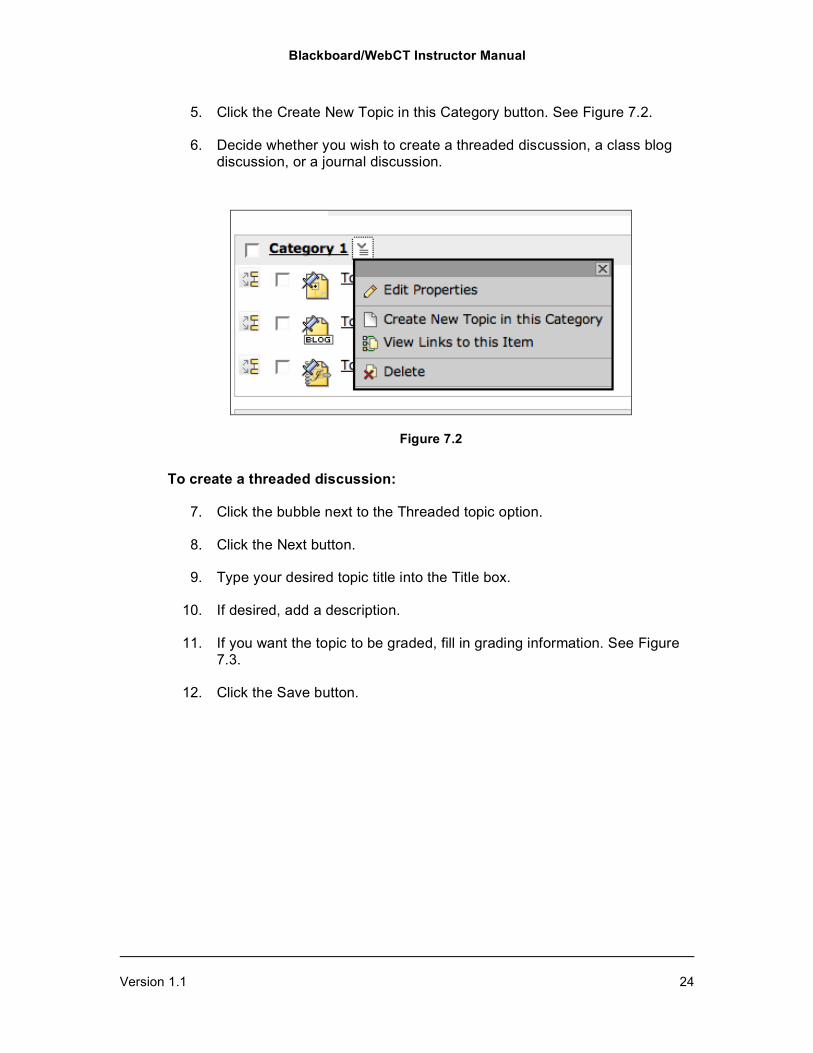
4. Click the gray pull down button next to your discussion category. See Figure 7.2.
Blackboard/WebCT Instructor Manual
Version 1.1 24
5. Click the Create New Topic in this Category button. See Figure 7.2.
6. Decide whether you wish to create a threaded discussion, a class blog discussion, or a journal discussion.
Figure 7.2
To create a threaded discussion:
7. Click the bubble next to the Threaded topic option.
8. Click the Next button.
9. Type your desired topic title into the Title box.
10. If desired, add a description.
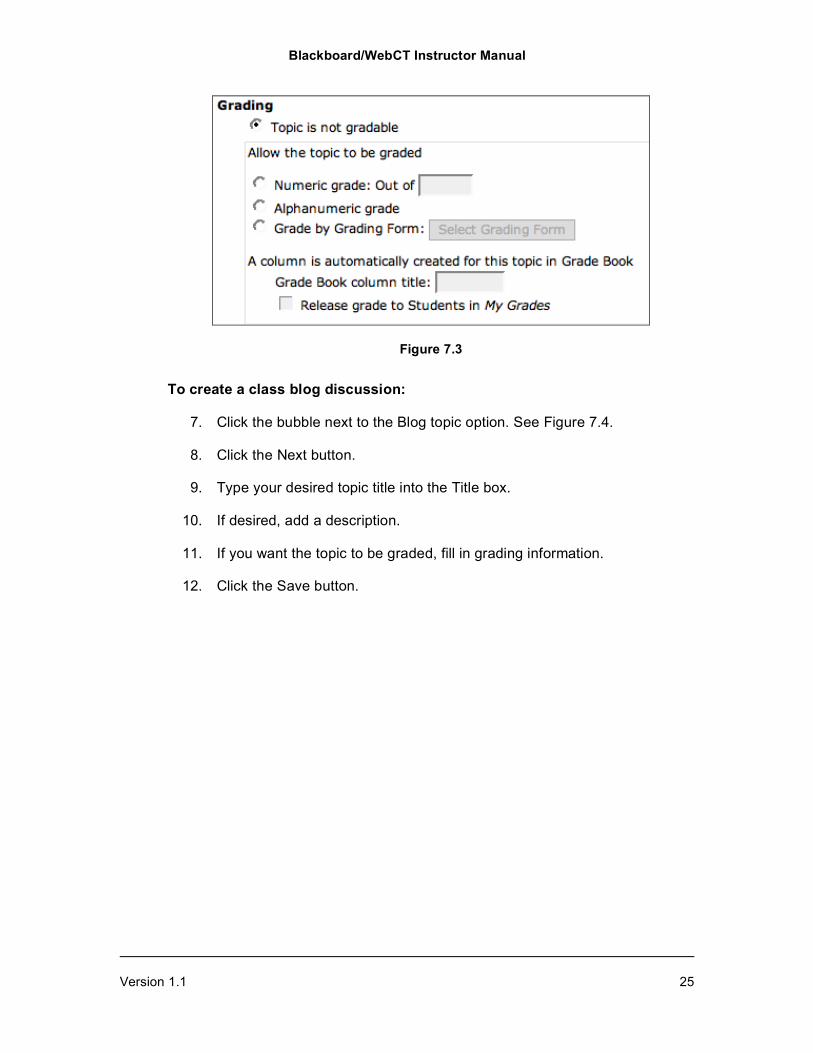
11. If you want the topic to be graded, fill in grading information. See Figure 7.3.
12. Click the Save button.
Blackboard/WebCT Instructor Manual
Version 1.1 25
Figure 7.3
To create a class blog discussion:
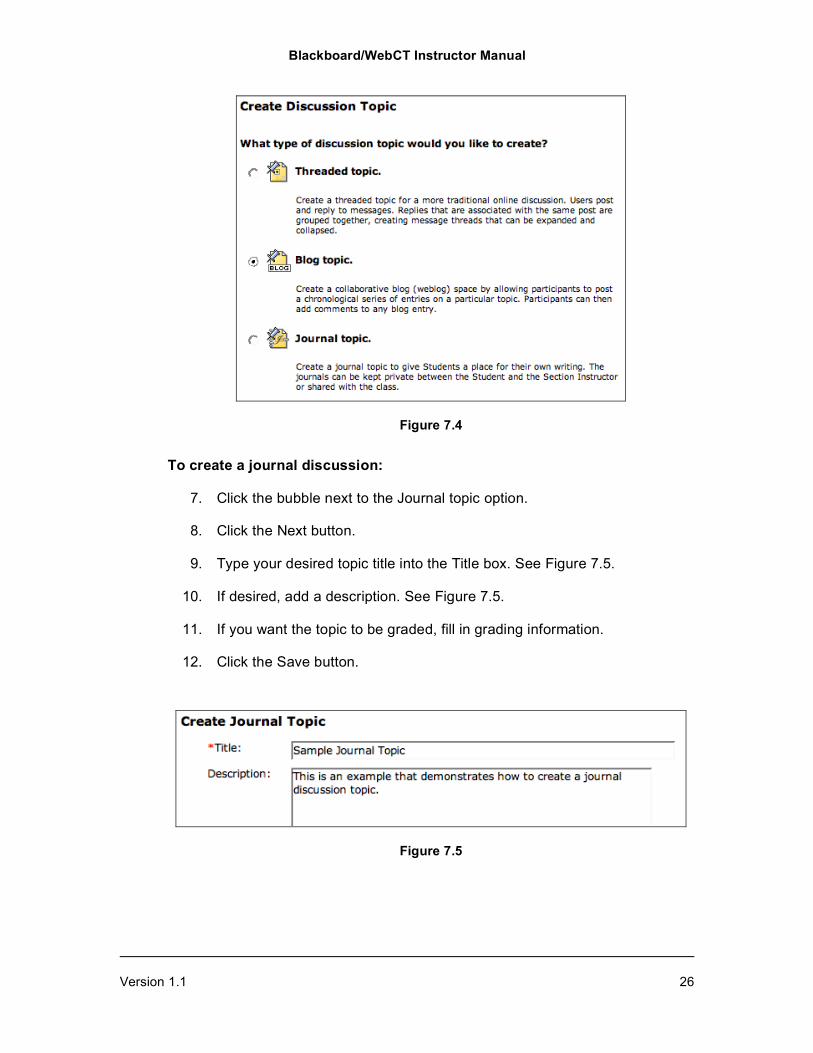
7. Click the bubble next to the Blog topic option. See Figure 7.4.
8. Click the Next button.
9. Type your desired topic title into the Title box.
10. If desired, add a description.
11. If you want the topic to be graded, fill in grading information.
12. Click the Save button.
Blackboard/WebCT Instructor Manual
Version 1.1 26
Figure 7.4
To create a journal discussion:
7. Click the bubble next to the Journal topic option.
8. Click the Next button.
9. Type your desired topic title into the Title box. See Figure 7.5.
10. If desired, add a description. See Figure 7.5.
11. If you want the topic to be graded, fill in grading information.
12. Click the Save button.
Figure 7.5
Blackboard/WebCT Instructor Manual
Version 1.1 27
How do I limit a discussion topic to members of a group?
If you have chosen to create groups using Blackboard/WebCT—see Chapter Six—you may opt to limit certain discussion topics to members of a group.
To limit a discussion topic to members of a group:
1. Log-in to your course.
2. Click the Build tab.
3. Click the Discussions button.
4. Click the gray pull down button next to your discussion topic title.
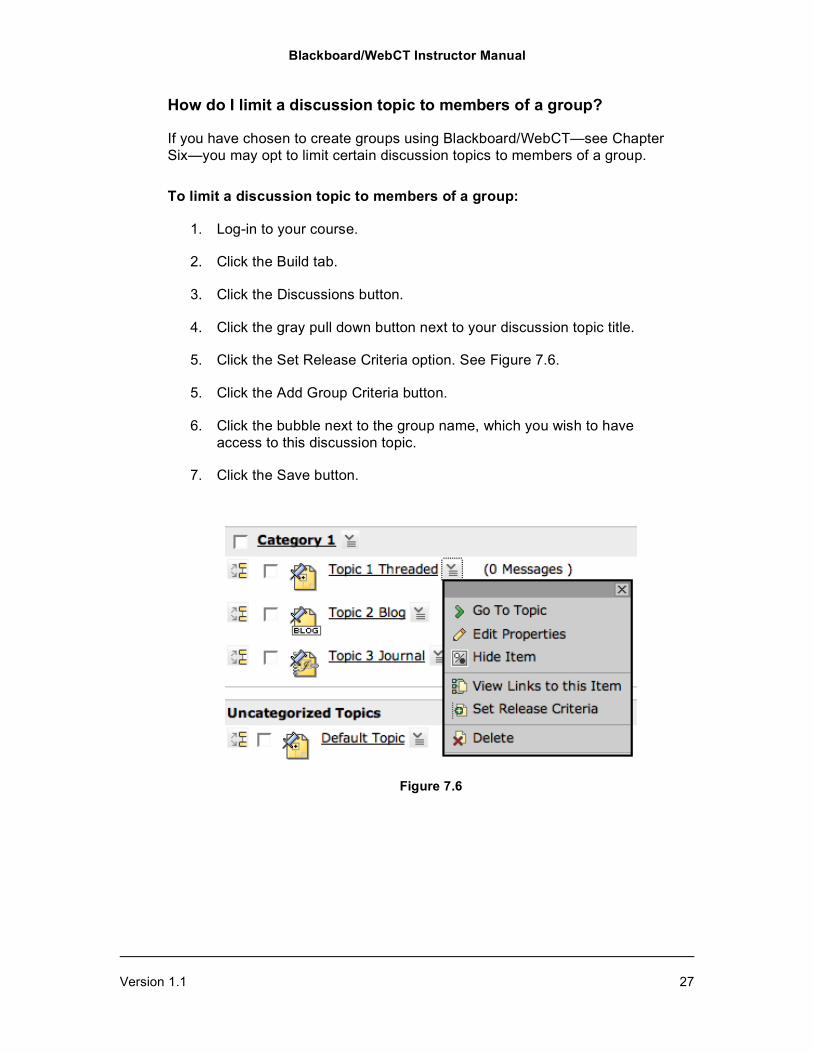
5. Click the Set Release Criteria option. See Figure 7.6.
5. Click the Add Group Criteria button.
6. Click the bubble next to the group name, which you wish to have access to this discussion topic.
7. Click the Save button.
Figure 7.6
Blackboard/WebCT Instructor Manual
Version 1.1 28
Chapter Eight: Creating an Online Assessment
You can use Blackboard/WebCT to create tests, quizzes, and surveys by creating online assessments. This tool saves paper and can be set up to allow students to complete assessments on their own time.
How do I organize the question database into categories?
The foundation of the Blackboard/WebCT online assessment tool is the question database. You can add questions to the database and then create a test, quiz, or survey that uses these questions. The database can be organized into categories by subject, questions, complexity, title, and any other desired organizational structure. For our example, we will explain how to set up your question database by title.
You can change, delete, and rename categories at any time. Also, questions do not have to be exclusively for one assessment, but can be repeated in any number of quizzes at your request. Using the online assessment question database makes it easy for you to find questions for the inclusion in your test, quiz, or survey.
To organize your question database by title:
1. Log-in to your course.
2. Click the Build tab.
3. Click the Assessments button.
4. Click the Go to Question Database button.
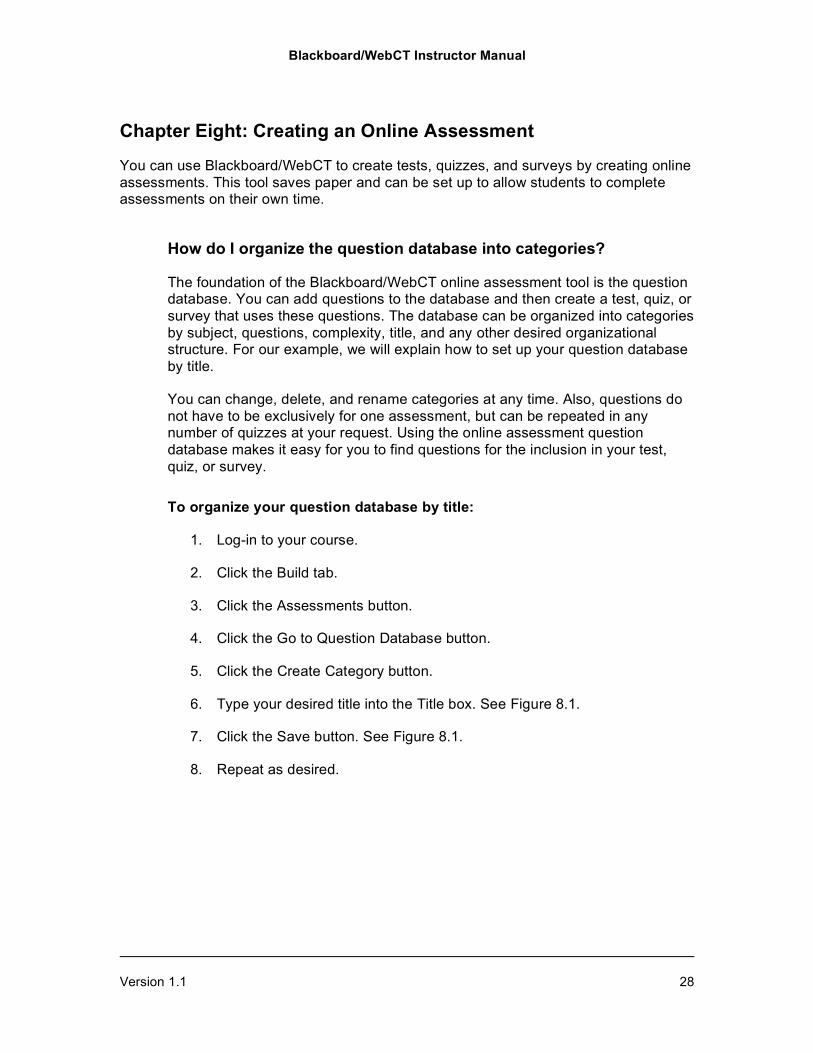
5. Click the Create Category button.
6. Type your desired title into the Title box. See Figure 8.1.
7. Click the Save button. See Figure 8.1.
8. Repeat as desired.
Blackboard/WebCT Instructor Manual
Version 1.1 29
Figure 8.1
How do I create an online assessment?
Once you have set up your question database, you are ready to create an online assessment. When creating an assessment you will have the option of creating a Quiz, Survey, or Self Test. A Quiz is an online assessment for which grades are assigned. A Survey is an anonymous online evaluation for which no grades are assigned. A Self Test is an online assessment for which students receive grades and feedback, but this grade will not appear in the Blackboard/WebCT Grade Book—See Chapter Nine.
To create an online assessment:
1. Log-in to your course.
2. Click the Build tab.
3. Click the Assessments button.
4. Click the Create Assessment button.
5. Type your desired title into the Title box.
6. If desired, type a description in the Description box.
7. Click the bubble next to the Show Item option to make your assessment visible to students.
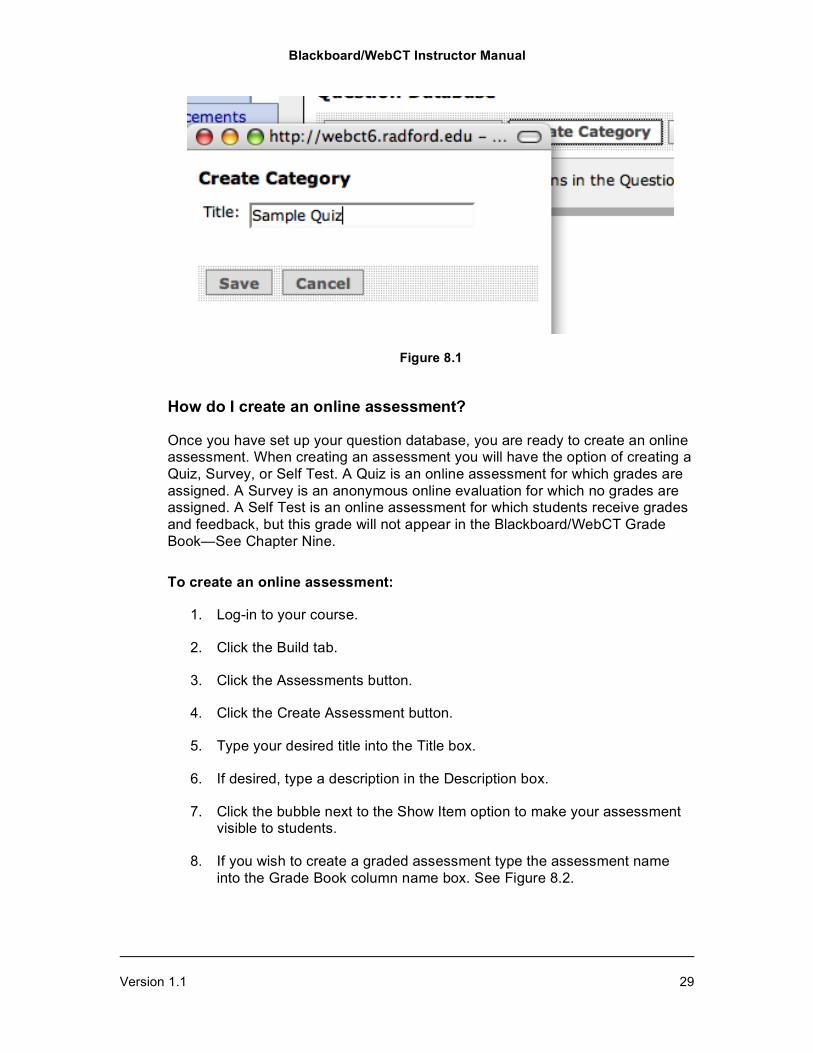
8. If you wish to create a graded assessment type the assessment name into the Grade Book column name box. See Figure 8.2.
Blackboard/WebCT Instructor Manual
Version 1.1 30
9. Click the bubble to the right of your desired option: Quiz, Survey, or Self Test. See Figure 8.2.
10. Click the Save button.
Figure 8.2
How do I add questions to the assessment?
Once you have created an online assessment, you need to add questions to it. Blackboard/WebCT has nine different question type options from which to choose: Calculated, Combination, Fill in the Blank, Jumbled Sentence, Matching, Multiple Choice, Paragraph, Short Answer, and True False.
To add questions to the assessment:
1. Log-in to your course.
2. Click the Build tab.
3. Click the Assessments button.
4. Click the title of the assessment to which you want to add questions.
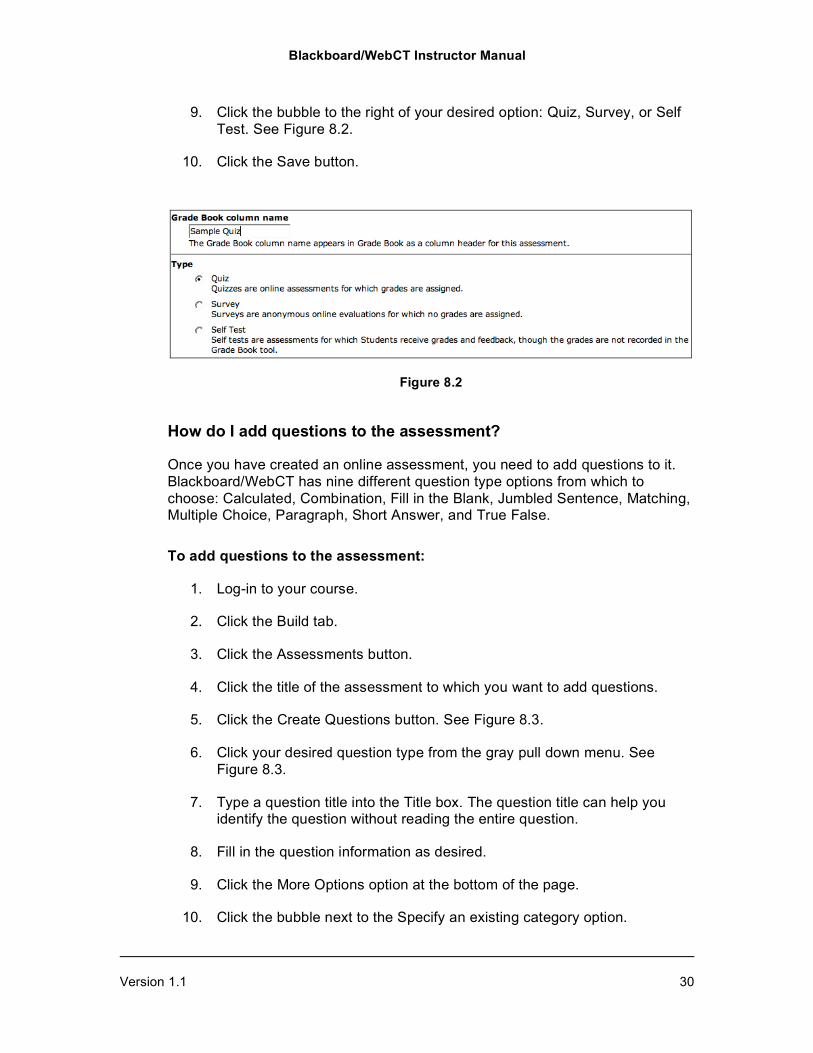
5. Click the Create Questions button. See Figure 8.3.
6. Click your desired question type from the gray pull down menu. See Figure 8.3.
7. Type a question title into the Title box. The question title can help you identify the question without reading the entire question.
8. Fill in the question information as desired.
9. Click the More Options option at the bottom of the page.
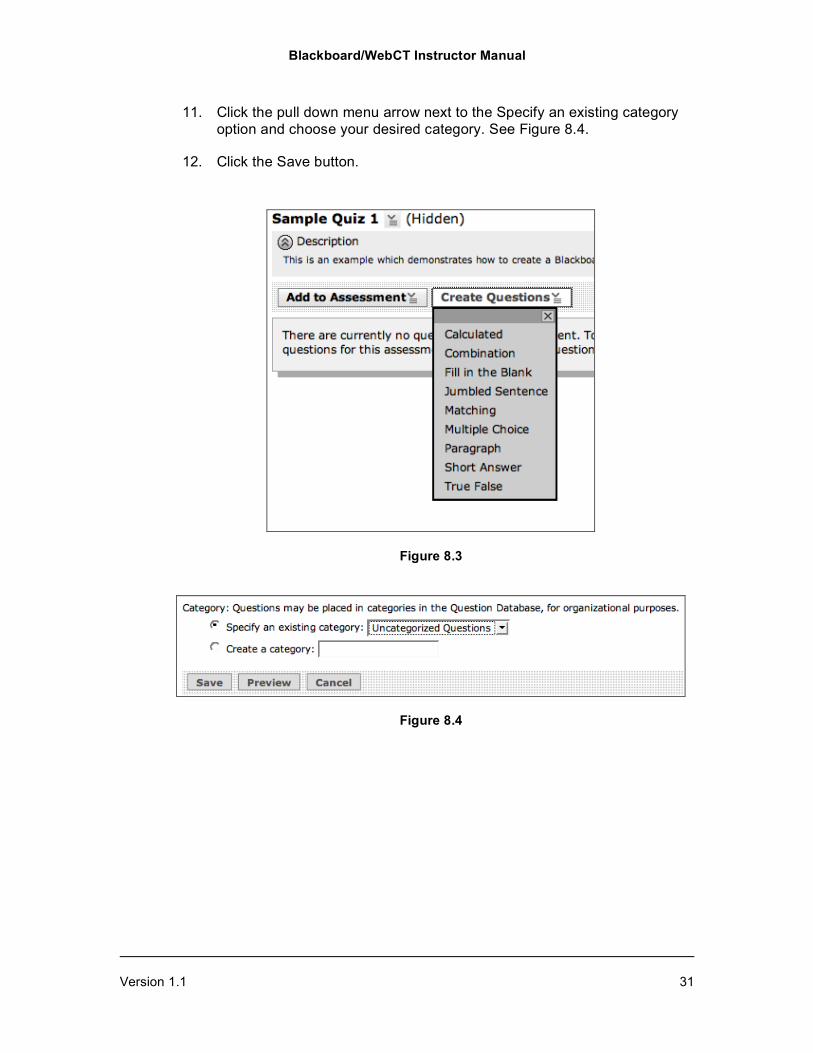
10. Click the bubble next to the Specify an existing category option.
Blackboard/WebCT Instructor Manual
Version 1.1 31
11. Click the pull down menu arrow next to the Specify an existing category option and choose your desired category. See Figure 8.4.
12. Click the Save button.
Figure 8.3
Figure 8.4

Blackboard/WebCT Instructor Manual
Version 1.1 32
To test your online assessment:
1. Log-in to your course.
2. Click the Student View tab.
3. Click the Assessments button.
4. Click the title of the assessment you wish to test.
5. Complete online assessment.
Blackboard/WebCT Instructor Manual
Version 1.1 33
Chapter Nine: Posting Student Grades
You can use Blackboard/WebCT to post student grades, allowing students to track their grades in your course. This can help cut back students’ questions regarding their progress in your course, as they will be able to access it online as soon as you post the grades.
Note: See Chapter Two to see how to activate My Grades tool.
How do I post student grades?
The Grade Book tool in Blackboard/WebCT is very versatile. This tool generates scores from online assessments and allows you to post grades for non-electronic assignments.
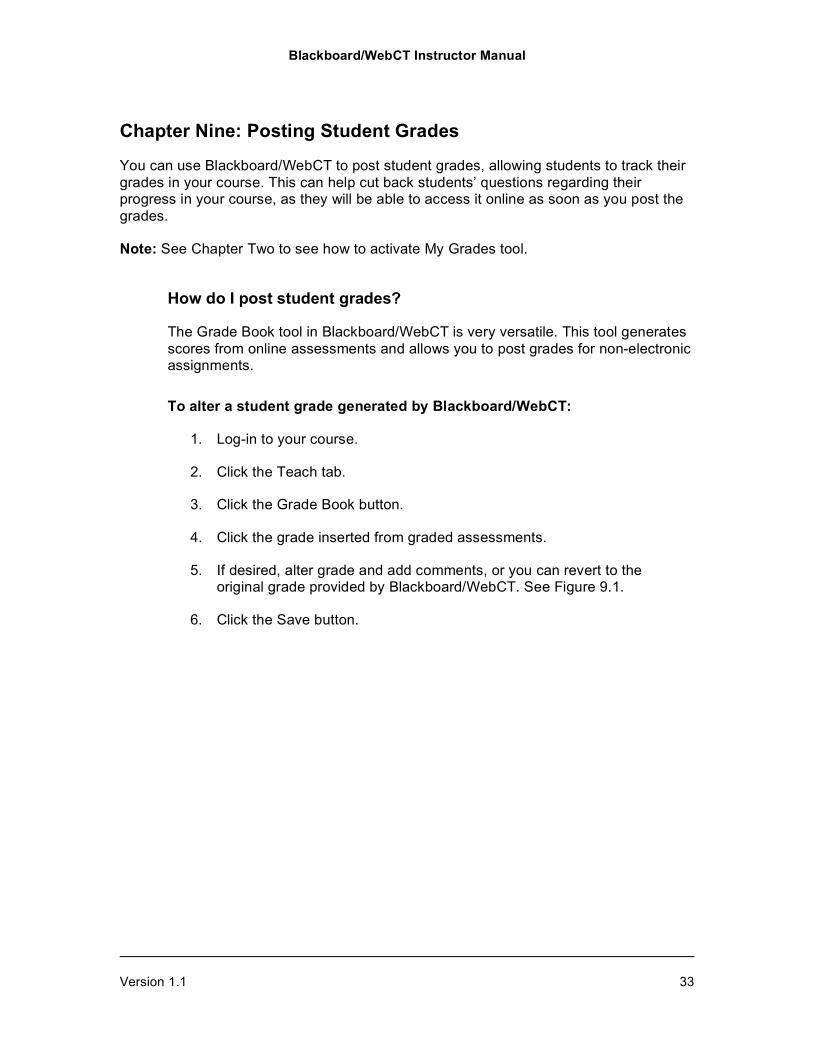
To alter a student grade generated by Blackboard/WebCT:
1. Log-in to your course.
2. Click the Teach tab.
3. Click the Grade Book button.
4. Click the grade inserted from graded assessments.
5. If desired, alter grade and add comments, or you can revert to the original grade provided by Blackboard/WebCT. See Figure 9.1.
6. Click the Save button.
Blackboard/WebCT Instructor Manual
Version 1.1 34
Figure 9.1
To post grades from a non-electronic assignment:
1. Log-in to your course.
2. Click the Teach tab.
3. Click the Grade Book button.
4. Click Create Column button.
5. Click your desired column-naming option.
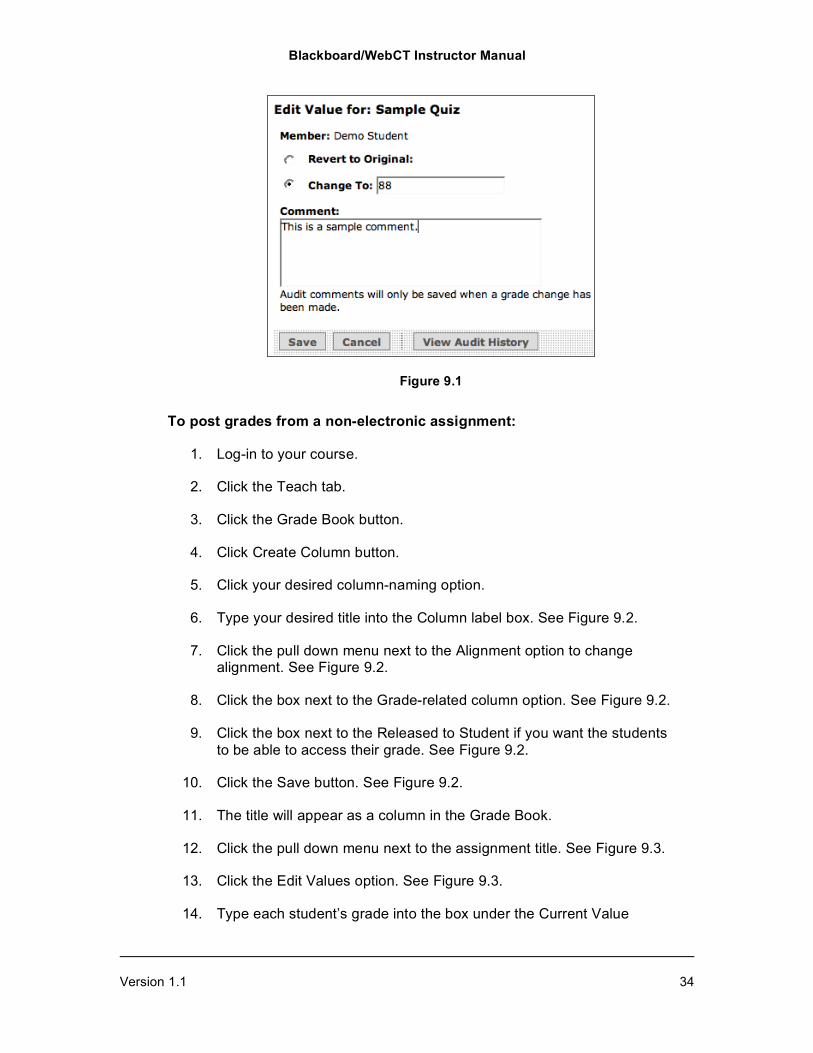
6. Type your desired title into the Column label box. See Figure 9.2.
7. Click the pull down menu next to the Alignment option to change alignment. See Figure 9.2.
8. Click the box next to the Grade-related column option. See Figure 9.2.
9. Click the box next to the Released to Student if you want the students to be able to access their grade. See Figure 9.2.
10. Click the Save button. See Figure 9.2.
11. The title will appear as a column in the Grade Book.
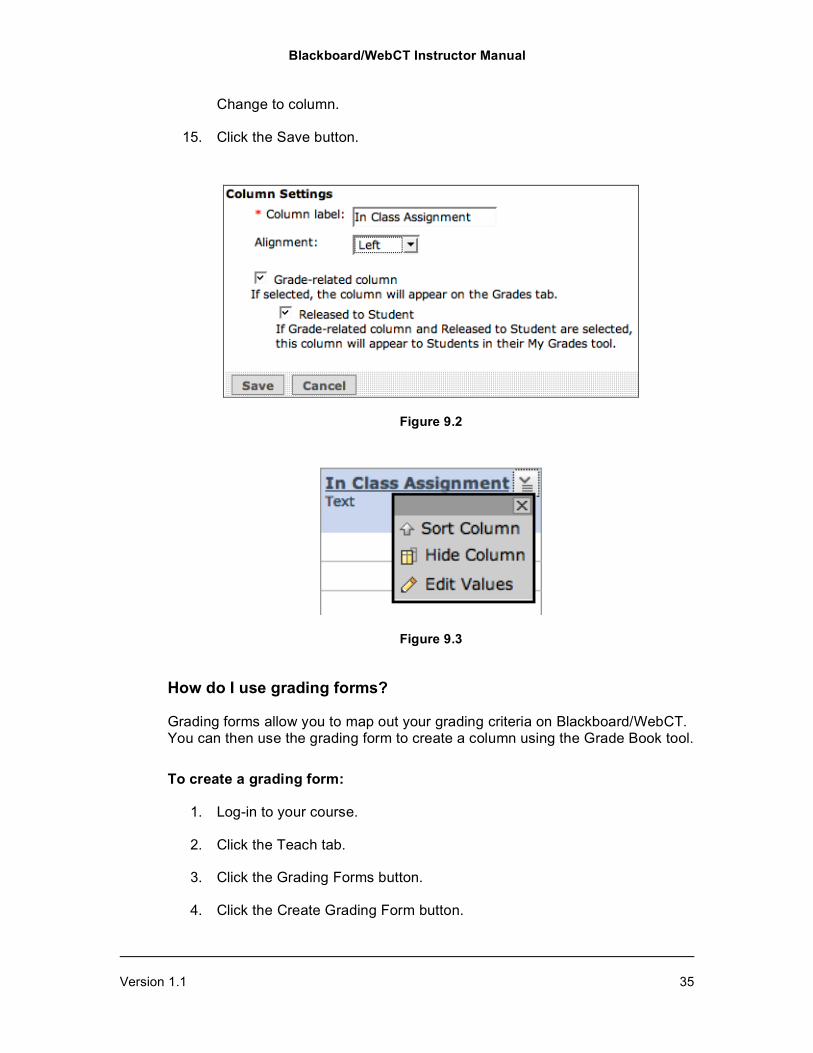
12. Click the pull down menu next to the assignment title. See Figure 9.3.
13. Click the Edit Values option. See Figure 9.3.
14. Type each student’s grade into the box under the Current Value
Blackboard/WebCT Instructor Manual
Version 1.1 35
Change to column.
15. Click the Save button.
Figure 9.2
Figure 9.3
How do I use grading forms?
Grading forms allow you to map out your grading criteria on Blackboard/WebCT. You can then use the grading form to create a column using the Grade Book tool.
To create a grading form:
1. Log-in to your course.
2. Click the Teach tab.
3. Click the Grading Forms button.
4. Click the Create Grading Form button.

Blackboard/WebCT Instructor Manual
Version 1.1 36
5. Type your desired title into the Title box. See Figure 9.4.
6. If desired, type a description in the Description box. See Figure 9.4.
7. Edit the Criterion and Performance Indicators as desired by clicking the pencil icon next to each option.
8. Type the number of points a student will receive if the criteria needs improvement, met expectations, or was exceptional in the points box. See Figure 9.4.
9. Click the Save button.
Figure 9.4
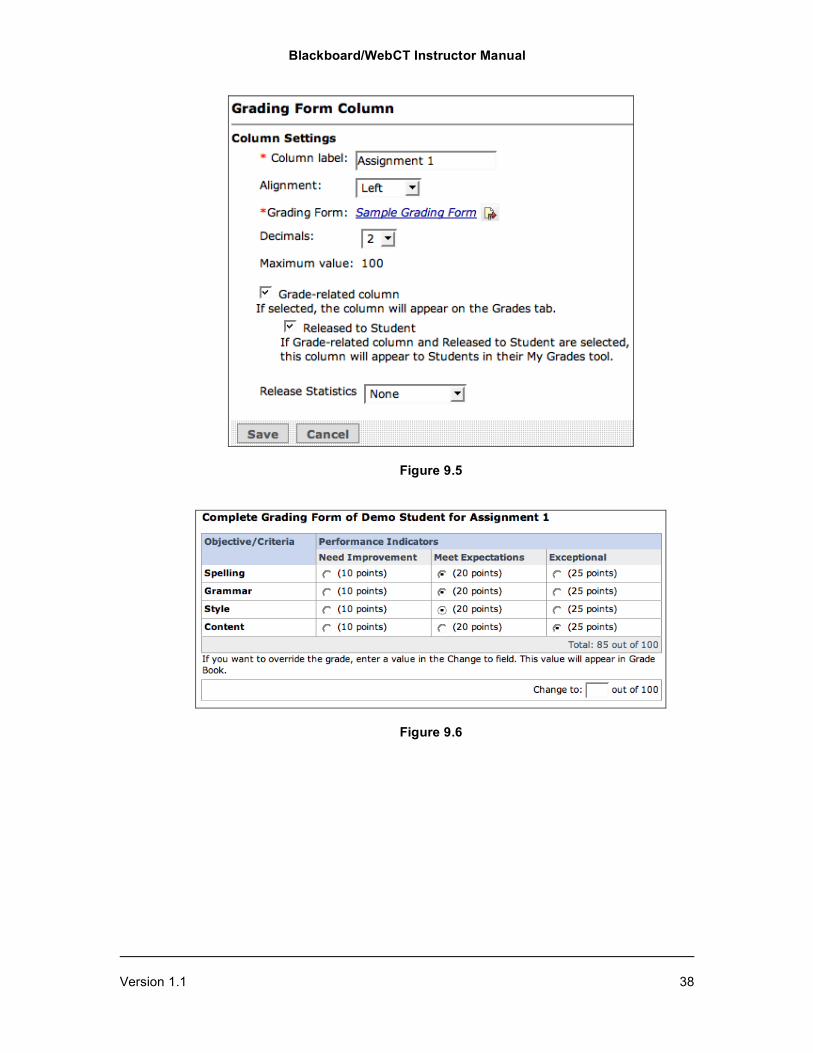
To use a grading form in your online grade book:
1. Log-in to your course.
2. Click the Teach tab.
3. Click the Grade Book button.
4. Click the Create Column button.
5. Click the Grading Form option in the pull down menu.
6. Type your desired title into the Column label box.
Blackboard/WebCT Instructor Manual
Version 1.1 37
7. Click the Select Grading Form button.
8. Click the bubble next to your desired Grading Form.
9. Click the box next to the Grade-related column option.
8. Click the box next to the Released to Student if you want the students to be able to access their grade.
9. Click the Save button.
10. Click the Grade Book button.
11. Click the pull down menu next to the assignment for which you created the grading form.
12. Click the Edit Values option.
13. Click the Edit Grading Form Grade button.
14. Click the bubble next to your desired points value or type an override grade into the Change to box. See Figure 9.6.
15. If desired, type your comments into the Comments box.
16. If desired, type your audit log comment into the Grade Book audit log comment box.
17. Click the Save button.
Blackboard/WebCT Instructor Manual
Version 1.1 38
Figure 9.5
Figure 9.6


