BLACKMER SEAL-LESS PUMPS 960901 INSTRUCTIONS NO. 108-A00 INSTALLATION OPERATION AND MAINTENANCE INSTRUCTIONS MODELS: SMVP15B, SMVP30B Section Effective Replaces 108 April 2007 April 2005 TABLE OF CONTENTS Page PUMP DATA Technical Data....................................................... 2 Initial Pump Start Up Information ........................... 2 INSTALLATION Pre-Installation Cleaning........................................ 3 Location and Piping ............................................... 3 Check Valves ......................................................... 3 Pump Mounting...................................................... 3 Motor Installation ................................................... 4 OPERATION Pre-Start Up Check List ......................................... 5 Start Up Procedures .............................................. 5 Pump Rotation ....................................................... 5 Reverse Rotation ................................................... 5 Flushing the Pump ................................................. 5 Pump Relief Valve ................................................. 6 Relief Valve Setting and Adjustment ..................... 6 MAINTENANCE Strainers ................................................................ 7 Lubrication ............................................................. 7 Vane Replacement ................................................ 8 Pump Disassembly ................................................ 8 Pump Assembly ..................................................... 9 TROUBLE SHOOTING ...................................... 11 NOTE: Numbers in parentheses following individual parts indicate reference numbers on Blackmer Parts Lists 108- A02 NOTE: Blackmer pump manuals & parts lists may be obtained from Blackmer’s website (www. blackmer. com) or by contacting Blackmer Customer Service SAFETY DATA This is a SAFETY ALERT SYMBOL. When you see this symbol on the product, or in the manual, look for one of the following signal words and be alert to the potential for personal injury, death or major property damage Warns of hazards that WILL cause serious personal injury, death or major property damage. Warns of hazards that CAN cause serious personal injury, death or major property damage. Warns of hazards that CAN cause personal injury or property damage. NOTICE: Indicates special instructions which are very important and must be followed. NOTICE: Blackmer Seal-Less pumps MUST only be installed In systems, which have been designed by qualified engineering personnel. The system MUST conform to all applicable local and national regulations and safety standards. This manual is intended to assist in the installation and operation of the Blackmer Seal-Less pumps, and MUST be kept with the pump. Blackmer Seal-Less pump service shall be performed by qualified technicians ONLY. Service shall conform to all applicable local and national regulations and safety standards. Thoroughly review this manual, all instructions and hazard warnings, BEFORE performing any work on the Blackmer Seal-Less pumps. Maintain ALL system and Blackmer Seal-Less pump operation and hazard warning decals.
INSTALLATION OPERATION AND MAINTENANCE INSTRUCTIONS MODELS: SMVP15B, SMVP30B
Section Effective
Replaces
108 April 2007 April 2005
TABLE OF CONTENTS Page
PUMP DATA Technical Data ....................................................... 2 Initial Pump Start Up Information ........................... 2INSTALLATION Pre-Installation Cleaning ........................................ 3 Location and Piping ............................................... 3 Check Valves ......................................................... 3 Pump Mounting ...................................................... 3 Motor Installation ................................................... 4OPERATION Pre-Start Up Check List ......................................... 5 Start Up Procedures .............................................. 5 Pump Rotation ....................................................... 5 Reverse Rotation ................................................... 5 Flushing the Pump ................................................. 5 Pump Relief Valve ................................................. 6 Relief Valve Setting and Adjustment ..................... 6MAINTENANCE Strainers ................................................................ 7 Lubrication ............................................................. 7 Vane Replacement ................................................ 8 Pump Disassembly ................................................ 8 Pump Assembly ..................................................... 9TROUBLE SHOOTING ...................................... 11
NOTE: Numbers in parentheses following individual parts indicate reference numbers on Blackmer Parts Lists 108-A02
NOTE: Blackmer pump manuals & parts lists may be obtained from Blackmer’s website (www. blackmer. com) or by contacting Blackmer Customer Service
SAFETY DATA
This is a SAFETY ALERT SYMBOL. When you see this symbol on the product, or in the manual, look for one of the following signal words and be alert to the potential for personal injury, death or major property damage
Warns of hazards that WILL cause serious personal injury,
death or major property damage.
Warns of hazards that CAN cause serious personal injury,
death or major property damage.
Warns of hazards that CAN cause personal injury
or property damage.
NOTICE: Indicates special instructions which are very
important and must be followed.
NOTICE:
Blackmer Seal-Less pumps MUST only be installed In systems, which have been designed by qualified engineering personnel. The system MUST conform to all applicable local and national regulations and safety standards. This manual is intended to assist in the installation and operation of the Blackmer Seal-Less pumps, and MUST be kept with the pump. Blackmer Seal-Less pump service shall be performed by qualified technicians ONLY. Service shall conform to all applicable local and national regulations and safety standards. Thoroughly review this manual, all instructions and hazard warnings, BEFORE performing any work on the Blackmer Seal-Less pumps.
Maintain ALL system and Blackmer Seal-Less pump operation and hazard warning decals.
108-A00: Page 2/12
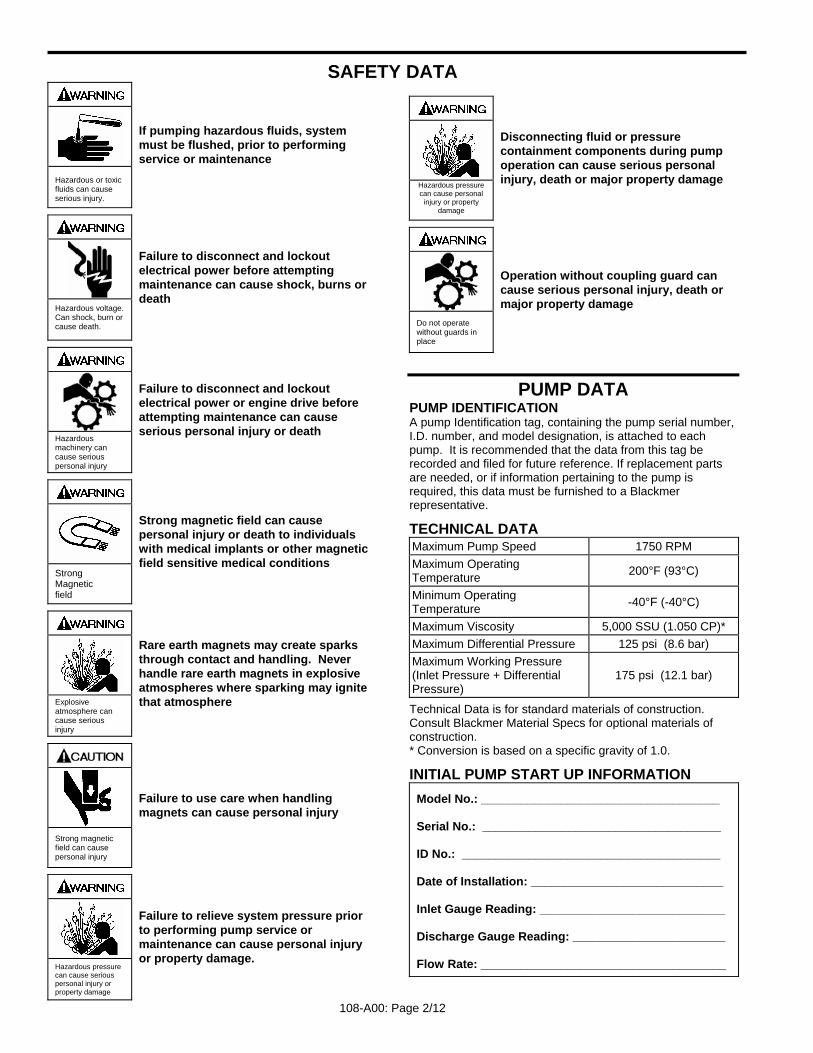
SAFETY DATA
Hazardous or toxic fluids can cause serious injury.
If pumping hazardous fluids, system must be flushed, prior to performing service or maintenance
Hazardous voltage. Can shock, burn or cause death.
Failure to disconnect and lockout electrical power before attempting maintenance can cause shock, burns or death
Hazardous machinery can cause serious personal injury
Failure to disconnect and lockout electrical power or engine drive before attempting maintenance can cause serious personal injury or death
Strong Magnetic field
Strong magnetic field can cause personal injury or death to individuals with medical implants or other magnetic field sensitive medical conditions
Explosive atmosphere can cause serious injury
Rare earth magnets may create sparks through contact and handling. Never handle rare earth magnets in explosive atmospheres where sparking may ignite that atmosphere
Strong magnetic field can cause personal injury
Failure to use care when handling magnets can cause personal injury
Hazardous pressure can cause serious personal injury or property damage
Failure to relieve system pressure prior to performing pump service or maintenance can cause personal injury or property damage.
Hazardous pressure can cause personal
injury or property damage
Disconnecting fluid or pressure containment components during pump operation can cause serious personal injury, death or major property damage
Do not operate without guards in place
Operation without coupling guard can cause serious personal injury, death or major property damage
PUMP DATA PUMP IDENTIFICATION A pump Identification tag, containing the pump serial number, I.D. number, and model designation, is attached to each pump. It is recommended that the data from this tag be recorded and filed for future reference. If replacement parts are needed, or if information pertaining to the pump is required, this data must be furnished to a Blackmer representative.
TECHNICAL DATA Maximum Pump Speed 1750 RPM Maximum Operating Temperature 200°F (93°C)
Minimum Operating Temperature -40°F (-40°C)
Maximum Viscosity 5,000 SSU (1.050 CP)* Maximum Differential Pressure 125 psi (8.6 bar) Maximum Working Pressure (Inlet Pressure + Differential Pressure)
175 psi (12.1 bar)
Technical Data is for standard materials of construction. Consult Blackmer Material Specs for optional materials of construction. * Conversion is based on a specific gravity of 1.0.
INITIAL PUMP START UP INFORMATION Model No.: ____________________________________
Serial No.: ____________________________________
ID No.: _______________________________________
Date of Installation: _____________________________
Inlet Gauge Reading: ____________________________
Discharge Gauge Reading: _______________________
Flow Rate: _____________________________________
108-A00: Page 3/12
INSTALLATION NOTICE:
Blackmer seal-less pumps must only be installed in systems designed by qualified engineering personnel. System design must conform with all applicable regulations and codes and provide warning of all system hazards.
Hazardous voltage. Can shock, burn or
cause death.
Install, ground and wire to local and National Electrical Code requirements.
Install an all-leg disconnect switch near the unit motor.
Disconnect and lockout electrical power before installation or service
Electrical supply MUST match motor nameplate specifications.
Motors equipped with thermal protection automatically disconnect motor electrical circuit when overload exists. Motor can start unexpectedly and without warning.
PRE-INSTALLATION CLEANING
NOTICE: New pumps contain residual test fluid and rust inhibitor. If necessary, flush pump prior to use. Foreign matter entering the pump WILL cause extensive damage. The suction tank and piping MUST be cleaned and flushed prior to pump installation and operation. LOCATION AND PIPING An improperly designed piping system or improper unit installation WILL significantly reduce pump performance and life. Blackmer recommends the following piping system layout and unit installation. 1. To minimize intake losses, locate the pump as close as
possible to the source of supply. 2. Intake piping and fittings MUST be at least as large in
diameter as the pump intake connection. 3. Minimize the number of intake line fittings (valves, elbows,
etc.) and piping turns or bends. 4. It is recommended an intake strainer be installed at least
24" (0.6m) from the pump intake. For viscosities less than 1000 SSU the strainer should have a net open area of at least four times the area of the intake pipe. For viscosities greater than 1000 SSU consult the strainer manufacturer instructions. Strainers must be cleaned regularly to avoid pump starvation.
5. Intake and discharge piping MUST be free of all leaks. 6. Expansion joints, placed at least 36" (0.9m) from the
pump, will compensate for expansion and contraction of the pipes. Contact the flexible connector/hose manufacturer for required maintenance/care and design assistance in their use.
7. Install vacuum and pressure gauges in the 1/4" NPT ports provided in the pump cylinder to check pump at start up.
8. ALL piping and fittings MUST be properly supported to prevent any piping loads from being placed on the pump.
9. Check alignment of pipes to pump to avoid strains which might later cause misalignment. See Figure 1. Unbolt flanges or break union joints. Pipes should not spring away or drop down. After pump has been in operation for a week or two, completely recheck alignment.
Figure 1
10. When pumping liquids at elevated temperature, provisions should be made to compensate for expansion and contraction of the pipes, especially when long pipe lines are necessary. Steel pipe expands approximately 3/4” (1.9 cm) per 100 feet (30.49 m) per 100°F (37.8°C) rise in temperature.
CHECK VALVES The use of check valves or foot valves in the supply tank is not recommended with self-priming, positive displacement pumps. If the possibility of liquid backflow exists when the pump is off, a check valve in the pump discharge piping is recommended because the pump can motor in the reverse rotation and create undue stress on all attached components. Never start a pump when it is rotating in the reverse rotation as the added starting torque can damage the pump and related equipment. PUMP MOUNTING Permanently mount the unit by securing the base plate with adequately sized anchor bolts to a level concrete floor following recommended industry standards. A solid foundation will reduce system noise and vibration, and will improve pump performance. Refer to ANSI/HI standards or a suitable pump handbook for information on typical pump mounting and foundations.
BOLT BASE
STANDARDPIPE
WASHER
Figure 2
108-A00: Page 4/12
INSTALLATION MOTOR INSTALLATION
Strong Magnetic field
Strong magnetic field can cause personal injury or death to individuals with medical implants or other magnetic field sensitive medical conditions
Strong magnetic field can cause personal injury
Failure to use care when handling magnets can cause personal injury
NOTICE:
Clear work area of all tools and materials affected by magnets. Non-magnetic work surface recommended.
MAGNET SET 1. Put drive key in keyway on motor shaft. 2. Loosely assemble bushing with bolts & outer magnet.
Slide magnet assembly onto motor shaft. 3. Position bushing and magnet to Reference Dim “B”,
(see Table 1) and tighten setscrew over drive key. 4. Tighten the 3 bolts in a uniform sequence, torque to 9 ft
lbs. (12.2Nm) 5. When bolts are tightened, take a measurement for Dim
“A”. (see table 1)
Table 1 Dim “A” Magnet Set
Dim “B” Bushing Set
Motor Frame INCH MM INCH MM 143TC / 145TC 0.464 11.8 0.454 11.5 182TC / 184TC 1.274 32.4 1.264 32.1 213TC / 215TC 1.374 34.9 1.364 34.6
6. If Measurement “A” does not match the value in the Table, the bushing MUST be repositioned with a new Dim “B”. Loosen the bolts and setscrew.
If Measurement “A” is High: Move the bushing towards the motor “C-Face” New Dim “B” = table Dim “B” less the difference between Measurement “A” and table Dim “A”. If Measurement “A” is Low: Move the bushing away from the motor “C-Face” New Dim “B” = table Dim “B” plus the difference between Measurement “A” and table Dim “A”
7. Retighten setscrew over drive key. Repeat Steps 4 – 6 8. When Dim “A” is set correctly. Ensure that Shaft &
Outer Magnet assembly rotate freely without binding 9. Slide the motor adapter ring (86) over the outer magnet to
the “C-Face” of the motor. Ensure that the flange of the motor adapter ring is fully and squarely seated. Install the adapter ring capscrews (56) torquing to 40 lbs ft (54 Nm)
NOTICE: Be prepared for strong magnet attraction between the inner and outer magnets, forcibly pulling the motor coupling adapter assembly inward. 10. Ensure that the magnet housing (57) is bolted to the base. 11. Using an appropriately sized hoist, CAREFULLY insert the
outer magnet and motor into the mounted magnet housing (57).
12. With the magnet housing fully and squarely seated, install the four housing capscrews (54B); torque to 40 lbs ft (54 Nm).
Figure 3
108-A00: Page 5/12
OPERATION
Do not operate without guards in place
Operation without coupling guard can cause serious personal injury, death or major property damage
Hazardous pressure can cause personal injury or property damage
Disconnecting fluid or pressure containment components during pump operation can cause serious personal injury, death or major property damage
Hazardous pressure can cause personal injury or property damage
Operating pump against a closed valve can cause system component failure, personal injury and property damage
Hazardous pressure can cause personal
injury or property damage
Failure to relieve system pressure prior to performing pump service or maintenance can cause personal injury or property damage.
PRE-START UP CHECK LIST 1. Check the alignment of the pipes to the pump. Pipes
should be supported so that they do not spring away or drop down when pump flanges or union joints are disconnected.
2. Inspect complete piping system to ensure all valves and fittings are in their start up or operation positions.
3. Ensure all electrical connections are correct and tight. 4. Jog the pump motor to ensure free and CLOCKWISE
pump rotation, as viewed from the fan end of the motor. START UP PROCEDURES
NOTICE: Consult the "troubleshooting" section of this manual if difficulties are experienced during start up.
1. Start the motor. Priming should occur within one minute. 2. Check the vacuum and pressure gauges installed on the
pump to ensure the pump is operating within the acceptable parameters. Record the gauge readings in the "Initial Pump Start Up Information" section.
3. If possible, check the flow rate to ensure the pump is operating within expected parameters.
4. Inspect piping, fittings and associated system equipment for leaks, noise, vibration and overheating.
5. If equipped, check the pressure relief setting of the pump relief valve by gradually closing a valve in the discharge line momentarily and noting the reading on the pressure gauge. This pressure reading should be 10-20 psi (.96 –1.4 bar) higher than the maximum system operating pressure. DO NOT run the pump for more than 15 seconds with the discharge valve completely closed. If adjustments need to be made, refer to "Relief Valve Setting and Adjustment."
PUMP ROTATION The pump models described in this manual are designed as RIGHT HAND pumps ONLY, with CLOCKWISE rotation. When viewing the pump from the drive end (motor end), the pump intake port must always be on the right, and the discharge port on the left. REVERSE ROTATION
NOTICE: Magnetic coupled pumps should be operated in reverse rotation for no more than 10 minutes, and only when a separate pressure relief valve is installed to protect the pump from excessive pressure.
It may be desirable to operate the pump in reverse rotation for system maintenance. The pump will operate satisfactorily for a LIMITED time; at a reduced performance level. FLUSHING THE PUMP
NOTICE: If flushing fluid is to be left in the pump for an extended time, it must be a lubricating, non-corrosive fluid. If a corrosive or non-lubricating fluid is used, it must be flushed from the pump immediately.
1. To flush the pump, run the pump with the discharge valve open and the intake valve closed. Bleed air into the pump through the intake gauge plug hole or through a larger auxiliary fitting in the intake piping. Pump air for 30 second intervals to clean out most of the pumpage.
2. Run a system compatible flushing fluid through the pump for one minute to clear out the remainder of the original pumpage.
3. To remove the flushing fluid, follow step 1 above. On SMVP models any remaining fluid in the pump can be drained from the cylinder through the drain plugs (73A).
NOTICE: After flushing the pump some residual fluid will remain in the pump and piping.
NOTICE: Properly dispose of all waste fluids in accordance with the appropriate standards and regulations.
108-A00: Page 6/12
OPERATION PUMP RELIEF VALVE
Hazardous pressure can cause personal
injury or property damage
An external bypass valve and/or internal relief valve must be installed in the system to protect the pump from excessive pressure.
The SMVP15B and SMVP30B pump models are offered with an optional pump relief valve assembly that bolts onto the pump cylinder. Blackmer STRONGLY RECOMMENDS the installation of the optional relief valve to protect the pump from excessive pressure, and a separate system pressure control valve to protect the system from excessive pressure.
NOTICE: The pump relief valve is designed to protect the pump from excessive pressure and must not be used as a system pressure control valve. Pumping volatile liquids under suction lift may cause cavitation. Partial closing of the discharge valve WILL result in internal relief valve chatter and is NOT recommended. For these applications, install an external system pressure control valve, and any necessary bypass piping, back to the storage tank. A system pressure control valve is also recommended when operating for extended periods (more than 1 minute) against a closed discharge valve.
RELIEF VALVE SETTING AND ADJUSTMENT The factory relief valve pressure setting is marked on a metal tag attached to the valve body. It is recommended the relief valve be set at least 10-20 psi (.69-1.4 bar) higher than the operating pressure or the system pressure control valve setting. DO NOT remove the R /V Cap OR adjust the relief valve pressure setting while the pump is in operation.
Hazardous pressure can cause personal injury or property damage
Incorrect settings of the pressure relief valve can cause pump component failure, personal injury and property damage
Hazardous or toxic fluids can cause serious injury.
Relief valve cap is exposed to pumpage and will contain some fluid
1. To INCREASE the pressure setting, remove the relief
valve cap (1) and O-ring / gasket (88), and turn the adjusting screw (2) inward, or CLOCKWISE. Install a new R/V O-ring / gasket (88), and re-attach the R/V cap.
2. To DECREASE the pressure setting, remove the relief valve cap (1) and O-ring / gasket (88), and turn the adjusting screw (2) outward, or COUNTERCLOCKWISE. Install a new R/V O-ring / gasket (88), and re-attach the R/V cap.
Refer to corresponding Blackmer pump parts lists for relief valve spring pressure ranges. Unless specified otherwise, pumps are supplied from the factory with the relief valve adjusted to the mid-point of the spring range.
108-A00: Page 7/12
MAINTENANCE
Hazardous voltage. Can shock, burn or cause death.
Failure to disconnect and lockout electrical power before attempting maintenance can cause shock, burns or death
Hazardous or toxic fluids can cause serious injury.
If pumping hazardous fluids, system must be flushed, prior to performing service or maintenance
Strong Magnetic field
Strong magnetic field can cause personal injury or death to individuals with medical implants or other magnetic field sensitive medical conditions
Explosive atmosphere can cause serious injury
Rare earth magnets may create sparks through contact and handling. Never handle rare earth magnets in explosive atmospheres where sparking may ignite that atmosphere
Hazardous machinery can cause serious personal injury
Failure to disconnect and lockout electrical power or engine drive before attempting maintenance can cause serious personal injury or death
Hazardous pressure can cause serious personal injury or property damage
Failure to relieve system pressure prior to performing pump service or maintenance can cause personal injury or property damage.
Do not operate without guard
in place
Operation without guards in place can cause serious personal injury, major property damage, or death.
Hazardous pressure can cause serious personal injury or property damage
Disconnecting fluid or pressure containment components during pump operation can cause serious personal injury, death or major property damage
Strong magnetic field can cause personal injury
Failure to use care when handling magnets can cause personal injury
NOTICE:
Maintenance shall be performed by qualified technicians only, following the appropriate procedures and warnings as presented in this manual.
NOTICE: Properly dispose of all waste fluids according to state and local regulations.
NOTICE: Clear the work area of all tools and materials affected by magnets. Non-magnetic work surface recommended. STRAINERS Adequately sized system strainers are recommended. Strainers MUST be kept clean to ensure adequate fluid flow to the pump. Failure to do so can cause pump cavitation and system damage. LUBRICATION
NOTICE: To avoid possible entanglement in moving parts do not lubricate the optional motor coupling adaptor or any other parts while the pump is running.
Pump sleeve bearings are lubricated by the pumpage. No other lubrication is required. For motor lubrication, refer to the manufacturer's instructions.
108-A00: Page 8/12
MAINTENANCE
VANE REPLACEMENT 1. Drain the pump and system, as required.
Drain plugs (73A) are located at the base of the cylinder of SMVP Models.
2. For replacement of the vanes ONLY, remove the outboard head, following steps 10 and 11 in the "Pump Disassembly" section of this manual.
3. Turn the shaft by hand until a vane (14) comes to the top (12 o'clock) position of the rotor. Remove the vane.
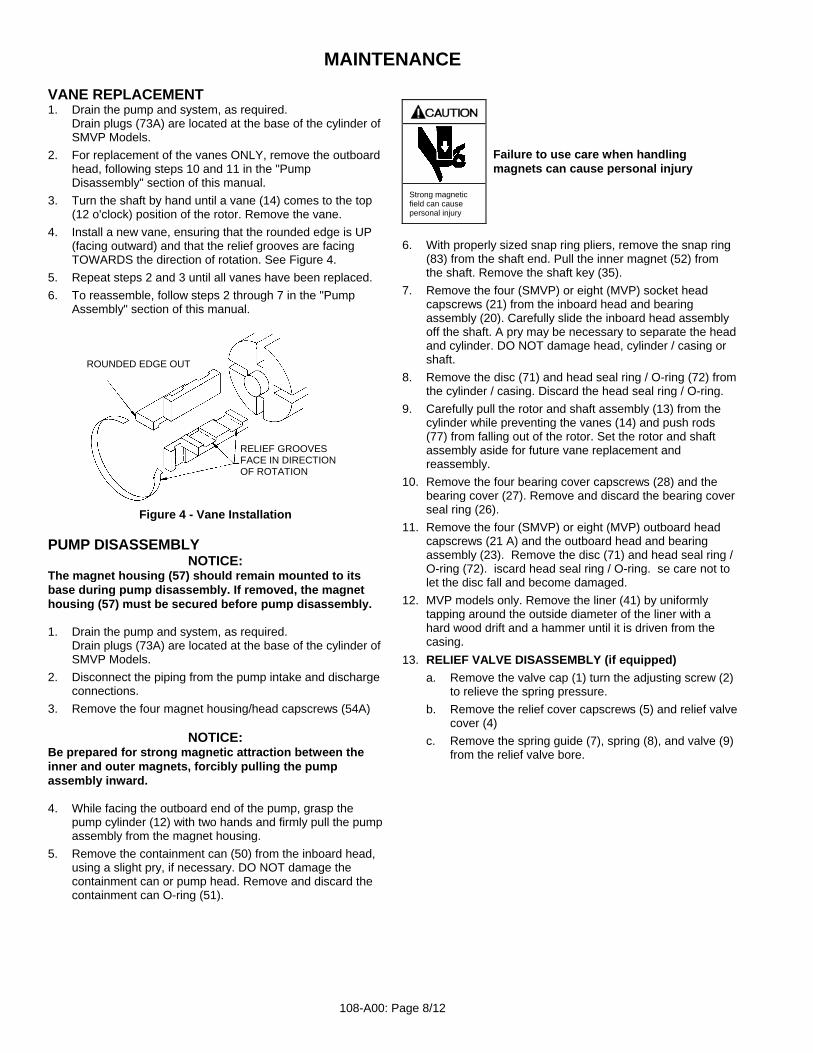
4. Install a new vane, ensuring that the rounded edge is UP (facing outward) and that the relief grooves are facing TOWARDS the direction of rotation. See Figure 4.
5. Repeat steps 2 and 3 until all vanes have been replaced. 6. To reassemble, follow steps 2 through 7 in the "Pump
Assembly" section of this manual.
ROUNDED EDGE OUT
RELIEF GROOVESFACE IN DIRECTIONOF ROTATION
Figure 4 - Vane Installation
PUMP DISASSEMBLY
NOTICE: The magnet housing (57) should remain mounted to its base during pump disassembly. If removed, the magnet housing (57) must be secured before pump disassembly. 1. Drain the pump and system, as required.
Drain plugs (73A) are located at the base of the cylinder of SMVP Models.
2. Disconnect the piping from the pump intake and discharge connections.
3. Remove the four magnet housing/head capscrews (54A)
NOTICE: Be prepared for strong magnetic attraction between the inner and outer magnets, forcibly pulling the pump assembly inward. 4. While facing the outboard end of the pump, grasp the
pump cylinder (12) with two hands and firmly pull the pump assembly from the magnet housing.
5. Remove the containment can (50) from the inboard head, using a slight pry, if necessary. DO NOT damage the containment can or pump head. Remove and discard the containment can O-ring (51).
Strong magnetic field can cause personal injury
Failure to use care when handling magnets can cause personal injury
6. With properly sized snap ring pliers, remove the snap ring
(83) from the shaft end. Pull the inner magnet (52) from the shaft. Remove the shaft key (35).
7. Remove the four (SMVP) or eight (MVP) socket head capscrews (21) from the inboard head and bearing assembly (20). Carefully slide the inboard head assembly off the shaft. A pry may be necessary to separate the head and cylinder. DO NOT damage head, cylinder / casing or shaft.
8. Remove the disc (71) and head seal ring / O-ring (72) from the cylinder / casing. Discard the head seal ring / O-ring.
9. Carefully pull the rotor and shaft assembly (13) from the cylinder while preventing the vanes (14) and push rods (77) from falling out of the rotor. Set the rotor and shaft assembly aside for future vane replacement and reassembly.
10. Remove the four bearing cover capscrews (28) and the bearing cover (27). Remove and discard the bearing cover seal ring (26).
11. Remove the four (SMVP) or eight (MVP) outboard head capscrews (21 A) and the outboard head and bearing assembly (23). Remove the disc (71) and head seal ring / O-ring (72). iscard head seal ring / O-ring. se care not to let the disc fall and become damaged.
12. MVP models only. Remove the liner (41) by uniformly tapping around the outside diameter of the liner with a hard wood drift and a hammer until it is driven from the casing.
13. RELIEF VALVE DISASSEMBLY (if equipped) a. Remove the valve cap (1) turn the adjusting screw (2)
to relieve the spring pressure. b. Remove the relief cover capscrews (5) and relief valve
cover (4) c. Remove the spring guide (7), spring (8), and valve (9)
from the relief valve bore.
108-A00: Page 9/12
MAINTENANCE
MAGNET HOUSING DISASSEMBLY 1. Remove the four housing/adapter capscrews (54B), and
pull the motor, motor adapter (86) and outer magnet (53) from the magnet housing (57).
2. Remove the motor adapter capscrews (56), and the motor adapter (86) from the motor.
3. Place a flat wrench or “plate” between the three bushing capscrews and the “C” face of the motor. Loosen the three Capscrews located in the bushing (87) allowing them to bottom out against the flat wrench or “plate” and assist in removing the outer magnet. If room allows for the screws to be removed completely, the bushing is predrilled with jacking holes for the purpose of removing the outer magnet from the bushing.
4. When outer magnet has been removed from the bushing, loosen setscrew and remove bushing and keyway from the motor shaft.
5. Pump and magnet housing disassembly is complete. PUMP ASSEMBLY
NOTICE: Follow all hazard warnings and instructions provided in the "maintenance" section of this manual.
Hazardous or toxic fluids can cause serious injury.
Containment can failure will permit fluid leakage and can cause serious injury.
Before reassembling the pump, all parts should be thoroughly cleaned and inspected for wear, damage, and replaced as necessary. Remove any burrs from the rotor and mating cylinder (SMVP) or liner (MVP).
NOTICE: The containment can (50) must be replaced if any corrosion, cracking, wear or other damage is present. 1. Begin assembly on the outboard side of the pump, by
laying the pump cylinder (12) on a flat surface with the intake port to the LEFT.
Figure 5 – SMVP Models
2. Install the disc (71) on the outboard end of the cylinder with the disc holes positioned as shown in Figure 5. Use the dowel locator pin hole to locate the disc.
3. Install a new head seal ring / O-ring (72) in the groove provided between the disc and the cylinder.
4. Inspect both sleeve bearings (24) for damage or wear. If damaged, bearings MUST be replaced. If the inside diameter of the bearing measures 1.074" (27.28mm) or greater at any point around the entire circumference, bearings MUST be replaced. To replace bearings: a. Using an appropriately sized arbor press, remove the
old bearing from the head. b. To aid installation and prevent damage, heat the head
in an oven to 200°F (93°C). c. Coat the new bearing with a quality grade of bearing
grease, and place it on the inside face of the head with the notched end UP. Align the notch in the bearing with the groove in the head.
d. Using an arbor press, CAREFULLY press the bearing into the head until it is flush with the inside face of the head. Ensure that the bearing does not become misaligned during the pressing activity.
5. Install the outboard head and bearing assembly (23) on the pump cylinder with the V-notch down, towards the bottom of the cylinder. Use the head dowel pins for proper alignment.
6. Lubricate the four outboard head capscrews (21 A) with a quality grade of anti-seize compound and install, torquing to 15 lbs-ft(20.3Nm).
7. Install a new bearing cover seal ring (26) in the groove in the outboard head. Place the bearing cover (27) on the head. Lubricate the bearing cover capscrews (28) with a quality grade of anti-seize compound, and install, torquing to 11 lbs-ft(15Nm)
8. Turn the pump cylinder / casing over so that it rests on the just installed outboard head and bearing cover.
9. Remove the four vanes (14) and two push rods (77) from the rotor assembly. Inspect for wear and damage, and replace as follows: a. The push rods MUST be installed before installing the
rotor and shaft (13) into the pump cylinder / casing. To do so, hold the rotor and shaft vertical, with the non-driven (shorter end) down. Slide the push rods into the push rod holes of the rotor, then insert the rotor and shaft into the open end of the pump cylinder / casing.
b. Insert new vanes into the rotor slots with the rounded edges outward, and the vane relief grooves facing TOWARDS the direction of rotation. Refer back to Figure 4 If necessary, move the push rods with a small screwdriver to install the vanes.
10. Install the inboard disc (71), head seal ring / O-ring (72), and sleeve (24) bearing as instructed in steps 2 – 4.
11. Install the inboard head and bearing assembly (20) on the pump cylinder / casing with the V-notch down, towards the bottom of the cylinder / casing. Use the head dowel pins for proper alignment.
12. Lubricate the four inboard head capscrews (21) with a quality grade of anti-seize compound, and install, torquing to 15 lbs ft (20.3Nm).
108-A00: Page 10/12
MAINTENANCE
RELIEF VALVE ASSEMBLY (If Equipped) 1. Insert the valve (9) into the relief valve bore of the casing
with the fluted end inward. 2. Install the relief valve spring (8) and spring guide (7)
against the valve. 3. Attach a new relief valve O-ring (10) and the valve cover
(4) on the cylinder. 4. Screw the relief valve adjusting screw (2) with locknut (3)
into the valve cover (4) until it makes contact with the spring guide (7).
NOTICE: The relief valve setting MUST be tested and adjusted more precisely before putting the pump into service. Refer to "Relief Valve Setting and Adjustment" 5. After the relief valve has been adjusted, tighten the
Locknut (3) and install the relief valve cap (1) and O-ring (88)
MAGNET HOUSING ASSEMBLY INNER MAGNET & PUMP ASSEMBLY 1. Install the shaft key (35) on the inboard shaft end. 2. Align the inner magnet (52) with the key, and slide the
magnet over the shaft with the pump end of the magnet towards the inboard head.
3. Fully and squarely install the snap ring (83) into the groove in the end of the shaft.
4. Check to ensure the pump shaft rotates freely when turned by hand.
5. Install a new containment can O-ring (51) into the groove provided on the hub of the inboard head (20). Slide the containment can (50) over the magnet and push it firmly against the inboard head.
6. CAREFULLY slide the pump assembly into the magnet housing.
7. Install the four housing / head capscrews (54A), torquing to 40 lbs ft (54 Nm)
OUTER MAGNET ASSEMBLY Follow instructions given in the MOTOR INSTALLATION Section of this Manual. FINAL ASSEMBLY When Outer Magnet & Motor have been installed correctly. 1. Reinstall the piping to the pump intake and discharge
connections. 2. Reassembly is complete.
NOTICE: Follow all steps in the "operation" section of this manual for start up procedures.
108-A00: Page 11/12
TROUBLESHOOTING
NOTICE: Maintenance shall be performed by qualified technicians only,
following the appropriate procedures and warnings as presented in this manual.
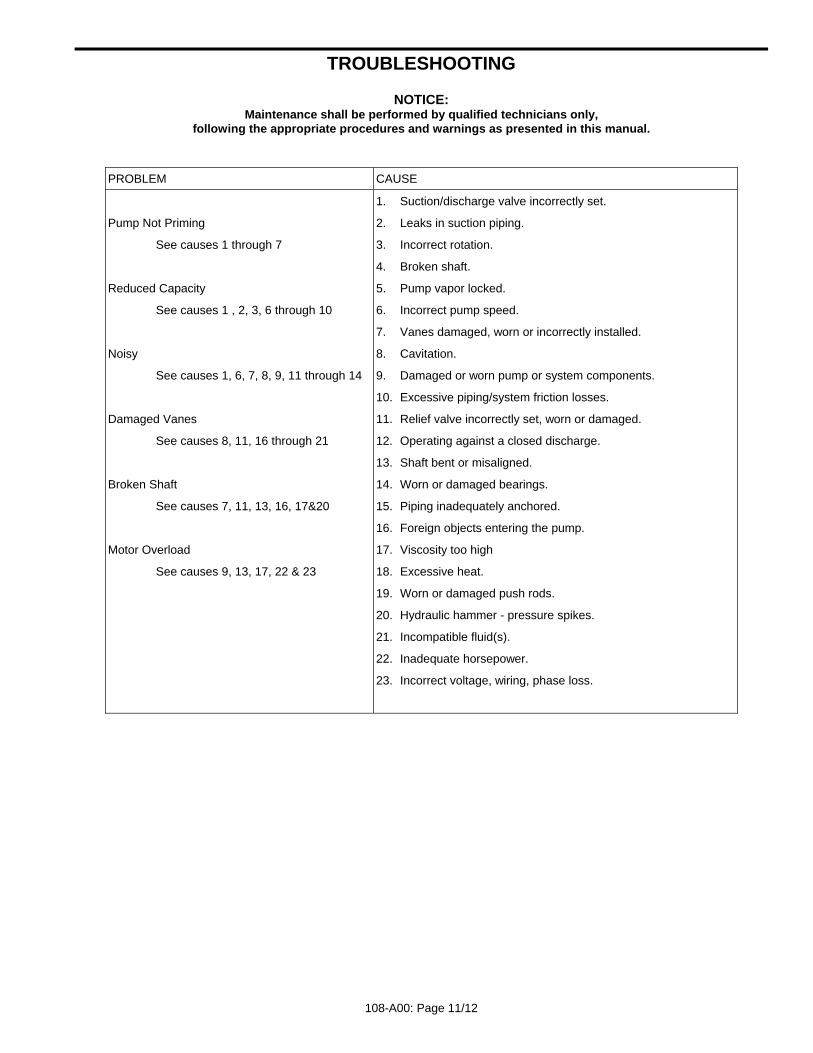
PROBLEM CAUSE
Pump Not Priming
See causes 1 through 7
Reduced Capacity
See causes 1 , 2, 3, 6 through 10
Noisy
See causes 1, 6, 7, 8, 9, 11 through 14
Damaged Vanes
See causes 8, 11, 16 through 21
Broken Shaft
See causes 7, 11, 13, 16, 17&20
Motor Overload
See causes 9, 13, 17, 22 & 23
1. Suction/discharge valve incorrectly set.
2. Leaks in suction piping.
3. Incorrect rotation.
4. Broken shaft.
5. Pump vapor locked.
6. Incorrect pump speed.
7. Vanes damaged, worn or incorrectly installed.
8. Cavitation.
9. Damaged or worn pump or system components.
10. Excessive piping/system friction losses.
11. Relief valve incorrectly set, worn or damaged.