19
BLUE PAPERS WILD TECHNICAL MANUAL

BLUE PAPERSWILDTECHNICAL MANUAL

WILD TECHNICAL SPECIFICATIONS 1
CONTENTGEOMETRY 3SPECIFICATIONS 4FRAME AND MATERIAL 5PARTS & HARDWARE 6CABLE ROUTING 10EXPLODED 13TORQUE SPECIFICATIONS 16

WILD

WILD TECHNICAL SPECIFICATIONS 3
Maximum tyre dimension: 28” [Maximum external dimension 687mm]
SIZES S M L1 - Seat tube 339 359 401
2 - Top tube 544 570 600
3 - Head tube 115 115 140
4- Chain stay 467 467 467
5 - BB drop 63 63 63
6 - BB height 305 305 305
7 - Wheelbase 1098 1124 1156
8 - Head angle 68° 68° 68°
9 - Seat angle 72,5° 72,5° 72,5°
10 - Fork offset 51 51 51
11 - Standover 800 800 808
12 - Reach 348 374 397
13 - Stack 637 637 660
14 - Fork length 527 527 527
15 - BB-Front wheel 638 664 696
16 - Front derailleur angle NO NO NO
GEOMETRY
ERGONOMY
* Medidas orientativas.
HEIGHT (cm) HEIGHT (in) SIZE155-170 61-67 S
165-185 65-73 M
>180 >71 L
WILD TECHNICAL SPECIFICATIONS 4
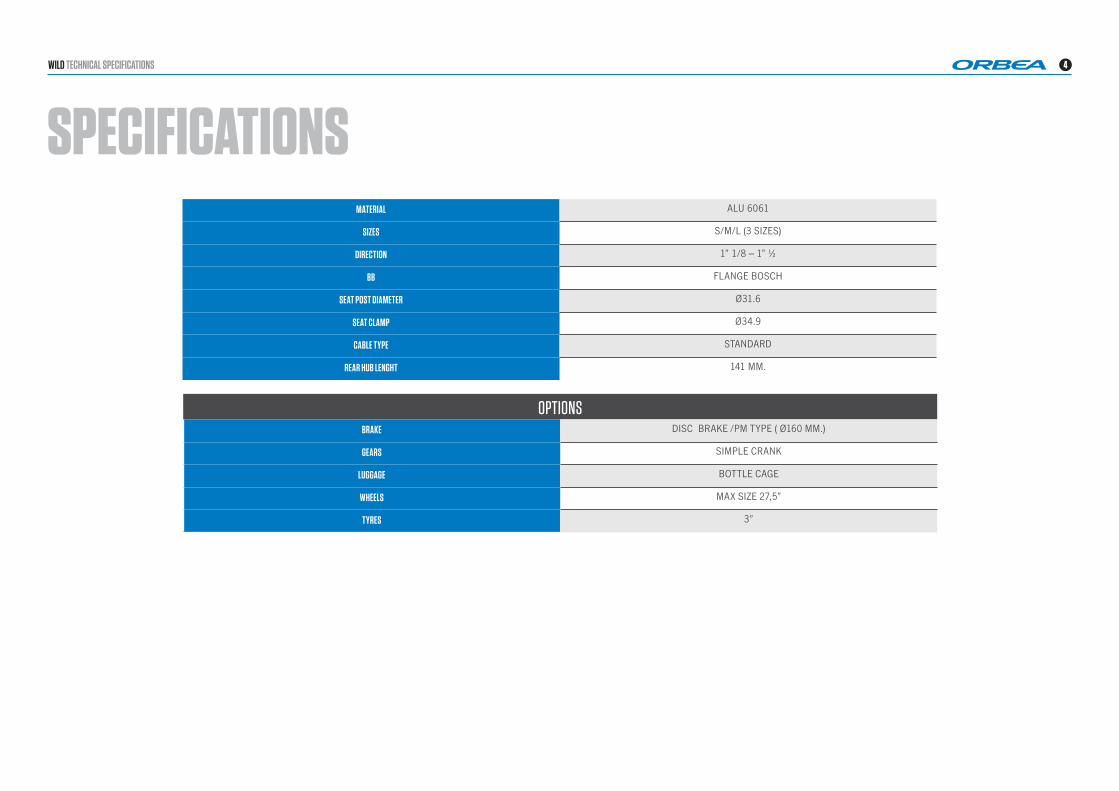
SPECIFICATIONSMATERIAL ALU 6061
SIZES S/M/L (3 SIZES)
DIRECTION 1” 1/8 – 1” ½
BB FLANGE BOSCH
SEAT POST DIAMETER Ø31.6
SEAT CLAMP Ø34.9
CABLE TYPE STANDARD
REAR HUB LENGHT 141 MM.
OPTIONSBRAKE DISC BRAKE /PM TYPE ( Ø160 MM.)
GEARS SIMPLE CRANK
LUGGAGE BOTTLE CAGE
WHEELS MAX SIZE 27,5”
TYRES 3”
WILD TECHNICAL SPECIFICATIONS 5
FRAME AND MATERIALOrbea frames are carefully designed to be durable, efficient, and easy to maintain. Wild tubes are stiff and light, giving excellent steering precision and pedaling efficiency. Wild carbon frame is extremely resistant to corrosion, making it perfect for road. With only a mi-nimum amount of maintenance, it’s easy to keep your Wild in top condition.
1) Keep your Wild clean
Washing your bike with mild soap and water will keep you looking stylish and allow you to check the con-dition of the frame and components. Don’t use high water pressure and avoid spraying water into bearings or frame tubes. Citrus degreasers are biodegradea-ble and do a great job of removing dirty grease from gears and chain.
2) Keep your Wild lubed
Once your bike is clean, it’s a good time to put fresh lube on the chain. Use only enough to get inside the links and wipe off any excess because it will attract dirt. Headset and pivot bearings should be inspected every few months for smoothness and to ensure that the seals are intact and lube is clean.
3) Inspect your Wild before you ride
Do a quick check before every ride to make sure your bike is in excellent condition. It is very common to dis-cover small issues at home that can become big pro-blems on the trail. CHAIN Is the chain dirty, noisy or dry? Clean and lube your chain before riding. BRAKES Check your brakes to make sure they are working correctly. Check for missing/loose caliper and rotor bolts. TIRES Look for damage to the sidewalls of your tires. Check and adjust tire pressure. WHEELS Spin the wheels and look for wobbles, check for loose or broken spokes. Check quick release levers to make sure they are functioning properly. FRONT END Stand over the saddle, pull on the brakes and rock the bike back and forth. Feel for any play or knocking that might indicate a loose headset, loose brake rotors or calipers, or worn fork bushings. TEST RIDE Take a quick ride up and down the street to make sure your bike is shifting and braking properly. Listen for unusual noises.
AFTER A CRASH OR IMPACT
Falling is part of riding and it’s impossible to avoid minor accidents. If you crash your Wild, please make sure you are okay and seek medical attention if ne-cessary. If you are not injured, you should check your bike before continuing:
1) Inspect your frame and components for da-mage. Do not ride your bike if any problems are de-tected.
WHAT TO LOOK FOR
Inspect Frame and fork for evidence of cracking or bending. If cracks are discovered, discontinue use immediately.
Check the drivetrain and spin the wheels to make sure components are operating correctly. If you discover damage to your components, discontinue use imme-diately.
Even if you don’t find any damage, pay careful atten-tion to the sound of your bike when you continue rid-ing. Unusual noises can be caused by cracks or other problems. A well-maintained bike will be quiet and free of creaks or squeaks. Investigate and locate the source of any new noises.
2) Bring your bike to your Orbea dealer for pro-fessional inspection. Some damage can only be de-tected by disassembling the bike to check for cracks or other signs of stress.
A crash or impact can put extraordinary stress on your bike and components, causing them to fail or to fatigue prematurely. Failure can happen suddenly with no warning, causing loss of control, serious injury or death.

WILD TECHNICAL SPECIFICATIONS 6
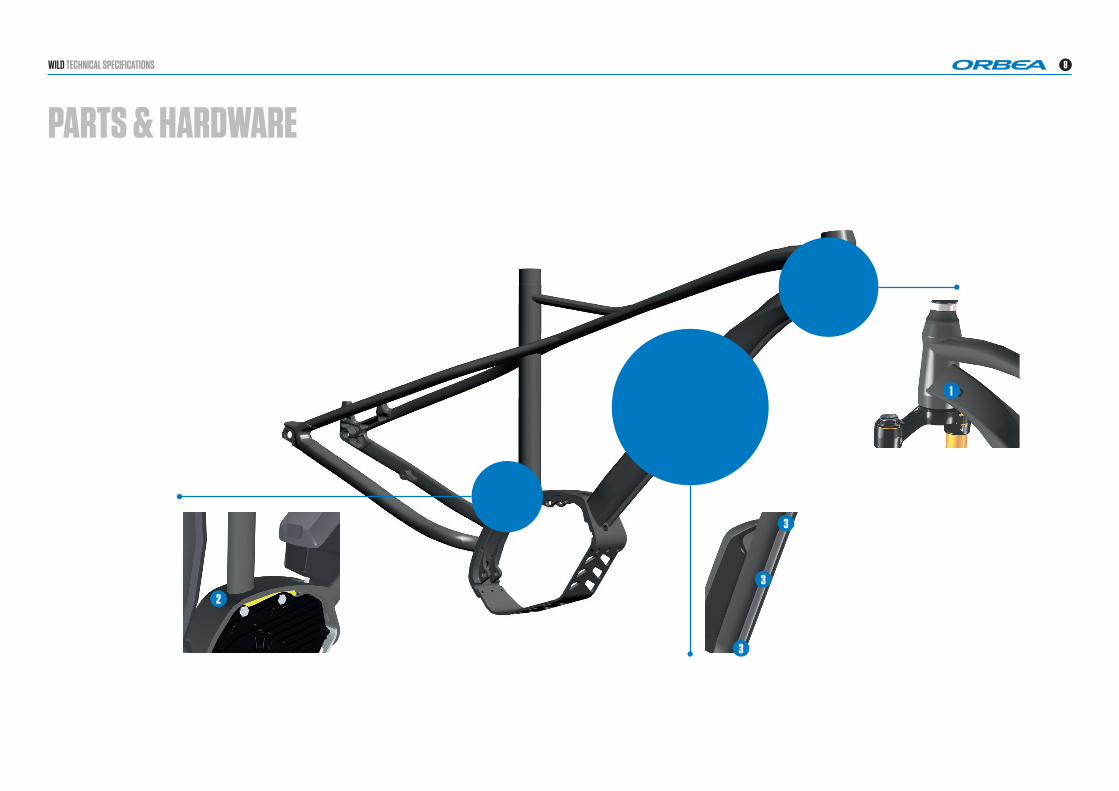
PARTS & HARDWARE
6
8
3
4
7
9
2
5
5
5

WILD TECHNICAL SPECIFICATIONS 7
PARTS & HARDWARE
PART NUMBER REFERENCE ORBEA DESCRIPTION1 11000118 PLASTIC BRIDLE 2.5X100 BLACK
2 12309061 M5X8 ISO 7380 BLACK MOTOR PROTECTOR SCREW
3 57840000 MOTOR PROTECTION BRACKET-WILD CX 16 BLACK
4 11200101 MOTOR MOUNTING WASHER - WILD CX
5 12300013 M5X20 DIN 7991 CABLE GUIDE SCREW
6 15430059 DIRECT MOUNT REAR DERAILLEUR HANGER
7 15430058 STANDARD MOUNT REAR DERAILLEUR HANGER
8 11100055 12 X 148 AXLE
9 11001175 D4 M5X4,.5 THREAD IN CABLE GUIDE
2 4 5
6 7 9
1 3
8
WILD TECHNICAL SPECIFICATIONS 8
PARTS & HARDWARE
3
3
3
1
2

WILD TECHNICAL SPECIFICATIONS 9
PARTS & HARDWARE
21 3
PART NUMBER REFERENCE ORBEA DESCRIPTION1 16100125 CABLE HOUSING GUIDE 22X8
2 16100113 D8 RUBBER PORT COVER
3 11207565 DOWN TUBE CABLE GUIDE T1

WILD TECHNICAL SPECIFICATIONS 10
CABLE ROUTINGRear brakedisc
ReverbSeat Post
Display
Rear derailleur
Battery
Speedsensor

WILD TECHNICAL SPECIFICATIONS 11
CABLE ROUTINGMontaje y desmontaje de componentes eBike
12
SOLTAR LOS CABLES• Retirar el sujetacables (1).
SOLTAR LAS CONEXIONES DE LOS CABLES EN LA UNIDAD DE ACCIONAMIENTO• Desconectar todos los cables.
- El conector que va al acumulador tiene un gancho de cierre (2). Hay que levantarlo unos 1–2 mm con un destornillador.
- Pueden producirse daños si no se suelta el gancho de cierre.
¡NO DAÑAR NI EL CONECTOR NI LOS CABLES!- Soltar los conectores siempre con los dedos o con unos alicates.
- ¡No tirar jamás de los cables!
CORTADOR LATERAL / DESTORNILLADOR PEQUEÑO / ALICATES
WILD TECHNICAL SPECIFICATIONS 12
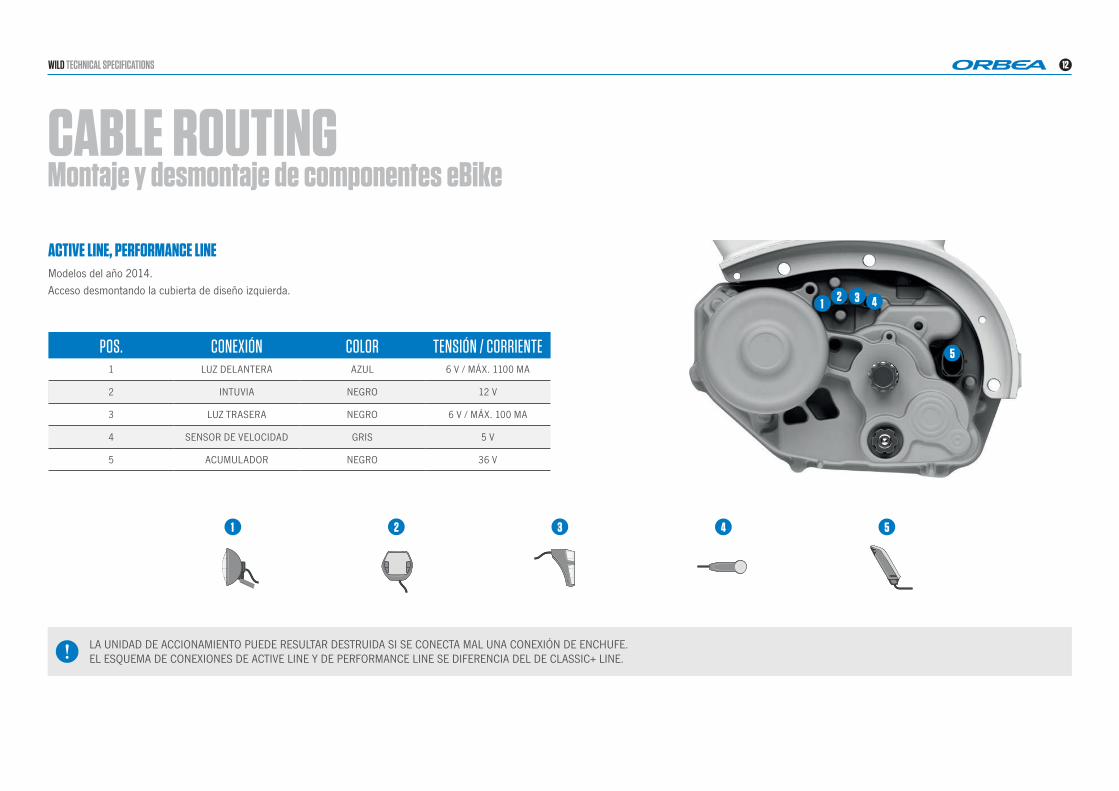
CABLE ROUTINGMontaje y desmontaje de componentes eBike
POS. CONEXIÓN COLOR TENSIÓN / CORRIENTE1 LUZ DELANTERA AZUL 6 V / MÁX. 1100 MA
2 INTUVIA NEGRO 12 V
3 LUZ TRASERA NEGRO 6 V / MÁX. 100 MA
4 SENSOR DE VELOCIDAD GRIS 5 V
5 ACUMULADOR NEGRO 36 V
LA UNIDAD DE ACCIONAMIENTO PUEDE RESULTAR DESTRUIDA SI SE CONECTA MAL UNA CONEXIÓN DE ENCHUFE.EL ESQUEMA DE CONEXIONES DE ACTIVE LINE Y DE PERFORMANCE LINE SE DIFERENCIA DEL DE CLASSIC+ LINE.
ACTIVE LINE, PERFORMANCE LINEModelos del año 2014.
Acceso desmontando la cubierta de diseño izquierda.1 2 4
5
3
1 2 3 4 5
WILD TECHNICAL SPECIFICATIONS 13
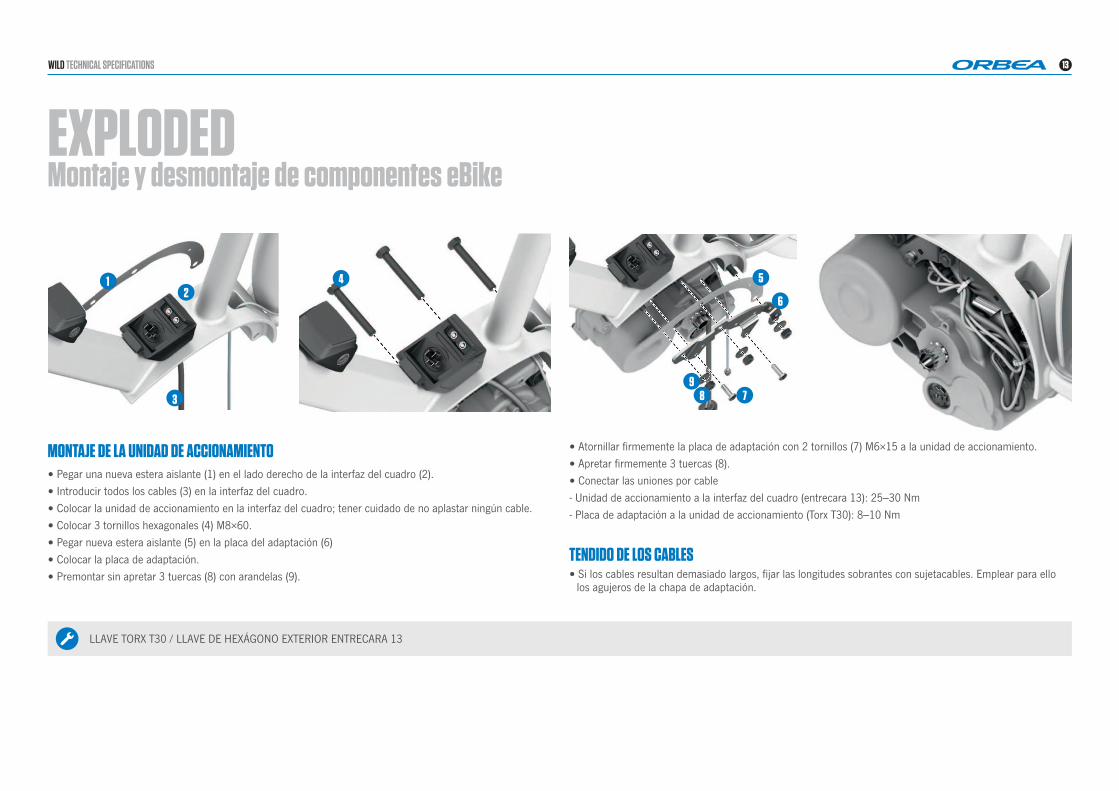
EXPLODEDMontaje y desmontaje de componentes eBike
12
MONTAJE DE LA UNIDAD DE ACCIONAMIENTO• Pegar una nueva estera aislante (1) en el lado derecho de la interfaz del cuadro (2).
• Introducir todos los cables (3) en la interfaz del cuadro.
• Colocar la unidad de accionamiento en la interfaz del cuadro; tener cuidado de no aplastar ningún cable.
• Colocar 3 tornillos hexagonales (4) M8×60.
• Pegar nueva estera aislante (5) en la placa del adaptación (6)
• Colocar la placa de adaptación.
• Premontar sin apretar 3 tuercas (8) con arandelas (9).
• Atornillar firmemente la placa de adaptación con 2 tornillos (7) M6×15 a la unidad de accionamiento.
• Apretar firmemente 3 tuercas (8).
• Conectar las uniones por cable
- Unidad de accionamiento a la interfaz del cuadro (entrecara 13): 25–30 Nm
- Placa de adaptación a la unidad de accionamiento (Torx T30): 8–10 Nm
TENDIDO DE LOS CABLES• Si los cables resultan demasiado largos, fijar las longitudes sobrantes con sujetacables. Emplear para ello
los agujeros de la chapa de adaptación.
LLAVE TORX T30 / LLAVE DE HEXÁGONO EXTERIOR ENTRECARA 13
4 5
3
6
89
7

WILD TECHNICAL SPECIFICATIONS 14
EXPLODEDMontaje y desmontaje de componentes eBike
MONTAJE DEL PLATO Y DE LAS BIELAS• Engrasar ligeramente el perfil de dientes y la rosca fina en el eje del motor.
• Colocar el plato (3) sobre el perfil de dientes del eje del motor.
- Si se monta un repuesto, es estrictamente necesario emplear un plato con el número de dientes del original.
• Atornillar firmemente el anillo de fijación (2) con la herramienta correspondiente (Lockring Tool) (1).
- Atención: ¡Rosca a la izquierda!
• Engrasar el eje del cojinete del pedal.
• Montar los brazos de biela.
- Anillo de fijación (aluminio, engrasado): 30 Nm
- Brazos de biela en el eje del cojinete del pedal (hexágono interior entrecara 8, M15): 45–55 Nm Atornillamiento modificado frente a Classic+ (M12)
GRASA PARA COJINETES / LLAVE DINAMOMÉTRICA / LOCKRING-TOOL (HERRAMIENTA PARA ANILLO DE FIJACIÓN) / ––LLAVE DE HEXÁGONO INTERIOR ENTRECARA 8
Anillo de fijación de aluminio con elemento de seguridad, Lockring-Tool

WILD TECHNICAL SPECIFICATIONS 15
ORBEA WARRANTYHOW DO I ACTIVATE MYLIFETIME WARRANTY?
Orbea provides a lifetime warranty on all its frames. Only a brand that knows the materials, masters the technologies and has the skills can guarantee that your frame is totally invincible. Only Orbea takes youa step beyond.
Orbea’s lifetime warranty is activated using the regis-tration number you will find on all frames from the 2009 range onwards. When you have activated it at your dealer or at www.orbea.com, your bike will auto-matically receive its lifetime warranty. The registration number is a unique, non-transferable code that you will find on the underside of your bike’s downtube. Activate your frame’s warranty using this number at your dealer’s or at www.orbea.com.
WHAT ARE THE ADVANTAGES?
· Lifetime guarantee of your frame against breakage.
· Two-year guarantee on all components.
· Identification of your bicycle and all its characteris-tics to our Technical Assistance Service so that wecan provide our best response to any problems. Access to special offers, events and prize drawings.
ORBEA WARRANTY
The ongoing efforts we make at Orbea to design high-end bicycles enable us to provide customerswith the following warranty:
1) We back each frame and rigid fork in our bicycles with a lifetime warranty against materials and manu-facturing defects. Frames with travel longer than 170 mm are covered by a 2-year warranty. We warrant each frame and fork in our bikes against paint or var-nish defects and corrosion for 3 years. This warranty covers the original purchaser only and is non-transfe-rable. For the lifetime warranty to be valid, customers must fill in the online warranty form within one mon-th of purchase, and proof of purchase in the form of cash register receipt or sales ticket is required.
2) Warranty claims are subject to the decision made by our technical staff about the nature of the defect after thorough inspection of the faulty part.
3) All the parts assembled in our bicycles are protec-ted against assembly or manufacturing defects for 2years, and repairs qualifying under this warranty willbe performed by authorized dealers in each country.
4) This warranty does not cover parts that naturally wear over time, such as tires, brake pads, handlebar grips, cranksets, bearings, etc.
5) This warranty does not cover damages or defects caused by negligence, improper use, assembly ofparts or accessories that are not original, or defective repair or maintenance work. of the bicycle, nonoriginal ac-cessories being fitted to it, or unsuitable maintenance operations or handling.
6) This warranty includes only replacement or repair coverage of the parts under it and in no case shall it cover personal damages directly or indirectly caused by the failure of said parts during use.
7) All claims must be reported to an authorized dealer.In case there is no such a dealer near the buyer’s lo-cation, please contact Orbea so that we can decide how to solve the problem.
8) In case of crashes, the Orbea warranty shall be con-sidered null and void.

WILD TECHNICAL SPECIFICATIONS 16
TORQUE SPECIFICATIONSPares de apriete
COMPONENTE HERRAMIENTA PAR DE APRIETE UNIDAD DE ACCIONAMIENTO
UNIDAD DE ACCIONAMIENTO A LA INTERFAZ DE CUADRO HEXÁGONO EXTERIOR ENTRECARA 13 25–30 NM
PLACA DE ADAPTACIÓN UNIDAD DE ACCIONAMIENTO TORX T30 8–10 NM
ADAPTADOR DE GUARDACADENAS A LA UNIDAD DE ACCIONAMIENTO TORX T20 TORNILLOS TALADRADORES: 2–3 NM
ANILLO DE FIJACIÓN (ATENCIÓN: ¡ROSCA A LA IZQUIERDA!) LOCKRING-TOOL (HERRAMIENTA DEL ANILLO DE FIJACIÓN) 30 NM (ALUMINIO, ENGRASADO)
TAPA DE DISEÑO TORX T20 1 NM
BRAZOS DE BIELA EN EL EJE DEL COJINETE DEL PEDAL (M15) HEXÁGONO INTERIOR ENTRECARA 8 45–55 NM (SEGÚN FABRICANTE)
SENSOR DE VELOCIDAD
SENSOR EN EL CUADRO TORX T15 3 NM
IMÁN EN EL RADIO CRUZ PH02 1 NM
ACUMULADOR DE PORTAEQUIPAJES
CUBIERTA DE LA CERRADURA AL SOPORTE DE LA CERRADURA TORX T10 2 NM
SOPORTE DE ACUMULADOR EN EL TRAVESAÑO DEL PORTAEQUIPAJES HEXÁGONO INTERIOR ENTRECARA 4 3 NM
ACUMULADOR DE CUADRO
ADAPTADOR DE SOPORTE EN EL CUADRO TORX T25 4 NM
CUBIERTAS DE SOPORTE TORX T15 2 NM
CERRADURA (NO ES PIEZA DE REPUESTO DE BOSCH) AL CUADRO HEXÁGONO INTERIOR ENTRECARA 4 4–5 NM
CUBIERTA DE LA CERRADURA A LA CERRADURA TORX T15 2 NM
ORDENADOR DE MANDO Y UNIDAD DE MANDO
SUJECIÓN DEL ZÓCALO DEL ORDENADOR DE A BORDO AL MANILLAR HEXÁGONO INTERIOR ENTRECARA 3 1 NM
FIJACIÓN DEL ORDENADOR DE A BORDO AL ZÓCALO (M3×8) CRUZ PH02 1 NM
SUJECIÓN DE LA UNIDAD DE MANDO AL MANILLAR HEXÁGONO INTERIOR ENTRECARA 3 1 NM
CABLE DE LA UNIDAD DE MANDO AL ZÓCALO DEL ORDENADOR DE A BORDO CRUZ PH00 0,1 NM
ACTIVE LINE, PERFOMANCE LINEModelos del año 2014

WILD TECHNICAL SPECIFICATIONS 17
ADDITIONAL INFORMATIONORBEA participates actively on facebook and Twitter with our fantastic global community of riders. Looking to find spots to ride or plan a vacation? Someone will have the answers:
YOUR ORBEA DEALEROur dealers are experts and should be able to assist you with setting up and maintaining your Orbea bicy-cle. A complete listing of Orbea dealers and distributors can be located on our website:
www.orbea.com/us-en/dealers/?country=INT
AFTER SALES SERVICE
Our service technicians are trained to handle any questions you might have about your Orbea bicycle:
mailto:[email protected]
ORBEA CONTENTView and download photos, videos and documents.
content.orbea.com/us-en/
ORBEA UNIVERSITYwww.orbea.com/es-es/university/
BLOG ORBEAwww.orbea.com/es-es/blog/
YOUTUBE
www.facebook.com/OrbeaBicycles
www.twitter.com/Orbea/
www.instagram.com/orbeabicycles
Visit our Orbea Channel on You Tube for a variety of helpful setup and tech videos:
www.youtube.com/user/OrbeaBicycles