54
User Manual / Manual del Usuario (GBE211) Bluetooth Wireless Headset Auricular inalámbrico Bluetooth
| Date post: | 29-Mar-2018 |
| Category: |
Documents |
| Upload: | truongmien |
| View: | 218 times |
| Download: | 2 times |

User Manual / Manual del Usuario (GBE211)
Bluetooth Wireless Headset
Auricular inalámbrico Bluetooth

©2006 IOGEAR. All Rights Reserved. PKG-M30141ESIOGEAR, the IOGEAR logo, are trademarks or registered trademarks of IOGEAR, Inc. Microsoft and Windows are registered trademarks of Microsoft Corporation. IBM is a registered trademark of International Business Machines, Inc. Macintosh, G3/G4 and iMac are registered trademarks of Apple Computer, Inc. All other brand and product names are trademarks or registered trademarks of their respective holders. IOGEAR makes no warranty of any kind with regards to the information presented in this document. All information furnished here is for informational purposes only and is subject to change without notice. IOGEAR, Inc. assumes no responsibility for any inaccuracies or errors that may appear in this document.

Table of Contents
Introduction 06
Pairing with a Bluetooth Phone 12
How to use the headset 14
· Making a call 14
· Ending a call 15
· Answering a call 16
Connecting the Headset to PC/laptop 18
Technical Support 27
Limited Warranty 28

6
Introduction
Please refer to the picture on the next page
1. Multi-function button – used to turn headset ON/OFF, activate in discovery mode for pairing, and answer/terminate calls2. Speaker – this is the speaker for incoming voice calls3. Power jack – insert power cable to charge internal battery4. Microphone – this is the microphone for outgoing voice calls5. LED window – displays red and blue LEDs6. Volume up – increase the volume on the headset7. Volume down – decrease the volume on the headset8. Ear hook - reversible

7
IntroductionIntroduction
1
2
3
4
5
6
7
8
8
Introduction
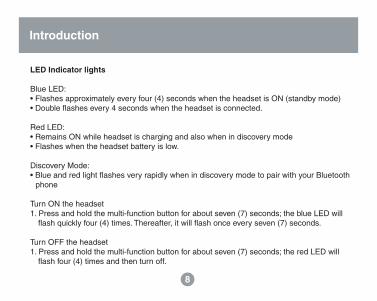
LED Indicator lights
Blue LED:• Flashes approximately every four (4) seconds when the headset is ON (standby mode)• Double flashes every 4 seconds when the headset is connected.
Red LED:• Remains ON while headset is charging and also when in discovery mode• Flashes when the headset battery is low.
Discovery Mode:• Blue and red light flashes very rapidly when in discovery mode to pair with your Bluetooth phone
Turn ON the headset1. Press and hold the multi-function button for about seven (7) seconds; the blue LED will flash quickly four (4) times. Thereafter, it will flash once every seven (7) seconds.
Turn OFF the headset1. Press and hold the multi-function button for about seven (7) seconds; the red LED will flash four (4) times and then turn off.
9
Introduction
Charging the Battery
You must charge the internal battery of the Bluetooth headset before your first use. There-after, the glimmering red LED will flash when the battery is low and emit a warning sound.
To charge the battery, follow the procedure below:1. Turn OFF the headset2. Connect AC adapter into the power jack of the Bluetooth headset3. The Red LED will remain ON while the headset is charging. Once the headset is fully charged, the red LED will turn OFF. It takesabout 2 hours to fully charge the headset.
A fully-charged battery will give you approximately 7 hours of talk time, or 170 hours stand-by time.

10
IntroductionIntroduction
Attaching ear hook
1. Position the headset with the speaker pointing inward2. Position the ear hook with the clip-on facing down3. Snap the ear hook onto the neck of the speaker
TIP: To use the headset on the other ear, insert the ear hook from the ooposite side.
➜ ➜
(for left ear) (for right ear)
11
IntroductionIntroduction
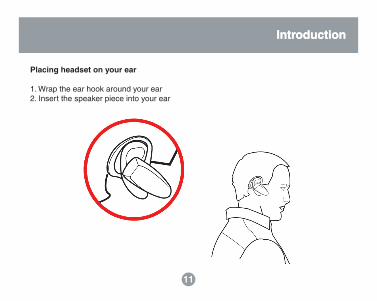
Placing headset on your ear
1. Wrap the ear hook around your ear2. Insert the speaker piece into your ear

12
Pairing to Bluetooth Phone
Pairing Procedure
Pairing is a Bluetooth function that enables Bluetooth devices to remain permanently linked to each other. By pairing devices, you only need to authenticate and authorize communication between your devices once. During the pairing procedure, a PIN code is required for secure authentication. Thereafter, communication between your two Bluetooth devices is done automatically without requiring authentication or confirmation.
For the procedure below, you will need to know how to use your cell phone’s Bluetooth feature for discovering, connecting, and pairing to other Bluetooth devices. If you’re not sure how to do this, please consult your cell phone user manual.
To pair the IOGEAR Bluetooth headset with your Bluetooth phone, follow the procedure below:
1. Turn headset ON (see page 8 under Introduction)2. Press and hold the Volume-Up (+) button for more than four (4) seconds; the red LED will turn ON and the blue LED will start rapidly flashing; the headset is now in pairing mode.
NOTE: If only the blue LED is on, the headset is in stand-by mode; repeat the step again and make sure
13
Pairing to Bluetooth Phone
the red LED is on and blue LED is blinking. The Bluetooth headset will remain in pairing mode for approximately five minutes. If no pairing takes place during that time interval, it will switch to stand-by mode.
3. Follow your cell phone’s instructions to search for Bluetooth devices. The IOGEAR Bluetooth headset will show up as “IOGEAR BT Headset.” If the headset is not found on your first attempt, try again as it may take a few tries the first time you search for the device.
4. Select the Bluetooth headset (“IOGEAR BT Headset”) and select the pairing option. If you are prompted for a PIN code, enter “0000”
5. You are now paired to the headset! The instructions will vary depending on the brand/ model of phone that you have. If you still have problems using the Bluetooth functionaity of your phone, please consult your cell phone’s user manual.
14
How to use headset
Before proceeding, please check the following:First, make sure that you have already paired the Bluetooth headset with your cell phone. Otherwise, you will be prompted to authorize the connection every time the Bluetooth headset communicates with your phone. Please refer to the section “Pairing to Bluetooth Phone” for additional information.
Making a call
1. Put on the Bluetooth headset (make sure that it’s turned on).2. Dial the desired number using your phone’s keypads3. Press the connect/send button to initiate the call4. The call should automatically be transferred to the Bluetooth headset.
NOTE: If the phone call is not automatically transferred to the Bluetooth headset, press the multi-function button once to transfer the call to the headset. Your phone may prompt you if you wish to accept the connection from the Bluetooth headset; simply click Yes/OK.
If you still cannot get your phone to transfer calls to the Bluetooth headset, we suggest you to consult your cell phone’s user manual for instructions on configuring your phone to use with a headset.

15
How to use headset
Ending a call
If you wish to terminate a call while using the Bluetooth headset, please do the following:
1. Press the multi-function button once to hang up2. You should now hear a beep sound from the headset indicating call has terminated Alternatively, you can terminate the phone call in the usual way using your cell phone’s keypads.
Redial a number
If you wish to redial the last number using the Bluetooth headset, please follow the procedure below:
1. Press and hold any of the volume buttons (volume up or volume down) for approximately 3-5 seconds. Note: If your phone has not previously used the headset, this may take longer as the phone will ask for confirmation to use the Bluetooth headset2. Your cell phone will start redialing the last number

16
How to use headset
Answering a call
Before proceeding, make sure you have already paired your Bluetooth phone and headset.
1. Put on the Bluetooth headset (make sure that it’s turned on).2. When you hear the ring tone on the headset, simply press the multifunction button once to pick up the call. Note: If the call is being transferred to your cell phone directly instead of the Bluetooth headset, press the multi-function button once on the headset to force your phone to use the headset.
If you still cannot get your phone to transfer calls to the Bluetooth headset, we suggest you to consult your cell phone’s user manual for instructions on configuring your phone to use with a headset.
Reject a call
To reject a call using the headset, do the following:1. You will hear the ringing tone on your Bluetooth headset2. Press and hold the multi-function button for 3 seconds until your phone stops ringing

17
Connecting Headset to PC/Laptop
The IOGEAR Bluetooth headset can also be used on your PC/Laptop. Why would you want to use your headset on your computer? The answer is simple:
• Voice Over IP
Please note that in order for this to work, the Bluetooth software on your PC/Laptop, must support the Headset profile. For the examples shown below, we used the WIDCOMM Bluetooth software v3.0.x which supports Headset profile.
If you’re not sure what profiles your Bluetooth software supports, please check with the vendor of your Bluetooth device/software.
18
Connecting Headset to PC/Laptop
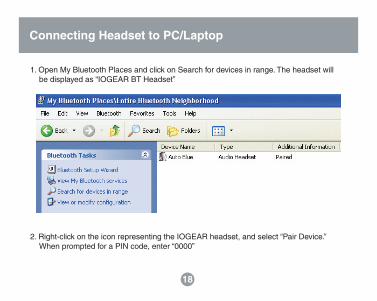
1. Open My Bluetooth Places and click on Search for devices in range. The headset will be displayed as “IOGEAR BT Headset”
2. Right-click on the icon representing the IOGEAR headset, and select “Pair Device.” When prompted for a PIN code, enter “0000”

19
Connecting Headset to PC/Laptop
3. To access the services offered by the headset, double-click the IOGEAR headset icon. Now, right click on the icon displayed below and select “Connect Headset.”
4. Upon successful connection, the icon will turn green and it will say “connected” as shown below. Also note that the Bluetooth icon on your tray bar will turn green.
5. If you hear a long-beep sound on the headset, click the multi-function button once to transfer the audio on your computer to the headset.

20
Connecting Headset to PC/Laptop
Voice Over IP
With Voice-Over-IP programs, you can use your Internet connection to make calls to your family/friends over the Internet. Examples of these are chat programs that let you have voice conversations such as MSN messenger, yahoo messenger, etc. The instructions below are provided as an example, but they should work for most Voice-Over-IP programs, with minor configuration necessary. Here we show two examples of Voice-OVER-IP programs:
- SKYPE - MSN Instant Messenger
Bluetooth Audio Drivers
Before proceeding, you need to check that your Bluetooth software has properly installed all Audio drivers necessary; otherwise, you will not be able to use the Bluetooth headset as an audio device. To verify this, go to Control Panel and look under Sound, video and game controllers, as shown below.
In our example, you can see that the Bluetooth audio drivers have been added to our system and appear as “Bluetooth Audio Device” (the name and location might vary in your case). If your system does not show any Bluetooth audio drivers that you can see,

21
Connecting Headset to PC/Laptop
please consult your Bluetooth software manual or check with your device vendor.

22
Connecting Headset to PC/Laptop
SKYPE
Configure softwareBefore you can use the Bluetooth headset with your Voice-Over-IP program, you needto first specify the headset as the source for Audio-IN and Audio-OUT.
1. First, click on the File menu and select Options

23
Connecting Headset to PC/Laptop
2. Now go to the Hand/Headsets tab. As you see below, the sound device specified is the Windows default device (most likely your PC/Laptop speakers). Change both Audio In and Audio Out to the Bluetooth Audio option.
24
Connecting Headset to PC/Laptop
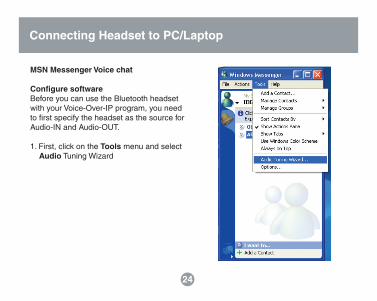
MSN Messenger Voice chat
Configure softwareBefore you can use the Bluetooth headset with your Voice-Over-IP program, you need to first specify the headset as the source for Audio-IN and Audio-OUT.
1. First, click on the Tools menu and select Audio Tuning Wizard

25
Connecting Headset to PC/Laptop
2. When prompted to specify your Audio device, make sure to select Bluetooth Audio, and then click Next. NOTE: The name of the audio device shown here is what was displayed in Control Panel under the Sound, video and game controllers section.

26
Connecting Headset to PC/Laptop
3. Once the wizard has completed, click on Actions > Start a Voice Conversation, and select the person you want to invite to your conversation.

27
If you need technical support, please check out our IOGEAR Tech Info Library (T.I.L.) at www.iogear.com/support for the latest tips, tricks, and troubleshooting. The IOGEAR T.I.L. was designed to provide you with the latest technical information about our products. Most of the answers to your questions can be found here, so please try it out before contacting technical support.
Technical support is available Monday through Friday from 8:00 am to 5:00 pm PST and can be reached at 866-9-IOGEAR or 866-946-4327
Technical Support

28
Limited Warranty
IN NO EVENT SHALL THE DIRECT VENDOR’S LIABILITY FOR DIRECT, INDIRECT, SPECIAL, INCIDENTAL OR CONSEQUENTIAL DAMAGES RESULTING FROM THE USE OF THE PRODUCT, DISK OR ITS DOCUMENTATION EXCEED THE PRICE PAID FOR THE PRODUCT.
The direct vendor makes no warranty or representation, expressed, implied, or statutory with respect to the contents or use of this documentation, and especially disclaims its quality, performance, merchantability, or fitness for any particular purpose.
The direct vendor also reserves the right to revise or update the device or documenta-tion without obligation to notify any individual or entity of such revisions, or updates. For further inquires please contact your direct vendor.


©2006 IOGEAR. All Rights Reserved. PKG-M030141ESIOGEAR, the IOGEAR logo, are trademarks or registered trademarks of IOGEAR, Inc. Microsoft and Windows are registered trademarks of Microsoft Corporation. IBM is a registered trademark of International Business Machines, Inc. Macintosh, G3/G4 and iMac are registered trademarks of Apple Computer, Inc. All other brand and product names are trademarks or registered trademarks of their respective holders. IOGEAR makes no warranty of any kind with regards to the information presented in this document. All information furnished here is for informational purposes only and is subject to change without notice. IOGEAR, Inc. assumes no responsibility for any inaccuracies or errors that may appear in this document.

31
Tabla de contenido
Introducción 32
Asociar a un teléfono Bluetooth 38
Cómo utilizar el auricular 40
· Realizar una llamada 40
· Terminar una llamada 41
· Responder a una llamada 42
Conectar Auricular con su PC/Laptop 43
Soporte técnico 53
Garantía 54

32
1. Botón principal2. Parlante3. Enchufe the corriente4. Micrófono5. Luces (rojo y azul)6. Elevar el volumen7. Bajar el volumen8. soporte reversible para la oreja
Introducción

33
IntroductionIntroduction
1
2
3
4
5
6
7
8

34
Luces de los indicadores LED
LED de color azul:• Parpadea aproximadamente cada cuatro (4) segundos cuando el auricular está encen dido en el modo de espera• Parpadea doblemente cada cuatro (4) segundos cuando el auricular esta conectado al teléfono.
LED de color rojo:• Permanece encendido mientras el auricular se carga y cuando está en el modo de detección• Parpadea cuando la carga de la batería del auricular es baja.
Descubrimiento• Parpadea muy rápido en el modo de detección cundo intenta establecer la asociación con un teléfono Bluetooth
Encender el auricular1. Mantenga presionado el botón principal durante unos siete (7) segundos; el indicador LED de color azul parpadeará rápidamente cuatro (4) veces. A partir de entonces, parpadeará una vez cada cuatro (4) segundos.
Introducción

35
Apagar el auricular1. Mantenga presionado el botón principal durante unos siete (7) segundos; el indicador LED de color rojo parpadeará cuatro (4) veces y, a continuación, se apagará.
Cargar la bateríaDebe cargar la batería interna del auricular Bluetooth antes de utilizarla por primera vez. A partir de entonces, el indicador LED de color rojo débil parpadeará cuando la carga de la batería sea baja y advertencia.
Para cargar la batería, siga el procedimiento que se describe a continuación:1. Apague el auricular2. Enchufe el cable cargador USB o el adaptador de CA al conector hembra de alimentación del auricular Bluetooth3. El indicador LED de color rojo permanecerá encendido mientras el auricular se esté cargando. Cuando el auricular esté completamente cargado, el indicador LED de color rojo se apagará. El auricular tarda en cargarse completamente alrededor de 2 horas.
Una batería totalmente cargada proporciona una autonomía de unas 7 horas de conver sación y 100 horas en el modo de espera.
Introducción

36
Acoplar el soporte para la oreja1. Coloque el auricular con el altavoz orientado hacia la parte interior2. Coloque el soporte del auricular con el elemento de sujeción hacia abajo3. Cierre el soporte del auricular por el cuello del altavoz
Sugerencia: para utilizar el auricular en la oreja izquierda, siga los mismospasos descritos anteriormente, pero coloque el roporte a la oreja al lado opuesto.
➜ ➜
(for left ear) (for right ear)
Introducción
37
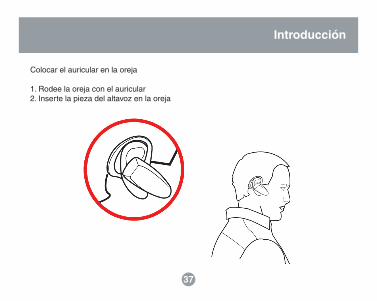
Colocar el auricular en la oreja
1. Rodee la oreja con el auricular2. Inserte la pieza del altavoz en la oreja
Introducción

38
La asociación es “pairing” una función Bluetooth que permite a dispositivos Bluetooth permanecer continuamente conectados. Con la asociación de dispositivos, sólo es nece-sario autenticar y autorizar la comunicación entre los dispositivos una única vez. Durante el procedimiento de asociación es necesario un código NIP para garantizar la autenti-cación. A partir de entonces, la comunicación entre los dispositivos Bluetooth se realiza automáticamente sin necesidad de autenticación ni confirmación. Para el procedimiento descrito a continuación, es necesario saber utilizar la función Bluetooth del teléfono para detectar, conectarse y asociarse con otros dispositivos Bluetooth. Si no está seguro de cómo realizar esta operación, consulte el manual del usuario del teléfono móvil.
Procedimiento de asociaciónPara asociar el auricular Bluetooth de IOGEAR con su teléfono Bluetooth, siga el proced-imiento que se describe a continuación:
1. Asegúrese que el auricular Bluetooth de IOGEAR este prendido.2. Mantenga presionado el botón de subir el volumén (+) durante mas de cuatro (4) segundos; el indicador LED de color rojo se iluminará y el indicador LED de color azul comenzará a parpadear rápidamente; el auricular se encuentra ahora en el modo de asociación. Nota: si sólo se ilumina el indicador LED de color azul, el auricular se encuentra en el modo de espera; repita el paso y asegúrese de que el indicador LED rojo está iluminado y el de color azul parpadea.
Asociar a un teléfono Bluetooth
39
El auricular Bluetooth permanecerá en el modo de asociación durante cinco minutos, aproximadamente.Si no tiene lugar ninguna asociación durante ese período de tiempo, el dispositivo pasará al modo de espera.
3. Siga las instrucciones del teléfono móvil para buscar dispositivos Bluetooth. El auricular Bluetooth de IOGEAR mostrará el mensaje “AURICULAR BT DE IOGEAR” [IOGEAR BT HEADSET]. Si el auricular no se detecta al primer intento, vuelva a intentarlo ya que puede ser necesario repetir la operación la primera vez que busca el dispositivo.4. Seleccione el auricular Bluetooth (“AURICULAR BT DE IOGEAR” [IOGEAR BT HEAD SET]) y elija la opción de asociación. Si se le solicita un número NIP, inserte “0000”5. ¡Acaba de establecer la asociación con el auricular!
Las instrucciones variarán en función de la marca y modelo del teléfono que tenga. Si sigue teniendo problemas cuando utilice la funcionalidad Bluetooth de su teléfono, consulte el manual del usuario del teléfono
Asociar a un teléfono Bluetooth

40
Antes de continuar, compruebe lo siguiente:En primer lugar, asegúrese de que ya ha asociado el auricular Bluetooth al teléfono móvil. Si no es así, se le solicitará que autorice la conexión cada vez que el auricular Bluetooth se comunique con el teléfono.Consulte la sección “Asociar a un teléfono Bluetooth” para obtener más información.
Realizar una llamada1. Póngase el auricular Bluetooth (asegúrese de que está encendido)2. Marque el número que desee mediante el teclado numérico del teléfono3. Presione el botón de conexión y envío para iniciar la llamada4. La llamada se debe transferir automáticamente al auricular Bluetooth NOTA: si la llamada telefónica no se transfiere inmediatamente al auricular Bluetooth, presione el botón principal una vez para transferir la llamada al auricular. El teléfono puede preguntarle si desea aceptar la conexión del auricular Bluetooth; simplemente haga clic en Sí/Aceptar [Yes/OK].
Si el teléfono sigue sin transferir las llamadas al auricular Bluetooth, es recomendable que consulte el manual de instrucciones del teléfono móvil para obtener instrucciones sobre el modo de configurar el teléfono para utilizarlo con un auricular.
Cómo utilizar el auricular
41
Terminar una llamadaSi desea terminar una llamada mientras utiliza el auricular Bluetooth, realice el siguiente procedimiento:1. Presione el botón principal una vez para colgar2. Debe escuchar un pitido procedente del auricular que indica que la llamada ha terminado
Alternativamente, puede terminar la llamada telefónica de la forma normal mediante el teclado del teléfono móvil.
Volver a marcar un númeroSi desea marcar de nuevo el último número mediante el auricular Bluetooth, siga el procedimiento que se describe a continuación:1. Mantenga presionado botón principal durante 3 a 5 segundos aproximadamente. Nota: si el teléfono no ha utilizado anteriormente el auricular, esta operación puede tardar algo más ya que el teléfono móvil solicitará confirmación para utilizar el auricular Bluetooth
2. El teléfono móvil comenzará a marcar de nuevo el último número
Cómo utilizar el auricular

42
Responder a una llamada
Antes de continuar, asegúrese de que ha asociado el teléfono y el auricular Bluetooth.1. Póngase el auricular Bluetooth (asegúrese de que está encendido).2. Cuando oiga el tono de llamada en el auricular, simplemente presione el botón principal una vez para aceptar la llamada. Nota: si la llamada se transfiere directamente al teléfono móvil, en lugar de al auricular Bluetooth, presione una vez el botón principal del auricular para obligar al teléfono a utilizar dicho auricular.
Si el teléfono sigue sin transferir las llamadas al auricular Bluetooth, es recomendable que consulte el manual de instrucciones del teléfono móvil para obtener instrucciones sobre el modo de configurar el teléfono para utilizarlo con un auricular.
Rechazar una llamada Para rechazar una llamada mediante el auricular, realice el siguiente procedimiento:1. Escuche el tono de llamada en el auricular Bluetooth2. Mantenga presionado el botón principal durante 3 segundos hasta que el teléfono deje de emitir el tono
Cómo utilizar el auricular

43
El auricular Bluetooth de IOGEAR también se puede utilizar en un equipo de sobremesa o portátil. ¿Por qué querría utilizar el auricular en su PC?
La respuesta es sencilla:Tenga en cuenta que para que ésto funcione, el software Bluetooth del equipo de sobremesa o portátil debe ser compatible con el perfil de auricular. En el caso de los ejemplos mostrados anteriormente, se utilizó el software Bluetooth WIDCOMM v3.0.x que admite dicho perfil.
Si no está seguro de los perfiles que admite el software Bluetooth que utiliza, consulte al proveedor del dispositivo y software Bluetooth.
Conectar el auricular a un equipo de sobremesa o portátil

44
Procedimiento de asociación1. Abra Mis lugares Bluetooth [My Bluetooth Places] y haga clic en Buscar dispositivos dentro del alcance de cobertura [ Search for devices in range]. El auricular se mostrará como “AURICULAR BT DE IOGEAR” [IOGEAR BT HEADSET]
2. Haga clic con el botón secundario en el icono que representa al auricular de IOGEAR y seleccione “Asociar dispositivo” [Pair Device]. Si se le solicita un número NIP, inserte “0000”
Conectar el auricular a un equipo de sobremesa o portátil

45
3. Para acceder a los servicios ofrecidos por el auricular, haga doble clic en el icono del auricular IOGEAR. Ahora, haga clic con el botón secundario en el icono que aparece a continuación y seleccione “Conectar auricular” [Connect Headset].4. Cuando la conexión se realice correctamente, el icono se iluminará en color verde y aparecerá el texto “Conectado” [Connected] tal y como se muestra a continuación. Asimismo tenga en cuenta que el icono Bluetooth de la barra de la bandeja se mostrará en color verde.
Conectar el auricular a un equipo de sobremesa o portátil
46
5. Si escucha un pitido prolongado en el auricular, haga clic en el botón principal una vez para transferir el audio del equipo al auricular.
Voz sobre IPCon programas de voz sobre IP, puede utilizar la conexión a Internet para realizar llamadas a sus familiares y amigos a través de Internet. Las instrucciones siguientes se proporcionan como ejemplo, pero deben ser válidas para la mayoría de los programas de voz sobre IP, con una mínima configuración. A continuación se muestran dos ejemplos de programas de voz sobre IP:
− SKYPE − MSN Instant Messenger
Controladores de audio BluetoothAntes de continuar, es necesario comprobar que el software Bluetooth ha instalado correctamente todos los controladores de audio necesarios; en caso contrario, no podrá utilizar el auricular Bluetooth como dispositivo de audio. Para comprobarlo, vaya al Admi-nistrador de dispositivos [Device Manager] y seleccione Dispositivos de sonido vídeo y juegos [ Sound, video and game controllers] tal y como se muestra a continuación.
En nuestro ejemplo, puede ver que los controladores de audio Bluetooth se han agrega-do a nuestro sistema y que aparecen como “Dispositivo de audio Bluetooth” [Blue-
Conectar el auricular a un equipo de sobremesa o portátil

47
tooth Audio Device] (el nombre y la ubicación pueden variar en su caso). Si el sistema no muestra ningún controlador de audio Bluetooth, consulte el manual de software Bluetooth o póngase en contacto con el proveedor del dispositivo.
Conectar el auricular a un equipo de sobremesa o portátil
48
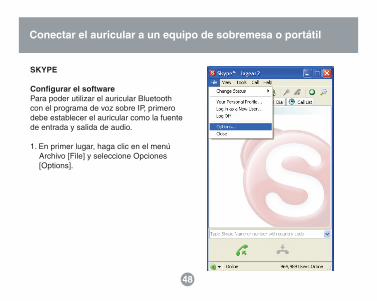
SKYPE
Configurar el softwarePara poder utilizar el auricular Bluetooth con el programa de voz sobre IP, primero debe establecer el auricular como la fuente de entrada y salida de audio.
1. En primer lugar, haga clic en el menú Archivo [File] y seleccione Opciones [Options].
Conectar el auricular a un equipo de sobremesa o portátil

49
2. Ahora seleccione la ficha Manos/Auriculares [Hand/ Headsets]. Como puede ver a continuación, el dispositivo de sonido especificado es el dispositivo predeterminado de Windows (los altavoces del equipo de sobremesa o portátil, lo más probable).
Conectar el auricular a un equipo de sobremesa o portátil

50
Conversación de voz con MSN Messenger
Configurar el softwarePara poder utilizar el auricular Bluetooth con el programa de voz sobre IP, primero debe establecer el auricular como la fuente de entrada y salida de audio.
1. En primer lugar, haga clic en el menú Herramientas [Tools] y seleccione Asistente para ajuste de audio [Audio Tuning Wizard].
Conectar el auricular a un equipo de sobremesa o portátil

51
2. Cuando se le solicite que especifique un dispositivo de audio, asegúrese de seleccionar Audio Bluetooth [Bluetooth Audio] y, a continuación, haga clic en Siguiente [Next]. NOTA: el nombre del dispositivo de audio aquí mostrado es lo que aparece en el Administrador de dispositivos en la sección Dispositivos de sonido vídeo y juegos [ Sound, video and game controllers].
Conectar el auricular a un equipo de sobremesa o portátil

52
3. Cuando el asistente se haya completado, haga clic en Acciones [Actions] > Iniciar una conversación de voz [Start a Voice Conversation] y seleccione la persona que desea invitar a la conversión.SKYPE
Conectar el auricular a un equipo de sobremesa o portátil

53
Si necesita soporte técnico, consulte nuestra Biblioteca de información técnica de IOGEAR (T.I.L., Tech Info Library) en la dirección Web http://www.iogear.com/support para obtener los consejos, los trucos y la solución de problemas más recientes. La biblio-teca TIL se diseñó para proporcionar la información técnica más reciente sobre nuestros productos. Aquí podrá encontrar la mayoría de las respuestas a sus preguntas, por tanto, consulte esta referencia antes de ponerse en contacto en el servicio de soporte técnico.
El servicio de soporte técnico está disponible de lunes a viernes de 08:00 a 17:00 (hora estándar del Pacífico) llamando a nuestro teléfono gratuito 866-9-IOGEAR (866-946-4327). Para llamadas internacionales puede ser necesario utilizar el número 949-453-8782. También puede obtener ayuda enviándonos un correo electrónico a [email protected].
Soporte técnico

54
Garantía
EN NINGÚN CASO, EL PROVEEDOR DIRECTO SERÁ RESPONSABLE DE NINGÚN DAÑO DIRECTO, INDIRECTO, ESPECIAL, INCIDENTAL O CONSECUENTE RESUL-TANTE DEL USO DEL PRODUCTO, DISCO O SU DOCUMENTACIÓN, SUPERIOR AL PRECIO PAGADO POR EL PRODUCTO.
El proveedor directo no representa ni otorga ninguna garantía expresa, implícita o legal respecto al contenido o uso de esta documentación, y renuncia expresamente a su calidad, rendimiento, comerciabilidad o idoneidad para ningún fin determinado.
El proveedor directo también se reserva el derecho a revisar o actualizar el dispositivo o documentación sin tener la obligación de notificar a ningún individuo o entidad tales revisiones o actualizaciones. Si tiene alguna pregunta no dude en ponerse en contacto con su proveedor directo.


Contact Info.Hubble • Irvine, CA 92618 • (P) 949.453.8782 • (F) 949.453.8785 • www.iogear.com


