20
THE B&O MODELER Volume 5, Number 3 May/June 2009 The B&O Modeler 1 May/June 2009 BUILDING SUNSHINE MODEL’S B&O M-27 SERIES
THE B&O MODELER Volume 5, Number 3 May/June 2009
The B&O Modeler 1 May/June 2009
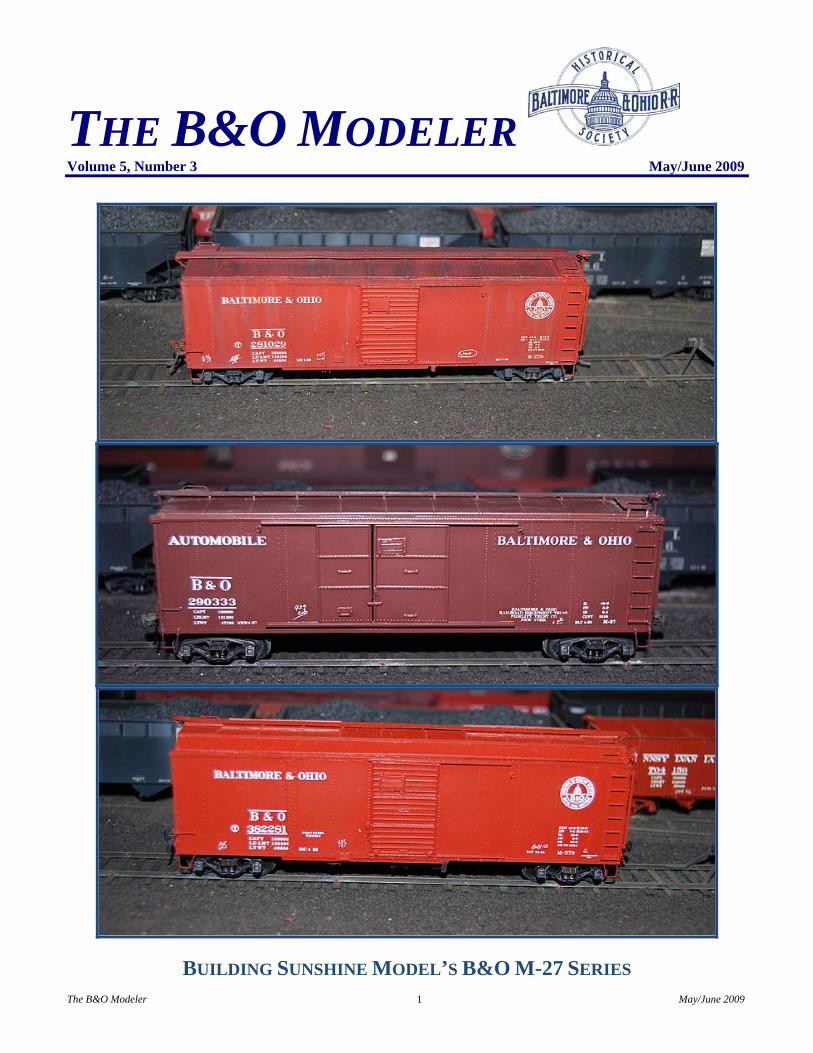
BUILDING SUNSHINE MODEL’S B&O M-27 SERIES
The B&O Modeler 2 May/June 2009
A publication of the B&O Railroad Historical Society (B&ORRHS) for the purpose of disseminating B&O modeling information. Copyright © B&ORRHS – 2005, 2006, 2007, 2008, 2009 – All Rights Reserved. May only be reproduced for personal use. Not for sale other than by the B&ORRHS. Editor – Bruce D. Griffin at [email protected] Associate Editor – Greg LaRocca at [email protected] Associate Editor – Benjamin Hom at [email protected] Did You See It? Editor – Ross Pollock at [email protected] Model Products News Editor – Clark Cone at [email protected] Modeling Committee Chair – Bill Barringer at [email protected] Index Editor - Jim Ford at [email protected] Manuscripts and photographs submitted for publication are considered to be gratis and no reimbursement will be made to the author or the photographer(s) or his/her representative(s). Please contact the Editor with comments and corrections and for submission guidelines. Statements and opinions made are those of the authors and do not necessarily represent those of the B&ORRHS. Cover Photos – Top, B&O M-27d Boxcar, Sunshine Models Kit – William Hanley photo. Middle, B&O M-27 Boxcar, Precision Scale brass model – William Hanley photo. Bottom, B&O M-27f Boxcar, Sunshine Models Kit – William Hanley photo.
AN INVITATION TO JOIN THE B&O RAILROAD HISTORICAL SOCIETY The Baltimore and Ohio Railroad Historical Society is an independent non-profit educational corporation. The Society's purpose is to foster interest, research, preservation, and the distribution of information concerning the B&O. Its membership is spread throughout the United States and numerous foreign countries, and its scope includes all facets of the B&O's history. Currently the Society has over 1600 registered members. Members regularly receive a variety of publications offering news, comments, technical information, and in-depth coverage of the B&O and its related companies. Since 1979, the Society has published a quarterly magazine, The Sentinel, dedicated to the publication of articles and news items of historical significance. Other Society publications include monographs, calendars, equipment rosters, and reprints of original B&O source material. Their
purpose is to make otherwise unobtainable data available to the membership at reasonable cost. Membership in the Society is a vote of support and makes all of the Society's work possible. It provides those interested in the B&O with a legitimate, respected voice in the railroad and historical communities. By working together, B&O fans are able to accomplish much more than by individual efforts. No matter how diverse your interests or how arcane your specialty, others share your fascination with America's most historic railroad. We invite your participation. Several classes of annual memberships are available, Regular memberships are only $35.00. If you would like to join, visit the website, http://borhs.org/Membership/membership.html to fill out a membership application, print a copy and mail it to:
B&ORRHS ATTN: Membership P.O. Box 24068 Baltimore, MD 21227-0568
FROM THE EDITOR The Shelves are Bare This weekend I set aside time to catch up on future issues of the Modeler. But, I found the shelves were bare, we don't have any more contributions to edit for the magazine. We have a
few minor pieces, but nothing of feature length. It appears that no one is building models, or at least they are not willing to write about them. One or two folks have been promising articles, but have not had time to finish them. Offers
The B&O Modeler 3 May/June 2009
include those working on both unique and, what one might consider, mundane projects. Others are probably working on models and do not plan to share them. Ben Hom, our modeling friend who often bailed me out in the past with an article, is away serving our country in the Navy. This all leads me to believe that there may not be too many more issues. Greg LaRocca, the Associate Editor and I will both take advantage of the free time and build more models. If they are B&O models, we will surely write about them. Maybe we can scrape together a few more
issues, but we won't learn anything from the effort. We only learn from other people’s articles. If you are building a B&O model, now is a good time to consider sharing your efforts with the rest of us. Maybe we have run the natural course and there are not too many more topics to write about. Maybe we will publish on a more limited schedule. Either way, Greg and I will have some extra modeling time, but we'll miss learning from our fellow B&O modelers.
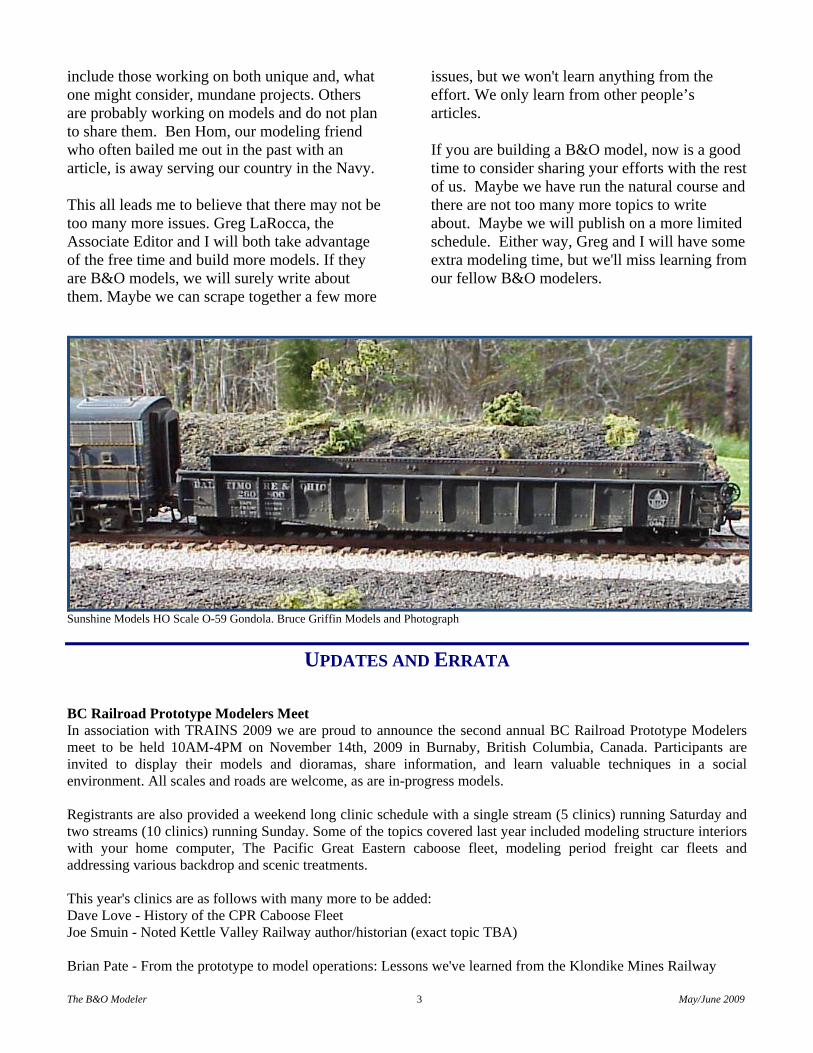
Sunshine Models HO Scale O-59 Gondola. Bruce Griffin Models and Photograph
UPDATES AND ERRATA BC Railroad Prototype Modelers Meet In association with TRAINS 2009 we are proud to announce the second annual BC Railroad Prototype Modelers meet to be held 10AM-4PM on November 14th, 2009 in Burnaby, British Columbia, Canada. Participants are invited to display their models and dioramas, share information, and learn valuable techniques in a social environment. All scales and roads are welcome, as are in-progress models. Registrants are also provided a weekend long clinic schedule with a single stream (5 clinics) running Saturday and two streams (10 clinics) running Sunday. Some of the topics covered last year included modeling structure interiors with your home computer, The Pacific Great Eastern caboose fleet, modeling period freight car fleets and addressing various backdrop and scenic treatments. This year's clinics are as follows with many more to be added: Dave Love - History of the CPR Caboose Fleet Joe Smuin - Noted Kettle Valley Railway author/historian (exact topic TBA) Brian Pate - From the prototype to model operations: Lessons we've learned from the Klondike Mines Railway

Marc Simpson - Mining and Smelting Railways of British Columbia Frank Valoczy - Imperial Oil Tank Cars Beyond the RPM meet and Clinic line-up, TRAINS 2009 has a lot to offer. The exhibition runs from the evening of Friday, November 13th through to Monday, November 16th. With Operating sessions, Public show, Escorted layout tour, Banquet and Prototype tour you can be assured a fun and informative weekend. Cost for the weekend less fees for banquet, layout and prototype tours is $20 CDN. Operating sessions are free but first come first serve. Family members can register for $7 CDN, Escorted Layout tour is $25 CDN, Banquet is $30 CDN, Proto-tour is $5 CDN. For more information regarding Trains 2009 see www.bctrains.org TRAINS 2009 is located at: Cameron Centre (across from Lougheed Mall), 9523 Cameron Street, Burnaby, BC Canada. Prototype Rails 2010 Save these dates, January 7-10, 2010. This year’s meet begins with a kickoff diner at a local restaurant, followed by clinics at the hotel, on Thursday, January 7. The main event begins Friday, January 8, with model displays opening and clinics beginning at 10:00 am and running until 11:00 pm and continuing on Saturday, January 9, running from 9:00 am until 10:00 pm, at which time panel sessions will occur. The location will be: The Hilton Hotel, 1550 N. Atlantic Ave. [highway A1a ], Cocoa Beach, FL, 1-800-526-2609 or 321-799-0003. $99 Room Rate. Refer to Prototype Rails. Preregistration $35, payable to Prototype Rails, to Marty Megregian, 480 Gails Way, Merritt Island, FL 32953. Southeastern Railroad Prototype Modeler's Meet The second Southeastern Railroad Prototype Modeler's Meet will be held in Greensboro, North Carolina on September 11 and 12, 2009 (the weekend after Labor Day) at the restored 1926 Southern Railway Depot at 243 South Church Street. In addition to clinics by Jim Six, Bob Harpe and other top notch modelers we plan to have ongoing "hands-on" demonstrations by several experts: Chris Thompson, Tony Sissons and others will be demonstrating different weathering techniques and if you bring a model they'll weather it for you before your eyes! Jim Six will be Photoshopping digital images on his laptop to convert them into decals or signs for your layout. Rick Bell will be helping modeler's do straightforward decoder installations to "get their feet wet" and Russ Goodwin will be building the new Southern TopGon model. We think our lineup of clinics, demonstrations and two slide shows give you a terrific modeling weekend. Most of us slow down our modeling during the summer months when we've got the lawn, the pool, vacations and other commitments. Get your new modeling year off to a quick start and join us in Greensboro on September 11 and 12. A two day "Exhibitor" pass is $25 (which includes an 8 foot table to display your models). Single day admissions (that includes all clinics, demos and the slide show on that day – but no table) are $10 per day. Here is our clinic and slide show lineup: Friday Afternoon 2:00 – 3:00 pm Jim Six - Photoshopping Images for Decals and Signs 3:00 – 4:00 pm Rick Bell - Custom installation of decoders 4:00 – 5:00 pm Russ Goodwin - Building an N&W Covered Hopper Fleet
The B&O Modeler 4 May/June 2009
The B&O Modeler 5 May/June 2009
Friday Evening 7:00 – 9:00 pm Bob Graham - Slideshow Saturday Morning 9:00 – 10:00 am Russ Goodwin - Building the NS TopGon 10:00 – 11:00 am Jim Six - Building a Layout to the Prototype 11:00 – 12:00 pm Kevin von der Lippe - An Historian's Approach to Turning Research into a Layout Plan 2:00 – 3:00 pm Bob Harpe - Southern GP-30 Modeling 3:00 – 4:00 pm Ken Rickman - Converting a Bachmann Spectrum 2-8-0 into a SR Ks-3 Saturday Evening 7:00 pm – 9:00 pm Slideshow - Brian Rackley – BNSF Before the Merger. Ongoing Demonstrations all day Friday and Saturday: Chris Thompson and others - Several Variations on Weathering Jim Six - Using Photoshop to Create Decals and Signs Rick Bell - Decoder Installation Russ Goodwin - Building the NS topgon We hope you'll join us in Greensboro on September 11 and 12. For more information, please e-mail or call Tony Sissons ([email protected]) or me.
The B&O Modeler 6 May/June 2009
BUILDING SUNSHINE MODELS B&O M-27 SERIES BY: WILLIAM HANLEY
PHOTOS BY AUTHORS UNLESS OTHERWISE SPECIFIED.
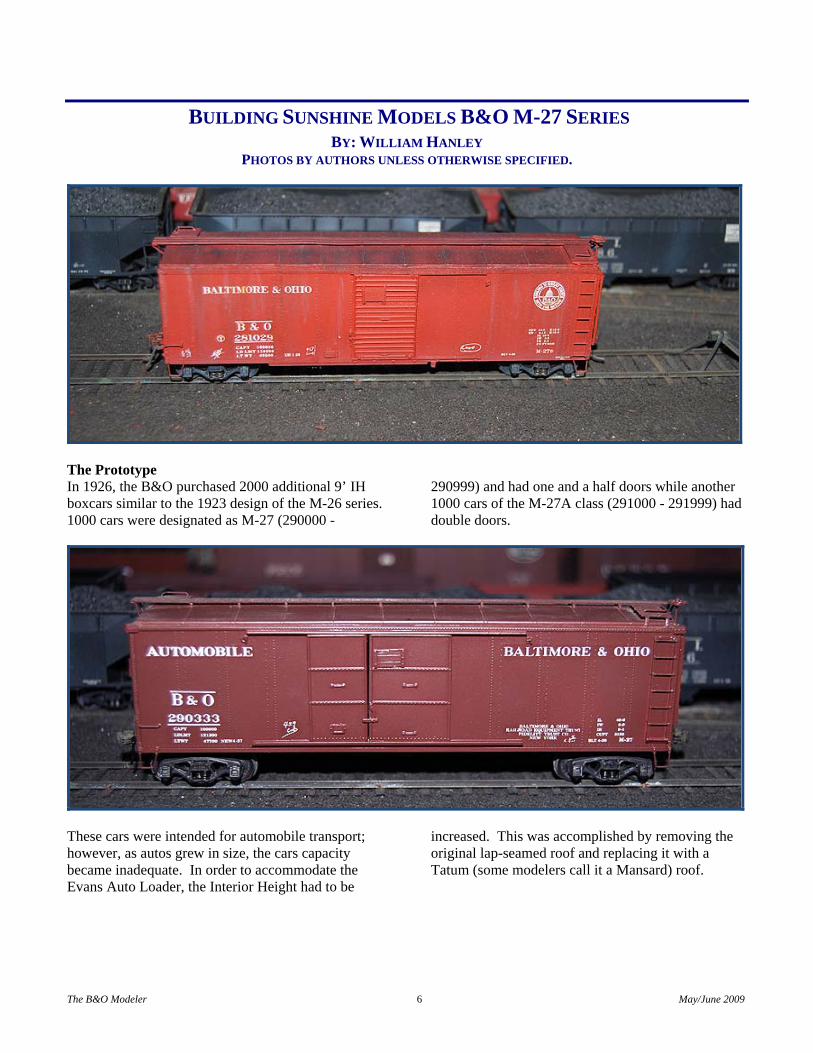
The Prototype In 1926, the B&O purchased 2000 additional 9’ IH boxcars similar to the 1923 design of the M-26 series. 1000 cars were designated as M-27 (290000 -
290999) and had one and a half doors while another 1000 cars of the M-27A class (291000 - 291999) had double doors.
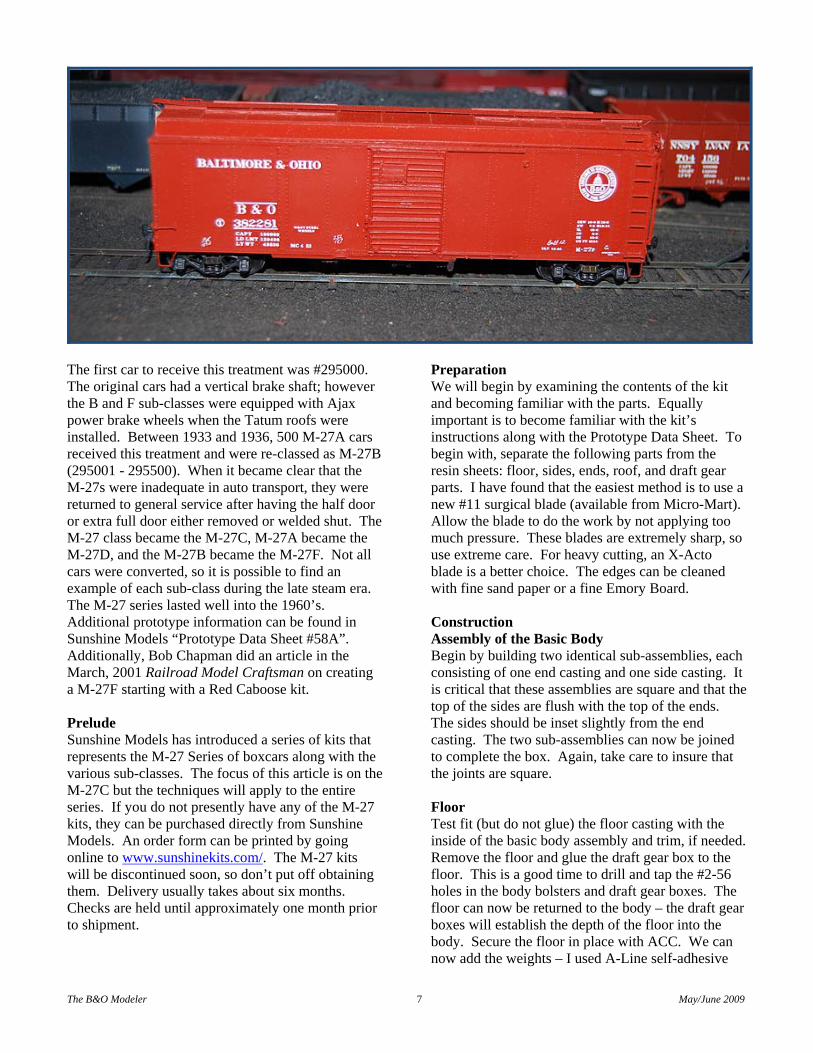
These cars were intended for automobile transport; however, as autos grew in size, the cars capacity became inadequate. In order to accommodate the Evans Auto Loader, the Interior Height had to be
increased. This was accomplished by removing the original lap-seamed roof and replacing it with a Tatum (some modelers call it a Mansard) roof.
The B&O Modeler 7 May/June 2009
The first car to receive this treatment was #295000. The original cars had a vertical brake shaft; however the B and F sub-classes were equipped with Ajax power brake wheels when the Tatum roofs were installed. Between 1933 and 1936, 500 M-27A cars received this treatment and were re-classed as M-27B (295001 - 295500). When it became clear that the M-27s were inadequate in auto transport, they were returned to general service after having the half door or extra full door either removed or welded shut. The M-27 class became the M-27C, M-27A became the M-27D, and the M-27B became the M-27F. Not all cars were converted, so it is possible to find an example of each sub-class during the late steam era. The M-27 series lasted well into the 1960’s. Additional prototype information can be found in Sunshine Models “Prototype Data Sheet #58A”. Additionally, Bob Chapman did an article in the March, 2001 Railroad Model Craftsman on creating a M-27F starting with a Red Caboose kit. Prelude Sunshine Models has introduced a series of kits that represents the M-27 Series of boxcars along with the various sub-classes. The focus of this article is on the M-27C but the techniques will apply to the entire series. If you do not presently have any of the M-27 kits, they can be purchased directly from Sunshine Models. An order form can be printed by going online to www.sunshinekits.com/. The M-27 kits will be discontinued soon, so don’t put off obtaining them. Delivery usually takes about six months. Checks are held until approximately one month prior to shipment.
Preparation We will begin by examining the contents of the kit and becoming familiar with the parts. Equally important is to become familiar with the kit’s instructions along with the Prototype Data Sheet. To begin with, separate the following parts from the resin sheets: floor, sides, ends, roof, and draft gear parts. I have found that the easiest method is to use a new #11 surgical blade (available from Micro-Mart). Allow the blade to do the work by not applying too much pressure. These blades are extremely sharp, so use extreme care. For heavy cutting, an X-Acto blade is a better choice. The edges can be cleaned with fine sand paper or a fine Emory Board. Construction Assembly of the Basic Body Begin by building two identical sub-assemblies, each consisting of one end casting and one side casting. It is critical that these assemblies are square and that the top of the sides are flush with the top of the ends. The sides should be inset slightly from the end casting. The two sub-assemblies can now be joined to complete the box. Again, take care to insure that the joints are square. Floor Test fit (but do not glue) the floor casting with the inside of the basic body assembly and trim, if needed. Remove the floor and glue the draft gear box to the floor. This is a good time to drill and tap the #2-56 holes in the body bolsters and draft gear boxes. The floor can now be returned to the body – the draft gear boxes will establish the depth of the floor into the body. Secure the floor in place with ACC. We can now add the weights – I used A-Line self-adhesive
The B&O Modeler 8 May/June 2009
lead weights with 1 oz. above each body bolster. You may want to install the couplers (Kadee #158 Scale Couplers). The draft gear covers are held in place with #2-56 screws. You can also attach the trucks (Kadee #515) with #2-56 screws. We’re starting to see the makings of a boxcar! Roof Place the roof casting on top of the carbody taking care to precisely center the roof. It is critical that the car sides are perfectly straight. If they are not, it is
probably because the ends and sides were not square. If this is the case, you can remedy the curved sides by fabricating spacers to force the sides straight. When satisfied, ACC the roof to the sides and ends. While we’re working on the roof, now is a good time to attach the running board. Remove it from the resin sheet along with the laterals. Clean the edges with an Emory Board and drill #79 holes in the laterals for the corner grab irons. We’ll add these in a later section.
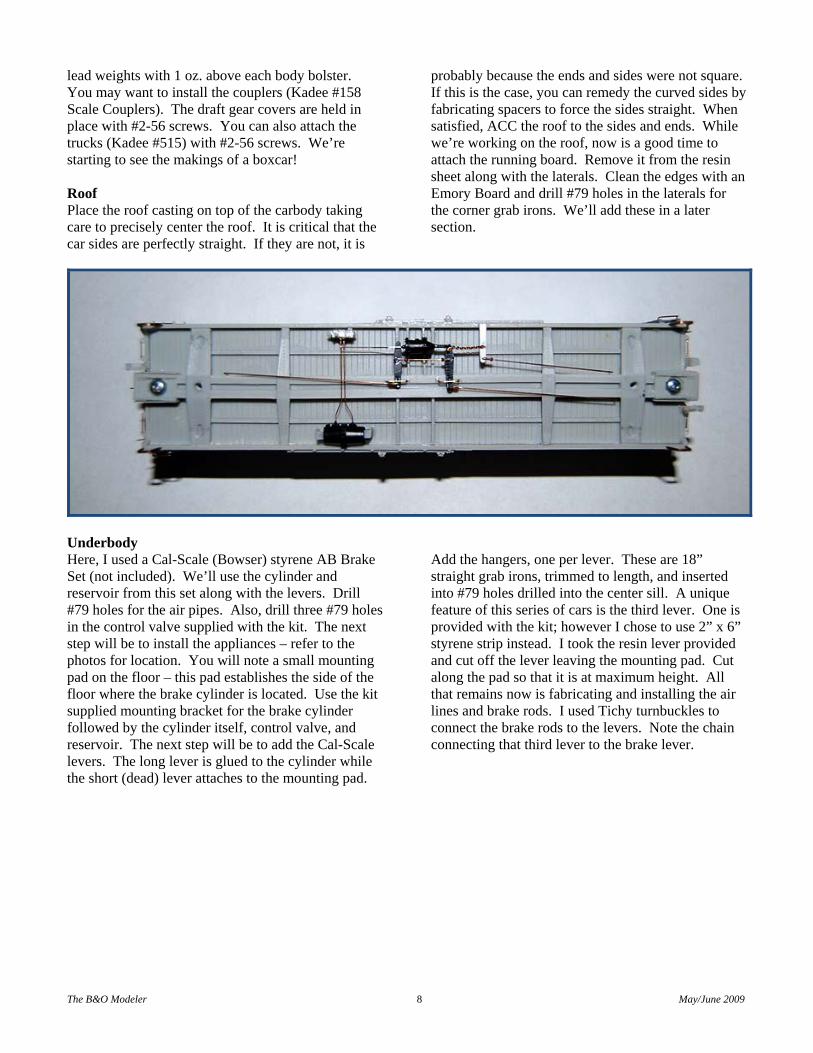
Underbody Here, I used a Cal-Scale (Bowser) styrene AB Brake Set (not included). We’ll use the cylinder and reservoir from this set along with the levers. Drill #79 holes for the air pipes. Also, drill three #79 holes in the control valve supplied with the kit. The next step will be to install the appliances – refer to the photos for location. You will note a small mounting pad on the floor – this pad establishes the side of the floor where the brake cylinder is located. Use the kit supplied mounting bracket for the brake cylinder followed by the cylinder itself, control valve, and reservoir. The next step will be to add the Cal-Scale levers. The long lever is glued to the cylinder while the short (dead) lever attaches to the mounting pad.
Add the hangers, one per lever. These are 18” straight grab irons, trimmed to length, and inserted into #79 holes drilled into the center sill. A unique feature of this series of cars is the third lever. One is provided with the kit; however I chose to use 2” x 6” styrene strip instead. I took the resin lever provided and cut off the lever leaving the mounting pad. Cut along the pad so that it is at maximum height. All that remains now is fabricating and installing the air lines and brake rods. I used Tichy turnbuckles to connect the brake rods to the levers. Note the chain connecting that third lever to the brake lever.
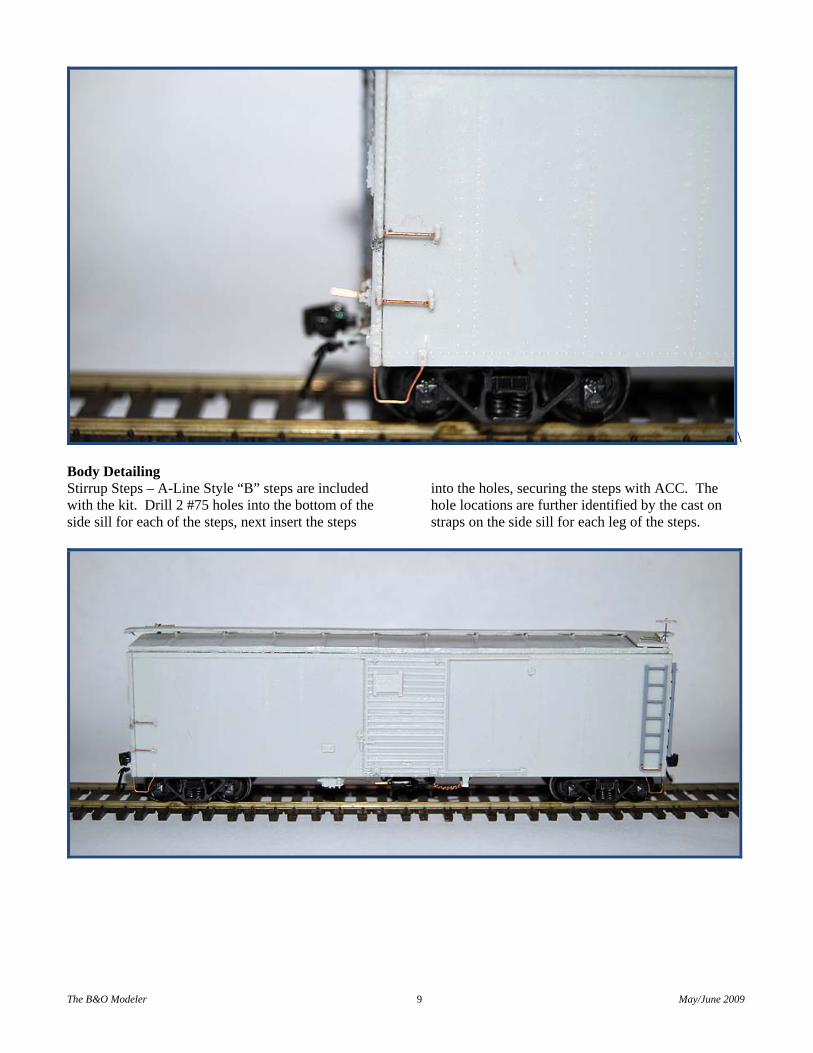
\ Body Detailing Stirrup Steps – A-Line Style “B” steps are included with the kit. Drill 2 #75 holes into the bottom of the side sill for each of the steps, next insert the steps
into the holes, securing the steps with ACC. The hole locations are further identified by the cast on straps on the side sill for each leg of the steps.
The B&O Modeler 9 May/June 2009
The B&O Modeler 10 May/June 2009
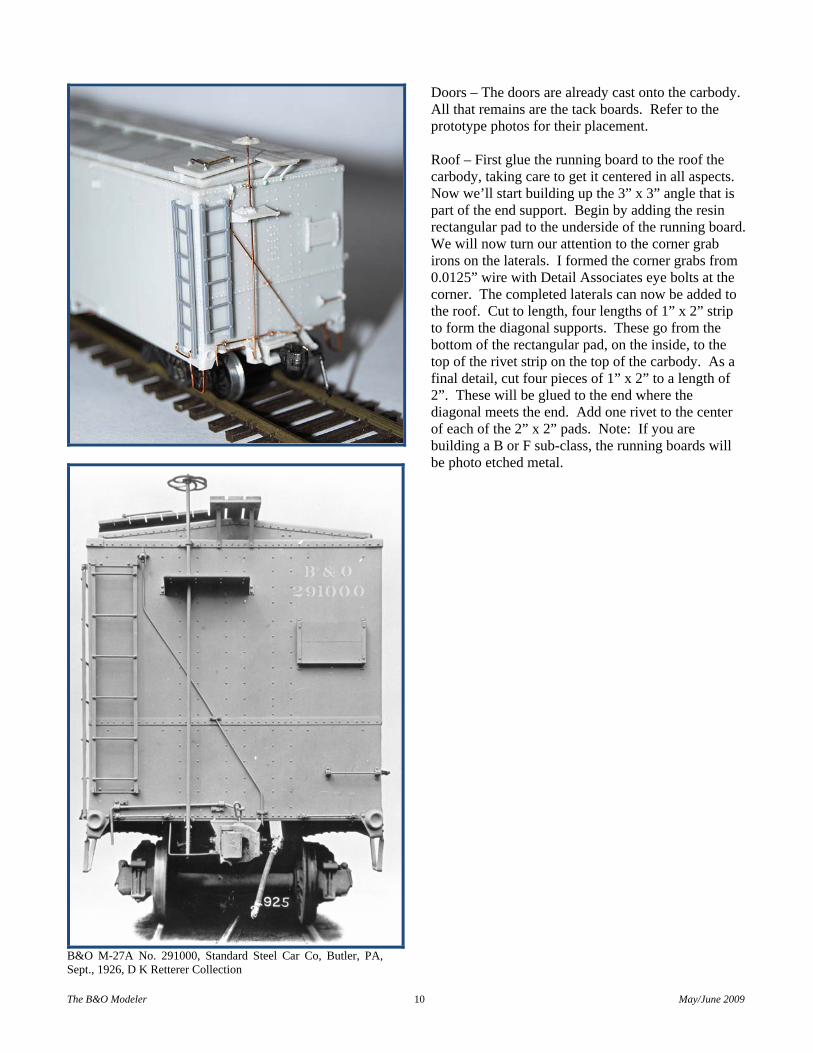
B&O M-27A No. 291000, Standard Steel Car Co, Butler, PA, Sept., 1926, D K Retterer Collection
Doors – The doors are already cast onto the carbody. All that remains are the tack boards. Refer to the prototype photos for their placement. Roof – First glue the running board to the roof the carbody, taking care to get it centered in all aspects. Now we’ll start building up the 3” x 3” angle that is part of the end support. Begin by adding the resin rectangular pad to the underside of the running board. We will now turn our attention to the corner grab irons on the laterals. I formed the corner grabs from 0.0125” wire with Detail Associates eye bolts at the corner. The completed laterals can now be added to the roof. Cut to length, four lengths of 1” x 2” strip to form the diagonal supports. These go from the bottom of the rectangular pad, on the inside, to the top of the rivet strip on the top of the carbody. As a final detail, cut four pieces of 1” x 2” to a length of 2”. These will be glued to the end where the diagonal meets the end. Add one rivet to the center of each of the 2” x 2” pads. Note: If you are building a B or F sub-class, the running boards will be photo etched metal.
The B&O Modeler 11 May/June 2009
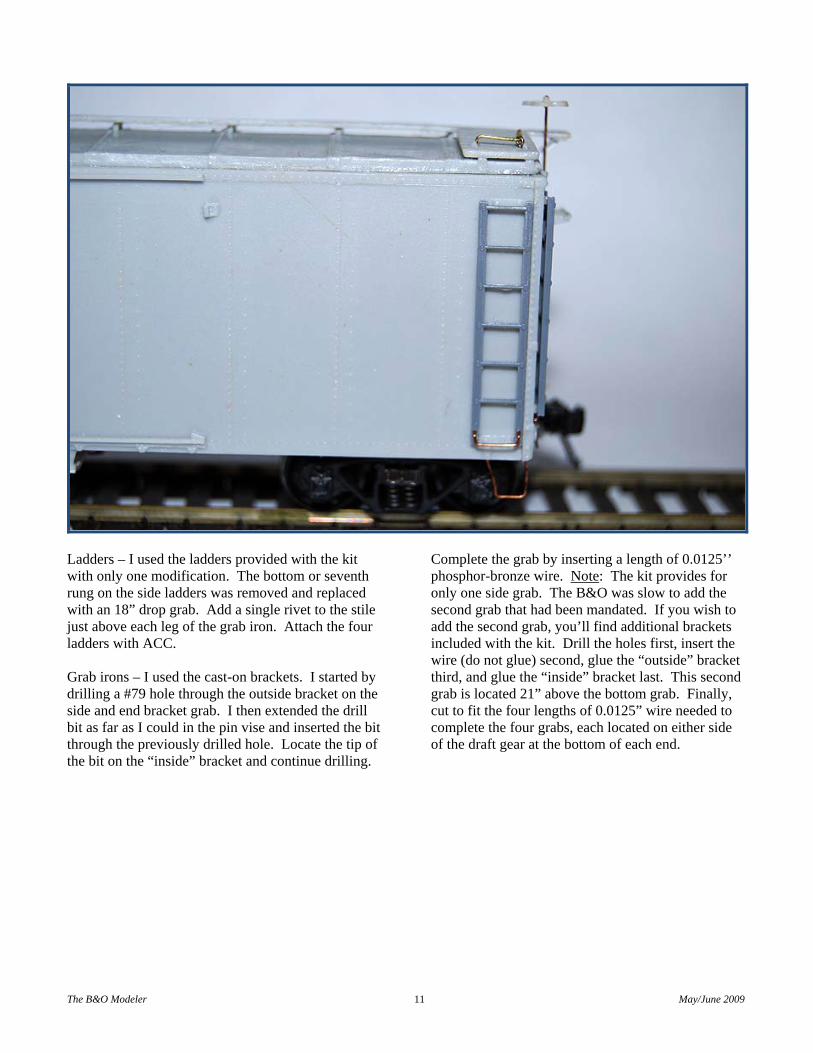
Ladders – I used the ladders provided with the kit with only one modification. The bottom or seventh rung on the side ladders was removed and replaced with an 18” drop grab. Add a single rivet to the stile just above each leg of the grab iron. Attach the four ladders with ACC. Grab irons – I used the cast-on brackets. I started by drilling a #79 hole through the outside bracket on the side and end bracket grab. I then extended the drill bit as far as I could in the pin vise and inserted the bit through the previously drilled hole. Locate the tip of the bit on the “inside” bracket and continue drilling.
Complete the grab by inserting a length of 0.0125’’ phosphor-bronze wire. Note: The kit provides for only one side grab. The B&O was slow to add the second grab that had been mandated. If you wish to add the second grab, you’ll find additional brackets included with the kit. Drill the holes first, insert the wire (do not glue) second, glue the “outside” bracket third, and glue the “inside” bracket last. This second grab is located 21” above the bottom grab. Finally, cut to fit the four lengths of 0.0125” wire needed to complete the four grabs, each located on either side of the draft gear at the bottom of each end.

The B&O Modeler 12 May/June 2009
B&O M-27F No. 382258, Kansas City, MO, circa 1953, George W. Sisk - photograph, Bob's Photos.
The B&O Modeler 13 May/June 2009
“B” end detailing – We’ll begin by adding the retainer valve. I used the resin casting from the kit. It gets placed below the rivet strip at the top of the carbody and just to the right of the ladder. The retainer line is formed from 0.010” wire. Refer to photos for the routing of this pipe. Do not attach it at this time. Our attention now turns to the brakemen’s step. Drill a #78 hole in the step for the brake shaft. Note the two brackets that hold the retainer pipe to the carbody. These are represented by bending 0.010” wire to the shape of a “U”. Drill a #79 hole on each side of the retainer pipe, insert the bracket, and secure with ACC. The brake shaft is 0.0125” wire. Glue the brake shaft support to the bottom of the car. Note: there is an eye bolt attached to the end
above the brakeman’s step. On the B and F class cars, omit this step and use the Tichy Ajax brake wheel and housing instead. Final details – We can add the tack boards to each end. After that, I fabricated the cut levers from 0.0125” wire and secured them to the car using Detail Associates lift rings. Note how the cut lever wraps around the brake shaft. Finally, I added the air hoses. Locate and clean the provided air hose brackets. Glue them to the right of the draft gear box. I then drilled the brackets with #65 bit to receive the air hoses. Save the air hoses (Kadee) until after the car has been painted.
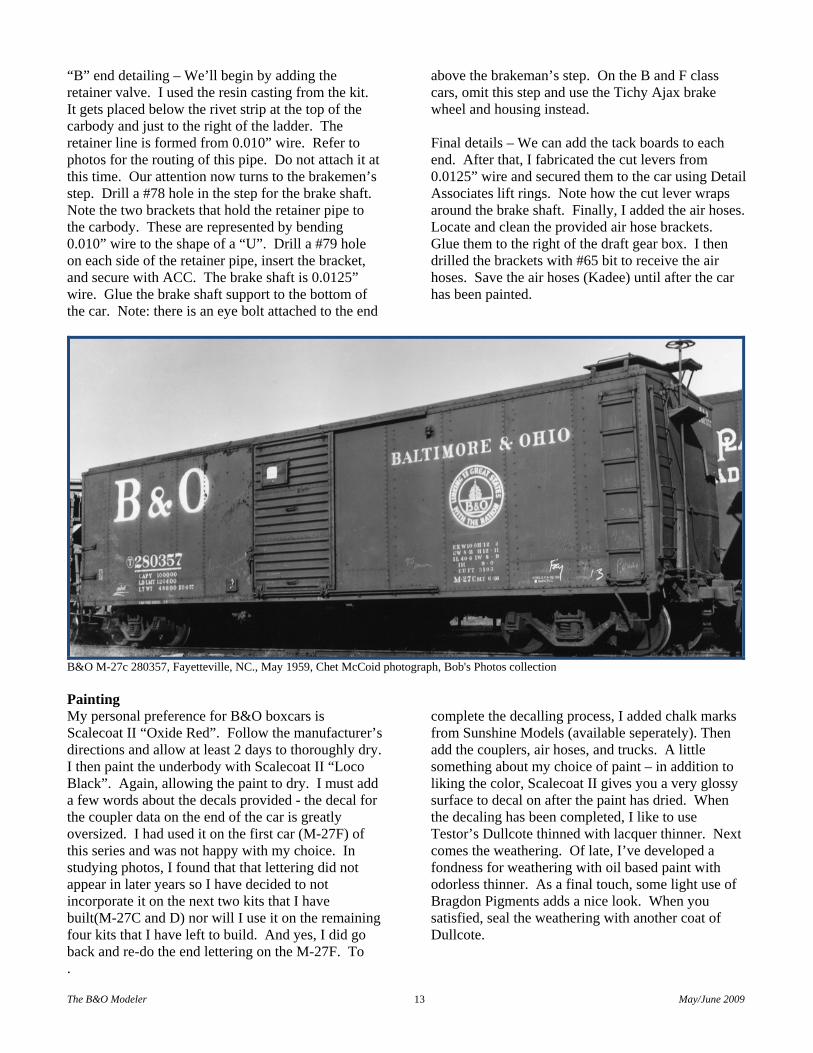
B&O M-27c 280357, Fayetteville, NC., May 1959, Chet McCoid photograph, Bob's Photos collection Painting My personal preference for B&O boxcars is Scalecoat II “Oxide Red”. Follow the manufacturer’s directions and allow at least 2 days to thoroughly dry. I then paint the underbody with Scalecoat II “Loco Black”. Again, allowing the paint to dry. I must add a few words about the decals provided - the decal for the coupler data on the end of the car is greatly oversized. I had used it on the first car (M-27F) of this series and was not happy with my choice. In studying photos, I found that that lettering did not appear in later years so I have decided to not incorporate it on the next two kits that I have built(M-27C and D) nor will I use it on the remaining four kits that I have left to build. And yes, I did go back and re-do the end lettering on the M-27F. To
complete the decalling process, I added chalk marks from Sunshine Models (available seperately). Then add the couplers, air hoses, and trucks. A little something about my choice of paint – in addition to liking the color, Scalecoat II gives you a very glossy surface to decal on after the paint has dried. When the decaling has been completed, I like to use Testor’s Dullcote thinned with lacquer thinner. Next comes the weathering. Of late, I’ve developed a fondness for weathering with oil based paint with odorless thinner. As a final touch, some light use of Bragdon Pigments adds a nice look. When you satisfied, seal the weathering with another coat of Dullcote.
.
The B&O Modeler 14 May/June 2009
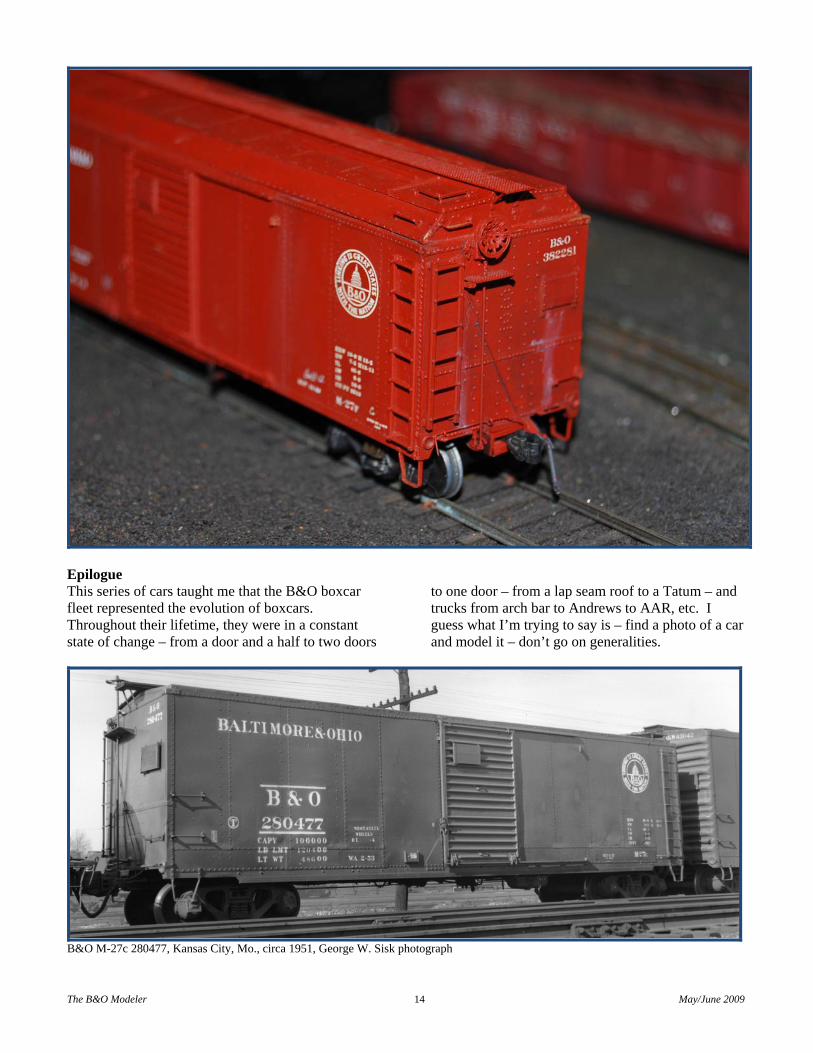
Epilogue This series of cars taught me that the B&O boxcar fleet represented the evolution of boxcars. Throughout their lifetime, they were in a constant state of change – from a door and a half to two doors
to one door – from a lap seam roof to a Tatum – and trucks from arch bar to Andrews to AAR, etc. I guess what I’m trying to say is – find a photo of a car and model it – don’t go on generalities.
B&O M-27c 280477, Kansas City, Mo., circa 1951, George W. Sisk photograph
Materials and Walthers Stock Numbers A-Line 116-13000 Lead Weights 116-28219 Chain – 40 links per inch Bowser (Cal-Scale) 190-283 AB Brake Set Creative Model Associates 293-1101 0.010” Phosphor Bronze Wire 293-1106 0.0125” Phosphor Bronze Wire Detail Associates 229-2202 Eye Bolts (lift rings) Evergreen 269-8102 1” x 2” Strip Styrene Kadee 360-158 Scale Couplers 360-515 Trucks Scalecoat II 640-20022 Oxide Red 640-20012 Loco Black Tichy 293-2001 18” Drop Grab Irons 293-3013 Westinghouse Air Brake Set (B and F sub-class) 293-2004 Styrene Turnbuckles Your Choice An old plastic car as a source of donor rivets
The B&O Modeler 15 May/June 2009
The B&O Modeler 16 May/June 2009
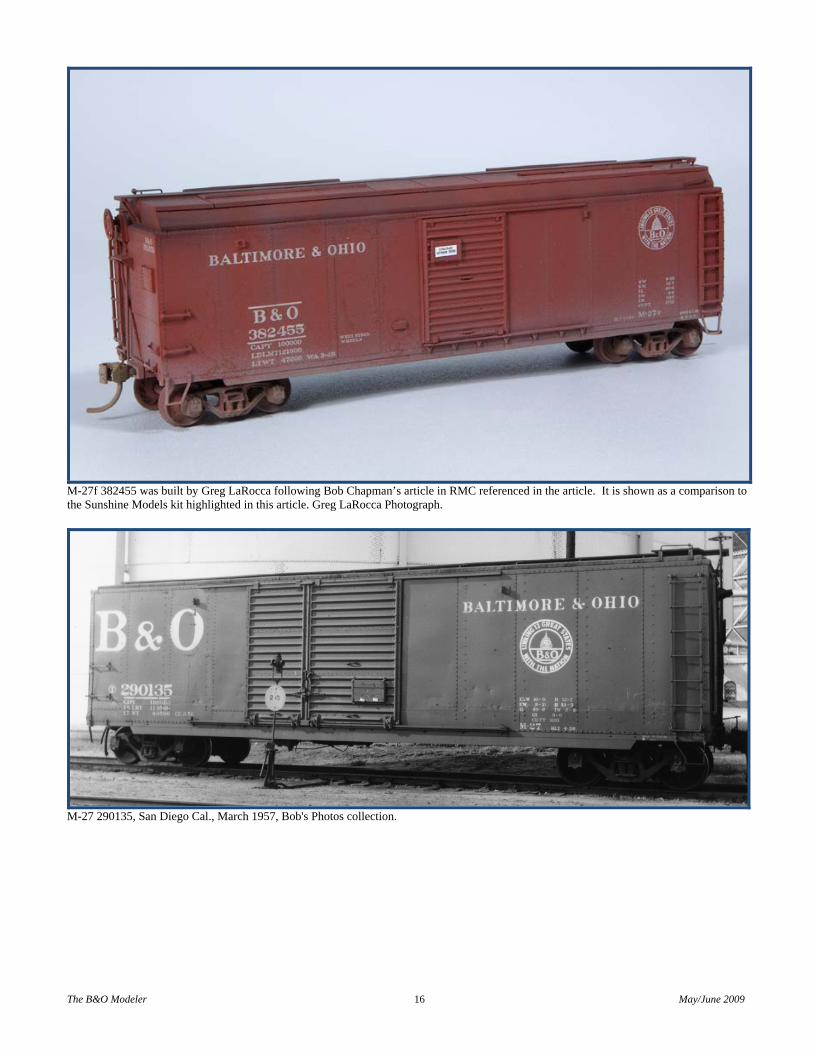
M-27f 382455 was built by Greg LaRocca following Bob Chapman’s article in RMC referenced in the article. It is shown as a comparison to the Sunshine Models kit highlighted in this article. Greg LaRocca Photograph.
M-27 290135, San Diego Cal., March 1957, Bob's Photos collection.
The B&O Modeler 17 May/June 2009
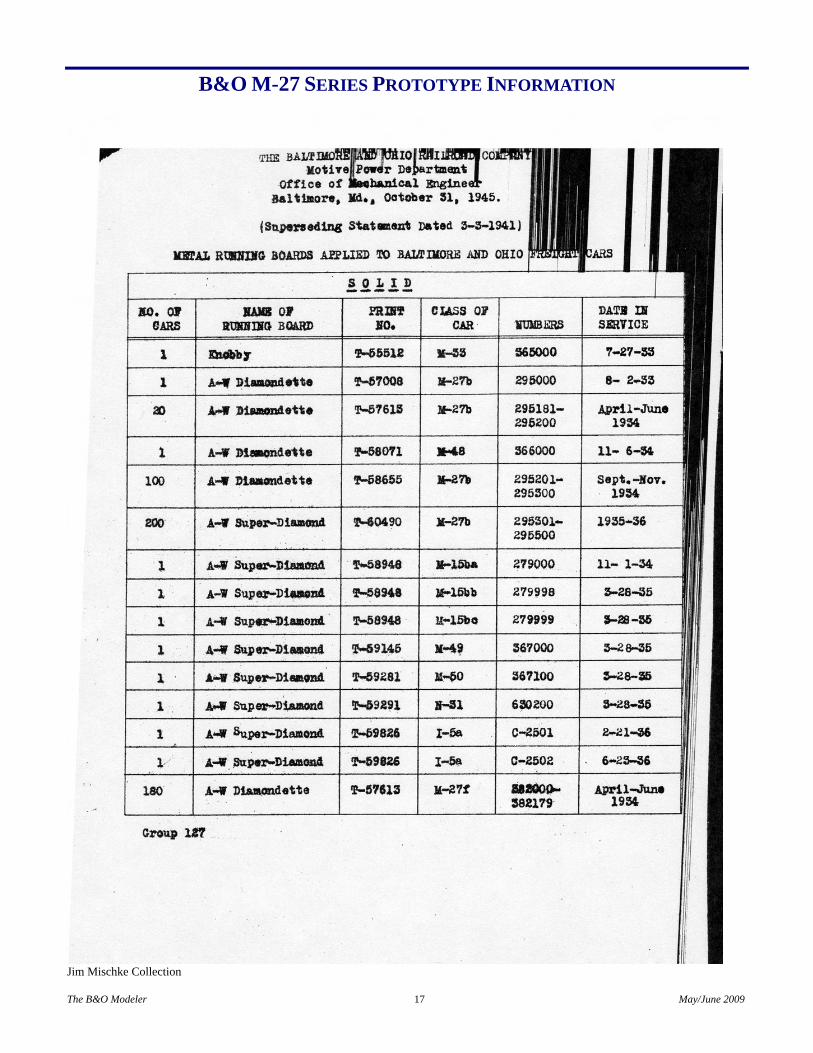
B&O M-27 SERIES PROTOTYPE INFORMATION
Jim Mischke Collection
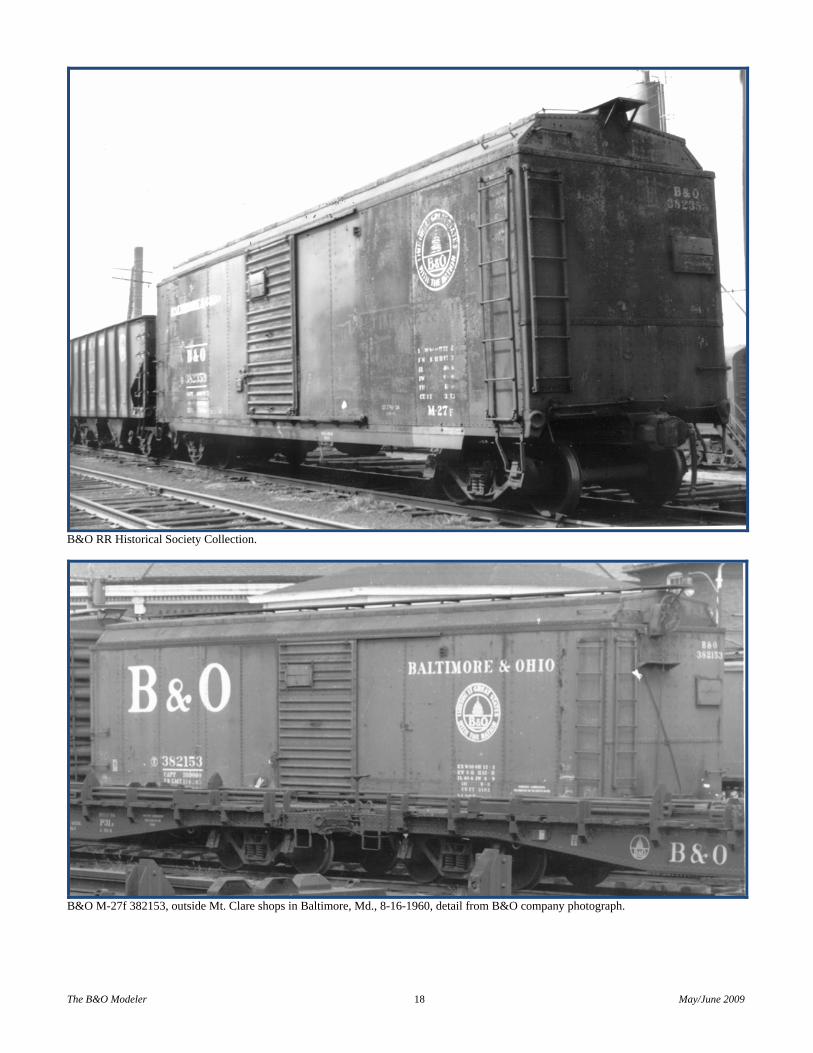
B&O RR Historical Society Collection.
B&O M-27f 382153, outside Mt. Clare shops in Baltimore, Md., 8-16-1960, detail from B&O company photograph.
The B&O Modeler 18 May/June 2009
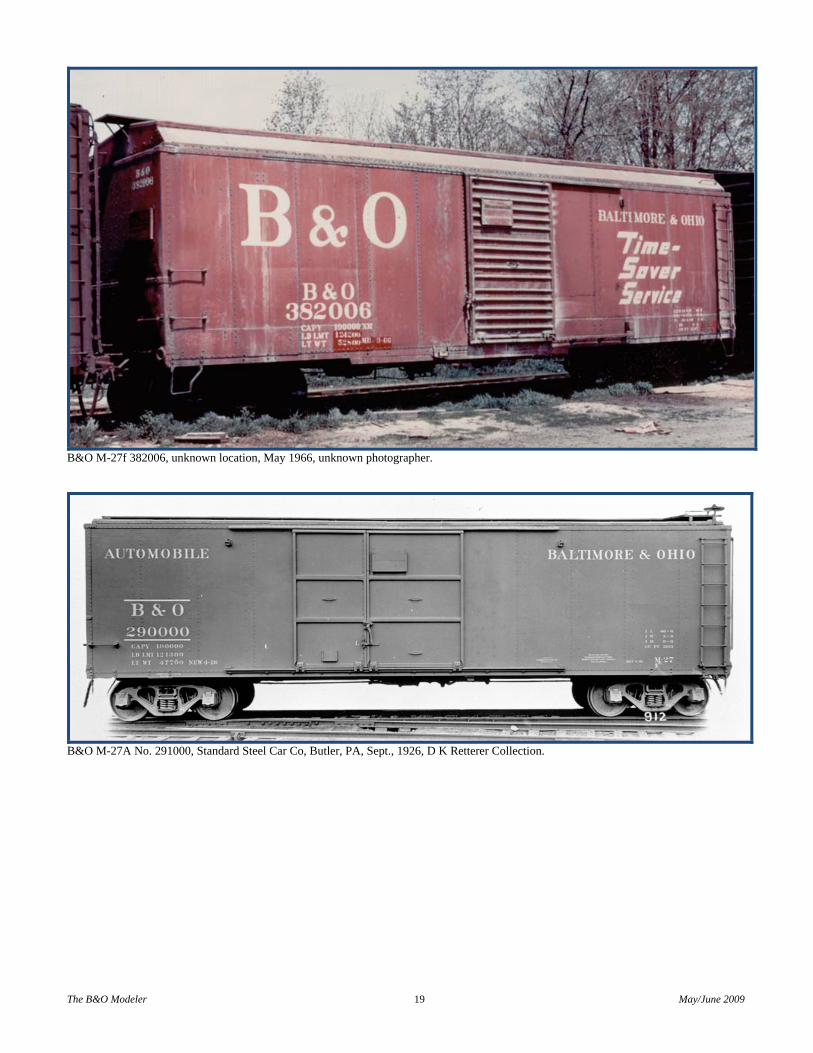
B&O M-27f 382006, unknown location, May 1966, unknown photographer.
B&O M-27A No. 291000, Standard Steel Car Co, Butler, PA, Sept., 1926, D K Retterer Collection.
The B&O Modeler 19 May/June 2009
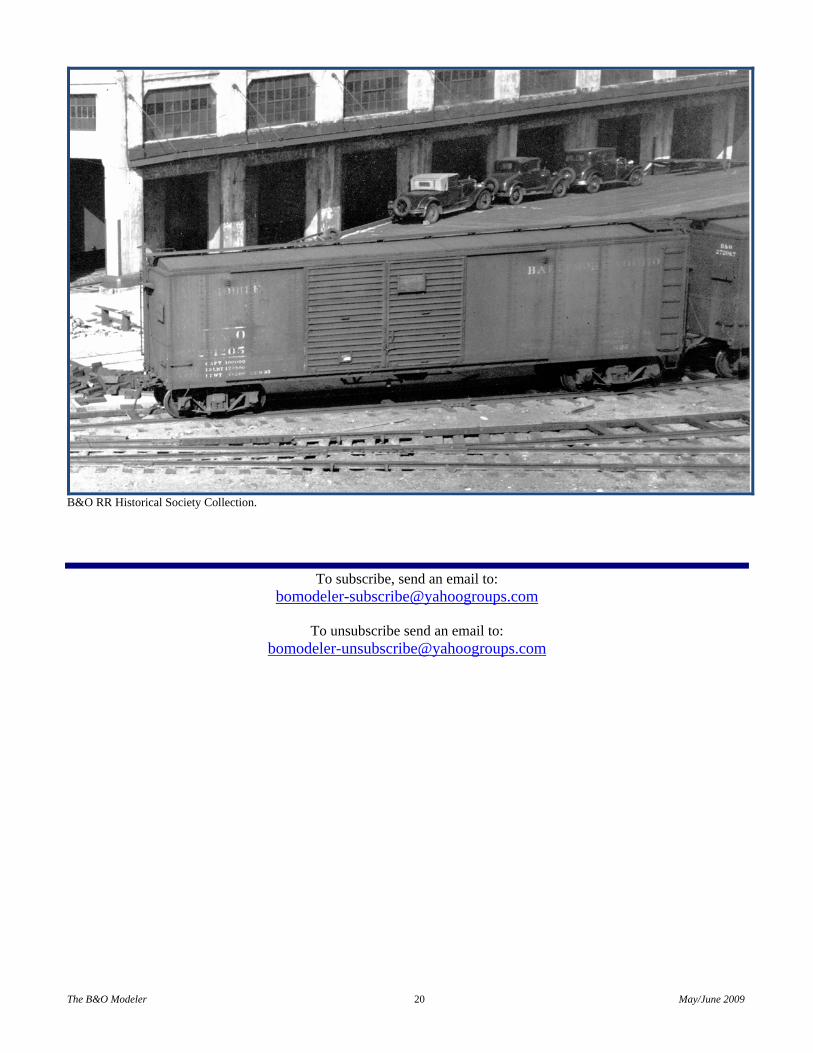
B&O RR Historical Society Collection.
To subscribe, send an email to: [email protected]
To unsubscribe send an email to:
The B&O Modeler 20 May/June 2009


