Date post: | 31-Jan-2018 |
Category: |
Documents |
Upload: | nguyenhuong |
View: | 221 times |
Download: | 2 times |
Bokeh Effect in 3ds Max
In this beginner‟s tutorial we‟re going to create a bokeh effect in 3ds Max. The term bokeh is familiar
from photography. When depth of field is shallow, part of the photo is blurred. Bokeh refers to that
blur or the quality of it. There are a few different methods of creating shallow depth of field in 3ds
Max, but this time we concentrate on the „Depth of Field / Bokeh‟ camera shader which is a new
feature in 3ds Max 2011. The Bokeh shader gives us nice tools to control the quality and the look of
the out of focus areas.
Step 1 Mental Ray Renderer
We‟re going to render the bokeh effect with Mental Ray. By default 3ds Max uses the Scanline
renderer so we have to change that. Change the renderer to Mental Ray ( Rendering > Render Setup…
> Common tab > Assign Renderer > Production > mental ray Renderer ).
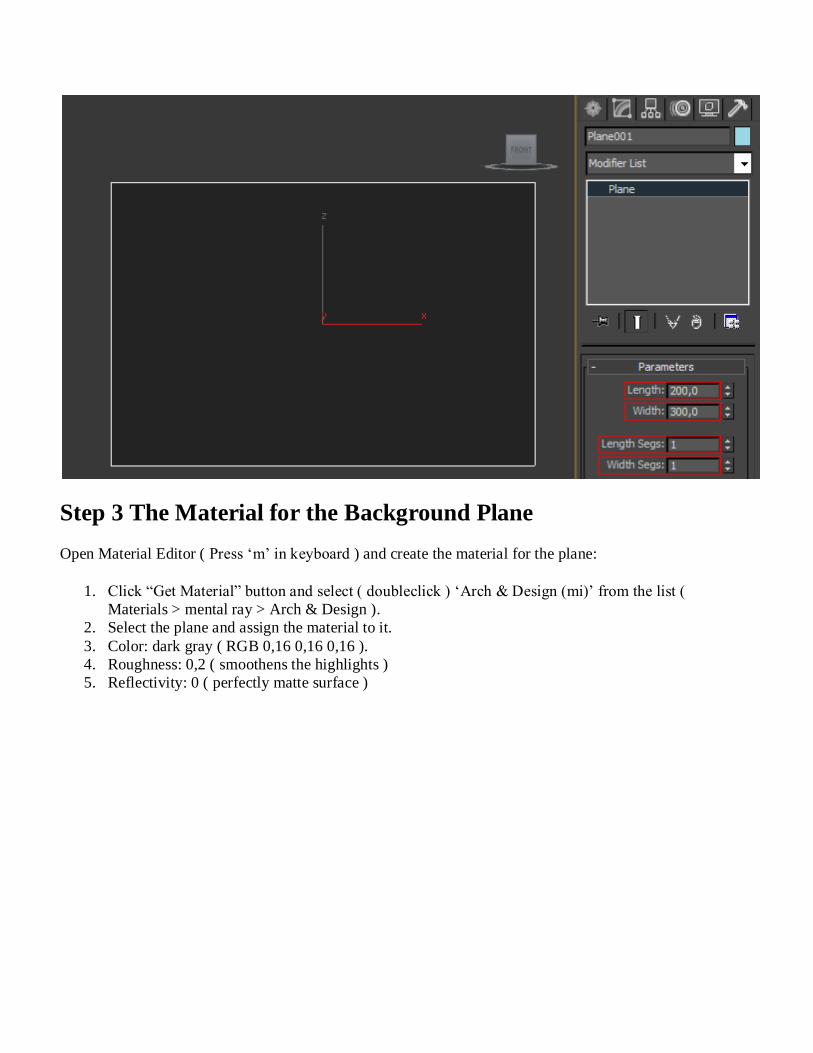
Step 2 The Background
We‟re going to create a simple 3d scene and finally add the bokeh effect to it. If you are just interested
about the bokeh effect itself, go ahead and skip to step 13.
We‟re going to create a simple scene with some text in it but first we create a background. Create a
Plane ( Create panel > Geometry > Standard Primitives > Plane ) in the front viewport . Modify the
Plane ( Make a selection > Modify panel ) according to the following parameters:
Length: 200
Width: 300
length Segs: 1
Width Segs: 1
Step 3 The Material for the Background Plane
Open Material Editor ( Press „m‟ in keyboard ) and create the material for the plane:
1. Click “Get Material” button and select ( doubleclick ) „Arch & Design (mi)‟ from the list (
Materials > mental ray > Arch & Design ).
2. Select the plane and assign the material to it.
3. Color: dark gray ( RGB 0,16 0,16 0,16 ).
4. Roughness: 0,2 ( smoothens the highlights )
5. Reflectivity: 0 ( perfectly matte surface )
Step 4 Text
Create a Text shape ( Create panel > Shapes > Splines > Text ) in the front viewport . Modify the text (
Make a selection > Modify panel ) according to the following parameters:
Interpolation
o Steps: 14 ( the default value is probably enough is you do only a low resolution render )
Parameters
o Font: Century Gothic
o Alignment: Center
o Size: 60
o Text: bokeh effect
Feel free to select different font or write something different. I chose Century Gothic because those
round shapes are good at catching highlights.
Step 5 3D Text
At this point the text is just a shape and can‟t even be seen in renderings. Let‟s turn it to a 3d surface.
Add Bevel modifier to the text ( Make a selection > Modify panel > Modifier List > Object-Space
Modifiers > Bevel ). Apply the following parameters ( Make a selection > Modify panel ) to the Bevel
modifier:
Parameters
o Surface
Curved Sides: YES
Segments: 10 ( 3 is probably enough if you do only a low resolution render )
Smooth Across Levels: YES
Bevel Values
o Level 1
Height: 4
Open Material Editor ( Press „m‟ in keyboard ) and create the material for the text:
1. Click “Get Material” button and select ( doubleclick ) „Arch & Design (mi)‟ from the list (
Materials > mental ray > Arch & Design ).
2. Select the text and assign the material to it.
3. Color: beige/brown ( RGB 0,734 0,655 0,5 ).
4. Glossiness: 0,7
5. Metal material: YES
Step 7 Prepare the Scene for Rendering
Let‟s prepare the scene for rendering:
Place the text into the center of the plane like in picture below.
Create a Target camera ( Create panel > Cameras > Target ) in the top viewport.
Right-click on the Perspective view and press „c‟ in the keyboard to change it to the Camera
view.
Step 8 First Test Render
Now is a good time to render the scene for the first time so hit render ( Main toolbar > Render
Production ) and you should see something like the picture below.
This is our first render so obviously there are some problems:
First of all the image is boring, there is nothing interesting
There are some rough edges because of low sampling values
Let‟s adjust the sampling settings to get a more polished render. Go to the render setup and increase
antialiasing quality by increasing Mental Ray‟s sampling values ( Rendering > Render setup… >
Renderer > Sampling Quality ):
Samples per pixel
o Minimum: 4
o Maximum: 64
Filter
o Type: Mitchell ( For most scenes the Mitchell filter gives the best results. )
Now the aliasing issues are fixed and it‟s time to illuminate the text. By the way, if rendering time is
an issue you could use the default sampling values for now and use these high quality settings only in
the final rendering.
Step 9 Illumination
Create Mental Ray area omni ( Create panel > Lights > Standard > mr Area Omni ) in the front
viewport and apply the following parameters to it ( Make a selection > Modify panel ):
Intensity/Color/Attenuation
o Multiplier: 1,5 ( the intensity of the light )
Place the omni light according to the picture below.
When you render the scene you should get something like the picture below. Move the light if
necessary.
The illumination is improved but the text is too dark and therefore merges with the background. Let‟s
address these issues with soft shadows and glare. Modify the omni light ( Make a selection > Modify
panel ) to get softer shadows:
Area Light Parameters
o Radius: 10
Apply Glare Camera Shader ( Rendering > Render Setup > Renderer > Camera Effects > Camera
Shaders > Output > Glare ) Just turn the output shader on, the glare shader should be selected by
default. Open Material Editor ( Press „m‟ in keyboard ) and drag and drop the Glare shader from
Camera Shaders to an empty material slot in Material Editor ( make sure to select „instance‟ when
asked ). Make the following adjustments to the Glare shader:
Quality: 4
Spread: 6
Render the scene the see the effect of these changes. Now shadows are softer and the text is brighter
and has a nice glow.
Step 10 Creating Particles
At the moment our scene is really flat so there is no point in adding a bokeh effect just yet. First we‟ll
create something that will be out of focus in the final rendering. Let‟s add some sparkles to the scene.
Create a super spray ( Create panel > Geometry > Particle Systems > Super Spray ) in the top viewport
and apply ( Make a selection > Modify panel ) the following parameters to it:
Particle Generation
o Particle Quantity
Use Total: 1000
o Particle Motion
Speed: 4
o Particle Timing:
Emit Start: -500
Emit Stop: 0
Life: 500
o Particle Size
Size: 0,5
Particle Type
o Standard Particles: Sphere
Step 11 Path for the Particles
Next we‟re going to create a spline and force the particles to travel along it. Create the spline:
Activate the Line tool ( Create panel > Shapes > Splines > Line ) and create a line with 4
vertices in the top viewport. The first vertex should be farthest from the camera and the last
vertex should be closest to the camera.
Select the spline, go to the modify panel, and set „Steps‟ to 40 ( Interpolation > Steps ).
Activate Vertex sub-object level.
Select all four vertices, right click on them, and select „Bezier‟ from the menu.
Move the vertices and adjust the bezier handles to create a spline like in the picture below.
( For the sake of this tutorial it‟s not required to create exactly the same kind of line. However,
to be able see
the effect of a bokeh shader, at least some part of the spline should be close to the camera. )
Place the super spray to the starting point of the line.
Create a path follow object ( Create panel > Space Warps > Forces > Path Follow ), go to the modify
panel, and apply the following parameters to it:
Current Path: Click „Pick Shape Object‟ and select the spline we just created
Motion Timing
o Start Frame: -500
o Travel Time: 500
o Variation: 20 ( Some variation to the travel time )
Bind the super spray to the path follow object:
1. Activate „Bind to Space Warp‟ ( Main toolbar > Bind to Space Warp )
2. Click and hold on top of the super spray
3. Release over path follow object
Particles should immediately follow the path like in the picture below.
Tip. If you‟d like the particles to stray away from the spline, try increasing the particle speed in super
spray and/or adjusting Particle Motion settings in the path follow object.
Step 12 Material for the Particles
Open Material Editor ( Press „m‟ in keyboard ) and create the material for the sparkles:
1. Click “Get Material” button and select ( doubleclick ) „Arch & Design (mi)‟ from the list.
2. Select the super spray and assign the material to it.
3. Turn self illumination on
4. Orange (RGB 0,996 0,737 0,459)
5. Luminance: 2
Render the scene the see the particles. The glow is really strong but wait till you see it with the Bokeh
effect.
Step 13 The Bokeh Effect
Apply „Depth of Field / Bokeh‟ Camera Shader ( Rendering > Render Setup > Renderer > Camera
Effects > Camera Shaders > Lens > Depth of Field / Bokeh ). Open Material Editor ( Press „m‟ in
keyboard ) and drag and drop the bokeh shader from Camera Shaders to an empty material slot in
Material Editor ( make sure to select „instance‟ when asked ). Make the following adjustments to the
Bokeh shader:
Focus Plane: The distance from the camera to the text ( 301 in my case ). The easiest way to
measure the distance is to align the camera target with the text and check the camera target
distance from the camera parameters ( Select the camera > Modify panel > Parameters >
Target Distance ). Focus plane is the area of the scene that‟ll appear sharp in the rendering.
Radius of Confusion: 2 ( The amount of blurriness )
Samples: 32 ( The quality of the blur. ) This value has a dramatic effect to the rendering time.
If the rendering takes too long, decrease this value. I rendered my image with 256 samples to
get silky smooth noise free bokeh. The downside was the 7h rendering time with my quad core
2,33GHz Q8200.
Now we‟re ready to render the final image with the bokeh effect. I made some adjustments in
Photoshop as well:
Brightness: +25
Contrast: +40