22
BPA, a BPAS Company CensusPRO™ User Guide December, 2012 TM

BPA, a BPAS Company CensusPRO™ User Guide December, 2012 TM

BPA CensusPRO™ User Guide
™ Page 2 of 22
We encourage you to review this User Guide thoroughly before calling the Census Department. It is very likely that your question(s) will be answered here. If you need additional assistance or have any questions that the Guide cannot answer, please call us. Our normal business hours are 9:00 am through 5:00 pm ET Monday through Friday.
Census Department Team Members Phone: 315.292.6970
Email: [email protected]
Janna Recchio, Senior Census Coordinator Karen Evert, Census Coordinator Kara Marco, Census Coordinator

BPA CensusPRO™ User Guide
™ Page 3 of 22
What is CensusPRO™ • A proprietary system, owned by BPA A web-based census application Allows you to manage your participant contributions and loans for single or multiple divisions Allows you to update participant addresses as well as birth, hire, and termination dates
System Requirements
• Microsoft Internet Explorer, Version 6 or higher required • Mozilla FireFox Version 1.5 or higher required • All Browsers JavaScript must be enabled for the system to function correctly • All Browsers To print Reports temporarily allow Pop-ups or add our website to your “Allowed” list • CSS should be enabled for proper rendering of all screens
Security CensusPRO™ has been built to be as secure as possible. While the security of a worldwide network cannot be guaranteed, CensusPRO™ uses one-way login and password encryption protection. CensusPRO™ is further secured behind a 128-bit encryption SSL connection. By using the system you agree to assume all associated risks and responsibilities, and further agree to indemnify Benefit Plans Administrators, its affiliates and employees against any and all losses, costs or damages arising from your use of this service via the Internet. Never share a User Log In or Password. Additional Features and Upgrade Notification From time to time we will communicate upgrades to the system or important information that we wish to share with you. Upon log in you will see a Message box with this important information. Once you click the ‘Continue to the Dashboard’ link at the bottom of the Message box you will be forwarded to the Dashboard and the current Message will no longer display. Conventions used in CensusPRO™ CensusPRO™ has the ability to import data. The file types that are accepted include Comma Separated Value (.csv) or a Flat, Comma Delimited file (.txt). CSV is the most common form of file export, and can be made utilizing an Excel Spreadsheet. Check your payroll processing software’s Help Guide to learn how to export your payroll data as a .csv or .txt file. See Step 1 for file examples of an ASCII file and .csv or .txt file. Depending on the number of employees you have in your company, you may decide to manually enter your data directly into CensusPRO™. Employee information displayed in this User Guide Keeping Employee information confidential is of key importance to BPA. The data used throughout this guide consists entirely of fictitious names, social security numbers and addresses.
We strongly recommend Microsoft Internet Explorer Version 6.5 or higher
BPA CensusPRO™ User Guide
™ Page 4 of 22
CensusPRO™ Steps
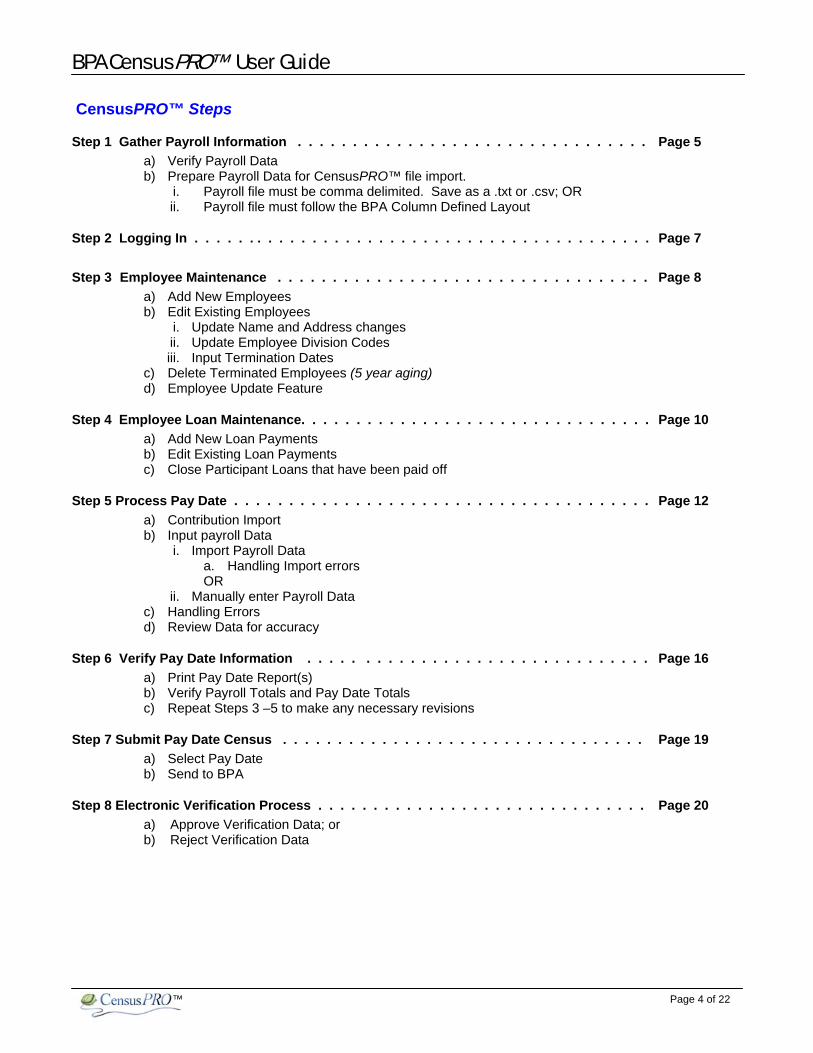
Step 1 Gather Payroll Information . . . . . . . . . . . . . . . . . . . . . . . . . . . . . . . . Page 5 a) Verify Payroll Data b) Prepare Payroll Data for CensusPRO™ file import.
i. Payroll file must be comma delimited. Save as a .txt or .csv; OR ii. Payroll file must follow the BPA Column Defined Layout
Step 2 Logging In . . . . . . . . . . . . . . . . . . . . . . . . . . . . . . . . . . . . . . . . . . Page 7
Step 3 Employee Maintenance . . . . . . . . . . . . . . . . . . . . . . . . . . . . . . . . . . Page 8 a) Add New Employees b) Edit Existing Employees
i. Update Name and Address changes ii. Update Employee Division Codes iii. Input Termination Dates
c) Delete Terminated Employees (5 year aging) d) Employee Update Feature
Step 4 Employee Loan Maintenance. . . . . . . . . . . . . . . . . . . . . . . . . . . . . . . . Page 10 a) Add New Loan Payments b) Edit Existing Loan Payments c) Close Participant Loans that have been paid off
Step 5 Process Pay Date . . . . . . . . . . . . . . . . . . . . . . . . . . . . . . . . . . . . . . Page 12 a) Contribution Import b) Input payroll Data
i. Import Payroll Data a. Handling Import errors OR
ii. Manually enter Payroll Data c) Handling Errors d) Review Data for accuracy
Step 6 Verify Pay Date Information . . . . . . . . . . . . . . . . . . . . . . . . . . . . . . . Page 16 a) Print Pay Date Report(s) b) Verify Payroll Totals and Pay Date Totals c) Repeat Steps 3 –5 to make any necessary revisions
Step 7 Submit Pay Date Census . . . . . . . . . . . . . . . . . . . . . . . . . . . . . . . . . Page 19 a) Select Pay Date b) Send to BPA
Step 8 Electronic Verification Process . . . . . . . . . . . . . . . . . . . . . . . . . . . . . . Page 20 a) Approve Verification Data; or b) Reject Verification Data

BPA CensusPRO™ User Guide
™ Page 5 of 22
Step 1 Gather Payroll Information Your “Welcome Packet” included file specifications specific to your plan document. There are two sets of specifications. One is for a comma delimited (a .csv) file, and the other is for a flat/text file. The file format your payroll company or payroll software uses will determine the file type used to import data into CensusPRO™. All files must include the following information, unless otherwise specified by your Plan Document: Social Security Number City Date of Birth YTD Salary First Name State Date of Hire Loan Repayment Last Name Zip Code Date of Termination *if Loans are allowed Street Address Division (if divisional security) YTD Hours Contributions Prepare Payroll Data for CensusPRO™ Import Verify the Payroll Data you will be working with in CensusPRO™. There are some important items to consider when preparing your payroll data for import. Contributions and Loan repayments are uploaded on a “per plan” and “pay date” basis. These only need to be reported as PERIODIC figures if you submit your census data every payroll. When utilizing a .csv file, if your plan allows more than one loan, combine those loan payments into one column. Example: John Doe has loan 1 pmt of $20.00 and loan 2 pmt of $30.00, add these and use $50 pmt in Loan Recon Column. To avoid format errors with your .csv file, take a moment to review your payroll file for the following items:
Dates Dates must be entered with a slash (‘/’) separating the months, days, and years as in the following example: Valid Date: 02/05/2007 Invalid Date: 252007 If you are an Excel user
Highlight the date columns Right click and choose ‘Format Cells’ Choose Custom as the Category Choose mm/dd/yyyy as the Type Click OK
When sorting an Excel or .csv file, make certain that you select all columns or the Worksheet. Not doing so will cause your columns to become unaligned and contributions allocated to incorrect participants

BPA CensusPRO™ User Guide
™ Page 6 of 22
Save your Payroll Data Once your file is formatted and you have verified all information:
1. Save your main file in Excel format. This will be your edit copy. 2. Click Save As ->
a. Name your file with a .csv extension, (ie. 082808.csv) b. In the drop down menu below your file name locate Comma Separated Value (csv) and click Save.
DO NOT REOPEN THIS FILE BEFORE UPLOAD AS THAT WILL REMOVE ALL FORMATTING. c. If you need to edit the file do so in the Excel format and resave it as a .csv. *This will prevent
you from having to reformat all the cells again.
Dollar Values Dollar values must be entered even if the value is 0, as in the following example:
Valid Dollar Amount: 0.00 Invalid Dollar Amount: a blank or null value
If you are an Excel user Highlight the dollar value columns Right click and choose ‘Format Cells’ Choose Number as the Category Set the decimal places to 2 Do not use a separator Click OK
Social Security Numbers (“SSN”) Make certain that your file contains the leading zeros in the SSN. For example, the following SSN, 008-12-4343, must display the 2 leading zeros. You must make sure that the column containing the SSN has been formatted to include the leading zeros.
Valid SSN: 001237475 Invalid SSN: 1237475 If you are an Excel user
Right click the SSN column Choose Format Cells Choose Special as the Category Choose Social Security Number as Type Click OK
Once your file is formatted and you have verified all information, save your main file in Excel format, and then save a copy as a .csv. Do not reopen the file before upload. Your .xls file will be your edit copy

BPA CensusPRO™ User Guide
™ Page 7 of 22
Step 2 Logging In To log into CensusPRO™ you must have a User ID and Password. If you do not have a User ID and Password, contact the BPA Census Department at (315) 292-6970 and a Team Member will assist you. We strongly recommend that you change your assigned Password when you enter CensusPRO™ for the first time. Never share a User ID or Password with anyone.
1. Go to www.bpas.com and select Employer Accounts, then Retirement Account from the menu. On the left you will find the link for CensusPRO™. The CensusPRO™ Log In screen will be displayed.
2. Enter the User ID and Password provided by BPA and click Log In. If you forget your Password, click the I forgot my password link on the Login screen. You will be asked to answer your security question. The question/answer will act as a key to allow you to obtain a new Password. If you cannot remember your security answer, you must contact the BPA Census Team, who will create a new User ID and Password for you. BPA does not have the ability to reset an existing account Password. Administrative Dashboard Upon log in, as a Plan Administrator only, the CensusPRO™ Administrative Dashboard is the first screen that opens (Data Entry Only users will not see the Administrative Dashboard), and should also be the last screen you check before you log out. The Dashboard provides you with key information about your payroll files and users assigned to work with your files.
We strongly encourage you to immediately go to Tools, Security, Users and click the Details button by your name to change your Password.
When creating a new Password please note the Password must be at least 8 characters and must contain at least one upper case and one lower case letter, one number and a symbol, ie: JDoe_2234.
The Administrative Dashboard is the first screen you see when you log in as a Plan Administrator, and should also be the last screen you check before logging out

BPA CensusPRO™ User Guide
™ Page 8 of 22
Step 3 Employee Maintenance Add / Edit Employees Click the Employees Menu Item and choose Add / Edit Employees from the submenu. If you’re new to CensusPRO™ and your company’s employees were pre-loaded, a list of employees entered in the system will display on the screen. Choose the “Show only employees with invalid data” button to narrow the list to employees highlighted in RED that need immediate attention.
Divisions If the plan has different payroll divisions or pay groups, the divisions can be tracked in the Div/Sub field of Employee Maintenance. The Div/Sub code is an alphanumeric field (letters and numbers) and can be no longer than 4 characters. If you have opted to use the CensusPRO™ Divisional Security feature, the Div/Sub field becomes a required data element. To manually Edit an existing Employee, click the Details button to the right of the Employee’s name and the Employee Information data screen will open. Follow the screen instructions to:
Reset Reset the screen data to its original state prior to the last time you clicked save Save Save the current Employee changes and remain on this Employee Cancel Cancel any changes made and return to the Employee List
To manually Add an Employee, click the Add button at the bottom of the Employee Maintenance screen. A blank Employee Information data screen will open. Required fields are indicated by a Bold label and marked with an asterisk (*).
Employees’ whose data appears in a RED row indicates that the Employee information contains invalid data. YELLOW rows indicate employees who have loans that contain invalid payment amounts. Clicking the Details button to the right of the Employee’s name allows you to enter the Employee Information data screen and Edit the Employee record. The Quick look-up by SSN field allows you to enter a SSN (with or without hyphens) to Search the Employee list for an employee.
Required Fields are indicated by a Bold label and marked with an asterisk (*). If a Required field is left blank, or data consistent with the field requirements are not met (i.e. the zip code is left blank) the field title will change to RED when you click the Save button and you will be returned to the Employee Information data screen to correct the error.

BPA CensusPRO™ User Guide
™ Page 9 of 22
Delete Terminated Employees A user who is identified as an ‘Administrator' of the company’s payroll data has permission to delete Terminated Employees from the system. A Terminated Employee cannot be deleted from the system until 5 years have passed since that Employee’s termination date. To see a listing of Employees with termination dates, go to the Reports menu and choose ‘Terminated Employees’. NOTE: Terminated employees need to remain in your file for the remaining calendar year of the termination date. 1. Click on the Delete Terminated Employees submenu item. A list of Employees whose Termination Dates are
more than 5 years from the current date will display on the screen. Select Terminated Employees to Delete:
3. Once you have selected the Terminated Employee(s) to be deleted on that page, click the Delete button at the
bottom right of the screen to permanently delete the Terminated Employee(s). You will be prompted to confirm that you want to delete the selected Terminated Employee(s).
Employee Update Feature A user who needs to submit an updated data element and is not due to submit a scheduled census submission can utilize the Employee Update feature. The data elements able to be updated through this feature are name, dates, and addresses. 1. Click on the Update Employees submenu item. All of the employees will be listed. All the fields (except social
security number) are editable fields that can be updated. 2. Click save after each data update. 3. Once all updates are made click Send to BPA. All files submitted Monday – Friday by 4:30 pm (EST) will be
applied that business day and posted for the participants to view the next business day. 4. Be sure that your payroll system is also updated. Whenever this feature is used, it is critical that the client
make the same changes simultaneously in its payroll system, so that the new information is also reflected in the next census file. Otherwise, old data in the next census file would overwrite the new data provided through the Employee Update feature, which invalidates the original data correction.
Select All Terminated Employees by clicking the Check All button. To select individual Employees, click the Delete box to the right of the Employees record.

BPA CensusPRO™ User Guide
™ Page 10 of 22
Step 4 Employee Loan Maintenance To ensure that we receive full loan repayments (we do not accept partial loan payments) BPA built a loan repayment utility into CensusPRO™. Add / Edit Loans CensusPRO™ uses the BPA record keeping system to assist you in maintaining participant loans. A nightly file is run to check the system for new loans issued to Employees in the plan. If new loans are detected, or a loan payoff made, a file with the record details will be exported from the record keeping system and loaded into the CensusPRO™ database. The next time you log into CensusPRO™ you will see a message display to alert you to the fact that new loan records have been added since the last time a pay date was submitted to BPA. You must enter the First Pay Date the loan payment will be included in. The “New loan records” message will continue to appear each time you log in until a First Pay Date has been entered.
At this time you can choose to select the “View New Loans” button in the message on your dashboard or click the Employees Menu option and then choose Employee Loans from the submenu.
To change the First Pay Date of a loan payment, click the Edit button to the right of the employee record. (If the Employee has multiple loan records, simply choose any one of the Employee’s loan records). The Loan Maintenance screen will open with a list of loan(s) for the selected Employee. Enter the new First Pay Date for a loan and click the Save button. You can also change the payment amount for a loan from this screen.
The system also allows you to manually add a new loan payment for Employee(s). Click the option to view All Employees to see a list of all Employees in the CensusPRO™ database. See the information above in the section referenced “Change the First Pay Date for processing of a loan payment”.
The loan payment amount will NOT display in future contribution pay dates until you have entered a First Pay Date
Note that changes made here will affect all future contribution pay dates.
Note the filter option buttons directly below the Loan Maintenance title bar to allow you to filter your data. Look-Up: Look up an Employee quickly by using the “Quick Look-Up by SSN” feature in the top right of the screen.

BPA CensusPRO™ User Guide
™ Page 11 of 22
If you add a new loan or update an existing loan with a date in a Pending Pay Date file, the system will alert you with a message box that gives you the option to add that loan payment to the Pending Pay Date(s). Closed Loans CensusPRO™ uses the BPA record keeping system to assist you in maintaining loans that are closed as well. A file with the record details of the closed loan will be exported from our record keeping system and loaded into the CensusPRO™ database. After this action happens the subsequent time you log into CensusPRO™ a message will be displayed to alert you that loan records have been closed since the last time a pay date was submitted to BPA. Click the ‘View All Closed Loans’ button in the message to see all closed loans in the plan. NOTE: The most recently closed loans will be at the top of the screen and highlighted to help guide you to the most recent activity so you can ensure that no additional loan payments are payroll deducted.
To manually Close a Loan, choose the loan record from the Open Loans list and enter the date the loan was paid off. Click the Save button to update the record. You will be prompted to confirm that you want to close loans with close dates. This action cannot be undone. The Closed Loan(s) will be removed from the Open Loan Maintenance list and will no longer display in the Edit Pay Date screen.
Once a loan has been closed it will no longer display when entering contribution data.
The Pending Pay Date message will alert you that you have added or updated a loan and indicated a ‘First Pay Date’ within a Pending Pay Date. This is the only opportunity to add this loan without starting the pay date all over.

BPA CensusPRO™ User Guide
™ Page 12 of 22
Step 5 Process Pay Date You have the option to manually input your payroll data or to use the file import feature within CensusPRO™. It is up to you to decide which method is most efficient for your data needs.
Add Pay Date Select Add Pay Date from the Contributions menu. Choose the payroll pay date you are reporting for from the calendar provided. A Yellow box will highlight the pay date selected. If previous pay date information is in the system you will have the option to “Copy the previous pay date information”. Checking the box will pre-fill the contribution, YTD hours and YTD salary amounts for each Employee based on the prior pay date’s submission. (Manual Data Entry Users: You may want to select this option if the contribution amounts are always the same.) Click the Add Button.
CensusPRO™ uses a color key to assist you in tracking the status of payroll file submissions. Once the Pay Date is added the selected date will be highlighted in Green, indicating that the pay date is ‘Pending’. You will be presented with the Edit Pay Date screen. This page defaults to list the current Active Employees in the system, with the running total of Contributions and Loans, if applicable, for each Employee. The “Total of all contributions and loans for the pay date” is displayed at the bottom of the screen and recalculated each time you update an Employee’s record.
All hours and compensation must be reported on a calendar year-to-date basis All contribution and loan fields should be reported for the current payroll (census) period
The Yellow box highlighting the pay date will change to Green once you click “Add”. See Pay Date Status Codes on Page 3 for a description of Pay Date status. You will be prompted to determine whether you want to include loan payments in the Pay Date.
Note the Pay Date you are working with is documented at the top of each screen.

BPA CensusPRO™ User Guide
™ Page 13 of 22
Divisional Security Feature If you have chosen to use Divisional Security, please note that you will only see Employees in the division for which you are working in. If you have not already done so, and are interested in learning more about using this feature, please contact the Census Department at BPA to discuss this feature and how it could work for your plan.
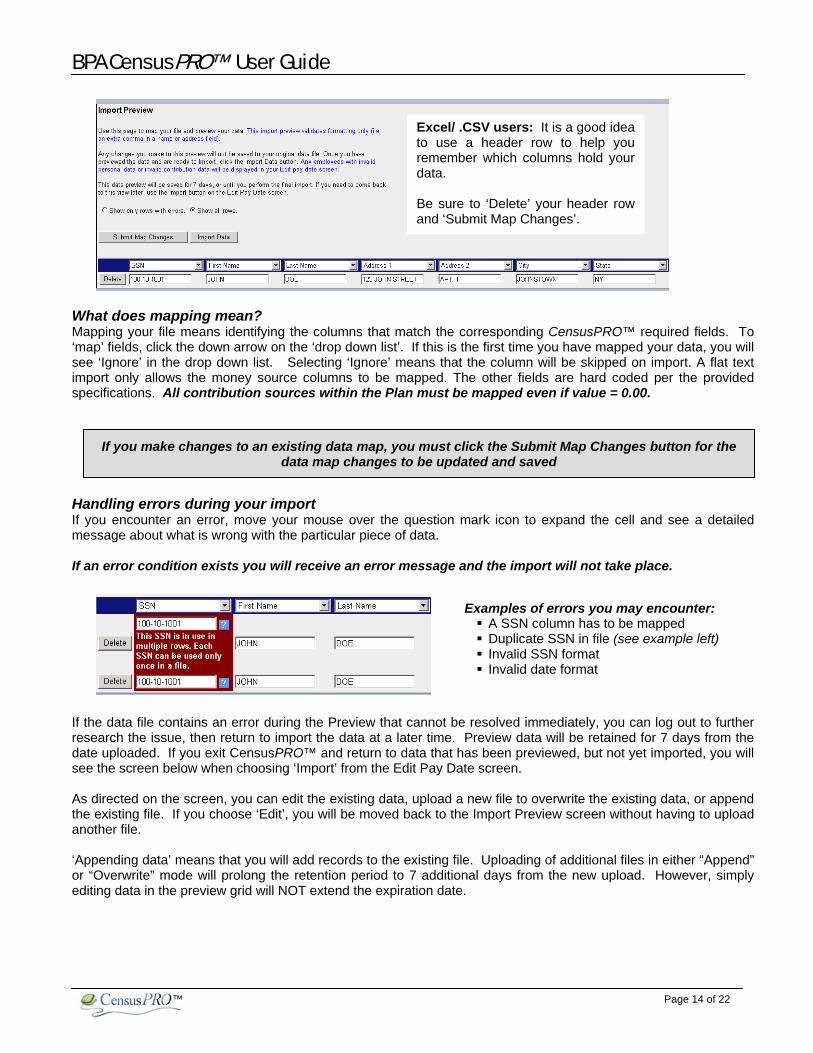
The following instructions apply to both traditional and divisional users. Import Feature The import will allow you to “Preview” your data and fix a wide range of formatting errors prior to importing your data. After adding the Pay Date, if you are importing a file, click the Import Period button at the bottom of the Edit Pay Date screen. If this is the first time you have imported a file you will see the following screen where you will be asked to select your file type from the drop down window. (If your file type changes you can change the format here, be aware that doing this will also automatically delete any previously mapped data.) Once you have uploaded the file you will be directed to the Import Preview Screen.
Import Preview Screens The Import Preview Screen has 2 views, changed by selecting ‘Show only rows with errors’ or ‘Show all rows’. You will see either rows with errors or a message that the file has no errors. The screen below shows you what a .csv file import might look like.
When working with Divisional Security, you will work with only one division at a time. You will see an additional field at the top of the calendar to choose the Division you will work with.
Select the file type you will load from the Import Contribution File screen.
If your file type changes you can change the format through the Import Contribution File page. Be aware that doing this will also automatically delete any previously mapped data
BPA CensusPRO™ User Guide
™ Page 14 of 22
What does mapping mean? Mapping your file means identifying the columns that match the corresponding CensusPRO™ required fields. To ‘map’ fields, click the down arrow on the ‘drop down list’. If this is the first time you have mapped your data, you will see ‘Ignore’ in the drop down list. Selecting ‘Ignore’ means that the column will be skipped on import. A flat text import only allows the money source columns to be mapped. The other fields are hard coded per the provided specifications. All contribution sources within the Plan must be mapped even if value = 0.00. Handling errors during your import If you encounter an error, move your mouse over the question mark icon to expand the cell and see a detailed message about what is wrong with the particular piece of data. If an error condition exists you will receive an error message and the import will not take place.
If the data file contains an error during the Preview that cannot be resolved immediately, you can log out to further research the issue, then return to import the data at a later time. Preview data will be retained for 7 days from the date uploaded. If you exit CensusPRO™ and return to data that has been previewed, but not yet imported, you will see the screen below when choosing ‘Import’ from the Edit Pay Date screen. As directed on the screen, you can edit the existing data, upload a new file to overwrite the existing data, or append the existing file. If you choose ‘Edit’, you will be moved back to the Import Preview screen without having to upload another file. ‘Appending data’ means that you will add records to the existing file. Uploading of additional files in either “Append” or “Overwrite” mode will prolong the retention period to 7 additional days from the new upload. However, simply editing data in the preview grid will NOT extend the expiration date.
Excel/ .CSV users: It is a good idea to use a header row to help you remember which columns hold your data. Be sure to ‘Delete’ your header row and ‘Submit Map Changes’.
If you make changes to an existing data map, you must click the Submit Map Changes button for the data map changes to be updated and saved
Examples of errors you may encounter: A SSN column has to be mapped Duplicate SSN in file (see example left) Invalid SSN format Invalid date format

BPA CensusPRO™ User Guide
™ Page 15 of 22
Once all errors are corrected, click ‘Import Data’ in the Import Preview screen to bring the data into the Edit Pay Date for a final data validation. Once the data has been loaded into the system, you will receive a message in green, indicating that the import was successful, and a message in red if there are additional errors (i.e. the Plan requires YTD Hours but the import validation reveals the mapped YTD Hours equal 0).
Manual Data Entry When entering payroll data manually, be sure to update YTD Hours and YTD Salary for all Employees, even those who do not have a contribution for the period.
To edit an Employee’s contribution record, click the Edit button to the right of the Employee’s name and the Edit Pay Date screen will open for that Employee. Follow the screen instructions to:
Previous Go to the Employee immediately before the current Employee (by SSN) Next Advance to the next Employee in the list (by SSN) Save and Next Save the current Employee changes and advance to the next Employee (by SSN) Save Save the current employee changes and remain on this Employee Cancel Cancel any changes made and return to the Employee List
All fields in the Edit Pay Date form are required fields and must be entered. 0.0 is not a valid entry for YTD Hours or YTD Salary.
Note the additional information in the green successful import message ONLY indicates the total contribution dollars imported.
Append Caution: Use Append when uploading 2 different groups of Employees. Use Overwrite if you wish to start over with a new file.

BPA CensusPRO™ User Guide
™ Page 16 of 22
Updating loan payment amounts. If the Plan allows Employee loans, you will see each loan in the lower portion of the Edit Pay Date screen. You can either manually modify the Loan Payment amount, or use the built-in calculator to easily update the number of loan payments being made.
Review Data for accuracy Clicking on an underlined column header will sort the data in the grid by that column. This will allow you to sort the CensusPRO™ screens in the same order as your payroll data and greatly increase the speed and efficiency of data entry. Note the Reviewed column to the right of the screen. This checkbox serves as a bookmark to allow you to easily return to the person lasted reviewed when updating or inputting payroll information manually. CensusPRO™ will not allow submission of a pay date file that contains invalid or missing data. If there are any records marked with a RED circle, indicating they have not been Reviewed, or a record is highlighted in RED, indicating there is invalid data contained in the record, the system will prevent the submission of the Pay Date file to BPA.
Reviewed Column Key:
Record Reviewed. *If data has been imported, all Records are marked reviewed
Record Not Reviewed
Employee Terminated prior to the current calendar year. Review not required Step 6 Verify Pay Date Information The CensusPRO™ application has several reports to assist you maintaining a record of your payroll contribution files. Access reports by choosing the report you want to view from the Reports Menu item. Each Report will open a window that allows you to choose a Pay Date, if applicable, and Sort order for the Report. Reports are rendered as Adobe Acrobat .pdf files.
If you did not check the box to “Copy the previous pay date information” the Edit Pay Date screen will open with the list of Employees currently in the system and the contribution information will be 0.00 for each Employee in the list. Any records marked as ‘Not Reviewed’ will prevent the pay date from being submitted to BPA. This ensures data integrity of all required fields.
To adjust the number of loan payments:
Enter number of Payments Click Recalculate
The application will perform the calculation and display the updated Total payment in the Total field. Entering 0 as the number of payments will return a 0.00 Loan Payment Total.

BPA CensusPRO™ User Guide
™ Page 17 of 22
Print the Contribution Detail and Pay Date Summary Reports. Verify Payroll Totals and Pay Date against the Data gathered in Step 1. Once you have reconciled the data you are ready to move on to Step 6 - Submit Pay Date Census.
Contribution Detail Report
Pay Date Summary Report
Additional Reports. BPA has provided several additional reports to assist you in reconciling pay date data entered in CensusPRO™ against your payroll records. Loan Payments Report
Select a Pay Date Select division (if divisional) Sort Filters available:
SSN Last Name
Choose a Pay Date Select division (if divisional) Sort Filters available:
SSN Div/Sub Last Name
Prior to printing a report, you must enable or allow pop ups
Choose a Starting and Ending Pay Date Sort Filters available:
Div/Sub Pay Date Detail by SSN Detail by Last Name

BPA CensusPRO™ User Guide
™ Page 18 of 22
Loan Reconciliation Report
Employee Listing Report
Terminated Employee Listing
Choose Pay Date Select division (if divisional) Filters available:
All Employees Employees w/ Discrepancies Employees w/ Loans
Sorting available: SSN Div/Sub Last Name Difference (greatest to least)
Sort Filters available: SSN Div/Sub Last Name
Sort Filters available: SSN Last Name

BPA CensusPRO™ User Guide
™ Page 19 of 22
Step 7 Submit Pay Date Census Once you have completed your file import / data entry and confirmed the pay date totals, submit the data file to BPA. Data files are swept to our servers hourly each day from 7AM to 6PM ET. There are 2 ways to access the Submit Pay Date screen.
Upon clicking Submit, a confirmation box will display, noting the date and total contributions about to be submitted.
1. Choose the “Submit Pay Date” menu item from the Contributions menu list.
2. Click the “Send to BPA button” on the Edit Pay Date screen for the Pay Date you are working with.

BPA CensusPRO™ User Guide
™ Page 20 of 22
Step 8 CensusPRO™ Electronic Verification Process Once your data entry is complete and you have clicked ‘Send to BPA’ the data is swept to BPA servers where the pay date data is processed. Once data is validated by our Record Keeping System, an e-mail is sent to all Verification contacts to notify them that data is ready for approval. The screen shot below is an example of the Verification E-Mail Alert. The E-Mail Alert is sent out every 3 days until the Verification Data is either Accepted or Rejected.
The Verification User logs into CensusPRO™ and Clicks View all status details to view the Pay Date Status grid.
The Plan Administrator User is always a User with authority to verify census and contribution data. Each Client should have at least 2 CensusPRO™ Users who have security to Accept/Reject Verification Files
Once the OK button has been checked, the calendar date and status will be updated from
DATA PENDING.
to
DATA SUBMITTED.

BPA CensusPRO™ User Guide
™ Page 21 of 22
Pay Date Status Summary
Client Verification Approval
Choose the Pay Date record
Highlighted in green Status = ‘To Verify’ Click the ‘View’ button to display the Verification Data
Approve Data: Click ‘Accept’ The text in the bottom half of the page confirms that your contribution dollars will be made available. Please Note: If BPA has made any adjustments to your data during our Edit Scrub it will be documented below the Verification Data Grid.
Please Note important information regarding your final Acceptance: Final confirmation includes notification that clicking ‘Accept’ again constitutes the User’s electronic signature.

BPA CensusPRO™ User Guide
™ Page 22 of 22
Confirmation of Verification Posted
Rejecting a Verification Data file
Rejected Data files are highlighted in Yellow
The Notes associated with the Rejected Verification data file are sent back to BPA and a team member will pick up the Task to research and correct the issue. Once the Verification Data is re-submitted, the CensusPRO™ Verification User will receive an e-mail that the Verification Data is available and the Verification process begins again.
The screen is updated to indicate that the pay date has successfully been verified and will be traded as indicated. When you return to Pay Date Status Summary on the Administrative Dashboard the Pay Date will be updated with a status of ‘Verified’.
Reject Data: After reviewing the Verification Data, if the User finds an error, click the ‘Reject’ button. The User will be required to enter a reason for the reject. Confirmation that the pay date file has been rejected will be returned to the screen and the Pay Date Status Summary updated accordingly.
Rejected Data file records are highlighted in yellow to indicate that modifications are necessary and a new Verification Data file must be submitted for review.


