70
Brad Miller Associate Director WPI Robotics Resource Center Programming the 2009 FRC Control System
| Date post: | 23-Dec-2015 |
| Category: |
Documents |
| Upload: | osborne-james |
| View: | 225 times |
| Download: | 1 times |

Brad MillerAssociate Director
WPI Robotics Resource Center
Programming the 2009 FRC Control System
Programming the 2009 FRC Control System
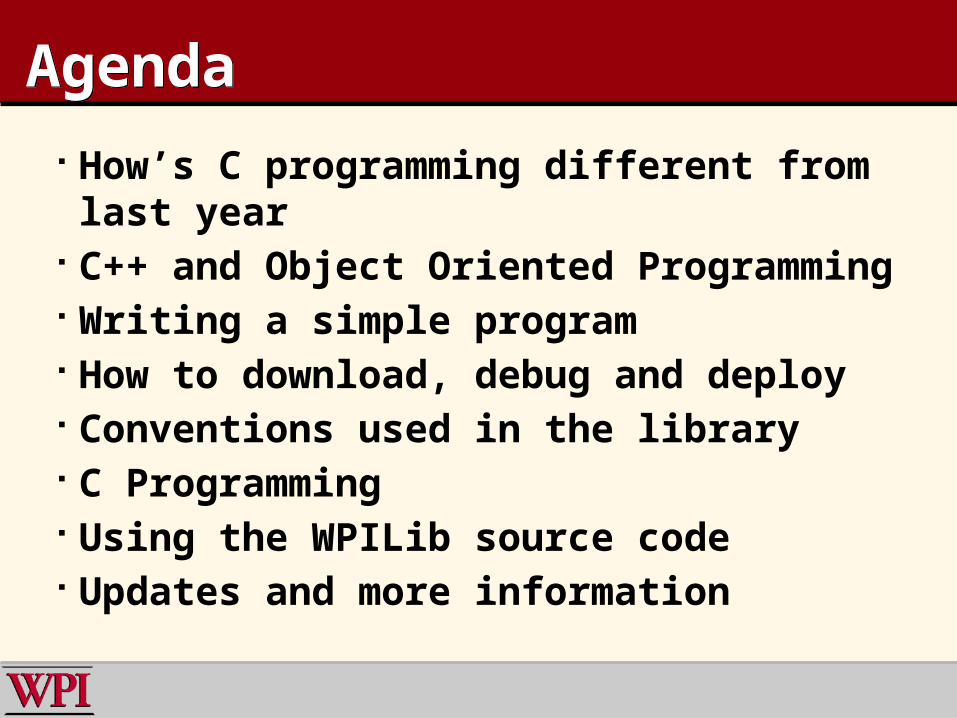
AgendaAgenda
How’s C programming different from last year
C++ and Object Oriented Programming Writing a simple program How to download, debug and deploy Conventions used in the library C Programming Using the WPILib source code Updates and more information

What’s Different - ProcessorWhat’s Different - Processor2009 Previous
800 MIPs (400MHz) 32-bit Power PC 10 MIPs (40MHz) 8-bit PIC
Hardware floating point (double precision)
Software floating point
128MB solid state disk 128KB flash memory
64MB RAM 4KB RAM
2M gate FPGA All software device support
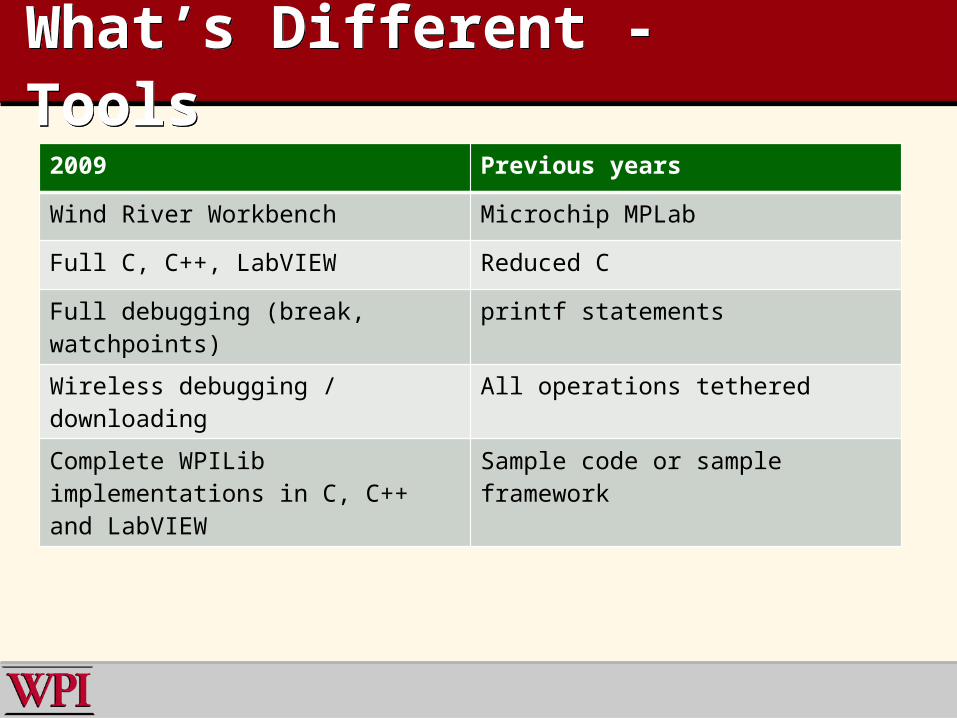
What’s Different - ToolsWhat’s Different - Tools
2009 Previous years
Wind River Workbench Microchip MPLab
Full C, C++, LabVIEW Reduced C
Full debugging (break, watchpoints) printf statements
Wireless debugging / downloading All operations tethered
Complete WPILib implementations in C, C++ and LabVIEW
Sample code or sample framework
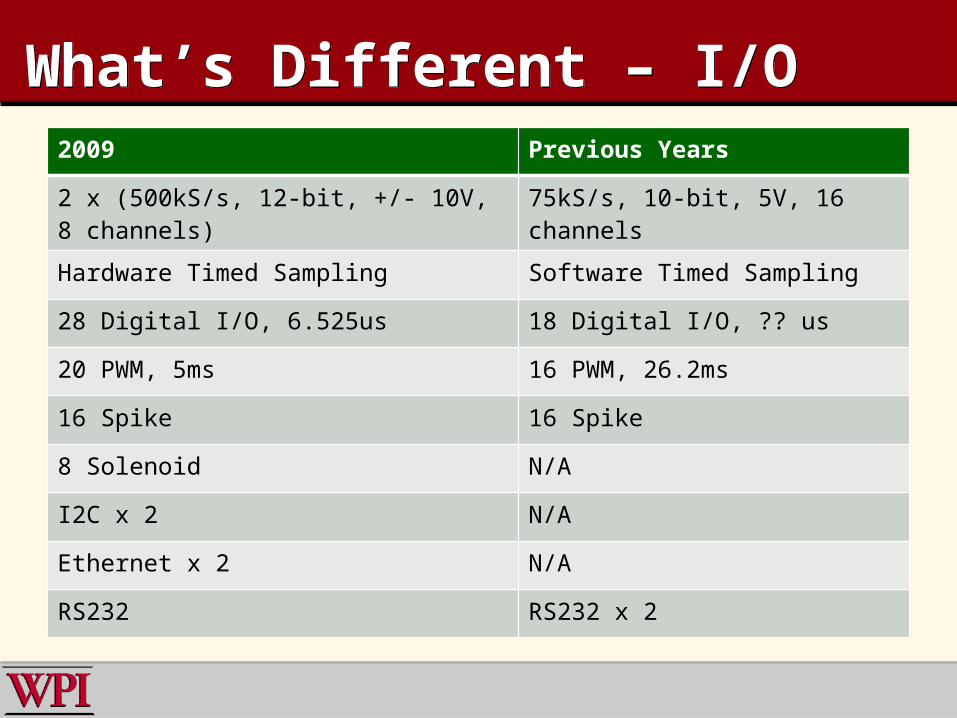
What’s Different – I/OWhat’s Different – I/O2009 Previous Years
2 x (500kS/s, 12-bit, +/- 10V, 8 channels) 75kS/s, 10-bit, 5V, 16 channels
Hardware Timed Sampling Software Timed Sampling
28 Digital I/O, 6.525us 18 Digital I/O, ?? us
20 PWM, 5ms 16 PWM, 26.2ms
16 Spike 16 Spike
8 Solenoid N/A
I2C x 2 N/A
Ethernet x 2 N/A
RS232 RS232 x 2
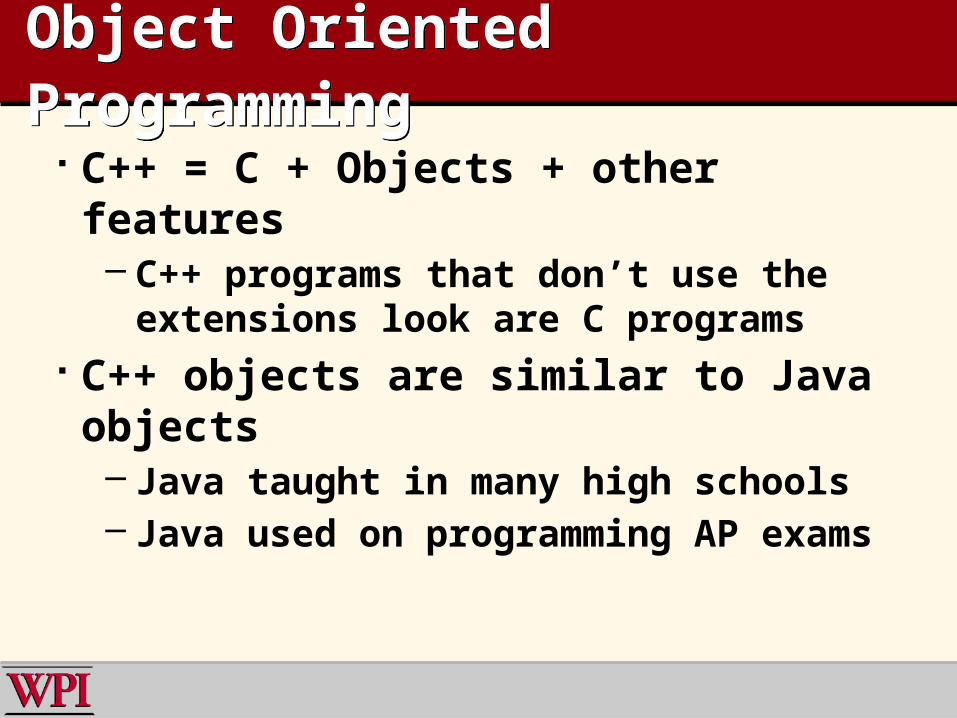
Object Oriented ProgrammingObject Oriented Programming
C++ = C + Objects + other features– C++ programs that don’t use the
extensions look are C programs C++ objects are similar to Java objects
– Java taught in many high schools– Java used on programming AP exams
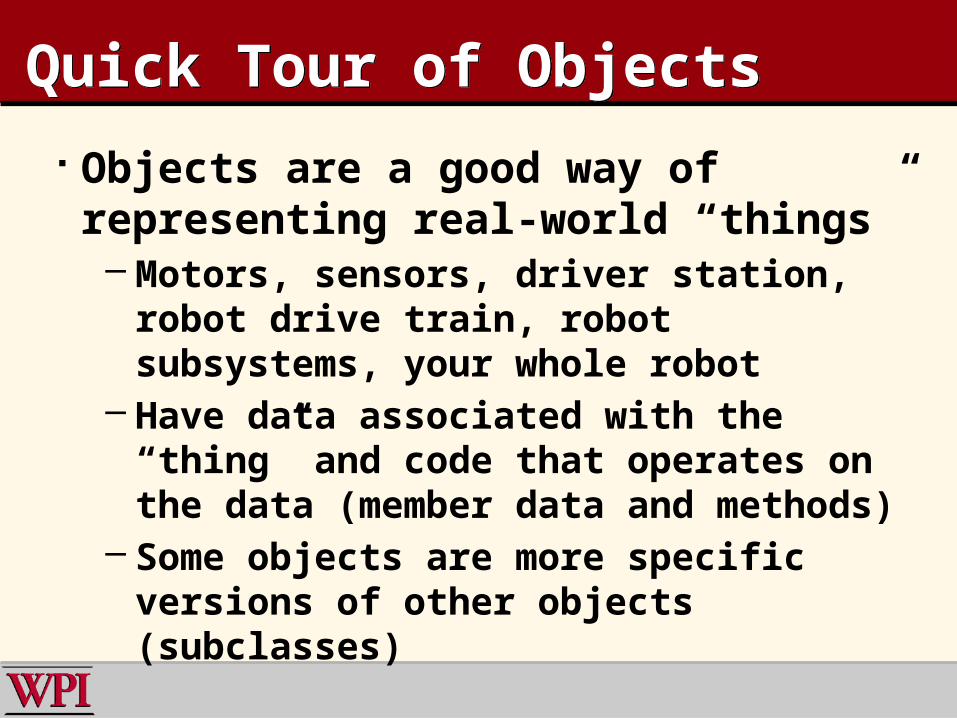
Quick Tour of ObjectsQuick Tour of Objects
Objects are a good way of representing real-world “things”– Motors, sensors, driver station, robot drive
train, robot subsystems, your whole robot– Have data associated with the “thing” and
code that operates on the data (member data and methods)
– Some objects are more specific versions of other objects (subclasses)

Objects (Classes)Objects (Classes)
Quadrature Encoder Object
What can it do?GetCount()GetPeriod()Reset()
What does it know?Port numbersReversed or not
Methods
RobotDrive ObjectWhat can it do?Drive()ArcadeDrive()TankDrive()
What does it know?Port numbersSpeed controller type
MemberVariables

Special Class MethodsSpecial Class Methods
Constructors (method with class-name)– Called automatically when the class is created– Used to initialize resources
• Happens when declared or when explicitly creating a new instance
Destructors (method with ~class-name)– Called automatically when the class is deleted– Frees class resources
• Happens when the object goes out of scope or when explicitly deleted

Subclass of a classSubclass of a class
SimpleRobot class
Autonomous() { print message “Autonomous” }
OperatorControl() { print message “Operator control” }
Very boring!
Autonomous() { Drive around the field and score point }
OperatorControl() { Drive our robot using tank steering}
Now very cool!
IsAutonomous() { return the current field state }
IsEnabled() { return robot state }
Team190Robot class

Making Your First ProgramMaking Your First Program
Start with a template– SimpleTemplate– IterativeDemo
There are a bunch of samples, more coming…
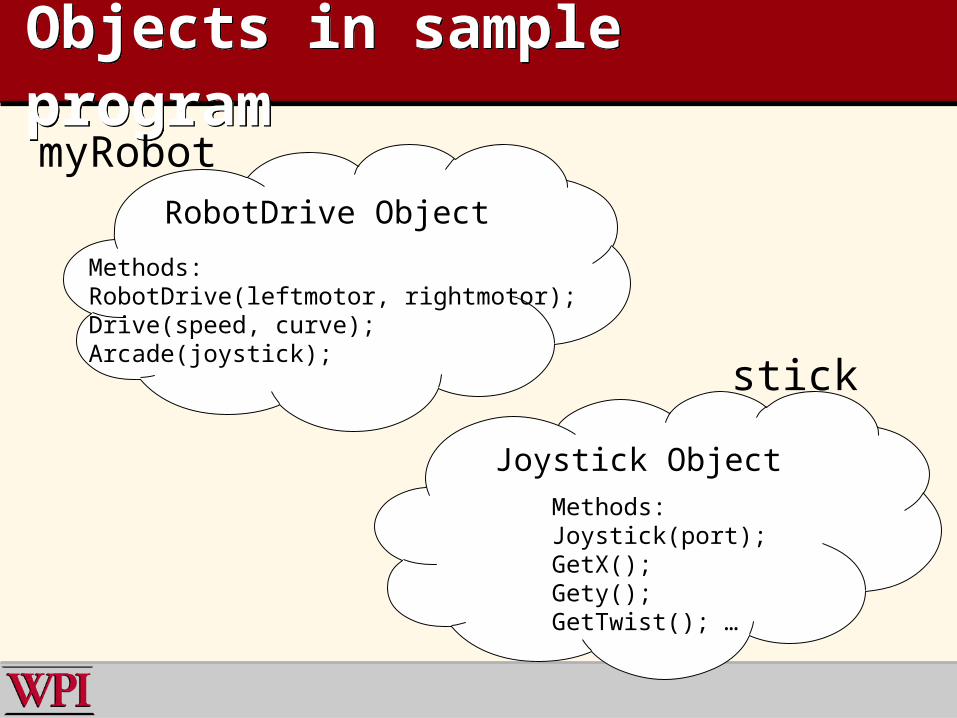
Objects in sample programObjects in sample program
RobotDrive Object
Joystick Object
Methods:RobotDrive(leftmotor, rightmotor);Drive(speed, curve);Arcade(joystick);
Methods:Joystick(port);GetX();Gety();GetTwist(); …
stick
myRobot
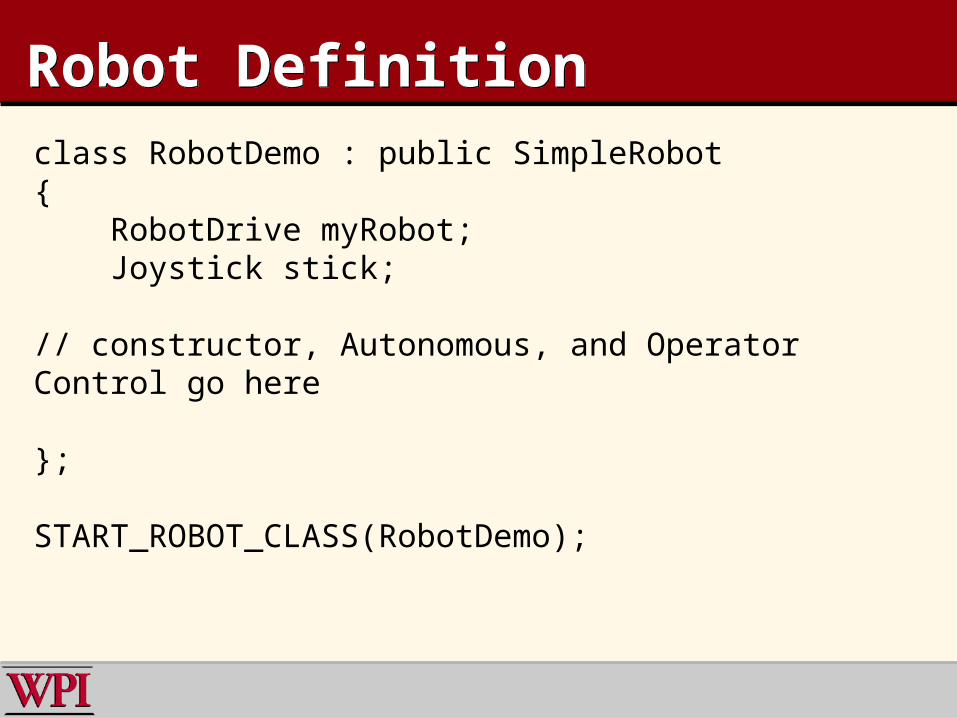
Robot DefinitionRobot Definitionclass RobotDemo : public SimpleRobot{ RobotDrive myRobot; Joystick stick;
// constructor, Autonomous, and Operator Control go here
};
START_ROBOT_CLASS(RobotDemo);

Initialization (constructor)Initialization (constructor)
RobotDemo(void) : myRobot(1, 2), stick(1);{ GetWatchdog().SetExpiration(100);}
Initialize the RobotDrive and
Joystick
Set the Watchdog timer expiration

Autonomous part of programAutonomous part of program
void Autonomous(void){ GetWatchdog().SetEnabled(false); myRobot.Drive(0.5, 0.0); Wait(2000); myRobot.Drive(0.0, 0.0);}
Use the RobotBase object Drive method to go 0.5 speed (forward, half speed) with no turnThen stop.
Key to the example:myRobot.Drive(speed, curve) speed: a value from -1.0 to 1.0 where 0.0 is stopped curve: a value from -1.0 to 1.0 where 0.0 is no turn
Watchdog disabled because of the Wait – will fix this soon

TeleOp part of programTeleOp part of program
void OperatorControl(void){ GetWatchdog().SetEnabled(true); while (1) { GetWatchdog().Feed(); myRobot.ArcadeDrive(stick); }}
Use the RobotBase object ArcadeDrive method to do arcade driving using our
Joystick object
Re-enable the watchdog since we aren’t waiting
any more
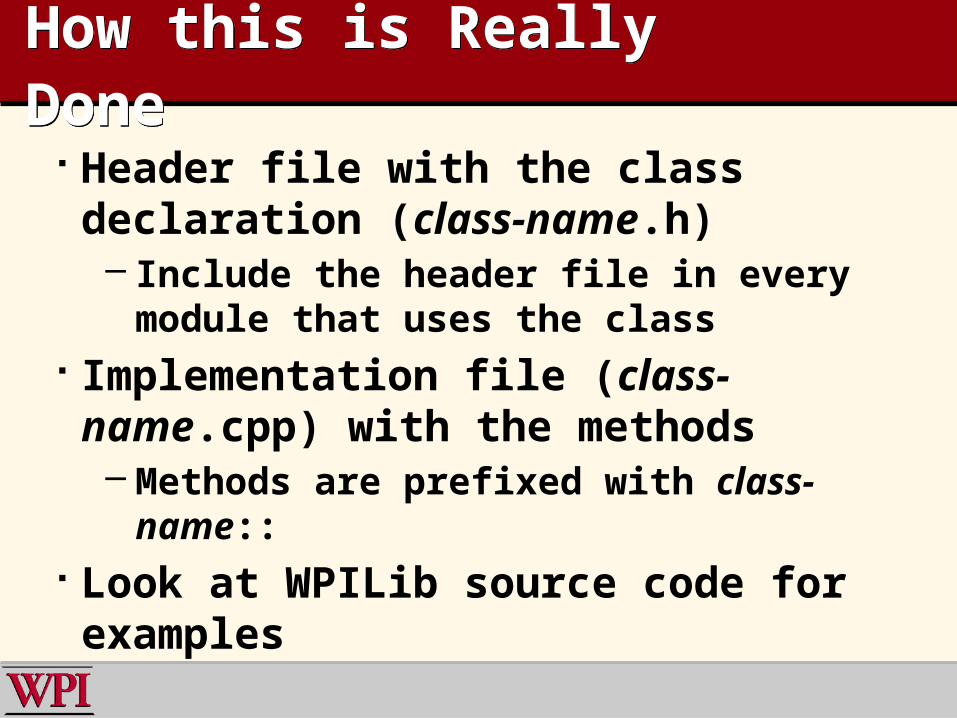
How this is Really DoneHow this is Really Done
Header file with the class declaration (class-name.h)– Include the header file in every module
that uses the class Implementation file (class-name.cpp)
with the methods– Methods are prefixed with class-name::
Look at WPILib source code for examples

Using WorkbenchUsing Workbench
What you have to do:– Write and compile program– Create a remote system connection– Create a run/debug configuration– Debug the program– Rinse and repeat
Then deploy the working program

Compiling the programCompiling the program
Build project and Build all Structure of built program
– Targets– Output file (.out)
Auto-build on save option Errors
– Build Console and Problems Window
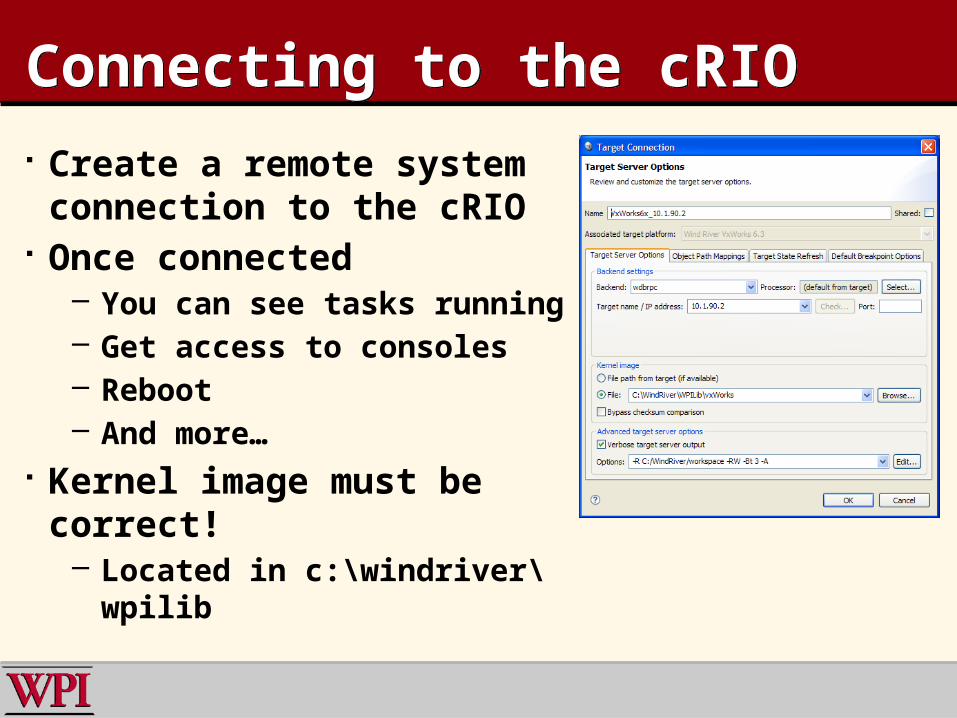
Connecting to the cRIOConnecting to the cRIO Create a remote system
connection to the cRIO Once connected
– You can see tasks running– Get access to consoles– Reboot– And more…
Kernel image must be correct!
– Located in c:\windriver\wpilib
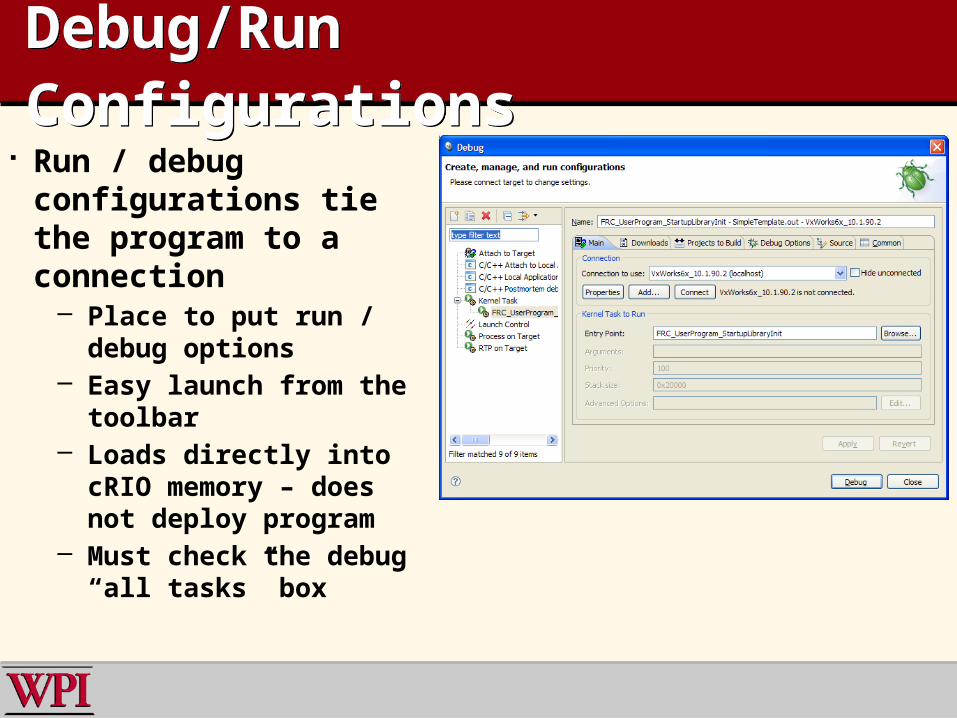
Debug/Run ConfigurationsDebug/Run Configurations Run / debug
configurations tie the program to a connection
– Place to put run / debug options
– Easy launch from the toolbar
– Loads directly into cRIO memory – does not deploy program
– Must check the debug “all tasks” box
Program debuggingProgram debugging
Download program to cRIO Debugger has professional tools
– Breakpoints– Watchpoints– Examination of variables
… all done wirelessly
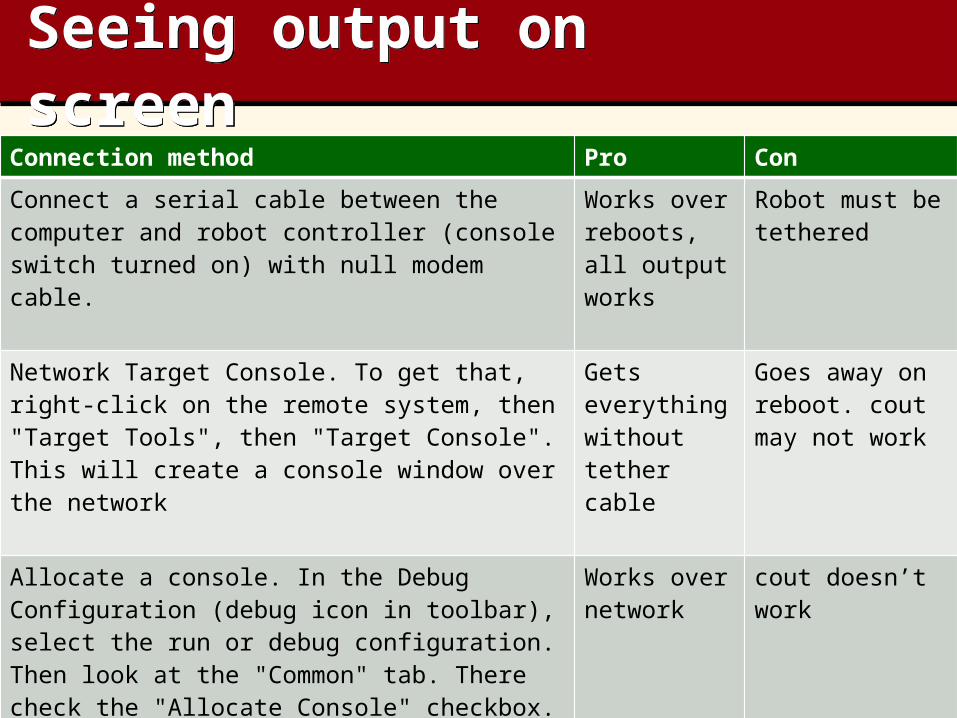
Seeing output on screenSeeing output on screenConnection method Pro Con
Connect a serial cable between the computer and robot controller (console switch turned on) with null modem cable.
Works over reboots, all output works
Robot must be tethered
Network Target Console. To get that, right-click on the remote system, then "Target Tools", then "Target Console". This will create a console window over the network
Gets everything without tether cable
Goes away on reboot. cout may not work
Allocate a console. In the Debug Configuration (debug icon in toolbar), select the run or debug configuration. Then look at the "Common" tab. There check the "Allocate Console" checkbox.
Works over network
cout doesn’t work
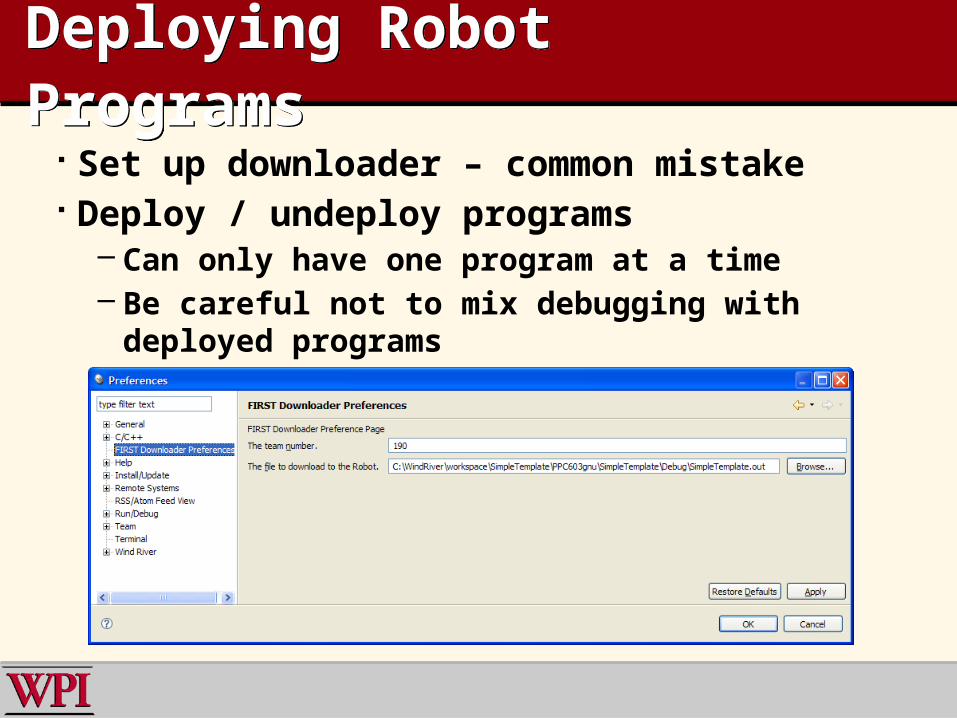
Deploying Robot ProgramsDeploying Robot Programs Set up downloader – common mistake Deploy / undeploy programs
– Can only have one program at a time– Be careful not to mix debugging with deployed
programs

Everything is C++Everything is C++
What if I can’t or don’t want to write C++ code?– Put .cpp at the end of file names– Write C code, except when referencing
WPILib objects• Use C++ object construction and referencing
rather than the C method• Create one class for your robot program• Everything else looks like C
C Interfaces exist for most functions
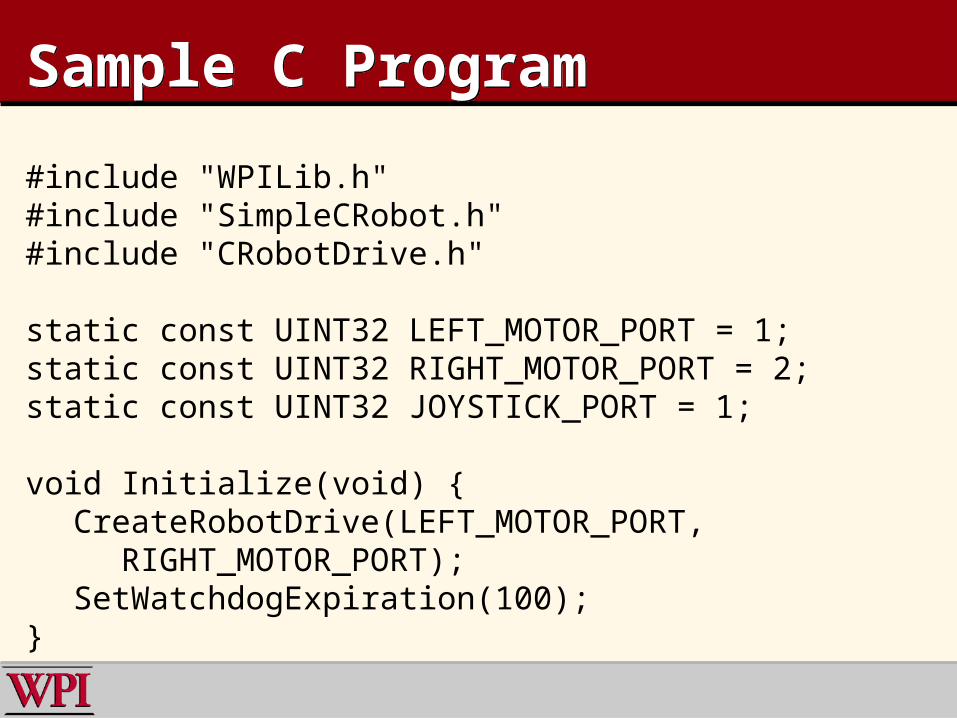
Sample C ProgramSample C Program
#include "WPILib.h"#include "SimpleCRobot.h"#include "CRobotDrive.h"
static const UINT32 LEFT_MOTOR_PORT = 1;static const UINT32 RIGHT_MOTOR_PORT = 2;static const UINT32 JOYSTICK_PORT = 1;
void Initialize(void) {CreateRobotDrive(LEFT_MOTOR_PORT,
RIGHT_MOTOR_PORT);SetWatchdogExpiration(100);
}
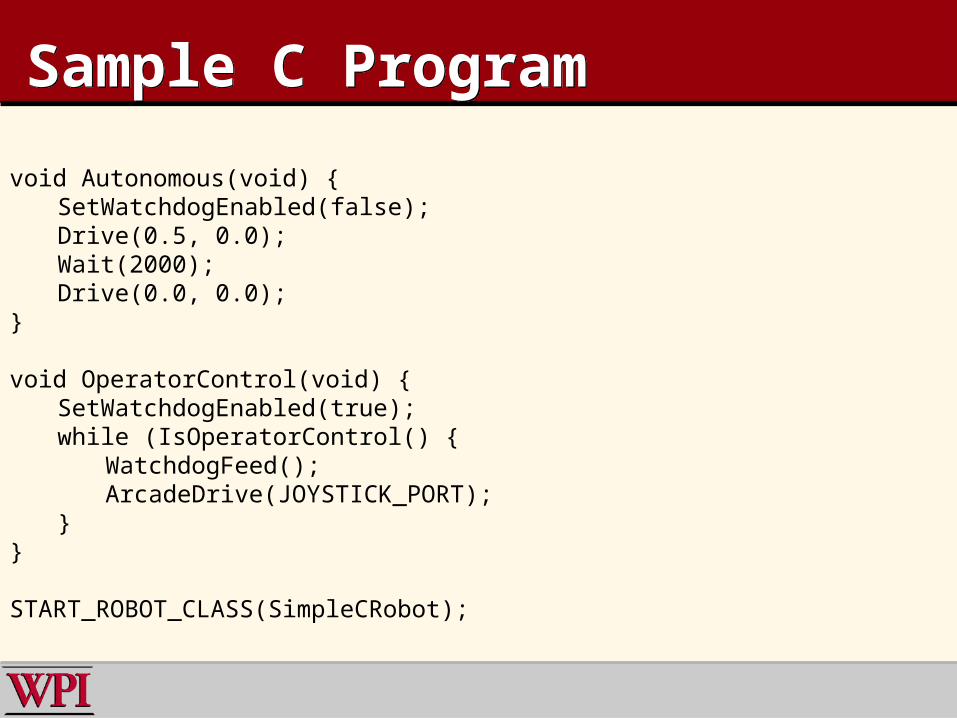
Sample C ProgramSample C Program
void Autonomous(void) {SetWatchdogEnabled(false);Drive(0.5, 0.0);Wait(2000);Drive(0.0, 0.0);
}
void OperatorControl(void) {SetWatchdogEnabled(true);while (IsOperatorControl() {
WatchdogFeed();ArcadeDrive(JOYSTICK_PORT);
}}
START_ROBOT_CLASS(SimpleCRobot);
Programming ParadigmProgramming Paradigm Subclass one of the robot classes
– SimpleRobot – like easyC/WPILib– IterativeRobot – more like raw IFI code
Lots of sensors– All supported sensors are built-in objects and
all supported through the FPGA– Lots of support code to make other stuff work
Full multi-tasking operating system at your disposal– VxWorks has tasks, syncronization, I/O, etc.
everything you expect and all built in!

Using WPILib Source CodeUsing WPILib Source Code
Source code will soon be available on a SourceForge server at WPI– Will have code in a SVN repository– Readable by all
WPILib normally is referenced inside the WindRiver directory tree
Teams need to change– The include path to use the new library– The library (wpilib.a) location

Program StructureProgram Structure
Subclass SimpleRobot or IterativeRobot classes– Fill in constructor (things that run when
the robot is turned on)– Fill in methods (Autonomous,
OperatorControl)

Program Develop/Debug/DeployProgram Develop/Debug/Deploy
Programs are developed in WorkBench– Environment based on eclipse with additions– Full debugger available with breakpoints,
watchpoints, variable examining, etc.– CVS/SVN plug-ins for tracking source code
Download your code for debugging Deploy working code so that starts at power-up
– Programs are loaded onto internal SSD, and load on reboot
– Tools in Workbench will help you get your code there
What kinds of objects are there?What kinds of objects are there?
About 48 objects currently:– Robot definition– Motors and servos– Driver station– Sensors– Utility classes

Defining the RobotDefining the Robot
RobotBase defines the robot control– SimpleRobot has methods for
Autonomous and Operator Control– IterativeRobot has methods for state
transitions on the field RobotDrive handles easy autonomous
and operator controlled driving– You tell it about motors– Call methods to Drive, TankDrive,
ArcadeDrive, HolonomicDrive

RobotDriveRobotDriveclass RobotDrive{
RobotDrive(unsigned frontLeftMotorChannel, unsigned rearLeftMotorChannel);
void Drive(float speed, float curve);
void TankDrive(float leftValue, float rightValue);
void ArcadeDrive(float moveValue, float rotateValue);
void HolonomicDrive(float magnitude, float direction, float rotation);
void SetLeftRightMotorSpeeds(float leftSpeed, float rightSpeed);
void TankDrive(GenericHID *leftStick, GenericHID *rightStick);
void ArcadeDrive(GenericHID *stick);
void SetInvertedMotor(MotorType motor, bool isInverted);};

Motors and ServosMotors and Servos
Motors are created as Victor or Jaguar objects– Have float values ranging from -1.0 to +1.0,
0 is stopped– Can be shut off completely– Works with the RobotDrive object
Servos are created as Servo objects– Values from 0.0 to 1.0– Never automatically set to 0

Driver StationDriver Station
Allows access to all DriverStation I/O– Joysticks, digital input/output, and analog
inputs– Packet numbers tell when values have
changed– Build custom interfaces and retrieve
values
SensorsSensors As many sensors as we could get to integrate
– All FIRST kit of parts sensors– Popular hobby sensors– Many Lego/HiTechnic I2C sensors
Specify channel and (optional) module– Channels generally are 1-based– Module (slot) is always 1-based
Additional general purpose code like interrupts, timing, etc. to handle those that we haven’t implemented
CompressorCompressor
One stop shopping for compressor control– You specify the relay port and the digital
input port– Compressor automatically starts and
stops using a task– You can turn off the compressor when not
in use
Ultrasonic RangefinderUltrasonic Rangefinder
Interface for Vex or Daventech SRF04 Ultrasonic Rangefinder– Individual operation for fire sensor– Automatic mode to round-robin sensors– Results returned in inches or millimeters
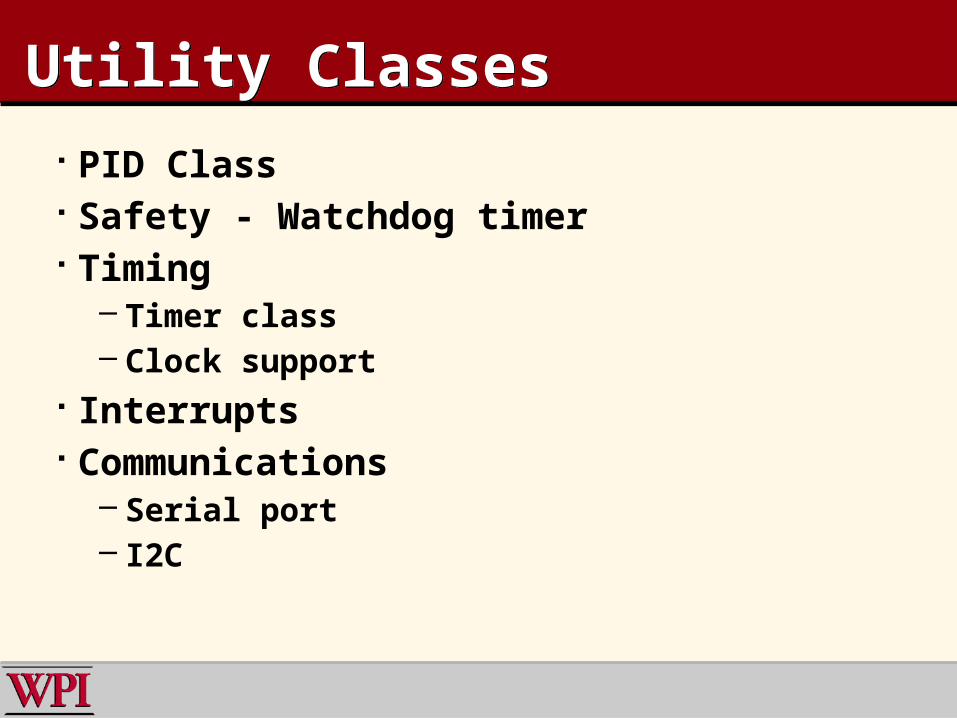
Utility ClassesUtility Classes
PID Class Safety - Watchdog timer Timing
– Timer class– Clock support
Interrupts Communications
– Serial port– I2C

TimersTimers
Timing various processes in your programs– Start, Stop, Get, Reset functions– Millisecond granularity
System clock with uSec granularity for synchronizing all events
VxWorks timing is also available

InterruptsInterrupts
Interrupts will notify your program of changes in a device or timer– Digital I/O– Notification queue
Can either wait or be notified of an interrupt
Task priorities allow you to tune the system
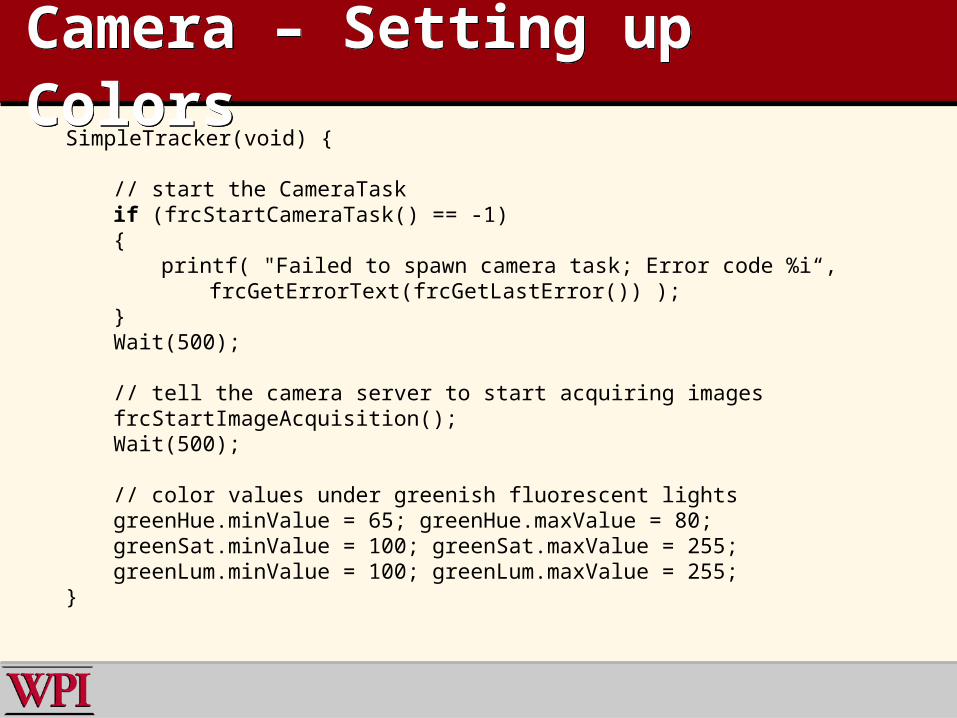
Camera – Setting up ColorsCamera – Setting up ColorsSimpleTracker(void) {
// start the CameraTaskif (frcStartCameraTask() == -1){
printf( "Failed to spawn camera task; Error code %i“,frcGetErrorText(frcGetLastError()) );
}Wait(500);
// tell the camera server to start acquiring imagesfrcStartImageAcquisition();Wait(500);
// color values under greenish fluorescent lightsgreenHue.minValue = 65; greenHue.maxValue = 80;greenSat.minValue = 100; greenSat.maxValue = 255;greenLum.minValue = 100; greenLum.maxValue = 255;
}

Camera – tracking an objectCamera – tracking an objectvoid Autonomous(void) {
GetWatchdog().Feed();
FrcParticleAnalysisReport par;
while (IsAutonomous()) {
if (frcFindColor(IMAQ_HSL, &greenHue, &greenSat, &greenLum, &par) && par.particleToImagePercent < MAX_PARTICLE_TO_IMAGE_PERCENT && par.particleToImagePercent > MIN_PARTICLE_TO_IMAGE_PERCENT)
myRobot->Drive(1.0, (float) par.center_mass_x_normalized);else
myRobot->Drive(0.0, 0.0);Wait(50);
}myRobot->Drive(0.0, 0.0);
}

Conventions in WPILibConventions in WPILib Constructors associate objects and channels
– Module/channel, channel only (shorthand for first module), or another object
Methods are overloaded, i.e. can take various types for arguments when it makes sense)– ArcadeDrive(moveValue, rotateValue) or
ArcadeDrive(Joystick) Object arguments can either be references or
pointers Default constructors are private

Getting HelpGetting Help
Documentation Online resources

WPILib DocumentationWPILib Documentation
Documentation comes in two forms:– Doxygen output compiled from the source
code comments• A C and a C++ Reference Manual
– C/C++ Programming Users Guide Both documents are stored in:
c:\WindRiver\docs\extensions\FRC Vision system spec

SupportSupport FIRST forums NI Community Forums – http://ni.com/FIRST WPI / FIRST NSF Community site (ThinkTank) All monitored by:
– WPI– NI– FIRST– Beta teams
All source code available for team-team assistance Phone support through NI
– 866-511-6285 (1PM-7PM CST, M-F)
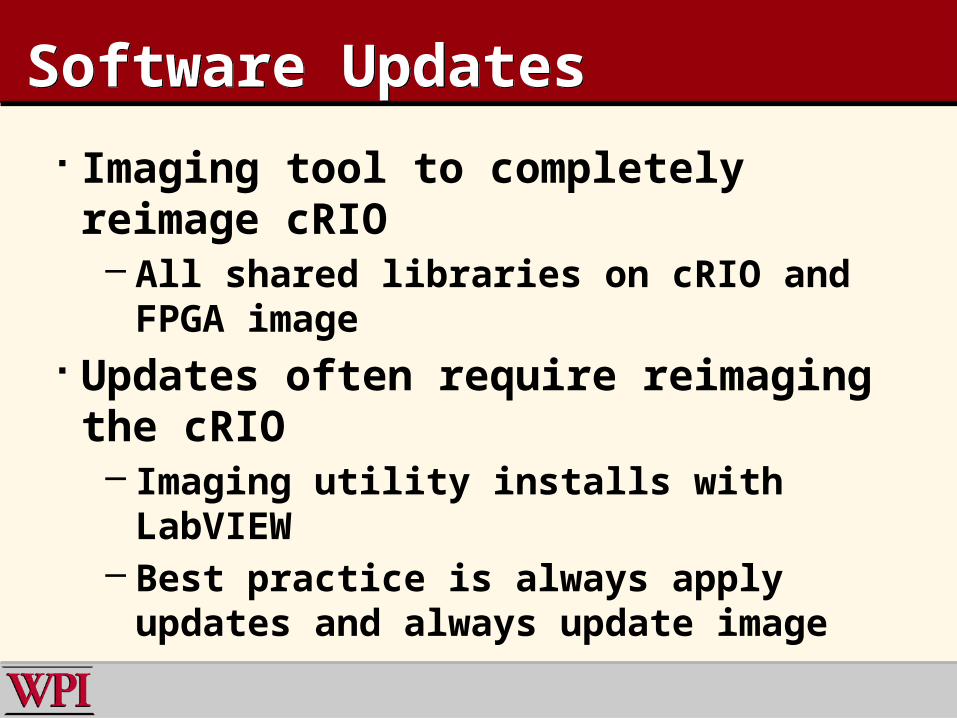
Software UpdatesSoftware Updates
Imaging tool to completely reimage cRIO– All shared libraries on cRIO and FPGA
image Updates often require reimaging the
cRIO– Imaging utility installs with LabVIEW– Best practice is always apply updates and
always update image
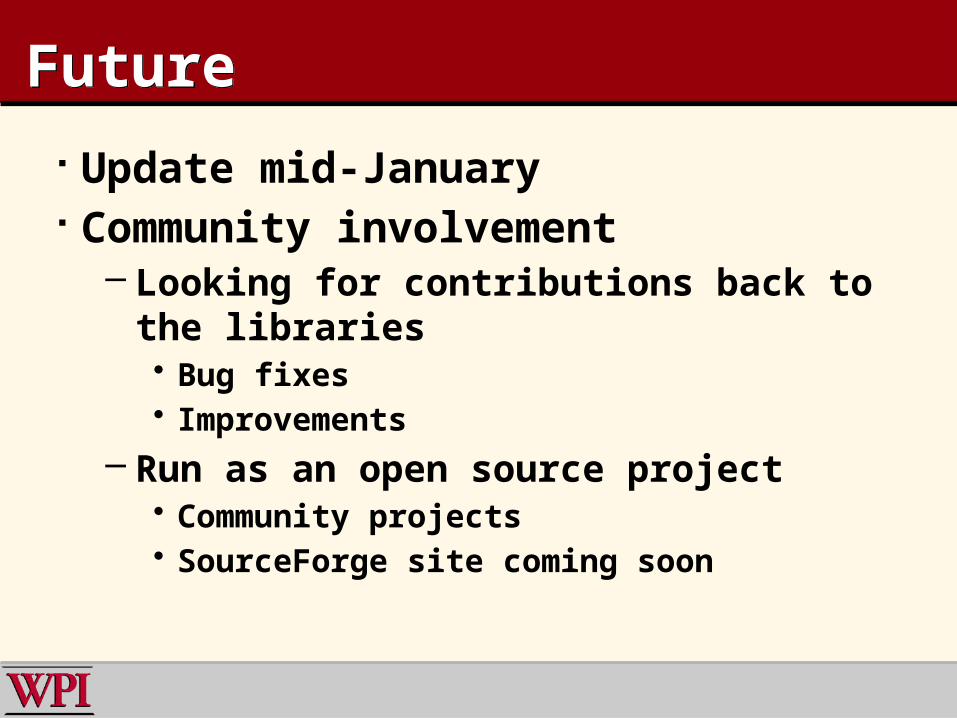
FutureFuture
Update mid-January Community involvement
– Looking for contributions back to the libraries• Bug fixes• Improvements
– Run as an open source project• Community projects• SourceForge site coming soon

•Questions?•Questions?
Examples and TemplatesExamples and Templates
Sample programs will be included– Use the samples as templates for your
own code– Additional samples to show how other
aspects of the system work
Analog I/O and TriggersAnalog I/O and Triggers
Analog I/O features:– User defined sample rates/module– Averaging of multiple values– Oversampling– DMA for synchronous measurements and user
averaging Triggers
– Range of analog values– Routed to a counter to count values in/out of
range– Can interrupt program on transitions
Using Robot ObjectsUsing Robot Objects
Objects are created as:– Local/global variables or allocated with C++
new operator• Encoder leftWheelEncoder(3, 4);• Encoder *leftWheelEncoder = new Encoder(3, 4);
Used by calling methods (functions)– encoder.Get()– speedController.Set()– rangefinder.Start()– Stop(), etc.
Common ProblemsCommon Problems
Running two programs concurrently Opening output windows Problems downloading code
– Modules already loaded, tasks loaded None of the libraries available
– cRIO FPGA image doesn’t match– Loading program before FPGA loads
Motors don’t move– Watchdog timer
Kernel image compatibility

Common ProblemsCommon Problems
Joystick support – Linux HID devices– Might have to play with the device to see
what’s there Installation
– Must be online for validating key– Virus scanners have caused problems– HP Single Signon features breaks
installation Driver Station connections have no
pullup or pulldown resistors
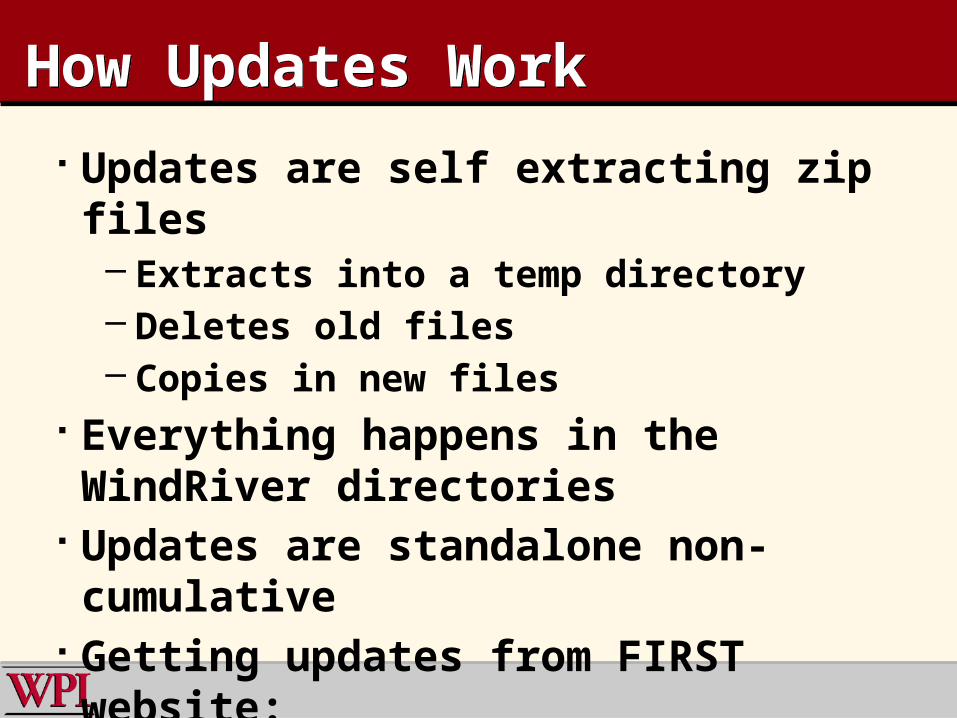
How Updates WorkHow Updates Work
Updates are self extracting zip files– Extracts into a temp directory– Deletes old files– Copies in new files
Everything happens in the WindRiver directories
Updates are standalone non-cumulative Getting updates from FIRST website:
www.usfirst.org

The HardwareThe Hardware
Overview Video Some specs:
– 400 mhz PPC– 64 mb RAM– 128 mb Flash (solid state disk)– 2m gate FPGA– 2 Ethernet ports– Serial port
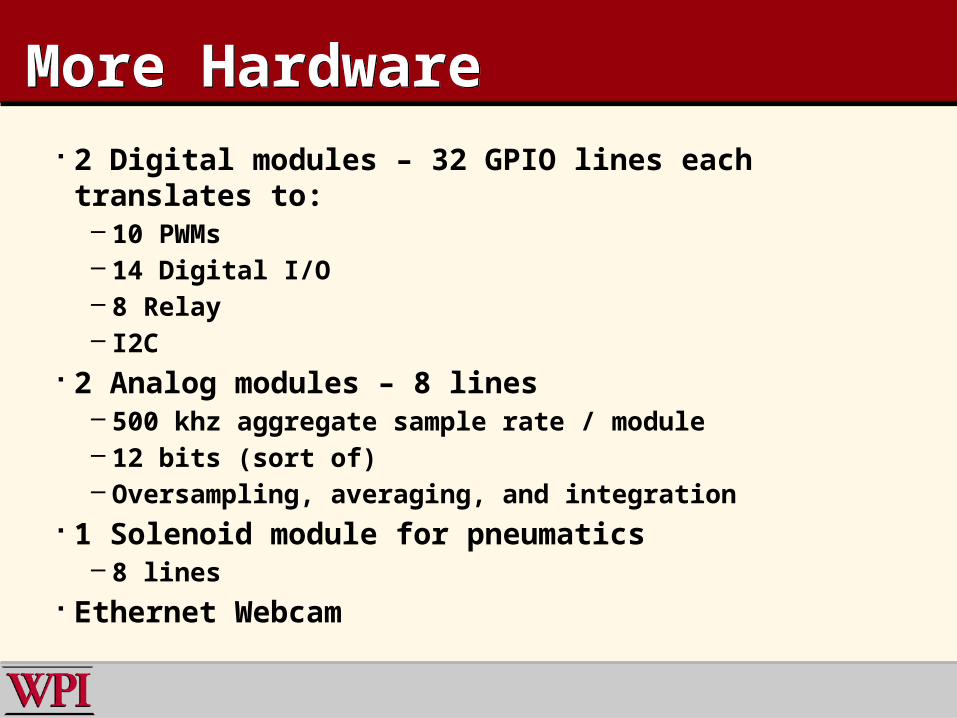
More HardwareMore Hardware 2 Digital modules – 32 GPIO lines each translates to:
– 10 PWMs– 14 Digital I/O– 8 Relay– I2C
2 Analog modules – 8 lines– 500 khz aggregate sample rate / module– 12 bits (sort of)– Oversampling, averaging, and integration
1 Solenoid module for pneumatics– 8 lines
Ethernet Webcam
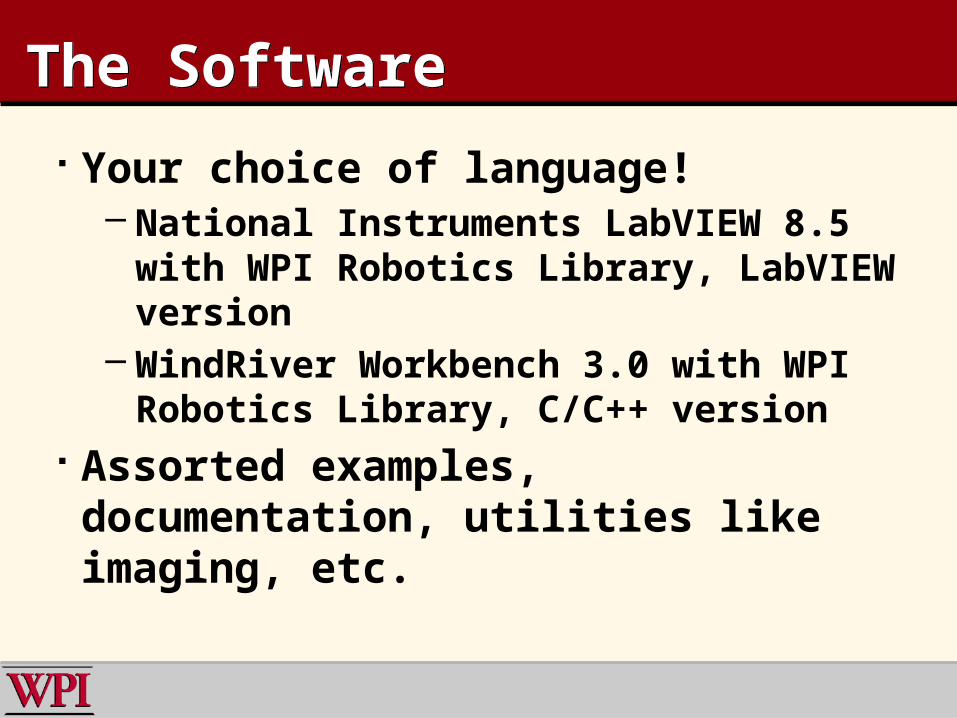
The SoftwareThe Software
Your choice of language!– National Instruments LabVIEW 8.5 with
WPI Robotics Library, LabVIEW version– WindRiver Workbench 3.0 with WPI
Robotics Library, C/C++ version Assorted examples, documentation,
utilities like imaging, etc.
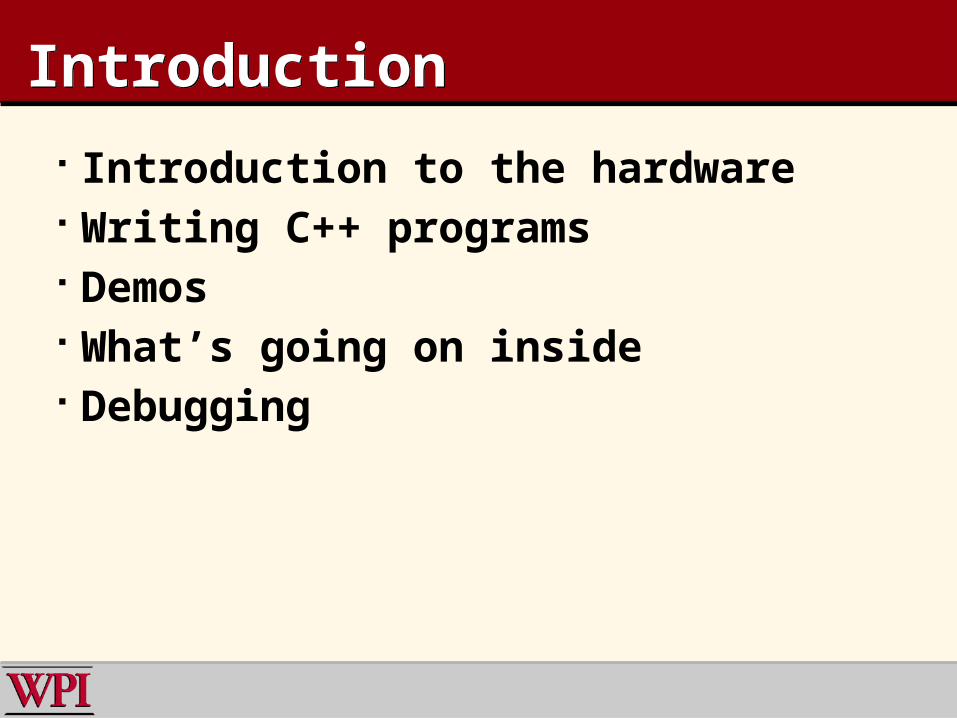
IntroductionIntroduction
Introduction to the hardware Writing C++ programs Demos What’s going on inside Debugging

A Little about ArchitectureA Little about Architecture
All heavy lifting to sensors and motors is through an FPGA– Field Programmable Gate Array
• Fancy name for custom logic that makes the sensors work
– All time sensitive hardware interactions are done through the FPGA
– If we did our job, you should never have to deal with it.

FPGA in WPI Robotics LibraryFPGA in WPI Robotics Library
All modules are connected to the PPC through the FPGA
Programming with the FPGA– Create instance of object with the port
number or port object the device is physically connected to• Most objects are “overloaded” to take either
unsigned port numbers or port objects
– Start and/or use the device

ArchitectureArchitecture

Accelerometer and GyroAccelerometer and Gyro
Gyro returns heading in degrees using the FPGA Analog Input accumulator– Relies on the oversampling and averaging
engine built into the FPGA Accelerometer converts value to mGs

Counters and SourcesCounters and Sources
Counters count Digital Sources and Analog Triggers– Digital sources are digital inputs where
you can specify modes (standard, geartooth, and semi-period) and edges
– Analog Triggers can be counted Subclasses include:
– Quadrature encoders– Geartooth sensors (with direction)– Simple counters
Digital I/ODigital I/O
Simple Digital Input and Output– Can route to a counter or used along with
a counter– Pulse generation for small signals– Can interrupt on edges

Relays and SolenoidsRelays and Solenoids
Relays are designed for spikes– On, Off, Forward, and Reverse output
Solenoids use the 9472 module– Controls pneumatics directly

Watchdog TimerWatchdog Timer
Stops all motors in event of failure System watchdog
– Can’t be modified by users– Based on the e-stop/enable flag and
reliable communications User Watchdog
– Default enabled– You are responsible for care and feeding
the watchdog
DMA (Direct Memory Access)DMA (Direct Memory Access)
Feature to record complete state of sensors periodically– Use for logging– Data smoothing and averaging


