S. Bravo Systems, Inc. 2929 Vail Ave. - Commerce, CA 90040 (323) 888-4133 - FAX: (323) 888-4123 www.SBravo.com BRAVO F-SERIES INSTALLATION INSTRUCTIONS AMERON LCX BRAVO F-SERIES FOR RIGID SINGLE WALL SUMPS AMERON FIBERGLASS LCX COAXIAL PIPE ONLY F-33-LS, F-33-LS-T, F-22-LS, F-22-LS-T READ THIS MANUAL FRONT TO BACK Written by Jonathan Smith 1 ii-F-Series-LCX-09B F-XX-LS MODELS MUST NOT BE INSTALLED ON ANY MANUFACTURERS DOUBLE WALL FIBERGLASS SUMPS. DO NOT INSTALL ON ROUND OR POLYETHYLENE SUMPS. 3” LCX COAXIAL 2” LCX COAXIAL
Transcript
S. Bravo Systems, Inc.
2929 Vail Ave. - Commerce, CA 90040
(323) 888-4133 - FAX: (323) 888-4123
www.SBravo.com
BRAVO F-SERIESINSTALLATION INSTRUCTIONS
AMERON LCXBRAVO F-SERIES FOR RIGID SINGLE WALL SUMPS
AMERON FIBERGLASS LCX COAXIAL PIPE ONLY
F-33-LS, F-33-LS-T, F-22-LS, F-22-LS-T
READ THIS MANUAL
FRONT TO BACK
Written by Jonathan Smith
1 ii-F-Series-LCX-09B
F-XX-LS MODELS MUST NOT BE INSTALLED ON ANY
MANUFACTURERS DOUBLE WALL FIBERGLASS SUMPS.
DO NOT INSTALL ON ROUND OR POLYETHYLENE SUMPS.
3” LCXCOAXIAL
2” LCXCOAXIAL
READ THESE INSTRUCTIONS - KEEP FOR FUTURE REFERENCE
TABLE OF CONTENTS
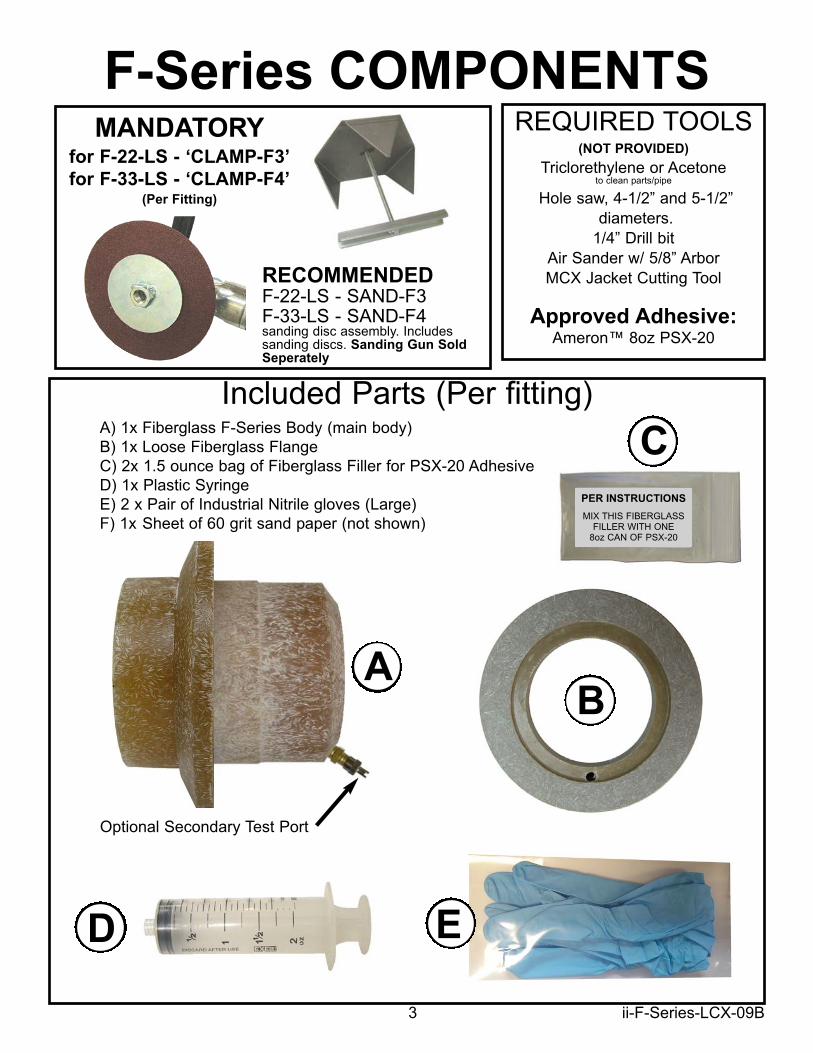
INCLUDED AND MANDATORY PARTS & TOOLS.................p. 3
ALL SUMPS AND BRAVO SYSTEMS FIBERGLASS F-SERIES FITTINGS MUST BE
KEPT FREE OF CONTAMINANTS, ESPECIALLY DIRT AND WATER / MOISTURE.
APPLY MEASURES TO KEEP THE INSTALLED FITTINGS DRY
WHEN LEFT OVERNIGHT ON-SITE.
A) Adhesive other than Ameron Brand PSX-20 8oz is used to install the F-Series fittings.
B) Fittings are installed on Polyethylene sumps or Round sumps.
C) F-Series Fiberglass Penetration Fittings are NOT installed by a Bravo Certified Contractor.
D) Failure to comply with the Required written report guidelines for Bravo DoubleWall Sumps.
WARRANTY IS VOID:IF ANY OF THE FOLLOWING OCCUR
If there is any indication or suspect damage, you must mark the freight paperwork
“Suspect Freight Damage”
E) The F-Series Fittings are applied to Fiberglass Sumps that are not Third Party Approved.
5 ii-F-Series-LCX-09B
A) Preparing the Fitting & FRP wall
A.1) Prepare your fittings by identifying the parts. Clean the surfaces of all fittings with
trichloroethylene or acetone to remove any contamination. Hand sand with 60-grit sandpaper if
necessary. Do not lay them on dirt, water, debris or other contaminated surfaces. When dusting off,
use a shop brush, chip brush or compressed air. Do not use rags, cloth or cloth-like material
DRY-FIT YOUR FITTINGS TO BE SURE THAT THEY ALIGN
PROPERLY WITH THE FALL YOUR VAPOR LINES WILL NEED.
DO NOT PLAN HOLE SAW CUTS ON UNEVEN SURFACES.
FLAT PANELS ONLY. CAREFUL OF CORNERS AND EDGES.
A.2) Dust off Sump walls (inside and out) and drill your pilot holes centered on the planned fitting
locations using a 1/4” Drill bit. Proceed when done to cut your holes with appropriate size hole saw
with 1/4” centralizer. See the table of fittings and hole saw sizes below. Hand-sand the rough
edges inside and outside made by the hole saw.
YOU CAN NOT MOUNT FITTINGS ON ROUND SURFACES
HOLE SAW SIZE CHART
4-1/2” for F-22-LS, F-22-LS-T
5-1/2” for F-33-LS, F-33-LS-T
A.3) Use the Sanding kit (Page 3, sanding gun sold seperately)
with an air powered source to lightly abrade each hole until the
surfaces are flat and even (Fig. A3).
Follow the T-FS-SAND-KIT Installation Instructions.
Slightly angle your grind if necessary to create an angle drop for your penetration.
DO NOT OVERGRIND!! MAINTAIN A MINIMUM WALL THICKNESS OF 1/8” INCH
Fig. A3
CAUTIONWINTER WARNING
FOR COLD WEATHER AT 50°F DEGREES OR LESS:OBSERVE AND FOLLOW THE WARNINGS BELOW
BRAVO SYSTEMS FF-SERIES FLANGE FITTINGS AND F-SERIESFITTINGS ARE THICKER THAN THE TYPICAL FIBERGLASS CLAMSHELLS
COMMONLY INSTALLED IN FIBERGLASS PIPING APPLICATIONS.YOU MUST APPLY ADEQUATE HEAT TO THE PARTS AND BONDING
ADHESIVES TO ALLOW A FULL CURE TIME DURING EXTREME COLDTEMPERATURES. FAILING TO ALLOW THE INSTALLATION TO FULLYCURE MAY CAUSE THE ADHESIVE BOND TO THE FITTING TO FAIL.
JUST BEFORE EACH ADHESIVE APPLICATIONDRY FIT YOUR COMPONENTS ONE LAST TIME
1) PRE-HEAT THE SUMP TO NO MORE THAN 150°F TO ELIMINATE MOISTURE.
2) PRE-HEATING COMPONENTS IN EXTREME COLD WEATHER IS CRITICAL:> PRE-HEAT THE FIBERGLASS FITTING THOROUGHLY TO ~100°F> PRE-HEAT THE ADHESIVE TO ~80°F. DO NOT HEAT CATALYST!!
3) DO NOT ASSUME THE ADHESIVE IS CURED BECAUSE IT HAS HARDENED ON THEEXTERIOR. IT MAY ONLY BE A CURED “CRUST” IN THIS TEMPERATURE AND ANYMOVEMENT OR WATER TESTING MAY CAUSE DELAMINATION AND TOTAL FAILUREOF THE BOND.
4) DO NOT ADJUST, MOVE, SHIFT OR OTHERWISE DISTURB THESUMP, FITTINGS OR PIPING DURING THE CURING PROCESS.
5) YOU MUST ENSURE A FULL CURE BEFORE WATER TESTING. FOLLOWYOUR ADHESIVE INSTRUCTIONS FOR TEMPERATURE GUIDELINES.
Fig. B5
Adhesive
360°
Around
INSIDE OF SUMP
B) FACTORY GLUING RECOMMENDATIONB.1) Your Ameron LCX Coaxial pipe and Bravo FRP rigid penetration fittings should be clean and
COMPLETELY DRY AT ALL TIMES. All pre-abraded or milled areas should be inspected for debris
and inconsistencies. No dirt, grit, water or other foreign material should be on or inside the fiberglass
fitting components.
B.2) If you have room, you must lay your Fiberglass UDC on its side, preferably on some pallets
or other raised platform. You will need easy access to the interior.
DO NOT DAMAGE THE SUMP! CAREFULLY LAY THE SUMP ON ITS SIDE
AND DO NOT ALLOW IT TO FALL ANY DISTANCE TO THE GROUND.
B.3) You do NOT need Bravo Clamp tools for this factory-install method.
B.4) Follow Ameron PSX-20 Instructions to mix and apply your adhesive. One bag of
fiberglass filler is to be fully mixed with each adhesive kit.
B.5) Main body first - carefully apply a generous amount of adhesive to the wall and the face that
will meet the wall (Fig. B5). Place fitting into the hole and briefly press it down so some adhesive
oozes out 360° around. ALLOW TO CURE FOLLOWING THE PIPE MANUFACTURERS ADHESIVE INSTRUCTIONS.
B.6) After full cure. Turn the UDC over on its opposite side and ensure the abraded surface on the
interior of the sump is clean and dry, ready for adhesive gluing.
MAKE SURE TO NOT DAMAGE THE FITTING
THAT HAS BEEN INSTALLED!
DO NOT LAY THE SUMP ON AN INSTALLED FITTING!
THE INJECTION PORT
MUST FACE 12-O-CLOCK,
TOWARDS THE TOP OF
SUMP (OPENING)
6 ii-F-Series-LCX-09B
USE AMERON™ 8oz PSX-20 ADHESIVE ONLY
(Fig. X)Secondary
Pipe
Test Port
(Only on
Main body)
Adhesive
Injection
Port
Item A(Main body)
Fill &
Bead
Here
360°
Fig. B7
Adhesive
Item B
(Flange)
The Adhesive Injection Port on the
fitting body must be at the 12-o-Clock
or North Position, towards the top of
sump (opening). (Fig. X)
B.7) The Flange (Item B) should be installed to the
inside of the sumpafter adhesive has been applied
as shown. (Fig. B7)
Fig. B8
OUTSIDE
OF SUMP
Adhesive
OUTSIDE
OF SUMP
B.8) Bead the adhesive 360° around the fitting edge where it meets the sump wall (Fig. B8).
Then again allow to cure following Ameron PSX-20 adhesive instructions. SKIP TO STEP D.
7 ii-F-Series-LCX-09B
Generously apply mixed
adhesive to the flange
Generously apply mixed
adhesive to the flange
8
C) Gluing Alternative to RecommendationC.1) Your Ameron LCX Coaxial pipe and Bravo FRP rigid penetration fittings should be clean and
COMPLETELY DRY AT ALL TIMES. All pre-abraded or milled areas should be inspected for debris
and inconsistencies. No dirt, grit, water or other foreign material should be on or inside the fiberglass
fitting components.
C.2) Follow Ameron LCX installation guidelines on cleaning, cutting, scarfing and gluing your
fiberglass coaxial pipe. Use a minimum of 4 feet between first joint & sump fitting for proper
flexibility. Clean all parts after scarfing and tapering.
C.3) Get T-FS-CLAMP clamping tool ready for
each fitting installation.
C.4) Follow Ameron PSX-20 Instructions
to mix and apply your adhesive. One bag
of provided fiberglass filler is to be fully mixed
with each adhesive kit. (Pg. 3)
DO NOT ATTEMPT TO
MIX MORE THAN
ONE KIT AT A TIME.
C.5) Main body first - carefully apply a
generous amount of adhesive to the wall and
the face that will meet the wall (Fig. C5).
Fig. C5
Adhesive
ii-F-Series-LCX-09B
OUTSIDE
USE AMERON™ 8oz PSX-20 ADHESIVE ONLY
3-POINT
CLAMP
INSIDE
Install Main body to outside of sump
and apply adhesive to areas shown
Install the loose Flange
and use gloved finger to run a
generous bead along joint.
Item A
(Main body)
Fill &
Bead
Here
360°
Fig. C6
Adhesive
Adhesive
C.7) Apply adhesive to the Main Body’s outer surface 360° where shown.
DO NOT BLOCK TEST PORTS. After applying adhesive to all contact areas
(Fig. C6) Apply the flange over the fitting and to the wall (Item B, Fig. C6)
C.8) Apply the Bravo Clamp immediately as shown in Fig. C8. Install clamp
shown to the body roughly flush with the face and tighten. Then hand-tighten
each bolt so it is snug. Apply 1/4 - 1/2 turn to each bolt evenly until the clamp
starts to move. Do not tighten bolts until the clamp falls off the body.
C.9) Apply a generous bead of adhesive as shown. (Fig. C9)
C.10) Glue all penetration fittings and allow to cure following the pipe
manufacturers adhesive instructions.
Item B
(Flange)
(Fig. X)Secondary
Pipe
Test Port
(Only on
Main body)
C.6) The main fitting body (Item A)
should be installed to the outside first.
Then apply adhesive as shown (Fig. C6).
Fig. C9
Adhesive
Injection
Port
9 ii-F-Series-LCX-09B
OUTSIDE
Fig. C8
The Adhesive Injection Port on the fitting
body must be at the 12-o-Clock or North
Position, towards the top of sump (opening).
(Fig. X)
SCARF 3” in both directions (Pg. 11)
2” AmeronLCX
(Coaxial)
STEP D2) You must add 2-7/8” to your total distance and use a Jacket Cutter to cut the
secondary coaxial away at that point. SEE PAGE 11 FOR JACKET CUTTER DIRECTIONS.
YOU MUST NOT FORGET TO ADD ANY ADDITIONAL DISTANCES.
From the point where your secondary LCX is cut, scarf 3” away from the cut and 3-1/2” towards the
cut and break the edge on your Secondary cut. See Page 11 for Directions on how to scarf.
Fig. D1
F-22-LS(LCX by Slip) Find your distance Elbow or Tee
(Termination)
You must add the
number on the left to
the total distance you
find between the face
of the fitting and your
termination
2-7/8”
Face of the fitting
(Inside of sump)
STEP D1) The F-22-LS ( LCX by Slip) below requires critical measurements. Follow the
directions! Dry fit to determine the distance from the face of your fitting to your termination. (Fig. D1)
Secondary
cut-away
3-1/2”
10 ii-F-Series-LCX-09B
D) LCX PREPARATION & GLUING
F-22-LS(LCX by Slip)
3”
Radius Edge
360°
Your pipe must
be well-scarfed in
preparation for
the Adhesive
Injection step.
Your target is
80-90% open
fiberglass within
the area
specified.
SCARFING YOUR PRIMARY PIPE
WITH SAND STRIP
11 ii-F-Series-LCX-09B
12 ii-F-Series-LCX-09B
STEP D3) YOUR SUMPS AND FITTINGS MUST BE COMPLETELY DRY! Get your Adhesive
Kits together and glue your PRIMARY LINE to their respective hardpoints (Tees, Elbows, Etc..).
Follow your Ameron PSX-20 adhesive Instructions to mix and apply your adhesive. DO NOT MIX MORE THAN ONE KIT AT A TIME.
STEP D4) After a full cure time, pressure test your primary pipe as per your pipe manufacturer.
If the test passes, continue to Section E. If the test fails, find the leak points and repair per your
pipe manufacturers guidelines. DO NOT TEST WHEN ADHESIVE IS WET.
PRIMARY PRESSURE TESTING ON GLUED PIPE JOINTS ONLY
DO NOT GLUE COAXIAL TO FITTING YET
13 ii-F-Series-LCX-09B
YOUR SECONDARY IS STILL NOT COMPLETELY SEALED.
DO NOT TEST YOUR SECONDARY YET.
THE F-SERIES FIBERGLASS PENETRATION FITTINGS MAY ONLY BEINSTALLED AND TESTED BY A BRAVO CERTIFIED CONTRACTOR
Details can be found at www.sbravo.com/cert
If you have any problems with Bravo Systems components, DoubleWall
Containment Systems, or accessories, Call Bravo Systems Immediately:
STEP F1) On an LCX Secondary termination, there is no taper so no adhesive needs to be
added to either the pipe or fitting before insertion.
Ensure that your LCX pipe is properly scarfed per the drawing on page 10.
YOUR SUMPS AND FITTINGS SHOULD BE COMPLETELY DRY & FREE OF DEBRIS!
Slide the LCX pipe all the way into the fitting. Mix your Ameron PSX-20 adhesive kit with the provided fiberglass filler. Load your syringe by placing the tip in the can of mixed adhesive anddrawing it up. LOAD THE CORRECT AMOUNT OF ADHESIVE INTO THE SYRINGE AND PURGETHE AIR FROM THE SYRINGE TIP (Pg. 14)
DO NOT TEST WHILE ADHESIVE IS WET!
For the Maximum Test Pressure, consult Ameron LCX pipe Instructions and/or Testing guidelines.
STEP F2) Quickly Inject the adhesive into the OUTSIDE Port first, at the top of the fitting body.
The paste should seep out along the LCX pipe. (Fig. F2)
STEP F4) Run adhesive around the joints and bead with a gloved finger. (Fig. F4)
STEP F5) After a full cure time, test your secondary pipe as per Ameron and local, state, or fed-
eral codes and/or regulations.
FIG. F4bead with
gloved finger
around pipe
FIG. F2INJECT
OUTSIDE
FIRST
FIG. F3INJECT
INSIDE
SECOND
F-22-LS Shown(LCX by Slip)
STEP F3) Quickly Inject the same amount of adhesive into the INSIDE Port second.
The paste should seep out along the LCX pipe. (Fig. F3)
FIG. F4bead with
gloved finger
around pipe
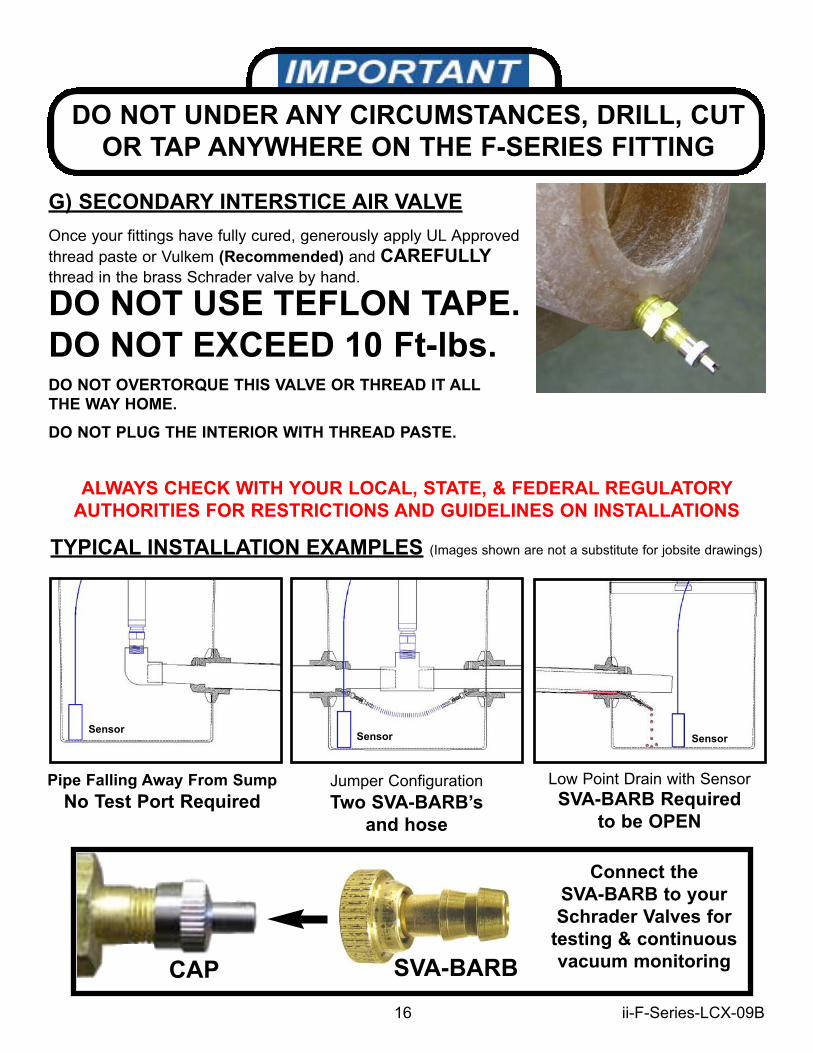
DO NOT UNDER ANY CIRCUMSTANCES, DRILL, CUT
OR TAP ANYWHERE ON THE F-SERIES FITTING
G) SECONDARY INTERSTICE AIR VALVE
Once your fittings have fully cured, generously apply UL Approved
thread paste or Vulkem (Recommended) and CAREFULLYthread in the brass Schrader valve by hand.
DO NOT USE TEFLON TAPE.
DO NOT EXCEED 10 Ft-lbs.DO NOT OVERTORQUE THIS VALVE OR THREAD IT ALL
THE WAY HOME.
DO NOT PLUG THE INTERIOR WITH THREAD PASTE.
SVA-BARBCAP
Connect the
SVA-BARB to your
Schrader Valves for
testing & continuous
vacuum monitoring
TYPICAL INSTALLATION EXAMPLES (Images shown are not a substitute for jobsite drawings)
Pipe Falling Away From Sump
No Test Port RequiredJumper Configuration
Two SVA-BARB’s
and hose
Low Point Drain with Sensor
SVA-BARB Required
to be OPEN
SensorSensor Sensor
ALWAYS CHECK WITH YOUR LOCAL, STATE, & FEDERAL REGULATORY
AUTHORITIES FOR RESTRICTIONS AND GUIDELINES ON INSTALLATIONS