Neil McCoubrey - 2008 1 Bristol Photographic Society – Introduction to Digital Imaging Part 1 – The Workspace This part of the course will introduce the Workspace, the Toolbox, Palettes and how to set up your workspace to meet your own needs. 1.1 Drop down menus You will need to “Open” an image in order to see many of the “Palette” details that we will discuss later on. This shows the drop down menus for opening a “Recent file”. Use “New” if you want to create a new blank image canvas to work on Use the “Open” if you know where the image file is located. Use “Browse” if you need to look for the file.
Transcript
Neil McCoubrey - 2008 1
Bristol Photographic Society – Introduction to Digital Imaging
Part 1 – The Workspace
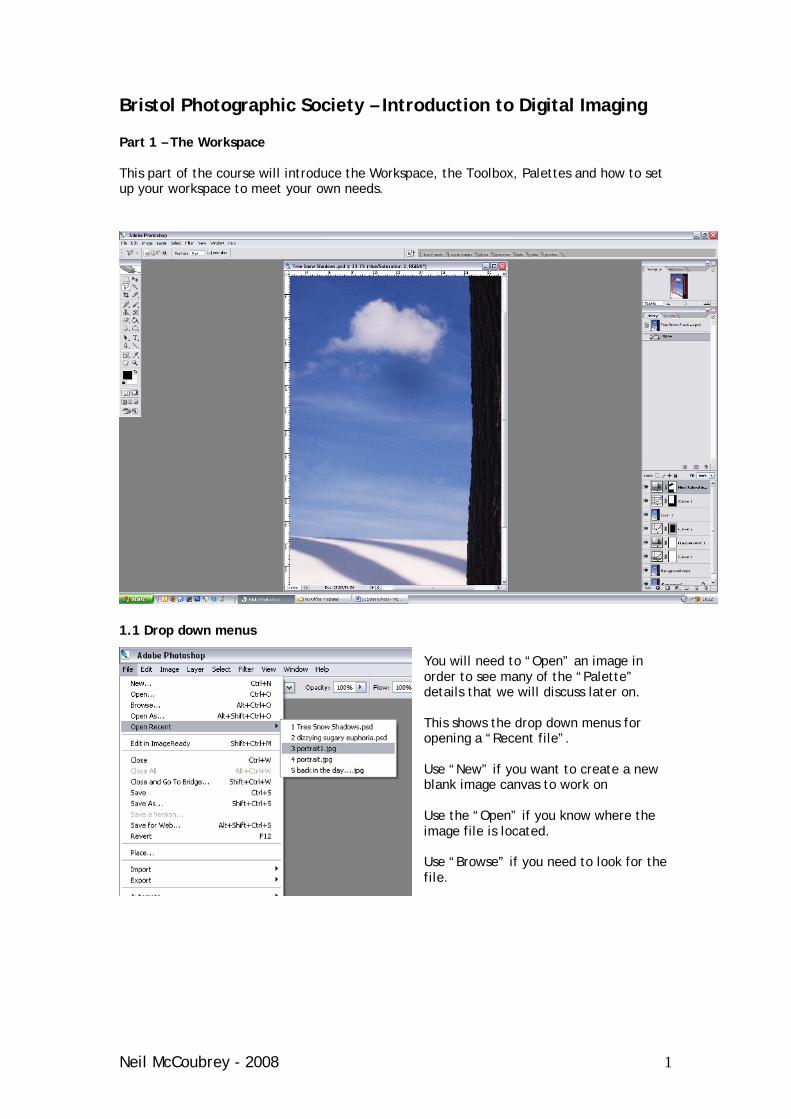
This part of the course will introduce the Workspace, the Toolbox, Palettes and how to set up your workspace to meet your own needs.
1.1 Drop down menus
You will need to “Open” an image in order to see many of the “Palette” details that we will discuss later on.
This shows the drop down menus for opening a “Recent file”.
Use “New” if you want to create a new blank image canvas to work on
Use the “Open” if you know where the image file is located.
Use “Browse” if you need to look for the file.
Neil McCoubrey - 2008 2
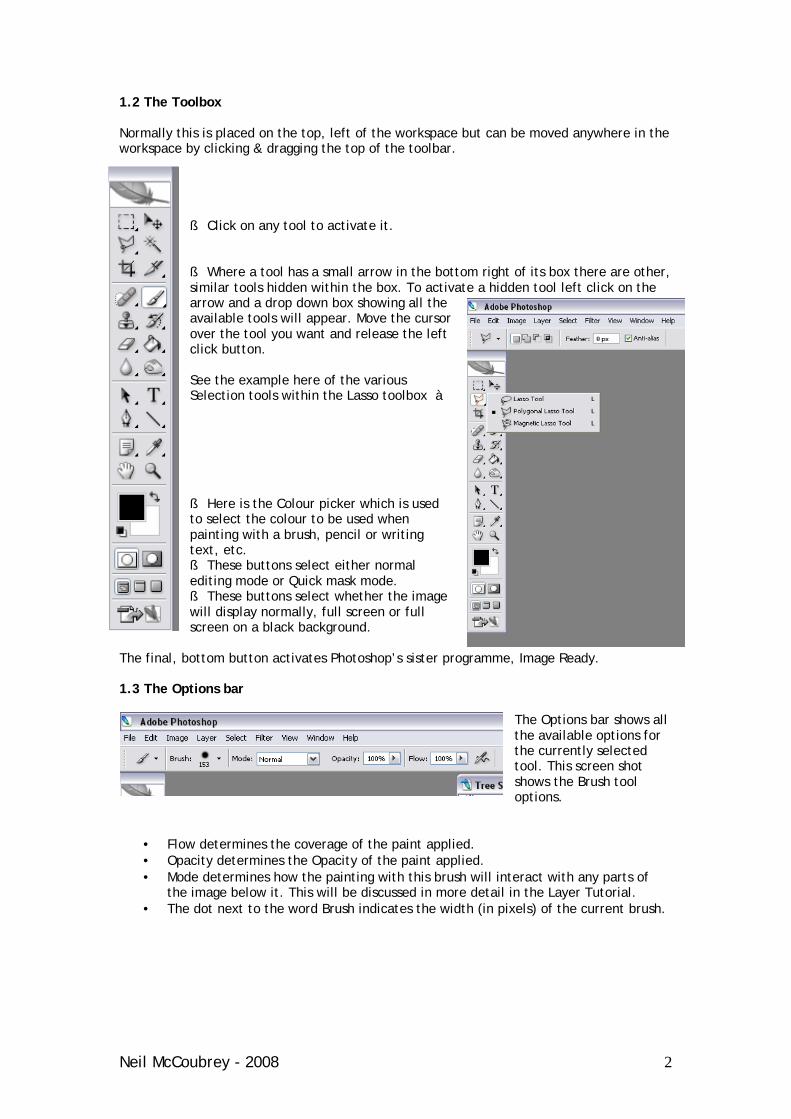
1.2 The Toolbox
Normally this is placed on the top, left of the workspace but can be moved anywhere in the workspace by clicking & dragging the top of the toolbar.
ß Click on any tool to activate it.
ß Where a tool has a small arrow in the bottom right of its box there are other, similar tools hidden within the box. To activate a hidden tool left click on the arrow and a drop down box showing all the available tools will appear. Move the cursor over the tool you want and release the left click button.
See the example here of the various Selection tools within the Lasso toolbox à
ß Here is the Colour picker which is used to select the colour to be used when painting with a brush, pencil or writing text, etc.ß These buttons select either normal editing mode or Quick mask mode.ß These buttons select whether the image will display normally, full screen or full screen on a black background.
The final, bottom button activates Photoshop’s sister programme, Image Ready.
1.3 The Options bar
The Options bar shows all the available options for the currently selected tool. This screen shot shows the Brush tooloptions.
• Flow determines the coverage of the paint applied.• Opacity determines the Opacity of the paint applied.• Mode determines how the painting with this brush will interact with any parts of
the image below it. This will be discussed in more detail in the Layer Tutorial.• The dot next to the word Brush indicates the width (in pixels) of the current brush.
Neil McCoubrey - 2008 3
If you now click on the down arrow next to the brush size dot this palette will appear.
ß You can adjust the diameter and hardness of the brush here as well as selecting from a range of predefined brush characteristics.
1.4 Viewing, Zooming & Navigating the Image
• When just opened the whole image will always fit the screen whatever its proportions.
• Select the magnifying Glass from the Toolbox• Every time you click inside the image it is magnified.
• Press the Spacebar at any time and whatever tool is selected will be replaced by the Hand tool and you can now move around the image by clicking and dragging the Mouse.
• Press the Alt key at the same time and the image will zoom out again.• Keep clicking the magnifying glass and eventually the individual pixels of the image
become visible. These are the individual building blocks of the image.
ß This is the Navigation palette. You can also use this to zoom in on part of the image. The red bounding box shows which part of the image is visible on the main screen. If you move the cursor into the red box and click you can move the box which will move you to a different part of the image on the main screen. You can use the slider & “mountain” buttons to zoom in or out.
Neil McCoubrey - 2008 4
1.5 Other Palettes
There are many palettes you can choose to show on your desktop. Here I will show my favourites.
ß The Histogram - This shows the volume of pixels ay every brightness level from full black on the left to full white on the right. This is the Histogram of the image shown on page 1. It shows there are no pixels that are full white or fully black. The left spike shows all the dark pixels in the tree bark. The right spike is the snow and clouds. The mid range indicates the volumes of pixels in the mid range which are primarily blue in this image.
ß This is the History palette. It shows and stores the last X actions you have taken on this file. The value of X is set by the user and will be discussed later. Here the only action so far is to “Open” the file. By clicking on earlier states and dragging them to the waste bin you can “Undo” recent actions.
ß This is the Layers palette. It shows all the layers in this image. You can turn the individual layers on and off, you can rearrange their order or change their effects.
Here at the bottom of the Layers palette are buttons that enable you to “Delete” a layer, “Add” a new blank Layer, add a Layer ß Mask, add an Adjustment Layer, etc.
ß This is the Channels palette. Here you can switch on and off each of the Red, Blue & Green channels. Try switching off the Blue and Green Channels (click the Eye to the left of the Channel). What remains is a B&W image that shows the brightness of all the red parts of the image. A white area has a full red and a black area contains no red. The various shades of grey indicate in between levels of red. Try the same switching off the Red and Green Channels. The sky & snow areas of the image are now very white or light grey showing high amounts of blue in these parts of the image.
Neil McCoubrey - 2008 5
1.5.1 The Colour Palette
If you click on a colour in the “Colour Picker” part of the Toolbox the following palette is revealed.
This palette shows everything you would ever want to know about the colour. You can pick any colour you want and it shows the CMYK values as well as the RGB values.
Using this palette you can select a macro colour range from the vertical colour bar and then refine your choice in the main colour box by moving the cursor to the desired colour. Clicking on “OK” will make this colour the “Foreground Colour” that will be used by
the tools in the toolbox.
Clicking the “only Web Colours” box limits the available colours to just those that are considered Web safe. Using any other colours on a web page may mean they are not correctly rendered on everyone’s monitor.
Select the colour you want, click OK and now click on the Paint Brush tool and paint and you will see the brush uses the chosen colour.
Click on the “Paint Bucket” tool and this will fill the whole frame with the chosen colour.
Palettes can be Hidden (not on the Workspace), Available (as a Tab within a Group on the Workspace or Open.
• To open a palette that does not yet exist in the Workspace or in a Group go the toolbar, click Window and then click on the required palette. If you want you can then drag it into a “Group” to make it Available but not Open on the Workspace.
• By clicking on the Tab of a Palette that is within a Group, on the Workspace, you can drag it onto the workspace to have it permanently visible (Open) and then move it to any suitable position.
• You can also drag and drop a palette from one Group into another.• To close a palette click on its tab and then on the Close button (X).
Neil McCoubrey - 2008 6
1.6 Setting up your Preferences
The “Preferences” are set, by you, to optimise Photoshop for the way you prefer to work
ß To modify the Preferences click Edit thenPreferences.
ß Preferences
The following dialog box will appear.
This shows the “General”screen.
On this screen the only setting that I change from the default is the “History States”. I set this to 40 which means that Photoshop remembers the last 40 things that I have done. Consequently, I can step back in history to previous states if I become unhappy with the recent changes I made to the image.
WARNING – The more History States you specify the more memory is required by Photoshop. My PC has 2.5GB of RAM and I find no problems with a setting of 40 History States.
Now click on the Next button to bring up the File Handling screen.
Neil McCoubrey - 2008 7
On the File Handling screen I set the “Maximise PSD & PSD File Compatibility” to “Always” and the “Recent files list” to 10.
On Displays & Cursors screen I set the “Normal Brush Tip” because it is easier to see the size of the brush.
I set the “Other Cursors” to “Precise” to see exactly where they are having their effect.
On the Units & Rulers screen I Print resolution to 240 and the Screen Resolution to 72.
Neil McCoubrey - 2008 8
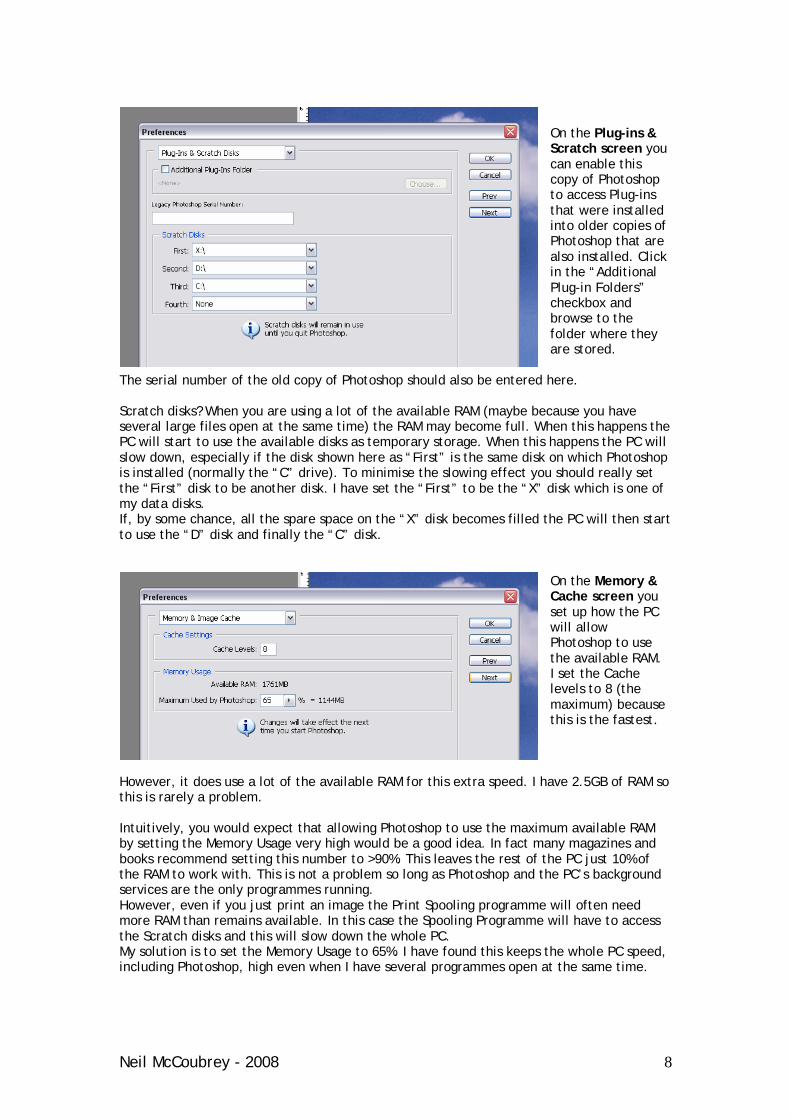
On the Plug-ins &Scratch screen you can enable this copy of Photoshop to access Plug-ins that were installed into older copies of Photoshop that arealso installed. Click in the “Additional Plug-in Folders” checkbox and browse to the folder where they are stored.
The serial number of the old copy of Photoshop should also be entered here.
Scratch disks? When you are using a lot of the available RAM (maybe because you have several large files open at the same time) the RAM may become full. When this happens the PC will start to use the available disks as temporary storage. When this happens the PC will slow down, especially if the disk shown here as “First” is the same disk on which Photoshop is installed (normally the “C” drive). To minimise the slowing effect you should really set the “First” disk to be another disk. I have set the “First” to be the “X” disk which is one of my data disks. If, by some chance, all the spare space on the “X” disk becomes filled the PC will then start to use the “D” disk and finally the “C” disk.
On the Memory & Cache screen you set up how the PC will allow Photoshop to use the available RAM. I set the Cache levels to 8 (the maximum) because this is the fastest.
However, it does use a lot of the available RAM for this extra speed. I have 2.5GB of RAM so this is rarely a problem.
Intuitively, you would expect that allowing Photoshop to use the maximum available RAM by setting the Memory Usage very high would be a good idea. In fact many magazines and books recommend setting this number to >90%. This leaves the rest of the PC just 10% of the RAM to work with. This is not a problem so long as Photoshop and the PC’s background services are the only programmes running. However, even if you just print an image the Print Spooling programme will often need more RAM than remains available. In this case the Spooling Programme will have to access the Scratch disks and this will slow down the whole PC.My solution is to set the Memory Usage to 65%. I have found this keeps the whole PC speed, including Photoshop, high even when I have several programmes open at the same time.