35
Broadcast E-Alerts Blackboard Web Community Manager
Broadcast E-Alerts
Blackboard Web Community Manager
Trademark Notice Blackboard, the Blackboard logos, and the unique trade dress of Blackboard are the trademarks, service marks, trade dress and logos of Blackboard, Inc. All other trademarks, service marks, trade dress and logos used in Blackboard and the Website are the trademarks, service marks, trade dress and logos of their respective owners.
Copyright Notice © 2016 Blackboard Inc. All rights reserved.
This guide covers all available features and functionality. Features included in your contract may vary.

Blackboard Web Community Manager Broadcast E-Alerts
C2BroadcastEAlerts_102516 i
Table of Contents Introduction .................................................................................................................................................. 1
Email E-Alerts ................................................................................................................................................ 2
Create an Email E-Alert ............................................................................................................................. 2
Send an Email E-Alert ................................................................................................................................ 6
Example of an Email E-Alert ...................................................................................................................... 9
Push Notification E-Alerts ........................................................................................................................... 10
Create a New Push Notification E-Alert .................................................................................................. 10
Send a Push Notification E-Alert ............................................................................................................. 12
Example of Sent Push Notification Broadcast E-Alert ......................................................................... 14
Announcement E-Alerts .......................................................................................................................... 15
Creating a New Announcement E-Alert .............................................................................................. 15
Send an Announcement E-Alert .......................................................................................................... 17
Example of an Announcement E-Alert ................................................................................................ 18
Twitter E-Alerts ....................................................................................................................................... 19
Create a New Twitter E-Alert .............................................................................................................. 19
Send a Twitter E-Alert ......................................................................................................................... 21
Example of Twitter E-Alert .................................................................................................................. 22
Facebook E-Alerts ................................................................................................................................... 23
Create a New Facebook E-Alert .......................................................................................................... 23
Send a Facebook E-Alert ..................................................................................................................... 25
Example of Facebook E-Alert .............................................................................................................. 26
Manage Broadcast E-Alerts ......................................................................................................................... 27
Alerts List View ........................................................................................................................................ 27
Delete an E-Alert ..................................................................................................................................... 27
Copy an E-Alert ....................................................................................................................................... 27
Filter E-Alerts........................................................................................................................................... 28
E-Alert Reports ........................................................................................................................................ 29
Display Results for a Broadcast E-Alert ................................................................................................... 29

Broadcast E-Alerts Blackboard Web Community Manager
ii C2BroadcastEAlerts_102516
Blackboard Web Community Manager Broadcast E-Alerts
C2BroadcastEAlerts_102516 1
Introduction
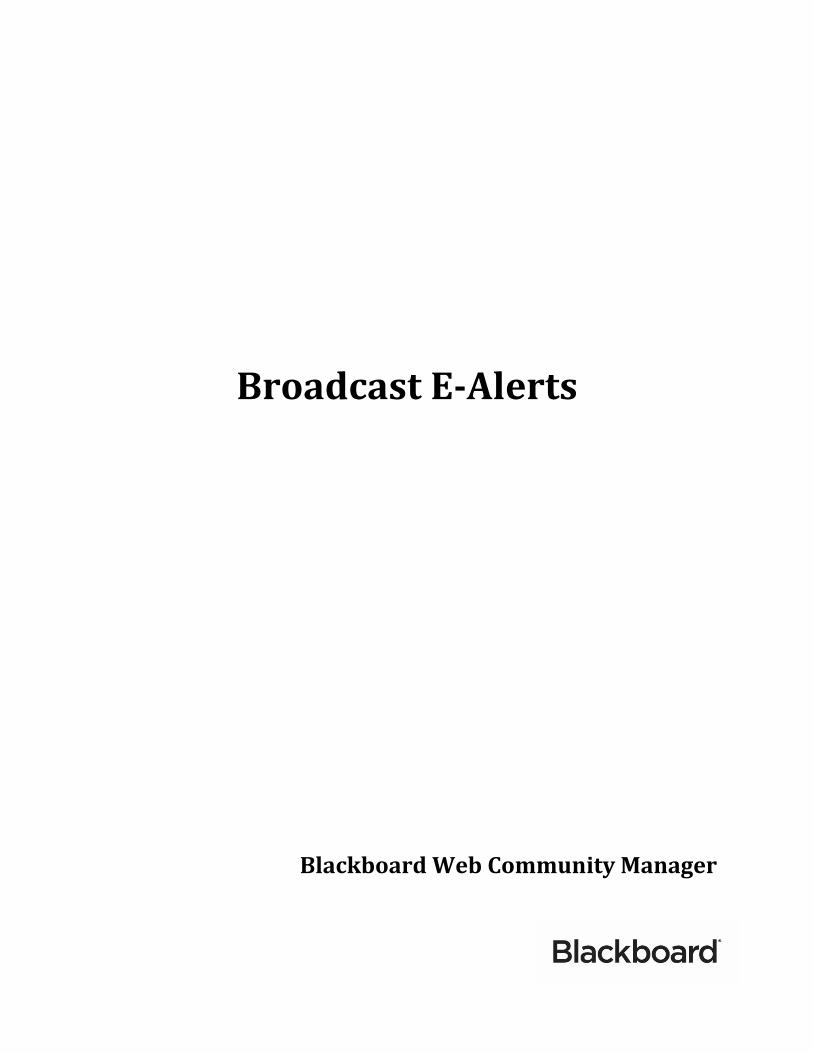
Broadcast E-Alerts allow you to mass communicate with users. You use Broadcast E-Alerts to relay important information such as school closings, events and early dismissals. You send them from within the Tools tab of the Site and Subsite workspaces. The Broadcast E-Alert types include Email, Push Notification, Announcement, Facebook and Twitter.
When sending a Broadcast E-alert, choose any of the E-Alert types. Fields that are required for each E-Alert type are marked with a corresponding E-Alert Type icon next to the field name text. Other required fields are marked with red triangles in the top right corner.

Broadcast E-Alerts Blackboard Web Community Manager
2 C2BroadcastEAlerts_102516
Email E-Alerts
You can send Email E-Alerts to specific registered users or a group of users.
Create an Email E-Alert
Here’s how you create a new email E-Alert.
1. In Site Manager, navigate to the Site Workspace from which you wish to send your Broadcast E-Alert.
2. Click the Tools tab and select Broadcast E-Alerts.
3. Click New E-Alert. The New Alert window displays.
Blackboard Web Community Manager Broadcast E-Alerts
C2BroadcastEAlerts_102516 3
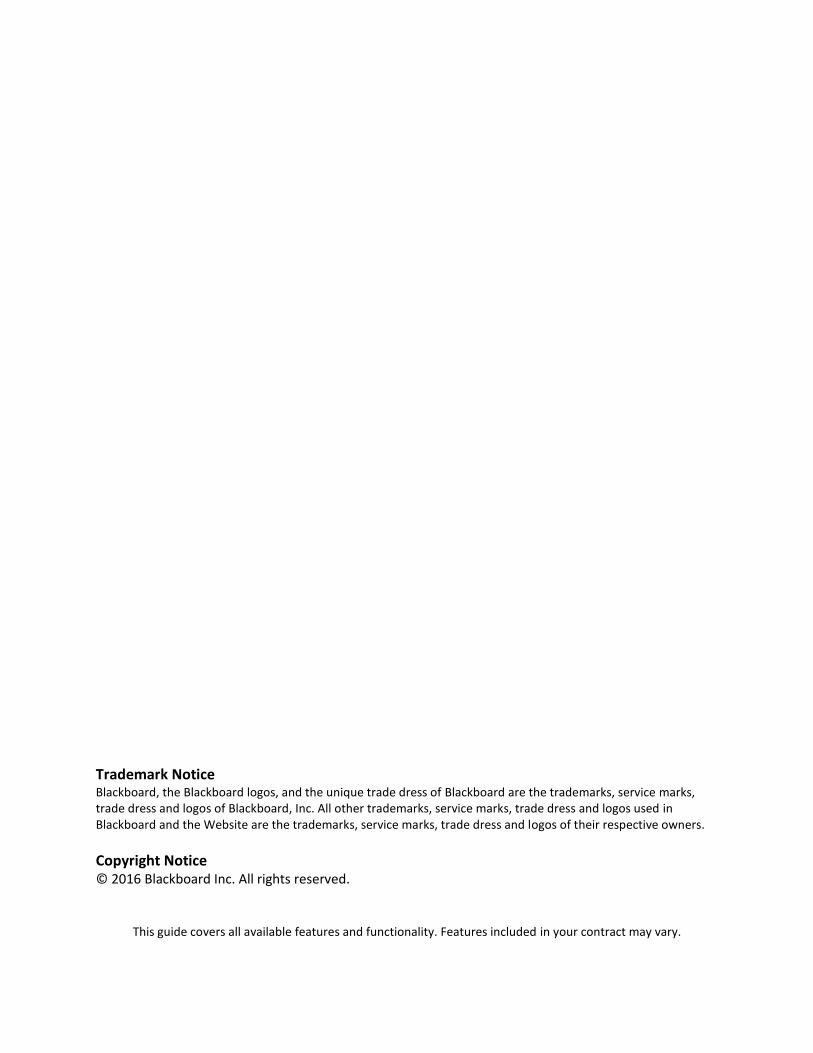
4. Enter a name for your Broadcast E-Alert in the Alert Name field. Note that the Email E-Alert type is the default selection.
5. Click Continue.
6. On the Message tab, enter the Subject for your E-Alert email.
7. Select an Email Type. Choose the Plain Text radio button to add only text. Choose the HTML radio button to add photos, links and format the text in your email using HTML code.
Broadcast E-Alerts Blackboard Web Community Manager
4 C2BroadcastEAlerts_102516
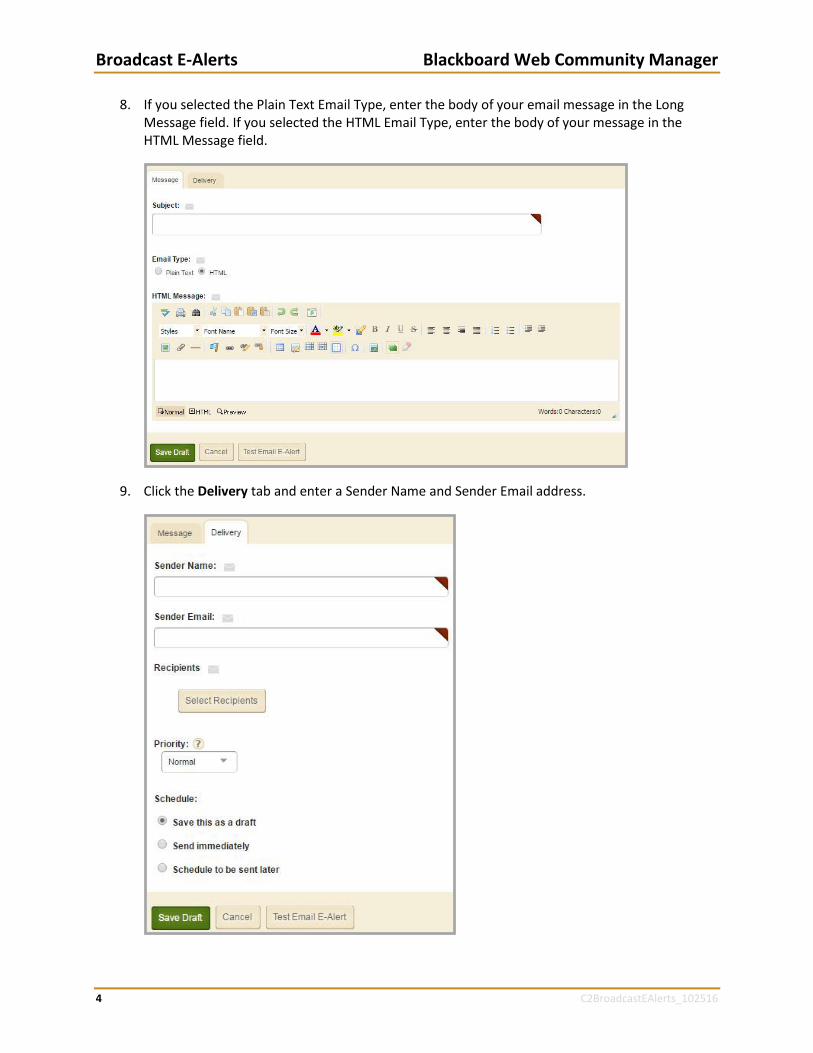
8. If you selected the Plain Text Email Type, enter the body of your email message in the Long Message field. If you selected the HTML Email Type, enter the body of your message in the HTML Message field.
9. Click the Delivery tab and enter a Sender Name and Sender Email address.

Blackboard Web Community Manager Broadcast E-Alerts
C2BroadcastEAlerts_102516 5
10. If you wish to test your Broadcast E-Alert, click Test Email E-Alert. The Test E-Alert window displays.
11. Enter the email address to which you wish to send the test E-Alert in the Email Address field.
12. Click Send Test E-Alert. 13. When finished, click Save Draft or navigate to the Delivery tab to send or schedule your
Broadcast E-Alert.
14. You are returned to the Alerts List View and the status of your E-Alert is marked as Draft.
Broadcast E-Alerts Blackboard Web Community Manager
6 C2BroadcastEAlerts_102516
Send an Email E-Alert
Here is how you send an email E-Alert.
1. In Site Manager, navigate to the Site workspace from which you wish to send your Broadcast E-Alert.
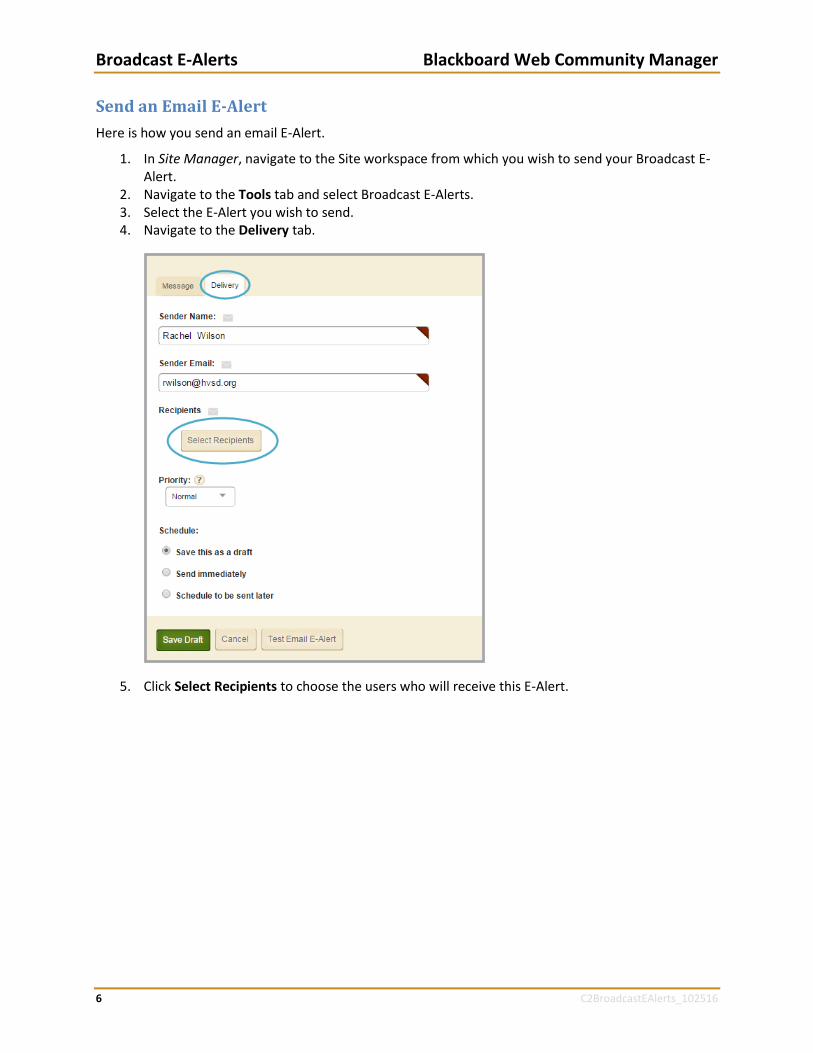
2. Navigate to the Tools tab and select Broadcast E-Alerts. 3. Select the E-Alert you wish to send. 4. Navigate to the Delivery tab.
5. Click Select Recipients to choose the users who will receive this E-Alert.
Blackboard Web Community Manager Broadcast E-Alerts
C2BroadcastEAlerts_102516 7
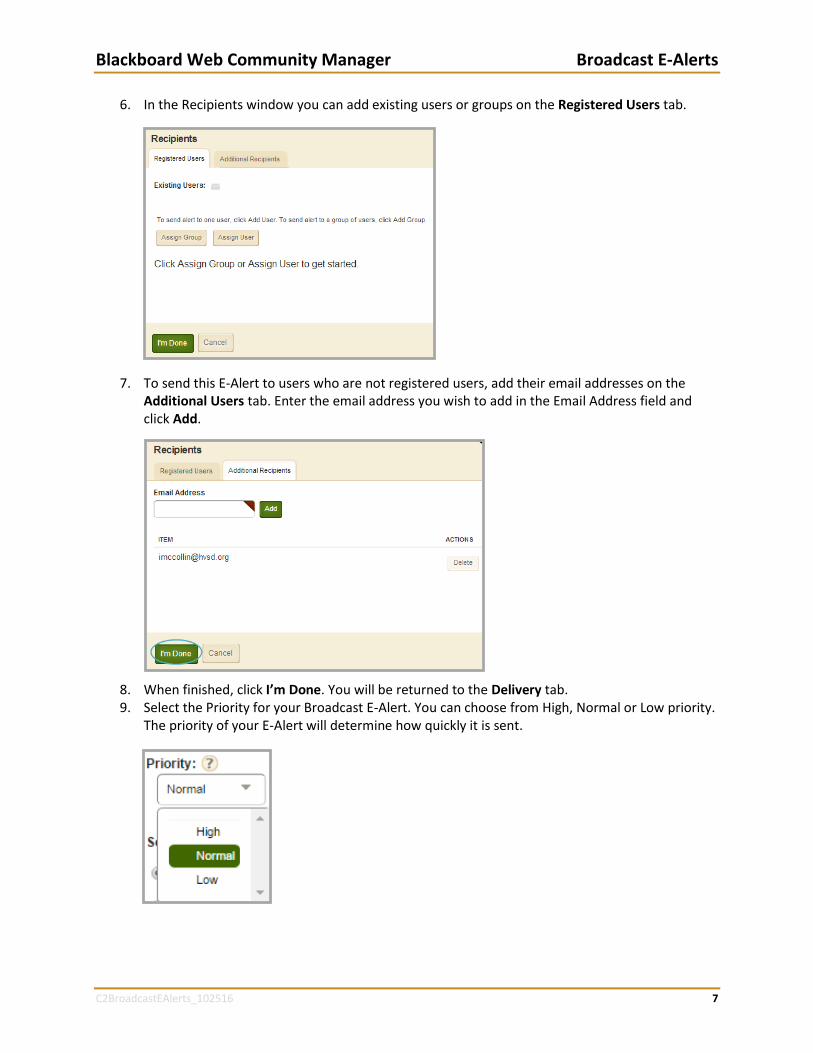
6. In the Recipients window you can add existing users or groups on the Registered Users tab.
7. To send this E-Alert to users who are not registered users, add their email addresses on the Additional Users tab. Enter the email address you wish to add in the Email Address field and click Add.
8. When finished, click I’m Done. You will be returned to the Delivery tab. 9. Select the Priority for your Broadcast E-Alert. You can choose from High, Normal or Low priority.
The priority of your E-Alert will determine how quickly it is sent.

Broadcast E-Alerts Blackboard Web Community Manager
8 C2BroadcastEAlerts_102516
10. There are two different options you can use to send your E-Alert. a. To send your E-Alert immediately, select Send immediately under Schedule. Then click
Send Now to send your Broadcast E-Alert.
You will be returned to the Alerts List View and the status of your E-Alert will be marked as Processing.
When your E-Alert has been sent, the status will be marked as Complete.
b. To schedule your E-Alert to be sent, select Schedule to be sent later. Choose the date and time you wish to send your Broadcast E-Alert, and then click Send Later.
You will be returned to the Alerts List View and the status of your E-Alert will be marked as Scheduled.

Blackboard Web Community Manager Broadcast E-Alerts
C2BroadcastEAlerts_102516 9
Example of an Email E-Alert
Here is an example of an email E-Alert that has been sent.

Broadcast E-Alerts Blackboard Web Community Manager
10 C2BroadcastEAlerts_102516
Push Notification E-Alerts
You can send Push Notifications to registered users who have downloaded and installed the Centricity2 Mobile Communications App (C2MCA). You will not see this option unless your district has C2MCA.
Create a New Push Notification E-Alert
Here is how you create a new push notification E-Alert.
1. In Site Manager, navigate to the Site workspace you wish to send your Broadcast E-Alert.
2. Navigate to the Tools tab and select Broadcast E-Alerts.
3. Click New E-Alert, the New Alert window displays.
Blackboard Web Community Manager Broadcast E-Alerts
C2BroadcastEAlerts_102516 11
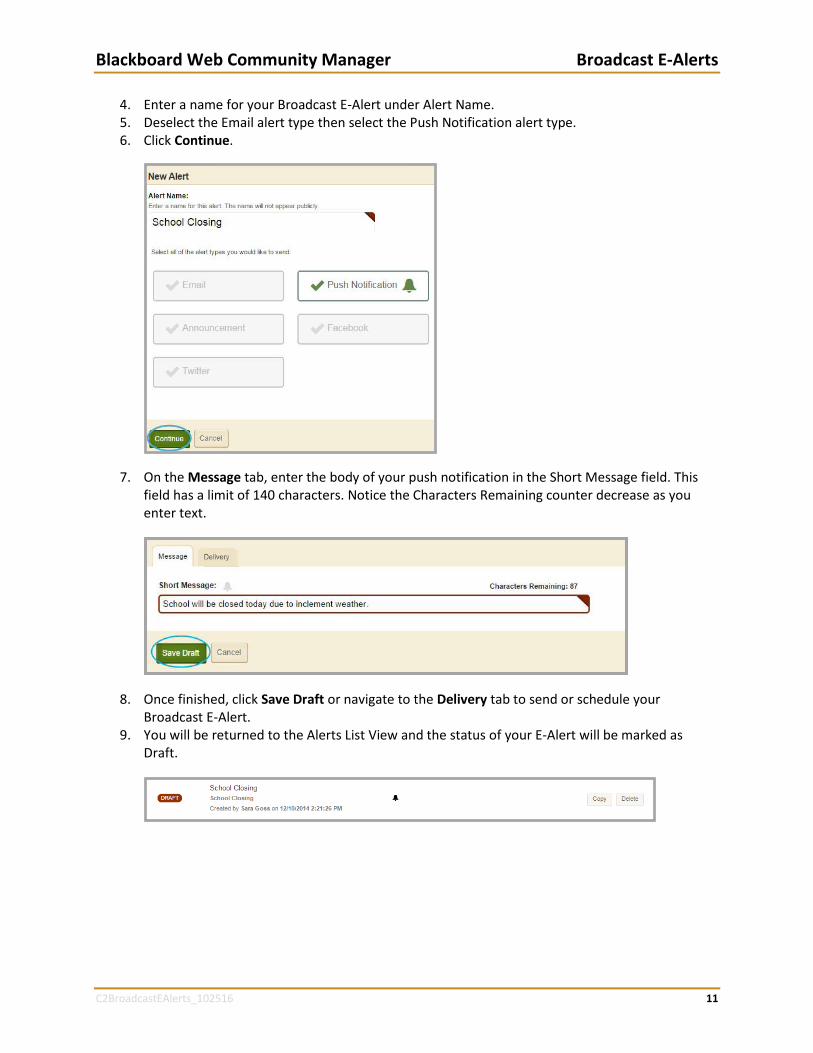
4. Enter a name for your Broadcast E-Alert under Alert Name. 5. Deselect the Email alert type then select the Push Notification alert type. 6. Click Continue.
7. On the Message tab, enter the body of your push notification in the Short Message field. This field has a limit of 140 characters. Notice the Characters Remaining counter decrease as you enter text.
8. Once finished, click Save Draft or navigate to the Delivery tab to send or schedule your Broadcast E-Alert.
9. You will be returned to the Alerts List View and the status of your E-Alert will be marked as Draft.
Broadcast E-Alerts Blackboard Web Community Manager
12 C2BroadcastEAlerts_102516
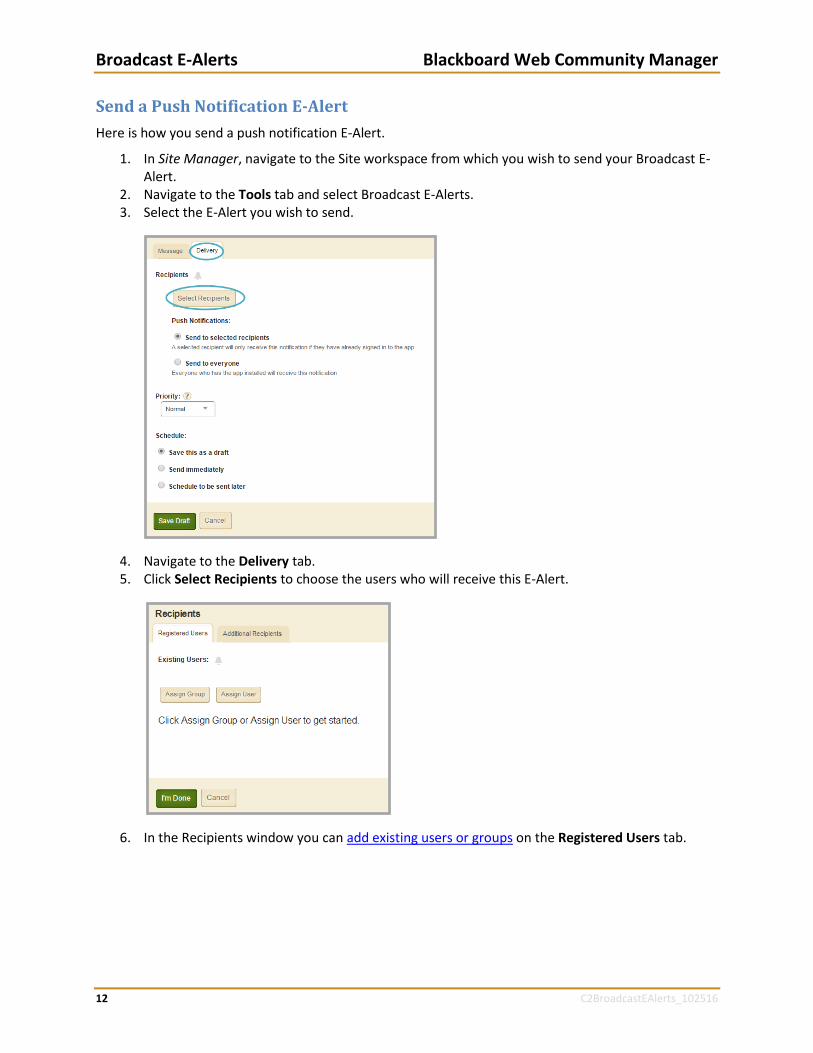
Send a Push Notification E-Alert
Here is how you send a push notification E-Alert.
1. In Site Manager, navigate to the Site workspace from which you wish to send your Broadcast E-Alert.
2. Navigate to the Tools tab and select Broadcast E-Alerts. 3. Select the E-Alert you wish to send.
4. Navigate to the Delivery tab. 5. Click Select Recipients to choose the users who will receive this E-Alert.
6. In the Recipients window you can add existing users or groups on the Registered Users tab.

Blackboard Web Community Manager Broadcast E-Alerts
C2BroadcastEAlerts_102516 13
7. To send this E-Alert to users who are not registered users, add their email addresses on the Additional Users tab. Enter the email address you wish to add in the Email Address field and click Add.
8. You can also select Send to everyone to send the E-Alert to all users having the Mobile Communications App installed on their Smartphones.
9. Select the Priority for your Broadcast E-Alert. You can choose from High, Normal or Low priority, the priority of your E-Alert will determine how quickly it is sent.
Broadcast E-Alerts Blackboard Web Community Manager
14 C2BroadcastEAlerts_102516
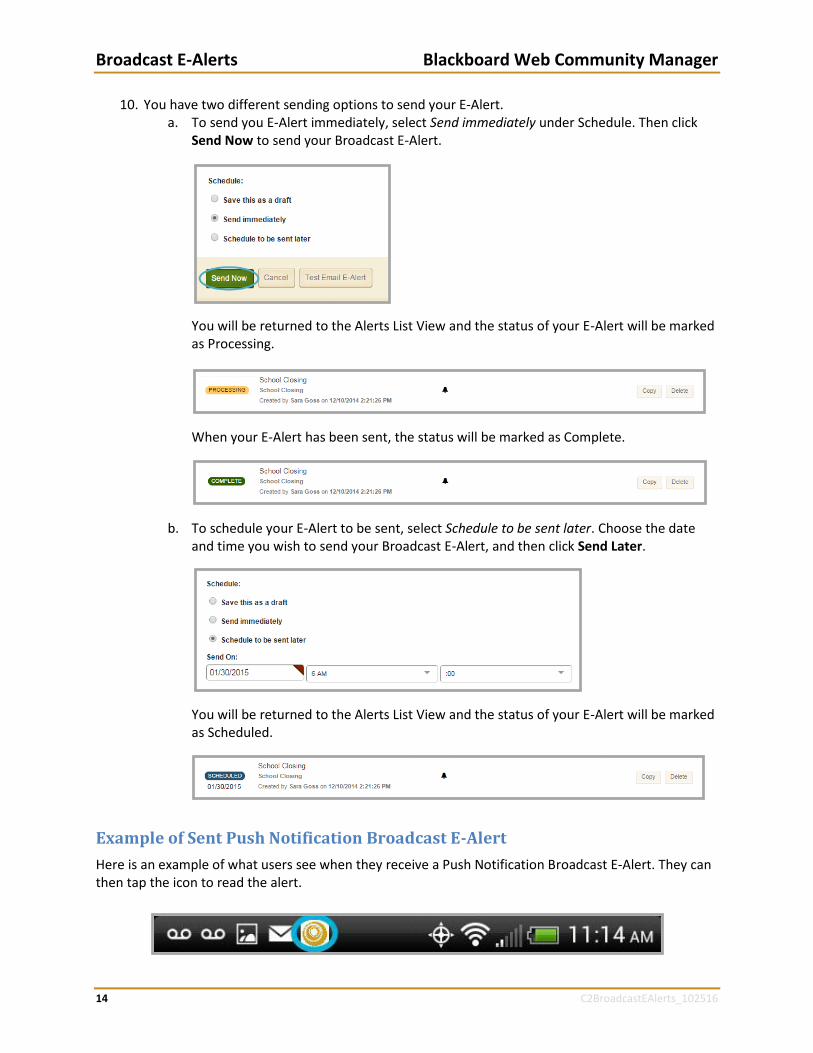
10. You have two different sending options to send your E-Alert. a. To send you E-Alert immediately, select Send immediately under Schedule. Then click
Send Now to send your Broadcast E-Alert.
You will be returned to the Alerts List View and the status of your E-Alert will be marked as Processing.
When your E-Alert has been sent, the status will be marked as Complete.
b. To schedule your E-Alert to be sent, select Schedule to be sent later. Choose the date and time you wish to send your Broadcast E-Alert, and then click Send Later.
You will be returned to the Alerts List View and the status of your E-Alert will be marked as Scheduled.
Example of Sent Push Notification Broadcast E-Alert
Here is an example of what users see when they receive a Push Notification Broadcast E-Alert. They can then tap the icon to read the alert.
Blackboard Web Community Manager Broadcast E-Alerts
C2BroadcastEAlerts_102516 15
Announcement E-Alerts
You can send an Announcement E-Alert that displays in an Announcement App.
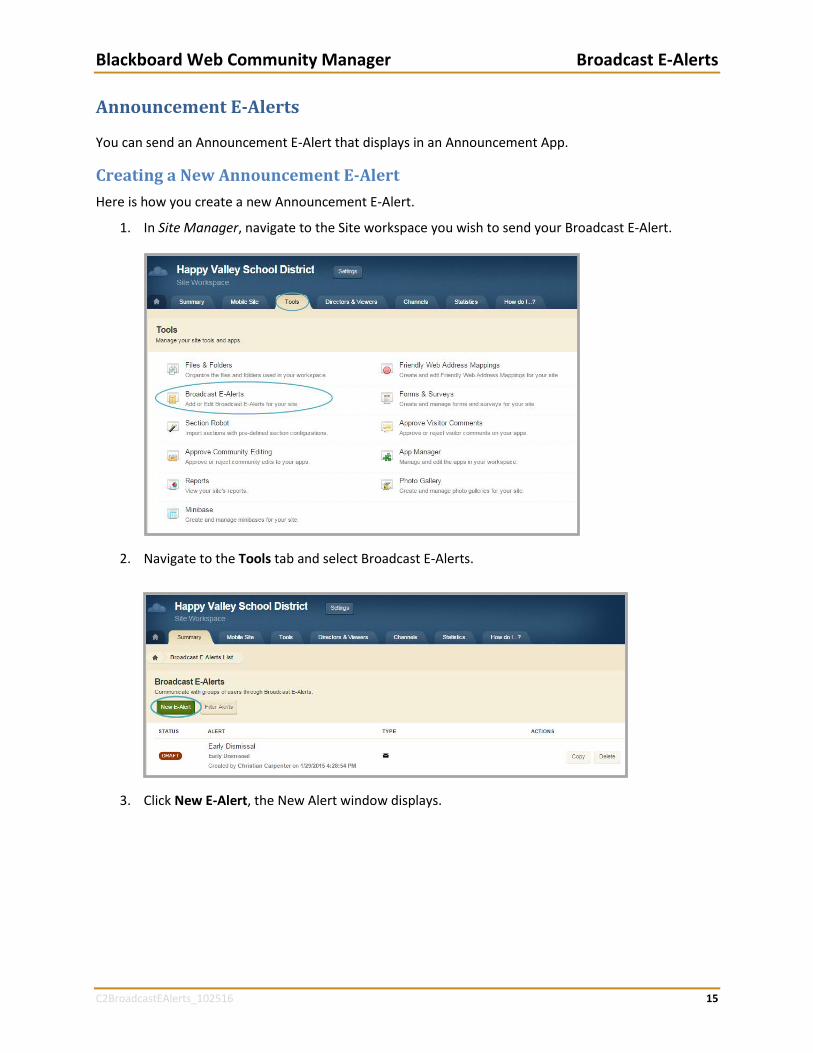
Creating a New Announcement E-Alert
Here is how you create a new Announcement E-Alert.
1. In Site Manager, navigate to the Site workspace you wish to send your Broadcast E-Alert.
2. Navigate to the Tools tab and select Broadcast E-Alerts.
3. Click New E-Alert, the New Alert window displays.
Broadcast E-Alerts Blackboard Web Community Manager
16 C2BroadcastEAlerts_102516
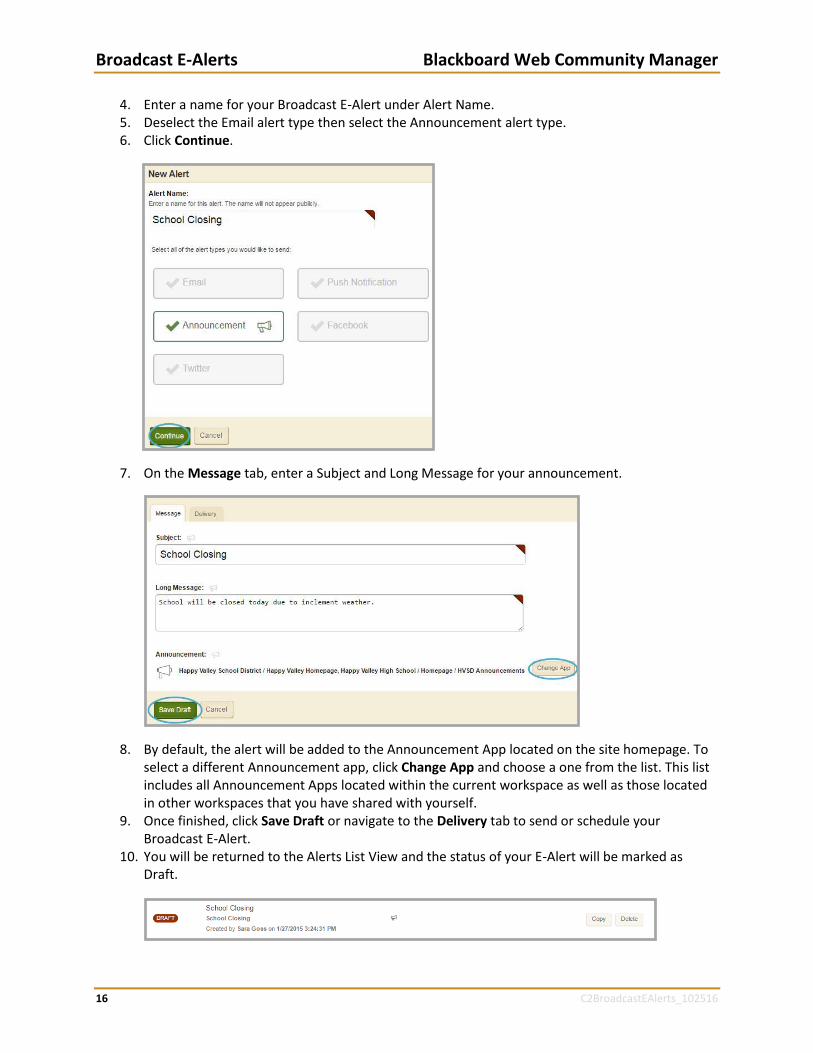
4. Enter a name for your Broadcast E-Alert under Alert Name. 5. Deselect the Email alert type then select the Announcement alert type. 6. Click Continue.
7. On the Message tab, enter a Subject and Long Message for your announcement.
8. By default, the alert will be added to the Announcement App located on the site homepage. To select a different Announcement app, click Change App and choose a one from the list. This list includes all Announcement Apps located within the current workspace as well as those located in other workspaces that you have shared with yourself.
9. Once finished, click Save Draft or navigate to the Delivery tab to send or schedule your Broadcast E-Alert.
10. You will be returned to the Alerts List View and the status of your E-Alert will be marked as Draft.
Blackboard Web Community Manager Broadcast E-Alerts
C2BroadcastEAlerts_102516 17
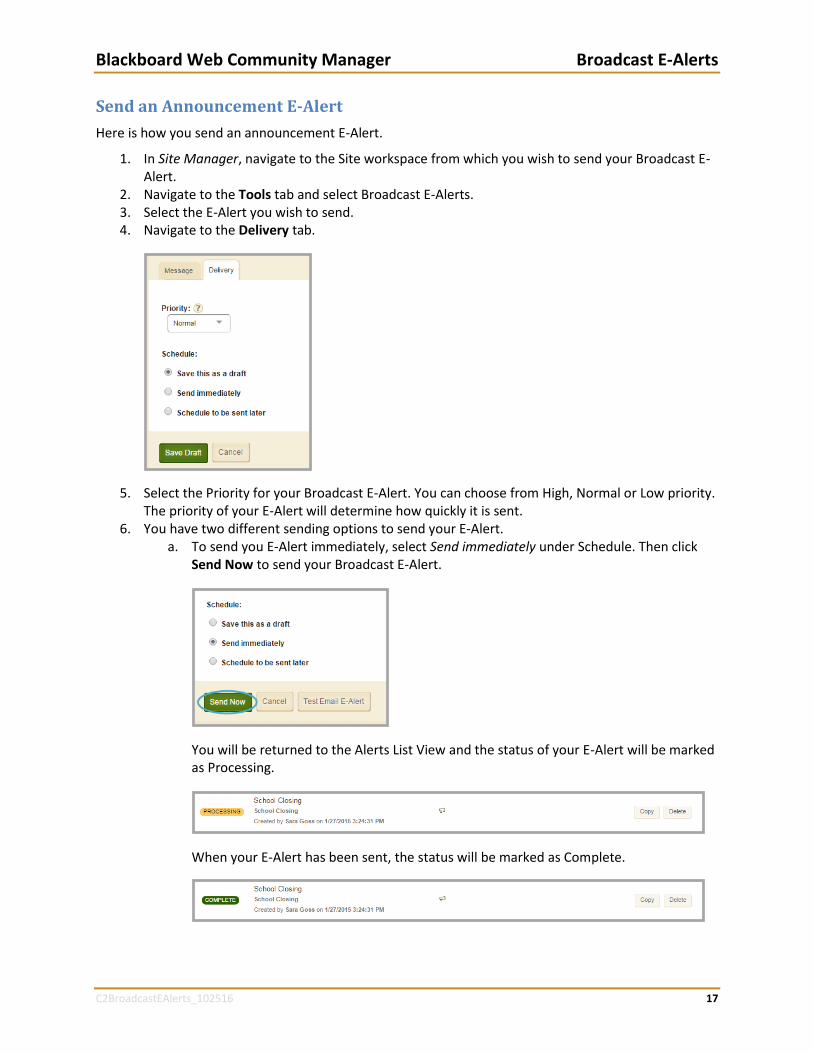
Send an Announcement E-Alert
Here is how you send an announcement E-Alert.
1. In Site Manager, navigate to the Site workspace from which you wish to send your Broadcast E-Alert.
2. Navigate to the Tools tab and select Broadcast E-Alerts. 3. Select the E-Alert you wish to send. 4. Navigate to the Delivery tab.
5. Select the Priority for your Broadcast E-Alert. You can choose from High, Normal or Low priority. The priority of your E-Alert will determine how quickly it is sent.
6. You have two different sending options to send your E-Alert. a. To send you E-Alert immediately, select Send immediately under Schedule. Then click
Send Now to send your Broadcast E-Alert.
You will be returned to the Alerts List View and the status of your E-Alert will be marked as Processing.
When your E-Alert has been sent, the status will be marked as Complete.
Broadcast E-Alerts Blackboard Web Community Manager
18 C2BroadcastEAlerts_102516
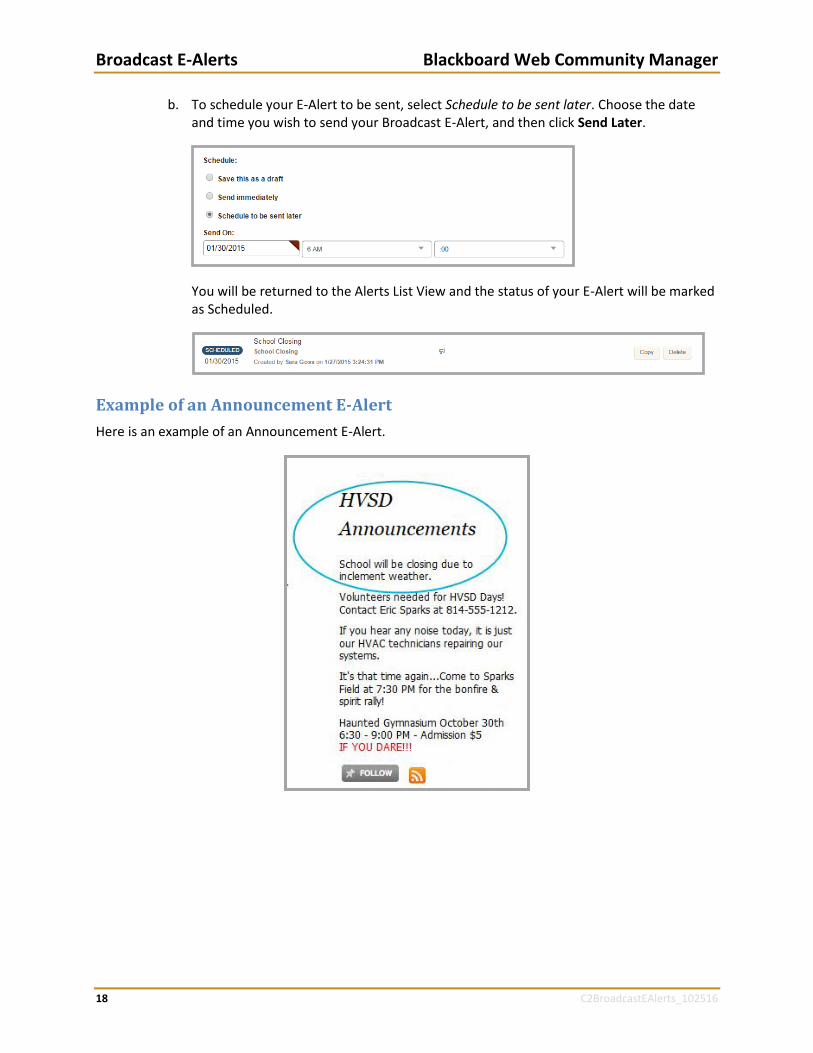
b. To schedule your E-Alert to be sent, select Schedule to be sent later. Choose the date and time you wish to send your Broadcast E-Alert, and then click Send Later.
You will be returned to the Alerts List View and the status of your E-Alert will be marked as Scheduled.
Example of an Announcement E-Alert
Here is an example of an Announcement E-Alert.
Blackboard Web Community Manager Broadcast E-Alerts
C2BroadcastEAlerts_102516 19
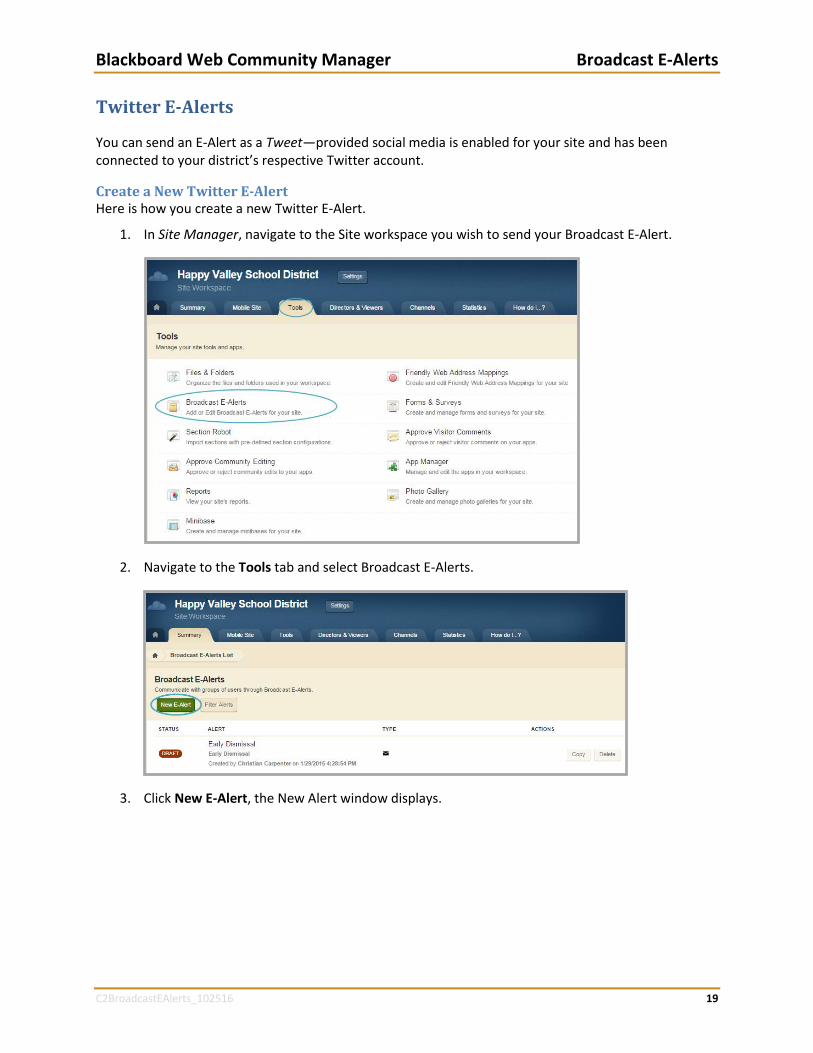
Twitter E-Alerts
You can send an E-Alert as a Tweet—provided social media is enabled for your site and has been connected to your district’s respective Twitter account.
Create a New Twitter E-Alert Here is how you create a new Twitter E-Alert.
1. In Site Manager, navigate to the Site workspace you wish to send your Broadcast E-Alert.
2. Navigate to the Tools tab and select Broadcast E-Alerts.
3. Click New E-Alert, the New Alert window displays.
Broadcast E-Alerts Blackboard Web Community Manager
20 C2BroadcastEAlerts_102516
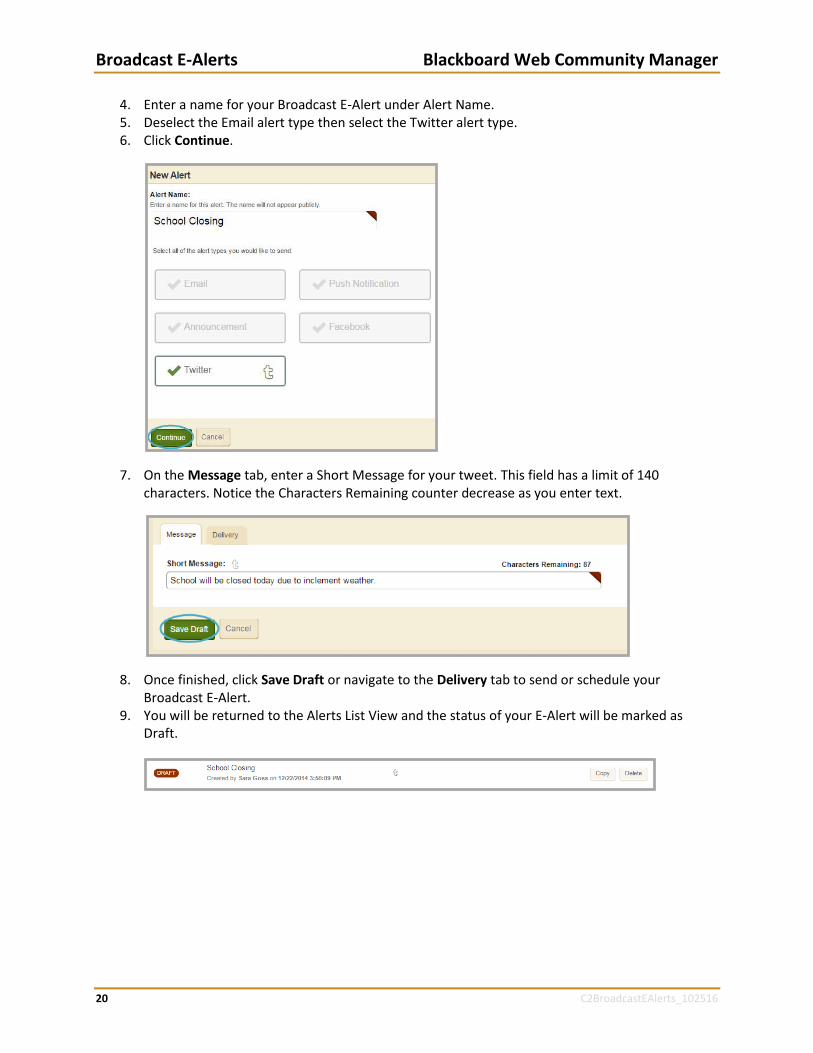
4. Enter a name for your Broadcast E-Alert under Alert Name. 5. Deselect the Email alert type then select the Twitter alert type. 6. Click Continue.
7. On the Message tab, enter a Short Message for your tweet. This field has a limit of 140 characters. Notice the Characters Remaining counter decrease as you enter text.
8. Once finished, click Save Draft or navigate to the Delivery tab to send or schedule your Broadcast E-Alert.
9. You will be returned to the Alerts List View and the status of your E-Alert will be marked as Draft.
Blackboard Web Community Manager Broadcast E-Alerts
C2BroadcastEAlerts_102516 21
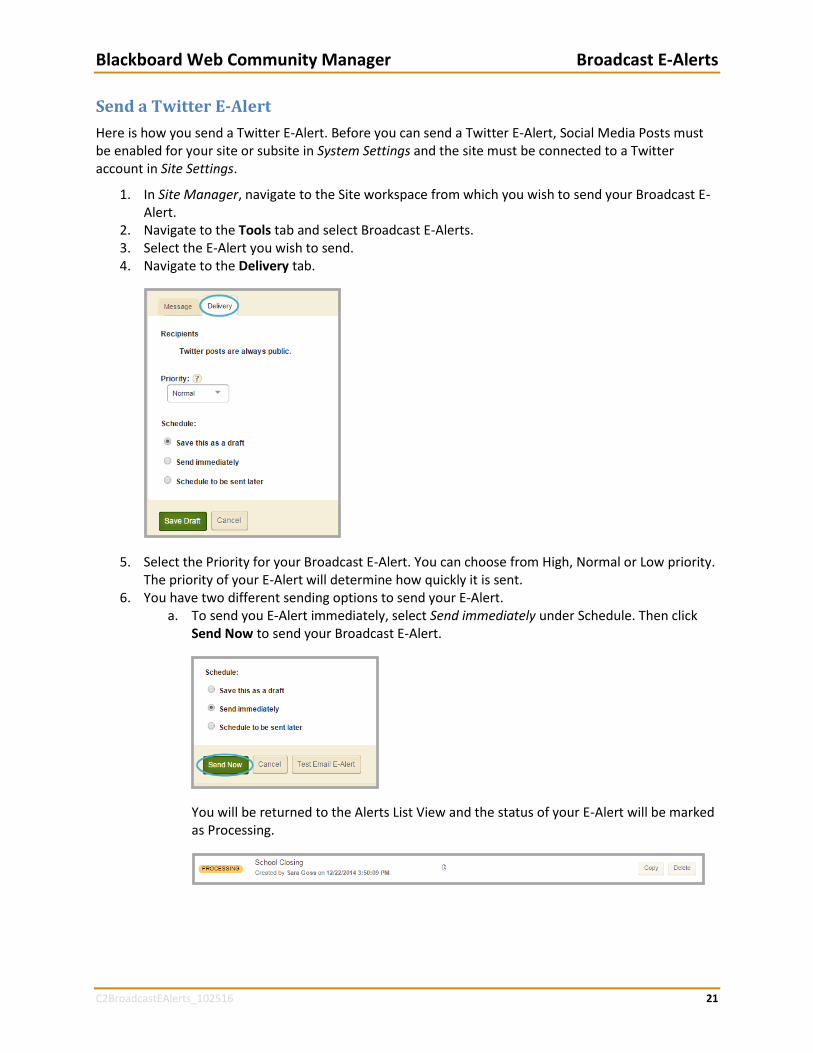
Send a Twitter E-Alert
Here is how you send a Twitter E-Alert. Before you can send a Twitter E-Alert, Social Media Posts must be enabled for your site or subsite in System Settings and the site must be connected to a Twitter account in Site Settings.
1. In Site Manager, navigate to the Site workspace from which you wish to send your Broadcast E-Alert.
2. Navigate to the Tools tab and select Broadcast E-Alerts. 3. Select the E-Alert you wish to send. 4. Navigate to the Delivery tab.
5. Select the Priority for your Broadcast E-Alert. You can choose from High, Normal or Low priority. The priority of your E-Alert will determine how quickly it is sent.
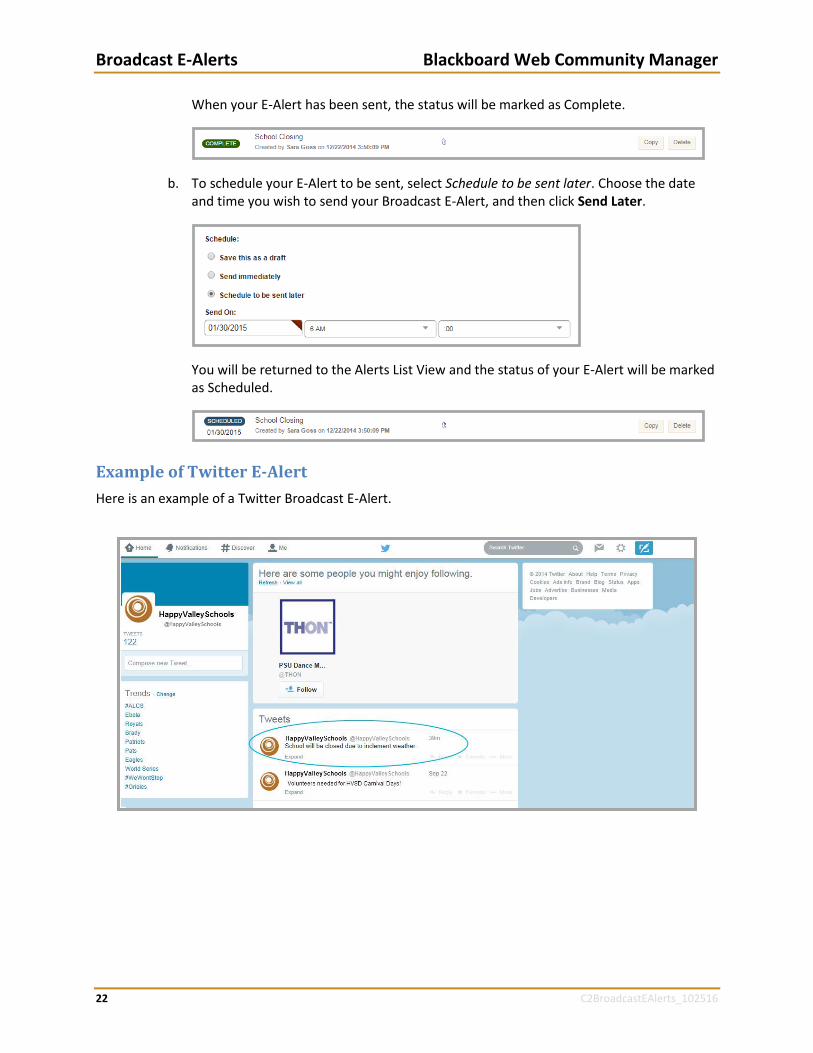
6. You have two different sending options to send your E-Alert. a. To send you E-Alert immediately, select Send immediately under Schedule. Then click
Send Now to send your Broadcast E-Alert.
You will be returned to the Alerts List View and the status of your E-Alert will be marked as Processing.
Broadcast E-Alerts Blackboard Web Community Manager
22 C2BroadcastEAlerts_102516
When your E-Alert has been sent, the status will be marked as Complete.
b. To schedule your E-Alert to be sent, select Schedule to be sent later. Choose the date and time you wish to send your Broadcast E-Alert, and then click Send Later.
You will be returned to the Alerts List View and the status of your E-Alert will be marked as Scheduled.
Example of Twitter E-Alert
Here is an example of a Twitter Broadcast E-Alert.
Blackboard Web Community Manager Broadcast E-Alerts
C2BroadcastEAlerts_102516 23
Facebook E-Alerts
You can send an E-Alert as a Facebook post—provided social media is enabled for your site and has been connected to your district’s respective Facebook account.
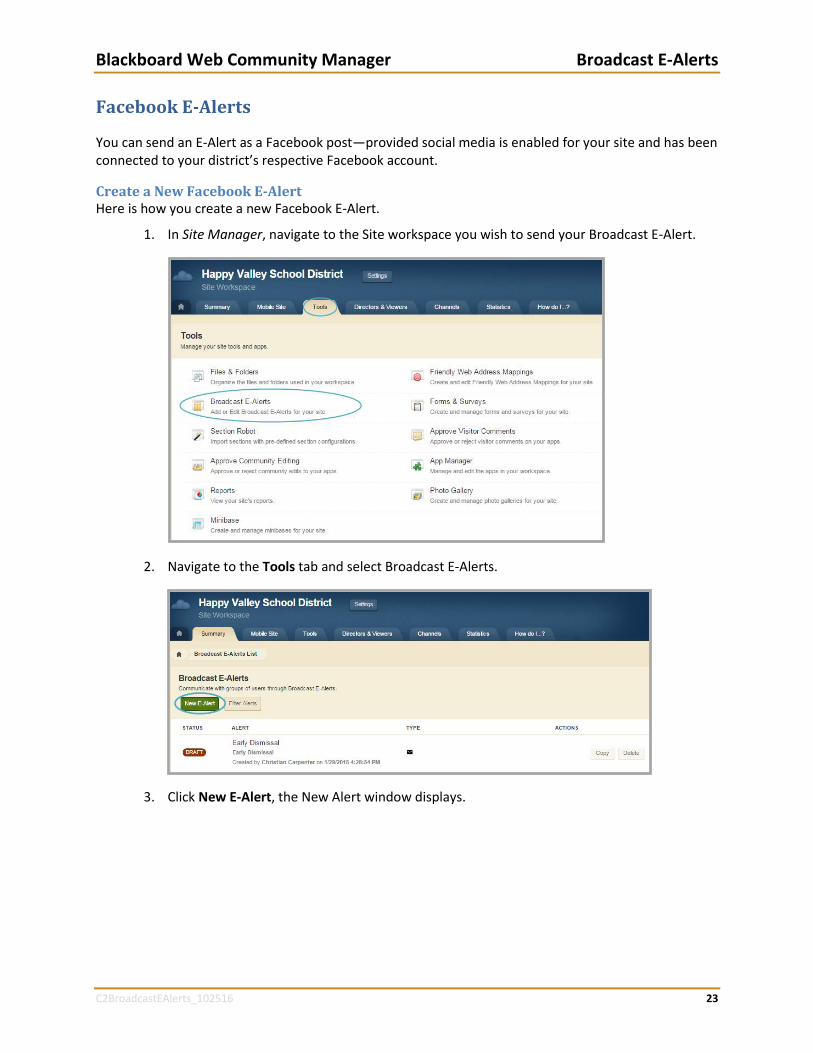
Create a New Facebook E-Alert Here is how you create a new Facebook E-Alert.
1. In Site Manager, navigate to the Site workspace you wish to send your Broadcast E-Alert.
2. Navigate to the Tools tab and select Broadcast E-Alerts.
3. Click New E-Alert, the New Alert window displays.
Broadcast E-Alerts Blackboard Web Community Manager
24 C2BroadcastEAlerts_102516
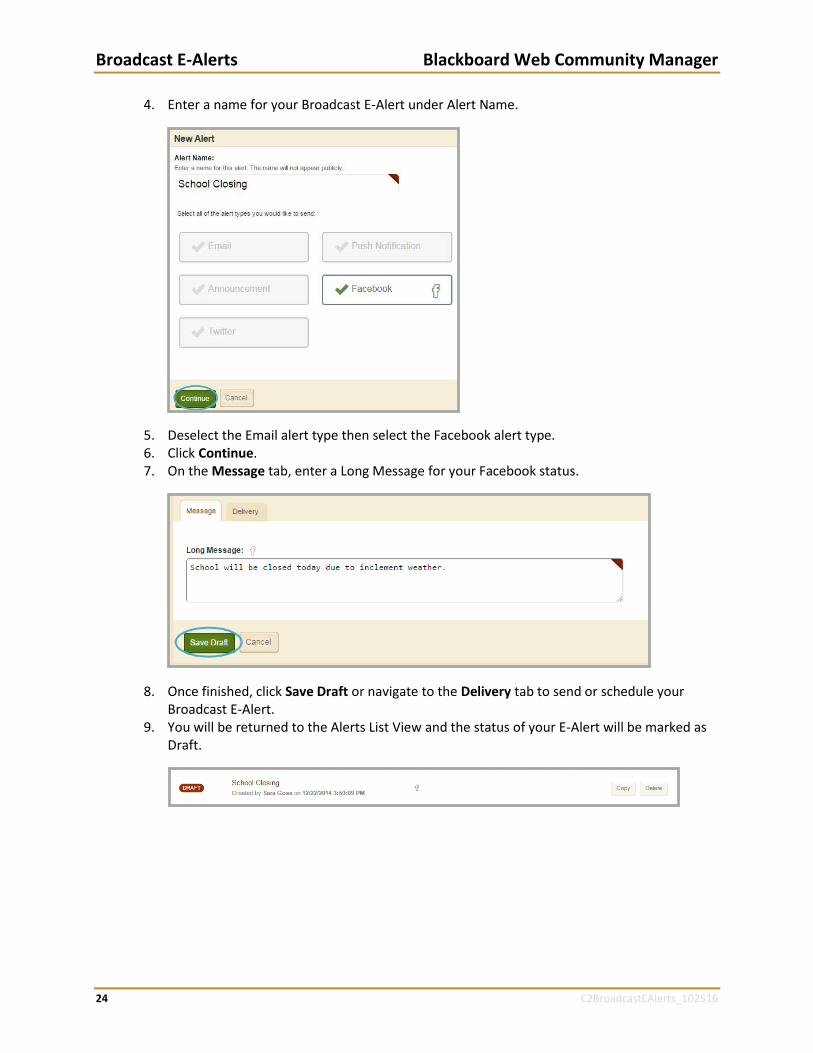
4. Enter a name for your Broadcast E-Alert under Alert Name.
5. Deselect the Email alert type then select the Facebook alert type. 6. Click Continue. 7. On the Message tab, enter a Long Message for your Facebook status.
8. Once finished, click Save Draft or navigate to the Delivery tab to send or schedule your Broadcast E-Alert.
9. You will be returned to the Alerts List View and the status of your E-Alert will be marked as Draft.
Blackboard Web Community Manager Broadcast E-Alerts
C2BroadcastEAlerts_102516 25
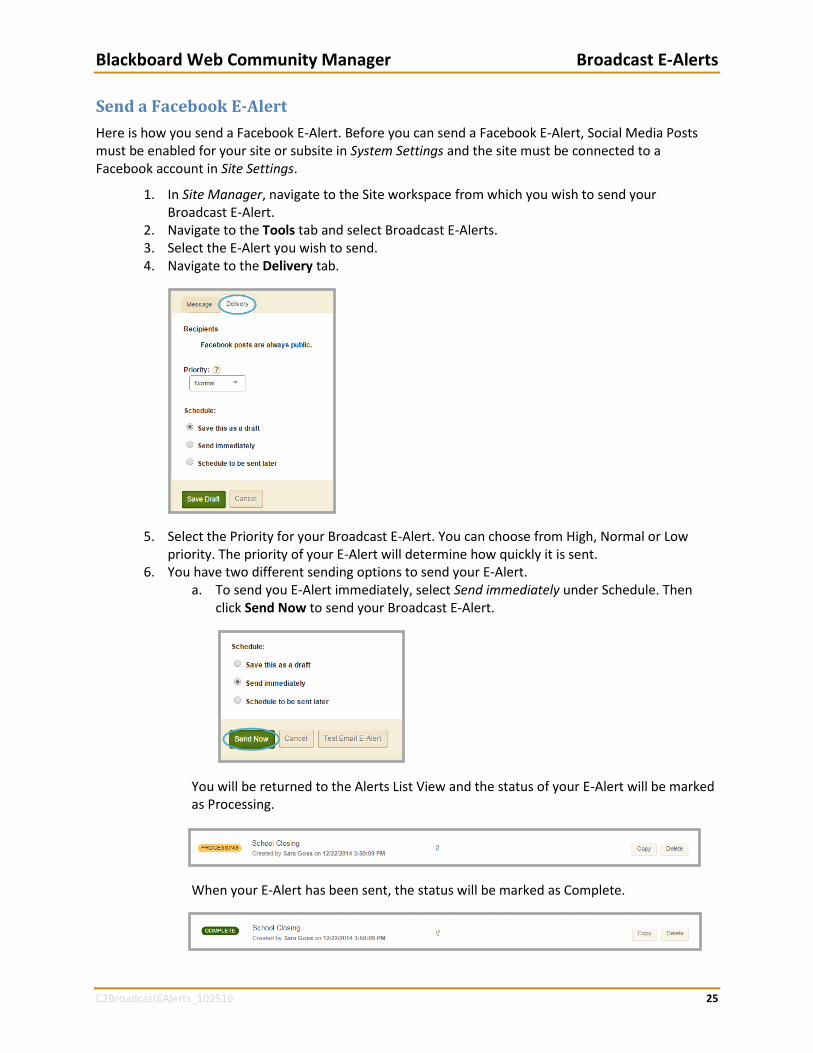
Send a Facebook E-Alert
Here is how you send a Facebook E-Alert. Before you can send a Facebook E-Alert, Social Media Posts must be enabled for your site or subsite in System Settings and the site must be connected to a Facebook account in Site Settings.
1. In Site Manager, navigate to the Site workspace from which you wish to send your Broadcast E-Alert.
2. Navigate to the Tools tab and select Broadcast E-Alerts. 3. Select the E-Alert you wish to send. 4. Navigate to the Delivery tab.
5. Select the Priority for your Broadcast E-Alert. You can choose from High, Normal or Low priority. The priority of your E-Alert will determine how quickly it is sent.
6. You have two different sending options to send your E-Alert. a. To send you E-Alert immediately, select Send immediately under Schedule. Then
click Send Now to send your Broadcast E-Alert.
You will be returned to the Alerts List View and the status of your E-Alert will be marked as Processing.
When your E-Alert has been sent, the status will be marked as Complete.
Broadcast E-Alerts Blackboard Web Community Manager
26 C2BroadcastEAlerts_102516
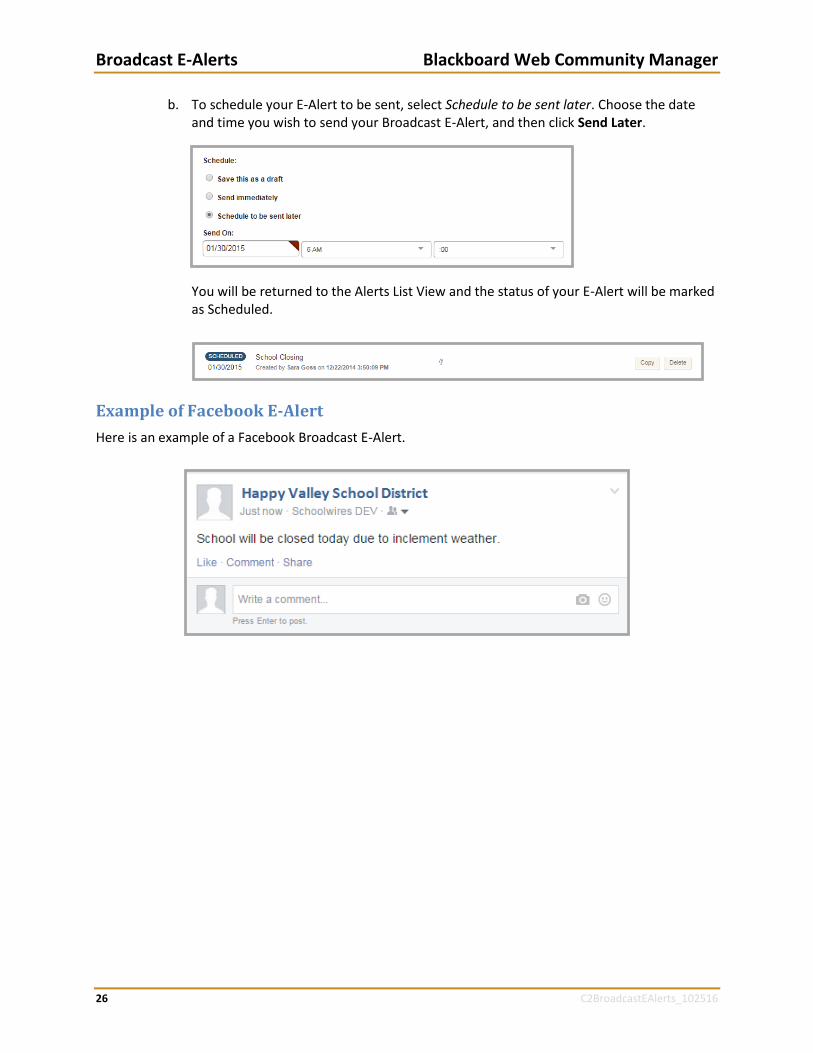
b. To schedule your E-Alert to be sent, select Schedule to be sent later. Choose the date and time you wish to send your Broadcast E-Alert, and then click Send Later.
You will be returned to the Alerts List View and the status of your E-Alert will be marked as Scheduled.
Example of Facebook E-Alert
Here is an example of a Facebook Broadcast E-Alert.
Blackboard Web Community Manager Broadcast E-Alerts
C2BroadcastEAlerts_102516 27
Manage Broadcast E-Alerts
You are able to edit, copy, delete and filter E-Alerts. You can check the status of sent E-Alerts.
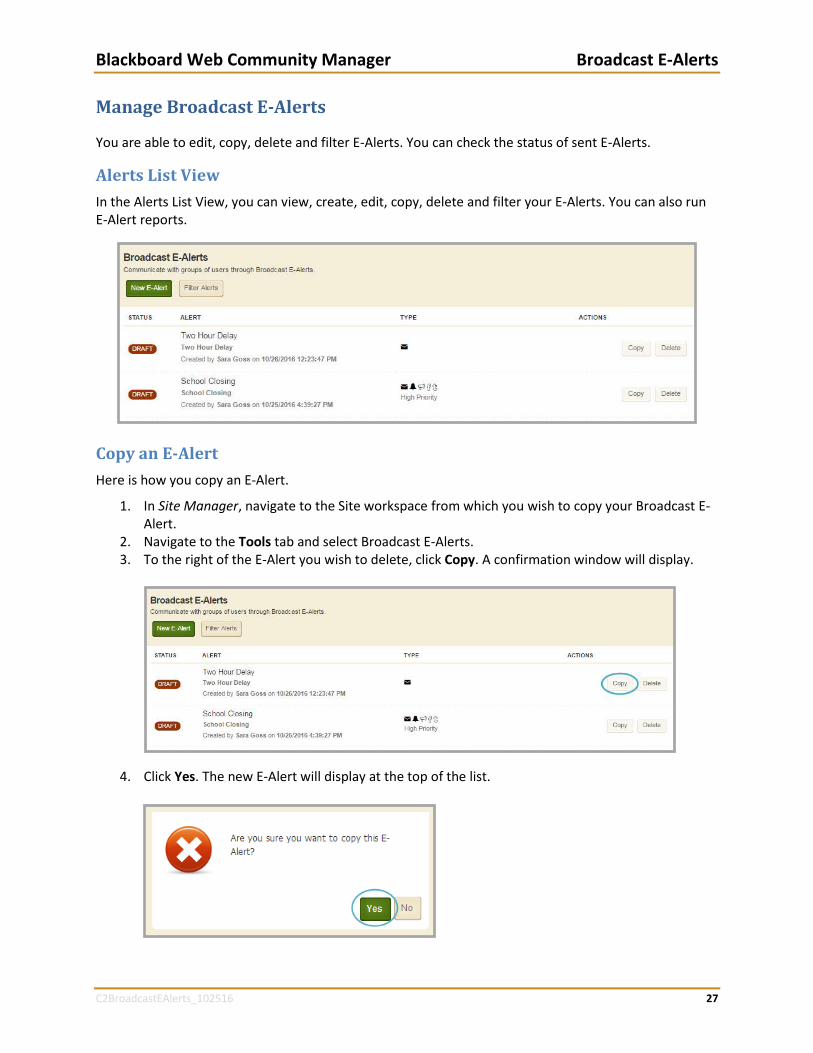
Alerts List View
In the Alerts List View, you can view, create, edit, copy, delete and filter your E-Alerts. You can also run E-Alert reports.
Copy an E-Alert
Here is how you copy an E-Alert.
1. In Site Manager, navigate to the Site workspace from which you wish to copy your Broadcast E-Alert.
2. Navigate to the Tools tab and select Broadcast E-Alerts. 3. To the right of the E-Alert you wish to delete, click Copy. A confirmation window will display.
4. Click Yes. The new E-Alert will display at the top of the list.

Broadcast E-Alerts Blackboard Web Community Manager
28 C2BroadcastEAlerts_102516
Delete an E-Alert
Here is how you delete an E-Alert.
1. In Site Manager, navigate to the Site workspace from which you wish to delete your Broadcast E-Alert.
2. Navigate to the Tools tab and select Broadcast E-Alerts. 3. To the right of the E-Alert you wish to delete, click Delete. A confirmation window will display.
4. Click Yes. You are returned to the Alerts List View.
Filter E-Alerts
Here is how you filter E-Alerts.
1. In Site Manager, navigate to the Site workspace from which you wish to filter your Broadcast E-Alert.
2. Navigate to the Tools tab and select Broadcast E-Alerts. 3. Click Filter Alerts, the Filter window will display.
Blackboard Web Community Manager Broadcast E-Alerts
C2BroadcastEAlerts_102516 29
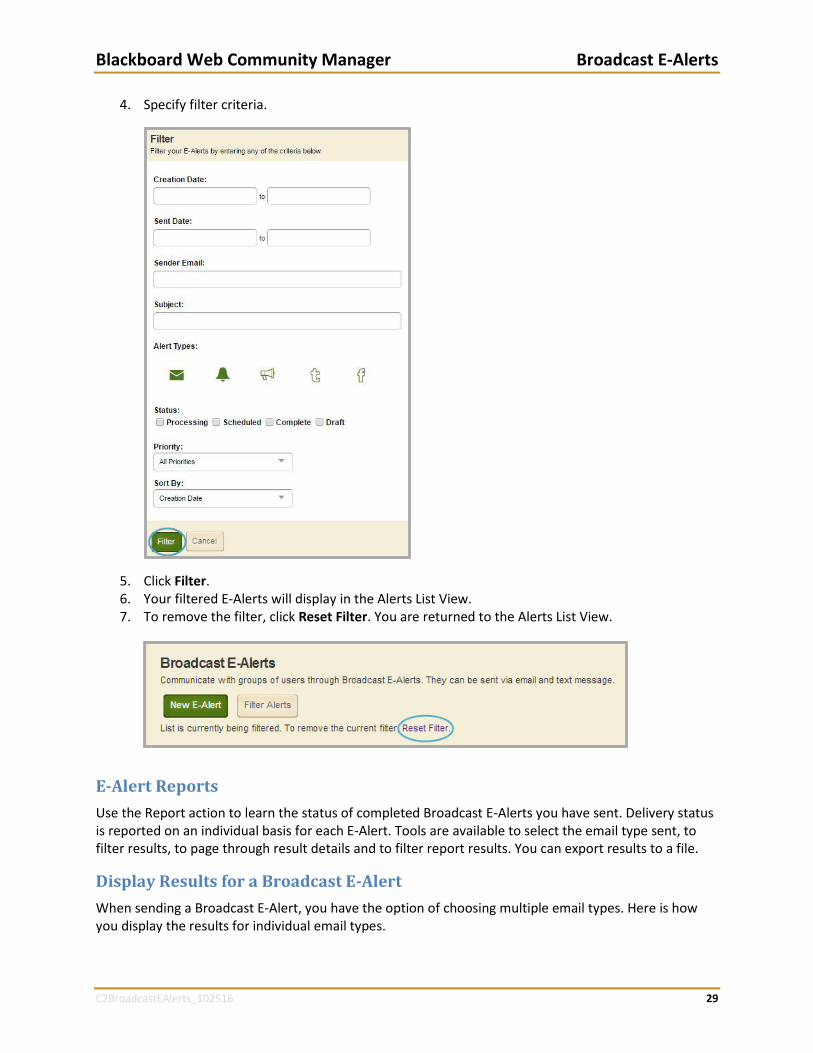
4. Specify filter criteria.
5. Click Filter. 6. Your filtered E-Alerts will display in the Alerts List View. 7. To remove the filter, click Reset Filter. You are returned to the Alerts List View.
E-Alert Reports
Use the Report action to learn the status of completed Broadcast E-Alerts you have sent. Delivery status is reported on an individual basis for each E-Alert. Tools are available to select the email type sent, to filter results, to page through result details and to filter report results. You can export results to a file.
Display Results for a Broadcast E-Alert
When sending a Broadcast E-Alert, you have the option of choosing multiple email types. Here is how you display the results for individual email types.
Broadcast E-Alerts Blackboard Web Community Manager
30 C2BroadcastEAlerts_102516
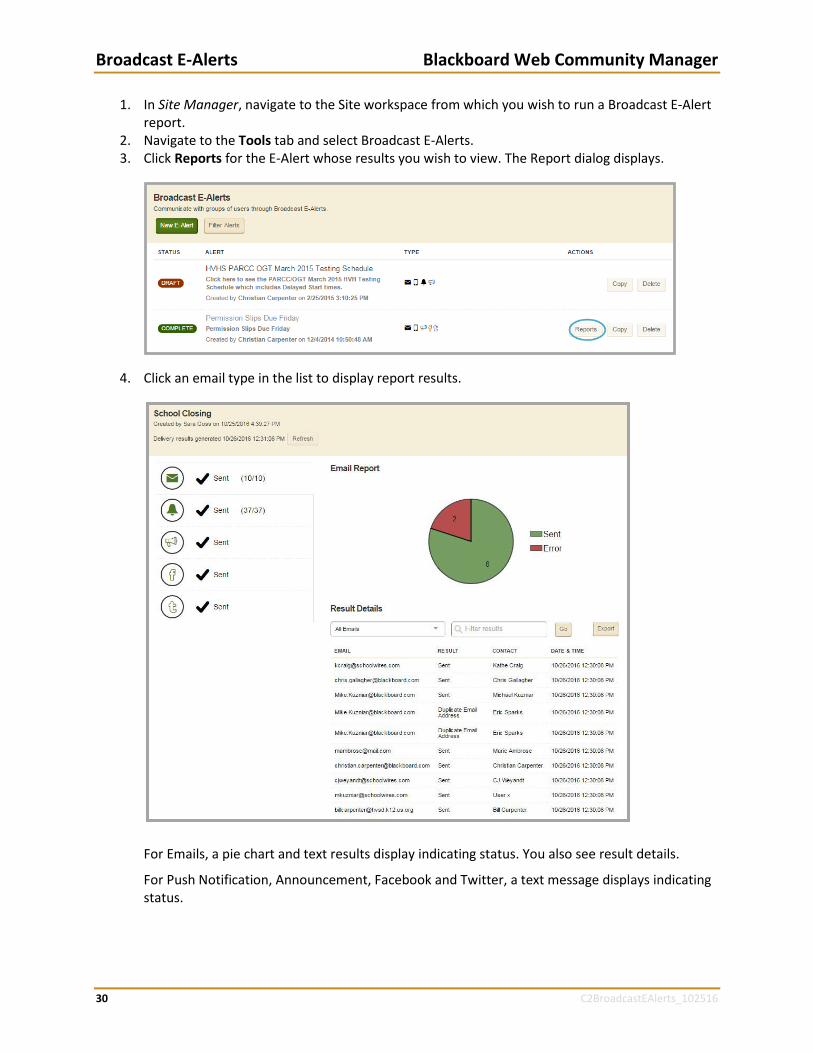
1. In Site Manager, navigate to the Site workspace from which you wish to run a Broadcast E-Alert report.
2. Navigate to the Tools tab and select Broadcast E-Alerts. 3. Click Reports for the E-Alert whose results you wish to view. The Report dialog displays.
4. Click an email type in the list to display report results.
For Emails, a pie chart and text results display indicating status. You also see result details.
For Push Notification, Announcement, Facebook and Twitter, a text message displays indicating status.
Blackboard Web Community Manager Broadcast E-Alerts
C2BroadcastEAlerts_102516 31
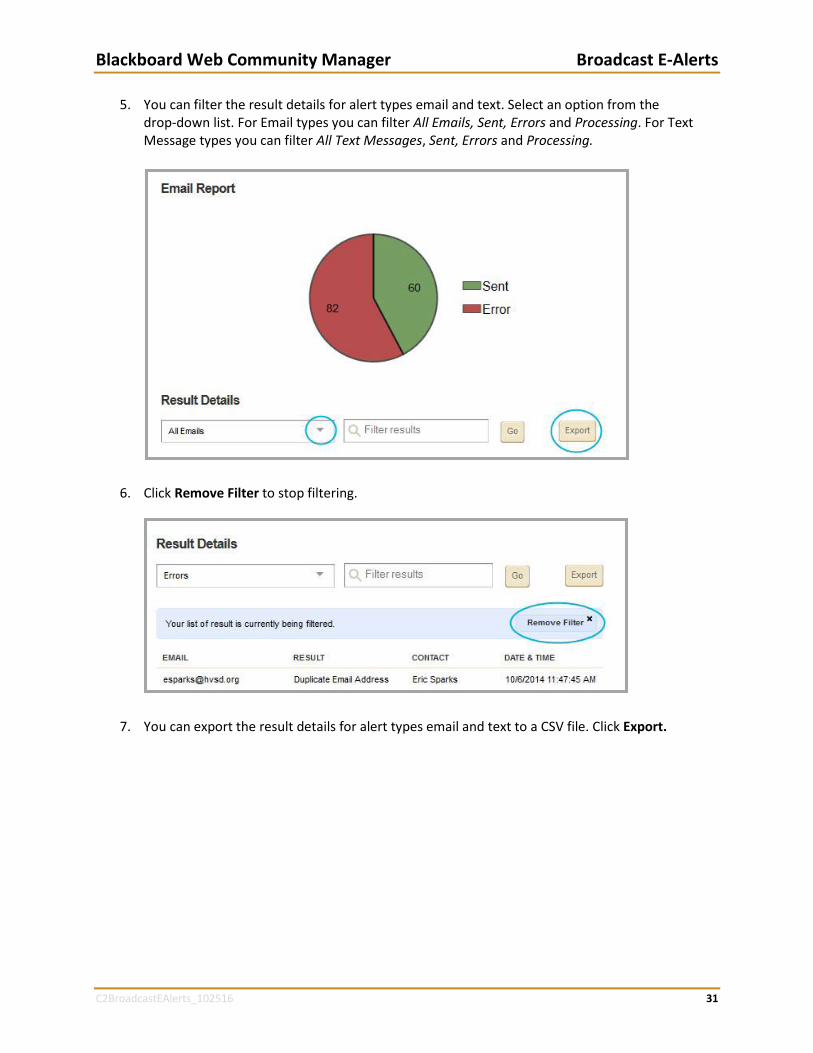
5. You can filter the result details for alert types email and text. Select an option from the drop-down list. For Email types you can filter All Emails, Sent, Errors and Processing. For Text Message types you can filter All Text Messages, Sent, Errors and Processing.
6. Click Remove Filter to stop filtering.
7. You can export the result details for alert types email and text to a CSV file. Click Export.


