ConfidentialBrother Laser Printer SERVICE MANUAL MODEL: HL-2030/2032/2040/2070N Read this manual thoroughly before maintenance work. Keep this manual in a convenient place for quick and easy reference at all times. November 2004 SM-PRN054 (6)
Transcript
8/13/2019 Brother Hl-2030, Hl-2032, Hl-2040, Hl-2070n Service Manual
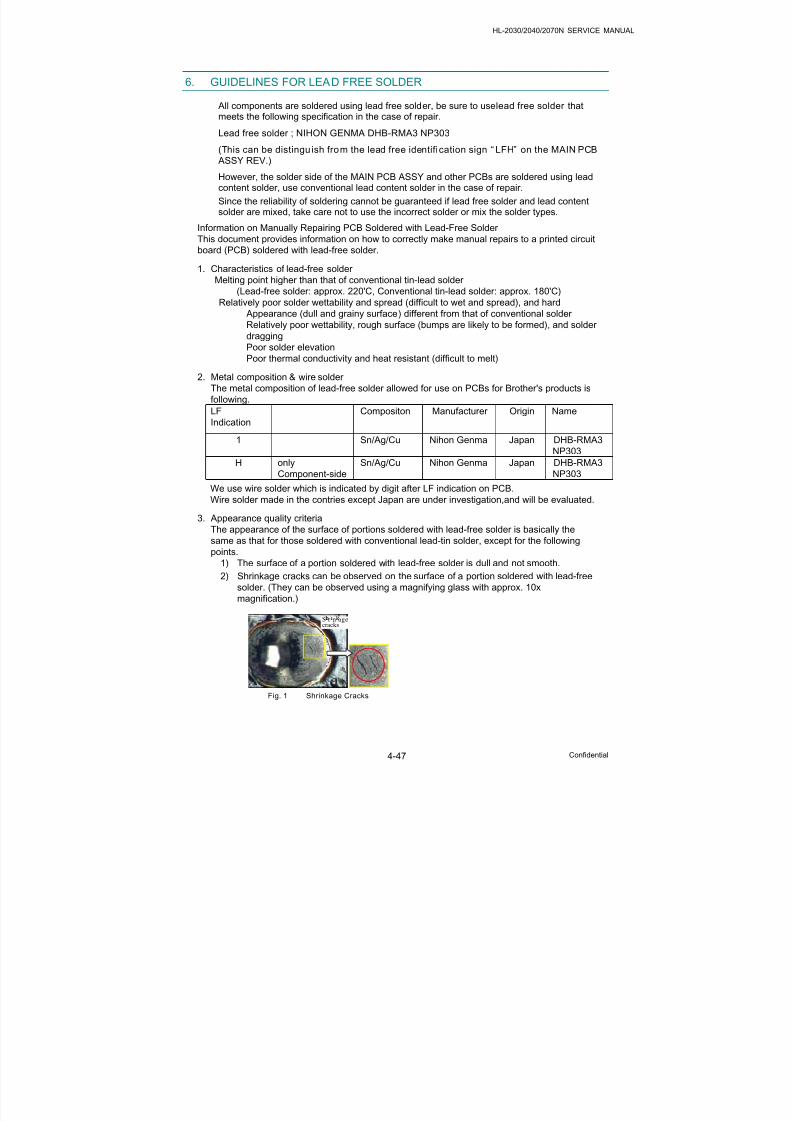
This service manual contains basic information required for after-sales service of the laserprinter (hereinafter referred to as "this machine" or "the printer"). This information is vital tothe service technician to maintain the high printing quality and performance of the printer.
This service manual covers the HL-2030/2040/2070N printers.This manual consists of the following chapters:
CHAPTER 1: GENERALFeatures, specifications, etc.
CHAPTER 2: INSTALLATION AND BASIC OPERATIONInstallation conditions, Installation procedures, basic operation of theprinter etc.
CHAPTER 3: THEORY OF OPERATIONBasic operation of the mechanical system, the electrical system and the
electrical circuits and their timing information.
CHAPTER 4: DISASSEMBLY AND RE-ASSEMBLYProcedures for disassembling and re-assembling the mechanicalsystem.
CHAPTER 5: PERIODIC MAINTENANCEPeriodical replacement parts, consumable parts, etc.
CHAPTER 6: ADJUSTMENTS AND UPDATING OF SETTING, REQUIRED AFTER
PARTS REPLACEMENT
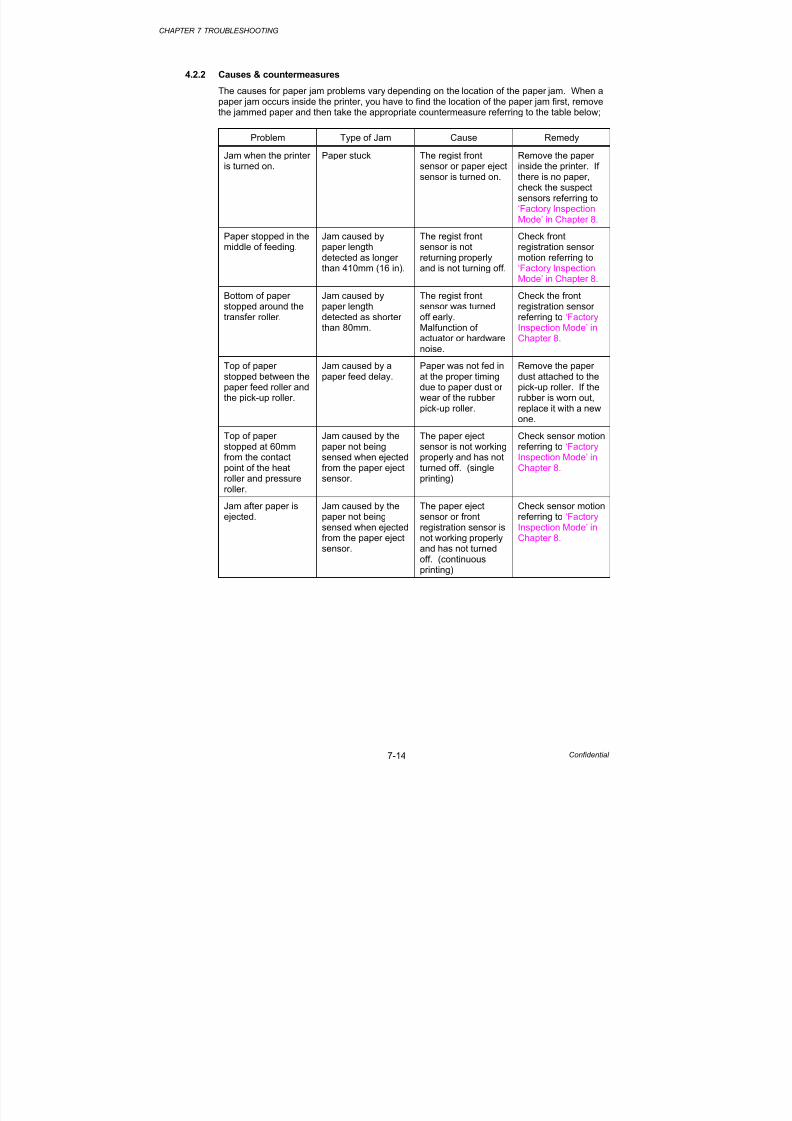
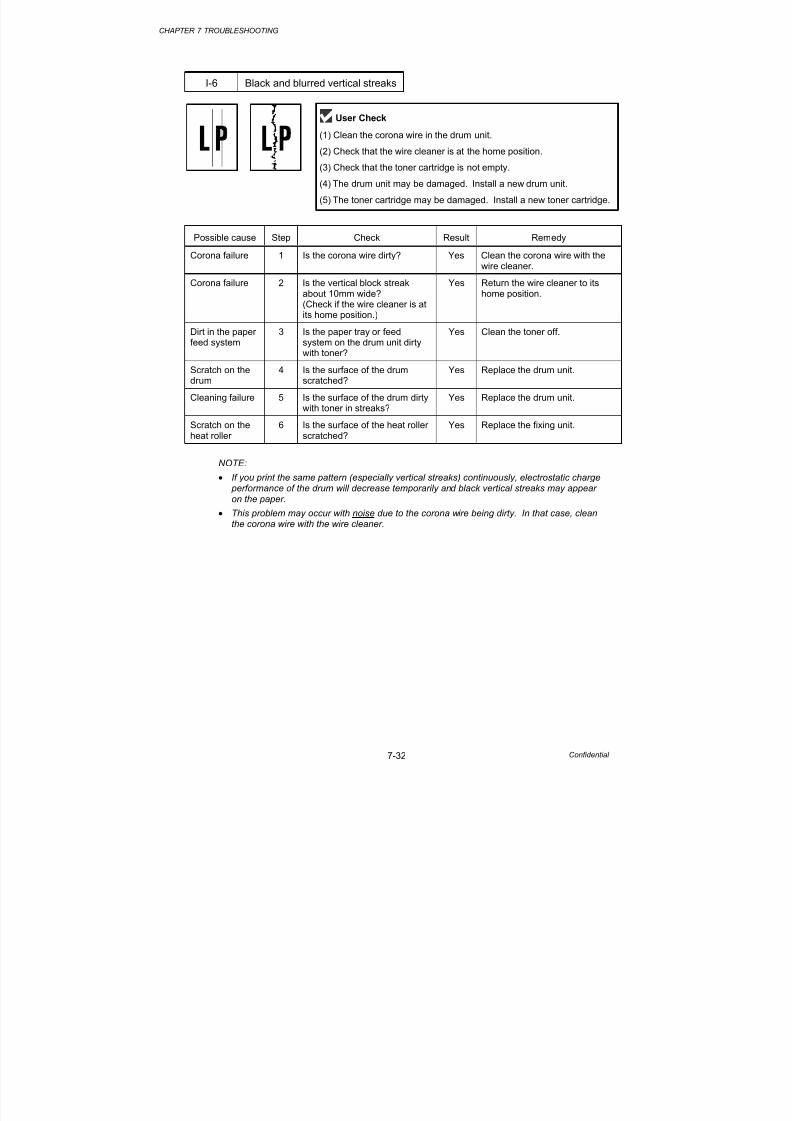
CHAPTER 7: TROUBLESHOOTINGReference values and adjustments, troubleshooting image defects, troubleshooting malfunctions, etc.
CHAPTER 8: SERVICE SUPPORT SOFTWARETest print mode and Service menu mode, etc.
APPENDICES: PCB circuit diagrams, etc.
Information in this manual is subject to change due to improvement or redesign of theproduct. All relevant information in such cases will be supplied in service information
bulletins (Technical Information). A thorough understanding of this printer, based on information in this service manual andservice information bulletins, is required for maintaining its print quality performance andfor improving the practical ability to find the cause of problems.
8/13/2019 Brother Hl-2030, Hl-2032, Hl-2040, Hl-2070n Service Manual
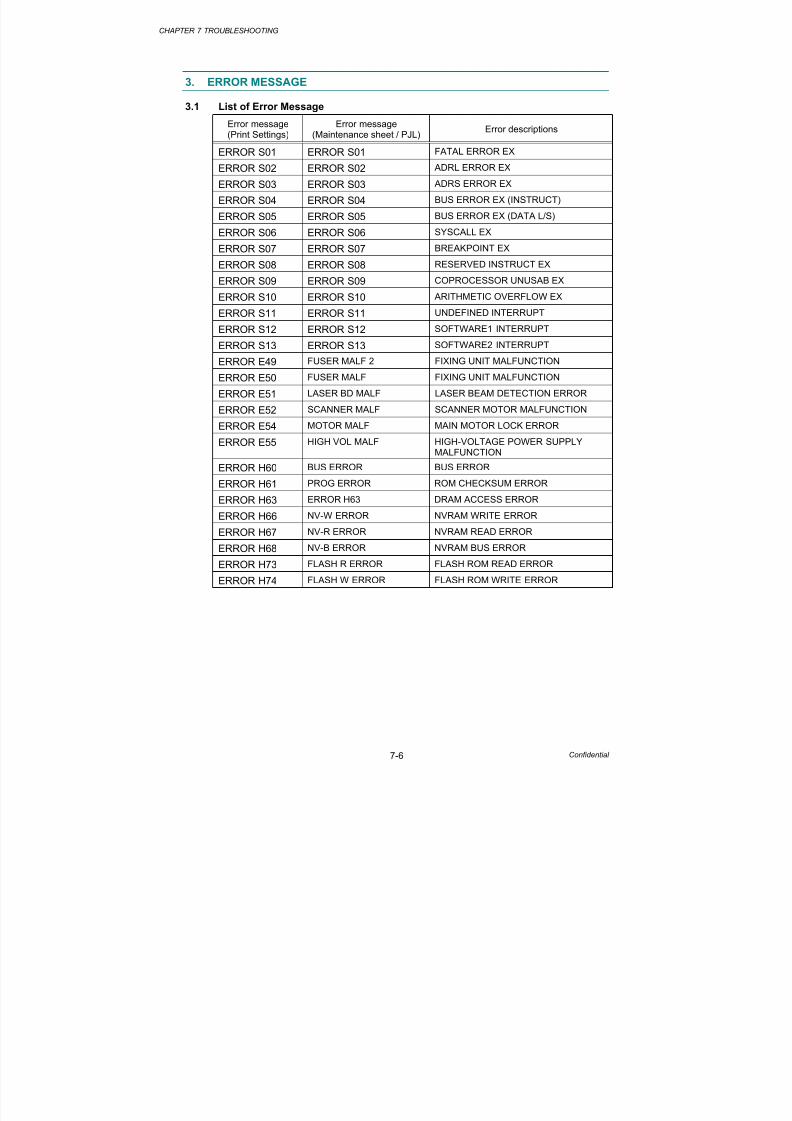
4. PAPER PROBLEMS.................................................................................................. 7-9 4.1 Paper Loading Problems ................................................................................................. 7-9
8/13/2019 Brother Hl-2030, Hl-2032, Hl-2040, Hl-2070n Service Manual
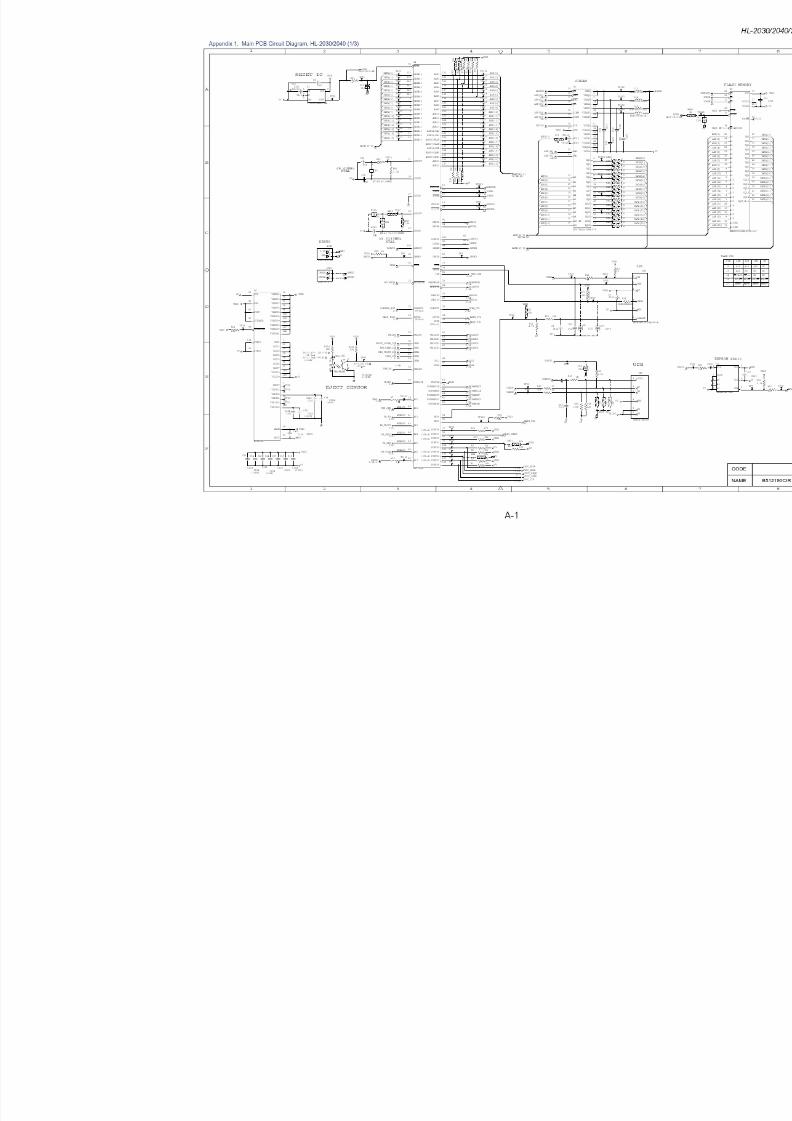
1. MAIN PCB CIRCUIT DIAGRAM, HL-2030/2040 (1/3) .................................................... A-1
2. MAIN PCB CIRCUIT DIAGRAM, HL-2030/2040 (2/3) .................................................... A-2
3. MAIN PCB CIRCUIT DIAGRAM, HL-2030/2040 (3/3) .................................................... A-3
4. MAIN PCB CIRCUIT DIAGRAM, HL-2070N (1/3) .......................................................... A-4
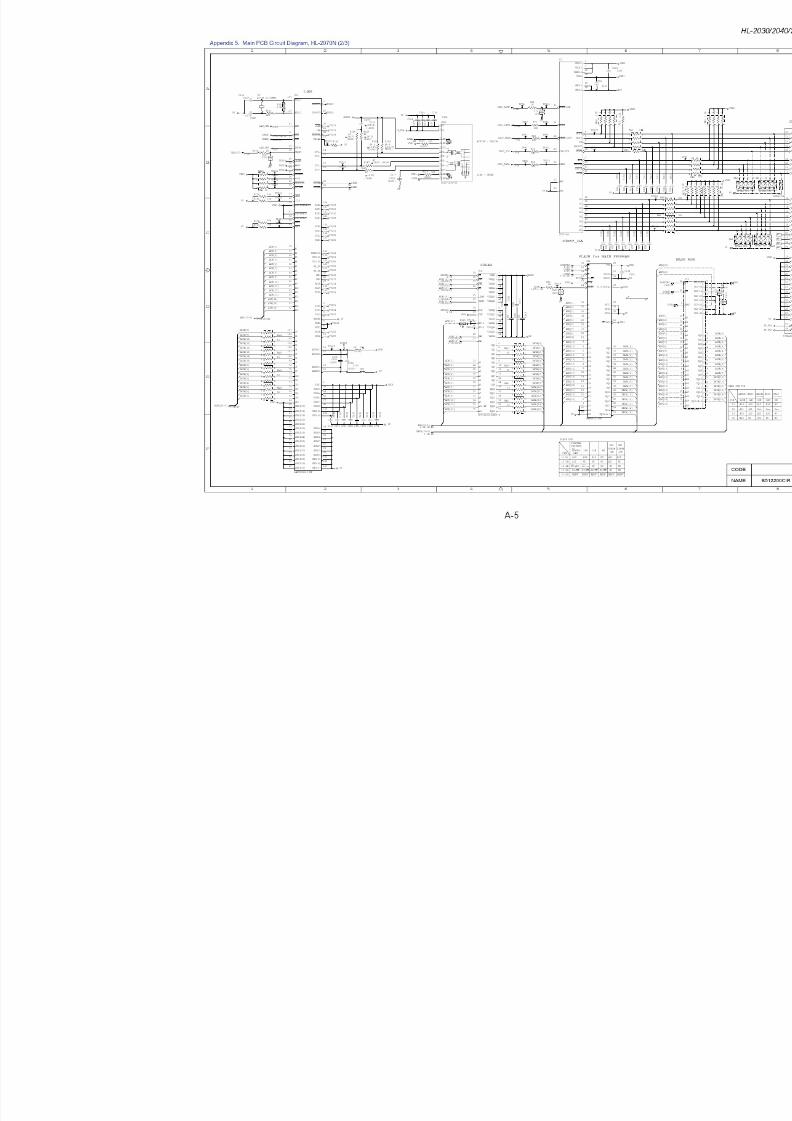
5. MAIN PCB CIRCUIT DIAGRAM, HL-2070N (2/3) .......................................................... A-5
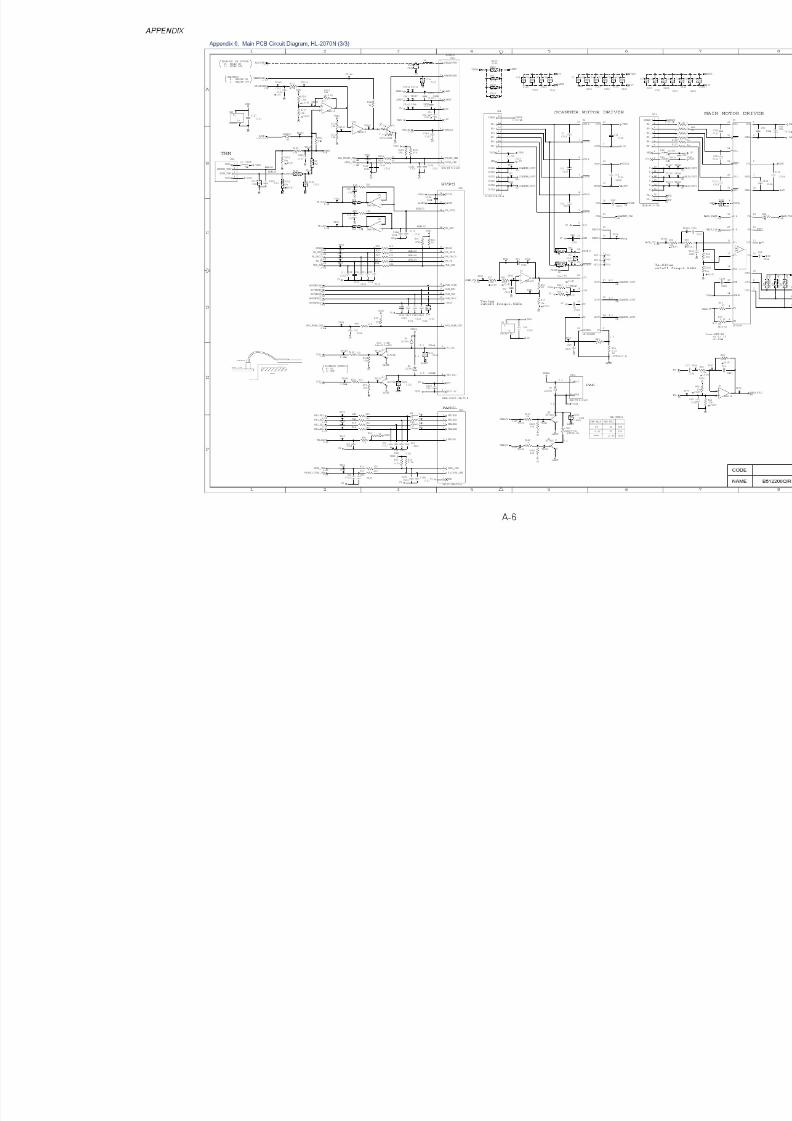
6. MAIN PCB CIRCUIT DIAGRAM, HL-2070N (3/3) .......................................................... A-6
7. POINT TO POINT CONNECTION DIAGRAM................................................................ A-7
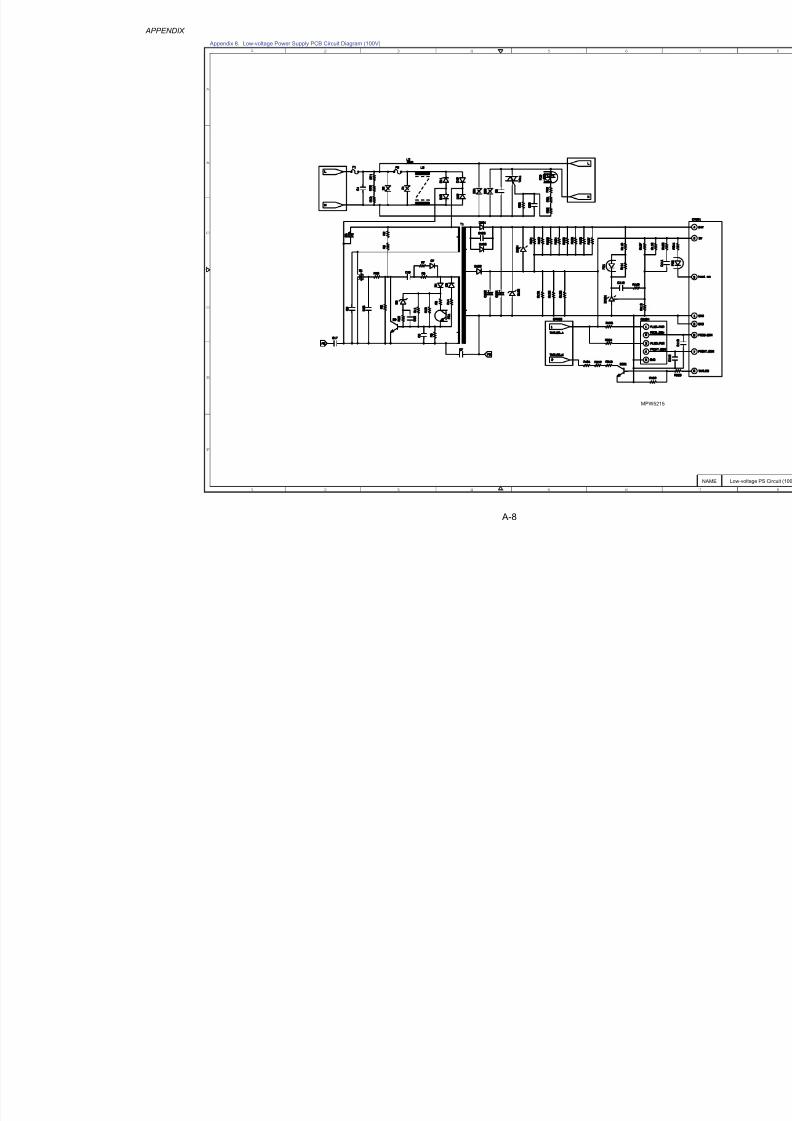
8. LOW-VOLTAGE POWER SUPPLY PCB CIRCUIT DIAGRAM (100V) .......................... A-8
9. LOW-VOLTAGE POWER SUPPLY PCB CIRCUIT DIAGRAM (200V) .......................... A-9
10. HIGH-VOLTAGE POWER SUPPLY PCB CIRCUIT DIAGRAM ................................... A-10
11. REPLACEMENT OF PINCH SPRING L AND PINCH SPRING R................................ A-11
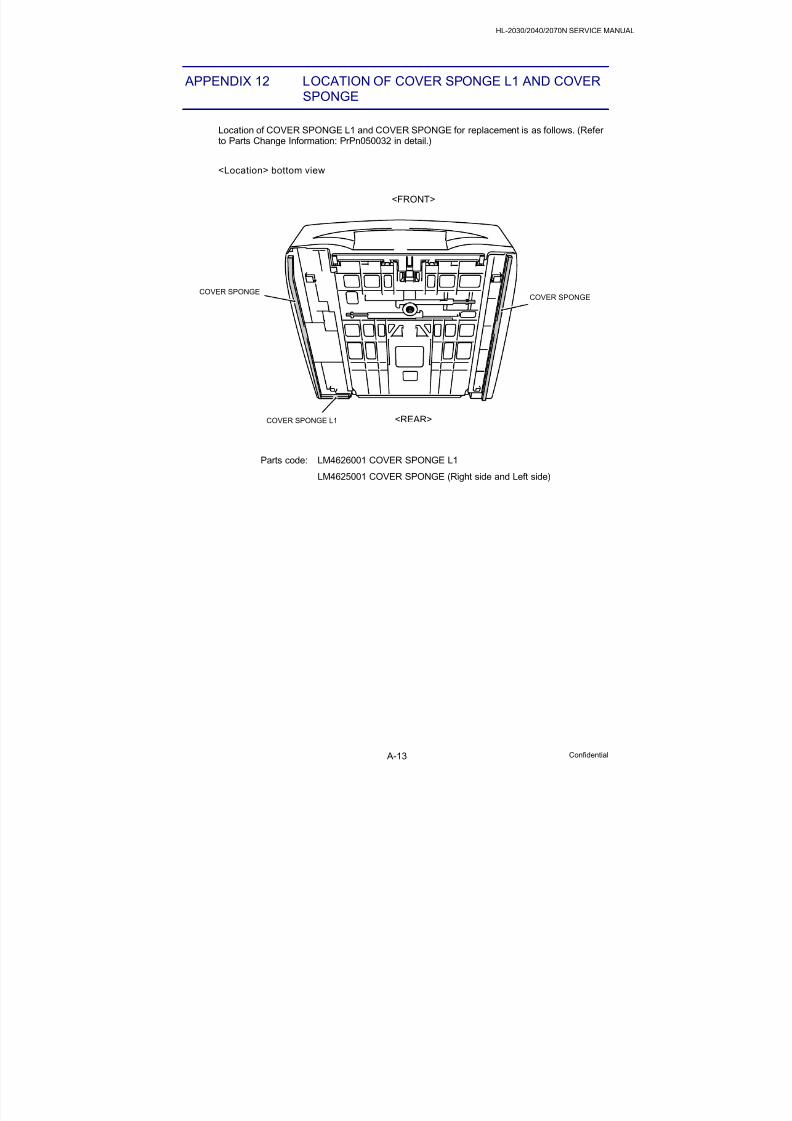
12. LOCATION OF COVER SPONGE L1 AND COVER SPONGE.................................... A-13
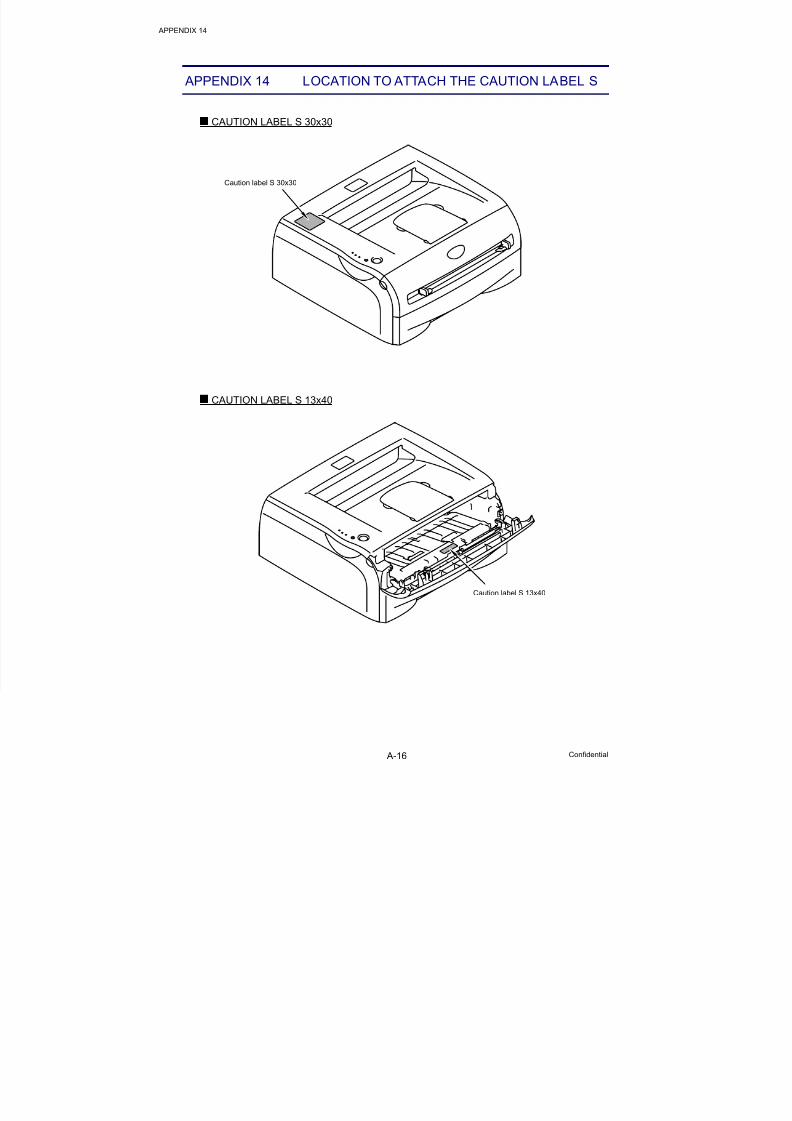
13. HOW TO ATTACH THE ANTI-STATIC BRUSH ALL ................................................... A-14 14. LOCATION TO ATTACH THE CAUTION LABEL S..................................................... A-16
8/13/2019 Brother Hl-2030, Hl-2032, Hl-2040, Hl-2070n Service Manual
This printer is certified as a Class 1 laser product under the U.S. Department of Healthand Human Services (DHHS) Radiation Performance Standard according to the Radiation
Control for Health and Safety Act of 1968. This means that the printer does not producehazardous laser radiation.
Since radiation emitted inside the printer is completely confined within protective housingsand external covers, the laser beam cannot escape from the machine during any phase ofuser operation.
FDA REGULATIONS (100 - 120V MODEL ONLY)
U.S. Food and Drug Administration (FDA) has implemented regulations for laser productsmanufactured on and after August 2, 1976. Compliance is mandatory for productsmarketed in the United States. One of the following labels on the back of the printerindicates compliance with the FDA regulations and must be attached to laser productsmarketed in the United States.
The label for Japanese manufactured products
MANUFACTURED:Brother Industries, Ltd.,
15-1 Naeshiro-cho Mizuho-ku Nagoya, 467-8561 JapanThis product complies with FDA performance standardsfor laser products except for deviations pursuant to LaserNotice No.50, dated July 26, 2001.
The label for Chinese manufactured products
MANUFACTURED:Brother Corporation (Asia) Ltd. Brother Buji Nan LingFactory
Gold Garden Ind., Nan Ling Village, Buji, Rong Gang,Shenzhen, CHINAThis product complies with FDA performance standardsfor laser products except for deviations pursuant to LaserNotice No.50, dated July 26, 2001.
CautionUse of controls, adjustments or performance of procedures other than those specified in
this User’s Guide may result in hazardous radiation exposure.
C
8/13/2019 Brother Hl-2030, Hl-2032, Hl-2040, Hl-2070n Service Manual
This printer is a Class 1 laser product as defined in IEC 60825 specifications. The labelshown below is attached in countries where it is required.
This printer has a laser diode which emits invisible laser radiation in the Laser Unit. TheLaser Unit should not be opened without disconnecting the two connectors connected withthe AC power supply and laser unit. Since the variable resistor in the laser unit is adjustedin accordance with the standards, never touch it.
CautionUse of controls, adjustments or performance of procedures other than those specified inthis manual may result in hazardous radiation exposure.
For Finland and Sweden
LUOKAN 1 LASERLAITE
KLASS 1 LASER APPARAT
Varoitus! Laitteen käyttäminen muulla kuin tässä käyttöohjeessa mainitulla tavalla saattaaaltistaa käyttäjän turvallisuusluokan 1 ylittävälle näkymättömälle lasersäteilylle.
Varning – Om apparaten används på annat sätt än i denna Bruksanvisning specificerats,kan användaren utsättas för osynlig laserstrålning, som överskrider gränsen för laserklass1.
Internal laser radiation
Maximum radiation power: 5 mW
Wave length: 770 – 810 nm
Laser class: Class 3B
8/13/2019 Brother Hl-2030, Hl-2032, Hl-2040, Hl-2070n Service Manual
CAUTION FOR LASER PRODUCT (WARNHINWEIS FUR LASER DRUCKER)
CAUTION: When the machine during servicing is operated with the cover open, theregulations of VBG 93 and the performance instructions for VBG 93 are
valid.
CAUTION: In case of any trouble with the laser unit, replace the laser unit itself. Toprevent direct exposure to the laser beam, do not try to open the enclosureof the laser unit.
ACHTUNG: Im Falle von Störungen der Lasereinheit muß diese ersetzt werden. DasGehäuse der Lasereinheit darf nicht geöffnet werden, da sonstLaserstrahlen austreten können.
<Location of the laser beam window>
ADDITIONAL INFORMATION
When servicing the optical system of the printer, be careful not to place a screwdriver orother reflective object in the path of the laser beam. Be sure to take off any personalaccessories such as watches and rings before working on the printer. A reflected beam,though invisible, can permanently damage the eyes.
Since the beam is invisible, the following caution label is attached on the laser unit.
8/13/2019 Brother Hl-2030, Hl-2032, Hl-2040, Hl-2070n Service Manual
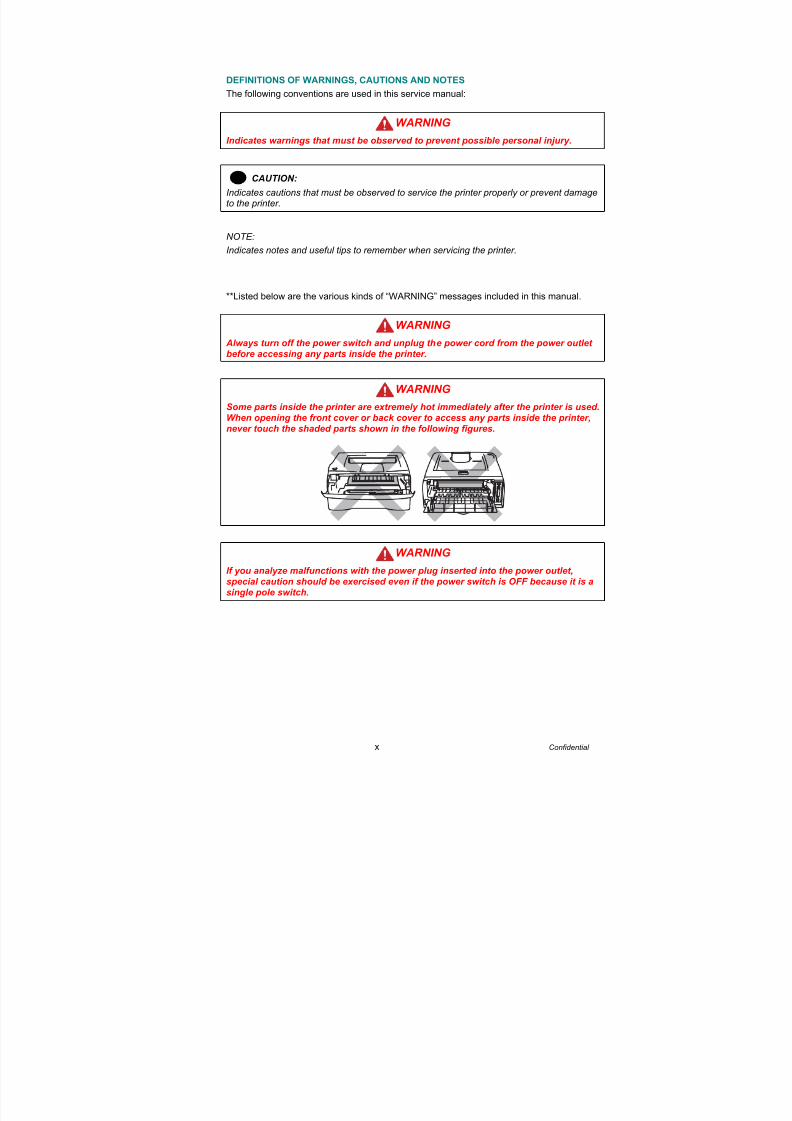
The following conventions are used in this service manual:
WARNING
Indicates warnings that must be observed to prevent possible personal injury.
! CAUTION:
Indicates cautions that must be observed to service the printer properly or prevent damageto the printer.
NOTE:
Indicates notes and useful tips to remember when servicing the printer.
**Listed below are the various kinds of “WARNING” messages included in this manual.
WARNING
Always turn off the power switch and unplug the power cord from the power outletbefore accessing any parts inside the printer.
WARNING
Some parts inside the printer are extremely hot immediately after the printer is used.
When opening the front cover or back cover to access any parts inside the printer,never touch the shaded parts shown in the following figures.
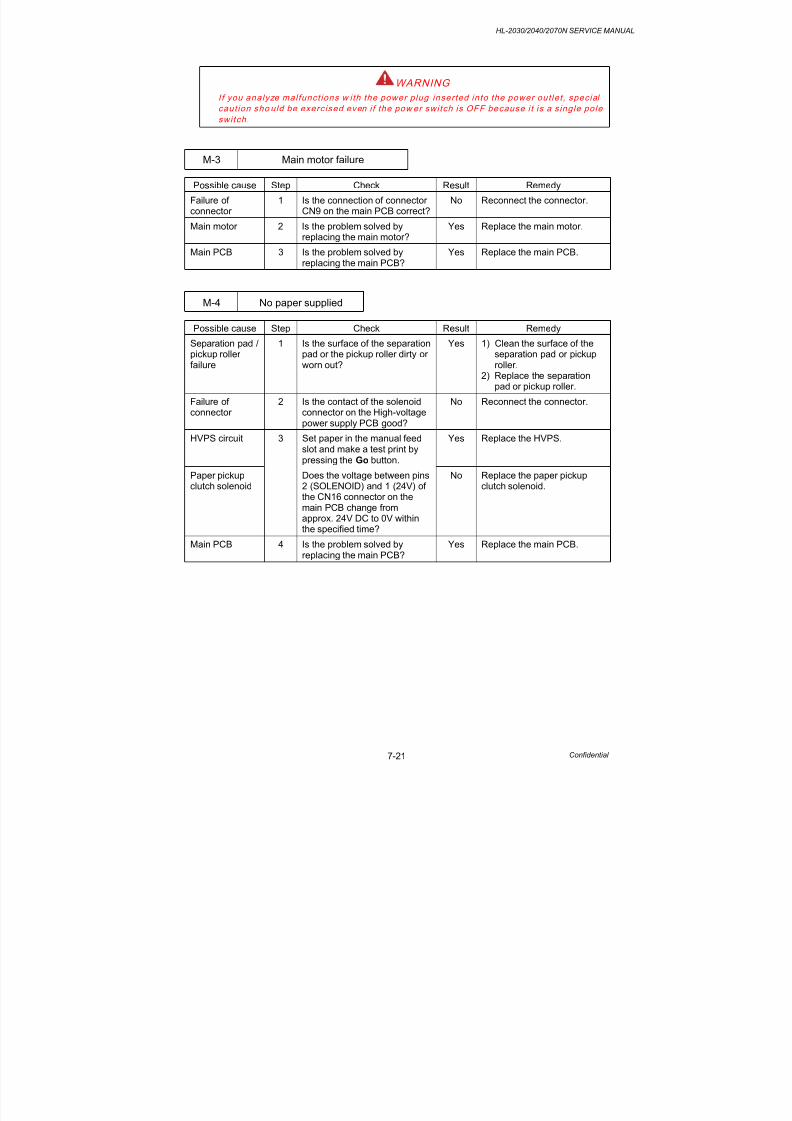
WARNING If you analyze malfunctions with the power plug inserted into the power outlet,special caution should be exercised even if the power switch is OFF because it is asingle pole switch.
8/13/2019 Brother Hl-2030, Hl-2032, Hl-2040, Hl-2070n Service Manual
True 600 x 600 dots/ true 300 x 300 dots per inch (dpi) and HQ1200 for graphics with microfinetoner and up to 16 (HL-2030)/ 20 (HL-2040/2070N) pages per minute (ppm) print speed for A4and 17 (HL-2030)/ 20 (HL-2040/2070N) pages per minute (ppm) print speed for Letter- sizepaper.
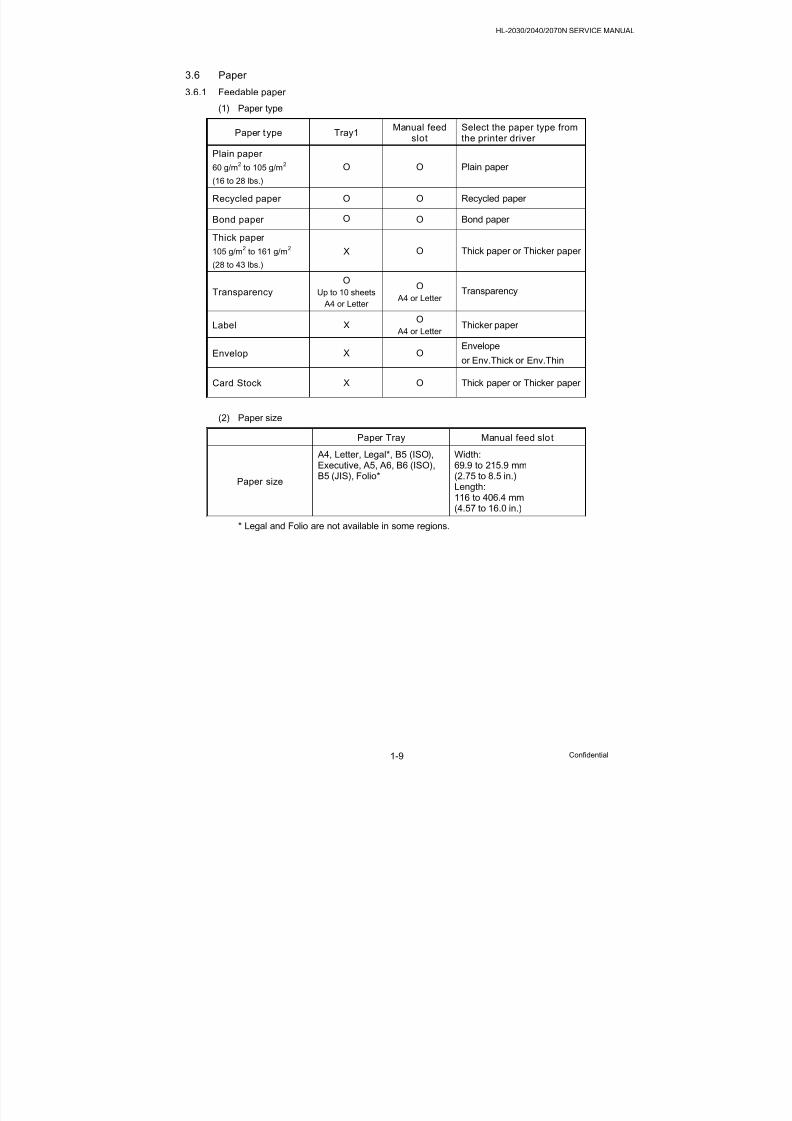
Versatile Paper Handling
The printer loads paper automatically from the paper tray. The paper tray can hold A4, letter,B5 (ISO), B5 (JIS), A5, B6 (ISO), A6, Executive, Folio and Legal* size of paper. The manual
feed slot allows manual paper loading sheet by sheet so you can use a variety of types andsizes of paper. *Legal paper is not available in some regions.
Front Operation
Basic operation of the printer can be controlled from the control panel.
Enhanced Printing Performance and User-Friendly Operation for Windows
The dedicated printer driver for Microsoft Windows 95/98/Me, Windows NT 4.0 and
Windows 2000/XP are available on the CD-ROM supplied with your printer. You can easily
install them into your Windows system using our installer program. The driver supports our
unique compression mode to enhance printing speed in Windows applications and allows youto choose various printer settings including toner save mode, custom paper size, sleep mode,
gray scale adjustment, resolution, water mark and many layout functions. You can easily setupthese print options through the Printer Setup Menu.
Printer Status Monitor with Bi-directional Parallel Interface (For HL-2040/2070N)
The printer driver can monitor the status of your printer using bi-directional parallelcommunications. IEEE-1284 bi-directional parallel printer cable is recommended.
The printer status monitor program can show the current status of your printer. When printing,the animated dialog box appears on your computer screen to show the current printingprocess. If an error occurs, a dialog box will appear to let you know what to correct. If youhave turned on the Interactive Help (Windows only) you can get visual guidance on your PCscreen on the actions in the event of certain printer errors. The default setting is OFF.
Quick Print Setup
The Quick Print Setup is a convenient utility to allow you to make changes to frequently useddriver settings easily without having to open the printer properties selection box every time. Itis launched automatically when this printer driver is selected. You can change the settings byclicking on the icon with the right mouse button. The default setting is OFF.
Enhanced Memory Management
The printer provides its own data compression technology in its printer hardware and thesupplied printer driver software, which can automatically compress graphic data and font dataefficiently into the printer’s memory. You can avoid memory errors and print most full pages600 dpi graphic and text data, including large fonts, with the standard printer memory.
8/13/2019 Brother Hl-2030, Hl-2032, Hl-2040, Hl-2070n Service Manual
USB Interface (for Windows 98/Me/2000/XP, Mac OS 9.1-9.2/ Mac OS X 10.2.4 or
greater)
The printer can be connected using the Universal Serial Bus (USB) interface to a PC or Macwhich has a USB interface. Drivers that allow you to use the USB port are provided on the CD-ROM supplied with the printer.
Popular Printer Emulation Support
These printers support the following printer emulation modes.HL-2030/2040: GDIHL-2070N: HP LaserJet (PCL6), Epson FX-850 and IBM Proprinter XL.
Environment-Friendly
<Economy Printing Mode>
This feature will cut your printing cost by saving toner. It is useful for obtaining draft copies for
proof-reading. You can select the toner saving economy mode through the Windows printerdriver supplied with your printer.
<Sleep Mode (Power Save Mode)>Sleep mode automatically reduces power consumption when the printer is not in use for acertain period of time. The printer consumes less than 5W (HL-2030/2040) or 7W (HL-2070N)when in sleep mode.
<Low Running Cost>
Since the toner cartridge is separate from the drum unit, you need to replace only the tonercartridge after printing around 2,500 (Standard toner cartridge) pages at 5% coverage for A4paper for the standard cartridge, which is both cost effective and ecologically friendly.
Bar Code Print (for HL-2070N only)
The printer can print the following 11 types of bar codes
• Code 39 • US-PostNet • EAN-8
• Code 128 • ISBN • EAN-13
• Interleaved 2 of 5 • UPC-A • EAN-128
• Codabar • UPC-E
Network Feature (for HL-2070N only)
The Brother printer has built in multi protocol network capability as standard. This allowsmultiple host computers to share the printer on a 10/100Mbps Ethernet network. Any userscan print their jobs as if the printer was directly connected to their computer. Users onWindows
® 95/98/Me, Windows
® NT4.0, Windows
® 2000/XP, Mac OS
® 9.1 to 9.2, Mac OS
® X
10.2.4 or greater simultaneously can access this printer. For further information, see theNetwork User’s Guide supplied with the printer.
8/13/2019 Brother Hl-2030, Hl-2032, Hl-2040, Hl-2070n Service Manual
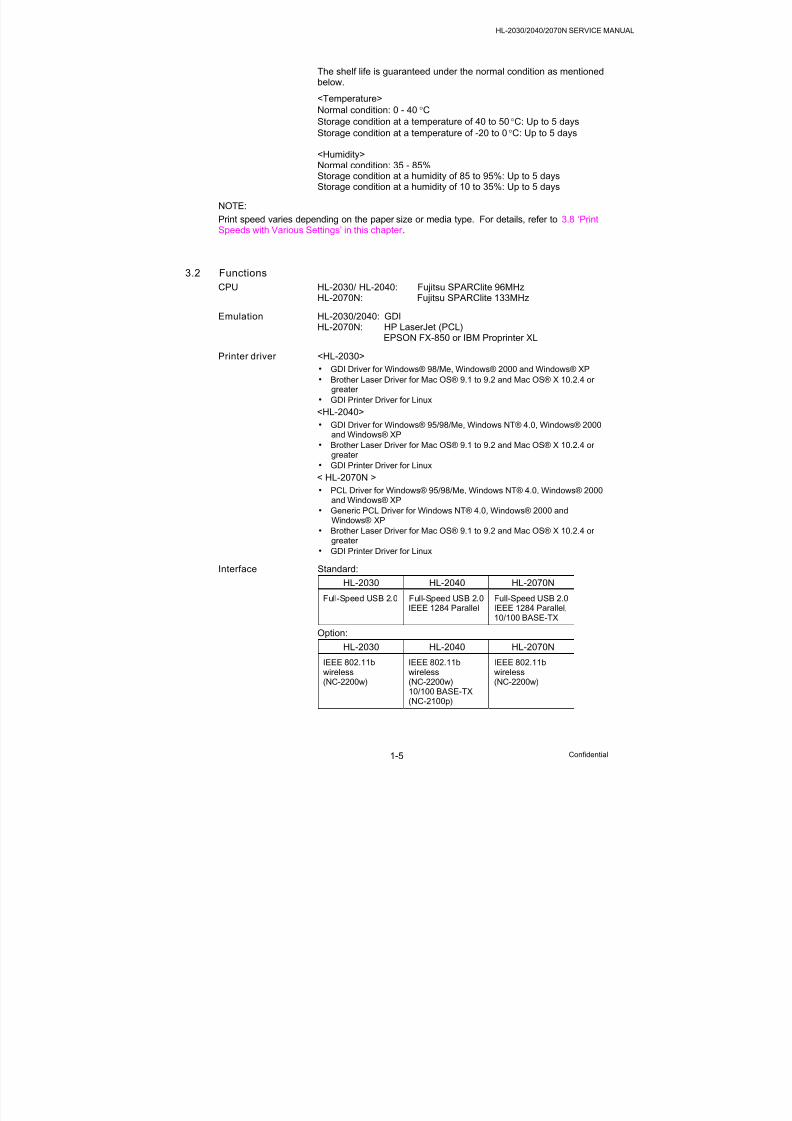
The shelf life is guaranteed under the normal condition as mentionedbelow.
<Temperature>
Normal condition: 0 - 40 °C
Storage condition at a temperature of 40 to 50 °C: Up to 5 days
Storage condition at a temperature of -20 to 0 °C: Up to 5 days
<Humidity>Normal condition: 35 - 85%Storage condition at a humidity of 85 to 95%: Up to 5 daysStorage condition at a humidity of 10 to 35%: Up to 5 days
NOTE:
Print speed varies depending on the paper size or media type. For details, refer to 3.8 ‘PrintSpeeds with Various Settings’ in this chapter .
Utilities HL-2030/2040: Interactive Help*HL-2070N: Interactive Help, Driver Deployment Wizard** Interactive Help: Instructional animations for problem solving.* The Driver Deployment Wizard automates the installation of a printer
in a peer-to-peer network.
Memory HL-2030/2040: 8 Mbytes
HL-2070N: 16 MbytesOption: N/A
Control Panel • Display LED: 4 LEDs
• Button 1 button
Diagnostics Self-diagnostic program
Resident Fonts HL-2030/2040: N/AHL-2070N: 49 scalable fonts, 12 bitmap fonts, 11 bar codes;Code39, Interleaved 2 of 5, EAN-8, EAN-13, UPC-A, EAN-128,Codabar, FIM (US-PostNet), ISBN, Code128
3.3 Electronics and Mechanics
Power source U.S.A. and Canada: AC 110 to 120V, 50 Hz/60 HzEurope and Australia: AC 220 to 240V, 50 Hz/60 Hz
Power consumption Printing: Less than 450 W at 25°C (77°F)
(average) Standing by: Less than 70 W at 25°C (77°F)Sleep: Less than 5 W (HL-2030/2040)
Less than 7 W (HL-2070N)
Noise <Sound pressure>Printing: Less than 51dB (A)
Standing by: Less than 30dB (A)<Sound power>Printing: 6.2B(A)(Office equipment with LWAd<6.3B(A) is not suitable for operation inrooms where predominantly intellectual work is done. Due to therenoise emissions, these devices should be separate rooms.)Standing by; 4.3B(A)
Temperature Operating: 10 to 32.5°C (50 to 90.5°F)
Non operating: 0 to 40°C (38 to 104°F)
Storage: -20 to 40°C (-4 to 104°F)
Humidity Operating: 20 to 80% (non condensing)Storage: 10 to 85% (non condensing)
Dimensions 371 x 361 x 165.5 mm(W x D x H) (14.6 x 14.2 x 6.5 inches)
Weight Approximately 5.4 kg (12.0lb) not including the drum unit and tonercartridge.
Approximately 6.5 kg (14.3lb) including the drum unit and tonercartridge
NOTE:
The power consumption figure quoted for sleep mode is when the fan has stopped.
8/13/2019 Brother Hl-2030, Hl-2032, Hl-2040, Hl-2070n Service Manual
Supplied software • BRAdmin Professional utility (for Windows 95/98/ME, WindowsNT
4.0/Windows 2000/XP)
• Web BRAdmin (Windows2000 Professional/ Server/ Advanced
Server, WindowsXP Professional)Web BRAdmin is NOT supplied with CD-ROM. Available only onWeb page. For more information on Web BRAdmin Professional,refer to http://solutions.brother.com
8/13/2019 Brother Hl-2030, Hl-2032, Hl-2040, Hl-2070n Service Manual
Print speed is up to 16 ppm for A4 size, 17 ppm for Letter size (HL-2030) and 20 ppm (HL-2040/2070N) when loading A4 or Letter size paper from the paper tray in the plain paper mode.
Actual print speed varies depending on the media type or paper size as shown in the tablesbelow;
<A4 / Letter size>
Media type setting All models
Transparency Up to 16/17 ppm (HL-2030)Up to 20 ppm (HL-2040/2070N)
Thin Paper Up to 16/17 ppm (HL-2030)Up to 20 ppm (HL-2040/2070N)
Plain Paper,Recycled Paper
Up to 16/17 ppm (HL-2030)Up to 20 ppm (HL-2040/2070N)
• The print speed may vary according to conditions, such as paper size and paper tray.
• When a smaller size paper than A4 or Letter is printed, the temperature on both edges ofthe fixing unit is much higher than the temperature on the center of the unit where the paperis fed depending on the setting or model. Therefore, the print speed is slowed in order todecrease the temperature on the edges after the specified time, it is maximum print speedwhen you first start printing.
• The actual print speed varies depending on the paper size.
8/13/2019 Brother Hl-2030, Hl-2032, Hl-2040, Hl-2070n Service Manual
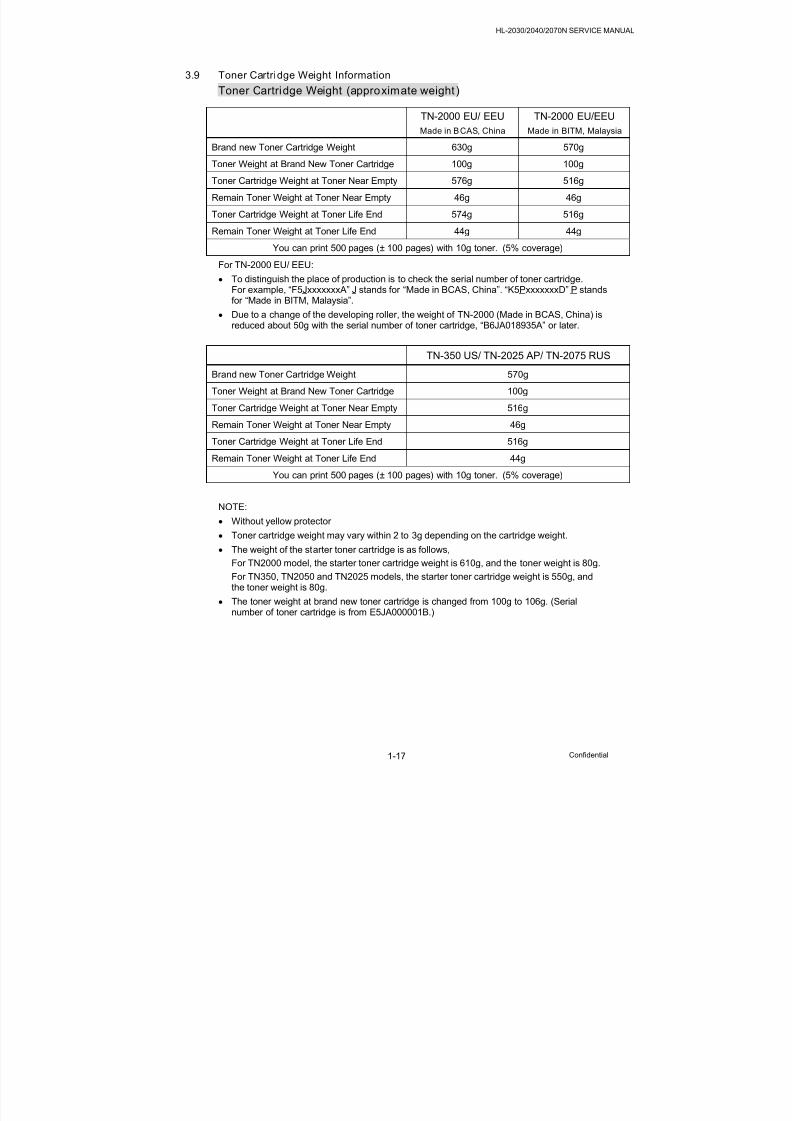
Toner Weight at Brand New Toner Cartridge 100g 100g
Toner Cartridge Weight at Toner Near Empty 576g 516g
Remain Toner Weight at Toner Near Empty 46g 46g
Toner Cartridge Weight at Toner Life End 574g 516g
Remain Toner Weight at Toner Life End 44g 44g
You can print 500 pages (± 100 pages) with 10g toner. (5% coverage)
For TN-2000 EU/ EEU:
• To distinguish the place of production is to check the serial number of toner cartridge.For example, “F5JxxxxxxxA” J stands for “Made in BCAS, China”. “K5PxxxxxxxD” P standsfor “Made in BITM, Malaysia”.
• Due to a change of the developing roller, the weight of TN-2000 (Made in BCAS, China) isreduced about 50g with the serial number of toner cartridge, “B6JA018935A” or later.
TN-350 US/ TN-2025 AP/ TN-2075 RUS
Brand new Toner Cartridge Weight 570g
Toner Weight at Brand New Toner Cartridge 100g
Toner Cartridge Weight at Toner Near Empty 516g
Remain Toner Weight at Toner Near Empty 46g
Toner Cartridge Weight at Toner Life End 516g
Remain Toner Weight at Toner Life End 44g
You can print 500 pages (± 100 pages) with 10g toner. (5% coverage)
NOTE:
• Without yellow protector
• Toner cartridge weight may vary within 2 to 3g depending on the cartridge weight.
•
The weight of the starter toner cartridge is as follows,For TN2000 model, the starter toner cartridge weight is 610g, and the toner weight is 80g.
For TN350, TN2050 and TN2025 models, the starter toner cartridge weight is 550g, andthe toner weight is 80g.
• The toner weight at brand new toner cartridge is changed from 100g to 106g. (Serialnumber of toner cartridge is from E5JA000001B.)
8/13/2019 Brother Hl-2030, Hl-2032, Hl-2040, Hl-2070n Service Manual
• The source voltage must stay within ±10% of the rated voltage shown on the rating plate.
• The power cord, including extensions, should not exceed 5 meters (16.5 feet).
• Do not share the same power circuit with other high-power appliances, particularly an airconditioner, copier or shredder. If it is unavoidable that you must use the printer with theseappliances, it is recommended that you use an isolation transformer or a high-frequencynoise filter.
• Use a voltage regulator if the power source is not stable.
1.2 Environment• Setup the printer near a power outlet, so that it can be easily unplugged from the power
outlet if there is an emergency.
• The room temperature is maintained between 10°C and 32.5°C. The relative humidity ismaintained between 20% and 80%.
• The printer should be used in a well-ventilated room.
• Place the printer on a flat, horizontal surface.
• Keep the printer clean. Do not place the printer in a dusty place.
• Do not place the printer where the ventilation hole of the printer is blocked. Keepapproximately 100 mm (4 inches) between the ventilation hole and the wall.
•
Do not place the printer where it is exposed to direct sunlight. Use a blind or a heavycurtain to protect the printer from direct sunlight when the printer is unavoidably set up neara window.
• Do not place the printer near devices that contain magnets or generate magnetic fields.
• Do not subject the printer to strong physical shocks or vibrations.
• Do not expose the printer to open flames or salty or corrosive gasses.
• Do not place objects on top of the printer.
• Do not place the printer near an air conditioner.
• Keep the printer horizontal when carrying.
• Do not cover the slots in the side cover.
8/13/2019 Brother Hl-2030, Hl-2032, Hl-2040, Hl-2070n Service Manual
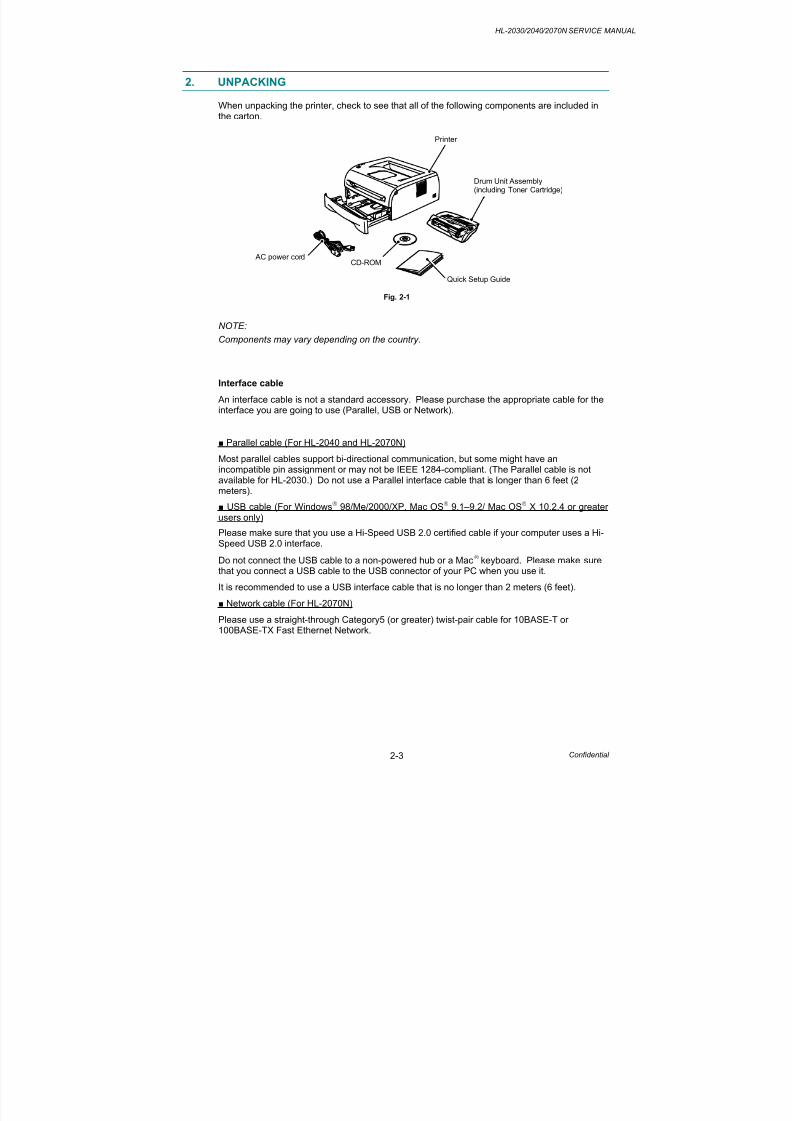
When unpacking the printer, check to see that all of the following components are included inthe carton.
Fig. 2-1
NOTE:
Components may vary depending on the country.
Interface cable
An interface cable is not a standard accessory. Please purchase the appropriate cable for theinterface you are going to use (Parallel, USB or Network).
■ Parallel cable (For HL-2040 and HL-2070N)
Most parallel cables support bi-directional communication, but some might have anincompatible pin assignment or may not be IEEE 1284-compliant. (The Parallel cable is notavailable for HL-2030.) Do not use a Parallel interface cable that is longer than 6 feet (2meters).
■ USB cable (For Windows 98/Me/2000/XP, Mac OS 9.1–9.2/ Mac OS X 10.2.4 or greaterusers only)
Please make sure that you use a Hi-Speed USB 2.0 certified cable if your computer uses a Hi-Speed USB 2.0 interface.
Do not connect the USB cable to a non-powered hub or a Mac keyboard. Please make surethat you connect a USB cable to the USB connector of your PC when you use it.
It is recommended to use a USB interface cable that is no longer than 2 meters (6 feet).
■ Network cable (For HL-2070N)
Please use a straight-through Category5 (or greater) twist-pair cable for 10BASE-T or100BASE-TX Fast Ethernet Network.
Printer
Drum Unit Assembly(including Toner Cartridge)
Quick Setup Guide
CD-ROM AC power cord
8/13/2019 Brother Hl-2030, Hl-2032, Hl-2040, Hl-2070n Service Manual
You need to implement hardware setup and driver installation to use the printer.
Firstly, identify the Operating System on your computer. (Windows®
95/98/Me, Windows NT®
4.0, Windows®
2000/XP and Macintosh) Then, purchase the appropriate interface cable(Parallel, USB or Network) for your computer. Most existing parallel cables support bi-directional communication, but some might have an incompatible pin assignment or may notbe IEEE 1284-compliant.
The installation programs for the hardware setup and driver installation are contained on thesupplied CD-ROM.
3.1 For All Users
For Windows users
(1) Turn on the PC power. Insert the supplied CD-ROM into the CD-ROM drive. Theopening screen will appear automatically. Select the printer model and the language.
(2) Click the Initial Setup icon on the menu screen.
(3) You can view the Initial Setup instructions.
For Mac OS 10.2.4 or greater us ers
(1) Turn on the PC. Insert the CD-ROM into the CD-ROM drive.
(2) Double-click the HL2000 icon on your Desktop. Double-click the Start Here OS X icon.Follow the on-screen instructions.
(3) Click the Initial Setup icon on the menu screen.
(4) You can view the Initial Setup instructions.
For Mac OS 9.1 to 9.2 users
Go to the next page and follow the instructions.
8/13/2019 Brother Hl-2030, Hl-2032, Hl-2040, Hl-2070n Service Manual
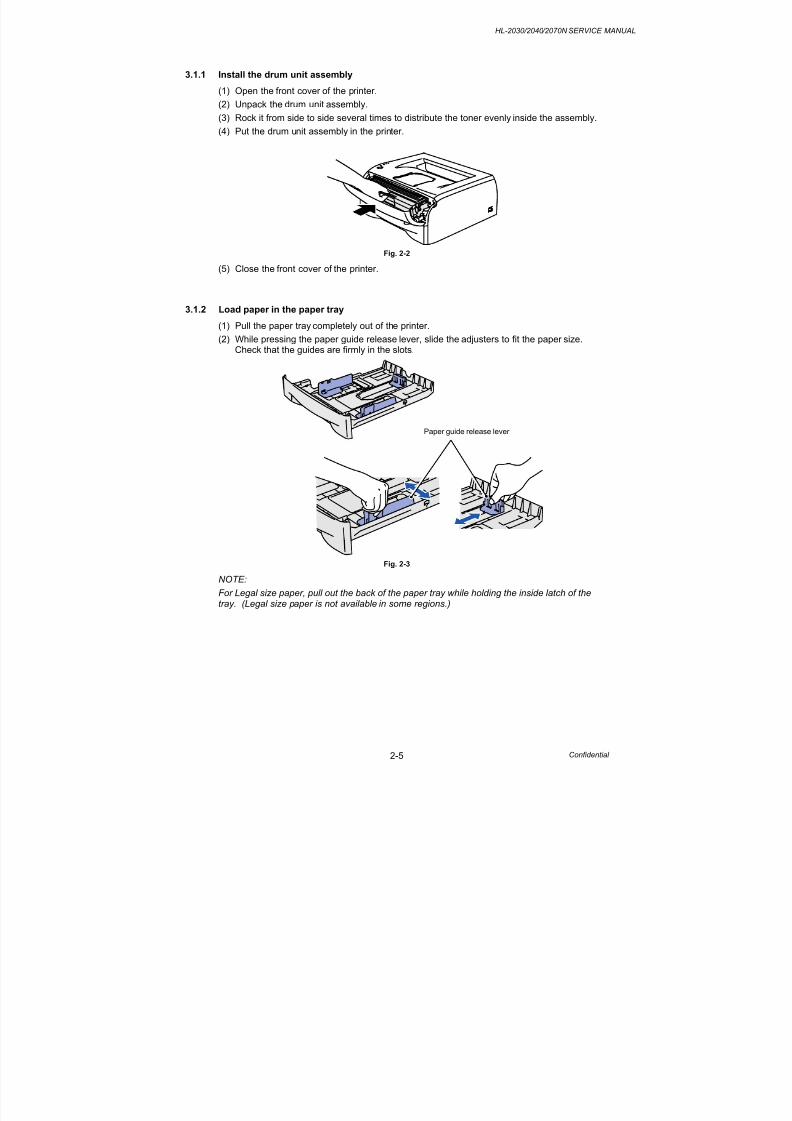
(3) Rock it from side to side several times to distribute the toner evenly inside the assembly.
(4) Put the drum unit assembly in the printer.
Fig. 2-2
(5) Close the front cover of the printer.
3.1.2 Load paper in the paper tray
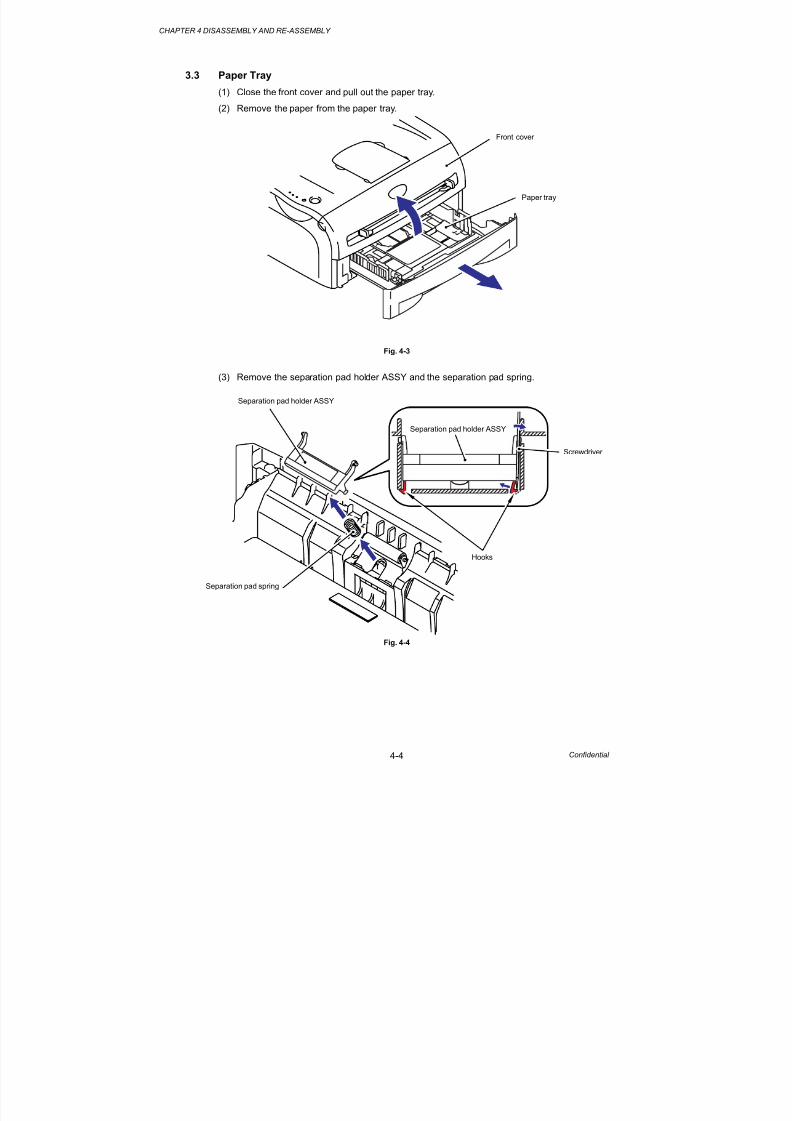
(1) Pull the paper tray completely out of the printer.
(2) While pressing the paper guide release lever, slide the adjusters to fit the paper size.Check that the guides are firmly in the slots.
Fig. 2-3
NOTE:
For Legal size paper, pull out the back of the paper tray while holding the inside latch of thetray. (Legal size paper is not available in some regions.)
Paper guide release lever
8/13/2019 Brother Hl-2030, Hl-2032, Hl-2040, Hl-2070n Service Manual
(3) Fan the stack of paper well to avoid paper jams and misfeeds.
(4) Put paper in the paper tray. Check that the paper is flat in the tray and below themaximum paper mark.
Fig. 2-4
NOTE:
• Paper jams may occur if you put more than 250 sheets (80g/m² or 21 lb) of plain paper inthe paper tray at one time.
• Paper jams may occur if you put more than 10 transparency in the paper tray at one time.
• When you use pre-printed paper, put the side that is going to be printed on (blank side) facedown, with the top of the paper at the front of the tray.
(5) Put the paper tray firmly back in the printer. Check that it is completely in the printer.
3.1.3 Print a test page
(1) Turn off the printer.
(2) Make sure that the front cover is closed and the AC power cord is plugged in.
(3) All LEDs light up, and keep the Go button pressed down until the Ready LED goes off.
Release the Go button. Make sure that the Toner , Drum and Paper LEDs are off.
(4) Press the Go button again. The printer will print a test page.
Fig. 2-5
8/13/2019 Brother Hl-2030, Hl-2032, Hl-2040, Hl-2070n Service Manual
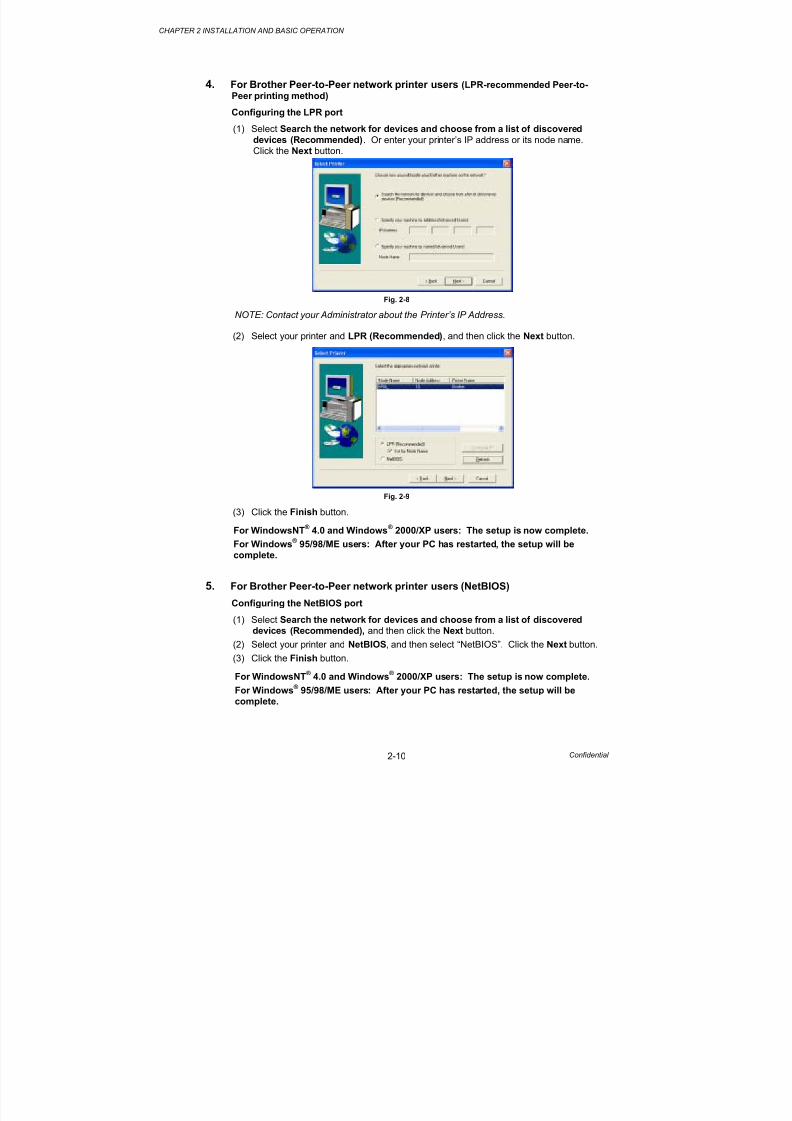
Follow the instructions for your operating system and interface cable type.
3.2 For Windows ® Users
For USB interface cable users
! CAUTION:
If the “Found New Hardware Wizard” appears on the PC, click the Cancel button.
(1) Make sure the USB interface cable is NOT connected to the printer, and then begininstalling the driver. If you have already connected to the cable, remove it.
(2) Click “Install Printer Driver” on the Menu screen.
(3) Select the USB Cable. Read the license agreement carefully. Follow the on-screeninstructions.
(4) When this screen appears, make sure the printer power switch is on. Connect the USB
interface cable to your PC, and then connect it to the printer. Click the Next button.
Fig. 2-6
(6) Click the Finish button.For Windows
® 98/Me users: The setup is now complete.
For Windows ®
2000/XP users: Follow the instructions below for setting the PC as thedefault printer.
For Windows® 2000/XP users only (Setting your printer as the default printer.)
(1) Click Start, and then Printers and Faxes.
Fig. 2-7
(2) Select the icon of the appropriate printer.
(3) From the File menu, select Set as Default printer.
For Windows ®
2000/XP users: The setup is now complete.
8/13/2019 Brother Hl-2030, Hl-2032, Hl-2040, Hl-2070n Service Manual
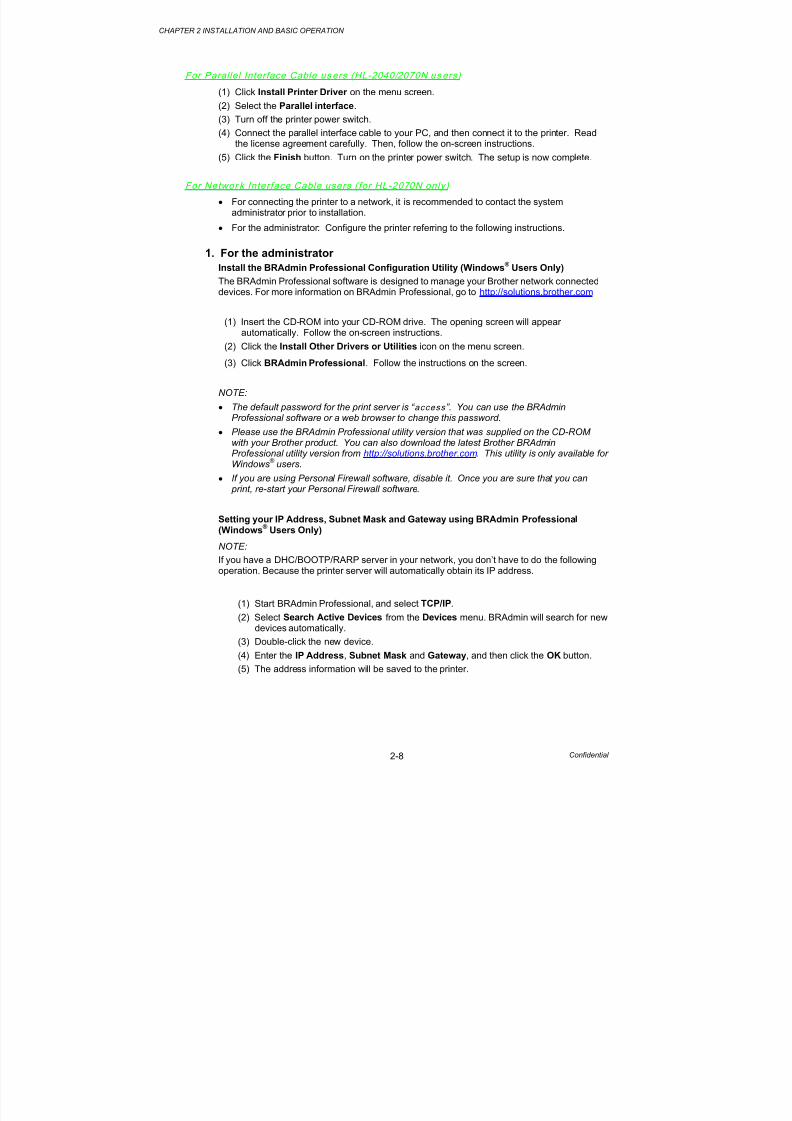
For Parallel Interface Cable us ers (HL-2040/2070N us ers)
(1) Click Install Printer Driver on the menu screen.
(2) Select the Parallel interface.
(3) Turn off the printer power switch.
(4) Connect the parallel interface cable to your PC, and then connect it to the printer. Readthe license agreement carefully. Then, follow the on-screen instructions.
(5) Click the Finish button. Turn on the printer power switch. The setup is now complete.
For Networ k Interface Cable users (for HL-2070N only)
• For connecting the printer to a network, it is recommended to contact the systemadministrator prior to installation.
• For the administrator: Configure the printer referring to the following instructions.
1. For the administrator
Install the BRAdmin Professional Configuration Utility (Windows ®
Users Only)
The BRAdmin Professional software is designed to manage your Brother network connecteddevices. For more information on BRAdmin Professional, go to http://solutions.brother.com
(1) Insert the CD-ROM into your CD-ROM drive. The opening screen will appearautomatically. Follow the on-screen instructions.
(2) Click the Install Other Drivers or Utilities icon on the menu screen.
(3) Click BRAdmin Professional. Follow the instructions on the screen.
NOTE:
• The default password for the print server is “ access ”. You can use the BRAdmin
Professional software or a web browser to change this password.
• Please use the BRAdmin Professional utility version that was supplied on the CD-ROMwith your Brother product. You can also download the latest Brother BRAdminProfessional utility version from http://solutions.brother.com. This utility is only available forWindows
® users.
• If you are using Personal Firewall software, disable it. Once you are sure that you can print, re-start your Personal Firewall software.
Setting your IP Address, Subnet Mask and Gateway using BRAdmin Professional(Windows
® Users Only)
NOTE:
If you have a DHC/BOOTP/RARP server in your network, you don’t have to do the followingoperation. Because the printer server will automatically obtain its IP address.
(1) Start BRAdmin Professional, and select TCP/IP.
(2) Select Search Active Devices from the Devices menu. BRAdmin will search for newdevices automatically.
(3) Double-click the new device.
(4) Enter the IP Address, Subnet Mask and Gateway, and then click the OK button.
(5) The address information will be saved to the printer.
8/13/2019 Brother Hl-2030, Hl-2032, Hl-2040, Hl-2070n Service Manual
Connect the printer to the Macintosh & install the BR-Script PPD file
<For Mac OS
® X 10.2.4 or greater Users>
(1) Click Install Printer Driver on the Menu screen.
(2) Click the Network interface and follow the on screen instructions.
(3) Turn off the printer power switch.
(4) Connect the network interface cable to the printer, and then connect it to a free port onyour hub.
(5) Turn on the printer power switch.
(6) From the Go menu, select Applications.
(7) Open the Utilities folder.
(8) Double-click the Printer Setup Utility icon.
(9) Click Add. Make the following selection.
(10) Select Brother HL-2070N series, and the click the Add button.
NOTE:
If there is more than one of the same model printer (HL-2070N) connected on your network,the Ethernet address (MAC address) will be displayed after the model name.
(11) From the Printer Setup Utility menu, select Quit Printer Setup Utility.
(12) The setup is now complete.
<For Mac OS ®
9.1 to 9.2 Users>
(1) Turn off the printer power switch.
(2) Connect the network interface cable to the printer, and then connect it to a free port onyour hub.
(3) Turn on the printer power switch.
(4) Insert the CD-ROM into your CD-ROM drive. Open the Mac OS 9 folder.
(5) Open your language folder.
(6) Double-click the Printer Driver Installer icon to install the printer driver. Follow the on-screen instructions.
(7) From the Apple menu, open the Chooser .
(8) Click the Brother Laser (IP) icon, and then select BRN_xxxxxx. Click the Setup…button.
* xxxxxx are the last six digits of the Ethernet address.
(9) Click the OK button. Close the Chooser. The setup is now complete.
.
8/13/2019 Brother Hl-2030, Hl-2032, Hl-2040, Hl-2070n Service Manual
The printer provides two types of printing method; printing from the paper tray and printingfrom the manual feed slot.
4.1 Printing on Plain Paper, Recycled Paper or Transparency from the Paper Tray
You can load plain paper, recycled paper or transparency into the paper tray. If paper isloaded into the paper tray, the printer automatically feeds paper sheet by sheet and ejects theprinted page into the output tray.
For the details on paper tray loading, refer to subsection 3.1.2 ‘Load paper into the paper tray’in this chapter and subsection 3.6 ‘Paper’ in Chapter 1.
NOTE:
• It is recommended that lifting up the support flap prevents from sliding off the facedownoutput tray. If you choose not to lift up the output tray support flap, we recommend thatyou remove printed pages immediately after they come out of the printer.
• Paper jams may occur if you put more than 250 sheets of plain paper in the paper tray atone time.
• Paper jams may occur if you put more than 10 transparency in the paper tray at one time.
• When you use pre-printed paper, put the side that is going to be printed on (blank side)face down, with the top of the paper at the front of the tray.
! CAUTION:
If you print on transparency, remove each transparency immediately. Stacking the printedtransparency may cause a paper jam or the transparency to curl.
4.2 Printing on Plain Paper, Recycled Paper, Bond Paper and Transparency from
the Manual Feed Slot
NOTE:The printer automatically turns on the Manual Feed mode when you put paper in the manualfeed slot.
(1) Select the Paper Size, Media Type, Paper Source and other settings in the printer driver.
(2) Send the print data to the printer.
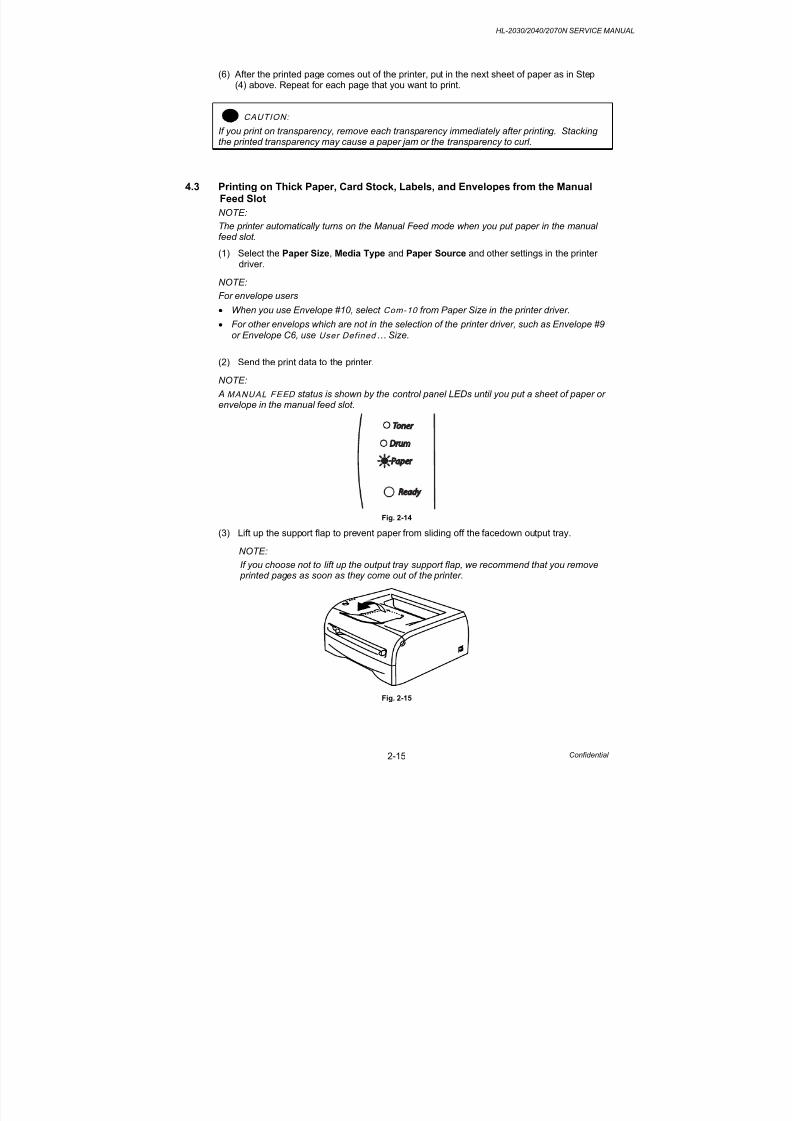
NOTE:
A MANUAL FEED status is shown by the control panel LEDs until you put a sheet of paper inthe manual feed slot.
Fig. 2-10
8/13/2019 Brother Hl-2030, Hl-2032, Hl-2040, Hl-2070n Service Manual
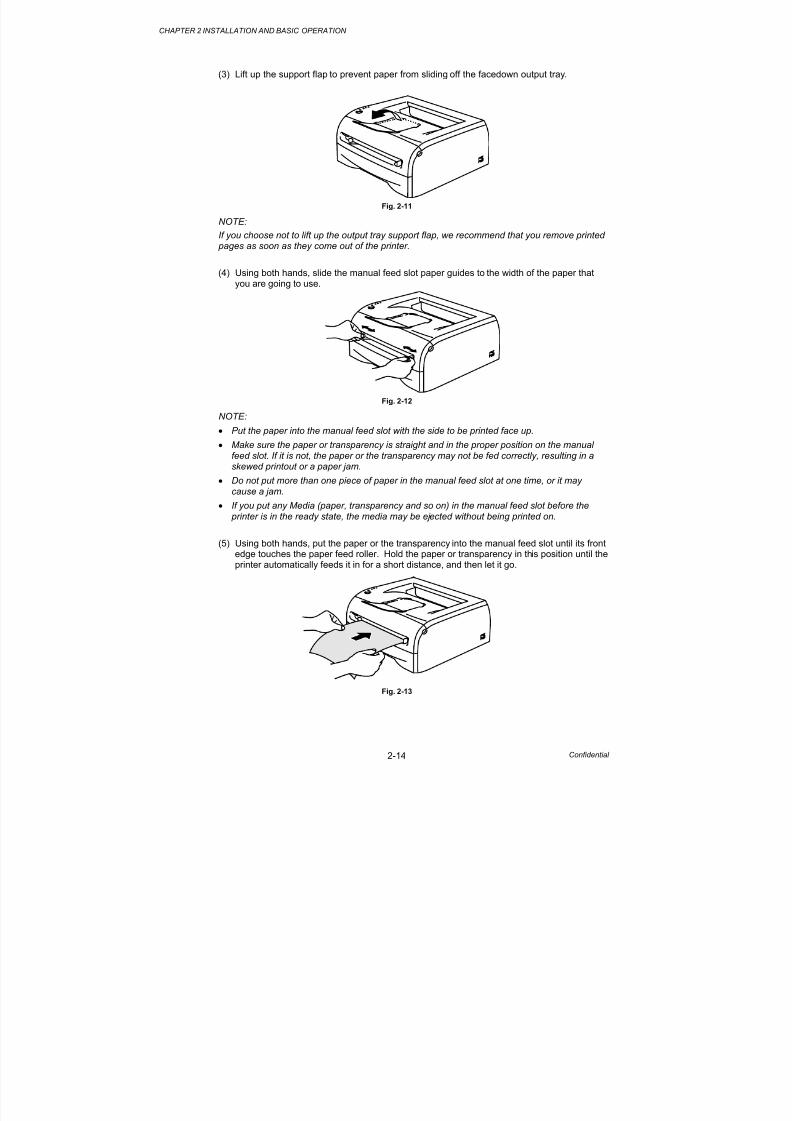
(3) Lift up the support flap to prevent paper from sliding off the facedown output tray.
Fig. 2-11
NOTE:
If you choose not to lift up the output tray support flap, we recommend that you remove printed pages as soon as they come out of the printer.
(4) Using both hands, slide the manual feed slot paper guides to the width of the paper thatyou are going to use.
Fig. 2-12
NOTE:
• Put the paper into the manual feed slot with the side to be printed face up.
• Make sure the paper or transparency is straight and in the proper position on the manualfeed slot. If it is not, the paper or the transparency may not be fed correctly, resulting in askewed printout or a paper jam.
• Do not put more than one piece of paper in the manual feed slot at one time, or it maycause a jam.
• If you put any Media (paper, transparency and so on) in the manual feed slot before the printer is in the ready state, the media may be ejected without being printed on.
(5) Using both hands, put the paper or the transparency into the manual feed slot until its front
edge touches the paper feed roller. Hold the paper or transparency in this position until theprinter automatically feeds it in for a short distance, and then let it go.
Fig. 2-13
8/13/2019 Brother Hl-2030, Hl-2032, Hl-2040, Hl-2070n Service Manual
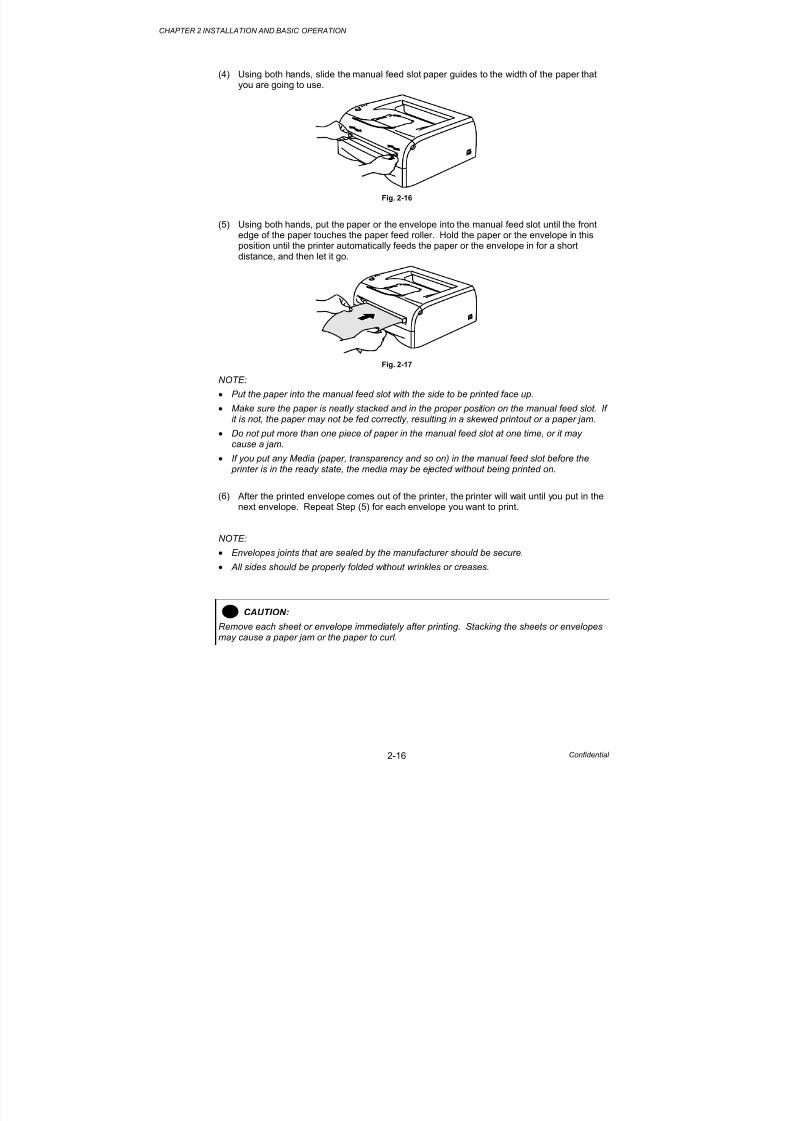
(4) Using both hands, slide the manual feed slot paper guides to the width of the paper thatyou are going to use.
Fig. 2-16
(5) Using both hands, put the paper or the envelope into the manual feed slot until the frontedge of the paper touches the paper feed roller. Hold the paper or the envelope in thisposition until the printer automatically feeds the paper or the envelope in for a shortdistance, and then let it go.
Fig. 2-17
NOTE:
• Put the paper into the manual feed slot with the side to be printed face up.
• Make sure the paper is neatly stacked and in the proper position on the manual feed slot. If
it is not, the paper may not be fed correctly, resulting in a skewed printout or a paper jam.
• Do not put more than one piece of paper in the manual feed slot at one time, or it maycause a jam.
• If you put any Media (paper, transparency and so on) in the manual feed slot before the printer is in the ready state, the media may be ejected without being printed on.
(6) After the printed envelope comes out of the printer, the printer will wait until you put in thenext envelope. Repeat Step (5) for each envelope you want to print.
NOTE:
• Envelopes joints that are sealed by the manufacturer should be secure.• All sides should be properly folded without wrinkles or creases.
! CAUTION:
Remove each sheet or envelope immediately after printing. Stacking the sheets or envelopesmay cause a paper jam or the paper to curl.
8/13/2019 Brother Hl-2030, Hl-2032, Hl-2040, Hl-2070n Service Manual
Use of any of the envelopes listed below may cause damage to the printer.
• Envelopes that are damaged, curled, wrinkled, or unusual shape
• Envelopes that are extremely shiny or highly textured
• Envelopes with clasps, snaps or tie strings• Envelopes with self-adhesive closures
• Envelopes of baggy construction
• Envelopes that are not sharply creased
• Embossed envelopes
• Envelopes that were previously printed by a laser printer
• Envelopes that are pre-printed on the inside
• Envelopes that cannot be arranged when put in a pile
• Envelopes made of paper that the weighs more than the paper weight specifications forthe printer.
• Envelopes that have been badly made, with edges that are not straight or consistentlysquare.
• Envelopes with windows, holes, cutouts or perforations.
WARNING
• If you use any of the types of envelopes listed above, they may damage your printer. This damage is not covered under any Brother warranty or serviceagreement.
NOTE:
• Before printing on envelopes, fan the stack well to avoid paper jams and misfeeds.
• Do not put different types of paper at the same time in the paper tray because it may cause paper jams or misfeeds.
• Do not print on envelopes using manual duplex printing.
• For proper printing, you must choose the same paper size from your software application asthe paper in the tray.
• Most envelopes will be suitable for your printer. However, some envelopes will have feedand print-quality problems because of the way they have been made. A suitable envelopeshould have edges with straight, well-creased folds and the leading edge should not bethicker than two pieces of paper. The envelope should lie flat and not be of baggy or flimsyconstruction. You should buy quality envelopes from a supplier who understands that youwill be using the envelopes in a laser printer. Before you print a lot of envelopes, test one tomake sure that the print results are what you want.
• Brother will not recommend a particular envelope because envelope manufacturers maychange the envelope specifications. You are responsible for the quality and performance ofenvelopes you use.
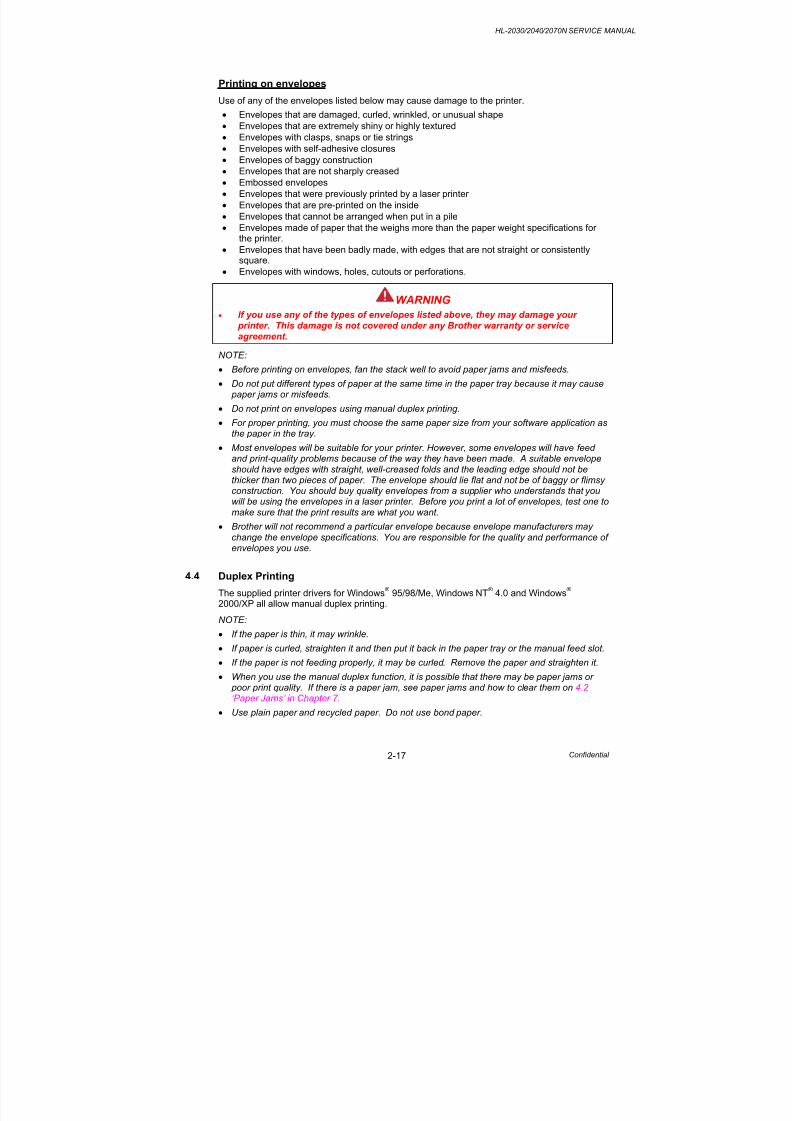
4.4 Duplex Printing
The supplied printer drivers for Windows® 95/98/Me, Windows
NT
® 4.0 and Windows
®
2000/XP all allow manual duplex printing.
NOTE:
• If the paper is thin, it may wrinkle.
• If paper is curled, straighten it and then put it back in the paper tray or the manual feed slot.
• If the paper is not feeding properly, it may be curled. Remove the paper and straighten it.
• When you use the manual duplex function, it is possible that there may be paper jams or poor print quality. If there is a paper jam, see paper jams and how to clear them on 4.2‘Paper Jams’ in Chapter 7.
• Use plain paper and recycled paper. Do not use bond paper.
8/13/2019 Brother Hl-2030, Hl-2032, Hl-2040, Hl-2070n Service Manual
Printing on both sides of the paper (manual duplex printing)
Manual duplex printing from the paper tray
NOTE:
You should use plain paper or recycled paper. Do not use bond paper.
When printing on both sides of the paper, follow the steps below;
(1) From the Advanced tab choose the Manual Duplex printing mode, and from the Basic
tab choose the Paper Source to be Auto Select or Tray1.
(2) The printer will automatically print all the even-numbered pages on one side of the paperfirst.
(3) Remove the printed even-numbered pages from the output tray and put them back in thepaper tray, placing the paper with the side that is going to be printed on (blank side) facedown. Follow the instructions on the computer screen.
Fig. 2-18
(4) The printer will now automatically print all the odd-numbered pages on the other side of thepaper.
Note:
When you put paper in the paper tray, first empty the tray then put the printed pages in the
tray, with the printed side face up. (Do not add the printed pages to the top of a stack ofunprinted paper.)
8/13/2019 Brother Hl-2030, Hl-2032, Hl-2040, Hl-2070n Service Manual
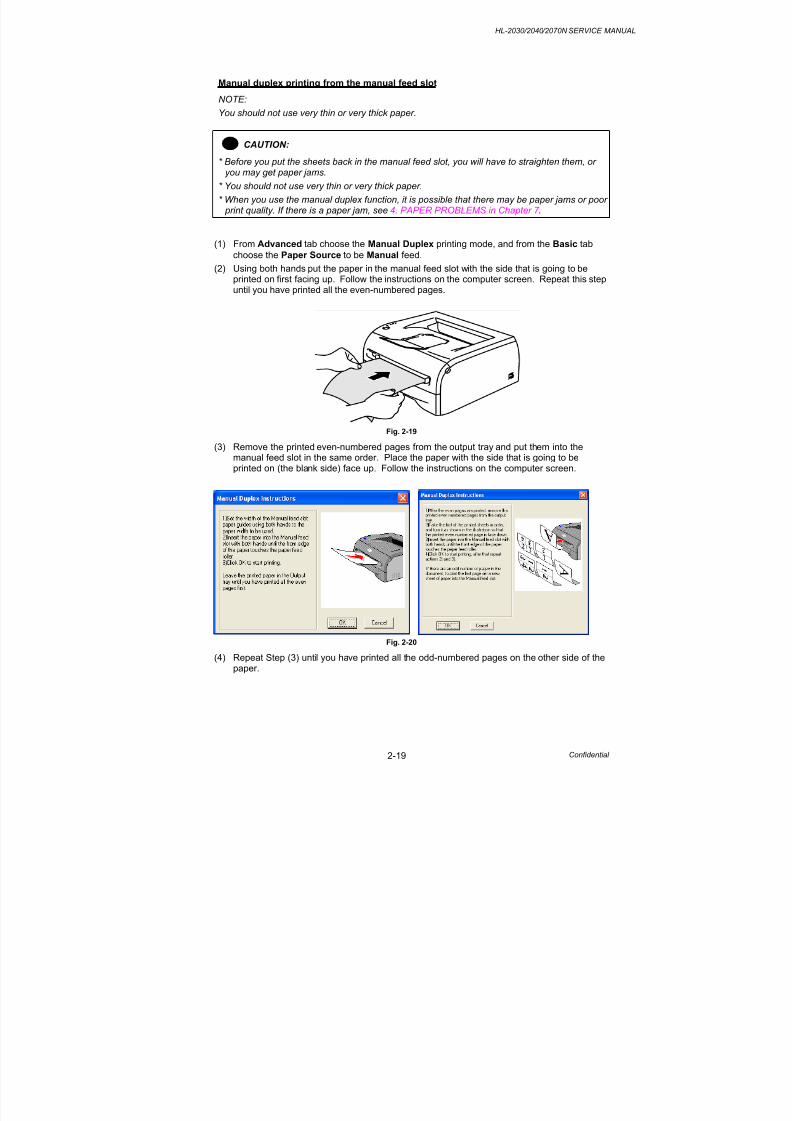
* Before you put the sheets back in the manual feed slot, you will have to straighten them, oryou may get paper jams.
* You should not use very thin or very thick paper.
* When you use the manual duplex function, it is possible that there may be paper jams or poor print quality. If there is a paper jam, see 4. PAPER PROBLEMS in Chapter 7 .
(1) From Advanced tab choose the Manual Duplex printing mode, and from the Basic tab
choose the Paper Source to be Manual feed.
(2) Using both hands put the paper in the manual feed slot with the side that is going to be
printed on first facing up. Follow the instructions on the computer screen. Repeat this stepuntil you have printed all the even-numbered pages.
Fig. 2-19
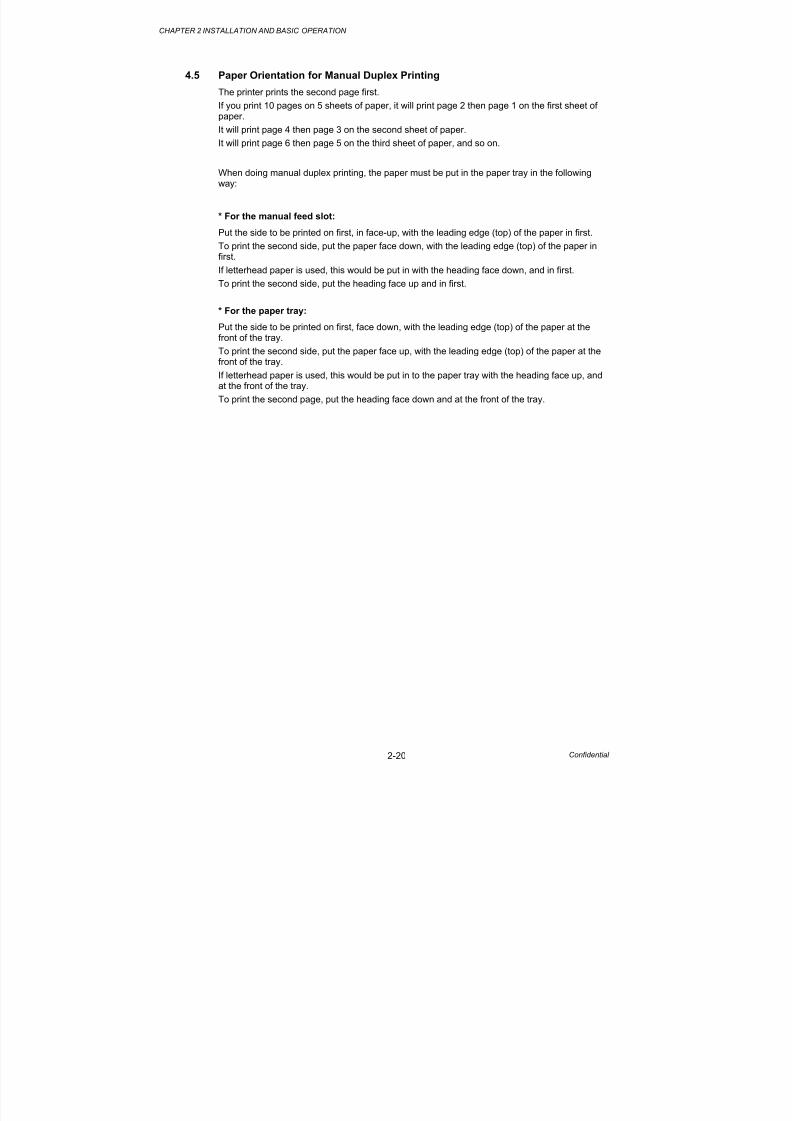
(3) Remove the printed even-numbered pages from the output tray and put them into themanual feed slot in the same order. Place the paper with the side that is going to beprinted on (the blank side) face up. Follow the instructions on the computer screen.
Fig. 2-20
(4) Repeat Step (3) until you have printed all the odd-numbered pages on the other side of thepaper.
8/13/2019 Brother Hl-2030, Hl-2032, Hl-2040, Hl-2070n Service Manual
The power switch is off or the printer is in Sleep mode. Pressing
the Go button wakes up the printer from Sleep mode toWarming up mode. After warming up, the printer will be readystate.
Warming up
The printer is warming up.
Receiving data
The printer is either receiving data from the computer,
processing data in memory or printing the data.
Fig. 2-23
Data remaining in memory
Print data is left in the printer memory. If the Ready LED blinksfor a long time and nothing has been printed, press the Gobutton to print the data that is still in memory.
Fig. 2-24
Ready to print
The printer is ready to print.
Fig. 2-25
Toner low
Indicates that the toner cartridge is nearly empty. Purchase anew toner cartridge and have it ready for when “Toner Life End”is indicated.
The Toner LED alternates turning on for 2 seconds and off for 3seconds.
Toner life end
Replace the toner cartridge with a new one. See 1.2 ‘TonerCartridge’ in Chapter 5.
Fig. 2-26
Cartridge position error
The toner cartridge is not installed correctly. Take out the tonercartridge and put it back into the printer again.
8/13/2019 Brother Hl-2030, Hl-2032, Hl-2040, Hl-2070n Service Manual
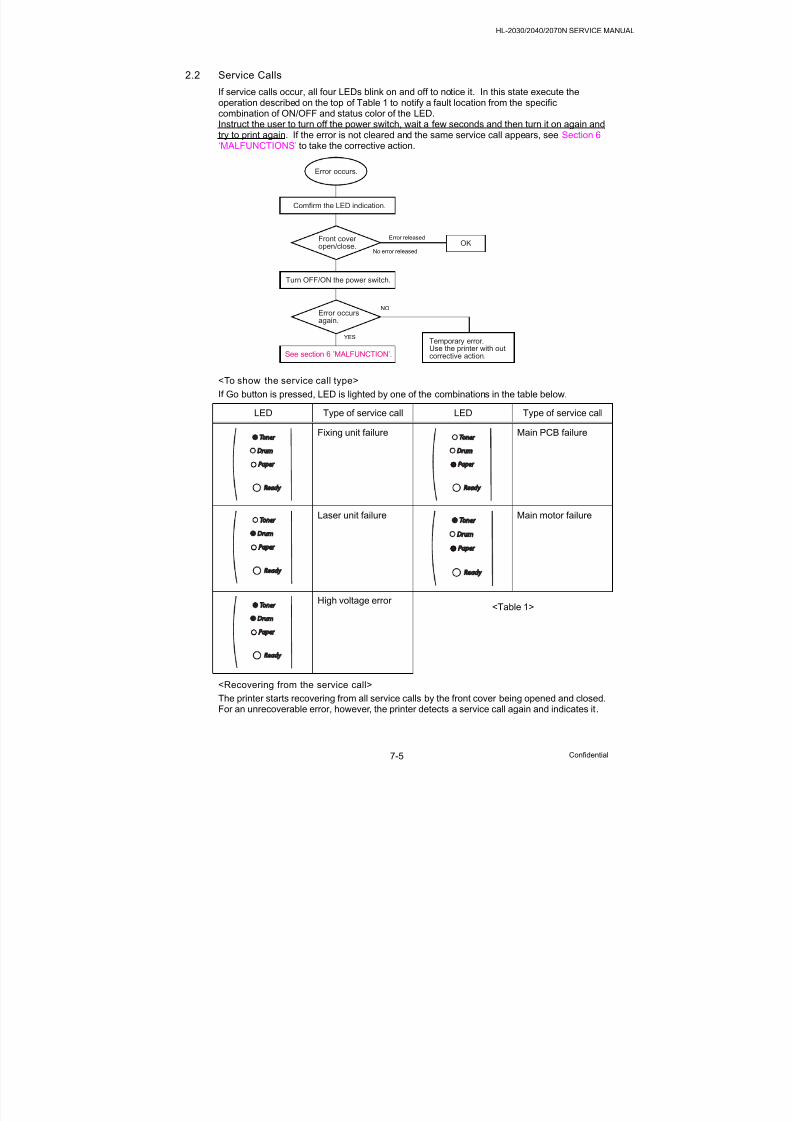
If there is an error that can not be cleared by the user, the printer will show that a service callis needed by lighting up all the LEDs as shown in the figure below.
Fig. 2-30
If you see the service call indication on the
left, turn off the power switch, wait a fewseconds, and then turn it back on and try toprint again.
When you press the Go button, the LEDs will light up as shown Table 1: LED indications whilepressing Go button as follows.
Table 1: LED indications while pressing Go button
LEDsFuser unit
failure*Laser unit
failure
Mainmotorfailure
MainPCB
failure
HighVoltageError
TonerYellow Yellow Yellow
DrumYellow Yellow
PaperRed Red
Ready
Fig. 2-31
For example, the LED indication on the leftside shows a fixing unit failure.
NOTE:
• Make sure that the front cover is fully closed before you report a service call.
• If this error occurs, turn the power switch off, wait a few seconds, and then turn it on again.Leave the printer for 10 minutes with the power on.
8/13/2019 Brother Hl-2030, Hl-2032, Hl-2040, Hl-2070n Service Manual
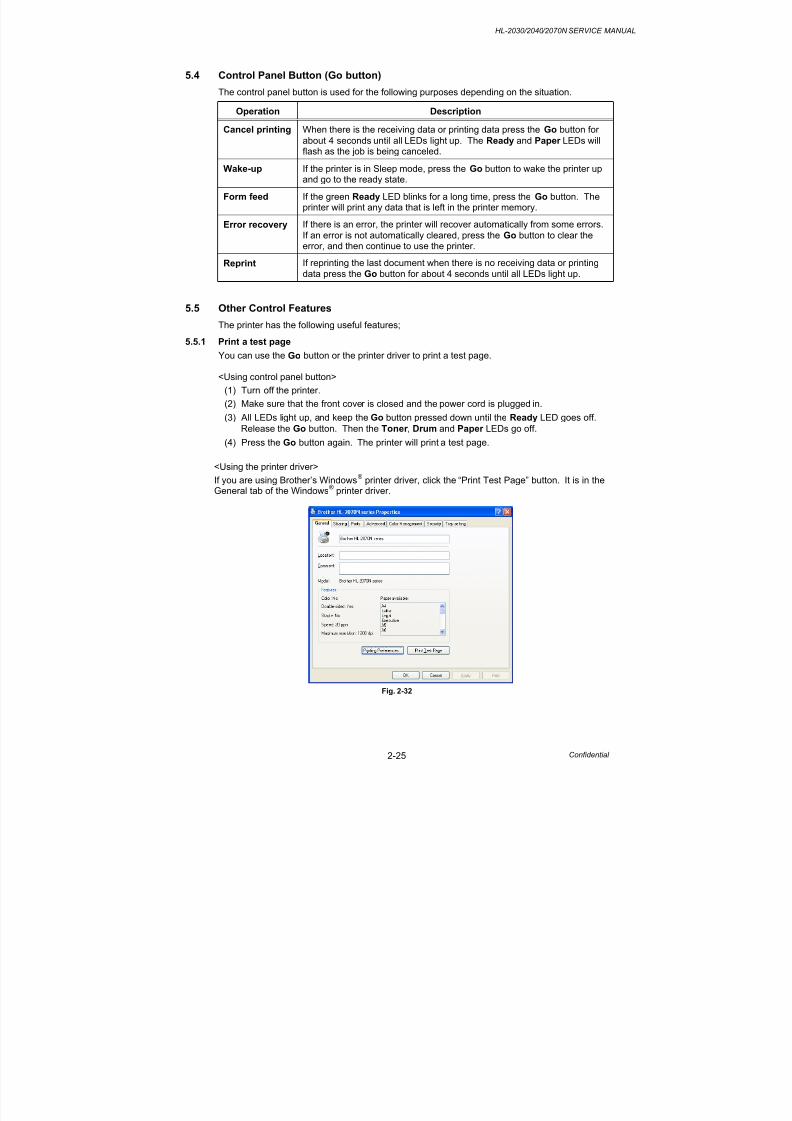
The control panel button is used for the following purposes depending on the situation.
Operation Description
Cancel printing When there is the receiving data or printing data press the Go button for
about 4 seconds until all LEDs light up. The Ready and Paper LEDs willflash as the job is being canceled.
Wake-up If the printer is in Sleep mode, press the Go button to wake the printer upand go to the ready state.
Form feed If the green Ready LED blinks for a long time, press the Go button. Theprinter will print any data that is left in the printer memory.
Error recovery If there is an error, the printer will recover automatically from some errors.
If an error is not automatically cleared, press the Go button to clear theerror, and then continue to use the printer.
Reprint If reprinting the last document when there is no receiving data or printing
data press the Go button for about 4 seconds until all LEDs light up.
5.5 Other Control Features
The printer has the following useful features;
5.5.1 Print a test page
You can use the Go button or the printer driver to print a test page.
<Using control panel button>
(1) Turn off the printer.
(2) Make sure that the front cover is closed and the power cord is plugged in.
(3) All LEDs light up, and keep the Go button pressed down until the Ready LED goes off.Release the Go button. Then the Toner , Drum and Paper LEDs go off.
(4) Press the Go button again. The printer will print a test page.
<Using the printer driver>
If you are using Brother’s Windows® printer driver, click the “Print Test Page” button. It is in the
General tab of the Windows® printer driver.
Fig. 2-32
8/13/2019 Brother Hl-2030, Hl-2032, Hl-2040, Hl-2070n Service Manual
You can print the current settings using the control panel button or printer driver.
<Using control panel button>
(1) Make sure that the front cover is closed and the power cord is plugged in.
(2) Turn on the printer and wait until the printer is in ready state.(3) Press the Go button three times within 2 seconds. The printer will print the current printer
settings.
<Using the printer driver>
If you are using Brother’s Windows®
printer driver, you can print the current printer settings byclicking the Print Settings button in the Support tab.
Fig.2-33
5.5.3 Print fonts (For HL-2070N)
You can print a list of the internal fonts using the control panel button or printer driver.
<Using the control panel button>
(1) Turn off the printer.
(2) Make sure that the front cover is closed and the power cord is plugged in.
(3) All LEDs light up, and keep the Go button pressed down until the Ready LED goes off.
Release the Go button. Then the Toner , Drum and Paper LEDs go off.(4) Press the Go button twice. The printer will print a list of the internal fonts.
<Using the printer driver>If you are using Brother’s Windows
®printer driver, you can print a list of the internal fonts by
clicking the Print Fonts button in the Support tab.
8/13/2019 Brother Hl-2030, Hl-2032, Hl-2040, Hl-2070n Service Manual
If you wish to reset the print server back to its default factory settings (resetting all informationsuch as the password and IP address information), please follow these steps;
(1) Turn off the printer.
(2) Make sure that the front cover is closed and the power cord is plugged in.
(3) All LEDs light up, and keep the Go button pressed down until the Ready LED goes off.
Release the Go button. Then the Toner , Drum and Paper LEDs go off.
(4) Press the Go button six times. Make sure that all the LEDs light up to indicate the printerserver has been reset to its default factory settings.
NOTE:
• If you wish to reset the printer and automatically disable the APIPA protocol, follow steps (1)
to (3) above. Press the Go button seven times and make sure that all the LEDs light up toindicate the printer server has been reset to its default factory settings.
• For more information on APIPA, see the Network User’s Guide or visithttp://solutions.brother.com
• You can also disable the APIPA protocol using EWS, BRAdmin Professional or Web
BRAdmin.
LED(Light-emitting Diode)
8/13/2019 Brother Hl-2030, Hl-2032, Hl-2040, Hl-2070n Service Manual
This printer has the following optional print servers.
Model NC-2200w NC-2100p
HL-2030 O N/AHL-2040 O O
HL-2070N O N/A
Wireless print server (NC-2200w)
An optional network print server (NC-2200w) allows you to print in a wireless environmentthrough the USB interface. The NC-2200w is compatible with Windows
®98/ME, Windows NT
®
4.0 and Windows®
2000/XP.
The Brother NC-2200w wireless print server supports the IEEE 802.11b wireless networkingstandard and can work in infrastructure or Ad-hoc mode using common wireless authenticationand security methods.
For more information, please visit our web site at http://solutions.brother.com.
Network interface IEEE 802.11b wireless
Communication Mode Infrastructure / Ad-hoc 802.11
Security SSID, WEP (64/128bit)
Printer Interface USB 2.0 (Full-speed)
Support Protocol TCP/IP
Embedded web server support
SNMP/MIB support
TELNET remote console
BRAdmin Professional compatible
Management Features
Flash memory for easy updating of firmware
Print server (NC-2100p) (For HL-2040)
An optional network print server (NC-2100p) allows you to connect to your network through theparallel interface.
Network interface 10/100BASE-TX Ethernet
Printer Interface Parallel
Support Protocol TCP/IP, NetBEUI
Embedded web server support
SNMP/MIB support
TELNET remote console
BRAdmin Professional compatible
Management Features
Flash memory for easy updating of firmware
Note:
HL-2070N already has a built-in 10/100BASE-TX Ethernet Print Server.
8/13/2019 Brother Hl-2030, Hl-2032, Hl-2040, Hl-2070n Service Manual
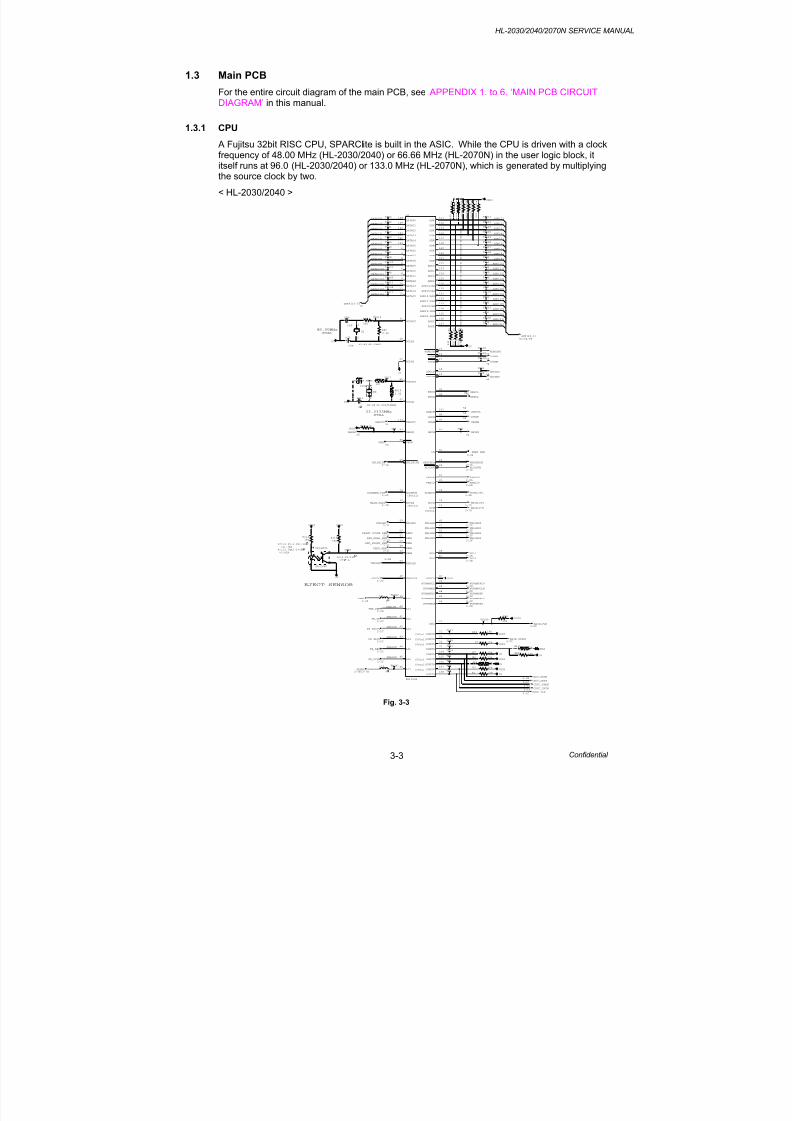
For the entire circuit diagram of the main PCB, see APPENDIX 1. to 6. ‘MAIN PCB CIRCUITDIAGRAM’ in this manual.
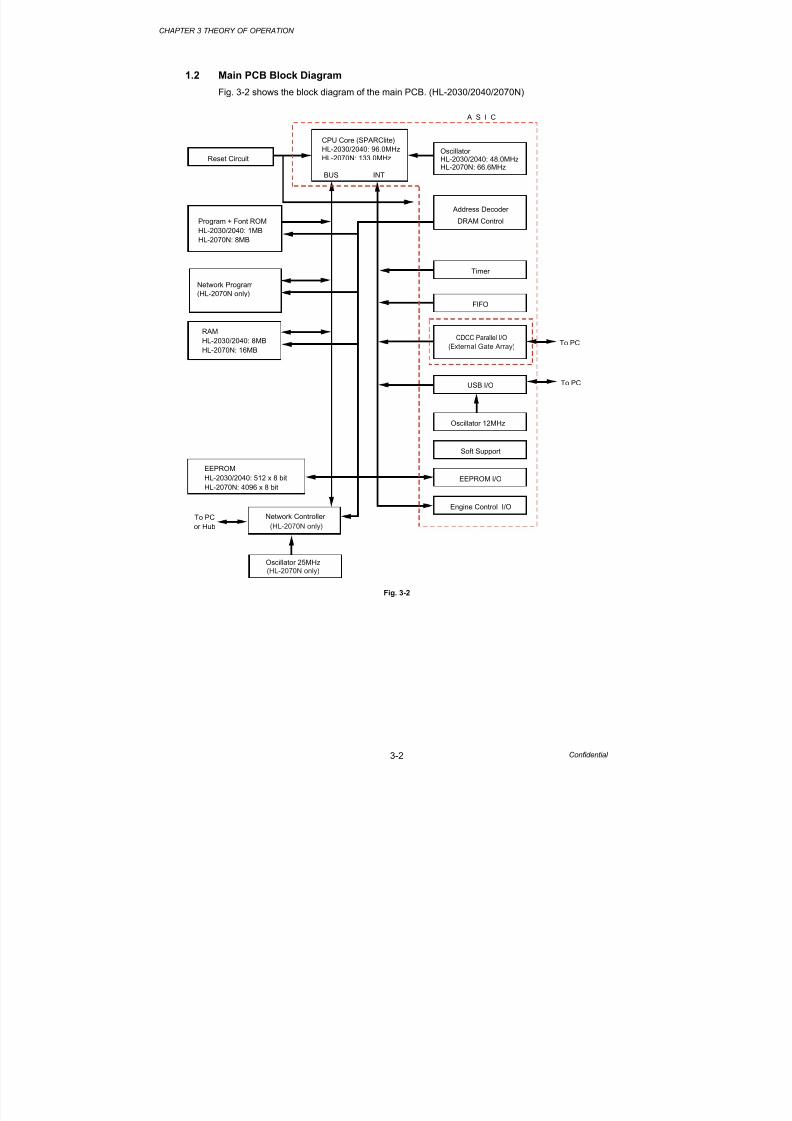
1.3.1 CPU
A Fujitsu 32bit RISC CPU, SPARClite is built in the ASIC. While the CPU is driven with a clockfrequency of 48.00 MHz (HL-2030/2040) or 66.66 MHz (HL-2070N) in the user logic block, ititself runs at 96.0 (HL-2030/2040) or 133.0 MHz (HL-2070N), which is generated by multiplyingthe source clock by two.
< HL-2030/2040 >
DATA[0]
DATA[1]
DATA[2]
DATA[3]
DATA[4]
DATA[5]
DATA[6]
DATA[7]
DATA[8]
DATA[9]
DATA[10]
DATA[11]
DATA[12]
DATA[13]
DATA[14]
DATA[15]
ADR[7]
ADR[8]
ADR[9]
ADR[10]
ADR[11]
ADR[12]
ADR[13]
ADR[14]
ADR[15]
ADR[16]
ADR[17]
ADR[18]
ADR[19]
ADR[20]
ADR[21]
ADR[4]
ADR[5]
ADR[6]
ADR[1]
ADR[2]
ADR[3]
ANALOG
ANALOG
ANALOG
ANALOG
ANALOG
ANALOG
ADR[22]
TP141
0V
VDD3
R115
33k
VDD3
R114
180
5C/6A/6B
ADR[22-1]
6ASDCSN0
6BSDCLK0
7AROMCSN0
7AIORDN
0V
@C11
0
@C16
C10P
@R19
3.3k
@R20
100
@X1
AT-49 33.333333MHZ
1
2
TP17
0V
C76
C5P
R85
2.2k
R86
330
TP116
X2
AT-49 48.00MHZ
1
2C75
C5P
2-4DSCAN_CTL
2-6CSCANNER_FGS
2-7DMAIN_CTL
2-7DMAIN_F/R
2-7EMAIN_FGS2
5EUSBVCC
5E
USBCTL5E
USBDP5E
USBDN
7AIOWEN
2DDBRXD
2DDBTXD
2-6BFAN12V
2-6AFAN24V
5CDATA[15-0]
8E
EESDA7E
EESCL
PI1
SG-206S
A
K
E
C
5D VBDN
2-1AHEATERON
2-1ARLYOFFN
2-1AHTLIMITN
2-2FPNLLED0
2-2FPNLLED1
2-2FPNLLED2
2-2FPNLLED3
2-2ESOL1
2-2ESOL2
2-2DHVPWMDEV
2-2DHVPWMTRCV
2-2DHVPWMTRCC
2-2DHVPWMCHG
2-2BREG_FRONT_SEN
2-2DREG_REAR_SEN
2-2FFRONT_COVER_SEN
2-2F
PNEW_SEN
2-2BPEDG_SEN
2-2FPNLSW0
2-2BTHM1
2-2CFB_TR
2-2CFB_TRCCV
2-2CFB_GRID
2-2CFB_DEV
2-2CFB_VCLN
R 2 9
1 0 k
R 1 0 9
1 0 k
R 1 0 4
1 0 k
R 1 0 2
1 0 k
R 1 0 0
1 0 k
R 9 3
1 0 k
VDD3
R 3 3
1 0 k
R 1 1 0
1 0 k
R 1 0 8
1 0 k
0V
R36 10k
VDD3R73 10k
@R3110k
R7 10k
R6 10k
@R4 10k
R3 10k
TP113
TP121
TP127
TP135
TP133
TP124
TP97
0V
TP117
TP109
TP95
TP53
TP44
TP79
TP46
TP70
TP87
TP115
TP92
TP83
TP131
TP75
TP102
TP76
TP63
TP62
TP61
TP67
TP60
TP66
TP59
TP81
TP94
TP120
TP123
TP96
TP103
TP111
TP108
TP112
TP100
TP106
TP105
TP91
TP99
TP4TP5
TP32
TP89
TP31
TP14
TP7
TP1
TP2
TP6
2-2CGRIDC
VDD3
R1 10k0V
VDD3
2-5B/2-7BSENSE
2-8CMAIN_FGS
U4
Bellona
DATA00138
DATA01139
DATA02140
DATA03141
DATA04142
DATA05143
DATA062
DATA073
DATA084
DATA095
DATA106
DATA118
DATA129
DATA1310
DATA1411
DATA1512
UCKOUT31
UCKIN29
SCKIN27
VCKOUT85
VCKIN87
USBVCC102
DBRXD82
VBDN80
HTLIMITN25
SCANFGS73
DCFGS35
PNLSW059
SEN052
SEN151
SEN250
SEN349
SEN4
20
TNRLED53
HVNOISE69
AI039
AI140
AI241
AI342
AI443
AI544
AI645
AI746
ADR1111
ADR2112
ADR3113
ADR4116
ADR5117
ADR6118
ADR7119
ADR8120
ADR9121
ADR10122
ADR11123
ADR12124
ADR13125
ADR14/BA0126
ADR15/BA1130
ADR16/RASN131
ADR17/CASN132
ADR18/WEN133
ADR19/DQM0134
ADR20/DQM1135
ADR21136
ADR22137
ROMCSN015
IOWEN16
IORDN17
SDCLK018
SDCSN019
EESCL95
EESDA94
USBCTL101
USBDP 98
UDBDN99
DBTXD83
VSH81
HEATERON23
RLYOFFN24
FAN24V 21
FAN12V 22
SCANCTL74
DCCTL34
DCFR33
PNLLED060
PNLLED161
PNLLED262
PNLLED363
SOL1
48
SOL247
HVVCLN67
HVPWMVCLN70
HVPWMDEV 68
HVPWMTRCV 64
HVPWMTRCC65
HVPWMCHG66
REV172
PORT0071
PORT0136
PORT0226
PORT0375
PORT04104
PORT05105
PORT06106
PORT07107
PORT08108
2-7CMAIN_START
2-2DTNR_SEN
2-3B
TNRLED
R34
10k
VDD3
R28 1k VDD3
0V
VDD3
VDD3
3-1B CDCC_RSTN
3-1C CDCC_DATA
3-1C CDCC_CLK
3-1C CDCC_REQN
3-1B CDCC_INTN
0V
2-2DHVPWMVCLN
TP42
@R30 10k0V
L9
0
L10
0
TP181
TP182
TP189
Ic=3.3V/33k
=97 A
EJECT SENSOR
33.3333MHz
XTAL
48.00MHz
XTAL
(5Vtol)
(5Vtol)
(5Vtol)
(5Vtol)
(5Vtol)
(5Vtol)
(5Vtol)
(5Vtol)
(5Vtol)
If=(3.3V-1.2V)/180
=11.7mA
P=(11.7mA)^2*180
=1/41W
Fig. 3-3
8/13/2019 Brother Hl-2030, Hl-2032, Hl-2040, Hl-2070n Service Manual
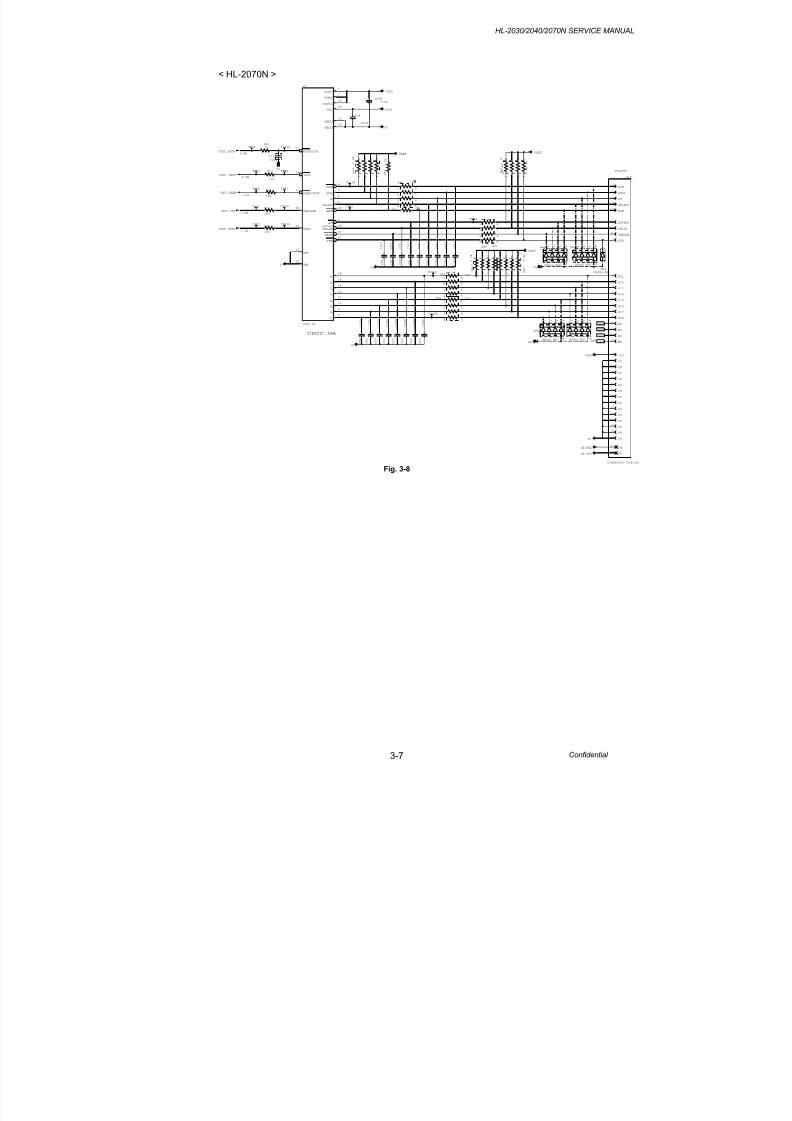
Stores the data received from the PC into DRAM by DMA using the Gate Array(UPD65421MC-11) exclusive for parallel I/F. It is for the normal receipt and dual directioncommunication (nibble mode, byte mode, ECP mode).
< HL-2040 >
5DI4
@ C 1 1 4
C 1 0 1
0V
TP146
0V
VDD5
1-5FCDCC_RSTN
@RA3 100
2 7
1 8
3 6
4 5
170V
260V
32
FLT
VDD5
TP157
7DI6
IF_FG2
31INPRIM
1STB
VDD5
@ C 9 8
C 1 0 1
@R131
100
TP156
@ R 1 2 4
1 . 5 k
@ R A 5
1 . 5 k
2
7
1
8
3
6
4
5
@ C 1 1 7
C 1 0 1
TP150
@C97
C103
37FG
9DI8
1-5FCDCC_DATA
220V
@C100
C103
@R121 0
35NC
@ C 1 0 8
C 1 0 1
300V
280V
@CN10
10ACK
@ C 1 2 0
C 1 0 1
@RA7 100
2 7
1 8
3 6
4 5
@ZD5
UDZS6.8B
TP155
15NC
11BUSY
0V
@DA4
DF5A6.8FU
C 3
C 1
C 2
A
C 4
34NC
@ C 1 0 6
C 1 0 1
TP148
230V
@C112
C104
VDD3
240V
1-5FCDCC_CLK
@ C 1 2 8
C 1 0 1
@RA4 0
2 7
1 8
3 6
4 513
SELECT
@ C 1 1 5
C 1 0 1
6DI5
VDD5
0V
18+5V
@ R A 2
1 . 5 k
2
7
1
8
3
6
4
5
@ C 1 2 5
C 1 0 1
@ C 1 2 7
C 1 0 1
@R5
100
@ C 1 0 9
C 1 0 1
@ R A 6
2 . 2 k 2
7
1
8
3
6
4
5
@DA2
DF5A6.8FU
C 3
C 1
C 2
A
C 4
250V
@ C 1 2 9
C 1 0 1
270V
TP158
57RE40360-730B-D29
38FG
200V
@R132
100
190V
@ C 1 1 1
C 1 0 1
@DA3
DF5A6.8FU
C 3
C 1
C 2
A
C 4
160V
@RA8 100
2 7
1 8
3 6
4 5
@R2
100
@ C 1 1 0
C 1 0 1
0V
12PE
0V
@ R A 9
2 . 2 k 2
7
1
8
3
6
4
5
1-5FCDCC_INTN
@ C 1 1 8
C 1 0 1
@DA1
DF5A6.8FU
C 3
C 1
C 2
A
C 4
210V
2DI1
1-5FCDCC_REQN
TP154
3DI2
4DI3
36SELIN
@ C 1 1 3
C 1 0 1
290V
14ATFEED
IF_FG3
@ C 1 2 1
C 1 0 1
TP161
0V
33NC
8DI7
@R134
1k TP159
@U12
CDCC-GA
RSTN/SIN21
INTN24
REQN/SOUT22
CLK/SCK
25
DATA23
AMC13
SMC20
VDD511
VDD577
VDD51616
GND2626
VDD330
GND1515
ACKN6
BUSY5
PE4
SELECT3
FLTN
28
AFN2
SELINN29
INITN27
STBN17
D018
D119
D214
D312
D411
D510
D69
D78
@L11
BLM18PG181SN1
@L12
BLM18PG181SN1
@C143
C104
(1608)
VDD5
TP190
TP191
NC
NC
NC
NC
CDCC_0V
CDCC_0V
CDCC
CDCC_GA
Fig. 3-7
8/13/2019 Brother Hl-2030, Hl-2032, Hl-2040, Hl-2070n Service Manual
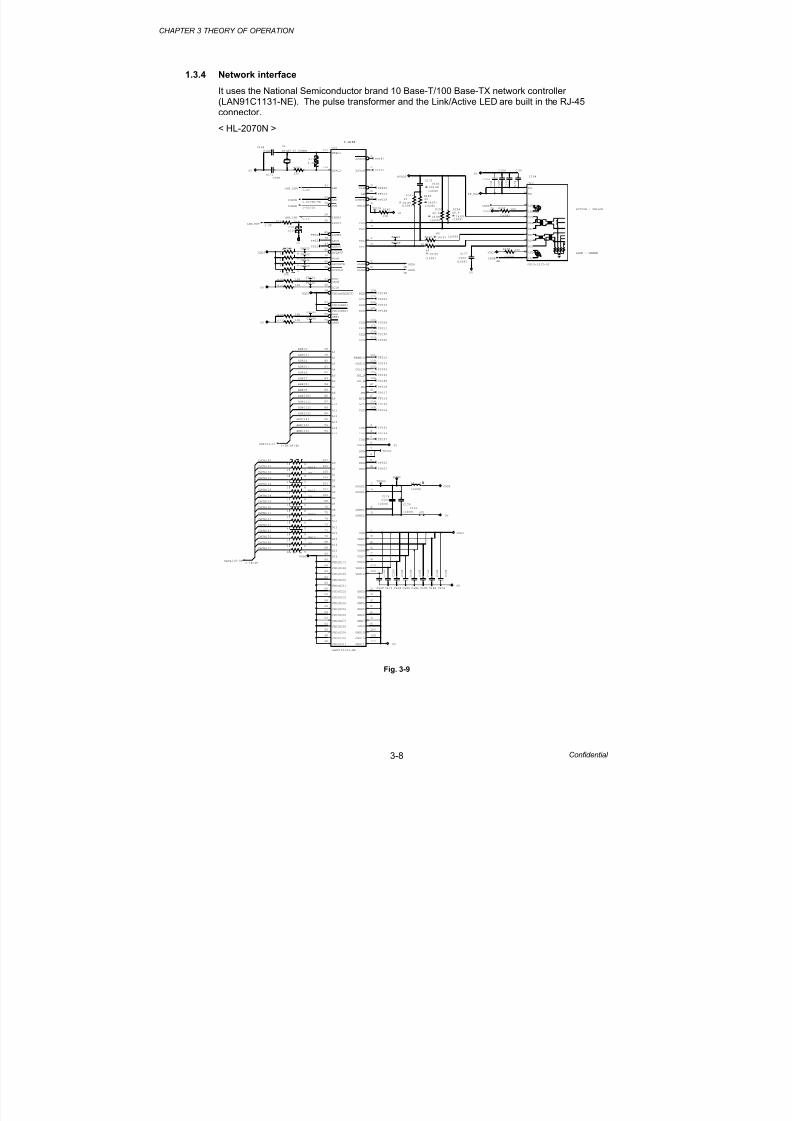
It uses the National Semiconductor brand 10 Base-T/100 Base-TX network controller(LAN91C1131-NE). The pulse transformer and the Link/Active LED are built in the RJ-45connector.
< HL-2070N >
ADR[3]
ADR[12]
ADR[16]
ADR[6]
ADR[7]
ADR[2]
ADR[11]
ADR[10]
ADR[4]
ADR[15]
ADR[5]
ADR[14]
ADR[13]
ADR[9]
ADR[8]
DATA[8]
DATA[9]
DATA[10]
DATA[11]
DATA[12]
DATA[13]
DATA[14]
DATA[15]
DATA[0]
DATA[1]
DATA[2]
DATA[3]
DATA[4]
DATA[5]
DATA[6]
DATA[7]
0V
TP197
TP188
TP219
C 1 7 3
C104
U15
LAN91C113I-NE
LAN
XTAL1127
XTAL2
128
AEN41
nRD31
nWR
32
INTR0
29
RESET30
nLDEV 45
ARDY
38
nSRDY
43
nVLBUS
40
W/nR
36
nRDYRTN46
nCYCLE
35
nADS
37
LCLK42
VDD(nDATACS)
34
VDD(nBE3)
97
VDD(nBE2)96
nBE1
95
nBE094
A1
78
A279
A3
80
A481
A5
82
A6
83
A7
84
A8
85
A986
A10
87
A1188
A12
89
A1390
A14
91
A1592
D0
107
D1106
D2
105
D3104
D4
102
D5101
D6
100
D799
D8
76
D9
75
D10
74
D11
73
D1271
D13
70
D1469
D15
68
D1666
VDD(D17)
65
VDD(D18)64
VDD(D19)
63
VDD(D20)61
VDD(D21)
60
VDD(D22)59
VDD(D23)
58
VDD(D24)56
VDD(D25)
55
VDD(D26)54
VDD(D27)
53
VDD(D28)51
VDD(D29)
50
VDD(D30)49
VDD(D31)
48
nCSOUT
2
X25OUT
47
nLNK20
LBK
21
nCNTRL28
RBIAS
12
TPO+14
TPO-
15
TPI+
17
TPI-
18
nLEDA22
nLEDB
23
RXD0
124
RXD1123
RXD2
122
RXD3121
TXD0116
TXD1
115
TXD2114
TXD3
113
TXEN100111
CRS100
119
COL100112
RX_DV
125
RX_ER
126
MDI
25
MDO
26
MCLK27
RX25
118
TX25109
IOS0
3
IOS14
IOS2
5
ENEEP6
EEDO
7
EEDI8
EESK
9
EECS10
AVDD11
11
AVDD1616
AGND13
13
AGND19
19
VDD11
VDD33
33
VDD4444
VDD62
62
VDD77 77
VDD98
98
VDD110110
VDD120
120
GND2424
GND39
39
GND5252
GND57
57
GND6767
GND72
72
GND9393
GND103
103
GND108108
GND117
117
C181
C 1 0 3
0V
TP217
0V
R131
220
X4
AT-49 25.00MHZ
C 1 7 4
C104
0V
C187
C102
TP211
0V
TP204
VDD3
R154
49.9
1%(F)(1608)
C168
C 1 0 3
TP224
IF_FG4
TP202
R147
49
1%(F) (1608)
TP192
C172
C 1 0 3
C179
C103
(1608)
10%(B)
TP220
C 1 9 1
C104
C180
C 1 0 3
1-3B/4F/4DADR[23-1]
1-3C/5D/7DIORDN
VDD3
TP194
TP201
R155 100
(1608)
1-1B/4FDATA[15-0]
1-3C/5CIOWEN
C176
C103
(1608)
TP205
TP193
0V
1-3CLAN_RST
TP214
VDD3
1-1CLAN_INT
VDD3
R152
49.9
(1608)
1%(F)
TP222
TP216
R145
49
1%(F)
(1608)
C178
C103
(1608)
0V
0V
R133 10k
C 1 8 9
C104
TP218
0V
R132 10k
C170
C 1 0 3
C182
C 1 0 3
TP212
VDD3
TP190
R143
49
1%(F)(1608)
R138 100
(1608)
VDD3
C169
C 1 0 3
TP200
TP225
TP191
TP189
TP203
TP210
L3
(1608)
0
0V
R156 1k
R140
11k
C164
C10P
TP207
1-3CLAN_CSN
R129
3.3k
R149
49
1%(F)
(1608)
TP199
C177
C103
(1608)
0V
R159 10k
TP198
TP215
TP213
TP187
C183
C 1 0 3
R160 10k
C171
C10P
TP226
VDD3
3BLEDA
3BLEDB
2BLEDA
2BLEDB
TP233
TP232
TP234
TP229
TP231
TP235
TP185
TP186
TP221
TP209
TP196
AVDD3
AVDD3
RA18
10k
2 7
1 8
3 6
4 5
RA14
332 7
1 8
3 6
4 5
RA13
33
2 7
1 8
3 6
4 5
RA16
33
2 7
1 8
3 6
4 5
RA15
33
2 7
1 8
3 6
4 5
OT1
CN15
0810-1X1T-03
1 TCT
2 TD+
3 TD-
4 RD+
5 RD-
6 RCT
7LED1_C
8 LED1_A
9 LED2
10 LED3
11FG
12 FG
ACTIVE : YELLOW
LINK : GREEN
Fig. 3-9
8/13/2019 Brother Hl-2030, Hl-2032, Hl-2040, Hl-2070n Service Manual
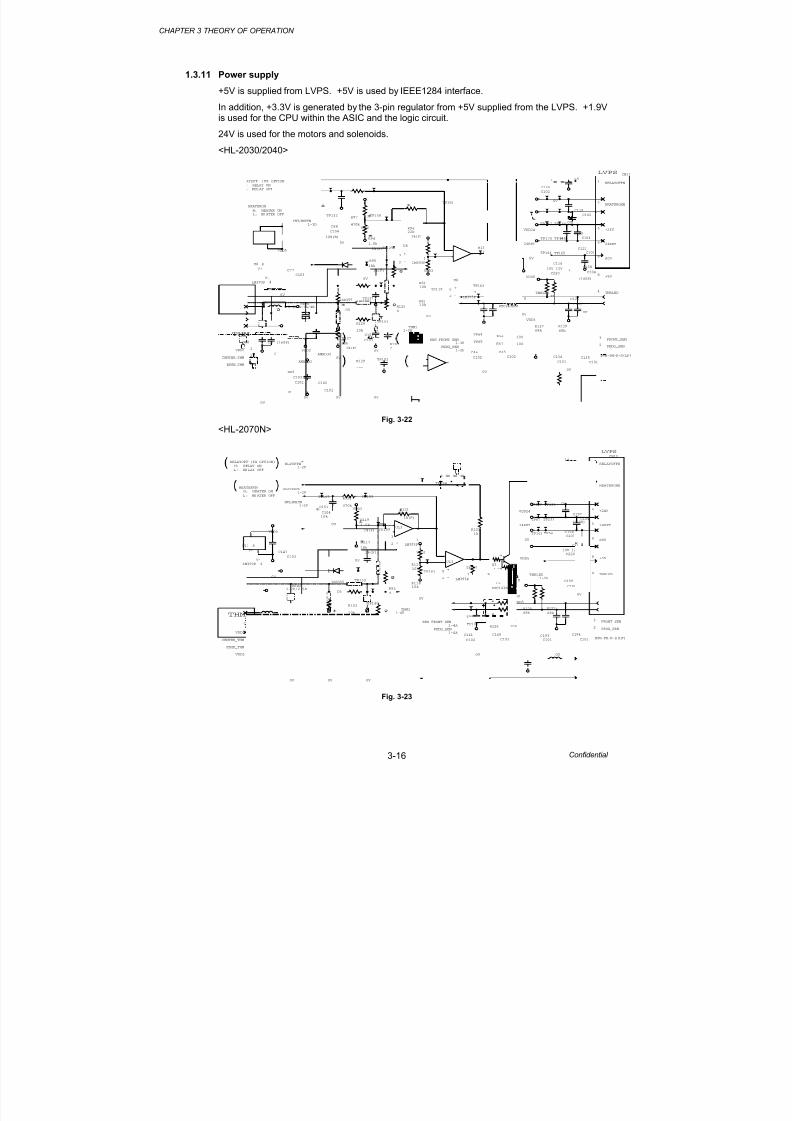
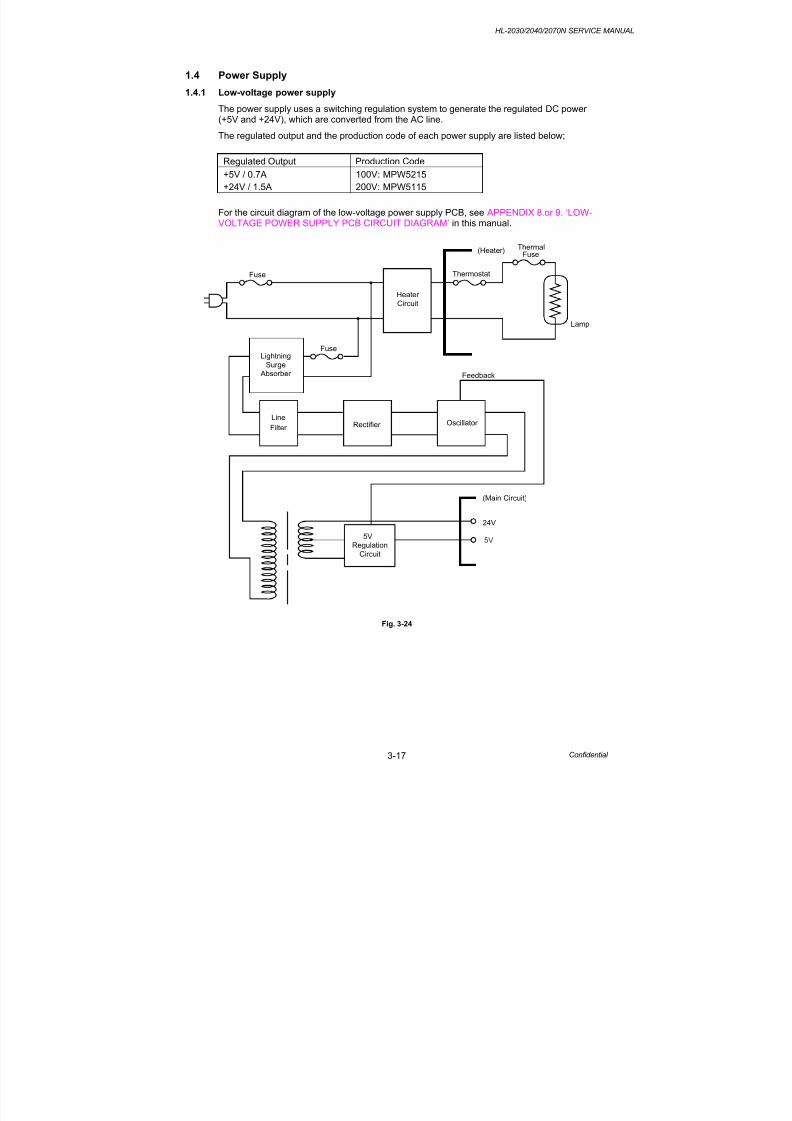
+5V is supplied from LVPS. +5V is used by IEEE1284 interface.
In addition, +3.3V is generated by the 3-pin regulator from +5V supplied from the LVPS. +1.9Vis used for the CPU within the ASIC and the logic circuit.
24V is used for the motors and solenoids.<HL-2030/2040>
+
-
+
ANALOG
ANALOG
VDD3
0V
C123
C104
D4
1SS355
1-3DHTLIMITN
C104
C103
U8
LM393P
8
V+
4
V-
R127
18k
1%(F)
1-4DHEATERON
R130
0
VDD3
Q3
DTC143ZUA
C
B
E
U8
LM393P2
31
C77
C103
0V
R135
1k
1-3ETHM1
C103
C101
VDD3
0V
VDD3
0V
R128
18k
1%(F)
1-4DRLYOFFN
R96
22k
1%(F)
0V
U8
LM393P6
57
0V
R95
18k
1%(F)
R129
10k
R8210k
1-2A/1-7A/4ERSTN
0V
0V
R125
0
C102
C101
R81
10k
0V 24RET
VDD24
R94
1.5k
1%(F)
0V
C88
C104
10%(B)
C101
C103
R97
470k
R126
10k
0V
1-3EREG_FRONT_SEN
1-3EPEDG_SEN
C122
C103
TP132 TP138
TP129
TP119
TP137
TP151
TP152
TP163
C119
C102
C130
C102
0V
0V TP162
VDD5
1-3ETNRLED
CN11
1RELAYOFFN
4TNRLED
6+24V
524RET
7HEATERONN
C126
C102
0V
C46
C102
C45
C102
R137
68k
R139
68k
R56 100
R57 100
VDD3
0V
9S0V
8+5V
3FRONT_SEN
B9B-PH-K-S(LF)
2PEDG_SEN
TP64
TP65
C116
C220
10V 12V
VDD5
TP167 TP166
TP170 TP168
TP164 TP165
L5
C134
C101
C135
C101
0V
L6 (1608)
0
C138
C104
(1608)
C141
C101
C142
C101
0V
CN8
1 VDD3
2CENTER_THM
3EDGE_THM
4 VDD3
+
-
LVPS
THM
RELAYOFF (FX OPTION)
H: RELAY ON
L: RELAY OFF
HEATERON
H: HEATER ON
L: HEATER OFF
4.7k
47k
Fig. 3-22
<HL-2070N>
+
-
+
-
ANALOG
ANALOG
TP141
D3
1SS355
VDD3
C154
C102
C161
C102
TP165
C160
C102
R122
1k
R126 100
C127
C103
0V
0V
0V
0V
1-2FHTLIMITN
C151
C104
10%
0V
R95
0
TP155
R121
22k
1%(F)
R105
10k
U13
LM393P2
31
U13
LM393P
8
V+
4
V-
0V
VDD24
R120
10k
0V
TP161
0V
VDD3
TP140
C134
C101
R102
10k
24RET
VDD3
U13
LM393P6
57
R124 100
0V
0V
1-6BTHM1
R119
1.5k
1%(F)
R117
18k
1%(F)
VDD3
C126
C103
C159
C102
VDD3
1-2C/2-5DRSTN
TP164
TP167
R125
68k
R104
18k
1%(F)
0V
C158
C103
C147
C103
1-2FTNRLED
VDD5
1-2FRLYOFFN
TP102R103
18k
1%(F)
C157
C104(1608)
TP132
1-4APEDG_SEN
Q3
DTC143ZUA
C
B
E
C31
C220
10V 12V
0V
TP99
0V
0V
R11810k
C163
C102
1-2FHEATERON
C135
C101
VDD5
R123
470k
0V
TP159
1-4AREG_FRONT_SEN
R127
68k
R94
0
TP119 TP133
TP67 TP239
TP160 TP56
L6
C193
C101
C194
C101
0V
L7 (1608)
0
CN12
1RELAYOFFN
4TNRLED
7HEATERONN
524RET
6+24V
9S0V
8+5V
3FRONT_SEN
B9B-PH-K-S(LF)
2PEDG_SEN
2CENTER_THM
3EDGE_THM
CN9
1 VDD3
4 VDD3
HEATERON
H: HEATER ON
L: HEATER OFF
4.7k
47k
RELAYOFF (FX OPTION)
H: RELAY ON
L: RELAY OFF
LVPS
THM
+
Fig. 3-23
8/13/2019 Brother Hl-2030, Hl-2032, Hl-2040, Hl-2070n Service Manual
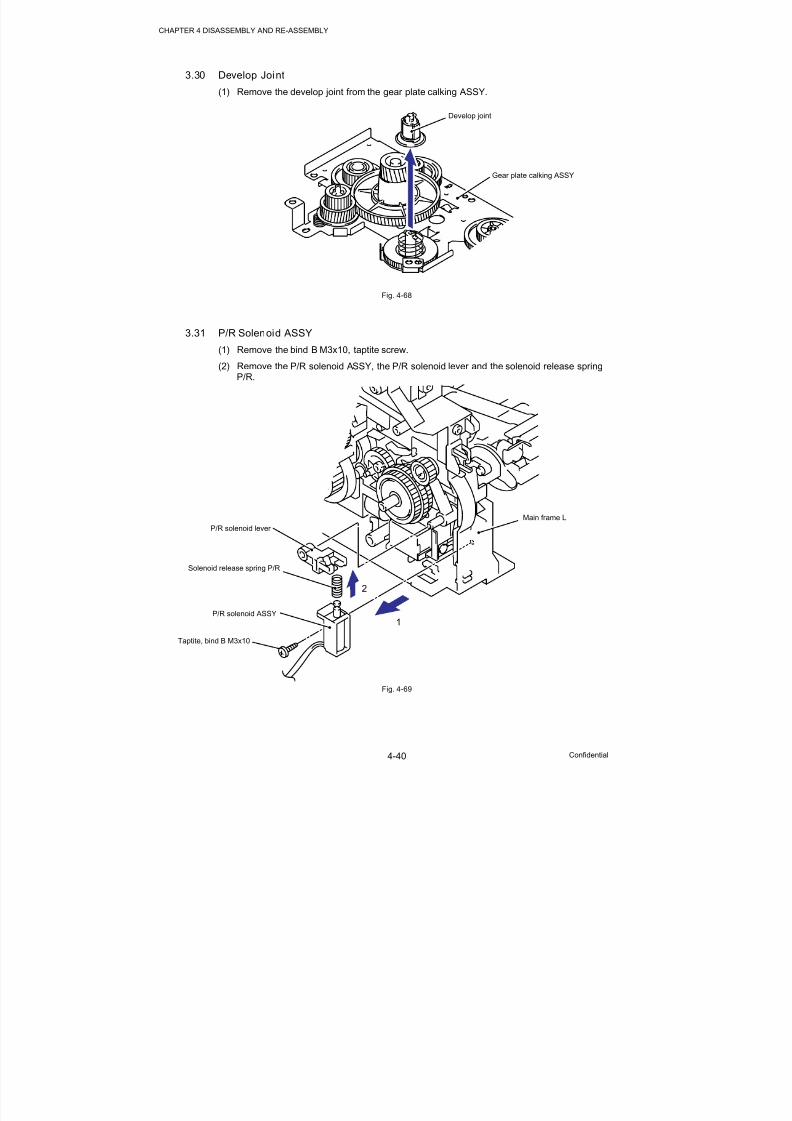
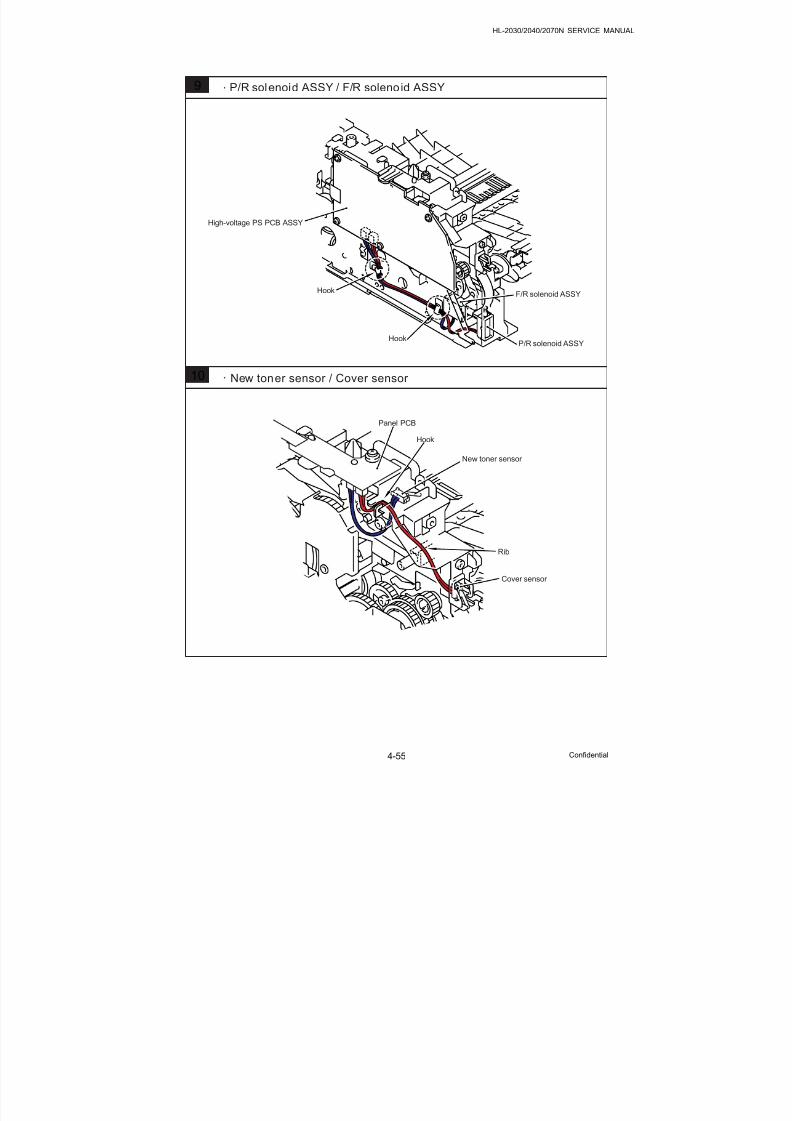
(1) The paper is gripped between the separation roller and separation pad and separated intoindividual sheets. The separation roller is connected to the gear 52 P/R.
(2) The section of the gear 52 P/R, where there is no cog, is normally fixed at the position asshown in the figure below by the P/R solenoid ASSY.
(3) Therefore, the main motor drive is not transmitted to the gear 52 P/R.
(4) When the paper is fed, the P/R solenoid ASSY is activated first.(5) Then, the gear 52 P/R is pulled by the spring extension P/R so that the gears are engaged.
(6) The main motor drive is transmitted to the gear 52 P/R, and the separation roller is turned.
The paper drawn out of the paper tray pushes against the regist front actuator, and the papertop position or absence of paper is detected by the actuator movement. The tail edge actuatordetects the end of the paper fed.
3
2
1
5
4
6
<“A” arrow view>
Fig. 3-28
“A”
Separation roller
Gear 52 P/R
Spring extension P/R
P/R solenoid ASSY
Fixation
Solenoid release spring P/R
No cog
Gear 52 P/R
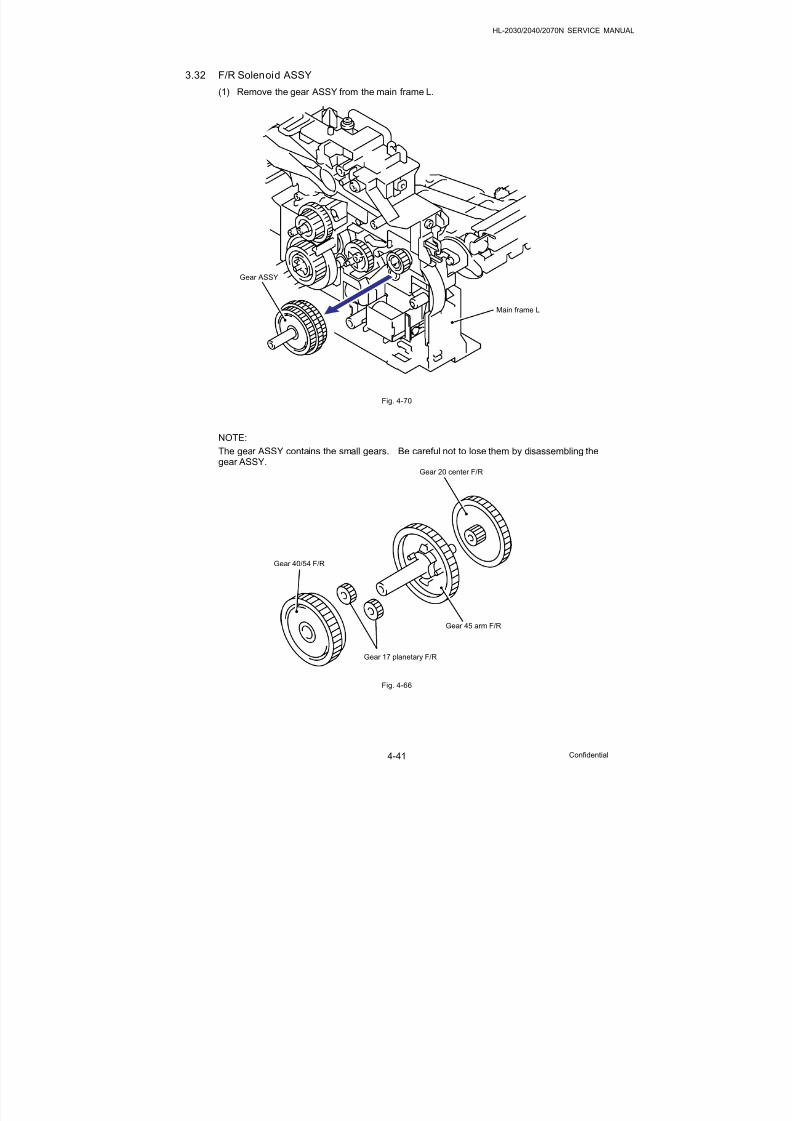
Gear 40/50 F/R
Spring extension P/R
8/13/2019 Brother Hl-2030, Hl-2032, Hl-2040, Hl-2070n Service Manual
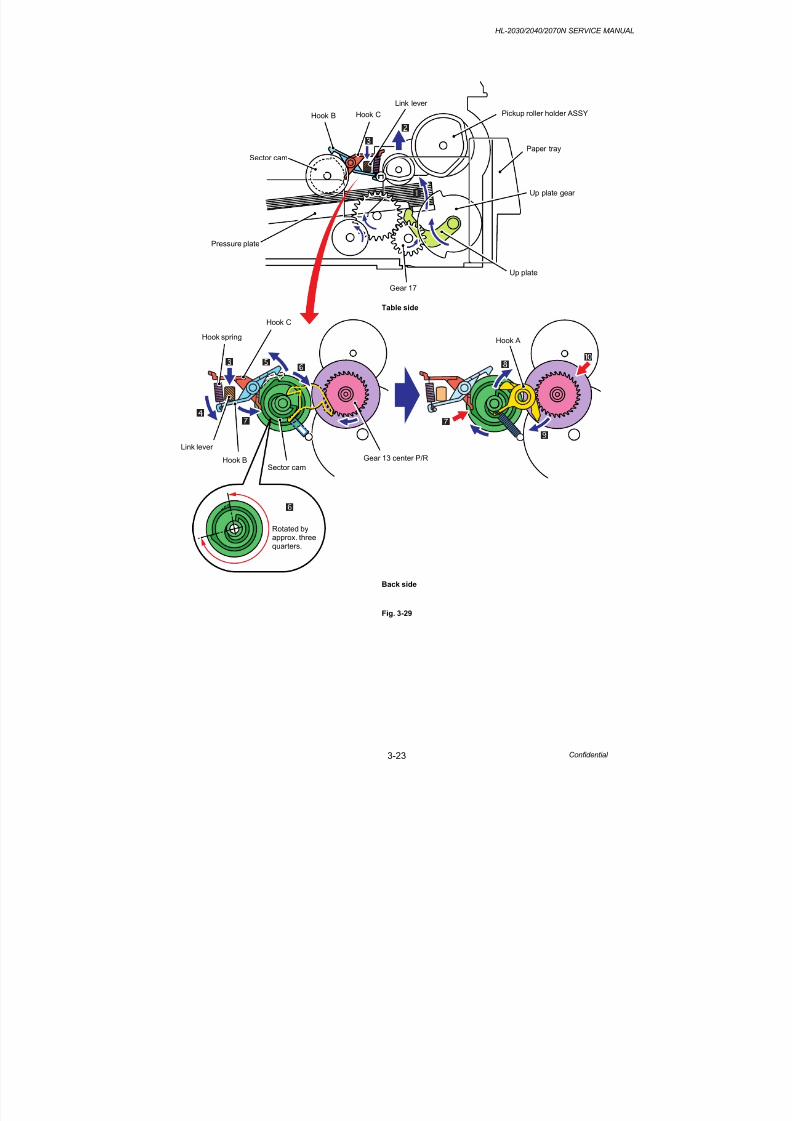
In order to improve the transfer function of the paper tray, the pressure plate in the paper trayis lifted up by the motor.
(1) The pressure plate comes down while the paper tray is inserted into the machine. Whenthe main motor rotates, it drives through some gears to actuate the gear 45 arm/FR. The
driving force that 45 arm/FR received is to be transferred to gear 13 center P/R, it thendrives through some gears to gear 17. The gear 17 actuates the up plate gear of thepaper tray to push up the pressure plate.
(2) When the pressure plate is pushed up, the paper placed on the pressure plate iscontacted with the pick up roller holder ASSY so that the pick up roller holder ASSY ispushed up.
(3) When the pick up roller holder ASSY is pushed up more, one end of the link leverassembled on the pick up roller holder ASSY is pushed up. Since the center of the linklever is held as a fulcrum, the other end of the link lever comes down.
(4) The other end of the link lever is contacted with the hook B and hook C so that the hook Bis pushed down when the link lever comes down.
(5) When the hook B is pushed down, the catch of the hook B is released from the lock of thesector cam.
(6) The sector cam is rotated by approximately three quarters when the catch of the hook B isreleased.
(7) Then, the sector cam is stopped rotating by the catch of the hook C. (The hook B andhook C is connected with the spring. When the hook B is pushed down, the hook C isalso pushed down, and the catch of the hook C is released from the lock of the sectorcam.)
(8) When the sector cam is fixed at the position of the catch of the hook C, the hook A is liftedup by the sector cam.
(9) The inside gear of the gear 13 center P/R, which has been fixed, is released.
(10) When the inside gear of the gear 13 center P/R is released, the central gear of the gear13 center P/R is stopped rotating. Then, the gear pushing up the pressure plate in thepaper tray is stopped so that the pressure plate is stopped lifting up.
The gear 13 center P/R consists of the three gears, and power of the main motor is addedonto the outside gear. When the inside gear is fixed while the main motor power being added,the central gear is started rotating. When the fixed inside gear is released, the central gear isstopped, and the inside gear is rotated.
8/13/2019 Brother Hl-2030, Hl-2032, Hl-2040, Hl-2070n Service Manual
After the paper top position is detected by the regist front actuator, the paper, separated intoindividual sheets by the separation roller, is fed further for a specified time, and the paper topposition reaches the paper feed roller so that the paper skew is adjusted. Then, the F/Rsolenoid is turned off, the paper feed roller starts turning, and the paper is fed to the transfer
roller in the drum/toner ASSY.
Fig. 3-30
The regist rear actuator in the path from the feed roller to the transfer roller controls the firstprint position on the paper. The printer starts transferring an image when a definite timepasses after the paper is passed through the regist rear actuator.
Regist rear actuatorTransfer roller
Exposure drum
Drum/toner ASSY
Paper feed roller
8/13/2019 Brother Hl-2030, Hl-2032, Hl-2040, Hl-2070n Service Manual
After the printing image on the exposure drum is transferred onto the paper, the paper is fedto the fixing unit to fix unfixed toner onto the paper by the heat roller and the pressure roller inthe fixing unit.
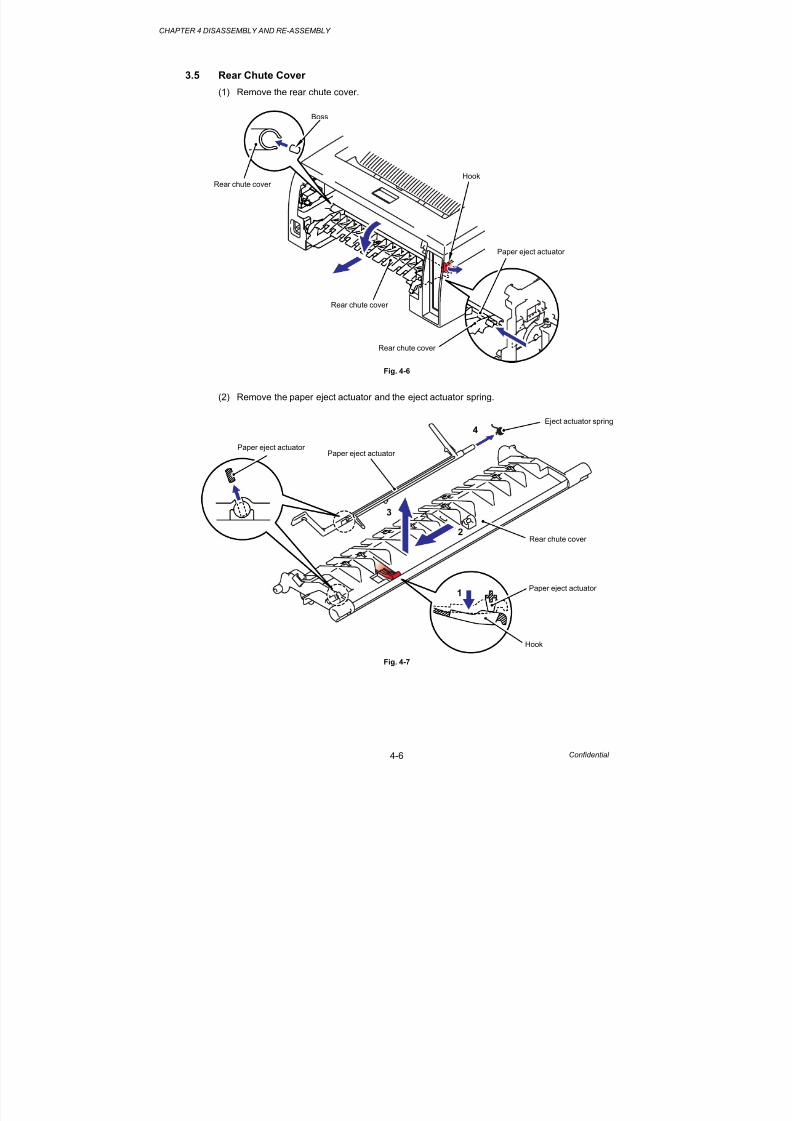
Afterwards, the paper is ejected from the fixing unit. The paper eject actuator detects whether
the paper is ejected correctly or not.
After the paper exits from the heat roller, the paper is turned by the rear cover and ejectedface down into the top output tray through the eject roller ASSY.
Fig. 3-31
2.3 Drum Unit
2.3.1 Exposure drum
Generates the latent electrostatic image and develops the image on the drum surface.
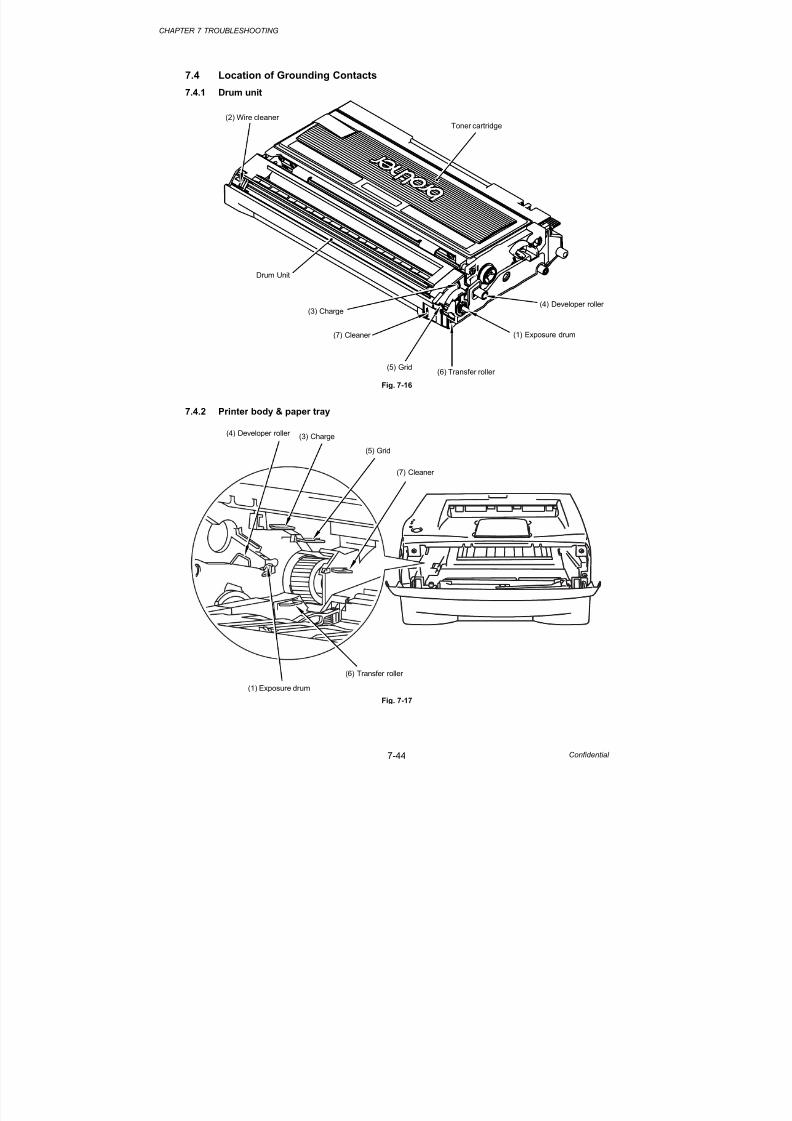
2.3.2 Primary charger
Forms a uniform charge on the drum surface.
(1) Corona wireGenerates the ion charge on the drum.
(2) GridSpreads the ion charge evenly over the drum surface.
2.3.3 Transfer roller
Transfers the toner image to the paper from the drum surface.
2.3.4 Cleaner
Removes the paper dust or dirt on the surface of the exposure drum.
Paper eject actuator
Eject roller ASSY
Rear cover
Heat roller
Pressure Roller
8/13/2019 Brother Hl-2030, Hl-2032, Hl-2040, Hl-2070n Service Manual
Develops the electrostatic latent image on the exposure drum with toner and forms the visibleimage.
2.4.1 Toner life end mode
The life of the toner cartridge is starter: 1,500, standard: 2,500 pages at the 5% coverage. Inthe case of low- duty printing, “Toner Life End” is indicated by lighting Toner LED before tonerruns out because the developer roller surface or other toner sealing is worn out due to rotationof the rollers. The upper limit of the drum rotation is 45,000 = 3000 sheets x 15 rotations.
The following graph shows the number of printable pages in the case of A4 printing.
HL-2030/2040/2070N (Standard toner)
Page/job 1 2 3 4 5 6 7 8 9 10 11 12artridge li e
(Always power on) 3,000 4,663 5,720 6,452 6,988 7,397 7,721 7,982 8,198 8,380 8,534 8,668artridge li e
The printer detects the amount of the remaining toner with the sensor and indicates the timing
to replace the toner cartridge by lighting up the Toner LED to the user. The problem such astoner leak or image defect may occur when low-duty printing is continued for a long time. To
prevent such a problem, the printer provides the function lighting up the Toner LED when the
toner is used to a certain degree to indicate it to the user.When replacing the toner cartridge with a new one, the printer detects that the toner cartridge
is replaced with a new one by the new toner detection switch and cancels that the Toner LEDlights up.
The mechanism to detect the new toner cartridge is as follows:
(1) A new toner cartridge is installed into the drum unit, and the drum unit is installed into theprinter.
(2) The reset gear of the toner cartridge is contacted with the new toner actuator to push thenew toner actuator.
(3) Then, the new toner actuator pushes the new toner detection switch so that it is detectedthat a new toner cartridge is installed.
(4) When the toner cartridge is installed into the printer, the reset gear is rotated gradually bythe main motor drive and moved to the position of “Toner in use”.
When the reset gear is moved to the position of “Toner in use”, the new toner actuator ispulled back by the new toner actuator spring and returned to the original position. Whenthe reset gear is at the position of “Toner in use”, the reset gear is not returned to theoriginal position since the reset gear and drive gear of the main motor are not engaged,and the reset gear is not rotated.
Fig. 3-32
Main frame L
New toner sensor
Reset gear
New toner actuator
New toner sensor
New toner actuator
Drum/toner ASSY
8/13/2019 Brother Hl-2030, Hl-2032, Hl-2040, Hl-2070n Service Manual
When the new toner detection switch detects that the toner cartridge is replaced with a newone, the developing bias voltage is initialized at the same time.
The toner used for the printer has a property that print density is light first and gradually darkerin the course of usage. The developing bias controls the toner property so that the printdensity is constant from first to last.
Toner property Actual control
[Used toner amount] [Used toner amount]
Print density
Bias voltage Bias voltage
Print density
[Density]
[Voltage]
[Density]
[Voltage]
To always obtain a print result of a constant density, the printer counts the number of printpages immediately after the toner cartridge is replaced and changes the bias voltageaccording to the accumulated number of prints with the toner cartridge.
The bias voltage is changed with the steps described below:
(1) When the new toner sensor detects that the toner cartridge is replaced with a new (full)one, the developing bias is set to 450V (initialized).
(2) After that, the bias voltage is stepped down according to the number of prints.
2.4.3 Counter reset during indication of “ Toner Life End”The counter resetting method during indication of “Toner Life End” depends on the cause oftoner life end and the condition of the inserted toner cartridge. Refer to the following table fordetails.
Toner Life End(Toner empty)
Toner Life End(Developer count full)
When a used toner isinserted (Reset gearis at the position of inuse.)
Toner exchange count: +0
Page counter of each toner: Continued
Coverage of each toner: Continued
Development bias: Reset (Default)
Not used.
When a new toner isinserted (Reset gearis at the position offactory set.)
Toner exchange count: +1
Page counter of each toner: Reset (0)
Coverage of each toner: Reset (0)
Development bias: Reset (Default)
8/13/2019 Brother Hl-2030, Hl-2032, Hl-2040, Hl-2070n Service Manual
The drum is charged to approximately 897V by an ion charge which is generated by theprimary charger. The charge is generated by ionization of the corona wire, which has a DCbias from the high-voltage power supply applied to it. The flow of the ion charge is controlled
by the grid to ensure it is distributed evenly on the drum surface. The aluminum drum sleevein the exposure drum is grounded.
+
+
+
+
++
+ + +
+
+
+
+
+
++
+
+ +++
--
-
----- - - -
Fig. 3-33
The primary charge uses a corona wire, but since the drum is positively charged, only lessthan 1/10 of the usual quantity of ozone is generated compared with the negatively chargeddrum. The level of ozone expelled from the printer is therefore not harmful to the human body. Applicable safety standards have been complied with.
2.5.2 Exposure stage
After the drum is positively charged, it is exposed to the light emitted from the laser unit.
Fig. 3-34
< Laser exposure unit >
1. The laser beam radiated from a laser diode inside the laser unit are concentrated into aconstant width by a slit in the CO lens cell and then reflected by a polygon mirror rotatingat high speed.
2. The laser beam reflected by the polygon mirror are refracted by the theta lens andradiated from the right through to the left end of the reflection mirror as the polygon mirrorrotates. At this time, blur of the vertical direction of the laser beam by inclination of apolygon mirror is corrected by passing a Toric lens.
CO lens
Laser beam
Polygon mirror
Paper
Laser detector
Laser diode Motor
Laser beam
f θ lens
Aluminum drum sleeveOrganic photoconductor layer
Exposuredrum
Voltage
circuit
Grid
HVPS
Corona wire
Drum
Toric Lens
8/13/2019 Brother Hl-2030, Hl-2032, Hl-2040, Hl-2070n Service Manual
3. The laser beams reflected by the reflection mirror go straight toward the exposure drumbelow it, then expose the exposure drum.
The area exposed to the laser beam is the image to be printed. The surface potential of theexposed area is reduced, forming the electrostatic image to be printed.
Fig. 3-35
2.5.3 Developing
Developing causes the toner to be attracted to the electrostatic image on the drum so as totransform it into a visible image.The developer consists of a non-magnetic toner. The developer roller is made of conductiverubber and the supply roller (which is also made of conductive sponge) rotate against eachother. The toner is charged and carried from the supply roller to the developer roller. The
toner adheres to the developer roller and is conveyed to the exposure drum at an eventhickness controlled by the blade. The toner is nipped between the developer roller and thedrum and developed onto the latent image on the drum. The electrostatic field between thedrum and the developer roller, which is DC-biased from the high-voltage power supply, createsthe electrostatic potential to attract toner particles from the developer roller to the latent imagearea on the drum surface.
Fig. 3-36
3
Primary charging
Laser beam exposure and developing
(a) Unexposed area
(Non image area)
(b) Exposed area
(Image area)
Transfer the image to paper
Drumsleeve 0
21
1
2
3
(a)
(b)
+150
+400
+897
Surfacepotential (V) 1 Cycle of drum
Supply roller Blade
Developer roller
Exposure drumCorona wire
Transfer roller
Time
8/13/2019 Brother Hl-2030, Hl-2032, Hl-2040, Hl-2070n Service Manual
After the drum has been charged and exposed, and has received a developed image, thetoner formed is transferred onto the paper by applying a negative charge to the back ofthe paper. The negative charge applied to the paper causes the positively charged toner
to leave the drum, and adhere to the paper. As a result, the image is visible on the paper.
(2) Cleaning process of transfer roller
If the toner is not transferred onto the paper perfectly it is possible that there may beresidual toner on the drum which will adhere to the transfer roller. The transfer rollervoltage changes to a positive voltage during non-printing rotation of the drum. Thereforethe transfer roller is cleaned by returning the positively charged toner adhering to thetransfer roller onto the exposure drum.
2.5.5 Fixing stage
The image transferred to the paper by static electricity is fixed by heat and pressure when
passing through the heat roller and the pressure roller in the fixing unit . The thermistor keepsthe surface temperature of the heat roller constant by detecting the surface temperature of theheat roller and turning on or off the halogen heater lamp.
Fig. 3-37
Pressure roller Halogen heater
Heat roller
Fixing unit
8/13/2019 Brother Hl-2030, Hl-2032, Hl-2040, Hl-2070n Service Manual
To avoid creating secondary problems by mishandling, follow the warnings and precautions belowduring maintenance work.
WARNING
• Always turn off the power switch and unplug the power cord from the power outlet
before accessing any parts inside the printer.
• Some parts inside the printer are extremely hot immediately after the printer is used.
When opening the front cover or rear cover to access any parts inside the printer,never touch the red colored parts shown in the following figures.
! CAUTION:
(1) Be careful not to lose screws, washers, or other parts removed.
(2) Be sure to apply grease to the gears and applicable positions specified in this chapter.
(3) When using soldering irons or other heat-generating tools, take care not to accidentallydamage parts such as wires, PCBs and covers.
(4) Before handling any PCBs, touch a metal portion of the equipment to discharge any staticelectricity charge on your body, or the electronic parts or components may be damaged.
(5) When transporting PCBs, be sure to wrap them in the correct protective packaging.
(6) Be sure to replace self-tapping screws correctly, if removed. Unless otherwise specified,tighten screws to the following torque values.
TAPTITE, BIND or CUP BM3: 0.5N mM4: 0.8N m
TAPTITE, CUP SM3: 0.8N m
(7) When connecting or disconnecting cable connectors, hold the connector body, not thecables. If the connector has a lock, release the connector lock first to release it.
(8) After a repair, check not only the repaired portion but also all connectors. Also check thatother related portions are functioning properly before operational checks.
8/13/2019 Brother Hl-2030, Hl-2032, Hl-2040, Hl-2070n Service Manual
When re-assembling the heat roller, assemble the HR bush onto the fuser frame referring tothe figure below.
Fig. 4-28 NOTE:
When re-assembling the halogen heater, put the halogen heater onto the fuser frame so thatthe terminal of the heater harness is at the top, and secure the screws in the order shown inthe figure below.
Fig. 4-29
HR bushHeat roller
Fuser frame
Heater harness
Halogen heater
Fuser frame
21
8/13/2019 Brother Hl-2030, Hl-2032, Hl-2040, Hl-2070n Service Manual
After you have just used the printer, some internal parts are extremely hot. Turn off the printerand wait for the printer to cool down before you touch the internal parts of the printer.
(1) Disconnect the three connectors from the high-voltage PS PCB ASSY.
(2) Disconnect the high-voltage PS PCB harness from the main PCB.
Fig. 4-33
(3) Remove the two bind B M4x12 taptite screws and the two cup S M3x6 taptite screws.
(4) Remove the high-voltage PS PCB from main frame L.
Fig. 4-34
High-voltage PS PCB harness
High-voltage PS PCB ASSY
Hook
High-voltage PS PCB
F/R solenoid harness
Toner sensor PCB harness
P/R solenoid harness
Taptite, bind B M4x12
Main frame L
Taptite, cup S M3x6
Taptite, bind B M4x12
1
2
8/13/2019 Brother Hl-2030, Hl-2032, Hl-2040, Hl-2070n Service Manual
(10) Disconnect the three connectors from the PS PCB unit, and then remove the PS PCB unit.
Fig. 4-45
NOTE:When disconnecting the connectors, disconnect the regist sensor PCB connector and tonerLED PCB unit ASSY connector first, lift up the PS PCB unit from the LV shield plate, anddisconnect the main PCB connector.
Fig. 4-46
PS PCB unit
Regist sensor PCB connector
Main PCB connector
LV shield plate
Main frame R
Taptite, cup S M3x6
Taptite, cup S M3x6
PS PCB unit
Toner LED PCB unit ASSY connector
8/13/2019 Brother Hl-2030, Hl-2032, Hl-2040, Hl-2070n Service Manual
All components are soldered using lead free solder, be sure to use lead free solder thatmeets the following specification in the case of repair.
Lead free solder ; NIHON GENMA DHB-RMA3 NP303
(This can be distingu ish from the lead free identifi cation sign “ LFH” on the MAIN PCB ASSY REV.)
However, the solder side of the MAIN PCB ASSY and other PCBs are soldered using leadcontent solder, use conventional lead content solder in the case of repair.
Since the reliability of soldering cannot be guaranteed if lead free solder and lead contentsolder are mixed, take care not to use the incorrect solder or mix the solder types.
Information on Manually Repairing PCB Soldered with Lead-Free Solder
This document provides information on how to correctly make manual repairs to a printed circuit
board (PCB) soldered with lead-free solder.
1. Characteristics of lead-free solder
Melting point higher than that of conventional tin-lead solder(Lead-free solder: approx. 220'C, Conventional tin-lead solder: approx. 180'C)
Relatively poor solder wettability and spread (difficult to wet and spread), and hard
Appearance (dull and grainy surface) different from that of conventional solder
Relatively poor wettability, rough surface (bumps are likely to be formed), and solder
dragging
Poor solder elevation
Poor thermal conductivity and heat resistant (difficult to melt)
2. Metal composition & wire solder
The metal composition of lead-free solder allowed for use on PCBs for Brother's products is
following.
LFIndication Compositon Manufacturer Origin Name
1 Sn/Ag/Cu Nihon Genma Japan DHB-RMA3
NP303
H only
Component-side
Sn/Ag/Cu Nihon Genma Japan DHB-RMA3
NP303
We use wire solder which is indicated by digit after LF indication on PCB.
Wire solder made in the contries except Japan are under investigation,and will be evaluated.
3. Appearance quality criteria
The appearance of the surface of portions soldered with lead-free solder is basically the
same as that for those soldered with conventional lead-tin solder, except for the following
points.1) The surface of a portion soldered with lead-free solder is dull and not smooth.
2) Shrinkage cracks can be observed on the surface of a portion soldered with lead-free
solder. (They can be observed using a magnifying glass with approx. 10x
magnification.)
S r n agecracks
Fig. 1 Shrinkage Cracks
8/13/2019 Brother Hl-2030, Hl-2032, Hl-2040, Hl-2070n Service Manual
For PCBs that use lead-free solder, "LF" is indicated by silk-screen printing or attaching a
label. "LF" stands for lead free and indicates that the PCBs bush such an indication have
been soldered with lead-free solder. A digit is given in a box following "LF" if produced by
silk-screen printing or follows "LF" without a box on an attached label, the digit indicating the
metal composition and wire solder.
5. Precautions for hand soldering operations
1) Soldering operations using lead-free solder are basically the same as those using tin-
lead solder, however, due to the lead-free solder's characteristics of being difficult to
melt, wet, and spread, as well as being hard, a soldering iron needs to be applied for
a longer period of time than when soldering with conventional tin-lead solder. While
soldering is being performed, it must be confirmed that the lead-free solder is
spreading. When solder needs to be added when repairing PCBs, the solder must
only be added after sufficiently melting the previously soldered area. When poor
soldering is repaired, the solder of the poorly soldered area must be sufficiently
removed and lead-free solder newly supplied.
2) Before starting soldering operations, it must be determined whether or not the PCB
has an "LF" indication. If the PCB has an "LF" indication, lead-free soldercorresponding to the digit following "LF" must be used. Conventional solder including
lead (tin-lead solder) must not be used on a PCB that has an "LF" indication. (Use of
tin-lead solder on a PCB having an "LF" indication is prohibited.)
3) A soldering iron for exclusive use with lead-free solder must only be used; a
soldering iron used for soldering with tin-lead solder must not be used with lead-free
solder. The use of soldering irons designed for lead-free solder is desirable (see "7.
Soldering iron" below).
4) The requirement for the temperature of the soldering iron’s tip is the same as that for
soldering using conventional solder; the temperature of the soldering iron's tip must
not be raised even though the melting point of the lead-free solder is higher. The
temperature of the soldering iron's tip is restricted to the temperature that the
component to be soldered can resist. It should be noted that the temperature that thecomponents to be soldered with lead-free solder can resist has not increased even
though the melting point of the solder has.
5) A soldering iron must be correctly applied.
Even though the melting point of the solder has increased, soldering operations must
be performed with the soldering iron’s tip at the same temperature as prescribed
before. Therefore, heat needs to be effectively applied from the tip of the soldering
iron to the base metal. For effective heat application, the shape of the soldering iron's
tip and application of the soldering iron (position and angle relative to the base metal)
need to be more strictly controlled than before.
6) The soldered point must be left as it is after the soldering iron is removed for a period
of time longer than that required when soldering is performed with conventional
solder.The amount of heat applied to the base metal increases due to the higher melting
point of the lead-free solder, and the base metal is heated to higher temperatures.
Consequently, it takes time for the melted solder to cool and to solidify and,
therefore, the soldered area must be left as it is after the soldering iron is removed for
a longer period of time.
7) A localized ventilation system and gloves are required for soldering operations.
Lead-free solder does not contain the toxic substance lead, however, inhalation of
the fumes may adversely affect the health of workers. The silver contained in lead-
free solder is also a toxic substance, though it is not as toxic as lead, and, therefore,
a localized ventilation system and gloves are required for lead-free solder soldering
operations, as required for those with conventional solder.
8/13/2019 Brother Hl-2030, Hl-2032, Hl-2040, Hl-2070n Service Manual
To avoid creating secondary problems by mishandling, follow the warnings below duringmaintenance work.
WARNING
• Always turn off the power switch and unplug the power cord from the poweroutlet before accessing any parts inside the printer.
• Some parts inside the printer are extremely hot immediately after the printer is used.
• When opening the front cover or rear cover to access any parts inside the printer,
never touch the shaded parts shown in the following figures.
1. CONSUMABLE PARTS
The consumable parts described in this section are parts which are subject to deterioration ordamage and should be replaced at least once during the period of warranty of the product ifany printing quality problem appears.
1.1 Drum Unit
Life expectancy: 12,000 pages with one drum unit
* At 5% print coverage (A4 or Letter size). The actual number ofprinted pages will vary depending on the average type of print joband paper.
NOTE:
* There are many factors that determine the actual drum life, such as temperature, humidity,type of paper, type of toner used, the number of pages per print job and so on. Under idealconditions, the average drum life is estimated at up to 12,000 pages. The actual number of pages that your drum will print may be significantly less than this estimate. Because we have
no control over the many factors that determine the actual drum life, we cannot guarantee aminimum number of pages that will be printed by your drum.
* For best performance, use only genuine Brother toner. The printer should be used only in aclean, dust-free environment with adequate ventilation.
* Printing with a third-party drum unit may reduce not only the printing quality but also thequality and life of the printer itself. Warranty coverage does not apply to problems caused bythe use of third-party drum unit.
8/13/2019 Brother Hl-2030, Hl-2032, Hl-2040, Hl-2070n Service Manual
If the LED shows the message below, it means the drum unit is near the end of its life. Werecommend that you replace the drum unit with a new one before there is a noticeabledeterioration in the print quality.
Fig. 5-1
! CAUTION:
* While removing the drum unit, handle it carefully as it may contain toner.
* Every time you replace the drum unit, be sure to clean the inside of the printer.
<Replacement Procedure>
(1) Open the front cover of the printer. Make sure that the printer is turned on and theDrum LED is blinking.
(2) Press and hold down the Go button for about 4 seconds until all the LEDs light up.Once all four LEDs are lit, release the Go button. Do not reset the drum counter whenyou replace only the toner cartridge.
(3) Pull out the drum unit and toner cartridge.
Fig. 5-2
! CAUTION:
* We recommend that you place the drum/toner ASSY on a piece of disposable paper orcloth in case you accidentally spill or scatter toner.
* To prevent damage to the printer from static electricity, do not touch the electrodes shown inthe figure below.
Fig. 5-3
8/13/2019 Brother Hl-2030, Hl-2032, Hl-2040, Hl-2070n Service Manual
(3) Push down the blue lock lever and take the toner cartridge out of the drum/toner ASSY.
NOTE:
* Discard the used drum unit according to local regulations, keeping it separatefrom domestic waste. If you have questions, call your local waste disposal office.
Fig. 5-4
(4) Unpack the new drum unit.
(5) Put the toner cartridge firmly into the new drum unit until you hear it lock into place.When the toner cartridge is installed correctly, the blue lock lever is lifted automatically.
NOTE:
* Make sure you insert the toner cartridge properly, or it may separate from the drum unitwhen you pick up the drum unit.
Fig. 5-5
(6) Put the drum/toner ASSY in the printer.
(7) Reset the drum counter. See the instructions supplied with the new drum unit.
(8) Close the front cover of the printer.
(9) Make sure that the Drum LED is now off.
! CAUTION:
* Handle the toner cartridge carefully. If toner scatters on your hands or clothes, wipe or washit off with cold water immediately.
* Wait to unpack a drum unit immediately before you put it in the printer. Exposure to directsunlight or room light may damage the drum unit.
* Do not reset the drum counter when replacing the toner cartridge only.
* It is recommended to clean the printer when you replace the drum unit. Refer to subsection3. ‘PERIODICAL CLEANING’ in this Chapter .
8/13/2019 Brother Hl-2030, Hl-2032, Hl-2040, Hl-2070n Service Manual
The life of the original toner cartridge that comes with the printer may be either a starter orstandard toner cartridge, and depends on the model and country you bought in.
A starter toner cartridge will print up to 1,500 A4 or Letter-size single-sized pages at 5%coverage. A standard and a replacement toner cartridge print up to 2,500 A4 or Letter-size
single sized pages at 5% coverage.
NOTE:
* The life of a toner cartridge may be different, depending on which country you bought the printer in.
* There are many factors that determine the actual toner life, such as temperature, humidity,type of paper used, the number of pages per print job, etc.
* The amount of toner used varies according to what is printed on the page and the printdensity setting.
* The more that is printed, the more toner will be used.
* If you change the print density setting for lighter or darker printing, the amount of toner that isused will change.
* Wait to unpack the toner cartridge immediately before you put it in the printer.
<Toner Low Message>
The Toner LED alternates turning on for 2 seconds and off for 3 seconds.
Fig. 5-6
If the LED shows this message, the toner cartridge has nearly run out of toner. Buy a newtoner cartridge and have it ready before you get a “Toner Life End” message.
NOTE:
The Toner LED will blink continuously if the toner cartridge is nearly empty.
8/13/2019 Brother Hl-2030, Hl-2032, Hl-2040, Hl-2070n Service Manual
(3) Push down the blue lock lever and take the toner cartridge out of the drum/toner ASSY.
Fig. 5-10
(4) Unpack the new toner cartridge. Hold the cartridge level with both hands and gentlyrock it from side to side five or six times to spread the toner evenly inside the cartridge.
Fig. 5-11
(5) Pull off the protective cover.
Fig. 5-12
8/13/2019 Brother Hl-2030, Hl-2032, Hl-2040, Hl-2070n Service Manual
(6) Put the new toner cartridge firmly into the drum unit until you hear it lock into place. Ifyou put it in properly, the lock lever will lift automatically.
NOTE:
* Make sure you insert the toner cartridge properly, or it may separate from the drum unitwhen you pick up the drum unit.
Fig. 5-13
(7) Clean the primary Corona wire inside the drum/toner ASSY by gently sliding the blue tabfrom right to left and left to right several times. Return the tab to the home position
before you put the drum/toner ASSY back into the printer. If you do not, printed pagesmay have a vertical stripe.
Fig. 5-14
(8) Put the drum/toner ASSY back into the printer. Close the front cover of the printer.
Fig. 5-15
Home position
8/13/2019 Brother Hl-2030, Hl-2032, Hl-2040, Hl-2070n Service Manual
* Handle the drum unit and toner cartridge carefully. If toner scatters on your hands or clothes,wipe or wash it off with cold water immediately.
* Be sure to seal the toner cartridge tightly so that toner powder does not spill out of the
cartridge.* Only unpack a toner cartridge immediately before you need to install it into the printer.
* If an unpacked drum unit is subjected to excessive direct sunlight or room light, the unit maybe damaged.
* Use a Brother genuine toner cartridge which is specially formulated to ensure top printquality.
* Printing with a 3rd party toner or toner cartridge may reduce not only the printing quality butalso the quality and life of the printer itself. It may also cause serious damage to the performance and life of a genuine Brother drum unit. Warranty coverage is not applied to problems caused by the use of 3rd party toner or toner cartridges.
* Brother strongly recommends that you do not refill the toner cartridge provided with the
printer. We also strongly recommend that you continue to use only Genuine Brother Brandreplacement toner cartridges. Using or attempting to use potentially incompatible tonerand/or toner cartridges in the printer may cause damage to the printer itself and/or it mayresult in unsatisfactory printing quality.
* Make sure that the wire cleaner on the drum/toner ASSY is returned to the home position( mark position) before re-installing the drum/toner ASSY into the printer, or printed pagesmay have vertical stripes. (Refer to Fig. 5-14)
* Install the toner cartridge immediately after you remove the protective cover. Do not touchthe shaded parts shown in the illustrations to prevent any degradation to the print quality.
Fig. 5-16
NOTE:
It is recommended to clean the printer when you replace the toner cartridge. Refer tosubsection 3. ‘PERIODICAL CLEANING’ in this Chapter .
8/13/2019 Brother Hl-2030, Hl-2032, Hl-2040, Hl-2070n Service Manual
Clean the outside and inside of the printer regularly with a dry soft cloth. When you replace thetoner cartridge or the drum unit, make sure you clean the inside of the printer. If printed pagesare stained with toner, clean the inside of the printer with a dry soft cloth.
! CAUTION:
While drum/toner ASSY and scanner window cleaning can be implemented by the end user,the electrical terminals inside the printer and on the drum/toner ASSY should be cleaned by aservice technician. Instruct the users not to touch those terminals.
WARNING
There are high voltage electrodes inside the printer. Before cleaning the printer, makesure that the power switch has been turned off and the power cord has been unplugged
from the power outlet.
3.1 Cleaning the Inside of the Printer
Clean the inside of the printer as follows:
Turn off the power switch and unplug the printer from the power outlet.
1) Open the front cover of the printer.
2) Pull out the drum/toner ASSY.
3) Wipe the scanner window with a dry soft cloth to remove dust.
4) Put the drum/toner ASSY back in the printer.
5) Close the front cover of the printer.
6) Plug the printer back in and turn on the printer power switch.
! CAUTION:
* Use water or neutral detergents for cleaning. Cleaning with volatile liquids such as thinner orbenzene will damage the surface of the printer.
* Do not use cleaning materials that contain ammonia. They will damage the printer and thetoner cartridge.
3.2 Cleaning the Corona Wire
If you are experiencing printing quality problems, please clean the corona wire as follows:
1) Turn off the power switch and unplug the power cord.
2) Open the front cover of the printer.
3) Pull out the drum/toner ASSY.
! CAUTION:
It is recommended to place the drum/toner ASSY on a piece of disposable paper or cloth incase you accidentally spill or scatter toner.
8/13/2019 Brother Hl-2030, Hl-2032, Hl-2040, Hl-2070n Service Manual
4) Clean the primary corona wire inside the drum/toner ASSY by gently sliding the blue tabfrom right to left and left to right several times. Return the tab to the home positionbefore you put the drum/toner ASSY back into the printer. If you do not, printed pagesmay have a vertical stripe.
Fig. 5-17
5) Put the drum/toner ASSY back in the printer.
6) Close the front cover of the printer.
3.3 Cleaning the Scanner Window
When replacing the drum unit or toner cartridge with a new one, be sure to clean the scannerwindow.
1) Turn off the power switch and unplug the power cord.
2) Press the cover release button, and then open the front cover.
3) Pull the drum/toner ASSY out of the printer.
! CAUTION:
It is recommended to place the drum/toner ASSY on a piece of disposable paper or cloth incase you accidentally spill or scatter toner.
4) Gently wipe the scanner window with a dry soft cloth.
Fig. 5-18
Home position
8/13/2019 Brother Hl-2030, Hl-2032, Hl-2040, Hl-2070n Service Manual
5) Re-install the drum/toner ASSY into the printer. Close the front cover of the printer.
6) Plug in the power cord, and then turn on the power switch.
! CAUTION:
* Handle the drum unit carefully since it contains toner. If toner scatters and your hands orcloths get dirty, immediately wipe or wash it off with cold water.
* Do not touch the scanner window with your fingers.
* Do not wipe the scanner window with isopropyl alcohol.
3.4 Cleaning the Electrical Terminals
To obtain the best print performance, be sure to clean the electrical terminals inside the printer.
1) Turn off the power switch and unplug the power cord.
2) Remove the drum/toner ASSY from the printer.
3) Wipe the electrical terminals as shown in the figure below with a dry soft cloth.
Fig. 5-19
8/13/2019 Brother Hl-2030, Hl-2032, Hl-2040, Hl-2070n Service Manual
Create the “hl2000” folder in the C drive, for example.
2) HL-2030/2040/2070N target printer
3) USB cable (one piece)
4) FILEDG32.EXE file
Install it into the PC. Then, copy the installed program into the “hl2000” folder which hasbeen created in the C drive.
5) Target firmware: LZXXXX_$.BLF (firmware of the printer)
LZXXXX_$.BLF LZXXXX: First six digits of the part number of the firmware
$: Alphabet representing the revision of the firmware.
Extract it and copy the extracted files into the “hl2000” folder which has been created inthe C drive.
6) Setting file of the default paper size (for HL-2070N only):Extract this file.
s2000E (A4 size), s2000U (Letter size),s2000I (A4 size, Israeli font for Israel) ALL_CHN.pjl (A4 size, Thin paper setting for China)
7) DRV2000.zip file (Install all the drivers of the HL-2030/2040/2070N printers at the sametime.)Copy it into the “hl2000” folder which has been created in the C drive. Extract the copiedfile and run the SETUP2.BAT file in the extracted file.
HL-2030/2040/2070N printer drivers (for USB) will be copied.
8) MAINTE.EXE file
Copy it into the “hl2000” folder which has been created in the C drive. Extract the copiedfile and run the bramainte.exe file by double-clicking.
8/13/2019 Brother Hl-2030, Hl-2032, Hl-2040, Hl-2070n Service Manual
CHAPTER 6 ADJUSTMENTS AND UPDATING OF SETTINGS,REQUIRED AFTER PARTS REPLACEMENT
Confidential 6-4
Setting the serial number
1) Make sure that the power supply of the printer is turned ON.
2) Double-click the brmainte.EXE file (maintenance utility) which has been copied in the“hl2000” folder to start.
3) Select Input Information from Menu. Select the applicable model name.4) Check the port (USB) which the printer is connected through and click “Serial No.” in the
lower box.
Fig. 6-2
Enter the serial number (the last nine digits) of the printer into the box at the right handside. The serial number is shown in the window, and check that it is correct. Follow thenext step without clicking the OK button.
Inputting the adjusted value of the laser scanner
1) Select ‘Adjust Scanner’ from Menu. Enter the figures (the last four digits) shown on thelabel attached on the chassis at the right hand side of the main PCB into the box at theright hand side.
Fig. 6-3
Follow the next step without clicking the OK button.
8/13/2019 Brother Hl-2030, Hl-2032, Hl-2040, Hl-2070n Service Manual
The “Toner Life End” message is displayed according to the upper limit value of thedeveloping roller rotation. The upper limit value is different between the starter tonercartridge and standard one. Therefore, it is necessary to set the conformable value to thetoner cartridge installed in the printer following the steps below.
1) Select ‘Set Starter count’ or ‘Set Standard count’ from Menu according as the currentlyused toner cartridge.
Fig. 6-4 Fig. 6-5
2) Check ON in the check box at the right hand side.
NOTE:
It is impossible to set both types of the toner cartridge. If selecting both, the NG message is
displayed.3) Click the OK button in the end. All of the settings are completed.
4) Turn the power supply of the printer off.
8/13/2019 Brother Hl-2030, Hl-2032, Hl-2040, Hl-2070n Service Manual
When an operator call occurs, the red Paper LED is ON or blinking to indicate it.
An ‘operator call’ which the printer indicates on the LEDs is user recoverable. Identify theerror from the table below and take the corrective action described for each indication tocorrect it. The printer automatically recovers from most errors, but some of errors arenecessary to reset the printer by holding down the Go button.
LED Type of error
Errorclearance bypressing theGo button.
Remedy
Toner life endX
Replace the toner cartridge with anew one.
Cartridge
position error X
The toner cartridge is not installed
correctry. Take out the tonercartridge and put it back into theprinter again.
Drum life endsoon
X
The drum unit is near the end of itslife. We recommend that you get anew drum unit to replace the currentone. The Drum LED alternatesturning on for 2 seconds and off for 3seconds.
No paper fed
tray
Put paper in the tray. Press the Go
button.
Front cover isopen
XClose the front cover of the printer.
Back cover isopen
XClose the back cover of the printer.
Paper jam Clear the paper jam. If the printer
does not start printing, press the Gobutton.
No paper fedmanual feed slot
Put the paper in the manual feed slot.
Memory fullX
An error is cleared when deleting thedata by the job cancel operation.
Print overrunX
An error is cleared when deleting thedata by the job cancel operation.
Dust on drum X The corona wire needs to be cleaned.
3
8/13/2019 Brother Hl-2030, Hl-2032, Hl-2040, Hl-2070n Service Manual
If service calls occur, all four LEDs blink on and off to notice it. In this state execute theoperation described on the top of Table 1 to notify a fault location from the specificcombination of ON/OFF and status color of the LED.Instruct the user to turn off the power switch, wait a few seconds and then turn it on again and
try to print again. If the error is not cleared and the same service call appears, see Section 6 ‘MALFUNCTIONS’ to take the corrective action.
See section 6 ’MALFUNCTION’.
NO
Error released
No error released
YES
Error occurs.
OKFront cover open/close.
Error occursagain.
Comfirm the LED indication.
Turn OFF/ON the power switch.
Temporary error.Use the printer with outcorrective action.
<To show the service call type>
If Go button is pressed, LED is lighted by one of the combinations in the table below.
LED Type of service call LED Type of service call
Fixing unit failure Main PCB failure
Laser unit failure Main motor failure
High voltage error<Table 1>
<Recovering from the service call>
The printer starts recovering from all service calls by the front cover being opened and closed.For an unrecoverable error, however, the printer detects a service call again and indicates it.
8/13/2019 Brother Hl-2030, Hl-2032, Hl-2040, Hl-2070n Service Manual
The Status Monitor will report problems with the printer. Take the corrective actions listed inthe following table for the error message that the Status Monitor reports.
The default setting for the Status Monitor is off. If you would like to turn the status monitor on,
you can change the setting of the Status Monitor in the Device Options of the Advanced tab.
Error message Remedy
Cover is open • Close the front cover of the printer.
Back Cover is open • Close the back cover of the printer.
Memory Full • Press the Go button to print the data remaining in theprinter. Cancel the print job if you want to delete the dataremaining in the printer.
• Reduce the print resolution or reduce the complexity ofyour document.
Print Overrun • Press the Go button to print the data left in the printer.
Cancel the print job if you want to delete the dataremaining in the printer.
• If this does not clear the error, reduce the complexity ofyour document or reduce the print resolution.
• Set page protection to AUTO by using the suppliedWindows
® driver or RPC program.
• Change the following settings in the supplied Windows®
driver and try again. The best combination of thesesettings will vary depending on your document:
• Graphics Mode
• TrueType mode
• Use Printer TrueType®
Fonts
No Paper Fed TrayNo Paper Fed Manual slot
• The paper tray may be out of paper or not properlyinstalled. If it is empty, put a new stack of paper in the
paper tray and then press the Go button.
• If there is paper in the paper tray, make sure it is straight.If the paper is curled, straighten it before printing.Sometimes it is helpful to remove the paper, turn thestack over and put it back in the paper tray.
• Reduce the amount of paper in the paper tray, and thentry again.
• Make sure you use paper that meets Brother’srecommended paper specifications. See 3.6 ‘Paper’ inChapter 1.
Paper Jam Tray 1Paper Jam InsidePaper Jam Rear
• Take out the jammed paper from the indicated area.See 4.2 ‘Paper Jams’ in this Chapter.
Toner Life End • See 1.2 ‘Toner Cartridge’ in Chapter 5.
Toner Low • Purchase a new toner cartridge and have it ready for whenthe Toner Life End status is indicated.
Cartridge Position Error • Take out the toner cartridge and put it back into the printeragain.
8/13/2019 Brother Hl-2030, Hl-2032, Hl-2040, Hl-2070n Service Manual
Drum Life End Soon • The drum is near the end of it's life. Purchase a new drumunit to replace the current one. See 1.1 ‘Drum Unit’ inChapter 5.
Dust on Drum • See 3.2 ‘Cleaning the Corona Wire ’ in Chapter 5.
Service Call • Check the LED indication to identify the error.
3.3 Error Message Printouts
The printer will report problems by printing an error message as defined in the following table.Take the corrective actions for the error message.
Error message Remedy
MEMORY FULL • Press the Go button to print the data left in the printer.
Cancel the print job if you want to delete the dataremaining in the printer.
• Reduce the print resolution or reduce the complexity ofyour document.
PRINT OVERRUN • Press the Go button to print the data left in the printer.Cancel the print job if you want to delete the dataremaining in the printer.
• If this does not clear the error, reduce the complexity ofyour document or reduce the print resolution.
• Set page protection to AUTO by using the suppliedWindows
® driver or RPC program.
• Change the following settings in the supplied Windows®
driver and try again. The best combination of thesesettings will vary depending on your document:
• Graphics Mode
• TrueType mode
• Use Printer TrueType®
Fonts
RESOLUTION REDUCED TOENABLE PRINTING(The printer has printed thedocument at a reducedresolution)
• Reduce the complexity of your document before you printto prevent automatic reduction in the resolution.
*NOTE:
The communication parameter settings are printed on the Print Settings sheet. For details onhow to print the Print Settings page, see ’Print Settings’ in Chapter 8 .
8/13/2019 Brother Hl-2030, Hl-2032, Hl-2040, Hl-2070n Service Manual
First, make sure that you are using paper that meets Brother recommended paper
specifications. See 3.6 ‘Paper’ in Chapter 1.
Problem Remedy
The printer does not feedpaper.
• If there is paper in the paper tray, make sure it is straight.If the paper is curled, you should straighten it beforeprinting. Sometimes it is helpful to remove the paper, turnthe stack over and put it back in the paper tray.
• Reduce the amount of paper in the paper tray, and thentry again.
• Check that manual feed mode is not selected in theprinter driver.
The printer does not feed
paper from the manual feedslot.
• Re-insert the paper firmly, one sheet at a time.
• Make sure that manual feed mode is selected in theprinter driver.
The printer will not feedenvelopes.
• The printer can feed envelopes from the manual feed slot.Your application software must be set up correctly to printon the envelope size you are using. This is usually donein the page setup or document setup menu of yoursoftware. Please see your software application manual.
A paper jam has occurred. • Clear the jammed paper. See 4.2 ‘Paper Jams’ in thisChapter.
8/13/2019 Brother Hl-2030, Hl-2032, Hl-2040, Hl-2070n Service Manual
If the jammed paper is removed completely by following the steps below, you can install thepaper tray first, and then close the front cover and the printer will resume printing automatically.
If the printer does not start printing automatically, press the Go button. If the printer still doesnot start printing, please check that all the remaining jammed paper has been removed fromthe printer. Then try printing again.
NOTE:
Always remove all paper from the paper tray and straighten the stack when you add new paper. This helps to prevent multiple sheets of paper from feeding through the printer at onetime and reduces paper jams.
(1) Pull the paper tray completely out of the printer.
Fig. 7-1
(2) Pull the jammed paper up and out of the printer.
Fig. 7-2
(3) Open the front cover.
Fig. 7-3
8/13/2019 Brother Hl-2030, Hl-2032, Hl-2040, Hl-2070n Service Manual
(6) Pull the tab toward you to open the rear chute cover.
Fig. 7-7
(7) Pull the jammed paper out of the fixing unit. If the jammed paper cannot be pulled outeasily, push down the tab with one hand as you gently pull the paper out with other.
Fig. 7-8
WARNING
After you have just used the printer, some internal parts of the printer are extremely hot.Wait for the printer to cool down before you touch the internal parts of the printer.
Rear chute cover
8/13/2019 Brother Hl-2030, Hl-2032, Hl-2040, Hl-2070n Service Manual
(9) Push the lock lever down and take the toner cartridge out of the drum unit. Take out the jammed paper if there is any inside the drum unit.
Fig. 7-9
(10) Put the toner cartridge back into the drum unit until you hear it lock into place. If you putit in properly, the lock lever will lift automatically.
Fig. 7-10
(11) Put the drum/toner ASSY back in the printer.
Fig. 7-11
(12) Put the paper tray firmly back in the printer.
(13) Close the front cover.
(14) Make sure that the Paper LED is now off and the printer is ready.
8/13/2019 Brother Hl-2030, Hl-2032, Hl-2040, Hl-2070n Service Manual
The causes for paper jam problems vary depending on the location of the paper jam. When apaper jam occurs inside the printer, you have to find the location of the paper jam first, removethe jammed paper and then take the appropriate countermeasure referring to the table below;
Problem Type of Jam Cause Remedy
Jam when the printeris turned on.
Paper stuck The regist frontsensor or paper ejectsensor is turned on.
Remove the paperinside the printer. Ifthere is no paper,check the suspectsensors referring to‘Factory InspectionMode’ in Chapter 8.
Paper stopped in themiddle of feeding.
Jam caused bypaper lengthdetected as longerthan 410mm (16 in).
The regist frontsensor is notreturning properlyand is not turning off.
Even if the paper is printed and ejected without any problems such as paper jams, paperfeeding problems below may appear.
Users can clear these problems by following the ‘User Check’ items for each problem. Even ifthe same problem occurs again, follow the procedures in the table below.
F-1 Double feeding
User Check
Check the paper used meets the recommended paper specifications. (Refer to 3.6 “Paper” in Chapter 1.)
Possible cause Step Check Result Remedy
Separation pad 1 Is the surface of the separationpad worn out?
Yes Replace the separation pad.
F-2 Wrinkles or creases
User Check
(1) Check that paper is loaded into the paper tray correctly.
(2) Check the paper used meets the recommended paper specifications. (Refer to 3.6 “Paper” in Chapter 1.)
(3) Turn over the stack of paper in the tray or try rotating the paper 180° in the tray.
Possible cause Step Check Result Remedy
Paper 1 Is the problem solved if newpaper is used?
Yes Instruct the user how to storepaper so that it does notabsorb moisture.
Fixing unitentrance guide
2 Is the entrance guide dirty? Yes Clean the entrance guide.
Fixing unit 3 Is the pressure roller dirty? Yes Clean the pressure roller.
No Replace the fixing unit.
F-3 Waves in the paper / folds in the paper at the eject roller
Possible cause Step Check Result Remedy
Paper 1 Is the problem solved if newpaper is used?
Yes Instruct the user how to storepaper so that it does notabsorb moisture.
Eject roller 2 Is the eject roller dirty? (Dustand dirt)
Yes Clean the eject roller.
8/13/2019 Brother Hl-2030, Hl-2032, Hl-2040, Hl-2070n Service Manual
(1) Check that the paper or other media is loaded into the paper tray correctly and that the paperguides are not too tight or too loose against the paper stack.
(2) If using the manual feed slot, check how to load paper into the manual feed slot correctly.
(3) The paper tray may be too full. Load paper below mark in depth.
(4) Check the paper used meets the recommended paper specifications. (Refer to 3.6 “Paper” inChapter 1.)
F-5 Curl or Wave
User Check
(1) Check the paper used meets the recommended paper specifications. Both high temperature andhumidity will cause paper to curl.
(2) If the printer is used infrequently, the paper may have sat for too long in the paper tray. Turn overthe stack of paper in the paper tray. Also, try rotating the paper 180° in the paper tray.
(3) Check that the paper used meets the Media Type setting in the driver.
NOTE:
For no paper supplied as the cause of a malfunction, see M-4 ‘No paper supplied’ in 6.‘MALFUNCTIONS’ in this Chapter.
F-6 Paper pickup
Possible cause Step Check Result Remedy
Disconnection ofthe pickupsolenoidharness
1 Is the harness of the pickupsolenoid disconnected?
Yes Reconnect the harness.
Pickup solenoidharness failure
2 Does the harness of the pickupsolenoid work correctly?
No Replace the pickup solenoid.
Pressure plate
gear damage
3 Is the pressure plate gear
damaged?
Yes Replace the pressure plate
gear.
Clutch geardamage
4 Is the clutch gear damaged? Yes Replace the gear unit.
8/13/2019 Brother Hl-2030, Hl-2032, Hl-2040, Hl-2070n Service Manual
The printer may not print the data correctly if there are incorrect software settings.
S-1“There was an error writing to LPT1: (or BRUSB) for the printer” error messageappears.
User Check
(1) Check that the printer cable is not damaged or broken. Check also that the cable is connectedto the correct interface connectors of both the printer and PC.
(2) Check that the correct printer is selected if you have an interface switching device.
(3) Check that the appropriate printer driver is selected as ‘Set as Default’. Check also that thecorrect print port is set for the selected printer driver.
(4) Check that the printer is not connected to the same port which is also connected to a massstorage device or scanner. Remove all other devices and connect the port to the printer only.Turn off the printer status monitor in the device options tab in the printer driver.
(5) If the print port is set as an ECP port, change it to a normal port.
(6) Try printing the test page refer to ‘Test Sample Page’ in Chapter 8.
(7) Try resetting the factory settings.
Possible cause Step Check Result Remedy
Failure insidethe printer
1 Is it possible to print the testpage with the method of ‘TestSample Page’ in Chapter 8.?
No Identify the error type, thenrefer to the specified sectionof this chapter.
Main PCBfailure
2 Is it possible to print withanother PC and printer cable?
No Replace the main PCB.
Yes This problem may appearunder the specified systemenvironment. Check theenvironment which the userused.
8/13/2019 Brother Hl-2030, Hl-2032, Hl-2040, Hl-2070n Service Manual
When taking countermeasures for malfunctions as described in this section, check connectorsfor contact failure before measuring the voltage at the specified connector pins.
M-1 No AC power supplied
Possible cause Step Check Result Remedy
Supply voltage 1 Is the correct voltage presentat the outlet?
No Inform the user that thecorrect voltage is not suppliedat the outlet.
Power plug 2 Is the power cord securelyplugged into the outlet?
No Plug the power cord securelyinto the outlet.
Fuse (F1, F2) 3 Is the fuse blown? Yes If the fuse blows againimmediately after replacingthe low-voltage power supply
PCB, check that there is not ashort circuit somewhere in the
AC power supply line.
Wiring 4 Unplug the power supply plug.Is there a broken wire betweenthe AC input connector of thelow-voltage power supply andthe power plug?
Yes Replace the AC power cord.
M-2 No DC power supplied
Possible cause Step Check Result Remedy
AC powersupply
1 Is AC power supplied betweenconnectors CN1-L and CN1-Nwhen the power plug isplugged into the outlet?
No Follow the same checkprocedure of M-1 “No ACpower supplied”.
Wiring, DC load 2 Turn on the power switch.Measure the voltages betweenthe terminals. Do themeasured voltage satisfy theprescribed valued in the tablebelow?
Yes Turn off the power switch,reconnect the connector andturn the power switch onagain. If the protector circuitis activated, check theconnector, the wiring from the
connector, and the DC load.Low-voltagepower supplyPCB
3 Refer to the chart *1 below. No Replace the low-voltagepower supply PCB.
*1
PCB +lead pin - lead pin Voltage
Main CN12-6CN12-8
CN12-9CN12-9
Approx. 24V Approx. 5V
8/13/2019 Brother Hl-2030, Hl-2032, Hl-2040, Hl-2070n Service Manual
1 Is the contact of connectorCN7 on the main PCB good?
No Reconnect the connector.
Blown thermalfuse
2 Remove the fixing unit andmeasure the resistance of thethermal fuse. Is it opencircuit?
Yes Replace the fixing unit.
Yes Replace the fixing unit.Thermistorassemblingfailure
3 Is the thermistor installedproperly?
No Reinstall the thermistorproperly.
Halogen heaterlamp failure
4 Remove the fixing unit andmeasure the resistance of thehalogen heater lamp. Is it
open circuit?
Yes Replace the halogen heaterlamp.
Heater harnessconnectionfailure
5 Is the heater harnessconnector connected to thelow-voltage power supply PCBand fixing unit secure?
No Reconnect the connectorssecurely.
NOTE:
• This problem will be cleared if leaving the printer power ON for ten minutes.
• If the heater is cooled down sufficiently, this problem may be cleared by the followingsteps; 1) Check that the front cover is open. 2) Turn on the printer power switch whilepressing the Go button. Be warned, however, that this operation wil l melt the fi xing
unit if the heater is hot.
M-9 Main PCB failure
Possible cause Step Check Result Remedy
Main PCB 1 Is it possible to print the testpage with the method of ‘TestSample Page’ in Chapter 8?
No Replace the main PCB.
Software bug 2 Does this problem appearwhen printing specific data or
printing under a specificenvironment?
Yes Inform the Brother office ofthe used specific data, printer
condition and systemenvironment.
8/13/2019 Brother Hl-2030, Hl-2032, Hl-2040, Hl-2070n Service Manual
Print out test print out test print out test Print out test print orint out test print out test print out test rint out test print o Print out test print o
Print out test print out test print out test Print out test print orint out test print out test print out test rint out test print o Print out test print o
Print out test print out test print out test Print out test print orint out test print out test print out test rint out test print o Print out test print o
Print out test print out test print out test Print out test print orint out test print out test print out test rint out test print o Print out test print o
Print out test print out test print out test Print out test print orint out test print out test print out test rint out test print o Print out test print o
Print out test print out test print out test Print out test print orint out test print out test print out test rint out test print o Print out test print o
Print out test print out test print out test Print out test print orint out test print out test print out test rint out test print o Print out test print o
Print out test print out test print out test Print out test print orint out test print out test print out test rint out test print o Print out test print o
Print out test print out test print out test Print out test print orint out test print out test print out test rint out test print o Print out test print o
Print out test print out test print out test Print out test print orint out test print out test print out test rint out test print o Print out test print o
Print out test print out test print out test Print out test print orint out test print out test print out test rint out test print o Print out test print o
Print out test print out test print out test Print out test print orint out test print out test print out test rint out test print o Print out test print o
Print out test print out test print out test Print out test print orint out test print out test print out test rint out test print o Print out test print o
P r i n t o u t t e s t p r i n t o u t t e s t p r i n t o u t t e s t P r i n t o u t t e s t p r i n t o P r i n t o u t t e s t p r i n t o
P r i n t o u t t e s t p r i n t o u t t e s t p r i n t o u t t e s t P r i n t o u t t e s t p r i n t o P r i n t o u t t e s t p r i n t o
P r i n t o u t t e s t p r i n t o u t t e s t p r i n t o u t t e s t P r i n t o u t t e s t p r i n t o P r i n t o u t t e s t p r i n t o
P r i n t o u t t e s t p r i n t o u t t e s t p r i n t o u t t e s t P r i n t o u t t e s t p r i n t o P r i n t o u t t e s t p r i n t o
P r i n t o u t t e s t p r i n t o u t t e s t p r i n t o u t t e s t P r i n t o u t t e s t p r i n t o P r i n t o u t t e s t p r i n t o
P r i n t o u t t e s t p r i n t o u t t e s t p r i n t o u t t e s t P r i n t o u t t e s t p r i n t o P r i n t o u t t e s t p r i n t o
P r i n t o u t t e s t p r i n t o u t t e s t p r i n t o u t t e s t P r i n t o u t t e s t p r i n t o P r i n t o u t t e s t p r i n t o
P r i n t o u t t e s t p r i n t o u t t e s t p r i n t o u t t e s t P r i n t o u t t e s t p r i n t o P r i n t o u t t e s t p r i n t o
P r i n t o u t t e s t p r i n t o u t t e s t p r i n t o u t t e s t P r i n t o u t t e s t p r i n t o P r i n t o u t t e s t p r i n t o
P r i n t o u t t e s t p r i n t o u t t e s t p r i n t o u t t e s t P r i n t o u t t e s t p r i n t o P r i n t o u t t e s t p r i n t o
P r i n t o u t t e s t p r i n t o u t t e s t p r i n t o u t t e s t P r i n t o u t t e s t p r i n t o P r i n t o u t t e s t p r i n t o
P r i n t o u t t e s t p r i n t o u t t e s t p r i n t o u t t e s t P r i n t o u t t e s t p r i n t o P r i n t o u t t e s t p r i n t o
P r i n t o u t t e s t p r i n t o u t t e s t p r i n t o u t t e s t P r i n t o u t t e s t p r i n t o P r i n t o u t t e s t p r i n t o
I-19 Hollow printI-15 White spots I-16 Black spots I-18 Gray backgroundI-17 Black band
I-20 Downward fogging
of solid black
I-21 Horizontal lines
I-11 Faultyregistration
I-10 White horizontalstreaks
I-8 Black verticalstreaks
I-9 White verticalstreaks
I-23 GhostI-22 Light rain I-24 Toner specks
Fig. 7-12
7.2 Diameter of Rollers
The diameter of each roller and the pitch which appears in the image are listed below.
No. Parts Name Diameter (The pitch whichappears in the image)
1 Paper Feed Roller Ø 14.0 mm (44.0 mm)
2 Transfer Roller Ø 12.1 mm (37.9 mm)
3 Exposure Drum Ø 24.0 mm (75.3 mm)
4 Heat Roller Ø 25.0 mm (78.5 mm)
5 Pressure Roller Ø 25.0 mm (78.5 mm)
6 Developer Roller Ø 20.0 mm (62.8 mm)
8/13/2019 Brother Hl-2030, Hl-2032, Hl-2040, Hl-2070n Service Manual
Several types of the image defects can be cleared by end users. For those defects, instructthe user to check the ‘User Check’ items described in each table. Even if the same imagedefect appears, the following procedures should be followed in the event of specific imagedefects.
See also subsection 7.4 ‘Location of Ground Contacts’ in this Chapter for information about thelocation of the grounding contacts.
! CAUTION:
When using the printer for a special job, such as printing of name cards, print quality cannot beguaranteed.
I-1 Light
Possible cause Step Check Result RemedyGroundcontacts
Toner sensorfailure
(printer side)
1 Can printing be started with thedrum unit and toner cartridge
removed?
Yes Check if the tonersensor is dirty and
check the tonersensor connection.
Toner sensorfailure(toner cartridgeside)
2 Is the problem solved when 4or 5 pages are printed after thetoner cartridge is replaced witha full one?
Yes The wiper of the tonercartridge is defective.Replace the tonercartridge.
Drumconnectionfailure
3 Are all the contacts betweenthe drum unit and printer bodyconnected correctly?
No Clean contactelectrodes both on thedrum unit and in theprinter body.
(1), (4),
(5), (6)
HVPS / Main
PCB failure
4 Is the harness connection
between the HVPS and themain PCB correct?
Yes Replace the HVPS or
the main PCB.
Dirt on thescanner window
5 Is there any dirt on the scannerwindow?
Yes Wipe it off with a softclean paper.
Laser unit failure 6 Is the problem solved afterreplacing the laser unit?
Yes Replace the laser unit.
User Check (1) Check the printer’s environment. Conditions such as humidity, high
temperatures, etc. may cause this situation to occur.
(2) If the whole page is light, toner save mode may be on. Disable toner save modewithin Printer Properties tab of the driver.
(3) Try installing a new toner cartridge or drum unit.
8/13/2019 Brother Hl-2030, Hl-2032, Hl-2040, Hl-2070n Service Manual
Corona failure 1 Is the corona wire dirty? Yes Clean the corona wire with thewire cleaner.
Corona failure 2 Is the vertical block streakabout 10mm wide?(Check if the wire cleaner is atits home position.)
Yes Return the wire cleaner to itshome position.
Dirt in the paperfeed system
3 Is the paper tray or feedsystem on the drum unit dirtywith toner?
Yes Clean the toner off.
Scratch on thedrum
4 Is the surface of the drumscratched?
Yes Replace the drum unit.
Cleaning failure 5 Is the surface of the drum dirtywith toner in streaks?
Yes Replace the drum unit.
Scratch on theheat roller
6 Is the surface of the heat rollerscratched?
Yes Replace the fixing unit.
NOTE:
• If you print the same pattern (especially vertical streaks) continuously, electrostatic charge performance of the drum will decrease temporarily and black vertical streaks may appearon the paper.
• This problem may occur with noise due to the corona wire being dirty. In that case, cleanthe corona wire with the wire cleaner.
User Check
(1) Clean the corona wire in the drum unit.(2) Check that the wire cleaner is at the home position.
(3) Check that the toner cartridge is not empty.
(4) The drum unit may be damaged. Install a new drum unit.
(5) The toner cartridge may be damaged. Install a new toner cartridge.
8/13/2019 Brother Hl-2030, Hl-2032, Hl-2040, Hl-2070n Service Manual
(1) Remove the toner cartridge from the drum unit. Place the printing samples in front of thedrum unit, and find the exact position of the image defect.
Fig. 7-13
(2) Turn the drum gear by hand while looking at the surface of the exposure drum.
Fig. 7-14
(3) Wipe the surface of the exposure drum with a cotton swab until the dust or paper powderon the surface comes off.
Fig. 7-15
! CAUTION:
• Do not wipe the surface of the exposure drum with something sharp. (ball-point pen etc.)
• Use cleaning liquid which is a 50-50 mixture of ethyl alcohol and pure water.
Position of smudge onthe drum
75.3mm interval
Printing sample
Drum unit
Exposure drum
Exposure drum
8/13/2019 Brother Hl-2030, Hl-2032, Hl-2040, Hl-2070n Service Manual
Print paper 1 Is thick paper of more than43lb being used or extremelyrough surface paper?
No Refer and compare with I-15.
I-20 Downward fogging of solid black
Possible cause Step Check Result Remedy
Toner cartridgefailure
1 Is the problem solved afterreplacing the toner cartridge?
Yes Replace the toner cartridge.
High-voltagepower supplyPCB failure
2 Is the problem solved afterreplacing the high-voltagepower supply PCB?
Yes Replace the high-voltage powersupply PCB.
I-21 Horizontal lines
Possible cause Step Check ResultRemedy
Paper traycontacts
1 Are the ground contacts on theright side of the paper trayconnecting correctly?
No Clean the contacts.
Drum unit 2 Are the high-voltage power
supply and drum unit contactedcorrectly?
No Clean the contacts.
User Check
(1) Check the paper used meets the recommended paper specifications.(2) Select the ‘Thick paper mode’ in the printer driver, or use thinner paper than you
are currently using.
(3) Check the printer’s environment, conditions such as high humidity may cause thissituation to occur.
8/13/2019 Brother Hl-2030, Hl-2032, Hl-2040, Hl-2070n Service Manual
When the data is not printed correctly as it is seen on the PC screen, follow the proceduresbelow in the event of a specific error.
P-1 The printer prints unexpectedly or it prints garbage.
User Check
(1) Check if the printer cable is not too long. It is recommended to use a parallel cable of less than 2meters (6.6 feet) in length.
(2) Check that the printer cable is not damaged or broken. Check also that the printer cable isconnected to the correct interface connectors of both the printer and PC.
(3) If an interface switching device is used, remove it and connect the computer directly to the printerand try again.
(4) Check that the appropriate printer driver is selected as ‘Set as Default’. Check also that thecorrect print port is set for the selected printer driver.
(5) Check that the printer is not connected to the same port which is also connected to a massstorage device or scanner. Remove all other devices and connect the port to the printer only.Turn off the printer status monitor in the device options tab in the printer driver.
(6) If the print port is set as an ECP port, change it to a normal port.
(7) Try printing the test page referring to ‘Test Sample Page’ in Chapter 8.
(8) Try resetting the factory settings.
Possible cause Step Check Result Remedy
Failure insidethe printer
1 Is it possible to print the testpage with the method of ‘TestSample Page’ in Chapter 8?
No Identify the error type, thenrefer to the specified section ofthis chapter.
NOTE:
If the printer prints garbage or incorrect fonts, instruct the user to use the ‘Troubleshooting forPrinter won’t print’ tool of the self-diagnostics tools. If the problem cannot be solved, instructuser to use the ‘Diagnostics’ tool described in the Chapter 7 so that you can get a log file toinvestigate the cause of the problem. For details on the self-diagnostics tools, see 2. ‘HOWTO USE SELF-DIAGNOSTICS TOOLS’. in Chapter 8.
P-2 Unable to print full pages of a document with the “PRINT OVERRUN” message.
User Check
(1) Press the Go button on the control panel to print the data remaining in the printer.
(2) If this does not clear the error, reduce the complexity of your document or reduce the printerresolution.
(3) Change the following setting in the printer driver and try again. The best combination of settingsbelow will vary depending on your document.
Graphic Mode / TrueTypeTM
mode (for HL-2070N) / Use Printer TrueTypeTM
Fonts (for HL-2070N)
NOTE:
This problem may appear if the data is too complex. If it is not cleared by taking the actionsabove, it will be impossible to print such data under the printer specifications.
8/13/2019 Brother Hl-2030, Hl-2032, Hl-2040, Hl-2070n Service Manual
P-3 Unable to print full pages of a document with the “MEMORY FULL” message.
User Check
(1) Press the Go button on the control panel to print the data remaining in the printer.
(2) Reduce the complexity of your document or reduce the printer resolution.
NOTE:
This problem may appear if the data is too complex.
Possible cause Step Check Result Remedy
Main PCBfailure
1 Is it possible to print afterreducing the data of adocument?
Yes Replace the main PCB.
P-4 Headers or footers are not printed out even though they are viewed on PC screen.
User Check
Most laser printers have a restricted area that cannot be printed on. Usually the first two lines and lasttwo lines of text cannot print (leaving 62 printable lines). Adjust the top and bottom margins in yourdocument to allow for this.
P-5 The printer sometimes prints a couple of characters and then ejects the page.
User Check
(For DOS environment only)
The application printer emulation setting and the printer’s emulation do not match. Check in theapplication software which printer you have selected to make sure the printer is set up correctly.Remember that the printer emulates widely used printer selections:
HP Laser Jet 6P, HP Laser Jet 6P, Epson FX-850, IBM Proprinter XL
Try setting the printer into HP emulation and then select the HP LaserJet 6P printer in the applicationsoftware.
8/13/2019 Brother Hl-2030, Hl-2032, Hl-2040, Hl-2070n Service Manual
If the error related to network occurs, refer to the following sections;
9.1 Installation ProblemThe Brother print server is not found during setup of the network print software
installation or from the printer driver of the Brother printer in Windows ®
.
The Brother print server is not found using the Simple Network Configuration
capabilities of Mac OS ®
X.
Make sure you have completed the IP address setting of the Brother print server according toChapter 2 of this User’s Guide before installing the network print software or printer driver.Check the following:
1. Make sure that the printer is powered on, is on-line and ready to print.
2. Check to see if there is any LED activity. Brother print servers have two LEDs on the back
panel of the printer. The upper side LED shows Link status. The lower side LED shows Activity (Receive/Transmit) status.
No light: If both LEDs are off, then the print server is not connected to the network.
Link LED is green: The Link LED indicates green if the print server is connected to aEthernet network.
3. Print the Printer Settings Page and check if the settings such as IP address settings arecorrect for your network. The problem may be the result of mismatched or duplicate IPaddress. Verify that the IP address is correctly loaded into the print server. And makesure that no other nodes on the network have this IP address. For information on how toprint the Printer Settings Page, see Printing the Printer Settings Page on page 7-2.
4. Verify that the print server is on your network as follows:
For Windows ®
Try pinging the print server from the host operating system command prompt with thecommand:
ping ipaddress
Where ipaddress is the print server IP address (note that in some instances it can takeup to two minutes for the print server to load its IP address after setting the IP address).
For Macintosh ®
For Mac OS ®
9.1 to 9.2
(1) From the Apple menu, open the Chooser .
(2) Click the Brother Laser (IP) icon, and make sure that your print server name appearsin the right frame. If it is visible, then the connection is good. Otherwise, go to Step 5.
For Mac OS ®
X 10.2.4 or greater
(1) From the Go menu, select Applications.
(2) Open the Utilities folder.
(3) Double-click the Printer Setup Utility icon.
(4) Click Add.
8/13/2019 Brother Hl-2030, Hl-2032, Hl-2040, Hl-2070n Service Manual
(5) Make the following selection. Make sure that your print server appears. If it is visible,then the connection is good. Otherwise, go to Step 5.
Fig. 7-18
5. If you have tried 1 to 4 above and it does not work, then reset the print server back to the
default factory settings and try from the initial setup again. For information how to reset tothe default factory settings, see Restoring the network settings to factory default on page7-2.
6. Check if a personal firewall such as ICF (Internet Connecting Firewall) for Windows XP isrunning on your computer. If it is running, temporarily turn it off and try again.
NOTE:
If none of the above steps are successful, there is almost certainly a hardware or network problem.
9.2 Printing Problem<Print job is not printed>
Make sure the status and configuration of the print server. Check following:
1. Make sure that the printer is powered on, is on-line and ready to print.
2. Print the Printer Settings Page of the printer and check if the settings such as IP addresssettings are correct for your network. The problem may be the result of mismatched orduplicate IP address. Verify that the IP address is correctly loaded into the print server.
And make sure that no other nodes on the network have this IP address.
3. Verify that the print server is on your network as follows:
For Windows ®
(1) Try pinging the print server from the host operating system command prompt with the
command:
ping ipaddress
Where ipaddress is the print server IP address (note that in some instances it cantake up to two minutes for the print server to load its IP address after setting the IPaddress).
(2) If a successful response is received, then proceed to Windows® 95/98/Me and
Windows NT® 4.0 Peer-to-Peer print (LPR) troubleshooting, and Windows
® 2000/XP
IPP troubleshooting. Otherwise, proceed to Step 4.
8/13/2019 Brother Hl-2030, Hl-2032, Hl-2040, Hl-2070n Service Manual
(2) Click the Brother Laser (IP) icon, and make sure that your print server name appears
in the right frame. If it is visible, then the connection is good. Otherwise, go to Step(4).
For Mac OS ®
X 10.2.4 or greater
(1) From the Go menu, select Applications..
(2) Open the Utilities folder.
(3) Double-click the Printer Setup Utility icon.
(4) Click Add.
(5) Make the following selection. Make sure that your print server appears. If it is visible,then the connection is good.
Fig. 7-19
4. If you have tried 1 to 4 above and it does not work, then reset the print server back to thedefault factory settings and try from the initial setup again. For information how to reset tothe default factory settings, see Restoring the network settings to factory default on page7-2.
<Error during printing>
If you try to print while other users are printing large amounts of data (e.g. many pages or colorpages with high resolution), the printer is unable to accept your print job until the ongoingprinting is finished. If the waiting time of your print job exceeds a certain limit, a time outsituation occurs, which causes the error message. In such situations, execute the print jobagain after the other jobs are completed.
9.3 Protocol-Specific Troubleshooting
<Windows ®
95/98/Me and Windows NT ®
4.0 Peer-to-Peer print (LPR) troubleshooting>
If you are having trouble printing on a Windows® 95/98/Me, Windows NT
® 4.0 or later Peer-to-
Peer network (LPR method), check the following:
1. Make sure that the Brother LPR Port driver is correctly installed and configured accordingto the Windows
® 95/98/Me or Windows NT
® 4.0 Peer-to-Peer chapters.
2. Try to turn the Byte Count on in the Configure port area of printer driver properties.
You may find that during the installation of BLP software, the screen that prompts you for a
Port name is not displayed. This may happen on some Windows
®
95/98/Me and Windows NT
®
4.0 computers. Press the ALT and TAB keys to make it appear.
8/13/2019 Brother Hl-2030, Hl-2032, Hl-2040, Hl-2070n Service Manual
If you are having trouble printing on a Windows® 95/98/Me, Windows NT
® 4.0 or later Peer-to-
Peer network (NetBIOS), check the following:
1. Make sure that the Brother NetBIOS Port driver is correctly installed and configured
according to the Windows® 95/98/Me or Windows NT® 4.0 Peer-to-Peer (NetBIOS)chapters. You may find that during the installation of the port driver, the screen thatprompts you for a Port name is not displayed. This happens on some Windows
® 95/98/Me
and Windows NT® 4.0 computers. Press the ALT and TAB keys to make it appear.
2. Make sure that the print server is configured to be in the same workgroup or domain as therest of your computers. It may take several minutes for the print server to appear in thenetwork neighborhood.
<Windows ®
2000/XP IPP troubleshooting>
Want to use a different Port number other than 631.
If you are using Port 631 for IPP printing, you may find that your firewall may not let the printdata through. If this is the case, use a different port number (port 80), or configure yourFirewall to allow Port 631 data through.
To send a print job using IPP to a printer using Port 80 (the standard HTTP port) enter thefollowing when configuring your Windows
® 2000/XP system.
http://ip_address/ipp
Get More Info option in Windows ®
2000 not working
If you are using a URL of:
http://ip_address:631 or http://ip_address:631/ipp ,
the Get More Info option in Windows® 2000 will not function. If you wish to use the Get More
Info option, use the following URL:
http://ip_address
This will then force Windows® 2000/XP to use Port 80 to communicate with the Brother print
server.
<Web browser troubleshooting (TCP/IP)>
1. If you can not connect to the print server using your web browser it may be worth checkingthe Proxy Settings of your browser. Look in the Exceptions setting and if necessary, typein the IP address of the print server. This will stop your PC from trying to connect to yourISP or proxy server every time you wish to look at the printer server.
2. Make sure that you are using the proper web browser, we recommend NetscapeNavigator
® version 4.0 or later/ Microsoft Internet Explorer
® version 5.0 or later.
8/13/2019 Brother Hl-2030, Hl-2032, Hl-2040, Hl-2070n Service Manual
Various modes can be used if the power switch is set to ON while the Go button is held.
There are two types of modes: User Mode and Service Mode.
Three types of LED display are used to indicate that the Go button is being held or execution offunctions is completed. (i), (ii), and (iii) correspond to the numbers in the operation procedure.
(i) Toner /Drum/Paper LEDs are lighted at the same time to show that transfer to the
specified mode is completed.
(ii) Ready LED is lighted to show that the Go button is held when the mode or function is
selected. The LED is out if the Go button is not held.
(iii) All LEDs are lighted for 1 second at the same time to show that initialization or change of
set values is completed.
1.1 User Mode
Operation procedure of User Mode is shown below.
1. Check that the front cover is closed.
2. Turn ON the power switch while holding down the Go button.
3. Check that Toner /Drum/Paper LEDs are lighted.
4. Release the Go button and check that all LEDs are off.
5. Press the Go button. (The mode changes every time the button is pressed.)
Press the Go button Each mode starts after 2 seconds.
Once (1) Test Sample PageTwice (2) Print Fonts
Three times (3) Hex Dump Mode
Four times (4) PCB ONLY Mode
Five times (5) 1push Printing Recovery Mode
* Check that all LEDs are out. (iii)
Six times (6) Network Factory Reset 1 (APIPA: ON)
* Check that all LEDs are out. (iii) (HL-2070 only)
Seven times (7) Network Factory Reset 2 (APIPA: OFF)
* Check that all LEDs are out. (iii) (HL-2070 only)
Eight times (8) NV-RAM Factory Reset
* Check that all LEDs are out. (iii)
More than nine times (1) Test Sample Page
NOTE:
* Each mode starts 2 seconds after pressing the Go button.
* Pressing of the Go button 2, 6, or 7 times is ineffective for GDI model.
* If the Go button is pressed, the Ready LED is lighted. If the Go button is released,the LED is out. (ii)
Explanation of functions of each User Mode is shown below.
8/13/2019 Brother Hl-2030, Hl-2032, Hl-2040, Hl-2070n Service Manual
The printer prints a demo page. The printer returns to the ready status after printing.
(2) Print Fonts
The printer prints a list of the internal fonts. The printer returns to the ready status afterprinting.
(3) Hex Dump Mode
You can print data as hexadecimal code. To exit from this mode, you have to turn off theprinter.
(4) PCB ONLY Mode
Even when the engine error occurs and PCB exchange is required for recovery, theprinter can be started, ignoring the engine error if this mode is used. NVRAM data can beobtained.
(5) 1push Printing Recovery Mode
Demo page print is possible by pressing Go button after the power supply is turned on.The data for printing is cleared since the mode can be executed only once.This mode enables to recover demo page printing. However, the design of printing is notdemo page printing, but test printing.
(6) Network Factory Reset 1 (APIPA: ON)
The network setting is reset to its factory setting. (APIPA is ON) Refer to Section 6.2 ofChapter 2.
(7) Network Factory Reset 2 (APIPA: OFF)
The network setting is reset to its factory setting. (APIPA is OFF) Refer to Section 6.3 ofChapter 2.
(8) NV-RAM Factory Reset
The printer is restored to the factory setting and permanent fonts and macros are cleared.The printer returns to the ready status after printing.
8/13/2019 Brother Hl-2030, Hl-2032, Hl-2040, Hl-2070n Service Manual
Close the front cover as pressing the Go button while the front cover is open.The scanner motor starts rotating, and in two seconds the main motor starts
rotating. When you stop pressing the Go button or open the front cover, thescanner motor and the main motor stop rotating.
vi) Turn the power off.
(2) Continuous Grid Pattern Print Mode
This mode is to continuously print a grid pattern with a serial number on it. The number ofgrid pattern prints is displayed at the same time.The machine does not go back to the ready state unless the power is turned off and on.
(3) Fixing Unit Test Print
This is to print the following three patterns to check the fixing unit.
・ Grid pattern with a serial number on it
・ Gray pattern
・ Black pattern
When this operation is completed, the machine automatically goes back to the readystate.
(4) NV-RAM Value Dump Mode
This is to collectively print the present state of the NV-RAM of all printers.When this operation is completed, the machine automatically goes back to the readystate.
(5) RAM Check
This is to execute a stricter RAM check than a standard one. If the result turns outunaccepted, it considers an error, and all the LEDs blink. If it turns out accepted, the
Ready LED keeps blinking.The machine does not go back to the ready state unless the power is turned off and on.
(6) Printing for Maintenance
This is to print a list of all maintenance information including printer coverage information.
• Series name
• Serial Number:
• <Device Status>
Page Count:Drum Count:
Average Coverage:
• <Drum Information>
Estimated Pages Remaining:• <Total Pages Printed>
MANUAL FEED:TRAY 1:
• <Total Pages Printed>
Previously Used Toner:Current Toner:
• <Total Pages Printed>
A4/LETTER:LGL/A4LONG/FOLIO:B5/EXECUTIVE:ENVELOPE:
OTHERS:
8/13/2019 Brother Hl-2030, Hl-2032, Hl-2040, Hl-2070n Service Manual
Some margin of error must be taken into consideration because coverage for the printable area of A4-size paper is calculated using video signals
(7) Print Settings
If you want to know the drum unit life or the number of printed pages, you should print outthe Print Settings.
1. Printing out the print settings
1) Turn off the power switch of the printer and check that the front cover is open.
2) Turn on the power switch while holding down the Go button. All LEDs light up,
and keep the Go button pressed down until the Ready LED goes off.
3) Release the Go button and make sure that all LEDs are off.
4) Press the Go button twice and wait for a two seconds.
NOTE:
• The descriptions printed in Print Settings vary depending on the countries.
• It is also allowed you to print the print settings by pressing the Go button three timescontinuously when the front cover is closed and when the printer is in the readymode.
< HL-2030/2040 series >
8/13/2019 Brother Hl-2030, Hl-2032, Hl-2040, Hl-2070n Service Manual
If printing 1 page per job with cold start, the drum unit life is decreasedearlier.
(ii) Counter information, history information
The counter and history information related to the following term areincluded. When it reaches the maximum count, each term is no longercounted.
• Device statusThe total number of pages printed. The maximum count is 1 millionpages.
• Total pages printed (TRAY)For Manual Feed Slot and TRAY, it is indicated only when they areequipped. The maximum count for each item is 1 million times.
• Total pages printed (PAPER)The number of A4/Letter, A4Long/Legal/Folio, B5/Excutine, Envelope,and other paper types used. The maximum count for each item is 1million times.
• Total paper jamsNumber of jams occurred in Tray, Inside and Rear. (It is indicatedonly when they are equipped.) The maximum count for each item is255 times.
• Replace countNumber of times which the Drum and Toner are replaced. Themaximum count for each item is 65535 times.
• Error history
The latest 10 errors are indicated. However, the cover open error isexcluded.
< Page 3 (HL-2070N only) >
This page includes various network settings information of the printer.
8/13/2019 Brother Hl-2030, Hl-2032, Hl-2040, Hl-2070n Service Manual
This is to select whether the Ready LED is turned off completely or lit in green with lowlight intensity during the Sleep mode. Whenever you switch this mode, the setting ischanged over from the present one to the other. When you take your finger off from this
switch, the Ready LED is lit in 100% light intensity or low light intensity according to thesetting so that you can verify the present setting.
(9) Sleep Mode Setting (ON/OFF)
This is to allow you to turn on and off the sleep mode of the printer. The default setting isON. The machine automatically goes back to the ready state after the operation iscompleted.
(10) Developer Roller Counter Reset 1 (For the starter toner)
(11) Developer Roller Counter Reset 2 (For the standard toner)
Since print density is likely to become darker as toner is getting older, the developing biasis lowered by degrees according to the number of prints so that an almost fixed densitycan be maintained from the start of the use of brand-new toner to the end of it. The value
of the developing bias is printed on the maintenance sheet. The developing bias is aparameter which depends on the developing assembly, so it needs to be reset when thedeveloping assembly is replaced. At that time, the developing roller counter reading isalso reset. This mode is to enable to execute these operations (equivalent to those donewhen the developing assembly is replaced) manually from the service mode.
8/13/2019 Brother Hl-2030, Hl-2032, Hl-2040, Hl-2070n Service Manual
Two self-diagnostics tools below are automatically installed when the printer driver is installed;
1) Diagnostics
2) Printer Information
The following sections describe the details on each tool.
2.1 Diagnostics
This tool helps you to report your PC environment to investigate the cause of problem such as‘Printer won’t print’ or ‘Printer prints garbage or incorrect fonts’.
(1) When you start the program, the dialog box shown below appears. Follow the steps
described in the box, then click the OK button.
Fig. 8-1
(2) The message below appears, click the OK button if you want to check whether there is
any incorrect data or not. If you do not want to check it, click the Cancel button.
Fig. 8-2
8/13/2019 Brother Hl-2030, Hl-2032, Hl-2040, Hl-2070n Service Manual
The drum unit life or page counter is printed on Print Settings in some countries as describedin ‘Print Settings’
This tool also shows the printer information such as printer version or page counter for allmodels only when the printer is connected to a parallel port or USB.
(1) When you start the program, the dialog box shown below appears.
(2) Select the model name of the printer, and select the port.
Fig. 8-4
(3) Select the LPT port or USB you are using and click the OK button.
(4) The dialog box below appears and indicates the printer information, printer ID, version,drum unit life, page counter and drum counter.
Fig. 8-5
8/13/2019 Brother Hl-2030, Hl-2032, Hl-2040, Hl-2070n Service Manual
The default values for the main items to be set in NVRAM are as follows;
Items DescriptionsTiming of Drum LED ON 12,000 pages
(Counted from the drum unit life.)
Development switchingtiming
The developing bias is switched from 450V to 300V graduallywhen 2,500 pages are printed.It is switched to 450V again when the toner cartridge isreplaced with the new one.
(Counted from the number of the drum rotation in non-continuous printing)
Fixing temperature • Transparency: 185°C
• Thin paper: 195°C• Plain paper: 213°C
• Thick paper: 200°C
• Thicker/Bond paper: 200°C (in non-continuous printing)
Smaller size mode See 3.8 ‘PRINT SPEEDS WITH VARIOUS SETTINGS’ in Chapter 1.
Paper size The default paper size is "Letter". The paper size needs to bechanged in Europe and other countries.
8/13/2019 Brother Hl-2030, Hl-2032, Hl-2040, Hl-2070n Service Manual