Before you can use the machine, you must set up the hardware and install the software. Please read this “Quick Setup Guide” for the correct setup procedure and installation instructions. Keep this “Quick Setup Guide”, User’s Guide and supplied CD-ROM in a convenient place for quick and easy reference at all times. Step 1 Setting Up the machine Step 2 Installing the Drivers & Software Setup is Complete! I n s t a l l i n g t h e D r i v e r s & S o f t w a r e S e t t i n g U p t h e m a c h i n e W i n d o w s ® U S B W i n d o w s ® P a r a l l e l W i n d o w s N T ® 4 . 0 P a r a l l e l M a c i n t o s h ® U S B M a c i n t o s h ® N e t w o r k W i n d o w s ® N e t w o r k N e t w o r k A d m i n i s t r a t o r s M F C - 8 4 6 0 N M F C 8 8 6 0 D N Q u i c k S e t u p G u i d e Version A
Before you can use the machine, you must set up the hardware and install the software.Please read this “Quick Setup Guide” for the correct setup procedure and installationinstructions.
Keep this “Quick Setup Guide”, User’s Guide and supplied CD-ROM in a convenient place forquick and easy reference at all times.
Carton components may differ from one country to another.Save all packing materials and the carton.
Carton Components
Quick Setup Guide
CD-ROMsFor Windows ® For Macintosh ®
User’s Guide
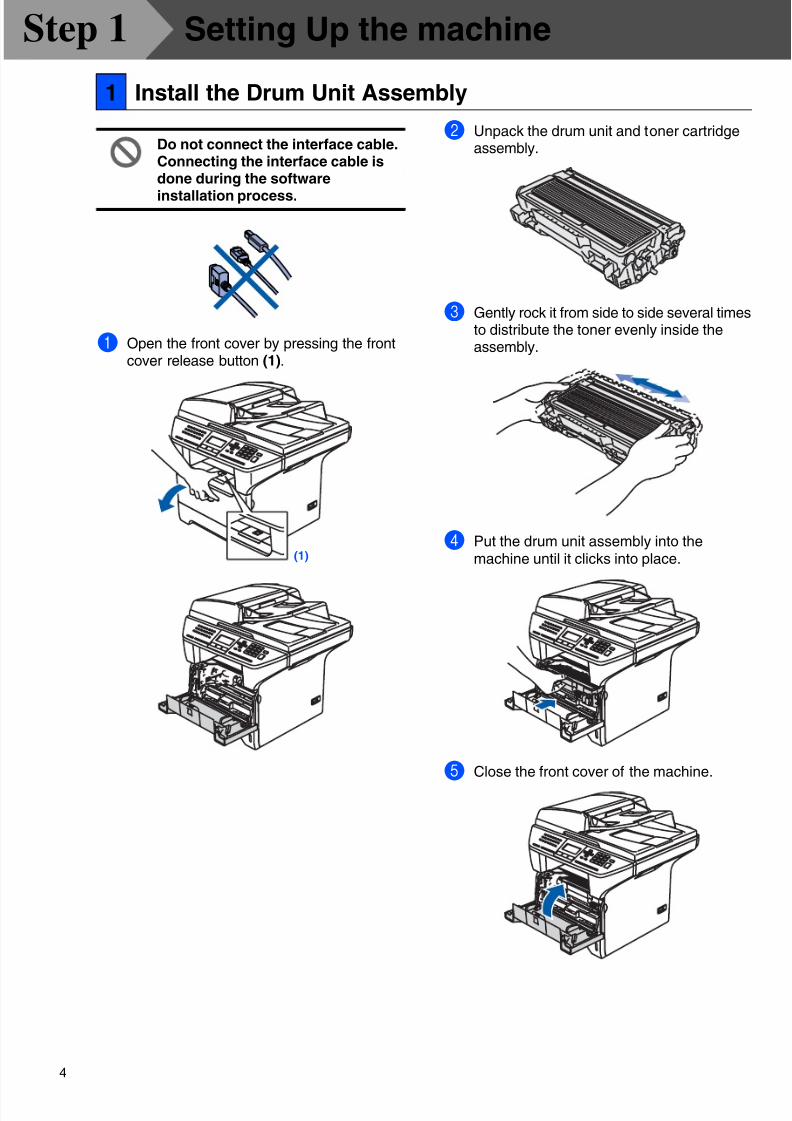
Drum Unit Assembly(including Toner Cartridge)
AC Power Cord Telephone Line Cord
The interface cable is not a standard accessory. Please purchase the appropriate interface cable for theinterface you intend to use (Parallel, USB or Network).Do NOT connect the interface cable at this time. Connecting the interface cable is done during thesoftware installation process.■ USB interface cable
Please make sure you use a USB 2.0 interface cable that is no longer than 2.0 metres.When you use a USB cable, make sure you connect it to the USB port of your computer and not to aUSB port on a keyboard or non-powered USB hub.
■ Parallel interface cable Please make sure you use a Parallel interface cable that is no longer than 2.0 metres.Use a shielded interface cable that is IEEE 1284-compliant.
■ Network cable
Use a straight-through Category 5 (or greater) twisted-pair cable for 10BASE-T or 100BASE-TX FastEthernet Network.
1. Automatic Document Feeder (ADF)2. Control Panel3. Face-down Output Tray
Support Flap (Support Flap)
4. Front cover
5. Paper Tray6. Power Switch7. Document Cover8. ADF Document Output Support Flap
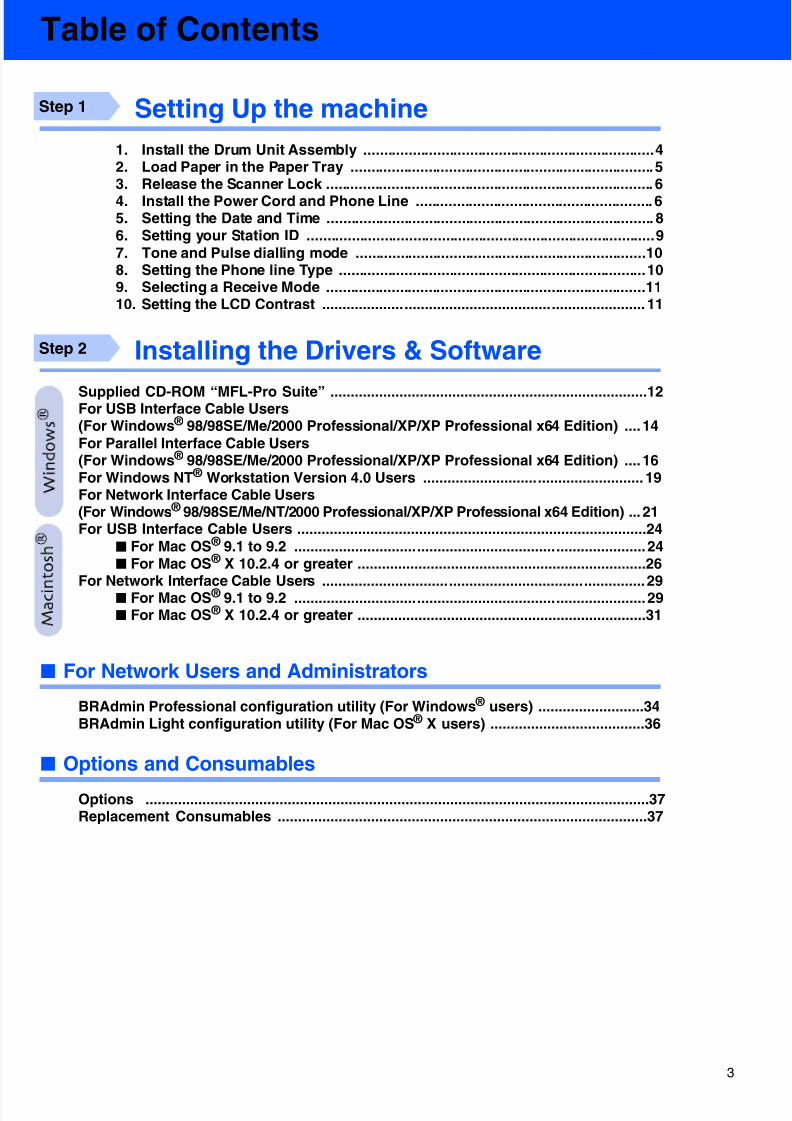
1. Install the Drum Unit Assembly .......................................................................42. Load Paper in the Paper Tray ..........................................................................53. Release the Scanner Lock ................................................................................ 6
4. Install the Power Cord and Phone Line .......................................................... 65. Setting the Date and Time ................................................................................ 86. Setting your Station ID .....................................................................................9
7. Tone and Pulse dialling mode .......................................................................108. Setting the Phone line Type ...........................................................................109. Selecting a Receive Mode ..............................................................................1110. Setting the LCD Contrast ............................................................................... 11
Installing the Drivers & Software
Supplied CD-ROM “MFL-Pro Suite” ..............................................................................12For USB Interface Cable Users(For Windows ® 98/98SE/Me/2000 Professional/XP/XP Professional x64 Edition) ....14
For Parallel Interface Cable Users(For Windows ® 98/98SE/Me/2000 Professional/XP/XP Professional x64 Edition) ....16For Windows NT ® Workstation Version 4.0 Users ...................................................... 19For Network Interface Cable Users(For Windows ® 98/98SE/Me/NT/2000 Professional/XP/XP Professional x64 Edition) ... 21For USB Interface Cable Users ......................................................................................24
■ For Mac OS ® 9.1 to 9.2 ......................................................................................24■ For Mac OS ® X 10.2.4 or greater .......................................................................26
For Network Interface Cable Users ...............................................................................29■ For Mac OS ® 9.1 to 9.2 ......................................................................................29■ For Mac OS ® X 10.2.4 or greater .......................................................................31
■ For Network Users and Administrators
BRAdmin Professional configuration utility (For Windows ® users) ..........................34BRAdmin Light configuration utility (For Mac OS ® X users) ......................................36
Warning ■ The machine must be fitted with an earthed plug.■ Since the machine is grounded through the power
outlet, you can protect yourself from potentiallyhazardous electrical conditions on the telephonenetwork by keeping the power cord connected to
your machine when you connect it to a telephoneline. Similarly, you can protect yourself when youwant to move your machine by disconnecting thetelephone line first and then the power cord.
If you are sharing one phone line with anexternal telephone, connect it as shownbelow.
If you are sharing one phone line with anexternal telephone answering device,connect it as shown below.
Please set the receive mode toExternal TAD
.For more details, see “Connecting anexternal TAD” in Chapter 7 of the User’sGuide.
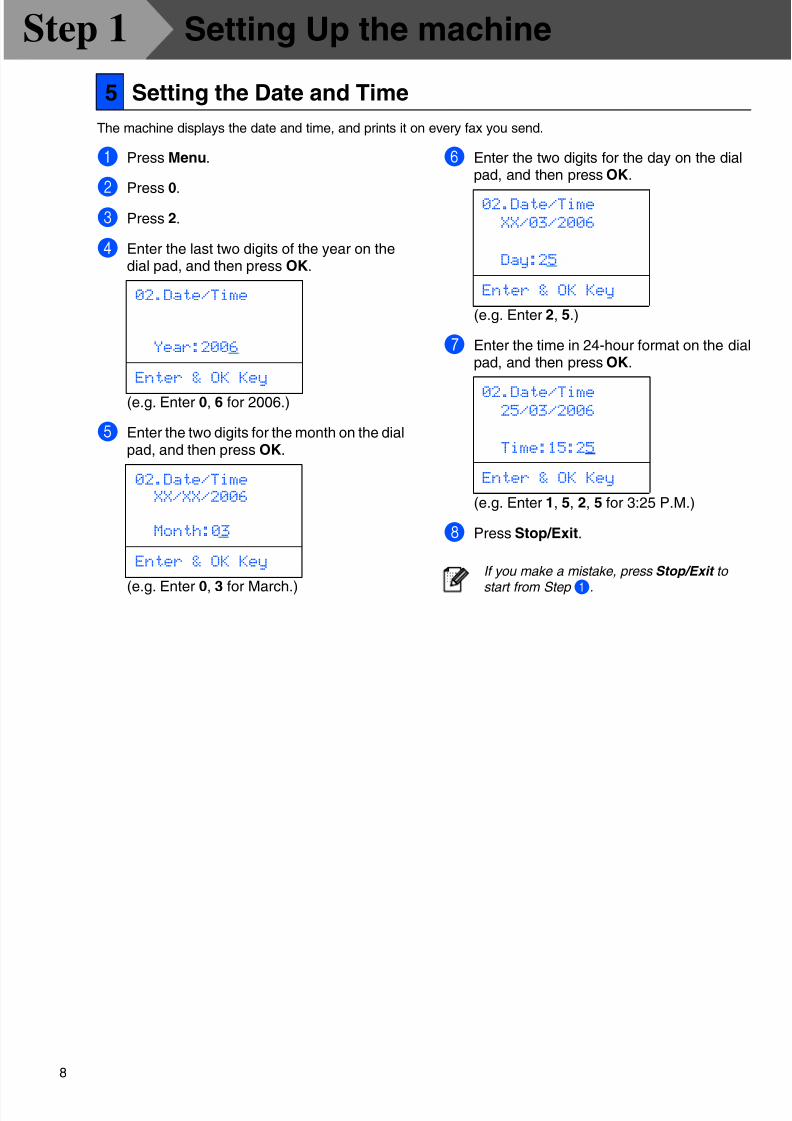
You should store your name and fax number to be printed on all fax pages that you send.
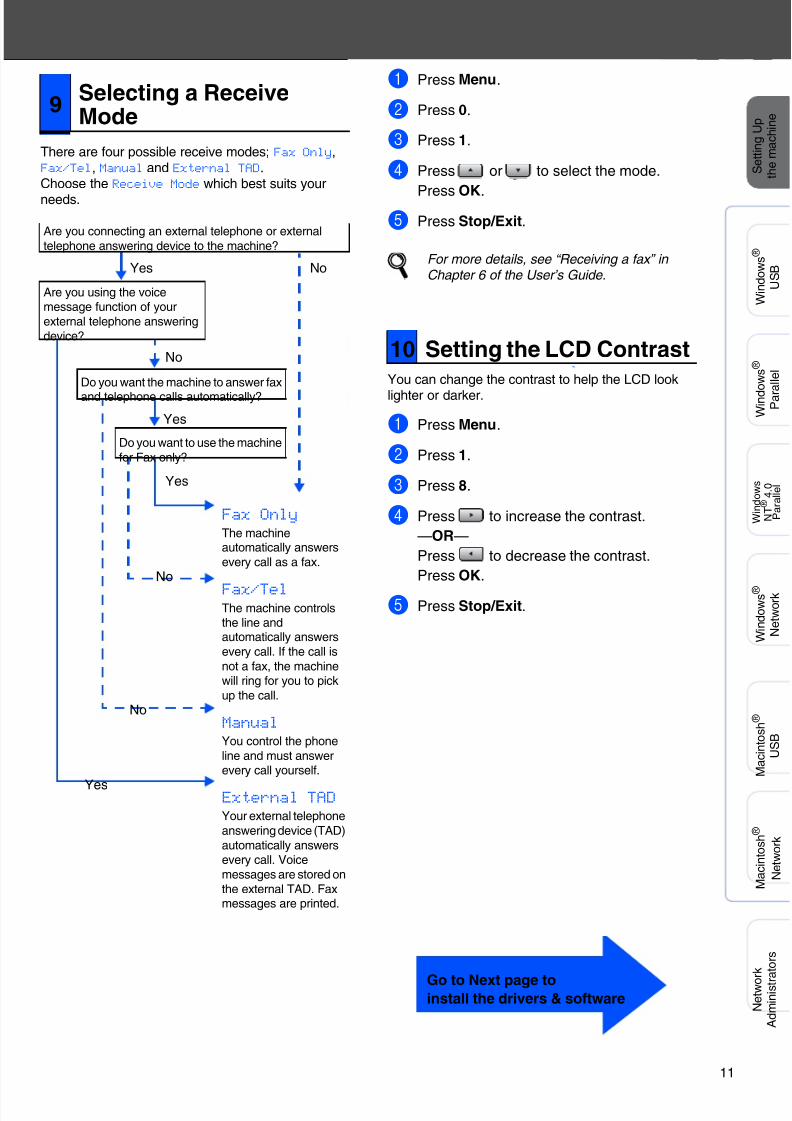
1 Press Menu.
2Press 0.
3 Press 3.
4 Enter your fax number (up to 20 digits) onthe dial pad, and then press OK.
5 Enter your telephone number (up to 20digits) on the dial pad, and then press OK.(If your telephone number and fax numberare the same, enter the same numberagain.)
6 Use the dial pad to enter your name (up to20 characters), and then press OK.
7 Press Stop/Exit.
6 Setting your Station ID
03.Station ID
Fax:_
Enter & OK Key
03.Station ID
Fax:+44XXXXXXXX
Tel:_
Enter & OK Key
03.Station ID
Fax:+44XXXXXXXX
Tel:+44XXXXXXXX
Name:_
Enter & OK Key
■ Refer to the following chart for enteringyour name.
■ If you need to enter a character that is onthe same key as the previous character,press to move the cursor to the right.
■ If you entered a letter incorrectly and wantto change it, press to move the cursorunder the incorrect character, pressClear/Back .
Presskey
Onetime
Twotimes
Threetimes
Fourtimes
2 A B C 2
3 D E F 3
4 G H I 4
5 J K L 5
6 M N O 6
7 P Q R S
8 T U V 8
9 W X Y Z
For more details, see “Entering Text” inChapter D of the User’s Guide.
Your machine comes set for Tone dialling service. Ifyou have Pulse dialling service (rotary), you need tochange the dialling mode.
1 Press Menu.
2 Press 0.
3 Press 4.
4 Press or to select Pulse (or Tone).
Press OK.
5 Press Stop/Exit.
If you are connecting the machine to a line thatfeatures a PABX (PBX) or ISDN to send and receivefaxes, it is also necessary to change the Phone Line
Type accordingly by completing the following steps.
1 Press Menu.
2 Press 0.
3 Press 6.
4 Press or to select the mode.
Press OK.
5 Press Stop/Exit.
PABX (PBX) and TRANSFERThe machine is initially set to Normal, which lets themachine connect to a standard PSTN (PublicSwitched Telephone Network) line. However, many
offices use a central telephone system or PrivateAutomatic Branch Exchange (PABX). Your machinecan be connected to most types of PABX (PBX). Themachine’s recall feature supports timed break recallonly (TBR). TBR will work with most PABX (PBX)systems allowing you to gain access to an outsideline, or transfer calls to another extension. Thefeature works when Tel/R is pressed.
7Tone and Pulse diallingmode
8Setting the Phone lineType
06.Phone Line set
a Normal
PBX
b ISDN
Select ab & OK
You can program a Tel/R key press as part ofa number stored in a One-Touch orSpeed-Dial location. When programming theOne-Touch or Speed-Dial number
( Menu , 2 , 3 , 1 or 2 , 3 , 2 ) press Tel/R first (thescreen displays “!”), then enter the telephonenumber. If you do this, you do not need topress Tel/R each time before you dial using aOne-Touch or Speed-Dial location. (See“Storing numbers” in Chapter 8 of the User’sGuide.) However, if PBX is not selected in thePhone Line Type setting, you cannot use theOne-Touch or Speed-Dial number that Tel/R press is programmed into.
You can install the MFL-Pro Suite and multifunctiondrivers.
Install Optional Applications
You can install additional MFL-Pro Suite softwareutilities.
Documentation
View the User’s Guide and other document in PDFformat (Viewer included). The User’s Guide on theCD-ROM includes the Software and Network User’s
Guide for features available when connected to acomputer (e.g. Printing, Scanning and networkingdetails)..
On-Line Registration
You will be pointed to the Brother ProductRegistration Web page for quick registration of yourmachine.
Brother Solutions Center
You can access the Brother Solutions Center, a Website offering information about your Brother product
including FAQs, User’s Guides, Driver updates andTips for using your machine.
Repair MFL-Pro Suite
(For USB and Parallel cable users only)If you experience errors while installing the MFL-ProSuite, you can use this function to automatically repairand re-install the software.
Start Here OS 9.1-9.2
You can install the printer driver, scanner driver andPresto! ® PageManager ® for Mac OS ® 9.1 - 9.2.
Start Here OSX
You can install the MFL-Pro Suite that includes theprinter driver, scanner driver and the BrotherControlCenter2 for Mac OS ® 10.2.4 or greater. Youcan also install Presto! ® PageManager ® to add OCRcapability to the Brother ControlCenter2 and easilyscan, share and organize photos and documents.
Readme.html
You can get important information andtroubleshooting tips.
Documentation
View the User’s Guide and other document in PDFformat (Viewer included). The User’s Guide on theCD-ROM includes the Software and Network User’sGuide for features available when connected to acomputer (e.g. Printing, Scanning and networkingdetails).
Brother Solutions Center
You can access the Brother Solutions Center, a Website offering information about your Brother productincluding FAQs, User’s Guides, Driver updates andTips for using your machine.
On-Line Registration
You will be pointed to the Brother ProductRegistration Web Page for quick registration of yourmachine.
Supplied CD-ROM “MFL-Pro Suite”
MFL-Pro Suite includes Printer Driver, ScannerDriver, Brother ControlCenter2, ScanSoft ® PaperPort ® SE with OCR and True Type ® fonts.PaperPort ® SE is a document managementapplication for viewing scanned documents.
Follow the instructions on this page for your operating system and interface cable.For the latest drivers and to find the best solution for your problem or question, access the Brother SolutionsCenter directly from the driver or go to http://solutions.brother.com
Step 2
USB Interface Cable Users ..........................................Go to page 14
(For Windows ® 98/98SE/Me/2000 Professional/XP/XP Professional x64 Edition)
Parallel Interface Cable Users.....................................Go to page 16
(For Windows ®
98/98SE/Me/2000 Professional/XP/XP Professional x64 Edition)
Windows NT ® Workstation Version 4.0 Users...........Go to page 19
(For Parallel Interface Cable Users)
Network Interface Cable Users
■ For Mac OS ® 9.1 to 9.2.............................................Go to page 29
■ For Mac OS ® X 10.2.4 or greater ............................. Go to page 31
Network Interface Cable Users....................................Go to page 21
USB Interface Cable Users
■ For Mac OS ® 9.1 to 9.2.............................................Go to page 24
■ For Mac OS ® X 10.2.4 or greater ............................. Go to page 26
For Network Users and Administrators......................Go to page 34
Make sure that you have finished the instructions from Step 1 “Setting Up
the machine” on pages 4 - 11.
1 Switch off the machine and disconnect themachine from the power socket (and fromyour computer, if you have alreadyconnected an interface cable).
2 Turn on your computer.(For Windows ® 2000 Professional/XP/ XP Professional x64 Edition, you must belogged on with Administrator rights.)
3 Put the supplied CD-ROM for Windows ® into your CD-ROM drive. If the model namescreen appears, choose your machine. Ifthe language screen appears, choose yourlanguage.
4 The CD-ROM main menu will appear.Click Install MFL-Pro Suite.
5 After reading and accepting the ScanSoft ® PaperPort ® SE License Agreement, clickYes.
The installation of PaperPort ® SE willautomatically start and is followed by theinstallation of MFL-Pro Suite.
6 When the Brother MFL-Pro Suite SoftwareLicense Agreement window appears, clickYes if you agree to the Software LicenseAgreement.
7 Choose Local Connection, and then clickNext. The installation will continue.
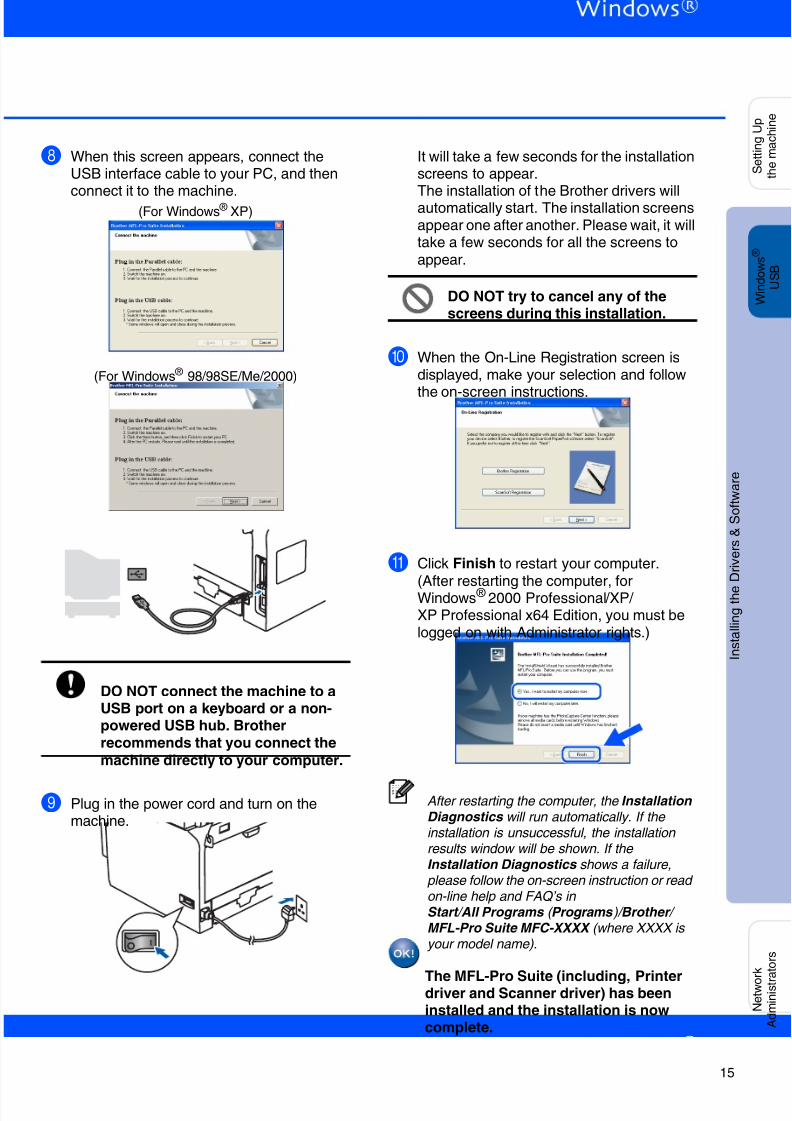
For USB Interface Cable Users(For Windows® 98/98SE/Me/2000 Professional/XP/XP Professional x64 Edition)
Please close any applications running beforeinstalling the MFL-Pro Suite.
If this window does not appear, use Windows ® Explorer to run the setup.exe program fromthe root folder of the Brother CD-ROM.
If you want to install the PS driver (BR-Script 3printer driver), choose Custom Install andthen follow the on-screen instructions. Whenthe Select Components screen appears,check PS Printer Driver , and then continuefollowing the on-screen instructions.
Make sure that you have finished the instructions from Step 1 “Setting Up
the machine” on pages 4 - 11.
1 Switch off the machine and disconnect themachine from the power socket (and fromyour computer, if you have alreadyconnected an interface cable).
2 Turn on your computer.(For Windows ® 2000 Professional/XP/ XP Professional x64 Edition, you must belogged on with Administrator rights.)
3 Put the supplied CD-ROM for Windows ® into your CD-ROM drive. If the model namescreen appears, choose your machine. Ifthe language screen appears, choose yourlanguage.
4 The CD-ROM main menu will appear.Click Install MFL-Pro Suite.
5 After reading and accepting the ScanSoft ® PaperPort ® SE License Agreement, clickYes.
The installation of PaperPort ® SE willautomatically start and is followed by theinstallation of MFL-Pro Suite.
6 When the Brother MFL-Pro Suite SoftwareLicense Agreement window appears, clickYes if you agree to the Software LicenseAgreement.
7 Choose Local Connection, and then clickNext. The installation will continue.
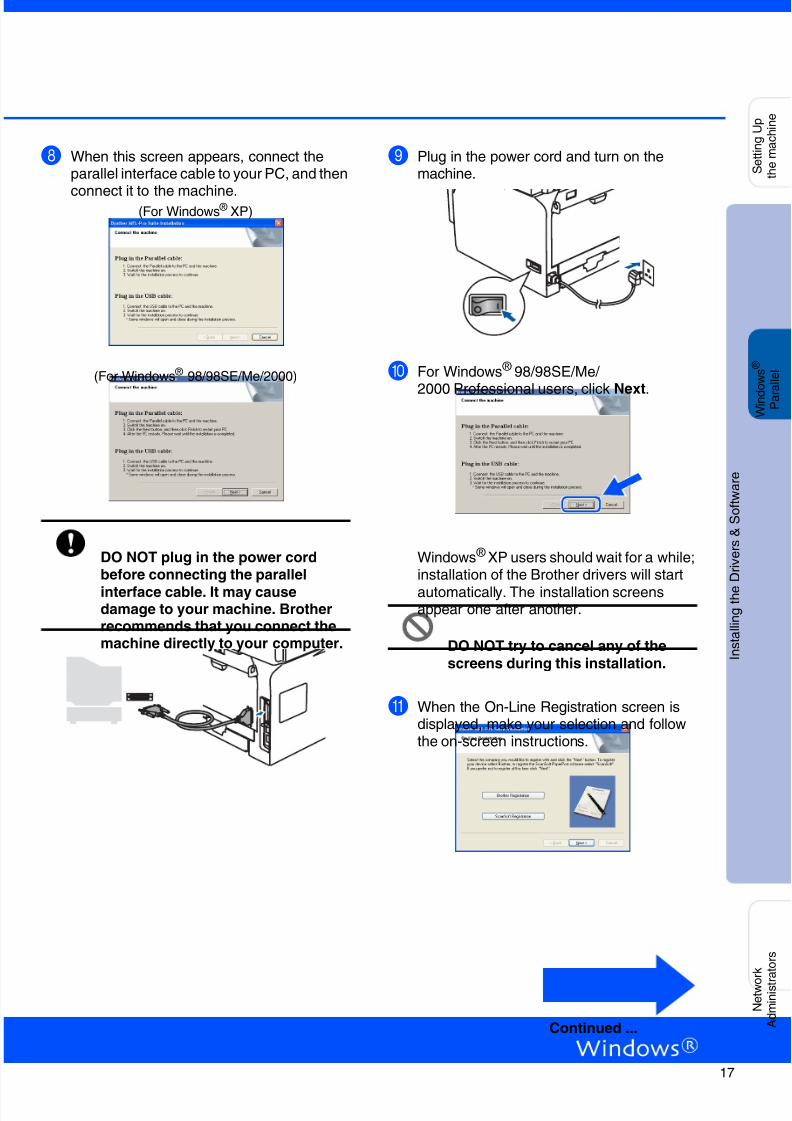
For Parallel Interface Cable Users(For Windows® 98/98SE/Me/2000 Professional/XP/XP Professional x64 Edition)
Please close any applications running beforeinstalling the MFL-Pro Suite.
If this window does not appear, use Windows ® Explorer to run the setup.exe program fromthe root folder of the Brother CD-ROM.
If you want to install the PS driver (BR-Script 3printer driver), choose Custom Install andthen follow the on-screen instructions. Whenthe Select Components screen appears,check PS Printer Driver , and then continuefollowing the on-screen instructions.
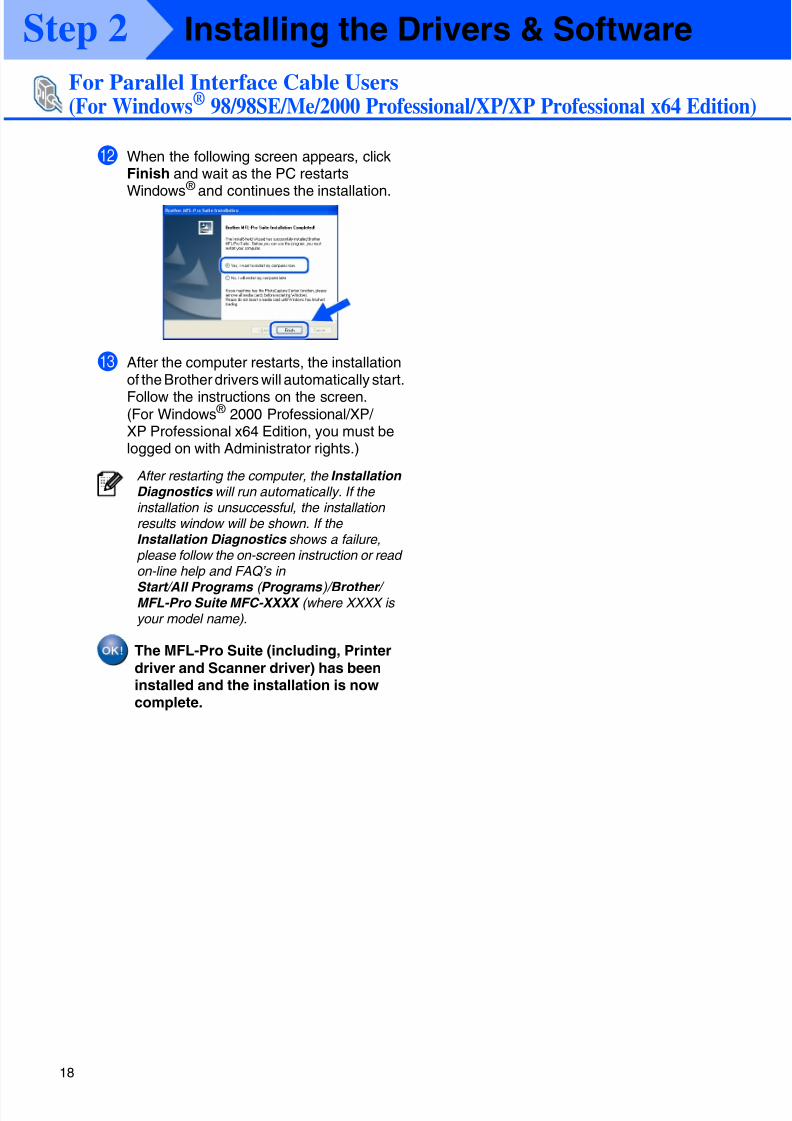
B When the following screen appears, clickFinish and wait as the PC restarts
Windows ®
and continues the installation.
C After the computer restarts, the installationof the Brother drivers will automatically start.
Follow the instructions on the screen.(For Windows ® 2000 Professional/XP/ XP Professional x64 Edition, you must belogged on with Administrator rights.)
The MFL-Pro Suite (including, Printer
driver and Scanner driver) has beeninstalled and the installation is nowcomplete.
For Parallel Interface Cable Users(For Windows® 98/98SE/Me/2000 Professional/XP/XP Professional x64 Edition)
After restarting the computer, the InstallationDiagnostics will run automatically. If theinstallation is unsuccessful, the installationresults window will be shown. If theInstallation Diagnostics shows a failure,please follow the on-screen instruction or readon-line help and FAQ’s in
Start / All Programs ( Programs )/ Brother / MFL-Pro Suite MFC-XXXX (where XXXX isyour model name).
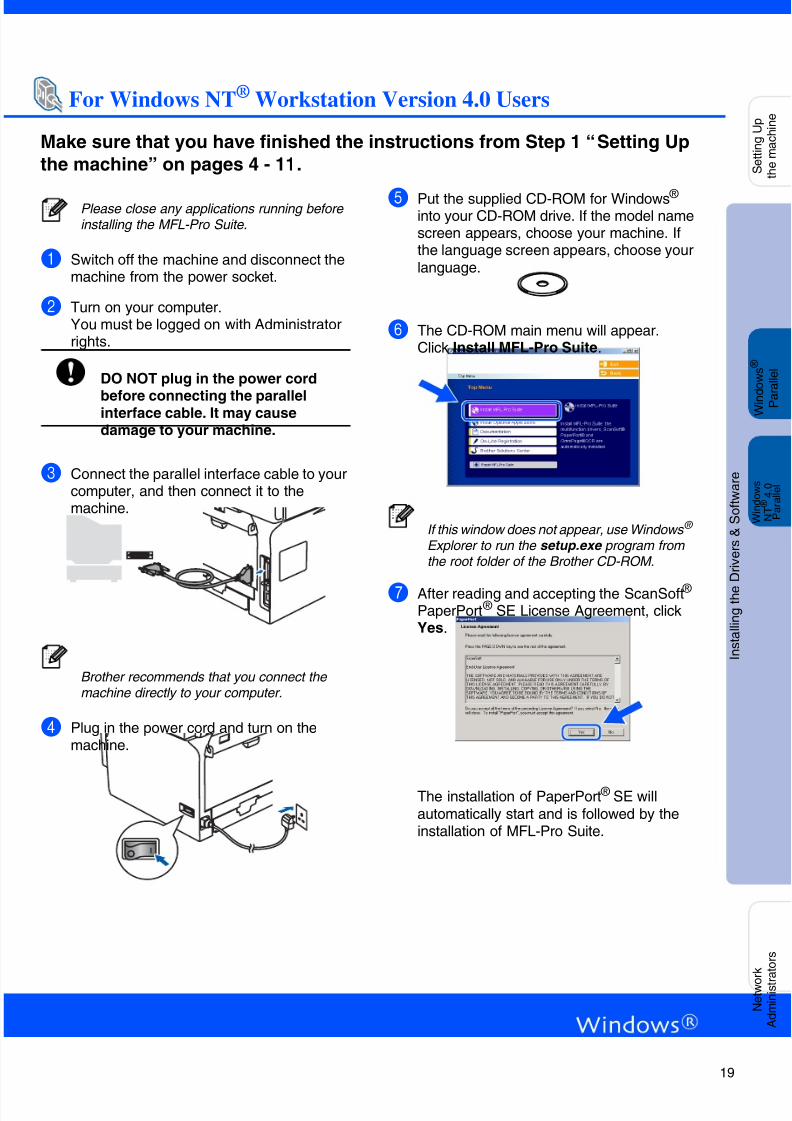
Make sure that you have finished the instructions from Step 1 “Setting Up
the machine” on pages 4 - 11.
1 Switch off the machine and disconnect themachine from the power socket.
2 Turn on your computer.You must be logged on with Administratorrights.
DO NOT plug in the power cord
before connecting the parallelinterface cable. It may causedamage to your machine.
3 Connect the parallel interface cable to yourcomputer, and then connect it to themachine.
4 Plug in the power cord and turn on themachine.
5 Put the supplied CD-ROM for Windows ® into your CD-ROM drive. If the model namescreen appears, choose your machine. Ifthe language screen appears, choose yourlanguage.
6 The CD-ROM main menu will appear.Click Install MFL-Pro Suite.
7 After reading and accepting the ScanSoft ® PaperPort ® SE License Agreement, clickYes.
The installation of PaperPort ® SE willautomatically start and is followed by theinstallation of MFL-Pro Suite.
For Windows NT® Workstation Version 4.0 Users
Please close any applications running beforeinstalling the MFL-Pro Suite.
Brother recommends that you connect themachine directly to your computer.
If this window does not appear, use Windows ® Explorer to run the setup.exe program fromthe root folder of the Brother CD-ROM.
Make sure that you have finished the instructions from Step 1 “Setting Up
the machine” on pages 4 - 11.
1 Switch off and disconnect the machine fromthe power socket.
2 Connect the network cable to the machine,and then connect it to a free port on yourhub.
3 Plug in the power cord and turn on themachine.
4 Turn on your computer.(For Windows ® 2000 Professional/XP/ XP Professional x64 Edition/ Windows NT ® 4.0, you must be logged onwith Administrator rights.) Close anyapplications running before installing the
MFL-Pro Suite.
5 Put the supplied CD-ROM for Windows ®
into your CD-ROM drive. If the model namescreen appears, choose your machine. Ifthe language screen appears, choose yourlanguage.
6 The CD-ROM main menu will appear.Click Install MFL-Pro Suite.
7 After reading and accepting the ScanSoft ® PaperPort ® SE License Agreement, clickYes.
The installation of PaperPort ® SE willautomatically start and is followed by theinstallation of MFL-Pro Suite.
8 When the Brother MFL-Pro Suite SoftwareLicense Agreement window appears, readthe agreement, then click Yes if you agree
to its terms.
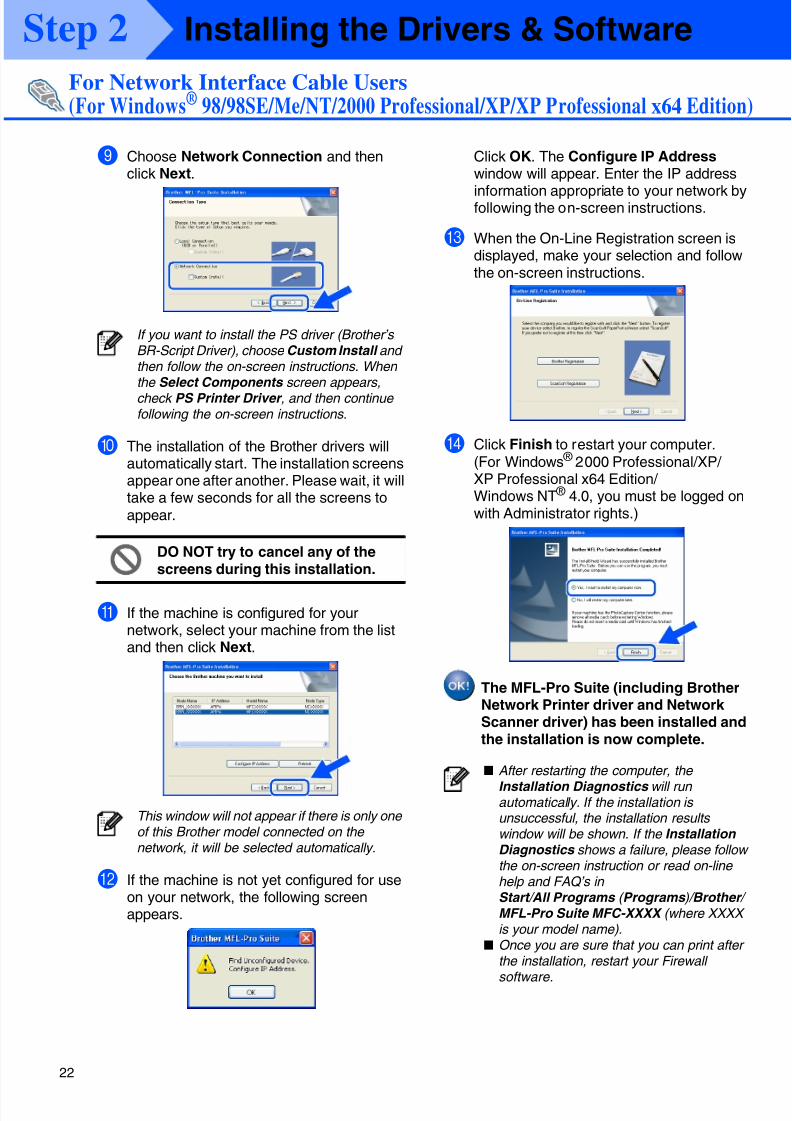
For Network Interface Cable Users(For Windows® 98/98SE/Me/NT/2000 Professional/XP/XP Professional x64 Edition)
Before installation, if you are using PersonalFirewall software, disable it. Once you aresure that you can print after the installation,re-start your Personal Firewall software.
If this window does not appear, use Windows ® Explorer to run the setup.exe program fromthe root folder of the Brother CD-ROM.
0 The installation of the Brother drivers willautomatically start. The installation screensappear one after another. Please wait, it willtake a few seconds for all the screens toappear.
DO NOT try to cancel any of thescreens during this installation.
A If the machine is configured for yournetwork, select your machine from the listand then click Next.
B If the machine is not yet configured for useon your network, the following screenappears.
Click OK. The Configure IP Address window will appear. Enter the IP address
information appropriate to your network byfollowing the on-screen instructions.
C When the On-Line Registration screen isdisplayed, make your selection and followthe on-screen instructions.
D Click Finish to restart your computer.(For Windows ® 2000 Professional/XP/ XP Professional x64 Edition/ Windows NT ® 4.0, you must be logged onwith Administrator rights.)
The MFL-Pro Suite (including BrotherNetwork Printer driver and NetworkScanner driver) has been installed andthe installation is now complete.
For Network Interface Cable Users(For Windows® 98/98SE/Me/NT/2000 Professional/XP/XP Professional x64 Edition)
If you want to install the PS driver (Brother’sBR-Script Driver), choose Custom Install andthen follow the on-screen instructions. Whenthe Select Components screen appears,check PS Printer Driver , and then continuefollowing the on-screen instructions.
This window will not appear if there is only oneof this Brother model connected on thenetwork, it will be selected automatically.
■ After restarting the computer, the
Installation Diagnostics will runautomatically. If the installation isunsuccessful, the installation resultswindow will be shown. If the InstallationDiagnostics shows a failure, please followthe on-screen instruction or read on-linehelp and FAQ’s inStart / All Programs ( Programs )/ Brother / MFL-Pro Suite MFC-XXXX (where XXXXis your model name).
■ Once you are sure that you can print afterthe installation, restart your Firewall
■ Firewall settings on your PC may reject thenecessary network connection for NetworkScanning and PC-Fax.
Follow the instructions below to configureyour Windows Firewall. If you are using apersonal Firewall software, see the User'sGuide for your software or contact thesoftware manufacturer.
■ Windows ® XP SP2 users: 1 Click the Start button, Control Panel
and then Windows Firewall .Make sure that Windows Firewall on theGeneral tab is set to On.
2 Click the Advanced tab and Settings... button.
3 Click the Add button.
4 To add port 54925 for network scanning,enter the information below: 1) InDescription of service: - Enter any
description, for example “BrotherScanner” (without the invertedcommas).
2) In Name or IP address (for example192.168.0.12) of the computerhosting this service on yournetwork: - Enter “Localhost” (withoutthe inverted commas).
3) In External Port Number for thisservice: - Enter “54925” (without the
inverted commas).4) In Internal Port number for this
service: - Enter “54925” (without theinverted commas).
5) Make sure UDP is selected.6) Click OK .
1
2
3
4
5
5 Click the Add button.6 To add port 54926 for Network PC-Fax,
enter the information below:
1) In Description of service: - Enter anydescription, for example “BrotherPC-Fax” (without the invertedcommas).
2) In Name or IP address (for example192.168.0.12) of the computerhosting this service on yournetwork: - Enter “Localhost” (withoutthe inverted commas).
3) In External Port Number for thisservice: - Enter “54926” (without theinverted commas).
4) In Internal Port number for thisservice: - Enter “54926” (without theinverted commas).
5) Make sure UDP is selected.6) Click OK .
7 If you still have trouble with your networkconnection, click the Add button.
8 To add port 137 for both networkscanning and Network PC-Fax receiving,enter the information below: 1) In Description of service: - Enter any
description, for example “BrotherPC-Fax Receiving” (without theinverted commas).
2) In Name or IP address (for example192.168.0.12) of the computerhosting this service on yournetwork: - Enter “Localhost” (withoutthe inverted commas).
3) In External Port Number for thisservice: - Enter “137” (without theinverted commas).
4) In Internal Port number for thisservice: - Enter “137” (without theinverted commas).
5) Make sure UDP is selected.6) Click OK .
9 Make sure that the new settings areadded and are checked, and then clickOK .
■ For Network installations, the RepairMFL-Pro Suite selection from the mainmenu is not supported.
■ Network Scanning, Network Remote Setup,Network PC-FAX Receiving are notsupported in Windows NT ® 4.0.
■ For configuration of advanced networkfunctions such as LDAP, Scan to FTP andFax to Server, see the Software andNetwork User’s Guides located on theCD-ROM.
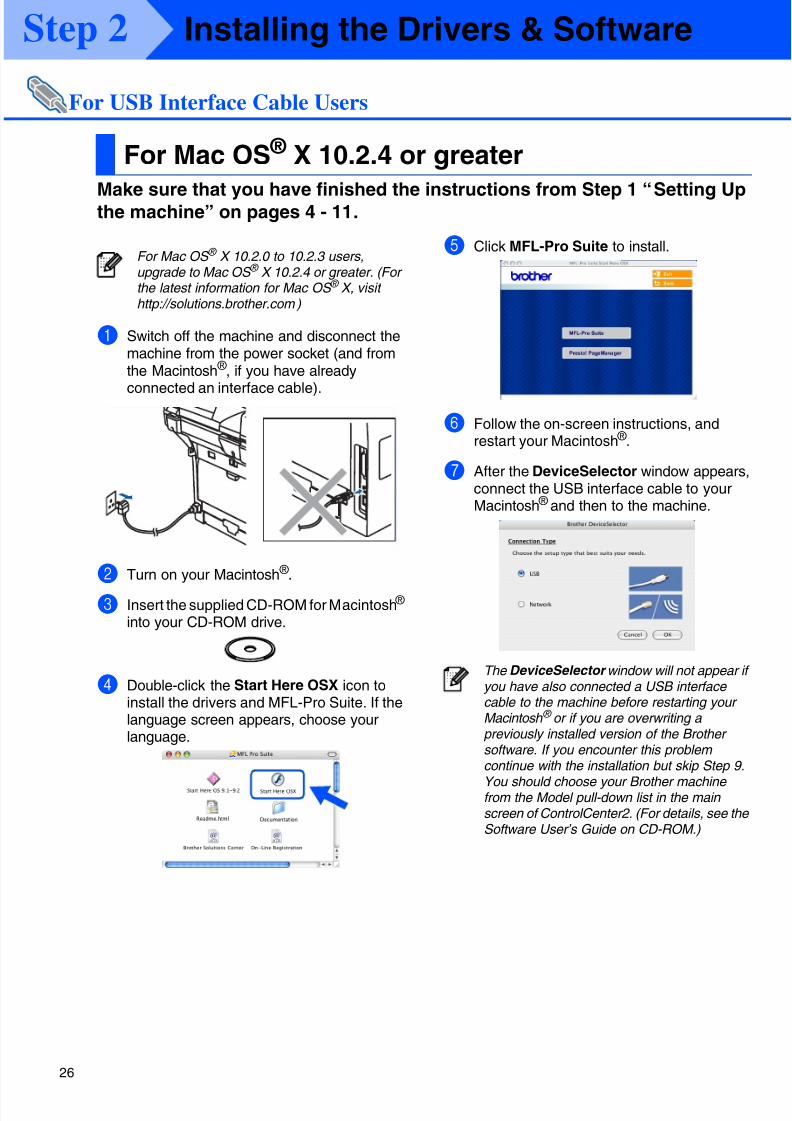
Make sure that you have finished the instructions from Step 1 “Setting Upthe machine” on pages 4 - 11.
1 Switch off the machine and disconnect themachine from the power socket (and fromthe Macintosh ® , if you have already
connected an interface cable).
2 Turn on your Macintosh ® .
3 Insert the supplied CD-ROM for Macintosh ®
into your CD-ROM drive.
4 Double-click the Start Here OSX icon toinstall the drivers and MFL-Pro Suite. If thelanguage screen appears, choose yourlanguage.
5 Click MFL-Pro Suite to install.
6 Follow the on-screen instructions, andrestart your Macintosh ® .
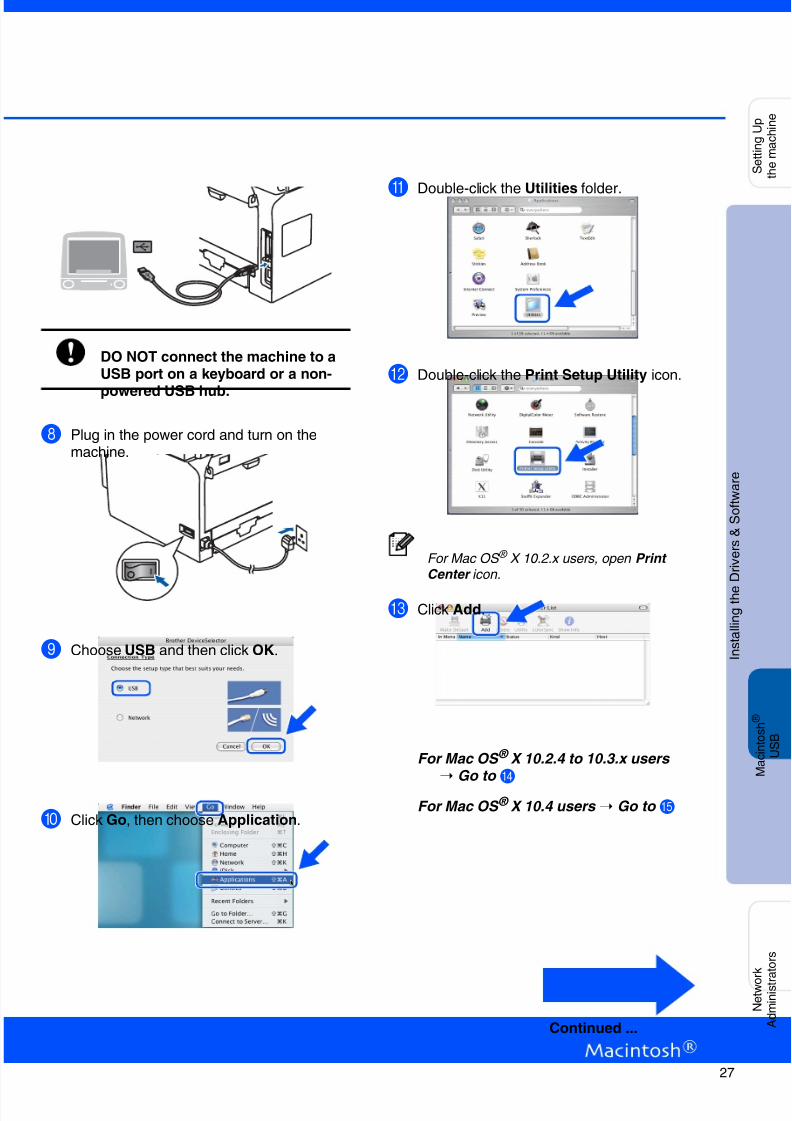
7 After the DeviceSelector window appears,connect the USB interface cable to yourMacintosh ® and then to the machine.
For USB Interface Cable Users
For Mac OS ® X 10.2.4 or greater
For Mac OS ® X 10.2.0 to 10.2.3 users,upgrade to Mac OS ® X 10.2.4 or greater. (Forthe latest information for Mac OS ® X, visithttp://solutions.brother.com )
The DeviceSelector window will not appear ifyou have also connected a USB interfacecable to the machine before restarting yourMacintosh ® or if you are overwriting apreviously installed version of the Brothersoftware. If you encounter this problemcontinue with the installation but skip Step 9.
You should choose your Brother machinefrom the Model pull-down list in the mainscreen of ControlCenter2. (For details, see theSoftware User’s Guide on CD-ROM.)
F Click Printer Setup Utility, then chooseQuit Printer Setup Utility.
The MFL-Pro Suite, driver and BrotherControlCenter2 have been installed.
G To install Presto! ® PageManager ® , click thePresto! PageManager icon and follow theon-screen instructions.
Presto! ® PageManager ® has been
installed and the installation is nowcomplete.
For USB Interface Cable Users
When Presto! ® PageManager ® is installedOCR capability is added to the BrotherControlCenter2. You can easily scan, share,and organize photos and documents usingPresto! ® PageManager ® .
Make sure that you have finished the instructions from Step 1 “Setting Upthe machine” on pages 4 - 11.
1 Switch off the machine and disconnect themachine from the power socket and fromthe Macintosh ® .
2 Turn on your Macintosh ® .
3 Insert the supplied CD-ROM for Macintosh ®
into your CD-ROM drive.
4 Double-click the Start Here OSX icon toinstall the printer and scanner drivers. If thelanguage screen appears, choose yourlanguage.
5 Click MFL-Pro Suite to install.
6 Follow the on-screen instructions, and
restart your Macintosh ® .
7 After the DeviceSelector window appears,connect the network interface cable to themachine, and then connect it to a free porton your hub.
8 Plug in the power cord and turn on themachine.
For Mac OS ® X 10.2.4 or greater
The DeviceSelector window will not appear ifyou have also connected a USB interfacecable to the machine before restarting yourMacintosh ® or if you are overwriting apreviously installed version of the Brothersoftware. If you encounter this problemcontinue with the installation skipping Steps 9to 11. You should then select your Brother
machine from the Model pull-down list in themain screen of ControlCenter2. (For details,see the software User’s Guide on CD-ROM.)
0 If you want to use the Scan key on themachine, you must check Register your
computer with the "Scan To" functionsat the machine box and enter a name youwant to use for your Macintosh ® in DisplayName. The name you enter will appear onthe machine’s LCD when you press theScan key and choose a scan option. Youcan enter any name up to 15 characterslong.(For more information on network scanning,see Chapter 10 of the Software User’sGuide on the CD-ROM.)
A Click Browse.
B Choose your model name, and then clickOK. Click OK again to close theDeviceSelector.
C Click Go, then choose Application.
D Double-click the Utilities folder.
E Double-click the Print Setup Utility icon.
For Network Interface Cable Users
For Mac OS ® X 10.2.x users, open PrintCenter icon.
I Click Printer Setup Utility, then chooseQuit Printer Setup Utility.
The MFL-Pro Suite, Printer driver,Scanner driver and ControlCenter2have been installed.
J To install Presto! ® PageManager ® , click thePresto! PageManager icon and follow theon-screen instructions.
Presto! ® PageManager ® has beeninstalled and the installation is nowcomplete.
For configuration of advanced networkfunctions such as LDAP, Scan to FTP and Faxto Server, see the Software and NetworkUser’s Guides located on the CD-ROM.
When Presto! ® PageManager ® is installedOCR capability is added to the BrotherControlCenter2. You can also easily scan,share, and organize photos and documents
The BRAdmin Professional utility for Windows ® is designed to manage your Brother networkconnected devices such as network-ready Multifunction devices and/or network-ready printers
in a Local Area Network (LAN) environment.For more information on BRAdmin Professional and BRAdmin Light, go tohttp://solutions.brother.com
Installing the BRAdmin Professional configuration utility
1 Put the supplied CD-ROM into your CD-ROM drive.The opening screen will appear automatically.Follow the on-screen instructions.
2 Click the Install Optional Applications icon on the main menu screen.
3 Click BRAdmin Professional and follow the on-screen instructions.
The Brother BRAdmin Light software is a Java™ application that is designed for the Apple MacOS ® X environment. It supports some of the features of the Windows BRAdmin Professional
software. For example, using the BRAdmin Light software, you can change some networksettings on Brother’s network ready printers and multifunction devices.The BRAdmin Light software will be installed automatically when you install the MFL-Pro Suite.If you have already installed the MFL-Pro Suite, you don’t have to install it again.For more information on BRAdmin Light, visit us at http://solutions.brother.com.
Setting your IP address, Subnet Mask and Gateway using BRAdmin Light
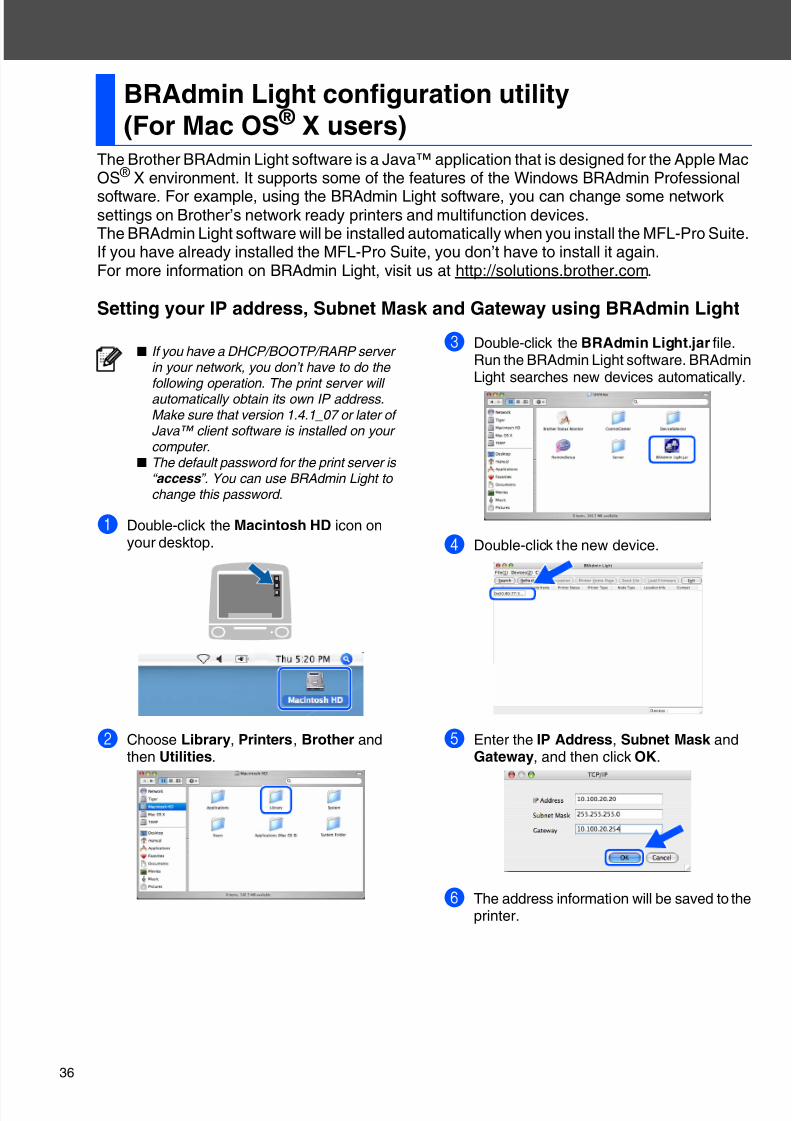
1 Double-click the Macintosh HD icon onyour desktop.
3 Double-click the BRAdmin Light.jar file.Run the BRAdmin Light software. BRAdminLight searches new devices automatically.
4 Double-click the new device.
5 Enter the IP Address, Subnet Mask andGateway, and then click OK.
6 The address information will be saved to theprinter.
BRAdmin Light configuration utility
(For Mac OS ® X users)
■ If you have a DHCP/BOOTP/RARP serverin your network, you don’t have to do thefollowing operation. The print server willautomatically obtain its own IP address.Make sure that version 1.4.1_07 or later ofJava™ client software is installed on yourcomputer.
■ The default password for the print server is“ access ”. You can use BRAdmin Light tochange this password.
The machine has the following optional accessories. You can expand the capabilities of themachine by adding these items.
When the time comes to replace consumables, an error message will be indicated on the LCD.For more information about the consumables for your machine, visithttp://solutions.brother.com or contact your local Brother re-seller.
Options
Lower Tray Unit Memory
LT-5300
Second lower paper tray unit expands total input capacity up
to 500 sheets.
You can expand the memory by installing a (144-pin DIMM)
memory module. For more details, see “Memory Board” inChapter B of the User’s Guide.
TrademarksThe Brother logo is a registered trademark of Brother Industries, Ltd.Brother is a registered trademark of Brother Industries, Ltd.Multi-Function Link is a registered trademark of Brother International Corporation.Windows, Microsoft and Windows NT are registered trademarks of Microsoft in the U.S. and other countries.Macintosh and True Type are registered trademarks of Apple Computer, Inc.Postscript and Postscript Level 3 are registered trademarks or trademarks of Adobe Systems Incorporated.PaperPort is a registered trademark of ScanSoft, Inc.Presto! PageManager is a registered trademark of NewSoft Technology Corporation.Each company whose software title is mentioned in this manual has a Software License Agreement specific to itsproprietary programs.
All other brand and product names mentioned in this manual are registered trademarks of their respectivecompanies.
Compilation and PublicationUnder the supervision of Brother Industries, Ltd., this manual has been compiled and published, covering thelatest product descriptions and specifications.The contents of this manual and the specifications of this product are subject to change without notice.Brother reserves the right to make changes without notice in the specifications and materials contained herein andshall not be responsible for any damages (including consequential) caused by reliance on the materials presented,including but not limited to typographical and other errors relating to the publication.This product is designed for use in a Professional Environment.