Why our feeders please… • Minimal waste. Panels prevent excess silage or hay from being pulled into the pen. Animals must work for each mouthful. • Less risk of injury from animals. Because entering the pen is not required even children can safely do the feeding. • Grain, silage and hay can all be fed in this feeder. Saves space and reduces cost. • Save $$. Use local lumber. • Proven. In use across the nation for years— and now even copied by our competitors. Of course, we’ve tweaked and improved the design along the way. (That’s who we are.) 2 panel sizes available! 1. Large sheep and rams—Holes are 4"x 6" for larger noses of Suffolks, Hamps, Columbias and Dorsets. Panel is 24 in. wide (which makes it more vertical when installed). 1/4 dia. hot- dip galvanized rod. 48" long. Caution: Not for use with small lambs/kids. 2. Goats and other sheep—Holes are 3" x 5" to match the narrow head shape of most goats. Saves hay. Panel is 30 in. wide (instead of 20 in. for original panel). Installed panel is more vertical. Feeder design is also different (no plywood at the top). 1/4 dia. hot-dip galvanized rod. 48" long. Double-sided or single-sided using Premier’s panels! (800) 282-6631 www.premier1supplies.com Washington, IA Build Your Own Feeders Prices are subject to change without notice.
silage or hay from being pulled into the pen. Animals must work for each mouthful.
• Less risk of injury from animals. Because entering the pen is not required even children can safely do the feeding.
• Grain, silage and hay can all be fed in this feeder. Saves space and reduces cost.
• Save $$. Use local lumber.
• Proven. In use across the nation for years—and now even copied by our competitors. Of course, we’ve tweaked and improved the design along the way. (That’s who we are.)
2 panel sizes available!1. Large sheep and rams—Holes are 4"x 6" for
larger noses of Suffolks, Hamps, Columbias and Dorsets. Panel is 24 in. wide (which makes it more vertical when installed). 1/4 dia. hot-dip galvanized rod. 48" long. Caution: Not for use with small lambs/kids.
2. Goats and other sheep—Holes are 3" x 5" to match the narrow head shape of most goats. Saves hay. Panel is 30 in. wide (instead of 20 in. for original panel). Installed panel is more vertical. Feeder design is also different (no plywood at the top). 1/4 dia. hot-dip galvanized rod. 48" long.
Double-sided or single-sided using Premier’s panels!
(800) 282-6631www.premier1supplies.com
Washington, IA
Build Your Own Feeders
Prices are subject to change without notice.
Figure 3 - Position Marksof Material on Legs
Figure 1 - Final Side View
Feeder Panel Inserts Feeder Panel Inserts
Floor Support Boards 2 x 4 x 35 Treated Plywood
96"
2 x
4 x
48
35"
Figure 2 - Final End View(Coded to Material List - at left)
c.
c.c.
c.
c.c.
c.
d. d.a. a.
g.
e.
c.c.
2 x 4
2 x 4
2 x
4 x
48
TreatedPlywood
Floor Support Board
Dimensions given assume use of purchased lumber (i.e. a 2 x 4 is actually 1-1/2"). If rough sawn lumber is used, the instructions and numbers will need to be adjusted accordingly. Please note: These plans have been modified for use with our 24" x 48" Inserts.
Material ListObtain necessary material—
approximately $155 total.
1. From Premiera. Four 24" x 48" Feeder Inserts at
$18.40 ea. Item #966000.b. 24 barbed staples (free from
Premier, but not pictured).
2. From local sourcesc. Twelve 2 x 4 x 8'
(horizontals)—$40d. Six 2 x 4 x 48" (vertical legs);
h. One third sheet of 1/2" CDX plywood cut into two 8" x 96" pieces—$6
i. Approximately 80 16d nails and 50 1-1/2" roofing nails, or 80 2-1/2" decking screws and 50 1-1/2" sheeting screws
(not pictured).
A. See material list above.
B. Cut wood to correct lengths & widths.
C. Assemble a vertical feeder side. We use a separate 4' x 8' sheet of plywood to provide a flat, clean working surface with pre-squared edges. To save time we pre-mark the plywood where the three pieces of vertical legs should lay.1. Take each 48" long treated 2 x 4 and lay it flat in front of you.
Use a ruler, a pencil and a square to mark the following points on it where the lower edges of the horizontal 2 x 4s will cross it: 4"; 10"; 17.5", 38.5" and 44.5". Figures 1, 2 & 3 illustrate this positioning. To save time, we lay all six legs beside each other in a row and mark them all at once.
2 x
4 x
48
2 x
4 x
48
2 x 4 x 9648"
44.5"42"
38.5"
21"
17.5"17"
13.5"
10"7.5"
4"
2 x 4 x 96
c.
h. h. CDX Plywood
2 x 4
CDX Plywood
48"
44.5"
42"
38.5"
21"
17.5"17"
13.5"
10"
7.5"
4"
c. c.
c. c.
48"
44.5"
42"
38.5"
21"
17.5"17"
13.5"
10"
7.5"
4"
2 x 4 x 96 - Note: Not added until Figure 8 (H.)
2 x 4 x 96 - Note: Not added until Figure 8 (H.)
CDX Plywood
2 x 4
Premier’s Double-Sided FeederFor large sheep and rams
Caution: Not for use with small lambs/kids.
2. (Figure 4) Place three marked 48" treated vertical 2 x 4s flat on the full sheet of plywood, one at each end and one exactly in the middle (with the marks facing up). From each end of the plywood the sides of the center 2 x 4 should be 46-1/4" and 49-3/4" respectively. Quick grip clamps work great to hold them to plywood as you nail or screw your horizontal 2 x 4s on.
3. (Figure 5) Place an 8' 2 x 4 at the 44-1/2" mark on the legs and secure with two 16d nails or two 2.5" deck screws at each joint. Repeat with 2 x 4s at the 38.5" and 17.5" marks.
4. (Figure 6) Place the 8" x 96" piece of CDX plywood so that it covers the gap between the top two 2 x 4s. Note that it does not fully cover the 2 x 4s. Secure with nails or screws every 12".
D. Repeat steps 1 – 4 to make the other vertical feeder side.
E. Screw or nail the (Figure 7) plywood floor boards (32" x 48") in place on a vertical side. Below, but against the 17.5" 2 x 4 board.1. (Figure 7) We leave a vertical side
lying flat on our plywood jig, and place the 48" side of the plywood on edge between the 17" and 17.5" marks of the vertical legs. This forms an L-shaped angle. We secure the plywood to the 8' 2 x 4 with either roofing nails or sheeting screws every 12".
2. Do the same with the other piece of treated plywood, resulting in a vertical side with floor attached for one entire
8' length.
F. Secure the plywood to the other vertical side. This is best done with two people as it requires setting both sides upside down as illustrated in Figure 8. Get the plywood in place and nail or screw the free 48" long edge of plywood to the 2 x 4.
G. While the plywood is upside down, install the horizontal floor supports.1. (Figure 8) At each end of the feeder,
place a 35" 2 x 4 on edge on the inside of the vertical corner legs and against the plywood floor. Nail or screw the floor support to the vertical legs with either 16d nails or 2.5" deck screws, two per joint.
2. Place the 32" 2 x 4 flat between the two center legs. In this way it provides floor support and seams the two pieces of plywood floor together. Secure by nailing or screwing through the center legs and into the floor support with two nails or screws on each side.
H. Keep the feeder upside down & place two 8' 2 x 4s between the 10" & 13.5" marks. Then place two 8' 2 x 4s between the 4" & 7.5" marks. (These boards are essential if you're feeding females with offspring.)
Figure 4 - Step One
96"
Figure 5 - Step Two
Nails or screws
Figure 7 - End View
TreatedPlywood 32" x 48"
48" vertical legs (lying flat)
42-3/4"
NOTE: Broken line around this diagram
represents the flat surface plywood that you are
working on.
48"
2 x 4
48"
44.5"
38.5"
17.5"
2 x
4 x
48
Figure 6 - Step Three
Nails or screws
1/2" CDX Plywood 8 x 96
2 x 4
CDX Plywood 8" x 96"
48"
38.5"
17.5"
2 x 4
Figure 8 - UpsideDown View
2 x
4
2 x
4
2 x
4
2 x
4
2 x
42
x 4
2 x
42
x 4
TreatedPlywood
Floor Support Board
CDX Plywood
2 x
4
2 x
4
2 x
4 x
48
2 x
4 x
48
2 x
4 x
48
2 x
4 x
48
2 x
4 x
48
2 x
4 x
48
2 x
4 x
48
2 x
4 x
48
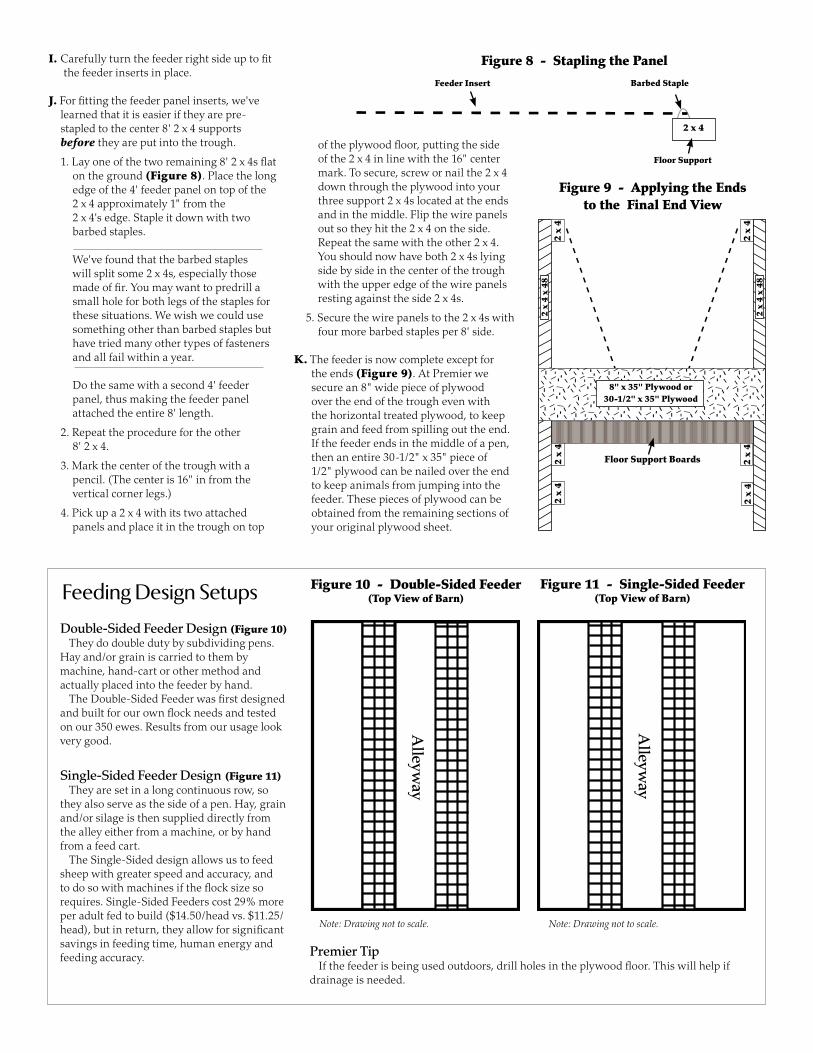
I. Carefully turn the feeder right side up to fit the feeder inserts in place.
J. For fitting the feeder panel inserts, we've learned that it is easier if they are pre-stapled to the center 8' 2 x 4 supports before they are put into the trough.
1. Lay one of the two remaining 8' 2 x 4s flat on the ground (Figure 9). Place the long edge of the 4' feeder panel on top of the 2 x 4 approximately 1" from the 2 x 4's edge. Staple it down with two barbed staples.
We've found that the barbed staples will split some 2 x 4s, especially those made of fir. You may want to predrill a small hole for both legs of the staples for these situations. We wish we could use something other than barbed staples but have tried many other types of fasteners and all fail within a year.
Do the same with a second 4' feeder panel, thus making the feeder panel attached the entire 8' length.
2. Repeat the procedure for the other 8' 2 x 4.
3. Mark the center of the trough with a pencil. (The center is 16" in from the vertical corner legs.)
4. Pick up a 2 x 4 with its two attached panels and place it in the trough on top of the plywood floor, putting the side
Figure 9 - Stapling the Panel
Feeder Insert Barbed Staple
Floor Support
Figure 10 - Applying the Endsto the Final End View
of the 2 x 4 in line with the 16" center mark. To secure, screw or nail the 2 x 4 down through the plywood into your three support 2 x 4s located at the ends and in the middle. Flip the wire panels out so they hit the 2 x 4 on the side. Repeat the same with the other 2 x 4. You should now have both 2 x 4s lying side by side in the center of the trough with the upper edge of the wire panels resting against the side 2 x 4s.
5. Secure the wire panels to the 2 x 4s with four more barbed staples per
8' side.
K. The feeder is now complete except for the ends (Figure 10). At Premier, we secure an 8" wide piece of ply over the end of the trough even with the horizontal treated plywood, to keep grain and feed from spilling out the end. If the feeder ends in the middle of a pen, then an entire 30-1/2" x 35" piece of 1/2" plywood can be nailed over the end to keep animals from jumping into the feeder. These pieces of plywood can be obtained from the remaining sections of your original plywood sheet.
2 x
4 x
48
2 x
4 x
48
Floor Support Boards
2 x
42
x 4
2 x
42
x 4
2 x
4
2 x
4
CDX Plywood
2 x 4
2 x
4
2 x
4
8" x 35" Plywood or30.5" x 35" Plywood
Double-Sided Feeder Design (Figure 11)They do double duty by subdividing pens.
Hay and/or grain is carried to them by machine, hand-cart or other method and actually placed into the feeder by hand.
The Double-Sided Feeder was first designed and built for our own flock needs and tested on our 350 ewes. Results from our usage look very good.
Single-Sided Feeder Design (Figure 12)They are set in a long continuous row, so
they also serve as the side of a pen. Hay, grain and/or silage is then supplied directly from the alley either from a machine, or by hand from a feed cart.
The Single-Sided design allows us to feed sheep with greater speed and accuracy, and to do so with machines if the flock size so requires. Single-Sided Feeders cost 29% more per adult fed to build ($14.50/head vs. $11.25/head), but in return, they allow for significant savings in feeding time, human energy and feeding accuracy.
Note: Drawing not to scale. Note: Drawing not to scale.
Premier TipIf the feeder is being used outdoors, drill holes in the plywood floor. This will help if
drainage is needed.
Figure 13 - Single-Sided Feeder
24" Feeder Insert
Material List1. From Premier
• Two 24" x 48" Feeder Inserts at $18.40 ea. Item #966000.
• Twelve barbed staples (provided free by Premier).
2. From local sources• Eight 2 x 4 x 96" (horizontals)—$25
• Three 2 x 4 x 48" (vertical legs); treated—$7
• Three 2 x 4 27" (short legs); treated—$4
• Three 2 x 4 x 25" floor supports—$3
• 1/3 sheet of 1/2" treated plywood floor (16" x 96")—$12
• 1/3 sheet of CDX 1/2" plywood (16" x 96")—$6
• One 8" x 96" piece of CDX plywood—$3
• Sixty 16d nails and 40 1-1/2" roofing nails, or 60 2-1/2" decking screws and 40 1-1/2" sheeting screws.
• Two sheets 13" x 25" CDX plywood—$3
Dimensions given assume use of purchased lumber (i.e. a 2 x 4 is actually 1 1/2"). If rough sawn lumber is used, the instructions and numbers will need to be adjusted accordingly. Please note: These plans have been modified for use with our 24" x 48" Inserts. Figure 13, indicates the intended placement of the following materials.
28"
Figure 13 is an end view of Premier’s Single Sided Feeder. We developed it so it could serve as the front of a long drive-thru feeding passage, allowing us to fill the troughs by machine. (At Premier we’re still using handcarts with either hay or grain on them to move the feed to the feeder. Doing so enables us to limit the alley to 5' wide, putting our buildings to better use.)
It's simply half the Double-Sided Feeder with the following modifications:
• An extra 16" wide sheet of 1/2" CDX plywood is set at approximately 60° to the feeder’s floor. Supported on the outside edge with an extra 8' 2 x 4 attached to both 2 x 4s with sheeting screws or nails every ft.
• Width of a Single-Sided Feeder will be 25" with the plywood feeding edge extending another 3". Double-Sided width is 28".
• Height of the tallest legs are 48" but height of the shortest legs are 27".
• The treated plywood floor for Single-Sided Feeders is cut differently than for Double-Sided Feeders. Instead of two 32" x 48" pieces we cut one 16" x 96" piece of plywood.
• The floor support 2 x 4s (25" long) are all cut and attached on the edge.
• As a last step to add structural strength to the feeder and to prevent feed from falling out the ends of the trough, we nail a piece of 1/2" plywood (13" x 25") to each end.
8" x 96"1/2" Plywood
48"
44.5"
42"
38.5"
21"
17.5"17"
13.5"
10"
7.5"
4"
Premier’s Single-Sided FeederFor large sheep and rams
2 x
42
x 4
13" x 25"1/2" Plywood end
2 x
4 x
48
16" x 96"1/2" Treated Plywood
2 x
4
2 x 4 x 25 Floor Support
2 x
42
x 4
2 x 4
2 x
4
2 x
4 x
27
2 x
4
Caution: Not for use with small lambs/kids.
16" x 96"1/2" Plywood
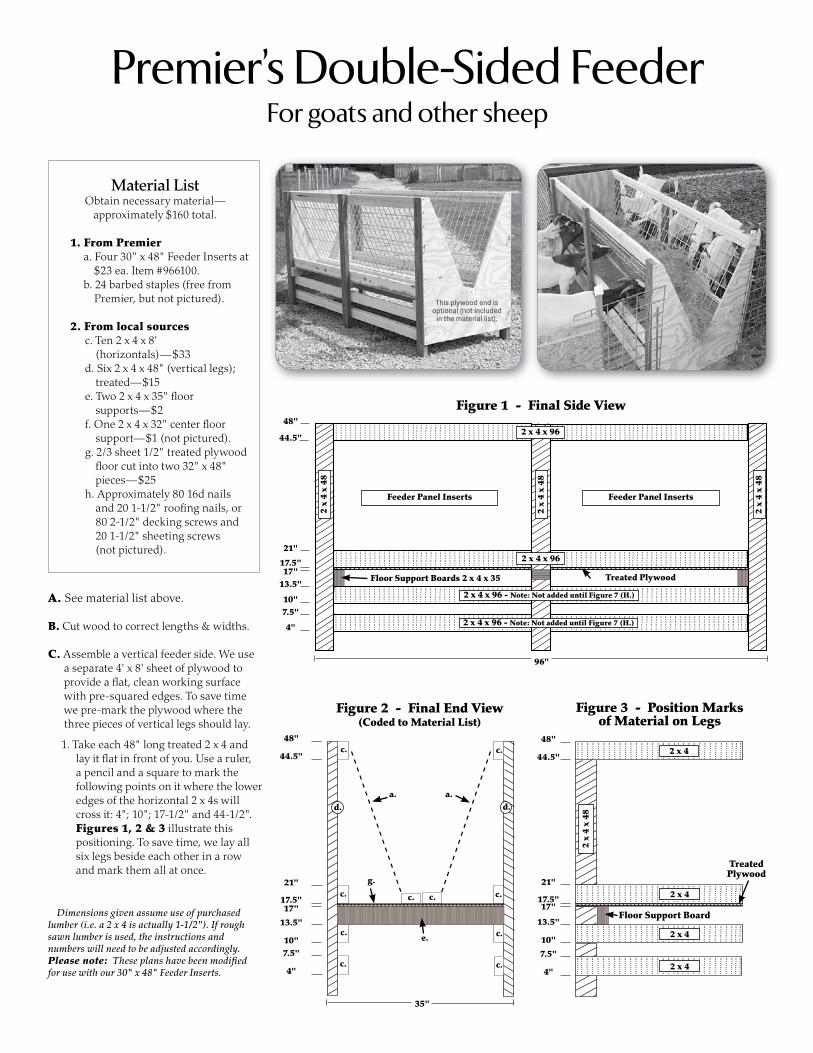
Premier’s Double-Sided FeederFor goats and other sheep
Figure 3 - Position Marksof Material on Legs
Figure 1 - Final Side View
Feeder Panel Inserts Feeder Panel Inserts
Floor Support Boards 2 x 4 x 35 Treated Plywood
96"
2 x
4 x
48
35"
Figure 2 - Final End View(Coded to Material List)
c.
c.
c.
c. c.
c.
c.
c.
d. d.a. a.
g.
e.
c. c.
2 x 4
2 x 4
2 x 4
2 x 4
2 x
4 x
48
Treated Plywood
Floor Support Board
Material ListObtain necessary material—
approximately $160 total.
1. From Premiera. Four 30" x 48" Feeder Inserts at
$23 ea. Item #966100.b. 24 barbed staples (free from
Premier, but not pictured).
2. From local sourcesc. Ten 2 x 4 x 8'
(horizontals)—$33d. Six 2 x 4 x 48" (vertical legs);
h. Approximately 80 16d nails and 20 1-1/2" roofing nails, or 80 2-1/2" decking screws and 20 1-1/2" sheeting screws
(not pictured).
A. See material list above.
B. Cut wood to correct lengths & widths.
C. Assemble a vertical feeder side. We use a separate 4' x 8' sheet of plywood to provide a flat, clean working surface with pre-squared edges. To save time we pre-mark the plywood where the three pieces of vertical legs should lay.
1. Take each 48" long treated 2 x 4 and lay it flat in front of you. Use a ruler, a pencil and a square to mark the following points on it where the lower edges of the horizontal 2 x 4s will cross it: 4"; 10"; 17-1/2" and 44-1/2". Figures 1, 2 & 3 illustrate this positioning. To save time, we lay all six legs beside each other in a row and mark them all at once.
2 x
4 x
48
2 x
4 x
48
2 x 4 x 96
2 x 4 x 96
48"
44.5"
21"
17.5"17"
13.5"
10"7.5"
4"
48"
44.5"
21"
17.5"17"
13.5"
10"7.5"
4"
48"
44.5"
21"
17.5"17"
13.5"
10"
7.5"
4"
This plywood end is optional (not included
in the material list).
2 x 4 x 96 - Note: Not added until Figure 7 (H.)
2 x 4 x 96 - Note: Not added until Figure 7 (H.)
Dimensions given assume use of purchased lumber (i.e. a 2 x 4 is actually 1-1/2"). If rough sawn lumber is used, the instructions and numbers will need to be adjusted accordingly. Please note: These plans have been modified for use with our 30" x 48" Feeder Inserts.
2 x
4 x
48
2 x
4 x
48
2 x
4 x
48
2 x
4 x
48
2 x
4 x
48
2 x
4 x
48
2 x
4 x
48
2 x
4 x
48
2. (Figure 4) Place three marked 48" treated vertical 2 x 4s flat on the full sheet of plywood, one at each end and one exactly in the middle (with the marks facing up). From each end of the plywood the sides of the center 2 x 4 should be 46-1/4" and 49-3/4" respectively. Quick grip clamps work great to hold them to plywood as you nail or screw your horizontal 2 x 4s on.
3. (Figure 5) Place an 8' 2 x 4 at the 44-1/2" mark on the legs and secure
with two 16d nails or two 2-1/2" deck screws at each joint. Repeat with 2 x 4 at the 17-1/2" mark.
D. Repeat steps 1 – 3 to make the other vertical feeder side.
E. Screw or nail the (Figure 6) plywood floor boards (32" x 48") in place on a vertical side. Below (but against) the
17-1/2" 2 x 4 board.
1. (Figure 6) We leave a vertical side lying flat on our plywood jig, and place the 48" side of the plywood on edge between the 17" & 17-1/2" marks of the vertical legs. This forms an L-shaped angle. We secure the plywood to the 8' 2 x 4 with either roofing nails or sheeting screws every 12".
2. Do the same with the other piece of treated plywood, resulting in a vertical side with floor attached for one entire
8' length.
F. Secure the plywood to the other vertical side. This is best done with two people as it requires setting both sides upside down as illustrated in Figure 7. Get the plywood in place and nail or screw the free 48" long edge of plywood to the 2 x 4.
G. While the plywood is upside down, install the horizontal floor supports.
1. (Figure 7) At each end of the feeder, place a 35" 2 x 4 on edge on the inside of the vertical corner legs and against the plywood floor. Nail or screw the floor support to the vertical legs with either 16d nails or 2-1/2" deck screws, two per joint.
2. Place the 32" 2 x 4 flat between the two center legs. In this way it provides floor support and seams the two pieces of plywood floor together. Secure by nailing or screwing through the center legs and into the floor support with two nails or screws on each side.
H. While the feeder is still upside down, fit two 8' 2 x 4s on the legs between the 10" and 13-1/2" marks. Fit two 8' 2 x 4s between 4" and 7.5". (These boards are essential if you intend to feed females with offspring.)
Figure 4 - Step One
96"
Figure 5 - Step Two
Nails or screws
Figure 7 - Upside Down View
Figure 6 - End View
Treated Plywood32" x 48"
48" vertical legs (lying flat)
42-3/4"
NOTE: Broken line around this diagram
represents the flat surface plywood that you are
working on.
48"
96"
2 x 4 2 x 4
Floor Support Boards
Treated Plywood32" x 48"
2 x
42
x 4
2 x
42
x 4
2 x
42
x 4
2 x
42
x 4
48"
44.5"
17.5"
I. Carefully turn the feeder right side up to fit the feeder inserts in place.
J. For fitting the feeder panel inserts, we've learned that it is easier if they are pre-stapled to the center 8' 2 x 4 supports before they are put into the trough.
1. Lay one of the two remaining 8' 2 x 4s flat on the ground (Figure 8). Place the long edge of the 4' feeder panel on top of the
2 x 4 approximately 1" from the 2 x 4's edge. Staple it down with two
barbed staples.
We've found that the barbed staples will split some 2 x 4s, especially those made of fir. You may want to predrill a small hole for both legs of the staples for these situations. We wish we could use something other than barbed staples but have tried many other types of fasteners and all fail within a year.
Do the same with a second 4' feeder panel, thus making the feeder panel attached the entire 8' length.
2. Repeat the procedure for the other 8' 2 x 4.
3. Mark the center of the trough with a pencil. (The center is 16" in from the vertical corner legs.)
4. Pick up a 2 x 4 with its two attached panels and place it in the trough on top
Figure 8 - Stapling the Panel
Feeder Insert Barbed Staple
Floor Support
Figure 9 - Applying the Endsto the Final End View
8" x 35" Plywood or 30-1/2" x 35" Plywood
of the plywood floor, putting the side of the 2 x 4 in line with the 16" center mark. To secure, screw or nail the 2 x 4 down through the plywood into your three support 2 x 4s located at the ends and in the middle. Flip the wire panels out so they hit the 2 x 4 on the side. Repeat the same with the other 2 x 4. You should now have both 2 x 4s lying side by side in the center of the trough with the upper edge of the wire panels resting against the side 2 x 4s.
5. Secure the wire panels to the 2 x 4s with four more barbed staples per 8' side.
K. The feeder is now complete except for the ends (Figure 9). At Premier we secure an 8" wide piece of plywood over the end of the trough even with the horizontal treated plywood, to keep grain and feed from spilling out the end. If the feeder ends in the middle of a pen, then an entire 30-1/2" x 35" piece of 1/2" plywood can be nailed over the end to keep animals from jumping into the feeder. These pieces of plywood can be obtained from the remaining sections of your original plywood sheet.
2 x
4 x
48
2 x
4 x
48
Floor Support Boards
2 x
42
x 4
2 x
42
x 4
2 x
4
2 x
4
2 x 4
Figure 11 - Single-Sided Feeder(Top View of Barn)
Alleyw
ay
Figure 10 - Double-Sided Feeder(Top View of Barn)
Alleyw
ay
Note: Drawing not to scale. Note: Drawing not to scale.
Double-Sided Feeder Design (Figure 10)They do double duty by subdividing pens.
Hay and/or grain is carried to them by machine, hand-cart or other method and actually placed into the feeder by hand.
The Double-Sided Feeder was first designed and built for our own flock needs and tested on our 350 ewes. Results from our usage look very good.
Single-Sided Feeder Design (Figure 11)They are set in a long continuous row, so
they also serve as the side of a pen. Hay, grain and/or silage is then supplied directly from the alley either from a machine, or by hand from a feed cart.
The Single-Sided design allows us to feed sheep with greater speed and accuracy, and to do so with machines if the flock size so requires. Single-Sided Feeders cost 29% more per adult fed to build ($14.50/head vs. $11.25/head), but in return, they allow for significant savings in feeding time, human energy and feeding accuracy.
Feeding Design Setups
Premier TipIf the feeder is being used outdoors, drill holes in the plywood floor. This will help if
drainage is needed.
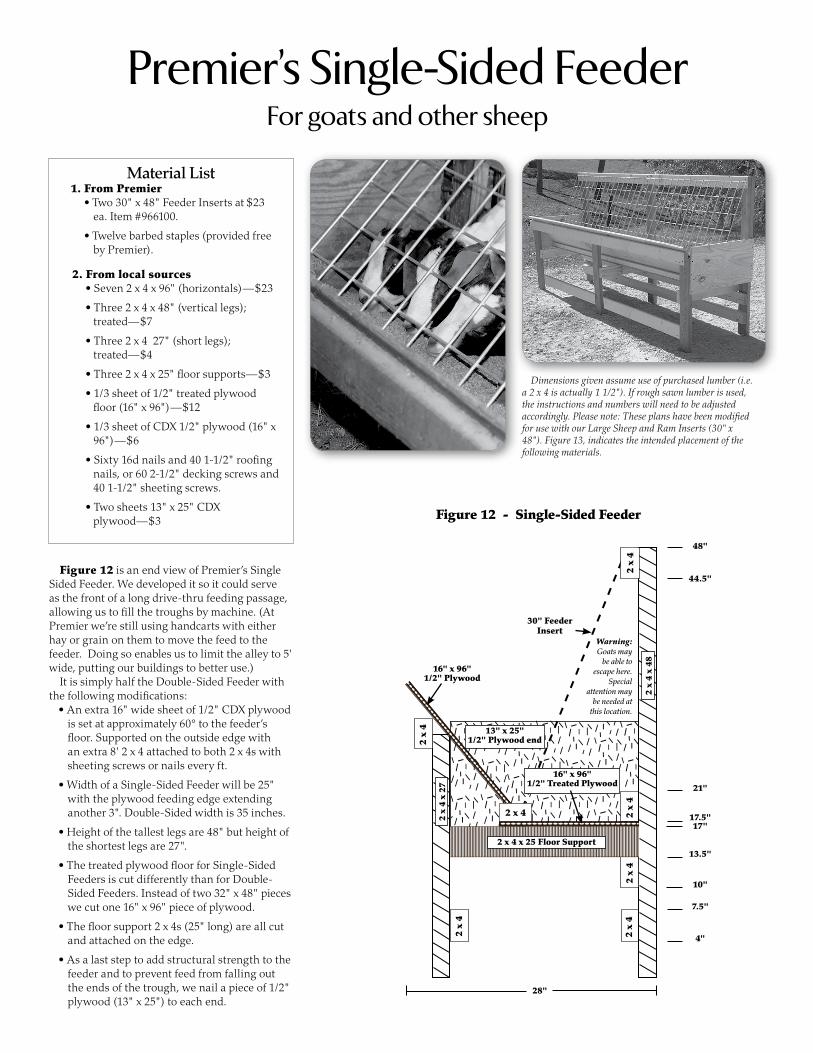
Figure 12 - Single-Sided Feeder
30" Feeder Insert
Material List1. From Premier
• Two 30" x 48" Feeder Inserts at $23 ea. Item #966100.
• Twelve barbed staples (provided free by Premier).
2. From local sources• Seven 2 x 4 x 96" (horizontals)—$23
• Three 2 x 4 x 48" (vertical legs); treated—$7
• Three 2 x 4 27" (short legs); treated—$4
• Three 2 x 4 x 25" floor supports—$3
• 1/3 sheet of 1/2" treated plywood floor (16" x 96")—$12
• 1/3 sheet of CDX 1/2" plywood (16" x 96")—$6
• Sixty 16d nails and 40 1-1/2" roofing nails, or 60 2-1/2" decking screws and 40 1-1/2" sheeting screws.
• Two sheets 13" x 25" CDX plywood—$3
48"
44.5"
21"
17.5"17"
13.5"
10"
7.5"
4"
16" x 96"1/2" Plywood
Figure 12 is an end view of Premier’s Single Sided Feeder. We developed it so it could serve as the front of a long drive-thru feeding passage, allowing us to fill the troughs by machine. (At Premier we’re still using handcarts with either hay or grain on them to move the feed to the feeder. Doing so enables us to limit the alley to 5' wide, putting our buildings to better use.)
It is simply half the Double-Sided Feeder with the following modifications:
• An extra 16" wide sheet of 1/2" CDX plywood is set at approximately 60° to the feeder’s floor. Supported on the outside edge with an extra 8' 2 x 4 attached to both 2 x 4s with sheeting screws or nails every ft.
• Width of a Single-Sided Feeder will be 25" with the plywood feeding edge extending another 3". Double-Sided width is 35 inches.
• Height of the tallest legs are 48" but height of the shortest legs are 27".
• The treated plywood floor for Single-Sided Feeders is cut differently than for Double-Sided Feeders. Instead of two 32" x 48" pieces we cut one 16" x 96" piece of plywood.
• The floor support 2 x 4s (25" long) are all cut and attached on the edge.
• As a last step to add structural strength to the feeder and to prevent feed from falling out the ends of the trough, we nail a piece of 1/2" plywood (13" x 25") to each end.
Warning: Goats may
be able to escape here.
Special attention may
be needed at this location.
Premier’s Single-Sided FeederFor goats and other sheep
2 x
4
2 x
4 x
48
2 x
42
x 4
2 x
4
16" x 96"1/2" Treated Plywood
2 x
4
2 x 4
13" x 25"1/2" Plywood end2
x 4
2 x
4 x
27
2 x 4 x 25 Floor Support
Dimensions given assume use of purchased lumber (i.e. a 2 x 4 is actually 1 1/2"). If rough sawn lumber is used, the instructions and numbers will need to be adjusted accordingly. Please note: These plans have been modified for use with our Large Sheep and Ram Inserts (30" x 48"). Figure 13, indicates the intended placement of the following materials.