Page 1
1 Step By Step SLES 11 SP2 Cluster on VM –Ben Yau 2/2014- http://geekswing.com
Building A Two Node SLES11 SP2 Linux Cluster On VMware
ABOUT THIS EBOOK Welcome to this 40 page excerpt of my 130 page step-by-step guide on how to build a two node SLES11
SP2 Linux Cluster on VMware. Enjoy!
DISCLAIMER
All information is provided as-is with no guarantees or warranties.
Use at your own risk!
Like this free exerpt? Get the full version for $3! This is a free 40 page excerpt of my 130 page ebook “Building A Two Node SLES 11 SP2 Linux Cluster On
VMware”. To get the full 130 page ebook for $3, visit
http://geekswing.com/geek/building-a-two-node-sles11-sp2-linux-cluster-on-vmware/
More ebooks? I help write and edit ebooks of both technical and non-technical natures. Some free, some paid, all
awesome! Come visit my library here:
http://geekswing.com/ebooks/
Page 2
2 Step By Step SLES 11 SP2 Cluster on VM –Ben Yau 2/2014- http://geekswing.com
ABOUT ME My first computer was a TRS 80 Model III when I was about 6 years old. I wanted to play games on it,
but my dad wouldn’t buy any. He did let me choose computer books to buy and so I found one called
“50 computer games you can program” and that was the start of my love for computers.
Fast forward to today: I have been a Unix/Linux sysadmin for 20 years now with crossover in
programming, DBA, and SAN. Worked at all sorts of companies (small, big, crazy, quiet) –still love it!
I do NOT work for any of the main vendor names in storage or OS (Sun, HP, IBM, Novell, Redhat, EMC,
VMware, etc). I just happen to use them… a lot!
On the non-technical side of things:
I am a champion swing dancer, bad pun lover, runner, gym-rat, music lover, movie lover, NETFLIX lover,
among many other things.
I am also a loving husband, and proud papa of two. Come check out my website where I am doing my
best to blog about all of the above! Cheers!
Ben Yau http://geekswing.com/ebooks
Page 3
3 Step By Step SLES 11 SP2 Cluster on VM –Ben Yau 2/2014- http://geekswing.com
INTRODUCTION:
This tutorial will cover building a two-node linux cluster using SLES 11 SP1 on VMware VMs. I will
configure a cluster IP, shared disk, and application as part of the cluster service.
THIS IS A VERY LONG DOCUMENT! Don’t let that intimidate you. A lot of it is screenshots. I want to
be very detailed so I take you through step by step by step. Be patient as you read through it.
If you are not using VMware’s ESXi, then I will leave you to your own devices on the physical server
platform.
My Environment:
vcenter server version 4.1.0 VMware ESXi 4.1.0
OS/Application used:
SLES 11 Sp2 a.k.a Suse Linux Enterprise Server SP2 (2 DVD set) SUSE Linux Enterprise High Availability Extension 11 SP2 (2 CD set)
ISOS used - you only need the first dvd/cd of each set.
SLES-11-SP2-DVD-x86_64-GM-DVD1.iso (OS) SLE-HA-11-SP2-x86_64-GM-CD1.iso (HA Extension)
GENERAL CLUSTER CONCEPTS:
Just about all cluster technologies utilize the same concepts
1) A “private” network for heartbeat and cluster-related communications
2) A “public” network for general administration access to each server
3) A group of shared resources which are on the active node of the cluster and which will failover
to the next node in a failover event. Generally this will be
a. IP address (cluster IP or failover IP)
b. Storage
c. Application (e.g. Oracle)
d. Quorum disk (specific type of shared storage)
SLES CLUSTER SPECIFIC:
A few things specific to the SLES cluster I found
1) For “private” network, it does not utilize a private or heartbeat IP. Instead it utilizes a multicast
network
2) Out of the three operating systems I have built clusters on (Redhat/Centos, AIX, SLES), this one is
the most straightforward.
Page 4
4 Step By Step SLES 11 SP2 Cluster on VM –Ben Yau 2/2014- http://geekswing.com
OUT OF SCOPE:
1) Installing OS I will consider out of scope of this document so I can focus on building the cluster
2) Bonding interfaces I will consider out of scope as well. This is a good practice for clustering and
for general redundancy of your servers
3) Multipathing I *ALMOST* considered out of scope. However, for most physical (non-VM)
clusters you will built you will likely use multipath. So I included that in this document even
though I only have one path to my storage.
4) If you're reading this, you likely want to get to details of creating a cluster. So I won’t go into
*WHY* you would want to cluster. I will assume cluster familiarity and some amount of linux
sysadmin experience (such as basic OS install).
5) The vmware portion of this *MIGHT* seem out of scope. If you are using physical hardware and
already have shared fiber storage, you might want to skip that portion. I included it since for
testing purposes it is very handy to try your hand at this on a VM environment. And if you do,
there are a few “gotchas” on how to add disks to VMs to make them “shared” or “cluster
friendly”.
6) The vncserver portion of this *MIGHT* also seem out of scope. However, using the GUI is
easiest to build and manage your cluster. Unfortunately it is not browser based so the easiest
way to accomplish this is to use VNC session and then start crm_gui on your VNC session.
MY SPECIFIC IDIOSYNCRACIES
1) I like to do my installs off of .iso files on the local machine. This is helpful if you are doing work
remotely and do not have someone who can insert and eject CD/DVDs for you
2) I like to use ssh-rsa authentication so I can ssh and scp without entering a password. However,
you do not need this for your cluster to function. Just a note so when you see me ssh or scp
back and forth between the nodes that is why you do not see a password prompt.
AND FINALLY … I re-iterate that all information is provided AS-IS with no guarantees or warranties. Use at your own risk!
The information gathered here is from my own experience: scouring the net and collecting information
from a variety of sources and integrating the information to build a cluster which worked for my
purposes and my environment. I do not guarantee that it will work for you and your environment.
Good luck!
Page 5
5 Step By Step SLES 11 SP2 Cluster on VM –Ben Yau 2/2014- http://geekswing.com
Here are the steps to building a cluster
“Hardware” Prep (using VM platform)
1) Build Your VM Servers
2) Prep First VM (slesnode01) for cluster use: Add storage and additional ethernet
3) Prep Second VM (slesnode02) for cluster use: Add storage and additional Ethernet
OS Prep (assuming you have already installed OS)
4) Prep Linux for Clustering: /etc/hosts
5) Prep Linux for Clustering: Adding Multipath for storage
Install Cluster Software
6) Install Cluster Software And Scripts
Initial Cluster Setup
7) Basic Cluster Config
8) Start and verify cluster
9) Configure Synchronization Between Nodes
10) Make Sure OPENAIS Does Not Start Automatically
11) Setup And Start GUI For Cluster Management
12) Access GUI For Further Cluster Config
13) Adding A Resource Group with a Cluster IP Address
14) Starting And Verifying A Resource Group
15) Configure Resource Group Not To Fail Back
Adding Shared Disk and Quorum Disk
16) Adding A Disk Resource: DATA
17) Adding A Disk Resource: STONITH a.k.a Quorum Disk
18) Add stonith disk as a quorum/voting disk to the Cluster
Adding Application
19) Adding A Script To Start Applications
DONE!
20) DONE!!
Page 6
6 Step By Step SLES 11 SP2 Cluster on VM –Ben Yau 2/2014- http://geekswing.com
Here is the table of contents again with all pics/screencaps included
1) Build Your VM Servers
2) Prep First VM (slesnode01) for cluster use: Add storage and additional Ethernet
PIC 2.1: slesnode01 "Edit Settings"
PIC 2.2: slesnode01 "Add Hard Disk"
PIC 2.3: slesnode01 “Create new virtual disk”
PIC 2.4: slesnode01 “Add 1gb cluster disk for quorum”
PIC 2.5: slesnode01 “Choose Disk On SCSI Controller”
PIC 2.6: slesnode01 “Summary and Click Finish”
PIC 2.7: slesnode01 “Change SCSI Controller Type”
PIC 2.8: slesnode01 “Add A Hard Disk”
PIC 2.9: slesnode01 “Create A New Virtual Disk”
PIC 2.10: slesnode01 “Create a 6gb Data Disk”
PIC 2.11: slesnode01 “Use Second SCSI controller”
PIC 2.12: slesnode01 “Summary and Click Finish”
3) Prep Second VM (slesnode02) for cluster use: Add storage and additional Ethernet
PIC 3.1: slesnode02 “Edit Settings”
PIC 3.2: slesnode02 “Add Hard Disk”
PIC 3.3: slesnode02 “Use an existing virtual disk”
PIC 3.4: slesnode02: “Browse to disk filepath”
PIC 3.5: slesnode02: “Choose the quorum disk (1gb)”
PIC 3.6: slesnode02: “Summary and Click Next”
PIC 3.7: slesnode02: “Choose second scsi controller”
PIC 3.8: slesnode02: “Summary and Click Finish”
PIC 3.9: slesnode02 “Change SCSI Controller Type”
PIC 3.10: slesnode02 “Add a hard disk”
PIC 3.11: slesnode02 “Use an existing virtual disk”
PIC 3.12: slesnode02 “Browse to disk filepath, Choose 6gb Data Disk”
PIC 3.13: slesnode02 “Summary and Click Next”
PIC 3.14: slesnode02 “Choose second scsi controller”
PIC 3.15: slesnode02 “Summary and click Finish”
4) Prep Linux for Clustering: /etc/hosts
5) Prep Linux for Clustering: Adding Multipath for storage
6) Install Cluster Software And Scripts
PIC 6.1: Software Repositories: “yast -> Software -> Software Repositories”
PIC 6.2: Software Repositories: “Disable CDROM”
PIC 6.3: Software Repositories: “Select Local ISO Image” -> Next
PIC 6.4: Software Repositories: “Click Browse”
PIC 6.5: Software Repositories: “Browse to first .iso and select (I chose HA .iso first)”
PIC 6.6: Software Repositories: "Summary and Click Next"
PIC 6.7: Software Repositories: “License Agreement”
PIC 6.8: Software Repositories: “Repeat and Add second .iso” (for me, install DVD)
PIC 6.9: Software Install: “yast -> Software -> Software Management”
Page 7
7 Step By Step SLES 11 SP2 Cluster on VM –Ben Yau 2/2014- http://geekswing.com
PIC 6.10: Software Install: “Change Filter From Search To Patterns”
PIC 6.11: Software Install: “Change Filter From Search To Patterns (drop down)”
PIC 6.12: Software Install: “Select ‘High Availability’”
PIC 6.13: Software Install: “Accept”
PIC 6.14: Software Install: “Dependency Check”
PIC 6.15: Software Install: “Installation in progress”
7) Basic Cluster Config
8) Start and verify cluster
9) Configure Synchronization Between Nodes
PIC 9.1: Sync Cluster Config: “yast -> High Availability -> Cluster”
PIC 9.2: Sync Cluster Config: “Communication -> Auto Generate Node ID”
PIC 9.3: Sync Cluster Config: “Security -> Enable Seucirty Auth”
PIC 9.4: Sync Cluster Config: “Change Threads = 5, Generate Auth Key File”
PIC 10.5: Sync Cluster Config: “Create /etc/corosync/authkey succeeded”
PIC 10.6: Sync Cluster Config: “Service -> Enable mgmt”
PIC 10.7: Configure Csync2: “Add Suggested Files“
PIC 10.8: Configure Csync2: “Files added to Sync File Column”
PIC 10.9: Configure Csync2: “Generate Pre-Shared-Keys“
PIC 10.10: Configure Csync2: “Add nodes to Sync Host column”
PIC 10.11: Configure Csync2: “Select -> Turn csync2 ON”
PIC 10.12: Configure Csync2: “After Being Turned on, Text Changes To ‘OFF’”
PIC 10.13: Configure Csync2: “Click Finish”
10) Make Sure OPENAIS Does Not Start Automatically
11) Setup And Start GUI For Cluster Management
PIC 11.1: VNCserver default desktops
12) Access GUI For Further Cluster Config
PIC 12.1: crm_gui: “Connection -> Login”
PIC 12.2: crm_gui: “Use hacluster username/password”
PIC 12.3: crm_gui: “Grabbing Info From Cluster Configs”
13) Adding A Resource Group with a Cluster IP Address
PIC 13.1: Add Resource Group: “crm_gui -> Resources menu”
PIC 13.2: Add Resource Group: “Select ‘Group’, Click OK”
PIC 13.3: Add Resource Group: Create resource group “testresource”
PIC 13.4: Add Resource Group: Creative “Primitive” resource (for IP)
PIC 13.5: Add Resource Group: “Add IP address”
PIC 13.6: Add Resource Group: “Edit The ‘ip’ Instance”
PIC 13.7: Add Resource Group: “Fill In IP Address”
PIC 13.8: Add Resource Group: “Click Apply”
PIC 13.9: Add Resource Group: “Cancel, Do Not Add Another Resource Now”
PIC 13.10: Add Resource Group: “Summary, Click Apply”
PIC 13.11: Add Resource Group: “Resource Group testresourcegroup added”
14) Starting And Verifying A Resource Group
15) Configure Resource Group Not To Fail Back
PIC 15.1: Default Resource Stickiness
Page 8
8 Step By Step SLES 11 SP2 Cluster on VM –Ben Yau 2/2014- http://geekswing.com
16) Adding A Disk Resource: DATA
PIC 16.1: Add Shared Disk: “Edit Resource Group testresource”
PIC 16.2: Add Shared Disk: “Add a new Primitive Resource”
PIC 16.3: Add Shared Disk: “Configure data disk primitive resource”
PIC 16.4: Add Shared Disk: “Configure data disk ‘device’”
PIC 16.5: Add Shared Disk: “Configure data disk 'directory'"
PIC 16.6: Add Shared Disk: “Configure data disk ‘fstype”
PIC 16.7: Add Shared Disk: “Summary and then Click Apply”
PIC 16.8: Add Shared Disk: “Summary and then Click OK”
PIC 16.9: Add Shared Disk: "Cluster Management Screen"
PIC 16.10: Add Shared Disk: "crm_mon screen"
17) Adding A Disk Resource: STONITH a.k.a Quorum Disk
18) Add stonith disk as a quorum/voting disk to the Cluster
PIC 18.1: Add Stonith Disk: “Resources -> Add"
PIC 18.2: Add Stonith Disk: “Add Primitive Resource”
PIC 18.3: Add Stonith Disk: "Configure Stonith Device -> Forward"
PIC 18.4: Add Stonith Disk: “Add Instance Attribute”
PIC 18.5: Add Stonith Disk: “Configure SBD Device Settings”
PIC 18.6: Add Stonith Disk: “Cluster Management Main Screen”
PIC 18.7: Starting Stonith: “Right Click -> Start”
PIC 18.8: Starting Stonith: “Cluster Management Main Screen”
19) Adding A Script To Start Applications
PIC 19.1: Add Application: “Edit Resource Group testresource”
PIC 19.2: Add Application: “Add Primitive Resource”
PIC 19.3: Add Application: “Configure Heartbeat Class For Application, Choose
rc.testapp”
PIC 19.4: Add Application: “Click Forward”
PIC 19.5: Add Application: “Click Apply”
PIC 19.6: Add Application: “Click OK”
PIC 19.7: Add Application: “Cluster Management Screen”
20) DONE!!
PIC 21.1: DONE
Page 9
9 Step By Step SLES 11 SP2 Cluster on VM –Ben Yau 2/2014- http://geekswing.com
1. Build your VM servers
We are going to run our cluster on two VMs. First step is to create the two VMs.
Create two VMs running SLES 11 Sp2
I leave OS install as out-of-scope. However, to be on the same page, this is how I generally do it: I
uncheck Novell AppArmor and Print Server. I add the C/C++ Development package (bottom). I always
add sysstat (not installed by default on SLES!! WHAT?!). Uncheck firewall. Disable ipv6.
The IPs I will be using:
16.16.169.68 slesnode01 #public 16.16.169.69 slesnode02 #public 16.16.169.70 slesnodecluster #cluster service ip
I will assume your VMs have one disk for OS and one ethernet controller.
Create /installdvd directory and copy the .iso there
As mentioned earlier, I like to have copies of .iso on my local drive. I copy the .iso to local disk. This is
something handy in general to do. With a VM it doesn't matter as much if you always have access to
console through vsphere. However, if you ever need to remotely manage a system and can't always
have someone popping dvds in and out, it is always handy to copy the .iso you will use to the machine.
I usually create a directory called "/installdvd" to house my .iso. In this case I will need about 5gig of
space to copy both the OS install disc 1 and the HA extension disc 1
slesnode01:/ # ls -1 /installdvd
SLE-HA-11-SP2-x86_64-GM-CD1.iso SLES-11-SP2-DVD-x86_64-GM-DVD1.iso slesnode01:/ #
So you can see the HA extension cd and the SLES 11 base os install dvd
Now power them off and we will get started with cluster-specific tasks
Page 10
10 Step By Step SLES 11 SP2 Cluster on VM –Ben Yau 2/2014- http://geekswing.com
2. Prep First VM (slesnode01) for cluster use: Add storage and
additional ethernet
Clusters in general, especially two-node clusters, all use a small shared disk (about 1gig is fine) called a
"quorum" disk. This is to provide a third vote in a two node cluster to avoid split brain scenarios.
(NOTE: The EXCEPTION is redhat/centos clusters where split brain is actually a conventional use. See my
redhat/centos cluster build guide for that little diddy of an install)
Clusters share what is called a "service". I will be creating an active/passive cluster so the "service"
(a.k.a. application) will run on one node, and then if that node goes down it will failover to the other.
Services mean there will be a collection of resources that will failover, usually an ip address and storage.
So we will in this example create a shared storage of 6gig that can be failed over.
Since the two disks (quorum and shared data) will be shared, you will use a different process as you set
up each server. On slesnode01 you will create the disks. On slesnode02 you will add the disks you just
created.
So power off your VMs so we can add some hard disks and network cards to your VMs
Prep the slesnode01 VM: Add a quorum disk
We are going to add two new disks for sharing between the nodes (one for quorum, one for data). Then
add a second network card for a heartbeat
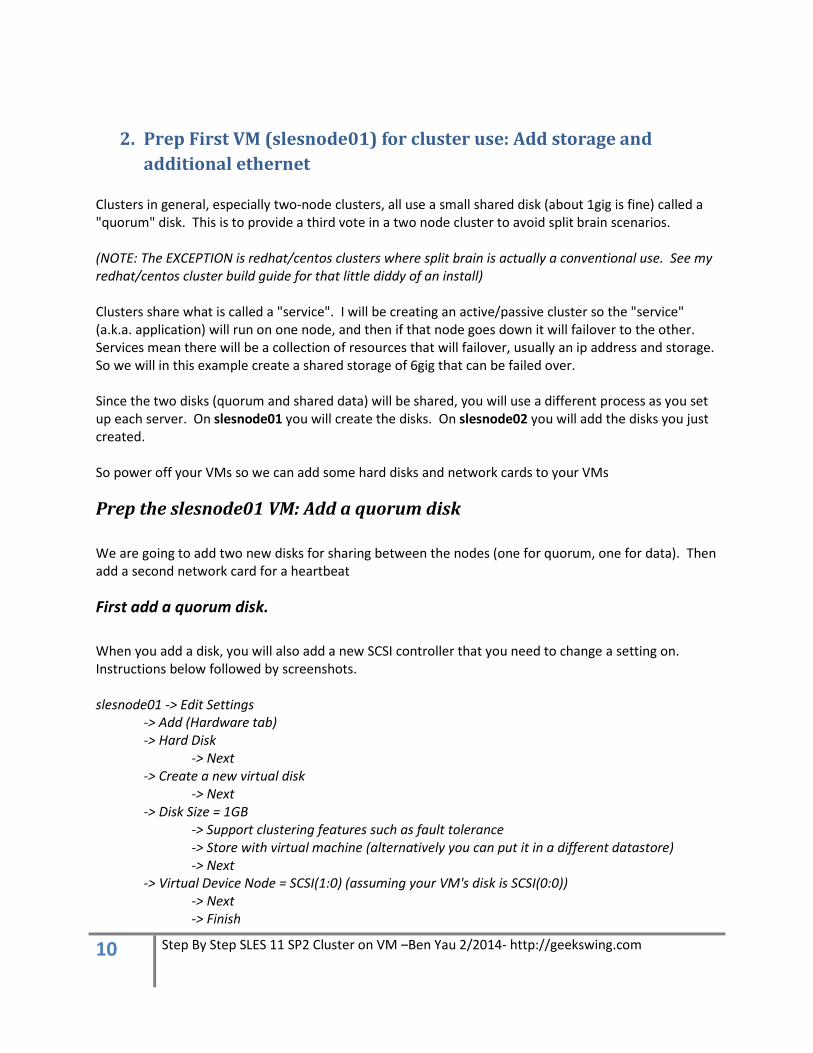
First add a quorum disk.
When you add a disk, you will also add a new SCSI controller that you need to change a setting on.
Instructions below followed by screenshots.
slesnode01 -> Edit Settings
-> Add (Hardware tab)
-> Hard Disk
-> Next
-> Create a new virtual disk
-> Next
-> Disk Size = 1GB
-> Support clustering features such as fault tolerance
-> Store with virtual machine (alternatively you can put it in a different datastore)
-> Next
-> Virtual Device Node = SCSI(1:0) (assuming your VM's disk is SCSI(0:0))
-> Next
-> Finish
Page 11
11 Step By Step SLES 11 SP2 Cluster on VM –Ben Yau 2/2014- http://geekswing.com
PIC 1.1: slesnode01 “Edit Settings”
Page 12
12 Step By Step SLES 11 SP2 Cluster on VM –Ben Yau 2/2014- http://geekswing.com
PIC 2.2: “Add Hard Disk”
Page 13
13 Step By Step SLES 11 SP2 Cluster on VM –Ben Yau 2/2014- http://geekswing.com
PIC 2.3: slesnode01 “Create new virtual disk”
Page 14
14 Step By Step SLES 11 SP2 Cluster on VM –Ben Yau 2/2014- http://geekswing.com
PIC 2.4: slesnode01 “Add 1gb cluster disk for quorum”
Page 15
15 Step By Step SLES 11 SP2 Cluster on VM –Ben Yau 2/2014- http://geekswing.com
PIC 2.5: slesnode01 “Choose Disk On SCSI Controller”
Page 16
16 Step By Step SLES 11 SP2 Cluster on VM –Ben Yau 2/2014- http://geekswing.com
PIC 2.6: slesnode01 “Summary and Click Finish”
Page 17
17 Step By Step SLES 11 SP2 Cluster on VM –Ben Yau 2/2014- http://geekswing.com
You should also see a New SCSI Controller being added of type Paravirtual (default). We need to change
a setting on it to be able to share it with our other VM.
Change the new SCSI Controller type. Instructions below followed by pictures
slesnode01's "Edit Settings"
-> Click on "New SCSI Controller" on the left
-> Choose "Physical" (take time to read the difference between "None", "Virtual", and "Physical")
-> OK
PIC 2.7: slesnode01 “Change SCSI Controller Type”
Page 18
18 Step By Step SLES 11 SP2 Cluster on VM –Ben Yau 2/2014- http://geekswing.com
Prep the slesnode01 VM: Add a data disk
This task is similar to the above, but adding a 6gig disk for data now. The scsi controller will already be
created, you will just add the disk to it. Instructions below followed by screenshots
slesnode01 -> Edit Settings
-> Add (Harwdare tab)
-> Hard Disk
-> Next
-> Create a new virtual disk
-> Next
-> Disk Size = 6GB
-> Support clustering features such as fault tolerance
-> Store with virtual machine (alternatively you can put it in a different datastore)
-> Next
-> Virtual Device Node = SCSI(1:1) (you should see the previous disk)
-> Next
-> Finish
PIC 2.8: slesnode01 “Add A Hard Disk”
Page 19
19 Step By Step SLES 11 SP2 Cluster on VM –Ben Yau 2/2014- http://geekswing.com
PIC 2.9: slesnode01 “Create A New Virtual Disk”
Page 20
20 Step By Step SLES 11 SP2 Cluster on VM –Ben Yau 2/2014- http://geekswing.com
PIC 2.10: slesnode01 “Create a 6gb Data Disk”
Page 21
21 Step By Step SLES 11 SP2 Cluster on VM –Ben Yau 2/2014- http://geekswing.com
PIC 2.11: slesnode01 “Use Second SCSI controller”
Page 22
22 Step By Step SLES 11 SP2 Cluster on VM –Ben Yau 2/2014- http://geekswing.com
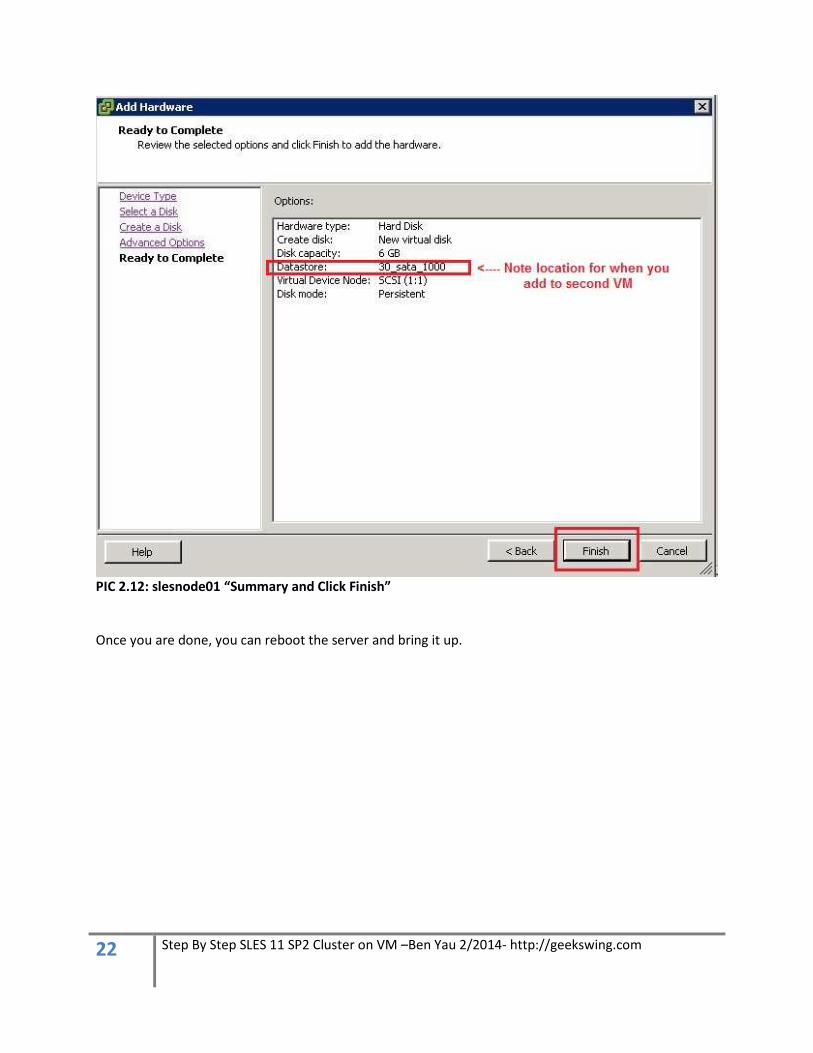
PIC 2.12: slesnode01 “Summary and Click Finish”
Once you are done, you can reboot the server and bring it up.
Page 23
23 Step By Step SLES 11 SP2 Cluster on VM –Ben Yau 2/2014- http://geekswing.com
3. Prep Second VM (slesnode02) for cluster use: Add storage and
additional Ethernet
Prep the slesnode02 VM: Add a quorum disk
We are going to add existing slesnode01 two disks (one for quorum, one for data). We will then add a
second network card for a heartbeat . Instructions Below followed by Pictures
slesnode02 -> Edit Settings
-> Add (Harwdare tab)
-> Hard Disk
-> Next
-> Use an existing virtual disk
-> Next
-> Disk File Path - Browse the datastore and navigate to slesnode01 and find the 1gb quourm
disk you created and select it. In my case it was named slesnode01_1.vmdk
-> select slesnode01_1.vmdk (1gb) and click "OK"
-> Next
-> Virtual Device Node = SCSI(1:0)
-> Next
-> Finish
Page 24
24 Step By Step SLES 11 SP2 Cluster on VM –Ben Yau 2/2014- http://geekswing.com
PIC 3.1: slesnode02 “Edit Settings”
Page 25
25 Step By Step SLES 11 SP2 Cluster on VM –Ben Yau 2/2014- http://geekswing.com
PIC 3.2: slesnode02 “Add Hard Disk”
Page 26
26 Step By Step SLES 11 SP2 Cluster on VM –Ben Yau 2/2014- http://geekswing.com
PIC 3.3: slesnode02 “Use an existing virtual disk”
Page 27
27 Step By Step SLES 11 SP2 Cluster on VM –Ben Yau 2/2014- http://geekswing.com
PIC 3.4: slesnode02: “Browse to disk filepath”
PIC 3.5: slesnode02: “Choose the quorum disk (1gb)”
Page 28
28 Step By Step SLES 11 SP2 Cluster on VM –Ben Yau 2/2014- http://geekswing.com
PIC 3.6: slesnode02: “Summary and Click Next”
Page 29
29 Step By Step SLES 11 SP2 Cluster on VM –Ben Yau 2/2014- http://geekswing.com
PIC 3.7: slesnode02: “Choose second scsi controller”
-> Click on "New SCSI Controller"
-> Choose "Physical" (take time to read the difference between "None", "Virtual", and "Physical")
-> OK
Page 30
30 Step By Step SLES 11 SP2 Cluster on VM –Ben Yau 2/2014- http://geekswing.com
PIC 3.9: slesnode02 “Change SCSI Controller Type”
Prep the slesnode02 VM: Add a data disk
Instructions below, then pics. You probably got this already.
Add a data disk (you are already in slesnode02's "Edit Settings"
-> Add (Harwdare tab)
-> Hard Disk -> Next
-> Use an existing virtual disk -> Next
-> Disk File Path - Browse the datastore and navigate to slesnode01 and find the 6gb data disk
you created and select it. In my case it was named slesnode01_2.vmdk
-> select slesnode01_2.vmdk (5gb) and click "OK"
-> Next
-> Virtual Device Node = SCSI(1:1)
-> Next
-> Finish
Page 31
31 Step By Step SLES 11 SP2 Cluster on VM –Ben Yau 2/2014- http://geekswing.com
PIC 3.10: slesnode02 “Add a hard disk”
Page 32
32 Step By Step SLES 11 SP2 Cluster on VM –Ben Yau 2/2014- http://geekswing.com
PIC 3.11: slesnode02 “Use an existing virtual disk”
PIC 3.12: slesnode02 “Browse to disk filepath, Choose 6gb Data Disk”
Page 33
33 Step By Step SLES 11 SP2 Cluster on VM –Ben Yau 2/2014- http://geekswing.com
PIC 3.13: slesnode02 “Summary and Click Next”
Page 34
34 Step By Step SLES 11 SP2 Cluster on VM –Ben Yau 2/2014- http://geekswing.com
PIC 3.14: slesnode02 “Choose second scsi controller”
Page 35
35 Step By Step SLES 11 SP2 Cluster on VM –Ben Yau 2/2014- http://geekswing.com
PIC 3.15: slesnode02 “Summary and click Finish”
Once you are done, you can power on the server and bring it up.
Page 36
36 Step By Step SLES 11 SP2 Cluster on VM –Ben Yau 2/2014- http://geekswing.com
Check In To See Where We Are At
At this point the servers should have at least the below
1) OS disk (internal): mine is /dev/sda and 15gig
2) Shared quorum disk: mine is /dev/sdb and 1gig
3) Shared data disk: mine is /dev/sdc and 6gig
slesnode01:~ # fdisk -l | grep "/dev/sd" Disk /dev/sdb doesn't contain a valid partition table Disk /dev/sdc doesn't contain a valid partition table Disk /dev/sda: 14.0 GB, 13958643712 bytes /dev/sda1 2048 1509375 753664 82 Linux swap / Solaris /dev/sda2 * 1509376 27262975 12876800 83 Linux Disk /dev/sdb: 1073 MB, 1073741824 bytes Disk /dev/sdc: 6442 MB, 6442450944 bytes slesnode01:~ # slesnode02:~ # fdisk -l | grep "/dev/sd" Disk /dev/sdb doesn't contain a valid partition table Disk /dev/sdc doesn't contain a valid partition table Disk /dev/sda: 14.0 GB, 13958643712 bytes /dev/sda1 2048 1509375 753664 82 Linux swap / Solaris /dev/sda2 * 1509376 27262975 12876800 83 Linux Disk /dev/sdb: 1073 MB, 1073741824 bytes Disk /dev/sdc: 6442 MB, 6442450944 bytes slesnode02:~ #
Page 37
37 Step By Step SLES 11 SP2 Cluster on VM –Ben Yau 2/2014- http://geekswing.com
4. Prep Linux for Clustering: /etc/hosts
Add to both /etc/hosts
16.16.169.68 slesnode01 #public 16.16.169.69 slesnode02 #public 16.16.169.70 slesnodecluster #cluster service ip
Page 38
38 Step By Step SLES 11 SP2 Cluster on VM –Ben Yau 2/2014- http://geekswing.com
5. Prep Linux for Clustering: Adding Multipath for storage
If you are using a VM, you probably only have one path so this is optional. It's a great exercise though.
And if you are using a physical server, hopefully you had (or someone had) the foresight to order the
system with extra fiber cards so you can have multipaths to your external storage.
NOTE: While on a server where there is a single path (or a VM with single path) you can ignore this
section if you wish, I would suggest doing this anyway especially if in the future you think a second
path might be added.
Use fdisk –l to verify redundant paths.
If you do have redundant paths they should show up using "fdisk -l". You will have a "/dev/sd*"
designation for each path, so one lun with two paths will be represented by, for example, a "/dev/sde"
and "/dev/sdf"
We should be able to see redundant paths for all LUNS including the small 1gb SBD stonith LUN. Verify
using
# fdisk -l
With my VM, I don't have redundant paths. I will still go through how to configure your multipath below
Turn on multipathh
The device-mapper and multipath rpms are installed by default. Turn multipath on
# chkconfig --list multipathd # chkconfig multipathd on # service multipathd start
Look for multipaths in /dev/mapper. On sles, they put the ids of the disks in /dev/mapper for you
(NICE!, not so on redhat) You will want to use these ids to create device aliases in /etc/multipath.conf
slesnode01:/dev/mapper # ls -l total 0 crw-rw---- 1 root root 10, 236 Jan 11 14:43 control lrwxrwxrwx 1 root root 7 Jan 11 14:43 36000c2977900e5e465b942e23278e20d -> ../dm-1 lrwxrwxrwx 1 root root 7 Jan 11 15:00 36000c29697102aa216643541c3f13294 -> ../dm-0 slesnode01:/dev/mapper #
Create multipath.conf file with aliases
You need to investigate a little bit to know which ID goes to which “disk” so you can choose your alias
appropriately. Use fdisk to do this
Page 39
39 Step By Step SLES 11 SP2 Cluster on VM –Ben Yau 2/2014- http://geekswing.com
slesnode01:/dev/mapper # ls -l total 0 lrwxrwxrwx 1 root root 7 Jan 10 15:02 36000c29697102aa216643541c3f13294 -> ../dm-0 lrwxrwxrwx 1 root root 7 Jan 10 15:02 36000c2977900e5e465b942e23278e20d -> ../dm-1 crw-rw---- 1 root root 10, 236 Jan 10 13:58 control slesnode01:/dev/mapper #
Each id represents a multipath to one of the LUNS. We want to create aliases just so things are a bit
easier to read and organize
Choose an id from above and do an fdisk -l on it
slesnode01:/dev/mapper # fdisk -l /dev/mapper/36000c29697102aa216643541c3f13294
Disk /dev/mapper/36000c29697102aa216643541c3f13294: 1073 MB, 1073741824 bytes 255 heads, 63 sectors/track, 130 cylinders, total 2097152 sectors Units = sectors of 1 * 512 = 512 bytes Sector size (logical/physical): 512 bytes / 512 bytes I/O size (minimum/optimal): 512 bytes / 512 bytes Disk identifier: 0x00000000 Disk /dev/mapper/36000c29697102aa216643541c3f13294 doesn't contain a valid partition table slesnode01:/dev/mapper # fdisk -l /dev/mapper/36000c2977900e5e465b942e23278e20d Disk /dev/mapper/36000c2977900e5e465b942e23278e20d: 6442 MB, 6442450944 bytes 255 heads, 63 sectors/track, 783 cylinders, total 12582912 sectors Units = sectors of 1 * 512 = 512 bytes Sector size (logical/physical): 512 bytes / 512 bytes I/O size (minimum/optimal): 512 bytes / 512 bytes Disk identifier: 0x00000000 Disk /dev/mapper/36000c2977900e5e465b942e23278e20d doesn't contain a valid partition table slesnode01:/dev/mapper #
This tells me that /dev/mapper/36000c29697102aa216643541c3f13294 is 1gb large.
This tells me that /dev/mapper/36000c2977900e5e465b942e23278e20d is 6gb large.
You should see exact same matching disk id on slesnode02
slesnode02:/dev/mapper # ls -l
total 0 lrwxrwxrwx 1 root root 7 Jan 10 15:02 36000c29697102aa21664351c3f13294 -> ../dm-0 lrwxrwxrwx 1 root root 7 Jan 10 15:02 36000c2977900e5e465b94223278e20d -> ../dm-1 crw-rw---- 1 root root 10, 236 Jan 10 14:04 control slesnode02:/dev/mapper #
Now I can match these up. The quorum disk by "convention" is called "sbddisk" (stonith disk) e.g. in
/etc/multipath.conf I put the following (if no multipath.conf exists, you can create it with the below)
Page 40
40 Step By Step SLES 11 SP2 Cluster on VM –Ben Yau 2/2014- http://geekswing.com
multipaths { multipath { wwid 36000c29697102aa216643541c3f13294 alias sbddisk } multipath { wwid 36000c2977900e5e465b942e23278e20d alias data1 } }
After editing multipath.conf
slesnode01:/dev/mapper # multipath -F; multipath -v3
You will see this now
slesnode01:/dev/mapper # ls -l
total 0 crw-rw---- 1 root root 10, 236 Jan 10 13:58 control lrwxrwxrwx 1 root root 7 Jan 10 15:07 data1 -> ../dm-1 lrwxrwxrwx 1 root root 7 Jan 10 15:07 sbddisk -> ../dm-0 slesnode01:/dev/mapper #
Repeat the above steps for slesnode02. You can copy the multipath.conf file since the IDs should be the
same on both nodes for shared disks.
Page 41
41 Step By Step SLES 11 SP2 Cluster on VM –Ben Yau 2/2014- http://geekswing.com
PIC 3.8: slesnode02: “Summary and Click Finish”
You should also see a New SCSI Controller being added of type Paravirtual (default). We need to change
this. Instructions below and pics to follow
Change the new SCSI Controller type (you are already in slesnode02's "Edit Settings")
Now you are ready to install your cluster software.
Like this free excerpt? Get the full version for $3! This is a free 40 page excerpt of my 130 page ebook “Building A Two Node SLES 11 SP2 Linux Cluster On
VMware”. To get the full 130 page ebook for $3, visit
http://geekswing.com/geek/building-a-two-node-sles11-sp2-linux-cluster-on-vmware/
More ebooks! http://geekswing.com/ebooks/