Building System Documentation in a Hurry Help yourself to a cup of water (in the foyer) or coffee. Turn right at the plants and right again to find the coffee and restrooms. There is a snack machine in the kitchen.
Transcript
Building System Documentation in a Hurry
Help yourself to a cup of water (in the foyer) or coffee.Turn right at the plants and right again to find the coffee and restrooms. There is a snack machine in the kitchen.
Our Objectives Today
• Look at the advantages of having good documentation
• Review the ERP project documentation process
• Look at the impact of layout
• One screen is worth 1,000 words – how to capture on-screen data
Why Create Documentation?
User acceptance is key
The success of your system depends upon your users’ success.
The user only needs to know two things:– your business procedure– how to complete the Banner process that
supports the procedure
Good documentation
• Increases adoption/compliance
• Cuts training time
• Reduces uncertainty and error
• Serves as a point of reference for agreement, revision, refinement
Well-Prepared Documentation
• is easy to read and understand
• contains screen shots
• provides procedural information
• incorporates reference information
• gives contacts for questions & help
• is easy to distribute via print, e-mail
• is easy to update/change
Activity 1Open Internet Explorer, browse to cnn.comHold the Shift key, press the PrtScn key.Open Paint (Start—programs—accessories—Paint)
Select Edit menu-Paste (ctrl-v)
Select File menu – Save
Open a new Word documentSelect Edit menu-Paste (ctrl-v)
Select File menu -- Save
Activity 1, continued
Open your saved Paint file.
Use the Select tool to highlight one part of the screen
Select Edit menu – Cut
Select File menu – New (say no to dialogue)
Select Edit menu – Paste
Select File menu -- Save
the Documentation Process
Teaming up to createdocumentation
Department experts:• Document business
processes• Provide feedback on
Banner procedures• Identify process
owners and helpers• Eventually assume
ownership of docs
Project K.E.Y.S. staff:• Document Banner
processes• Integrate Banner and
business procedures• Produce finished
documentation• Distribute docs via the
project web site
The hard part: collecting the information
• Who has the procedure information?
• When can you get this from them?
• How will you track down details?
• Who can demonstrate the screens?
• Who can help you proofread and check your work?
The easy part: documenting the procedure
• jot down the steps
• get the screen shots
• use the template to assemble the pieces
• have a helper assemble the document
• always have someone check your work
• send an incomplete document to the process owner(s) asking for feedback
ERP Template
• our goal is to present 1 screen with as much step-by-step instruction as practical
• one screen and step table per page(or one screen, zoom detail, and step table per page)
• leave blank space for notes
• or design your own template – just be clear and consistent
Inch by Inch, Docs A Cinch
• if you don’t have complete information, distribute the step-by-step text procedure
• when time permits, add key screen shots and fill in the business procedure information
• this gives you time to put the document into a template
• post a copy of the ‘official’ version of the document where everyone can find it
• expect feedback and frequent revision
Keep it Simple
Make it your goal to produce plain, understandable documentation. You are likely to achieve this goal!
Content experts are few, word processors are many -- if someone wants the material to look fancier, they can take your content and run with it.
Activity 2Look at the ERP project template provided on your
desktop.
Using the template, document the procedure for the following task using step tables and screen shots:
“How to locate the Expense Reimbursementforms in FlashLine.”
Document Layout
Layout improves comprehension
• Horizontal (landscape) is for screen presentation
• Vertical (portrait) is for reading and printing
• a template ensures that information is complete, easy to read, familiar
• leave blank space on the page
• minimize distracting graphical elements
Horizontal layout: large image, great detail,but this uses a lot of paper
Vertical Layout: the image is smaller,but text is easier to read.
Zoom layout: makes the important connection between the ‘big picture’ and a detail area.
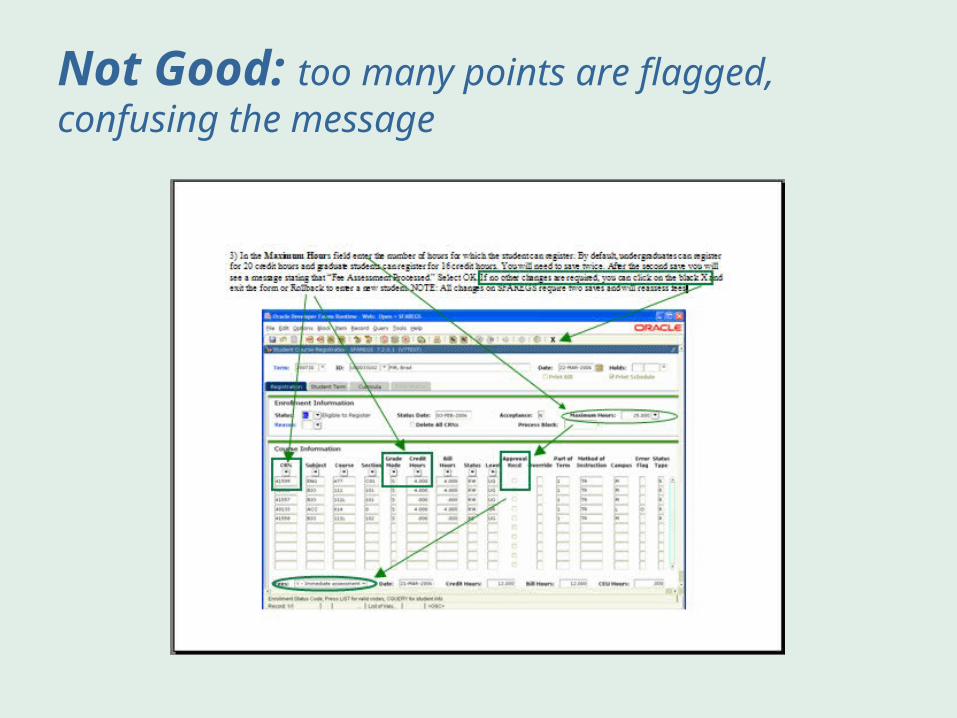
Not Good: too many points are flagged, confusing the message
Better: focus on one key pointor procedure per page
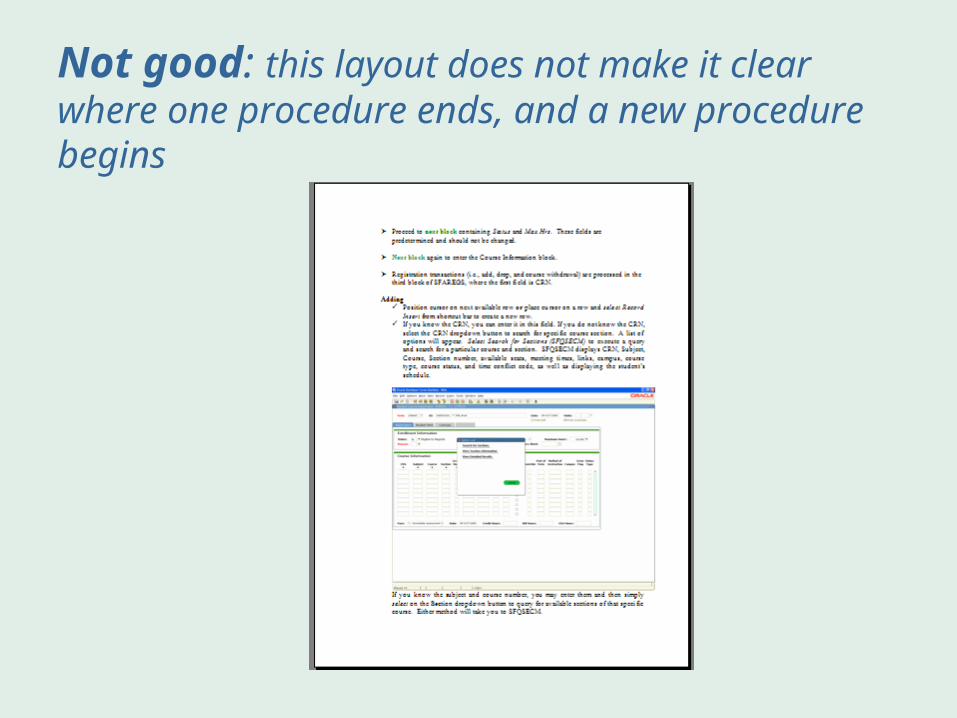
Not good: this layout does not make it clear where one procedure ends, and a new procedure begins
Better: a new procedure starts on a new page, is clearly identified
Type improves comprehension
• use two typefaces at most
• use contrast for emphasis: size, style, weight
• think of what a photocopy will look like
• use a style sheet or template for a standard look
• use tables to organize your information
Activity 3
Open Internet Explorer
Browse to techsmith.com
Click the ‘try it’ button for SnagIt
Download and install SnagIt on your computer – we’ll use it for the next activity.
While you’re downloading, enjoy a quick demo of Snagit
Capturing Screen Images
Bad Screen Capture – why?
Good Screen Capture – why?
Better Screen Capture – why?
Detail Screen Capture and Zoom with highlight and callout
SAVE
Good Screen Images
• show the point of discussion in context
• are large enough to be readable
• are cropped/reduced to an appropriate size
• have arrow pointers and highlight boxes when needed
• are not too many, nor too few to do the job
Collecting Images
• more is better!
• put images in a folder titled with the process name
• title each image sequentially: namechange1, namechange2, etc.
• capturing open menus and some functions is tricky – use SnagIt for difficult captures
• best: snag a program window sized to the smallest possible dimensions
Selecting Images
After the first full-screen image, the rest may not need to be as large, allowing you to:
• crop to the window and menus
• crop to the just the active area of the window
• enlarge the important part of the screen
• use step instructions to take the reader beyond the 1st screen pictured
Activity 4
Explore SnagIt (see handout)
Open any web page and practice snagging, cropping, and saving specific parts of the screen.
Use the edit tools to create 1) highlight boxes, 2) rubber stamp accents, and 3) text callouts.
What did you learn today that you will use?
Seminar Evaluation & Contacts
• Please fill out the evaluation form and leave it by the door.
Thank you for joining us today! contact us for assistance with Banner document preparation –