29
Business Central Wireless Manager 2.1 Application How to Start Guide July 2016 202-11632-02 350 E. Plumeria Drive San Jose, CA 95134 USA
Business Central WirelessManager 2.1 ApplicationHow to Start Guide
July 2016202-11632-02
350 E. Plumeria DriveSan Jose, CA 95134USA

SupportThank you for purchasing this NETGEAR product.You can visit www.netgear.com/support to register yourproduct, get help, access the latest downloads and user manuals, and join our community. We recommend thatyou use only official NETGEAR support resources.
Trademarks© NETGEAR, Inc., NETGEAR and the NETGEAR Logo are trademarks of NETGEAR, Inc. Any non-NETGEARtrademarks are used for reference purposes only.
2
Business Central Wireless Manager 2.1 Application

Contents
Chapter 1 Prepare Your Access Points, Subscribe, and Get Started
Basic Concepts......................................................................................................5Prepare Your NETGEAR WiFi Access Points for Cloud Management...................6
Upgrade to the Required Cloud-Enabled Firmware Version..............................7Upgrade an Access Point From BCWM 1.0 to BCWM 2.0 or a Later BCWMVersion............................................................................................................12
Subscribe to the BCWM 2.0 or a Later BCWM Version.......................................16Set Up a Location With a WiFi Network and Access Point..................................18
Add Your First Location....................................................................................18Add a First WiFi Network to a Location...........................................................20Add a First Access Point to a Location............................................................23
Monitor WiFi Traffic and Client Usage at a Location............................................25
Appendix A Upgrade to the Minimum Required Standalone Firmware Version
3

1Prepare Your Access Points, Subscribe,and Get Started
This how to start guide provides information about how to prepare your access points for cloud management,how to subscribe to the NETGEAR Business Central Wireless Manager (BCWM), and how to get started withthe BCWM 2.1 application.
For more information about the BCWM 2.1 application, visit businesscentral.netgear.com.
For extensive configuration procedures, see the Business Central Wireless Manager 2.1 User Manual, whichyou can download from downloadcenter.netgear.com.
This chapter includes the following sections:
• Basic Concepts on page 5
• Prepare Your NETGEAR WiFi Access Points for Cloud Management on page 6
• Subscribe to the BCWM 2.0 or a Later BCWM Version on page 16
• Set Up a Location With a WiFi Network and Access Point on page 18
• Monitor WiFi Traffic and Client Usage at a Location on page 25
In this manual, WiFi and wireless are exchangeable terms.Note
The BCWM 2.1 application supports the desktop versions of the following browsers:Note
• Microsoft Internet Explorer 11 or later
• Mozilla Firefox 15 or later
• Google Chrome 15 or later
• Apple Safari 5 or later
• Microsoft Edge 13 or later
4
Basic Concepts
The NETGEAR Business Central Wireless Manager (BCWM) 2.1 application is a cloud managementapplication that you can access from any computer to centrally manage cloud-enabled NETGEAR accesspoints. Using the BCWM 2.1 application, you can add, configure, and monitor multiple WiFi networks in thecloud.
The BCWM cloud management solution is intended primarily for single or multisite small and medium-sizedbusinesses, K–12 education, small to medium hospitalities, retailers, and healthcare organizations.
In this manual, the BCWM 2.1 application is referred to as the application.Note
The BCWM application functions with the following basic concepts:
• Service locations.With the application, the entire provisioning process is service location based. Accesspoints and WiFi networks are installed at physical addresses that are referred to as service locations,or simply locations. In the application, these locations are logical locations and can span multiple Layer2 or Layer 3 network segments.
• Automatic network provisioning. All WiFi networks configured at a location are automatically supportedby all access points at that location.With standalone access points, you add a WiFi network to an accesspoint. With managed access points, the application assigns the WiFi network automatically to one ormore access points, depending on the number of WiFi networks and the number of access points atthe location.For access points that you assign to a location, you can attach building labels and floor labels to them.However, these are just labels for organization.
• Offline location and network provisioning.You can set up locations and WiFi networks while offline.Then, add access points and assign them to locations, allowing the networks to go online.
• Location-based radio management. For each location independently, you can manage the radiosettings for individual or all access points and run or schedule automatic resource management for allaccess points.
• Location-based firmware management. For each location independently, you can run or schedulefirmware updates for individual or all access points and reboot all access points or schedule to rebootthem.
• Monitoring.You can display WiFi network and access point health; WiFi network and access pointusage; WiFi network location maps; alarms; statistics for networks, access points, traffic, and clients;and neighboring access points, with the option to classify access points into known and unknown.
• Application account management.You can add accounts to the application, assign licenses to anaccount, assign locations to an account, assign access points to an account, and add and inviteapplication users to an account.
Prepare Your Access Points, Subscribe, and Get Started
5
Business Central Wireless Manager 2.1 Application

Prepare Your NETGEAR WiFi Access Points for CloudManagement
Before the application can manage an access point, the access point must run the required firmware versionthat is cloud enabled.
This release supports the following NETGEAR WiFi access points running cloud-enabled firmware:
• WAC730 ProSAFE 3x3 Dual-Band Wireless AC Access Point
• WAC720 ProSAFE 2x2 Dual-Band Wireless AC Access Point
• WNDAP660 ProSAFE Dual-Band Wireless-N Access Point
• WNDAP360 ProSAFE Dual-Band Wireless-N Access Point
• WNDAP350 ProSAFE Dual-Band Wireless-N Access Point
• WNAP320 ProSAFE Wireless-N Access Point
• WNAP210v2 ProSAFE Wireless-N Access Point
If your access point runs a standalone firmware version that is not cloud enabled, consult the following table.
Table 1. Firmware requirements for upgrade to the cloud-enabled firmware version
RequiredCloud-EnabledFirmware
Minimum Required StandaloneFirmware for Upgrade toCloud-Enabled Firmware
Access Point Model
v3.5.6.0 or laterv3.1.1.0 or a later standalone versionWAC730 ProSAFE 3x3 Dual-Band Wireless AC Access Point
v3.5.6.0 or laterv3.1.1.0 or a later standalone versionWAC720 ProSAFE 2x2 Dual-Band Wireless AC Access Point
v3.5.5.0 or laterv2.0.5 or a later standalone versionWNDAP660 ProSAFE Dual-Band Wireless-N Access Point
v3.5.5.0 or laterv2.1.12 or a later standalone versionWNDAP360 ProSAFE Dual-Band Wireless-N Access Point
v3.5.5.0 or laterv2.1.9 or a later standalone versionWNDAP350 ProSAFE Dual-Band Wireless-N Access Point
v3.5.5.0 or laterv2.1.6 or a later standalone versionWNAP320 ProSAFE Wireless-N Access Point
v3.5.5.0 or laterv2.1.5 or a later standalone versionWNAP210v2 ProSAFE Wireless-N Access Point
The table lists the minimum required standalone firmware version that an access point must run for you tobe able to upgrade the access point to the required cloud-enabled firmware version. Note the following aboutupgrades:
• If your access point does run the minimum required standalone firmware version or a later standalonefirmware version, you can upgrade directly to the required cloud-enabled firmware. For more information,see Upgrade to the Required Cloud-Enabled Firmware Version on page 7.
• In the unlikely situation that your access point runs a standalone firmware version that is earlier thanthe minimum required standalone firmware version, you first must upgrade the access point to theminimum required standalone firmware version before you can upgrade the access point to the requiredcloud-enabled firmware version. For more information, see Appendix A, Upgrade to the MinimumRequired Standalone Firmware Version on page 27.
Prepare Your Access Points, Subscribe, and Get Started
6
Business Central Wireless Manager 2.1 Application
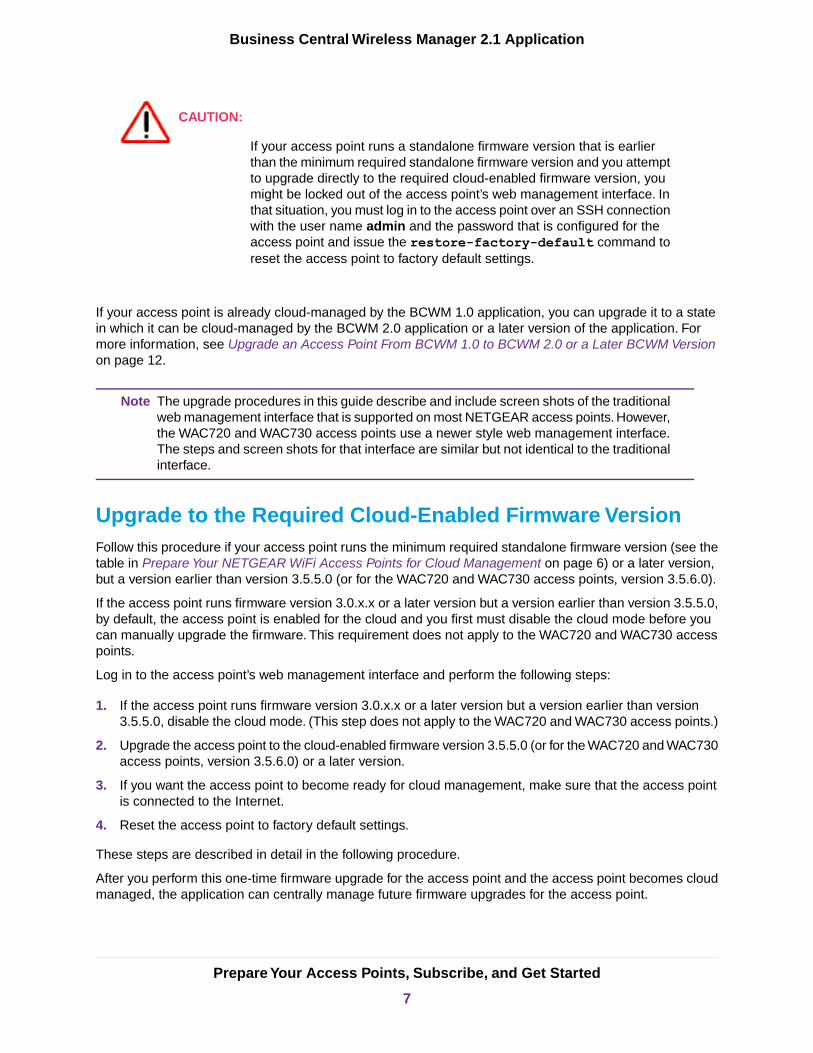
CAUTION:
If your access point runs a standalone firmware version that is earlierthan the minimum required standalone firmware version and you attemptto upgrade directly to the required cloud-enabled firmware version, youmight be locked out of the access point’s web management interface. Inthat situation, you must log in to the access point over an SSH connectionwith the user name admin and the password that is configured for theaccess point and issue the restore-factory-default command toreset the access point to factory default settings.
If your access point is already cloud-managed by the BCWM 1.0 application, you can upgrade it to a statein which it can be cloud-managed by the BCWM 2.0 application or a later version of the application. Formore information, see Upgrade an Access Point From BCWM 1.0 to BCWM 2.0 or a Later BCWM Versionon page 12.
The upgrade procedures in this guide describe and include screen shots of the traditionalweb management interface that is supported on most NETGEAR access points. However,the WAC720 and WAC730 access points use a newer style web management interface.The steps and screen shots for that interface are similar but not identical to the traditionalinterface.
Note
Upgrade to the Required Cloud-Enabled Firmware VersionFollow this procedure if your access point runs the minimum required standalone firmware version (see thetable in Prepare Your NETGEAR WiFi Access Points for Cloud Management on page 6) or a later version,but a version earlier than version 3.5.5.0 (or for the WAC720 and WAC730 access points, version 3.5.6.0).
If the access point runs firmware version 3.0.x.x or a later version but a version earlier than version 3.5.5.0,by default, the access point is enabled for the cloud and you first must disable the cloud mode before youcan manually upgrade the firmware. This requirement does not apply to the WAC720 and WAC730 accesspoints.
Log in to the access point’s web management interface and perform the following steps:
1. If the access point runs firmware version 3.0.x.x or a later version but a version earlier than version3.5.5.0, disable the cloud mode. (This step does not apply to the WAC720 and WAC730 access points.)
2. Upgrade the access point to the cloud-enabled firmware version 3.5.5.0 (or for the WAC720 and WAC730access points, version 3.5.6.0) or a later version.
3. If you want the access point to become ready for cloud management, make sure that the access pointis connected to the Internet.
4. Reset the access point to factory default settings.
These steps are described in detail in the following procedure.
After you perform this one-time firmware upgrade for the access point and the access point becomes cloudmanaged, the application can centrally manage future firmware upgrades for the access point.
Prepare Your Access Points, Subscribe, and Get Started
7
Business Central Wireless Manager 2.1 Application

IMPORTANT:After you upgrade an access point to the cloud-enabled firmware, you mustreset the access point to factory default settings as described in the followingprocedure.
To upgrade an access point to the required cloud-enabled firmware version and enable theaccess point for the cloud:
1. Visit the support website at netgear.com/support.
2. Navigate to the page for your access point and download firmware version 3.5.5.0 (or for the WAC720and WAC730 access points, version 3.5.6.0) or a later version.
3. Read the release notes before upgrading the firmware.
4. If the access point does not receive power through Power over Ethernet (PoE), apply power to theaccess point and wait for the access point to complete its startup procedure.
5. Open a browser on your computer.
6. In the address bar, enter the IP address of the access point.
By default, the access point functions as a DHCP client. If the access point is installed in a network thatincludes a DHCP server, the IP address of the access point is issued by the DHCP server.
If the access point is not connected to a DHCP server or is accessible only over its default IP address,do the following:
a. Change the IP address of your computer to an IP address in the 192.168.0.x subnet, which is thesubnet in which the access point’s default IP address is located.
For example, change the computer’s IP address to 192.168.0.210.
b. Connect your computer to the access point with an Ethernet cable.
c. In the address bar of the browser, enter the default IP address of the access point:
• WAC730. 192.168.0.100
• WAC720. 192.168.0.100
• WNDAP660. 192.168.0.100
• WNDAP360. 192.168.0.100
• WNDAP350. 192.168.0.237
• WNAP320. 192.168.0.100
• WNAP210v2. 192.168.0.236
A login window opens.
7. Enter the user name and password.
The user name is admin. The default password is password.
8. Click the LOGIN button.
The General page displays.
Prepare Your Access Points, Subscribe, and Get Started
8
Business Central Wireless Manager 2.1 Application
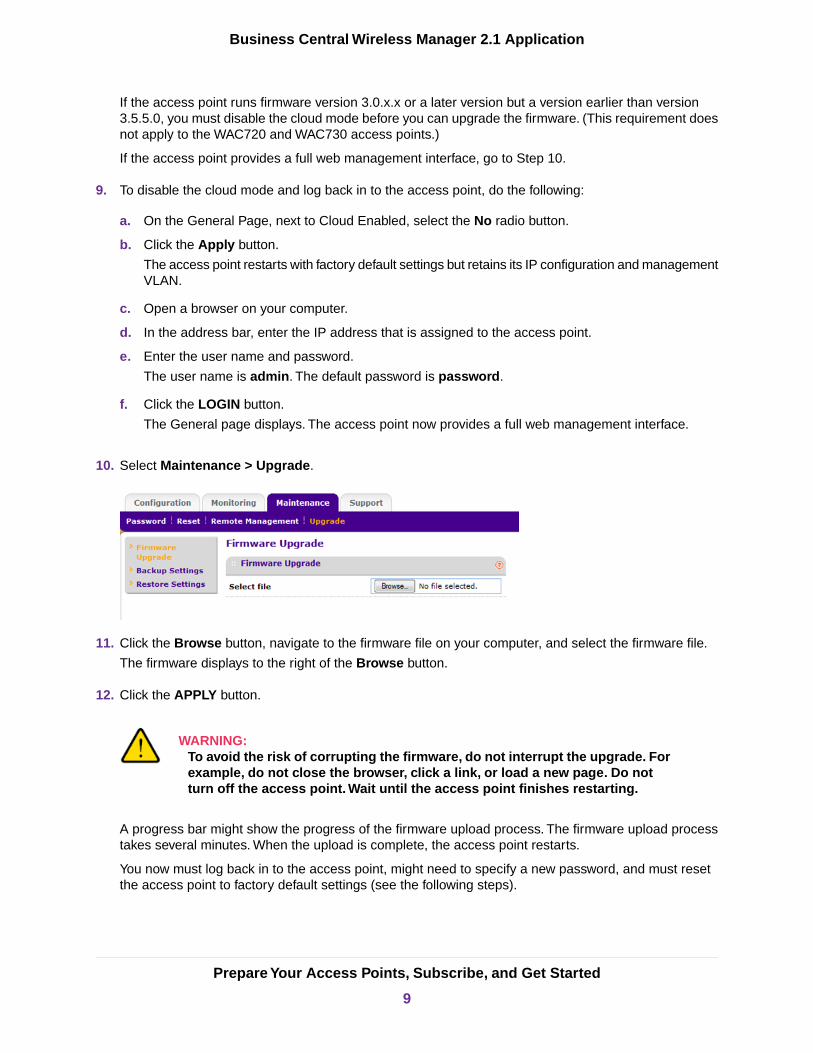
If the access point runs firmware version 3.0.x.x or a later version but a version earlier than version3.5.5.0, you must disable the cloud mode before you can upgrade the firmware. (This requirement doesnot apply to the WAC720 and WAC730 access points.)
If the access point provides a full web management interface, go to Step 10.
9. To disable the cloud mode and log back in to the access point, do the following:
a. On the General Page, next to Cloud Enabled, select the No radio button.
b. Click the Apply button.
The access point restarts with factory default settings but retains its IP configuration and managementVLAN.
c. Open a browser on your computer.
d. In the address bar, enter the IP address that is assigned to the access point.
e. Enter the user name and password.
The user name is admin. The default password is password.
f. Click the LOGIN button.
The General page displays. The access point now provides a full web management interface.
10. Select Maintenance > Upgrade.
11. Click the Browse button, navigate to the firmware file on your computer, and select the firmware file.
The firmware displays to the right of the Browse button.
12. Click the APPLY button.
WARNING:To avoid the risk of corrupting the firmware, do not interrupt the upgrade. Forexample, do not close the browser, click a link, or load a new page. Do notturn off the access point. Wait until the access point finishes restarting.
A progress bar might show the progress of the firmware upload process. The firmware upload processtakes several minutes. When the upload is complete, the access point restarts.
You now must log back in to the access point, might need to specify a new password, and must resetthe access point to factory default settings (see the following steps).
Prepare Your Access Points, Subscribe, and Get Started
9
Business Central Wireless Manager 2.1 Application
When the access point runs firmware version 3.5.5.0 (or for the WAC720 and WAC730access points, version 3.5.6.0) or a later version, by default, the access point is enabledfor the cloud and operates with a limited web management interface (only theConfiguration and Monitoring menu tabs display).
Note
13. Log back in to the access point by doing the following:
a. Open a browser on your computer.
b. In the address bar, enter the IP address that is assigned to the access point.
A login window opens.
c. Enter the user name and password.
The user name is admin. The default password is password.
d. Click the LOGIN button.
If the Change Password page displays, go to Step 14.
If the General page displays, go to Step 15.
14. If the Change Password page displays, specify a new password by doing the following:
a. In the Current Password field, enter the existing password, which is the default password.
b. In the New Password and Repeat New Password fields, specify the new password.
c. Click the APPLY button.
A login window opens again.
d. Enter the user name and new password.
The user name is admin. The new password is the one that you just specified.
e. Click the LOGIN button.
The General page displays.
Prepare Your Access Points, Subscribe, and Get Started
10
Business Central Wireless Manager 2.1 Application

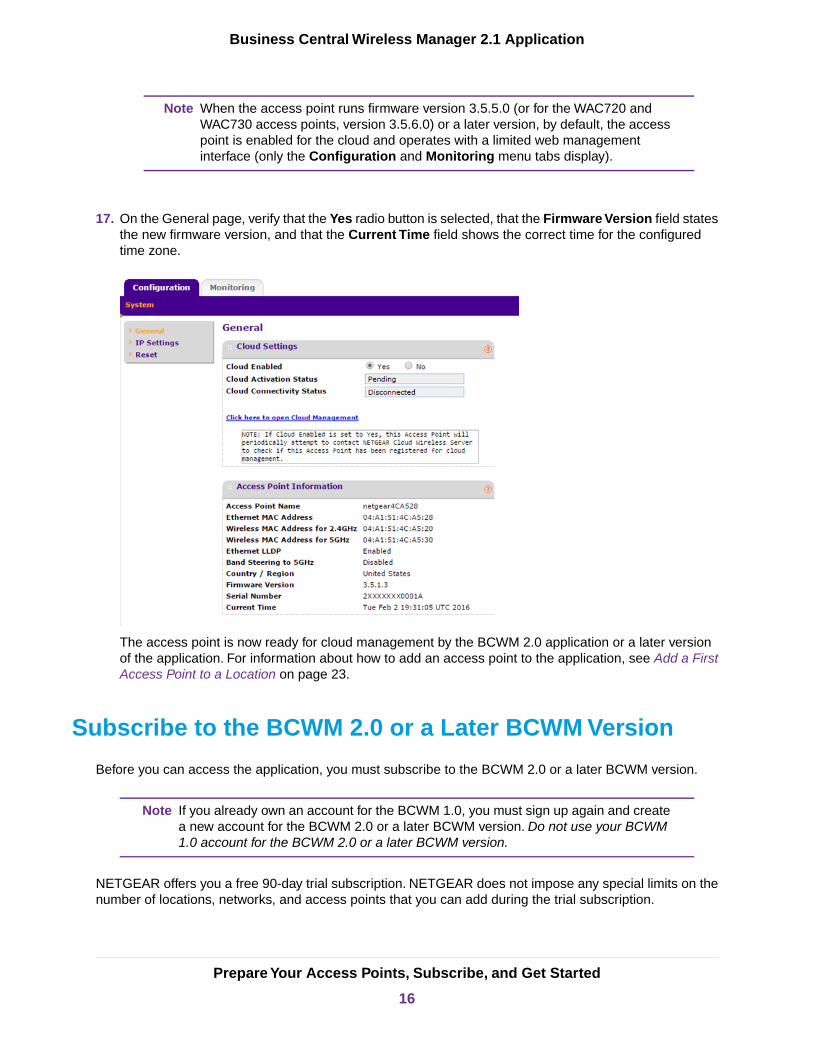
15. On the General page, verify that the Yes radio button is selected and that the Firmware Version fieldstates the new firmware version.
16. If the access point is not yet connected to the Internet and you want it to become ready for cloudmanagement, connect it to the Internet.
Wait several minutes. The access point must get an Internet connection and reach an NTP server.
You can also connect the access point to the Internet later. In that case, skip this stepand the following step. After you reset the access point to factory default settings asdescribed in Step 18, the access point is not ready for cloud management until youconnect it to the Internet.
Note
17. To verify that the access point can reach an NTP server, make sure that the Current Time field on theGeneral page (see the previous figure) shows the correct time for the configured time zone.
18. Reset the access point to factory default settings by doing the following:
Prepare Your Access Points, Subscribe, and Get Started
11
Business Central Wireless Manager 2.1 Application
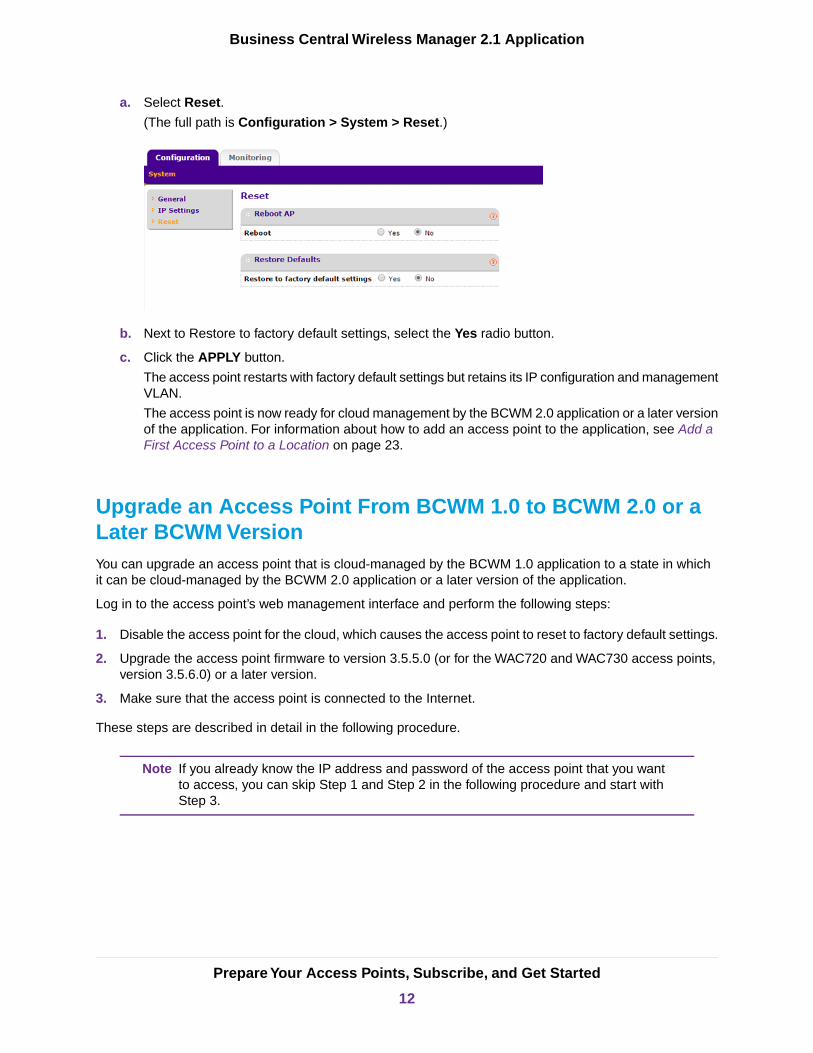
a. Select Reset.
(The full path is Configuration > System > Reset.)
b. Next to Restore to factory default settings, select the Yes radio button.
c. Click the APPLY button.
The access point restarts with factory default settings but retains its IP configuration and managementVLAN.
The access point is now ready for cloud management by the BCWM 2.0 application or a later versionof the application. For information about how to add an access point to the application, see Add aFirst Access Point to a Location on page 23.
Upgrade an Access Point From BCWM 1.0 to BCWM 2.0 or aLater BCWM VersionYou can upgrade an access point that is cloud-managed by the BCWM 1.0 application to a state in whichit can be cloud-managed by the BCWM 2.0 application or a later version of the application.
Log in to the access point’s web management interface and perform the following steps:
1. Disable the access point for the cloud, which causes the access point to reset to factory default settings.
2. Upgrade the access point firmware to version 3.5.5.0 (or for the WAC720 and WAC730 access points,version 3.5.6.0) or a later version.
3. Make sure that the access point is connected to the Internet.
These steps are described in detail in the following procedure.
If you already know the IP address and password of the access point that you wantto access, you can skip Step 1 and Step 2 in the following procedure and start withStep 3.
Note
Prepare Your Access Points, Subscribe, and Get Started
12
Business Central Wireless Manager 2.1 Application

To upgrade an access point that is cloud-managed by the BCWM 1.0 application to a statein which it can be cloud-managed by the BCWM 2.0 application or a later version of theapplication:
1. To view the IP address of the access point in the BCWM 1.0 application, do the following:
a. Open a browser on your computer.
b. In the address bar, enter https://wireless.netgear.com.
The application login page displays.
c. Enter the email address and password for your BCWM 1.0 account and click the LOG IN button.
d. The Home page displays.
e. Select Inventory.
All access point configurations display. By default, the configurations are sorted by access pointname.
f. On the right side of the page, click the access point configuration for which you want to view the IPaddress.
The Access Point Profile section displays information about the access point.
g. Scroll down and click the IP Settings heading.
The IP address displays. Take note of the IP address, which you will need in Step 7.
2. To view the password of the access point in the BCWM 1.0 application, do the following:
a. Select Configuration.
The All Locations page displays.
b. In the LOCATIONS tree on the left, click the location to which the access point is assigned.
The Location Profile page displays.
c. On the right side of the page, click the AP Local Management heading.
The AP Local Management section expands.
d. To display the current password, select the Show Characters check box.
Take note of the password, which you will need in Step 8.
3. Visit the support website at netgear.com/support.
4. Navigate to the page for your access point and download firmware version 3.5.5.0 (or for the WAC720and WAC730 access points, version 3.5.6.0) or a later version.
5. Read the release notes before upgrading the firmware.
6. Open a browser on your computer.
7. In the address bar, enter the IP address of the access point.
Use the IP address that you determined in Step 1.
A login window opens.
8. Enter the user name and password.
The user name is admin. Use the password that you noted in Step 2.
Prepare Your Access Points, Subscribe, and Get Started
13
Business Central Wireless Manager 2.1 Application

9. Click the LOGIN button.
The General page displays.
10. Disable the access point for the cloud by doing the following:
a. Next to Cloud Enabled, select the No radio button.
b. Click the APPLY button.
The access point restarts with a full web management interface and factory default settings, butretains its IP configuration and management VLAN.
You now must log back in to the access point, might need to specify a new password, and mustupgrade the firmware (see the following steps).
11. Log back in to the access point by doing the following:
a. Open a browser on your computer.
b. In the address bar, enter the IP address of the access point.
Because the access point retained its IP configuration, use the same IP address as the one thatyou used in Step 7.
A login window opens.
c. Enter the user name and password.
The user name is admin. The default password is password.
d. Click the LOGIN button.
If the Change Password page displays, go to Step 12.
If the General page displays, go to Step 13.
12. If the Change Password page displays, specify a new password by doing the following:
a. In the Current Password field, enter the existing password, which is the default password.
b. In the New Password and Repeat New Password fields, specify the new password.
c. Click the APPLY button.
A login window opens again.
d. Enter the user name and new password.
The user name is admin. The new password is the one that you just specified.
e. Click the LOGIN button.
The General page displays.
Prepare Your Access Points, Subscribe, and Get Started
14
Business Central Wireless Manager 2.1 Application

13. Select Maintenance > Upgrade.
14. Click the Browse button, navigate to the firmware file on your computer, and select the firmware filethat you downloaded in Step 4.
The firmware displays to the right of the Browse button.
15. Click the APPLY button.
WARNING:To avoid the risk of corrupting the firmware, do not interrupt the upgrade. Forexample, do not close the browser, click a link, or load a new page. Do notturn off the access point. Wait until the access point finishes restarting.
A progress bar might show the progress of the firmware upload process. The firmware upload processtakes several minutes. When the upload is complete, the access point restarts.
16. To verify that the access point runs the new firmware version, is enabled for the cloud, and is connectedto the Internet, log back in to the access point by doing the following:
a. Open a browser on your computer.
b. In the address bar, enter the IP address of the access point.
Because the access point retained its IP configuration, use the same IP address as the one thatyou used in Step 7.
A login window opens.
c. Enter the user name and password.
The user name is admin.The password is either the default password (password) or the passwordthat you specified in Step 12.
d. Click the LOGIN button.
The General page displays.
Prepare Your Access Points, Subscribe, and Get Started
15
Business Central Wireless Manager 2.1 Application
When the access point runs firmware version 3.5.5.0 (or for the WAC720 andWAC730 access points, version 3.5.6.0) or a later version, by default, the accesspoint is enabled for the cloud and operates with a limited web managementinterface (only the Configuration and Monitoring menu tabs display).
Note
17. On the General page, verify that the Yes radio button is selected, that the Firmware Version field statesthe new firmware version, and that the Current Time field shows the correct time for the configuredtime zone.
The access point is now ready for cloud management by the BCWM 2.0 application or a later versionof the application. For information about how to add an access point to the application, see Add a FirstAccess Point to a Location on page 23.
Subscribe to the BCWM 2.0 or a Later BCWM Version
Before you can access the application, you must subscribe to the BCWM 2.0 or a later BCWM version.
If you already own an account for the BCWM 1.0, you must sign up again and createa new account for the BCWM 2.0 or a later BCWM version. Do not use your BCWM1.0 account for the BCWM 2.0 or a later BCWM version.
Note
NETGEAR offers you a free 90-day trial subscription. NETGEAR does not impose any special limits on thenumber of locations, networks, and access points that you can add during the trial subscription.
Prepare Your Access Points, Subscribe, and Get Started
16
Business Central Wireless Manager 2.1 Application
To subscribe to the BCWM 2.0 or a later BCWM version:
1. Open a browser on your computer.
2. In the address bar, enter https://bc.netgear.com.
The application login page displays.
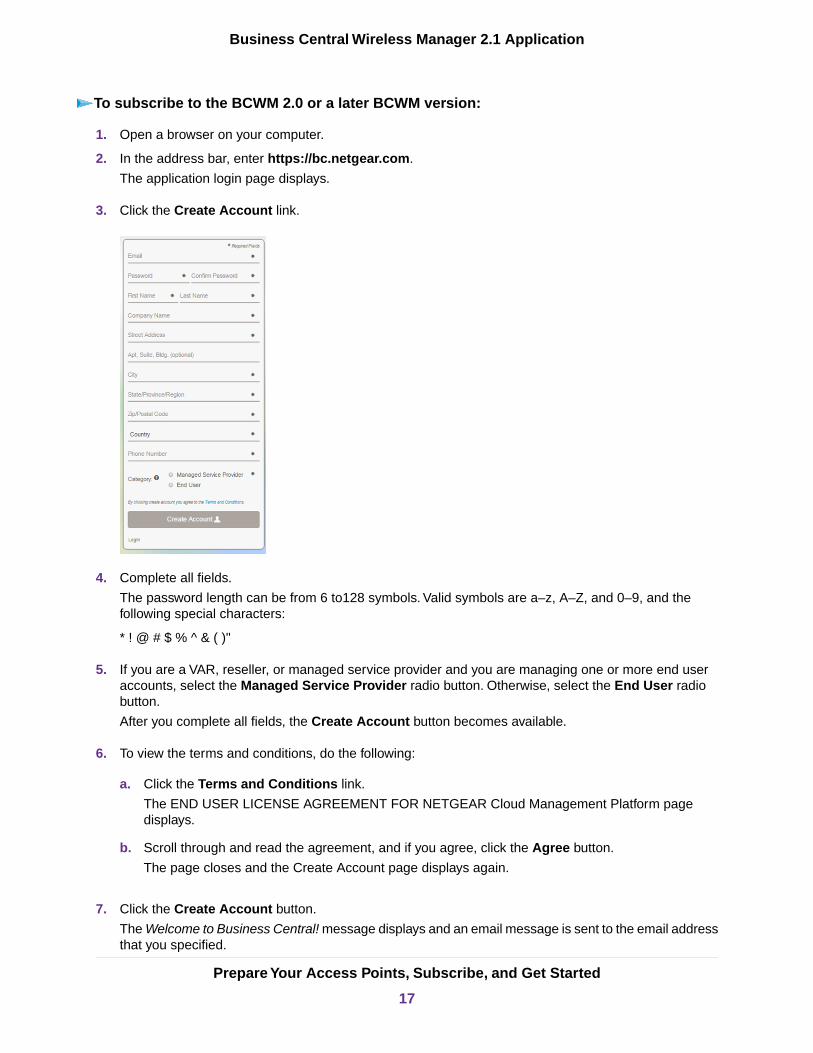
3. Click the Create Account link.
4. Complete all fields.
The password length can be from 6 to128 symbols. Valid symbols are a–z, A–Z, and 0–9, and thefollowing special characters:
* ! @ # $ % ^ & ( )"
5. If you are a VAR, reseller, or managed service provider and you are managing one or more end useraccounts, select the Managed Service Provider radio button. Otherwise, select the End User radiobutton.
After you complete all fields, the Create Account button becomes available.
6. To view the terms and conditions, do the following:
a. Click the Terms and Conditions link.
The END USER LICENSE AGREEMENT FOR NETGEAR Cloud Management Platform pagedisplays.
b. Scroll through and read the agreement, and if you agree, click the Agree button.
The page closes and the Create Account page displays again.
7. Click the Create Account button.
The Welcome to Business Central! message displays and an email message is sent to the email addressthat you specified.
Prepare Your Access Points, Subscribe, and Get Started
17
Business Central Wireless Manager 2.1 Application

8. Go to your email inbox and open the email message.
9. Click the Activate Account button in the email.
The application login page displays again and shows the message Email Confirmed. Please login.Youremail address and password are entered automatically.
10. To log in to the application, click the Login button.
The Monitoring page displays.
Set Up a Location With a WiFi Network and Access Point
The following procedures describe how you can set up a basic location, add a single WiFi network, and adda single access point. Setting up a complex location with multiple WiFi networks and multiple access pointsis just an extension of these procedures:You simply add more WiFi networks and access points to thelocation.
Add Your First LocationBefore you can add WiFi networks and access points, you must set up at least one location. For accesspoints (and therefore WiFi networks) to become active, you must assign the location to a license account.
To add your first location and assign it to a license account:
1. Open a browser on your computer.
2. In the address bar, enter https://bc.netgear.com.
The application login page displays.
3. Enter the email address and password for your BCWM and click the Login button.
The Monitoring page displays.
4. Select Configuration.
The Configuration page displays and does not yet show any locations.
Prepare Your Access Points, Subscribe, and Get Started
18
Business Central Wireless Manager 2.1 Application

5. Click the + New Location button.
6. In the Location Search field, enter a name or address and select the location that Google searchgenerates.
The location displays on the map.
7. Make sure that the correct country is selected from the Country menu.
When you complete the Location Search field, the country is automatically selected from the Countrymenu.
The selection from the Country menu determines the radio settings for access points at the location.Once the location is created, you cannot change the country selection.
8. Enter the location name, contact name, and contact email address that you want to be associated withthe location.
9. In the Device Password field, enter the password for accessing the web management interface of anycloud-managed access point that is assigned to the location.
Click the eye icon to make the password visible.
This password is pushed to all access points that you assign to the location.
The Device Username field shows the fixed user name (admin) for accessing theweb management interface of any cloud-managed access point that is assigned tothe location.You cannot change this name.
Note
10. From the Account menu, select the account to which the location must be assigned.
An account is a set of locations that are funded by the same license. Each location must be assignedto an account with an active license (which can be a trial license) for access points to be licensed and
Prepare Your Access Points, Subscribe, and Get Started
19
Business Central Wireless Manager 2.1 Application

active. The Accounts menu lists the available license accounts. If you did not create a license account,only the default license account is available from the menu.
11. Click the Save button.
Your settings are saved. The location displays in the Locations tree on the left. Below the location inthe tree, the Wireless Networks and Devices headings display.
Add a First WiFi Network to a LocationWhen you add a location (see Add Your First Location on page 18), the application automatically adds aWiFi Networks heading for the location in the Locations tree on the Configuration page, but you must defineone or more WiFi networks that can broadcast at the location.
To add a first WiFi network to a location:
1. Open a browser on your computer.
2. In the address bar, enter https://bc.netgear.com.
The application login page displays.
3. Enter the email address and password for your BCWM and click the Login button.
The Monitoring page displays.
4. Select Configuration.
The Configuration page displays and shows the location that you added (see Add Your First Locationon page 18).
5. In the Locations tree, click Wireless Networks.
The page displays the following message: There are no wireless networks configured for this location.
Prepare Your Access Points, Subscribe, and Get Started
20
Business Central Wireless Manager 2.1 Application

6. Click the + New Wireless Network button.
7. In the SSID field, enter a WiFi network name (SSID).
You can use up to and including 32 ASCII printable (typeable) characters. Do not use extended ASCIIcharacters, control ASCII characters, or ASCII characters that you compose with the Alt key on yourkeyboard.
By default, the application broadcasts the SSID. If you want to hide the SSID so that only users whoknow the SSID can access it, clear the Broadcast SSID check box.
8. From the Bands menu, select the WiFi band or bands.
The default setting is 2.4GHz and 5.0GHz Radios, which applies to dual-band access points only. Ifan access points supports a single band only, the access points broadcasts on that band, unless yourselection from the Bands menu disables that band.
9. To specify a tagged VLAN, select the Specify a tagged VLAN check box, and in the VLAN ID field,enter the VLAN ID.
The VLAN ID is a 12-bit number that identifies the tagged VLAN. If the connection from the accesspoints to the Internet gateway requires an IEEE 802.1Q VLAN tag, you must specify a VLAN ID. Ifmultiple WiFi networks operate over the same physical Ethernet link, VLANs can provide isolation andseparation.
10. From the Authentication Type menu, select the type of authentication:
• Open.You do not need to specify any additional information because the network functions withoutauthentication and encryption.
• WPA Personal. In the Password field, you must specify the password that is required to accessthe network.You can enter up to 63 alphanumeric and special characters.
Prepare Your Access Points, Subscribe, and Get Started
21
Business Central Wireless Manager 2.1 Application

The default encryption method is TKIP+AES, but you can select the Change Data Encryptioncheck box and, from the Data Encryption menu, select TKIP.
• WPA Enterprise.You must specify a RADIUS profile and the network must be connected to aRADIUS server. For more information, see the Business Central Wireless Manager 2.1 User Manual,which you can download from downloadcenter.netgear.com.
11. To assign a captive portal to the WiFi network, click the +Add a Captive Portal button.
For information about configuring a captive portal, see the Business Central Wireless Manager 2.1 UserManual.
12. To specify bandwidth caps, select the Enable Bandwidth Caps check box and adjust the upload anddownload bandwidth caps.
By default, the upload and download bandwidth caps are 1000 Kbps each. For each type of bandwidthcap, the minimum value is 64 Kbps and the maximum value is 10 Gbps.
13. If you select WPA Personal (with TKIP + AES) or WPA Enterprise from the Authentication Typemenu, you can configure fast roaming (802.11r) for the WAC720 and WAC730 access points by doingthe following:
a. Select the Enable Fast Roaming check box.
For more information about fast roaming and associated restrictions, see the Business CentralWireless Manager 2.1 User Manual.
If you select the Enable Fast Roaming check box, the Exchange Fast Roaming Info Over WiredNetwork check box displays.
b. To enable fast roaming information to be exchanged over the wired network, select the ExchangeFast Roaming Info Over Wired Network check box.
If you enable fast roaming, by default, fast roaming information is exchanged over the WiFi networkinstead of the wired network.
14. To enable client isolation, select the Enable Client Isolation check box.
Enabling client isolation on a WiFi network for a location with 802.11ac access pointsenables client isolation for all WiFi networks for those access points.
Note
15. To set up a radio on/off broadcast schedule, select the Create Schedule check box.
For information about setting up a radio on/off broadcast schedule, see the the Business Central WirelessManager 2.1 User Manual.
16. Click the Save button.
Prepare Your Access Points, Subscribe, and Get Started
22
Business Central Wireless Manager 2.1 Application
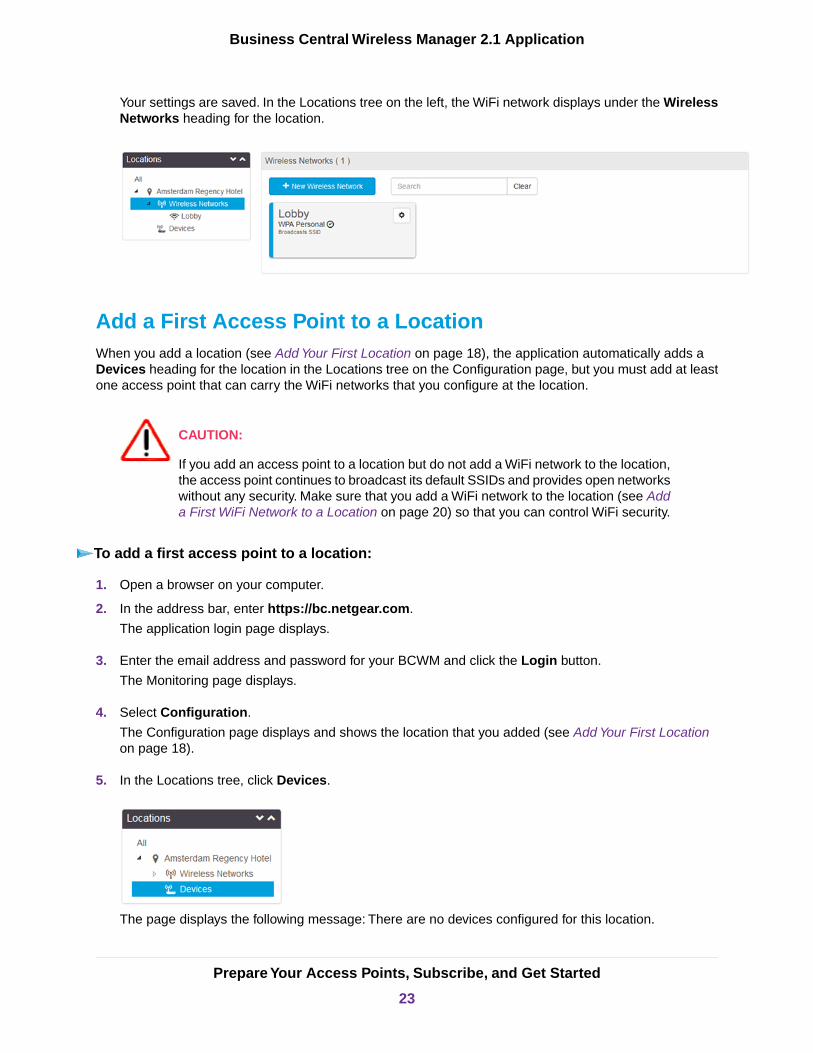
Your settings are saved. In the Locations tree on the left, the WiFi network displays under the WirelessNetworks heading for the location.
Add a First Access Point to a LocationWhen you add a location (see Add Your First Location on page 18), the application automatically adds aDevices heading for the location in the Locations tree on the Configuration page, but you must add at leastone access point that can carry the WiFi networks that you configure at the location.
CAUTION:
If you add an access point to a location but do not add a WiFi network to the location,the access point continues to broadcast its default SSIDs and provides open networkswithout any security. Make sure that you add a WiFi network to the location (see Adda First WiFi Network to a Location on page 20) so that you can control WiFi security.
To add a first access point to a location:
1. Open a browser on your computer.
2. In the address bar, enter https://bc.netgear.com.
The application login page displays.
3. Enter the email address and password for your BCWM and click the Login button.
The Monitoring page displays.
4. Select Configuration.
The Configuration page displays and shows the location that you added (see Add Your First Locationon page 18).
5. In the Locations tree, click Devices.
The page displays the following message: There are no devices configured for this location.
Prepare Your Access Points, Subscribe, and Get Started
23
Business Central Wireless Manager 2.1 Application

6. Click the + New Device button.
7. In the Serial Number field, enter the precise serial number for the access point.
If you do not enter a correct serial number, you cannot add the access point to the network. After youenter a correct serial number, an image of the associated model displays in the Model field, and thegray Invalid Serial button changes into the Save button.
8. In the Device Name field, enter a name for the access point.
The name does not need to be the factory default name.
9. To register the access point with NETGEAR, keep the Register this device check box selected andenter your date of purchase in the Purchase Date field.
By default, the Register this device check box is selected. If you do not need or want to register theaccess point, clear the check box.
10. Click the Save button.
Your settings are saved. In the Locations tree on the left, the access point displays under the Devicesheading for the location.
Note the following about access point states:
• If the access point is not connected to the Internet, the application displays the status Waiting.
• If the location to which you added the access point is assigned to an unlicensed account, the accesspoint displays the status Unlicensed and does not become active until you add a license to the account.For more information, see the Business Central Wireless Manager 2.1 User Manual.
Prepare Your Access Points, Subscribe, and Get Started
24
Business Central Wireless Manager 2.1 Application
CAUTION:
If an access point remains unlicensed and is not active, it broadcasts itsdefault SSIDs and provides open networks without any security. Makesure that the account to which you assigned the location is licensed sothat the access point becomes active.
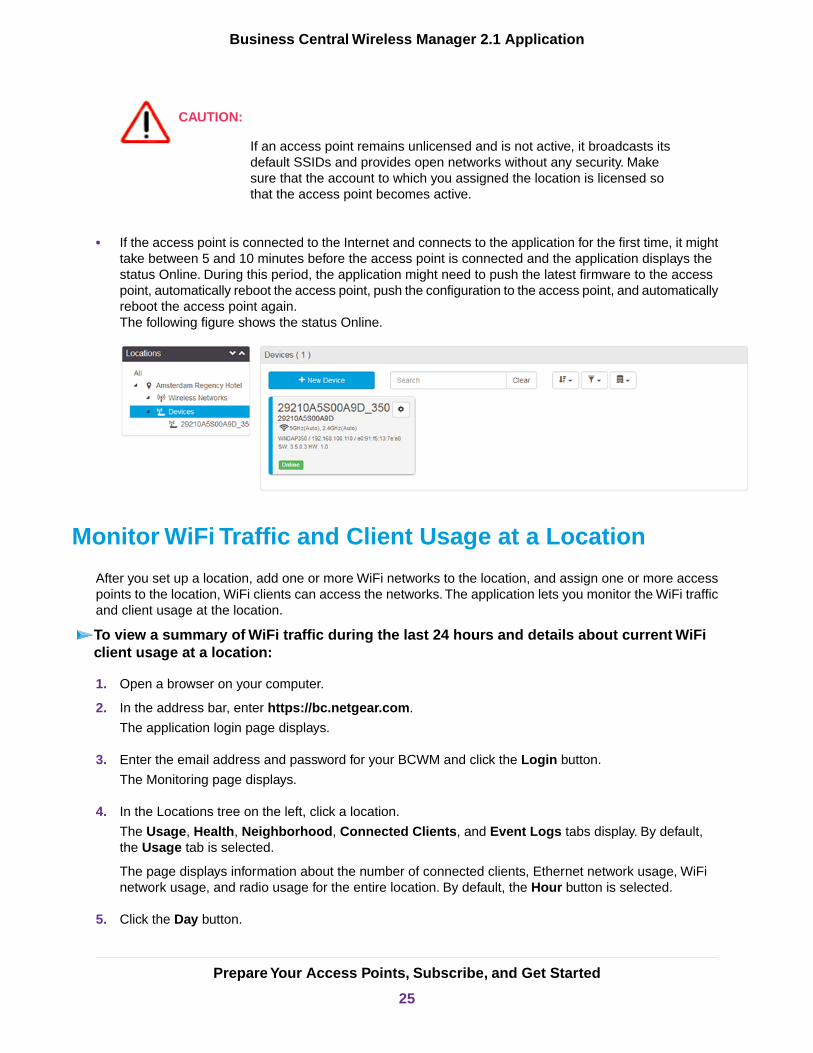
• If the access point is connected to the Internet and connects to the application for the first time, it mighttake between 5 and 10 minutes before the access point is connected and the application displays thestatus Online. During this period, the application might need to push the latest firmware to the accesspoint, automatically reboot the access point, push the configuration to the access point, and automaticallyreboot the access point again.The following figure shows the status Online.
Monitor WiFi Traffic and Client Usage at a Location
After you set up a location, add one or more WiFi networks to the location, and assign one or more accesspoints to the location, WiFi clients can access the networks. The application lets you monitor the WiFi trafficand client usage at the location.
To view a summary of WiFi traffic during the last 24 hours and details about current WiFiclient usage at a location:
1. Open a browser on your computer.
2. In the address bar, enter https://bc.netgear.com.
The application login page displays.
3. Enter the email address and password for your BCWM and click the Login button.
The Monitoring page displays.
4. In the Locations tree on the left, click a location.
The Usage, Health, Neighborhood, Connected Clients, and Event Logs tabs display. By default,the Usage tab is selected.
The page displays information about the number of connected clients, Ethernet network usage, WiFinetwork usage, and radio usage for the entire location. By default, the Hour button is selected.
5. Click the Day button.
Prepare Your Access Points, Subscribe, and Get Started
25
Business Central Wireless Manager 2.1 Application

The information is restricted to the last 24 hours.
6. Click the Connected Clients tab.
The page displays detailed information about the connected clients for the entire location.
7. Click the Day button.
The information is restricted to the last 24 hours.
For more information about the BCWM 2.1 application and extensive information about monitoringprocedures, see the Business Central Wireless Manager 2.1 User Manual, which you can downloadfrom downloadcenter.netgear.com.
Prepare Your Access Points, Subscribe, and Get Started
26
Business Central Wireless Manager 2.1 Application
AUpgrade to the Minimum RequiredStandalone Firmware Version
Follow the procedure in this appendix only if your access point does not yet run the minimum standalone versionthat is required to upgrade the access point to the cloud-enabled firmware version (see the table in PrepareYour NETGEAR WiFi Access Points for Cloud Management on page 6).
Using the web management interface of the access point, upgrade the access point to the minimum requiredstandalone firmware. When you are done, continue with the procedure that is described in Upgrade to theRequired Cloud-Enabled Firmware Version on page 7.
To upgrade an access point to the minimum required standalone firmware version:
1. Visit netgear.com/support.
2. Navigate to the support page for your access point and download the minimum required standalone firmwareversion for your access point.
For more information, see the table in Prepare Your NETGEAR WiFi Access Points for Cloud Managementon page 6.
3. Read the release notes before upgrading the firmware.
4. If the access point does not receive power through Power over Ethernet (PoE), apply power to the accesspoint and wait for the access point to complete its startup procedure.
5. Open a browser on your computer.
6. In the address bar, enter the IP address of the access point.
By default, the access point functions as a DHCP client. If the access point is installed in a network thatincludes a DHCP server, the IP address of the access point is issued by the DHCP server.
If the access point is not connected to a DHCP server or is accessible only over its default IP address, dothe following:
a. Change the IP address of your computer to an IP address in the 192.168.0.x subnet, which is the subnetin which the access point’s default IP address is located.
For example, change the computer’s IP address to 192.168.0.210.
b. Connect your computer to the access point with an Ethernet cable.
c. In the address bar of the browser, enter the default IP address of the access point:
• WAC730. 192.168.0.100
• WAC720. 192.168.0.100
• WNDAP660. 192.168.0.100
• WNDAP360. 192.168.0.100
• WNDAP350. 192.168.0.237
Prepare Your Access Points, Subscribe, and Get Started
27
Business Central Wireless Manager 2.1 Application

• WNAP320. 192.168.0.100
• WNAP210v2. 192.168.0.236
A login window opens.
7. Enter the user name and password.
The user name is admin. The default password is password.
8. Click the LOGIN button.
The General page displays.
9. Select Maintenance > Upgrade.
10. Click the Browse button, navigate to the firmware file on your computer, and select the firmware file.
The firmware displays to the right of the Browse button.
11. Click the APPLY button.
WARNING:To avoid the risk of corrupting the firmware, do not interrupt the upgrade. Forexample, do not close the browser, click a link, or load a new page. Do not turnoff the access point. Wait until the access point finishes restarting.
A progress bar might show the progress of the firmware upload process.The firmware upload process takesseveral minutes. When the upload is complete, the access point restarts.
12. To verify that the access point runs the new firmware version, log back in to the access point by doing thefollowing:
a. Open a browser on your computer.
b. In the address bar, enter the IP address that is assigned to the access point.
A login window opens.
c. Enter the user name and password.
The user name is admin. The default password is password.
d. Click the LOGIN button.
If the Change Password page displays, go to Step 13.
If the General page displays, go to Step 14.
Prepare Your Access Points, Subscribe, and Get Started
28
Business Central Wireless Manager 2.1 Application

13. If the Change Password page displays, specify a new password by doing the following:
a. In the Current Password field, enter the existing password, which is the default password.
b. In the New Password and Repeat New Password fields, specify the new password.
c. Click the APPLY button.
A login window opens again.
d. Enter the user name and new password.
The user name is admin. The new password is the one that you just specified.
e. Click the LOGIN button.
The General page displays.
14. Select Monitoring > System.
The Firmware Version field states the new firmware version.
Continue with the procedure that is described in Upgrade to the Required Cloud-Enabled Firmware Versionon page 7.
Prepare Your Access Points, Subscribe, and Get Started
29
Business Central Wireless Manager 2.1 Application


