40
By Mrs. Saliu Phlebotomy
| Date post: | 23-Dec-2015 |
| Category: |
Documents |
| Upload: | christine-dixon |
| View: | 215 times |
| Download: | 0 times |

ByMrs. Saliu
Phlebotomy

PhlebotomyStandard Practices
Using Vacuum Collection Set

Wash Hands (before and after the procedure) and Wear New Gloves

Label tube with the client identification number

Put tourniquet on client about 3-4” above venipuncture site

Have client form a fist so veins are more prominent

After palpating the path of the vein, clean the venipuncture site with alcohol using a
circular motion. Allow the area to dry

Assemble needle and vacuum tube holder
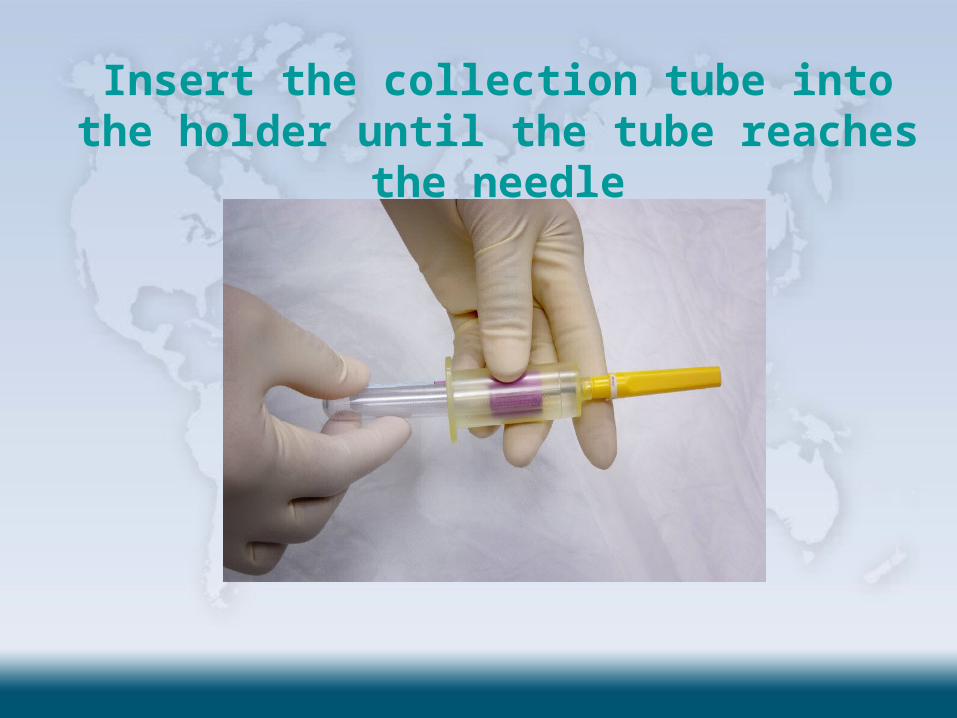
Insert the collection tube into the holder until the tube reaches the needle

Remove cap from needle

Use your thumb to draw skin tight about 1- 2” below the venipuncture site.
Hold skin tight

Insert the needle, bevel side up, into the vein

Push the vacutainer tube completely onto the needle. Blood should begin to
flow into the tube.

Release the tourniquet

Fill the tube until it is full or until vacuum is exhausted.

After opening client’s hand, place dry gauze over the venipuncture site

Apply mild pressure to the pad and slowly remove the needle

Apply bandage or continue applying mild pressure until bleeding has stopped

Collect Supplies;New vacuum set (holder, needle and collection
tubes), new gloves, alcohol swab, sterile gauge, tourniquet, sharp box and infectious
waste container

ORDER OF DRAW
Blood collection must be drawn in a specific order to avoid cross contamination of anticoagulant. The recommended order is
First draw – Blood culture tube (yellow-black stopper)
Second draw – Plain tube (red stopper)Third draw – Coagulation tube (light blue stopper)Last draw – Anticoagulated tubeRed-grey, or gold stopper – gel separator and clot
activator

ORDER OF DRAW CONTD
Dark green stopper – sodium heparin.Light green stopper – lithium heparin and
a gel separator.Lavender stopper – Ethylene diamine tetra
acetic acid (EDTA)Pale yellow stopper – acid citrate dextroseLight gray stopper – oxalate fluoride

RED TOP
ADDITIVE: None MODE OF ACTION: Blood clots, and the
serum is separated by centrifugation USES: Chemistries, Immunology and
Serology, Blood Bank (Cross match)

LIGHT GREEN TOP
ADDITIVE: Plasma Separating Tube (PST) with Lithium heparin
MODE OF ACTION: Anticoagulates with lithium heparin; Plasma is separated with PST gel at the bottom of the tube
USES: Chemistries

PURPLE/LAVENDER TOP
ADDITIVE: EDTA liquid MODE OF ACTION: Forms calcium salts to
remove calcium USES: Hematology (FBC) requires full draw
invert 8 times to prevent clotting and platelet clumping

GOLD TOP
ADDITIVE: None MODE OF ACTION: Serum separator tube
(SST) contains a gel at the bottom to separate blood from serum on centrifugation
USES: Chemistries, Immunology and Serology

YELLOW TOP
ADDITIVE: ACD (acid-citrate-dextrose)MODE OF ACTION: Complement inactivationUSES: HLA tissue typing, paternity testing,
DNA studies

LIGHT GRAY TOP
ADDITIVES: Sodium fluoride and potassium oxalate
MODE OF ACTION: Antiglycolytic agent, preserves glucose up to 5 days
USES: Glucose requires full draw (may cause hemolysis if short draw)

Venipuncture site selection
The larger and fuller median cubital and cephalic veins of the arm are used most frequently; wrist and hand veins are also acceptable.

Sites for venipuncture
g

Site selection contd
Avoid these areas when choosing a siteExtensive scars from burns and surgery.HematomaIntravenous therapy/ blood transfusion

Vein selection
Palpate and trace the path of veins with the index finger.
Arteries pulsate, are more elastic than vein and have thick wall.
Thrombosed veins lack resilience, feel cord like and roll easily.

Performance of venipuncture
Approach the patient in a friendly calm manner.
Provide for their comfort as much as possible.
Briefly explain the procedure to the patient and assure him/her.
Gain the patient’s cooperation before going ahead.

Performance contd
Verify the patient’s condition, e.g. fasting, medication, timing etc.
Position the patient, can either sit in a chair, lie down, or sit up in bed.
Hyperextend the patient’s arm. Apply tourniquet 3 - 4 inches above the
puncture site.Do not place too tightly or leave tourniquet on
the arm for more than 1 – 2 minutes.

Performance contd
The patient should make a fist without pumping the hand.
Select the venipuncture site.Prepare the patient' arm using alcohol wipe.Cleanse in a circular fashion, beginning at the
site and working outward. Allow to air dry.Grasp the patient’s arm firmly.The needle should form a 15º to 30º angle with
the surface of the arm

15º - 30º angle with the surface of the arm
Swiftly insert the needle through the skin into the lumen of the vein with the bevel side facing up.
Avoid trauma and excessive probing.

contd
When the last tube is about filling, remove the tourniquet.
Remove the needle from the patient’s arm using a swift backward motion when the tube is filled
Press down the gauze once the needle is out of the arm.
Apply adequate pressure to avoid formation of a hematoma.

contd
Dispose of contaminated materials / sharps in appropriate containers.
Dispose of needles immediately upon removal from the patient’s vein.
Do not bend, break or re cap needles.Mix by inversion and label all tubes at
patient’s side.Deliver specimens promptly to the
laboratory.

LABELING SAMPLES
Properly labeled samples is essential so that the results of the test match the patient.
Key elements in labeling includePatient’s surname, first name & middle name.Patient’s ID number/Hospital number.Both of the above MUST match with the
request form.Date, time and initials of the phlebotomist

An example of a properly labeled tube

Do not recap. Dispose of all Parts in a Sharp Container / Safety Box.
DO NOT reuse holder


