Page 1
C++ BUILDER
Chapter 1
Introduction
This Quick Start provides an overview of the C++Builder development
environment to get you started using the product right away. It also tells you
where to look for details about the tools and features available in C++Builder.
What is C++Builder?
C++Builder is an object-oriented, visual programming environment for rapid
application development (RAD). Using C++Builder, you can create highly
efficient 32-bit Windows applications with a minimum of manual coding.
C++Builder provides all the tools you need to develop, test, debug, and deploy
applications, including a large library of reusable components, a suite of design
tools, application and form templates, and programming wizards. These tools
simplify prototyping and shorten development time.
Where to find information
Information on C++Builder is available in a variety of forms:
Online Help
Printed documentation
Inprise developer support services
Inprise and borland.com Web sites
For information about new features in this release, refer to What's New in the
online Help and to the borland.com Web site.
Online Help
The online Help system provides detailed information about user-interface
features, language implementation, programming tasks, and the components in
the Visual Component Library (VCL). It includes the core Help files listed in
Table 1.1
Page 2
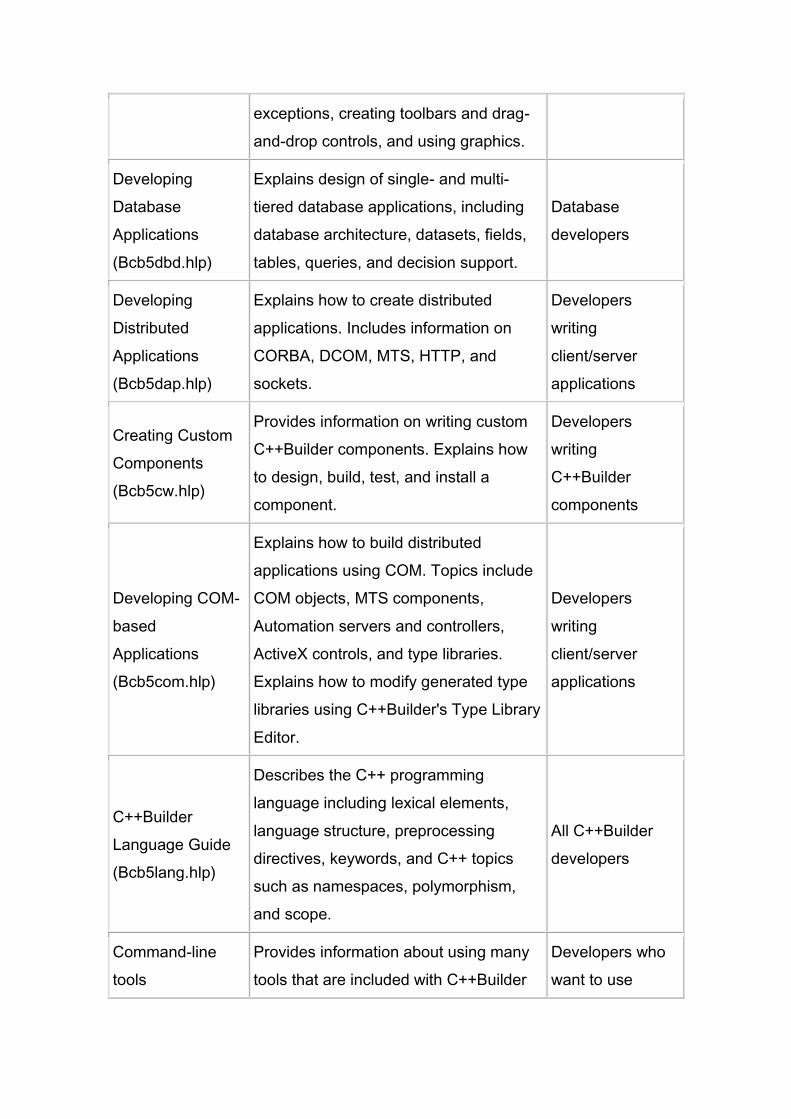
Table 1.1 Online Help files
Help file Contents Audience
What's New
(BCB5new.hlp)
Introduces new features and
enhancements to C++Builder for the
current release and includes links to
detailed information. Includes details on
upgrading from a previous release.
Developers who
upgraded to this
release
Using C++Builder
(Bcb5.hlp)
Introduces the development
environment and explains how to work
with forms, projects, and packages.
Discusses basic concepts of
component-based object-oriented
programming. Includes two step-by-step
tutorials to help you learn C++Builder.
New C++Builder
developers,
people with
questions about
the IDE
Visual Component
Library Reference
(Bcb5vcl.hlp)
Presents a detailed reference on VCL
classes, global routines, types, and
variables. Entries show the unit where
each class is declared; its position in the
hierarchy; a list of available properties,
methods, and events; and code
examples.
All C++Builder
developers
Standard C++
Library Reference
(Bcb5scl.hlp)
Presents a detailed reference on the
Standard C++ Library.
All C++Builder
developers
C Runtime Library
Reference
(Bcbrtl.hlp)
Presents a detailed reference on the C
Runtime Library.
All C++Builder
developers
Programming with
C++Builder
(Bcb5prog.hlp)
Provides details about using the VCL
components and illustrates common
programming tasks such as handling
All C++Builder
developers
Page 3
exceptions, creating toolbars and drag-
and-drop controls, and using graphics.
Developing
Database
Applications
(Bcb5dbd.hlp)
Explains design of single- and multi-
tiered database applications, including
database architecture, datasets, fields,
tables, queries, and decision support.
Database
developers
Developing
Distributed
Applications
(Bcb5dap.hlp)
Explains how to create distributed
applications. Includes information on
CORBA, DCOM, MTS, HTTP, and
sockets.
Developers
writing
client/server
applications
Creating Custom
Components
(Bcb5cw.hlp)
Provides information on writing custom
C++Builder components. Explains how
to design, build, test, and install a
component.
Developers
writing
C++Builder
components
Developing COM-
based
Applications
(Bcb5com.hlp)
Explains how to build distributed
applications using COM. Topics include
COM objects, MTS components,
Automation servers and controllers,
ActiveX controls, and type libraries.
Explains how to modify generated type
libraries using C++Builder's Type Library
Editor.
Developers
writing
client/server
applications
C++Builder
Language Guide
(Bcb5lang.hlp)
Describes the C++ programming
language including lexical elements,
language structure, preprocessing
directives, keywords, and C++ topics
such as namespaces, polymorphism,
and scope.
All C++Builder
developers
Command-line
tools
Provides information about using many
tools that are included with C++Builder
Developers who
want to use
Page 4
(Bcb5tool.hlp) such as the C++ compiler, the
incremental linker, the resource linker,
MAKE, GREP, and several conversion
tools.
additional tools
from the
command line
Object Pascal
Reference
(Del5op.hlp)
Provides a formal definition of the
Object Pascal language and includes
topics on file I/O, string manipulation,
program control, data types, and
language extensions.
Developers who
need Object
Pascal language
details
Borland
OpenHelp
(OpenHelp.hlp)
Explains how to configure the
C++Builder Help system. The OpenHelp
utility lets you add or remove any
Windows Help (.HLP) file.
Developers
wanting to
customize the
C++Builder Help
system
You will also find Help on additional products that are supplied with some
versions of C++Builder, such as:
Integrated Translation Environment (ITE) Help
InterBase Express Reference Help
Borland Database Engine (BDE) Help
BDE Administrator Help
Database Explorer Help
Local SQL, SQL Builder, and SQL Monitor Help
TeamSource Help
CodeGuard Help
TurboAssembler Help
Package Collection Editor Help
Help Author's Guide (Help Workshop)
QuickReport Help
TeeChart Help
InterBase and InterBase Express Help
CORBA Component Library Reference Help
Help for miscellaneous components (FastNet Time, DayTime, Echo, Finger,
HTTP, NNTP, POP3, Powersock, SMTP, UDP, URL Encode/Decode,
UUprocessor, Stream and Msg components)
All Help files are located in the Help directory under the main C++Builder
directory.
Page 5
Developer support services
Inprise also offers a variety of support options to meet the needs of its diverse
developer community. To find out about support offerings, refer to
http://www.borland.com/devsupport/.
From the Web site, you can access many newsgroups where C++Builder
developers exchange information, tips, and techniques. The site also includes a
list of books about C++Builder.
Typographic conventions
This manual uses the typefaces described below to indicate special text.
Table 1.2 Typographic conventions
Typeface Meaning
Monospace
type
Monospaced type represents text as it appears on screen or in
code. It also represents anything you must type.
Boldface Boldfaced words in text or code listings represent reserved words
or compiler options.
Italics
Italicized words in text represent C++Builder identifiers, such as
variable or type names. Italics are also used to emphasize certain
words, such as new terms.
Keycaps This typeface indicates a key on your keyboard. For example,
"Press Esc to exit a menu."
Page 6
Chapter 2
A tour of the environment
Starting C++Builder
You can start C++Builder in several ways:
Double-click the C++Builder icon (if you've created a shortcut).
Choose Programs|Borland C++Builder from the Windows Start menu.
Choose Run from the Windows Start menu, then enter Bcb.
Double-click Bcb.exe in the CBuilder\Bin directory.
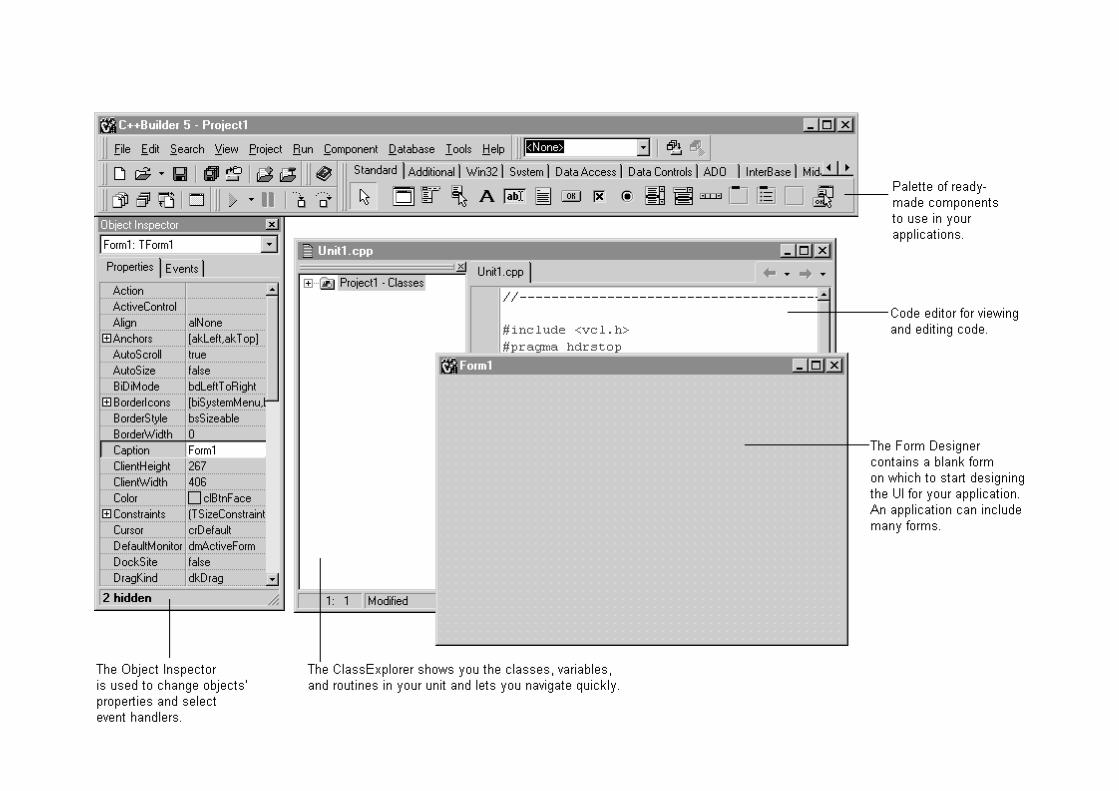
Right away, you'll see some of the major tools in C++Builder's integrated
development environment (IDE).
Page 8
C++Builder's development model is based on two-way tools. This means that
you can move back and forth between visual design tools and text-based
editing. For example, after using the Form Designer to arrange buttons and
other elements in a graphical interface, you can immediately view the form
(.DFM) file that contains the textual description of your form. You can also
manually edit any code generated by C++Builder without losing access to the
visual programming environment.
From the IDE, all your programming tools are within easy reach. You can
manage projects, design graphical interfaces, write code, search databases,
compile, test, debug, and browse through class libraries without leaving the
IDE.
To learn about organizing and configuring the IDE, see Chapter 5, "Customizing
the environment".
Using toolbars, menus, and keyboard shortcuts
C++Builder's toolbars, located in the main window, provide quick access to
frequently used operations and commands. All toolbar operations are duplicated
in the drop-down menus.
Page 9
Many operations have keyboard shortcuts as well as toolbar buttons. When a
keyboard shortcut is available, it is always shown next to the command on the
drop-down menu.
You can right-click on many tools and icons to display a menu of commands
appropriate to the object you are working with. These are called context menus.
The toolbar is also customizable. You can add commands you want to it or
move the parts of the toolbar to different locations. For more information, see
"Arranging menus and toolbars".
You can name and save desktop arrangements using the Desktop toolbar.
Placing components on a form
To build an application interface, you place components on a form, set their
properties, and code their event handlers.
Page 11
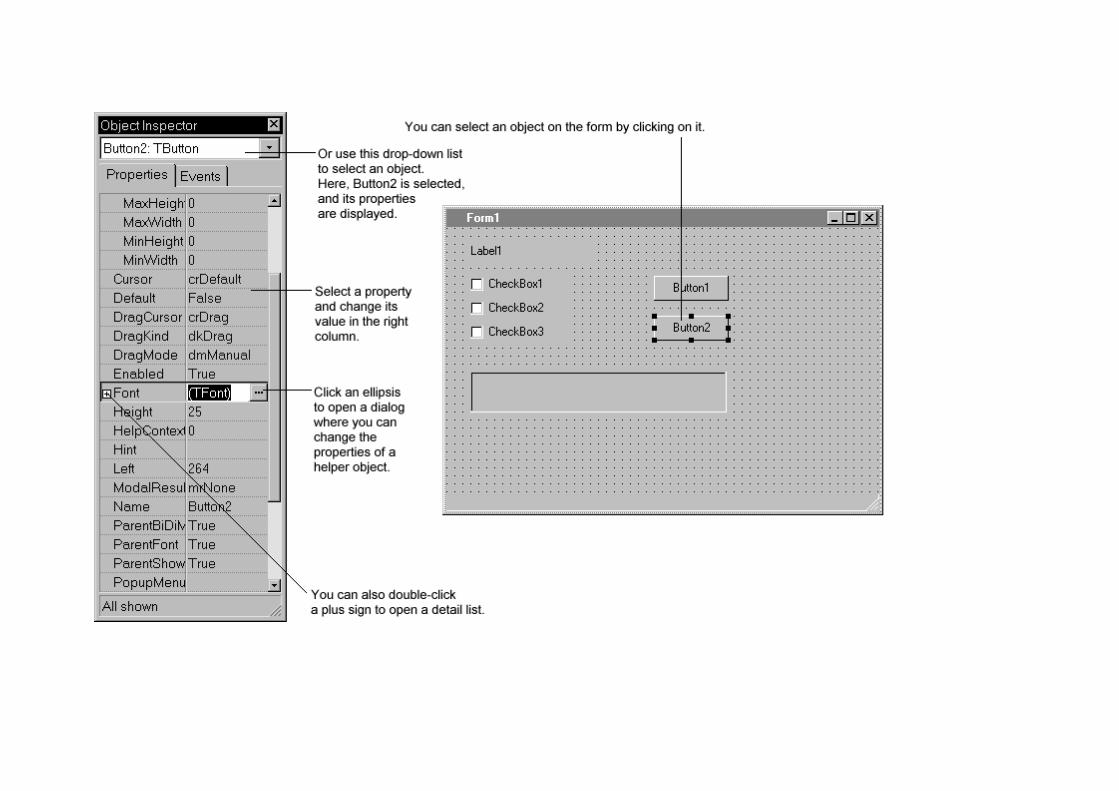
Changing component appearance and behavior
You can change the way a component appears and behaves in your application by using the Object Inspector. When a component
is selected on a form, its properties and events are displayed in the Object Inspector.
Page 13
Many properties have simple values--such as names of colors, true or false, and integers. For Boolean properties, you can double-
click the word to toggle between true and false. Some properties have associated property editors to set more complex values.
When you click on such a property value, you'll see an ellipsis.
Page 14
Working with events
Page 15
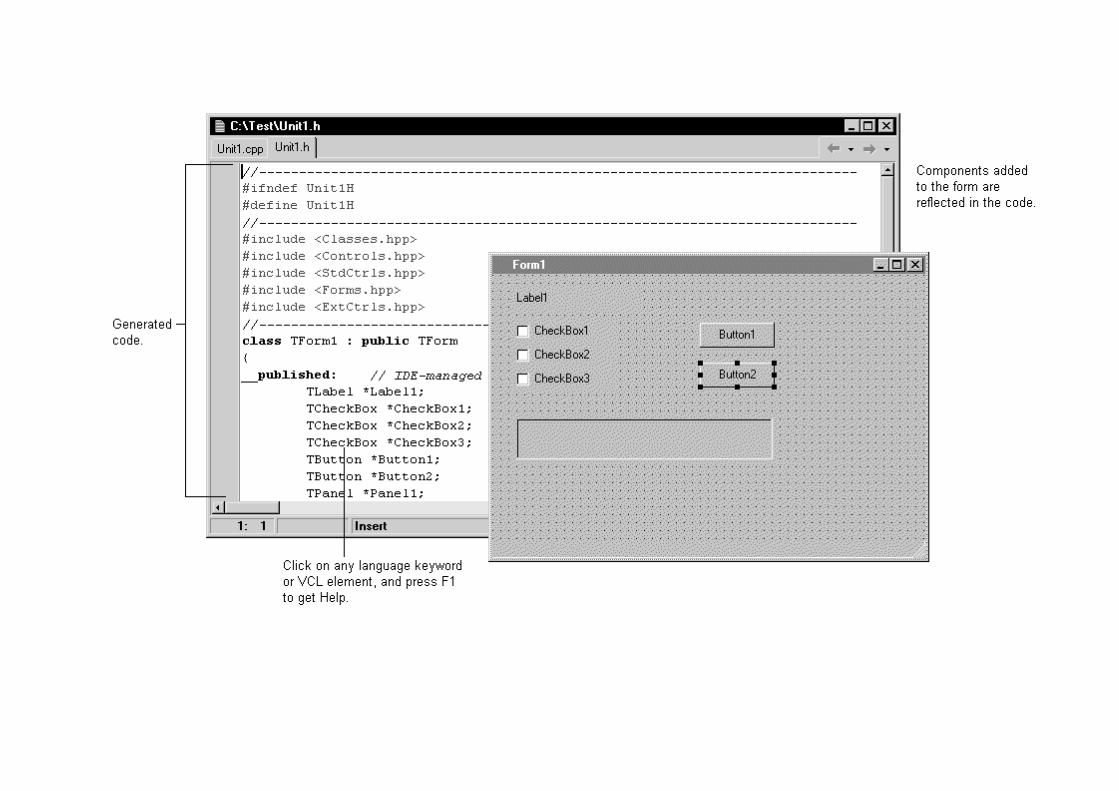
Viewing and editing code
As you design the user interface for your application, C++Builder generates the underlying code. When you select and modify the
properties of forms and components, your changes are automatically reflected in the source files.
You can also add code to your source files directly using the built-in Code editor. The Code editor is a full-featured ASCII editor.
Choose Tools|Editor Options to customize your editing environment. You can set options such as tabbing, key mapping, color, and
automatic features.
Page 17
Viewing form files
Forms are a very visible part of most C++Builder projects--they are where you
design the user interface of an application. Normally, you design forms using
C++Builder's visual tools, and C++Builder stores the forms in form files. Form
files (extension .DFM) describe each component in your form, including the
values of all persistent properties.
To view a form (.DFM) file in the editor, right-click on the form and select View
as Text. Form files can be edited. To return to the pictorial view of your form,
right-click and choose View as Form.
You can save form files in either text (the default) or binary format. The
Environment Options dialog lets you indicate which format to use for newly
created forms.
For more information...
Search for "form files" in the Help index.
Page 18
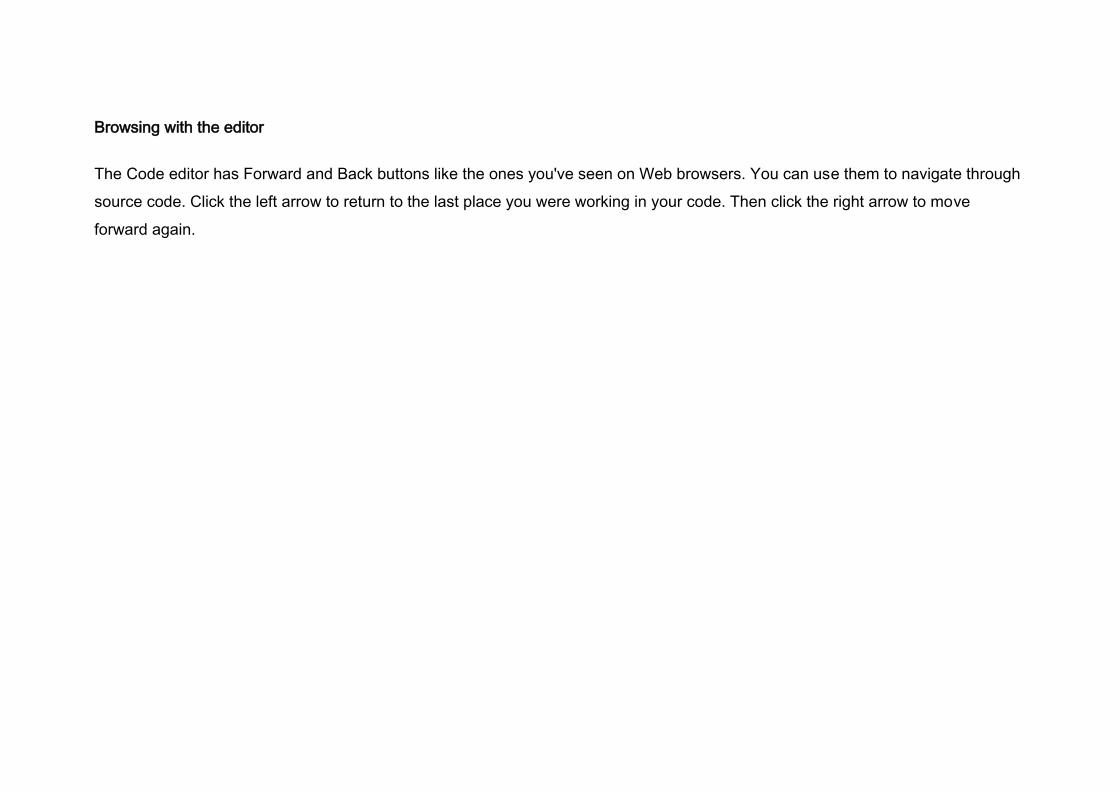
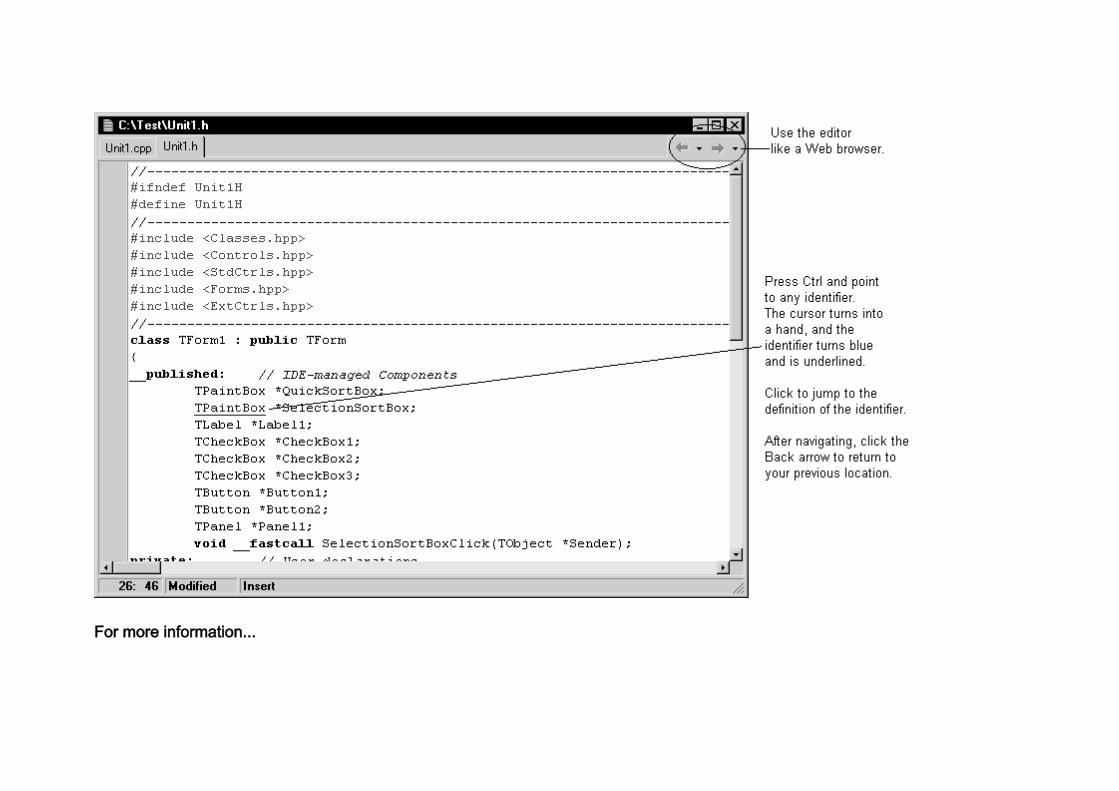
Browsing with the editor
The Code editor has Forward and Back buttons like the ones you've seen on Web browsers. You can use them to navigate through
source code. Click the left arrow to return to the last place you were working in your code. Then click the right arrow to move
forward again.
Page 19
For more information...
Page 20
Search for "Code editor" in the Help index.
Exploring code
When a source file is open in the Code editor, you can use the ClassExplorer to see a structured table of contents for the code. The
ClassExplorer contains a tree diagram showing the types, classes, properties, methods, global variables, and routines defined in
your unit.
Page 22
Managing projects
Use the Project Manager to organize the form and unit files that make up an
application. To display the Project Manager, choose View|Project Manager.
The Project Manager shows you the form, unit, resource, object, library, and
other files contained in a project. You can use the Project Manager to add and
remove files, and you can open any file by double-clicking it.
You can combine related projects into a single project group. For example, you
might use project groups to organize a multi-tiered application or to keep DLLs
with executables that use them.
For more information...
Search for "Project Manager" in the Help index.
Creating to-do lists
To-do lists record items that need to be completed for a project. You can add
project-wide items to a list by adding them directly to the list, or you can add
specific items directly in the source code. Choose View|To-Do list to add or view
information associated with a project.
Page 23
For more information...
Search for "To-Do Lists" in the Help index.
Designing data modules
A data module is a special form that contains nonvisual components. All the
components in a data module could be placed on ordinary forms alongside
visual controls. But if you plan on reusing groups of database and system
objects, or if you want to isolate the parts of your application that handle
database connectivity and business rules, data modules provide a convenient
organizational tool.
The Data Module Designer makes it easy to create data modules. To create a
data module, choose File|New and double-click on Data Module.
Page 24
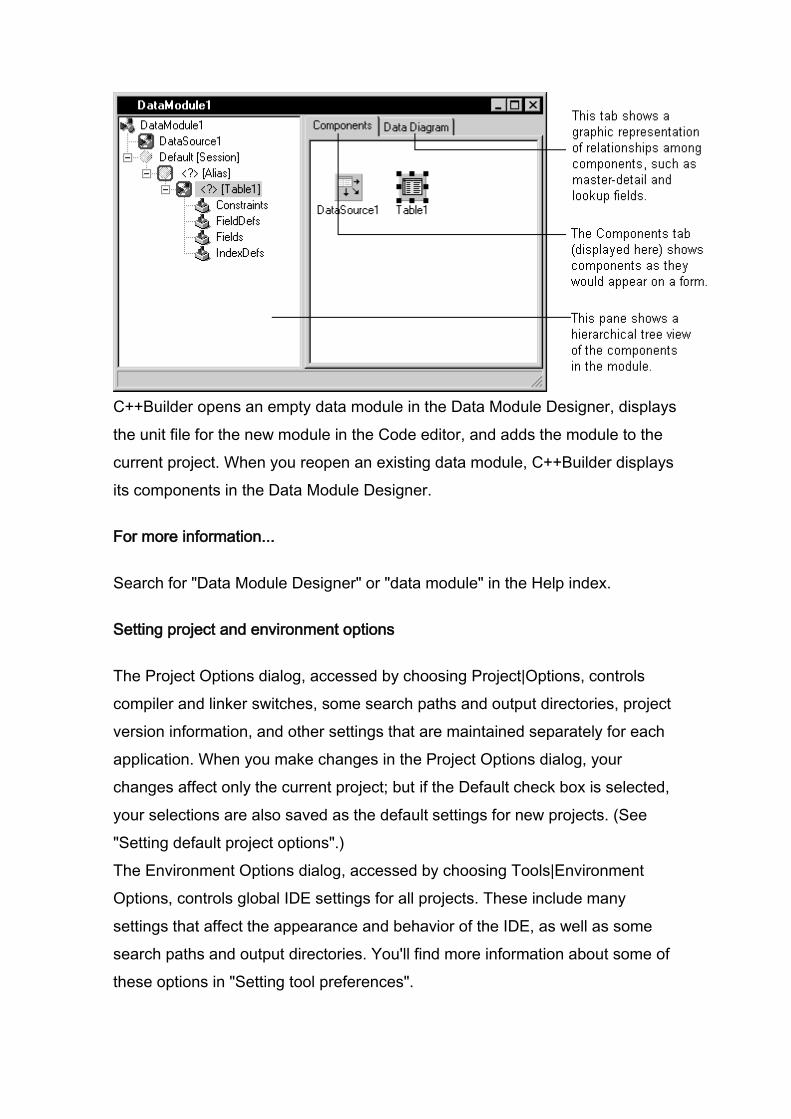
C++Builder opens an empty data module in the Data Module Designer, displays
the unit file for the new module in the Code editor, and adds the module to the
current project. When you reopen an existing data module, C++Builder displays
its components in the Data Module Designer.
For more information...
Search for "Data Module Designer" or "data module" in the Help index.
Setting project and environment options
The Project Options dialog, accessed by choosing Project|Options, controls
compiler and linker switches, some search paths and output directories, project
version information, and other settings that are maintained separately for each
application. When you make changes in the Project Options dialog, your
changes affect only the current project; but if the Default check box is selected,
your selections are also saved as the default settings for new projects. (See
"Setting default project options".)
The Environment Options dialog, accessed by choosing Tools|Environment
Options, controls global IDE settings for all projects. These include many
settings that affect the appearance and behavior of the IDE, as well as some
search paths and output directories. You'll find more information about some of
these options in "Setting tool preferences".
Page 25
For more information...
For details about the options on any page of the Project Options or Environment
Options dialogs, click the Help button on that page. Or search for "Project
Options dialog box" or "Environment Options dialog box" in the Help index.
Getting help
The online Help system provides extensive documentation on the VCL and
other parts of C++Builder. Here are some of the ways you can display Help:
Page 27
You can get Help on any part of the development environment, including menu
items, dialog boxes, windows, toolbars, and components.
Pressing the Help button in any dialog box also displays context-sensitive online
documentation.
Error messages from the compiler and linker appear in a special window below
the Code editor. To get Help with compilation errors, select a message from the
list and press F1.
Help with coding
C++Builder provides various aids to help you write code. The Code Insight tools
display context-sensitive pop-up windows in the Code editor.
Page 28
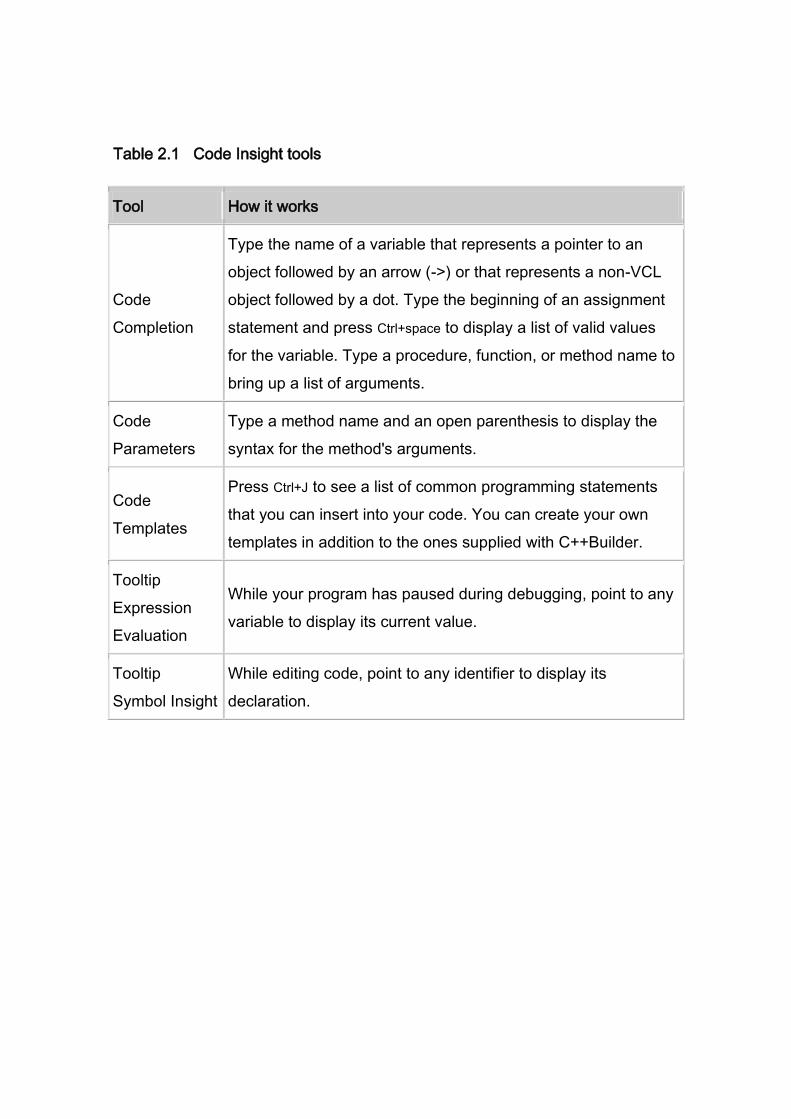
Table 2.1 Code Insight tools
Tool How it works
Code
Completion
Type the name of a variable that represents a pointer to an
object followed by an arrow (->) or that represents a non-VCL
object followed by a dot. Type the beginning of an assignment
statement and press Ctrl+space to display a list of valid values
for the variable. Type a procedure, function, or method name to
bring up a list of arguments.
Code
Parameters
Type a method name and an open parenthesis to display the
syntax for the method's arguments.
Code
Templates
Press Ctrl+J to see a list of common programming statements
that you can insert into your code. You can create your own
templates in addition to the ones supplied with C++Builder.
Tooltip
Expression
Evaluation
While your program has paused during debugging, point to any
variable to display its current value.
Tooltip
Symbol Insight
While editing code, point to any identifier to display its
declaration.
Page 29
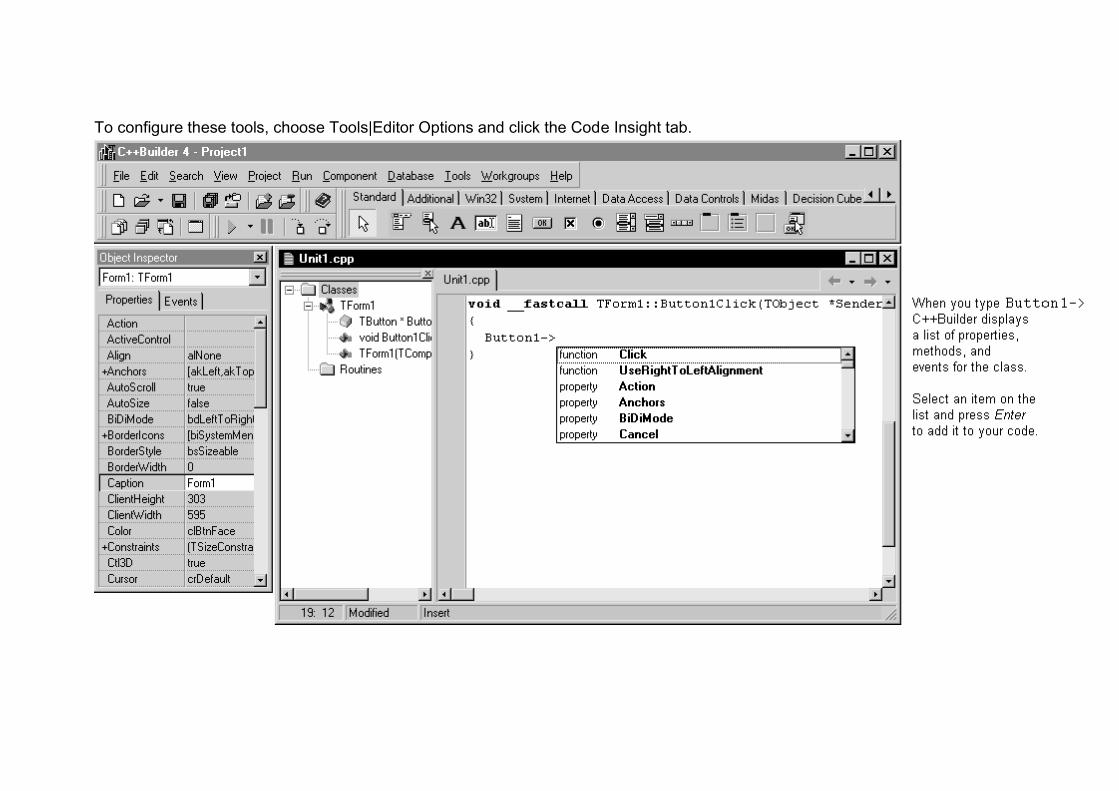
To configure these tools, choose Tools|Editor Options and click the Code Insight tab.
Page 30
Debugging applications
The IDE includes an integrated debugger that helps you locate and fix errors in
your code. The debugger lets you control program execution, watch variables,
and modify data values while your application is running. You can step through
your code line by line, examining the state of the program at each breakpoint.
Page 31
To use the debugger, you must compile your program with debug information. Choose Project|Options, select the Compiler page,
and check Debug Information. Then you can begin a debugging session by running the program from the IDE. To set debugger
options, choose Tools|Debugger Options.
Many debugging windows are available, including Breakpoints, Call Stack, Watches, Local Variables, Threads, Modules, CPU, and
Event Log. Display them by choosing View|Debug Windows. To learn how to combine debugging windows for more convenient use,
see "Docking tool windows".
Once you set up your desktop as you like it for debugging, you can save the settings as the debugging or runtime desktop. This
desktop layout will be used whenever you are debugging any application. For details, see "Customizing desktop settings".
Some versions of C++Builder support multiprocess and remote debugging of distributed applications from either the client or the
server. To turn on remote debugging, choose Run|Parameters, click the Remote tab, and check "Debug Project on remote
machine".
For more information...
Page 32
See "Using C++Builder" in the Help contents or search for "debugging" in the Help index.
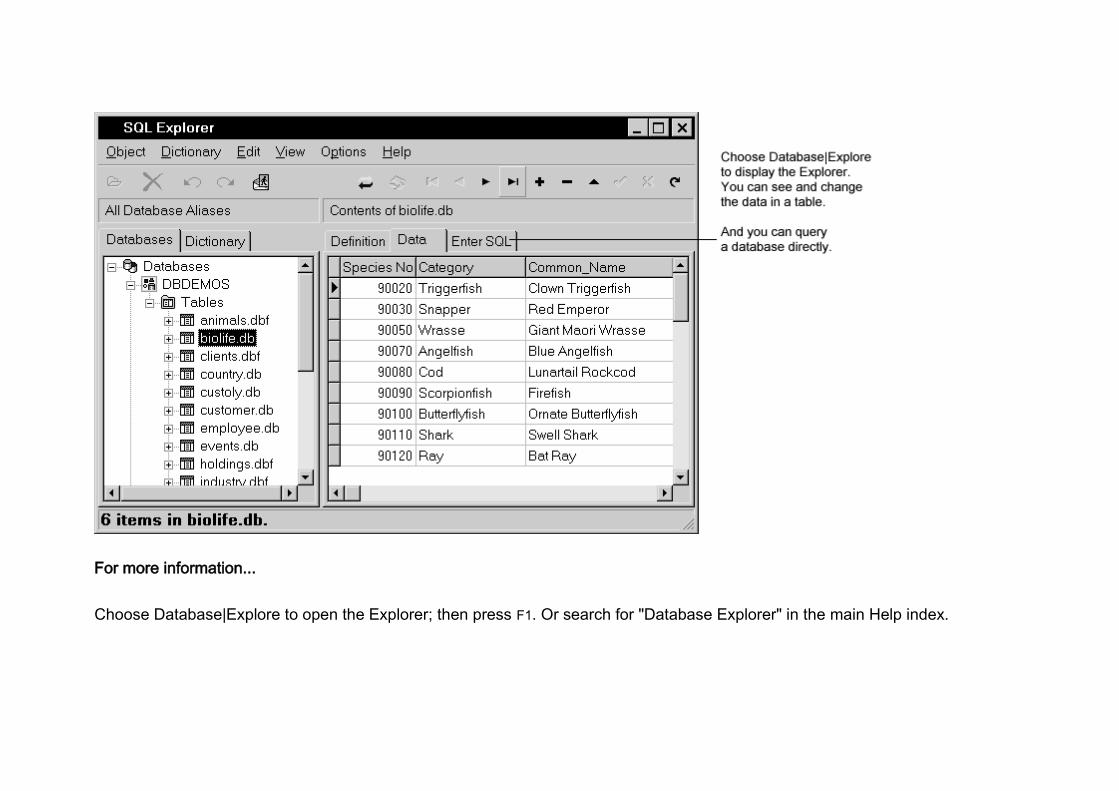
Exploring databases
The SQL Explorer (or Database Explorer in some editions of C++Builder) lets you work directly with a remote database server
during application development. For example, you can create, delete, or restructure tables, and you can import constraints while
you are developing a database application.
Page 33
For more information...
Choose Database|Explore to open the Explorer; then press F1. Or search for "Database Explorer" in the main Help index.
Page 34
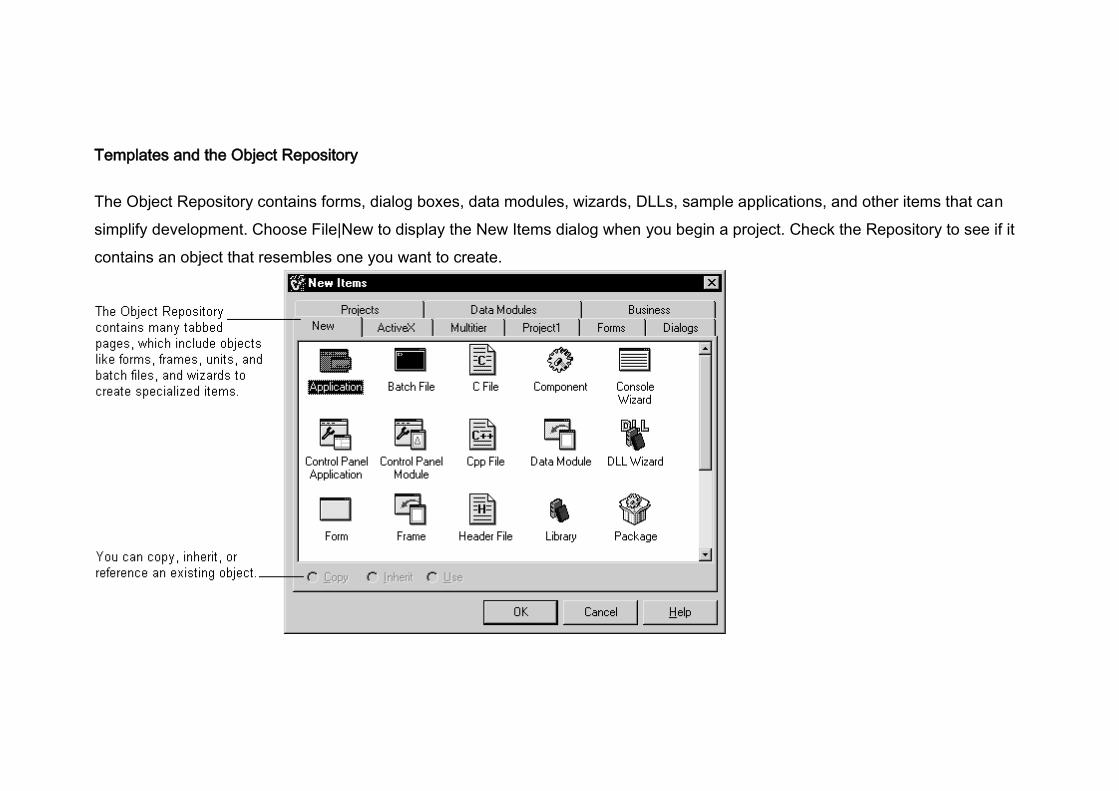
Templates and the Object Repository
The Object Repository contains forms, dialog boxes, data modules, wizards, DLLs, sample applications, and other items that can
simplify development. Choose File|New to display the New Items dialog when you begin a project. Check the Repository to see if it
contains an object that resembles one you want to create.
Page 35
You can add your own objects to the Repository to facilitate reusing them and sharing them with other developers. Reusing objects
lets you build families of applications with common user interfaces and functionality; building on an existing foundation also reduces
development time and improves quality. The Object Repository provides a central location for tools that members of a development
team can access over a network.
To add objects to the Repository, right-click in the New Items dialog and choose Properties, or choose Tools|Repository from the
main menu.
Page 36
For more information...
Page 37
See "Using C++Builder" in the Help contents or search for "Object Repository"
in the Help index. Also choose File|New and browse in the Object Repository to
see the types of templates and wizards you can use as starting points for your
applications. The objects available to you will depend on the version of
C++Builder you purchased.
Chapter 3
Creating a text editor--a tutorial
This tutorial takes you through the creation of a text editor complete with
menus, a toolbar, and a status bar. It includes a simple help file accessible from
the application.
Note: This tutorial is for all versions of C++Builder.
Starting a new application
Before beginning a new application, create a folder to hold the source files:
1. Create a folder called TextEditor in the Projects directory off the main
C++Builder directory.
2. Create a new project.
Each application is represented by a project. When you start C++Builder,
it creates a blank project by default. If another project is already open,
choose File|New Application to create a new project.
When you open a new project, C++Builder automatically creates the
following files:
o Project1.cpp: a source-code file associated with the project.
o Unit1.cpp: a source-code file associated with the main project form. This
is called a unit file.
o Unit1.h: a header file associated with the main project form. This is
called a unit header file.
o Unit1.dfm: a resource file that stores information about the main project
form. This is called a form file.
Page 38
Each form has its own unit (Unit1.cpp), header (Unit1.h), and form
(Unit1.dfm) files. If you create a second form, a second unit (Unit2.cpp),
header (Unit2.h), and form (Unit2.dfm) file are automatically created.
3. Choose File|Save All to save your files to disk. When the Save dialog appears:
o Navigate to your TextEditor folder.
o Save Unit1 using the default name Unit1.cpp.
o Save the project using the name TextEditor.bpr. (The executable will be
named the same as the project name with an exe extension.)
Later, you can resave your work by choosing File|Save All.
When you save your project, C++Builder creates additional files in your
project directory. These files include TextEditor.bpr, which is the project
options or makefile, and TextEditor.res, which is the Windows resource
file. You don't need to worry about these files but don't delete them.
When you open a new project, C++Builder displays the project's main form,
named Form1 by default. You'll create the user interface and other parts of your
application by placing components on this form.
Page 39
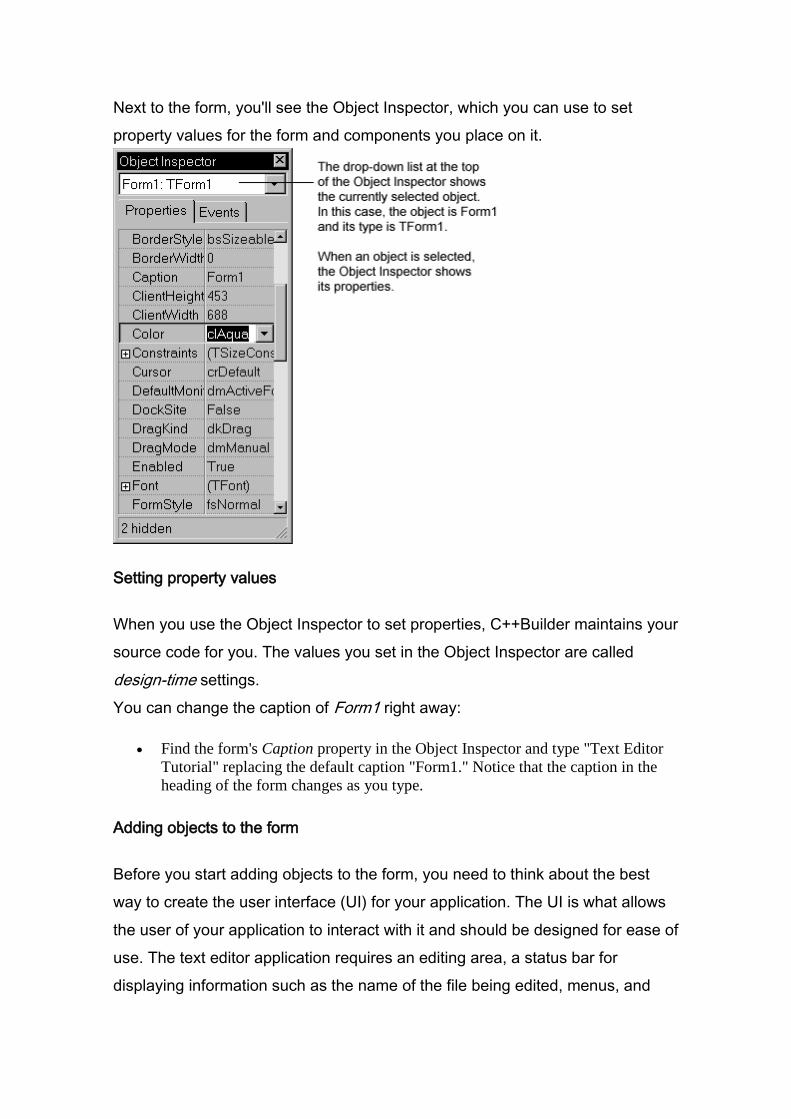
Next to the form, you'll see the Object Inspector, which you can use to set
property values for the form and components you place on it.
Setting property values
When you use the Object Inspector to set properties, C++Builder maintains your
source code for you. The values you set in the Object Inspector are called
design-time settings.
You can change the caption of Form1 right away:
Find the form's Caption property in the Object Inspector and type "Text Editor
Tutorial" replacing the default caption "Form1." Notice that the caption in the
heading of the form changes as you type.
Adding objects to the form
Before you start adding objects to the form, you need to think about the best
way to create the user interface (UI) for your application. The UI is what allows
the user of your application to interact with it and should be designed for ease of
use. The text editor application requires an editing area, a status bar for
displaying information such as the name of the file being edited, menus, and
Page 40
perhaps a toolbar with icons for easy access to commands. The beauty of designing the interface using C++Builder is that you can
experiment with different components and see the results right away. This way, you can quickly prototype an application interface.
C++Builder includes many objects that represent parts of an application. For example, there are objects (also called components)
that make it easy to program menus, toolbars, dialog boxes, and hundreds of other visual (and nonvisual) program elements.
The Component palette represents VCL components using icons grouped onto tabbed pages. Add a component to a form by
selecting the component on the palette, then clicking on the form where you want to place it. You can also double-click a
component to place it in the middle of the form. To get help on the components, select the component (either in the Component
palette or on the form) and press F1.
To start designing the text editor, add a RichEdit and a StatusBar component to the form:
1. To create a text area, drop a RichEdit component onto the form.
Click the Win32 page on the Component palette. To find the RichEdit component, point to an icon on the palette for a
moment; C++Builder displays a Help hint showing the name of the component.
Page 41
When you find the RichEdit component, double-click it to place it on the form.
Page 43
Each C++Builder component is a class; placing a component on a form creates an instance of that class. Once the
component is on the form, C++Builder generates the code necessary to construct an instance object when your application is
running.
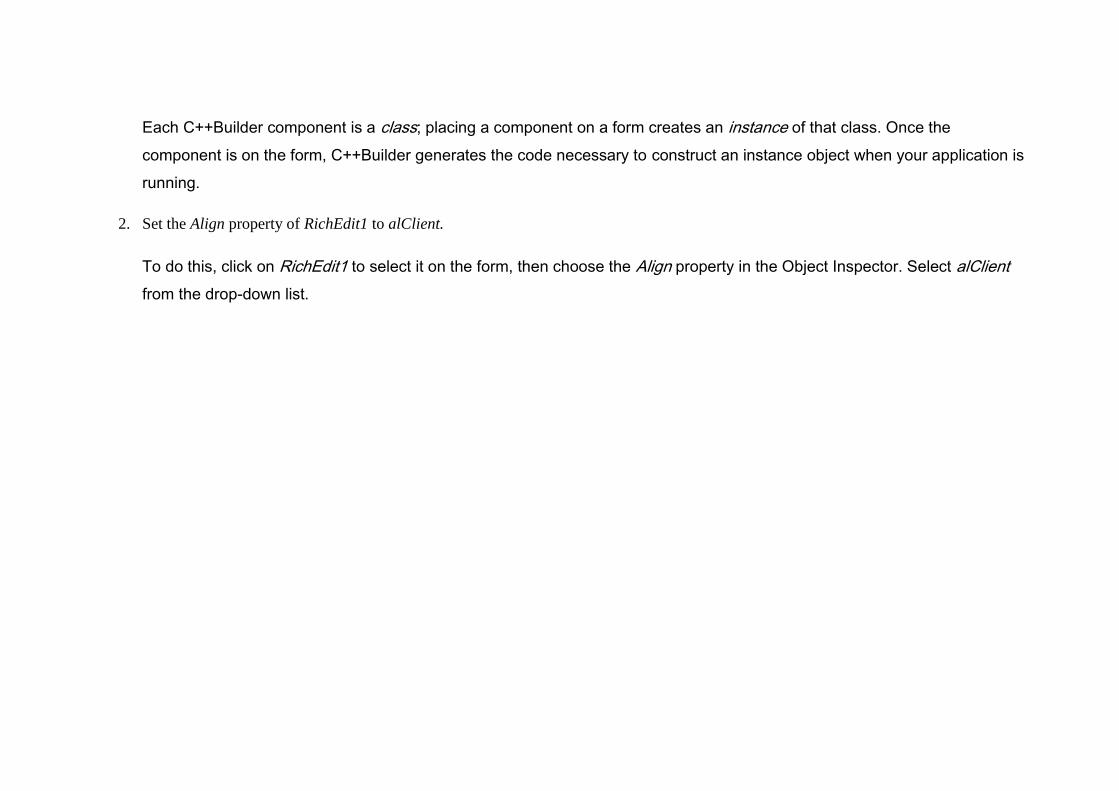
2. Set the Align property of RichEdit1 to alClient.
To do this, click on RichEdit1 to select it on the form, then choose the Align property in the Object Inspector. Select alClient
from the drop-down list.
Page 44
The RichEdit component now fills the form so you have a large text editing area. By choosing the alClient value for the Align
property, the size of the RichEdit control will vary to fill whatever size window is displayed even if the form is resized.
3. Double-click the StatusBar component on the Win32 page of the Component palette. This adds a status bar to the bottom of the form.
Page 45
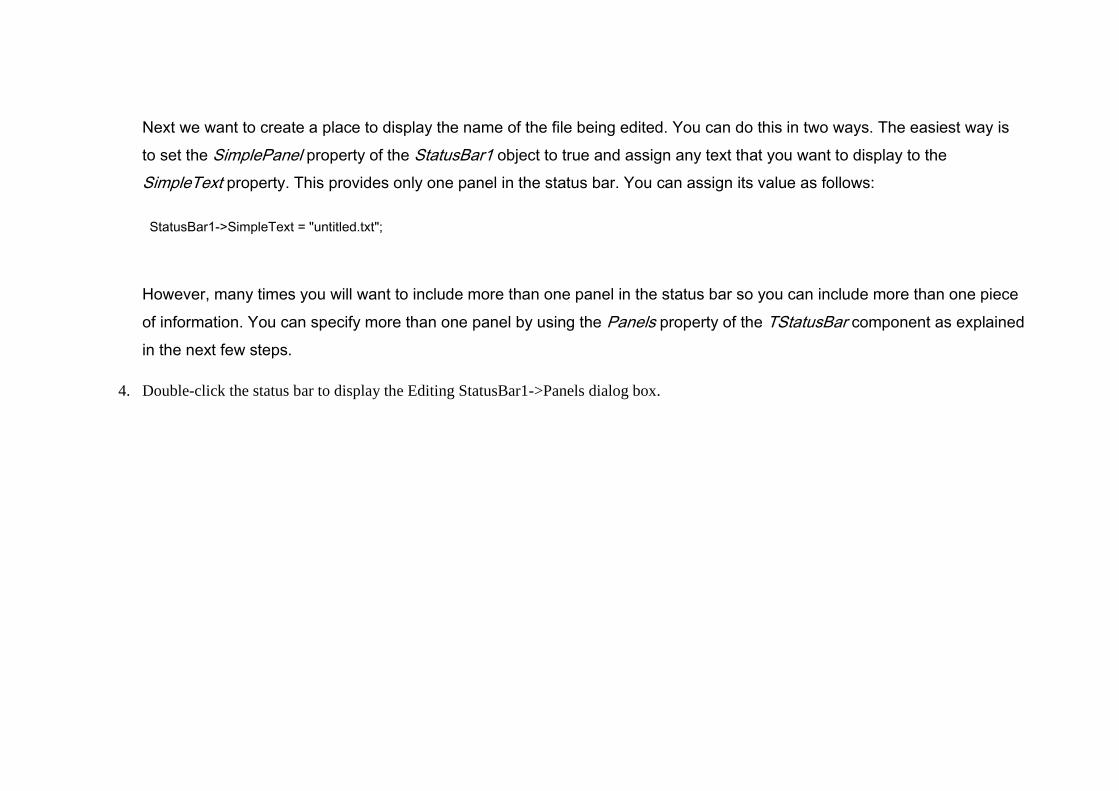
Next we want to create a place to display the name of the file being edited. You can do this in two ways. The easiest way is
to set the SimplePanel property of the StatusBar1 object to true and assign any text that you want to display to the
SimpleText property. This provides only one panel in the status bar. You can assign its value as follows:
StatusBar1->SimpleText = "untitled.txt";
However, many times you will want to include more than one panel in the status bar so you can include more than one piece
of information. You can specify more than one panel by using the Panels property of the TStatusBar component as explained
in the next few steps.
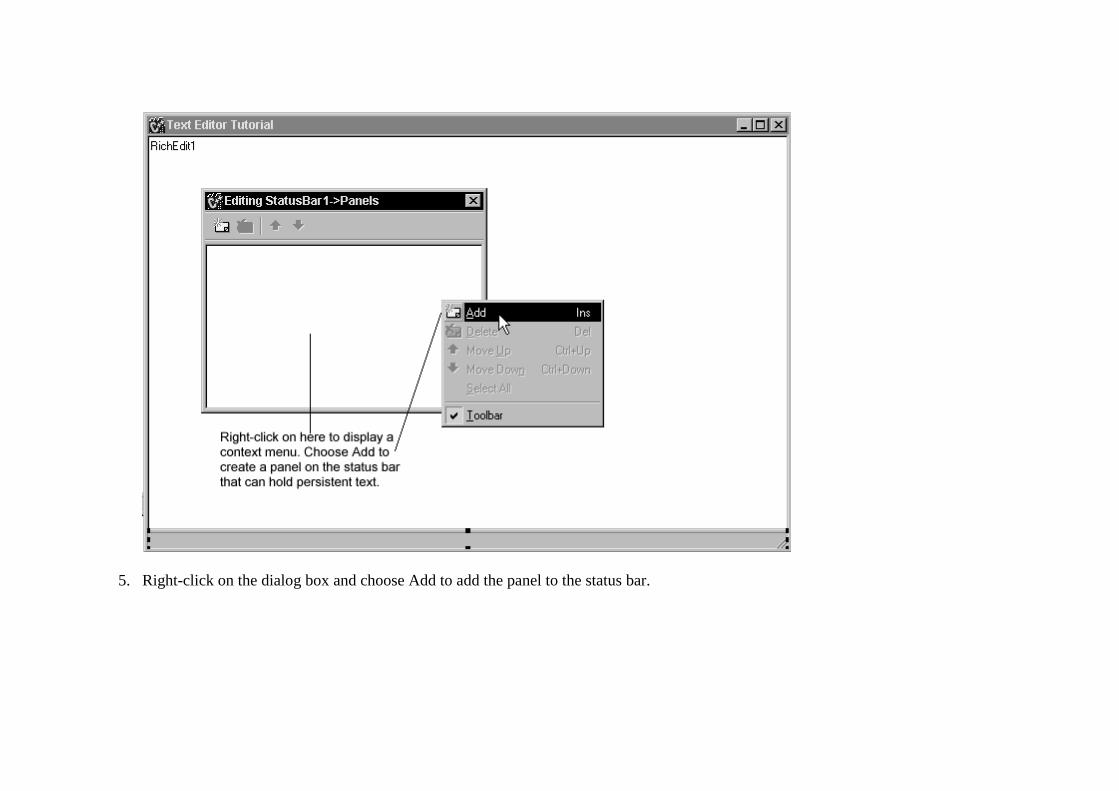
4. Double-click the status bar to display the Editing StatusBar1->Panels dialog box.
Page 46
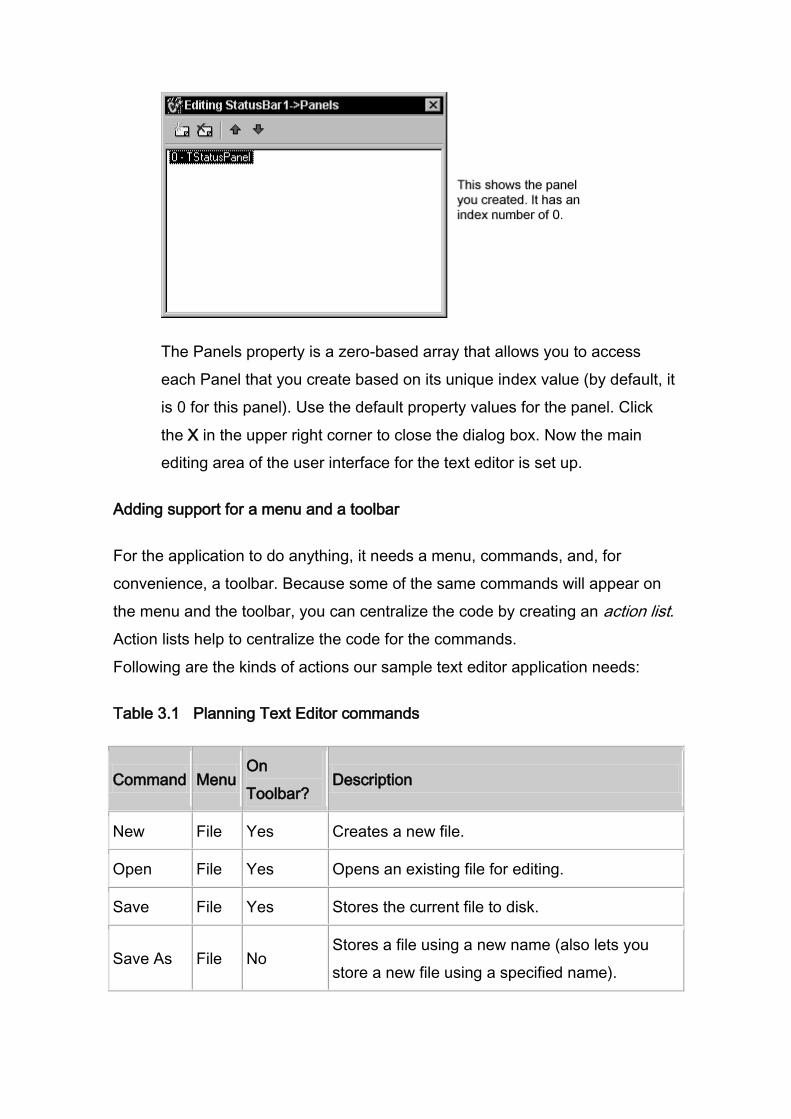
5. Right-click on the dialog box and choose Add to add the panel to the status bar.
Page 47
The Panels property is a zero-based array that allows you to access
each Panel that you create based on its unique index value (by default, it
is 0 for this panel). Use the default property values for the panel. Click
the X in the upper right corner to close the dialog box. Now the main
editing area of the user interface for the text editor is set up.
Adding support for a menu and a toolbar
For the application to do anything, it needs a menu, commands, and, for
convenience, a toolbar. Because some of the same commands will appear on
the menu and the toolbar, you can centralize the code by creating an action list.
Action lists help to centralize the code for the commands.
Following are the kinds of actions our sample text editor application needs:
Table 3.1 Planning Text Editor commands
Command Menu On
Toolbar? Description
New File Yes Creates a new file.
Open File Yes Opens an existing file for editing.
Save File Yes Stores the current file to disk.
Save As File No Stores a file using a new name (also lets you
store a new file using a specified name).
Page 48
Exit File Yes Quits the editor program.
Cut Edit Yes Deletes text and stores it in the clipboard.
Copy Edit Yes Copies text and stores it in the clipboard.
Paste Edit Yes Inserts text from the clipboard.
Contents Help Yes Displays the Help contents screen from which
you can access Help topics.
Index Help No Displays the Help index screen.
About Help No Displays information about the application in a
box.
You can also centralize images to use for your toolbar and menus in an
ImageList.
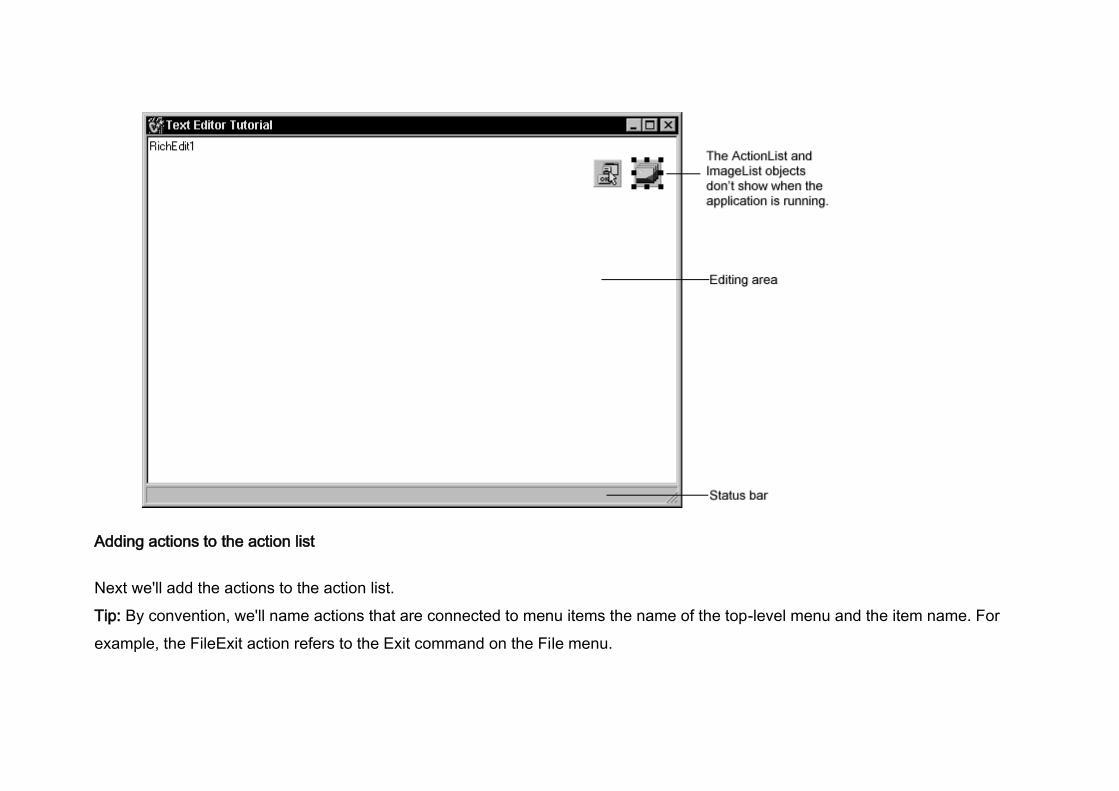
To add an ActionList and an ImageList to your form:
1. From the Standard page of the Component palette, drop an ActionList
component onto the form. The ActionList component is nonvisual, so it
doesn't matter where you put it on the form. It won't appear at runtime.
2. From the Win32 page, choose the ImageList component and drop it onto
your form. It's also nonvisual so you can put it anywhere.
Your form should now resemble the following figure.
Page 49
Adding actions to the action list
Next we'll add the actions to the action list.
Tip: By convention, we'll name actions that are connected to menu items the name of the top-level menu and the item name. For
example, the FileExit action refers to the Exit command on the File menu.
Page 50
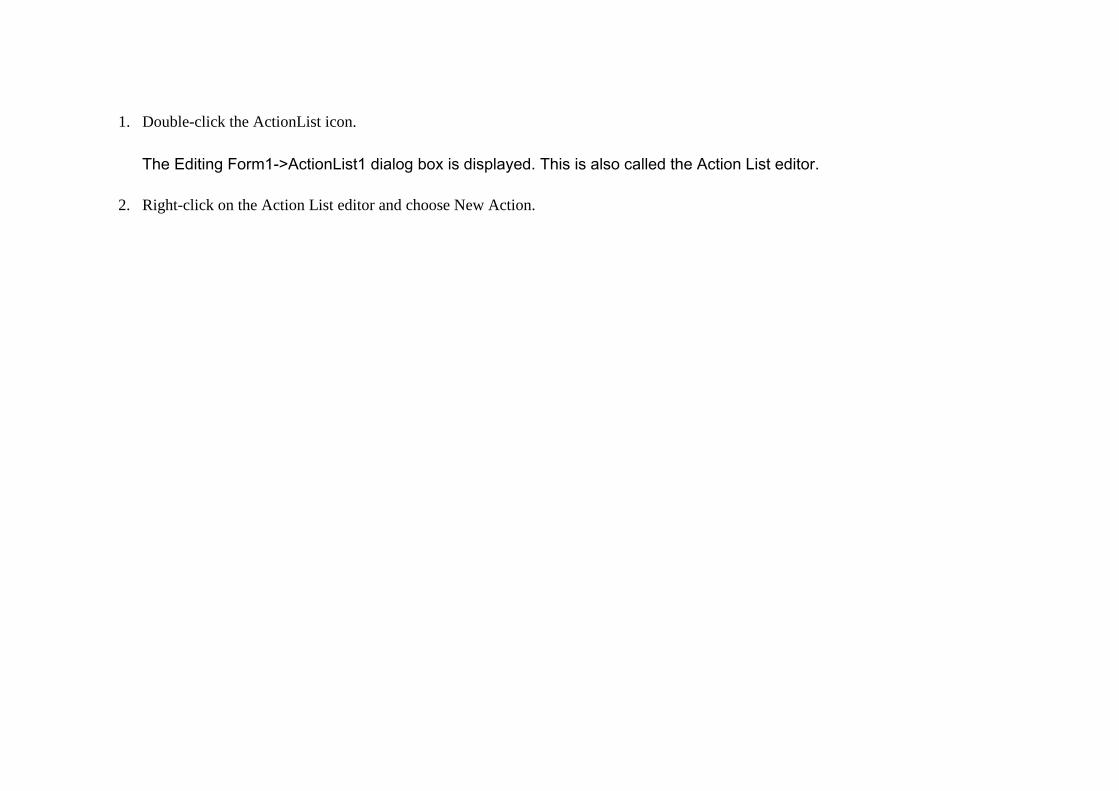
1. Double-click the ActionList icon.
The Editing Form1->ActionList1 dialog box is displayed. This is also called the Action List editor.
2. Right-click on the Action List editor and choose New Action.
Page 51
3. In the Object Inspector, set the following properties for the action:
o After Caption, type &New. Note that typing an ampersand before one of
the letters makes that letter a shortcut to accessing the command.
o After Category, type File. This organizes the File commands in one
place.
o After Hint, type Create file (this will be the Help hint).
o After ImageIndex, type 0 (this will associate image number 0 in your
ImageList with this action).
o After Name, type FileNew (for the File|New command).
4. Right-click on the Action List editor and choose New Action.
5. In the Object Inspector, set the following properties:
o After Caption, type &Open.
o Make sure the Category says File.
o After Hint, type Open file.
o After ImageIndex, type 1.
o After Name, type FileOpen (for the File|Open command).
6. Right-click on the Action List editor and choose New Action.
7. In the Object Inspector, set the following properties:
o After Caption, type &Save.
o Make sure the Category says File.
o After Hint, type Save file.
o After ImageIndex, type 2.
o After Name, type FileSave (for the File|Save command).
8. Right-click on the Action List editor and choose New Action.
9. In the Object Inspector, set the following properties:
o After Caption, type Save &As.
o Make sure the Category says File.
Page 52
o After Hint, type Save file as.
o No ImageIndex is needed. Leave the default value.
o After Name, type FileSaveAs (for the File|Save As command).
10. Right-click on the Action List editor and choose New Action.
11. In the Object Inspector, set the following properties:
o After Caption, type E&xit.
o Make sure the Category says File.
o After Hint, type Exit application.
o After ImageIndex, type 3.
o After Name, type FileExit (for the File|Exit command).
12. Right-click on the Action List editor and choose New Action to create a
customized Help|Contents command.
13. In the Object Inspector, set the following properties:
o After Caption, type &Contents.
o After Category, type Help.
o After Hint, type Display Help.
o After ImageIndex, type 7.
o After Name, type HelpContents (for the Help|Contents command).
14. Right-click on the Action List editor and choose New Action.
15. In the Object Inspector, set the following properties:
o After Caption, type &Index.
o Make sure the Category says Help.
o After Name, type HelpIndex (for the Help|Index command).
16. Right-click on the Action List editor and choose New Action.
17. In the Object Inspector, set the following properties:
o After Caption, type &About.
o Make sure the Category says Help.
o After Name, type HelpAbout (for the Help|About command).
Keep the Action List editor on the screen.
Note: When you were adding actions to the action list, you might have noticed a
standard Help|Contents command is provided. We added a custom
Help|Contents command that will display the Help Contents tab at all times. The
standard Help|Contents command brings up the last tabbed page that was
displayed, either the Contents or the Index.
Adding standard actions to the action list
C++Builder provides several standard actions that are often used when
developing applications. Next we'll add the standard actions (cut, copy, and
paste) to the action list.
Page 53
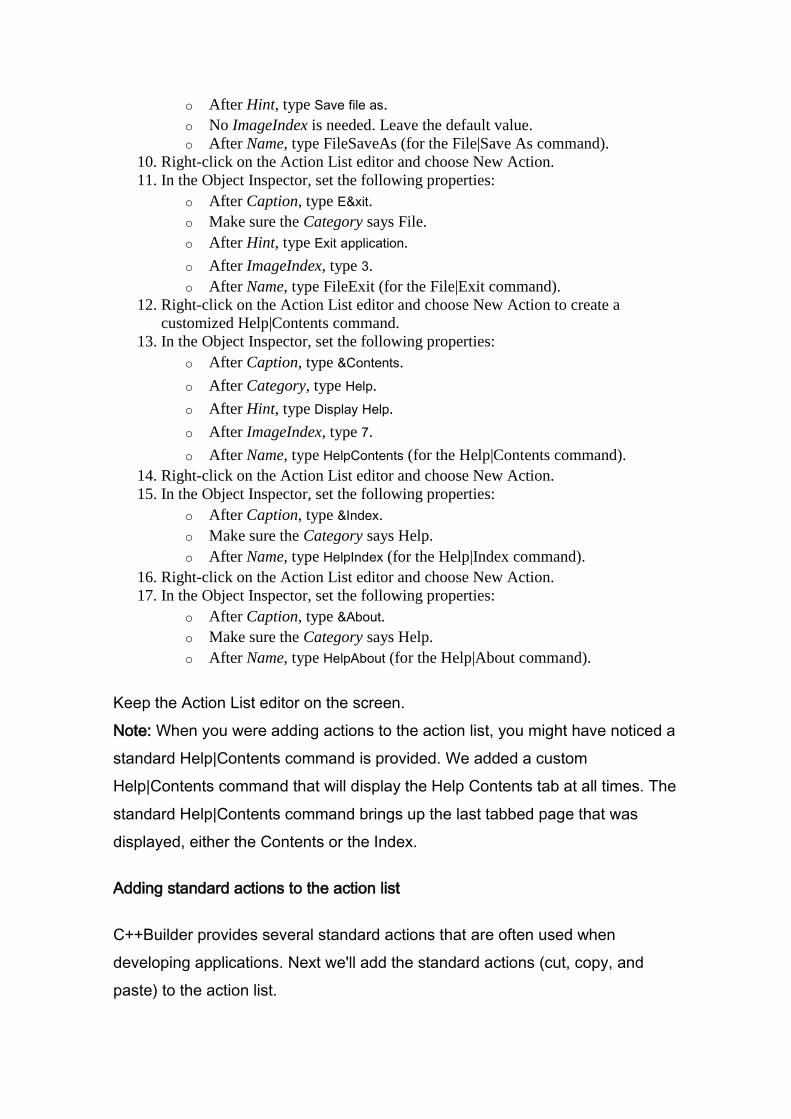
Note: The Action List editor should still be displayed. If it's not, double-click the ActionList icon on the form.
To add standard actions to the action list:
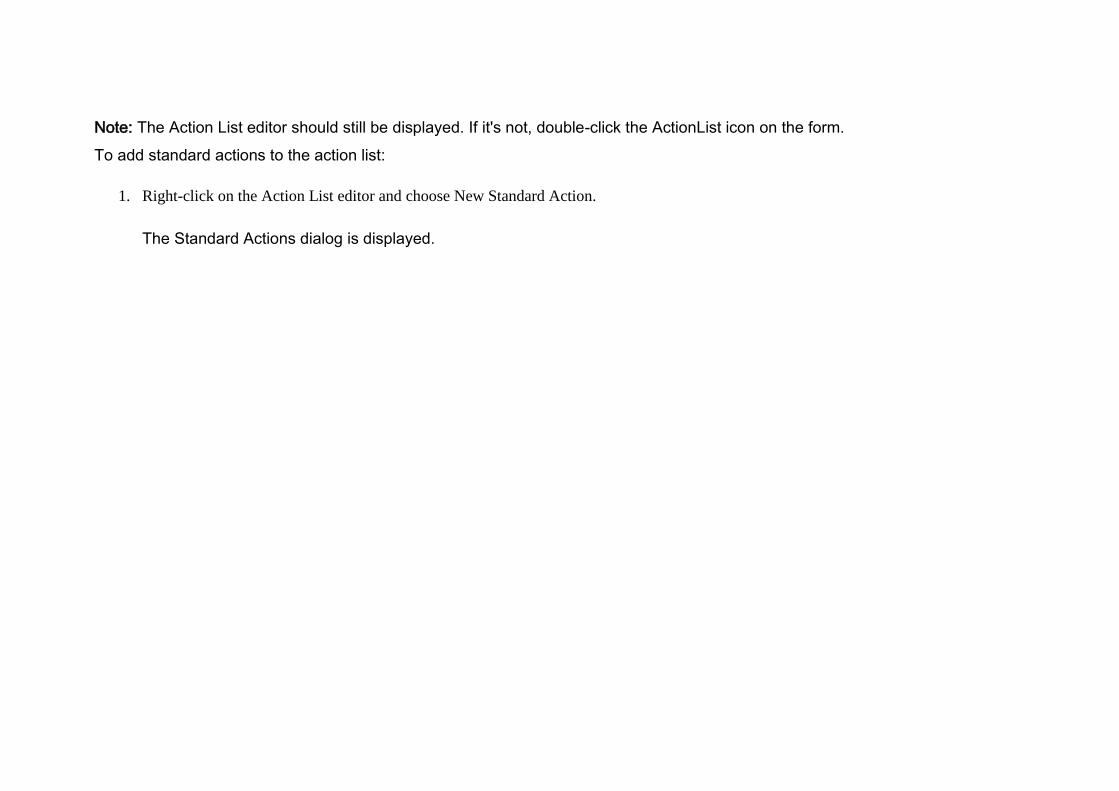
1. Right-click on the Action List editor and choose New Standard Action.
The Standard Actions dialog is displayed.
Page 54
2. Double-click TEditCut. The action is created along with a new category called Edit. EditCut1 should be selected.
3. In the Object Inspector, set the following property for EditCut1:
o After ImageIndex, type 4.
Page 55
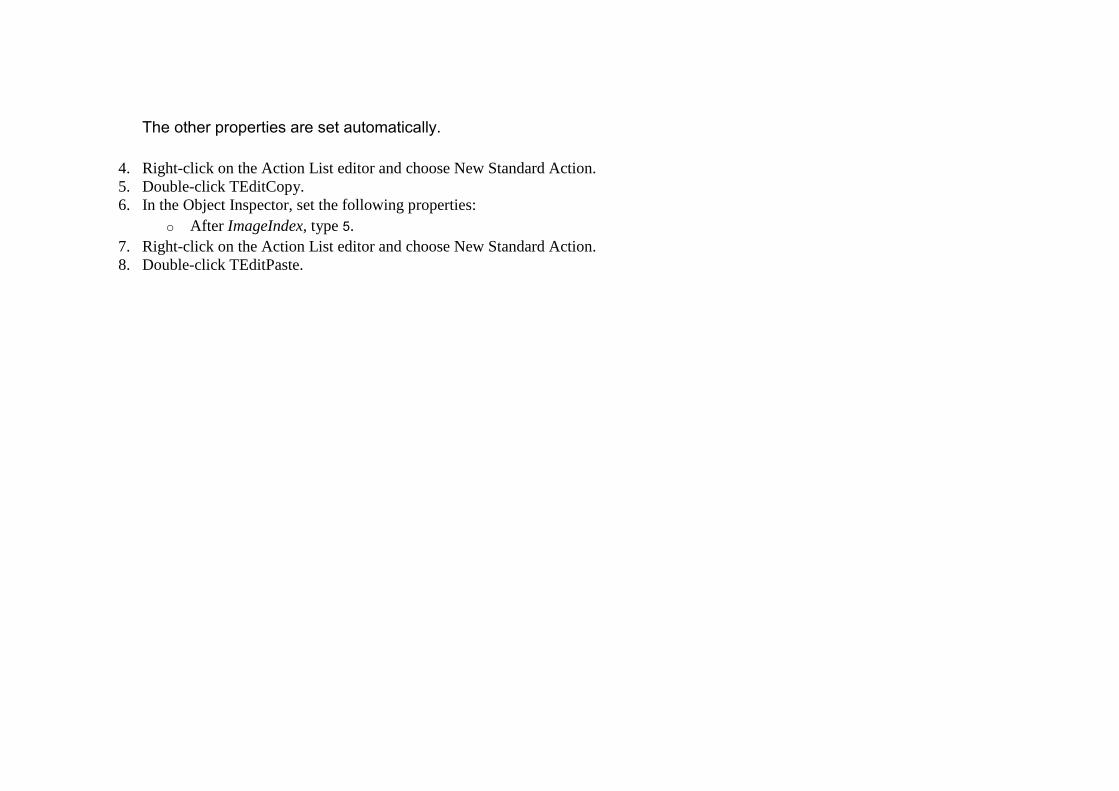
The other properties are set automatically.
4. Right-click on the Action List editor and choose New Standard Action.
5. Double-click TEditCopy.
6. In the Object Inspector, set the following properties:
o After ImageIndex, type 5.
7. Right-click on the Action List editor and choose New Standard Action.
8. Double-click TEditPaste.
Page 57
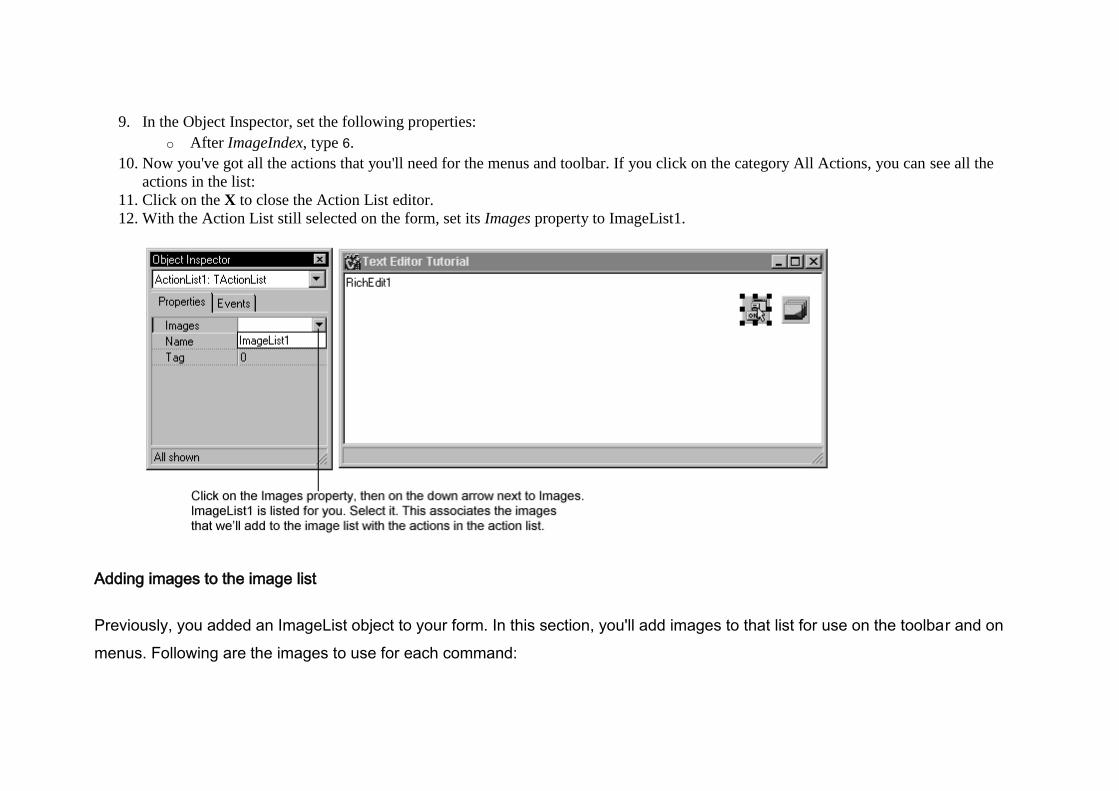
9. In the Object Inspector, set the following properties:
o After ImageIndex, type 6.
10. Now you've got all the actions that you'll need for the menus and toolbar. If you click on the category All Actions, you can see all the
actions in the list:
11. Click on the X to close the Action List editor.
12. With the Action List still selected on the form, set its Images property to ImageList1.
Adding images to the image list
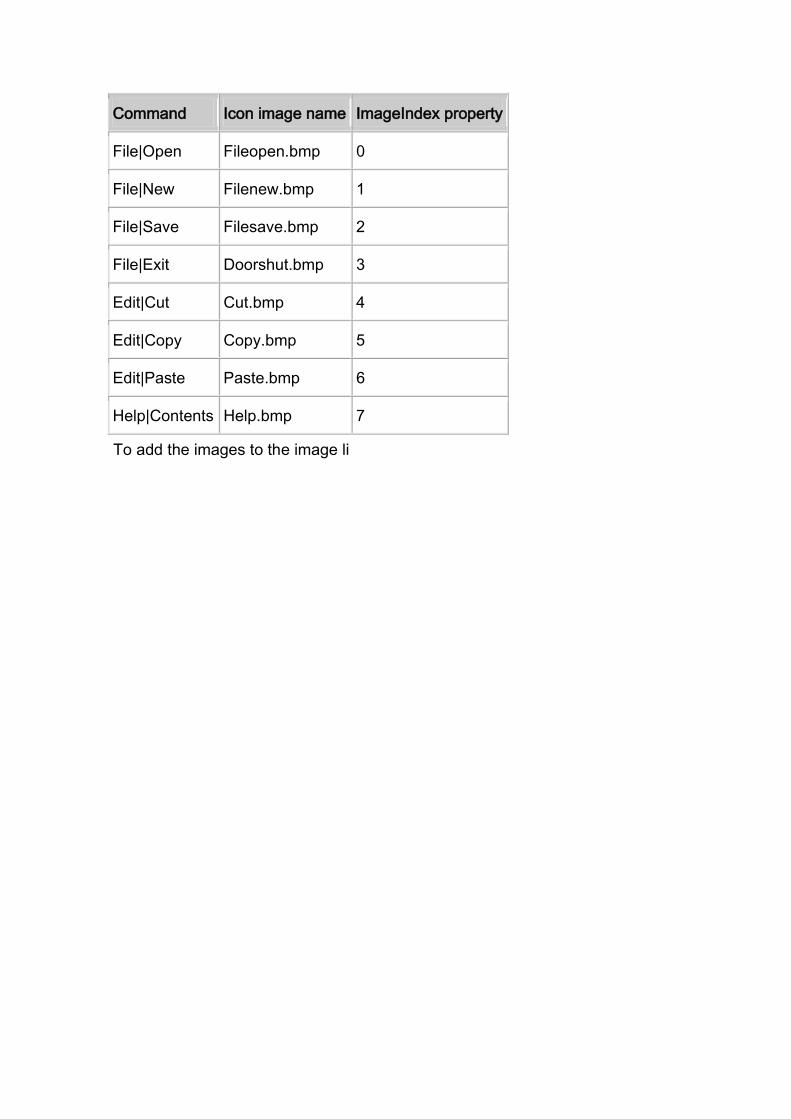
Previously, you added an ImageList object to your form. In this section, you'll add images to that list for use on the toolbar and on
menus. Following are the images to use for each command:
Page 59
Command Icon image name ImageIndex property
File|Open Fileopen.bmp 0
File|New Filenew.bmp 1
File|Save Filesave.bmp 2
File|Exit Doorshut.bmp 3
Edit|Cut Cut.bmp 4
Edit|Copy Copy.bmp 5
Edit|Paste Paste.bmp 6
Help|Contents Help.bmp 7
To add the images to the image li
Page 60
1. Double-click on the ImageList object on the form to display the Image List
editor.
2. Click on the Add button and navigate to the Buttons directory provided with the
product. The default location is C:\Program Files\Common Files\Borland
Shared\Images\Buttons.
3. Select fileopen.bmp.
4. When a message asks if you want to separate the bitmap into two separate ones,
click Yes each time. Each of the icons includes an active and a grayed out
version of the image. You'll see both images. Delete the grayed out (second)
image.
o Click Add and select filenew.bmp. Delete the grayed out image.
o Click Add and select filesave.bmp. Delete the grayed out image.
o Click Add and select doorshut.bmp. Delete the grayed out image.
o Click Add and select cut.bmp. Delete the grayed out image.
o Click Add and select copy.bmp. Delete the grayed out image.
o Click Add and select paste.bmp. Delete the grayed out image.
o Click Add and select help.bmp. Delete the grayed out image.
5. Click OK to close the Image List editor.
You've added 8 images to the image list and they're numbered 0-7
consistent with the ImageIndex numbers on each of the actions.
Note: If you get them out of order, you can drag and drop them into their
correct positions in the image list editor.
6. To see the associated icons on the action list, double-click the ActionList object
then select the All Actions category.
Page 61
When you're done close the Action List editor. Now you're ready to add the
menu and toolbar.
Adding a menu
In this section, you'll add a main menu bar with three drop-down menus--File,
Edit, and Help--and you'll add menu items to each one using the actions in the
action list.
1. From the Standard page of the Component palette, drop a MainMenu component
onto the form. It doesn't matter where you place it.
2. Set the main menu's Images property to ImageList1. This will allow you to add
the images to the menu items.
3. Double-click the menu component to display the Menu Designer.
4. In the Object Inspector, type &File to set the Caption property of the first top-
level menu item and press Enter.
Page 62
5. In the Menu Designer, select the File item you just created. You'll notice an empty item under it: select the empty item. In the Object
Inspector, choose the Action property. The Actions from the action list are all listed there. Select FileNew.
Page 63
o Focus on the item under New and choose FileOpen from its Action property.
o Focus on the item under Open and choose FileSave from its Action property.
o Focus on the item under Save and choose FileSaveAs from its Action property.
o Focus on the item under Save As and type a hyphen as the Caption of the next item under the File menu and press Enter to create a
separator bar on the menu.
o Focus on the item under the separator bar and choose FileExit from its Action property.
6. Next create the Edit menu:
o Point to the item to the right of the File command and set its Caption property to &Edit and press Enter.
o Focus is now on the item under Edit; choose EditCut1 from its Action property.
o Select the item under Cut and choose EditCopy1 from its Action property.
o Select the item under Copy and choose EditPaste1 from its Action property.
Page 64
7. Next create the Help menu:
o Point to the item to the right of the Edit command and type &Help as its caption.
o Focus on the Menu Designer to select the item under Help and choose HelpContents from its Action property.
o Select the item under Contents and choose HelpIndex from its Action property.
o Select the item under Index and type a hyphen its Caption and press Enter to create a separator bar on the Help menu.
o Select the item under the separator bar and choose HelpAbout from its Action property.
8. Click on the X to close the Menu Designer.
9. Choose File|Save to save your project.
10. Press F9 to compile and run the project. (You can also run the project by clicking the Run button on the Debug toolbar, or by choosing
Run from the Run menu.)
Page 65
When you run your project, C++Builder opens the program in a window like the one you designed on the form. The program
is a full-fledged Windows application, complete with Minimize, Maximize, and Close buttons and a Control menu. The menus
all work although most of the commands are grayed out. The images are displayed next to menu items with which we
associated icons.
Though your program already has a great deal of functionality, there's still more to do to activate the commands. And we
want to add a toolbar to provide easy access to the commands.
11. Click the X in the upper right corner to close the application and return to the design-time view of the form.
Page 66
Clearing the text area (optional)
When you ran your program, the name of the RichEdit control appeared in the text area. You can remove that text using the Strings
editor. This is optional because in a later step, the text will be removed when initializing the main form.
To clear the text area:
1. On the main form, click on the RichEdit component.
2. In the Object Inspector, double-click on the value (TStrings) next to the Lines property to display the String List editor.
3. Select the text you want to remove in the String List editor, press the Delete key, and click OK.
4. Save your changes and trying running the program again.
The text editing area is now cleared when the main form is displayed.
Adding a toolbar
Since we've set up actions in an action list, we can add some of the same actions that were used on the menus onto a toolbar.
1. On the Win32 page of the Component palette , double-click the ToolBar to add it to the form.
A blank toolbar is added under the main menu. With the toolbar still selected, change the following properties in the Object
Inspector:
o Set the toolbar's Indent property to 4. (This indents the icons 4 pixels from the left of the toolbar.)
o Set its Images property to ImageList1.
o Set ShowHint to true. (Tip: Double-click on false to change it to true.)
Page 67
2. Add buttons and separators to the toolbar:
o With the toolbar selected, right-click and choose New Button four times.
o Right-click and choose New Separator.
o Right-click and choose New Button three more times.
o Right-click and choose New Separator.
o Right-click and choose New Button once again.
Note: Don't worry if the icons aren't correct yet. The correct icons will be selected when you assign actions to the buttons.
Page 68
3. Assign actions from the action list to the first set of buttons.
o Select the first button and set its Action to FileExit.
o Select the second button and set its Action to FileNew.
o Select the third button and set its Action to FileOpen.
o Select the fourth button and set its Action to FileSave.
4. Assign actions to the second set of buttons.
o Select the first button and set its Action to EditCut1.
o Select the second button and set its Action to EditCopy1.
o Select the third button and set its Action to EditPaste1.
5. Assign an action to the last button.
o Select the last button and set its Action to HelpContents.
6. Press F9 to compile and run the project.
Your text editor already has lots of functionality. You can type in the text area. Check out the toolbar. If you select text in the
text area, the Cut, Copy, and Paste buttons work.
7. Click the X in the upper right corner to close the application and return to the design-time view.
Writing event handlers
Up to this point, you've developed your application without writing a single line of code. By using the Object Inspector to set property
values at design time, you've taken full advantage of C++Builder's RAD environment. In this section, you'll write functions called
event handlers that respond to user input while the application is running. You'll connect the event handlers to the items on the
menus and toolbar, so that when an item is selected your application executes the code in the handler.
Because all the menu items and toolbar actions are consolidated in the action list, you can create the event handlers from there.
Page 69
For more information about events and event handlers, see "Developing the application user interface" in the Developer's Guide or
online Help.
Creating an event handler for the New command
To create an event handler for the New command:
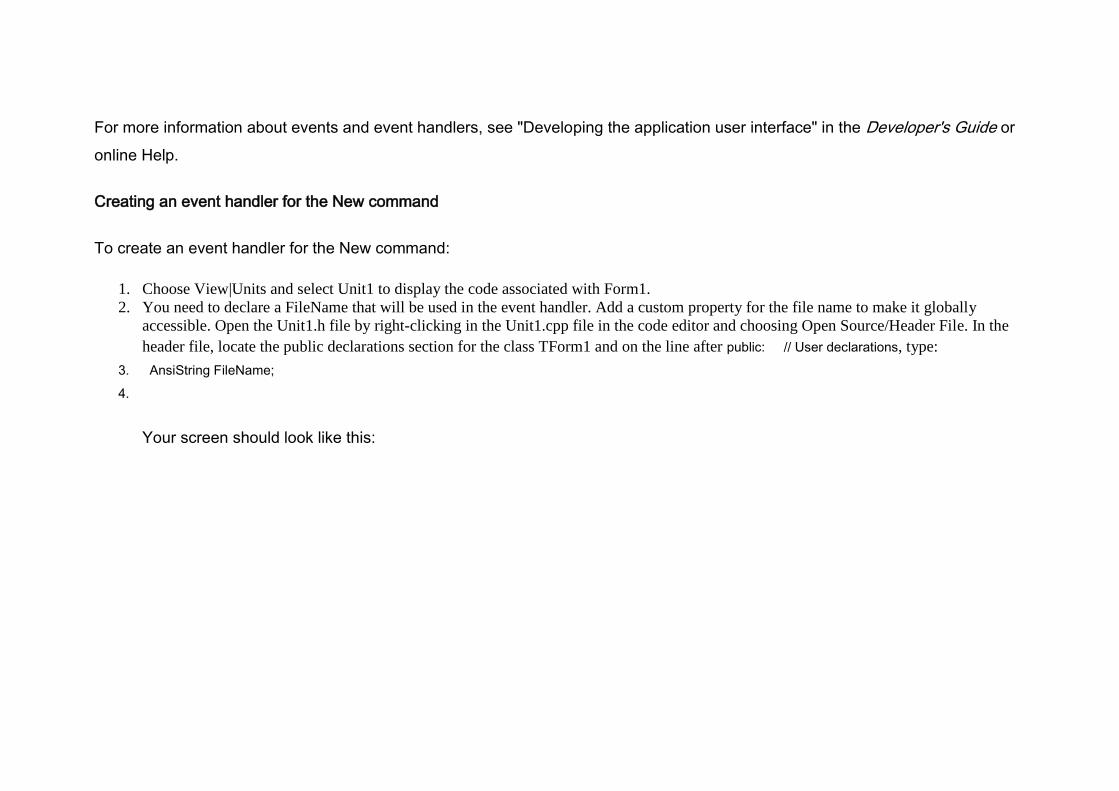
1. Choose View|Units and select Unit1 to display the code associated with Form1.
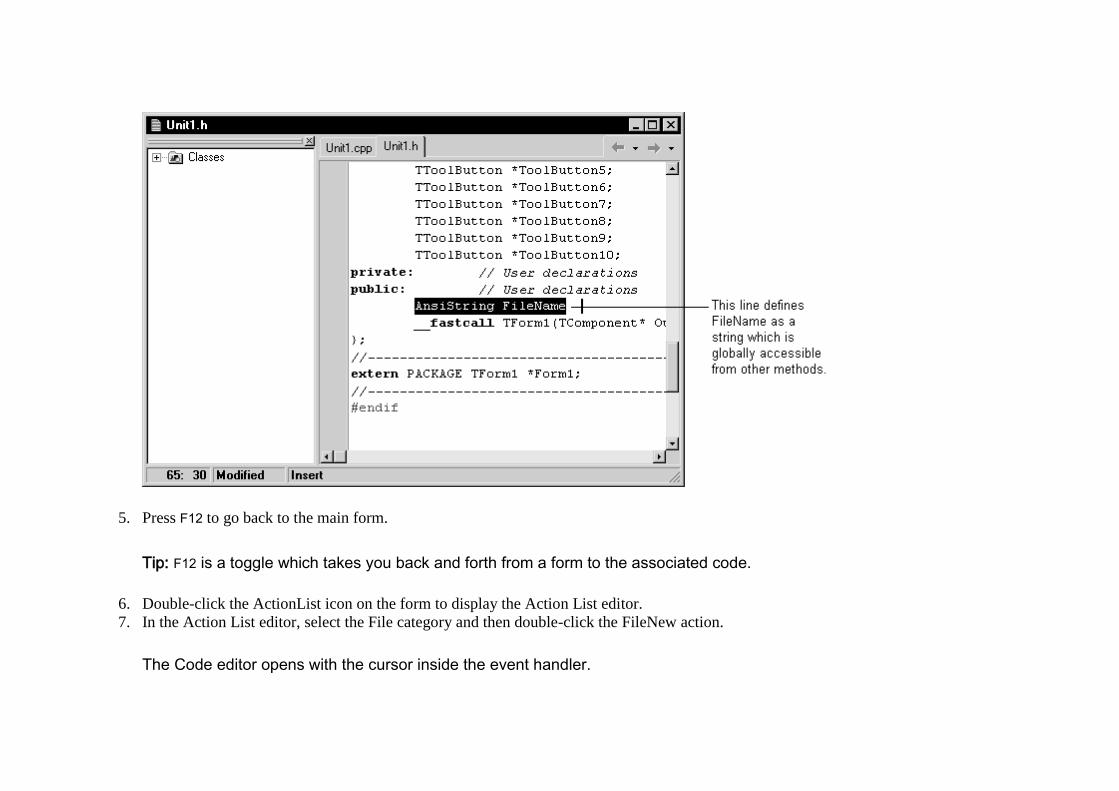
2. You need to declare a FileName that will be used in the event handler. Add a custom property for the file name to make it globally
accessible. Open the Unit1.h file by right-clicking in the Unit1.cpp file in the code editor and choosing Open Source/Header File. In the
header file, locate the public declarations section for the class TForm1 and on the line after public: // User declarations, type:
3. AnsiString FileName;
4.
Your screen should look like this:
Page 70
5. Press F12 to go back to the main form.
Tip: F12 is a toggle which takes you back and forth from a form to the associated code.
6. Double-click the ActionList icon on the form to display the Action List editor.
7. In the Action List editor, select the File category and then double-click the FileNew action.
The Code editor opens with the cursor inside the event handler.
Page 71
8. Right where the cursor is positioned in the text editor (between { and }), type the following lines:
9. RichEdit1->Clear();
10.
Page 72
11. FileName = "Untitled.txt";
12.
13. StatusBar1->Panels->Items[0]->Text = FileName;
14.
Your event handler should look like this when you're done:
Save your work and that's it for the File|New command.
Tip: You can resize the code portion of the window to reduce horizontal scrolling.
Page 73
Creating an event handler for the Open command
When you open a file, a File Open dialog is automatically displayed. To attach it to the Open command, drop a TOpenDialog object
on the main editor form. Then you can write the event handler for the command.
To create an Open dialog and an event handler for the Open command:
1. Locate the main form (select View|Forms and choose Form1 to quickly find it).
2. From the Dialogs page of the Component palette , drop an OpenDialog component onto the form. (You may need to scroll to find the
Dialogs page.) This is a nonvisual component, so it doesn't matter where you place it. C++Builder names it OpenDialog1 by default.
(When OpenDialog1's Execute method is called, it invokes a standard Windows dialog for opening files.)
3. In the Object Inspector, set the following properties of OpenDialog1:
o Set DefaultExt to txt.
o Double-click the text area next to Filter to display the Filter editor. Specify filters for file types: Type "Text files" as the Filter
Name and *.txt as the filter and "All files" as a second Filter Name and *.* as its filter). Then click OK.
Page 74
o Set Title to Open File.
4. The Action List editor should still be displayed. If it's not, double-click the ActionList icon on the form.
5. In the Action List editor, double-click the FileOpen action.
The Code editor opens with the cursor inside the event handler.
6. Right where the cursor is positioned in the text editor (between { and }), type the following lines:
7. if (OpenDialog1->Execute())
8.
9. {
10.
11. RichEdit1->Lines->LoadFromFile(OpenDialog1->FileName);
12.
13. FileName = OpenDialog1->FileName;
Page 75
14.
15. StatusBar1->Panels->Items[0]->Text = FileName;
16.
17. }
18.
Your FileOpen event handler should look like this when you're done:
That's it for the File|Open command and the Open dialog.
Creating an event handler for the Save command
Page 76
To create an event handler for the Save command:
1. The Action List editor should still be displayed. If it's not, double-click the ActionList icon on the form.
2. On the Action List editor, double-click the FileSave action.
The Code editor opens with the cursor inside the event handler.
3. Right where the cursor is positioned in the text editor (between { and }), type the following lines:
4. if (FileName == "Untitled.txt")
5.
6. FileSaveAsExecute(NULL);
7.
8. else
9.
10. RichEdit1->Lines->SaveToFile(FileName);
11.
This code tells the editor to display the SaveAs dialog if the file isn't named yet so the user can assign a name to it.
Otherwise, save the file using its name. The SaveAs dialog is defined in the event handler for the Save As command(see list
item 4, in the section "Creating an event handler for the Save As command"). FileSaveAsExecute is the automatically
generated name for the Save As command.
Your event handler should look like this when you're done:
Page 77
That's it for the File|Save command.
Creating an event handler for the Save As command
To create an event handler for the Save As command:
1. From the Dialogs page of the Component palette , drop a SaveDialog component onto the form. This is a nonvisual component, so it
doesn't matter where you place it. C++Builder names it SaveDialog1 by default. (When SaveDialog's Execute method is called, it invokes
a standard Windows dialog for saving files.)
2. In the Object Inspector, set the following properties of SaveDialog1:
Page 78
o Set DefaultExt to txt.
o Double-click the text area next to Filter to display the Filter Editor. In the editor, specify filters for file types as in the Open dialog
(set Text files to *.txt and All files to *.*) then click OK.
o Set Title to Save As.
Note: The Action List editor should still be displayed. If it's not, double-click the ActionList icon on the form.
3. In the Action List editor, double-click the FileSaveAs action.
The Code editor opens with the cursor inside the event handler.
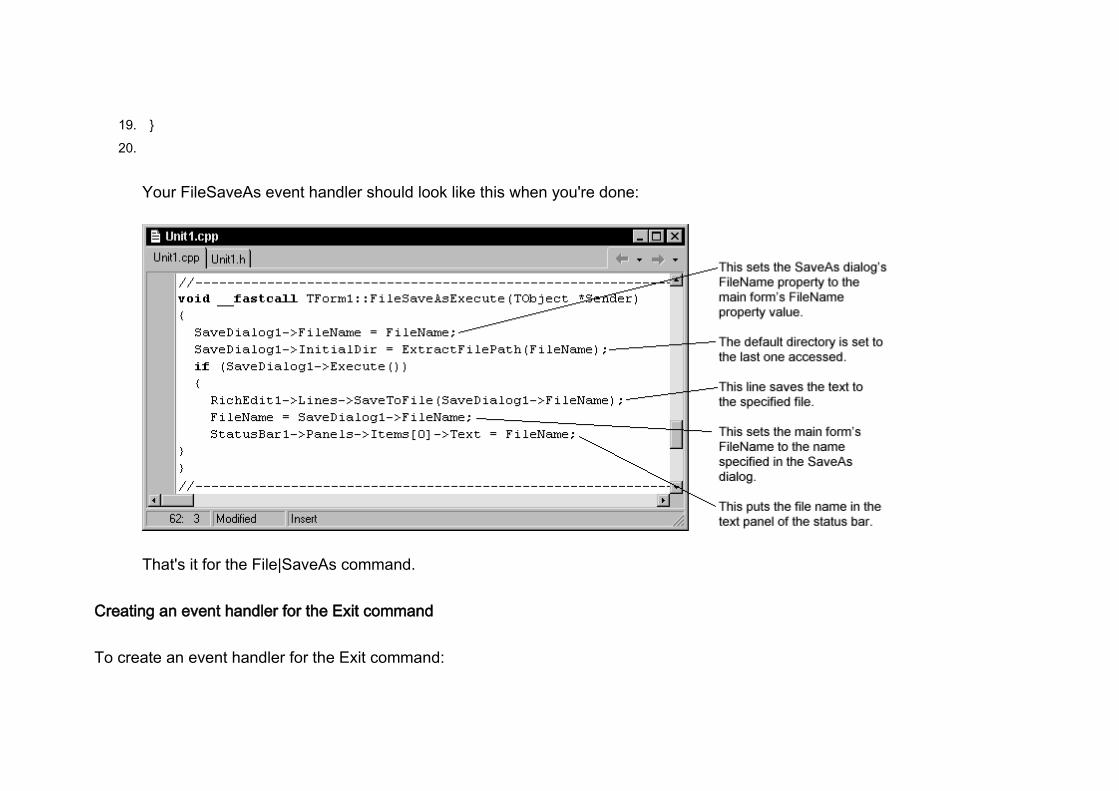
4. Right where the cursor is positioned in the text editor, type the following lines:
5. SaveDialog1->FileName = FileName;
6.
7. SaveDialog1->InitialDir = ExtractFilePath(FileName);
8.
9. if (SaveDialog1->Execute())
10.
11. {
12.
13. RichEdit1->Lines->SaveToFile(SaveDialog1->FileName);
14.
15. FileName = SaveDialog1->FileName;
16.
17. StatusBar1->Panels->Items[0]->Text = FileName;
18.
Page 79
19. }
20.
Your FileSaveAs event handler should look like this when you're done:
That's it for the File|SaveAs command.
Creating an event handler for the Exit command
To create an event handler for the Exit command:
Page 80
1. The Action List editor should still be displayed. If it's not, double-click the ActionList icon on the form.
2. On the Action List editor, double-click the FileExit action.
The Code editor opens with the cursor inside the event handler.
3. Right where the cursor is positioned in the text editor, type the following line:
4. Close();
5.
This calls the close method of the main form. That's all you need to do for the File|Exit command.
6. Choose File|Save All to save your project.
To see what it looks like so far, run the application by pressing F9 or by clicking on the green Run button on the toolbar.
Page 81
Most of the buttons and toolbar buttons work but we're not finished yet.
To return to design mode, close the Text Editor application by choosing File|Exit, by clicking the Exit application button on the
toolbar of your application, or by clicking the X in the upper right corner.
If you receive any error messages, click on them to locate the error. Make sure you've followed the steps as described in the
tutorial.
Creating a Help file
Page 82
It's a good idea to create a Help file that explains how to use your application. C++Builder provides Microsoft Help Workshop in the
Help\Tools directory which includes information on designing and compiling a Windows Help file. In the sample editor application,
users can choose Help|Contents or Help|Index to access a Help file with either the contents or index displayed.
Earlier, we created HelpContents and HelpIndex actions in the action list for displaying the Contents tab or Index tab of a compiled
Help file. We need to assign constant values to the Help parameters and create event handlers that display what we want.
To use the Help commands, you'll have to create and compile a Windows Help file. Creating Help files is beyond the scope of this
tutorial. A sample rtf file (TextEditor.rtf), Help file (TextEditor.hlp) and contents file (TextEditor.cnt) are downloadable from the
http://www.borland.com/techpubs/bcppbuilder/ Web site. Or, to test the Help, you can use any HLP or CNT file (such as one of the
C++Builder Help files and its associated CNT file) in your project. You will have to rename them for the application to find them.
Creating an event handler for the Help Contents command
To create an event handler for the Help Contents command:
1. The Action List editor should still be displayed. If it's not, double-click the ActionList icon on the form.
2. On the Action List editor, select the Help category, then double-click the HelpContents action.
The Code editor opens with the cursor inside the event handler.
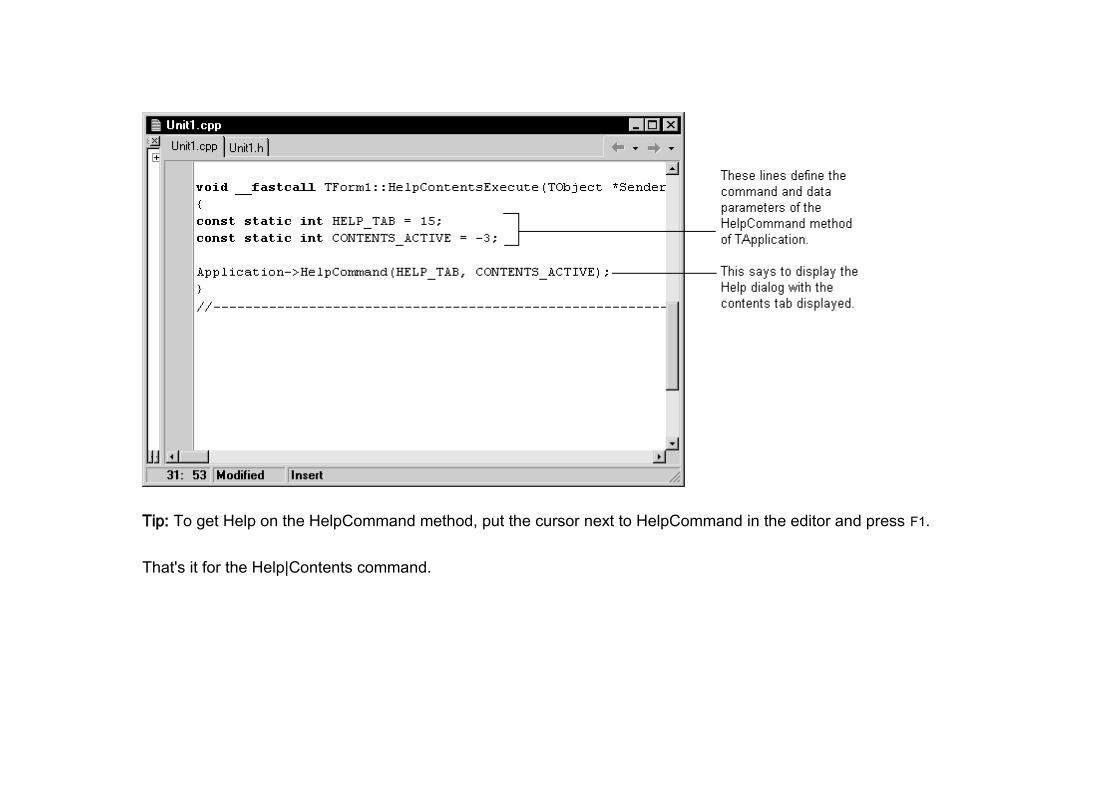
3. Right after where the cursor is positioned in the text editor, type the following lines:
4. const static int HELP_TAB = 15;
5.
6. const static int CONTENTS_ACTIVE = -3;
Page 83
7.
8.
9.
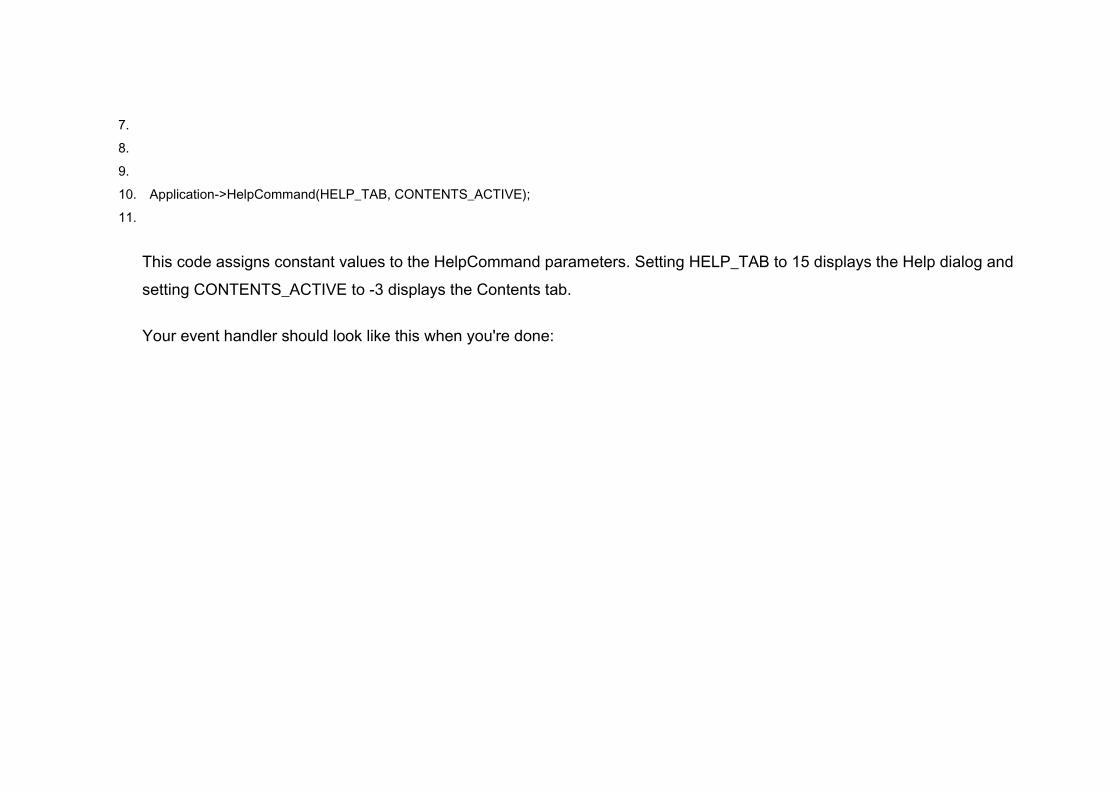
10. Application->HelpCommand(HELP_TAB, CONTENTS_ACTIVE);
11.
This code assigns constant values to the HelpCommand parameters. Setting HELP_TAB to 15 displays the Help dialog and
setting CONTENTS_ACTIVE to -3 displays the Contents tab.
Your event handler should look like this when you're done:
Page 84
Tip: To get Help on the HelpCommand method, put the cursor next to HelpCommand in the editor and press F1.
That's it for the Help|Contents command.
Page 85
Creating an event handler for the Help Index command
To create an event handler for the Help Index command:
1. The Action List editor should still be displayed. If it's not, double-click the ActionList icon on the form.
2. On the Action List editor, select the Help category and then double-click the HelpIndex action.
The Code editor opens with the cursor inside the event handler.
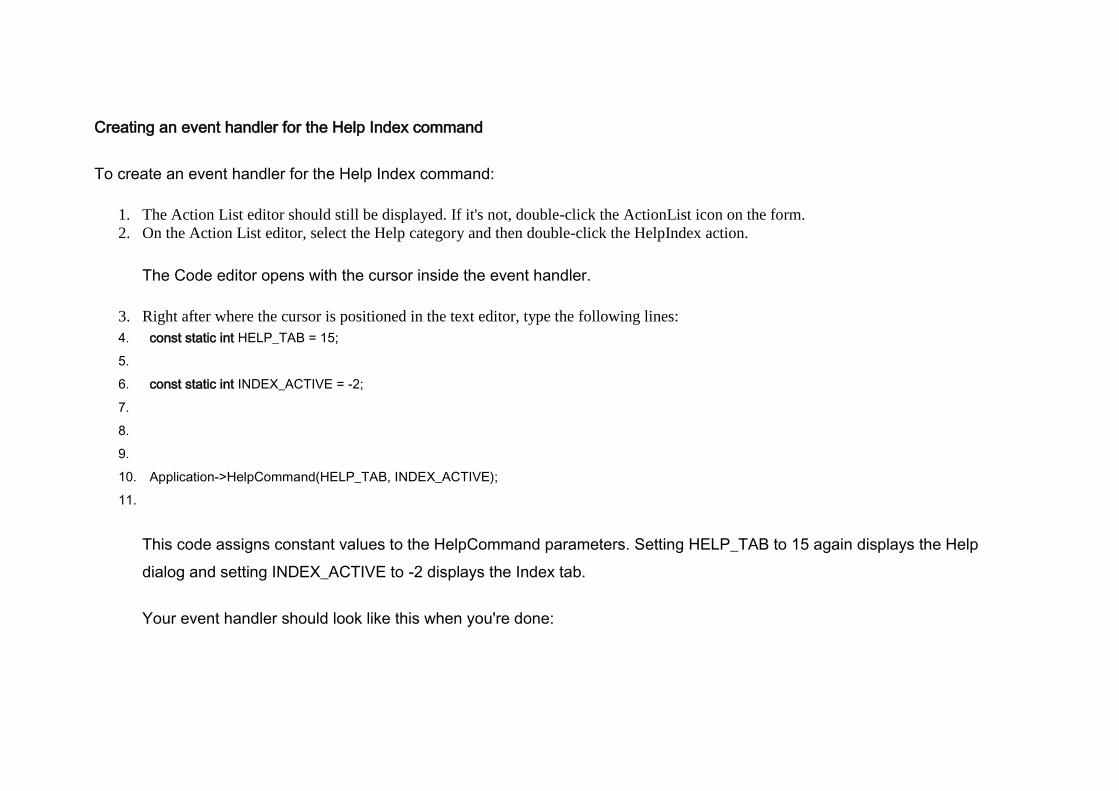
3. Right after where the cursor is positioned in the text editor, type the following lines:
4. const static int HELP_TAB = 15;
5.
6. const static int INDEX_ACTIVE = -2;
7.
8.
9.
10. Application->HelpCommand(HELP_TAB, INDEX_ACTIVE);
11.
This code assigns constant values to the HelpCommand parameters. Setting HELP_TAB to 15 again displays the Help
dialog and setting INDEX_ACTIVE to -2 displays the Index tab.
Your event handler should look like this when you're done:
Page 86
That's it for the Help|Index command.
Page 87
Creating an About box
Many applications include an About box which displays information on the product such as the name, version, logos, and may
include other legal information including copyright information.
We've already set up a Help About command on the action list.
To create an About box:
1. Choose File|New to display the New Items dialog box and select the Forms tab.
Page 88
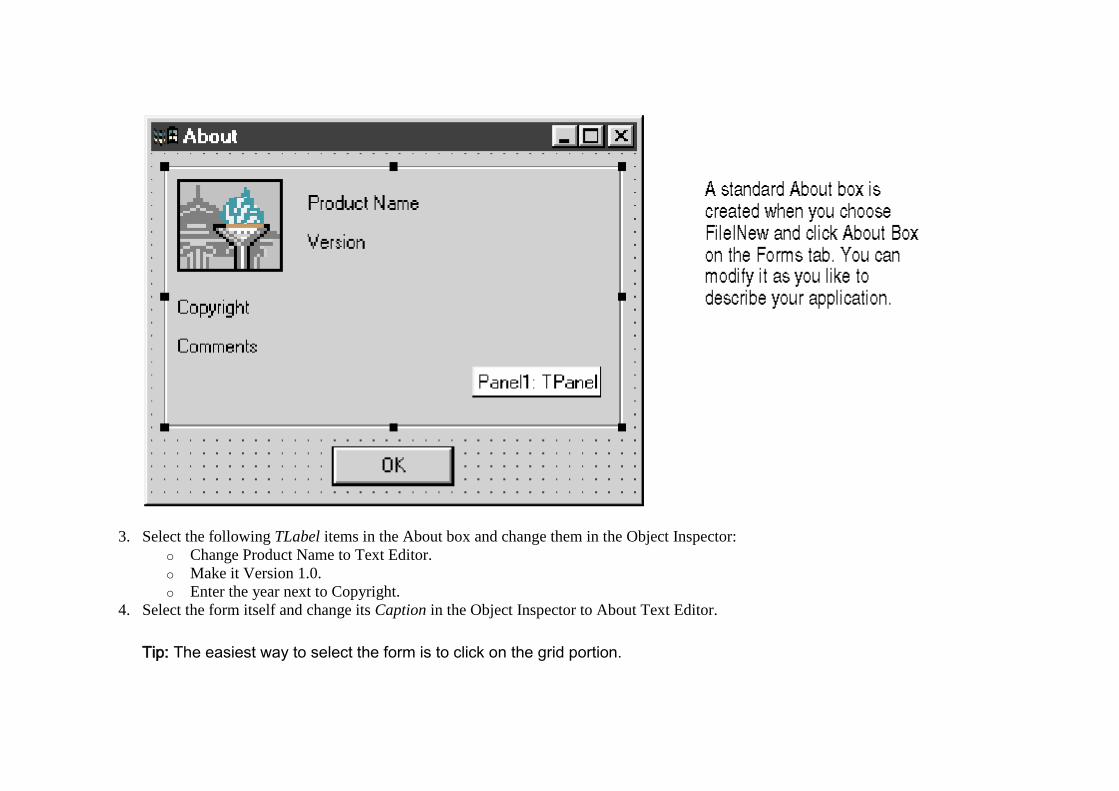
2. On the Forms tab, choose About Box.
A new form is created that simplifies creation of an About box.
Page 89
3. Select the following TLabel items in the About box and change them in the Object Inspector:
o Change Product Name to Text Editor.
o Make it Version 1.0.
o Enter the year next to Copyright.
4. Select the form itself and change its Caption in the Object Inspector to About Text Editor.
Tip: The easiest way to select the form is to click on the grid portion.
Page 90
5. Save the About box form by choosing File|Save As and saving it as About.cpp.
6. In the C++Builder editor, you should have three files displayed: Unit1.cpp, Unit1.h, and About.cpp. Click on the Unit1.cpp tab.
7. Add an include statement for the About unit to Unit1. Choose File|Include Unit Hdr and then select About and click OK.
Notice that #include About.h has been added to the top of the .cpp file.
Page 92
8. On the action list, double-click the HelpAbout action to create an event handler.
9. Right where the cursor is positioned in the text editor, type the following line:
10. AboutBox->ShowModal();
11.
This code opens the About box when the user clicks Help|About. ShowModal opens the form in a modal state. That means
the user can't do anything until the form is closed.
Completing your application
The application is almost complete. However, we still have to specify some items on the main form. To complete the application:
1. Locate the main form (press F12 to quickly find it).
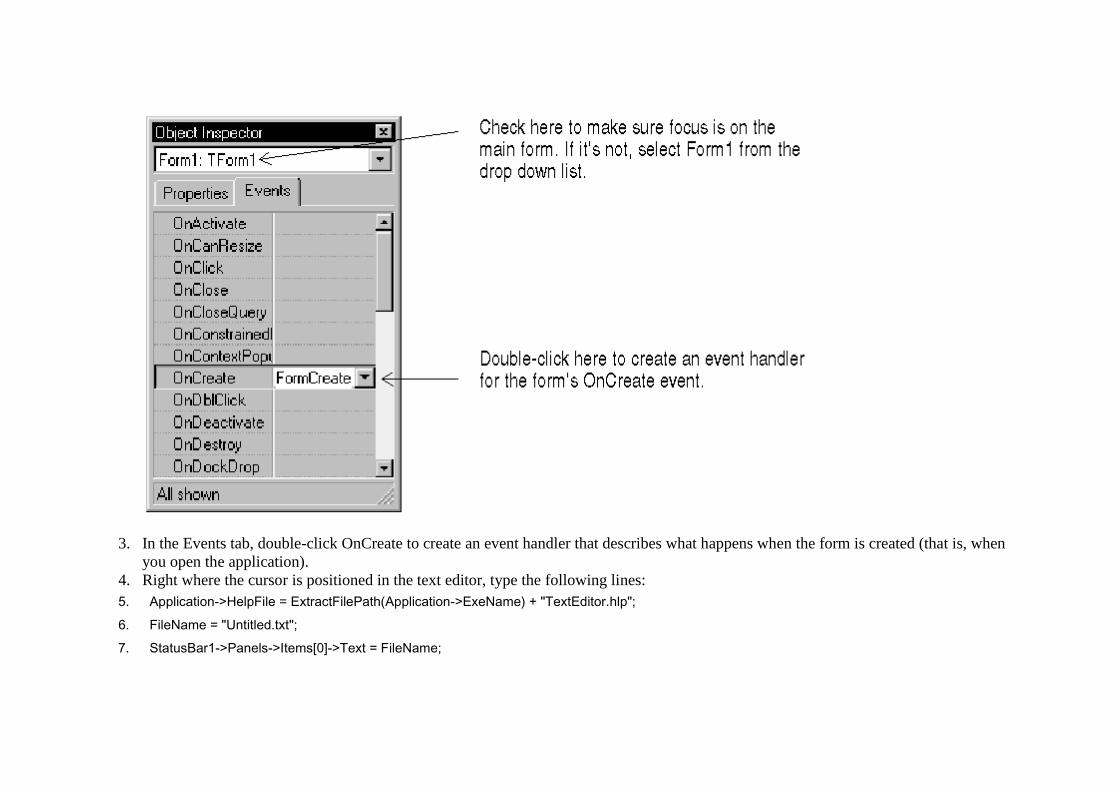
2. Check that focus is on the form itself, not any of its components. The top list box on the Object Inspector should say Form1: TForm1. (If
it doesn't, select Form1 from the drop down list.)
Page 93
3. In the Events tab, double-click OnCreate to create an event handler that describes what happens when the form is created (that is, when
you open the application).
4. Right where the cursor is positioned in the text editor, type the following lines:
5. Application->HelpFile = ExtractFilePath(Application->ExeName) + "TextEditor.hlp";
6. FileName = "Untitled.txt";
7. StatusBar1->Panels->Items[0]->Text = FileName;
Page 95
8. RichEdit1->Clear();
This code initializes the application by associating a Help file, setting the
value of FileName to untitled.txt, putting the filename into the status bar,
and clearing out the text editing area.
9. Put the .HLP file and the CNT file into the project application directory (called
projects\TextEditor).
Note: If you decided not to investigate how to create a Help file or use
the sample one provided on the web, the application still works but you'll
receive an error message when you choose either of the Help
commands or click Help on the toolbar.
10. Press F9 to run the application.
You can test the Text Editor now to make sure it works. If errors occur, click on
the error message and you'll go right to the place in the code where the error
occurred.
Congratulations! You're done.
Page 96
Chapter 4
Programming with C++Builder
The following sections provide an overview of software development with
C++Builder and describe features that are not covered earlier in this Quick
Start.
Development tools and features
The integrated development environment (IDE) includes the Form Designer,
Object Inspector, Component palette, Project Manager, ClassExplorer, Code
editor, Data Module Designer, software localization tools, debugger, and many
other tools. The particular features and components available to you will depend
on which version of C++Builder you've purchased.
All versions of C++Builder support general-purpose 32-bit Windows
programming, multithreading, COM (Component Object Model) and Automation
controllers, and multiprocess debugging. Some versions add support for server
applications such as COM servers and Web applications, database
development with report and chart generation for a variety of DBMS back ends,
support for SQL database servers (such as Oracle 8 and InterBase), Microsoft
Transaction Server (MTS), multi-tiered database applications, CORBA, and
decision-support systems. For up-to-date product information, refer to
www.borland.com or contact your Inprise distributor.
Using the VCL
C++Builder comes with components that are part of a class hierarchy called the
Visual Component Library (VCL). The VCL includes objects that are visible at
runtime--such as edit controls, buttons, and other user-interface elements--as
well as nonvisual controls like datasets and timers.
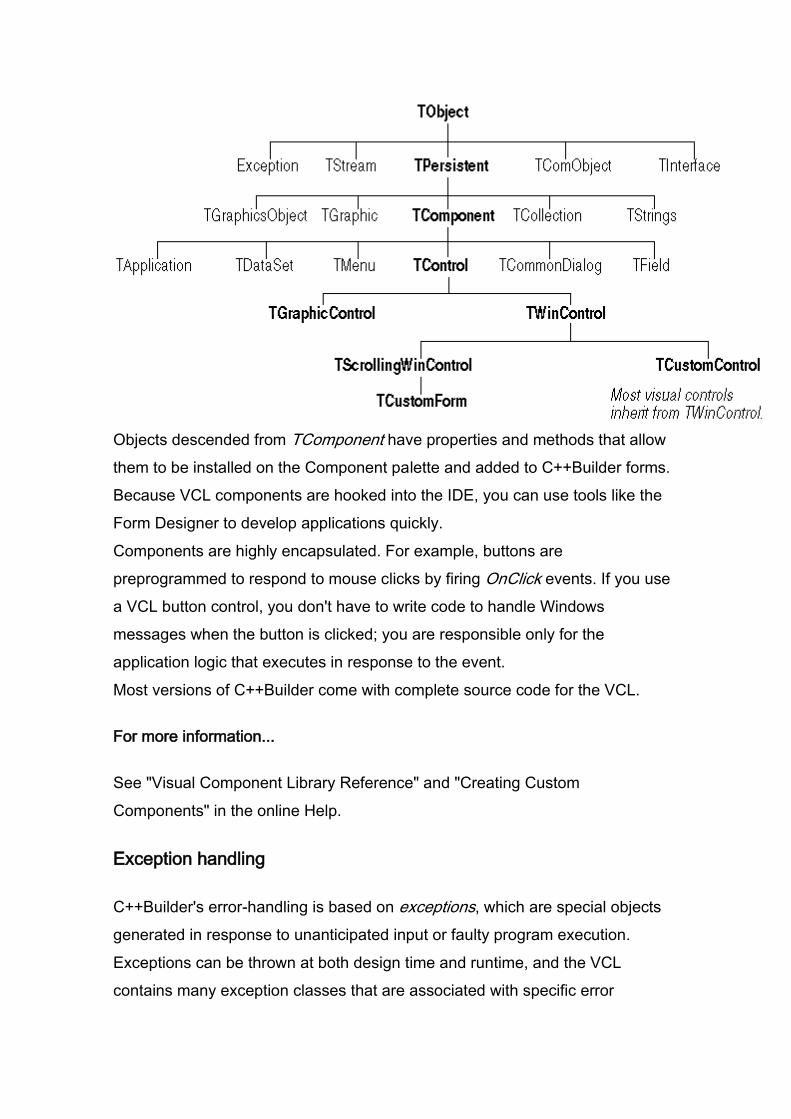
The diagram below shows some of the principal classes that make up the VCL.
Page 97
Objects descended from TComponent have properties and methods that allow
them to be installed on the Component palette and added to C++Builder forms.
Because VCL components are hooked into the IDE, you can use tools like the
Form Designer to develop applications quickly.
Components are highly encapsulated. For example, buttons are
preprogrammed to respond to mouse clicks by firing OnClick events. If you use
a VCL button control, you don't have to write code to handle Windows
messages when the button is clicked; you are responsible only for the
application logic that executes in response to the event.
Most versions of C++Builder come with complete source code for the VCL.
For more information...
See "Visual Component Library Reference" and "Creating Custom
Components" in the online Help.
Exception handling
C++Builder's error-handling is based on exceptions, which are special objects
generated in response to unanticipated input or faulty program execution.
Exceptions can be thrown at both design time and runtime, and the VCL
contains many exception classes that are associated with specific error
Page 98
conditions. In your applications, you'll want to write exception handlers to deal
gracefully with runtime errors. Exceptions can also be a valuable debugging
tool, since the class of an exception often provides a clue about what caused it
to be thrown.
For more information...
See the entries for "Exception" and its specialized descendant classes in the
online VCL reference. Look up "exception handling" in the Help index.
Database connectivity and utilities
C++Builder and the VCL offer a variety of connectivity tools to simplify the
development of database applications. The Borland Database Engine (BDE) is
a collection of drivers that support many popular database formats, including
dBASE, Paradox, FoxPro, Access, and any ODBC data source. SQL Links
drivers, available with some versions of C++Builder, support servers such as
Oracle, Sybase, Informix, DB2, SQL Server, and InterBase.
C++Builder includes components that you can use to access data through
InterBase Express (IBX). IBX applications provide access to advanced
InterBase features and offer the highest performance component interface for
InterBase 5.5 and later.
IBX is based on the custom data access C++Builder component architecture,
and is integrated with the Data Module Designer. IBX is compatible with
C++Builder's library of data-aware components, and does not require the BDE.
You can create database tables at design time in the Form Designer. First,
create field definitions using the Object Inspector, then right-click on the table
component and choose Create Table.
Some versions of C++Builder include components to connect to databases
using ActiveX Data Objects (ADO). ADO is Microsoft's high-level interface to
any data source, including relational and non-relational databases, email and
file systems, text and graphics, and custom business objects.
For more information...
Page 99
See "Developing Database Applications" in the Developer's Guide or online
Help.
BDE Administrator
Use the BDE Administrator (BDEAdmin.exe) to configure BDE drivers and set
up the aliases used by data-aware VCL controls to connect to databases.
For more information...
Start the BDE Administrator from the C++Builder program group under the
Windows Start menu. Then choose Help|Contents.
SQL Explorer (Database Explorer)
The SQL Explorer (DBExplor.exe) lets you browse and edit databases. You can
use it to create database aliases, view schema information, execute SQL
queries, and maintain data dictionaries and attribute sets.
For more information...
From the C++Builder main menu, choose Database|Explore to open the
Explorer; then press F1. Or search for "Database Explorer" in the main Help
index.
Database Desktop
The Database Desktop (DBD32.exe) lets you create, view, and edit Paradox
and dBase database tables in a variety of formats.
For more information...
Start the Database Desktop from the C++Builder program group under the
Windows Start menu. Then press F1.
Data Dictionary
Page 100
The Data Dictionary provides a customizable storage area, independent of your
applications, where you can create extended field attribute sets that describe
the content and appearance of data. The Data Dictionary can reside on a
remote server for additional sharing of information.
For more information...
Search for "Data Dictionary" in the Help index.
Types of development projects
You can use C++Builder to write Windows GUI applications, console
applications, service applications, dynamic-link libraries (DLLs), packages (a
special type of DLL used by C++Builder), and other programs.
Applications and servers
C++Builder has features that make it easy to write distributed applications,
including client/server, multi-tiered, and Web-based systems. In addition to
support for standards like COM and a suite of Internet components, some
versions of C++Builder provide extensive tools for CORBA development.
For more information...
See "Building applications, components, and libraries" and "Developing
distributed applications" in the Developer's Guide or online Help.
DLLs
Dynamic-link libraries (DLLs) are compiled modules containing routines that can
be called by applications and by other DLLs. Since a DLL contains sharable
code or resources, it is typically used by more than one application.
For more information...
Search for "DLLs" in the Help index.
Page 101
Custom components and packages
A package is a special dynamic-link library used by C++Builder applications, the
IDE, or both. While packages can be used in a variety of ways, their most
common purpose is the encapsulation of C++Builder components. In fact, all
components installed in the IDE must be compiled as packages.
The components that come with C++Builder are preinstalled in the IDE and
offer a range of functionality that should be sufficient for most of your
development needs. You could program with C++Builder for years without
installing a new component, but you may sometimes want to solve special
problems or encapsulate particular kinds of behavior that require custom
components.
Custom components supplement the VCL while promoting code reuse and
consistency across applications. Many C++Builder components are available
through third-party developers, and C++Builder provides a New Component
wizard that makes it easy to create and install components on your own.
For more information...
See "Creating Custom Components" in the Developer's Guide or online Help.
Search for "packages" in the Help index.
Frames
A frame (TFrame), like a form, is a container for other components. In some
ways, a frame is more like a customized component than a form. Frames can
be saved on the Component palette for easy reuse, and they can be nested
within forms, other frames, or other container objects. After a frame is created
and saved, it continues to function as a unit and to inherit changes from the
components (including other frames) it contains. When a frame is embedded in
another frame or form, it continues to inherit changes made to the frame from
which it derives.
For more information...
Page 102
Search for "frames" and "TFrame" in the Help index.
COM and ActiveX
C++Builder supports Microsoft's COM standard and provides wizards for
creation of ActiveX controls. Sample ActiveX controls are installed on the
ActiveX page of the Component palette. Numerous COM server components
are provided on the Servers tab of the Component palette. You can use these
components as if they were VCL components. For example, you can place one
of the Microsoft Word components onto a form to bring up an instance of
Microsoft Word within an application interface.
For more information...
Search for "COM" and "ActiveX" in the Help index.
Type libraries
Type libraries are files that include information about data types, interfaces,
member functions, and object classes exposed by an ActiveX control or server.
By including a type library with your COM application or ActiveX library, you
make information about these entities available to other applications and
programming tools. C++Builder provides a Type Library editor for creating and
maintaining type libraries.
For more information...
Search for "type libraries" in the Help index.
Deploying applications
When you deploy an application, be sure to supply all the required files--
including executables, DLLs, packages, and BDE drivers--to your users. To
make this process easier, C++Builder includes a special version of InstallShield
Express, a popular tool for developing installation utilities.
Page 103
For more information...
Search for "deploying applications" in the Help index.
Internationalizing applications
C++Builder offers many features for internationalizing and localizing
applications. Support for input method editors (IMEs) and extended character
sets is provided throughout the VCL, and tools like the Resource DLL wizard
make it easy to prepare a project for localization. To get the maximum benefit
from these features, you need to start thinking about internationalization
requirements as early as possible in the development process.
The Integrated Translation Environment (ITE), available in some versions of
C++Builder, is a suite of tools for software localization and simultaneous
development for different locales. It is integrated with the IDE to let you manage
multiple localized versions of an application as part of a single project.
The ITE includes three tools:
Translation Manager, a grid for viewing and editing translated resources
Translation Repository, a sharable database for translations
Resource DLL wizard, a DLL wizard that generates and manage resource DLLs