CHAPTER THE PRESERVATION OF FRICTION RIDGES Laura A. Hutchins Contributing author Robert E. May CONTENTS 3 8.1 Introduction 3 8.2 History of Photography 5 8.3 Photography in the Criminal Justice Community 6 8.4 The Fingerprint Camera 7 8.5 Modern Photography 16 8.6 Other Methods of Friction Ridge Preservation 19 8.7 Conclusion 20 8.8 Reviewers 20 8.9 References 8–1
Transcript
C H A P T E RTHE PRESERVATION OF FRICTION RIDGES Laura A. HutchinsContributing author Robert E. May
C O N T E N T S
3 8.1 Introduction
3 8.2 History of Photography
5 8.3 Photography in the Criminal Justice Community
6 8.4 The Fingerprint Camera
7 8.5 Modern Photography
16 8.6 Other Methods of Friction Ridge Preservation
19 8.7 Conclusion
20 8.8 Reviewers
20 8.9 References
8–1
CHAPTER 8
THE PRESERVATION OF FRICTION RIDGESLaura A. HutchinsContributing author Robert E. May
8.1 Introduction Inherent in the criminal justice community, and specifi-cally the crime laboratory, is the policy that the information derived from evidence must be preserved to the extent possible. With regard to friction ridge detail, methods of preservation include film and digital photography, latent print lifts, and the use of casting material. Although the two latter methods do create secondary evidence in the form of a lift or cast, the photographing of the friction ridge detail on the lift or the cast is still important to generate ad-ditional secondary evidence. Certainly with respect to state and national labs, evidence submitted with a case must be returned to the contributor. With this in mind, the preserva-tion of all relevant friction ridge information derived from evidence is mandatory, and the production of an archival image enables most of that information to be retained within the case file.
8.2 History of PhotographyPhotography dates back to the time of Aristotle and his study of light, specifically his reference to the passing of light through a pinhole and the creation of a reverse image on the ground (London, 2005, p 368). In the 10th century, the Arabian scholar Alhazen described in detail the dis-covery of the camera obscura, meaning “dark chamber” (London, 2005, p 368). He explained how light could pass through a single hole in a wall of a dark room and project inverted images from the outside onto the opposite wall of the darkened room. Alhazen made specific references to the ability to view a solar eclipse by this method. Eventu-ally, the camera obscura became the size of a box, and a lens for focusing and a mirror for adjusting the light were incorporated. The original use of the camera obscura was for artists as an aid for drawing in perspective (Davenport, 1999, p 4).
The word photography (derived from two ancient Greek words, phos, meaning light, and graphos, meaning to write) was coined by Sir John Herschel in 1839 (Redsicker, 1994, p 1). The first application of recording images by the action of light on a sensitive material was 12 years prior
8–3
The Preservation of Friction RIdges C H A P T E R 8
to Herschel’s use of the word. It was in 1827 when the French inventor Joseph Nicéphore Niépce took the first successful sun-exposure picture. Pewter coated with a mixture of bitumen of Judea (an asphaltlike substance) and lavender oil was placed inside a camera obscura that was aimed at the courtyard outside his window. After 8 hours, the pewter plate was removed from the camera obscura and was rinsed in lavender oil. The bitumen mixture had hardened on areas of the plate that had been exposed to light, whereas the bitumen mixture on the areas not ex-posed remained soluble and was washed away in the rinse (London, 2005, p 368). The result was a permanent scene of the view outside Niépce’s window on the pewter plate.
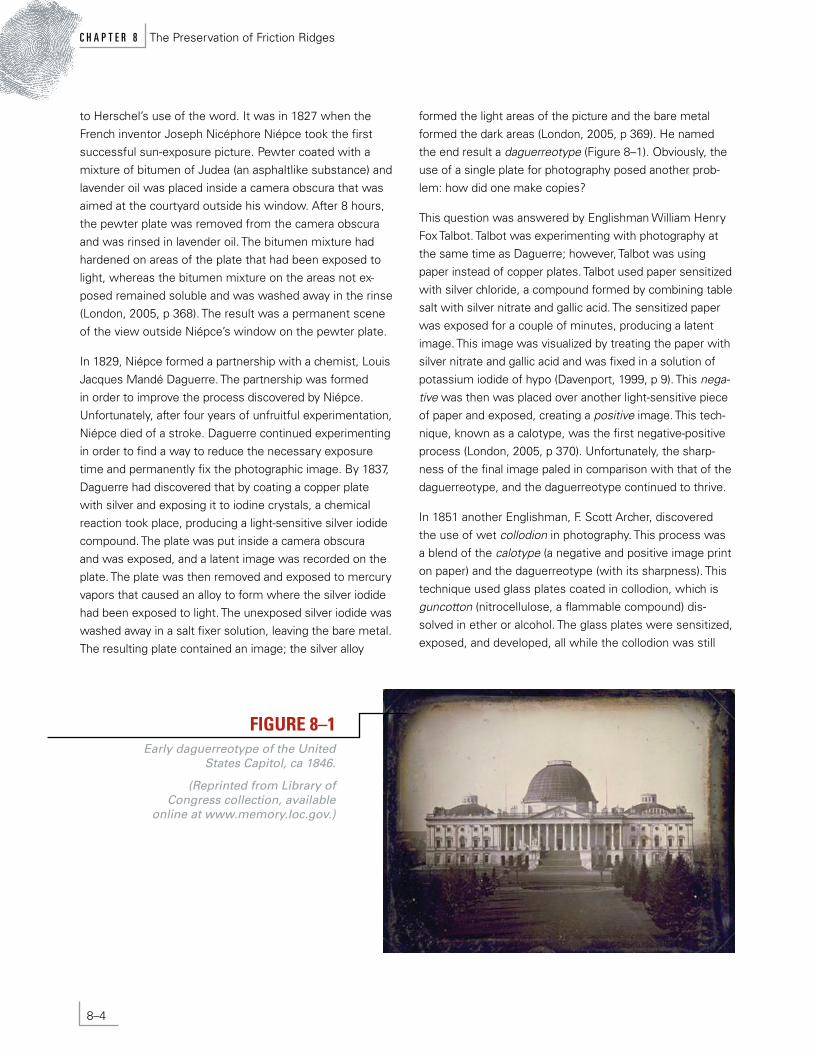
In 1829, Niépce formed a partnership with a chemist, Louis Jacques Mandé Daguerre. The partnership was formed in order to improve the process discovered by Niépce. Unfortunately, after four years of unfruitful experimentation, Niépce died of a stroke. Daguerre continued experimenting in order to find a way to reduce the necessary exposure time and permanently fix the photographic image. By 1837, Daguerre had discovered that by coating a copper plate with silver and exposing it to iodine crystals, a chemical reaction took place, producing a light-sensitive silver iodide compound. The plate was put inside a camera obscura and was exposed, and a latent image was recorded on the plate. The plate was then removed and exposed to mercury vapors that caused an alloy to form where the silver iodide had been exposed to light. The unexposed silver iodide was washed away in a salt fixer solution, leaving the bare metal. The resulting plate contained an image; the silver alloy
formed the light areas of the picture and the bare metal formed the dark areas (London, 2005, p 369). He named the end result a daguerreotype (Figure 8–1). Obviously, the use of a single plate for photography posed another prob-lem: how did one make copies?
FIGURE 8–1Early daguerreotype of the United
States Capitol, ca 1846.
(Reprinted from Library of Congress collection, available
online at www.memory.loc.gov.)
This question was answered by Englishman William Henry Fox Talbot. Talbot was experimenting with photography at the same time as Daguerre; however, Talbot was using paper instead of copper plates. Talbot used paper sensitized with silver chloride, a compound formed by combining table salt with silver nitrate and gallic acid. The sensitized paper was exposed for a couple of minutes, producing a latent image. This image was visualized by treating the paper with silver nitrate and gallic acid and was fixed in a solution of potassium iodide of hypo (Davenport, 1999, p 9). This nega-tive was then was placed over another light-sensitive piece of paper and exposed, creating a positive image. This tech-nique, known as a calotype, was the first negative-positive process (London, 2005, p 370). Unfortunately, the sharp-ness of the final image paled in comparison with that of the daguerreotype, and the daguerreotype continued to thrive.
In 1851 another Englishman, F. Scott Archer, discovered the use of wet collodion in photography. This process was a blend of the calotype (a negative and positive image print on paper) and the daguerreotype (with its sharpness). This technique used glass plates coated in collodion, which is guncotton (nitrocellulose, a flammable compound) dis-solved in ether or alcohol. The glass plates were sensitized, exposed, and developed, all while the collodion was still
8–4
C H A P T E R 8 The Preservation of Friction Ridges
wet (Davenport, 1999, pp 18–19). Although the technique was complicated by the fact that the glass plates had to remain wet, it was much cheaper than the Daguerre method, produced negatives that were much sharper than calotypes, and reduced exposure time to a few seconds. Because Archer never patented his discovery, the use of this type of photography was adopted worldwide and sup-planted the previous two methods. For the next 20 years, the wet method of photography continued to thrive.
In 1871, Richard Leach Maddox produced the first viable dry plate that retained light sensitivity (Davenport, 1999, pp 22–23). Maddox’s discovery was prompted by health problems caused by overexposure to the ether vapor used in the wet collodion process. Being an enthusiast of photography, he searched for an alternate method of adher-ing the silver salts to the glass plate. He discovered that instead of using wet collodion, he could coat the glass with an emulsion of gelatin that the sensitizing material adhered to and the glass would still retain its light-sensitive proper-ties (Harrison, 1888, p 61).
As more and more photographers began using this method, the desire for the process to be more available to amateur photographers and the general public became the focal point of one man, George Eastman. By 1888, Eastman had initiated a method of mass producing dry paper film rolls contained within a simple box camera, called the Kodak.
FIGURE 8–2Portraits parlé of Alphonse Bertillon taken in 1897.
(Reprinted with permis-sion from the R.A. Reiss photographic collection at the Institut de Police Scientifique, Université de Lausanne.)
8.3 Photography in the Criminal Justice Community
8.3.1 Identifying the Criminal: Rogues’ Galleries of the PastWith the coming of the second Industrial Revolution (1871–1914), city populations became flooded with people coming and going on steam-powered ships and railways. As cities grew, so did the criminal element. It was an easy time to be a criminal. The criminal justice community had no established method of recognizing repeat offenders. It was very easy for recidivists to deny their true identity by merely giving the authorities another name. In fact, at the time, the only method of criminal recognition was the memory of police officers. When the daguerreotype was discovered, the criminal justice community quickly implemented the photograph as a way of documenting criminals.
Collections of photographs of criminals for identification purposes became known as rogues’ galleries. Rogues’ galleries were displayed in police departments for refer-ence while checking in suspects and, after the invention of photographic negatives, served as the template for “wanted” posters. By the late 1800s, extensive rogues’ galleries could be found in many police departments. Eventually, Alphonse Bertillon (see Chapter 1, p 8) incor-porated portraits parlé, now known as mug-shots (Figure 8–2), into his system of identification (Phillips, 1997, p 20). From this standard front and side mug-shot technique, books were produced. In essence, the rogues’ gallery from the wall became a pocket book.
8–5
The Preservation of Friction RIdges C H A P T E R 8
8.3.2 Documenting the CrimeThe advantages of the camera went beyond the mere accumulation of rogues’ galleries. It was a natural progres-sion from documenting the criminal to documenting the crime itself (Figure 8–3).
FIGURE 8–3Daguerreotype taken
after President Lincoln’s assassination.
(Reprinted from www.civilwarphotos.net.)
The value of permanently record-ing a true and accurate depiction of a crime came to be an invaluable investigative tool. Not only could the photo-graphs say what a witness could not, but they were seen as objective recordings (Buckland, 2001, p 27). As early as 1859, photographs began to appear in the courtroom, ranging from photographs comparing forged and nonforged signatures to photographs establishing the true identity of a corpse (Moenssens).
With the advent of the crime laboratory, evidence that was photographed at the crime scene could be analyzed and photographed in a controlled environment. By the 1930s, full-service crime laboratories were springing up across the world (e.g., FBI Laboratory in 1932, London’s Metropoli-tan Police Forensic Laboratory in 1935). The advent of the
crime laboratory occurred in conjunction with several fo-rensic science milestones. The 1930s witnessed the ush-ering in of typewriter standard files, fraudulent check files, automotive paint files, firearms reference collections, use of the polygraph, the first use of the ABO blood testing on forensic evidence, metallurgical services, gunshot residue analysis, DNA secretor analysis, luminol as a presumptive test for blood, and the establishment of the Single Finger-print Section at the FBI. As methods of forensic detection were established in crime laboratories, the recording of results through photography became standard procedure.
FIGURE 8–4Self-contained fingerprint camera.
(Courtesy of the South Wales Police Museum.)
8.4 The Fingerprint CameraThe first camera designed specifically for fingerprint work was made by Folmer & Schwing Manufacturing Company of New York in the early 20th century. The camera was self-sufficient, providing a fixed focus lens and lighting contained within an oblong box (Figure 8–4). The lens was positioned at a fixed point that produced a focused life-size
8–6
C H A P T E R 8 The Preservation of Friction Ridges
image on the negative (1:1) and the lamps were activated by the movement of the shutter, thus exposing the 2” x 3” glass plate (Lightning Powder Co., Inc., 2003, p 5). A photo-graph was taken by positioning the open end of the oblong camera over the print and pressing the exposure button. The creation of this type of camera enabled a person who was not trained in the art of photography to take photo-graphs of latent prints.
This type of fingerprint camera remained in existence until the 1970s. Technological advances were incorporated into the design over the years, but the basic concept and ease of use continued. Advances involved additional lens types, vari-able shutter speeds, adjustable apertures, electronic flash bulbs, and the use of roll film or Polaroid-type films of sizes varying from 2 1/4” x 3 1/4” to 4” x 5” (Olsen, 1978, p 178).
8.5 Modern PhotographyAs with any type of specific-use technology, the cost of specialized equipment leads to the need for more afford-able equipment that can also be used for other purposes. Smaller police departments could not afford to purchase a fingerprint camera, so they began to outfit the cameras they owned with attachments for fingerprint photography (Olsen, 1978, p 147). A general-purpose camera could be adapted for fingerprint work with the use of a camera stand, proper lighting, and an appropriate lens. Another factor that allowed for the easy transition to traditional camera usage was the ease with which irregularly shaped objects could be photographed. The fingerprint camera was perfectly suited to flat evidence, but evidence that was irregular in shape posed depth of field problems. Addition-ally, although the fingerprint camera was appropriate to basic fingerprint processing techniques such as powdering, the advent of forensic light sources demanded the use of nonspecific camera equipment.
8.5.1 Film PhotographyModern film is composed of plastic sheets that are coated with an emulsion containing silver halide salts bonded by gelatin. The grain size of the silver halide salt determines the sensitivity of the film and the resulting resolution. Film with a smaller grain size, known as slow film, requires a longer exposure but produces a photograph of finer detail. When the silver halide salts are exposed to a form of light, an invisible image is recorded on the film. Film-developing chemicals are then applied to the exposed film in order to
visualize the latent images. This process causes the conver-sion of the silver halide salts to metallic silver. The metallic silver blocks the transmission of light and forms the black portion of a negative.
There are generally three camera formats available: small, medium, and large. In photography, the term “format” refers to the size of the film that is used in the camera. Small format cameras use film that is 35 mm and smaller. The main disadvantage of using a small format camera is that the small negative must be enlarged in the printing process. A medium format camera uses film that is fixed at 6 cm in width but varies in length, ranging from 4.5 cm to 7 cm. Large format cameras use film that is 4” x 5” or larger. The advantage of having a larger format camera is the higher resolution that is achieved.
8.5.2 Digital PhotographyThe history of the digital camera is rooted in the technology that gave rise to the television and the first videotape re-corder. This technology allowed for the conversion of infor-mation into electrical impulses that could be recorded onto magnetic tape. In 1970, Willard Boyle and George Smith of AT&T Bell Labs invented the charge coupled device (CCD) (Boyle, 1970). Essentially, a CCD is an image recording sensor containing picture elements, commonly referred to as pixels, on a grid (Bidner, 2000, p 25). The pixels on the sensor record light electronically (i.e., light is converted into electrons). Generally, the greater the number of pixels on the CCD, the sharper the image. This electronically record-ed light is then converted into digital data.
With regard to photography, a digital camera records the image with a CCD instead of recording the image on film (Ippolito, 2003, p 36). Specifically, an image is focused on the sensor through the lens. The sensor for the digital cam-era contains millions of CCD cells (pixels) on a grid. Each CCD records a color and a brightness (tonal) value that is stored as a series of numbers in the camera’s memory. These stored numbers are then reassembled and sent as an image to a printer or a computer screen. Because of the volume of pixels on the grid, the human eye views the recorded image as continuous tones, just as one would view a photograph (London, 2005, p 200).
Key to the understanding of digital camera technology is pixel resolution. Pixel resolution refers to the number of pixels in an image. For example, a 1000 x 1000 pixel image printed in a one-inch square would have 1000 pixels per inch (PPI).
8–7
The Preservation of Friction RIdges C H A P T E R 8
Traditional film photography cameras are based upon film format; digital camera file format is based upon the storage of data. Most digital cameras offer a choice of file formats for saving images. There are two main types of formats: compressed and uncompressed. Compressed file formats produce smaller image files that allow for more storage space. Images are reduced in size by the discarding, or loss, of pixel information. Every time an image is saved in a compressed format, information is lost. Because of this loss, compression file formats are referred to as lossy. The most common type of lossy compression format is JPEG (Joint Photographic Experts Group).
Uncompressed file formats are those in which no pixel values are lost and the image can be retrieved in its original form (Federal Bureau of Investigation, 2004, p 14). Un-compressed file formats include TIFF (tagged information file format) and RAW formats (i.e., the camera’s native or unprocessed file format). Both formats store an image in its original form, thus requiring more storage space. For the purpose of recording friction ridge impressions, the use of TIFF or RAW images in digital photography is valuable to ensure that the integrity of the evidence is preserved.
A vital aspect of maintaining the integrity of the evidence is the acquisition of a digital camera that meets or exceeds the guidelines set forth by the Scientific Working Group on Friction Ridge Analysis, Study and Technology (SWGFAST) (SWGFAST, 2009) and the National Institute of Standards and Technology (NIST). NIST has established that the mini-mal resolution of an image taken by a digital camera that is used for latent impression evidence be 1000 PPI at 1:1 (SWGIT, 2002; SWGFAST, 2009, p 2).
Another key aspect to digital photography in relation to the criminal justice community is the maintenance of the original digital image. The original image must be stored in an unaltered state. The original images can be stored on the following media: silver-based film negative, write-once compact disk-recordable (CD-R), and digital versatile disk-recordable (DVD-R) (SWGIT, 2006, pp 3-4). If digital process-ing is needed, it must be performed on a duplicate image.
In addition to the acquisition of fingerprint impressions with a digital camera, impressions on relatively flat sur-faces may be digitized through the use of a flatbed scanner and the image(s) can be imported into a computer. A flatbed scanner consists of a flat piece of glass, known as a platen, a light source under the platen and in the lid, and a CCD image recording sensor on a track underneath the
platen. Items to be scanned are placed face down on the platen, and the CCD sensor track moves beneath the item, recording the image(s). The type of item to be scanned dic-tates the location of the light source for the scan (opaque versus transparent lifts). For opaque items, the light on the tract below the platen is used. As the tract moves below the item, the CCD sensor records the light that is reflected off the item. This is known as reflective scanning. Transmis-sive scanning is used to record image(s) on a transparent item. With transmissive scanning, the light from the lid is transmitted through the item and onto the CCD. Like the digital camera, the flatbed scanner must be able to pro-duce the PPI requirement for latent impressions set forth by NIST, and the original images should be recorded on the appropriate medium.
8.5.3 Properties of LightPhotography is the recording of images on sensitive material by the reaction of light, and the photographer will benefit by knowing something about its properties and how to control it.
Light travels as waves. Light waves ordinarily travel in straight lines, passing through some substances, and be-ing absorbed or reflected by others. Forms of energy trans-mitted by waves of any nature are classified according to their wavelength into a system called the electromagnetic spectrum. This classification is important because it allows the assignment of a given wavelength to each form of en-ergy with which photography is concerned. For fingerprint photography, the wavelengths that are most important are those in the invisible short- and long-wave ultraviolet light and the visible light spectrum.
The term spectrum refers to the entire range of electromag-netic radiation. In their basic nature, there are no differenc-es between light waves and other kinds of electromagnetic waves. The various types of electromagnetic waves that make up the electromagnetic spectrum are gamma rays, x-rays, ultraviolet radiation, visible light, infrared radiation, radar, and radio waves (Figure 8–5) (Langford, 1973, p 23).
8.5.3.1 Luminescence. When certain materials, such as some solids, liquids, or gases, are subjected to electro-magnetic radiation, such as ultraviolet radiation or mono-chromatic light, they will emit light of a longer wavelength (Miller, 1998, p 205). This occurrence is called lumines-cence. The two particular types of luminescence are known as fluorescence and phosphorescence. If the luminescence
8–8
C H A P T E R 8 The Preservation of Friction Ridges
FIGURE 8–5Electromagnetic spectrum.
ceases within a fraction of a second (i.e., less than 10-6 second) (Menzel, 1980, p 68) after removing the exciting radiation, the phenomenon is called fluorescence. Although fluorescence ceases almost immediately after removing the exciting radiation, some substances continue to emit luminescence for some time. This phenomenon is called phosphorescence (Miller, 1998, p 205). For most fingerprint imaging purposes, the differences between fluorescence and phosphorescence are inconsequential.
Invisible ultraviolet radiation (UV) is that portion of the electromagnetic spectrum that can induce visible lumines-cence in certain materials. Invisible long-wave ultraviolet radiation in the electromagnetic spectrum ranges from 320 nm to 390 nm. Visible light is that portion of the electro-magnetic spectrum that normally stimulates sight. Visible light in the electromagnetic spectrum ranges from 390 nm to 700 nm. When materials absorb light and re-emit this light at longer wavelengths, the difference between
absorption and emission is known as Stokes shift (Figure 8–6) (Menzel, 1980, p 9).
8.5.3.2 Filters Used in Luminescent Photography. A barrier filter of optical photographic quality and particular absorption and transmission properties is needed to visual-ize and photograph luminescing latent prints. The barrier filter will absorb or reflect most of the excitation and will transmit the sufficiently longer wavelength to enable pho-tographic imaging (Figure 8–7). Without the barrier filter, the excitation light tends to compete with and wash out luminescing friction ridge detail. In some instances, a bar-rier filter may help block interfering fluorescence. Modern forensic light sources come with an array of nanometer choices and barrier filters that allow for the visualization and resulting photography of luminescing latent prints (Table 8–1). For most forensic light sources (e.g., laser, alternate lightsource, LEDs), the customary barrier filters are orange (amber), yellow, and red.
FIGURE 8–6Stokes shift.
8–9
The Preservation of Friction RIdges C H A P T E R 8
FIGURE 8–7Basic scheme for forensic
light source detection.
Table 8–1
Emitted light and corresponding filter selections (Hardwick, 1990, p 21; Eastman Kodak Company, 1990, p 4).
Emitted Light (Color)
CorrespondingNanometers
Barrier Filter(Color)
Common Barrier Filter
Invisible Ultraviolet 320–400 Pale Yellow 390, 405, 415
Violet/Blue
350–469 Yellow 476
Yellow/Orange 510, 515
Orange 529, 550
Red 593
Blue
352–519 Yellow/Orange 510, 515
Orange 529, 550
Red 593
Blue/Green468–526 Orange 529, 550
Red 593
Green473–546 Orange 549
Red 593
Green/Yellow 503–591 Red 593
8–10
C H A P T E R 8 The Preservation of Friction Ridges
Table 8–2
Contrast adjusting filters.
Background Color
Filter Used to Lighten
Filter Used to Darken
Blue Blue Red
Red Red Blue
Green Green Red or Blue
Orange Yellow Blue
Yellow Yellow Blue
Using long-wave ultraviolet radiation, latent impressions developed with chemical treatments, dye stains, and fluorescent powders are often visible without the use of a filter. However, when photographing latent impressions that luminesce, with black and white film or a digital format, using a UV barrier filter will block the invisible light that the film or the digital sensor is sensitive to, thus eliminating the chance of distortion or overexposure of an image.
8.5.4 Close-Up Photography EquipmentMedium and small format cameras need a macro lens in order to take close-up photographs. A macro lens is classified as a flat field lens, meaning that the images are produced on an even plane, thereby maintaining the sharp-ness on the edges (Eastman Kodak Company, 1988, p 41). Conversely, a standard lens is classified as a curved field lens, meaning the images are produced on a bowed plane. This makes a standard lens less desirable for close-up photography because the edges will lose their sharpness.
Additional methods for achieving close-up photography are close-up lenses, reversing ring adaptors, and bellows units. Close-up lenses are clear glass lenses that are used to increase the magnification of the standard lens. Close-up lenses screw into the filter mounting threads on the front of the lens. The lenses are numbered from 1 to 10, with the higher number representing the increased strength of the lens. A reversing ring adaptor allows the lens to be turned so that the rear element of the lens faces toward the subject. This increases the distance between the film plane and the lens, thereby increasing the image size. A flexible bellows unit extends the lens forward, allowing closer focusing.
8.5.5 The Use of FiltersThe use of black and white film in latent print photography allows for the use of color filters for heightened contrast. These filters will lighten or darken the images and are dependent upon the background color; a colored filter will lighten the tone of the same color and darken the tone of a complementary color (Table 8–2).
8.5.6 Lighting8.5.6.1 Equipment. The source of the illumination may be a photographic laboratory lamp, photographic slide viewer, electronic flash, forensic light source, or photographic negative viewing light. A diffuser is used in order to provide an even illumination of the entire object being photo-graphed. Any type of translucent covering (e.g., plexiglass or thin white paper) can be used as a diffuser. The diffuser is placed between the object being photographed and the light source, about 6 to 12 inches away from the light source. (When the diffuser and the light are too close, the light will be brighter in the center of the area.)
8.5.6.2 Lighting Techniques. The type of evidence that is to be photographed determines the type of lighting tech-nique employed. For example, evidence that is reflective will require a lighting technique far different from evidence that is transparent. In order to take accurate and clear pho-tographs, the photographer must have an understanding of the varied lighting techniques that are available.
8–11
The Preservation of Friction RIdges C H A P T E R 8
Direct Lighting. Direct lighting provides strong lighting from a source without the light first having been reflected off another surface. This type of lighting produces substan-tial contrast between the light and dark areas of the object being photographed. Direct lighting is set up with two or four lights equally balanced and set 45 degrees above the object, with the light shining directly onto the object (Figure 8–8).
FIGURE 8–8Direct lighting.
Direct Reflection Lighting. Direct reflection lighting uses one light source set approximately 10 degrees from the object, with the object set at approximately 10 degrees from the camera lens. This technique can only be used on flat surfaces and creates very high contrast. Latent prints developed with black, gray, or silver powder will always photograph dark (black) on a light gray (white) background (Figure 8–9).
FIGURE 8–9Front directional lighting.
8–12
C H A P T E R 8 The Preservation of Friction Ridges
Front Directional Lighting. Front directional lighting (axial or axis lighting) uses one light source set at 90 degrees from the axis of the camera lens. The object to be pho-tographed is mounted directly under the camera lens. A piece of glass is placed in the axis of the camera lens at a 45-degree angle to reflect the light down onto the object. Front directional lighting is used when photographing latent prints on mirrors or prints inside curved items (e.g., glasses or cups) (Figure 8–10).
FIGURE 8–10Direct reflection lighting.
FIGURE 8–11Transmitted lighting.
Transmitted Lighting. Transmitted lighting is also referred to as back lighting. When employing this technique, the illuminator is placed behind the object being photographed, with the light from the illuminator directed through the evidence toward the camera (Figure 8–11). Transmitted lighting is used when photographing an object that is trans-parent or translucent. Another distinct advantage for trans-mitted lighting is the recording of watermarks in paper.
8–13
The Preservation of Friction RIdges C H A P T E R 8
FIGURE 8–12Oblique lighting.
Oblique Lighting. Oblique lighting is also called side light-ing or cross lighting. Oblique lighting uses low-angle illumi-nation to show detail by creating shadows. For this type of lighting, a single light source should be positioned at a low angle to skim across the surface, highlighting the raised portions (Figure 8–12). If shadows become a problem, a second light is required. When two lights are used, they are placed opposite each other to light up both sides of the impressed area. The proper angle for the light source can be found by viewing the item through the view finder and adjusting the height of the light source.
Bounced Lighting. Bounced light is light that does not travel directly from the illumination source to the object being photographed but is reflected off another surface (Figure 8–13). Bounced lighting illuminates the object with a shadow-reducing softer light. Bounced lighting is ideal for photographing objects that are concave or convex.
FIGURE 8–13Bounced lighting.
8–14
C H A P T E R 8 The Preservation of Friction Ridges
8.5.7 Processing and Evidence-Dependent PhotographyThe key to latent print photography is the proper usage of the equipment in relation to the type of evidence being photographed and the processing that was performed. For example, knowing the best lighting technique for a certain type of evidence can mean the difference between excel-lent photographic evidence and evidence that needs to be re-photographed.
8.5.7.1 Ninhydrin Impressions. The ability to adjust color is based upon the components of color and how a change in one color component affects other colors. A color wheel aids in the determination of color change (Figure 8–14). Looking at the color wheel, if a color is to be darkened (more contrast), an increase in the opposite color achieves this effect. If a color is to be lightened, or decreased, colors adjacent to that color are added.
FIGURE 8–14The color wheel.
Latent impressions processed with ninhydrin (a chemical reagent) develop in the visible red range. Looking at the color wheel, the color opposite red is green. Green (#58) and yellow-green (#11) filters have been found to enhance latent impressions developed with ninhydrin. Additionally, ninhydrin impressions should be photographed using bal-anced direct lighting.
photographs, and product packaging) often pose a problem when it comes to photographing latent impressions that cross over background color variations. A solution to this is a reflected ultraviolet imaging system (RUVIS), which eliminates the multicolored background by absorbing UV light. Using the RUVIS, fingerprint residue treated with superglue may appear light or dark, untreated sebaceous prints may appear as black, and untreated sweat prints reflect white (Lin, 2006, pp 2137–2153).
8.5.7.3 Luminescent Photography. When exposing an item with luminescent latent impression(s) to a forensic light source, the luminescence of the latent impressions may diminish or completely disappear. This phenomenon is called photodecomposition or photodegradation and can occur within seconds. Because of this, objects with lumi-nescent latent impression(s) should not be exposed to a forensic light source for longer than necessary (Hard-wick, 1990, p 38). Sometimes the latent impression(s) can be redeveloped to make them luminesce again. This is normally not the case if the latent impression(s) are inher-ently luminescing.
8.5.7.4 Impressions on Reflective Surfaces. Latent impressions on reflective surfaces (e.g., chrome, silver, or nickel) are usually processed with gray or light-colored powder because the reflective surface photographs black or dark gray when employing direct lighting. Direct lighting photography used with reflective surfaces produces light ridges on a dark background and therefore the negative may be color reversed.
8–15
The Preservation of Friction RIdges C H A P T E R 8
Bounced lighting may also be used when photograph-ing flat reflective surfaces. A distinct advantage of using bounced lighting over direct lighting for photographing re-flective surfaces is that bounced lighting normally produces dark ridges on a light background. This is because bounced lighting highlights the object and not the ridges.
8.5.7.5 Indented Impressions. Oblique lighting is primarily used for photographing “plastic” impressions (e.g., those in putty, casting material, wax, grease, butter, dust, blood, or any pliable surface). The use of this technique allows shadows to be cast into the areas impressed by the ridges. Care should be exercised when photographing this type of evidence to prevent heat generated by the lights from degrading the impressions.
8.5.7.6 Impressions on Irregular Surfaces. Latent prints on concave or convex surfaces often pose a problem for the photographer. Because of the curvature of the surface, total illumination of the latent prints and adequate depth of field is difficult to achieve. Even illumination of the latent print with bounced lighting can overcome this problem. A distinct advantage to this is that friction ridges will be depicted black or dark gray and the furrows and back-ground will be white or light gray.
When using bounced lighting to illuminate latent prints for photographic purposes, the lens of the camera should be extended through the center of a pliable white matte surface material. A filter adaptor ring may be used to hold the matte in place. Once the matte material surrounds the camera lens, the material is positioned as a concave reflec-tor partially surrounding the object being photographed. With the camera and reflective matte material in place, the photographic light is then positioned to illuminate the concave matte material. The light will reflect off the matte material and back onto the surface of the object being photographed.
8.5.7.7 Transparent Latent Print Lifts. Transparent tape can be used to lift latent impressions developed with any color of fingerprint powder. Transparent tape that is mount-ed on either a white or black backing card is photographed using direct lighting or may be digitally recorded using a scanner. Transparent tape that is mounted onto clear plastic may be photographed using direct lighting if the lift is placed on contrasting material before being photographed.
Another option for photographing transparent lifts is using transmitted lighting. Using transmitted lighting has two
benefits: improved contrast is achieved and the spoiling effects of excessive powder on the lifts are decreased. When items are processed with powder, there is a possibil-ity that excess powder will adhere to the background and will be lifted along with the latent impressions. By using transmitted lighting, the light transmits through the thinner background powder but is not transmitted through the thicker powder adhering to the latent impression(s). Trans-parent lifts may also be used as a photographic negative for recording through direct contact with unexposed film or photographic paper on a darkroom enlarger or similar setup.
8.6 Other Methods of Friction Ridge PreservationAs mentioned previously, latent print preservation is also achieved through the use of latent print lifts and casting material. Typically, these types of preservation methods are used at the crime scene. Often the evidence that needs to be processed for latent prints is too large to be removed or is immovable and must be processed in the field. Another factor dictating the use of latent print lifts and casting material is when photography cannot adequately record the latent impression(s). When this occurs, the impres-sion should be imaged insofar as possible before lifting or casting procedures are used, to retrieve the latent print detail. At this point, the lift or cast can be imaged again for additional preservation.
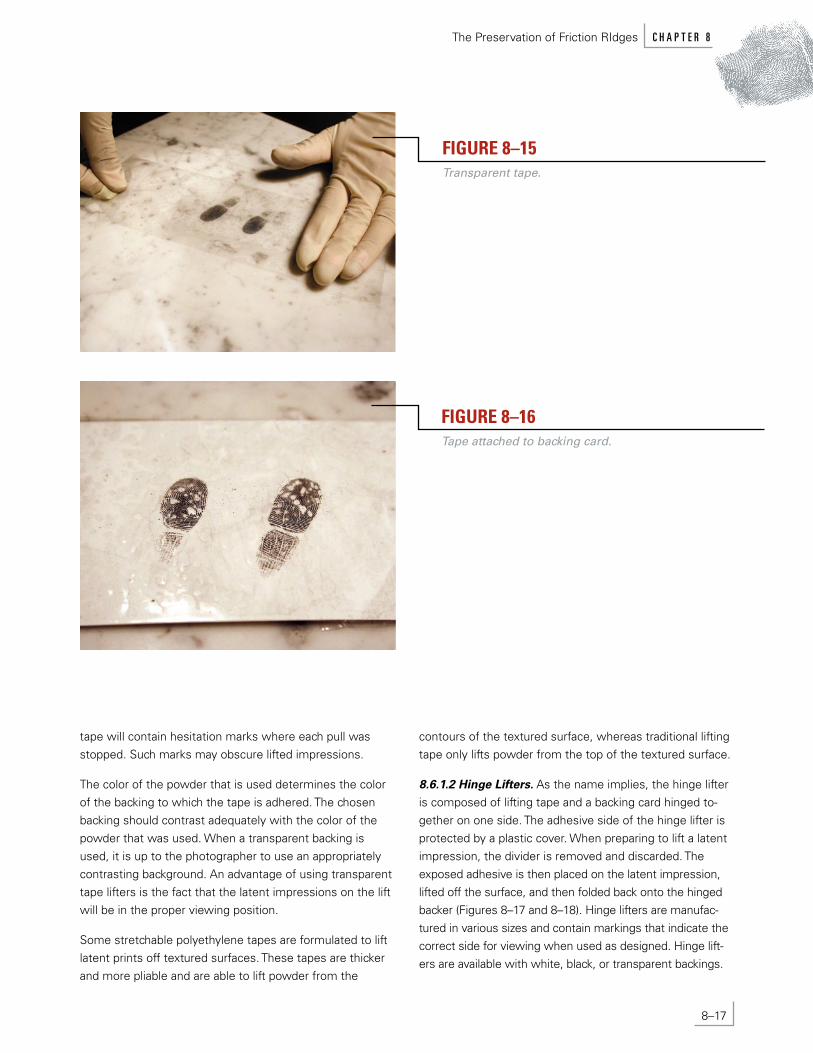
8.6.1 Fingerprint LiftersFingerprint lifters are used after the application of finger-print powders. The powder clings to latent print deposits or contaminants already on a substance. A lift is usually made with tape or a similar lifting material having the correct amount of adhesive to remove enough of the fingerprint powder without destroying the original item. Fingerprint lifters come in a variety of types that vary in color, size, flexibility, and tackiness (stickiness).
In general, there are four types of commercially produced fingerprint lifts: (1) transparent tape lifters (Figures 8–15 and 8–16), (2) hinge lifters, (3) rubber-gelatin lifters, and (4) lifting sheets.
The tape may be clear or frosted and is dispensed from a roll. The tape should be unrolled in one continuous motion to the desired length. If the tape is pulled in stages, the
8–16
C H A P T E R 8 The Preservation of Friction Ridges
tape will contain hesitation marks where each pull was stopped. Such marks may obscure lifted impressions.
The color of the powder that is used determines the color of the backing to which the tape is adhered. The chosen backing should contrast adequately with the color of the powder that was used. When a transparent backing is used, it is up to the photographer to use an appropriately contrasting background. An advantage of using transparent tape lifters is the fact that the latent impressions on the lift will be in the proper viewing position.
Some stretchable polyethylene tapes are formulated to lift latent prints off textured surfaces. These tapes are thicker and more pliable and are able to lift powder from the
contours of the textured surface, whereas traditional lifting tape only lifts powder from the top of the textured surface.
FIGURE 8–15Transparent tape.
FIGURE 8–16Tape attached to backing card.
8.6.1.2 Hinge Lifters. As the name implies, the hinge lifter is composed of lifting tape and a backing card hinged to-gether on one side. The adhesive side of the hinge lifter is protected by a plastic cover. When preparing to lift a latent impression, the divider is removed and discarded. The exposed adhesive is then placed on the latent impression, lifted off the surface, and then folded back onto the hinged backer (Figures 8–17 and 8–18). Hinge lifters are manufac-tured in various sizes and contain markings that indicate the correct side for viewing when used as designed. Hinge lift-ers are available with white, black, or transparent backings.
8–17
The Preservation of Friction RIdges C H A P T E R 8
FIGURE 8–17Hinge lifter.
8.6.1.3 Rubber-gelatin Lifters. Of the different types of lifters, rubber-gelatin lifters tend to be the least tacky and most pliable. This type of lifter is commonly chosen when a latent impression is on a surface that is considered either fragile (peeling paint from a wall) or irregularly shaped (e.g., doorknob). Rubber-gelatin lifters include a cover sheet, a low-adhesion gelatin layer, and a high-quality elastic sheet of rubber (Lightning Powder Co., Inc., 2000). These types of lifters are available in various sizes in black, white, or transparent sheets.
FIGURE 8–18Hinge lifter.
The rubber sheet contains adhesive material and is applied to the powdered latent impression. Once it is removed from the surface, the clear and clean plastic covering is
reapplied (Figures 8–19 and 8–20). Because the latent im-pression adheres to the rubber and is viewed through the covering, the print will be in reverse position.
8.6.1.4 Lifting Sheets. Lifting sheets are made specifi-cally for the recording of forensic impressions and are commonly used in the processing of human remains. The sheets are flexible and have a smooth adhesive coating. The sheets come in various sizes and can be cut according to need.
For processing human remains, sheets are cut slightly larger than the size of the finger-block on a standard finger-print card. Because of the slight elasticity of the material,
8–18
C H A P T E R 8 The Preservation of Friction Ridges
it is easy to wrap the material around a finger that has been lightly coated with fingerprint powder. Once a print is obtained, the lifter is cut down to finger block size and is placed in the correct location on the back of a transparency that has had a standard fingerprint card printed on it. When the transparency is viewed from the front, the printed friction ridges are in the correct position, with the correct color, in the appropriate finger-block.
FIGURE 8–19Rubber-gelatin lifter.
8.6.2 Casting MaterialCasting material is advantageous when dealing with patent impressions, powdered latent impressions on textured sur-faces, or when processing the friction ridges of deceased
individuals. Casting materials are available in several colors and have been manufactured to dry quickly and release easily.
In addition to use in photographic recording, casting mate-rial can be powdered or inked and then lifted or impressed on lifting sheets. The resulting image will be a reverse posi-tion image of the friction ridges.
FIGURE 8–20Rubber-gelatin lifter.
8.7 ConclusionThe recording of friction ridge detail dates back to the early 1900s. From the very beginning, the value of accurate
8–19
The Preservation of Friction RIdges C H A P T E R 8
preservation was realized, and preservation methods improved as new technologies and techniques were introduced to the forensic community. The forensic science community has witnessed the discovery of groundbreaking fingerprint detection and preservation techniques, ranging from the simple to the complex. Throughout, innovation has been the norm in crime laboratories.
8.8 ReviewersThe reviewers critiquing this chapter were Herman Bergman, Jeri Eaton, Robert J. Garrett, Alice Maceo, Kenneth O. Smith, Jr., Kasey Wertheim, and Juliet H. Wood.
8.9 ReferencesBellis, M. George Eastman—History of Kodak and Rolled Photographic Film. http://www.inventors.about.com/od/estartinventors/ss/George_Eastman.htm, accessed July 17, 2006.
Bidner, J. Digital Photography: A Basic Guide to New Technology. The Kodak Workshop Series; Silver Pixel Press: New York, 2000.
Boyle, W. S.; Smith, G. E. Charge-Coupled Semiconductor Devices. Bell Systems Technical Journal 1970, 49, 587.
Buckland, G.; Evans, H. Shots in the Dark: True Crime Pictures; Bulfinch Press: New York, 2001.
Davenport, A. The History of Photography; University of New Mexico Press: Alubquqerque, NM, 1999, p 4.
Eastman Kodak Company. Photography with Large Format Cameras; Eastman Kodak Company: Rochester, NY, 1988.
Federal Bureau of Investigation. Latent Print Operations Manual, Standard Operation Procedures for Digital Images; Federal Bureau of Investigation, U.S. Department of Jus-tice: Washington, DC, 2004.
Hardwick, S. A.; Kent, T.; Sears, V. Fingerprint Detection by Fluorescence Examination: A Guide to Operational Imple-mentation; White Crescent Press, Ltd.: Luton, 1990.
Harrison, W. J. A History of Photography Written as a Practical Guide and an Introduction to its Lastest Develop-ments. The County Press: London, 1888.
Ippolito, J. A. Understanding Digital Photography; Thomson/Delmar Learning: New York, 2003, p 36.
Langford, M. J. Basic Photography, 3rd ed.; The Focal Press: Woburn, 1973.
Leggat, R. A History of Photography from Its Beginnings Till the 1920’s. http://www.rleggat.com/photohistory (ac-cessed July 2, 2006).
Lightning Powder Co., Inc. Fingerprint Camera. Minutiae, 2003, 74, 5.
Lin, S. S.; Yemelyanov, K. M.; Pugh, Jr. E. N.; Engheta, N. Polarization-Based and Specular-Reflection-Based Noncon-tact Latent Fingerprint Imaging and Lifting. J. Opt. Soc. Am. 2006, 23 (9), 2137-2153.
London, B.; Upton, J.; Stone, J.; Kobre, K.; Brill, B. Photog-raphy; Prentice Hall: Upper Saddle River, 2005.
Menzel, E. R. Fingerprint Detection with Lasers, 1st ed.; Marcel Dekker, Inc: New York, 1980.
Miller, L. S. Police Photography, 4th ed.; Anderson Publish-ing Company: Cincinnati, 1998.
Moenssens, A. A. The Origin of Legal Photography. http://www.forensic-evidence.com/site/EVID/LegalPhotog.html (accessed September 10, 2010).
Olsen Sr., R. D. Scott’s Fingerprint Mechanics; Charles C. Thomas: Springfield, 1978.
Phillips, S. S.; Haworth-Booth, M.; Squires, C. Police Pic-tures: The Photograph as Evidence; San Francisco Museum of Modern Art and Chronicle Books: San Francisco, 1997.
8–20
C H A P T E R 8 The Preservation of Friction Ridges
Redsicker, D. R. Principles in Photography. In The Practical Methodology of Forensic Photography; Redsicker, D. R., Ed.; CRC Press: Boca Raton, Fla., 1994.
Scientific Working Group on Friction Ridge Analysis, Study and Technology (SWGFAST). Standard for Friction Ridge Digital Imaging (Latent/Tenprint). 2009. Available online at http://www.swgfast.org/documents/imaging/090914_Standard_Imaging_1.1.pdf
Scientific Working Group on Imaging Technology (SWGIT). General Guidelines for Capturing Latent Impressions Using a Digital Camera, Version 1.2, December 6, 2001. Forensic Sci. Communications 2002, 4 (2) (online journal).
SWGIT. Overview of SWGIT and the Use of Imaging Tech-nology in the Criminal Justice System, Version 3., 2006, pp 1-8. Available online at http://www.theiai.org.
8–21
The Preservation of Friction RIdges C H A P T E R 8