101
User Guide c Tightrope Media Systems Applies to Cablecast 6.1.4 Build 46 Printed September 8, 2016
| Date post: | 11-Mar-2019 |
| Category: |
Documents |
| Upload: | nguyennhan |
| View: | 218 times |
| Download: | 0 times |

User Guide
c©Tightrope Media SystemsApplies to Cablecast 6.1.4 Build 46
Printed September 8, 2016

http://www.trms.com/cablecast/support
2
Contents
I Getting Started 5
1 Preface 61.1 Thank You . . . . . . . . . . . . . . . . . . . . . . . . . . 61.2 About This Documentation . . . . . . . . . . . . . . . . . 61.3 About Tightrope . . . . . . . . . . . . . . . . . . . . . . . 61.4 Conventions Used In This Guide . . . . . . . . . . . . . . 7
2 System Overview 92.1 What is Cablecast? . . . . . . . . . . . . . . . . . . . . . 92.2 System Components . . . . . . . . . . . . . . . . . . . . 92.3 Example System . . . . . . . . . . . . . . . . . . . . . . 10
3 Quick Start 123.1 Logging In . . . . . . . . . . . . . . . . . . . . . . . . . 123.2 Importing a Digital Media File into Cablecast . . . . . . . 123.3 Scheduling a Show . . . . . . . . . . . . . . . . . . . . . 133.4 Sending Autopilot . . . . . . . . . . . . . . . . . . . . . . 14
II User Interface Reference 16
4 Main Menu 174.1 Menu Bar . . . . . . . . . . . . . . . . . . . . . . . . . . 174.2 Side Menu . . . . . . . . . . . . . . . . . . . . . . . . . . 184.3 System Dashboard . . . . . . . . . . . . . . . . . . . . . 184.4 Channel Summaries . . . . . . . . . . . . . . . . . . . . . 194.5 Location Changer . . . . . . . . . . . . . . . . . . . . . . 19
5 Schedule 205.1 Schedule Toolbar . . . . . . . . . . . . . . . . . . . . . . 205.2 Shows Schedule . . . . . . . . . . . . . . . . . . . . . . . 215.3 Crawl Schedule . . . . . . . . . . . . . . . . . . . . . . . 335.4 Record Schedule . . . . . . . . . . . . . . . . . . . . . . 36
6 Shows 406.1 Show Screen . . . . . . . . . . . . . . . . . . . . . . . . 406.2 New Show . . . . . . . . . . . . . . . . . . . . . . . . . . 446.3 Show Search . . . . . . . . . . . . . . . . . . . . . . . . 44
6.4 Saved Searches . . . . . . . . . . . . . . . . . . . . . . . 486.5 Cleared Shows . . . . . . . . . . . . . . . . . . . . . . . 48
7 Producers 507.1 Producer Fields . . . . . . . . . . . . . . . . . . . . . . . 507.2 Creating Producers . . . . . . . . . . . . . . . . . . . . . 517.3 Editing Producers . . . . . . . . . . . . . . . . . . . . . . 517.4 Deleting Producers . . . . . . . . . . . . . . . . . . . . . 52
8 Autopilot 538.1 Send Autopilot . . . . . . . . . . . . . . . . . . . . . . . 538.2 Event Table . . . . . . . . . . . . . . . . . . . . . . . . . 548.3 Device Assignments . . . . . . . . . . . . . . . . . . . . 558.4 Force Matrix . . . . . . . . . . . . . . . . . . . . . . . . 568.5 Force Small . . . . . . . . . . . . . . . . . . . . . . . . . 59
9 Digital File Managment 619.1 Filter Tabs . . . . . . . . . . . . . . . . . . . . . . . . . . 619.2 Search . . . . . . . . . . . . . . . . . . . . . . . . . . . . 629.3 File Details . . . . . . . . . . . . . . . . . . . . . . . . . 62
10 Internet Video 6510.1 Live Streaming . . . . . . . . . . . . . . . . . . . . . . . 6510.2 Video On Demand . . . . . . . . . . . . . . . . . . . . . 66
11 Tools 7011.1 Batch Functions . . . . . . . . . . . . . . . . . . . . . . . 7011.2 Reporting . . . . . . . . . . . . . . . . . . . . . . . . . . 7111.3 Plugins . . . . . . . . . . . . . . . . . . . . . . . . . . . 7311.4 Developer Tools . . . . . . . . . . . . . . . . . . . . . . . 74
12 Settings 7512.1 Location Settings . . . . . . . . . . . . . . . . . . . . . . 7512.2 System Settings . . . . . . . . . . . . . . . . . . . . . . . 9212.3 User Settings . . . . . . . . . . . . . . . . . . . . . . . . 101
Contents 4

I. Getting Started
1 Preface
1.1 Thank You
Thank you for picking Cablecast and thank you for choosing Tightrope! Weappreciate your business, not only because we depend on it, but becausewe really believe in Cablecast as a uniquely powerful tool that has changedthe lives of our customers since 1999. Your choice inspires us to keepgoing.
1.2 About This Documentation
This is the Cablecast Manual and it is intended for anyone who will beinvolved in the automation of your station.
This manual does not include:
• Instructions on installing and configuring the system for first-use. Newsystems include commissioning service for this purpose.
• Instructions on installing or upgrading the Cablecast software. Newsystems ship with the software pre-installed.
• Specific information about 3rd part device configuration. This iscovered in the Cablecast Control Module Reference Guide.
1.3 About Tightrope
Tightrope Media Systems is a manufacturer of web-centric media deliveryand display systems. We strive to provide integrated solutions designedspecifically for the markets we choose to address, with a web-centric inter-face as a core design of everything we do.
For more information on Tightrope Media Systems, please visit our web site:www.trms.com
Email us at: [email protected]
Our Address is:
Tightrope Media Systems800 Transfer Road, Suite 1BSaint Paul, Minnesota 55114
For customer service, please contact your dealer or Tightrope Media Systemsdirectly:

Forum : http://forums.trms.com
Email : [email protected]
Support Request Form : An online support request form is at www.trms.com/community.
Knowledge Base : www.trms.com/community/knowledgebase
Training Videos : www.trms.com/community/training_videos
Blogs : blog.trms.com
Chat : chat.trms.com
Phone : (866) 866-4118 / (612) 866-4118
The fastest way to get support is through email, the online support form,chat and our forum. The forum requires a free registration.
1.4 Conventions Used In This Guide
Throughout this guide, the following conventions will be used:
This is a note. Notes are used to call attention to special information thatmay be helpful to keep in mind.
This is a tip. Tips show unique ways to use the software, and tricks thathave been picked up by other users.
This is a warning. Warnings call attention to actions that may result inunforeseen consequences, such as actions that delete large amounts ofdata or configurations that might have network security implications.
If we want to highlight an section of the text that is critical to a particularThis is a margin note.topic, we’ll insert a margin note, like the one you see next to this paragraph.Margin notes might also include small pictures of the user interface, when afigure would be too cumbersome.! →If we need to call special attention to something that is critical, you mightsee the symbol you that you now see to the left.
When the text references a particular menu item, field or label within thesoftware, that text will appear as follows:
Example: Click on the Main Menu button.
When we talk about or reference a menu in the software, we use a specialstyle and reference it in the margin. When we reference menus, we leaveout the main menu and we separate each menu with a colon (“:”).
1 Preface 7
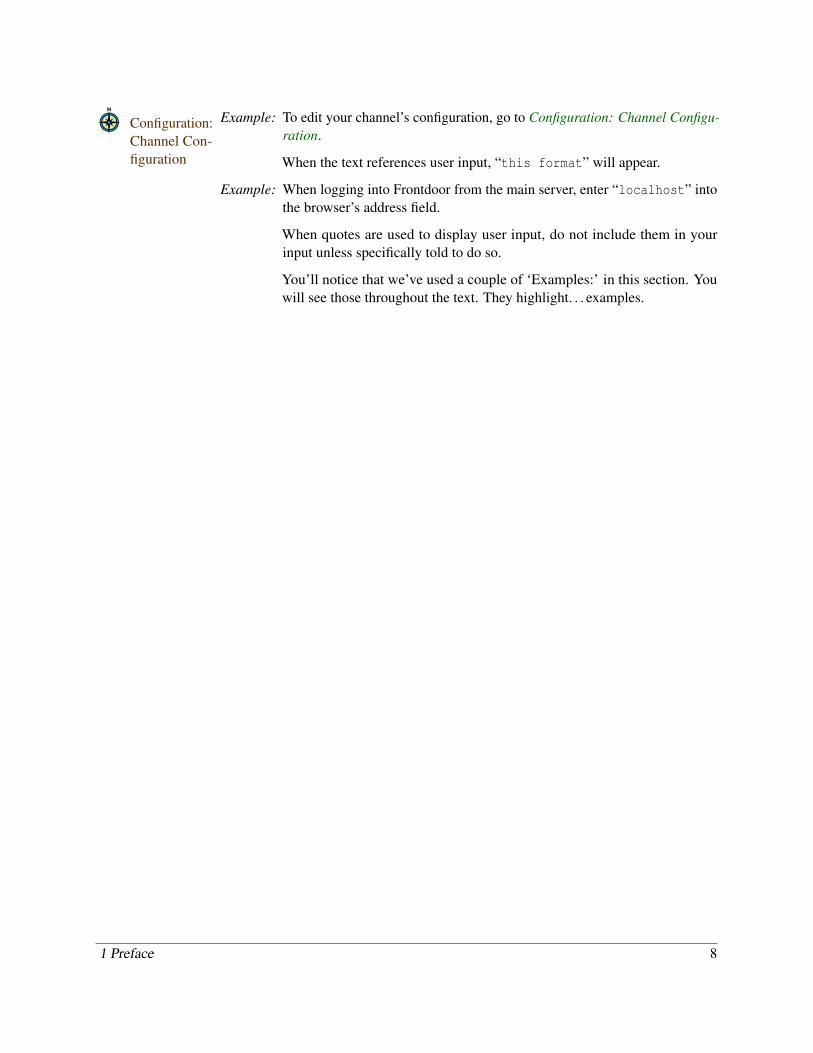
Example: To edit your channel’s configuration, go to Configuration: Channel Configu-Configuration:Channel Con-figuration
ration.
When the text references user input, “this format” will appear.
Example: When logging into Frontdoor from the main server, enter “localhost” intothe browser’s address field.
When quotes are used to display user input, do not include them in yourinput unless specifically told to do so.
You’ll notice that we’ve used a couple of ‘Examples:’ in this section. Youwill see those throughout the text. They highlight. . . examples.
1 Preface 8
2 System Overview
2.1 What is Cablecast?
Cablecast is an audiovisual headend management system for televisionstations. It is capable of managing many aspects of your station’s lifeincluding: program information, schedules, routing switchers, digital videoservers, public web schedule output, reports, video on demand servers, livestreaming servers, TV Guide X-List output and Carousel schedule display. Itis the automation and back office system for your headend operations.
Through its web interface, Cablecast gives your staff the tools they need toprogram their entire audiovisual headend.
2.2 System Components
There are several hardware and software components that together comprisea working Cablecast system.
Software Components:
Frontdoor : Frontdoor provides user login, security set-tings, user rights assignment and related functions. Frontdoor is a webapplication that you will log in to whenever you want to access Cablecast.
Cablecast Web User Interface : The Cablecast Web User Interface is theheart of your Cablecast system. Depending on your configuration, the Ca-blecast Web Interface may be hosted by your video server, or on a separateserver.
Cablecast Video Overlay : The Cablecast Video Overlay applicationadds built-in, high quality channel branding capabilities to your SX seriesvideo server.
Cablecast DSK : The Cablecast DSK application allows Ca-blecast to control third-party downstream key devices for channel branding.
Hardware Components:
Cablecast Server : We call the server that is running the Cable-cast Web User Interface the Cablecast Server. Depending on your configura-tion, the Cablecast Server might be the same physical computer as one ormore of following additional devices.
VOD Server : The VOD server is responsible for transcod-ing video files so that your viewers can watch them on-demand from yourwebsite. The server also stores all of the resulting transcoded files.
Video Server : The video server is responsible for recordingand playback of digital media files.
Live Streaming Server : The live streaming server encodes your finalchannel output in an Internet-friendly format. The resulting stream can bedisplayed on your website so that your viewers can watch your channelonline.
On-air CG : Tightrope’s Carousel digital signage productis often used as a character generator between programs.
There are several additional devices that you will likely need beyond thosethat Tightrope has supplied. These devices might include:
Routing Switcher : The routing switcher controls how video andaudio signals are connected within your facility. The Cablecast Server willdirectly control the routing switcher so that the appropriate connections aremade as needed.
Playback and Recording devices : In addition to the Video Server, you mayhave additional playback and recording devices that you would like to usesuch as DVD players.
Live Sources : Beyond the playback devices already described,you might have additional sources that are used for live events.
Preview Monitor : It is always a good idea to have a monitorthat you can use to check things without needing to put them out on-air. Wecall this a Preview Monitor.
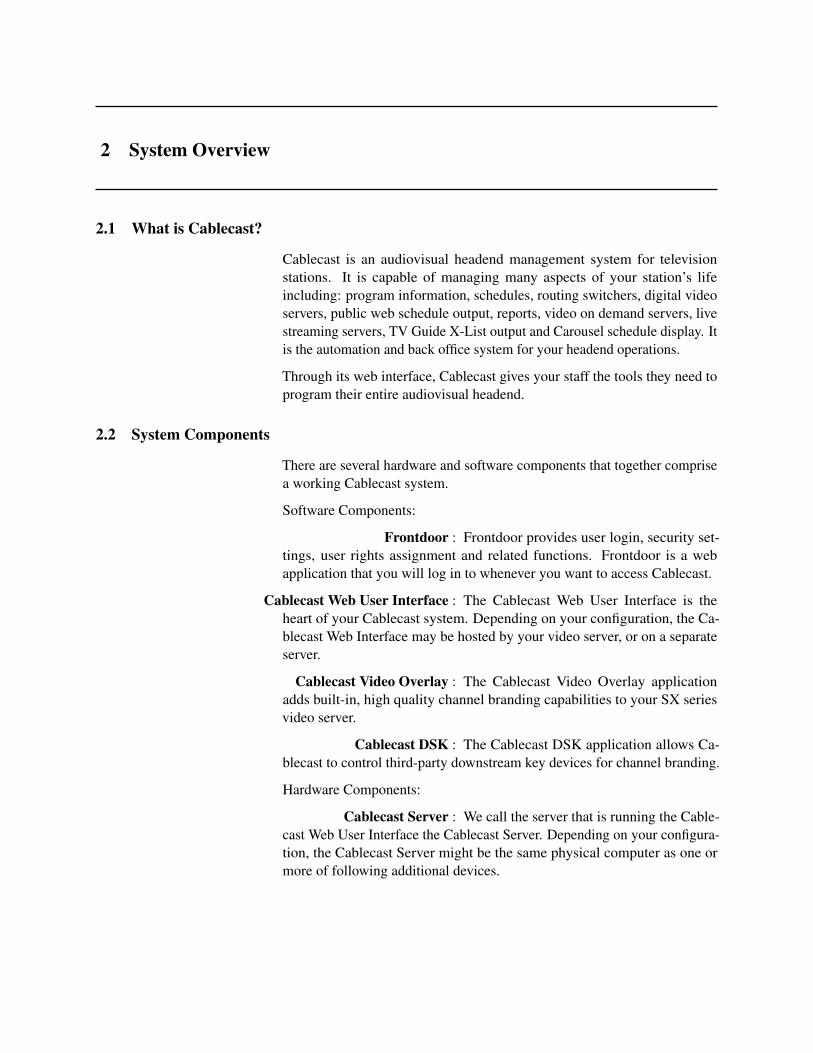
2.3 Example System
The following system diagrams show an example Cablecast System.
The system in Figure 2.1 is comprised of:
Cablecast Pro with VOD Server : The CablecastPRO with VOD server includesthe following software functions: hosts the Frontdoor web-based user-management application, hosts the Cablecast Web User Interface, acts as theVideo On Demand server for the system, among other functions.
An SX2HD Video Server : The SX2HD Video Server includes two play-back and one recording channel as well as storage for its video content.
Two Cablecast Live Streaming Servers : Each live streaming server is able to recordone television channel’s output for Internet based streaming.
2 System Overview 10
FIGURE 2.1: An exampleCablecast System
A Blackmagic Designs Routing Switcher : Cablecast can control hundreds of differentrouting switchers, for the purposes of this example, we will use the Black-magic Design Smart Videohub.
Feeds to two Cable TV channels : This example system will feed HD-SDI videoto two separate Cable TV channels. Each channel is independently control-lable.
2 System Overview 11
3 Quick Start
This chapter will walk you through a few basic operations of your Cablecastsystem. The purpose of this chapter isn’t to give you an in-depth explanationof how everything in Cablecast works. Instead, our aim is to walk youthrough a few of the basics that you will use virtually every day you useCablecast.
This section assumes that your system has been installed and configured.If it has not, please contact us in order to arrange this service.
If you perform all of the following sections in order, you will have a basicidea of how to login to the software, add a digital file for playback, schedulethat file, and commit the changes to automation. If everything works asexpected, you will have a file playing back on-air in about 10 minutes.
3.1 Logging In
To log in to the Cablecast software:
Step 1: From the Windows desktop of your Cablecast Server, launch Internet Ex-plorer.
Step 2: If the Frontdoor login screen doesn’t automatically appear, please navigateto “localhost”.
Step 3: Enter “admin” in the username field.
Step 4: Enter “trms” in the password field.
Step 5: Click Log In
You should change the password for the admin account right away, as itis never a good idea to use the manufacturer-provided password!
Step 6: Click Cablecast to launch the Cablecast Web User Interface.
3.2 Importing a Digital Media File into Cablecast
Cablecast is able to playback programming from a variety of sources. Themost common type of source used is a video server that is capable of playingback files. This exercise will walk you through the steps needed to add a fileto the video server and create a new Show record based on that file.
Step 1: From the Windows Desktop of your video server, locate the digital mediafile that you would like to import into Cablecast.
Step 2: Drag the file into the “E:\” drive.
Step 3: From the Main Menu of the Cablecast Web User Interface, click DigitalFiles in the Side Menu on the left side.
Step 4: Navigate to the Orphaned tab.
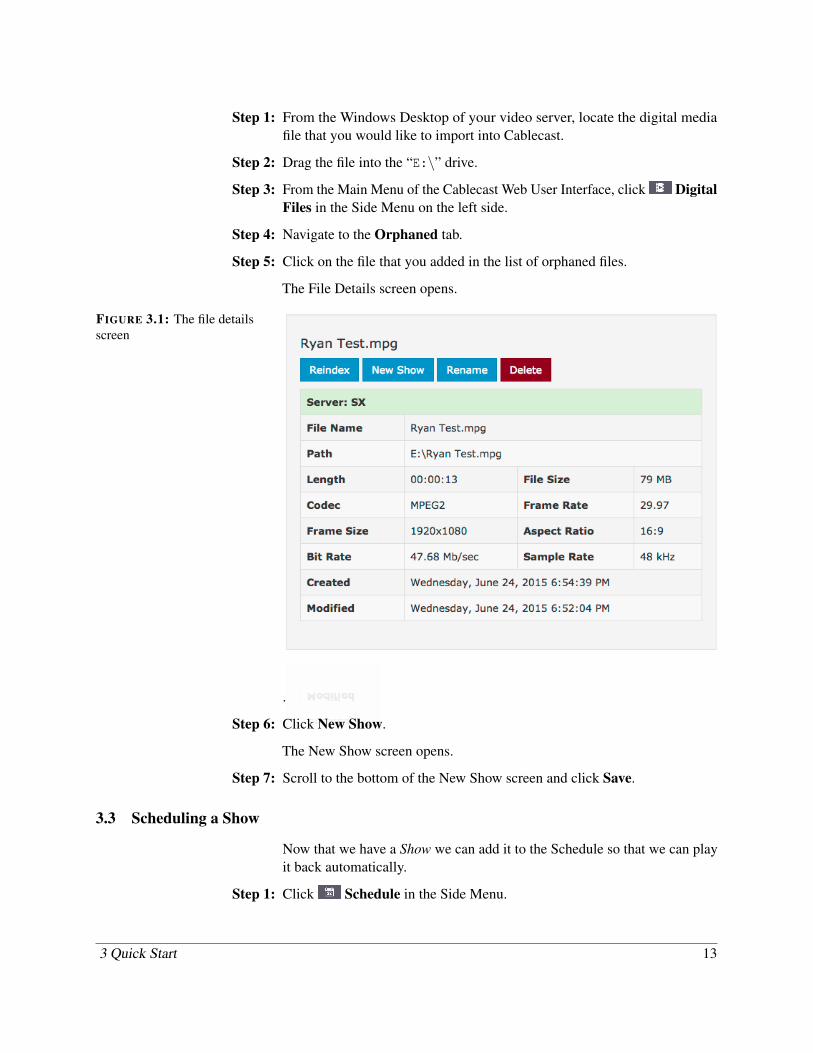
Step 5: Click on the file that you added in the list of orphaned files.
The File Details screen opens.
FIGURE 3.1: The file detailsscreen
.
Step 6: Click New Show.
The New Show screen opens.
Step 7: Scroll to the bottom of the New Show screen and click Save.
3.3 Scheduling a Show
Now that we have a Show we can add it to the Schedule so that we can playit back automatically.
Step 1: Click Schedule in the Side Menu.
3 Quick Start 13
The Cablecast Schedule interface will appear.
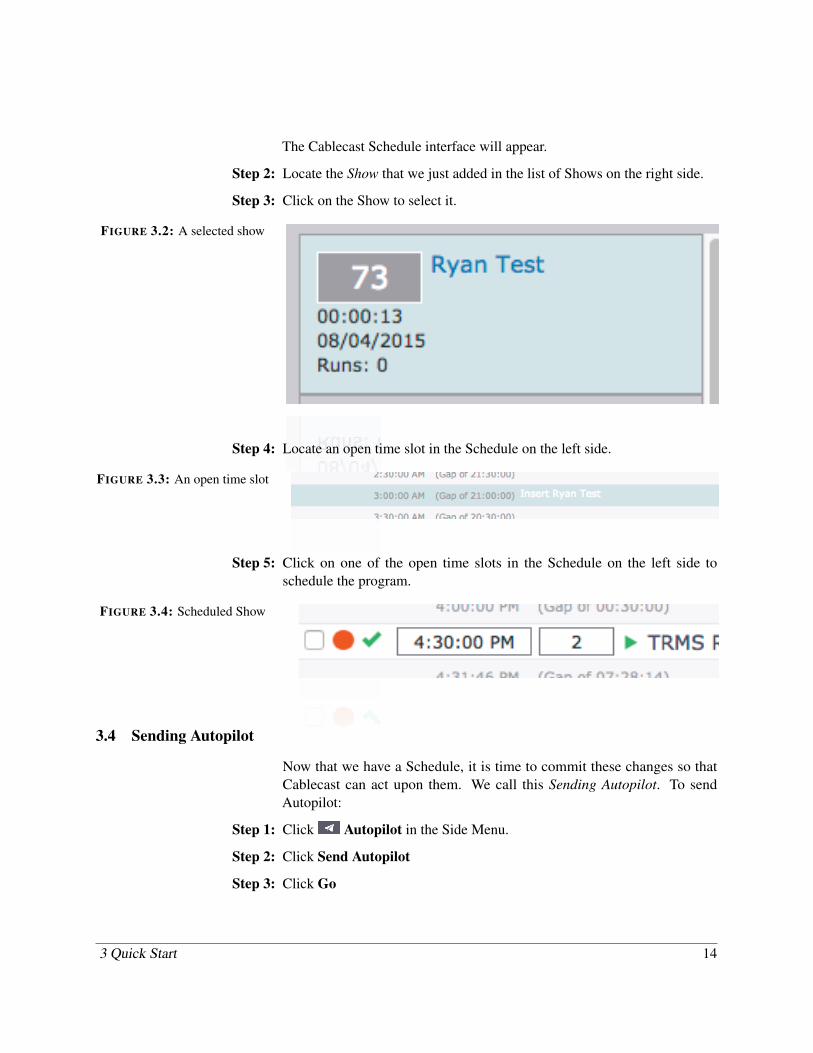
Step 2: Locate the Show that we just added in the list of Shows on the right side.
Step 3: Click on the Show to select it.
FIGURE 3.2: A selected show
Step 4: Locate an open time slot in the Schedule on the left side.
FIGURE 3.3: An open time slot
Step 5: Click on one of the open time slots in the Schedule on the left side toschedule the program.
FIGURE 3.4: Scheduled Show
3.4 Sending Autopilot
Now that we have a Schedule, it is time to commit these changes so thatCablecast can act upon them. We call this Sending Autopilot. To sendAutopilot:
Step 1: Click Autopilot in the Side Menu.
Step 2: Click Send Autopilot
Step 3: Click Go
3 Quick Start 14

Once the send is complete, you will be taken to the send report screen. Thisscreen includes information about any errors or warnings that occurred whileautopilot was being sent.
3 Quick Start 15
II. User Interface Reference
The following pages include an explanation of all of the screens, settingsand options within Cablecast.
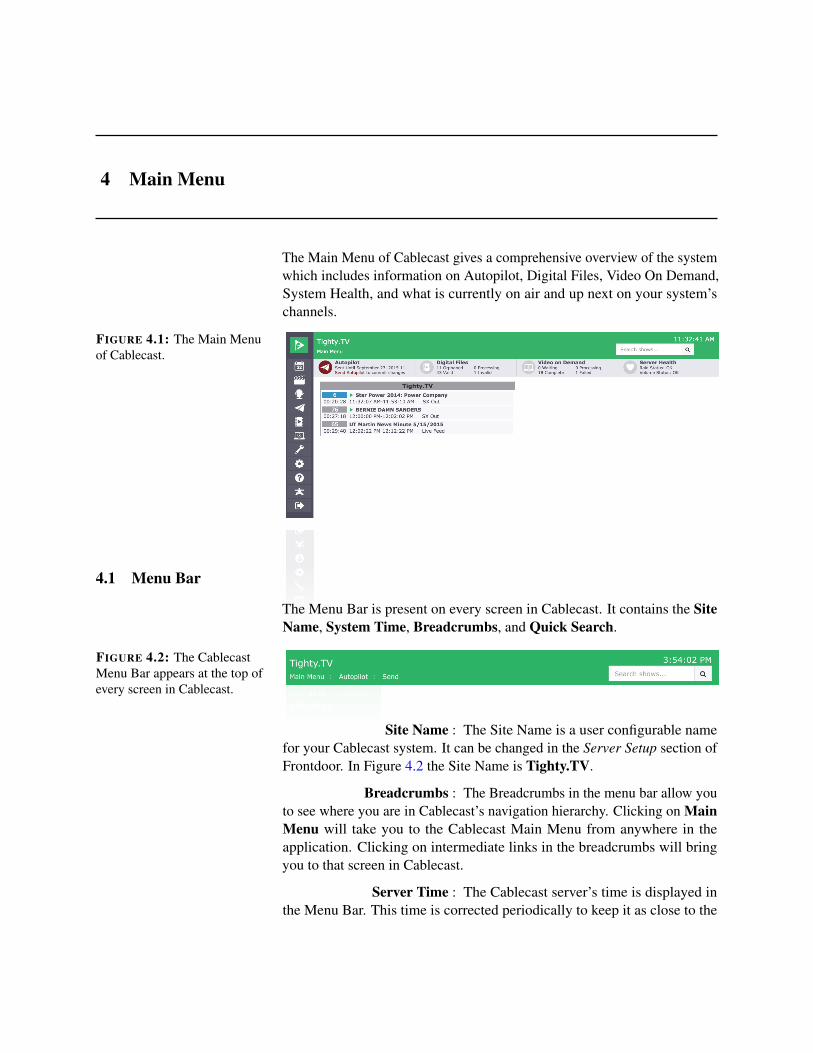
4 Main Menu
The Main Menu of Cablecast gives a comprehensive overview of the systemwhich includes information on Autopilot, Digital Files, Video On Demand,System Health, and what is currently on air and up next on your system’schannels.
FIGURE 4.1: The Main Menuof Cablecast.
4.1 Menu Bar
The Menu Bar is present on every screen in Cablecast. It contains the SiteName, System Time, Breadcrumbs, and Quick Search.
FIGURE 4.2: The CablecastMenu Bar appears at the top ofevery screen in Cablecast.
Site Name : The Site Name is a user configurable namefor your Cablecast system. It can be changed in the Server Setup section ofFrontdoor. In Figure 4.2 the Site Name is Tighty.TV.
Breadcrumbs : The Breadcrumbs in the menu bar allow youto see where you are in Cablecast’s navigation hierarchy. Clicking on MainMenu will take you to the Cablecast Main Menu from anywhere in theapplication. Clicking on intermediate links in the breadcrumbs will bringyou to that screen in Cablecast.
Server Time : The Cablecast server’s time is displayed inthe Menu Bar. This time is corrected periodically to keep it as close to the
Cablecast Server’s actual time as possible. It is always shown using theCablecast Server’s time zone.
Quick Search : The quick search box allows searching forShows from anywhere in Cablecast. You can enter the ShowID to go directlyto a Show Record if it exists.
4.2 Side Menu
The Side Menu in Cablecast allows access to any top level screen from any-where in Cablecast. Table 4.2 describes each item in the Side Menu.
Schedule : Use to manage runs, crawls and record events.
Shows : Use to manage Shows and searches.
Producers : Use to manage producers.
Autopilot : Use to commit the schedule and send eventsto the hardware. You can also use this menu for real time control of thesystem.
Digital Files : Use to view information on your system’splayback files. You can also rename files, create new Shows from orphanedfiles, and delete files from this screen.
Internet Video : Use to manage Video On Demand and LiveStreaming.
Tools : Use to access Batch Functions, Plugins,Reporting and Developer Tools.
Settings : Use to access Location Settings, SystemSettings, and User Settings.
About : Use to display the About Screen. This screenwill display the version of Cablecast currently installed.
Frontdoor : Use to navigate to Frontdoor and the Carouselsignage system.
Log Out : Use to log out of Cablecast.
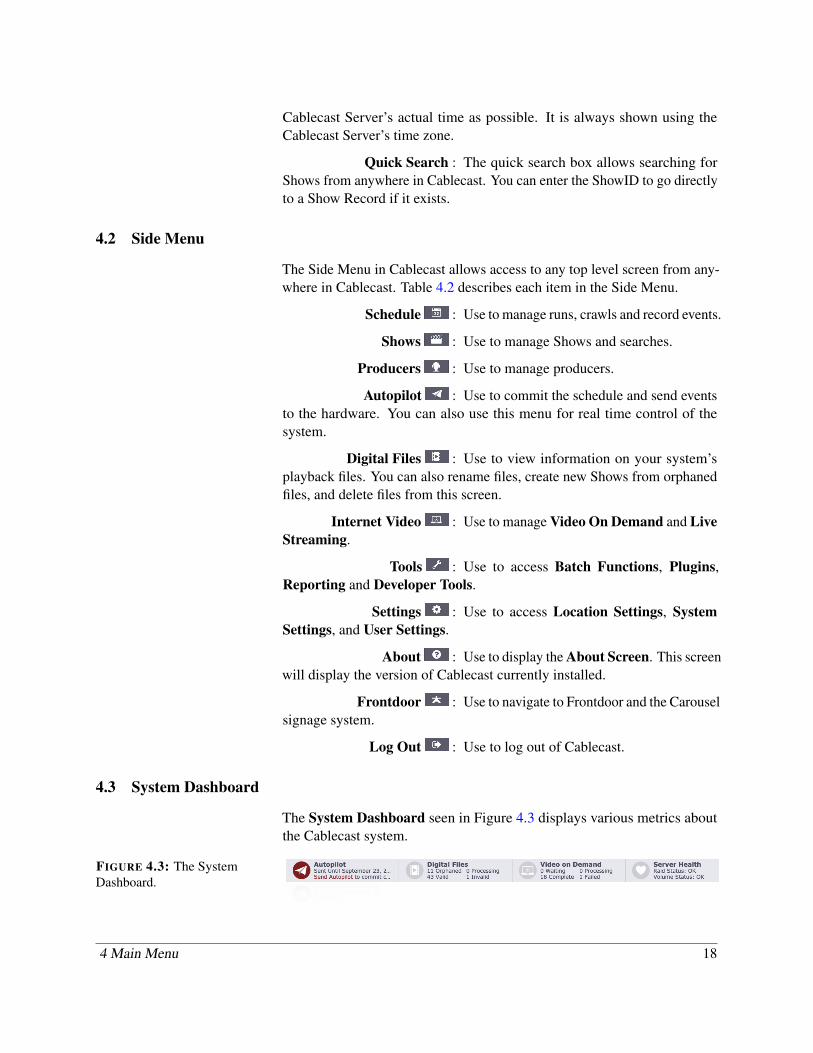
4.3 System Dashboard
The System Dashboard seen in Figure 4.3 displays various metrics aboutthe Cablecast system.
FIGURE 4.3: The SystemDashboard.
4 Main Menu 18
Autopilot : The Autopilot dashboard group displays whenAutopilot was last sent. If the Schedule has been modified, or if the currentsend duration has elapsed, it will be highlighted red as seen in Figure 4.3.
Digital Files : The Digital Files dashboard group displayshow many playback files are available to the system, and in what state theyare in.
Video on Demand : The Video On Demand dashboard group dis-plays how many VODs are available to the system, and in what state theyare in.
Server Health : The Server Health dashboard group displaysthe condition of all RAID arrays, and disk volumes available to the system.If any RAIDs are in a warning state, or if any disk volumes lack sufficientfree space, the heart will appear broken and the icon will be red.
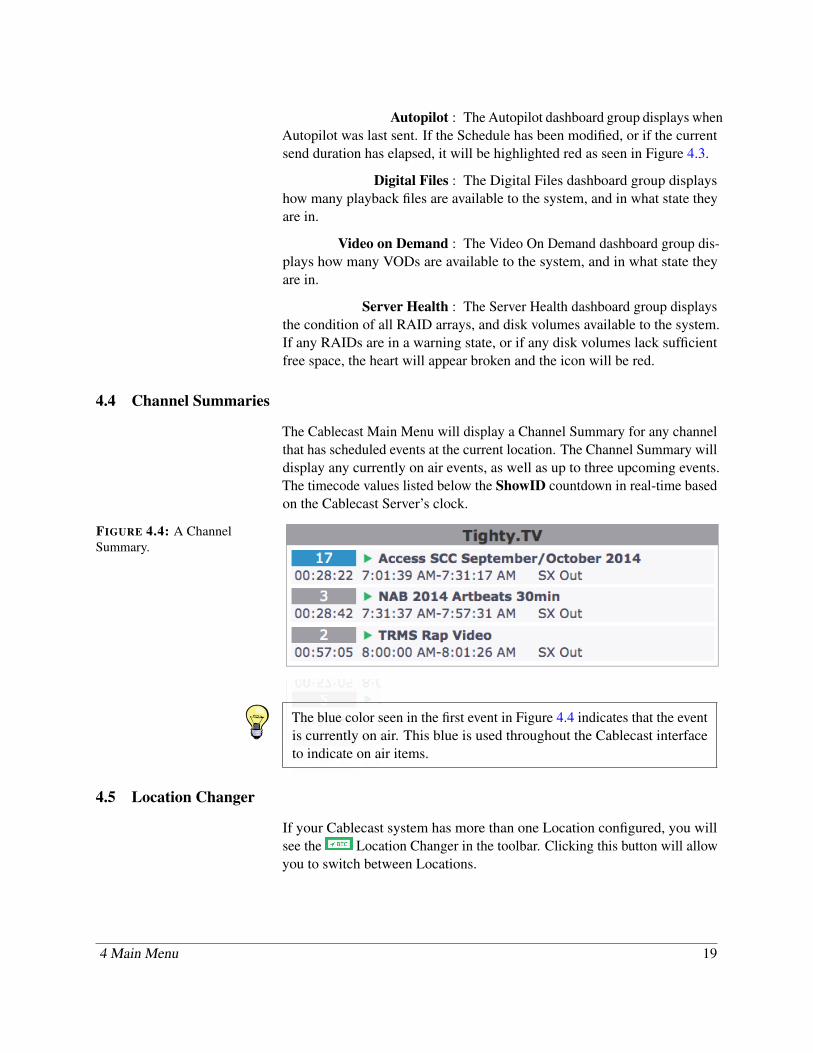
4.4 Channel Summaries
The Cablecast Main Menu will display a Channel Summary for any channelthat has scheduled events at the current location. The Channel Summary willdisplay any currently on air events, as well as up to three upcoming events.The timecode values listed below the ShowID countdown in real-time basedon the Cablecast Server’s clock.
FIGURE 4.4: A ChannelSummary.
The blue color seen in the first event in Figure 4.4 indicates that the eventis currently on air. This blue is used throughout the Cablecast interfaceto indicate on air items.
4.5 Location Changer
If your Cablecast system has more than one Location configured, you willsee the Location Changer in the toolbar. Clicking this button will allowyou to switch between Locations.
4 Main Menu 19
5 Schedule
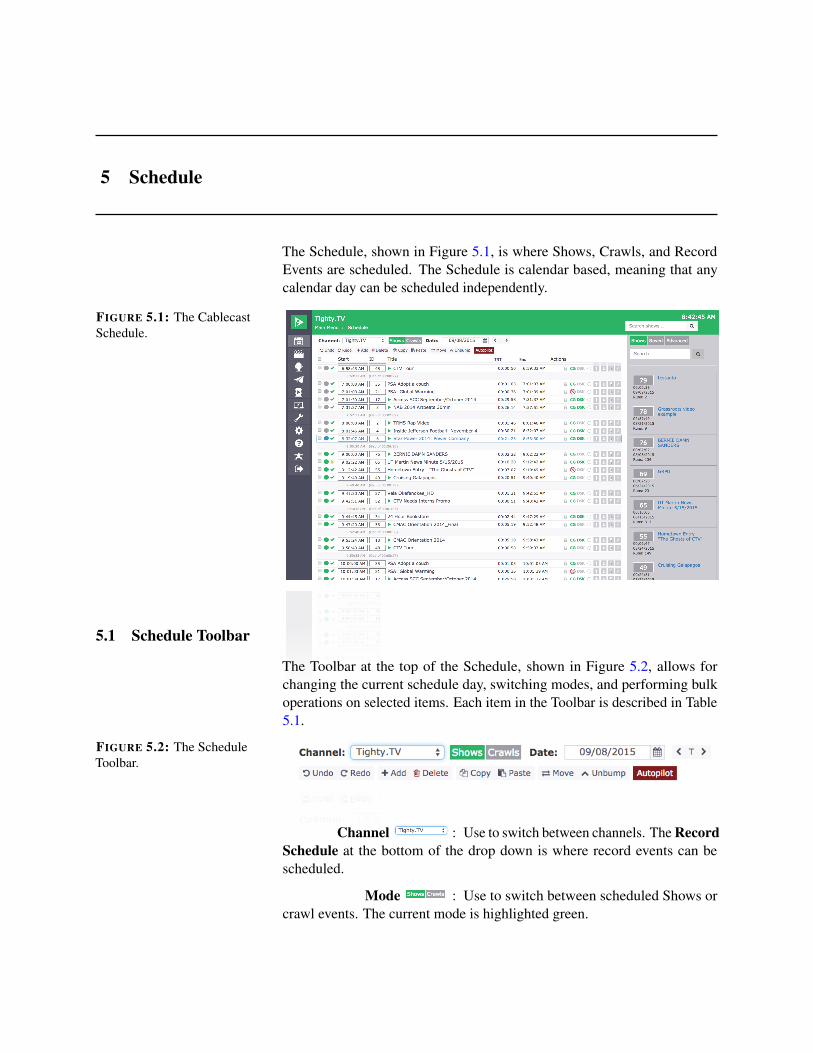
The Schedule, shown in Figure 5.1, is where Shows, Crawls, and RecordEvents are scheduled. The Schedule is calendar based, meaning that anycalendar day can be scheduled independently.
FIGURE 5.1: The CablecastSchedule.
5.1 Schedule Toolbar
The Toolbar at the top of the Schedule, shown in Figure 5.2, allows forchanging the current schedule day, switching modes, and performing bulkoperations on selected items. Each item in the Toolbar is described in Table5.1.
FIGURE 5.2: The ScheduleToolbar.
Channel : Use to switch between channels. The RecordSchedule at the bottom of the drop down is where record events can bescheduled.
Mode : Use to switch between scheduled Shows orcrawl events. The current mode is highlighted green.
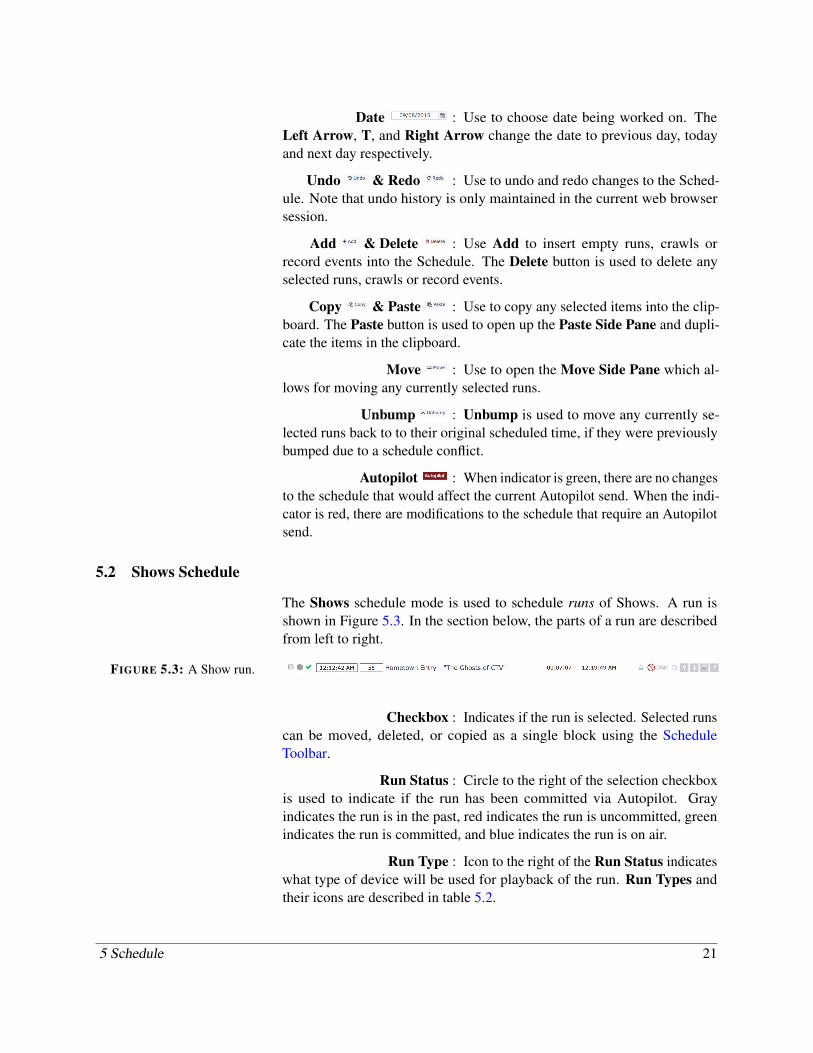
Date : Use to choose date being worked on. TheLeft Arrow, T, and Right Arrow change the date to previous day, todayand next day respectively.
Undo & Redo : Use to undo and redo changes to the Sched-ule. Note that undo history is only maintained in the current web browsersession.
Add & Delete : Use Add to insert empty runs, crawls orrecord events into the Schedule. The Delete button is used to delete anyselected runs, crawls or record events.
Copy & Paste : Use to copy any selected items into the clip-board. The Paste button is used to open up the Paste Side Pane and dupli-cate the items in the clipboard.
Move : Use to open the Move Side Pane which al-lows for moving any currently selected runs.
Unbump : Unbump is used to move any currently se-lected runs back to to their original scheduled time, if they were previouslybumped due to a schedule conflict.
Autopilot : When indicator is green, there are no changesto the schedule that would affect the current Autopilot send. When the indi-cator is red, there are modifications to the schedule that require an Autopilotsend.
5.2 Shows Schedule
The Shows schedule mode is used to schedule runs of Shows. A run isshown in Figure 5.3. In the section below, the parts of a run are describedfrom left to right.
FIGURE 5.3: A Show run.
Checkbox : Indicates if the run is selected. Selected runscan be moved, deleted, or copied as a single block using the ScheduleToolbar.
Run Status : Circle to the right of the selection checkboxis used to indicate if the run has been committed via Autopilot. Grayindicates the run is in the past, red indicates the run is uncommitted, greenindicates the run is committed, and blue indicates the run is on air.
Run Type : Icon to the right of the Run Status indicateswhat type of device will be used for playback of the run. Run Types andtheir icons are described in table 5.2.
5 Schedule 21
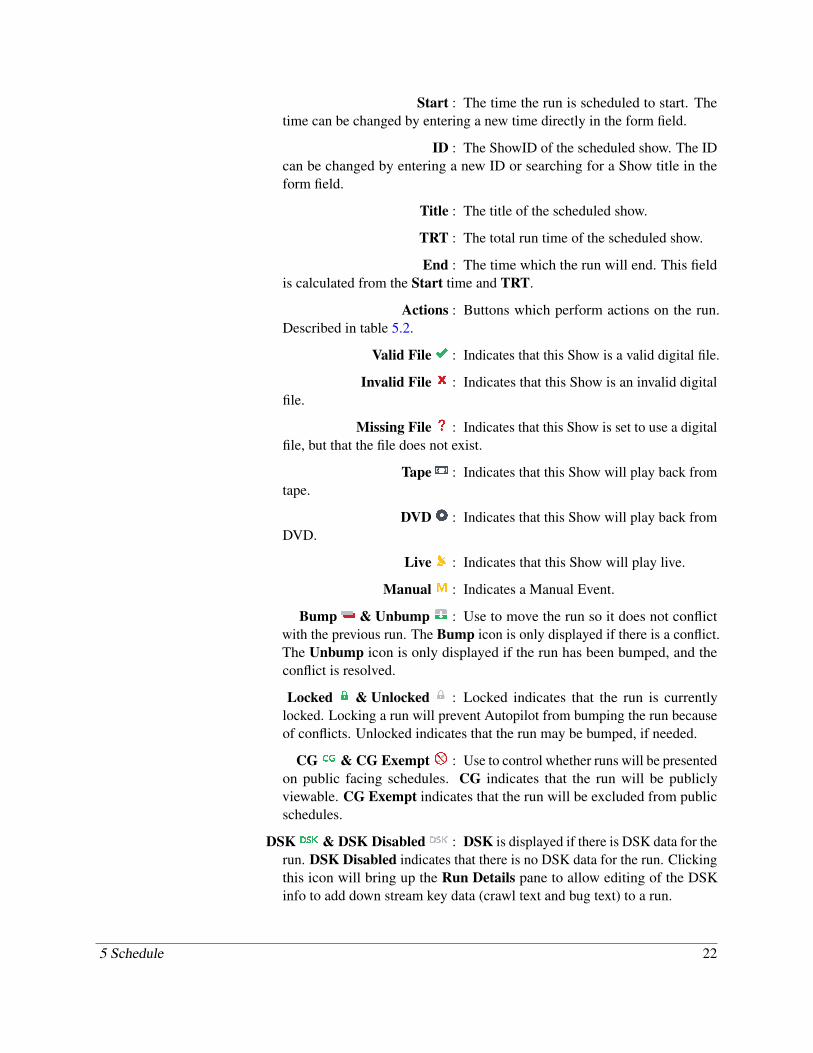
Start : The time the run is scheduled to start. Thetime can be changed by entering a new time directly in the form field.
ID : The ShowID of the scheduled show. The IDcan be changed by entering a new ID or searching for a Show title in theform field.
Title : The title of the scheduled show.
TRT : The total run time of the scheduled show.
End : The time which the run will end. This fieldis calculated from the Start time and TRT.
Actions : Buttons which perform actions on the run.Described in table 5.2.
Valid File : Indicates that this Show is a valid digital file.
Invalid File : Indicates that this Show is an invalid digitalfile.
Missing File : Indicates that this Show is set to use a digitalfile, but that the file does not exist.
Tape : Indicates that this Show will play back fromtape.
DVD : Indicates that this Show will play back fromDVD.
Live : Indicates that this Show will play live.
Manual : Indicates a Manual Event.
Bump & Unbump : Use to move the run so it does not conflictwith the previous run. The Bump icon is only displayed if there is a conflict.The Unbump icon is only displayed if the run has been bumped, and theconflict is resolved.
Locked & Unlocked : Locked indicates that the run is currentlylocked. Locking a run will prevent Autopilot from bumping the run becauseof conflicts. Unlocked indicates that the run may be bumped, if needed.
CG & CG Exempt : Use to control whether runs will be presentedon public facing schedules. CG indicates that the run will be publiclyviewable. CG Exempt indicates that the run will be excluded from publicschedules.
DSK & DSK Disabled : DSK is displayed if there is DSK data for therun. DSK Disabled indicates that there is no DSK data for the run. Clickingthis icon will bring up the Run Details pane to allow editing of the DSKinfo to add down stream key data (crawl text and bug text) to a run.
5 Schedule 22
Record & Recording Disabled : Record is displayed if there is a record eventassociated with the run. Recording Disabled is displayed if there is norecord event associated with the run. Clicking Recording Disabled willcreate a record event and open the Run Details pane for editing.
Move Up & Move Down : Use to move a run. Move Up moves a run,so it begins when the previous run ends. Move Down moves a run, so itends when the next run begins.
Delete : Use to delete a run from the Schedule.
Edit : Use to open the Run Details pane.
5.2.1 Right Side Pane
To the right of the runs in the Show schedule is a pane used for searchingShows and contextual controls for pasting, moving and editing of runs.The side pane in its default search mode is seen in Figure 5.4. Click theShows, Saved, or Advanced buttons to bring up the different search optionsdescribed next.
Shows : The simplest search mode. Type a searchterm into the Search box and click the magnifying glass to search.
Saved : Recall Saved Searches and list the most re-cent results.
Advanced : Build a custom query to filter available Showsby any property of the Show.
5.2.2 Adding Runs
There are three ways to schedule a new run.
Select and Schedule
Selecting a Show from the search results in the right side pane and thenclicking a time slot is the simplest way to schedule a show.
Step 1: Find the Show you wish to schedule using any of the search methods in theRight Side Pane.
Step 2: Click anywhere in the Show card. The card will be highlighted blue asshown in Figure 5.5.
Step 3: Click anywhere in a time slot to schedule the show. While your mouse isover a time slot it will be highlighted blue if the Show can fit in the time slot,or red if scheduling the Show here would create a conflict.
5 Schedule 23
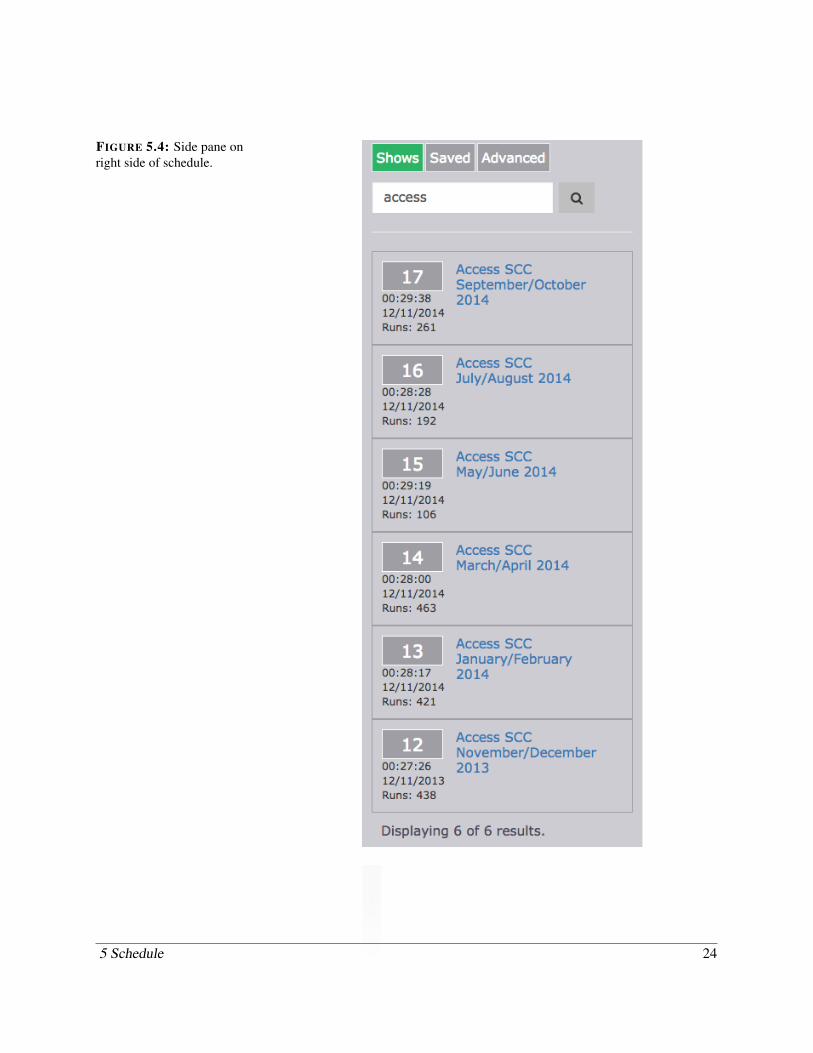
FIGURE 5.4: Side pane onright side of schedule.
5 Schedule 24
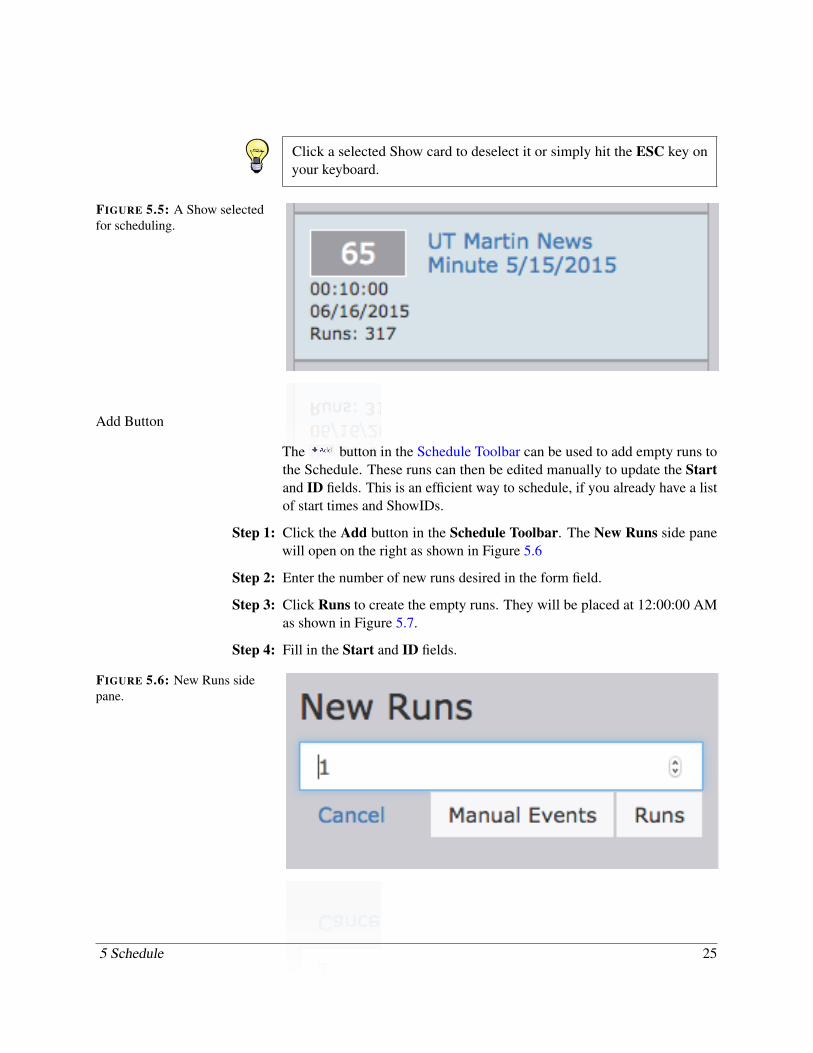
Click a selected Show card to deselect it or simply hit the ESC key onyour keyboard.
FIGURE 5.5: A Show selectedfor scheduling.
Add Button
The button in the Schedule Toolbar can be used to add empty runs tothe Schedule. These runs can then be edited manually to update the Startand ID fields. This is an efficient way to schedule, if you already have a listof start times and ShowIDs.
Step 1: Click the Add button in the Schedule Toolbar. The New Runs side panewill open on the right as shown in Figure 5.6
Step 2: Enter the number of new runs desired in the form field.
Step 3: Click Runs to create the empty runs. They will be placed at 12:00:00 AMas shown in Figure 5.7.
Step 4: Fill in the Start and ID fields.
FIGURE 5.6: New Runs sidepane.
5 Schedule 25
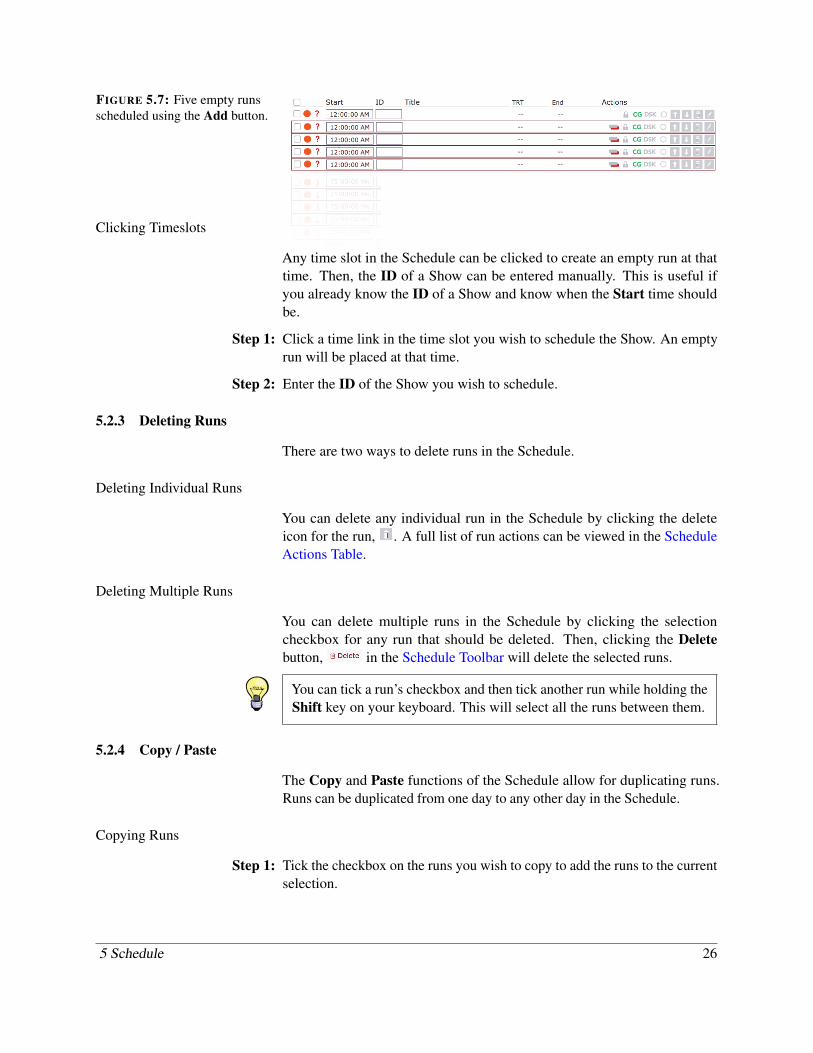
FIGURE 5.7: Five empty runsscheduled using the Add button.
Clicking Timeslots
Any time slot in the Schedule can be clicked to create an empty run at thattime. Then, the ID of a Show can be entered manually. This is useful ifyou already know the ID of a Show and know when the Start time shouldbe.
Step 1: Click a time link in the time slot you wish to schedule the Show. An emptyrun will be placed at that time.
Step 2: Enter the ID of the Show you wish to schedule.
5.2.3 Deleting Runs
There are two ways to delete runs in the Schedule.
Deleting Individual Runs
You can delete any individual run in the Schedule by clicking the deleteicon for the run, . A full list of run actions can be viewed in the ScheduleActions Table.
Deleting Multiple Runs
You can delete multiple runs in the Schedule by clicking the selectioncheckbox for any run that should be deleted. Then, clicking the Deletebutton, in the Schedule Toolbar will delete the selected runs.
You can tick a run’s checkbox and then tick another run while holding theShift key on your keyboard. This will select all the runs between them.
5.2.4 Copy / Paste
The Copy and Paste functions of the Schedule allow for duplicating runs.Runs can be duplicated from one day to any other day in the Schedule.
Copying Runs
Step 1: Tick the checkbox on the runs you wish to copy to add the runs to the currentselection.
5 Schedule 26
Step 2: Click the Copy button on the Schedule Toolbar or Ctrl + C on your key-board.
Pasting Runs
When runs are in the clipboard, they can be pasted either by opening thePaste Pane or by clicking the Paste button in any timeslot.
Paste Runs Pane
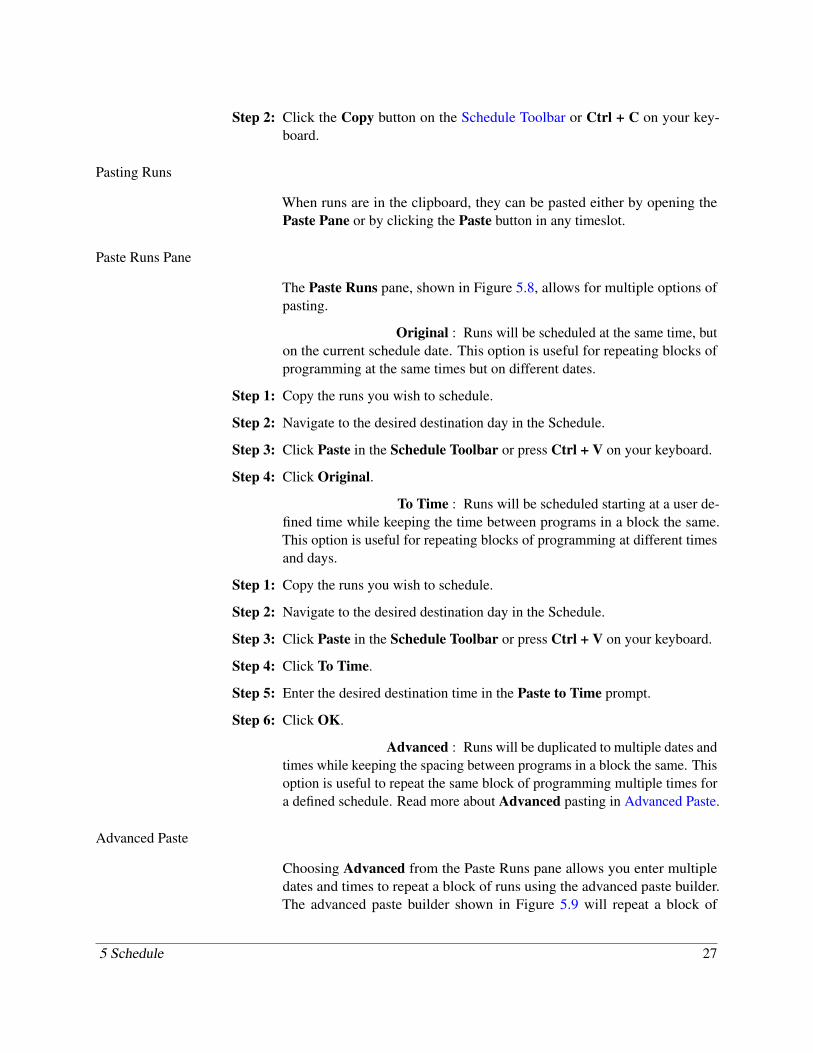
The Paste Runs pane, shown in Figure 5.8, allows for multiple options ofpasting.
Original : Runs will be scheduled at the same time, buton the current schedule date. This option is useful for repeating blocks ofprogramming at the same times but on different dates.
Step 1: Copy the runs you wish to schedule.
Step 2: Navigate to the desired destination day in the Schedule.
Step 3: Click Paste in the Schedule Toolbar or press Ctrl + V on your keyboard.
Step 4: Click Original.
To Time : Runs will be scheduled starting at a user de-fined time while keeping the time between programs in a block the same.This option is useful for repeating blocks of programming at different timesand days.
Step 1: Copy the runs you wish to schedule.
Step 2: Navigate to the desired destination day in the Schedule.
Step 3: Click Paste in the Schedule Toolbar or press Ctrl + V on your keyboard.
Step 4: Click To Time.
Step 5: Enter the desired destination time in the Paste to Time prompt.
Step 6: Click OK.
Advanced : Runs will be duplicated to multiple dates andtimes while keeping the spacing between programs in a block the same. Thisoption is useful to repeat the same block of programming multiple times fora defined schedule. Read more about Advanced pasting in Advanced Paste.
Advanced Paste
Choosing Advanced from the Paste Runs pane allows you enter multipledates and times to repeat a block of runs using the advanced paste builder.The advanced paste builder shown in Figure 5.9 will repeat a block of
5 Schedule 27
FIGURE 5.8: The Paste RunsPane.
5 Schedule 28
programming on September 16th at 12:00:00 AM and 3:00:00 PM, andSeptember 17th at 1:00:00 AM and 9:00:00 PM. The fields in the advancedpaste builder are:
Load Blocks : This dropdown allows you to load pre-definedblocks of paste targets. See blocks for more information on creating blocks.
Pick a Day : The date picker allows for creating a newpaste day.
Date : The Date at the top of a paste day displayswhat calendar date the copied runs will be pasted to.
X : The X in the upper right will remove an en-tire paste day from the advanced paste builder.
Time : Each paste day contains a list of times atwhich runs will be duplicated.
Remove : The Remove link removes an individual timefrom a paste day.
Cancel : Close the Paste Runs pane without pastingany runs.
Reset : Remove all paste days and paste times.
Paste : Perform the paste, duplicating any runs inthe clipboard to each of the date time combinations defined in the pastebuilder.
Time Slot Paste Button
When runs are copied and in the clipboard, a Paste button will be available(Figure 5.10) on all time slots. Clicking this button will paste the copiedruns to that time. This is equivalent to using the Paste To Time feature inthe Paste Runs pane.
5.2.5 Moving Runs
Existing runs can be moved in three different ways.
Moving Individual Runs
You can move any individual run in the schedule by clicking the Move Upor Move Down buttons in the Actions section of a run. See the ActionsTable for details about the Move Up and Move Down actions.
5 Schedule 29
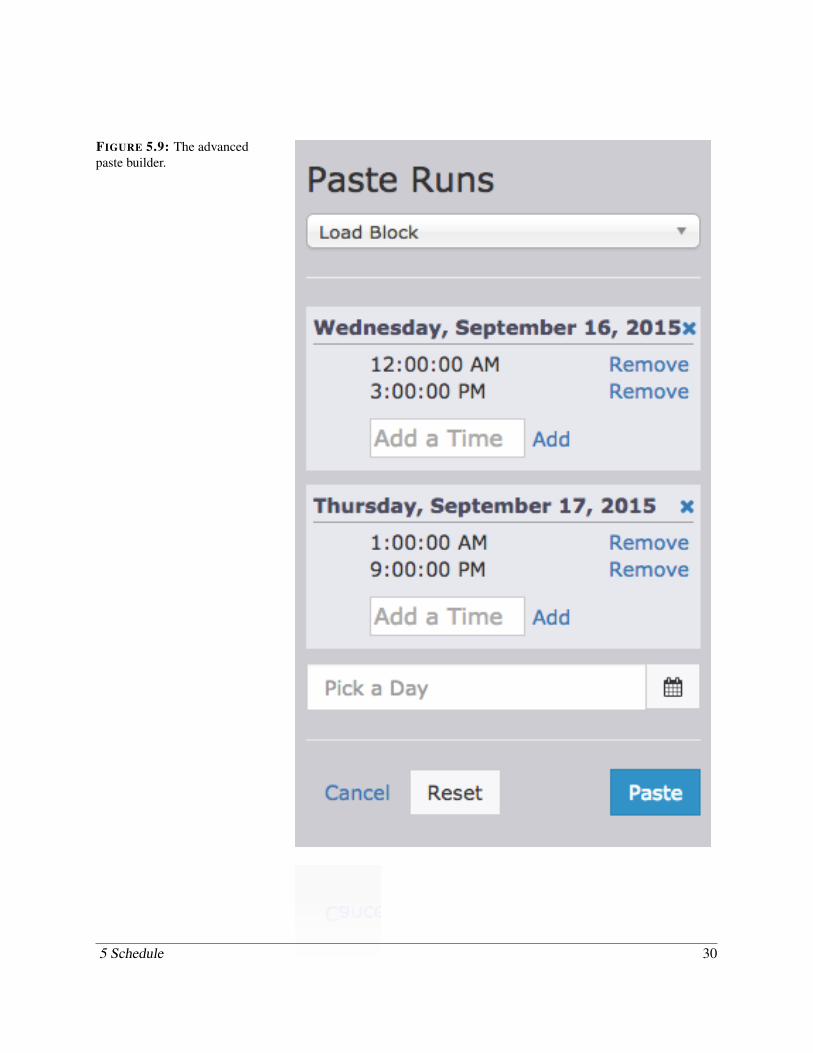
FIGURE 5.9: The advancedpaste builder.
5 Schedule 30
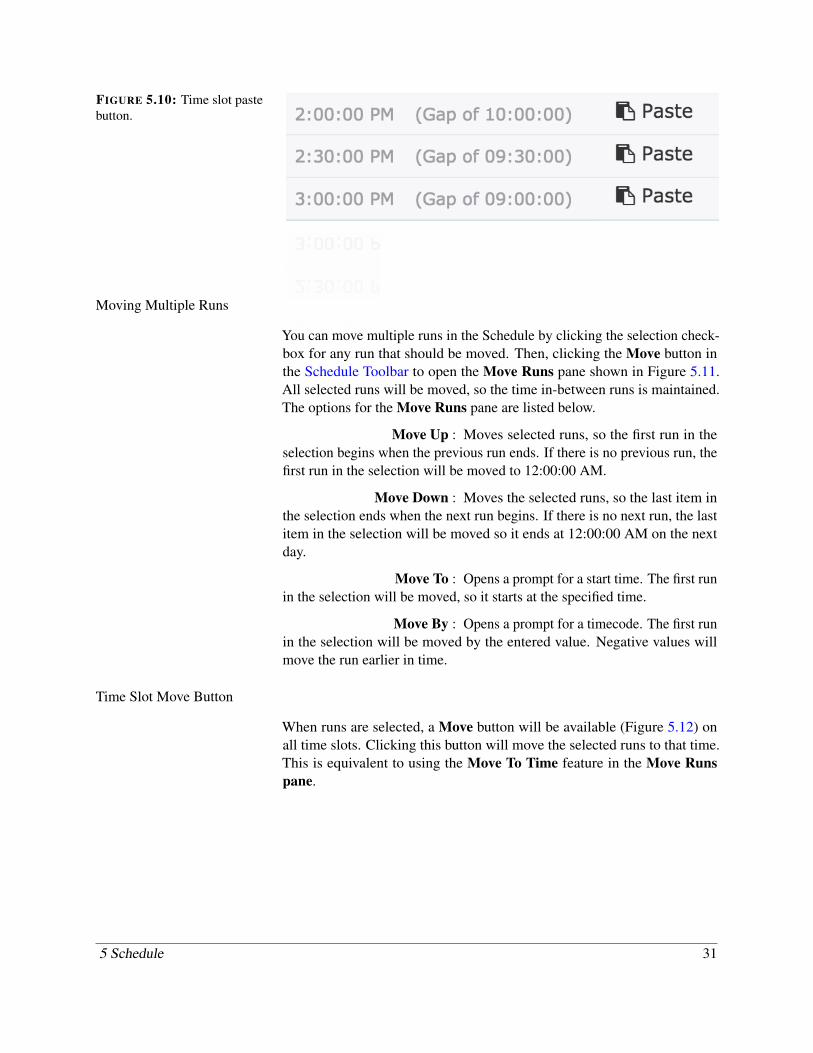
FIGURE 5.10: Time slot pastebutton.
Moving Multiple Runs
You can move multiple runs in the Schedule by clicking the selection check-box for any run that should be moved. Then, clicking the Move button inthe Schedule Toolbar to open the Move Runs pane shown in Figure 5.11.All selected runs will be moved, so the time in-between runs is maintained.The options for the Move Runs pane are listed below.
Move Up : Moves selected runs, so the first run in theselection begins when the previous run ends. If there is no previous run, thefirst run in the selection will be moved to 12:00:00 AM.
Move Down : Moves the selected runs, so the last item inthe selection ends when the next run begins. If there is no next run, the lastitem in the selection will be moved so it ends at 12:00:00 AM on the nextday.
Move To : Opens a prompt for a start time. The first runin the selection will be moved, so it starts at the specified time.
Move By : Opens a prompt for a timecode. The first runin the selection will be moved by the entered value. Negative values willmove the run earlier in time.
Time Slot Move Button
When runs are selected, a Move button will be available (Figure 5.12) onall time slots. Clicking this button will move the selected runs to that time.This is equivalent to using the Move To Time feature in the Move Runspane.
5 Schedule 31
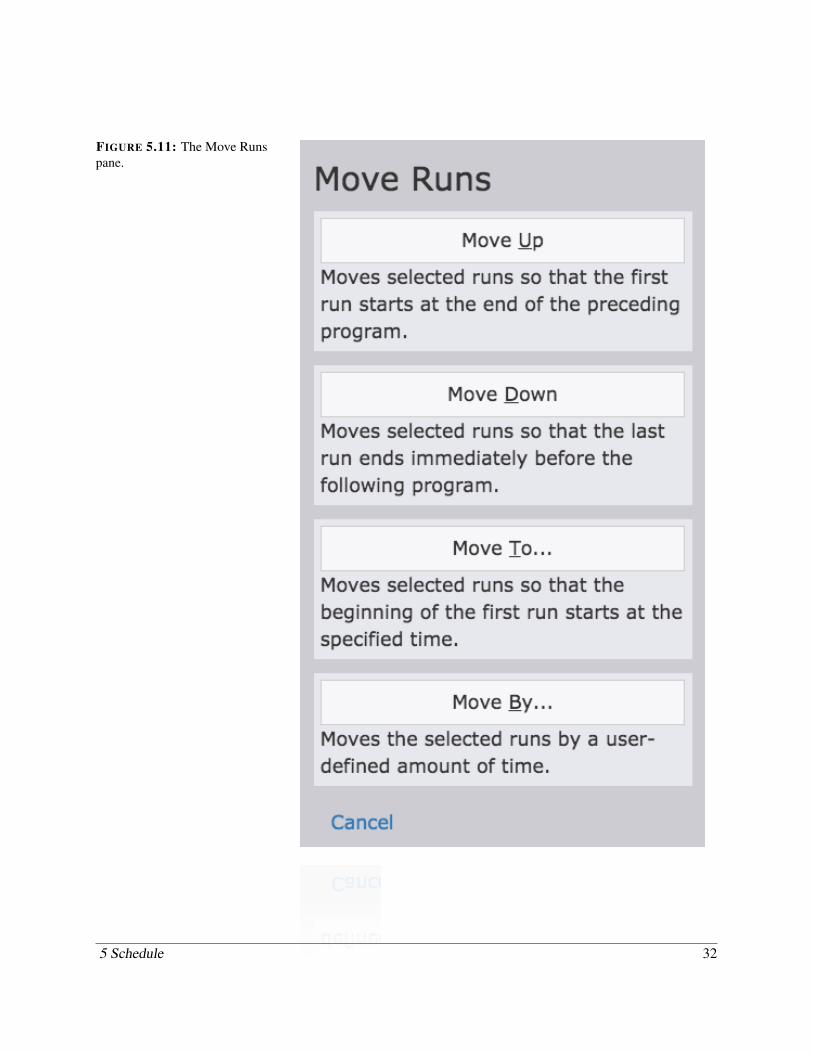
FIGURE 5.11: The Move Runspane.
5 Schedule 32
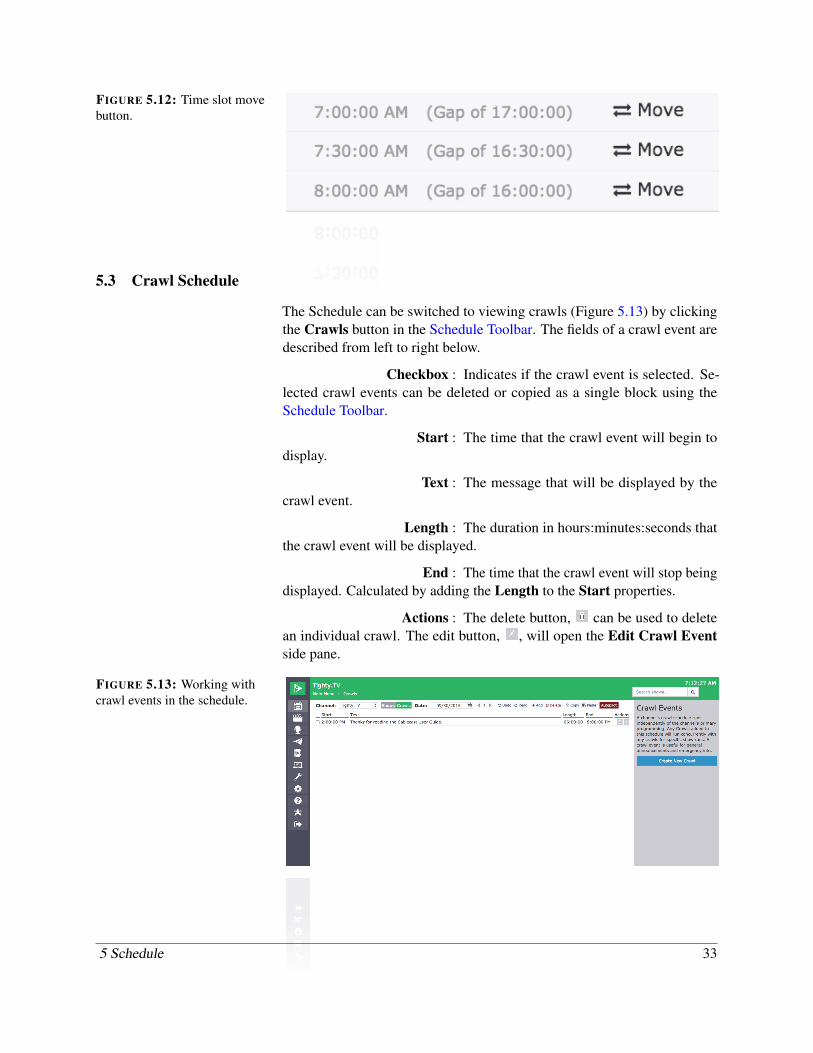
FIGURE 5.12: Time slot movebutton.
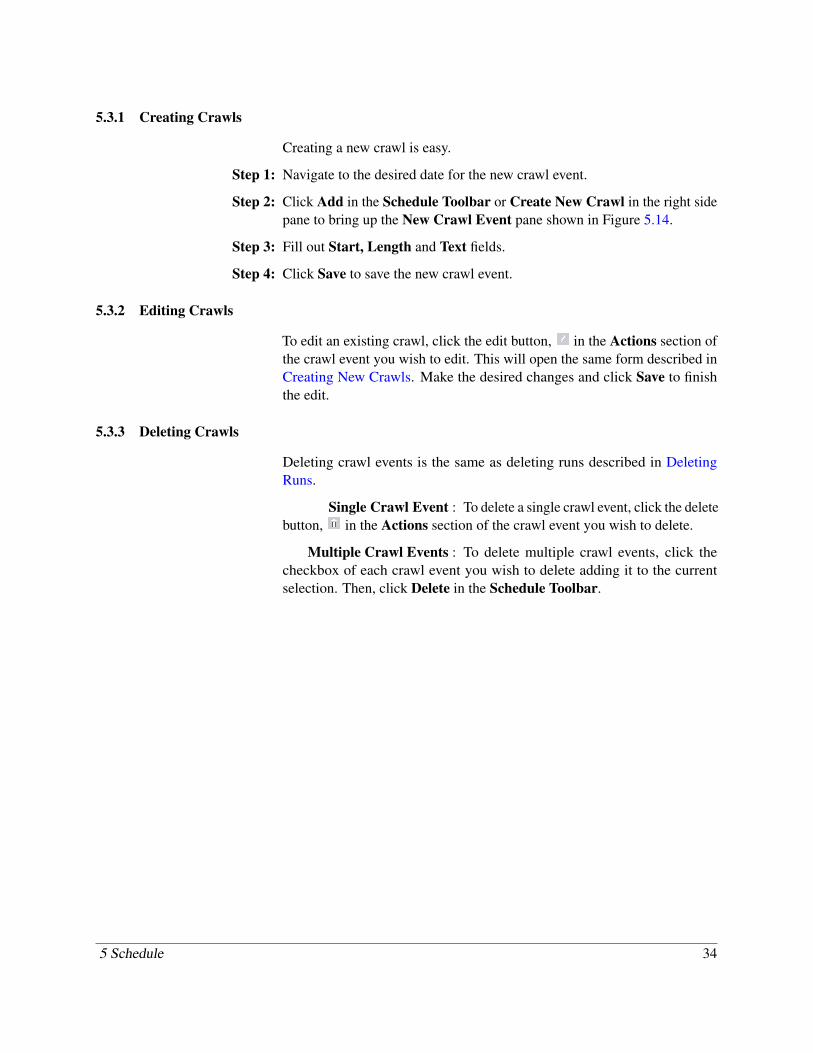
5.3 Crawl Schedule
The Schedule can be switched to viewing crawls (Figure 5.13) by clickingthe Crawls button in the Schedule Toolbar. The fields of a crawl event aredescribed from left to right below.
Checkbox : Indicates if the crawl event is selected. Se-lected crawl events can be deleted or copied as a single block using theSchedule Toolbar.
Start : The time that the crawl event will begin todisplay.
Text : The message that will be displayed by thecrawl event.
Length : The duration in hours:minutes:seconds thatthe crawl event will be displayed.
End : The time that the crawl event will stop beingdisplayed. Calculated by adding the Length to the Start properties.
Actions : The delete button, can be used to deletean individual crawl. The edit button, , will open the Edit Crawl Eventside pane.
FIGURE 5.13: Working withcrawl events in the schedule.
5 Schedule 33
5.3.1 Creating Crawls
Creating a new crawl is easy.
Step 1: Navigate to the desired date for the new crawl event.
Step 2: Click Add in the Schedule Toolbar or Create New Crawl in the right sidepane to bring up the New Crawl Event pane shown in Figure 5.14.
Step 3: Fill out Start, Length and Text fields.
Step 4: Click Save to save the new crawl event.
5.3.2 Editing Crawls
To edit an existing crawl, click the edit button, in the Actions section ofthe crawl event you wish to edit. This will open the same form described inCreating New Crawls. Make the desired changes and click Save to finishthe edit.
5.3.3 Deleting Crawls
Deleting crawl events is the same as deleting runs described in DeletingRuns.
Single Crawl Event : To delete a single crawl event, click the deletebutton, in the Actions section of the crawl event you wish to delete.
Multiple Crawl Events : To delete multiple crawl events, click thecheckbox of each crawl event you wish to delete adding it to the currentselection. Then, click Delete in the Schedule Toolbar.
5 Schedule 34
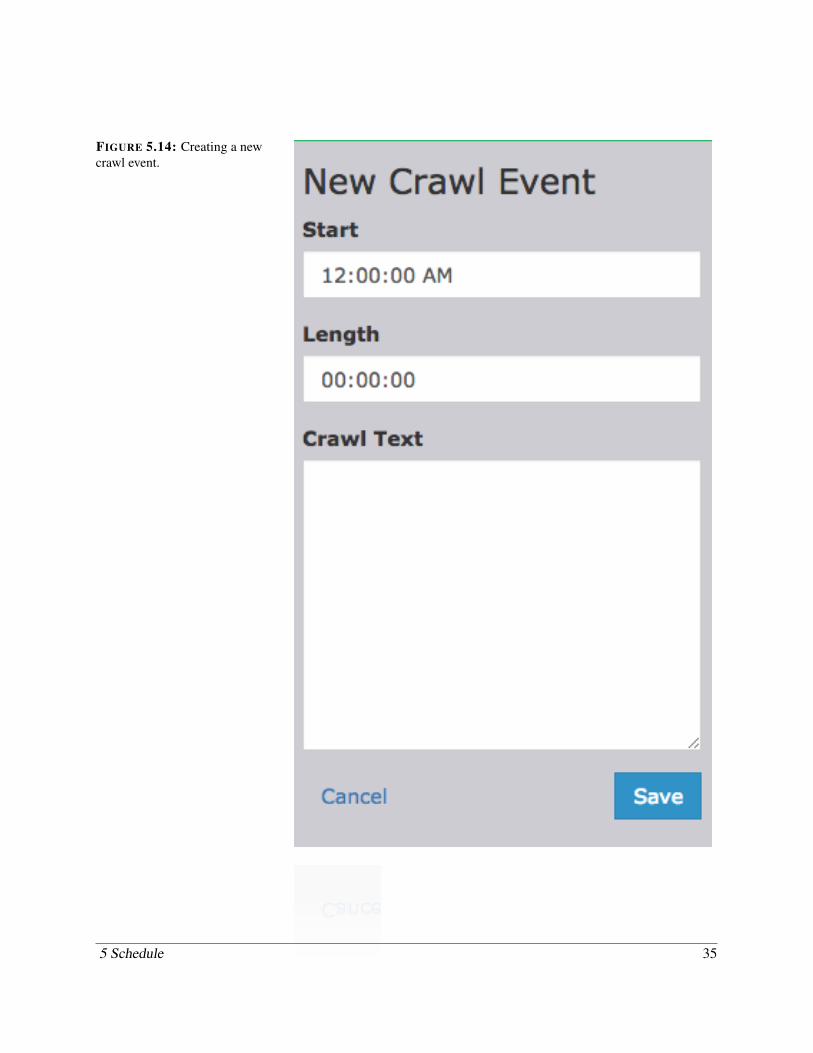
FIGURE 5.14: Creating a newcrawl event.
5 Schedule 35
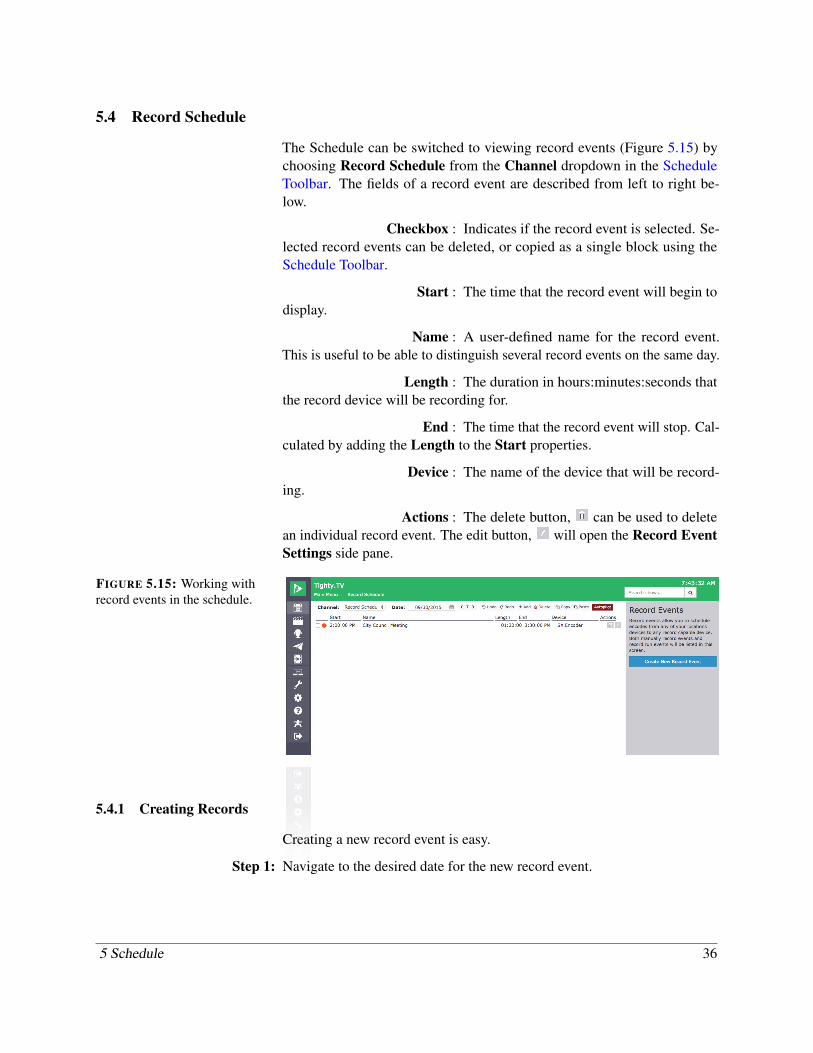
5.4 Record Schedule
The Schedule can be switched to viewing record events (Figure 5.15) bychoosing Record Schedule from the Channel dropdown in the ScheduleToolbar. The fields of a record event are described from left to right be-low.
Checkbox : Indicates if the record event is selected. Se-lected record events can be deleted, or copied as a single block using theSchedule Toolbar.
Start : The time that the record event will begin todisplay.
Name : A user-defined name for the record event.This is useful to be able to distinguish several record events on the same day.
Length : The duration in hours:minutes:seconds thatthe record device will be recording for.
End : The time that the record event will stop. Cal-culated by adding the Length to the Start properties.
Device : The name of the device that will be record-ing.
Actions : The delete button, can be used to deletean individual record event. The edit button, will open the Record EventSettings side pane.
FIGURE 5.15: Working withrecord events in the schedule.
5.4.1 Creating Records
Creating a new record event is easy.
Step 1: Navigate to the desired date for the new record event.
5 Schedule 36
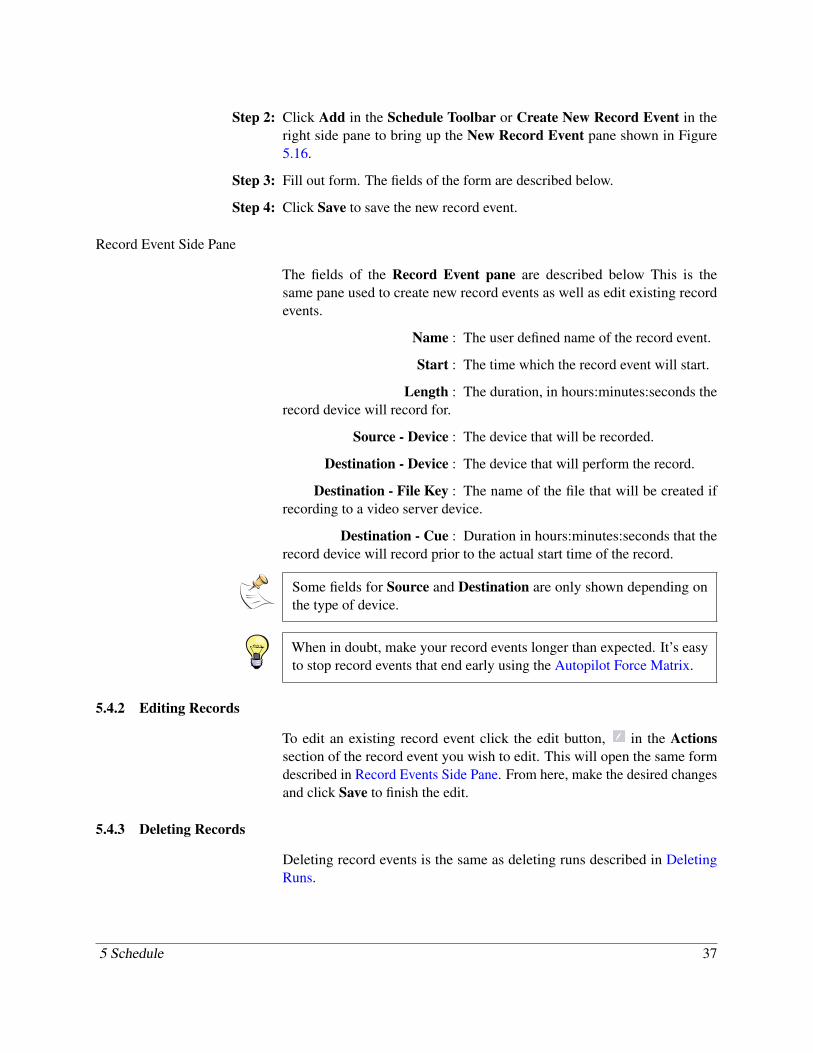
Step 2: Click Add in the Schedule Toolbar or Create New Record Event in theright side pane to bring up the New Record Event pane shown in Figure5.16.
Step 3: Fill out form. The fields of the form are described below.
Step 4: Click Save to save the new record event.
Record Event Side Pane
The fields of the Record Event pane are described below This is thesame pane used to create new record events as well as edit existing recordevents.
Name : The user defined name of the record event.
Start : The time which the record event will start.
Length : The duration, in hours:minutes:seconds therecord device will record for.
Source - Device : The device that will be recorded.
Destination - Device : The device that will perform the record.
Destination - File Key : The name of the file that will be created ifrecording to a video server device.
Destination - Cue : Duration in hours:minutes:seconds that therecord device will record prior to the actual start time of the record.
Some fields for Source and Destination are only shown depending onthe type of device.
When in doubt, make your record events longer than expected. It’s easyto stop record events that end early using the Autopilot Force Matrix.
5.4.2 Editing Records
To edit an existing record event click the edit button, in the Actionssection of the record event you wish to edit. This will open the same formdescribed in Record Events Side Pane. From here, make the desired changesand click Save to finish the edit.
5.4.3 Deleting Records
Deleting record events is the same as deleting runs described in DeletingRuns.
5 Schedule 37
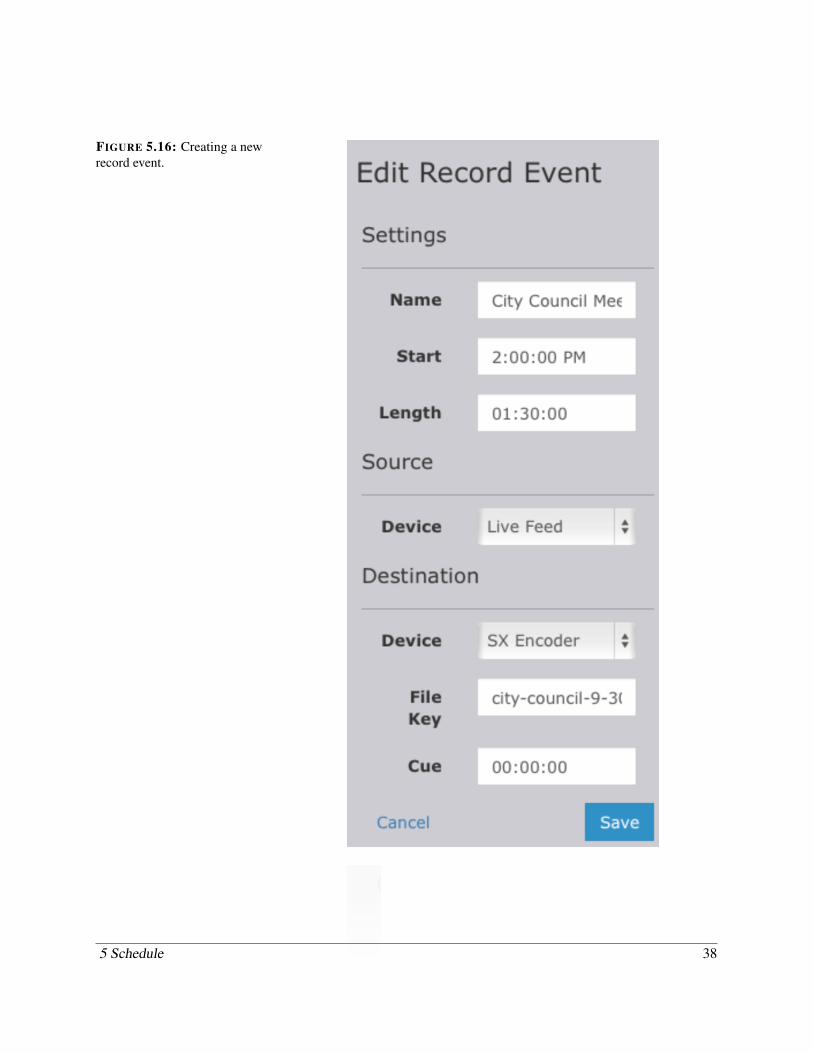
FIGURE 5.16: Creating a newrecord event.
5 Schedule 38

Single Record Event : To delete a single record event, click thedelete button, in the Actions section of the record event you wish todelete.
Multiple Record Events : To delete multiple record events, click thecheckbox of each record event you wish to delete adding it to the currentselection. Then, click Delete in the Schedule Toolbar.
5 Schedule 39
6 Shows
A Show is the metadata that represents a single, self-contained item ofprogramming. Examples could include a specific football game, a singlecity council meeting or an episode of a comedy series.
6.1 Show Screen
6.1.1 Basic Info
The following Basic Info fields are included in every Show:
ShowID : This number is assigned by Cablecast auto-matically and is the system-wide unique identifier for each Show. Cablecastallows you to enter a ShowID to instantly recall a Show in almost everyscreen.
Title : The user-defined name of the program. Us-ing a concise, descriptive title will make it easier for you to find a givenShow later when using Cablecast’s search system.
CG Title : The public-facing name of the program. TheCG Title is used for any publicly viewable description of the program, suchas on your channels Character Generator, website, and TV Guide output.
Local ID : A user-defined identifier for the show. Thisfield is not automatically generated by Cablecast. Typically this field is usedwhen data is migrated into Cablecast from a different automation system.This allows you to find Cablecast Shows based on the old system’s identifiersif needed.
Project : Defines a grouping of Shows such as episodesof the same series. You can create as many projects as you would like, buteach Show can only belong to one project at a time.
CG Exempt : Checking this box tells Cablecast that thisprogram should not be shown on your stations character generator, or otherpublic-facing outputs. For example, you might not want to include each andevery PSA on your website’s schedule display.
Ancillary Files : You can upload supplementary files for aShow here. Examples might include the minutes and agenda of a publicmeeting, the crew list of a live production and so on.
Thumbnail : The thumbnail of a Show is used on yourwebsite to give viewers a visual representation of the Show. Cablecastwill automatically generate a thumbnail for digital files on supported videoservers, and you can always upload your own thumbnail.
6.1.2 Reels
Each Show in Cablecast includes a single Reel by default. You can add anddelete additional reels, but each Show must have at least one.
The reel represents a segment of a Show, such as each half of a football game.When it comes time to schedule your channel, you will simply schedule theShow and Cablecast will take care of playing all of the needed reels in orderautomatically.
Reel Settings:
Reel Count : The total number of reels in the current Show.
TRT : The total running time of the Show, expressedin hours, minutes and seconds. This is the sum of the lengths of all of theindividual reels.
In : The point in the source material at which theprogram starts. For example, if the file has 5 seconds of black before thebeginning of the program, you will want to enter “0:00:04” or “0:00:05”.This field is expressed in hours, minutes, seconds.
Length : The desired on-air duration of the program.This field is expressed in hours, minutes, seconds.
Out : The point in the source material at which theprogram ends. This field is calculated based on the In and Length fields. Inorder to enter timing information for a given reel, you will need to populatethe In field, as well as either the Length or Out field. This field is expressedin hours, minutes, seconds.
Format : The type of content that this reel represents.Cablecast includes some default formats, but you will likely need to createmore of your own.
Media : The Cablecast Media record that is associ-ated with this reel. Media records allow you to have several reels that usea single piece of physical media, such as several segments on a single tape.This feature is not often used.
Device : Indicates if a specific playback device hasbeen manually assigned for this Reel; otherwise, it displays Auto. Thissetting can be edited by clicking Media: Edit.
6 Shows 41
Aspect Ratio : (For Digital File formats only) Indicates ifthe assigned aspect ratio setting for this reel has been manually set; otherwise,it displays auto. This setting can be edited by clicking Media: Edit.
Digital Files : (For Digital File formats only) Lists the filesthat Cablecast has associated with this reel. Clicking the link will bring up adialog with more detailed file information.
Copy time from file : (For Digital File formats only) Sets the In,Length and Out fields for this reel based on the length of the associateddigital file.
DVD Title and Chapter : (For DVD formats only) Sets the Title andChapter of the disk that should be played for this reel.
Thumbnail : The system-generated thumbnail for the as-sociated digital file or a format-based icon, if there is no thumbnail image.
Add : Adds a new reel after the existing reels.
Delete : Removes the last reel.
6.1.3 Bibliographic Info
The Bibliographic Info section allows you to keep track of additional detailsabout the Show. The following fields are available:
Event Date : The date on which the Show was recorded.Example: the date of the football game.
Category : You can associate a user-defined categorywith all of your Shows to facilitate easier searches. Cablecast includesseveral default categories. You can edit and delete them as you see fit as wellas create new ones.
Producer : The person or organization that created thisprogram. You can add as many Producers to Cablecast as you need.
Comments : Any additional notes about this program.
This field is exposed to the public through Cablecast’s API.
Custom Fields : Cablecast includes eight custom fields thatyou can name and use to store any other data you need.
6.1.4 DSK Settings
The DSK Settings section allows you to define default values to be usedfor DSK info when this Show is scheduled. For example, you can definecrawl text here, and it will be used automatically whenever this Show issubsequently scheduled.
6 Shows 42
These settings need to be set in the Show before it is scheduled. If youschedule the Show and then edit these settings, your changes won’t showup on-air.
Bug Text : User-defined text that will be shown on-screensuch as “Live” for live programs.
Crawl Text : User-defined text that will be slowly movedacross the top or bottom of the screen while this Show is on air.
Crawl Length : Sets how long the Crawl Text will be shownafter the start of the Show. This field is expressed in hours, minutes andseconds.
6.1.5 Live Streaming
This section is only shown if your system includes Cablecast Live Stream-ing hardware.
Live Streaming Exempt : If this box is ticked, Cablecast will not broad-cast this program via live streaming. Instead, users will see a page informingthem that this Show can’t be viewed on-line.
6.1.6 TRMS Video On Demand
This section is only shown if your system includes Cablecast Video OnDemand hardware.
VOD Enabled : If this box is ticked, Cablecast will automati-cally create Internet viewable versions of all digital files and publish them toyour website.
Quality : Select the appropriate quality based on thecontent type of this Show. Higher qualities will improve the video quality atthe expense of increased Internet bandwidth and storage space.
Status : Displays the current status of the automaticVOD transcoding operation.
Watch : Opens a separate window so that you canview the completed VOD file.
Link : Opens a dialog that allows you to copy adirect-link to the transcoded file.
Embed : Opens a dialog that allows you to copy asnippet of HTML code that can be placed on your website in order to displaythe completed VOD file.
6 Shows 43
6.1.7 Runs
This list shows all or some of the scheduled air times of this Show.
6.2 New Show
Use New Show to create an empty Show that you can then edit. See ShowFields for information about the fields on the Show screen.
6.3 Show Search
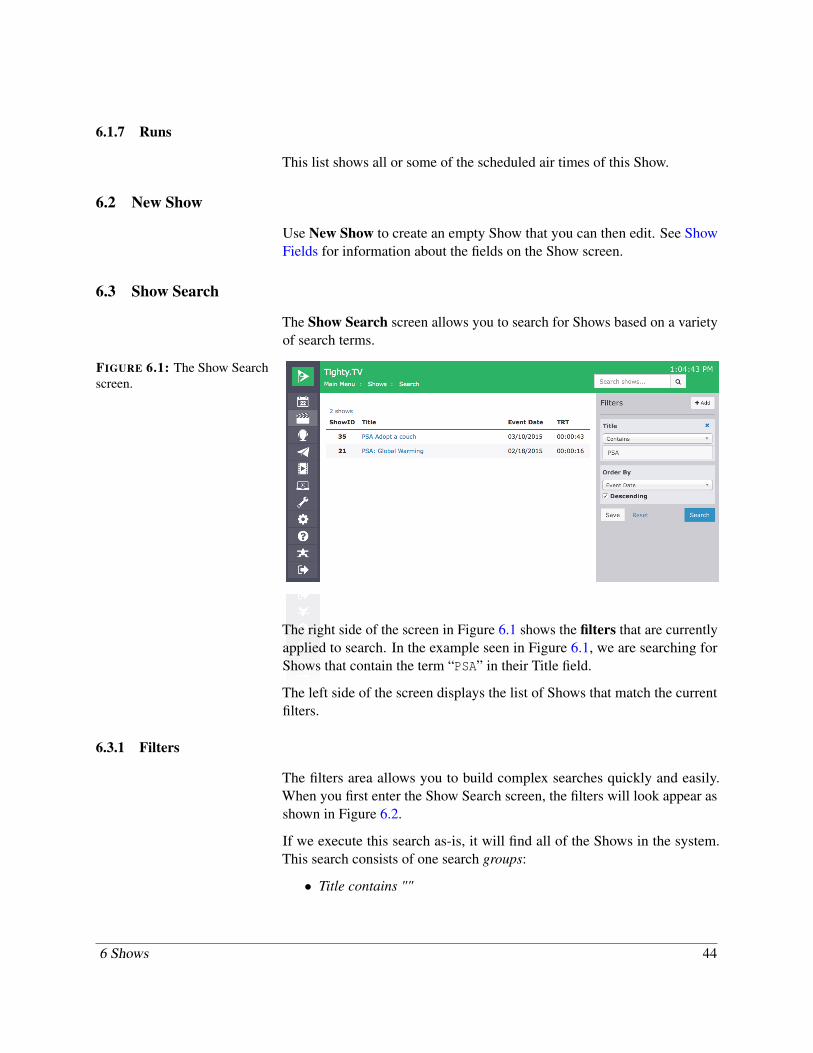
The Show Search screen allows you to search for Shows based on a varietyof search terms.
FIGURE 6.1: The Show Searchscreen.
The right side of the screen in Figure 6.1 shows the filters that are currentlyapplied to search. In the example seen in Figure 6.1, we are searching forShows that contain the term “PSA” in their Title field.
The left side of the screen displays the list of Shows that match the currentfilters.
6.3.1 Filters
The filters area allows you to build complex searches quickly and easily.When you first enter the Show Search screen, the filters will look appear asshown in Figure 6.2.
If we execute this search as-is, it will find all of the Shows in the system.This search consists of one search groups:
• Title contains ""
6 Shows 44
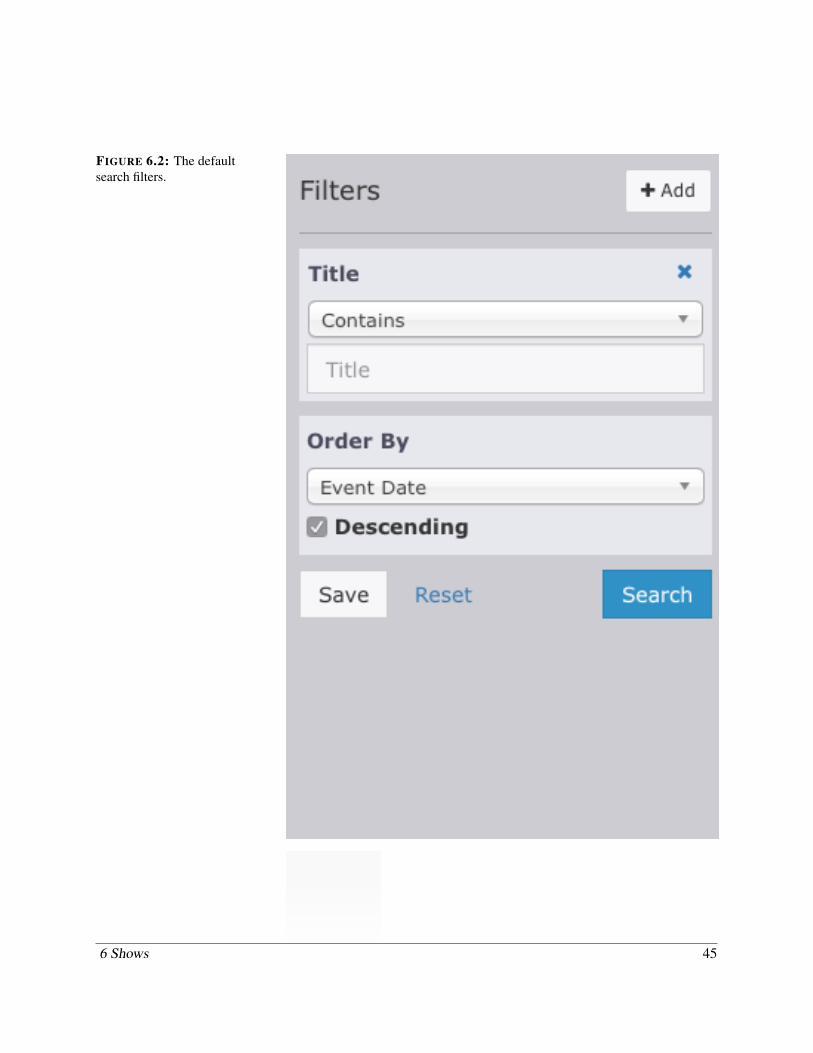
FIGURE 6.2: The defaultsearch filters.
6 Shows 45
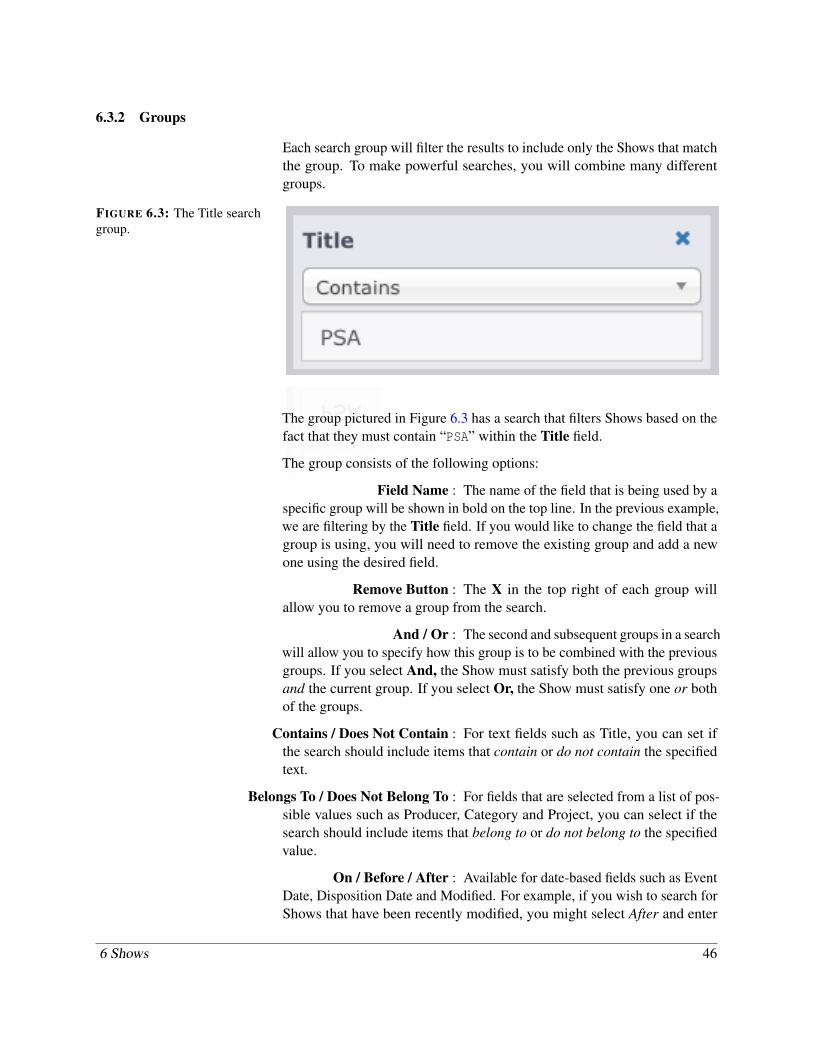
6.3.2 Groups
Each search group will filter the results to include only the Shows that matchthe group. To make powerful searches, you will combine many differentgroups.
FIGURE 6.3: The Title searchgroup.
The group pictured in Figure 6.3 has a search that filters Shows based on thefact that they must contain “PSA” within the Title field.
The group consists of the following options:
Field Name : The name of the field that is being used by aspecific group will be shown in bold on the top line. In the previous example,we are filtering by the Title field. If you would like to change the field that agroup is using, you will need to remove the existing group and add a newone using the desired field.
Remove Button : The X in the top right of each group willallow you to remove a group from the search.
And / Or : The second and subsequent groups in a searchwill allow you to specify how this group is to be combined with the previousgroups. If you select And, the Show must satisfy both the previous groupsand the current group. If you select Or, the Show must satisfy one or bothof the groups.
Contains / Does Not Contain : For text fields such as Title, you can set ifthe search should include items that contain or do not contain the specifiedtext.
Belongs To / Does Not Belong To : For fields that are selected from a list of pos-sible values such as Producer, Category and Project, you can select if thesearch should include items that belong to or do not belong to the specifiedvalue.
On / Before / After : Available for date-based fields such as EventDate, Disposition Date and Modified. For example, if you wish to search forShows that have been recently modified, you might select After and enter
6 Shows 46

“30 days ago”. You may also enter a specific date instead of a relativeexpression.
Is / Is Not : Available for the Digital File field. This filterwill match Shows based on the status of their digital files.
Equals / Greater Than / Less Than : Available for numeric fields such as RunCount.
6.3.3 Order By
Below the search groups you can control the order in which the results aredisplayed.
Field : Selects the field that should be used to sortthe results.
Descending : Reverses the sort order.
6.3.4 Buttons
+Add : Press +Add to add an additional group to thesearch.
Save : Press Save to store this search as a SavedSearch so that you can easily recall it later.
Reset : Press Reset to discard your changes and re-store the search to its original state.
Search : Press Search to execute the search using thecurrent filters and order by settings. After executing the search, you canfurther refine the filters and search again.
6.3.5 Results
The search results area shows the following information:
Result count : Displays the total number of Shows that matchthe specified filters.
ShowID : The unique ShowID of the Show.
Title : The title of the Show.
Producer : The name of the producer, if set.
Event Date : The event date of the Show.
TRT : The Total Run Time of the Show.
Runs : The total number of times that the Show hasran.
6 Shows 47
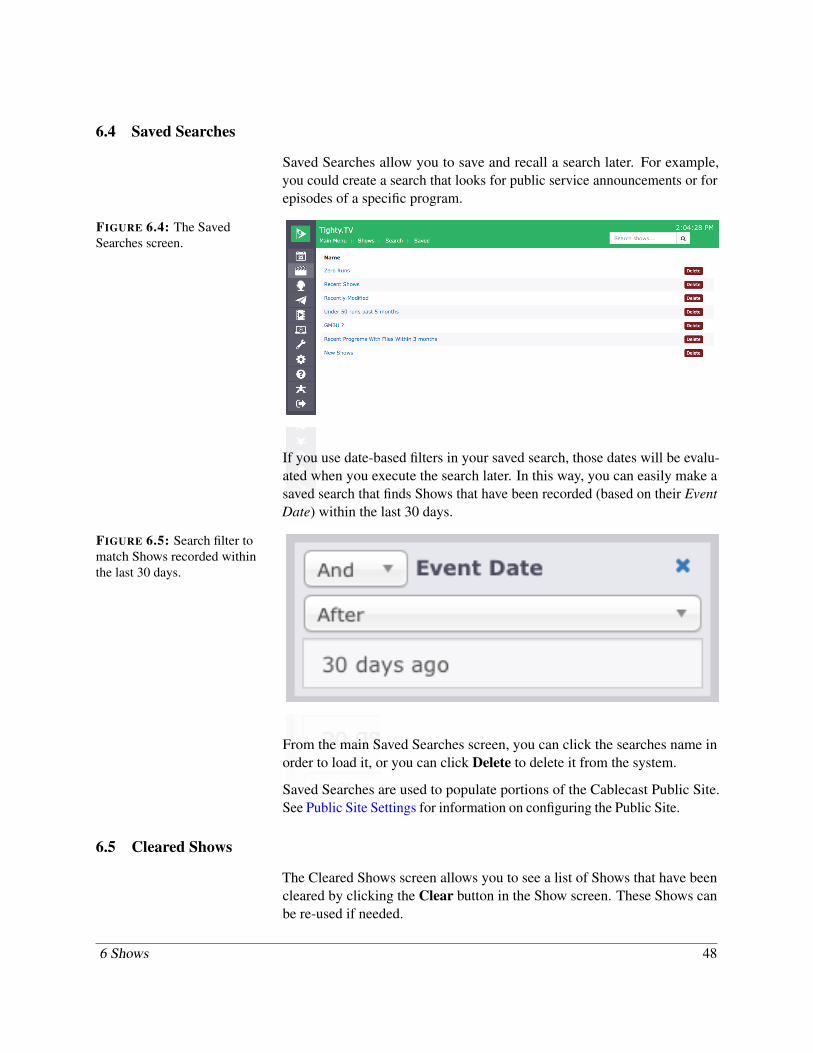
6.4 Saved Searches
Saved Searches allow you to save and recall a search later. For example,you could create a search that looks for public service announcements or forepisodes of a specific program.
FIGURE 6.4: The SavedSearches screen.
If you use date-based filters in your saved search, those dates will be evalu-ated when you execute the search later. In this way, you can easily make asaved search that finds Shows that have been recorded (based on their EventDate) within the last 30 days.
FIGURE 6.5: Search filter tomatch Shows recorded withinthe last 30 days.
From the main Saved Searches screen, you can click the searches name inorder to load it, or you can click Delete to delete it from the system.
Saved Searches are used to populate portions of the Cablecast Public Site.See Public Site Settings for information on configuring the Public Site.
6.5 Cleared Shows
The Cleared Shows screen allows you to see a list of Shows that have beencleared by clicking the Clear button in the Show screen. These Shows canbe re-used if needed.
6 Shows 48

Clearing a Show removes all record of it’s existence from Cablecast. ThisShow will not appear in reports or any other fashion. Reusing Shows is,in many ways anathema to the design goals of Cablecast and should onlybe done under special circumstances.
6 Shows 49
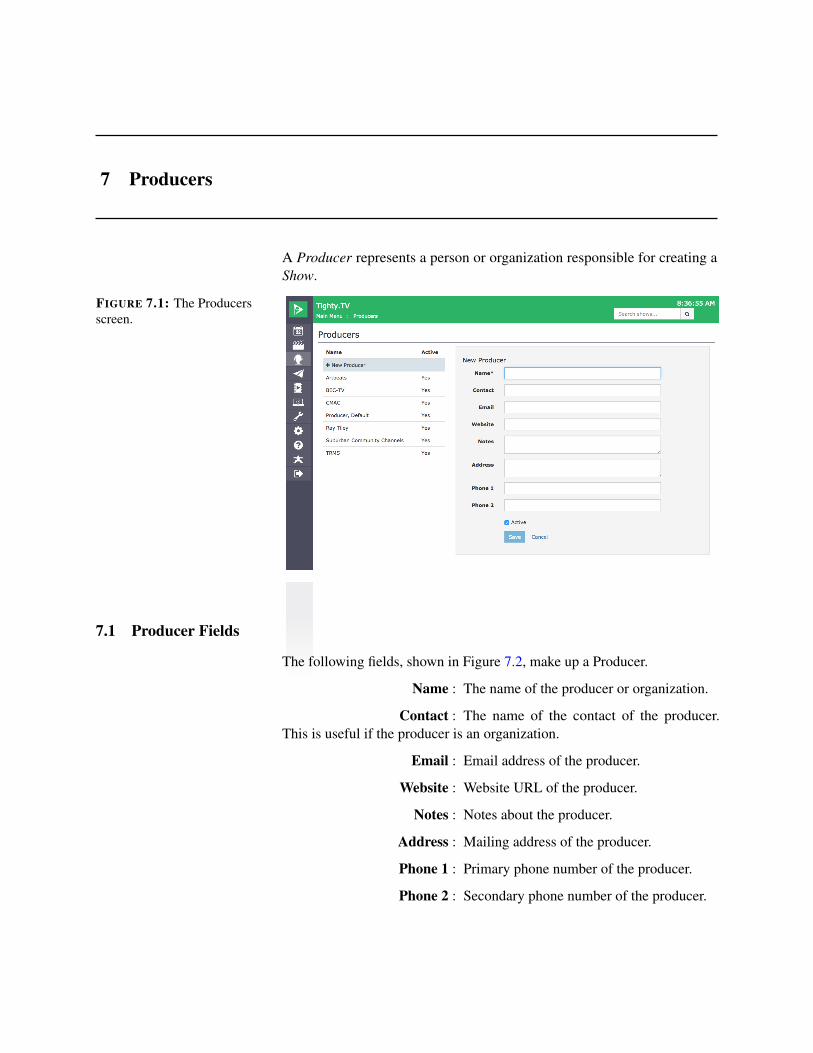
7 Producers
A Producer represents a person or organization responsible for creating aShow.
FIGURE 7.1: The Producersscreen.
7.1 Producer Fields
The following fields, shown in Figure 7.2, make up a Producer.
Name : The name of the producer or organization.
Contact : The name of the contact of the producer.This is useful if the producer is an organization.
Email : Email address of the producer.
Website : Website URL of the producer.
Notes : Notes about the producer.
Address : Mailing address of the producer.
Phone 1 : Primary phone number of the producer.
Phone 2 : Secondary phone number of the producer.
FIGURE 7.2: Editing a Pro-ducer.
Active : Indicates if the producer is active or not.Shows produced by inactive producers will cause an Autopilot error ifscheduled.
7.2 Creating Producers
Creating a new producer is easy.
Step 1: In the Producers screen, shown in Figure 7.1 click New Producer.
Step 2: Fill out the form. The fields are described in Producer Fields.
Step 3: Click Save.
7.3 Editing Producers
To edit an existing Producer:
Step 1: In the Producers screen, shown in Figure 7.1 click the Name of an existingproducer.
Step 2: Fill out the form. The fields are described in Producer Fields.
Step 3: Click Save.
7 Producers 51

7.4 Deleting Producers
To delete an existing Producer:
Step 1: In the Producers screen, shown in Figure 7.1 click the Name of an existingproducer.
Step 2: Click Delete.
Step 3: Your choice to delete the producer will be confirmed. This operation cannotbe undone. Click OK to confirm your choice and delete the producer.
7 Producers 52
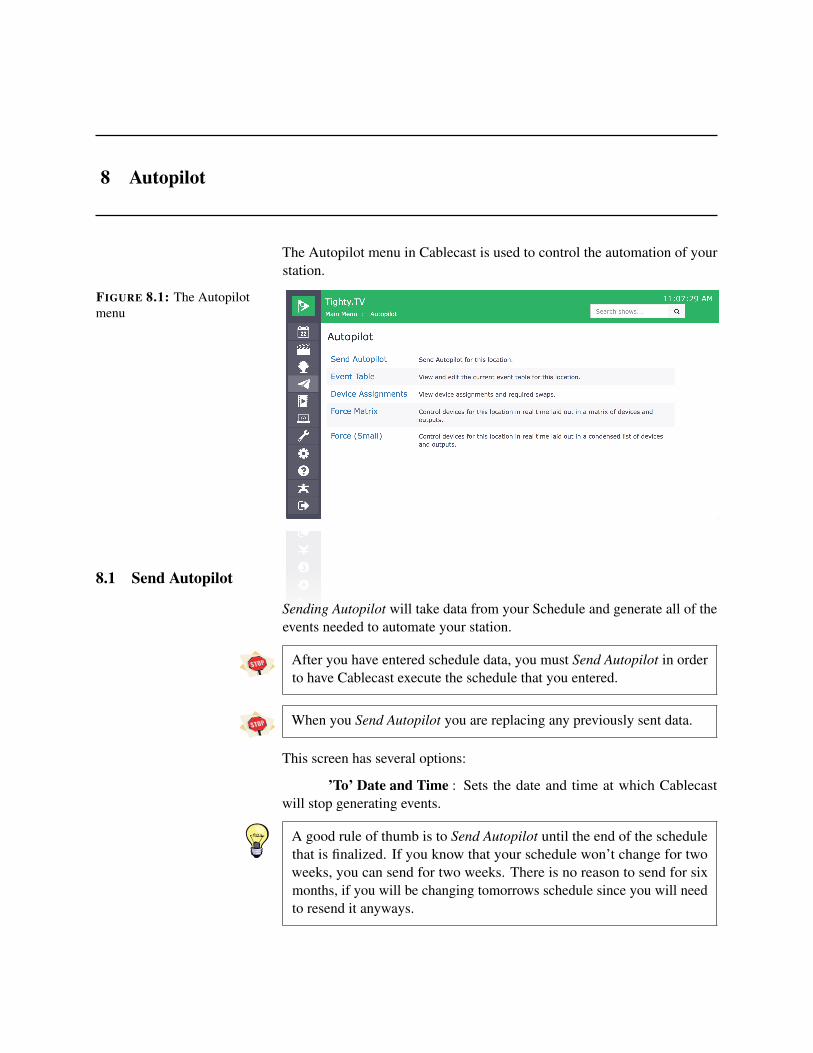
8 Autopilot
The Autopilot menu in Cablecast is used to control the automation of yourstation.
FIGURE 8.1: The Autopilotmenu
8.1 Send Autopilot
Sending Autopilot will take data from your Schedule and generate all of theevents needed to automate your station.
After you have entered schedule data, you must Send Autopilot in orderto have Cablecast execute the schedule that you entered.
When you Send Autopilot you are replacing any previously sent data.
This screen has several options:
’To’ Date and Time : Sets the date and time at which Cablecastwill stop generating events.
A good rule of thumb is to Send Autopilot until the end of the schedulethat is finalized. If you know that your schedule won’t change for twoweeks, you can send for two weeks. There is no reason to send for sixmonths, if you will be changing tomorrows schedule since you will needto resend it anyways.
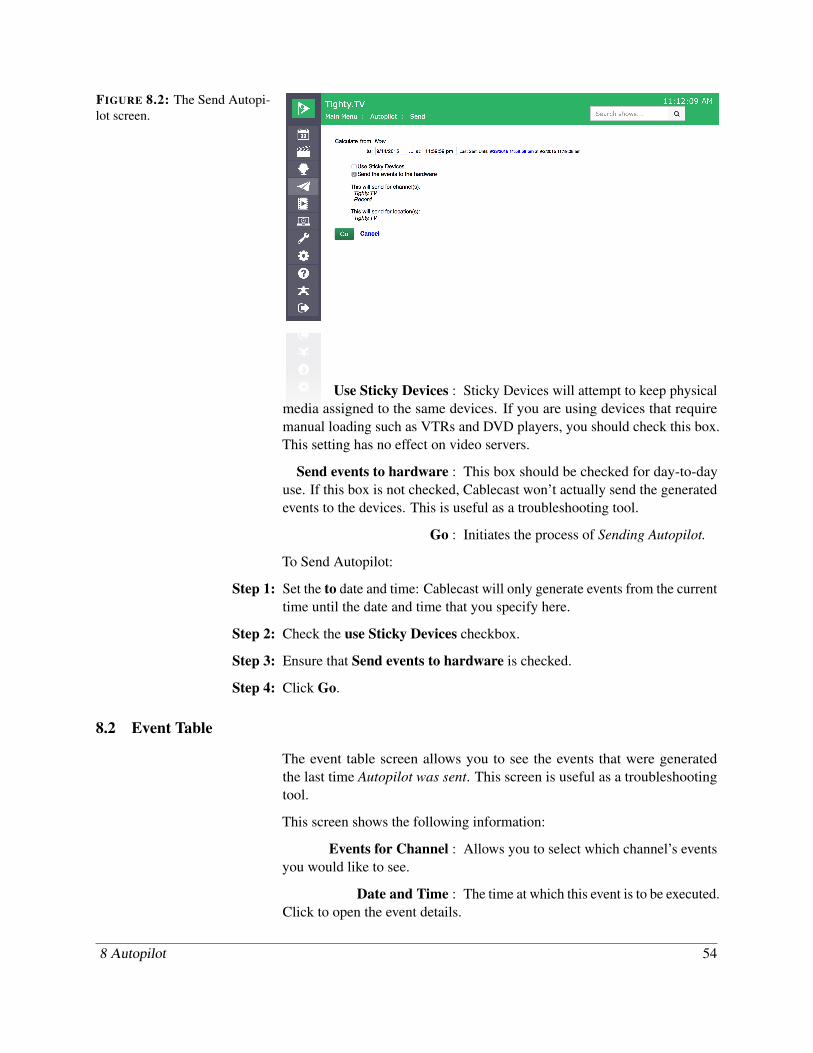
FIGURE 8.2: The Send Autopi-lot screen.
Use Sticky Devices : Sticky Devices will attempt to keep physicalmedia assigned to the same devices. If you are using devices that requiremanual loading such as VTRs and DVD players, you should check this box.This setting has no effect on video servers.
Send events to hardware : This box should be checked for day-to-dayuse. If this box is not checked, Cablecast won’t actually send the generatedevents to the devices. This is useful as a troubleshooting tool.
Go : Initiates the process of Sending Autopilot.
To Send Autopilot:
Step 1: Set the to date and time: Cablecast will only generate events from the currenttime until the date and time that you specify here.
Step 2: Check the use Sticky Devices checkbox.
Step 3: Ensure that Send events to hardware is checked.
Step 4: Click Go.
8.2 Event Table
The event table screen allows you to see the events that were generatedthe last time Autopilot was sent. This screen is useful as a troubleshootingtool.
This screen shows the following information:
Events for Channel : Allows you to select which channel’s eventsyou would like to see.
Date and Time : The time at which this event is to be executed.Click to open the event details.
8 Autopilot 54
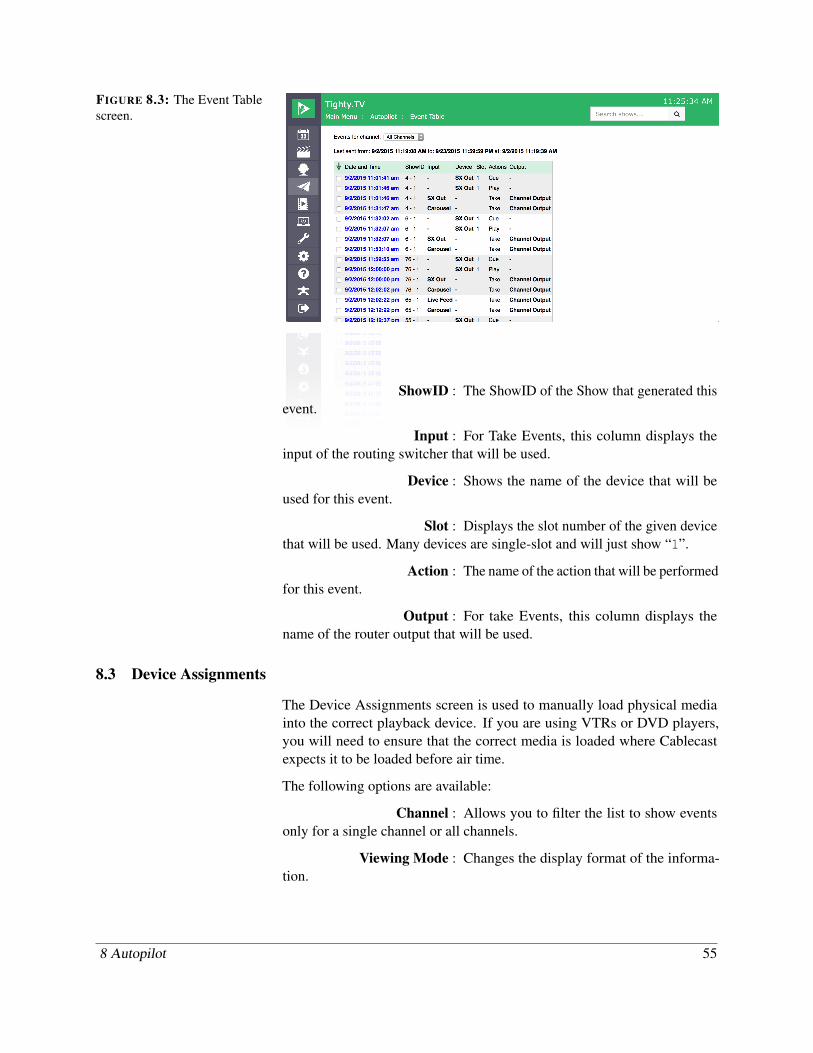
FIGURE 8.3: The Event Tablescreen.
ShowID : The ShowID of the Show that generated thisevent.
Input : For Take Events, this column displays theinput of the routing switcher that will be used.
Device : Shows the name of the device that will beused for this event.
Slot : Displays the slot number of the given devicethat will be used. Many devices are single-slot and will just show “1”.
Action : The name of the action that will be performedfor this event.
Output : For take Events, this column displays thename of the router output that will be used.
8.3 Device Assignments
The Device Assignments screen is used to manually load physical mediainto the correct playback device. If you are using VTRs or DVD players,you will need to ensure that the correct media is loaded where Cablecastexpects it to be loaded before air time.
The following options are available:
Channel : Allows you to filter the list to show eventsonly for a single channel or all channels.
Viewing Mode : Changes the display format of the informa-tion.
8 Autopilot 55
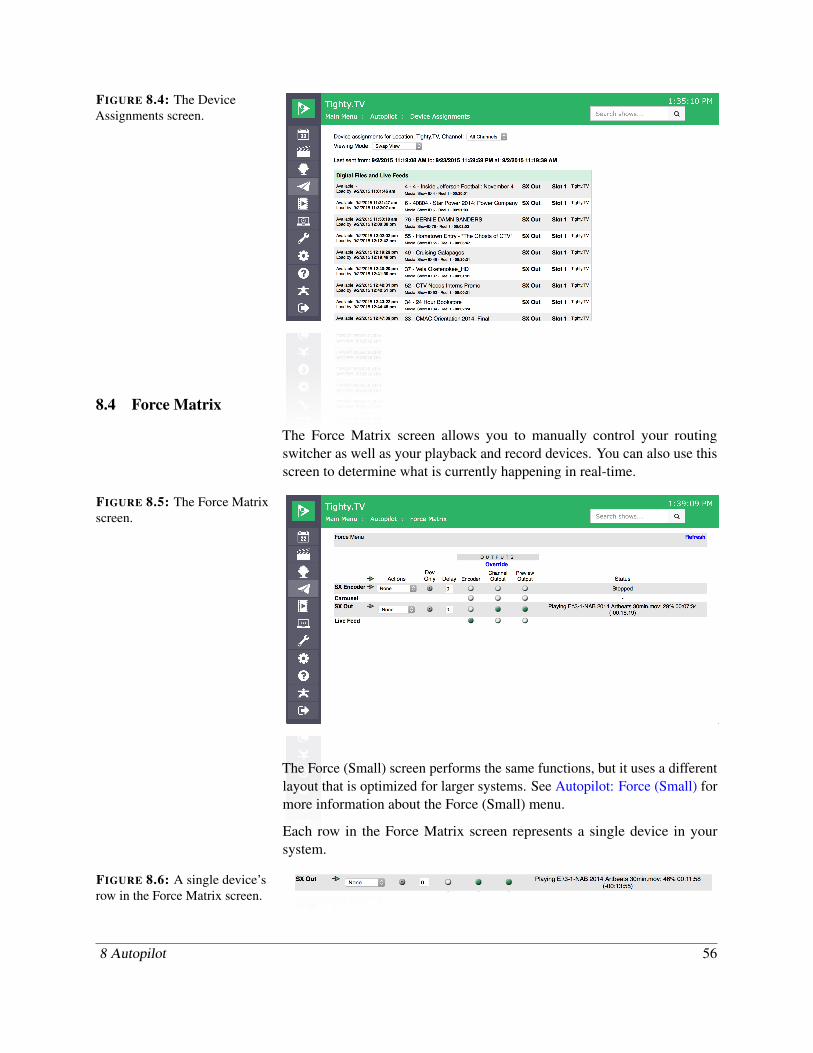
FIGURE 8.4: The DeviceAssignments screen.
8.4 Force Matrix
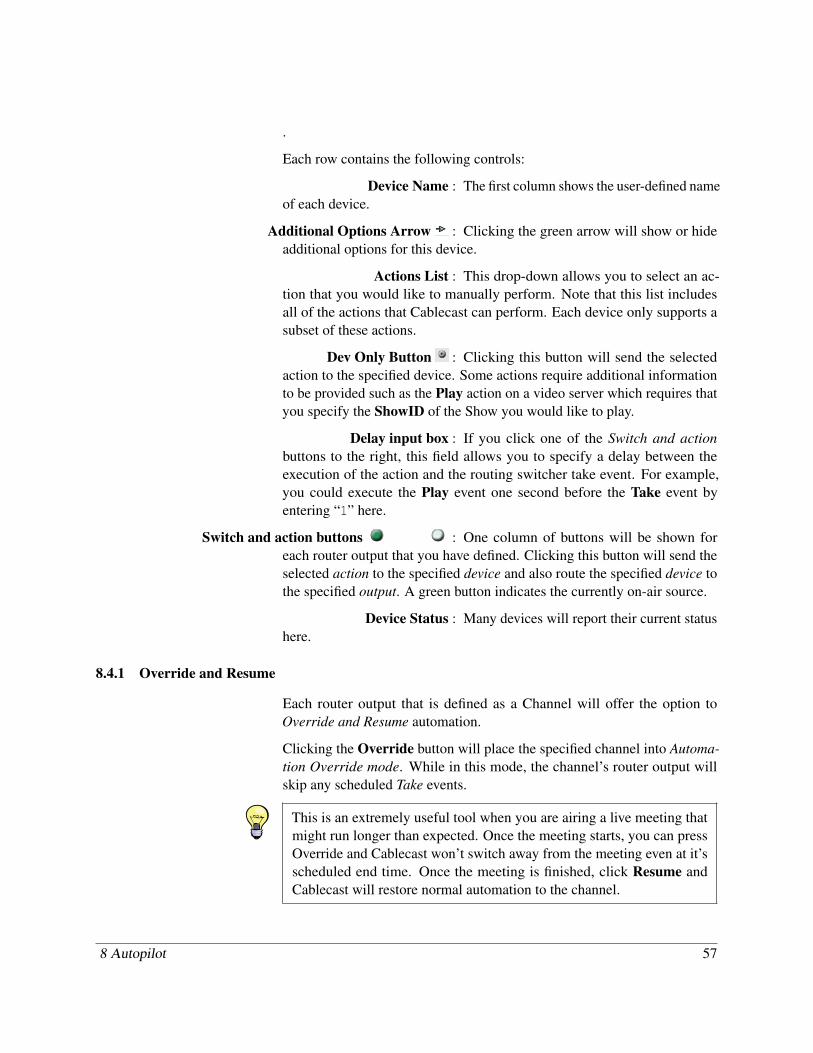
The Force Matrix screen allows you to manually control your routingswitcher as well as your playback and record devices. You can also use thisscreen to determine what is currently happening in real-time.
FIGURE 8.5: The Force Matrixscreen.
The Force (Small) screen performs the same functions, but it uses a differentlayout that is optimized for larger systems. See Autopilot: Force (Small) formore information about the Force (Small) menu.
Each row in the Force Matrix screen represents a single device in yoursystem.
FIGURE 8.6: A single device’srow in the Force Matrix screen.
8 Autopilot 56
.
Each row contains the following controls:
Device Name : The first column shows the user-defined nameof each device.
Additional Options Arrow : Clicking the green arrow will show or hideadditional options for this device.
Actions List : This drop-down allows you to select an ac-tion that you would like to manually perform. Note that this list includesall of the actions that Cablecast can perform. Each device only supports asubset of these actions.
Dev Only Button : Clicking this button will send the selectedaction to the specified device. Some actions require additional informationto be provided such as the Play action on a video server which requires thatyou specify the ShowID of the Show you would like to play.
Delay input box : If you click one of the Switch and actionbuttons to the right, this field allows you to specify a delay between theexecution of the action and the routing switcher take event. For example,you could execute the Play event one second before the Take event byentering “1” here.
Switch and action buttons : One column of buttons will be shown foreach router output that you have defined. Clicking this button will send theselected action to the specified device and also route the specified device tothe specified output. A green button indicates the currently on-air source.
Device Status : Many devices will report their current statushere.
8.4.1 Override and Resume
Each router output that is defined as a Channel will offer the option toOverride and Resume automation.
Clicking the Override button will place the specified channel into Automa-tion Override mode. While in this mode, the channel’s router output willskip any scheduled Take events.
This is an extremely useful tool when you are airing a live meeting thatmight run longer than expected. Once the meeting starts, you can pressOverride and Cablecast won’t switch away from the meeting even at it’sscheduled end time. Once the meeting is finished, click Resume andCablecast will restore normal automation to the channel.
8 Autopilot 57
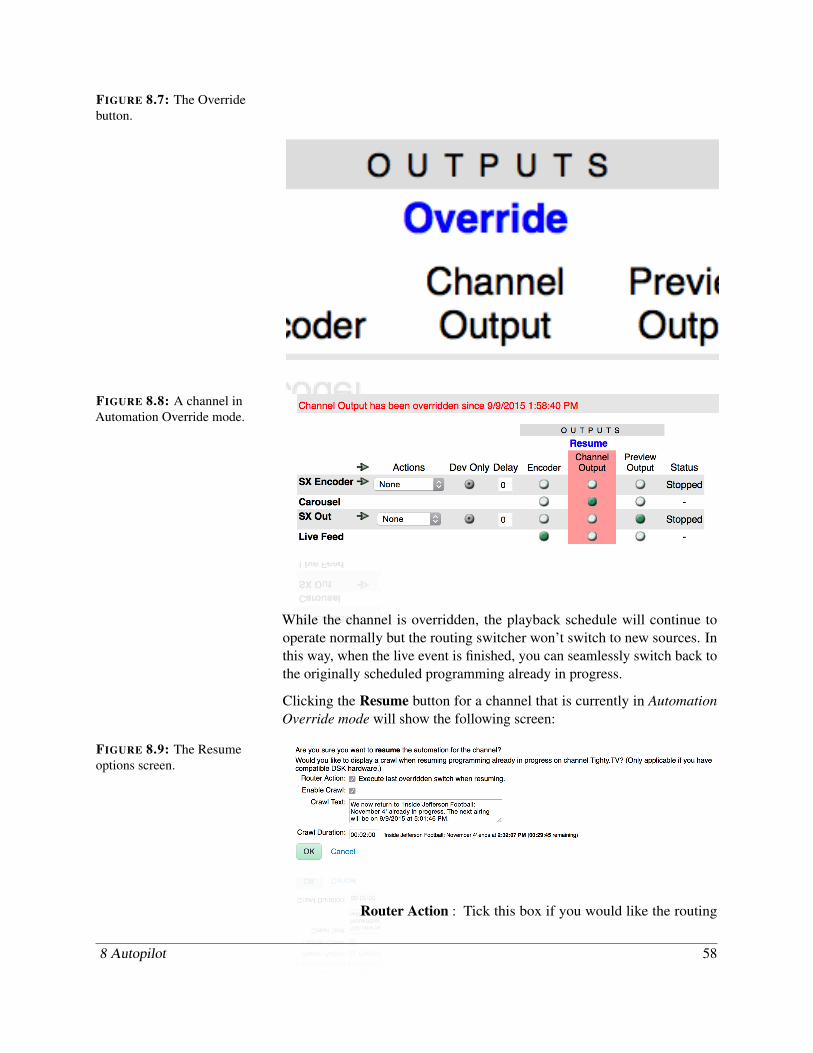
FIGURE 8.7: The Overridebutton.
FIGURE 8.8: A channel inAutomation Override mode.
While the channel is overridden, the playback schedule will continue tooperate normally but the routing switcher won’t switch to new sources. Inthis way, when the live event is finished, you can seamlessly switch back tothe originally scheduled programming already in progress.
Clicking the Resume button for a channel that is currently in AutomationOverride mode will show the following screen:
FIGURE 8.9: The Resumeoptions screen.
Router Action : Tick this box if you would like the routing
8 Autopilot 58
switcher to automatically switch to the programming that was originallyscheduled to be on-air now.
Enable Crawl : Tick this box to enable the crawl defined inthe Crawl Text field.
Crawl Text : Set the text that should be displayed if En-able Crawl is ticked. The default text indicates that the current programmingis being joined in-progress.
Crawl Duration : Set the length of time for which you wouldlike to run the crawl defined in Crawl Text. The default is “00:02:00” (twominutes).
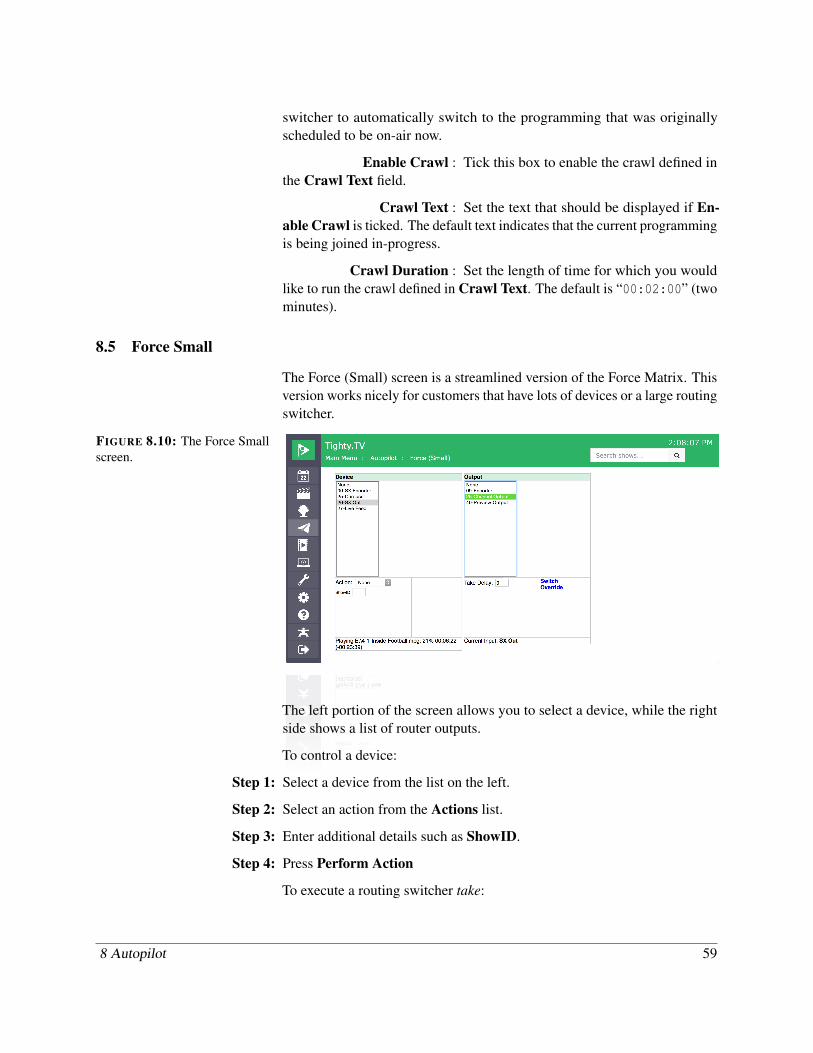
8.5 Force Small
The Force (Small) screen is a streamlined version of the Force Matrix. Thisversion works nicely for customers that have lots of devices or a large routingswitcher.
FIGURE 8.10: The Force Smallscreen.
The left portion of the screen allows you to select a device, while the rightside shows a list of router outputs.
To control a device:
Step 1: Select a device from the list on the left.
Step 2: Select an action from the Actions list.
Step 3: Enter additional details such as ShowID.
Step 4: Press Perform Action
To execute a routing switcher take:
8 Autopilot 59

Step 1: Select a device from the list on the left.
Step 2: Select a router output from the list on the right.
Step 3: Press Switch.
8 Autopilot 60
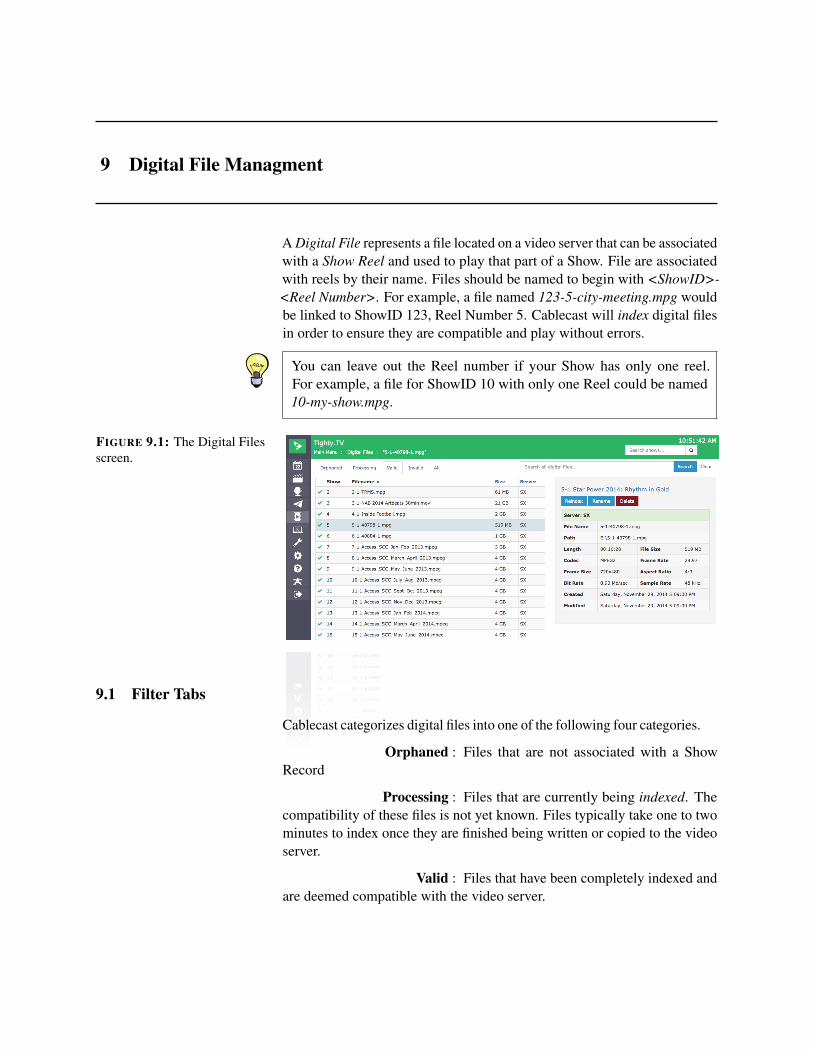
9 Digital File Managment
A Digital File represents a file located on a video server that can be associatedwith a Show Reel and used to play that part of a Show. File are associatedwith reels by their name. Files should be named to begin with <ShowID>-<Reel Number>. For example, a file named 123-5-city-meeting.mpg wouldbe linked to ShowID 123, Reel Number 5. Cablecast will index digital filesin order to ensure they are compatible and play without errors.
You can leave out the Reel number if your Show has only one reel.For example, a file for ShowID 10 with only one Reel could be named10-my-show.mpg.
FIGURE 9.1: The Digital Filesscreen.
9.1 Filter Tabs
Cablecast categorizes digital files into one of the following four categories.
Orphaned : Files that are not associated with a ShowRecord
Processing : Files that are currently being indexed. Thecompatibility of these files is not yet known. Files typically take one to twominutes to index once they are finished being written or copied to the videoserver.
Valid : Files that have been completely indexed andare deemed compatible with the video server.
Invalid : Files that have been completely indexed andare deemed incompatible with the video server. Cablecast will not allowthese files to be scheduled and will return an error when sending Autopilot.
The tabs at the top of the digital files screen, shown in Figure 9.1 allowfiltering the digital files by any of the above categories. In addition the Alltab allows displaying all digital files available to the system.
9.2 Search
The Search all digital files input allows for searching for specific wordsfrom the FileName or Show Title. When performing a digital file search theFilter Tabs will switch to All. Clicking on any of the other tabs will filterthe search results to just digital files in that state. Click Clear to reset thesearch filter.
9.3 File Details
Clicking on any digital file will display the details for that file. The detailsof a file, shown in Figure 9.2 will display metadata about the file. A validdigital file will have a green header. An invalid digital file, shown in Figure9.3 will have a red header. Additionally an invalid file will also display adescription of why the file was marked as invalid.
Above the details of a digital file are several buttons used to perform actionson the digital files. Each of these actions is discussed below.
Reindex : When a file is reindexed the video server willre-run its indexing and compatibility checks. This should be done if a file isbelieved to be incorrectly marked as invalid. This may happen because thefile was indexed before it was fully copied to the video server.
New Show : Clicking New Show will create a new ShowRecord with the Title being set to the name of the file that is ready toschedule. Additionally the digital file will be renamed so it is correctlyassociated with the newly created show.
New Show is only available for Orphaned digital files.
Rename : Clicking Rename will allow for renamingthe digital file. This is useful if you want to associate a digital file to anexisting Show record.
Delete : Clicking Delete will permanently delete thedigital file from the video server.
9 Digital File Managment 62
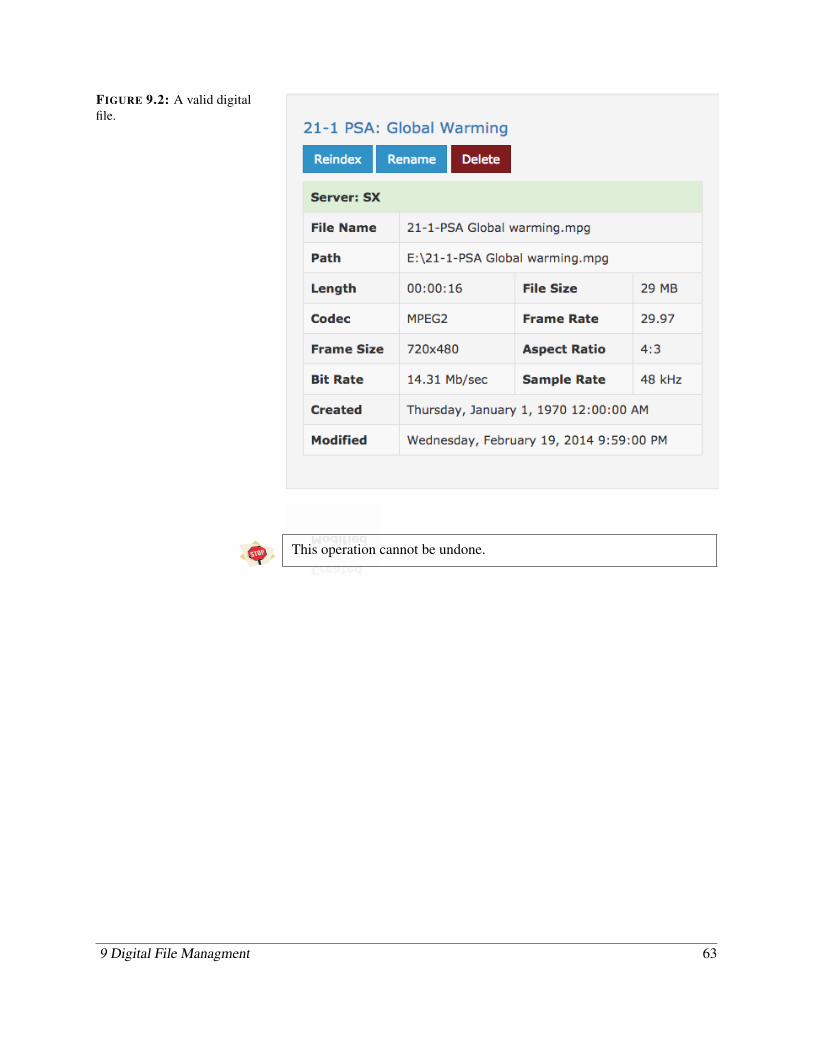
FIGURE 9.2: A valid digitalfile.
This operation cannot be undone.
9 Digital File Managment 63
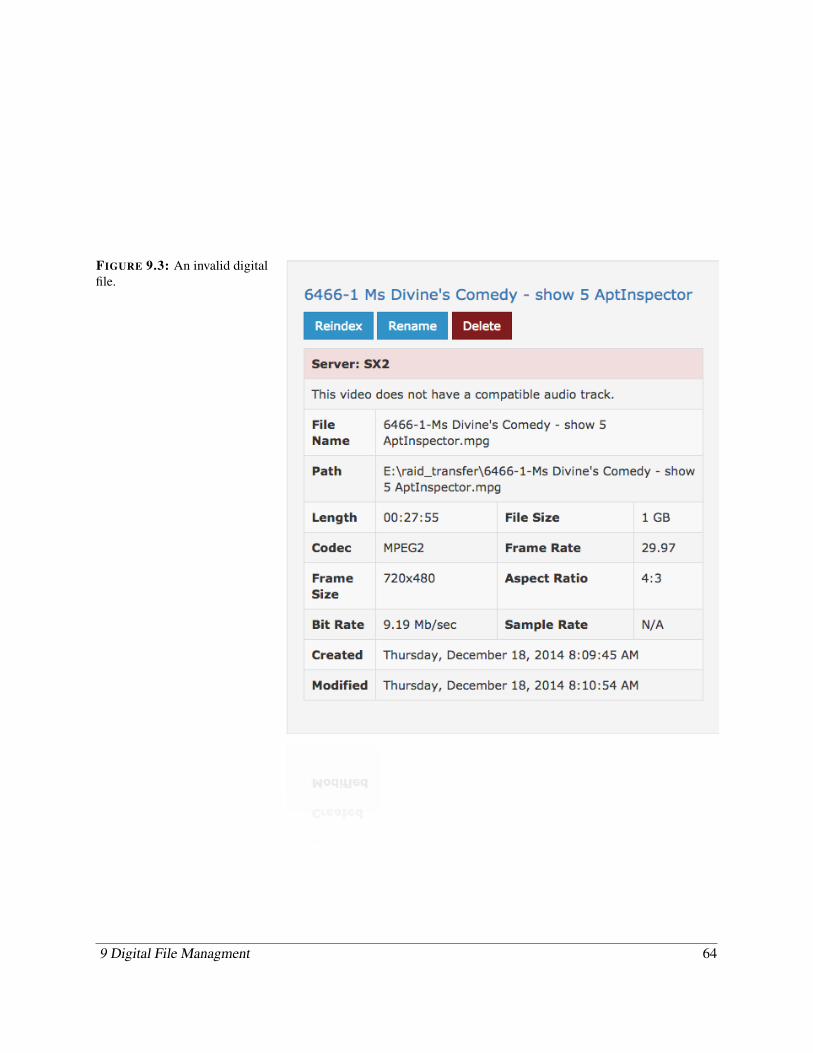
FIGURE 9.3: An invalid digitalfile.
9 Digital File Managment 64
10 Internet Video
Internet Video menu items are only available if your Cablecast systemis licensed for the appropriate products.
VODs respect the In and Length fields set in a Show’s Reels, no need totrim the digital file. Further your Cablecast VOD server can combine allof a Show’s Reels into a single VOD.
The Internet Video screen contains the Live Streaming and VOD screensboth described in the following sections.
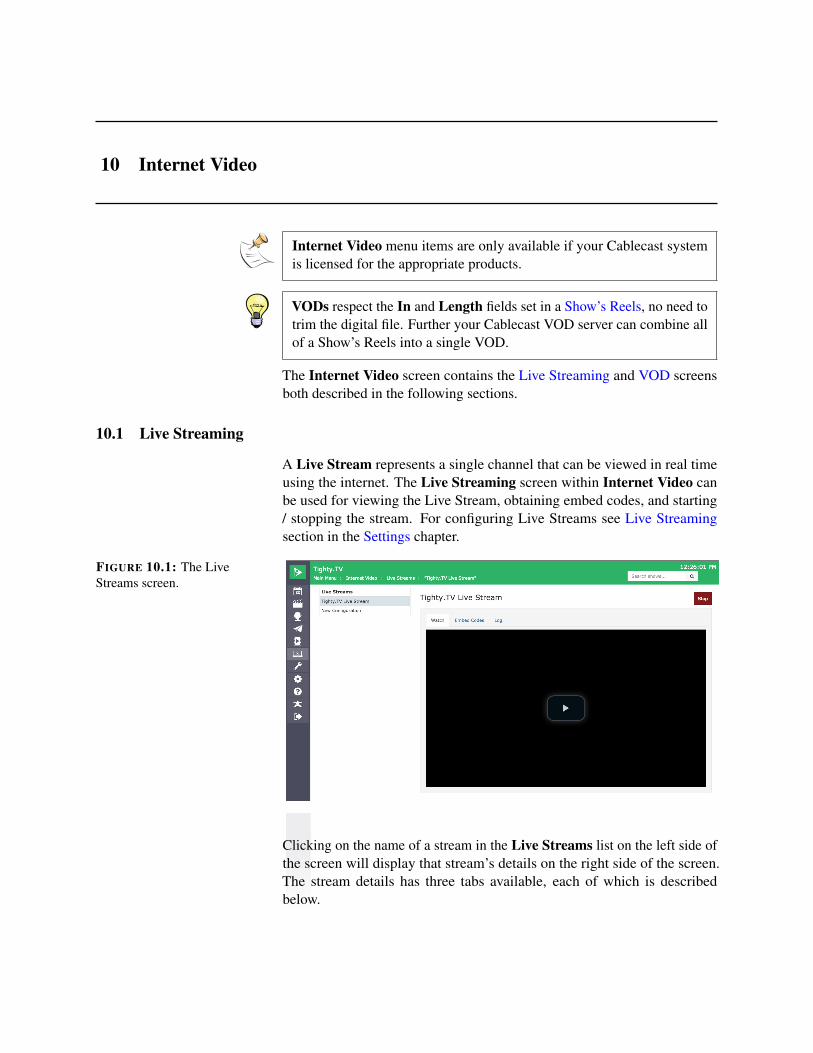
10.1 Live Streaming
A Live Stream represents a single channel that can be viewed in real timeusing the internet. The Live Streaming screen within Internet Video canbe used for viewing the Live Stream, obtaining embed codes, and starting/ stopping the stream. For configuring Live Streams see Live Streamingsection in the Settings chapter.
FIGURE 10.1: The LiveStreams screen.
Clicking on the name of a stream in the Live Streams list on the left side ofthe screen will display that stream’s details on the right side of the screen.The stream details has three tabs available, each of which is describedbelow.
Watch : Will load the Live Stream Player. Click thePlay button in the video player to watch the stream.
Embed : Displays the embed code that can be copiedand pasted to embed the Live Stream Player in another website.
Log : Displays logs about when the stream hasbeen started and stopped, and by what user.
10.1.1 Starting and Stopping
As seen in Figure 10.1, a button is located in the top right of a Live Streamsdetail screen that can be used to Start / Stop the stream depending on itscurrent state. The button will be red and read Stop when the Live Stream iscurrently streaming. The button will be blue and read Start when the LiveStream is currently stopped. Clicking Start / Stop will change the state ofthe stream.
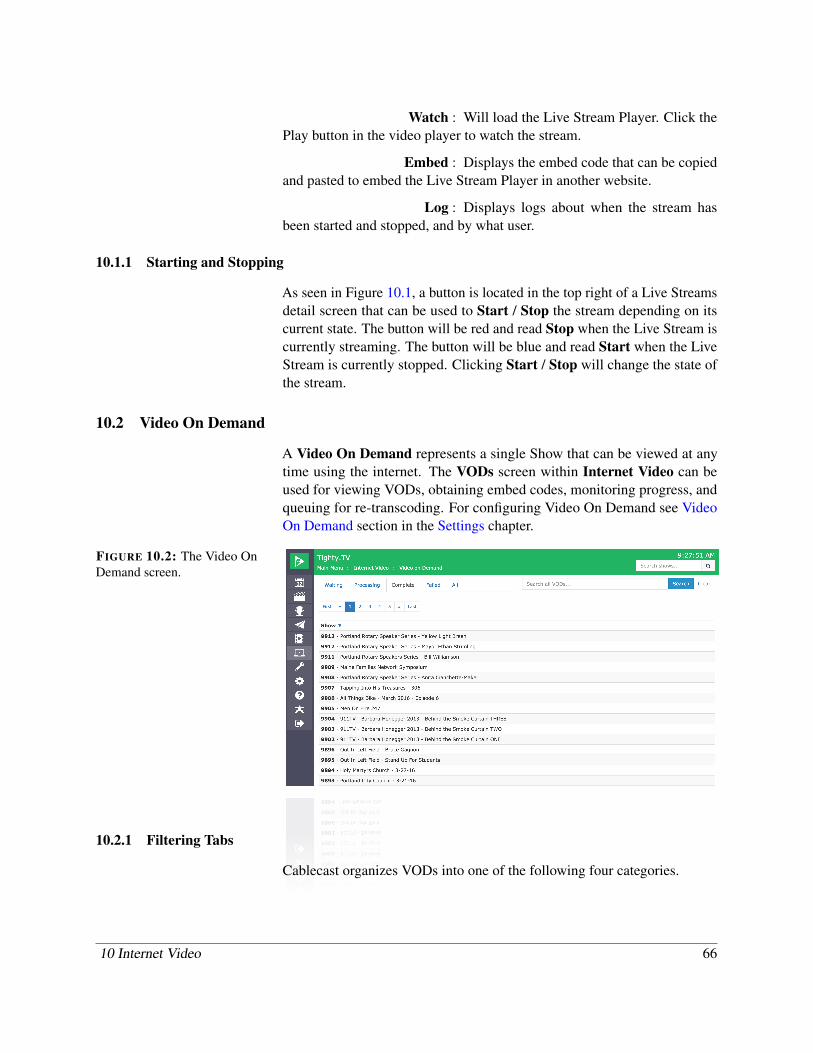
10.2 Video On Demand
A Video On Demand represents a single Show that can be viewed at anytime using the internet. The VODs screen within Internet Video can beused for viewing VODs, obtaining embed codes, monitoring progress, andqueuing for re-transcoding. For configuring Video On Demand see VideoOn Demand section in the Settings chapter.
FIGURE 10.2: The Video OnDemand screen.
10.2.1 Filtering Tabs
Cablecast organizes VODs into one of the following four categories.
10 Internet Video 66

Waiting : VODs that cannot be transcoded becausethere are missing files, or the Show Reels are not properly timed. Useraction is required for these VODs to be transcoded.
Processing : VODs that are currently in some stage of theVOD process. These VODs will eventually enter the Complete tab oncefinished.
Complete : Finished VODs that are available for view-ing.
Failed : VODs that have failed a stage of the VODprocess.
The tabs at the top of the VODs screen, shown in Figure 10.2 allow filteringthe VODs by any of the above categories. In addition the All tab allowsdisplaying all VODs available on the system.
10.2.2 Search
The Search all VODs input allows for searching for specific words from theShow Title of the associated VOD. When performing a VODs search theFilter Tabs will switch to All. Clicking on any of the other tabs will filterthe search results to just VODs in that state. Click Clear to reset the searchfilter.
10.2.3 Details
Clicking on any VOD will display the details for that VOD. What is displayedin the details section will depend on the state of the VOD. The informationdisplayed is described below for different VOD states.
Waiting : The VOD details screen will display a ReelStatus tab showing the status of each Reel that is preventing the VOD frombeing transcoded.
Processing : The VOD details screen will display the progressof the current transcode step.
Completed : The VOD details screen will allow watching,assigning chapters, obtaining embed codes, and viewing the VOD logs. Formore information see Completed VOD Details.
Failed : The VOD details screen will show the VODlogs.
Details
A completed VOD, shown in Figure 10.4, has three tabs which are describedbelow.
10 Internet Video 67
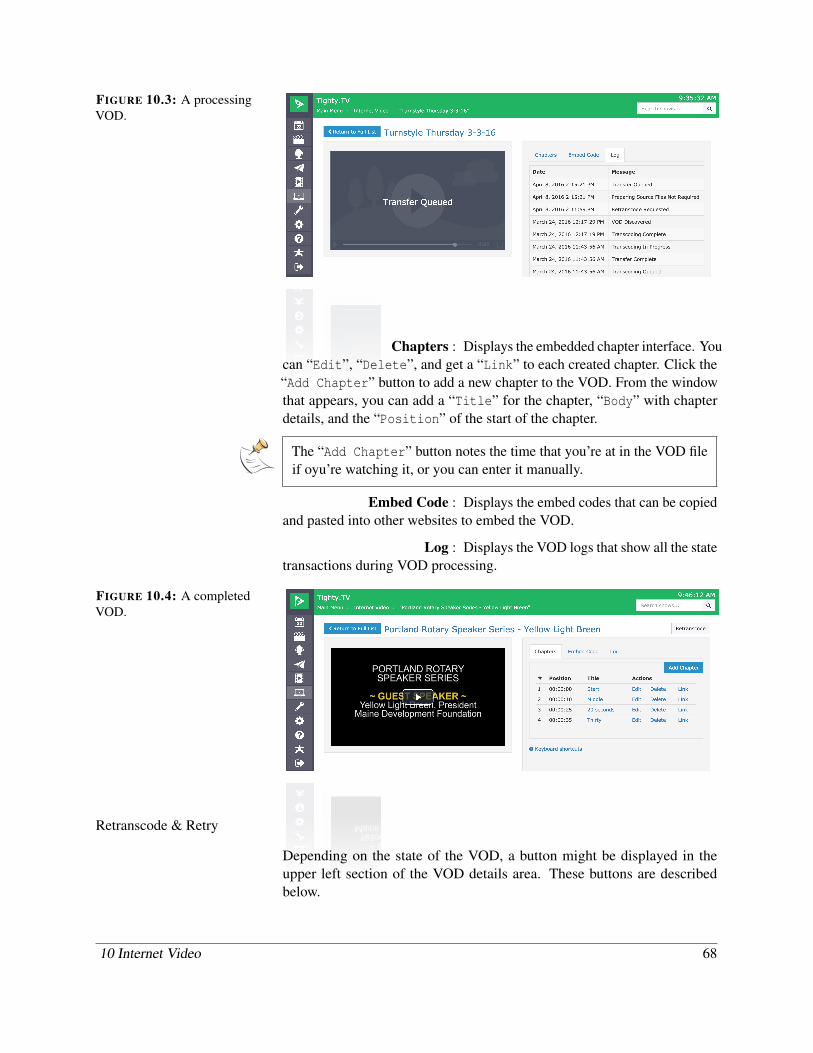
FIGURE 10.3: A processingVOD.
Chapters : Displays the embedded chapter interface. Youcan “Edit”, “Delete”, and get a “Link” to each created chapter. Click the“Add Chapter” button to add a new chapter to the VOD. From the windowthat appears, you can add a “Title” for the chapter, “Body” with chapterdetails, and the “Position” of the start of the chapter.
The “Add Chapter” button notes the time that you’re at in the VOD fileif oyu’re watching it, or you can enter it manually.
Embed Code : Displays the embed codes that can be copiedand pasted into other websites to embed the VOD.
Log : Displays the VOD logs that show all the statetransactions during VOD processing.
FIGURE 10.4: A completedVOD.
Retranscode & Retry
Depending on the state of the VOD, a button might be displayed in theupper left section of the VOD details area. These buttons are describedbelow.
10 Internet Video 68

Retranscode : Displayed on Completed VODs. Clickingqueues the VOD for re-transcoding. This is especially useful if the originalsource material of the VOD has changed.
Retry : Displayed on Failed VODs. Clicking queuesthe VOD for re-transcoding.
10 Internet Video 69
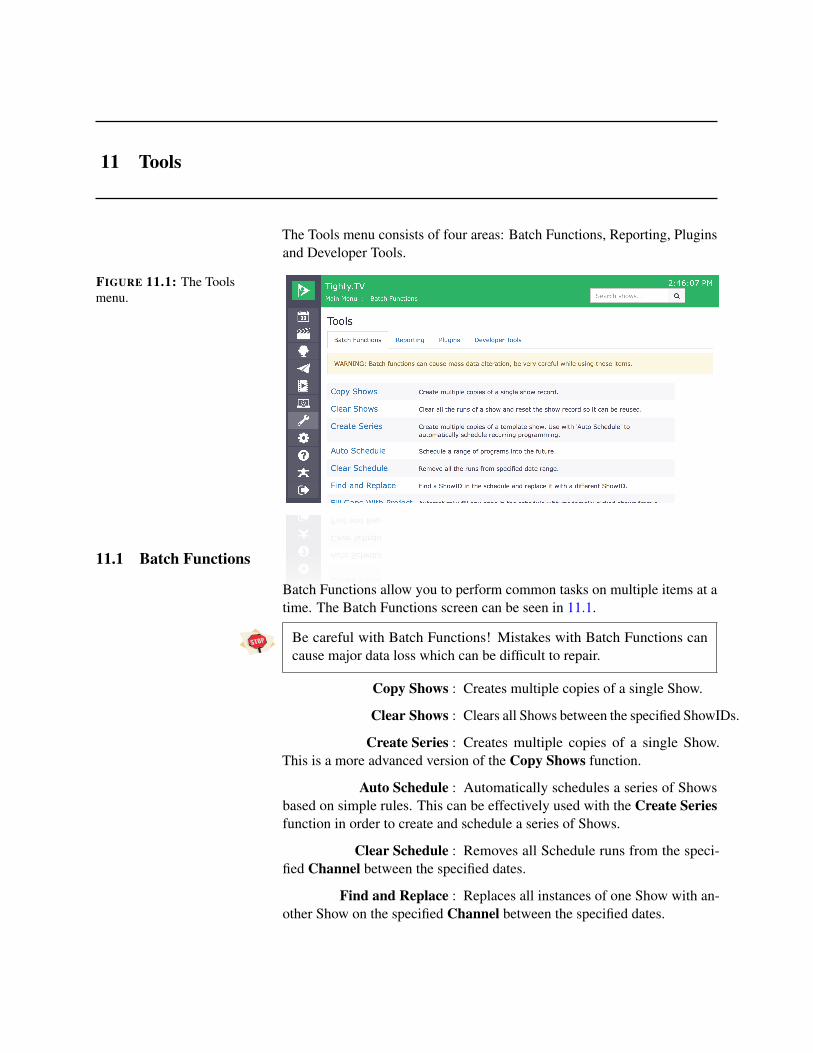
11 Tools
The Tools menu consists of four areas: Batch Functions, Reporting, Pluginsand Developer Tools.
FIGURE 11.1: The Toolsmenu.
11.1 Batch Functions
Batch Functions allow you to perform common tasks on multiple items at atime. The Batch Functions screen can be seen in 11.1.
Be careful with Batch Functions! Mistakes with Batch Functions cancause major data loss which can be difficult to repair.
Copy Shows : Creates multiple copies of a single Show.
Clear Shows : Clears all Shows between the specified ShowIDs.
Create Series : Creates multiple copies of a single Show.This is a more advanced version of the Copy Shows function.
Auto Schedule : Automatically schedules a series of Showsbased on simple rules. This can be effectively used with the Create Seriesfunction in order to create and schedule a series of Shows.
Clear Schedule : Removes all Schedule runs from the speci-fied Channel between the specified dates.
Find and Replace : Replaces all instances of one Show with an-other Show on the specified Channel between the specified dates.

Fill gaps with Project : Uses Shows from the specified Project tofill in gaps in the Schedule on the specified channel.
Clear Filled Gaps : Removes runs from the Schedule that wereoriginally created using the Fill Gaps with Project function.
11.2 Reporting
The reporting section allows you to generate reports and export data fromCablecast.
FIGURE 11.2: The Reportingmenu.
The following reports are available:
Schedule Report : Generates a report based on all Shows thathave aired between the selected dates.
Shows Report : Generates a report based on Shows with anEvent Date that is between the selected dates.
Export TV Guide X-List : Creates a file that can be sent to TV Guidefor inclusion in their guide data.
Export Data : Exports data from Cablecast so that it can beused in an external system. Various options are available.
11.2.1 Schedule Report
You can edit the criteria for your report from within the Schedule Reportmenu in the following ways:
11 Tools 71
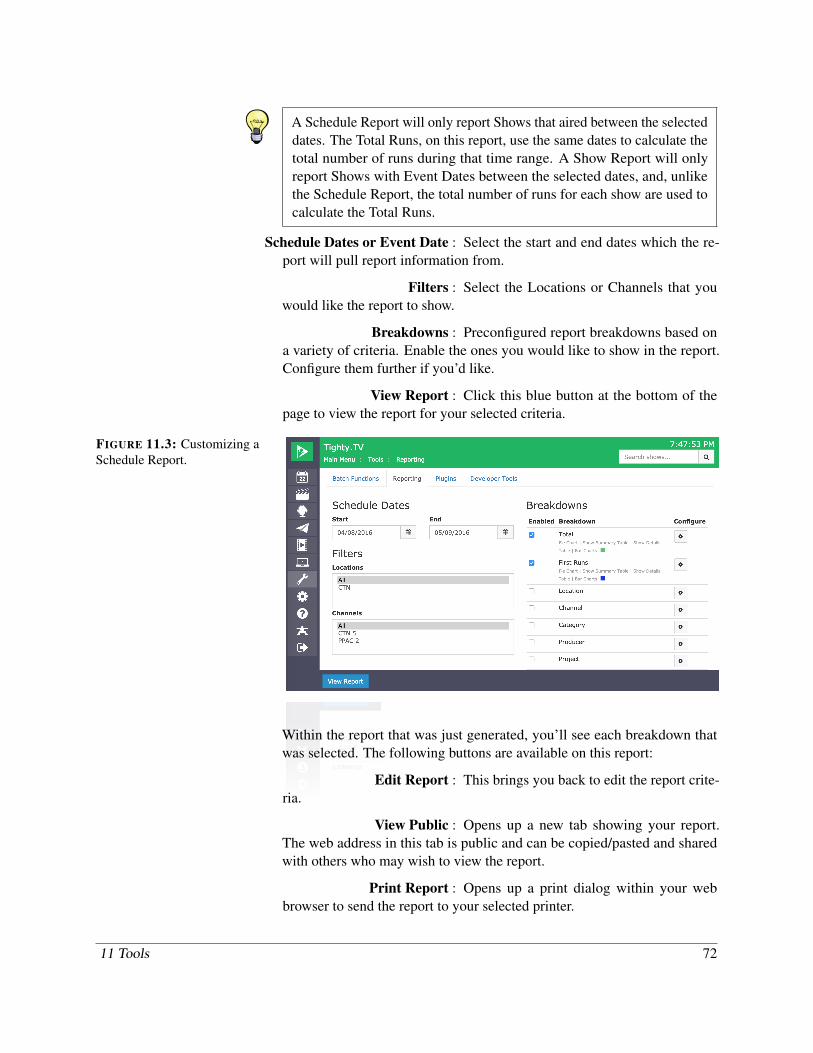
A Schedule Report will only report Shows that aired between the selecteddates. The Total Runs, on this report, use the same dates to calculate thetotal number of runs during that time range. A Show Report will onlyreport Shows with Event Dates between the selected dates, and, unlikethe Schedule Report, the total number of runs for each show are used tocalculate the Total Runs.
Schedule Dates or Event Date : Select the start and end dates which the re-port will pull report information from.
Filters : Select the Locations or Channels that youwould like the report to show.
Breakdowns : Preconfigured report breakdowns based ona variety of criteria. Enable the ones you would like to show in the report.Configure them further if you’d like.
View Report : Click this blue button at the bottom of thepage to view the report for your selected criteria.
FIGURE 11.3: Customizing aSchedule Report.
Within the report that was just generated, you’ll see each breakdown thatwas selected. The following buttons are available on this report:
Edit Report : This brings you back to edit the report crite-ria.
View Public : Opens up a new tab showing your report.The web address in this tab is public and can be copied/pasted and sharedwith others who may wish to view the report.
Print Report : Opens up a print dialog within your webbrowser to send the report to your selected printer.
11 Tools 72
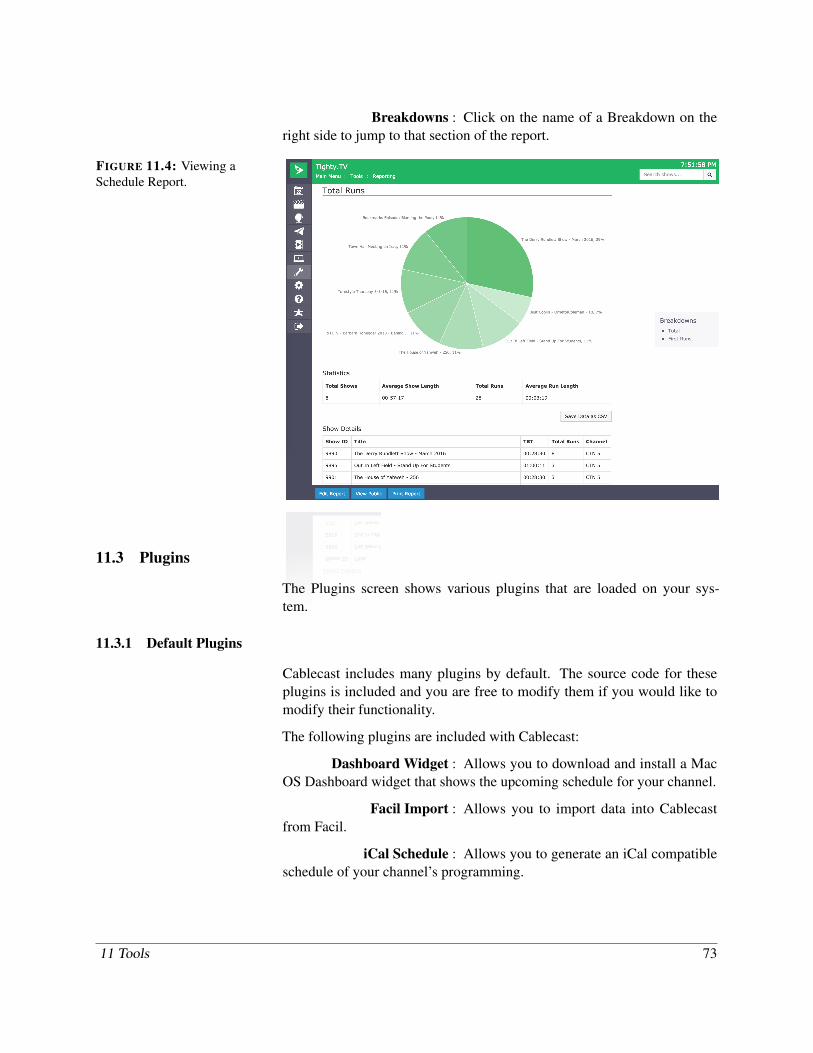
Breakdowns : Click on the name of a Breakdown on theright side to jump to that section of the report.
FIGURE 11.4: Viewing aSchedule Report.
11.3 Plugins
The Plugins screen shows various plugins that are loaded on your sys-tem.
11.3.1 Default Plugins
Cablecast includes many plugins by default. The source code for theseplugins is included and you are free to modify them if you would like tomodify their functionality.
The following plugins are included with Cablecast:
Dashboard Widget : Allows you to download and install a MacOS Dashboard widget that shows the upcoming schedule for your channel.
Facil Import : Allows you to import data into Cablecastfrom Facil.
iCal Schedule : Allows you to generate an iCal compatibleschedule of your channel’s programming.
11 Tools 73
Label Printer : Allows you to print labels for physical mediausing the data from Cablecast. You can create your own layouts that fit yourworkflow.
Print Schedule : Allows you to print formatted schedules ofyour programming.
RSS Schedule : Generates an RSS feed of upcoming sched-ule information.
Web Schedule : Generates a web page of upcoming scheduleinformation.
11.4 Developer Tools
The Developer Tools area includes the following options:
RESTful API : Links to the help for Cablecast’s built-inRESTful API. The API can be used to integrate with external systems.
11 Tools 74
12 Settings
12.1 Location Settings
The Location Settings menu provides access to settings specific to thecurrent Location. For more on multi-location setting systems see Loca-tions.
Remember to navigate to the correct Location as all the settings describedbelow apply to the current Location. For information on changing thecurrent Location see Location Changer
12.1.1 Shows Tab
Settings in the Shows Tab are used to configure options available whencreating and editing Shows using the Show Record.
Categories
A Category is a Name used to group like Shows together. Sports, Meetings,Arts & Entertainment are all examples of categories.
From the Categories screen, shown in Figure 12.1, you can create a Categoryby clicking + New Category. Clicking on any Category in the list will bringup the details for that Category where it can be changed or deleted.
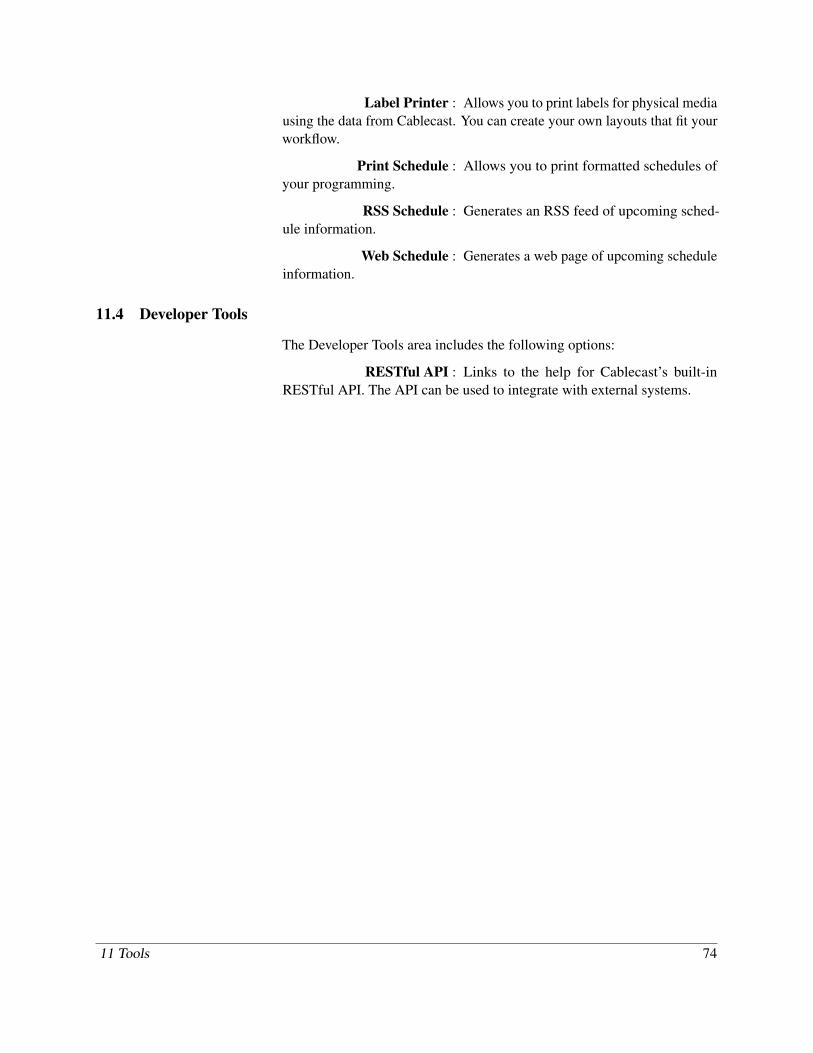
FIGURE 12.1: The Toolsmenu.
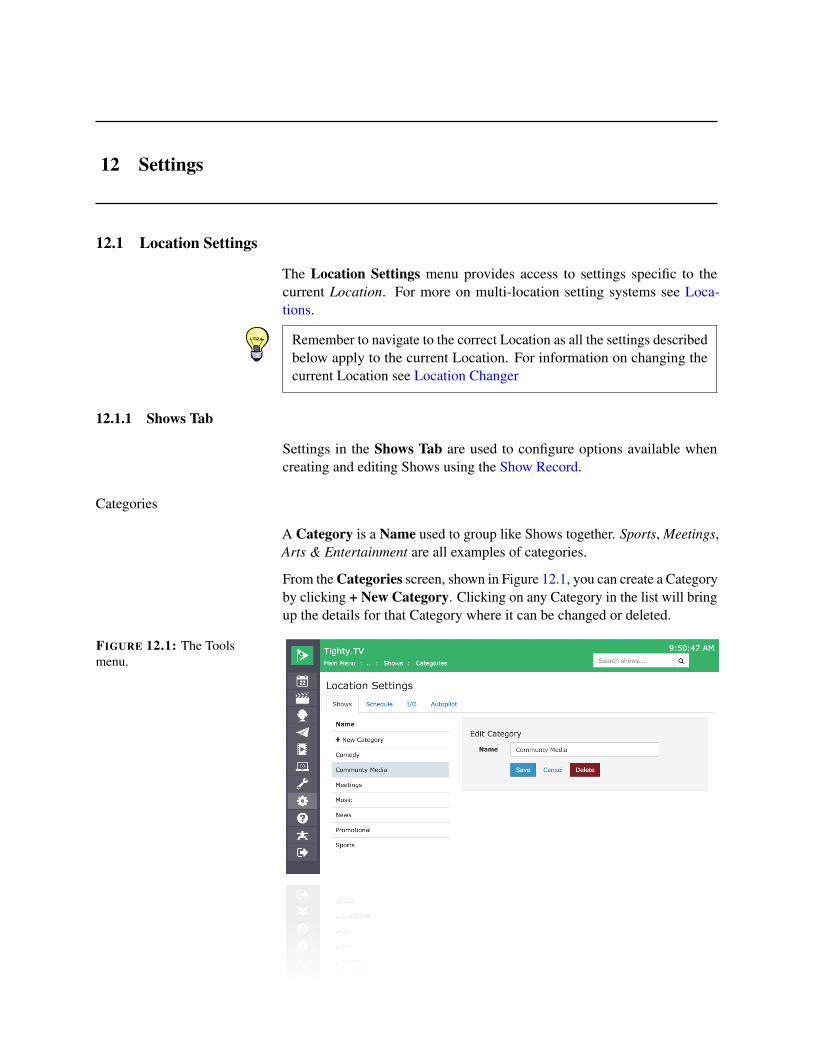
Custom Fields
Custom Fields allow you to store additional data as part of a Show record.These fields are searchable within Cablecast and are available for public usethrough the Cablecast APIs.
FIGURE 12.2: The CustomFields screen.
Cablecast supports up to eight Custom Fields. Each field has the followingoptions:
Name : A descriptive name for the field. If this fieldis empty, the field will not be shown in the Cablecast User Interface.
Field Type : Sets the desired display style of the field.
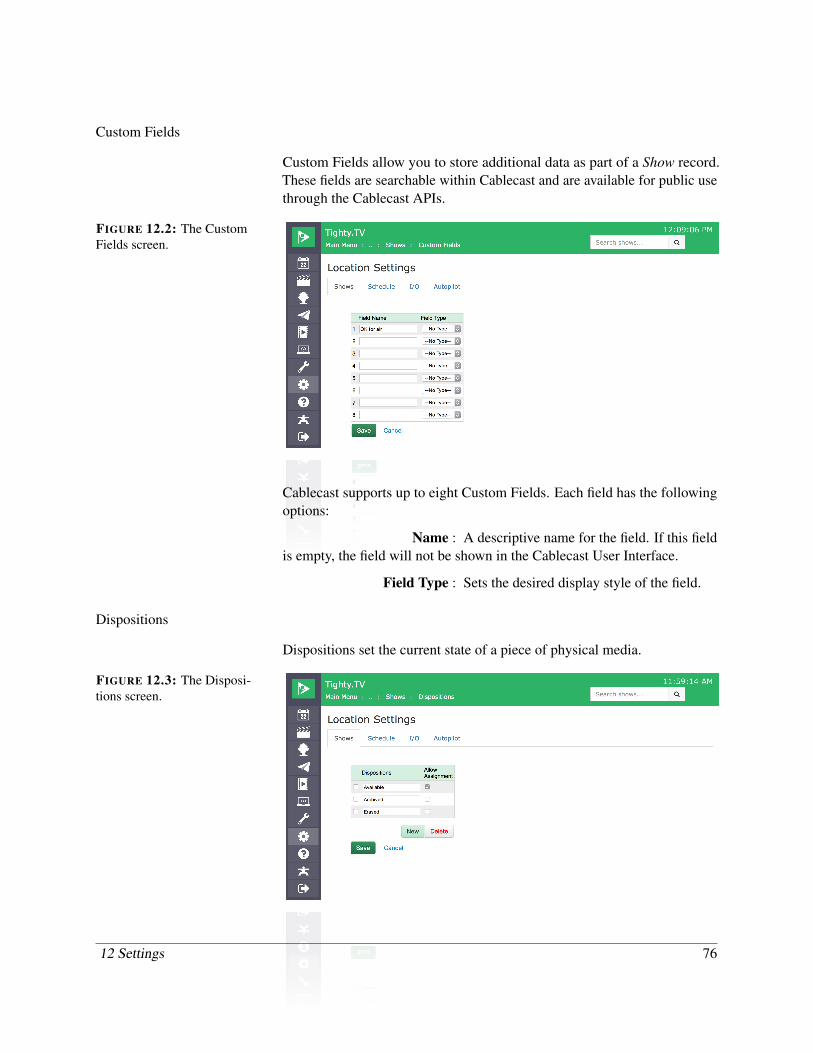
Dispositions
Dispositions set the current state of a piece of physical media.
FIGURE 12.3: The Disposi-tions screen.
12 Settings 76
Each Disposition has the following options:
Name : A descriptive name for the disposition. Thisvalue will be shown throughout Cablecast.
Allow Assignment : This setting determines if Autopilot will per-mit media having the given disposition to be assigned for playback.
Example: For a disposition such as “Erased” you should make sure that Allow As-signment is not ticked since the Show can’t be played.
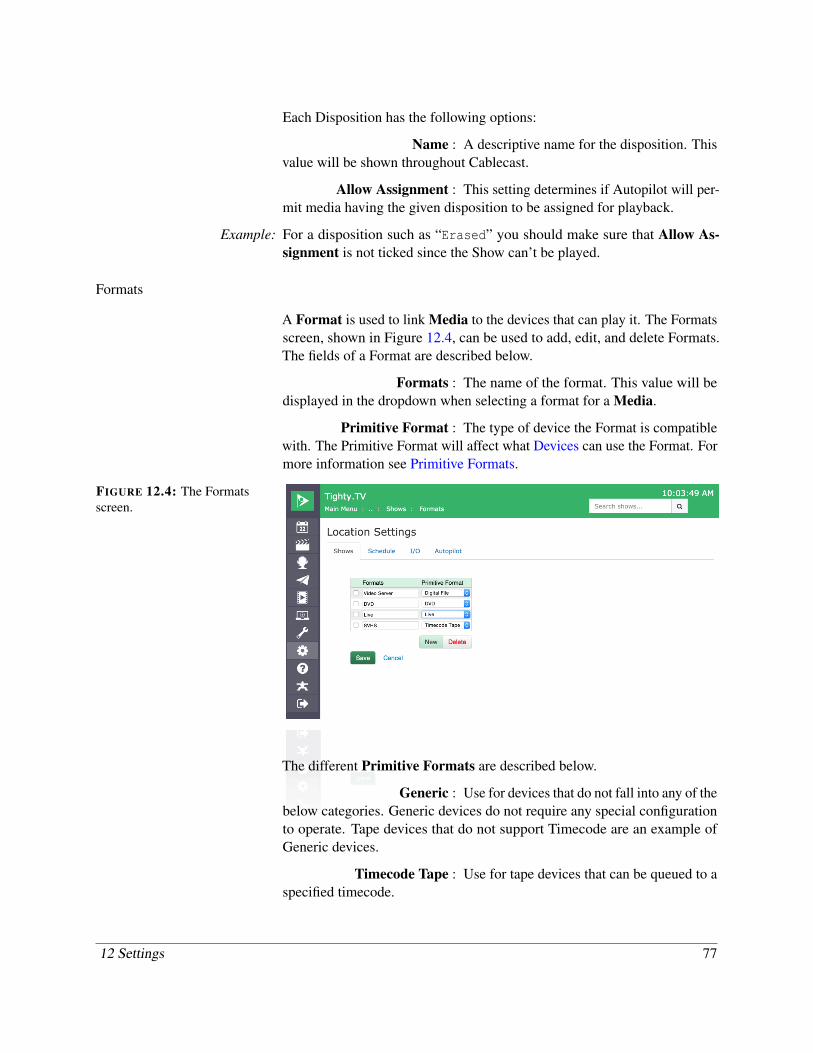
Formats
A Format is used to link Media to the devices that can play it. The Formatsscreen, shown in Figure 12.4, can be used to add, edit, and delete Formats.The fields of a Format are described below.
Formats : The name of the format. This value will bedisplayed in the dropdown when selecting a format for a Media.
Primitive Format : The type of device the Format is compatiblewith. The Primitive Format will affect what Devices can use the Format. Formore information see Primitive Formats.
FIGURE 12.4: The Formatsscreen.
The different Primitive Formats are described below.
Generic : Use for devices that do not fall into any of thebelow categories. Generic devices do not require any special configurationto operate. Tape devices that do not support Timecode are an example ofGeneric devices.
Timecode Tape : Use for tape devices that can be queued to aspecified timecode.
12 Settings 77
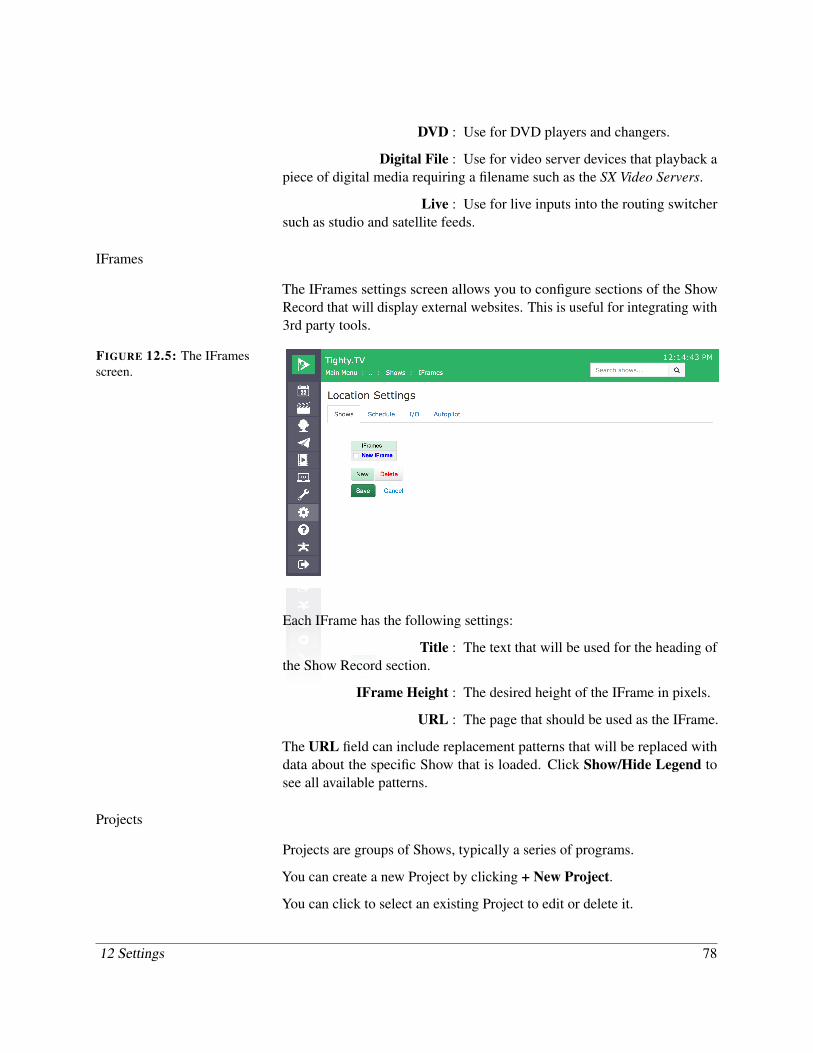
DVD : Use for DVD players and changers.
Digital File : Use for video server devices that playback apiece of digital media requiring a filename such as the SX Video Servers.
Live : Use for live inputs into the routing switchersuch as studio and satellite feeds.
IFrames
The IFrames settings screen allows you to configure sections of the ShowRecord that will display external websites. This is useful for integrating with3rd party tools.
FIGURE 12.5: The IFramesscreen.
Each IFrame has the following settings:
Title : The text that will be used for the heading ofthe Show Record section.
IFrame Height : The desired height of the IFrame in pixels.
URL : The page that should be used as the IFrame.
The URL field can include replacement patterns that will be replaced withdata about the specific Show that is loaded. Click Show/Hide Legend tosee all available patterns.
Projects
Projects are groups of Shows, typically a series of programs.
You can create a new Project by clicking + New Project.
You can click to select an existing Project to edit or delete it.
12 Settings 78
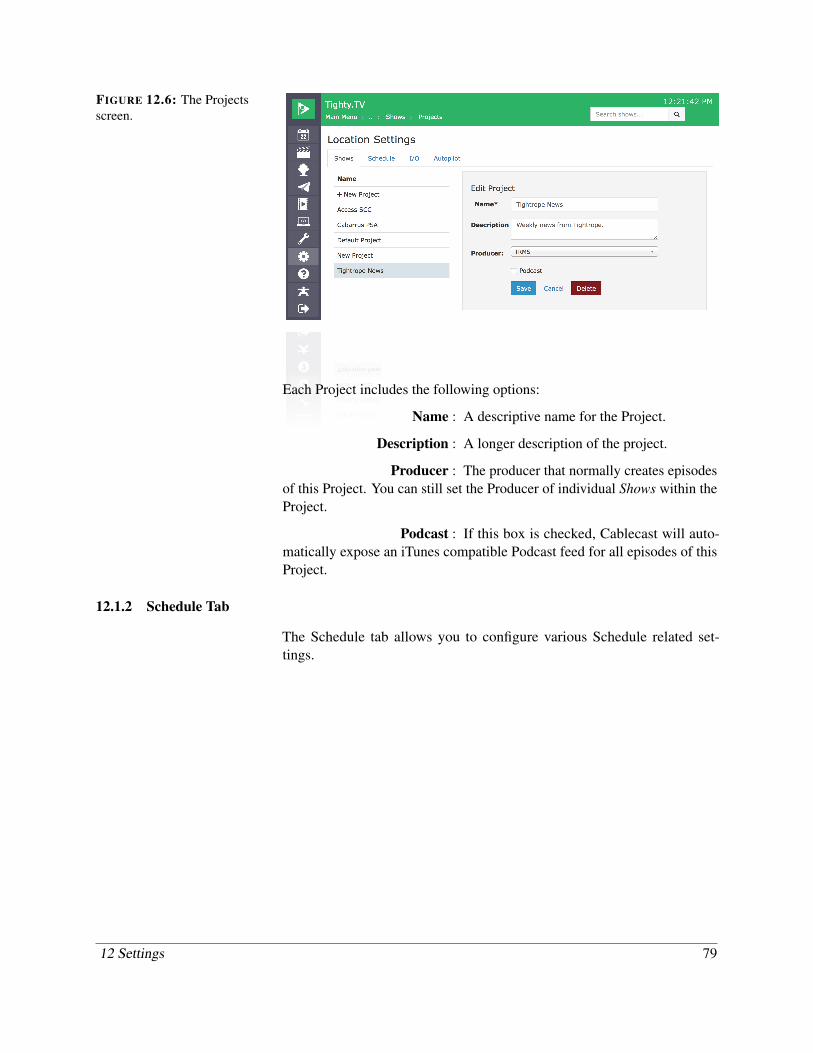
FIGURE 12.6: The Projectsscreen.
Each Project includes the following options:
Name : A descriptive name for the Project.
Description : A longer description of the project.
Producer : The producer that normally creates episodesof this Project. You can still set the Producer of individual Shows within theProject.
Podcast : If this box is checked, Cablecast will auto-matically expose an iTunes compatible Podcast feed for all episodes of thisProject.
12.1.2 Schedule Tab
The Schedule tab allows you to configure various Schedule related set-tings.
12 Settings 79
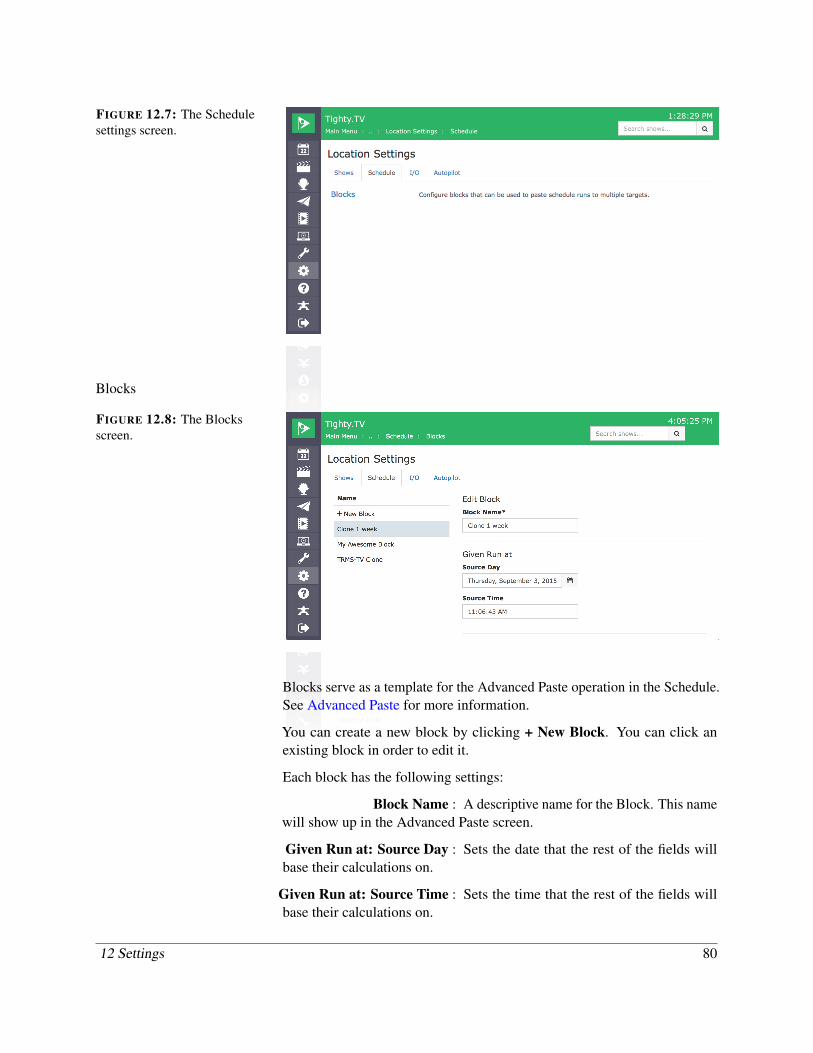
FIGURE 12.7: The Schedulesettings screen.
Blocks
FIGURE 12.8: The Blocksscreen.
Blocks serve as a template for the Advanced Paste operation in the Schedule.See Advanced Paste for more information.
You can create a new block by clicking + New Block. You can click anexisting block in order to edit it.
Each block has the following settings:
Block Name : A descriptive name for the Block. This namewill show up in the Advanced Paste screen.
Given Run at: Source Day : Sets the date that the rest of the fields willbase their calculations on.
Given Run at: Source Time : Sets the time that the rest of the fields willbase their calculations on.
12 Settings 80
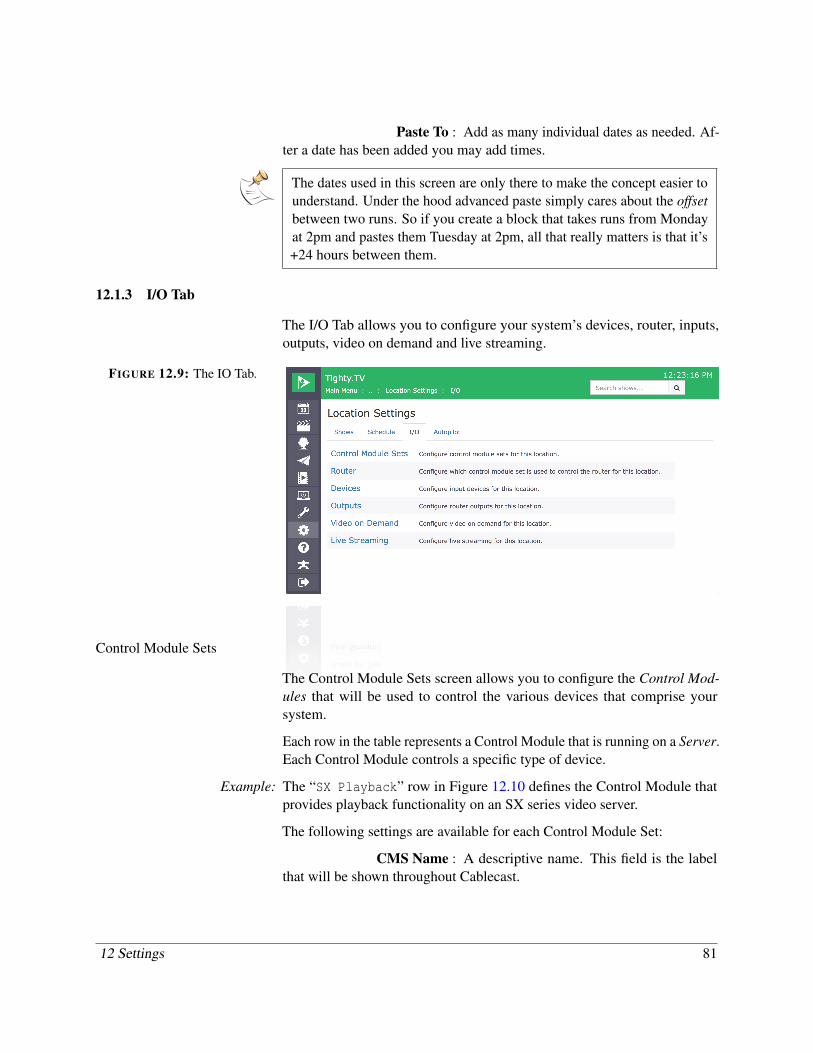
Paste To : Add as many individual dates as needed. Af-ter a date has been added you may add times.
The dates used in this screen are only there to make the concept easier tounderstand. Under the hood advanced paste simply cares about the offsetbetween two runs. So if you create a block that takes runs from Mondayat 2pm and pastes them Tuesday at 2pm, all that really matters is that it’s+24 hours between them.
12.1.3 I/O Tab
The I/O Tab allows you to configure your system’s devices, router, inputs,outputs, video on demand and live streaming.
FIGURE 12.9: The IO Tab.
Control Module Sets
The Control Module Sets screen allows you to configure the Control Mod-ules that will be used to control the various devices that comprise yoursystem.
Each row in the table represents a Control Module that is running on a Server.Each Control Module controls a specific type of device.
Example: The “SX Playback” row in Figure 12.10 defines the Control Module thatprovides playback functionality on an SX series video server.
The following settings are available for each Control Module Set:
CMS Name : A descriptive name. This field is the labelthat will be shown throughout Cablecast.
12 Settings 81
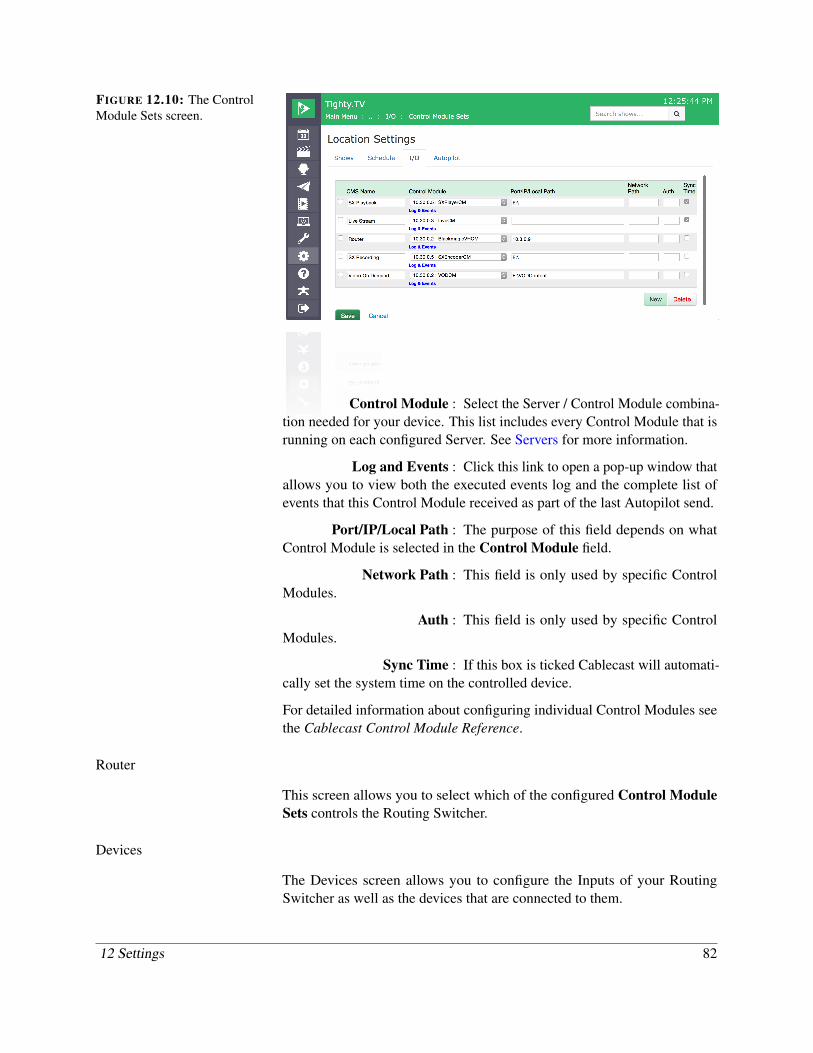
FIGURE 12.10: The ControlModule Sets screen.
Control Module : Select the Server / Control Module combina-tion needed for your device. This list includes every Control Module that isrunning on each configured Server. See Servers for more information.
Log and Events : Click this link to open a pop-up window thatallows you to view both the executed events log and the complete list ofevents that this Control Module received as part of the last Autopilot send.
Port/IP/Local Path : The purpose of this field depends on whatControl Module is selected in the Control Module field.
Network Path : This field is only used by specific ControlModules.
Auth : This field is only used by specific ControlModules.
Sync Time : If this box is ticked Cablecast will automati-cally set the system time on the controlled device.
For detailed information about configuring individual Control Modules seethe Cablecast Control Module Reference.
Router
This screen allows you to select which of the configured Control ModuleSets controls the Routing Switcher.
Devices
The Devices screen allows you to configure the Inputs of your RoutingSwitcher as well as the devices that are connected to them.
12 Settings 82
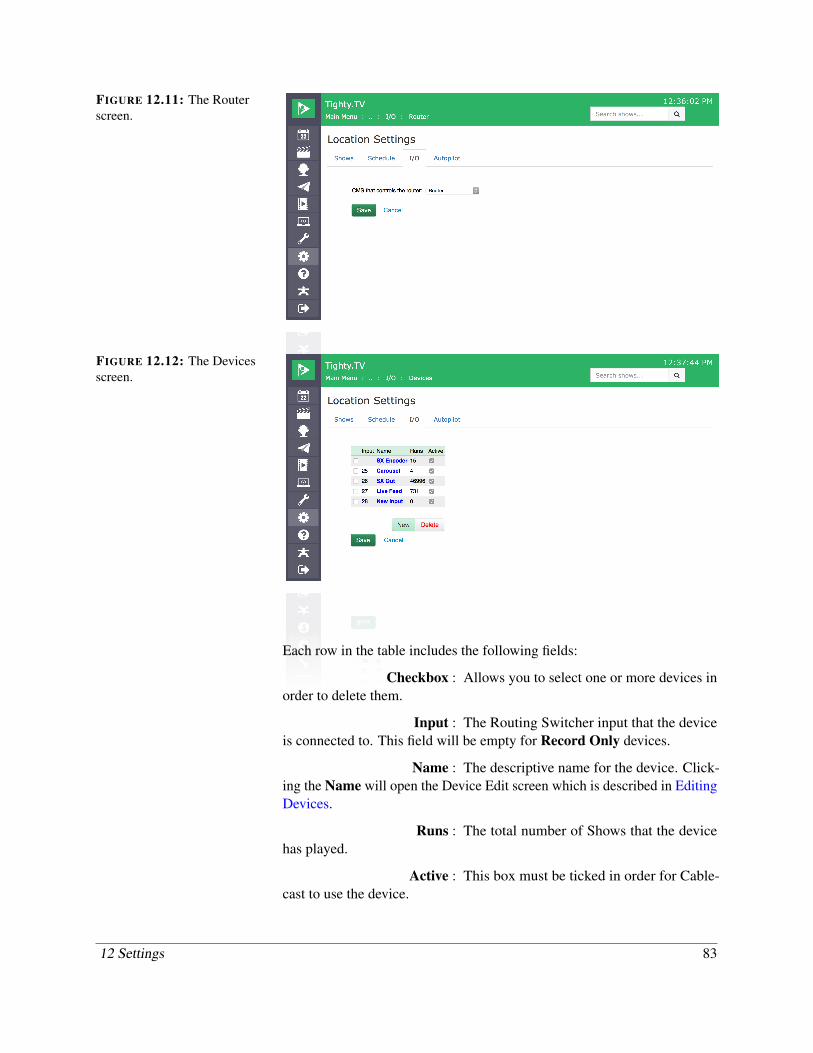
FIGURE 12.11: The Routerscreen.
FIGURE 12.12: The Devicesscreen.
Each row in the table includes the following fields:
Checkbox : Allows you to select one or more devices inorder to delete them.
Input : The Routing Switcher input that the deviceis connected to. This field will be empty for Record Only devices.
Name : The descriptive name for the device. Click-ing the Name will open the Device Edit screen which is described in EditingDevices.
Runs : The total number of Shows that the devicehas played.
Active : This box must be ticked in order for Cable-cast to use the device.
12 Settings 83
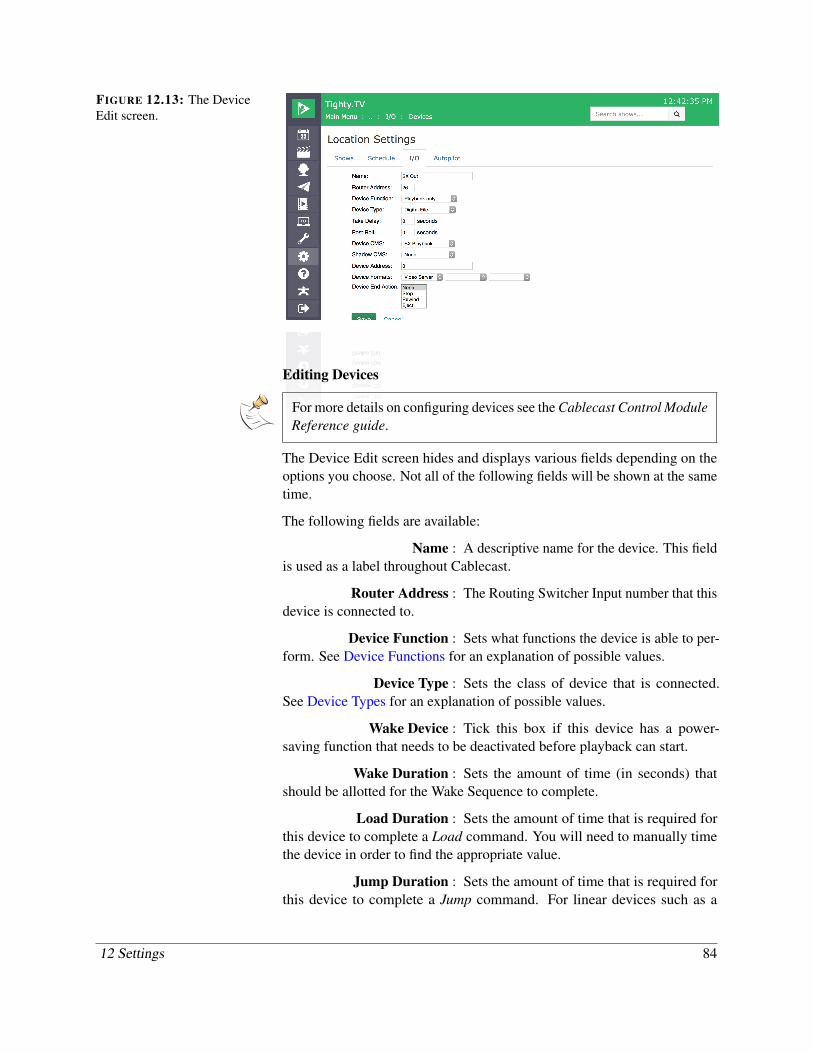
FIGURE 12.13: The DeviceEdit screen.
Editing Devices
For more details on configuring devices see the Cablecast Control ModuleReference guide.
The Device Edit screen hides and displays various fields depending on theoptions you choose. Not all of the following fields will be shown at the sametime.
The following fields are available:
Name : A descriptive name for the device. This fieldis used as a label throughout Cablecast.
Router Address : The Routing Switcher Input number that thisdevice is connected to.
Device Function : Sets what functions the device is able to per-form. See Device Functions for an explanation of possible values.
Device Type : Sets the class of device that is connected.See Device Types for an explanation of possible values.
Wake Device : Tick this box if this device has a power-saving function that needs to be deactivated before playback can start.
Wake Duration : Sets the amount of time (in seconds) thatshould be allotted for the Wake Sequence to complete.
Load Duration : Sets the amount of time that is required forthis device to complete a Load command. You will need to manually timethe device in order to find the appropriate value.
Jump Duration : Sets the amount of time that is required forthis device to complete a Jump command. For linear devices such as a
12 Settings 84
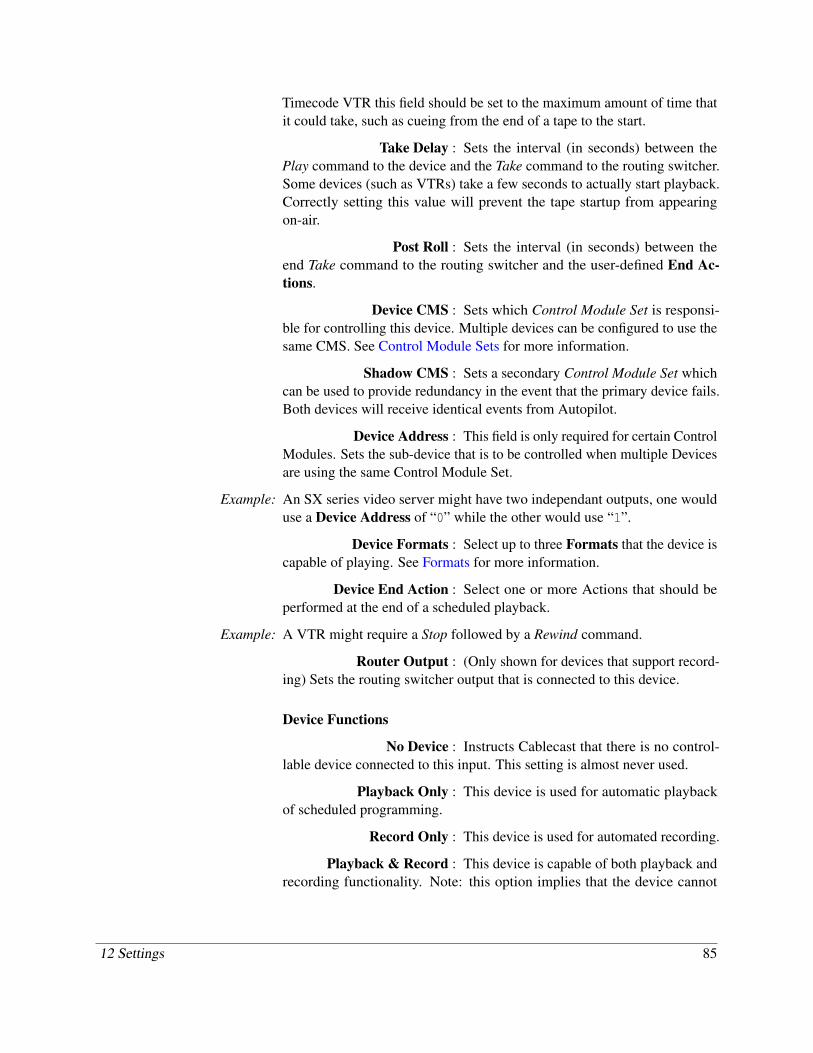
Timecode VTR this field should be set to the maximum amount of time thatit could take, such as cueing from the end of a tape to the start.
Take Delay : Sets the interval (in seconds) between thePlay command to the device and the Take command to the routing switcher.Some devices (such as VTRs) take a few seconds to actually start playback.Correctly setting this value will prevent the tape startup from appearingon-air.
Post Roll : Sets the interval (in seconds) between theend Take command to the routing switcher and the user-defined End Ac-tions.
Device CMS : Sets which Control Module Set is responsi-ble for controlling this device. Multiple devices can be configured to use thesame CMS. See Control Module Sets for more information.
Shadow CMS : Sets a secondary Control Module Set whichcan be used to provide redundancy in the event that the primary device fails.Both devices will receive identical events from Autopilot.
Device Address : This field is only required for certain ControlModules. Sets the sub-device that is to be controlled when multiple Devicesare using the same Control Module Set.
Example: An SX series video server might have two independant outputs, one woulduse a Device Address of “0” while the other would use “1”.
Device Formats : Select up to three Formats that the device iscapable of playing. See Formats for more information.
Device End Action : Select one or more Actions that should beperformed at the end of a scheduled playback.
Example: A VTR might require a Stop followed by a Rewind command.
Router Output : (Only shown for devices that support record-ing) Sets the routing switcher output that is connected to this device.
Device Functions
No Device : Instructs Cablecast that there is no control-lable device connected to this input. This setting is almost never used.
Playback Only : This device is used for automatic playbackof scheduled programming.
Record Only : This device is used for automated recording.
Playback & Record : This device is capable of both playback andrecording functionality. Note: this option implies that the device cannot
12 Settings 85
perform both tasks at the same time. If your device is capable of both (likemost video servers) you will need to create two separate devices.
GPI : This device is a GPI interface device whichcan be automated using Manual Events.
Device Types
Generic : Represents a standard VTR, or devices thatperform similarly. This device will receive a Play command to initiateplayback.
VTR(TC) : Represents a VTR that is capable of cueingtapes based on Timecode. This device will receive a Cue command prior toplayback followed by a Play command.
VTR(TC-Multitape) : Represents a Timecode-capable VTR thatcan hold multiple tapes simultaneously. This device will receive a Loadcommand to load the correct tape, a Cue command to cue it to the correctsegment, followed by a Play command to initiate playback.
DVD : Represents a DVD player. This device willreceive a Jump command which sets the Title and Chapter to be playedfollowed by a Play command to initiate playback.
DVD(Multidisc) : Represents a DVD changer. This device willreceive a Load command to load the correct disk, a Jump command to selectthe appropriate Title and Chapter followed by a Play command to initiateplayback.
Digital File : Represents a video server. This device willreceive a Cue command to select the correct file and start position followedby a Play command to start playback.
Live : Represents a Live source. No command issent to start playback for live sources.
Bulletin Board : Represents a source that is available at alltimes such as an on-air character generator.
Outputs
The Outputs screen allows you to configure the outputs of your routingswitcher.
The following fields are displayed in the table:
Output : The routing switcher output number.
12 Settings 86
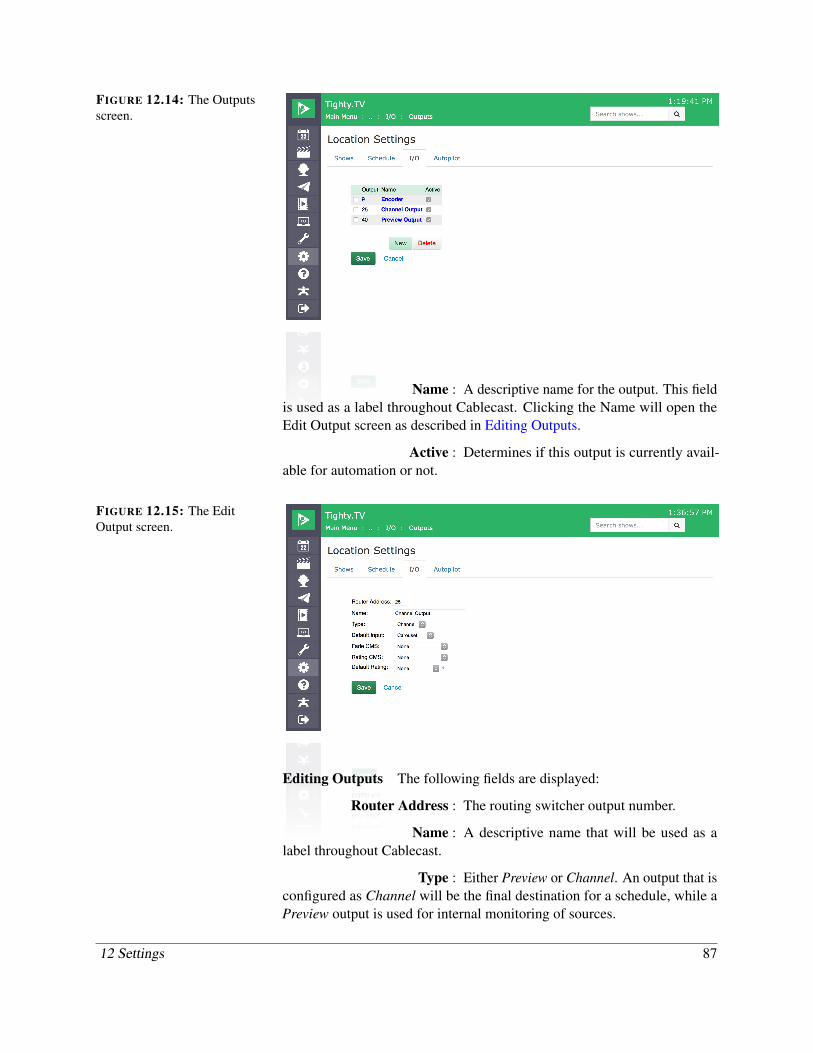
FIGURE 12.14: The Outputsscreen.
Name : A descriptive name for the output. This fieldis used as a label throughout Cablecast. Clicking the Name will open theEdit Output screen as described in Editing Outputs.
Active : Determines if this output is currently avail-able for automation or not.
FIGURE 12.15: The EditOutput screen.
Editing Outputs The following fields are displayed:
Router Address : The routing switcher output number.
Name : A descriptive name that will be used as alabel throughout Cablecast.
Type : Either Preview or Channel. An output that isconfigured as Channel will be the final destination for a schedule, while aPreview output is used for internal monitoring of sources.
12 Settings 87

Default Input : The Device that should be on-air when noth-ing is scheduled, such as a bulletin board.
Fade CMS : The Control Module Set that controls fade-to-black for this channel.
Rating CMS : The Control Module Set that controls V-Chiprating insertion for this channel.
Default Rating : Sets the V-Chip rating that should be used ifone is not set for a specific show.
Video On Demand
This screen allows you to configure Video on Demand for your station.
FIGURE 12.16: The Video onDemand screen.
The following settings are available:
Video on Demand Server CMS : The Control Module Set for the Video onDemand server.
Transcoding Quality : Sets the transcoding quality that will be usedif one is not set in the specific Show.
Public Address for Video on Demand Server : The publicly-available IP address or DNShostname of the Video on Demand server.
Public Address for Cablecast Server : The publicly-available IP address or DNShostname of the Cablecast server.
Enable Reflect : Determines if this Video on Demand serverwill use the Cablecast Reflect bandwidth management service. This settingshould only be modified by TRMS support personnel.
12 Settings 88
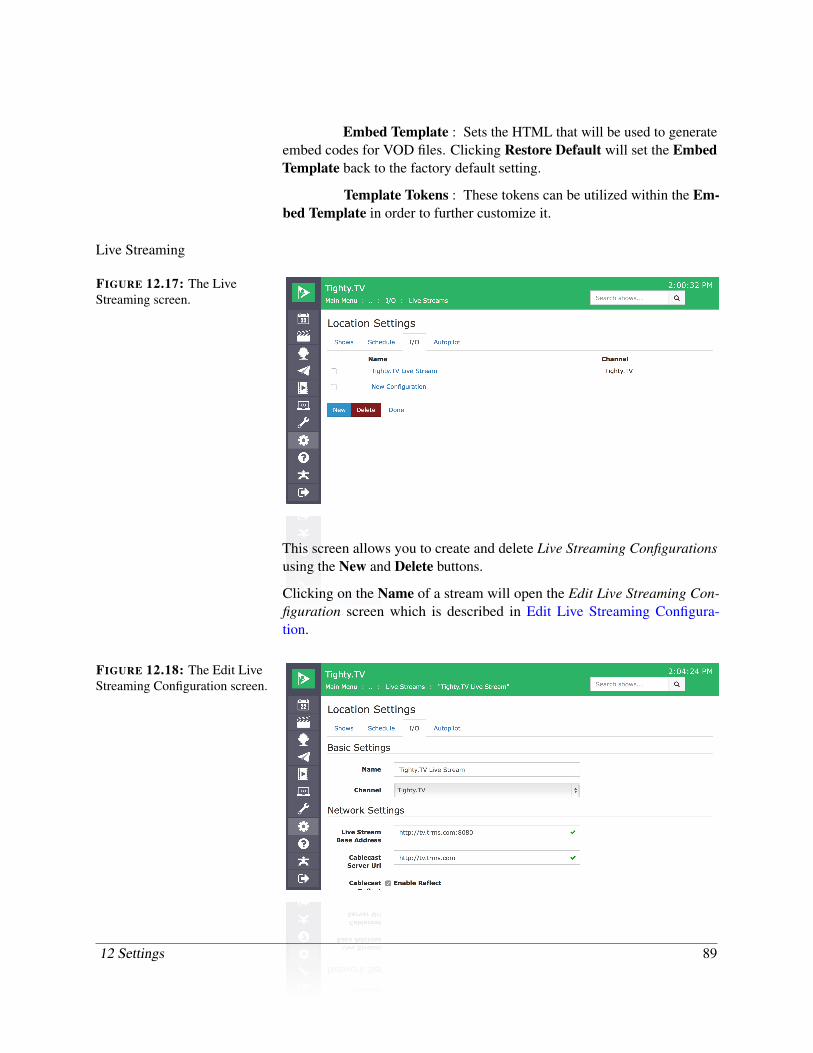
Embed Template : Sets the HTML that will be used to generateembed codes for VOD files. Clicking Restore Default will set the EmbedTemplate back to the factory default setting.
Template Tokens : These tokens can be utilized within the Em-bed Template in order to further customize it.
Live Streaming
FIGURE 12.17: The LiveStreaming screen.
This screen allows you to create and delete Live Streaming Configurationsusing the New and Delete buttons.
Clicking on the Name of a stream will open the Edit Live Streaming Con-figuration screen which is described in Edit Live Streaming Configura-tion.
FIGURE 12.18: The Edit LiveStreaming Configuration screen.
12 Settings 89
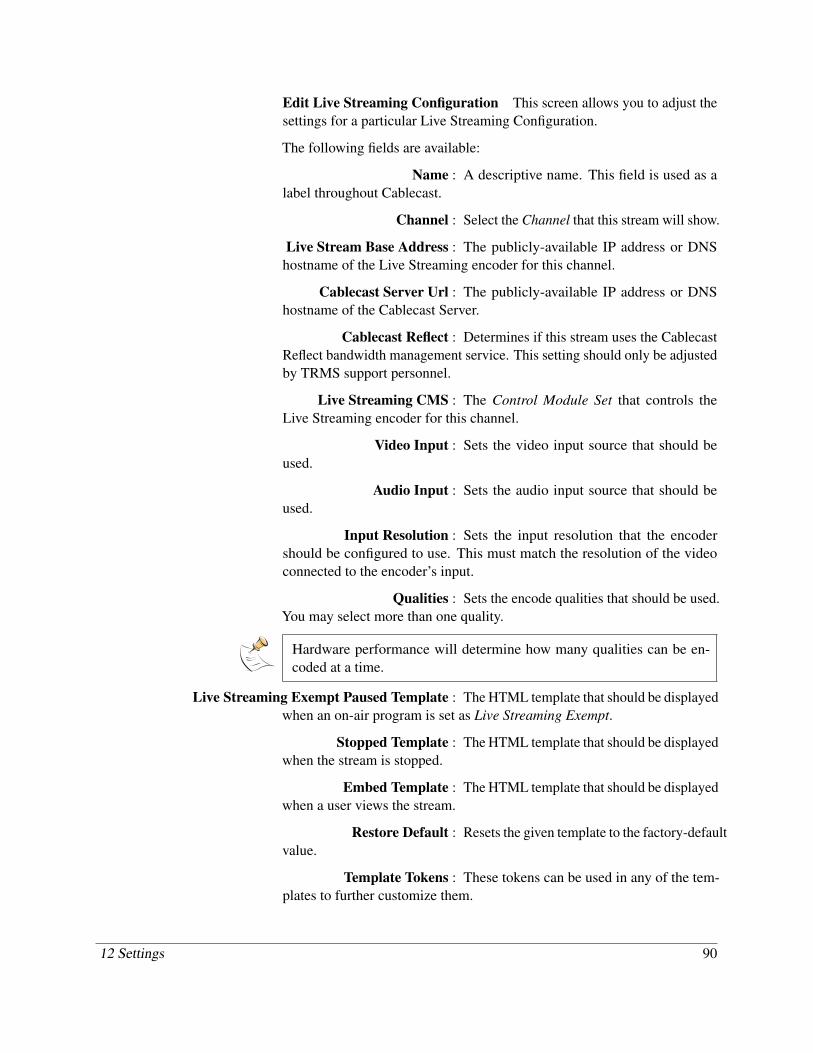
Edit Live Streaming Configuration This screen allows you to adjust thesettings for a particular Live Streaming Configuration.
The following fields are available:
Name : A descriptive name. This field is used as alabel throughout Cablecast.
Channel : Select the Channel that this stream will show.
Live Stream Base Address : The publicly-available IP address or DNShostname of the Live Streaming encoder for this channel.
Cablecast Server Url : The publicly-available IP address or DNShostname of the Cablecast Server.
Cablecast Reflect : Determines if this stream uses the CablecastReflect bandwidth management service. This setting should only be adjustedby TRMS support personnel.
Live Streaming CMS : The Control Module Set that controls theLive Streaming encoder for this channel.
Video Input : Sets the video input source that should beused.
Audio Input : Sets the audio input source that should beused.
Input Resolution : Sets the input resolution that the encodershould be configured to use. This must match the resolution of the videoconnected to the encoder’s input.
Qualities : Sets the encode qualities that should be used.You may select more than one quality.
Hardware performance will determine how many qualities can be en-coded at a time.
Live Streaming Exempt Paused Template : The HTML template that should be displayedwhen an on-air program is set as Live Streaming Exempt.
Stopped Template : The HTML template that should be displayedwhen the stream is stopped.
Embed Template : The HTML template that should be displayedwhen a user views the stream.
Restore Default : Resets the given template to the factory-defaultvalue.
Template Tokens : These tokens can be used in any of the tem-plates to further customize them.
12 Settings 90
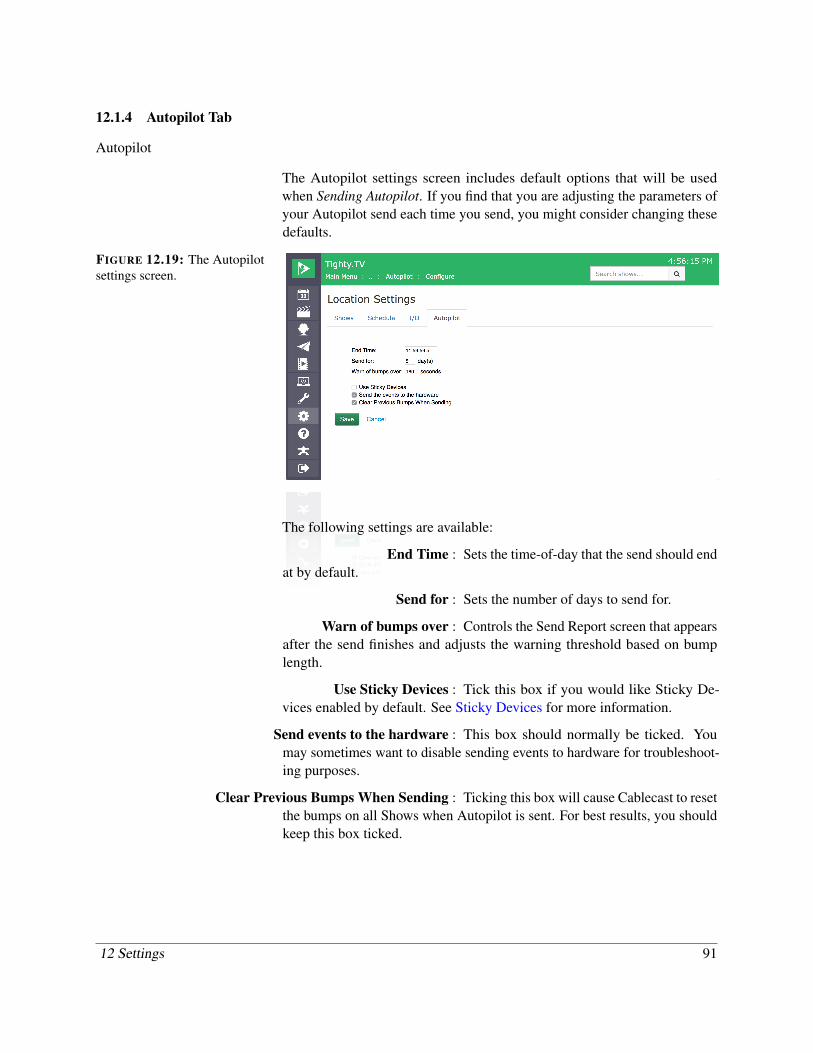
12.1.4 Autopilot Tab
Autopilot
The Autopilot settings screen includes default options that will be usedwhen Sending Autopilot. If you find that you are adjusting the parameters ofyour Autopilot send each time you send, you might consider changing thesedefaults.
FIGURE 12.19: The Autopilotsettings screen.
The following settings are available:
End Time : Sets the time-of-day that the send should endat by default.
Send for : Sets the number of days to send for.
Warn of bumps over : Controls the Send Report screen that appearsafter the send finishes and adjusts the warning threshold based on bumplength.
Use Sticky Devices : Tick this box if you would like Sticky De-vices enabled by default. See Sticky Devices for more information.
Send events to the hardware : This box should normally be ticked. Youmay sometimes want to disable sending events to hardware for troubleshoot-ing purposes.
Clear Previous Bumps When Sending : Ticking this box will cause Cablecast to resetthe bumps on all Shows when Autopilot is sent. For best results, you shouldkeep this box ticked.
12 Settings 91
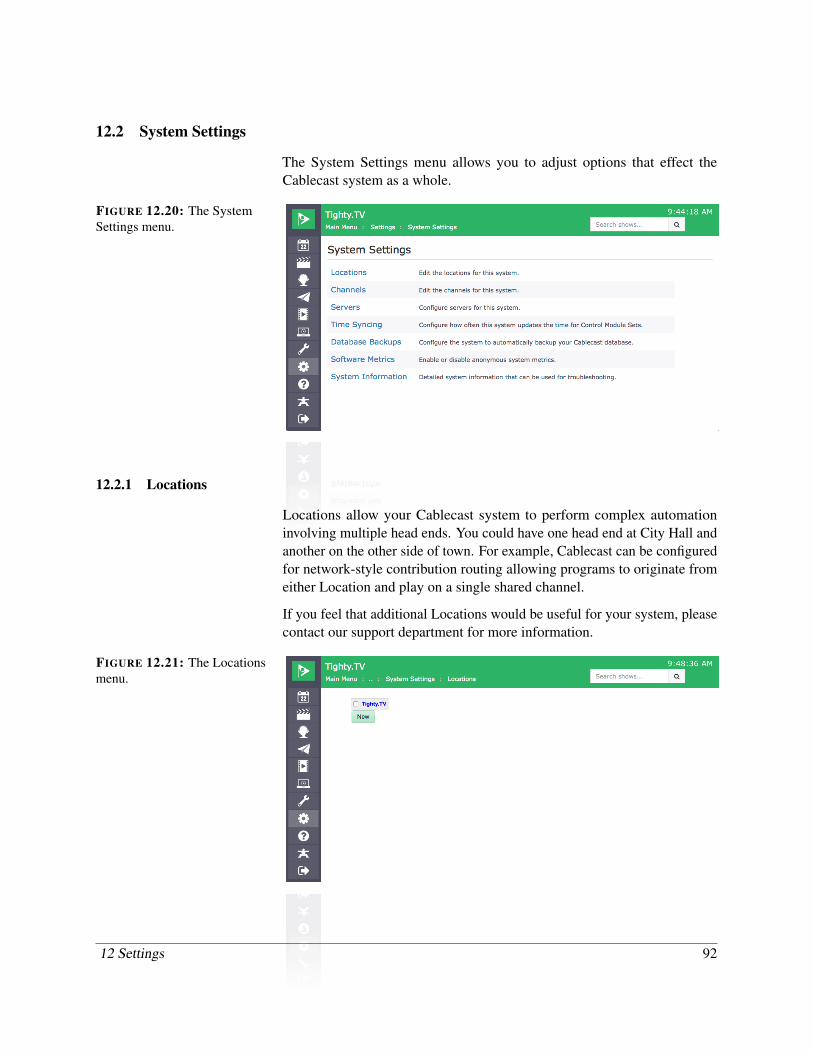
12.2 System Settings
The System Settings menu allows you to adjust options that effect theCablecast system as a whole.
FIGURE 12.20: The SystemSettings menu.
12.2.1 Locations
Locations allow your Cablecast system to perform complex automationinvolving multiple head ends. You could have one head end at City Hall andanother on the other side of town. For example, Cablecast can be configuredfor network-style contribution routing allowing programs to originate fromeither Location and play on a single shared channel.
If you feel that additional Locations would be useful for your system, pleasecontact our support department for more information.
FIGURE 12.21: The Locationsmenu.
12 Settings 92
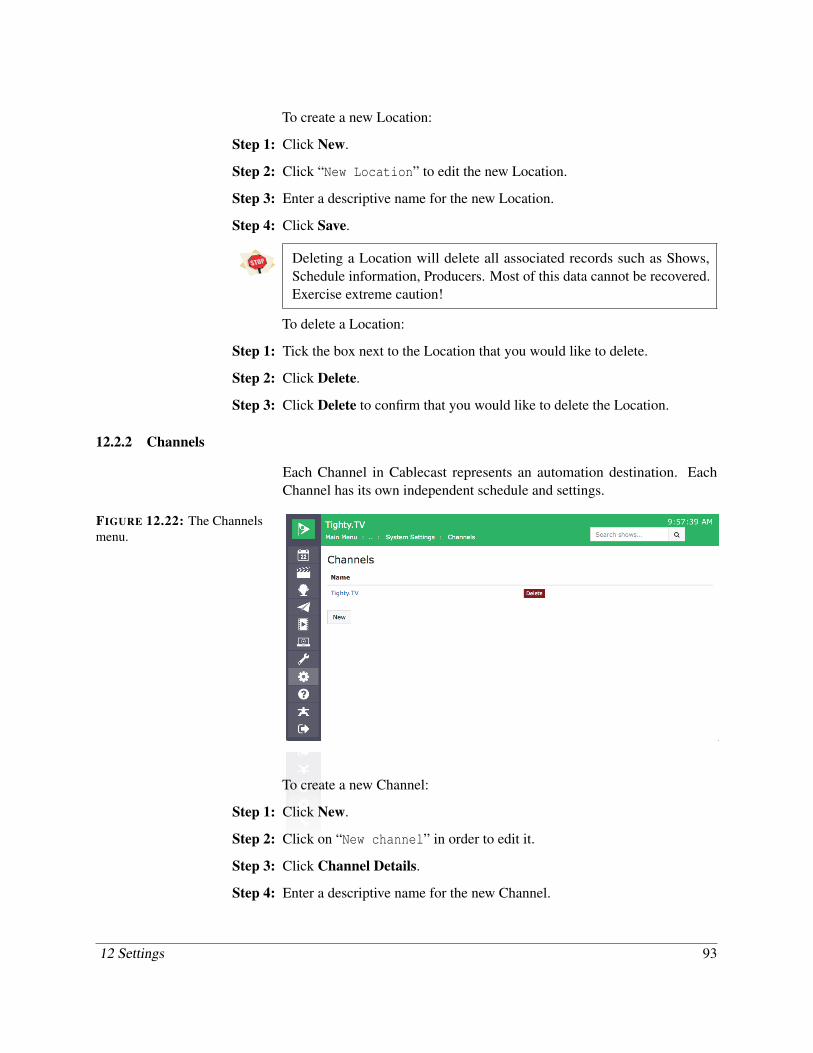
To create a new Location:
Step 1: Click New.
Step 2: Click “New Location” to edit the new Location.
Step 3: Enter a descriptive name for the new Location.
Step 4: Click Save.
Deleting a Location will delete all associated records such as Shows,Schedule information, Producers. Most of this data cannot be recovered.Exercise extreme caution!
To delete a Location:
Step 1: Tick the box next to the Location that you would like to delete.
Step 2: Click Delete.
Step 3: Click Delete to confirm that you would like to delete the Location.
12.2.2 Channels
Each Channel in Cablecast represents an automation destination. EachChannel has its own independent schedule and settings.
FIGURE 12.22: The Channelsmenu.
To create a new Channel:
Step 1: Click New.
Step 2: Click on “New channel” in order to edit it.
Step 3: Click Channel Details.
Step 4: Enter a descriptive name for the new Channel.
12 Settings 93
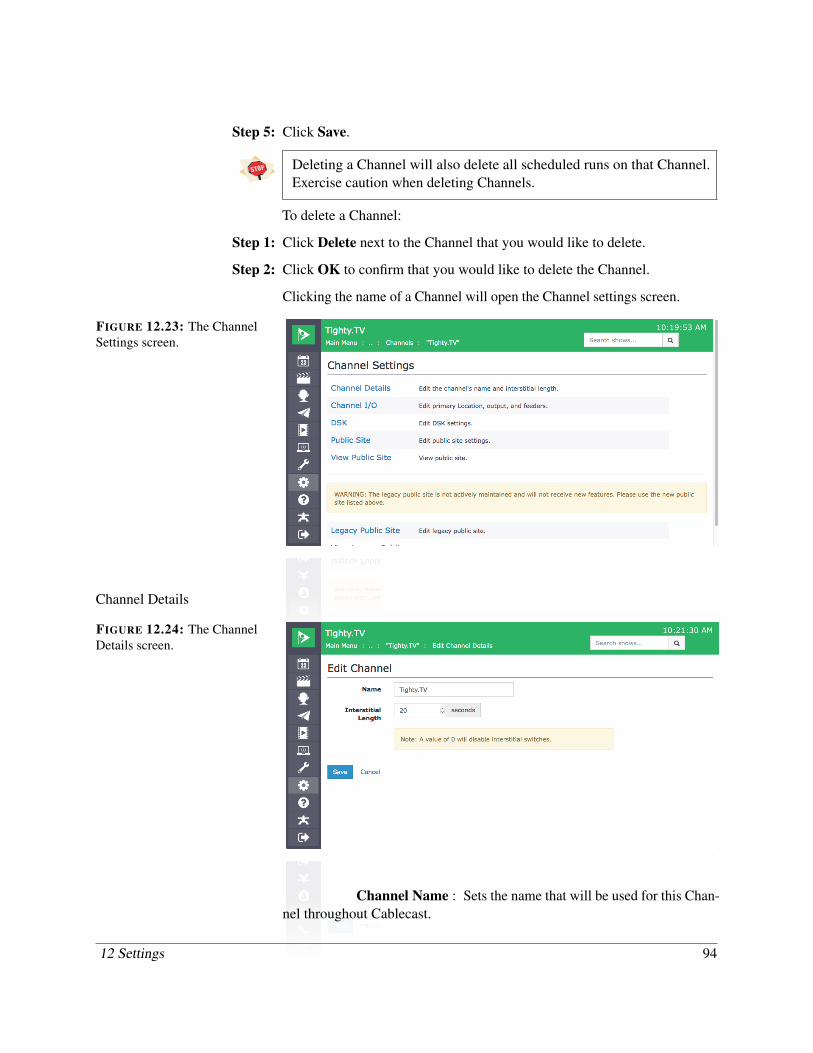
Step 5: Click Save.
Deleting a Channel will also delete all scheduled runs on that Channel.Exercise caution when deleting Channels.
To delete a Channel:
Step 1: Click Delete next to the Channel that you would like to delete.
Step 2: Click OK to confirm that you would like to delete the Channel.
Clicking the name of a Channel will open the Channel settings screen.
FIGURE 12.23: The ChannelSettings screen.
Channel Details
FIGURE 12.24: The ChannelDetails screen.
Channel Name : Sets the name that will be used for this Chan-nel throughout Cablecast.
12 Settings 94
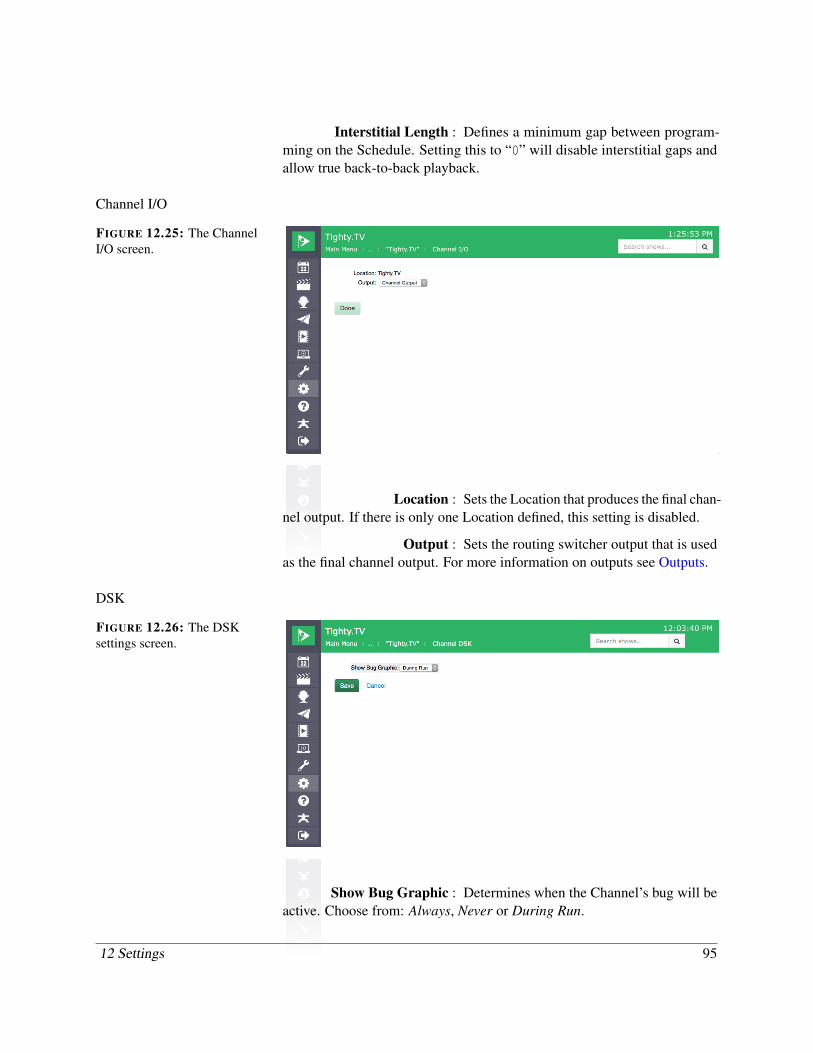
Interstitial Length : Defines a minimum gap between program-ming on the Schedule. Setting this to “0” will disable interstitial gaps andallow true back-to-back playback.
Channel I/O
FIGURE 12.25: The ChannelI/O screen.
Location : Sets the Location that produces the final chan-nel output. If there is only one Location defined, this setting is disabled.
Output : Sets the routing switcher output that is usedas the final channel output. For more information on outputs see Outputs.
DSK
FIGURE 12.26: The DSKsettings screen.
Show Bug Graphic : Determines when the Channel’s bug will beactive. Choose from: Always, Never or During Run.
12 Settings 95
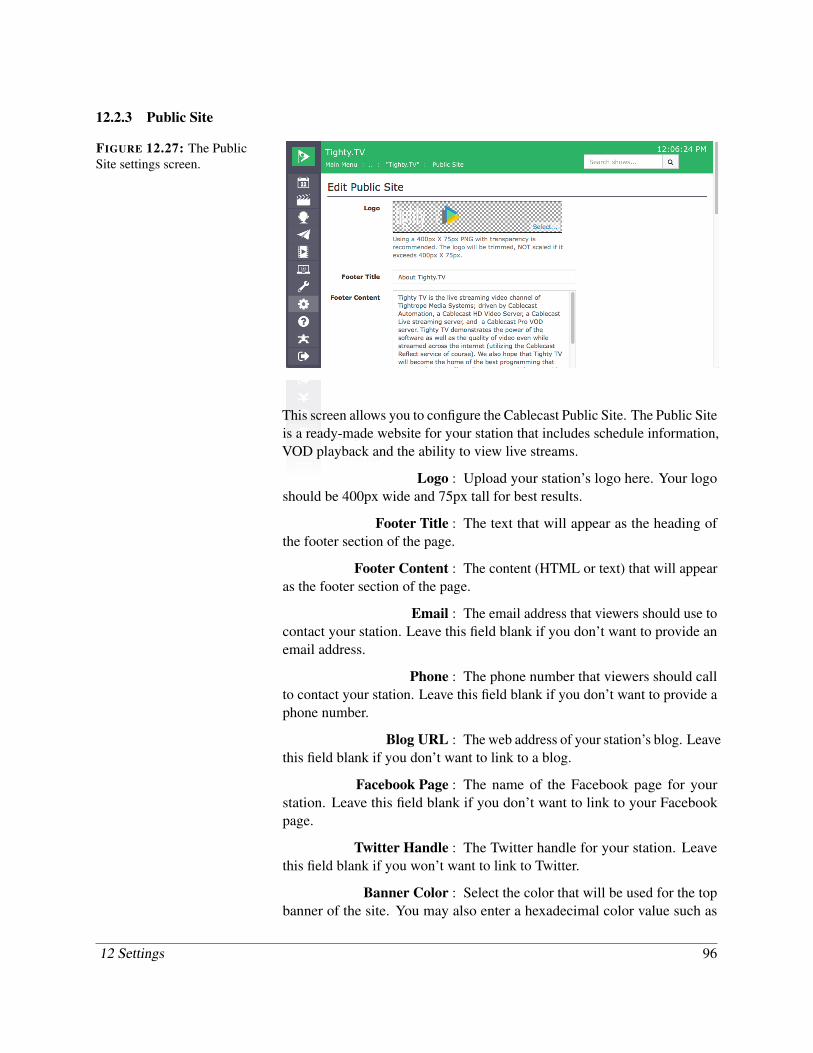
12.2.3 Public Site
FIGURE 12.27: The PublicSite settings screen.
This screen allows you to configure the Cablecast Public Site. The Public Siteis a ready-made website for your station that includes schedule information,VOD playback and the ability to view live streams.
Logo : Upload your station’s logo here. Your logoshould be 400px wide and 75px tall for best results.
Footer Title : The text that will appear as the heading ofthe footer section of the page.
Footer Content : The content (HTML or text) that will appearas the footer section of the page.
Email : The email address that viewers should use tocontact your station. Leave this field blank if you don’t want to provide anemail address.
Phone : The phone number that viewers should callto contact your station. Leave this field blank if you don’t want to provide aphone number.
Blog URL : The web address of your station’s blog. Leavethis field blank if you don’t want to link to a blog.
Facebook Page : The name of the Facebook page for yourstation. Leave this field blank if you don’t want to link to your Facebookpage.
Twitter Handle : The Twitter handle for your station. Leavethis field blank if you won’t want to link to Twitter.
Banner Color : Select the color that will be used for the topbanner of the site. You may also enter a hexadecimal color value such as
12 Settings 96
“#ffffff” for white.
Background Color : Select the color that will be used behind thecontent of your page.
Gradient Color : Select the color that will be used for the topof the page. This color will gradually transition to white at the bottom of thepage.
Slideshow Search : Select the Saved Search that will be used topopulate the Slideshow at the top of the page. For more information seeSaved Searches.
Gallery Title : Enter the text that should be used as theheader to the Gallery portion of the page.
Gallery Search : Select the Saved Search that will be used topopulate the Gallery in the middle of the page.
View Public Site
This link will open the Cablecast Public Site so that you can view it.
Legacy Public Site
This screen will allow you to edit the settings for the Legacy Public Site. Thisolder Public Site has been greatly improved with the Public Site describedin Public Site. The Legacy Public Site is provided to maintain compatibilitywith existing installations and should not be used for new projects.
View Legacy Public Site
This link will open the Legacy Public Site so that you can view it.
12.2.4 Servers
The Servers page allows you to configure all of the servers that will becontrolled by Cablecast for automation.
To create a new Server:
Step 1: Click New.
Step 2: Enter a descriptive name for the Server in the Name field.
Step 3: Enter the IP Address or DNS Hostname of the Server in the Host Addressfield.
Step 4: Click Save.
To edit a Server:
12 Settings 97

FIGURE 12.28: The Serversscreen.
Step 1: Click Edit for the Server that you would like to edit.
Step 2: Update the Name or Host Address to the desired value.
Step 3: Click Save.
To delete a Server:
Step 1: Tick the box next to the Server that you which to delete.
Step 2: Click Delete.
Step 3: Click OK to confirm.
Once Cablecast connects to a Server it will populate the remaining fields inthe table. The displayed fields are:
Name : The user-defined name of the Server. Thisvalue will be displayed throughout Cablecast.
Host Address : The IP Address or DNS Hostname of theServer.
Connection : Indicates the real-time status of the connec-tion to the Server.
RAID : Indicates the current status of any RAID stor-age volumes on the Server. This data is updated every few minutes.
Volumes : Indicates the current status of free space onthe Server’s storage volumes.
Last Update : Shows the time at which the system last up-dated information about this Server.
Version : Shows the version of Cablecast that is in-stalled on the Server.
12 Settings 98
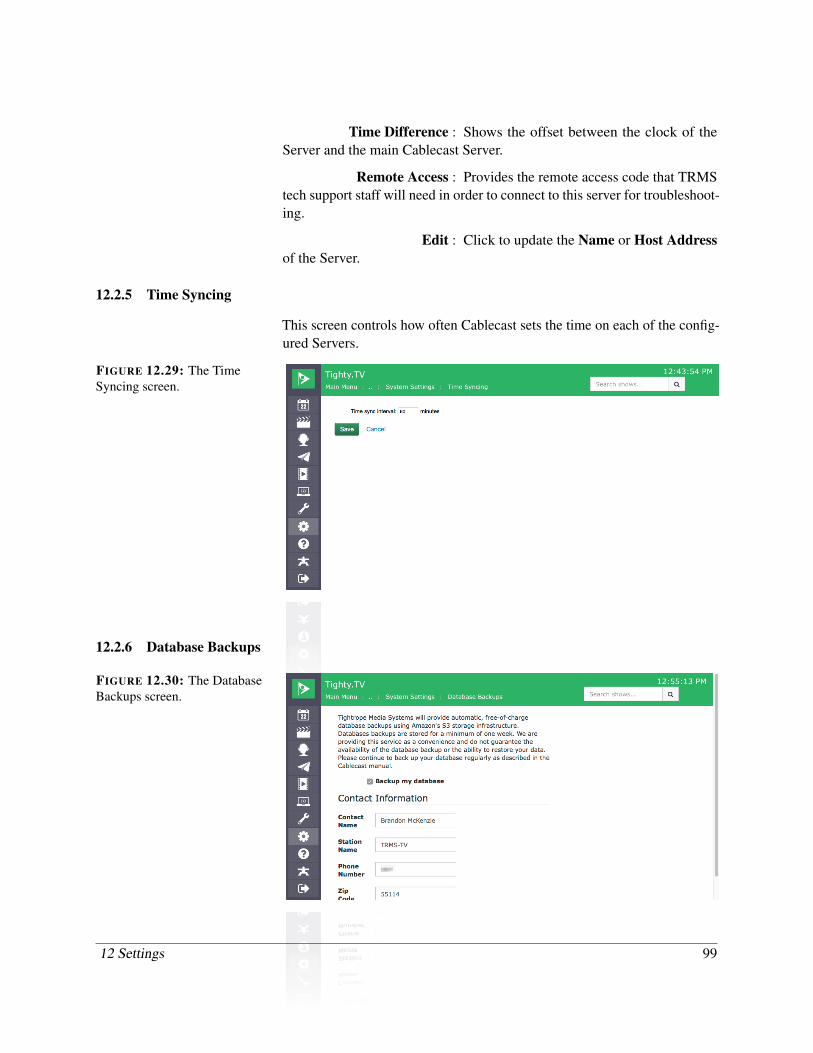
Time Difference : Shows the offset between the clock of theServer and the main Cablecast Server.
Remote Access : Provides the remote access code that TRMStech support staff will need in order to connect to this server for troubleshoot-ing.
Edit : Click to update the Name or Host Addressof the Server.
12.2.5 Time Syncing
This screen controls how often Cablecast sets the time on each of the config-ured Servers.
FIGURE 12.29: The TimeSyncing screen.
12.2.6 Database Backups
FIGURE 12.30: The DatabaseBackups screen.
12 Settings 99
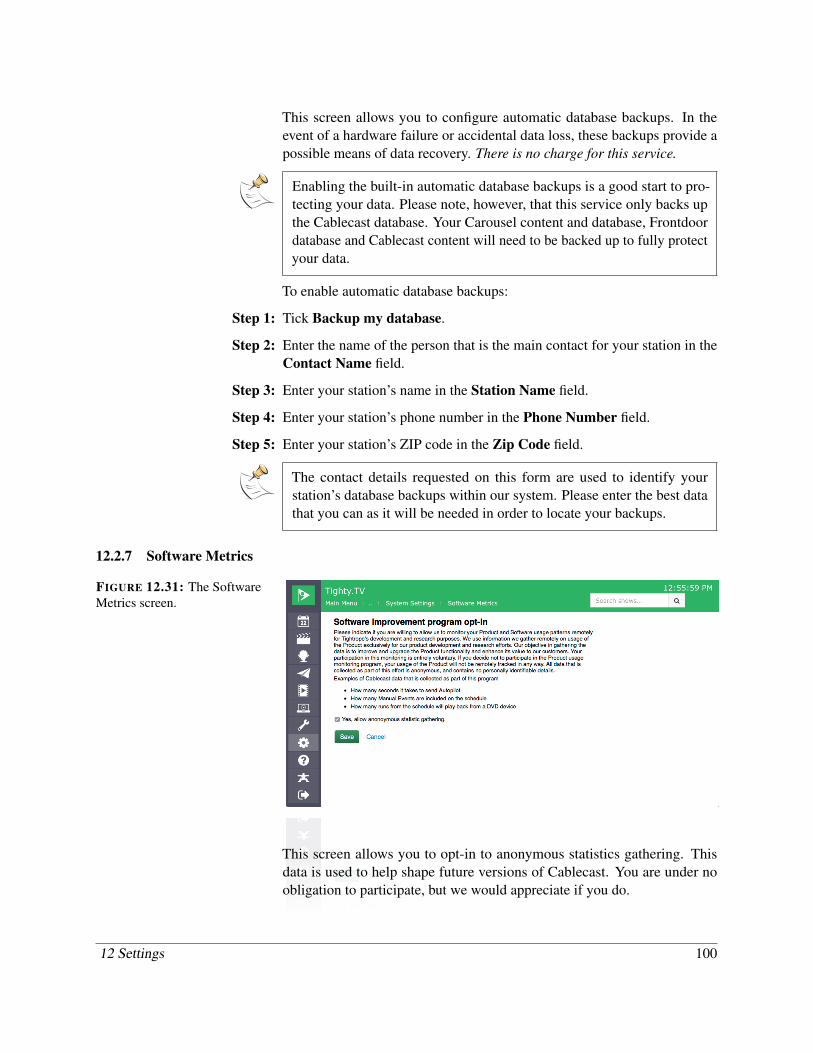
This screen allows you to configure automatic database backups. In theevent of a hardware failure or accidental data loss, these backups provide apossible means of data recovery. There is no charge for this service.
Enabling the built-in automatic database backups is a good start to pro-tecting your data. Please note, however, that this service only backs upthe Cablecast database. Your Carousel content and database, Frontdoordatabase and Cablecast content will need to be backed up to fully protectyour data.
To enable automatic database backups:
Step 1: Tick Backup my database.
Step 2: Enter the name of the person that is the main contact for your station in theContact Name field.
Step 3: Enter your station’s name in the Station Name field.
Step 4: Enter your station’s phone number in the Phone Number field.
Step 5: Enter your station’s ZIP code in the Zip Code field.
The contact details requested on this form are used to identify yourstation’s database backups within our system. Please enter the best datathat you can as it will be needed in order to locate your backups.
12.2.7 Software Metrics
FIGURE 12.31: The SoftwareMetrics screen.
This screen allows you to opt-in to anonymous statistics gathering. Thisdata is used to help shape future versions of Cablecast. You are under noobligation to participate, but we would appreciate if you do.
12 Settings 100
12.2.8 System Information
This screen provides diagnostic information about the server that is runningCablecast.
12.3 User Settings
User settings allow you to customize Cablecast to your preference. Thesesettings apply to the currently logged-in user, each user can set them individ-ually.
12.3.1 Location
Select the Location that you would like to use when you first log intoCablecast.
12.3.2 Channel
Select the Channel that you would like to see when you first load the Sched-ule.
12.3.3 Time Format
Select whether or not you would like to use 24-hour time.
12 Settings 101


