Cablevision Optimum IO User Guide for Standard and High Definition cable boxes.
32
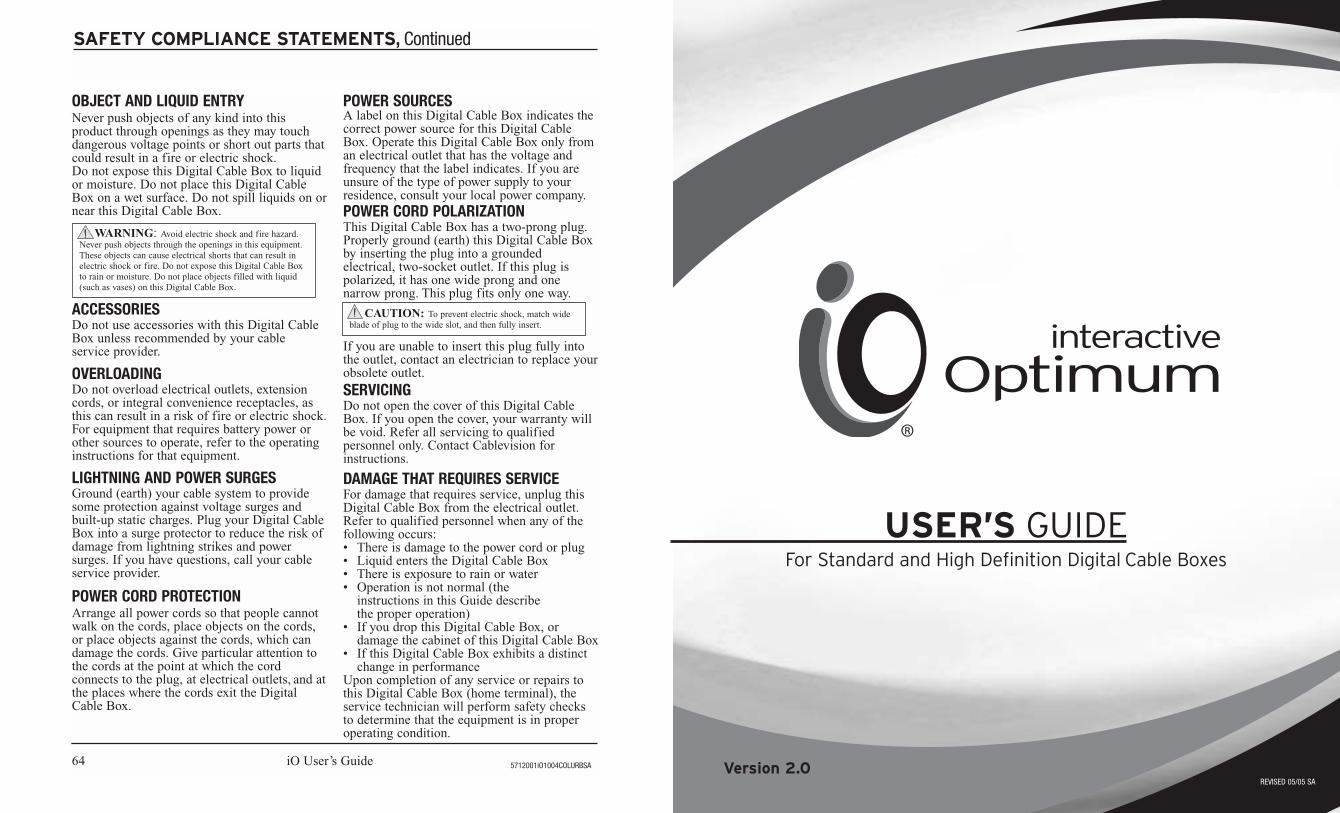
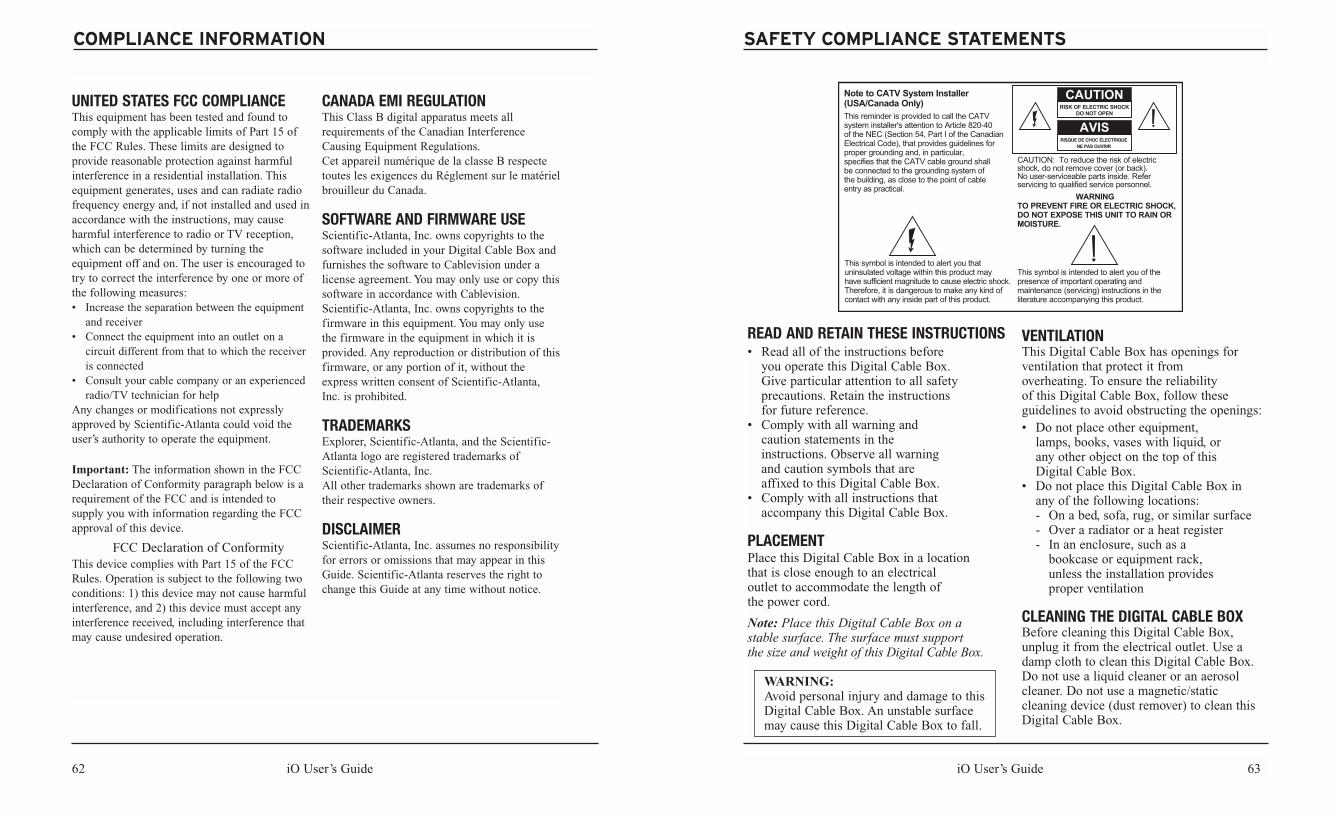
SAFETY COMPLIANCE STATEMENTS, Continued OBJECT AND LIQUID ENTRY Never push objects of any kind into this product through openings as they may touch dangerous voltage points or short out parts that could result in a fire or electric shock. Do not expose this Digital Cable Box to liquid or moisture. Do not place this Digital Cable Box on a wet surface. Do not spill liquids on or near this Digital Cable Box. ACCESSORIES Do not use accessories with this Digital Cable Box unless recommended by your cable service provider. OVERLOADING Do not overload electrical outlets, extension cords, or integral convenience receptacles, as this can result in a risk of fire or electric shock. For equipment that requires battery power or other sources to operate, refer to the operating instructions for that equipment. LIGHTNING AND POWER SURGES Ground (earth) your cable system to provide some protection against voltage surges and built-up static charges. Plug your Digital Cable Box into a surge protector to reduce the risk of damage from lightning strikes and power surges. If you have questions, call your cable service provider. POWER CORD PROTECTION Arrange all power cords so that people cannot walk on the cords, place objects on the cords, or place objects against the cords, which can damage the cords. Give particular attention to the cords at the point at which the cord connects to the plug, at electrical outlets, and at the places where the cords exit the Digital Cable Box. POWER SOURCES A label on this Digital Cable Box indicates the correct power source for this Digital Cable Box. Operate this Digital Cable Box only from an electrical outlet that has the voltage and frequency that the label indicates. If you are unsure of the type of power supply to your residence, consult your local power company. POWER CORD POLARIZATION This Digital Cable Box has a two-prong plug. Properly ground (earth) this Digital Cable Box by inserting the plug into a grounded electrical, two-socket outlet. If this plug is polarized, it has one wide prong and one narrow prong. This plug fits only one way. If you are unable to insert this plug fully into the outlet, contact an electrician to replace your obsolete outlet. SERVICING Do not open the cover of this Digital Cable Box. If you open the cover, your warranty will be void. Refer all servicing to qualified personnel only. Contact Cablevision for instructions. DAMAGE THAT REQUIRES SERVICE For damage that requires service, unplug this Digital Cable Box from the electrical outlet. Refer to qualified personnel when any of the following occurs: • There is damage to the power cord or plug • Liquid enters the Digital Cable Box • There is exposure to rain or water • Operation is not normal (the instructions in this Guide describe the proper operation) • If you drop this Digital Cable Box, or damage the cabinet of this Digital Cable Box • If this Digital Cable Box exhibits a distinct change in performance Upon completion of any service or repairs to this Digital Cable Box (home terminal), the service technician will perform safety checks to determine that the equipment is in proper operating condition. 64 iO User’s Guide WARNING: Avoid electric shock and fire hazard. Never push objects through the openings in this equipment. These objects can cause electrical shorts that can result in electric shock or fire. Do not expose this Digital Cable Box to rain or moisture. Do not place objects filled with liquid (such as vases) on this Digital Cable Box. CAUTION: To prevent electric shock, match wide blade of plug to the wide slot, and then fully insert. 5712001iO1004COLURBSA USER’S GUIDE For Standard and High Definition Digital Cable Boxes Version 2.0 REVISED 05/05 SA
Transcript
SAFETY COMPLIANCE STATEMENTS, Continued
OBJECT AND LIQUID ENTRYNever push objects of any kind into thisproduct through openings as they may touchdangerous voltage points or short out parts thatcould result in a fire or electric shock. Do not expose this Digital Cable Box to liquidor moisture. Do not place this Digital CableBox on a wet surface. Do not spill liquids on ornear this Digital Cable Box.
ACCESSORIESDo not use accessories with this Digital CableBox unless recommended by your cable service provider.
OVERLOADINGDo not overload electrical outlets, extensioncords, or integral convenience receptacles, asthis can result in a risk of fire or electric shock.For equipment that requires battery power orother sources to operate, refer to the operating instructions for that equipment.
LIGHTNING AND POWER SURGESGround (earth) your cable system to providesome protection against voltage surges andbuilt-up static charges. Plug your Digital CableBox into a surge protector to reduce the risk ofdamage from lightning strikes and powersurges. If you have questions, call your cableservice provider.
POWER CORD PROTECTIONArrange all power cords so that people cannotwalk on the cords, place objects on the cords,or place objects against the cords, which candamage the cords. Give particular attention tothe cords at the point at which the cordconnects to the plug, at electrical outlets, and atthe places where the cords exit the DigitalCable Box.
POWER SOURCESA label on this Digital Cable Box indicates the correct power source for this Digital CableBox. Operate this Digital Cable Box only froman electrical outlet that has the voltage andfrequency that the label indicates. If you areunsure of the type of power supply to yourresidence, consult your local power company.POWER CORD POLARIZATIONThis Digital Cable Box has a two-prong plug. Properly ground (earth) this Digital Cable Box by inserting the plug into a grounded electrical, two-socket outlet. If this plug is polarized, it has one wide prong and onenarrow prong. This plug fits only one way.
If you are unable to insert this plug fully intothe outlet, contact an electrician to replace yourobsolete outlet.
SERVICINGDo not open the cover of this Digital CableBox. If you open the cover, your warranty willbe void. Refer all servicing to qualifiedpersonnel only. Contact Cablevision forinstructions.
DAMAGE THAT REQUIRES SERVICEFor damage that requires service, unplug this Digital Cable Box from the electrical outlet. Refer to qualified personnel when any of the following occurs:• There is damage to the power cord or plug• Liquid enters the Digital Cable Box• There is exposure to rain or water• Operation is not normal (the
instructions in this Guide describe the proper operation)
• If you drop this Digital Cable Box, or damage the cabinet of this Digital Cable Box
• If this Digital Cable Box exhibits a distinct change in performance
Upon completion of any service or repairs tothis Digital Cable Box (home terminal), theservice technician will perform safety checksto determine that the equipment is in properoperating condition.
64 iO User’s Guide
WARNING: Avoid electric shock and fire hazard.Never push objects through the openings in this equipment.These objects can cause electrical shorts that can result inelectric shock or fire. Do not expose this Digital Cable Boxto rain or moisture. Do not place objects filled with liquid(such as vases) on this Digital Cable Box.
CAUTION: To prevent electric shock, match wideblade of plug to the wide slot, and then fully insert.
5712001iO1004COLURBSA
USER’S GUIDE For Standard and High Definition Digital Cable Boxes
Enjoy the best in home entertainment.With iO digital cable service, you get access toover 200 channels, On Demand programming and features that satellite can’t deliver.
ON DEMAND
Choose from over a thousand On Demand movies and shows whenever you want. No trips to the video store or late fees…just great entertainment on your schedule. As an iO Customer, you have access to On Demand features such as Free On Demand, Movies On Demand, HBO On Demand, Showtime On Demand and so much more. Use your remote to start, stop, pause, fast-forward and rewind just as you would withyour VCR or DVD player.
ENHANCED TV
Enhanced TV is your passport to experiencing television in a whole new way – allowingyou to interact with your TV like never before. And, as an iO customer you can accessEnhanced TV features including Entertainment, News and Sports and Optimum Autos atno additional cost.
iO GAMES
Exciting games packages are available on iO digital cable service. Each package consistsof at least six games and games and levels are refreshed often.
MUSIC CHOICE®
Music Choice is included with your iO subscription. Enjoy 45 channels of commercial-free music with a full range of formats that appeal to everyone’s musical taste.
HDTV - HIGH DEFINITION TELEVISION
High Definition Television offers an unparalleled home-theater experience. Watch sportsand movies and your favorite shows in awe-inspiring detail! With iO High DefinitionTelevision, you’ll get 17 channels including local networks in high definition and evenHi-Def On Demand programs. There’s no additional monthly charge or expensiveequipment to buy. All you need is an HD-ready TV and an iO HD box.
PERSONALIZED VIEWING
By customizing your Channel Guide, you can go directly to the listings for the channelsyou love to watch. In addition, iO has Parental Control features which allow you to blockprograms by channel, program rating or time of day.
This Guide will take you step by step through everything you will need to know to fullyenjoy your iO experience. Keep it handy for easy reference.
iO User’s Guide 5
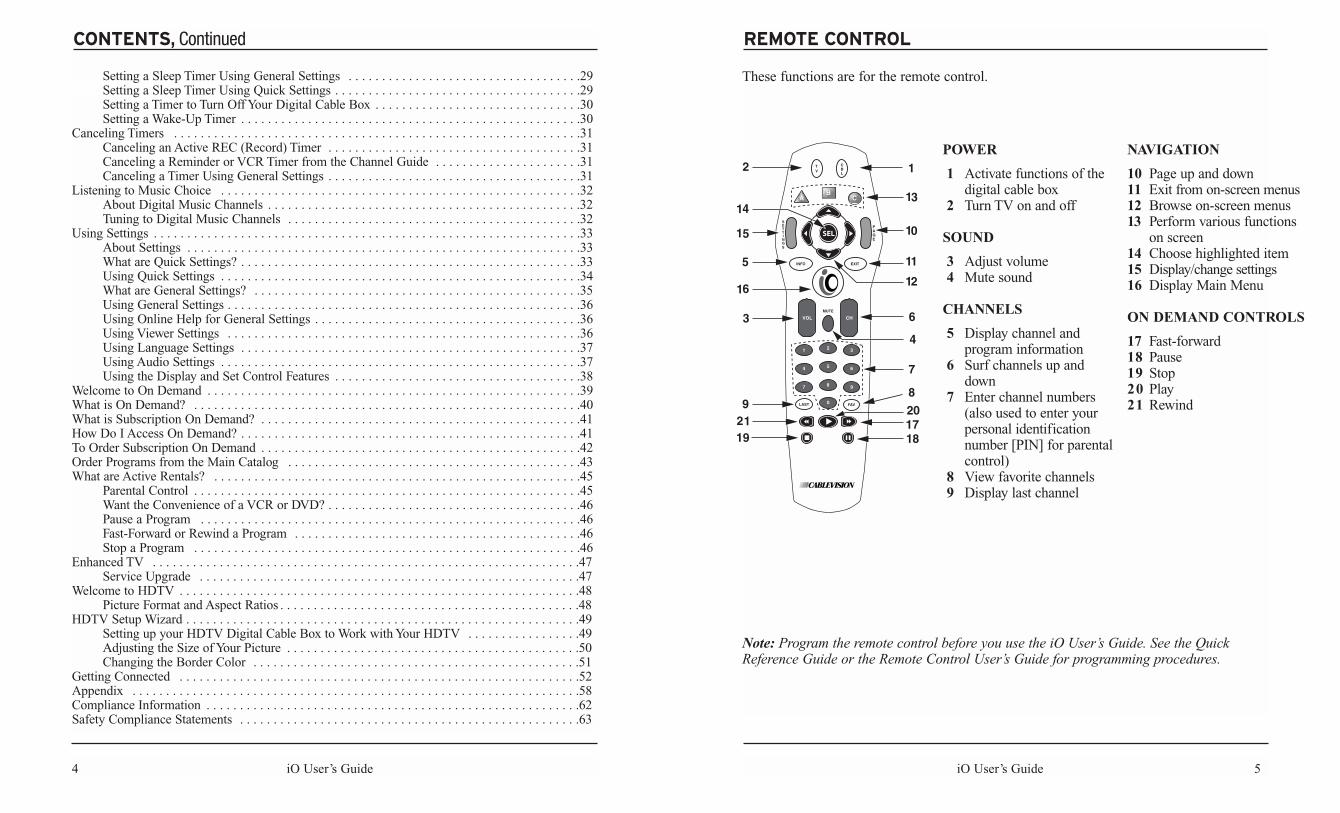
REMOTE CONTROL
These functions are for the remote control.
Note: Program the remote control before you use the iO User’s Guide. See the QuickReference Guide or the Remote Control User’s Guide for programming procedures.
POWER
1 Activate functions of the digital cable box
2 Turn TV on and off
SOUND
3 Adjust volume4 Mute sound
CHANNELS
5 Display channel andprogram information
6 Surf channels up and down
7 Enter channel numbers(also used to enter your personal identification number [PIN] for parental control)
8 View favorite channels9 Display last channel
NAVIGATION
10 Page up and down11 Exit from on-screen menus12 Browse on-screen menus13 Perform various functions
on screen14 Choose highlighted item15 Display/change settings16 Display Main Menu
WHAT IS THE MAIN MENU?Do you want a quick way to get to your Channel Guide, On Demand, Active Rentals, iO Games, Enhanced TV and iO Showcase? The Main Menu provides quick access to all these services.
While you are in the Main Menu, you can still watch TV. The Main Menu maintains your TV-viewing experience and by using the CH +/- key on your remote control, it allows you to change channels within the video window.
Note: When you access the Main Menu, your screens may appear slightly different from thesample screens shown in this Guide.
Pressing the iO button on your remote brings you to the Main Menu where you’ll haveaccess to everything iO has to offer, like an interactive searchable Channel Guide, On Demand movies and shows, Active Rentals, iO Games, Enhanced TV and iO Showcase.
Important: Before you can use your remote control for the Main Menu, you must programthe remote to work with your Digital Cable Box. Refer to the Quick Reference Guide or theRemote Control User’s Guide for instructions.
TO ACCESS THE MAIN MENU
ACCESS SERVICES FROM THE MAIN MENU
Choose a category using the UP or DOWN arrow keys on your remote. After you havehighlighted your selection, press SEL to activate your choice - the active iO logo in theupper left corner of your screen indicates that your request is being processed.
Note: To exit the Main Menu, press the EXIT key or tune to a channel.
PARENTAL CONTROL
In addition to the Parental Control features in the General Settings and Quick Settings ofthe Digital Cable Box, you may also block services that you access from your Main Menu.To block a service from the Main Menu, complete these steps:
1. Access the Main Menu by pressing the iO button.
Note: Services that are blocked display a lock icon next to them.
2. Press the B key.
Result: If parental control is active,you will be prompted for your PersonalIdentification Number (PIN).
3. Enter your PIN.
Result: The Block Services screen appears. The services and programs that are blockeddisplay a lock icon next to them.
4. Use the UP and DOWN arrow keys to highlight the service or channel that you want toblock or unblock. Continue to press the UP and DOWN arrow keys until you find theservice or channel that you want to block or unblock.
Note: You can also press the PAGE UP and DOWN keys to find your service or channel more quickly.
5. Press SEL to block or unblock the service or channel.
6. Press the A key to accept your changes. If you change your mind, you can press the Bkey to ignore the changes and return to the Main Menu or press the EXIT key to ignorethe changes and exit the Main Menu.
For detailed instructions on using Parental Control features, refer to the Using ParentalControl section of this Guide or contact Cablevision.
iO User’s Guide 9
INTRODUCTION TO THE CHANNEL GUIDE, Continued
GETTING TO THE CHANNEL GUIDE
Press the iO button on the remote control to access the Main Menu. Press the SEL key on the remote control to access the Channel Guide main screen as shown in the followingillustration. The Channel Guide appears starting on the channel you were watching.
PARTS OF THE CHANNEL GUIDE
The following list describes the parts of the Channel Guide:
• The program you are watching is reduced to fit in the upper right area of your screen. The program remains there while you are using the main functions of the Channel Guide.
• The Current Information banner under the picture provides the current date, time and channel.
• The Channel Banner provides a description for each program you highlight in the mainprogram list.
• The Message Bar contains a Browse By feature that allows searching for programs bychannel, theme or title.
• The Main Program listing displays the programs that will be broadcast.
8 iO User’s Guide
INTRODUCTION TO THE CHANNEL GUIDE
WHAT IS THE CHANNEL GUIDE?
The Channel Guide is a convenient way to find out what’s on your TV and to view a list ofupcoming programs. Lists of programs are available for any date in the next 7 days.
FEATURES OF THE CHANNEL GUIDE
The following list provides an overview of the features of the Channel Guide:
• With the browsing features, you can see what’s on TV for a particular channel, program theme or program title.
• Instant program descriptions appear while using the browsing feature to see what’s on.
• While using the Channel Guide, you can use Parental Control to restrict viewing ofprograms according to rating, time or channel.
• Reminder Timers help you keep track of upcoming programs by giving you a reminderon the screen before the program starts.
• VCR Timers tune your Digital Cable Box to a particular channel at the proper time torecord a program.
• Your current program is reduced to fit in the corner of your screen when you use any of the main Channel Guide functions.
• You can purchase Pay Per View events with just the press of a key. Some subscriptionservices may require a phone call to initially order the service.
• While using the Channel Guide, you can set up unlimited Favorite Channels for a quickbrowse of your favorites — right at your fingertips.
SYMBOLS USED ON THE CHANNEL GUIDEThe following table describes the symbols that you may see on the Channel Guide:
Symbol Description Symbol Description
Stereo Sound. The channel transmits stereo sound. Youmust have stereo speakers or equipment connected.
Closed Captioned. The channel has text subtitles forhearing-impaired viewers. This option applies only tochannels that offer closed captioning.
Second Audio Programming (SAP). The channel offersalternate audio, such as a second audio language, withthe TV picture. This option applies only to channels thatoffer second audio. NOTE: If you have SAP enabled and experience no soundon some channels, disable SAP. SAP is available only onchannels that offer second audio.
Blocked channel. Parental Control is on.
Unblocked channel. Parental Control is off.
Favorite Channel. The channel is included in thelist of favorite channels.
Indicates a Pay Per View event that you havepurchased.
A VCR timer is set for this program.
A reminder timer is set for this program.
The program is a Pay Per View event.
Program you arewatching isreduced to fit inthis areaChannel Banner
describes highlighted
program
Message Barfor navigational
instructions
CurrentInformation
MainProgramlisting
iO User’s Guide 1110 iO User’s Guide
BROWSING TO SEE WHAT’S ON TV
WHAT IS BROWSING?
Browsing is a convenient way to find the programs that you want to watch using theChannel Guide. There are three ways to find the programs using the Browse feature:
Title Lists programs in alphabetical order by their title for the date selected.
Channel Lists programs in order by time and channel.
Theme Lists programs of a particular type (such as Adventure,Comedy or News) for the date selected.
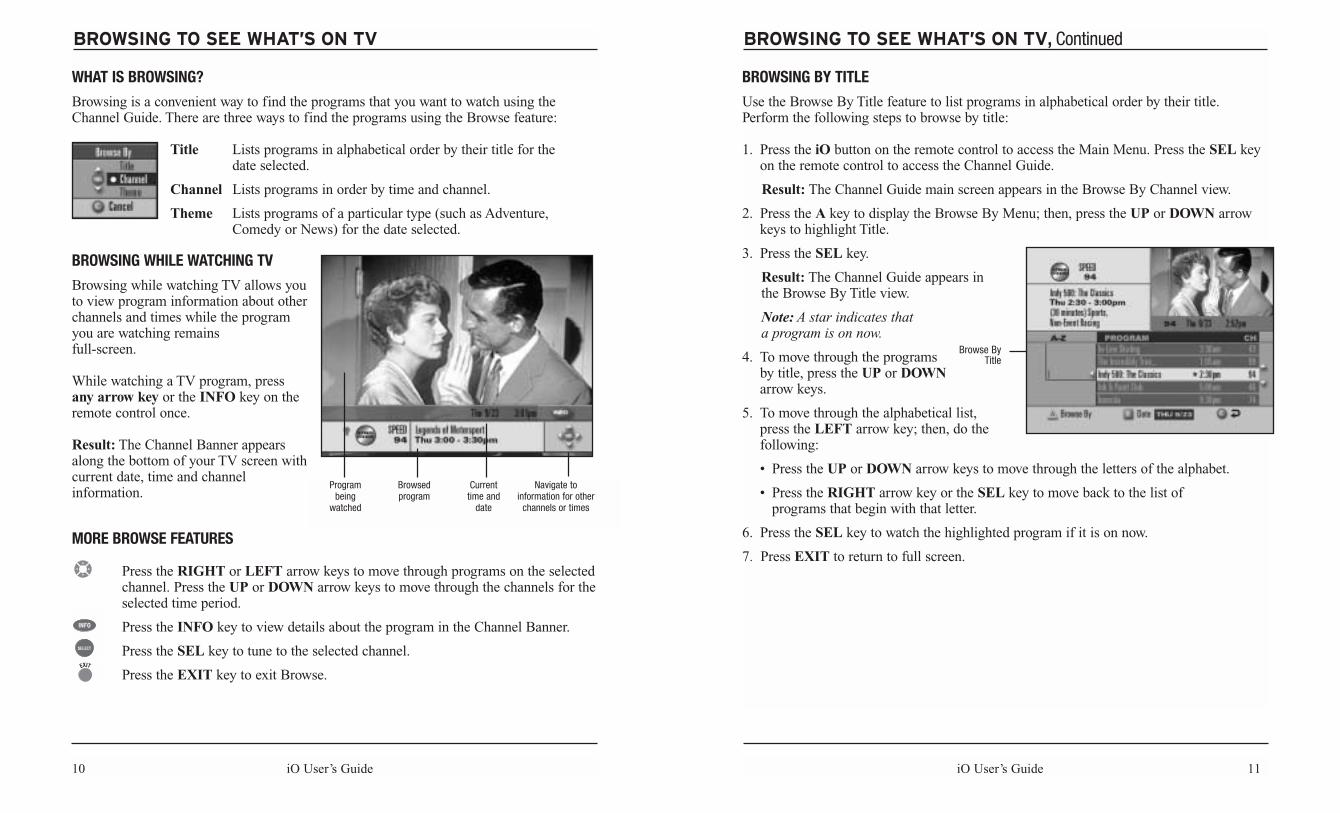
BROWSING WHILE WATCHING TV
Browsing while watching TV allows youto view program information about otherchannels and times while the programyou are watching remains full-screen.
While watching a TV program, pressany arrow key or the INFO key on theremote control once.
Result: The Channel Banner appearsalong the bottom of your TV screen withcurrent date, time and channel information.
MORE BROWSE FEATURES
Press the RIGHT or LEFT arrow keys to move through programs on the selectedchannel. Press the UP or DOWN arrow keys to move through the channels for theselected time period.
Press the INFO key to view details about the program in the Channel Banner.
Press the SEL key to tune to the selected channel.
Press the EXIT key to exit Browse.
BROWSING TO SEE WHAT’S ON TV, Continued
BROWSING BY TITLE
Use the Browse By Title feature to list programs in alphabetical order by their title.Perform the following steps to browse by title:
1. Press the iO button on the remote control to access the Main Menu. Press the SEL keyon the remote control to access the Channel Guide.
Result: The Channel Guide main screen appears in the Browse By Channel view.
2. Press the A key to display the Browse By Menu; then, press the UP or DOWN arrowkeys to highlight Title.
3. Press the SEL key.
Result: The Channel Guide appears in the Browse By Title view.
Note: A star indicates that a program is on now.
4. To move through the programs by title, press the UP or DOWNarrow keys.
5. To move through the alphabetical list, press the LEFT arrow key; then, do thefollowing:
• Press the UP or DOWN arrow keys to move through the letters of the alphabet.
• Press the RIGHT arrow key or the SEL key to move back to the list ofprograms that begin with that letter.
6. Press the SEL key to watch the highlighted program if it is on now.
7. Press EXIT to return to full screen.
Browse By Title
Program Browsed Current Navigate tobeing program time and information for other
watched date channels or times
iO User’s Guide 1312 iO User’s Guide
BROWSING TO SEE WHAT’S ON TV, Continued
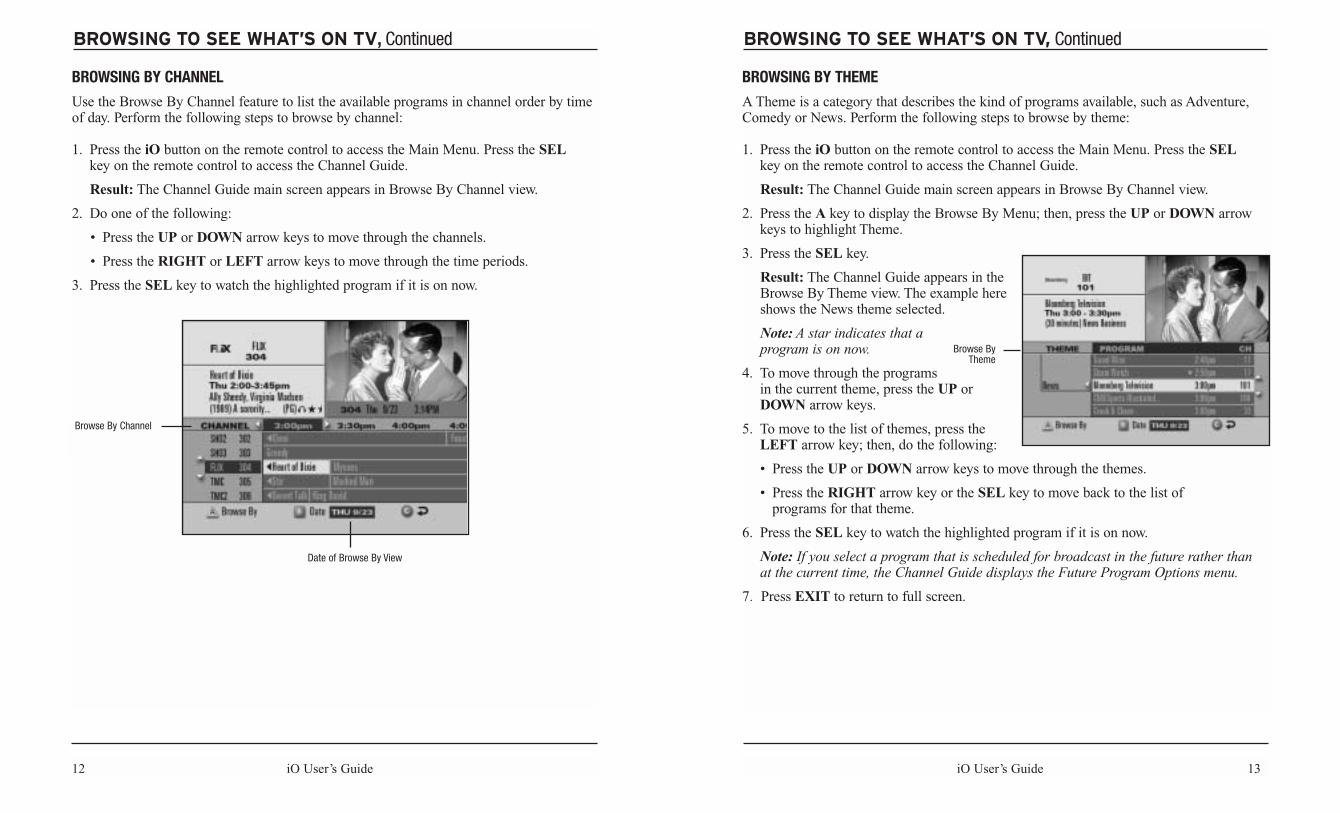
BROWSING BY THEME
A Theme is a category that describes the kind of programs available, such as Adventure,Comedy or News. Perform the following steps to browse by theme:
1. Press the iO button on the remote control to access the Main Menu. Press the SELkey on the remote control to access the Channel Guide.
Result: The Channel Guide main screen appears in Browse By Channel view.
2. Press the A key to display the Browse By Menu; then, press the UP or DOWN arrowkeys to highlight Theme.
3. Press the SEL key.
Result: The Channel Guide appears in the Browse By Theme view. The example here shows the News theme selected.
Note: A star indicates that aprogram is on now.
4. To move through the programsin the current theme, press the UP orDOWN arrow keys.
5. To move to the list of themes, press theLEFT arrow key; then, do the following:
• Press the UP or DOWN arrow keys to move through the themes.
• Press the RIGHT arrow key or the SEL key to move back to the list of programs for that theme.
6. Press the SEL key to watch the highlighted program if it is on now.
Note: If you select a program that is scheduled for broadcast in the future rather than at the current time, the Channel Guide displays the Future Program Options menu.
7. Press EXIT to return to full screen.
Browse By Theme
BROWSING TO SEE WHAT’S ON TV, Continued
BROWSING BY CHANNEL
Use the Browse By Channel feature to list the available programs in channel order by timeof day. Perform the following steps to browse by channel:
1. Press the iO button on the remote control to access the Main Menu. Press the SELkey on the remote control to access the Channel Guide.
Result: The Channel Guide main screen appears in Browse By Channel view.
2. Do one of the following:
• Press the UP or DOWN arrow keys to move through the channels.
• Press the RIGHT or LEFT arrow keys to move through the time periods.
3. Press the SEL key to watch the highlighted program if it is on now.
Browse By Channel
Date of Browse By View
iO User’s Guide 15
ORDERING PAY PER VIEW (PPV)
WHAT IS PAY PER VIEW?
Pay Per View (PPV) events are special programs, or sporting events, that may be offered byCablevision and billed as separate items on your cable bill. You only pay for the programsyou order. You can order PPV events by pressing a key on your remote control.
The PPV symbol indicates PPV channels.
ORDERING PPV
Perform the following steps to order PPV events:
1. Press the iO button on the remote control to access the Main Menu. Press the SEL keyon the remote control to access the Channel Guide.
Result: The Channel Guide main screen appears in Browse By Channel.
2. Press the UP, DOWN, RIGHT, andLEFT arrow keys to find the event youwant to purchase. Look for the PPVsymbol that indicates PPV channels.
3. Press the SEL key; then, do one of thefollowing:
• If the event is scheduled for futurebroadcast, the Channel Guide displaysthe Future Program Options menu.Follow the instructions on the screen.
• If the event is about to be broadcast,the purchase screen appears with theevent information. Press the B key tobuy the event, or follow the instructionson the screen.
Result: If you have a PersonalIdentification Number (PIN) for PPVpurchases, the PIN Entry screen appears.
4. Enter your PIN to authorize the PPVpurchase, if required.
14 iO User’s Guide
BROWSING TO SEE WHAT’S ON TV, Continued
BROWSING BY A DIFFERENT DATE
You can view upcoming program information for up to seven days in advance by changingthe date you are browsing. Perform the following steps to browse by a different date:
1. Press the iO button on the remote control to access the Main Menu. Press the SEL keyon the remote control to access the Channel Guide.
Result: The Channel Guide main screen appears in Browse By Channel view.
2. Press the B key to view the Date menu.
Note: You can also select the Date screen while using the Browse By Theme and BrowseBy Title features of the Channel Guide.
3. Press the UP or DOWN arrow keys to highlight the date you want to view.
4. Press the SEL key.
Result: Programs for the selected date appear.
Browse By Date
iO User’s Guide 17
ORDERING PAY PER VIEW (PPV), Continued
CANCELING A PPV ORDER
You can cancel an order from the General Settings menu. Perform the following steps tocancel a PPV order:
1. Press the SETTINGS key twice.
2. At the General Settings menu, press the UP or DOWN arrow keys to highlight PPV:Purchases; then, press the SEL key.
3. Enter your Purchase PIN, if required.
4. Press the UP or DOWN arrow keys to highlight Pending; then, press the SEL key.
Result: The Channel Guide displays a list of events that you have ordered.
5. Press the UP or DOWN arrow keys to highlight the program you want to cancel; then,press the SEL key.
6. Press the A key to confirm the cancellation.
Result: The order is canceled.
7. Press EXIT to return to watching TV.
CHANGING YOUR PURCHASE PIN
You can change your Purchase PIN from the General Settings menu. Perform the followingsteps to change your Purchase PIN:
1. Press the SETTINGS key twice.
2. At the General Settings menu, press theUP or DOWN arrow keys to highlightPurchase: PIN.
3. Press the SEL key.
4. Press the UP or DOWN arrow keysto highlight Change.
5. Press the SEL key.
6. Enter your CURRENT PIN.
7. Enter your NEW PIN.
8. Reenter your new PIN for confirmation.
9. Press the EXIT key to return to watching TV.
16 iO User’s Guide
ORDERING PAY PER VIEW (PPV), Continued
Note: After the purchase has been authorized, a confirmation message appears for a fewseconds if the program has already started. Otherwise, an attention screen counts downuntil the program begins.
REVIEWING WHAT YOU HAVE ORDERED
After you purchase a PPV event, the channel banner indicates PPV programs youhave purchased with a dollar symbol.
You can also review your PPV purchases from the General Settings menu:
• Pre-Purchased Programs purchased by phone, but not yet shown
• Pending Programs purchased using the remote control
• Past Previously purchased programs and programs in progress
Perform the following steps to review PPV purchases:
1. Press the SETTINGS key twice.
2. At the General Settings menu, press the UP or DOWN arrow keys to highlightPPV: Purchases.
3. Press SEL.
4. Enter your Purchase PIN, if required.
5. Press the UP or DOWN arrow keys tohighlight Past, Pre-Purchased or Pending.
6. Press the SEL key.
Result: The screen displays a list of events that you have ordered.
7. Press the EXIT key to return to watching TV.
USING PARENTAL CONTROL, Continued
18 iO User’s Guide
USING PARENTAL CONTROL
TAKE CONTROL – IT’S EASY!
The Parental Control feature allows you to decide what TV content is appropriate for your family by setting viewing restrictions and spending limits. Simply follow the Parental Control set up steps in this Guide – it’s that easy!
WHAT IS PARENTAL CONTROL?
The Parental Control feature allows you to block programs by channel, program rating ortime of day. You select the channels, ratings or times to block from the General Settingsmenu. You set up Parental Control and turn it on and off for the entire system by enteringyour Personal Identification Number (PIN). When you turn the Parental Control feature on,you cannot view blocked programs without entering your PIN.
A padlock symbol on the Channel Banner indicates that a channel or program isblocked, or that a part of the program is blocked by time or rating.
You can turn off all Parental Control, or you can selectively unblock a single program,channel or time period.
When the Parental Control feature is off, an open or unlocked padlock symbol onthe Channel Banner identifies each channel or program that would be blocked ifthe Parental Control feature were on.
CHANGING YOUR PARENTAL CONTROL BLOCKING PIN
You can enable, disable or change your Parental Control Blocking PIN from the GeneralSettings menu:
1. Press the SETTINGS key twice.
2. At the General Settings menu, press the UP or DOWN keys to highlightBlock: PIN; then, press the SEL key.
3. Press the UP or DOWN arrow keys to highlight Change; then, press the SEL key.
4. Enter your CURRENT PIN.
5. Enter your NEW PIN.
6. Reenter your new PIN for confirmation.
7. Press the EXIT key to return to watching TV.
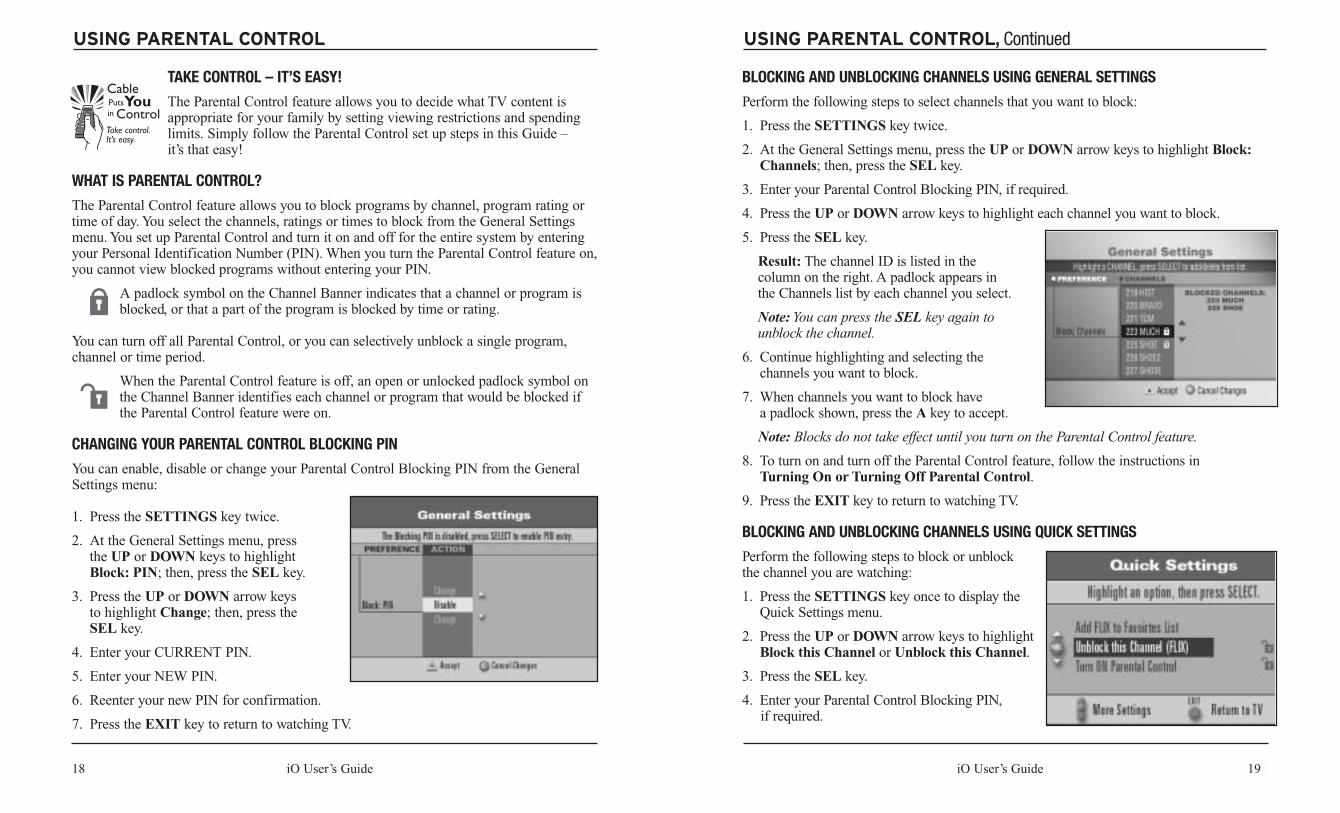
BLOCKING AND UNBLOCKING CHANNELS USING GENERAL SETTINGS
Perform the following steps to select channels that you want to block:
1. Press the SETTINGS key twice.
2. At the General Settings menu, press the UP or DOWN arrow keys to highlight Block:Channels; then, press the SEL key.
3. Enter your Parental Control Blocking PIN, if required.
4. Press the UP or DOWN arrow keys to highlight each channel you want to block.
5. Press the SEL key.
Result: The channel ID is listed in thecolumn on the right. A padlock appears in the Channels list by each channel you select.
Note: You can press the SEL key again to unblock the channel.
6. Continue highlighting and selecting thechannels you want to block.
7. When channels you want to block have a padlock shown, press the A key to accept.
Note: Blocks do not take effect until you turn on the Parental Control feature.
8. To turn on and turn off the Parental Control feature, follow the instructions inTurning On or Turning Off Parental Control.
9. Press the EXIT key to return to watching TV.
BLOCKING AND UNBLOCKING CHANNELS USING QUICK SETTINGS
Perform the following steps to block or unblockthe channel you are watching:
1. Press the SETTINGS key once to display theQuick Settings menu.
2. Press the UP or DOWN arrow keys to highlightBlock this Channel or Unblock this Channel.
3. Press the SEL key.
4. Enter your Parental Control Blocking PIN,if required.
iO User’s Guide 19
iO User’s Guide 21
USING PARENTAL CONTROL, Continued
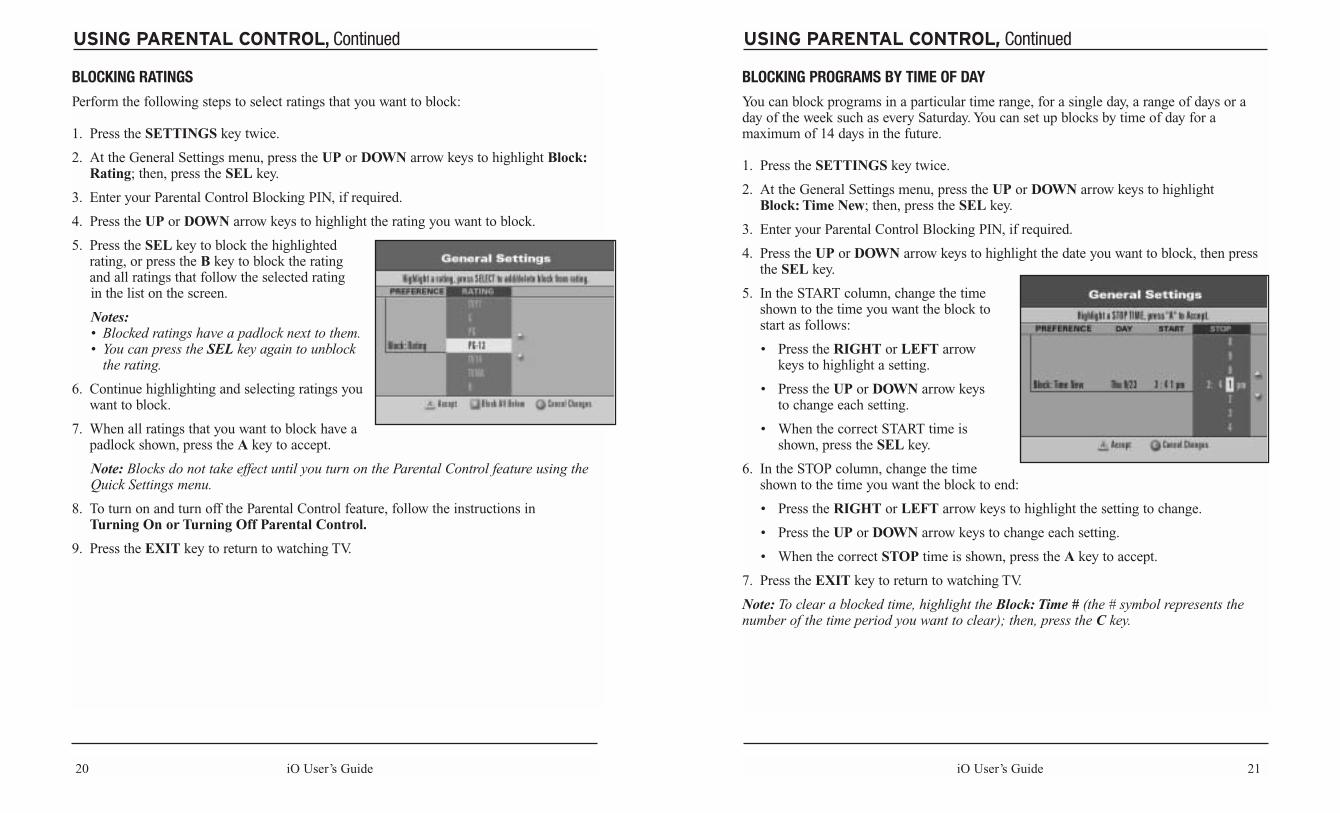
BLOCKING PROGRAMS BY TIME OF DAY
You can block programs in a particular time range, for a single day, a range of days or aday of the week such as every Saturday. You can set up blocks by time of day for amaximum of 14 days in the future.
1. Press the SETTINGS key twice.
2. At the General Settings menu, press the UP or DOWN arrow keys to highlight Block: Time New; then, press the SEL key.
3. Enter your Parental Control Blocking PIN, if required.
4. Press the UP or DOWN arrow keys to highlight the date you want to block, then pressthe SEL key.
5. In the START column, change the timeshown to the time you want the block tostart as follows:
• Press the RIGHT or LEFT arrow keys to highlight a setting.
• Press the UP or DOWN arrow keys to change each setting.
• When the correct START time is shown, press the SEL key.
6. In the STOP column, change the timeshown to the time you want the block to end:
• Press the RIGHT or LEFT arrow keys to highlight the setting to change.
• Press the UP or DOWN arrow keys to change each setting.
• When the correct STOP time is shown, press the A key to accept.
7. Press the EXIT key to return to watching TV.
Note: To clear a blocked time, highlight the Block: Time # (the # symbol represents the number of the time period you want to clear); then, press the C key.
20 iO User’s Guide
USING PARENTAL CONTROL, Continued
BLOCKING RATINGS
Perform the following steps to select ratings that you want to block:
1. Press the SETTINGS key twice.
2. At the General Settings menu, press the UP or DOWN arrow keys to highlight Block:Rating; then, press the SEL key.
3. Enter your Parental Control Blocking PIN, if required.
4. Press the UP or DOWN arrow keys to highlight the rating you want to block.
5. Press the SEL key to block the highlightedrating, or press the B key to block the ratingand all ratings that follow the selected rating in the list on the screen.
Notes:• Blocked ratings have a padlock next to them. • You can press the SEL key again to unblock
the rating.
6. Continue highlighting and selecting ratings youwant to block.
7. When all ratings that you want to block have apadlock shown, press the A key to accept.
Note: Blocks do not take effect until you turn on the Parental Control feature using the Quick Settings menu.
8. To turn on and turn off the Parental Control feature, follow the instructions in Turning On or Turning Off Parental Control.
9. Press the EXIT key to return to watching TV.
iO User’s Guide 23
USING PARENTAL CONTROL, Continued
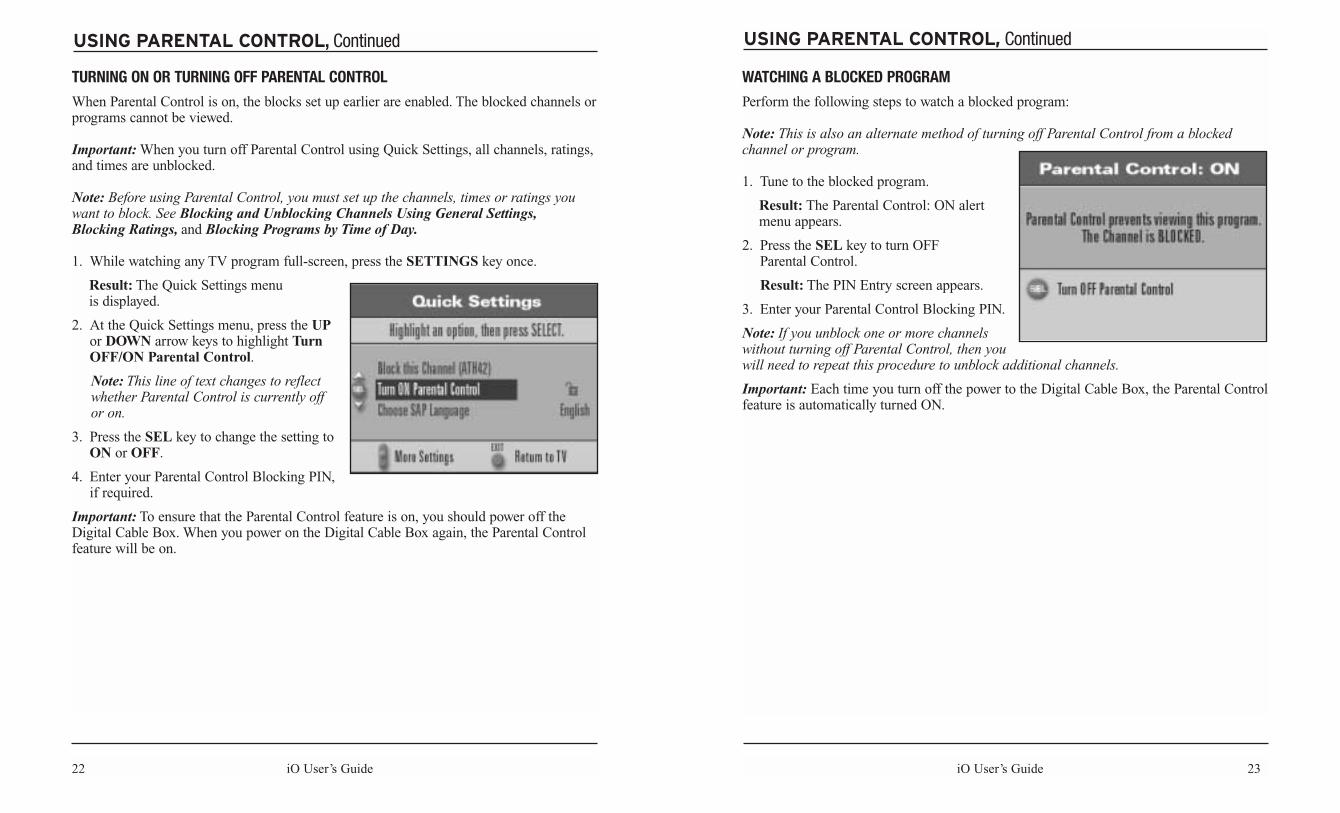
WATCHING A BLOCKED PROGRAM
Perform the following steps to watch a blocked program:
Note: This is also an alternate method of turning off Parental Control from a blockedchannel or program.
1. Tune to the blocked program.
Result: The Parental Control: ON alert menu appears.
2. Press the SEL key to turn OFF Parental Control.
Result: The PIN Entry screen appears.
3. Enter your Parental Control Blocking PIN.
Note: If you unblock one or more channelswithout turning off Parental Control, then you will need to repeat this procedure to unblock additional channels.
Important: Each time you turn off the power to the Digital Cable Box, the Parental Controlfeature is automatically turned ON.
22 iO User’s Guide
USING PARENTAL CONTROL, Continued
TURNING ON OR TURNING OFF PARENTAL CONTROL
When Parental Control is on, the blocks set up earlier are enabled. The blocked channels orprograms cannot be viewed.
Important: When you turn off Parental Control using Quick Settings, all channels, ratings,and times are unblocked.
Note: Before using Parental Control, you must set up the channels, times or ratings youwant to block. See Blocking and Unblocking Channels Using General Settings,Blocking Ratings, and Blocking Programs by Time of Day.
1. While watching any TV program full-screen, press the SETTINGS key once.
Result: The Quick Settings menu is displayed.
2. At the Quick Settings menu, press the UPor DOWN arrow keys to highlight TurnOFF/ON Parental Control.
Note: This line of text changes to reflect whether Parental Control is currently off or on.
3. Press the SEL key to change the setting toON or OFF.
4. Enter your Parental Control Blocking PIN,if required.
Important: To ensure that the Parental Control feature is on, you should power off the Digital Cable Box. When you power on the Digital Cable Box again, the Parental Controlfeature will be on.
iO User’s Guide 25
SETTING TIMERS
WHAT ARE TIMERS?
You can set up several types of timers to turn on and turn off your Digital Cable Boxautomatically, and to remind you of programs to watch.
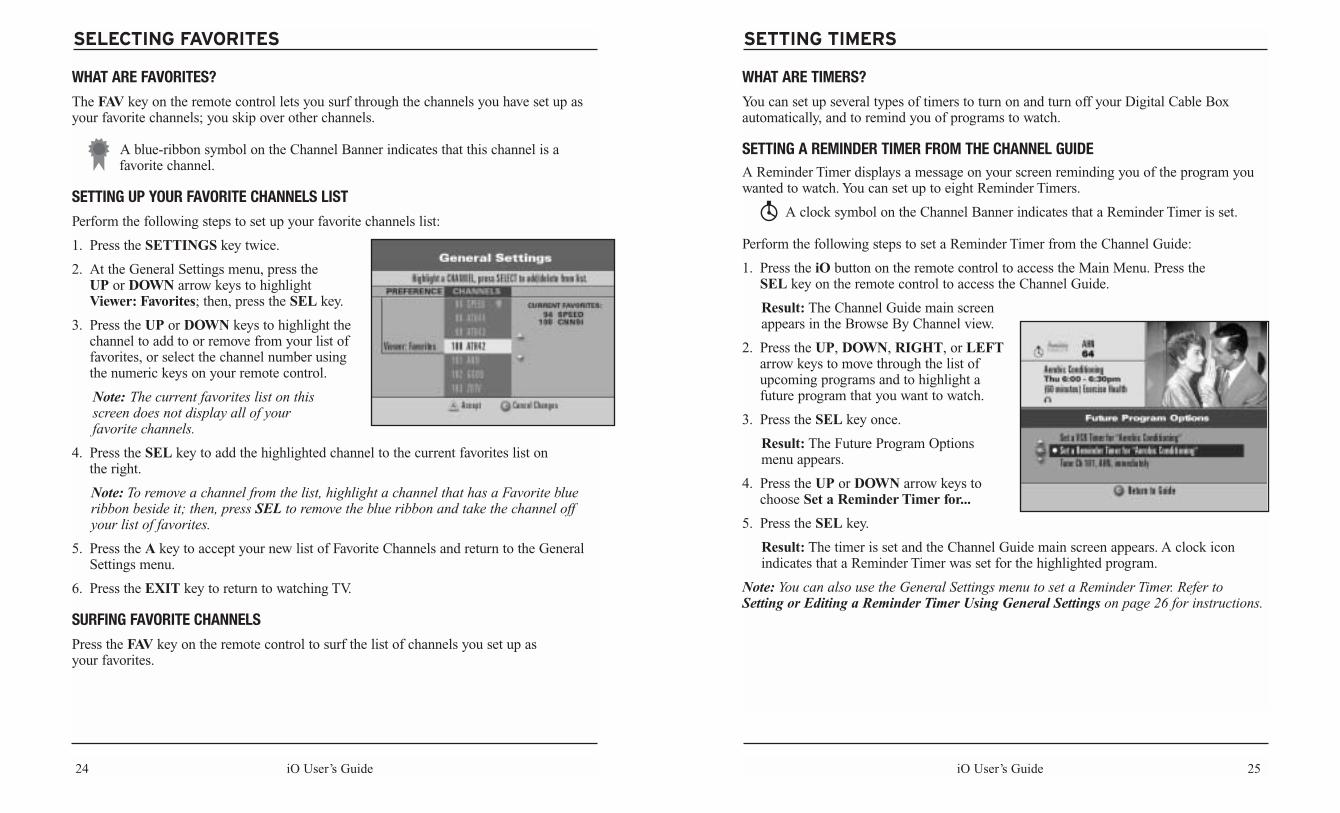
SETTING A REMINDER TIMER FROM THE CHANNEL GUIDEA Reminder Timer displays a message on your screen reminding you of the program youwanted to watch. You can set up to eight Reminder Timers.
A clock symbol on the Channel Banner indicates that a Reminder Timer is set.
Perform the following steps to set a Reminder Timer from the Channel Guide:
1. Press the iO button on the remote control to access the Main Menu. Press the SEL key on the remote control to access the Channel Guide.
Result: The Channel Guide main screen appears in the Browse By Channel view.
2. Press the UP, DOWN, RIGHT, or LEFTarrow keys to move through the list ofupcoming programs and to highlight afuture program that you want to watch.
3. Press the SEL key once.
Result: The Future Program Options menu appears.
4. Press the UP or DOWN arrow keys tochoose Set a Reminder Timer for...
5. Press the SEL key.
Result: The timer is set and the Channel Guide main screen appears. A clock icon indicates that a Reminder Timer was set for the highlighted program.
Note: You can also use the General Settings menu to set a Reminder Timer. Refer to Setting or Editing a Reminder Timer Using General Settings on page 26 for instructions.
24 iO User’s Guide
SELECTING FAVORITES
WHAT ARE FAVORITES?
The FAV key on the remote control lets you surf through the channels you have set up asyour favorite channels; you skip over other channels.
A blue-ribbon symbol on the Channel Banner indicates that this channel is a favorite channel.
SETTING UP YOUR FAVORITE CHANNELS LIST
Perform the following steps to set up your favorite channels list:
1. Press the SETTINGS key twice.
2. At the General Settings menu, press the UP or DOWN arrow keys to highlightViewer: Favorites; then, press the SEL key.
3. Press the UP or DOWN keys to highlight thechannel to add to or remove from your list offavorites, or select the channel number usingthe numeric keys on your remote control.
Note: The current favorites list on this screen does not display all of your favorite channels.
4. Press the SEL key to add the highlighted channel to the current favorites list on the right.
Note: To remove a channel from the list, highlight a channel that has a Favorite blueribbon beside it; then, press SEL to remove the blue ribbon and take the channel offyour list of favorites.
5. Press the A key to accept your new list of Favorite Channels and return to the GeneralSettings menu.
6. Press the EXIT key to return to watching TV.
SURFING FAVORITE CHANNELS
Press the FAV key on the remote control to surf the list of channels you set up asyour favorites.
iO User’s Guide 27
SETTING TIMERS, Continued
SETTING A VCR TIMER FROM THE CHANNEL GUIDE
A VCR Timer tunes your Digital Cable Box to a particular channel at the proper time torecord a program. You can set up to eight VCR timers.
A REC symbol on the Channel Banner indicates that a VCR Timer is set.
Perform the following steps to set a VCR Timer from the Channel Guide:
1. Press the iO button on the remote control to access the Main Menu. Press the SEL keyon the remote control to access the Channel Guide.
Result: The Channel Guide main screen appears in the Browse By Channel view.
2. Press the UP, DOWN, RIGHT or LEFT arrow keys to move through the list of futureprograms and to highlight the future program that you want to record.
3. Press the SEL key once.
Result: The Future Program Optionsscreen appears.
4. Press the UP or DOWN arrow keys tochoose Set a VCR Timer for…
5. Press the SEL key.
Result: The timer is set and the ChannelGuide main screen appears. A REC icon indicates that a record timer was set for the highlighted program.
Notes:• If you select a blocked channel, rating or time for this VCR Timer, a prompt requests you
to enter your Parental Control Blocking PIN.• When you set a VCR timer, you must program your VCR for the proper time.
VCR COMMANDER
Cablevision offers the VCR Commander service to all Digital Cable Subscribers. You can purchase a VCR Commander cable at your local Cablevision Walk-In-Center. No additional service fees apply.
The VCR Commander is a feature that allows your Digital Cable Box to automaticallyprogram your VCR for recording. Just tune your Digital Cable Box to the channel youwish to tape, power off your VCR and select the shows you wish to record on the ChannelGuide. Then, just insert a tape in your VCR and let VCR Commander do the rest!
Note: For set up information, refer to the guide that accompanies the VCR Commander cable.
26 iO User’s Guide
SETTING TIMERS, Continued
SETTING OR EDITING A REMINDER TIMER USING GENERAL SETTINGS
Perform the following steps to set or edit a Reminder Timer using the General Settings menu:
1. Press the SETTINGS key twice.
2. At the General Settings menu, press the UP or DOWN arrow keys to highlight Timer:Remind New; then, press the SEL key.
Note: To edit a Reminder Timer, highlight the Reminder Timer number, then press the SEL key.
3. Press the UP or DOWN arrow keys to highlight the channel you want; then, press theSEL key, or select the channel number using the numeric keys on your remote control.
4. Press the UP or DOWN arrow keys tohighlight the date you want; then, press the SEL key.
5. In the START column, press the UP,DOWN, RIGHT or LEFT arrow keys toselect the start time for the program thatyou want to watch, or enter the time usingthe numeric keys on your remote control.
6. If all the information is correct, press theA key to accept the timer setting.
7. Press the EXIT key to return to watching TV.
Note: You can also set a Reminder Timer while using the Channel Guide. See Setting a Reminder Timer from the Channel Guide on page 25 for instructions.
iO User’s Guide 29
SETTING TIMERS, Continued
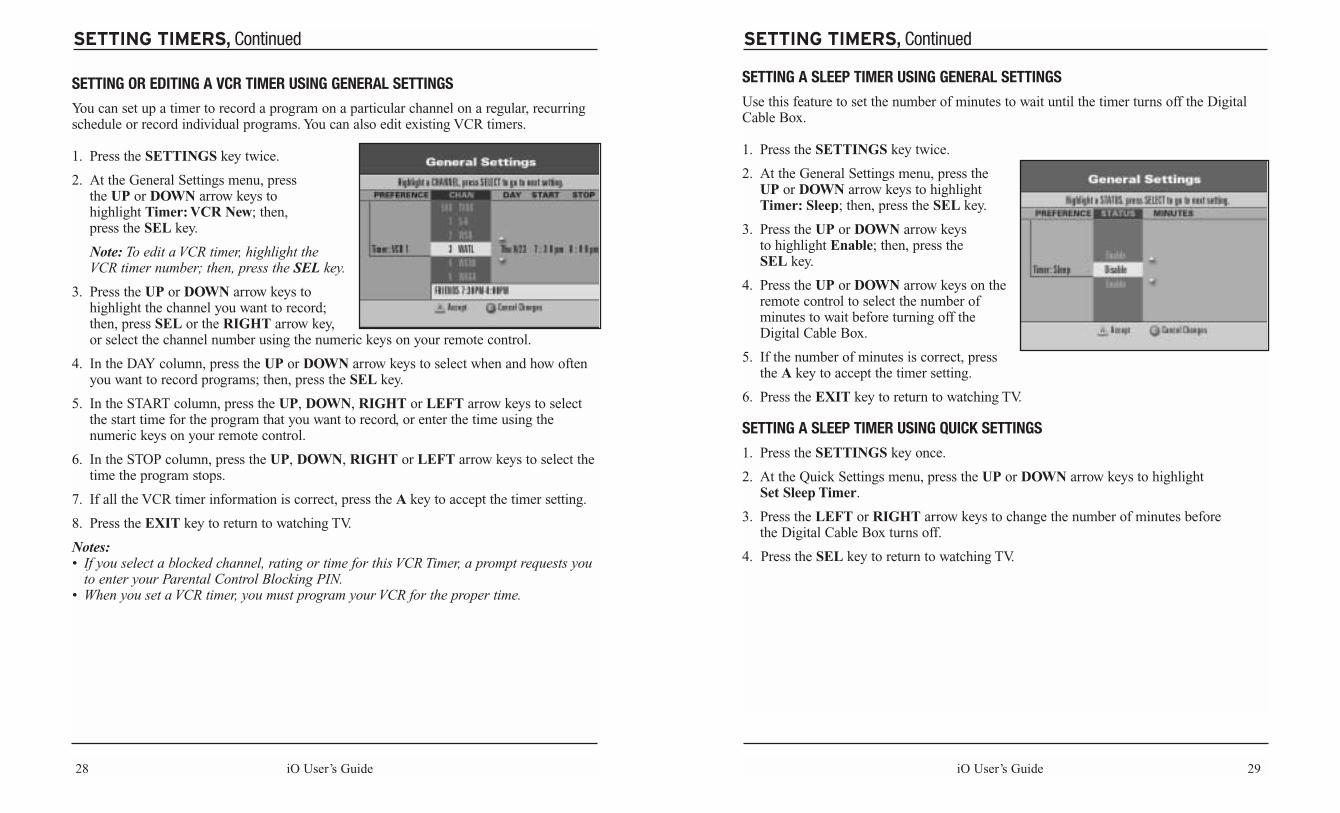
SETTING A SLEEP TIMER USING GENERAL SETTINGS
Use this feature to set the number of minutes to wait until the timer turns off the DigitalCable Box.
1. Press the SETTINGS key twice.
2. At the General Settings menu, press theUP or DOWN arrow keys to highlightTimer: Sleep; then, press the SEL key.
3. Press the UP or DOWN arrow keys to highlight Enable; then, press the SEL key.
4. Press the UP or DOWN arrow keys on theremote control to select the number ofminutes to wait before turning off theDigital Cable Box.
5. If the number of minutes is correct, pressthe A key to accept the timer setting.
6. Press the EXIT key to return to watching TV.
SETTING A SLEEP TIMER USING QUICK SETTINGS
1. Press the SETTINGS key once.
2. At the Quick Settings menu, press the UP or DOWN arrow keys to highlight Set Sleep Timer.
3. Press the LEFT or RIGHT arrow keys to change the number of minutes before the Digital Cable Box turns off.
4. Press the SEL key to return to watching TV.
28 iO User’s Guide
SETTING OR EDITING A VCR TIMER USING GENERAL SETTINGS
You can set up a timer to record a program on a particular channel on a regular, recurringschedule or record individual programs. You can also edit existing VCR timers.
1. Press the SETTINGS key twice.
2. At the General Settings menu, pressthe UP or DOWN arrow keys to highlight Timer: VCR New; then, press the SEL key.
Note: To edit a VCR timer, highlight the VCR timer number; then, press the SEL key.
3. Press the UP or DOWN arrow keys tohighlight the channel you want to record;then, press SEL or the RIGHT arrow key, or select the channel number using the numeric keys on your remote control.
4. In the DAY column, press the UP or DOWN arrow keys to select when and how oftenyou want to record programs; then, press the SEL key.
5. In the START column, press the UP, DOWN, RIGHT or LEFT arrow keys to selectthe start time for the program that you want to record, or enter the time using thenumeric keys on your remote control.
6. In the STOP column, press the UP, DOWN, RIGHT or LEFT arrow keys to select thetime the program stops.
7. If all the VCR timer information is correct, press the A key to accept the timer setting.
8. Press the EXIT key to return to watching TV.
Notes:• If you select a blocked channel, rating or time for this VCR Timer, a prompt requests you
to enter your Parental Control Blocking PIN.• When you set a VCR timer, you must program your VCR for the proper time.
SETTING TIMERS, Continued
iO User’s Guide 31
CANCELING TIMERS
CANCELING AN ACTIVE REC (RECORD) TIMER
If the VCR is actively recording a program, the Digital Cable Box power indicator must beon and you must use the remote control to cancel the active record timer.
1. If the Digital Cable Box power indicator is off, press the CBL key on the Digital CableBox or the remote control.
2. Press the EXIT key on the remote control.
Result: The recording is canceled.
CANCELING A REMINDER OR VCR TIMER FROM THE CHANNEL GUIDEYou can cancel an existing Reminder or VCR Timer while viewing the Channel Guide.
1. Press the iO button on the remote control to access the Main Menu. Press the SEL keyon the remote control to access the Channel Guide.
Result: The Channel Guide main screen appears in the Browse By Channel view.
2. Press the UP, DOWN, RIGHT or LEFT arrow keys to move through the list of upcomingprograms and highlight the future program for which you have already set a timer.
3. Press the SEL key once.
Result: The Future Program Options menu appears.
4. Press the UP or DOWN arrow keys to highlight the cancel option for the timer.
5. Press the SEL key on the remote control.
Result: The timer is now canceled.
CANCELING A TIMER USING GENERAL SETTINGSYou can cancel a timer from the General Settings menu.
1. Press the SETTINGS key twice.
2. At the General Settings menu, press the UP or DOWN arrow keys to highlight the timerthat you want to cancel.
3. Press the C key to clear (or cancel) the timer.
Result: The timer is canceled.
Note: You can also cancel a timer by highlighting Timer: All and pressing the SEL key. Using the UP or DOWN arrow keys, highlight the timer you want to cancel; then, press the SEL key to clear (or cancel) it.
4. Press EXIT to return to watching TV.
30 iO User’s Guide
SETTING A TIMER TO TURN OFF YOUR DIGITAL CABLE BOX
Use this feature to set the time of day to turn off the Digital Cable Box automatically.
1. Press the SETTINGS key twice.
2. At the General Settings menu, press theUP or DOWN keys to highlight Timer:Turn Off; then, press the SEL key.
3. Press the UP or DOWN arrow keys tohighlight Enable; then, press the SEL key.
4. Press the UP, DOWN, RIGHT or LEFTarrow keys on the remote control to set the day and time you want to turn off theDigital Cable Box, or enter the time usingthe numeric keys on your remote control.
5. When the correct time is shown, press the A key to accept the timer setting.
6. Press the EXIT key to return to watching TV.
SETTING A WAKE-UP TIMER
Use this feature to set the time of day for thetimer to turn on the Digital Cable Boxautomatically.
1. Press the SETTINGS key twice.
2. At the General Settings menu, press theUP or DOWN keys to highlight Timer:Wake-up; then, press the SEL key.
3. Press the UP or DOWN arrow keys tohighlight Enable; then, press the SEL key.
4. Press the UP, DOWN, RIGHT or LEFTarrow keys on the remote control to set the channel and time you want to turn on the Digital Cable Box.
5. When the correct time is shown, press the A key to set the timer.
6. Press the EXIT key to return to watching TV.
SETTING TIMERS, Continued
iO User’s Guide 33
USING SETTINGS
ABOUT SETTINGS
There are two ways to set options for the Digital Cable Box features while you arewatching TV full-screen:
• Press the SETTINGS key once to get to Quick Settings.
• Press the SETTINGS key twice to get to General Settings.
Quick Settings and General Settings are described in the following sections.
WHAT ARE QUICK SETTINGS?
The Quick Settings menu allows you to change quickly the features that you want tochange often. You can use Quick Settings to change the following features:
Add/Remove (Channel) Use this setting to add the channel you are watching to your presetto/from Favorites List list of favorites or to remove the channel from your list of favorites.
Block/Unblock Use this setting to toggle between block and unblock for the this Channel channel you are currently watching. This setting also adds and
removes channels to and from the blocked channels list.
Choose SAP Language Use this setting to select an audio language for digital channelsthat support this feature.
Enable/Disable SAP Use this setting to toggle between Enable and Disable for secondaudio programming for analog channels that support this feature.
Start Recording Now Use this setting to begin recording the channel you arewatching.
Set Sleep Timer Use this setting to set a sleep timer. This setting indicates OFFwhen the sleep timer is OFF, or the number of minutes beforethe Digital Cable Box turns off.
Turn ON/OFF Use this setting to toggle between OFF and ON for Parental Parental Control Control. Refer to Using Parental Control in this Guide for
details about setup.
32 iO User’s Guide
LISTENING TO MUSIC CHOICE
ABOUT DIGITAL MUSIC CHANNELS
Digital music channels are listed along with other channels in the Channel Guide. You tuneto a music channel just like any other channel.
Notes:
• You can add a music channel to your favorites list.
• You can set a reminder timer for a program on a music channel.
• You can record a program on a music channel.
TUNING TO DIGITAL MUSIC CHANNELS
If you know a digital music channel number, you can tune to it directly using the numberkeys on your remote control. If you do not know a digital music channel number, performthe following steps to find and tune to a digital music channel:
1. Press the iO button on the remote control to access the Main Menu. Press the SEL keyon the remote control to access the Channel Guide.
Result: The Channel Guide main screen appears in the Browse By Channel view.
2. Press the UP or DOWN arrow keys to move through the channels to highlight yourchoice of a digital music channel.
3. Press the SEL key to tune to a highlighted digital music channel.
Result: The music plays immediately through your TV speakers.
iO User’s Guide 35
USING SETTINGS, Continued
WHAT ARE GENERAL SETTINGS?
General Settings allow you to set up certain features of the Digital Cable Box according toyour preferences. Use the General Settings menu to control the following features:
Audio Use Audio settings to set audio preferences. Instructions for Audio settingsare provided in the following pages.
Block Use Block settings to set up Parental Control and to turn on and turn offParental Control Blocking. Refer to Using Parental Control in this Guidefor instructions.
Display Use Display settings to control what is displayed on the front panel of theDigital Cable Box when it is powered on.
Language Use Language settings to select languages for second audio programming(SAP) for digital channels and text for screen displays. Instructions forLanguage settings are provided in the following pages.
PPV Use PPV setting to view PPV purchase information. Refer to Ordering Pay Per View in this Guide for instructions.
Purchase Use Purchase setting to change Purchase PIN.
Set Use these settings to control the basic operation of your Digital Cable Box.Instructions for these settings are provided in the following pages.
Timer Use Timer settings to turn on and turn off your Digital Cable Box automatically at the times you schedule. Refer to Setting Timers in thisGuide for instructions.
Viewer Use Viewer settings to select your favorite channels for quick viewing and to set up the channel that the Digital Cable Box tunes to when first powered on. Instructions for Viewer settings are provided in the following pages.
34 iO User’s Guide
USING SETTINGS, Continued
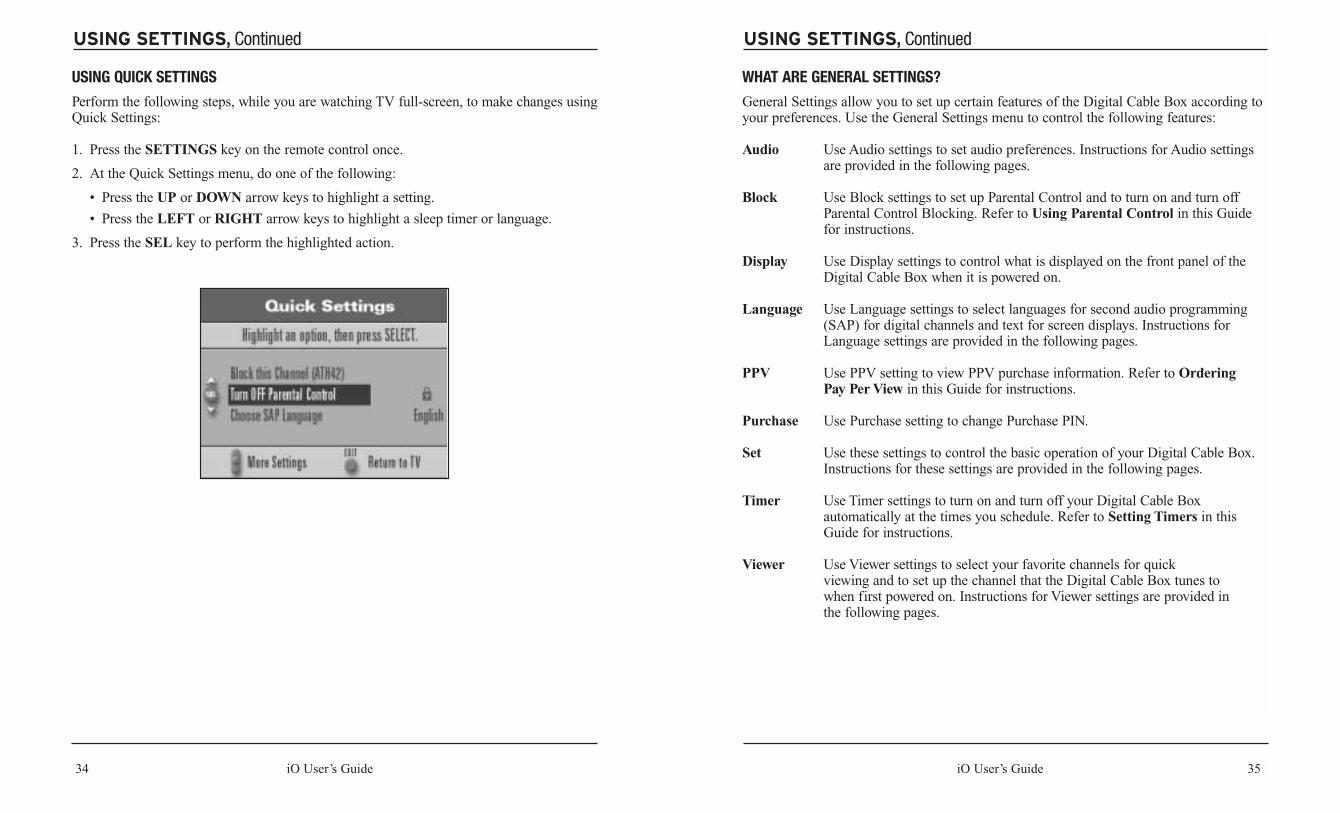
USING QUICK SETTINGS
Perform the following steps, while you are watching TV full-screen, to make changes usingQuick Settings:
1. Press the SETTINGS key on the remote control once.
2. At the Quick Settings menu, do one of the following:
• Press the UP or DOWN arrow keys to highlight a setting.
• Press the LEFT or RIGHT arrow keys to highlight a sleep timer or language.
3. Press the SEL key to perform the highlighted action.
iO User’s Guide 37
USING SETTINGS, Continued
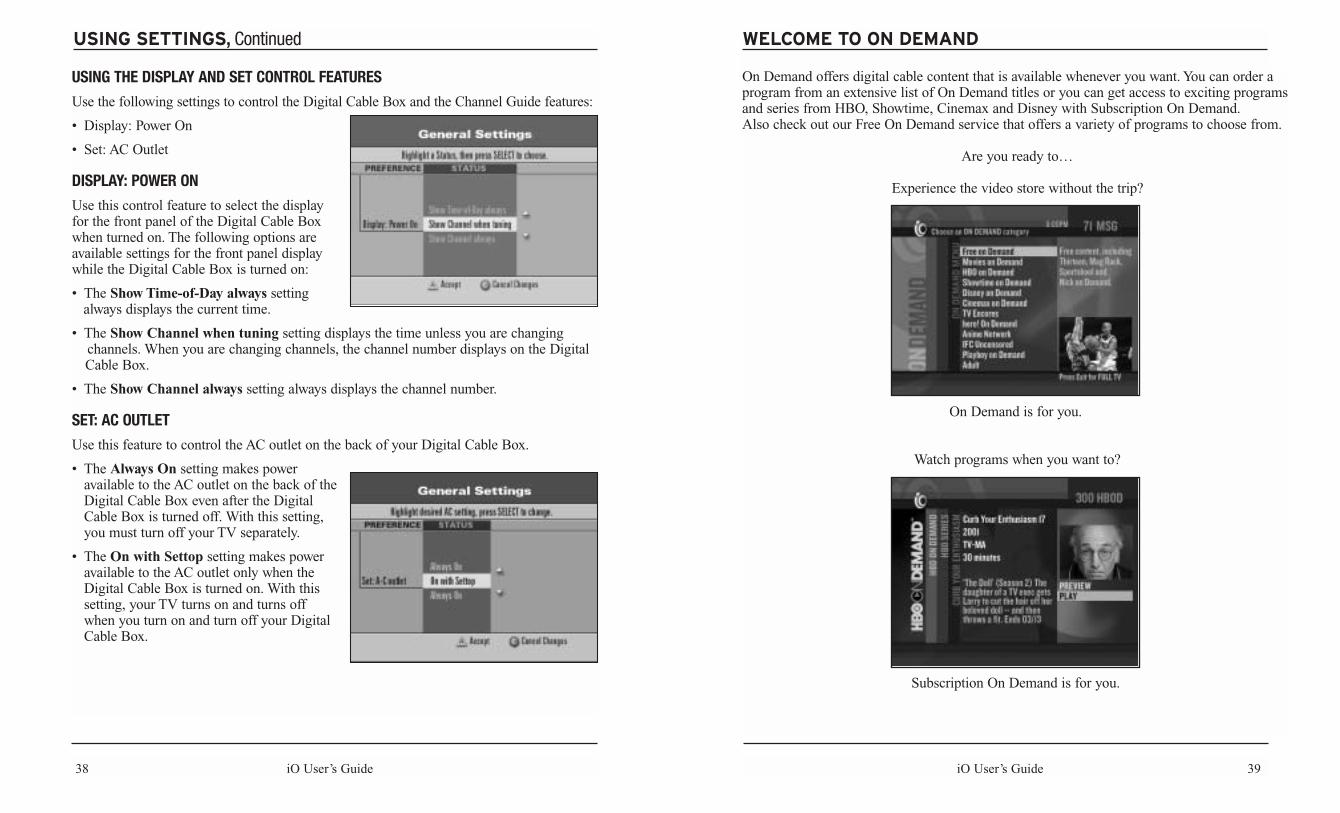
USING LANGUAGE SETTINGS
Use the language settings to select the second audio language for digital channels and textfor screen displays. The default language is English.
LANGUAGE: AUDIO
Use this feature to select the second audiolanguage to use for digital channels thatsupport more than one language.
Note: Refer to Using Quick Settings forinstructions on enabling SAP for analogchannels and for choosing an audio languagefor the digital channel that is currently tuned.
LANGUAGE: SCREEN
Use this feature to select the language you want the Digital Cable Box to display on thescreen and the Channel Guide.
USING AUDIO SETTINGS
Use the audio settings to set up your volumepreferences.
AUDIO: RANGE
Use this feature to set the dynamic range ofthe Dolby Digital volume. The setting Widemimics a movie theater or CD, using the entiredynamic range. The setting Narrow is idealfor programming that contains mostly dialogue.
AUDIO: VOLUME CONTROL
Use this feature to set the volume control to one of the following options:
The setting Fixed always provides maximum audio output. This setting is recommended ifyou control the volume using a stereo receiver. Use the Variable setting for all other meansof volume control.
Note: Refer to your Remote Control User’s Guide for instructions on programming theremote control to operate your TV.
36 iO User’s Guide
USING SETTINGS, Continued
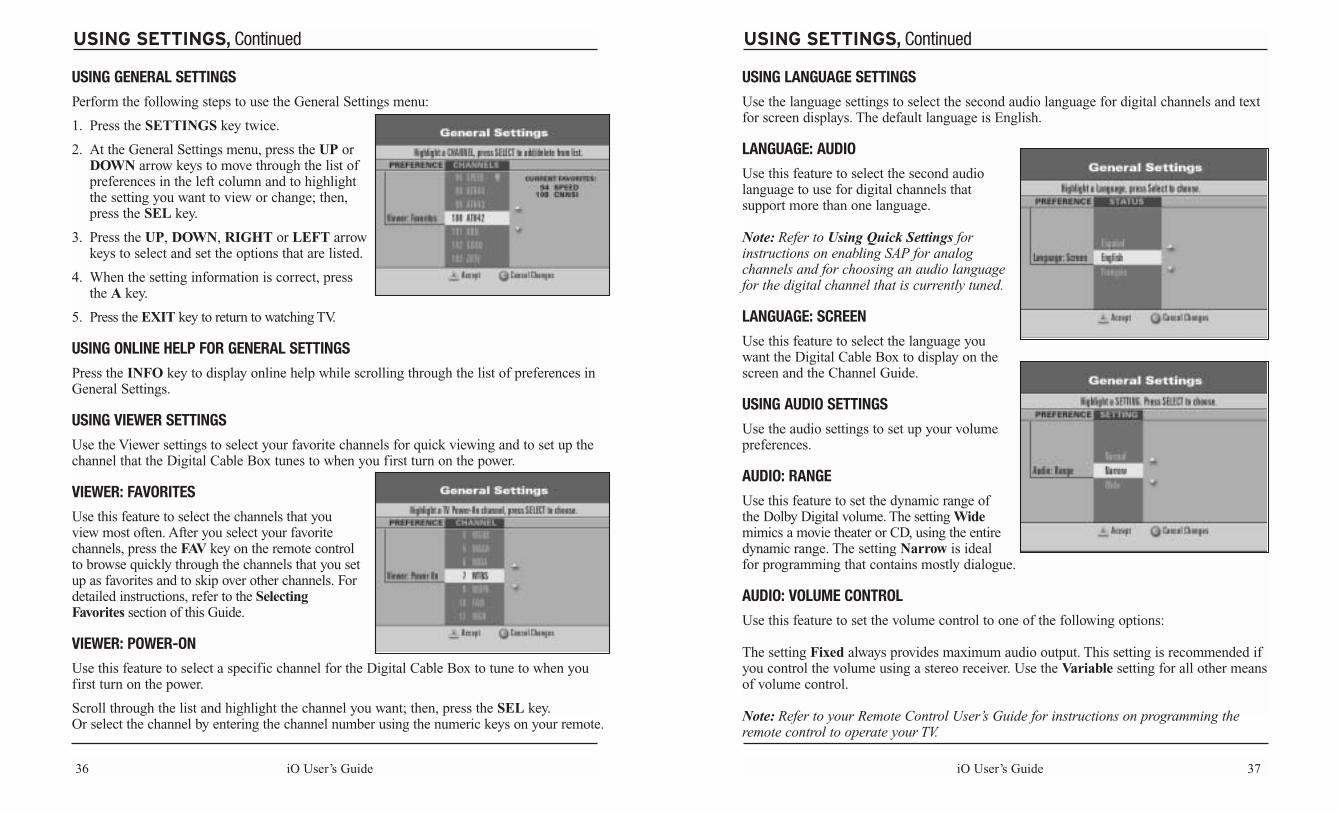
USING GENERAL SETTINGS
Perform the following steps to use the General Settings menu:
1. Press the SETTINGS key twice.
2. At the General Settings menu, press the UP orDOWN arrow keys to move through the list ofpreferences in the left column and to highlight the setting you want to view or change; then,press the SEL key.
3. Press the UP, DOWN, RIGHT or LEFT arrowkeys to select and set the options that are listed.
4. When the setting information is correct, press the A key.
5. Press the EXIT key to return to watching TV.
USING ONLINE HELP FOR GENERAL SETTINGS
Press the INFO key to display online help while scrolling through the list of preferences inGeneral Settings.
USING VIEWER SETTINGS
Use the Viewer settings to select your favorite channels for quick viewing and to set up thechannel that the Digital Cable Box tunes to when you first turn on the power.
VIEWER: FAVORITES
Use this feature to select the channels that youview most often. After you select your favoritechannels, press the FAV key on the remote controlto browse quickly through the channels that you setup as favorites and to skip over other channels. Fordetailed instructions, refer to the SelectingFavorites section of this Guide.
VIEWER: POWER-ON
Use this feature to select a specific channel for the Digital Cable Box to tune to when youfirst turn on the power.
Scroll through the list and highlight the channel you want; then, press the SEL key. Or select the channel by entering the channel number using the numeric keys on your remote.
iO User’s Guide 39
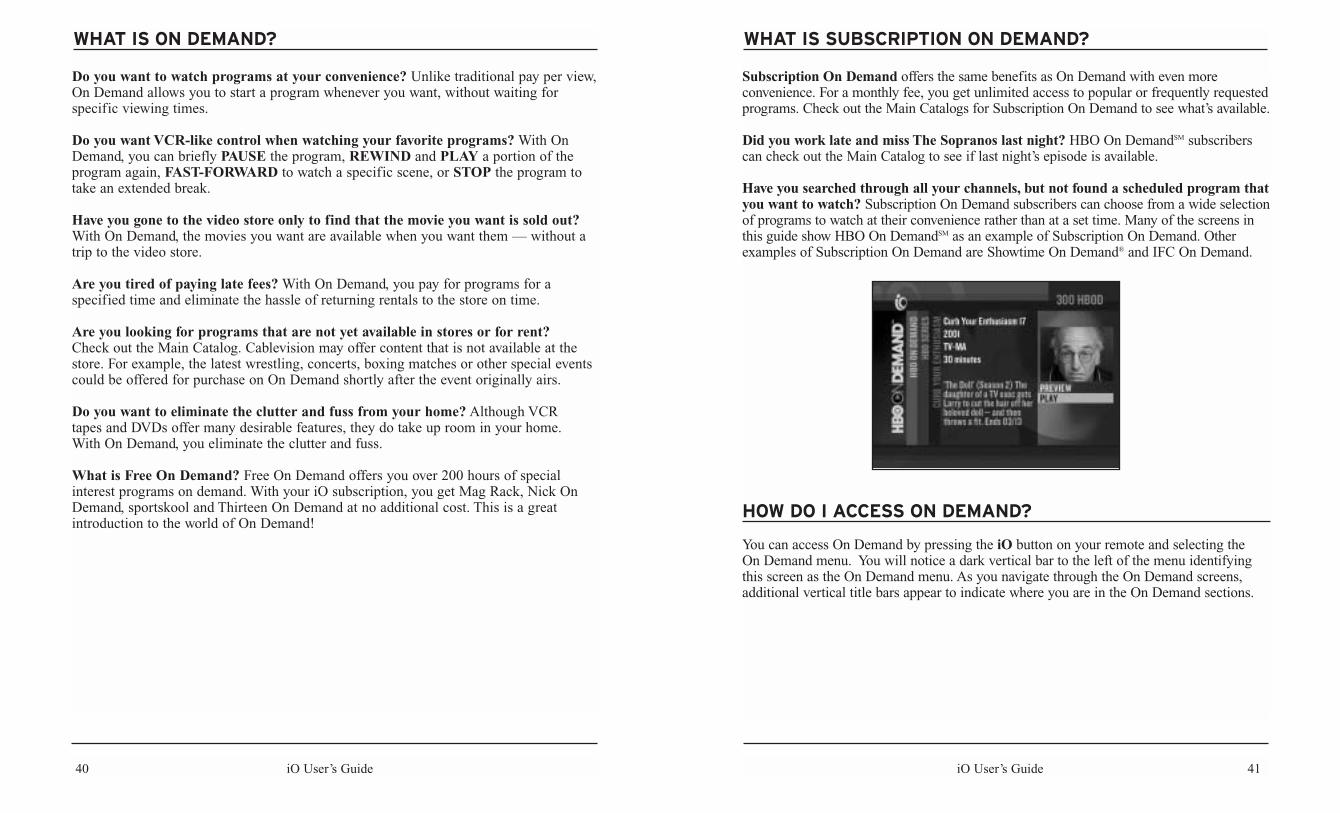
WELCOME TO ON DEMAND
On Demand offers digital cable content that is available whenever you want. You can order aprogram from an extensive list of On Demand titles or you can get access to exciting programsand series from HBO, Showtime, Cinemax and Disney with Subscription On Demand.Also check out our Free On Demand service that offers a variety of programs to choose from.
Are you ready to…
Experience the video store without the trip?
On Demand is for you.
Watch programs when you want to?
Subscription On Demand is for you.
38 iO User’s Guide
USING SETTINGS, Continued
USING THE DISPLAY AND SET CONTROL FEATURES
Use the following settings to control the Digital Cable Box and the Channel Guide features:
• Display: Power On
• Set: AC Outlet
DISPLAY: POWER ON
Use this control feature to select the displayfor the front panel of the Digital Cable Boxwhen turned on. The following options areavailable settings for the front panel displaywhile the Digital Cable Box is turned on:
• The Show Time-of-Day always setting always displays the current time.
• The Show Channel when tuning setting displays the time unless you are changing channels. When you are changing channels, the channel number displays on the Digital Cable Box.
• The Show Channel always setting always displays the channel number.
SET: AC OUTLET
Use this feature to control the AC outlet on the back of your Digital Cable Box.
• The Always On setting makes poweravailable to the AC outlet on the back of theDigital Cable Box even after the DigitalCable Box is turned off. With this setting,you must turn off your TV separately.
• The On with Settop setting makes poweravailable to the AC outlet only when theDigital Cable Box is turned on. With thissetting, your TV turns on and turns offwhen you turn on and turn off your DigitalCable Box.
iO User’s Guide 41
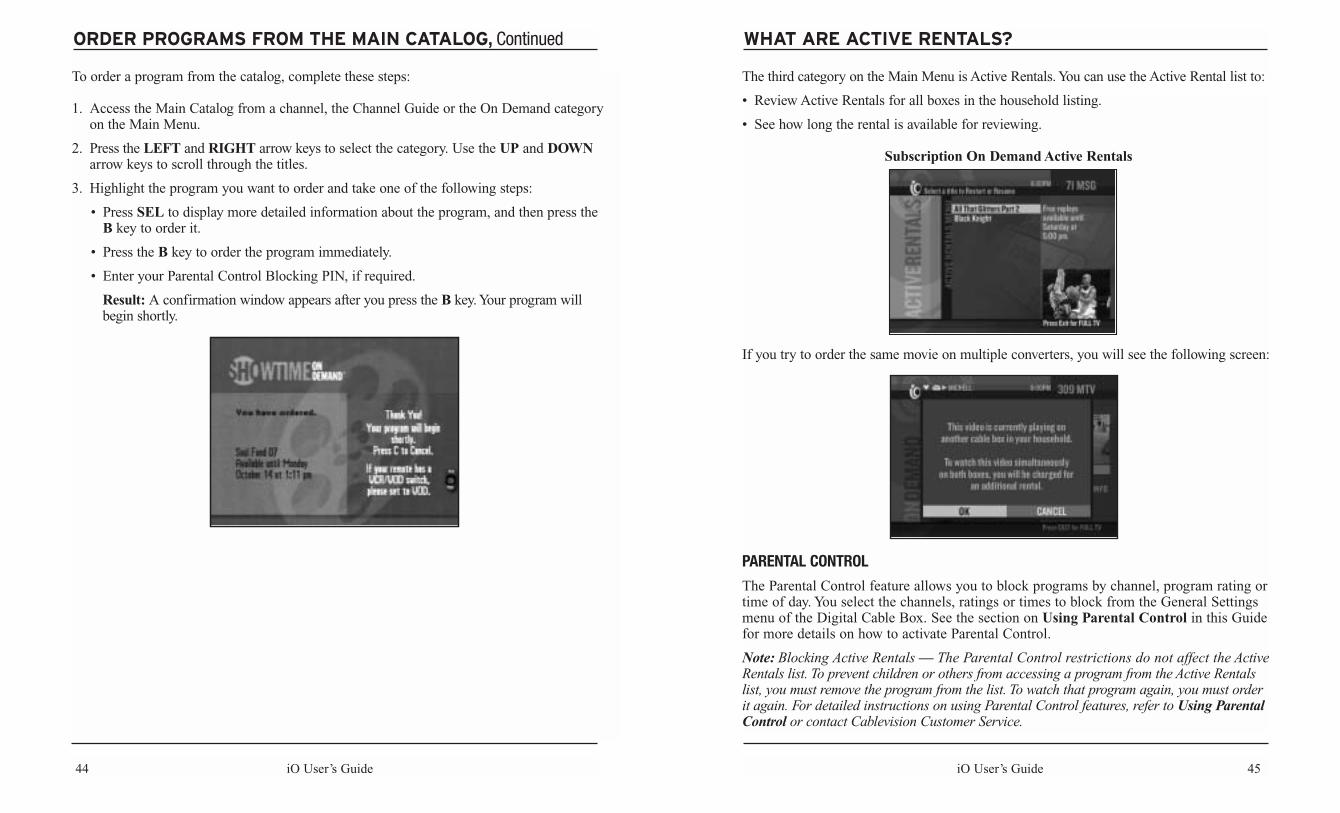
WHAT IS SUBSCRIPTION ON DEMAND?
Subscription On Demand offers the same benefits as On Demand with even moreconvenience. For a monthly fee, you get unlimited access to popular or frequently requestedprograms. Check out the Main Catalogs for Subscription On Demand to see what’s available.
Did you work late and miss The Sopranos last night? HBO On DemandSM subscriberscan check out the Main Catalog to see if last night’s episode is available.
Have you searched through all your channels, but not found a scheduled program thatyou want to watch? Subscription On Demand subscribers can choose from a wide selectionof programs to watch at their convenience rather than at a set time. Many of the screens inthis guide show HBO On DemandSM as an example of Subscription On Demand. Otherexamples of Subscription On Demand are Showtime On Demand® and IFC On Demand.
HOW DO I ACCESS ON DEMAND?
You can access On Demand by pressing the iO button on your remote and selecting the On Demand menu. You will notice a dark vertical bar to the left of the menu identifying this screen as the On Demand menu. As you navigate through the On Demand screens,additional vertical title bars appear to indicate where you are in the On Demand sections.
40 iO User’s Guide
WHAT IS ON DEMAND?
Do you want to watch programs at your convenience? Unlike traditional pay per view,On Demand allows you to start a program whenever you want, without waiting forspecific viewing times.
Do you want VCR-like control when watching your favorite programs? With OnDemand, you can briefly PAUSE the program, REWIND and PLAY a portion of the program again, FAST-FORWARD to watch a specific scene, or STOP the program totake an extended break.
Have you gone to the video store only to find that the movie you want is sold out?With On Demand, the movies you want are available when you want them — without atrip to the video store.
Are you tired of paying late fees? With On Demand, you pay for programs for aspecified time and eliminate the hassle of returning rentals to the store on time.
Are you looking for programs that are not yet available in stores or for rent?Check out the Main Catalog. Cablevision may offer content that is not available at thestore. For example, the latest wrestling, concerts, boxing matches or other special eventscould be offered for purchase on On Demand shortly after the event originally airs.
Do you want to eliminate the clutter and fuss from your home? Although VCR tapes and DVDs offer many desirable features, they do take up room in your home. With On Demand, you eliminate the clutter and fuss.
What is Free On Demand? Free On Demand offers you over 200 hours of specialinterest programs on demand. With your iO subscription, you get Mag Rack, Nick OnDemand, sportskool and Thirteen On Demand at no additional cost. This is a greatintroduction to the world of On Demand!
iO User’s Guide 43
ORDER PROGRAMS FROM THE MAIN CATALOG
There is a Main Catalog for each On Demand and Subscription On Demand service. You can access the Main Catalog directly from a channel, from the Channel Guide or theOn Demand category on the Main Menu.
Main Catalog For On Demand Channel
The Sub-Category Catalog lists the “titles” for the specific category you have chosen aswell as a brief description of the highlighted program.
Sub-Category Catalog
42 iO User’s Guide
TO ORDER SUBSCRIPTION ON DEMAND
You can order Subscription On Demand four different ways:
1. Tune to Channel 900 and use your remote to click on the Subscription On Demand channel you wish to order.
2. Tune to a channel that offers Subscription On Demand and use your remote to click on SUBSCRIBE NOW.
3. Use your remote to click on the On Demand category of the Main Menu and highlight the Subscription On Demand channel you want to order. Use your remote to click on SUBSCRIBE NOW.
4. Log on to www.iO.tv.
iO User’s Guide 45
WHAT ARE ACTIVE RENTALS?
The third category on the Main Menu is Active Rentals. You can use the Active Rental list to:
• Review Active Rentals for all boxes in the household listing.
• See how long the rental is available for reviewing.
Subscription On Demand Active Rentals
If you try to order the same movie on multiple converters, you will see the following screen:
PARENTAL CONTROL
The Parental Control feature allows you to block programs by channel, program rating ortime of day. You select the channels, ratings or times to block from the General Settingsmenu of the Digital Cable Box. See the section on Using Parental Control in this Guidefor more details on how to activate Parental Control.
Note: Blocking Active Rentals — The Parental Control restrictions do not affect the ActiveRentals list. To prevent children or others from accessing a program from the Active Rentalslist, you must remove the program from the list. To watch that program again, you must orderit again. For detailed instructions on using Parental Control features, refer to Using ParentalControl or contact Cablevision Customer Service.
44 iO User’s Guide
ORDER PROGRAMS FROM THE MAIN CATALOG, Continued
To order a program from the catalog, complete these steps:
1. Access the Main Catalog from a channel, the Channel Guide or the On Demand categoryon the Main Menu.
2. Press the LEFT and RIGHT arrow keys to select the category. Use the UP and DOWNarrow keys to scroll through the titles.
3. Highlight the program you want to order and take one of the following steps:
• Press SEL to display more detailed information about the program, and then press the B key to order it.
• Press the B key to order the program immediately.
• Enter your Parental Control Blocking PIN, if required.
Result: A confirmation window appears after you press the B key. Your program will begin shortly.
iO User’s Guide 47
ENHANCED TV
As an iO customer you can access Enhanced TV features including Entertainment, Newsand Sports, and Optimum Autos at no additional cost. To access Enhanced TV, start at theMain Menu and use the DOWN arrow key on your remote to choose ENHANCED TVand press SEL.
SERVICE UPGRADE
iO now offers the convenience of adding services to your current iO package right fromyour TV or online at www.iO.tv.
Simply tune to Channel 900. Using the ARROW keys, highlight the service you wish toorder and press SEL.
Note: Not all services can be upgraded with the service upgrade feature. If you cannotorder through your remote or website, please call Cablevision at 1-866-360-2758.
46 iO User’s Guide
An expired program is a program that you have ordered, but the amount of time left towatch the program has expired. The amount of time you have to watch a program varies. If you want to watch an expired program, you must return to the Main Catalog and orderthe program again. When you receive the message that a movie has expired, press EXIT toreturn to the previous channel you were watching.
Note: Because the available programs are regularly updated, your expired program maynot always be available for renewed viewing.
WANT THE CONVENIENCE OF A VCR OR DVD?
You can use the dedicated keys on your remote control to make your TV function similarlyto a VCR or DVD.
PAUSE A PROGRAM
While you are watching a program, you may want to leave the room briefly. Press PAUSEto pause the program for up to 15 minutes. When you return to the room, press PAUSEagain or press PLAY to resume watching the program. If you pause the program for anextended period of time, the Active Rentals list will appear with your program highlighted.Highlight PLAY and press SEL to pick up from where you left off.
FAST-FORWARD OR REWIND A PROGRAM
Let’s say you missed something in a program and you would like to see it again. Press REWIND to rewind the program to the missed scene, or you can continue pressing REWIND to go to the beginning of the program. If you rewind the programtoo far, press FAST-FORWARD to advance through the program.
STOP A PROGRAM
While you are watching a program, you may need to take an extended break. You can pressthe STOP key on the remote control to stop the program. The Active Rentals list shows afreeze-frame of the last program you were watching, and the title appears highlighted in thelist. To restart the program, you must go to the Active Rentals list to play the program fromwhere you left off or from the beginning.
WHAT ARE ACTIVE RENTALS?, Continued
HDTV SETUP WIZARD
SETTING UP YOUR HDTV DIGITAL CABLE BOX TO WORK WITH YOUR HDTV
Note: If you had your Digital Cable Box installed professionally, you will not have to gothrough this setup procedure unless you move your box to a different TV, or if you areexperiencing problems with your picture.
1. Set the display on your HDTV to normal (refer to the guide that came with your HDTV).
2. Turn off your Digital Cable Box.
3. Press the INFO and GUIDE keys (on the Digital Cable Box) simultaneously to access the HDTV Setup program.
4. Choose the output that represents the connection to your HDTV. Most likely option A ‘Y,Pb, Pr output’.
5. Choose the correct screen size for your HDTV. See picture on the previous page for help.
6. Set the picture format. The recommended option is C, which will allow you to save only those formats (or scan rates) that your HDTV can display. To save the formats that are compatible with your HDTV:
• Choose OPTION C.
• Press A to acknowledge that the HDTV monitor is in Normal display mode.
• Press A to cycle through, and test, the resolution options (720p, 480i, 1080i, etc.). If your TV does not support one of the options, you will see a blank screen – save only those scan rates that are compatible with your HDTV.
• Press EXIT.
• Press EXIT again.
• Press the POWER button on your cable box.
Now you can change Picture Formats safely by accessing the picture format option on theQuick Settings menu.
iO User’s Guide 49 48 iO User’s Guide
WELCOME TO HDTV
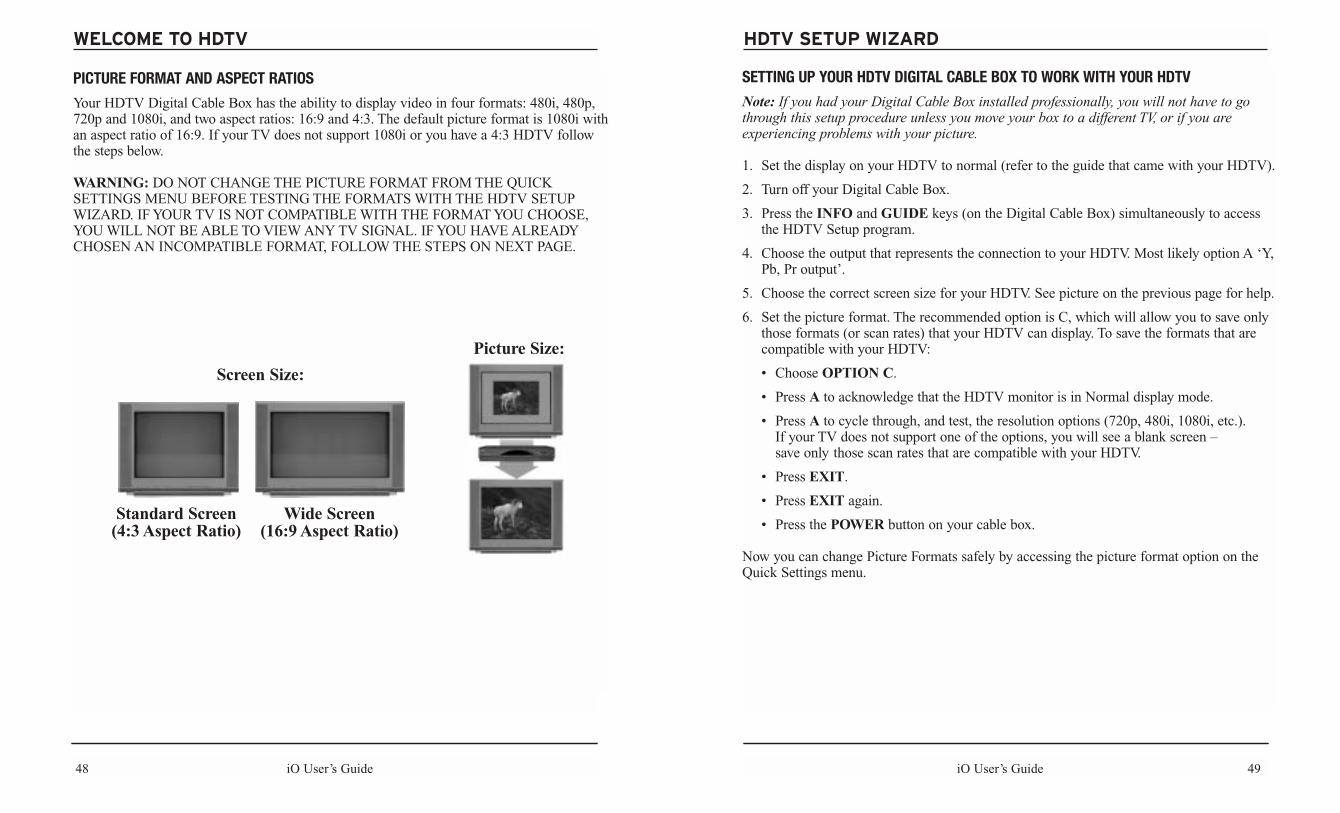
PICTURE FORMAT AND ASPECT RATIOS
Your HDTV Digital Cable Box has the ability to display video in four formats: 480i, 480p,720p and 1080i, and two aspect ratios: 16:9 and 4:3. The default picture format is 1080i withan aspect ratio of 16:9. If your TV does not support 1080i or you have a 4:3 HDTV followthe steps below.
WARNING: DO NOT CHANGE THE PICTURE FORMAT FROM THE QUICKSETTINGS MENU BEFORE TESTING THE FORMATS WITH THE HDTV SETUPWIZARD. IF YOUR TV IS NOT COMPATIBLE WITH THE FORMAT YOU CHOOSE,YOU WILL NOT BE ABLE TO VIEW ANY TV SIGNAL. IF YOU HAVE ALREADYCHOSEN AN INCOMPATIBLE FORMAT, FOLLOW THE STEPS ON NEXT PAGE.
Screen Size:
Picture Size:
Standard Screen(4:3 Aspect Ratio)
Wide Screen(16:9 Aspect Ratio)
HDTV SETUP WIZARD, Continued
Important Notice: Leaving your television on, and tuned to, any screen with non-movingimages including the iO Main Menu, Channel Guide or Side Bars (displayed whenwatching a (4:3) standard definition image on a (16:9) wide screen) for extended periodsmay damage your television screen. Please check the owner’s manual for your televisionfor specific warnings, or consult with your television manufacturer to learn more about theproperties and sensitivities of your television set.
CHANGING THE BORDER COLOR
On some channels, the setup may be displaying a border either on the right and left of thescreen or on the top and bottom. To adjust the display, see Adjusting the Size of YourPicture on the previous page. To change the color of the border, follow the steps below:
1. Press SETTINGS twice to access the General Settings menu.
2. Scroll to Set: TV Borders.
3. Press RIGHT arrow key to access the Light, Med, and Dark options.
4. Scroll through the options and select the border color of your choice.
5. Press A to accept the changes.
Visit www.iO.tv to find out more about HDTV.
iO User’s Guide 51 50 iO User’s Guide
HDTV SETUP WIZARD, Continued
ADJUSTING THE SIZE OF YOUR PICTURE
After the installation of your HDTV cable box, your standard definition channels (non-HD) may appear smaller than your TV screen, with bars on the left and right of the picture (see Diagram A). This isNORMAL, and is the intended format of non-HD broadcasts. If you would like to viewthe picture without the bars, you can “stretch” the picture by performing the following steps:
1. While watching any standard definition channel, press the SETTINGS key on your iO remote control (Diagram B). The Quick Settings menu should be displayed.
2. At the Quick Settings menu, use the UP or DOWN arrow keys on your iO remote (Diagram B) to highlight Picture Size (Diagram C). Press SEL on your iO remote to see the menu of picture formats available (Diagram B).
3. Scroll through the options until your television screen appears in the format of your choice.
4. Press the EXIT key on your iO remote to exitthe Quick Settings menu and return to your television viewing (Diagram B).
Note: To avoid conflicting settings, adjust picture size through your Digital Cable Box and not through the settings on your TV. See your User’s Guide for additional info about HDTV.
Diagram A
Diagram C
Quick Settings
Highlight an option, then press SELECT.
Block this Channel (ATH42)Picture SizeChoose SAP Language
More Settings Return to TV
English
EDIT
TPicture SizeSEL
Navigation keys
Diagram B
iO User’s Guide 53
GETTING CONNECTED, Continued
T8728
Cable Input
Backof TV
S VIDEO
VIDEO
VHF/UHF
LAUDIO
R
VIDEO IN1 3
120 VAC60Hz 40W
120 VAC 60Hz 400W
BYPASS
0003B4287797
SABDQXTL N0006246618
•2
CONNECTING A NON-STEREO TV
Note: Audio output from the Digital Cable Box CABLE OUT is monaural (non-stereo).
Required Cables1 �� ������� ���
Required Cables1
Connect the coaxial cable from the wall outlet to the Digital Cable Box’s CABLE IN jack.
Connect the Digital Cable Box’s TO TV/VCR jack to the TV’s VHF/UHF IN (or RF IN) jack.
Connect one end of the AC power cord to the Digital Cable Box’s AC IN jackand plug the other end into an AC outlet. Tune the TV to channel 3.
•1
•2
•3
•3
120 VAC60Hz 40W
120 VAC 60Hz 400W
BYPASS
0003B4287797
SABDQXTL N0006246618
Cable Input
Back of TV
T8729S VIDEO
VIDEO
VHF/UHF
LAUDIO
R
VIDEO IN1 3
CONNECTING A STEREO TV
•1
•2
•1
•1
•2
GETTING CONNECTED
1 S-Video Out Connects to S-Video Input of TV orVCR (standarddefinition).
2 Serial Number Located in the lower left corner of the barcode. Cablevision may ask for this number if your system requires troubleshooting in the future.
3 Digital Audio Out Connects to external digital inputs of surround-sound receiveror other digital services.
4 Audio Out Connects to left/right (L/R) audio inputs of a stereo receiveror a TV with stereo sound.
5 Video Out Connects to video input of TV or VCR.
6 Cable Out Connects to cable input of TV or VCR.
7 Cable In Connects to coaxial cable coming from the wall.
8 AC Outlet Connects the power cord from another device such as aTV.
9 AC Power Input Delivers power from the AC electrical outlet to the DigitalCable Box using the cord provided.
120 VAC60Hz 40W
120 VAC 60Hz 400W
BYPASS
0003B4287797
SABDQXTL N0006246618
4 51 2 3 6 87 9T10000
DIGITAL CABLE BOX BACK PANEL
52 iO User’s Guide
Connect the Digital Cable Box’s LINE OUT (TV) AUDIO/VIDEO jacks to the TV’s AUDIO/VIDEO IN jacks.
Note: If your TV has an S-VIDEO jack:For best picture quality, use an S-VIDEO connection instead of the yellow video cable on your combined A/V cable. Connect the Digital Cable Box’s S-VIDEO OUT jack to the TV’s S-VIDEO IN jack. S-VIDEO does not provide audio,so audio cables must still be connected.
Connect one end of the AC power cord to the Digital Cable Box’s AC IN jack and plugthe other end into an AC outlet. Tune the TV to channel 3.
Set of Video/Stereo Audio Cables
iO User’s Guide 55
GETTING CONNECTED, Continued
T8730
Back ofHome Theatre
Back of TVBack of VCR
S VIDEO
VIDEO
LAUDIO
R
VIDEO IN1 3
VIDEOCABLE/ANT.
CABLE/ANT.
AUDIO
LINE IN
LINE OUT
IN
OUT
RIGHTLEFT
VIDEO
MONITOR
AUDIO
LINE IN
LINE OUTOUT
RIGHTLEFT
120 VAC60Hz 40W
120 VAC 60Hz 400W
BYPASS
0003B4287797
SABDQXTL N0006246618
VIDEO FROM VCR
RECORDEDVIDEOOUT
AUDIO OUT
AUDIO FROM VCR
L R
Cable Input
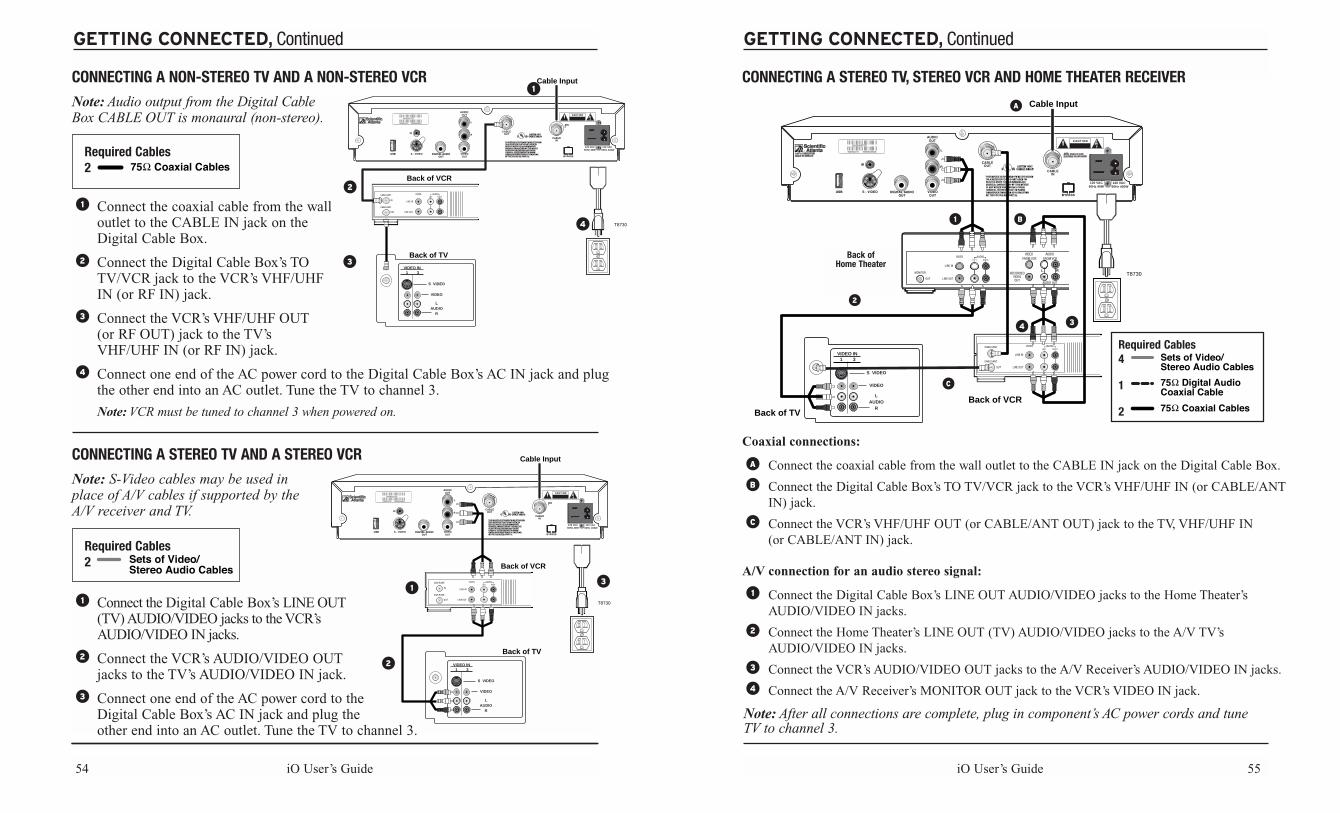
CONNECTING A STEREO TV, STEREO VCR AND HOME THEATER RECEIVER
A/V connection for an audio stereo signal:
Connect the Digital Cable Box’s LINE OUT AUDIO/VIDEO jacks to the Home Theater’s AUDIO/VIDEO IN jacks.
Connect the Home Theater’s LINE OUT (TV) AUDIO/VIDEO jacks to the A/V TV’s AUDIO/VIDEO IN jacks.
Connect the VCR’s AUDIO/VIDEO OUT jacks to the A/V Receiver’s AUDIO/VIDEO IN jacks.
Connect the A/V Receiver’s MONITOR OUT jack to the VCR’s VIDEO IN jack.
•1
•2
•3
•4
Coaxial connections:
Connect the coaxial cable from the wall outlet to the CABLE IN jack on the Digital Cable Box.
Connect the Digital Cable Box’s TO TV/VCR jack to the VCR’s VHF/UHF IN (or CABLE/ANTIN) jack.
Connect the VCR’s VHF/UHF OUT (or CABLE/ANT OUT) jack to the TV, VHF/UHF IN (or CABLE/ANT IN) jack.
•A
•B
•C
2
•3•4
•1
•A
•B
•C
54 iO User’s Guide
GETTING CONNECTED, Continued
T8730
Back of VCR
Back of TV
S VIDEO
VIDEO
LAUDIO
R
VIDEO IN1 3
VIDEOCABLE/ANT.
CABLE/ANT.
AUDIO
LINE IN
LINE OUT
IN
OUT
RIGHTLEFT
120 VAC60Hz 40W
120 VAC 60Hz 400W
BYPASS
0003B4287797
SABDQXTL N0006246618
Cable Input
T8730
Back of TV
S VIDEO
VIDEO
LAUDIO
R
VIDEO IN1 3
Back of VCR
VIDEOCABLE/ANT.
CABLE/ANT.
AUDIO
LINE IN
LINE OUT
IN
OUT
RIGHTLEFT
120 VAC60Hz 40W
120 VAC 60Hz 400W
BYPASS
0003B4287797
SABDQXTL N0006246618
Cable Input
•2
•4
CONNECTING A NON-STEREO TV AND A NON-STEREO VCR
Note: Audio output from the Digital Cable Box CABLE OUT is monaural (non-stereo).
Required Cables2 �� ������� ����
Connect the coaxial cable from the wall outlet to the CABLE IN jack on the Digital Cable Box.
Connect the Digital Cable Box’s TOTV/VCR jack to the VCR’s VHF/UHFIN (or RF IN) jack.
Connect the VCR’s VHF/UHF OUT (or RF OUT) jack to the TV’sVHF/UHF IN (or RF IN) jack.
Connect one end of the AC power cord to the Digital Cable Box’s AC IN jack and plugthe other end into an AC outlet. Tune the TV to channel 3.
Note: VCR must be tuned to channel 3 when powered on.
•1
•1 •3
•2
CONNECTING A STEREO TV AND A STEREO VCR
Note: S-Video cables may be used in place of A/V cables if supported by theA/V receiver and TV.
Required Cables2 ���� �� ����
������ � �� ������
Connect the Digital Cable Box’s LINE OUT(TV) AUDIO/VIDEO jacks to the VCR’s AUDIO/VIDEO IN jacks.
Connect the VCR’s AUDIO/VIDEO OUT jacks to the TV’s AUDIO/VIDEO IN jack.
Connect one end of the AC power cord to the Digital Cable Box’s AC IN jack and plug the other end into an AC outlet. Tune the TV to channel 3.
•3
•1
•2
•3
•4
•1
•2
•3
Back of Home Theater
Note: After all connections are complete, plug in component’s AC power cords and tune TV to channel 3.
Required Cables4
1
2
���� �� ����
������ � �� ������
�� ������� ��� ������ ����
�� ������� ����
•2
iO User’s Guide 57
GETTING CONNECTED, Continued
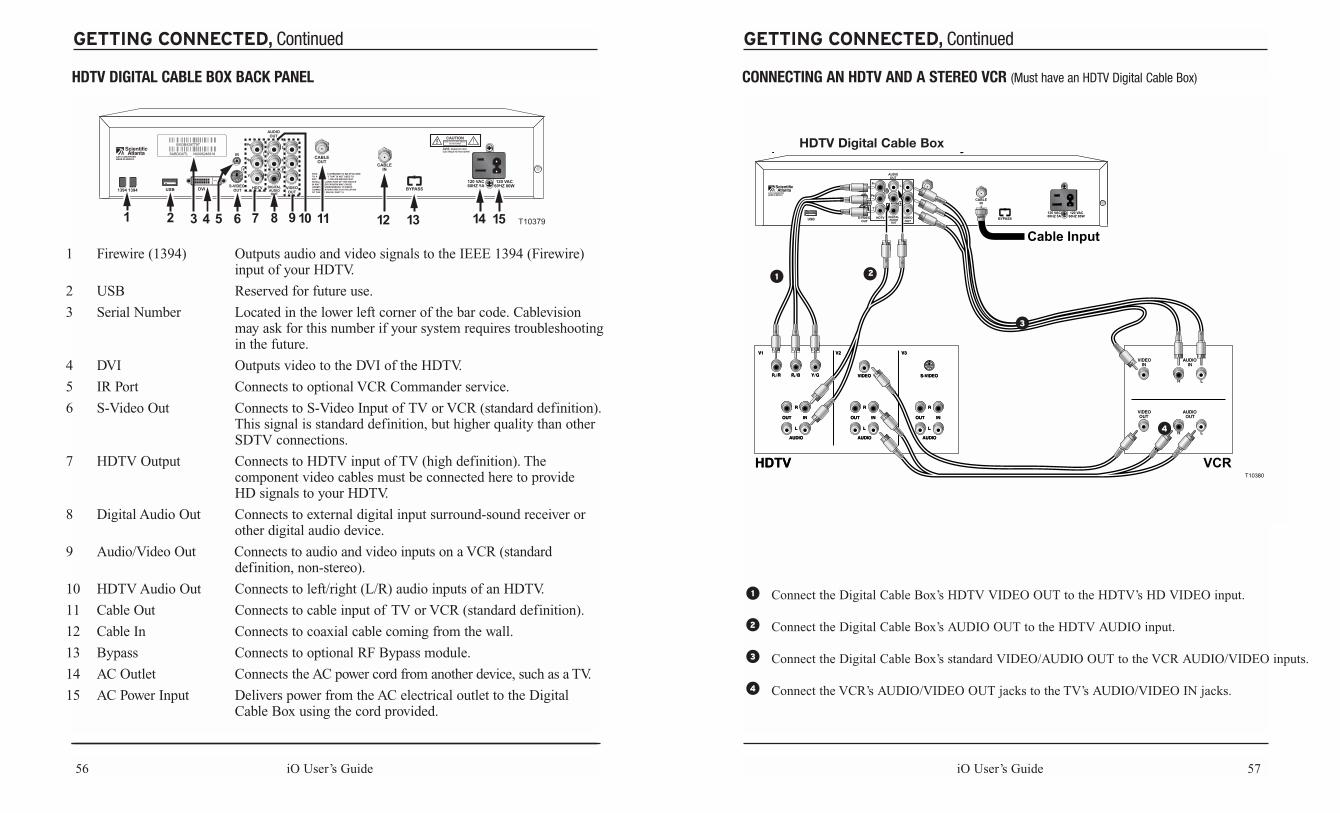
CONNECTING AN HDTV AND A STEREO VCR (Must have an HDTV Digital Cable Box)
Connect the Digital Cable Box’s HDTV VIDEO OUT to the HDTV’s HD VIDEO input.
Connect the Digital Cable Box’s AUDIO OUT to the HDTV AUDIO input.
Connect the Digital Cable Box’s standard VIDEO/AUDIO OUT to the VCR AUDIO/VIDEO inputs.
Connect the VCR’s AUDIO/VIDEO OUT jacks to the TV’s AUDIO/VIDEO IN jacks.
•1
•2
•3
•4
IR
L
RCABLE
OUTCABLE
IN
120 VAC60HZ 5A
120 VAC60HZ 80W
AUDIOOUT
BYPASS
p y
USB VIDEOOUT
HDTV DIGITALAUDIOOUT
S-VIDEO OUT
Y
Pr
Pb
HDTVHDTV VCR
Cable Input
T10380
•1 ••3
HDTV Digital Cable Box
2
4
56 iO User’s Guide
GETTING CONNECTED, Continued
HDTV DIGITAL CABLE BOX BACK PANEL
IR
L
RCABLE
OUTCABLE
IN
AVIS: RISQUE DE CHOC
ELECTRIQUE NE PAS OUVRIR
120 VAC60HZ 5A
120 VAC60HZ 80W
AUDIOOUT
CAUTIONRISK OF ELECTRIC SHOCK
DO NOT OPEN
BYPASSUSB
THIS DEVICE IS INTENDED TO BE ATTACHEDTO A RECEIVER THAT IS NOT USED TORECEIVE OVER-THE-AIR BROADCASTSIGNALS. CONNECTION OF THIS DEVICEIN ANY OTHER FASHION MAY CAUSEHARMFUL INTERFERENCE TO RADIO COMMUNICATIONS AND IS IN VIOLATIONOF THE FCC RULES, PART 15.
Y
Pr
Pb
0003B4287797
SABDQXTL N0006246618
T103794 51 111063 8 1312
S-VIDEO OUT1394 1394
2
HDTV DIGITALAUDIOOUT
VIDEOOUT
7 9 14 15
DVI
1 Firewire (1394) Outputs audio and video signals to the IEEE 1394 (Firewire) input of your HDTV.
2 USB Reserved for future use.
3 Serial Number Located in the lower left corner of the bar code. Cablevision may ask for this number if your system requires troubleshooting in the future.
4 DVI Outputs video to the DVI of the HDTV.
5 IR Port Connects to optional VCR Commander service.
6 S-Video Out Connects to S-Video Input of TV or VCR (standard definition). This signal is standard definition, but higher quality than other SDTV connections.
7 HDTV Output Connects to HDTV input of TV (high definition). The component video cables must be connected here to provide HD signals to your HDTV.
8 Digital Audio Out Connects to external digital input surround-sound receiver or other digital audio device.
9 Audio/Video Out Connects to audio and video inputs on a VCR (standard definition, non-stereo).
10 HDTV Audio Out Connects to left/right (L/R) audio inputs of an HDTV.
11 Cable Out Connects to cable input of TV or VCR (standard definition).
12 Cable In Connects to coaxial cable coming from the wall.
13 Bypass Connects to optional RF Bypass module.
14 AC Outlet Connects the AC power cord from another device, such as a TV.
15 AC Power Input Delivers power from the AC electrical outlet to the Digital Cable Box using the cord provided.
•4
iO User’s Guide 59iO User’s Guide
APPENDIX, Continued
Appendix B - Terms & Conditions1. Payment of Charges: Subscriber will be billed monthly inadvance for services to be received, plus pro-rate charges, if any, forperiods not previously billed. Subscriber will be billed monthly forPay Per View, On Demand or other services ordered where chargesare based on actual usage or on orders placed during the previousmonth. Subscriber must pay all undisputed monthly charges asitemized on the Cablevision monthly invoice and/or notifyCablevision of disputed items within thirty (30) days of receipt, orsuch greater amount of time as required by law. Failure to paycharges invoiced may result in discontinuance of service, theremoval of all equipment delivered and/or the imposition of a latepayment or service charge. An additional charge may be imposed ifa check is not honored due to insufficient funds. In the eventcollection activities are required, an additional collection chargemay be imposed.
2. Services Provided: In addition to providing video programmingand video-related services, and interactive television services, theCablevision digital cable box may provide email, e-commerce andother services as well as access to certain proprietary products ofCablevision. Through email and other functions you may be able tosubscribe to or access other Services and transact other forms ofelectronic commerce (hereinafter collectively “Services”).Subscriber acknowledges that Subscriber may incur charges whileusing these Services or while engaging in other forms of “e-commerce” (i.e. charges may be incurred as a result of accessingcertain information, or purchasing or subscribing to certainofferings using these functions). All such charges, includingapplicable taxes shall be paid by Subscriber to those Services andare not the responsibility of Cablevision.
3. Cablevision Property: All equipment, including but not limitedto, any cables, wires, amplifiers, cable box, the digital cable box,access card, remotes, and keyboards distributed to and/or installedfor use in the Subscriber’s home by or on behalf of Cablevision(“Equipment”) remains the property of Cablevision. None of theequipment shall become a fixture. Subscriber must return allequipment upon substitution of use or termination of service.Failure to do so will result in a charge to be determined withreference to Cablevision’s then current penalty schedule, whichamount shall be due immediately. Subscriber agrees to pay suchcharge whether the equipment is lost (through theft or otherwise) ordestroyed.
4. Disruption of Service: In no event shall Cablevision be liable forany failure or interruption of program transmissions or serviceresulting in part or entirely from circumstance beyondCablevision’s reasonable control. Subject to applicable law, creditwill be given for qualifying outages. In any event, if there is aknown program or service interruption in excess of 24 consecutivehours (or in excess of such lesser time period pursuant to state law),Cablevision, upon prompt notification of such failure orinterruption from Subscriber, will either provide Subscriber with apro-rate credit relating to such failure or interruption or, at itsdiscretion, in lieu of the credit provide alternative programmingduring any program interruption. Cablevision shall not be liable forany incidental or consequential damages.
5. Repair of Cablevision Equipment: Cablevision will repair and/orreplace defective equipment (excluding the replacement ofbatteries) as long as such damage was not caused by misuse or other
improper operations or handling by Subscriber. Cablevision is notresponsible for the maintenance or repair of Subscriber providedequipment, including but not limited to television sets, VCR’s orother video equipment, remote controls, keyboards, stereos or otheraudio equipment, telephones or A/B switches. A service charge maybe imposed if damage to Cablevision equipment is due to negligentuse or abuse or if no fault is discovered in Cablevision’s system orequipment. In addition, an equipment charge may be imposed forthe repair or replacement of any lost, stolen or damaged equipment.Cablevision makes no warranties, with respect to equipment orservice provided by Cablevision or with respect to the Equipment’scompatibility with any Subscriber-owned equipment.
6. Subscriber Property: Cablevision assumes no responsibility forand shall have no responsibility for the condition or repair of anySubscriber-provided equipment. Subscriber is responsible for therepair and maintenance of Subscriber-provided equipment.Cablevision is not responsible or liable for any loss or impairmentof reception of Cablevision’s service due in whole or in part to amalfunction or defect in Subscriber-provided equipment.
7. Taxes: Subscriber agrees to pay any local, state or federal taxesimposed or levied on or with respect to the Services, the equipmentor installation or service charges incurred with respect to the same.
8. Reproduction of Programs: Subscriber agrees that the programsand other services provided by Cablevision will be utilized solelyfor Subscriber’s personal, non-commercial use and will not beduplicated except in compliance with applicable law.
9. Cablevision’s Rights: (a) Cablevision has no obligation tomonitor content or services accessible by means of Cablevision’scable system or the digital cable box. However, Subscriberacknowledges and agrees that Cablevision has the right to monitorcontent electronically from time to time and to disclose anyinformation as necessary to satisfy any law, or regulation, to operateits programming and data information services properly, or toprotect itself or its Subscribers. (b) Cablevision shall have the rightto determine in its sole discretion what constitutes an“inappropriate” or “commercial use” of Cablevision’s systems,equipment and services.
10. Care of Cablevision Property: Subscriber agrees that neitherSubscriber nor any other person (except Cablevision’s authorizedpersonnel) will open, tamper with service, make any alterations to,or remove any equipment from its point of initial installation, absentCablevision’s consent. Any alteration, tampering, removal, etc. orthe use of equipment which permits the receipt of services withoutauthorization or the receipt of services to an unauthorized numberof outlets, or to unauthorized locations constitutes theft of serviceand is prohibited.
11. Access to Subscriber Premises: Subscriber agrees to provideCablevision’s representatives with access at reasonable times toSubscriber’s premises to install, inspect, maintain and/or repair theequipment supplied by Cablevision and, upon the termination ofservice, to remove the same from the premises. Cablevision’s failureto remove its property shall not be deemed an abandonment thereof.
12. Assignment or Transfer: This Agreement and the equipmentsupplied by Cablevision are not assignable or otherwise transferableby Subscriber.
58 iO User’s Guide
APPENDIX
Appendix AWe are pleased that you have chosen Cablevision’s new digitalservices. These innovative services will enhance the quality andquantity of our video program offerings and will offer newcommunications products and interactive features, including theopportunity to purchase goods and services over the system.
Your privacy is important to us, so we have prepared this statementto address any questions you may have. In addition, federal lawaffords you certain rights of which you should be aware. Inconsideration of your privacy concerns, Cablevision wants you tofully understand the nature of the information that we collect overthe system, and how we protect, use and disclose that information.
What type of information does Cablevision collect? We collectsubscriber information only (a) when it is necessary to provide ourservices to you; (b) when you voluntarily provide information to us;or (c) to detect and prevent unauthorized reception of our services.This information may include both personally identifiableinformation and non-personal information.
Personally identifiable information means information necessary toprovide services to you. The information includes names,addresses, telephone numbers, social security numbers, billing,service and credit records, correspondence, the services yousubscribe to and use, the purchases you make over the system andthe types and number of devices you use to connect to the system(e.g., televisions and computers). To provide you with a morepersonalized experience, we also may collect personal informationsuch as your locality and the service preferences you indicatethrough your voluntary interaction with the system. We may alsomaintain research records containing information obtained throughvoluntary subscriber interviews or surveys.
Non-personal information means aggregate information about ourcustomers from other sources and does not identify individualcustomers. We may at times collect non-personal information anduse it with our business records to better serve our customers.
Why does Cablevision collect personally identifiable information?We collect personally identifiable information to provide you withaccurate and high quality customer service, to properly deliver yourservices and to protect the security of the system. For example,information on your connections to our system makes it possible forCablevision’s digital cable box to receive and process the signals forthe products and services you order. Additional information alsoallows us to tailor our video, Internet, email and other services, aswell as develop and market new services to better fit your needs.Finally, we also use personally identifiable information to maintainour accounting and tax records.
Who sees the information collected by Cablevision? Cablevisionwill not disclose personally identifiable information to others unless(a) it is necessary for us to render our services; (b) disclosure isrequired to comply with a court order, under which circumstanceswe will inform you if the law permits; (c) such disclosure ispermitted pursuant to law; or (d) you provide written or electronicconsent in advance. In addition, unless you object by contacting usas provided below, we may disclose limited personally identifiableinformation consisting of your name, address and/or the particularservices to which you subscribe to certain third parties for
commercial purposes. People that may have authorized access topersonally identifiable information include our employees; billingand collection services; installation, repair and subscriber assistancesubcontractors or agents; program guide distributors; softwarevendors; program and other service suppliers (for audit purposes);marketers of Cablevision products and services; and sweepstakes,fulfillment and other like companies to whom we provideinformation in furtherance of our business needs. The frequency ofdisclosure may vary according to business needs.
How long does Cablevision maintain personally identifiableinformation? We maintain personally identifiable information aslong as it is necessary for the purpose(s) for which it was collected.These purposes may include compliance with laws governing ourbusiness, such as tax and accounting laws, satisfaction of pendingsubscriber requests, or orders for access to information.
How does Cablevision protect customer information? We usesecurity/encryption technology to secure personally identifiableinformation collected over the system and we maintain ourcustomer database in a restricted area secured by firewalls and othersecurity methods. Cablevision carefully restricts employee access tosuch information.
Can I see the information that Cablevision collects about me? If youwould like to see this information, please send us a written request.We will be glad to arrange for you to come to our offices duringregular business hours. If your review reveals an error in ourrecords, we will correct it. You may also be able to access certaininformation about yourself over the system, depending upon thedata you have provided (e.g., information you have provided toprocess an order made over the system).
Can any other parties collect information from me over the system?Cablevision requires that all system content providers comply withour privacy standards regarding your personally identifiableinformation, unless you give such information to these providers byseparate written or electronic consent.
Does Cablevision collect information about children? Cablevisionstrictly complies with all applicable laws concerning the knowingcollection of information from children. In addition, we havedesigned all of our interactive functions, including credit cardpurchases with optional processes such as PIN numbers and smartcard features, to allow for maximum control by parents andguardians over their children’s interactive experience. Forinstructions on activating these security features contactCablevision Customer Service.
What if I have any questions? If you have any questions about ourprivacy protections and policies, please contact us Monday throughFriday between the hours of 9:00am and 5:00pm Eastern Time. Ifyou believe that we have violated our limitations andresponsibilities under federal law, you may also have the right tobring an action in Federal District Court.
Given our ongoing efforts to offer exciting and innovative services,it may be necessary to modify this statement to reflect new serviceofferings. Cablevision will therefore notify you of any such changesto its privacy policy.
APPENDIX, Continued
26. Cablevision shall not be Liable for: Any information sent by theSubscriber utilizing the functions of Cablevision’s digital cable boxis sent at the Subscriber’s sole risk, and Cablevision shall have noliability whatsoever for any claims, losses, actions, damages, suitsor proceedings arising out of or otherwise relating to such actionsby the Subscriber.
27. Security: You are responsible for any misuse of Cablevision’sequipment, Cablevision’s service or the Services that you havecontracted for, even if the inappropriate activity was committed bya friend, family member, guest, employee or Subscriber with accessto your account. Therefore, you must take steps to ensure that othersdo not gain unauthorized access to Cablevision’s equipment, orServices. The equipment, Cablevision’s service or the Service maynot be used to breach the security of another user or to attempt togain access to any other person’s computer, software or data,without the knowledge and consent of such person. They also maynot be used in any attempt to circumvent the user authentication orsecurity of any host, network, or account. Use or distribution oftools designed for compromising security is prohibited.
28. Use of System: Cablevision’s digital cable box, Cablevision’sservices or the Services may not be used to send unsolicited bulk orcommercial messages. This includes, but is not limited to, bulkmailing of commercial advertising, informational announcements,charity requests, petitions for signatures and political or religiousmessages. Such messages may only be sent to those who haveexplicitly requested it. Cablevision’s digital cable box, Cablevision’sservice or the Services may not be used to collect responses fromunsolicited email sent from accounts on other Internet hosts oremail services that violate this Policy or the acceptable use policyof any other Internet service provider. Moreover, unsolicited emailmay not direct the recipient to any Web site or other resource, whichuses the services. The propagation of chain letters is prohibited,whether or not the recipient wishes to receive such mailings.Cablevision is not responsible for the forwarding of email sent toany account, which has been suspended or terminated. Such emailwill either be returned to sender, ignored, deleted, or storedtemporarily at Cablevision’s sole discretion.
29. Violation of Acceptable Use Policy: Cablevision does notroutinely monitor the activity of email or other Internet serviceaccounts for violation of this Policy. However, in our efforts topromote good citizenship within the Internet community, we willrespond appropriately if we become aware of inappropriate use ofour services. Cablevision prefers to advise Subscribers ofinappropriate behavior and any necessary corrective action.However, if Cablevision’s digital cable box or Cablevision’s serviceor Services are used in a way which Cablevision or its distributionaffiliates, in their sole discretion, believe violate this Policy,Cablevision or its distribution affiliates may take any responsiveactions they deem appropriate. Such actions include, but are notlimited to, temporary or permanent removal of content, and theimmediate suspension or termination of all or any portion of theInternet or data features, services and functionalities. NeitherCablevision nor its distribution affiliates will have any liability forany such responsive actions. The above described actions are notCablevision exclusive remedies and Cablevision may take any otherlegal or technical action it deems appropriate. Cablevision reserves
the right to investigate suspected violations of this Policy, includingthe gathering of information from the user or users involved andthe complaining party, if any, and examination of material onCablevision’s servers and network. During an investigation,Cablevision may suspend the account or accounts involved and/orremove material, which potentially violates this Policy. You herebyauthorize Cablevision and its distribution affiliates to cooperatewith (i) law enforcement authorities in the investigation ofsuspected criminal violations, and (ii) system administrators atother Internet service providers or other network or computingfacilities in order to enforce this Policy. Such cooperation mayinclude Cablevision providing the username, IP address, or otheridentifying information about a subscriber. Upon termination of anaccount, Cablevision is authorized to delete any data, emailmessages and files associated with such account. The failure ofCablevision or its distribution affiliates to enforce this Policy, forwhatever reason, shall not be construed as a waiver of any right todo so at any time. You agree that, if any portion of this Policy isheld invalid or unenforceable, that portion will be construedconsistent with applicable law as nearly as possible, and theremaining portions will remain in full force and effect. This Policyshall be exclusively governed by, and construed in accordancewith, the laws of the State of New York.
30. Privacy Statement: Please see Cablevision’s privacy statementfor a detailed outline of Cablevision’s video or digital servicesprivacy policies and how they affect your use of Cablevision’sequipment and services.
31. Data Storage and Retention: Subscriber agrees to complywith any policies or requirements of Cablevision relating toemail storage as established and modified by Cablevision fromtime to time. Such policies may include but shall not be limitedto limitations upon the quantity of emails stored, the period oftime for which they may be retained, and the length ofpermissible emails.
32. Entire Agreement: This Agreement constitutes the entireagreement between the Subscriber and Cablevision for OptimumTV and or iO services. No undertaking, representation or warrantymade by any agent or representative of Cablevision in connectionwith the sale, installation, maintenance or removal of Cablevision’sservices or equipment shall be binding on Cablevision except asexpressly included herein. Please see additional terms andconditions for Cablevision’s Optimum OnlineSM and other services.
33. Amendment: Cablevision may, at its sole discretion, change,modify, add or remove portions of this Agreement at any time.Cablevision may notify Subscriber of any such changes to thisAgreement by posting notice of such changes on using the featuresof Cablevision’s digital cable box, or sending notice via email orpostal mail. The Subscriber’s continued use of Cablevision’sservice following notice of such change, modification oramendment shall be deemed to be the Subscriber’s acceptance ofany such modification. If Subscriber does not agree to anymodification of this Agreement, Subscriber must immediatelycease using Cablevision’s equipment and services and notifyCablevision that Subscriber is terminating this Agreement inaccordance with Section 14 of this Agreement.
iO User’s Guide 61 60 iO User’s Guide
APPENDIX, Continued
13. Termination for Bankruptcy: Cablevision may terminate itsservice immediately in the event that Subscriber makes anassignment for the benefit of creditors or a voluntary or involuntarypetition is filed by or against Subscriber under any law having forits purpose the adjudication of Subscriber as a bankrupt or thereorganization of Subscriber.
14. Termination of Service by Subscriber: Subscriber shall have theright at any time to terminate the service by giving seven (7) daysprior written notice to Cablevision. In the event Subscriber elects toterminate the service, Subscriber will pay for such service until thedate of disconnection. However, in no event, unless Subscriber failsto keep the scheduled disconnect appointment, shall Subscriber payfor a period greater than seven (7) days after Cablevision receivessuch written notification of termination.
15. Breach of Agreement: If Subscriber breaches this Agreement orfails to abide by Cablevision’s rates, rules and regulations,Cablevision at its option may discontinue the service and removethe equipment. Failure of Cablevision to remove such equipmentshall not be deemed an abandonment thereof. Subscriber shall payreasonable collection and/or attorney’s fees to Cablevision in theevent that Cablevision shall find it necessary to enforce collectionor to preserve and protect its rights under this Agreement.
16. Security Deposit: Any security deposit given by customer forthe Equipment or Cablevision’s service will be due and payableupon the first monthly billing. Such security deposits will bereturned to customer within sixty (60) days of termination ofCablevision’s service so long as payment has been made for allamounts due on customer’s account and customer has returned theCablevision Equipment undamaged.
17. Programming: All programming, program services, programpackages, number of channels, channel allocations, broadcastchannels, interactive services, emails, data offerings and otherServices are subject to change in accordance with applicable law.
18. Rates: All rates are subject to change in accordance withapplicable law.
19. Late Fee: If your account is 30 days past due, you will see areminder message on your statement. If your past due balanceremains unpaid, you may be charged an applicable late feeidentified on your rate card on top of your past due balance atCablevision’s then current rate. If your account remains unpaid yourservice may be disconnected. You can avoid any late charges bypaying your bill promptly.
20. Disclaimer: Cablevision assumes no liability for any program,services or information distributed over Cablevision’s digital cablebox unless locally produced by Cablevision. Cablevision shall notbe responsible for any products, merchandise or prizes promoted onor purchased through the use of the cable system or Cablevision’sdigital cable box, unless such products, merchandise or prizes areprovided directly by Cablevision.
21. Parental Control: A Parental Control feature is available for youif you want to keep children from watching certain programming.Please check the Parental Control section in your User’s Guide. It is
recommended that you occasionally verify that your ParentalControl/Locks & Limits feature is activated and operational.
22. Spending Controls: As part of your Optimum TV or iOsubscription your service provides a means of spending control.Please check your User’s Guide for details.
23. Limitation of Liability: Unless otherwise specifically providedin this Agreement, Cablevision will not be liable to the Subscriberor to any third party for: (a) any direct, indirect, incidental, special,punitive or consequential losses or damages, including loss ofprofits, loss of earnings, loss of business opportunities or personalinjuries (including death), resulting directly or indirectly out of, orotherwise arising in connection with the use of Cablevision’s digitalcable box by the Subscriber, Cablevision’s services, or any other useof the Services including without limitation, any damage resultingfrom or arising out of the Subscriber’s reliance on or use ofCablevision’s digital cable box, Cablevision’s services or theServices, or the mistakes, omissions, interruptions, deletion ofemails, deletion of files, errors, defects, delays in operation,transmission, or any failure of performance of Cablevision’s digitalcable box, Cablevision’s services or the Services; and (b) any losses,claims, damages, expenses, liabilities or costs (including legal fees)resulting directly or indirectly out of, or otherwise arising inconnection with, any allegation, claim, suit or other proceedingbased upon a contention that the use of Cablevision’s digital cablebox, Cablevision’s services, or the Services by the Subscriber or athird party infringes the copyright, patent, trademark, trade secret,confidentiality, privacy, or other industrial or intellectual propertyrights or contractual rights of any third party. This limitation appliesto the acts, omissions, negligence and gross negligence ofCablevision, its officers, employees, agents, contractors orrepresentatives which, but for this provision, would give rise to acause of action against Cablevision in contract, tort or any otherlegal doctrine.
24. Prohibited: The Subscriber shall not use Cablevision’s digitalcable box, Cablevision’s services or the Services for illegal orinappropriate activities, including but not limited to:(a) invadinganother person’s privacy; unlawfully using, possessing, posting,transmitting or disseminating obscene, profane or pornographicmaterial; posting, transmitting, distributing or disseminatingcontent which is unlawful, threatening, abusive, harassing, libelous,slanderous, defamatory or otherwise offensive or objectionable; (b)modifying, disrupting or tampering with Cablevision’s equipmentincluding but not limited to, tampering with the seal on the digitalcable box, the access card or any of Cablevision’s services; (c)restricting, inhibiting or otherwise interfering with the ability of anyother person to use or enjoy any Cablevision service, the Service, orthe Internet; (d) reselling Cablevision service or services; (e)conducting a pyramid or other illegal soliciting scheme; or (f)impersonating any person or entity or forging anyone else’s digitalor manual signature. Engaging in one or more of these activitiesmay result in termination of this Agreement. This section 24 shallnot in any way limit Cablevision’s rights of termination pursuant toany other provision of this Agreement.
25. License Requirements: Subscriber agrees to comply with allend user license requirements relative to any of the Services whichSubscriber accesses pursuant to the terms of this Agreement.
SAFETY COMPLIANCE STATEMENTS
READ AND RETAIN THESE INSTRUCTIONS• Read all of the instructions before
you operate this Digital Cable Box. Give particular attention to all safety precautions. Retain the instructionsfor future reference.
• Comply with all warning and caution statements in the instructions. Observe all warning and caution symbols that are affixed to this Digital Cable Box.
• Comply with all instructions that accompany this Digital Cable Box.
PLACEMENTPlace this Digital Cable Box in a location that is close enough to an electrical outlet to accommodate the length of the power cord.
Note: Place this Digital Cable Box on a stable surface. The surface must support the size and weight of this Digital Cable Box.
WARNING:Avoid personal injury and damage to this Digital Cable Box. An unstable surface may cause this Digital Cable Box to fall.
VENTILATIONThis Digital Cable Box has openings for ventilation that protect it from overheating. To ensure the reliability of this Digital Cable Box, follow these guidelines to avoid obstructing the openings:• Do not place other equipment,
lamps, books, vases with liquid, or any other object on the top of this Digital Cable Box.
• Do not place this Digital Cable Box in any of the following locations: - On a bed, sofa, rug, or similar surface- Over a radiator or a heat register- In an enclosure, such as a
bookcase or equipment rack, unless the installation provides proper ventilation
CLEANING THE DIGITAL CABLE BOXBefore cleaning this Digital Cable Box, unplug it from the electrical outlet. Use a damp cloth to clean this Digital Cable Box. Do not use a liquid cleaner or an aerosol cleaner. Do not use a magnetic/static cleaning device (dust remover) to clean this Digital Cable Box.
iO User’s Guide 63
COMPLIANCE INFORMATION
UNITED STATES FCC COMPLIANCEThis equipment has been tested and found tocomply with the applicable limits of Part 15 ofthe FCC Rules. These limits are designed toprovide reasonable protection against harmfulinterference in a residential installation. Thisequipment generates, uses and can radiate radiofrequency energy and, if not installed and used inaccordance with the instructions, may causeharmful interference to radio or TV reception,which can be determined by turning theequipment off and on. The user is encouraged totry to correct the interference by one or more ofthe following measures:• Increase the separation between the equipment
and receiver• Connect the equipment into an outlet on a
circuit different from that to which the receiver is connected
• Consult your cable company or an experienced radio/TV technician for help
Any changes or modifications not expresslyapproved by Scientific-Atlanta could void theuser’s authority to operate the equipment.
Important: The information shown in the FCCDeclaration of Conformity paragraph below is arequirement of the FCC and is intended tosupply you with information regarding the FCCapproval of this device.
FCC Declaration of ConformityThis device complies with Part 15 of the FCCRules. Operation is subject to the following twoconditions: 1) this device may not cause harmfulinterference, and 2) this device must accept anyinterference received, including interference thatmay cause undesired operation.
CANADA EMI REGULATIONThis Class B digital apparatus meets allrequirements of the Canadian InterferenceCausing Equipment Regulations.Cet appareil numérique de la classe B respectetoutes les exigences du Réglement sur le matérielbrouilleur du Canada.
SOFTWARE AND FIRMWARE USEScientific-Atlanta, Inc. owns copyrights to thesoftware included in your Digital Cable Box andfurnishes the software to Cablevision under alicense agreement. You may only use or copy thissoftware in accordance with Cablevision.Scientific-Atlanta, Inc. owns copyrights to thefirmware in this equipment. You may only usethe firmware in the equipment in which it isprovided. Any reproduction or distribution of thisfirmware, or any portion of it, without theexpress written consent of Scientific-Atlanta,Inc. is prohibited.
TRADEMARKSExplorer, Scientific-Atlanta, and the Scientific-Atlanta logo are registered trademarks ofScientific-Atlanta, Inc. All other trademarks shown are trademarks oftheir respective owners.
DISCLAIMERScientific-Atlanta, Inc. assumes no responsibilityfor errors or omissions that may appear in thisGuide. Scientific-Atlanta reserves the right tochange this Guide at any time without notice.
62 iO User’s Guide
CAUTIONRISK OF ELECTRIC SHOCK
DO NOT OPEN
AVIS
Note to CATV System Installer(USA/Canada Only)
This reminder is provided to call the CATVsystem installer's attention to Article 820-40of the NEC (Section 54, Part I of the CanadianElectrical Code), that provides guidelines forproper grounding and, in particular, specifies that the CATV cable ground shallbe connected to the grounding system ofthe building, as close to the point of cable entry as practical.
CAUTION: To reduce the risk of electricshock, do not remove cover (or back).No user-serviceable parts inside. Referservicing to qualified service personnel.
This symbol is intended to alert you of thepresence of important operating and maintenance (servicing) instructions in the literature accompanying this product.
This symbol is intended to alert you that uninsulated voltage within this product mayhave sufficient magnitude to cause electric shock.Therefore, it is dangerous to make any kind of contact with any inside part of this product.
WARNINGTO PREVENT FIRE OR ELECTRIC SHOCK,DO NOT EXPOSE THIS UNIT TO RAIN ORMOISTURE.