26
Cadence Virtuoso IC 6.16 Schematic Capture Tutorial ECE 546 - Advanced Signal Integrity

Cadence Virtuoso IC 6.16 Schematic Capture
Tutorial
ECE 546 - Advanced Signal Integrity

ECE 546 Advanced Signal Integrity Spring 2014
Contents
1 Introduction 2
2 Environment Setup 2
3 Schematic Capture 33.1 Creating a New Schematic . . . . . . . . . . . . . . . . . . . . . . . . . . . . . . . . . 33.2 Creating a New Library . . . . . . . . . . . . . . . . . . . . . . . . . . . . . . . . . . 53.3 Creating a Symbol . . . . . . . . . . . . . . . . . . . . . . . . . . . . . . . . . . . . . 113.4 Creating a Testbench . . . . . . . . . . . . . . . . . . . . . . . . . . . . . . . . . . . . 14
4 Circuit Simulation Using Spectre 154.1 Launching ADE . . . . . . . . . . . . . . . . . . . . . . . . . . . . . . . . . . . . . . . 154.2 DC Analysis . . . . . . . . . . . . . . . . . . . . . . . . . . . . . . . . . . . . . . . . . 164.3 Parametric Sweep . . . . . . . . . . . . . . . . . . . . . . . . . . . . . . . . . . . . . . 204.4 Transient Analysis . . . . . . . . . . . . . . . . . . . . . . . . . . . . . . . . . . . . . 23
1

ECE 546 Advanced Signal Integrity Spring 2014
1 Introduction
The motivation for this manual is to provide a step-by-step tutorial to design and simulate circuitsusing Cadence IC 6.16 Virtuoso Design Environment. In this short-tutorial students are exposed tothe steps involved in remotely connecting to the EWS servers and launch the Virtuoso simulatorengine from the terminal window followed by a detailed guide to create their own custom circuitsand simulate them using the Cadence Spectre circuit simulator.
Cadence is an Electronic Design Automation (EDA) environment that integrates various circuitdesign and verifications applications and tools (both in-house proprietary as well as external thirdparty vendor tools) in a single framework allowing unified IC design and verification in a singleenvironment. The tools are generic and allow the designer to configure the environment dependingon the fabrication technology of choice by installing the appropriate PDK (Process-Design Kit).
This tutorial document is not intended to be a one-stop reference for all the features available inCadence Virtuoso Design Environment. Instead, it’s only meant to be a quick-start guide for circuitdesigners to be able to use the EDA tool to effectively simulate their designs for quick prototypingand verification of their designs.
2 Environment Setup
In order to remotely login to the EWS Linux Servers follow the instructions provided below:
1. Windows OS Users:
(a) Install PuTTy[ www.chiark.greenend.org.uk/~sgtatham/putty/download.html ], oranother such SSH client MobaXterm[ http://mobaxterm.mobatek.net/download-home-edition.html] depending on your preference.
(b) Install Xming X Server [ http://sourceforge.net/projects/xming/ ] for Windowsto allow X-forwarding during the SSH session. Also, install Xming-fonts from [ http://sourceforge.net/projects/xming/files/Xming-fonts/]Note: Without installing Xming you will not be able to open Virtuoso or for that matterany application with a GUI.
(c) Launch your SSH client, type ssh -X [email protected], hit ‘En-ter’. You will be prompted to type in a password so type in your ‘AD Password’ andagain hit ‘Enter’. Now you can follow the steps outlined in Figure 1.
2. Mac OSX Users:
(a) Install XQuartz 2.7.5 for Mac OSX if you are using OSX Mountain Lion or later. Ifyou have an older OS then you will already have X11 pre-installed in your system. Checkyour ‘System Preferences’ to check whether X11 is turned on.Note: Without installing XQuartz or enabling X11 (depending upon your OSX version)you will not be able to open Virtuoso or for that matter any application with a GUI.
(b) Launch your SSH client and type ssh -X [email protected], hit‘Enter’. You will be prompted to type in a password so type in your ‘AD Password’ andagain hit ‘Enter’. Now you can follow the steps outlined in Figure 1.
3. Linux OS Users:
(a) Launch Terminal and type ssh -X [email protected], hit ‘Enter’.You will be prompted to type in a password so type in your ‘AD Password’ and again hit‘Enter’. Now you can follow the steps outlined in Figure 1.
2

ECE 546 Advanced Signal Integrity Spring 2014
Figure 1: Launch Instructions for Virtuoso
If connecting directly from the EWS Machines, just directy follow the steps outlined in Figure 1.When prompted by the error message shown in Figure 1 select ‘Yes’.
3 Schematic Capture
3.1 Creating a New Schematic
1. To view all the libraries in the current work directory click on Tools → LibraryManager asoutlined in Figure 2. and the Library Manager window will pop up as shown in Figure 3.
Note: If you want to manually add a library that you copied from an external source intoyour Cadence work directory you would need to edit the cds.lib file found in your work direc-tory folder by opening it in a text-editor.
Figure 2: Launch Instructions for Library Manager
3

ECE 546 Advanced Signal Integrity Spring 2014
Figure 3: Library Manager Window
2. To create a new library click on File → New → Library and name the library as TestLib ashighlighted in Figure 4. After creating the new library you need to specify the Technology Fileto be used in your respective PDK. In our case we will ‘Attach an existing technology library’,specifically the ‘NCSU TechLib tsmc02d’ which corresponds to 180nm CMOS process.Figure 5 shows the steps involved in attaching the appropriate technology file to a new library.
4

ECE 546 Advanced Signal Integrity Spring 2014
(a) Create New Library (b) New Library Name
Figure 4: Steps to Create New Library
(a) (b)
Figure 5: Attaching Tech File
3.2 Creating a New Library
1. To create a new schematic click on on the library you created above, i.e. click on ‘TestLib’which will then be highlighter. Now within the Library Manager window click on File →New → Cell V iew and call the new schematic inv as highlighted in Figure 6. In this tutorialwe will use a CMOS Inverter as an example circuit to explore the steps involved in basic circuitsimulation using Cadence ADE (Analog Design Environment).
2. Once you have created your new schematic cellview a ‘Virtuoso Schematic Editor’ window willopen up as shown in Figure 7.
5

ECE 546 Advanced Signal Integrity Spring 2014
(a) Create Schematic (b) New Schematic Name
Figure 6: Steps to Create New Schematic
Figure 7: Schematic Window
6

ECE 546 Advanced Signal Integrity Spring 2014
3. In order to create a circuit in the schematic editor we need to add ‘instances’ or circuit-components like transistors, supply nets and wires. In the case of an inverter we need oneNMOS and one PMOS transistor, thus to add an instance press I from your keyboard. Thiswill open up a ‘Component Browser’ as shown in Figure 8. Choose the ‘NCSU Analog Parts’library and check-off the ‘Flatten’ icon by clickin on the grey box next to it. This will listall the components housed within the ‘NCSU Analog Parts’ library and gives you the abilityto search for a specific component from the ‘Filter’. Search for ‘nmos4’ and follow the stepsoutline in Figure 9.
Figure 8: Adding an Instance on Schematic
7

ECE 546 Advanced Signal Integrity Spring 2014
(a)
(b)
Figure 9: Inserting NMOS Transistor on Schematic
8

ECE 546 Advanced Signal Integrity Spring 2014
4. Similarly, following the same steps as (2) add a PMOS transistor to your schematic by choosingthe ‘pmos4’ transistor from the ‘NCSU Analog Parts’ library. Your schematic should now looklike Figure 10.
Figure 10: PMOS Transistor
5. In order to add wires to your schematic press W from your keyboard and make appropriateconnections across all transistor elements. Figure 11 demonstrates the steps involved in labelingwires with a circuit schematic. This will come in very handy during simulation, especially whendealing with circuits with several components.
(a)
(b)
Figure 11: Inserting Wire Names on Circuit
9

ECE 546 Advanced Signal Integrity Spring 2014
(a)
(b)
(c)
Figure 12: Creating Pin Names
6. It is often advisable to add ‘Pin’ names to each of the IO terminals in a circuit. Thus, to addpins to your schematic press P from your keyboard or click on the pin symbol as shown inFigure 12 and make appropriate connections across all IO ports. Figure 12 demonstrates thesteps involved in labeling wires with a circuit schematic.Note: The ‘VDDA’ and ‘GNDA’ pins should be chosen to be ‘InputOutput’ when selecting the‘Direction’ during pin creation.
10

ECE 546 Advanced Signal Integrity Spring 2014
7. Finally your schematic should look like Figure 13. Now click on ‘Check and Save’ icon (asshown in Figure 14) in the toolbar so that you can move onto the next step of creating asymbol for the inverter schematic.
Figure 13: Inverter Schematic
Figure 14: Check and Save
3.3 Creating a Symbol
1. When dealing with large circuits its often advisable to generate symbols for each sub-circuit inthe design and perform all simulations by placing the corresponding symbols in a testbench.Figure 15 summarizes the steps involved in generating a symbol from the inverter schematicdesigned in the previous section.
11

ECE 546 Advanced Signal Integrity Spring 2014
(a)
(b)
Figure 15: Generating Symbol from Schematic
2. Once you create the symbol it will pop-up. By default Cadence will generate a rectangularsymbol, however you can edit the generated symbol as per your needs. In our case we willedit the symbol shape to make it resemble the traditional inverter symbol used in conventionalsystem design (as shown in Figure 16).
12

ECE 546 Advanced Signal Integrity Spring 2014
(a)
(b)
Figure 16: Designing Schematic Symbol
3.4 Creating a Testbench
Create a new-schematic following the steps outlined earlier in Section 3.1 and name it ‘Tb inv’. Thiswill be the testbench schematic from which we will run all our simulations. Insert ‘vdc’, ‘gnd’ and‘vsource’ from the Component Library by navigating to the ‘Analog Parts’ library. Figure 17 shows
13

ECE 546 Advanced Signal Integrity Spring 2014
the initial conditions to be set for the voltage sources and Figure 18 shows what your testbenchschematic should look like at the end of this step.
(a) (b)
Figure 17: Inserting Sources in Testbench
Figure 18: Designing the Testbench
14

ECE 546 Advanced Signal Integrity Spring 2014
4 Circuit Simulation Using Spectre
4.1 Launching ADE
1. We will simulate our circuits using Cadence Spectre Simulation engine. Spectre is a variant ofHSPICE developed by Cadence and provides greater accuracy, speed and flexibility especiallywhen dealing with mixed signal circuits thus we will use it as our preferred simulation enginein this course as well.
2. Make sure you first ‘Check and Save’ your testbench schematic and click on Launch → ADEto open up the ADE window as shown in Figure 19.
3. Click on Setup → Simulator to make sure the Simulator is set to Spectre as shown in Figure19.
(a)
(b)
Figure 19: Simulating Circuit with ADE
15

ECE 546 Advanced Signal Integrity Spring 2014
4. Now click on Setup → Model Libraries to configure the Spectre model files. Figure 20 showsthe path you need to browse to in order to get the correct model files for the PDK used in thiscourse.
(a)
(b)
Figure 20: Configuring Model Files
4.2 DC Analysis
1. First simulation you will be exposed to is simulation of the DC operating point for the inverteryou designed earlier.
2. Click on AC,DC,Tran icon on the right pane of the ADE window and a window like Figure21 should pop open. Choose ‘dc’ and under ‘DC Analysis’ save the the DC Operating point.Note: Make sure you keep the Enabled option checked off before you click on ‘Ok’.
3. The output window should look like Figure 22 after you simulate the testbench by pressingthe green ‘Play’ button on the right sidebar of ADE.
4. Suppose we want to now view the DC Operating points for the PMOS transistor in the inverter.In order to do so we need to descend into the schematic view from the testbench schematic.
16

ECE 546 Advanced Signal Integrity Spring 2014
First click on Results → Print → DC Operating Points as shown in Figure 23. Now in orderto descend into the actual schematic of the inverter and select the PMOS transistor we startoff from the testbench schematic and click Edit → Hierarchy → Descend Point → Click oninverter symbol → select PMOS. The complete steps are outlined in Figures 23, 24 and 25.
Figure 21: Configuring DC Operating Point
Figure 22: DC Operating Point Netlist Output
17

ECE 546 Advanced Signal Integrity Spring 2014
Figure 23: Viewing DC Operating Point from ADE
Figure 24: Viewing DC Operating Point from ADE
18

ECE 546 Advanced Signal Integrity Spring 2014
(a)
(b)
(c)
Figure 25: Final DC Operating Point Results
19

ECE 546 Advanced Signal Integrity Spring 2014
4.3 Parametric Sweep
1. Often we want to sweep across a parameter so in this section we will introduce parametricsweep in Cadence ADE by performing a DC parametric sweep across Vsource.
2. In the testbench schematic click on ‘Vsource’ and press Q to edit its properties. A windowlike Figure and Figure 26 (a) will pop up. Under the ‘DC voltage’ option type in ‘Vgs’ (thiswill be your sweep parameter). Make sure to click on ‘Check and Save’ and now in the ADEwindow click on V ariables → Copy from Cellview.
3. Click on the AC,DC,Tran icon on the right pane of the ADE window and follow the stepsoutlined in Figure 26. Under the same DC analysis window scroll down and follow the stepsin Figure 27.
(a) Sweep Vsource (b) Extract Sweep Parameter from Schematic
(c) Specify Sweep Parameter DC value (d) Perform DC Sweep
Figure 26: DC Parametric Sweep of Vgs
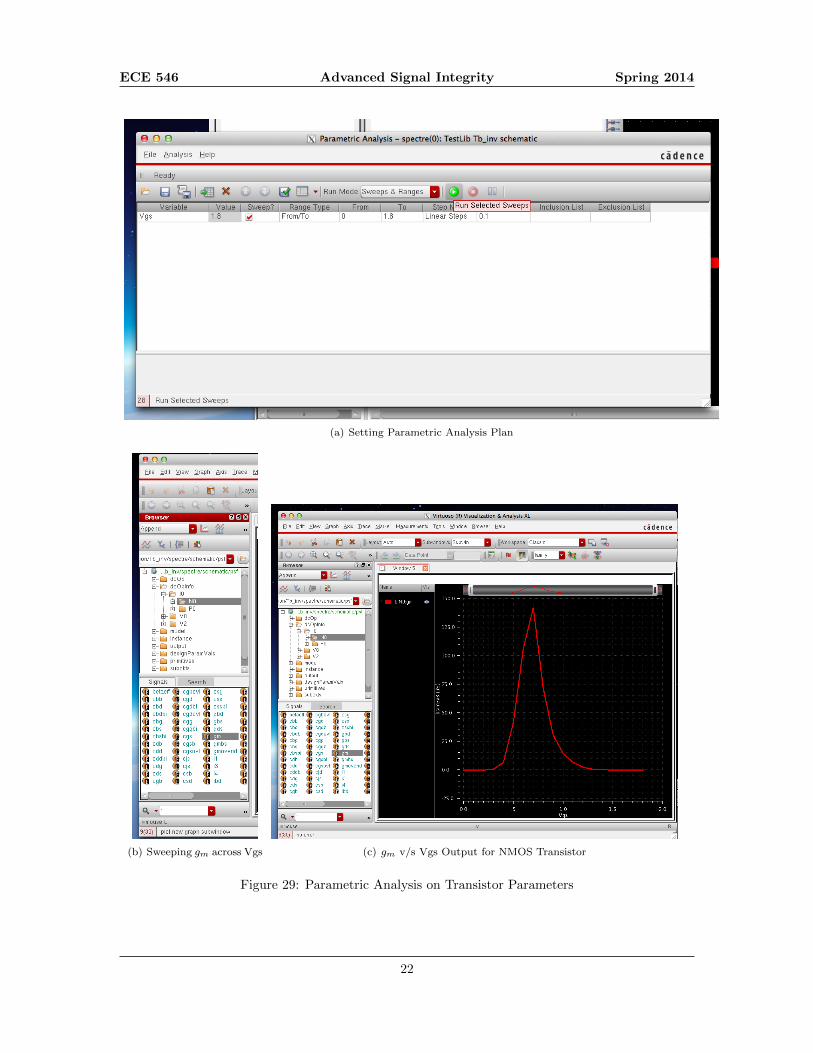
4. Finally, click on Tools → Parametric Analysis (as shown in Figure 28)and a window likeFigure 29 (a) will pop up. Follow the appropriate entries within this window as shown in
20

ECE 546 Advanced Signal Integrity Spring 2014
Figure 29 (a) and then proceed to steps outlined in 29 (b). Your final output for gm vs. Vgs
for the NMOS transistor in the inverter will look like Figure 29 (c).
Figure 27: DC Analysis Sweep Plan
Figure 28: Parametric Analysis on Vgs
21
ECE 546 Advanced Signal Integrity Spring 2014
(a) Setting Parametric Analysis Plan
(b) Sweeping gm across Vgs (c) gm v/s Vgs Output for NMOS Transistor
Figure 29: Parametric Analysis on Transistor Parameters
22

ECE 546 Advanced Signal Integrity Spring 2014
4.4 Transient Analysis
1. Transient analysis of any circuit is key to study the time domain behavior. In this sectionyou will simulate the transient time domain responce of the inverter Vout, Vin and computepropagation delay using the in-built Calculator in ADE.
2. First open the testbench schematic and change the Vsource into a ‘Pulse’ type signal andconfigure it with the characteristics shown in Figure 30. Make sure you ‘Check and Save’ theschematic and now in ADE click on the AC,DC,Tran icon on the right pane. Choose the‘tran’ simuation type, pick the stop time to be 10ns and choose ‘moderate’ in the ‘Accuracydetails’.
3. Click on the green ‘Play’ button to run the simulation and click on Result → Direct P lot toview the transient simulation plots.
4. In order to calculate the propagation delay of the inverter designed, in the ADE window clickon Tools → Calculator and follow the instructions shown in Figure 31.
5. Finally, your propagation delay and the final transient simulation plot should look like Figure32.
(a) Configuring Vsource for Transient Analysis (b) Transient Simulation Configuration
Figure 30: Transient Simulation Setup
23

ECE 546 Advanced Signal Integrity Spring 2014
(a)
(b)
Figure 31: Propagation Delay Calculation
24

ECE 546 Advanced Signal Integrity Spring 2014
(a) Propagation Delay from Calculator
(b) Transient Analysis Output Plot
Figure 32: Propagation Delay and Transient Analysis Output
25


