25
CANALIS KT BUSBAR TRUNKING INSTALLATION GUIDE

CANALIS KT BUSBAR TRUNKINGINSTALLATION GUIDE

CCCAAANNNAAALLLIIISSS KKKTTT IIINNNSSSTTTAAALLLLLLAAATTTIIIOOONNN MMMAAANNNUUUAAALLL
Canalis® Busway Installation Guide January 2001
All Rights Reserved © 1 Schneider Electric SAS
Contents Page
CONTENTS
1. INTRODUCTION ......................................................................................... 2
2. SAFETY PRECAUTIONS ............................................................................ 3
3. RECEIVING, HANDLING AND STORAGE ................................................. 4
Receiving ................................................................................................. 4
Handling .................................................................................................. 4
Moisture Protection During Storage ........................................................ 5
4. INSTALLATION ........................................................................................... 6
Pre-Installation Checks ............................................................................ 6
Installation Precautions ........................................................................... 7
Busbar Support Installation ..................................................................... 8
Junction Block Installation ....................................................................... 11
End Cover Installation ............................................................................. 17
Tap-Off Units Installation ......................................................................... 18
5. PRE-ENERGIZATION CHECKS ................................................................. 21
6. ENERGIZING THE EQUIPMENT ................................................................ 22
7. MAINTENANCE .......................................................................................... 23
8. QUESTIONNAIRE ....................................................................................... 25
CCCAAANNNAAALLLIIISSS KKKTTT IIINNNSSSTTTAAALLLLLLAAATTTIIIOOONNN MMMAAANNNUUUAAALLL
Canalis® Busway Installation Guide January 2001
All Rights Reserved © 2 Schneider Electric SAS
Section 1 – Introduction
SECTION 1 - INTRODUCTION
This manual is a collection of practical information, and proposes generalrecommendations complementary to the installation regulations, which details thefundamental instructions needed for handling, storage, installation and maintenance ofCanalis® busbar trunking equipment manufactured by Schneider Electric SAS.
The Purchaser’s engineering, installation and operating personnel should familiarizethemselves with the manual and become acquainted with the appearance andcharacteristics of each piece of Canalis® busway. Proper planning and coordinationbetween trades is important for a efficient installation.
Every Canalis® busway device is carefully inspected and packaged at the assemblyplant. Construction is checked, both structurally and electrically. After a completeinspection, the busway is prepared for shipment. Each section is packaged for easyhandling before installation. The catalogue number is marked on each shipping section.

CCCAAANNNAAALLLIIISSS KKKTTT IIINNNSSSTTTAAALLLLLLAAATTTIIIOOONNN MMMAAANNNUUUAAALLL
Canalis® Busway Installation Guide January 2001
All Rights Reserved © 3 Schneider Electric SAS
Section 2 – Safety Precautions
SECTION 2 – SAFETY PRECAUTIONS
DANGER
HAZARD OF ELECTRIC SHOCK, BURN, OR EXPLOSION
� Only qualified electrical maintenance personnel should install, operate,service or maintain this equipment. This document should not be viewedas sufficient for those who are not otherwise qualified to operate, service,or maintain the equipment discussed.
� Turn off power to the busway before installing, removing, or working onthis equipment.
� Always use a properly rated voltage sensing device to confirm power isoff.
� The successful operation of this equipment depends upon properhandling, installation, operation, and maintenance.
Failure to follow these instructions may result in seriousinjury or death

CCCAAANNNAAALLLIIISSS KKKTTT IIINNNSSSTTTAAALLLLLLAAATTTIIIOOONNN MMMAAANNNUUUAAALLL
Canalis® Busway Installation Guide January 2001
All Rights Reserved © 4 Schneider Electric SAS
Section 3 – Receiving, Handling and Storage
SECTION 3 – RECEIVING, HANDLING AND STORAGE
WARNING
HAZARD OF ELECTRIC SHOCK, BURN, OR EXPLOSION
� Protect this equipment from containments such as water, salts, concreteand other corrosive environments before and during installation.
� Outdoor equipment is not weather resistant until completely and properlyinstalled.
� Do not sit, walk or stand on this equipment.
Failure to follow these instructions may result in equipmentdamage, serious injury or death.
RECEIVING Upon receipt, check the packing list against the equipment received to ensure the orderand shipment are complete. Claims for shortages or other errors must be in writing toSchneider Electric SAS within 30 days of receipt of shipment. If a claim is not madewithin 30 days of receipt of shipment, Schneider Electric SAS will not be responsible forrepair or replacement.
Also upon receipt, immediately inspect the busway sections for any damage that mayhave occurred during transit. If damage is found or suspected, file a claim with thecarrier immediately and notify the nearest Schneider Electric office.
HANDLING Handle Canalis® products with care to avoid damage to the internal components, oraffecting the external appearance of the casing and the ends of the busbars(connection terminations).
At all times, the busway must be supported independently such that its weight does notrest on top of the transformers or switchboards. The distance between such supportsshould not exceed 3m.
Avoid subjecting the busway to twisting, denting, impact, and in general, roughhandling. Ensure the handling equipment at the installation site is adequate for handlingthe busway. Verify the lifting capacity of the crane or other equipment available.
CCCAAANNNAAALLLIIISSS KKKTTT IIINNNSSSTTTAAALLLLLLAAATTTIIIOOONNN MMMAAANNNUUUAAALLL
Canalis® Busway Installation Guide January 2001
All Rights Reserved © 5 Schneider Electric SAS
Section 3 – Receiving, Handling and Storage
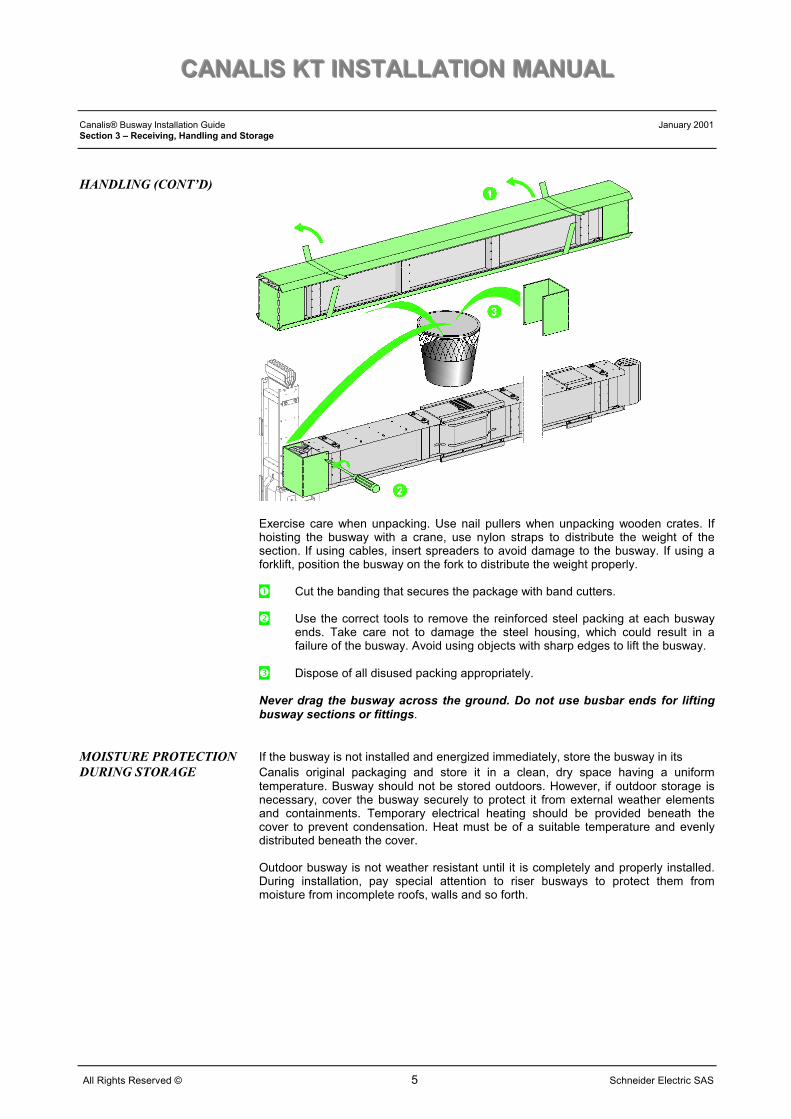
HANDLING (CONT’D)
Exercise care when unpacking. Use nail pullers when unpacking wooden crates. Ifhoisting the busway with a crane, use nylon straps to distribute the weight of thesection. If using cables, insert spreaders to avoid damage to the busway. If using aforklift, position the busway on the fork to distribute the weight properly.
� Cut the banding that secures the package with band cutters.
� Use the correct tools to remove the reinforced steel packing at each buswayends. Take care not to damage the steel housing, which could result in afailure of the busway. Avoid using objects with sharp edges to lift the busway.
� Dispose of all disused packing appropriately.
Never drag the busway across the ground. Do not use busbar ends for liftingbusway sections or fittings.
MOISTURE PROTECTION If the busway is not installed and energized immediately, store the busway in itsDURING STORAGE Canalis original packaging and store it in a clean, dry space having a uniform
temperature. Busway should not be stored outdoors. However, if outdoor storage isnecessary, cover the busway securely to protect it from external weather elementsand containments. Temporary electrical heating should be provided beneath thecover to prevent condensation. Heat must be of a suitable temperature and evenlydistributed beneath the cover.
Outdoor busway is not weather resistant until it is completely and properly installed.During installation, pay special attention to riser busways to protect them frommoisture from incomplete roofs, walls and so forth.

CCCAAANNNAAALLLIIISSS KKKTTT IIINNNSSSTTTAAALLLLLLAAATTTIIIOOONNN MMMAAANNNUUUAAALLL
Canalis® Busway Installation Guide January 2001
All Rights Reserved © 6 Schneider Electric SAS
Section 4 – Installation
SECTION 4 – INSTALLATION
PRE-INSTALLATION Proper installation of Canalis® is essential to proper busway operation .CHECKS
� Before installing the busway, conduct an insulation resistance test on eachbusway device to check for possible damage or contamination duringshipment or storage. With an insulation resistance tester rated at 1000 volts,ensure the phase-to-phase, phase-to-neutral, and phase-to-ground isolation.
� Ambient temperature limits are –10oC through +40oC. Verify that temperaturesof the operating environment are within this range. If not, please apply thederating factors indicated in the product catalogues.
� Provide sufficient horizontal and vertical clearance from the walls and ceilingsto provide easy access to joints.
� Level and align busways (vertically and horizontally) before the final tighteningof all joints.
� Ensure that all joint surfaces are free of containments.
� Align the busbar ends of adjoining sections, verifying proper busbar alignment,before sliding sections together.
� Verify that the system phasing matches the busway phasing.

CCCAAANNNAAALLLIIISSS KKKTTT IIINNNSSSTTTAAALLLLLLAAATTTIIIOOONNN MMMAAANNNUUUAAALLL
Canalis® Busway Installation Guide January 2001
All Rights Reserved © 7
Section 4 – Installation
INSTALLATION Depending on the installation orientation of the busways, the following precautions PRECAUTIONS should always be exercised.
CAUTION
HAZARD OF EQUIPMENT DAMAGE
� Always maintain the minimum required clearance distance as shown below.
Failure to follow these instructions may result in equipmentdamage or personal injury.
EDGEWISE For busways installed edgewise, INSTALLATION A minimum clearance distance o
the wall.
A minimum clearance distance onext.
FLATWISE For busways installed flatwise, alINSTALLATION A minimum clearance distance o
the wall.
A minimum clearance distance onext.
270
100
0
50
10
Schneider Electric SAS
always maintain :f 100mm from the back of the busways to the edge of
f 270mm from the centre-point of 1 busway run to the
ways maintain :f 50mm from the back of the busways to the edge of
f 100mm from the centre-point of 1 busway run to the
CCCAAANNNAAALLLIIISSS KKKTTT IIINNNSSSTTTAAALLLLLLAAATTTIIIOOONNN MMMAAANNNUUUAAALLL
Canalis® Busway Installation Guide January 2001
All Rights Reserved © 8 Schneider Electric SAS
Section 4 – Installation
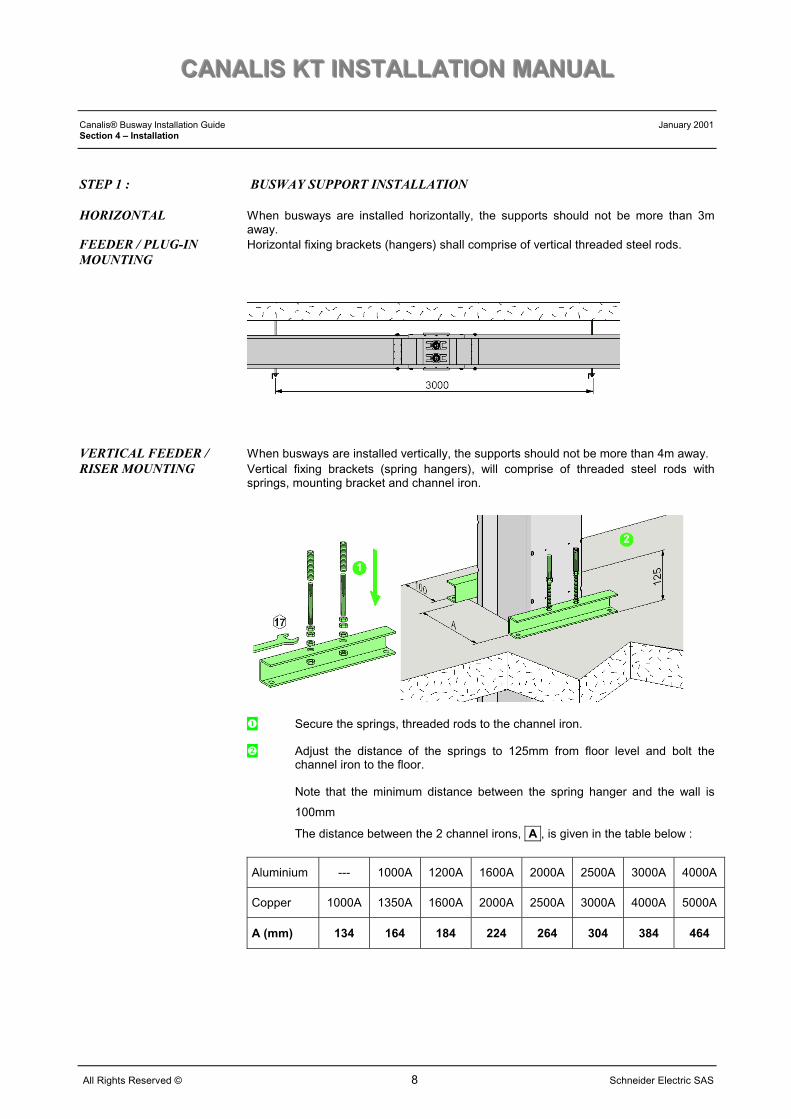
STEP 1 : BUSWAY SUPPORT INSTALLATION
HORIZONTAL When busways are installed horizontally, the supports should not be more than 3maway.
FEEDER / PLUG-IN Horizontal fixing brackets (hangers) shall comprise of vertical threaded steel rods.MOUNTING
VERTICAL FEEDER / When busways are installed vertically, the supports should not be more than 4m away.RISER MOUNTING Vertical fixing brackets (spring hangers), will comprise of threaded steel rods with
springs, mounting bracket and channel iron.
� Secure the springs, threaded rods to the channel iron.
� Adjust the distance of the springs to 125mm from floor level and bolt thechannel iron to the floor.
Note that the minimum distance between the spring hanger and the wall is
100mm
The distance between the 2 channel irons, A , is given in the table below :
Aluminium --- 1000A 1200A 1600A 2000A 2500A 3000A 4000A
Copper 1000A 1350A 1600A 2000A 2500A 3000A 4000A 5000A
A (mm) 134 164 184 224 264 304 384 464

CCCAAANNNAAALLLIIISSS KKKTTT IIINNNSSSTTTAAALLLLLLAAATTTIIIOOONNN MMMAAANNNUUUAAALLL
Canalis® Busway Installation Guide January 2001
All Rights Reserved © 9 Schneider Electric SAS
Section 4 – Installation
VERTICALFEEDER / RISERMOUNTING (CONT’D)
� & � Bolt the mounting bracket to both sides of the casing of the busbar using 8mmdiameter bolts.
� Adjust the mounting bracket to 185mm above the floor level. The springs havea tolerance of �30 mm to adjust the height of the supports as required.
CCCAAANNNAAALLLIIISSS KKKTTT IIINNNSSSTTTAAALLLLLLAAATTTIIIOOONNN MMMAAANNNUUUAAALLL
Canalis® Busway Installation Guide January 2001
All Rights Reserved © 10 Schneider Electric SAS
Section 4 – Installation
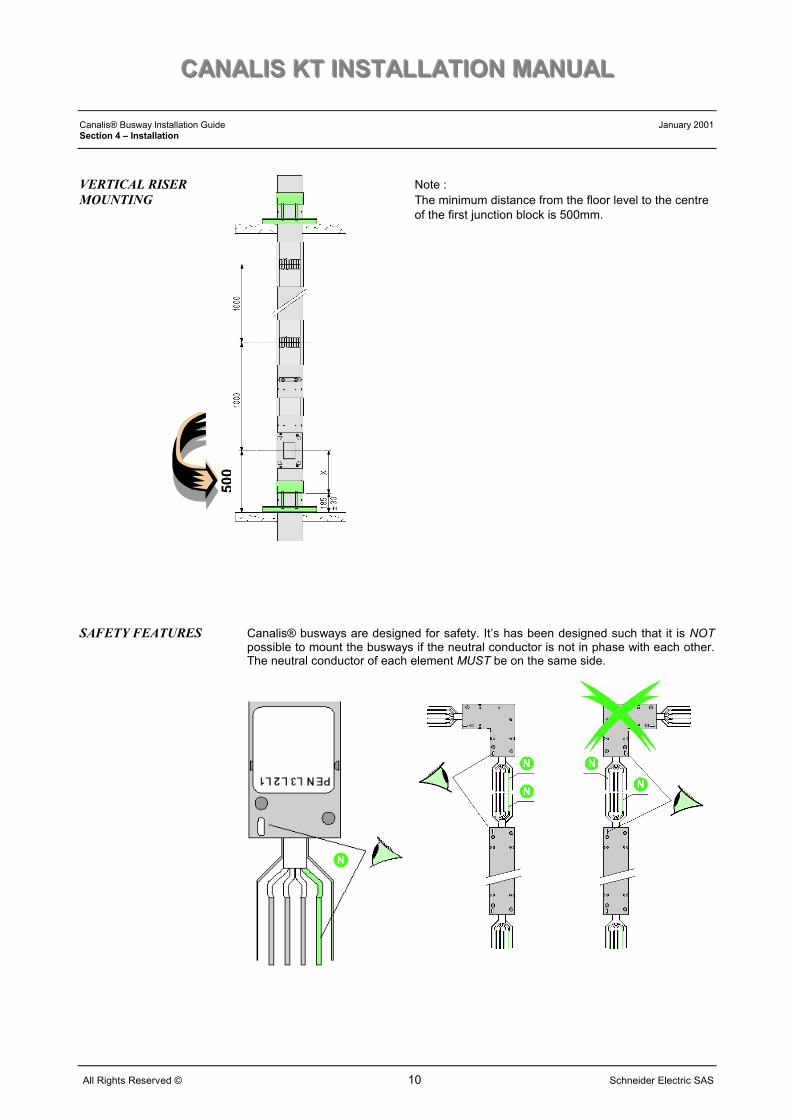
VERTICAL RISER Note :MOUNTING The minimum distance from the floor level to the centre
of the first junction block is 500mm.
SAFETY FEATURES Canalis® busways are designed for safety. It’s has been designed such that it is NOTpossible to mount the busways if the neutral conductor is not in phase with each other.The neutral conductor of each element MUST be on the same side.
500

CCCAAANNNAAALLLIIISSS KKKTTT IIINNNSSSTTTAAALLLLLLAAATTTIIIOOONNN MMMAAANNNUUUAAALLL
Canalis® Busway Installation Guide January 2001
All Rights Reserved © 11 Schneider Electric SAS
Section 4 – Installation
STEP 2 : JUNCTION BLOCK INSTALLATIONOnce the busways are mounted on the supports, the junction blocks can be installed. Aminimum distance of 40mm between each ends of the busway must be allowed in orderto mount the junction block properly.
HORIZONTAL MOUNTING.
Reminder : When busways are installed horizontally, the supports should not bemore than 3m away
� Cut a piece of wood measuring 40mm in order to ensure that the minimumallowable distance is always met. Place this piece of wood in between theends of the 2 busway.
� - � Install the lower cover of the joint to set the 40mm dimension and ensureproper alignment of the busway. The piece of wood can then be removed.
� Insert the junction block, taking note not to tighten it at this stage.

CCCAAANNNAAALLLIIISSS KKKTTT IIINNNSSSTTTAAALLLLLLAAATTTIIIOOONNN MMMAAANNNUUUAAALLL
Canalis® Busway Installation Guide January 2001
All Rights Reserved © 12 Schneider Electric SAS
Section 4 – Installation
HORIZONTALMOUNTING (CONT’D)
CAUTION : When installing the junction block, always ensure that the casing is inserted correctly.
� Close the joint by installing the upper cover of the joint.

CCCAAANNNAAALLLIIISSS KKKTTT IIINNNSSSTTTAAALLLLLLAAATTTIIIOOONNN MMMAAANNNUUUAAALLL
Canalis® Busway Installation Guide January 2001
All Rights Reserved © 13 Schneider Electric SAS
Section 4 – Installation
HORIZONTALMOUNTING (CONT’D)
� Once the upper cover is installed, the junction block can be tightened.
Torque with an 18 inch (457mm) or longer torque wrench until the outer VISI-TITE® bolt head twists off and the red washer falls off.

CCCAAANNNAAALLLIIISSS KKKTTT IIINNNSSSTTTAAALLLLLLAAATTTIIIOOONNN MMMAAANNNUUUAAALLL
Canalis® Busway Installation Guide January 2001
All Rights Reserved © 14 Schneider Electric SAS
Section 4 – Installation
VERTICAL MOUNTING .
Reminder : When busways are installed vertically, the supports should not bemore than 4m away
� Cut a piece of wood measuring 40mm in order to ensure that the minimumallowable distance is always met. Place this piece of wood in between theends of the 2 busway.
� - � Install the lower cover of the joint to set the 40mm dimension and ensureproper alignment of the busway. The piece of wood can then be removed.
� Insert the junction block, taking note not to tighten it at this stage.

CCCAAANNNAAALLLIIISSS KKKTTT IIINNNSSSTTTAAALLLLLLAAATTTIIIOOONNN MMMAAANNNUUUAAALLL
Canalis® Busway Installation Guide January 2001
All Rights Reserved © 15 Schneider Electric SAS
Section 4 – Installation
VERTICALMOUNTING (CONT’D)
CAUTION : When installing the junction block, always ensure that the casing is inserted correctly.
� Close the joint by installing the upper cover of the joint.

CCCAAANNNAAALLLIIISSS KKKTTT IIINNNSSSTTTAAALLLLLLAAATTTIIIOOONNN MMMAAANNNUUUAAALLL
Canalis® Busway Installation Guide January 2001
All Rights Reserved © 16 Schneider Electric SAS
Section 4 – Installation
VERTICALMOUNTING (CONT’D)
� Once the upper cover is installed, the junction block can be tightened.
Torque with an 18 inch (457mm) or longer torque wrench until the outer VISI-TITE® bolt head twists off and the red washer falls off.

CCCAAANNNAAALLLIIISSS KKKTTT IIINNNSSSTTTAAALLLLLLAAATTTIIIOOONNN MMMAAANNNUUUAAALLL
Canalis® Busway Installation Guide January 2001
All Rights Reserved © 17 Schneider Electric SAS
Section 4 – Installation
STEP 3 : END COVER INSTALLATIONAlways terminate each busway run with an end cover in order to prevent any contactwith live conductors.
The method of installation of the end covers are similar for both horizontal and verticalmounting.
HORIZONTAL MOUNTING
VERTICAL MOUNTING
� Insert the isolators between the phases bars at the end of the busway runs.
� Install both side covers first by tightening them together.
� Install the top cover and bolt them to the casing of the busway as shown.

CCCAAANNNAAALLLIIISSS KKKTTT IIINNNSSSTTTAAALLLLLLAAATTTIIIOOONNN MMMAAANNNUUUAAALLL
Canalis® Busway Installation Guide January 2001
All Rights Reserved © 18 Schneider Electric SAS
Section 4 – Installation
STEP 4 : TAP-OFF UNITS INSTALLATION
INSTALLATION Depending on the installation orientation of the busways, the following precautions PRECAUTIONS should always be exercised when mounting the tap-off units :
CAUTION
HAZARD OF EQUIPMENT DAMAGE
� Always maintain the minimum required clearance distance as shown below.
� Ensure sufficient clearance for the doors of the tap-off units to open or closewithout obstruction
� Ensure sufficient access to the switch or circuit breaker of the tap-off units
� When a large number of tap-off units are required to be installed on thesame run of trunking, alternate mounting (use the tap-off outlets on bothsides of the trunking) of the tap-off units, whenever possible, to allow foradditional support brackets.
Failure to follow these instructions may result in equipmentdamage or personal injury.
EDGEWISE For busways installed edgewise, always maintain :INSTALLATION A minimum clearance distance (Dmini) of 1000mm
from the front of the busways to the edge of thewall, if the tap-off units are mounted facing a wall orcolumn.
FLATWISE For busways installed flatwise, always maintain :INSTALLATION A minimum clearance distance of 500mm from
The centre-point of the tap-off units to the edge of the wall.
1000
mm
500m
m

CCCAAANNNAAALLLIIISSS KKKTTT IIINNNSSSTTTAAALLLLLLAAATTTIIIOOONNN MMMAAANNNUUUAAALLL
Canalis® Busway Installation Guide January 2001
All Rights Reserved © 19 Schneider Electric SAS
Section 4 – Installation
TAP-OFFMOUNTING 25A – 400A
Canalis� range of Tap-OffUnits (25A – 400A), can beplugged-in into the tap-offoutlets of the busway trunking.
> 400A – 1250ACanalis� range of Tap-OffUnits (>400A – 1250A), aremounted on the bolt-on-typeoutlet of the busway trunkingand bolted to the buswaycasing, for additional safety.

CCCAAANNNAAALLLIIISSS KKKTTT IIINNNSSSTTTAAALLLLLLAAATTTIIIOOONNN MMMAAANNNUUUAAALLL
Canalis® Busway Installation Guide January 2001
All Rights Reserved © 20 Schneider Electric SAS
Section 5 – Pre-Energization Checks
SECTION 5 – PRE-ENERGIZATION CHECKS
Before energizing the busway, some precaution checks are necessary.
1. Carry out a visual check on the conformity of tightening, at the joints and theconnections to the transformers and switchboards. All VISI-TITE bolts shouldhave the double-headed bolts broken off. Shutters of the tap-off outlets notused should be closed.
2. Ensure that the protective devices are correctly rated (current, breakingcapacity) with respect to the loads supplied, or in accordance with thespecification drawings.
3. Check that all the tap-off units are disconnected or isolated (doors open) : off-load position.
4. Conduct an Insulation Resistance Test between phase-to-phase, phase-to-neutral and phase-to-ground and record the readings. (A sample reading tableis shown below)� Open the circuit by disconnecting the trunking from the transformer or
by opening the circuit in the switchboard.
� Use an Insulation Resistance Tester of 1000V DC to megger betweeneach live conductor, and between the live conductors and the metalcasing (PE).
� The value of insulation resistance must read at least 1 M� with a ratedvoltage of 1000V.
5. Check the equi-potential of the protective circuit.
6. Verify the phase rotation of the busway matches the system phasing before re-connecting to the transformers, switchboards etc.
Insulation Resistance Reading Table
DATE : DATE :
DEVICE : DEVICE :
Phase M� Phase M�
R – G R – G
Y – G Y – G
B – G B – G
N – G N – G
R – Y R – Y
R – B R – B
Y – B Y – B
R – N R – N
Y – N Y – N
B – N B – N
SAMPLE

CCCAAANNNAAALLLIIISSS KKKTTT IIINNNSSSTTTAAALLLLLLAAATTTIIIOOONNN MMMAAANNNUUUAAALLL
Canalis® Busway Installation Guide January 2001
All Rights Reserved © 21 Schneider Electric SAS
Section 6 – Energizing The Equipment
SECTION 6 – ENERGIZING THE EQUIPMENT
DANGER
HAZARD OF ELECTRIC SHOCK, BURN, OR EXPLOSION
� Only qualified electrical maintenance personnel should install, operate,service or maintain this equipment. This document should not be viewed assufficient for those who are not otherwise qualified to operate, service, ormaintain the equipment discussed.
� The successful operation of this equipment depends upon proper handling,installation, operation, and maintenance.
Failure to follow these instructions may result in serious injuryor death
When the equipment is energized for the first time, qualified electrical personnel shouldbe present. If short-circuits and ground faults caused by damage or poor installationpractices have not been detected in the pre-energization checks procedure, seriousdamage can result when the power is turned-on.
The busway should have no electrical load on it when it is energized. As buswaystypically extends through several rooms and floors, ensure that all devices fed from thebusway are in the OFF position.
Energize the equipment in sequence by starting at the source end and working towardsthe load end. In other words, energize the main devices, then the feeder devices, andthen the branch-circuit devices. Turn the devices to the “ON” position with a firmpositive motion.
After all overcurrent devices have been turned on, loads such as lighting circuits,contactors, heaters and motors may be turned on.
Busways, when operating correctly, will have a moderate hum. Excessive noise may bean indication of hardware that has not been tightened correctly or of metal parts thathave been improperly assembled.
Occurrence of sparking at any point along the busway is not normal condition. De-energize the busway immediately. Correct the cause of the sparking condition. Then,conduct an insulation resistance test again according to Section 5 before attempting toenergize again.

CCCAAANNNAAALLLIIISSS KKKTTT IIINNNSSSTTTAAALLLLLLAAATTTIIIOOONNN MMMAAANNNUUUAAALLL
Canalis® Busway Installation Guide January 2001
All Rights Reserved © 22 Schneider Electric SAS
Section 7 – Maintenance
SECTION 7 – MAINTENANCE
DANGER
HAZARD OF ELECTRIC SHOCK, BURN, OR EXPLOSION
� Only qualified electrical maintenance personnel should install, operate,service or maintain this equipment. This document should not be viewed assufficient for those who are not otherwise qualified to operate, service, ormaintain the equipment discussed.
� Turn off power to the busway before installing, removing, or working on thisequipment.
� Always use a properly rated voltage sensing device to confirm power is off.
� The successful operation of this equipment depends upon proper handling,installation, operation, and maintenance.
Failure to follow these instructions may result in serious injuryor death
CAUTION
HAZARD OF EQUIPMENT DAMAGE
� Hydrocarbon spray propellants and hydrocarbon-based sprays orcompounds will cause degradation of certain plastics.
Before using products to clean, dry or lubricate components duringinstallation or maintenance, consult your nearest Schneider Electric SASoffice.
Failure to follow these instructions may result in equipmentdamage or personal injury.

CCCAAANNNAAALLLIIISSS KKKTTT IIINNNSSSTTTAAALLLLLLAAATTTIIIOOONNN MMMAAANNNUUUAAALLL
Canalis® Busway Installation Guide January 2001
All Rights Reserved © 23 Schneider Electric SAS
Section 7 – Maintenance
MAINTENANCE (CONT’D) Canalis® busways are designed to be of minimal maintenance. Inspect the buswayonce a year or after any severe electrical short circuit or ground fault. Perform thefollowing maintenance procedures :
Carefully inspect all visible electrical joints and terminals. Do not remove joint covers.Verify that the bolts and nuts are correctly tightened.
Check the torque on joint bolts using a torque wrench. The tightening torque is shownon the connector block and its values are as follows :
BOLT TIGHTENING TORQUE
HM 16 16 mdaN
HM 14 12 mdaN
HM 12 7 mdaN
HM 10 5 mdaN
If any joints or terminations are badly discoloured, corroded or pitted, or if they showevidence of having been subjected to high temperatures, the devices must be replacedwith new factory-built devices. Consult your local Schneider Electric SAS office forreplacements.
Ensure that the mechanisms are in satisfactory operational condition. Lubricate themoving parts of the various mechanisms, if necessary. Similarly, remove any surpluslubrication to prevent the accumulation of any un-wanted foreign bodies.
Check the insulation resistance before re-energizing the busway. It is recommended tokeep a permanent record of resistance readings. If readings decrease appreciably withtime, deterioration is occurring. Conduct the insulation resistance test according toSection 5.
Energize the equipment again following the instructions in Section 6.
After performing all the above inspections and necessary repairs, it may be desirable toperform an infra-red temperature test on all the electrical connections. Conduct this testafter the busway is re-energized and reaches a stabilized operating temperature.
LiabilitySchneider Electric SAS declines all responsibility in the event of maintenance which does not conform to thespecifications or not meeting the installation regulations; unsuitable conditions of storage; inappropriateenvironment to the product (chemical, ambient conditions, atmospheric conditions, etc); incorrect use of theproducts; non-compliance of installation and/or connection procedures.

CCCAAANNNAAALLLIIISSS KKKTTT IIINNNSSSTTTAAALLLLLLAAATTTIIIOOONNN MMMAAANNNUUUAAALLL
Canalis® Busway Installation Guide January 2001
All Rights Reserved © 24 Schneider Electric SAS
Section 8 – Questionnaire
SECTION 7 – QUESTIONNAIRE
In order to better meet your expectations, we would ask you to complete this shortquestionnaire and return it to us.
Is the product packaging satisfactory ?
Do our products and documents satisfy your requirements ?
### If not, what improvements must be made ?
� Documentation : .........………………………………………………..
� Products : .....................………………………………………………
Was your installation easy to commission ?
If not, what were the problems ?
Are our services satisfactory ?
Are you sufficiently well informed on our products and services ?
I would like further information on the following products :
Other comments or suggestions :
Your name and address in order to give a speedy reply :
COMMERCIAL REPRESENTATION Schneider Electric SAS6 rue Lafontaine – BP12238163 St Marcellin CedexFranceTel : +33 4 76 38 89 25Fax : +33 4 76 38 89 70


