21
Capacitive Touch Sensors on the Raspberry Pi Created by Craig Richardson Last updated on 2014-04-09 11:30:13 AM EDT

Capacitive Touch Sensors on the Raspberry PiCreated by Craig Richardson
Last updated on 2014-04-09 11:30:13 AM EDT

244556666677889
101111111213141517171717
Guide Contents
Guide ContentsOverviewMomentaryToggle5-PadAssembly
HeadersPlace the BoardSolderAdmire
WiringMomentary Board WiringToggle Board Wiring5-Pad Sensor WiringLEDsConnecting to ObjectsProgrammingInstalling the GPIO ModuleContinuous OutputSingle OutputRunning the CodeProgramming the 5-Pad SensorRunning the CodeControlling Minecraft: Pi Edition
Install Minecraft: Pi EditionCopy the API
Super Jump
© AdafruitIndustries
https://learn.adafruit.com/capacitive-touch-sensors-on-the-raspberry-pi
Page 2 of 21

181921
MelonsControl Panel (5-Pad Board)Running the Code
© AdafruitIndustries
https://learn.adafruit.com/capacitive-touch-sensors-on-the-raspberry-pi
Page 3 of 21

OverviewCapacitive touch breakout boards are an excellent way to use household objects as inputs onyour Raspberry Pi. Any conductive object can act as a switch when connected to sensorboards, including potatoes, apples, spoons and pencil graphite.
The capacitive touch sensors detect when you touch the board's pad or an object connectedto the board. Humans carry a small electrical charge. When you touch a capacitive touch sensorit will detect this charge.
With some simple wiring to the Raspberry Pi and a few lines of Python, you've got a fun andeasy way to control your projects and games. For example at the end of this guide we'll showyou how to control Minecraft: Pi Edition using a apples.
There are three breakout boards that this guide will show you how to use with your RaspberryPi.
Momentary
© AdafruitIndustries
https://learn.adafruit.com/capacitive-touch-sensors-on-the-raspberry-pi
Page 4 of 21
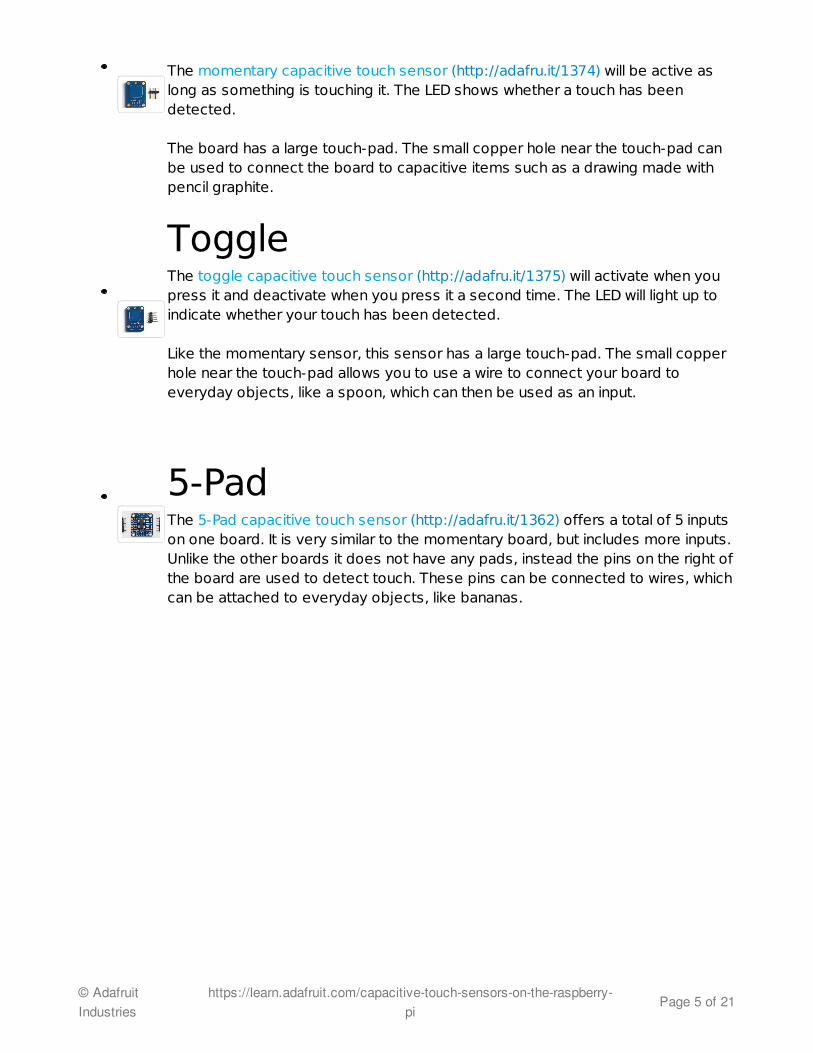
The momentary capacitive touch sensor (http://adafru.it/1374) will be active aslong as something is touching it. The LED shows whether a touch has beendetected.
The board has a large touch-pad. The small copper hole near the touch-pad canbe used to connect the board to capacitive items such as a drawing made withpencil graphite.
ToggleThe toggle capacitive touch sensor (http://adafru.it/1375) will activate when youpress it and deactivate when you press it a second time. The LED will light up toindicate whether your touch has been detected.
Like the momentary sensor, this sensor has a large touch-pad. The small copperhole near the touch-pad allows you to use a wire to connect your board toeveryday objects, like a spoon, which can then be used as an input.
5-PadThe 5-Pad capacitive touch sensor (http://adafru.it/1362) offers a total of 5 inputson one board. It is very similar to the momentary board, but includes more inputs.Unlike the other boards it does not have any pads, instead the pins on the right ofthe board are used to detect touch. These pins can be connected to wires, whichcan be attached to everyday objects, like bananas.
© AdafruitIndustries
https://learn.adafruit.com/capacitive-touch-sensors-on-the-raspberry-pi
Page 5 of 21
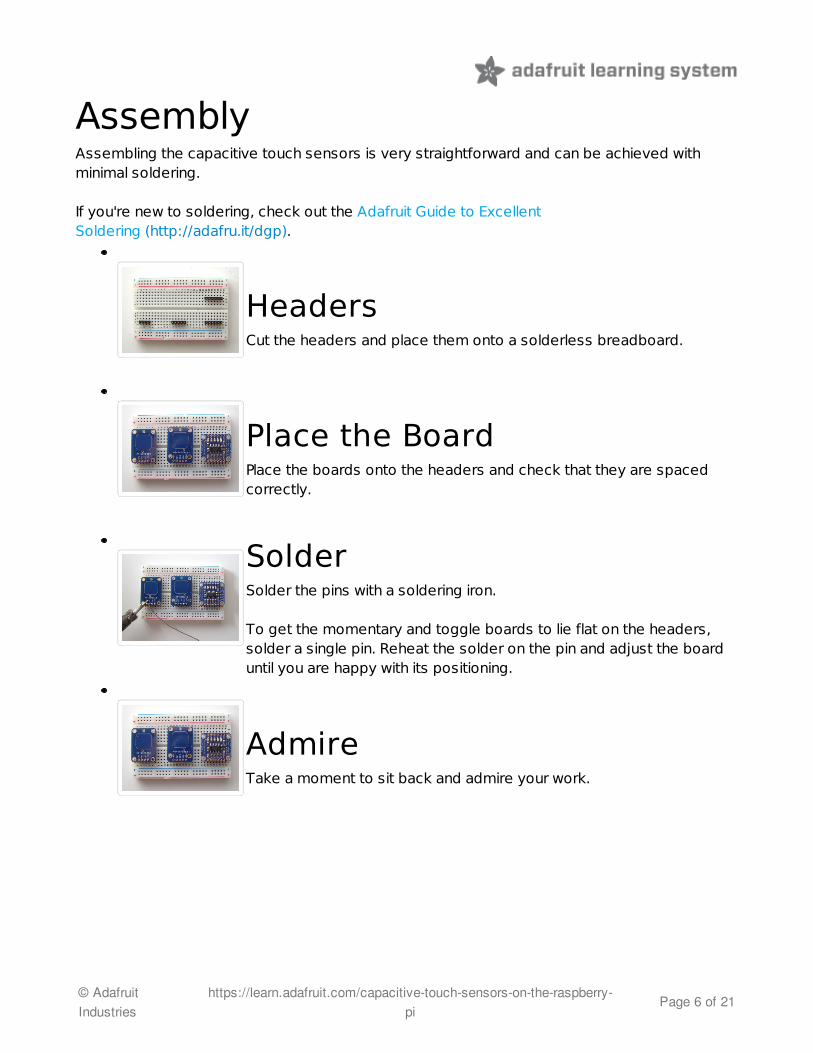
AssemblyAssembling the capacitive touch sensors is very straightforward and can be achieved withminimal soldering.
If you're new to soldering, check out the Adafruit Guide to ExcellentSoldering (http://adafru.it/dgp).
HeadersCut the headers and place them onto a solderless breadboard.
Place the BoardPlace the boards onto the headers and check that they are spacedcorrectly.
SolderSolder the pins with a soldering iron.
To get the momentary and toggle boards to lie flat on the headers,solder a single pin. Reheat the solder on the pin and adjust the boarduntil you are happy with its positioning.
AdmireTake a moment to sit back and admire your work.
© AdafruitIndustries
https://learn.adafruit.com/capacitive-touch-sensors-on-the-raspberry-pi
Page 6 of 21
WiringIn this section we'll learn how to wire up the sensor boards to a Raspberry Pi. For this you willneed:
A capacitive touch sensor (momentary (http://adafru.it/1374),toggle (http://adafru.it/1375) or 5-pad (http://adafru.it/1362))A solderless breadboard (http://adafru.it/64)Breadboarding/jumper wire (http://adafru.it/153)An Adafruit Pi Cobbler and ribbon cable (http://adafru.it/1105) (available pre-soldered (http://adafru.it/914)) or male-female jumper wire (http://adafru.it/825)A 10k resistor (no resistors are required for the 5-pad board)Apples, potatoes, bannanas or another fun object that you can connect the board toA Raspberry Pi Model A (http://adafru.it/1344) or Model B (http://adafru.it/998)Power supply, mouse, monitor, monitor cable, keyboard and SD card for the Raspberry Pi
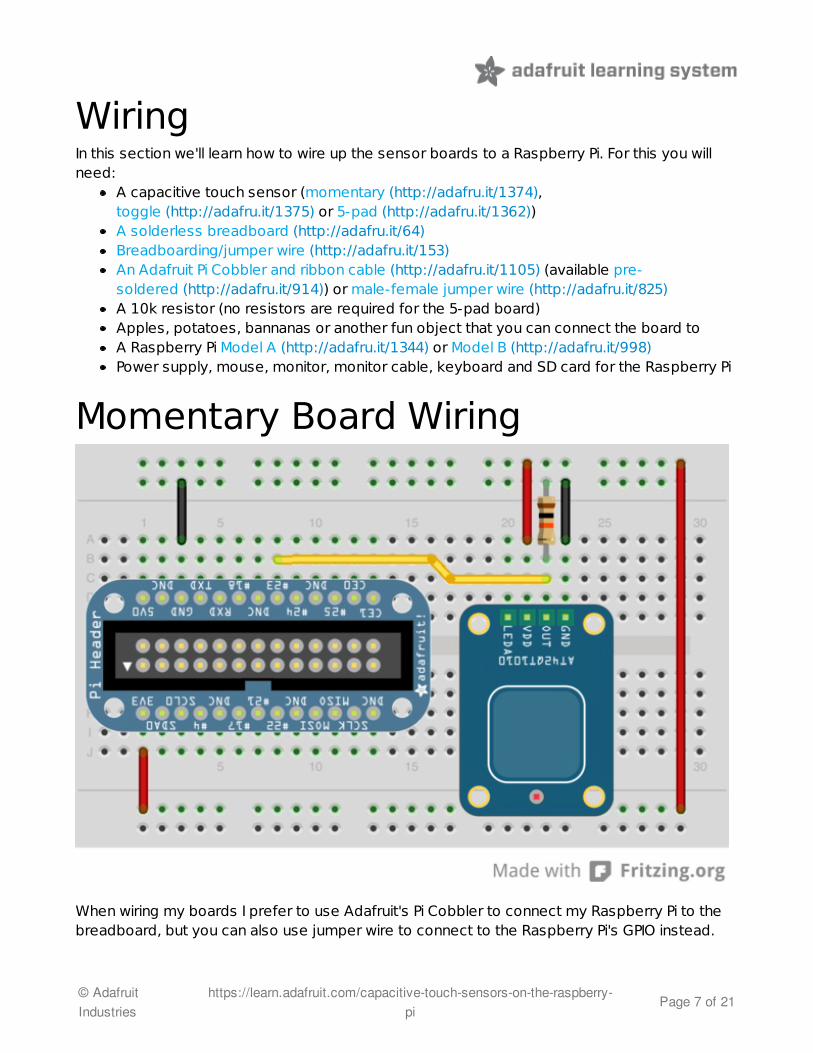
Momentary Board Wiring
When wiring my boards I prefer to use Adafruit's Pi Cobbler to connect my Raspberry Pi to thebreadboard, but you can also use jumper wire to connect to the Raspberry Pi's GPIO instead.
© AdafruitIndustries
https://learn.adafruit.com/capacitive-touch-sensors-on-the-raspberry-pi
Page 7 of 21
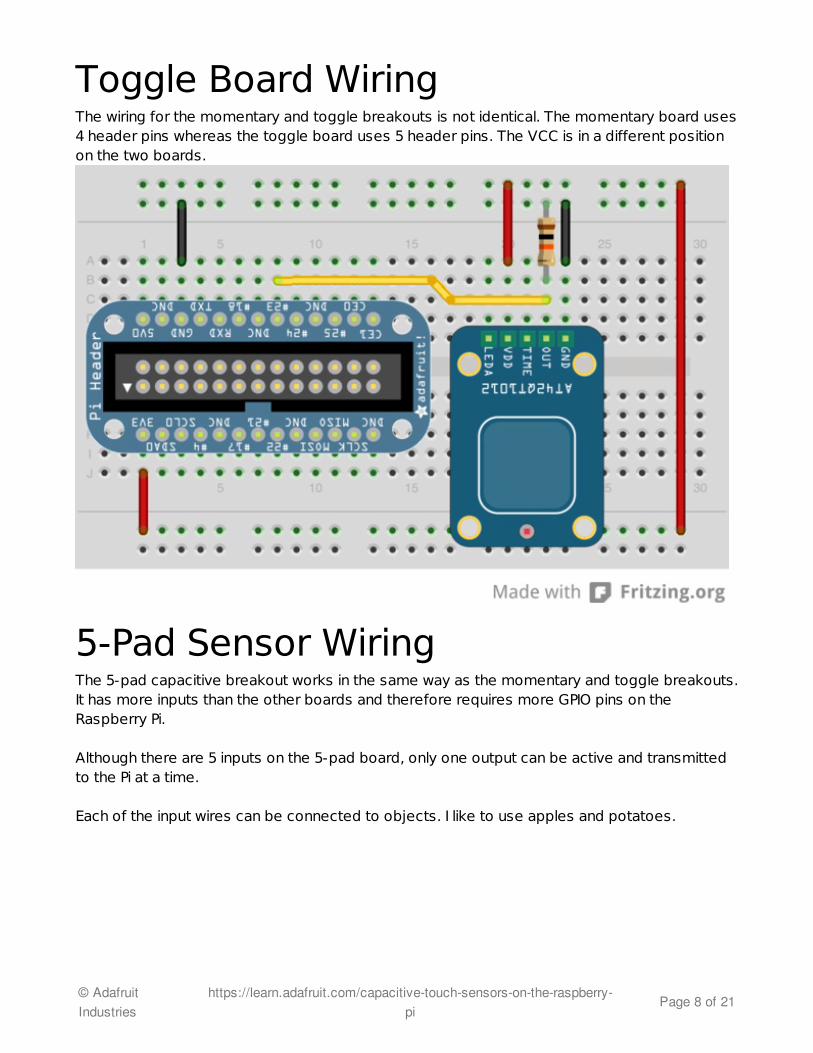
Toggle Board WiringThe wiring for the momentary and toggle breakouts is not identical. The momentary board uses4 header pins whereas the toggle board uses 5 header pins. The VCC is in a different positionon the two boards.
5-Pad Sensor WiringThe 5-pad capacitive breakout works in the same way as the momentary and toggle breakouts.It has more inputs than the other boards and therefore requires more GPIO pins on theRaspberry Pi.
Although there are 5 inputs on the 5-pad board, only one output can be active and transmittedto the Pi at a time.
Each of the input wires can be connected to objects. I like to use apples and potatoes.
© AdafruitIndustries
https://learn.adafruit.com/capacitive-touch-sensors-on-the-raspberry-pi
Page 8 of 21
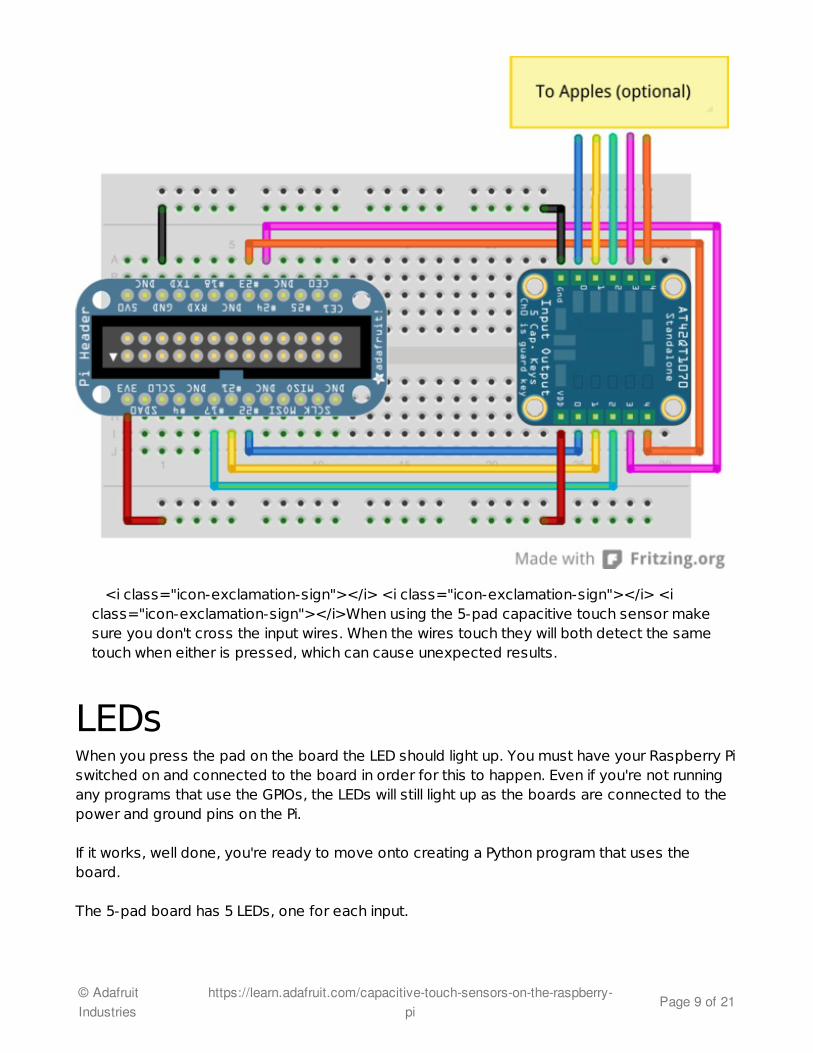
<i class="icon-exclamation-sign"></i> <i class="icon-exclamation-sign"></i> <iclass="icon-exclamation-sign"></i>When using the 5-pad capacitive touch sensor makesure you don't cross the input wires. When the wires touch they will both detect the sametouch when either is pressed, which can cause unexpected results.
LEDsWhen you press the pad on the board the LED should light up. You must have your Raspberry Piswitched on and connected to the board in order for this to happen. Even if you're not runningany programs that use the GPIOs, the LEDs will still light up as the boards are connected to thepower and ground pins on the Pi.
If it works, well done, you're ready to move onto creating a Python program that uses theboard.
The 5-pad board has 5 LEDs, one for each input.
© AdafruitIndustries
https://learn.adafruit.com/capacitive-touch-sensors-on-the-raspberry-pi
Page 9 of 21

Connecting to ObjectsEach of the boards can be connected to everyday objects that are conductive. This includesfruit, vegetables, plants, metals, animals, conductive fabrics, pencil graphite and conductivepaint to name a few.
With some objects you may find that the sensor will be activated when your hand is near theobject, but not touching it. This is normal and very common with fruits and vegetables thatcontain a lot of water.
Adafruit also stocks a number of materials which are excellent for connecting your sensors to:Bare Conductive paint (http://adafru.it/1305) (also available as apen (http://adafru.it/1306))Copper tape (http://adafru.it/1128)Conductive fabric (http://adafru.it/1167)Conductive thread (http://adafru.it/641)ITO (Indium Tin Oxide) Coated PET Plastic (http://adafru.it/1309)
Materials that are not conductive will not work. Plastics, wood, fabric and glass are all notconductors.
<i class="icon-exclamation-sign"></i> A tip: Although your novel idea of usingraspberries with your capacitive touch sensor and your Raspberry Pi may seem like astroke of genius, the raspberries are very soft and will quickly turn to mush. Try usingfirmer fruit instead, like an apple or a melon.
© AdafruitIndustries
https://learn.adafruit.com/capacitive-touch-sensors-on-the-raspberry-pi
Page 10 of 21

ProgrammingThese example programs show you how to use the capacitive touch sensors with Python andthe Raspberry Pi's GPIO. It is relatively straightforward to adapt the programs to do differentthings. Just change the lines with print "pressed".
Two versions of the code are provided. One will continuously print output to the terminal whilethe touch sensor is pressed. The other will only print output once, irrelevant of how long thepad is pressed. Both pieces of code will work with the momentary and toggle boards.
Code for 5-pad board can be found on the next page of the guide.
Installing the GPIO ModuleIn order to use the Python code you need to have the RPi.GPIO module installed. The PythonGPIO module is pre-installed on all of the latest Raspbian images so it's likely that it's alreadyinstalled. If it is not installed follow the steps in Adafruit's Raspberry Pi Lesson 4. GPIOSetup (http://adafru.it/aXR)
Make sure you have connected the boards using the wiring instructions in the previous sectionbefore continuing.
Continuous OutputThis version of the code will continuously print output while the pad is pressed.
import time
import RPi.GPIO as GPIO
GPIO.setmode(GPIO.BCM)
padPin = 23
GPIO.setup(padPin, GPIO.IN)
while True:
padPressed = GPIO.input(padPin)
if padPressed:
print "pressed"
time.sleep(0.1)
© AdafruitIndustries
https://learn.adafruit.com/capacitive-touch-sensors-on-the-raspberry-pi
Page 11 of 21
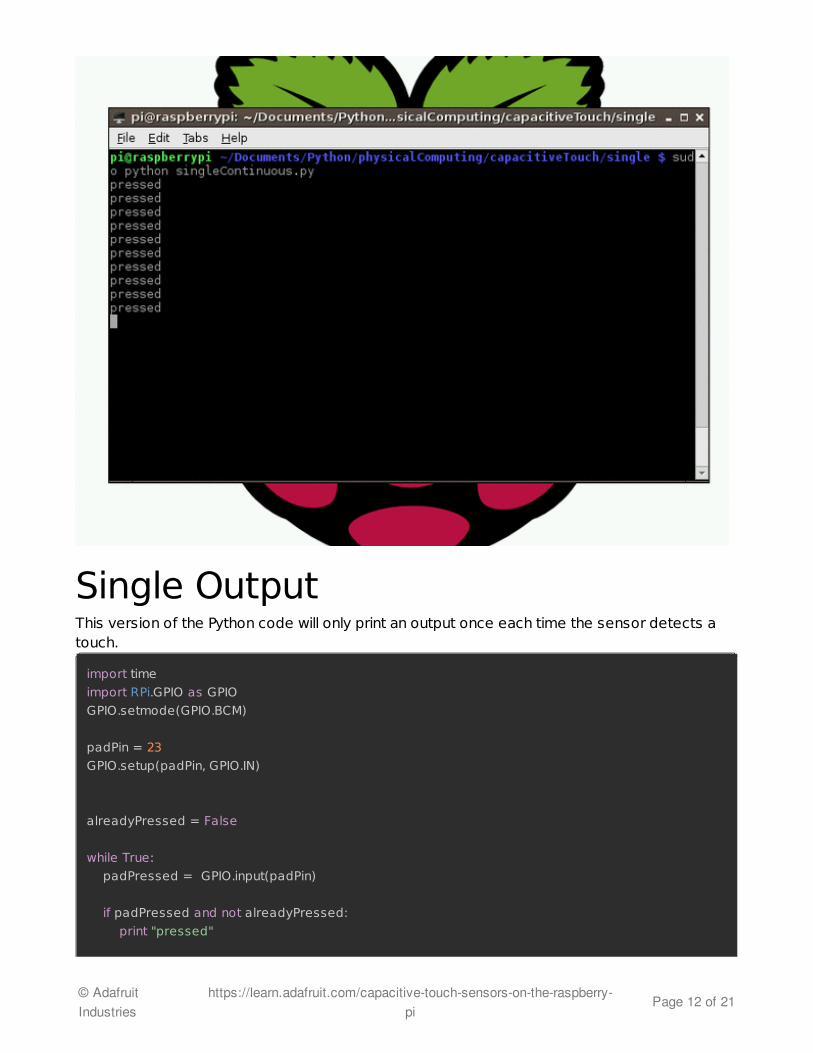
Single OutputThis version of the Python code will only print an output once each time the sensor detects atouch.
import time
import RPi.GPIO as GPIO
GPIO.setmode(GPIO.BCM)
padPin = 23
GPIO.setup(padPin, GPIO.IN)
alreadyPressed = False
while True:
padPressed = GPIO.input(padPin)
if padPressed and not alreadyPressed:
print "pressed"
© AdafruitIndustries
https://learn.adafruit.com/capacitive-touch-sensors-on-the-raspberry-pi
Page 12 of 21
alreadyPressed = padPressed
time.sleep(0.1)
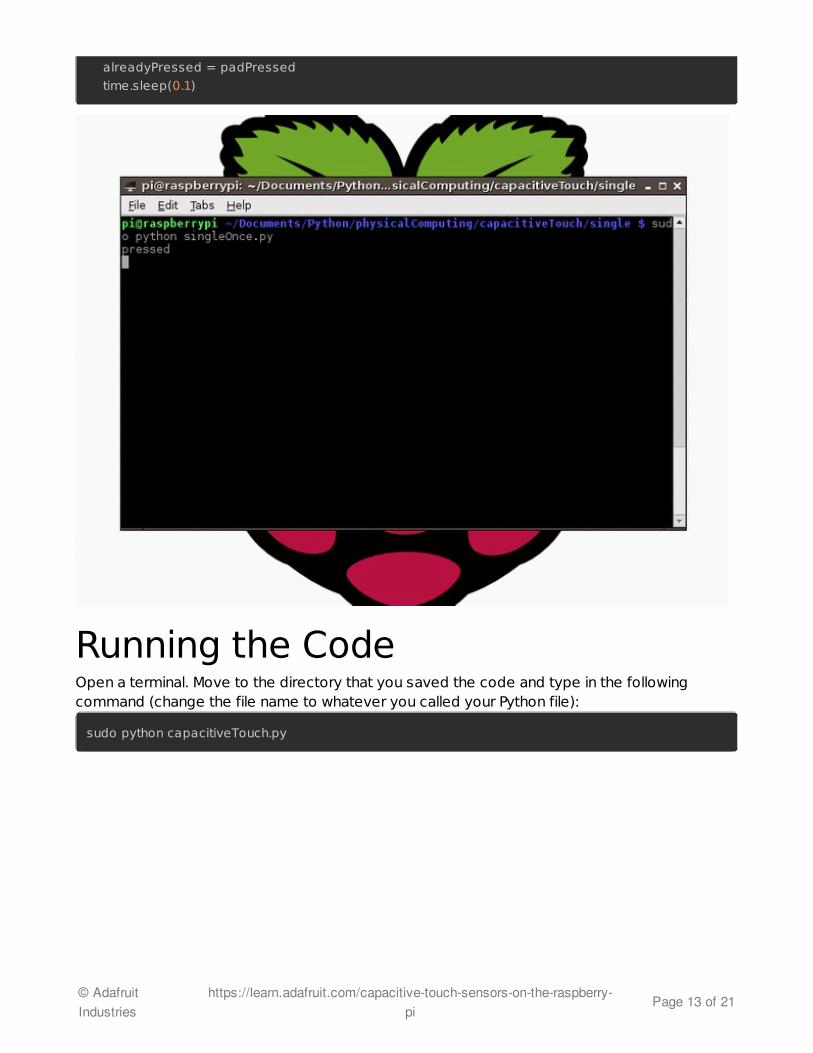
Running the CodeOpen a terminal. Move to the directory that you saved the code and type in the followingcommand (change the file name to whatever you called your Python file):
sudo python capacitiveTouch.py
© AdafruitIndustries
https://learn.adafruit.com/capacitive-touch-sensors-on-the-raspberry-pi
Page 13 of 21

Programming the 5-Pad SensorThe code for the 5-pad capacitive touch sensor can be found below. It cannot be swapped witheither of the single pad boards as they are wired differently.
import RPi.GPIO as GPIO
import time
GPIO.setmode(GPIO.BCM)
#set the GPIO input pins
pad0 = 22
pad1 = 27
pad2 = 17
pad3 = 24
pad4 = 23
GPIO.setup(pad0, GPIO.IN)
GPIO.setup(pad1, GPIO.IN)
GPIO.setup(pad2, GPIO.IN)
GPIO.setup(pad3, GPIO.IN)
GPIO.setup(pad4, GPIO.IN)
pad0alreadyPressed = False
pad1alreadyPressed = False
pad2alreadyPressed = False
pad3alreadyPressed = False
pad4alreadyPressed = False
while True:
pad0pressed = not GPIO.input(pad0)
pad1pressed = not GPIO.input(pad1)
pad2pressed = not GPIO.input(pad2)
pad3pressed = not GPIO.input(pad3)
pad4pressed = not GPIO.input(pad4)
if pad0pressed and not pad0alreadyPressed:
print "Pad 0 pressed"
pad0alreadyPressed = pad0pressed
if pad1pressed and not pad1alreadyPressed:
print "Pad 1 pressed"
pad1alreadyPressed = pad1pressed
if pad2pressed and not pad2alreadyPressed:
© AdafruitIndustries
https://learn.adafruit.com/capacitive-touch-sensors-on-the-raspberry-pi
Page 14 of 21

print "Pad 2 pressed"
pad2alreadyPressed = pad2pressed
if pad3pressed and not pad3alreadyPressed:
print "Pad 3 pressed"
pad3alreadyPressed = pad3pressed
if pad4pressed and not pad4alreadyPressed:
print "Pad 4 pressed"
pad4alreadyPressed = pad4pressed
time.sleep(0.1)
Running the CodeOpen a terminal. Move to the directory that you saved the code and type in the followingcommand (change the file name to whatever you called your Python file):
sudo python 5pad.py
© AdafruitIndustries
https://learn.adafruit.com/capacitive-touch-sensors-on-the-raspberry-pi
Page 15 of 21

The program works very similar to the programs for the momentary and toggle sensor boards.If you're having trouble understanding how the code works for the 5-pad, have a look at thecode on the previous section of this guide first.
© AdafruitIndustries
https://learn.adafruit.com/capacitive-touch-sensors-on-the-raspberry-pi
Page 16 of 21

Controlling Minecraft: Pi EditionThe GPIO pins on the Raspberry Pi are one of the reasons for its popularity. In this guide we'veused the GPIO to connect to capacitive touch sensors. This has a range of applications andallows you to create some really creative projects.
The Raspberry Pi has a special version of Minecraft that can be programmed with Python.Combining Minecraft on the Raspberry Pi with our capacitive touch sensors allows us to createprograms with limitless potential for creativity and fun.
Install Minecraft: Pi EditionBefore we begin you'll need to have Minecraft: Pi Edition installed on your Raspberry Pi. To installMinecraft Pi you can use this guide on the Adafruit Learning System (http://adafru.it/dgq).
Copy the APIIn order to connect to a Minecraft game you will need to copy the API.
Open a terminal and create a new directory named Minecraft within the Documents directorywith the following command:
mkdir ~/Documents/Minecraft
Next, we will copy the API into this folder with the following command:
cp -r ~/mcpi/api/python/ ~/Documents/Minecraft
Super JumpThis code uses the capacitive touch pad with Minecraft: Pi Edition to make the player jump 10blocks into the air when the pad is pressed.
This code works best with the momentary board, though can be used with the toggle boardand can be adapted for the 5-pad board.
import RPi.GPIO as GPIO
import time
import mcpi.minecraft as minecraft
mc = minecraft.Minecraft.create()
GPIO.setmode(GPIO.BCM)
© AdafruitIndustries
https://learn.adafruit.com/capacitive-touch-sensors-on-the-raspberry-pi
Page 17 of 21

padPin = 23
GPIO.setup(padPin, GPIO.IN)
alreadyPressed = False
while True:
padPressed = GPIO.input(padPin)
if padPressed and not alreadyPressed:
pos = mc.player.getPos()
x = pos.x
y = pos.y + 10
z = pos.z
mc.player.setPos(x, y, z)
alreadyPressed = padPressed
time.sleep(0.1)
MelonsThis code will place a melon block at the current position of the player. If you hold down thetouch pad of the capacitive touch sensor or use toggle sensor, a trail of melons will be createdwherever the player walks. This example works particularly well with the toggle sensor board.
import RPi.GPIO as GPIO
import time
import mcpi.minecraft as minecraft
mc = minecraft.Minecraft.create()
GPIO.setmode(GPIO.BCM)
padPin = 23
GPIO.setup(padPin, GPIO.IN)
# melon block
blockType = 103
while True:
padPressed = GPIO.input(padPin)
if padPressed:
pos = mc.player.getPos()
x = pos.x
y = pos.y
z = pos.z
mc.setBlock(x, y, z, blockType)
© AdafruitIndustries
https://learn.adafruit.com/capacitive-touch-sensors-on-the-raspberry-pi
Page 18 of 21

time.sleep(0.1)
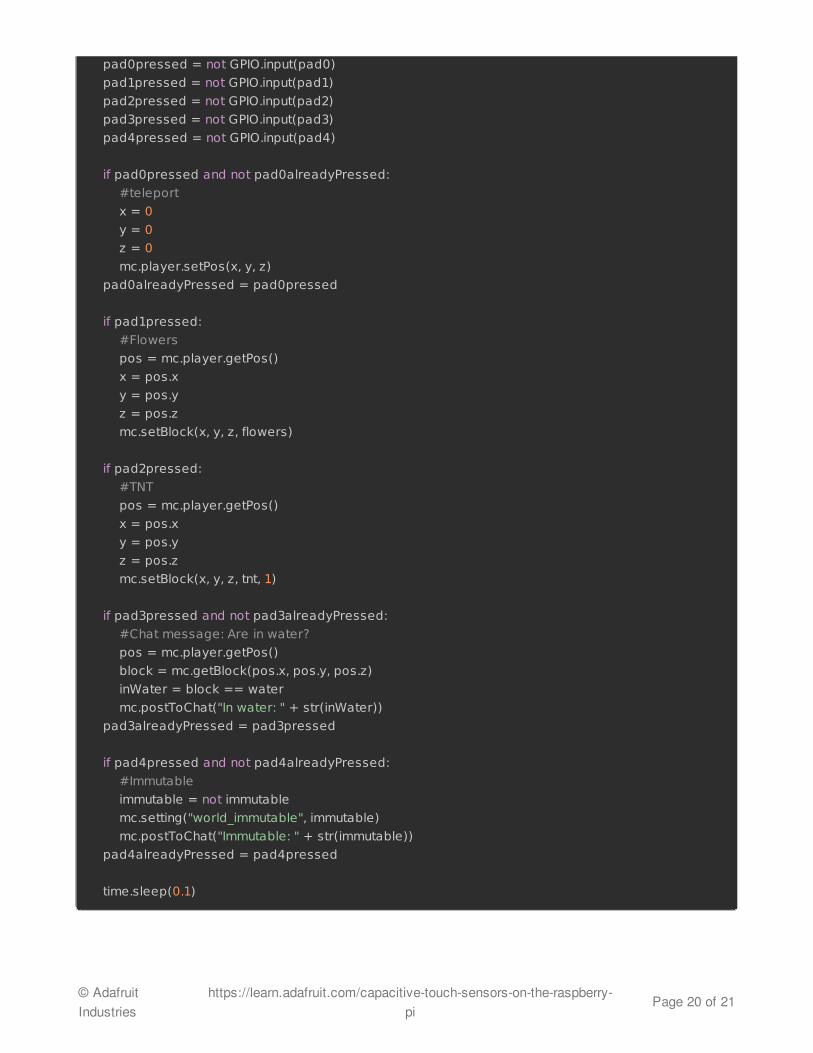
Control Panel (5-Pad Board)In the last example we use the 5-pad capacitive touch sensor board to do 5 different things inMinecraft Pi.
This is what each pad does:
0 - Teleports the player to co-ordinates (0, 0, 0)1 - Places a flower at the player's position2 - Places explosive TNT at the player's position3 - Checks if the player is in water4 - Toggles whether or not blocks can be smashed
import RPi.GPIO as GPIO
import time
import mcpi.minecraft as minecraft
mc = minecraft.Minecraft.create()
GPIO.setmode(GPIO.BCM)
#set the GPIO input pins
pad0 = 22
pad1 = 27
pad2 = 17
pad3 = 24
pad4 = 23
GPIO.setup(pad0, GPIO.IN)
GPIO.setup(pad1, GPIO.IN)
GPIO.setup(pad2, GPIO.IN)
GPIO.setup(pad3, GPIO.IN)
GPIO.setup(pad4, GPIO.IN)
pad0alreadyPressed = False
pad3alreadyPressed = False
pad4alreadyPressed = False
immutable = False
tnt = 46
water = 9
flowers = 38
while True:
© AdafruitIndustries
https://learn.adafruit.com/capacitive-touch-sensors-on-the-raspberry-pi
Page 19 of 21
pad0pressed = not GPIO.input(pad0)
pad1pressed = not GPIO.input(pad1)
pad2pressed = not GPIO.input(pad2)
pad3pressed = not GPIO.input(pad3)
pad4pressed = not GPIO.input(pad4)
if pad0pressed and not pad0alreadyPressed:
#teleport
x = 0
y = 0
z = 0
mc.player.setPos(x, y, z)
pad0alreadyPressed = pad0pressed
if pad1pressed:
#Flowers
pos = mc.player.getPos()
x = pos.x
y = pos.y
z = pos.z
mc.setBlock(x, y, z, flowers)
if pad2pressed:
#TNT
pos = mc.player.getPos()
x = pos.x
y = pos.y
z = pos.z
mc.setBlock(x, y, z, tnt, 1)
if pad3pressed and not pad3alreadyPressed:
#Chat message: Are in water?
pos = mc.player.getPos()
block = mc.getBlock(pos.x, pos.y, pos.z)
inWater = block == water
mc.postToChat("In water: " + str(inWater))
pad3alreadyPressed = pad3pressed
if pad4pressed and not pad4alreadyPressed:
#Immutable
immutable = not immutable
mc.setting("world_immutable", immutable)
mc.postToChat("Immutable: " + str(immutable))
pad4alreadyPressed = pad4pressed
time.sleep(0.1)
© AdafruitIndustries
https://learn.adafruit.com/capacitive-touch-sensors-on-the-raspberry-pi
Page 20 of 21
Running the CodeTo run any of the examples on this page you will need to be in Minecraft game world on yourRaspberry Pi. You will get an error if you don't have Minecraft open or if you're on the titlescreen.
All of these examples use the same wiring as the rest of this guide.
The code runs like any other Python program that uses the GPIO. You can run it from theterminal on your Raspberry Pi with the following command (change the name of the program):
sudo python superJump.py
© Adafruit Industries Last Updated: 2014-04-09 11:30:15 AM EDT Page 21 of 21


