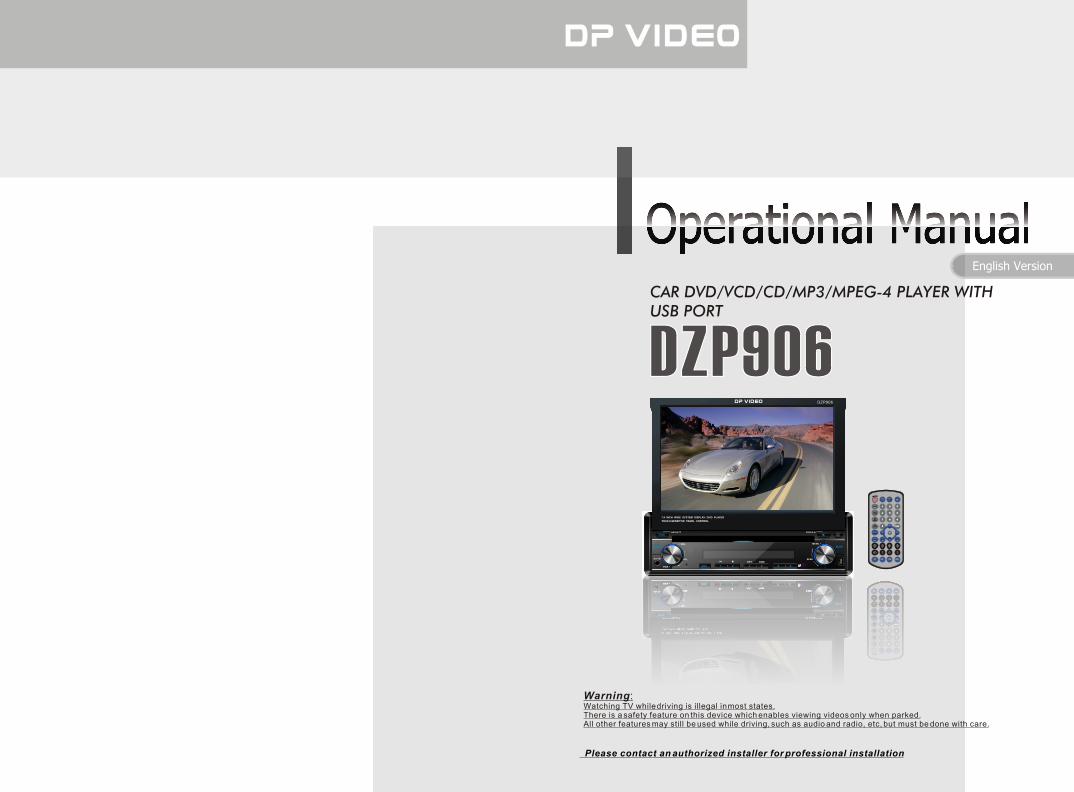
CAR DVD/VCD/CD/MP3/MPEG-4 PLAYER WITH USB PORT English Version Warning: Watching TV while driving is illegal in most states. There is a safety feature on this device which enables viewing videos only when parked. All other features may still be used while driving, such as audio and radio, etc, but must be done with care. Please contact an authorized installer for professional installation 1 EQ EQ LOUD LOUD 2 3 4 5 6 7 8 9 0 BAND BAND TITLE TITLE AMS AMS MENU MENU LOC LOC SUB-T SUB-T ST ST AUDIO AUDIO RPT RPT RDM RDM ANGLE ANGLE OSD OSD PROG PROG ZOOM ZOOM P / N P / N SETUP SETUP ENTER ENTER DZP906 7.0 INCH WIDE SYSTEM DISPLAY / DVD PLAYER TOUCH-SENSITIVE PANEL CONTROL ANGLE ANGLE
Transcript
CAR DVD/VCD/CD/MP3/MPEG-4 PLAYER WITH USB PORT
English Version
Warning: Watching TV while driving is illegal in most states.
There is a safety feature on this device which enables viewing videos only when parked.
All other features may still be used while driving, such as audio and radio, etc, but must be done with care.
Please contact an authorized installer for professional installation
PWRPWR
SOURCESOURCE
11
EQEQ LOUDLOUD
22 33
44 55 66
77 88 99
00
BANDBANDTITLETITLE
AMSAMSMENUMENU
LOCLOCSUB-TSUB-T
STSTAUDIOAUDIO
RPTRPT RDMRDM
GOTOGOTO
ANGLEANGLE OSDOSD
PROGPROG
ZOOMZOOM
P / NP / N
SETUPSETUP
ENTER ENTER
VOL+VOL+VOLVOL SELSEL
CLEARCLEAR
DZP906
7.0 INCH WIDE SYSTEM DISPLAY / DVD PLAYERTOUCH-SENSITIVE PANEL CONTROL
ANGLE ANGLE
Common Operations3To Select Source by Menu 18Reset the Unit 18Turning the Unit On/Off 18Volume Control 18Setting the Sound Characteristics 18EQ Setting 19Turning Loudness On/Off 19Eject a Disc 19Insert a SD Card 19Mute Function 19Mode Selector 19Infrared Sensor 19
00
2
Contents
InstallationWiring Connections 12Install the Unit 13Detach the Unit 15Install the Front Panel 16Detach the Front Panel 16clean the connector 17
2
1 Before You StartImportant Safeguards 4 About this manual 4Precautions 5Maintenance 6Location & function of the controls 7Remote control 9 Specifications 11
1
5 Main MenuMain Menu Setup 20 Video Adjust 20Audio Adjust 21Source Setup 21System Adjust 21
4
DVD/VCD/MP455DVD/VCD/MP4 Setup 25DVD/VCD/MP4 Play 25Selecting Tracks Fast 25Number Buttons 25Pause the Playback 25Stop the Playback 25Play tracks at Random 26Repeat Playing 26Skip backward/forward/F.F/F.REW the
Playback 26System Switch 26Slow Motion Playback 26Increase Picture Size 26On Screen Display 26Setting the Playback Time 27Changing Audio Language 27Changing the Subtitle Language 27Changing the Viewing Angle 28Selecting Channel 28Program Playing 28Playing PBC(Menu) 28Selecting Menu 29DVD Setup Menu 296 CD/MP3/SD/USB
CD/MP3/SD/USB Setup 36CD/MP3/SD/USB Play 36Selecting Tracks Fast 36Repeat Playing 37Number Buttons 37Selecting Track 37Stop Play 37Playing Tracks at Random 37Pause the Playback 37Skip backward/forward/F.F/F.REW
the Playback 37
10
00
3
Contents
On Screen Display 38Program Playing 38Eject SD Card 38Eject USB 38
AUX
AUX Touch Screen Menu 418
7 TunerListening to the Radio 39Band Selector 39Manual/Automatic Tuning 39DX/LOC Selector 39Selecting The stored Station 39MO/ST Selector 40Scanning/Memorizing Stations
Additional Information Simple Troubleshooting Guide 429
Additional Information
Simple Troubleshooting Guide
No power. Check and make sure whether the fuse is blown, replace with the proper value if necessary.
Some errors occur in
LCD or no function
pressing the button.
the
when
Unable to receive stations.
Poor signal when receiving a
station.
CDs cannot be loaded.
Sound skips.
No images.
Images skip.
Press RESET button.
Check and make sure whether the antenna is inserted or the antenna is properly connected, if not, insert the antenna or connect it properly.
Antenna may not be the proper length. Make sure the antenna is fully extended; if broken, replace the antenna with a new one.
A CD is loaded in the mechanism.
The CD is dirty or damaged.
The Video line from main unit to the TV is not connected properly.
Improper setting of the color system. Set the color system according to the connected television.
to PAL or NTSC
.
.
.
Note: If any of the problems persist after the check list has been reviewed, consult your nearest service dealer. Never attempt to disassemble your unit by yourself.
The following checklist might help to solve the problems which you meet when usingthe unit. Please double check and make sure the connections are correct and you are followingthe operating procedures before using the checklist below .
Problem Cause/Solution
..
.
.
.The antenna is poorly grounded, check and makesure the antenna is properly grounded at its mounting location.
.
Due to continuous product improvement, the operations
of this model are subject to change.
Before You Start
41
08AUX
AUX Touch Screen Menu
VOL+VOL-
AV SET
AUXF
BT
SRC
VOL+VOL-
AV SET
AUXR
BT
SRC
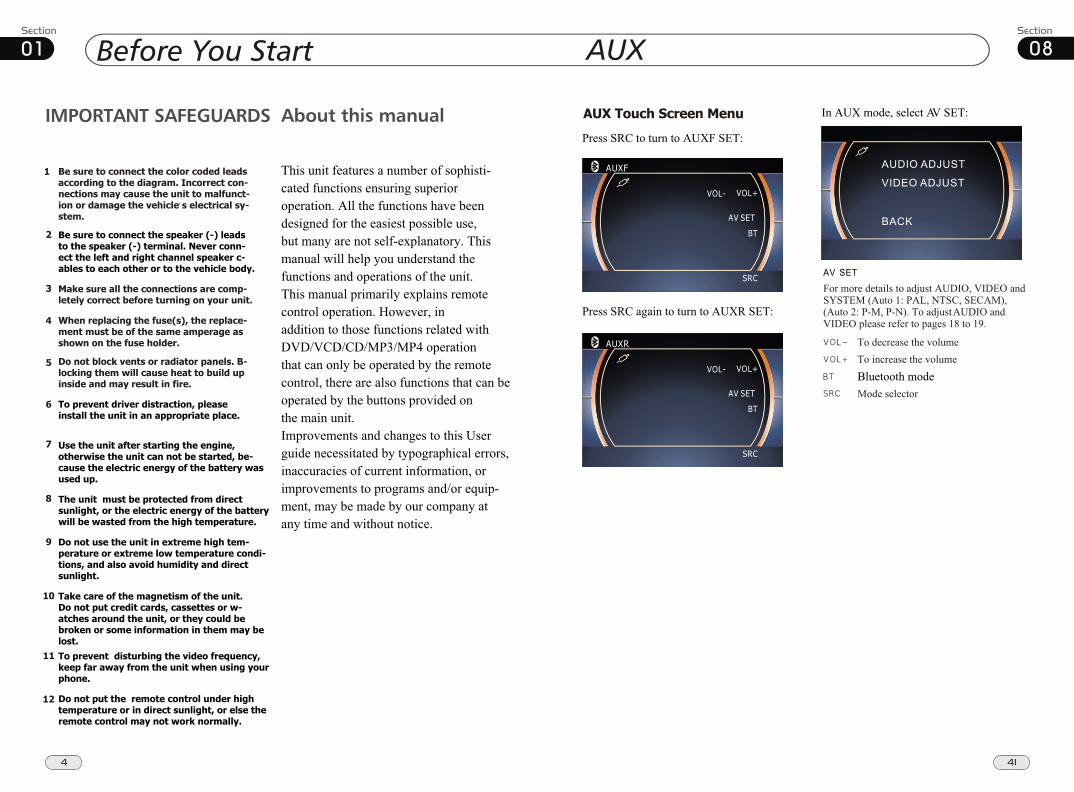
Press SRC to turn to AUXF SET:
Press SRC again to turn to AUXR SET:
AV SET
For more details to adjust AUDIO, VIDEO andSYSTEM (Auto 1: PAL, NTSC, SECAM), (Auto 2: P-M, P-N). To adjust AUDIO andVIDEO please refer to pages 18 to 19.
To decrease the volumeTo increase the volume
In AUX mode, select AV SET:
Bluetooth modeMode selector
AUDIO ADJUST
VIDEO ADJUST
BACK
IMPORTANT SAFEGUARDS About this manual
Be sure to connect the color coded leads
according to the diagram. Incorrect con-
nections may cause the unit to malfunct-,
ion or damage the vehicle s electrical sy-
stem.
Be sure to connect the speaker (-) leads
to the speaker (-) terminal. Never conn-
ect the left and right channel speaker c-
ables to each other or to the vehicle body.
Make sure all the connections are comp-
letely correct before turning on your unit.
When replacing the fuse(s), the replace-
ment must be of the same amperage as
shown on the fuse holder.
Do not block vents or radiator panels. B-
locking them will cause heat to build up
inside and may result in fire.
This unit features a number of sophisti-cated functions ensuring superior operation. All the functions have beendesigned for the easiest possible use,but many are not self-explanatory. This manual will help you understand the functions and operations of the unit.This manual primarily explains remote
control operation. However, in addition to those functions related withDVD/VCD/CD/MP3/MP4 operation that can only be operated by the remote control, there are also functions that can be operated by the buttons provided onthe main unit.Improvements and changes to this Userguide necessitated by typographical errors,inaccuracies of current information, or improvements to programs and/or equip-ment, may be made by our company at any time and without notice.
To prevent driver distraction, please
install the unit in an appropriate place.
Use the unit after starting the engine,
otherwise the unit can not be started, be-
cause the electric energy of the battery was
used up.
The unit must be protected from direct
sunlight, or the electric energy of the battery
will be wasted from the high temperature.
Do not use the unit in extreme high tem-
perature or extreme low temperature condi-
tions, and also avoid humidity and direct
sunlight.
Take care of the magnetism of the unit.
Do not put credit cards, cassettes or w-
atches around the unit, or they could be
broken or some information in them may be
lost.
To prevent disturbing the video frequency,
keep far away from the unit when using your
phone.
Do not put the remote control under high
temperature or in direct sunlight, or else the
remote control may not work normally.
12
1
2
3
4
5
6
7
8
9
10
11
01
5
Before You Start
40
07 Tuner
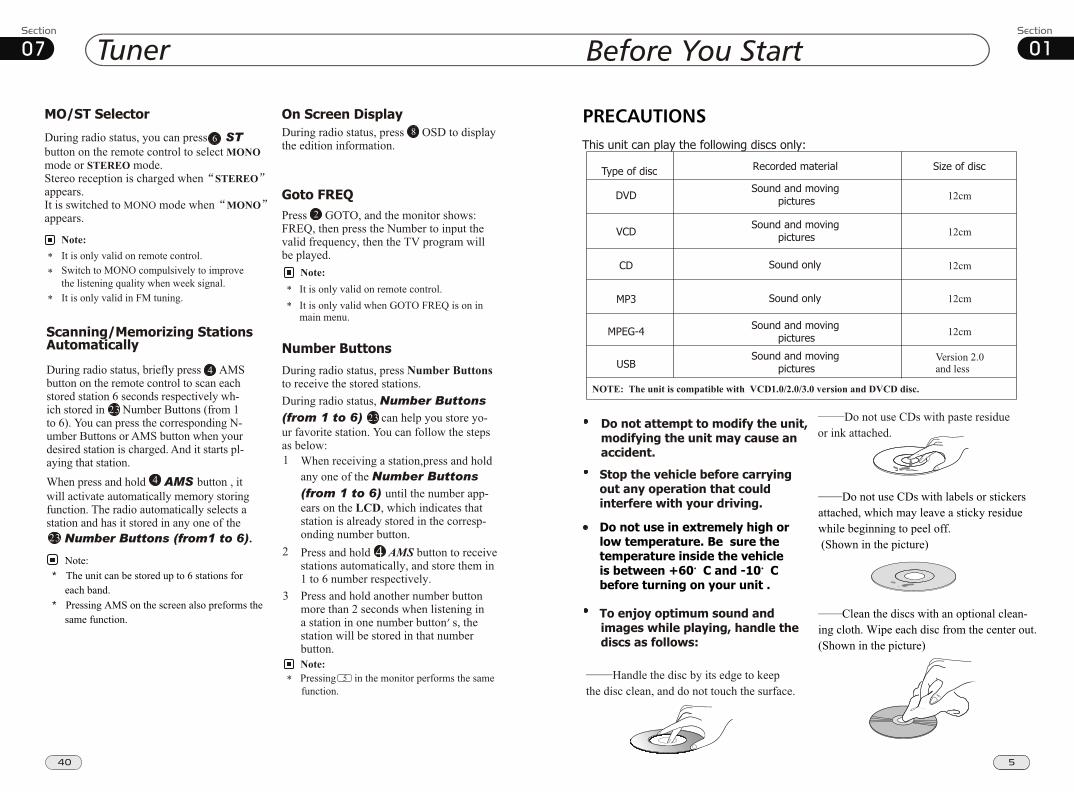
During radio status, you can press ST button on the remote control MONO mode or STEREO
to select mode.
Stereo reception is charged when STEREO
appears. It is switched to MONO mode when MONO
appears.
MO/ST Selector
It is only valid on remote control.
It is only valid in FM tuning.
6
Switch to MONO compulsively to improve the listening quality when week signal.
Note:
*
*
*
Number Buttons
During radio status, Number Buttons
(from 1 to 6) can help you yo-ur favorite station. You can follow the as below:
store steps
Press and hold AMS button to receive stations automatically, and store them in 1 to 6 number respectively.
23
During radio status, press Number Buttons
to receive the stored stations.
4
When receiving a station,press and holdany one of the Number Buttons
(from 1 to 6) until the number app-ears on the LCD, which indicates that station is already stored in the corresp-onding number button.
Press and hold another number button more than 2 seconds when listening in a station in one number button s, thestation will be stored in that number button.
1
2
3
Pressing in the monitor performs the same function.
Note:
* 5
Goto FREQ
2Press GOTO, and the monitor shows: FREQ, then press the Number to input the valid frequency, then the TV program will be played.
Note:
* It is only valid on remote control.* It is only valid when GOTO FREQ is on in
main menu. Scanning/Memorizing Stations
Automatically
During radio status, briefly press AMS button on the remote control to scan each stored seconds respectively wh-ich Number Buttons (from 1 to . You can press responding N-umber Buttons or ton when your desired station is And it starts pl-aying that station.
station 6stored in
6) the corAMS butcharged.
23
4
When press and hold AMS , automatically memory storing
The radio automatically selects and has it stored in any one of
Number Buttons (from1 to 6).
button it will activate function. a station the
4
23
Note: * The unit can be stored up to 6 stations for each band. * Pressing AMS on the screen also preforms the same function.
On Screen Display
8During radio status, press OSD to displaythe edition information.
5
Handle the disc by its edge to keep the disc clean, and do not touch the surface.
Do not attempt to modify the unit,
modifying the unit may cause an
accident.
Stop the vehicle before carrying
out any operation that could
interfere with your driving.
Do not use in extremely high or
low temperature. Be sure the
temperature inside the vehicle
is between +60 C and -10 C
before turning on your unit .
To enjoy optimum sound and
images while playing, handle the
discs as follows:
Do not use CDs with paste residueor ink attached.
Do not use CDs with labels or stickers attached, which may leave a sticky residue while beginning to peel off. (Shown in the picture)
Clean the discs with an optional clean-ing cloth. Wipe each disc from the center out. (Shown in the picture)
PRECAUTIONS
This unit can play the following discs only:
Type of disc
VCD
12cm
MP3
12cm
CD 12cm
NOTE: The unit is compatible with VCD1.0/2.0/3.0 version and DVCD disc.
12cm
DVD
Recorded material
Sound and moving pictures
Sound and moving pictures
Sound only
Sound only
Size of disc
MPEG-4 Sound and moving pictures 12cm
USB Sound and moving pictures
Version 2.0 and less
Before You Start01
6 39
07Tuner
Listening to the radio
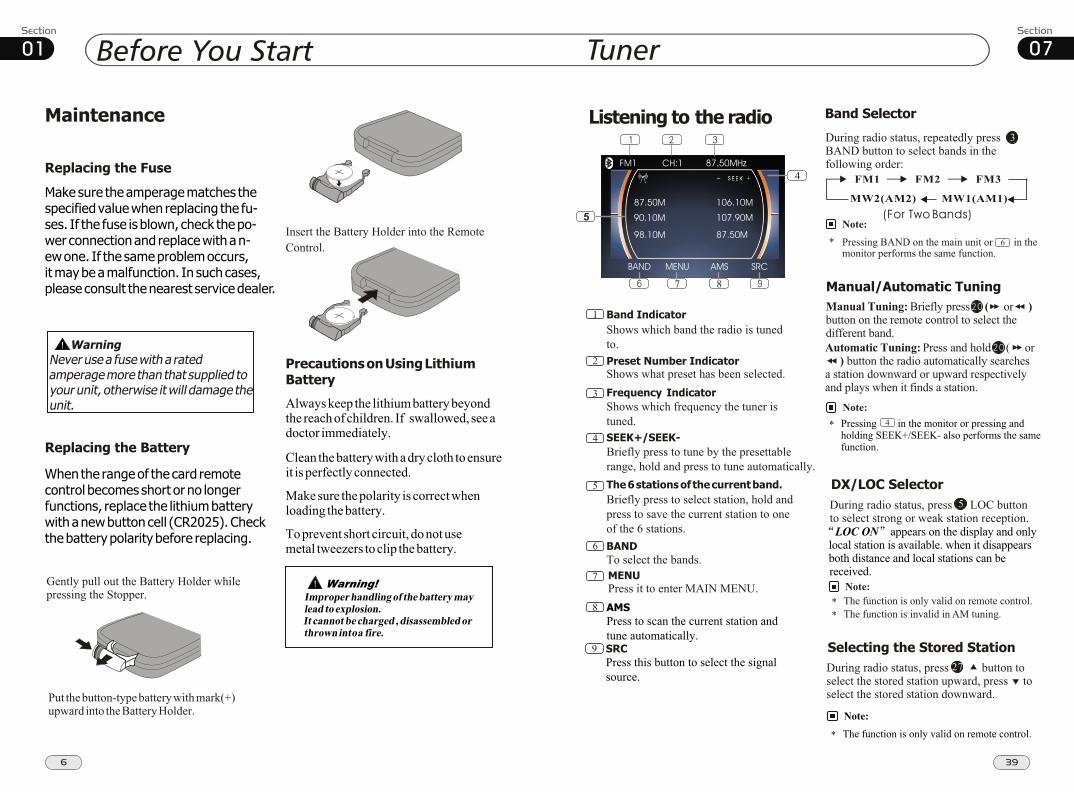
Band Indicator
Shows which band the radio is tuned to.
1
Preset Number Indicator
Shows what preset has been selected.2
Shows which frequency the tuner istuned.
Frequency Indicator3
SEEK+/SEEK-
Briefly press to tune by the presettable range, hold and press to tune automatically.
4
5
6 BAND
To select the bands.
The 6 stations of the current band.
Briefly press to select station, hold andpress to save the current station to oneof the 6 stations.
Note:
FM2
MW2(AM2) MW1(AM1)
FM3FM1
During radio status, repeatedly pressBAND button to select bands in
lowing order: the
fol
Band Selector
3
(For Two Bands)
Manual/Automatic Tuning
Manual Tuning: Briefly press ( button on the remote control to select thedifferent band.
or )
Automatic Tuning: ress and
) button the radio a station or respectively and plays when it finds a station.
P hold ( or automatically searches
downward upward
Note:
7 MENU
Press it to enter MAIN MENU.
9 SRC
Press this button to select the signal source.
* Pressing BAND on the main unit or in the monitor performs the same function.
6
LOC ON appears on the display and only local station is available. when it disappears both distance and local stations can be received.
DX/LOC Selector
During radio status, press LOC button to select or weak station reception.strong
5
The function is only valid on remote control.The function is invalid in AM tuning.
Note:
**
Selecting the Stored Station
During radio status, press button to select the stored station upward, press toselect downward.the stored station
27
Note:
The function is only valid on remote control.*
Pressing in the monitor or pressing and holding SEEK+/SEEK- also performs the samefunction.
* 4
8 AMS
Press to scan the current station and tune automatically.
87.50M 106.10M107.90M
87.50M98.10M
90.10M
4
5
FM1 CH:1- +
BAND
7MENU SRC
87.50MHz
8AMS
Replacing the Fuse
Make sure the amperage matches the specified value when replacing the fu-ses. If the fuse is blown, check the po-wer connection and replace with a n-ew one. If the same problem occurs, it may be a malfunction. In such cases,please consult the nearest service dealer.
When the range of the card remote control becomes short or no longerfunctions, replace the lithium battery with a new button cell (CR2025). Check the battery polarity before replacing.
Precautions on Using Lithium
Battery
Always keep the lithium battery beyond the reach of children. If swallowed, see a doctor immediately.
Clean the battery with a dry cloth to ensure it is perfectly connected.
Make sure the polarity is correct whenloading the battery.
To prevent short circuit, do not use metal tweezers to clip the battery.
Gently pull out the Battery Holder whilepressing the Stopper.
Put the button-type battery with mark(+) upward into the Battery Holder.
Replacing the Battery
Insert the Battery Holder into the Remote Control.
!
Maintenance
Warning
Never use a fuse with a rated amperage more than that supplied to you r unit , otherwise i twil l damage the unit.
Warning!
Improper handling of the battery may
lead to explosion.
It cannot be charged ,disassembled or
thrown int o a fire.
!
01
7
Before You Start
Location of the Controls
The Expanding
The Whole
O PEN
BAND MUTE
A/V IN
PWRSRC 1 2 3 4 5 6
RPT RDMVOL SEEK
MENUSEL
ANGLE ANGLE
OPEN
BAND MUTE
A/V IN
PWR SRC 1 2 3 4 5 6RPT RDMVOL SEEK
MENUSEL
ANGLE ANGLE
4
1311
5 6 871 2
910
12
14
38
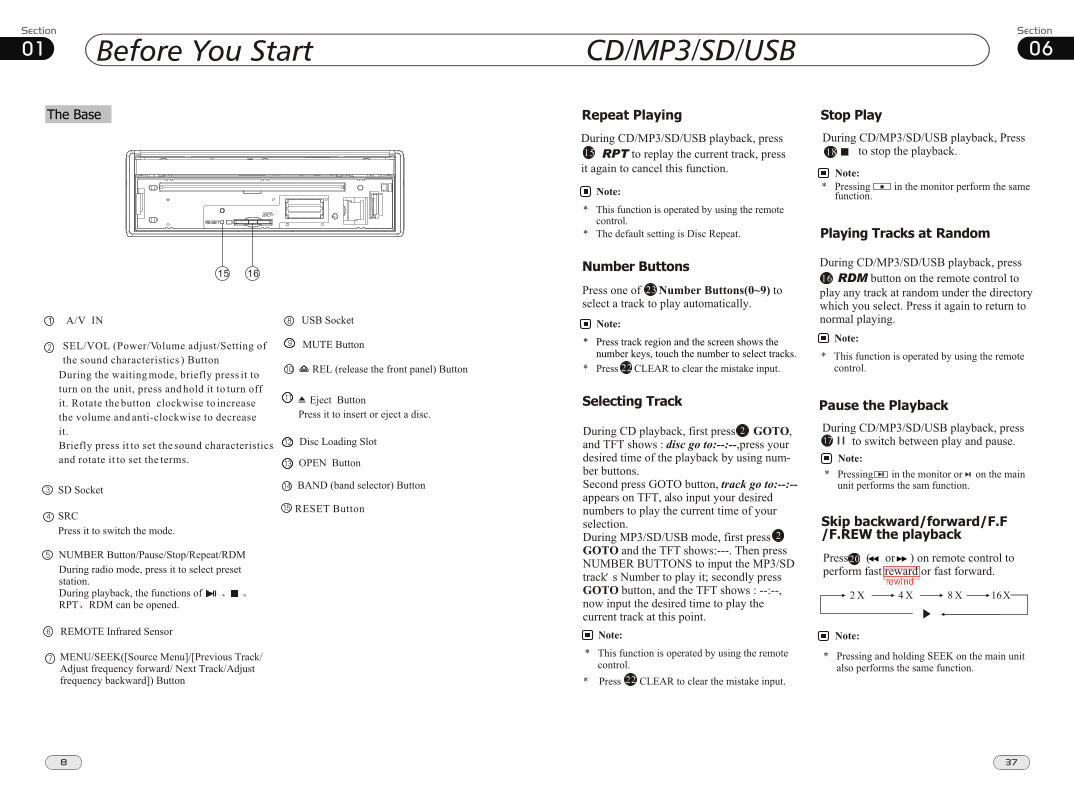
06 CD/MP3/SD/USB
During CD status, press OSD button the display shows:
Single elapsed
Total
elapsed
Total
remain
Single remain
Note:
* This function is operated by using the remote control.
On Screen Display
Program Playing
During CD mode, press PROG, the TFTdisplays the program menu. Press NUMBER
BUTTONS to select the track Number andthen press to move the cursor to START,press ENTER to start program playing; move the cursor to EXIT and press ENTERto exit the program playing. Move the cursorto and press ENTER to the previous page; move the cursor to and press ENTER to the next page. During this process, press to cancel the program playing.
13
18
The function is only valid on remote control.Note:
*
27
* Press CLEAR to clear the mistake input.22
Eject SD Card
Push SD card to eject it.During SD playing mode, to eject SD card to switch to Disc mode; if there is no disc in the main unit, it will switch to USB mode, or else, it will switch to Radio mode.During other modes, to eject SD card to keepthe previous mode.
Eject USB
Pull USB to eject it.During USB playing mode, to eject USB toswitch to Disc mode; if there is no disc in the main unit, it will switch to SD Card mode,or else, it will switch to Radio mode.During other modes, to eject USB to keepthe previous mode.
During the waiting mode, briefly press it to turn on the unit, press and hold it to turn off it. Rotate the button clockwise to increasethe volume and anti-clockwise to decrease it.Briefly press it to set the sound characteristicsand rotate it to set the terms.
SD Socket
NUMBER Button/Pause/Stop/Repeat/RDM During radio mode, press it to select preset station.During playback, the functions of RPT RDM can be opened.
MENU/SEEK([Source Menu]/[Previous Track/Adjust frequency forward/ Next Track/Adjust frequency backward]) Button
37
* Pressing in the monitor or on the main unit performs the sam function.
06Repeat Playing
During CD/MP3/SD/USB playback, press replay the current track, press it again to cancel this function.
RPT to 15
* This function is operated by using the remote control.
Note:
* The default setting is Disc Repeat.
* Press CLEAR to clear the mistake input.22
Number Buttons
Press one of Number Buttons(0~9) to select a track to play automatically.
23
* Press track region and the screen shows the number keys, touch the number to select tracks.
Note:
Selecting Track
2
* This function is operated by using the remote control.
Note:
* Press CLEAR to clear the mistake input.22
During CD playback, first press GOTO, and TFT shows : disc go to:--:--,press your desired time of the playback by using num-ber buttons.Second press GOTO button, track go to:--:--
appears on TFT, also input your desirednumbers to play the current time of yourselection.During MP3/SD/USB mode, first press GOTO and the TFT shows:---. Then press NUMBER BUTTONS to input the MP3/SD track s Number to play it; secondly press GOTO button, and the TFT shows : --:--, now input the desired time to play the current track at this point.
2
Stop Play
During CD/MP3/SD/USB playback, Press to stop the playback.18
* Pressing in the monitor perform the same function.
Note:
Playing Tracks at Random
During CD/MP3/SD/USB playback, RDM button on the remote control to
play random under the directory which you select. P return to
press
any track at ress it again to
normal playing.
16
* This function is operated by using the remote control.
Note:
Pause the Playback
During CD/MP3/SD/USB playback, press to switch between play and pause. Note:
Press ( or ) on remote control to perform fast reward or fast forward.
Skip backward/forward/F.F
/F.REW the playback
20
2 X 4 X 8 X 16X
Note:
CD/MP3/SD/USB
* Pressing and holding SEEK on the main unit also performs the same function.
ronnie
ronnie
rewind
01
9
Before You Start
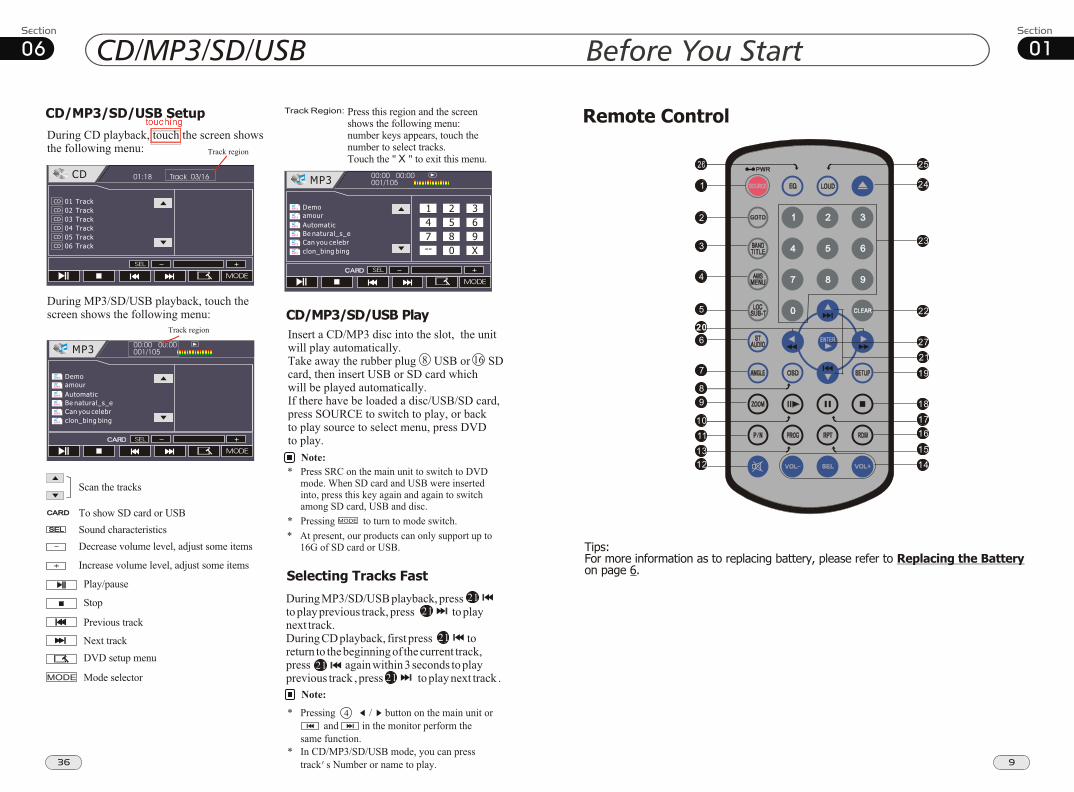
Remote Control
Tips:For more information as to replacing battery, please refer to Replacing the Battery
on page 6.
1
2
3
4
5
7
206
8
9
10
11
12
13
14
15
16
17
18
19
21
22
23
24
26
27
25
36
06During CD playback, touch the screen shows the following menu:
CD/MP3/SD/USB Setup
Track region
During MP3/SD/USB playback, touch the screen shows the following menu:
Track region
Scan the tracks
CARDCARD To show SD card or USBSELSEL Sound characteristics
Decrease volume level, adjust some items
Increase volume level, adjust some items
Play/pause
Stop
Previous track
Next trackDVD setup menu
MODE Mode selector
CD/MP3/SD/USB Play
Insert a CD/MP3 disc into the slot, the unit will play automatically.Take away the rubber plug USB or SDcard, then insert USB or SD card which will be played automatically.If there have be loaded a disc/USB/SD card, press SOURCE to switch to play, or back to play source to select menu, press DVDto play. Note:
*
8 16
Press SRC on the main unit to switch to DVDmode. When SD card and USB were inserted into, press this key again and again to switch among SD card, USB and disc.
* Pressing to turn to mode switch.
MODE
01:18CD
01 Track02 Track03 Track04 Track05 Track06 Track
CDCDCDCDCDCD
Track 03/16
Track Region: Press this region and the screen shows the following menu:number keys appears, touch the number to select tracks. Touch the " X " to exit this menu.
MP3
MP3
MP3
MP3
MP3
MP3
MP3
DemoamourAutomaticBe natural_s_eCan you celebrclon_bing bing
00:00001/105
00:00
1 2 34 5 67 8 9-- 0 X
00:00001/105
00:00MP3
MP3
MP3
MP3
MP3
MP3
MP3
DemoamourAutomaticBe natural_s_eCan you celebrclon_bing bing
Selecting Tracks Fast
Note:
During MP3/SD/USB playback, pressto play previous track, press to play next track.During CD playback, first press to return to the beginning of the current track, press again within 3 seconds to play previous track , press to play next track .
2121
21
2121
CD/MP3/SD/USB
* Pressing / button on the main unit or and in the monitor perform the same function. * In CD/MP3/SD/USB mode, you can press track s Number or name to play.
4
* At present, our products can only support up to16G of SD card or USB.
ronnie
ronnie
touching
Before You Start
10
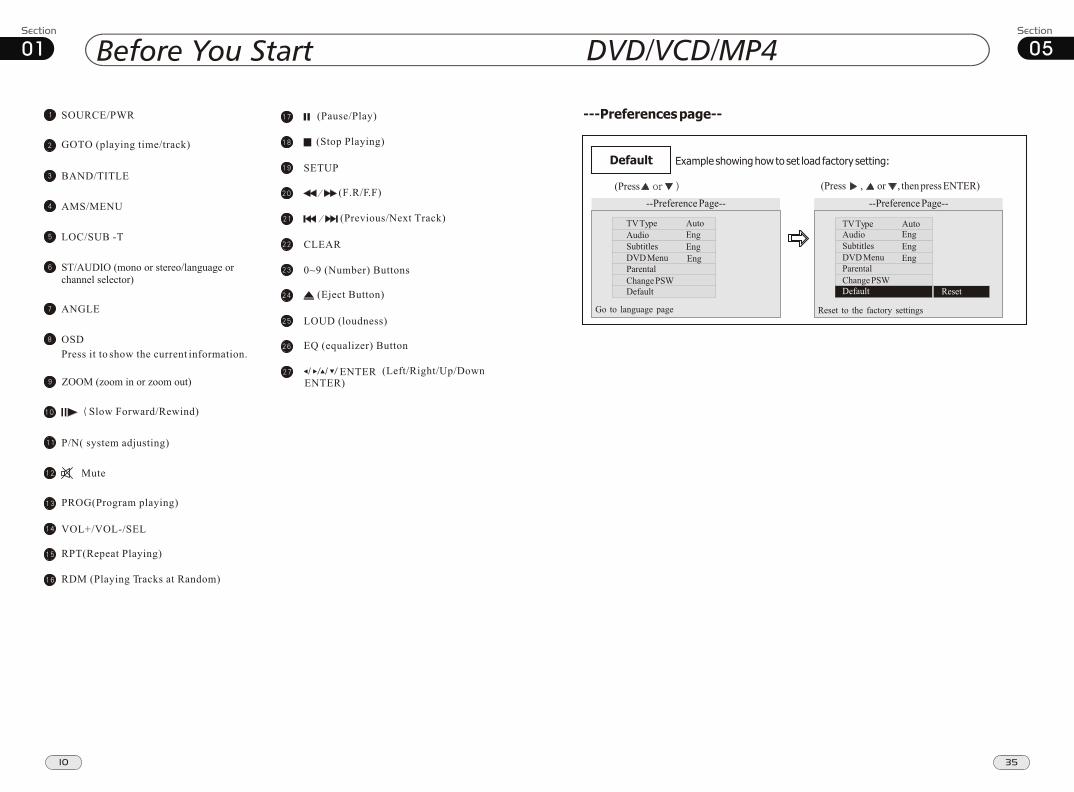
01SOURCE/PWR
AMS/MENU
BAND/TITLE
LOC/SUB -T
ST/AUDIO (mono or stereo/language orchannel selector)
OSD
Slow Forward/Rewind)
ANGLE
PROG(Program playing)
Mute
P/N( system adjusting)
ZOOM (zoom in or zoom out)
GOTO (playing time/track)
RPT(Repeat Playing)
RDM (Playing Tracks at Random)
VOL+/VOL-/SEL
Press it to show the current information.
30
LOUD (loudness)
SETUP
(F.R/F.F)
CLEAR
0~9 (Number) Buttons
(Eject Button)
(Stop Playing)
(Pause/Play)
EQ (equalizer) Button
(Previous/Next Track)
ENTER (Left/Right/Up/Down ENTER)
35
05DVD/VCD/MP4
---Preferences page--
Default Example showing how to set load factory setting:
(Press , or , then press ENTER)(Press--Preference Page--
Go to language page Reset to the factory settings
TV TypeAudio Subtitles DVD MenuParental Change PSW Default
Auto Eng Eng Eng
--Preference Page--
TV TypeAudio Subtitles DVD MenuParental Change PSW Default
Outer Trim Frame x 1 Connecting Wire x1 Steel Bar x 1
Installation Method DIN Front-Mount
8
Key x 2
Bend these clawsoutward for a tight fit, if necessary.
To support the unitFire Wall
32
05 DVD/VCD/MP4
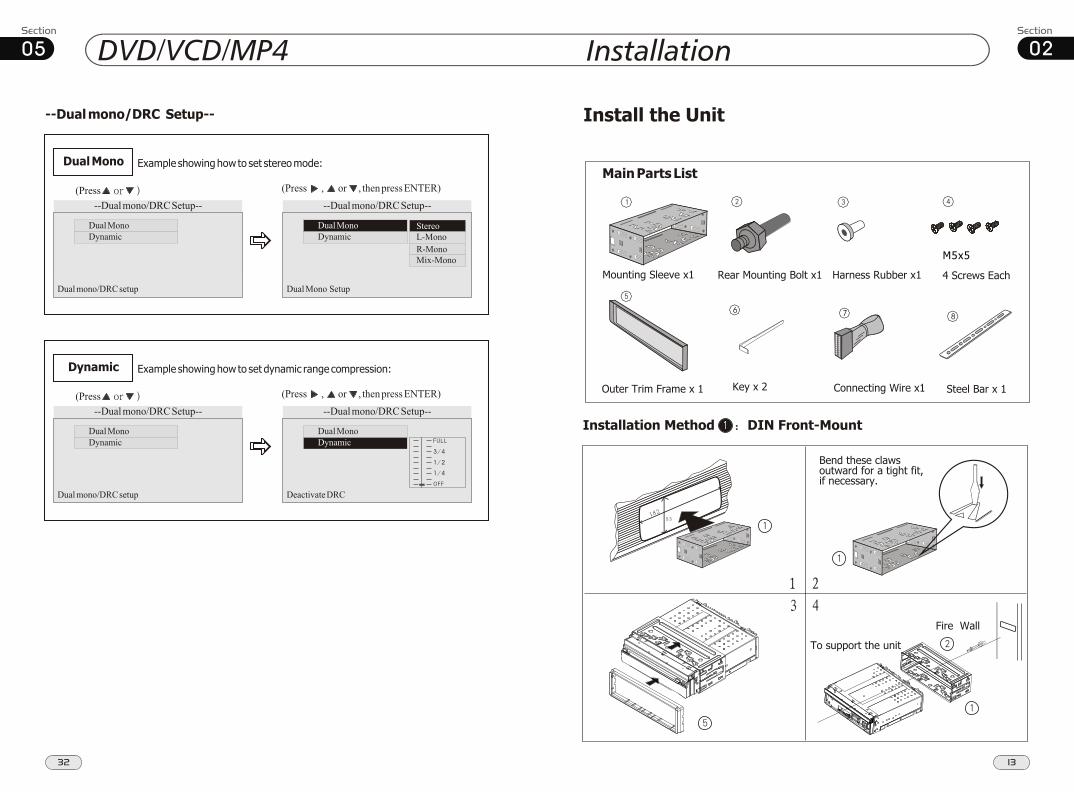
--Dual mono/DRC Setup--
Dual Mono Example showing how to set stereo mode:
(Press (Press , or , then press ENTER)--Dual mono/DRC Setup--
Dual MonoDynamic
Dual mono/DRC setup
Dual MonoDynamic
Dual Mono Setup
Stereo L-MonoR-MonoMix-Mono
Dynamic Example showing how to set dynamic range compression:
(Press (Press , or , then press ENTER)
Dual MonoDynamic
Dual mono/DRC setup
Dynamic
Deactivate DRC
1 41 23 4
Dual Mono
--Dual mono/DRC Setup--
--Dual mono/DRC Setup----Dual mono/DRC Setup--
Installation
14
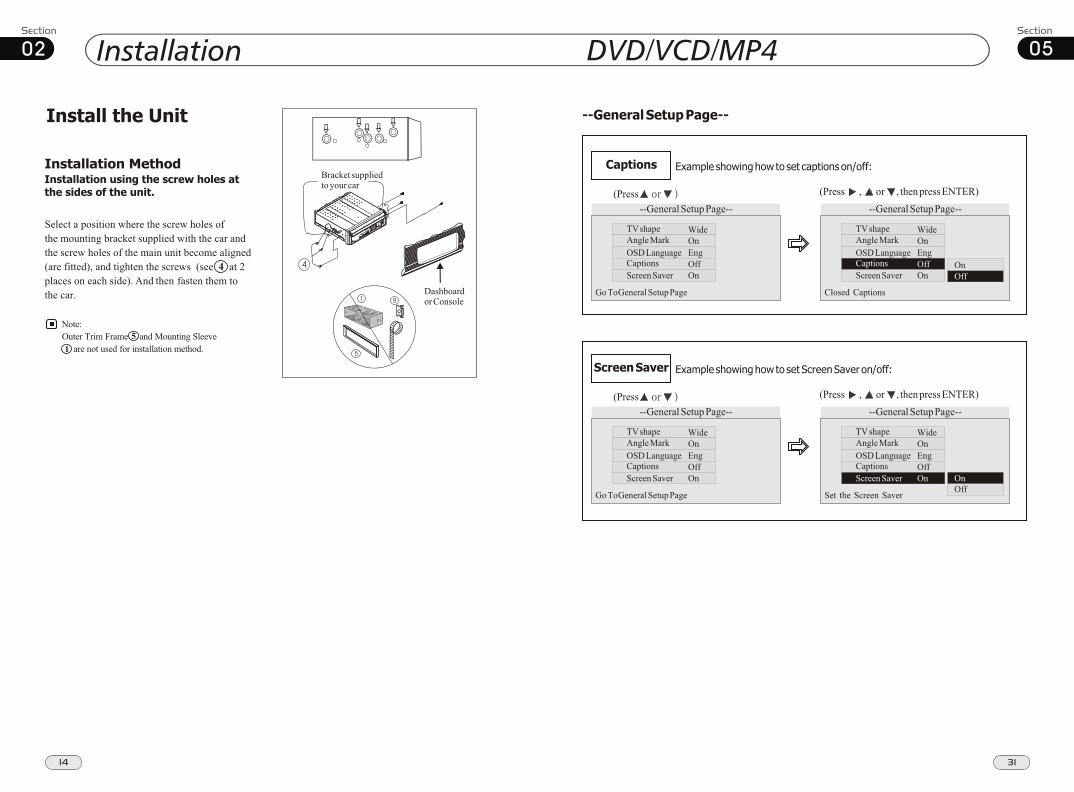
02Install the Unit
Select a position where the screw holes of the mounting bracket lied with the car and the of the main unit
fitted), and at 2 places on each fasten them to the car.
suppscrew holes become aligned
(are tighten the screws (see side). And then
4
Note: Outer Trim Frame Mounting Sleeve are not used
and for installation method.
Installation Method
Installation using the screw holes at
sides of the unit.the
5
1
Bracket supplied to your car
Dashboard or Console
31
05DVD/VCD/MP4
--General Setup Page--
Captions Example showing how to set captions on/off:
(Press (Press , or , then press ENTER)--General Setup Page--
TV shapeAngle MarkOSD LanguageCaptions Screen Saver
Wide On Eng Off On
Go To General Setup Page
--General Setup Page--
TV shapeAngle MarkOSD LanguageCaptions Screen Saver
Wide On Eng Off On
Closed Captions
Off On
Screen Saver Example showing how to set Screen Saver on/off:
(Press (Press , or , then press ENTER)--General Setup Page--
TV shapeAngle MarkOSD LanguageCaptions Screen Saver
Wide On Eng Off On
Go To General Setup Page
--General Setup Page--
TV shapeAngle MarkOSD LanguageCaptions Screen Saver
Wide On Eng Off On
Set the Screen Saver
On Off
02
15
Installation
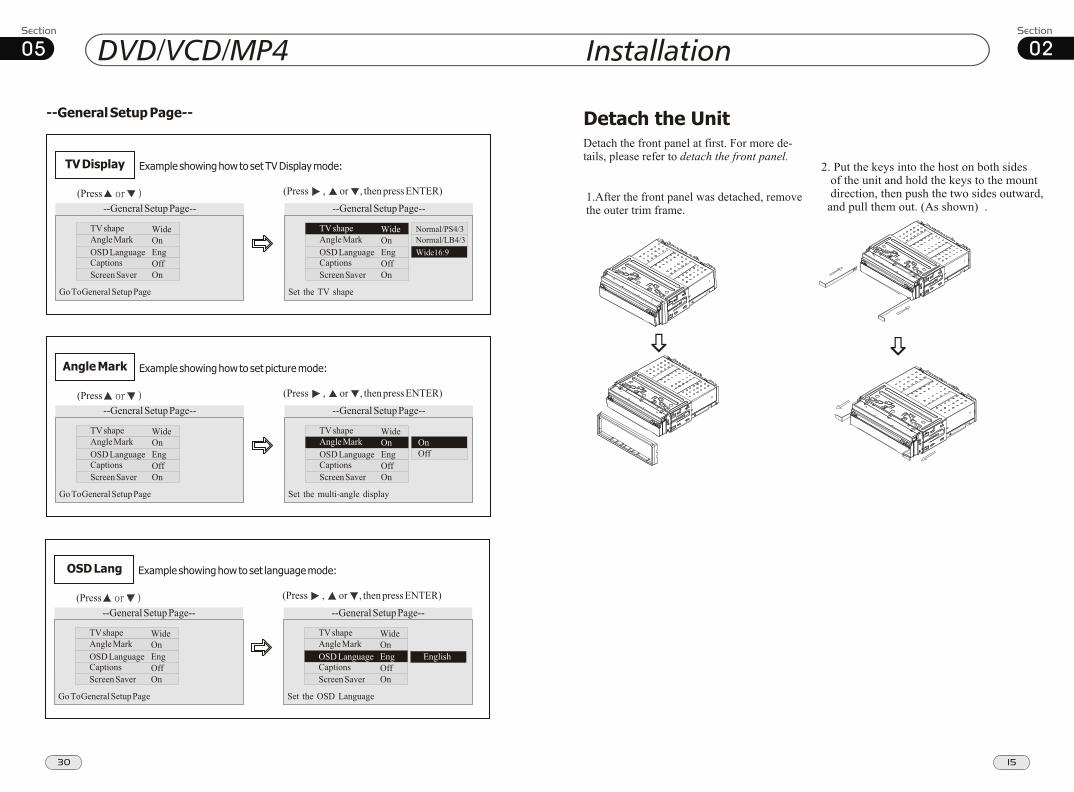
Detach the Unit
Detach the front panel at first. For more de-tails, please refer to detach the front panel.1.After the front panel was detached, remove the outer trim frame.
2. Put the keys into the host on both sides of the unit and hold the keys to the mount direction, then push the two sides outward, and pull them out. (As shown) .
30
05 DVD/VCD/MP4
--General Setup Page--
TV Display Example showing how to set TV Display mode:
(Press (Press , or , then press ENTER)--General Setup Page--
TV shapeAngle MarkOSD LanguageCaptions Screen Saver
Wide On Eng Off On
Go To General Setup Page
--General Setup Page--
TV shapeAngle MarkOSD LanguageCaptions Screen Saver
Wide On Eng Off On
Set the TV shape
Normal/PS4/3Normal/LB4/3Wide16:9
Angle Mark Example showing how to set picture mode:
(Press (Press , or , then press ENTER)--General Setup Page--
TV shapeAngle MarkOSD LanguageCaptions Screen Saver
Wide On Eng Off On
Go To General Setup Page
--General Setup Page--
TV shapeAngle MarkOSD LanguageCaptions Screen Saver
Wide On Eng Off On
Set the multi-angle display
On Off
OSD Lang Example showing how to set language mode:
(Press (Press , or , then press ENTER)--General Setup Page--
TV shapeAngle MarkOSD LanguageCaptions Screen Saver
Wide On Eng Off On
Go To General Setup Page
--General Setup Page--
TV shapeAngle MarkOSD LanguageCaptions Screen Saver
Wide On Eng Off On
Set the OSD Language
English
16
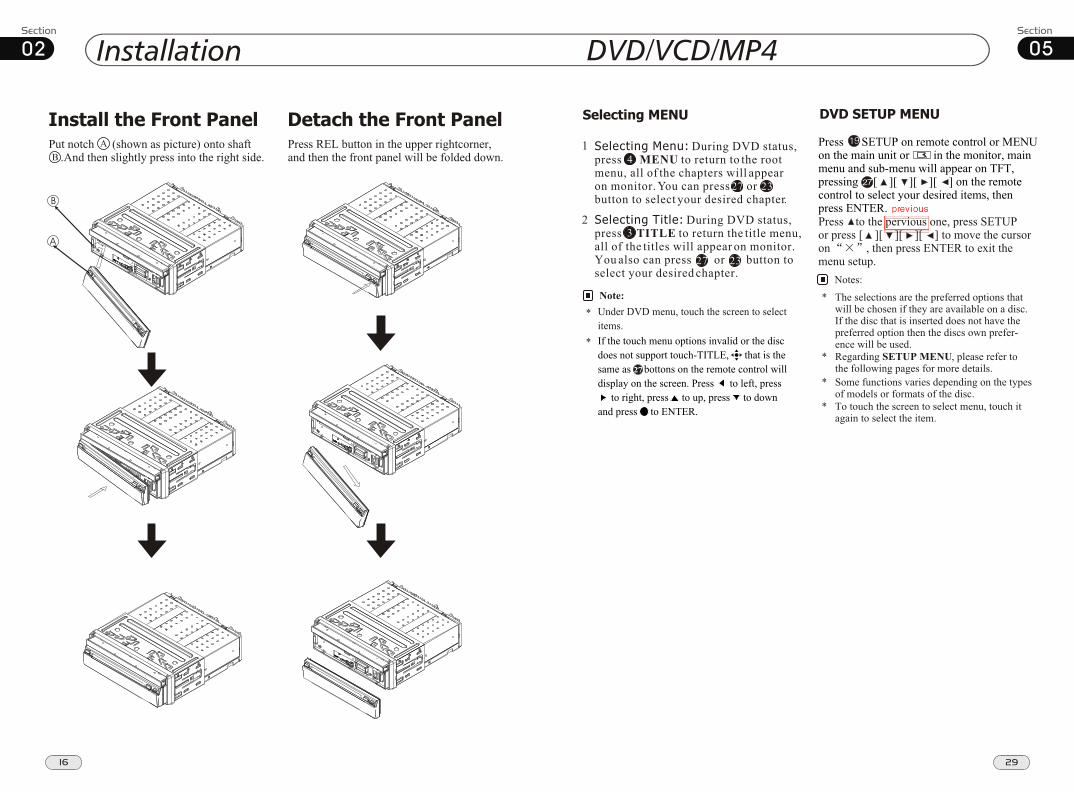
Installation02Install the Front Panel
Put notch (shown as picture) onto shaft .And then slightly press into the right side.B
A
Detach the Front Panel
Press REL button in the upper rightcorner, and then the front panel will be folded down.
B
A
29
05DVD/VCD/MP4
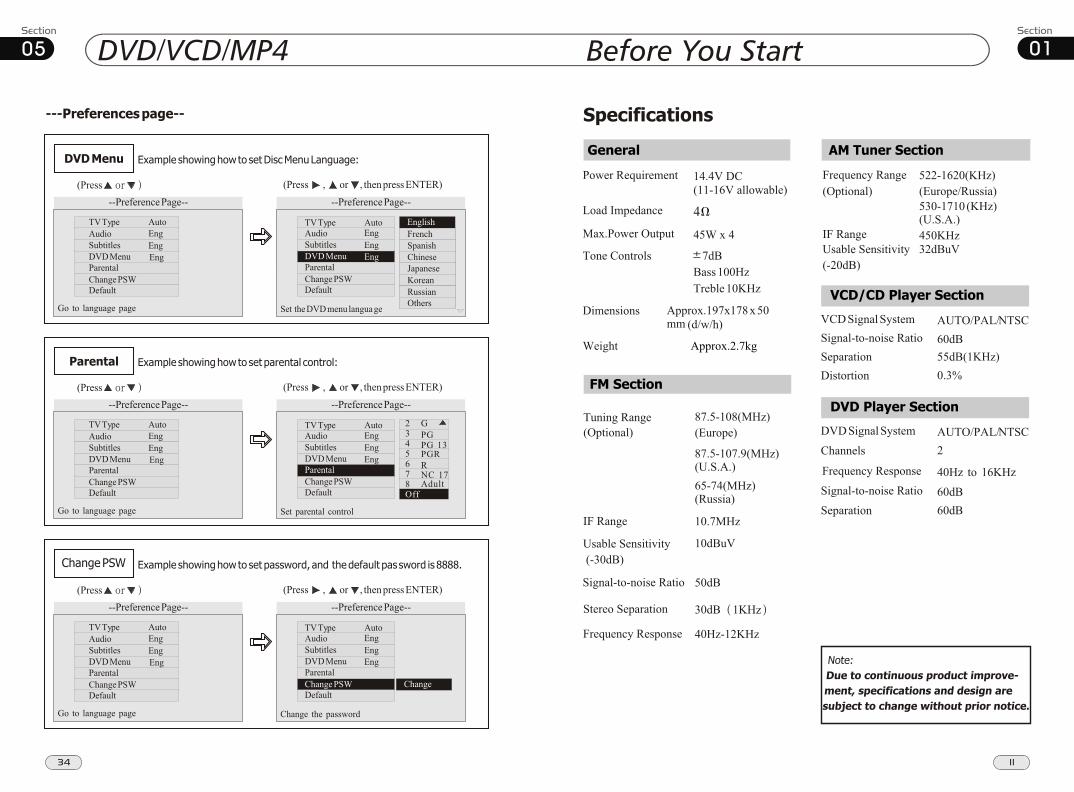
Selecting MENU
Selecting Menu: During DVD status, press MENU to return to the root menu, all of the chapters will appear on monitor. You can press or button to select your desired chapter.
4
27 23
Selecting Title: During DVD status, press TITLE to return the title menu, all of the titles will appear on monitor. You also can press or button to select your desired chapter.
3
1
2
Under DVD menu, touch the screen to selectitems.
Note:
*
27 23 27
Press SETUP on remote control or MENU on the main unit or in the monitor, main menu and sub-menu will appear on TFT,pressing [ ][ ][ ][ ] on the remote control to select your desired items, then press ENTER.
* The selections are the preferred options that will be chosen if they are available on a disc. If the disc that is inserted does not have the preferred option then the discs own prefer- ence will be used. * Regarding SETUP MENU, please refer to the following pages for more details. * Some functions varies depending on the types of models or formats of the disc.
DVD SETUP MENU
Notes:
Press to the pervious one, press SETUP or press [ ][ ][ ][ ] to move the cursoron , then press ENTER to exit the menu setup.
* To touch the screen to select menu, touch it again to select the item.
If the touch menu options invalid or the discdoes not support touch-TITLE, that is thesame as bottons on the remote control willdisplay on the screen. Press to left, press to right, press to up, press to down and press to ENTER.
*
27
ronnie
ronnie
previous
17
the unit
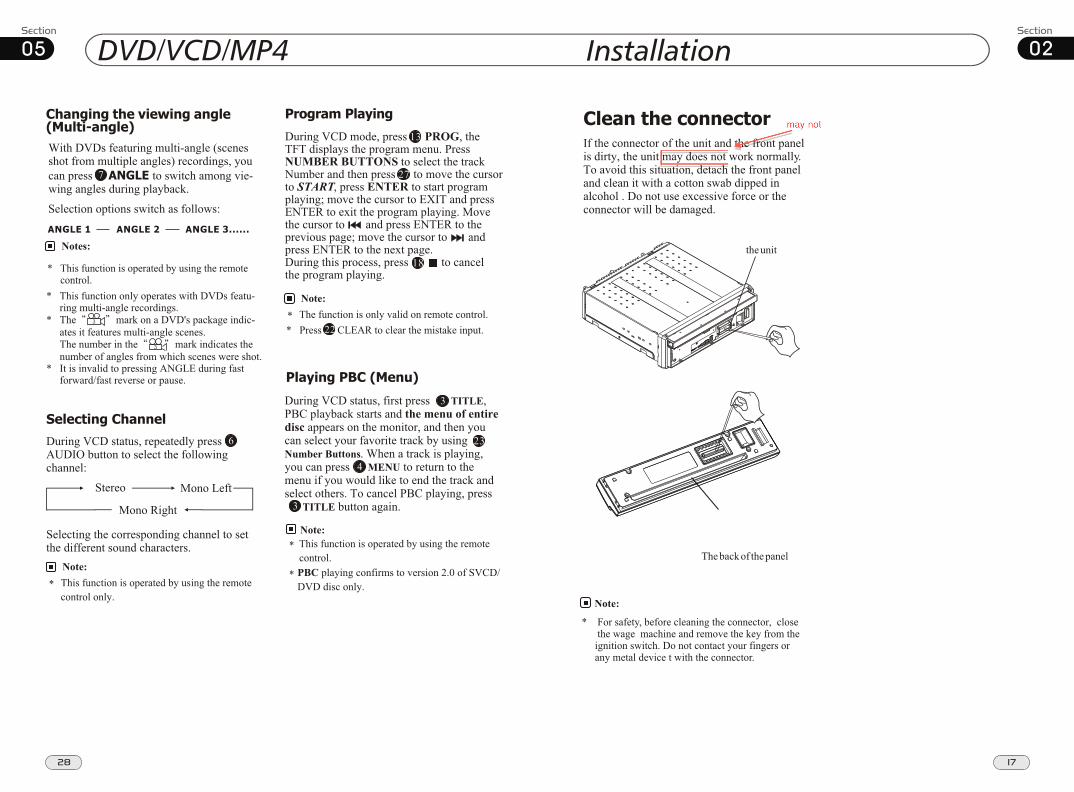
The back of the panel
02Installation
Clean the connector
If the connector of the unit and the front panelis dirty, the unit may does not work normally.To avoid this situation, detach the front paneland clean it with a cotton swab dipped in alcohol . Do not use excessive force or the
damaged. connector will be
* For safety, before cleaning the connector, close the wage machine and remove the key from the ignition switch. Do not contact your fingers or any metal device t with the connector.
Note:
28
05 DVD/VCD/MP4
ANGLE 1 ANGLE 2 ANGLE 3......
Changing the viewing angle
(Multi-angle)
With DVDs featuring multi-angle (scenes shot from multiple angles) recordings, youcan press ANGLE to switch among vie-wing angles during playback.Selection options switch as follows:
* This function is operated by using remote control.
the
* This function only operates with DVDs featu- ring multi-angle recordings.* The mark on a DVD's package indic- ates it features multi-angle scenes. The number in the mark indicates the number of angles from which scenes were shot.* It is invalid to pressing ANGLE during fast forward/fast reverse or pause.
3
7
Notes:
3
Selecting Channel
During VCD status, repeatedly press AUDIO button to select the following channel:
6
Stereo Mono Left
Mono Right
Selecting the corresponding channel to setthe different sound characters.
This function is operated by using the remotecontrol only.
Note:
*
Program Playing
During VCD mode, press PROG, the TFT displays the program menu. Press NUMBER BUTTONS to select the trackNumber and then press to move the cursorto START, press ENTER to start program playing; move the cursor to EXIT and pressENTER to exit the program playing. Movethe cursor to and press ENTER to the previous page; move the cursor to and press ENTER to the next page.During this process, press to cancel the program playing.
13
18
The function is only valid on remote control.Note:
*
27
* Press CLEAR to clear the mistake input.22
*
Playing PBC (Menu)
During VCD status, first press TITLE, PBC playback starts and the menu of entire
disc appears on the monitor, and then you can select your favorite track by using Number Buttons. When a track is playing, you can to return to
if you would like to end the track and select others. To cancel PBC playing, press button again.
press MENU the menu
TITLE
4
23
3
This function is operated by using the remote control.
Note:
*
PBC playing confirms to version 2.0 of SVCD/DVD disc only.
3
ronnie
ronnie
may not
ronnie
18
Common Operations03
Setting the Sound Characteristics Repeatedly briefly press SEL button to select the mode in the following order:
desired
* briefly pressing button and rotating on the main unit also performs the same function.
Reset the Unit
Operating the unit for the first time or after replacing the car battery, you must reset the unit.
Note:
* When ome errors occur on the also press RESET
it will
s display, you can button to resume to normal,
and erase the clock setting and some me- morized functions. * This function can only be operated by the main unit.
Release the front panel at first, and thenpress RESET button in the panel w
object, (such as a ballthe unit to initial status.
ith a pointed point pen) to set
15
14
After selecting the desired mode, youadjust the current level by pressing
.
can VOL
buttons
Note:
Press VOL+ button to increase sou- nd level and press VOL- button to decr- ease sound level.
the
the
Volume Control
* Rotating on the main unit also performs the same function.
1414
Note:
2
2
Turning the Unit On/Off
Briefly press PWR button to turn on the unit, press it again, the unit is still in waiting status. Press and hold to turn off.
the 1
* Pressing PWR button on the main unit also performs the same function.
Note:
14
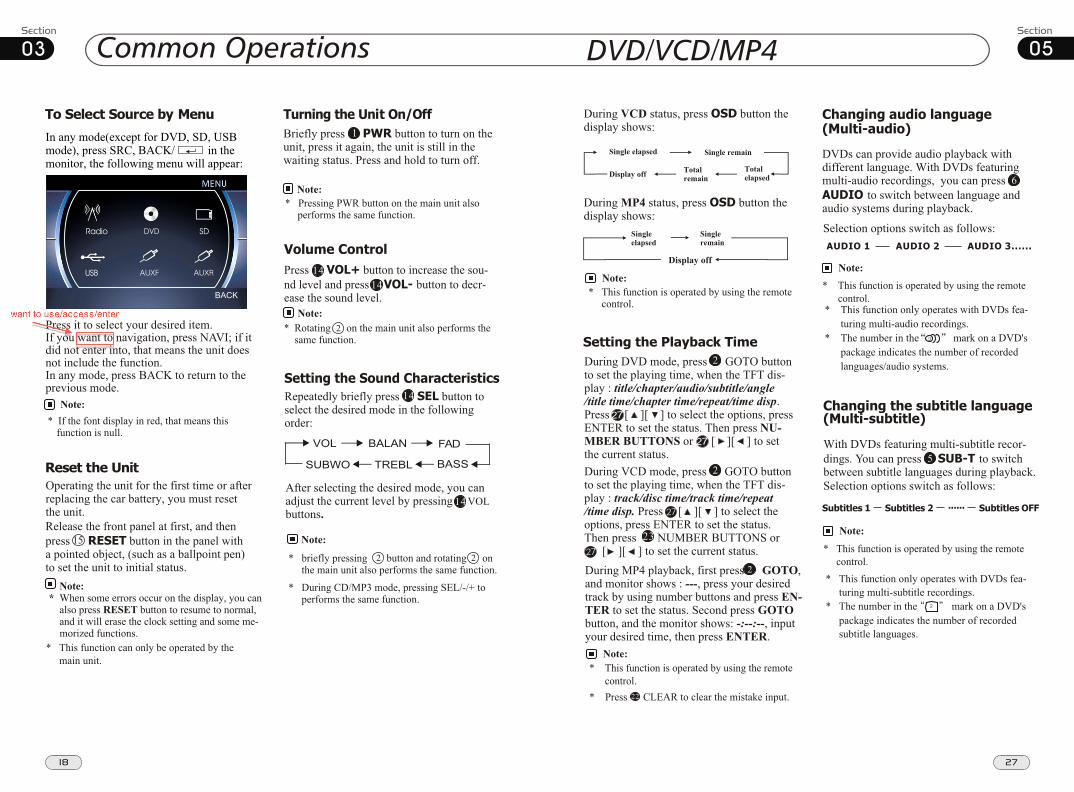
To Select Source by Menu
Press it to select your desired item.If you want to navigation, press NAVI; if it did not enter into, that means the unit does not include the function.In any mode, press BACK to return to the previous mode.
* If the font display in red, that means this function is null.
Note:
TREBL
BALAN
BASS
VOL FAD
SUBWO
* During CD/MP3 mode, pressing SEL/-/+ to performs the same function.
In any mode(except for DVD, SD, USB mode), press SRC, BACK/ in the monitor, the following menu will appear:
2
27
05DVD/VCD/MP4
During DVD mode, press GOTO buttonto set the playing time, when the TFT dis-play : /chapter/audio/subtitle/angle
/title time/chapter time/repeat/time disp. Press [ ][ ] to select the options, press ENTER to set the status. Then press NU-
MBER BUTTONS or [ ][ ] to set the current status.
title
2
27
27
During VCD mode, press GOTO buttonto set the playing time, when the TFT dis-play : /disc time/track time/repeat
/time disp. Press [ ][ ] to select the options, press ENTER to set the status. Then press NUMBER BUTTONS or [ ][ ] to set the current status.
track
2
23
Setting the Playback Time
During MP4 playback, first press GOTO, and monitor shows : ---, press your desired track by using number buttons and press EN-
TER to set the status. Second press GOTO
button, and the monitor shows: -:--:--, input your desired time, then press ENTER.
2
* This function is operated by using remote control.
theNote:
Changing audio language
(Multi-audio)
DVDs can provide audio playback with different language. With DVDs featuring multi-audio recordings, you can pressAUDIO to switch between language and audio systems during playback.
AUDIO 1 AUDIO 2 AUDIO 3......
Selection options switch as follows:
* This function is operated by using remote control.
the
* This function only operates with DVDs fea- turing multi-audio recordings.* The number in the mark on a DVD's package indicates the number of recorded languages/audio systems.
2
Note:
6
Changing the subtitle language
(Multi-subtitle)
With DVDs featuring multi-subtitle recor-dings. You can press SUB-T to switch between subtitle languages during playback.
Subtitles 1 Subtitles 2 Subtitles OFF
Selection options switch as follows:
* This function is operated by using remote control.
the
* This function only operates with DVDs fea- turing multi-subtitle recordings.* The number in the mark on a DVD's package indicates the number of recorded subtitle languages.
2
Note:
5
......
During VCD status, press OSD button the display shows:
Single elapsed
Total
elapsed
Total
remain
Single remain
Display off
Note:
Display off
* This function is operated by using the remote control.
Single
elapsed
Single
remain
During MP4 status, press OSD button the display shows:
* Press CLEAR to clear the mistake input.22
Radio
USB
SD
BACK
ronnie
ronnie
want to use/access/enter
ronnie
1919
03Common Operations
Mode Selector
* Briefly pressing SRC on the main unit also performs the same function.
Note:
Repeatedly press SOURCE button to select the different modes available.
1
Receptor on the main unit for the card remote control.
Infrared Sensor:
6
Press button to shut off sound output. And appears on the LCD. Press it again to resume to previous volume level.
the
Mute Function
Pressing MUTE on the main unit also performs the same function.
12
Note:
*
EQ Setting
Repeatedly pressing button to choose the following modes turn:
EQ
in
While listening to the popular music, classic music or rock music, you select the co-rresponding preset modes to adjust the sou-nd quality ing EQ button.
can
perfectly by us3
Note:
26
The default setting is OFF.
26
ROCK
CLASSPOP
OFF
* This function is only valid on remote control .
Turning Loudness On/Off
Press activate loud function. You can this button to increase the low
quency, which can improve sensi ty for ears. Pressing it again to quit this function.
LOUD button press
fre tiviyour
25
Note:
* it is only valid on the remote control.
Eject a Disc
Press button to insert a disc and press to eject it.
Note:
* Briefly Pressing on the remote control also performs the same function.
Insert a SD Card
Common SD Card: insert a common SD card into SD slot and the programs in the card will be played.
3
26
05
Repeat Playing
During DVD playback, press ing
RPT on the remote control to perform replayfunction as follows:
* This function is only valid on remote control.
15
Note:
Chapter Title
Off
During VCD/MP4 playback, press RPT on the remote control to TRACK REPEAT.
Slow motion playback
During DVD mode, press to slow play. There are speeds as follows:
During VCD/MP4 mode, press to slow play. There are speeds as follows:
The function is only valid on remote control.Note:
*
During DVD/VCD/MP4 mode, press ZOOM to increase the picture in size. There are sizes as follow, each pressing increasesthe size until the maximum size is reached.
Increase the size of picture
9
No Change
The function is only valid on remote control.Note:
*
2X 3X 4X
To remove the image by pressing button.* 27
Playing Tracks at Random
During DVD/VCD/MP4 playback, RDM button on the remote control to play
random under the directory which you select. P return to
press
any track at ress it again to
normal playing.
16
* This function is operated by using the remote control.
Note:
Note:
Press ( or ) on remote control to perform fast reward or fast forward. Each pressing will change as follows:
Skip backward/forward/F.F
/F.REW the playback
20
16X 2X 4X 8 X
During DVD/VCD mode, press P/N on remote control to set the TV standard to PAL or NTSC or AUTO system.
System Switch
NTSC
PAL
AUTO
The function can be operated by selecting theDVD MENU SETUP.
Note:
*
On Screen Display
During DVD status, press OSD buttonthe display shows:
8
Title elapsed
Chapter
elapsed
Chapter
remaining
Title remaining
Display off
DVD/VCD/MP4
* Pressing and holding on the main unit also performs the same function.
/
20
87.50M 106.10M107.90M
87.50M98.10M
90.10M
FM1 CH:1 87.50MHz- +
BAND MENU SRCAMS
04Set up Main Menu
When the unit is on, the monitor will displaythe menu as follows:
Press and hold SETUP on the remote controlor MENU on the main unit, or press MENUin the monitor to enter the menu as follows:
This menu includes AUDIO, SOURCE, SYSTEM, EXIT. Press them inthe monitor to set the desired status.
VIDEO,
Main MenuMain Menu
1.Video Adjust
After selecting VIDEO, the sub menu willappear as follows:
In this menu you can adjust CONTRAST, COLOR, TINT, BRIGHT, EXIT. PICTURE,
Picture Adjust
Press PICTURE in this menu, it will appearas follows:
Press and to adjust the size, then press SAVE to save the setup, press EXIT to exit this menu.
Note:
* Adjusting the other options performs the same operation.
AUDIO
SYSTEMSOURCE
VIDEO
EXIT
EXIT
PICTU 20
25
05
During DVD/VCD/MP4 playback, press to switch between play and pause; During stop mode, press this button to resume playback mode.
Pause the Playback
17
Note:
* Pressing in the monitor or on the main unit performs the sam function.
Press one of Number Buttons(0~9)
to select a track, it will be played auto-matically.
23
*
Number Buttons
Note:
* Press CLEAR to clear the mistake input.22
Stop the playback
During DVD/VCD playback, first press, , then press or on the remote control to replay; press twice to stop playing completely, then press to return to the beginning of the current track.During MP4 playback, press first, thenpress to return to the beginning of thecurrent track.
* Pressing in the monitor perform the same function.
Note:
During DVD/VCD/MP4 playback, touch the screen the bottom shows the following menu:
Insert a disc into the slot , the unit will automatically switch on, if a disc is loaded, press SOURCE to start the playback. If the unit is in other menu, press DVD to switch to disc play.
Press SRC on the main unit to switch to DVDmode. When SD card and USB were inserted into, press this key again and again to switch among SD card, USB and disc.
12
Note:
*
Pressing in the monitor perform the same function.
*
Selecting Tracks Fast
21
Note:
During DVD/MP4 playback, pressto play previous track, press to play next track.During VCD playback, first press to return to the beginning of the currenttrack, press again within 3 secondsto play previous track ,press to play next track .
21
21
2121
1 2 34 5 67 8 9-- 0 X
Press this region and the screen shows the following menu: number keys appears, touch the number to select tracks. Touch the " X " to exit this menu.
Track region
DVD/VCD/MP4
* Pressing SRC on the main unit or press left/right twice continuously in the monitor also perform the same function.
4
Note:
* Press right corner repeatedly to play the next track( shows), press left corner to play the previous track( shows).
ronnie
ronnie
touching
ronnie
ronnie
at the
21
04Main Menu
3.Source Adjust
In the main menu, press SOURCE in the monitor, the sub menu will appear as follows:
You can adjust above items to ON or OFF, press the corresponding button to set. If one of them was set OFF, that function is null. For example, to set the TV OFF,press SOURCE can not activate TV fun-ction.But can not set the current playback OFF.If OFF in red, that meas this function is null.
4.System Adjust
After selecting SYSTEM, the sub menu willappear as follows:
In this menu you can adjust CLOCK SYSTEM, KEY BEEP, MONITOR FLEXand so on.
2.Audio Adjust
After selecting AUDIO, the sub menu willappear as follows:
You can adjust VOLUME, SUBWOOFER,BALANCE, FAD, BASS, TREBLE, for example, press FAD, the setting menu will appear as follow:
Press and to adjust the desired FADlevel, press EXIT to exit this menu.
Note:
* Adjusting the other options performs the same operation.
CLOCK SYS
KEY BEEP
MONI FLEX
EXIT
EXIT
VOLUME
FAD F4
VOLUME
24
EXIT
LOCAL AREA
LOCAL
GOTO FREQ
Main Menu04
(Picture 1)
(Picture 2)
Press in picture 1 or press in picture 2to enter the following menu:
Adjust Screen
Press ADJ SCREEN to display the above menu, there are a square button in the top left corner . Press the square button at place ,then the button will move to placepress it at place , it will move to place , then place , press SAVE at last.
,
Clock Adjust
Press CLOCK ADJ in the monitor toadjust the clock.
CLOCK
EXIT
SAVE
+
+ +
+
CLOCK
EXIT
00:00:00
CLOCK SYS
KEY BEEP
MONI FLEX
EXIT
EXIT
ONAUXF ONAUXRONUSB
ONSDONDVDONRADIO
ronnie
ronnie
is
ronnie
ronnie
ronnie
pressing
ronnie
ronnie
ronnie
cannot
ronnie
22
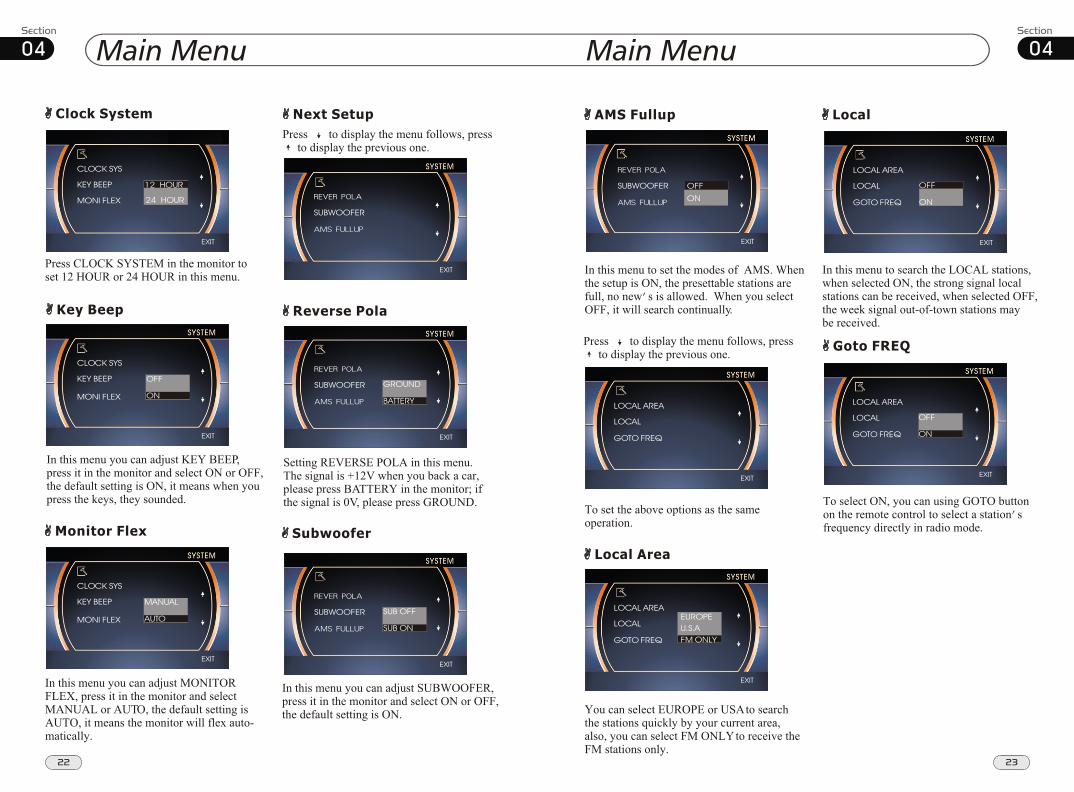
Main Menu04Clock System
Press CLOCK SYSTEM in the monitor toset 12 HOUR or 24 HOUR in this menu.
Key Beep
In this menu you can adjust KEY BEEP, press it in the monitor and select ON or OFF,the default setting is ON, it means when you press the keys, they sounded.
Monitor Flex
In this menu you can adjust MONITORFLEX, press it in the monitor and select MANUAL or AUTO, the default setting is AUTO, it means the monitor will flex auto-matically.
Next Setup
Press to display the menu follows, press to display the previous one.
Setting REVERSE POLA in this menu. The signal is +12V when you back a car, please press BATTERY in the monitor; if the signal is 0V, please press GROUND.
Reverse Pola
Subwoofer
In this menu you can adjust SUBWOOFER, press it in the monitor and select ON or OFF,the default setting is ON.
CLOCK SYS
KEY BEEP
EXIT
MONI FLEX
EXIT
SUBWOOFER
CLOCK SYS
KEY BEEP
EXIT
MONI FLEX
CLOCK SYS
KEY BEEP
EXIT
MONI FLEX
EXIT
SUBWOOFER
EXIT
SUBWOOFER
23
04Main Menu
Press to display the menu follows, press to display the previous one.
To set the above options as the same operation.
AMS Fullup
In this menu to set the modes of AMS. Whenthe setup is ON, the presettable stations arefull, no new s is allowed. When you selectOFF, it will search continually.
Local Area
You can select EUROPE or USA to search the stations quickly by your current area,also, you can select FM ONLY to receive the FM stations only.
Local
In this menu to search the LOCAL stations, when selected ON, the strong signal localstations can be received, when selected OFF,the week signal out-of-town stations maybe received.
Goto FREQ
To select ON, you can using GOTO buttonon the remote control to select a station sfrequency directly in radio mode.