1 MP3-FMTRANS40 MANUAL (p. 2) CAR MP3 FM TRANSMITTER INCL RC MODE D’EMPLOI (p. 5) TRANSMETTEUR VOITURE FM LECTEUR MP3 INCL RC MANUALE (p. 8) TRASMETTITORE FM MP3 PER AUTO CON TELECOMANDO BRUKSANVISNING (s. 14) BIL-MP3/FM SÄNDARE MED FJÄRRKONTROLL MANUAL DE UTILIZARE (p. 17) TRANSMIŢĂTOR MP3 FM PENTRU MAŞINĂ, CU TELECOMANDĂ HASZNÁLATI ÚTMUTATÓ (o. 11.) AUTÓS MP3 KIHANGOSÍTÓ TÁVIRÁNYÍTÓVAL KÄYTTÖOHJE (s. 13) CAR MP3 FM LÄHETIN INCL RC ANLEITUNG (s. 3) AUTO MP3 FM-TRANSMITTER MIT FERNBEDIENUNG GEBRUIKSAANWIJZIN G (p. 6) AUTO MP3 FM ZENDER INCL. AFSTANDSBEDIENING MANUAL DE USO (p. 10) TRANSMISOR FM MP3 PARA AUTO REC INCL NÁVOD K POUŽITÍ (s. 16) MP3 FM VYSÍLAČ DO VOZIDLA VČ. DÁLKOVÉHO OVLÁDÁNÍ ΕΓΧΕΙΡΙΔΙΟ XPHΣHΣ (σελ. 19) MP3 ΑΥΤΟΚΙΝΗΤΟΥ, ΠΟΜΠΟΣ FM INCL RC
Safety precautions:Do not expose the product to water or moisture.
Maintenance:Clean only with a dry cloth. Do not use cleaning solvents or abrasives.
Warranty:No guarantee or liability can be accepted for any changes and modifications of the product or damage causeddue to incorrect use of this product.
General:Designs and specifications are subject to change without notice. All logos brands and product names are trademarks or registered trademarks of their respective holders and
are hereby recognized as such.
Keep this manual and packaging for future reference.
Attention:
This product is marked with this symbol. I t means that used electrical and electronic products
should not be mixed with general household waste. There is a separate collections system for these
products.
DEUTSCH
Einstellung
1. Stecken Sie den 12-24V-Adapterstecker des Geräts in den Zigarettenanzünder oder einen anderen
Stromanschluss Ihres Fahrzeugs ein.
2. Stellen Sie das Autoradio auf die Frequenz des Geräts (87,5-108,0 MHz) ein. Achten Sie darauf, dass die
gewählte Frequenz nicht von einem Radiosender benutzt wird.
3. Mit den Tasten „A-“ und „B+“ stellen Sie die Frequenz ein.
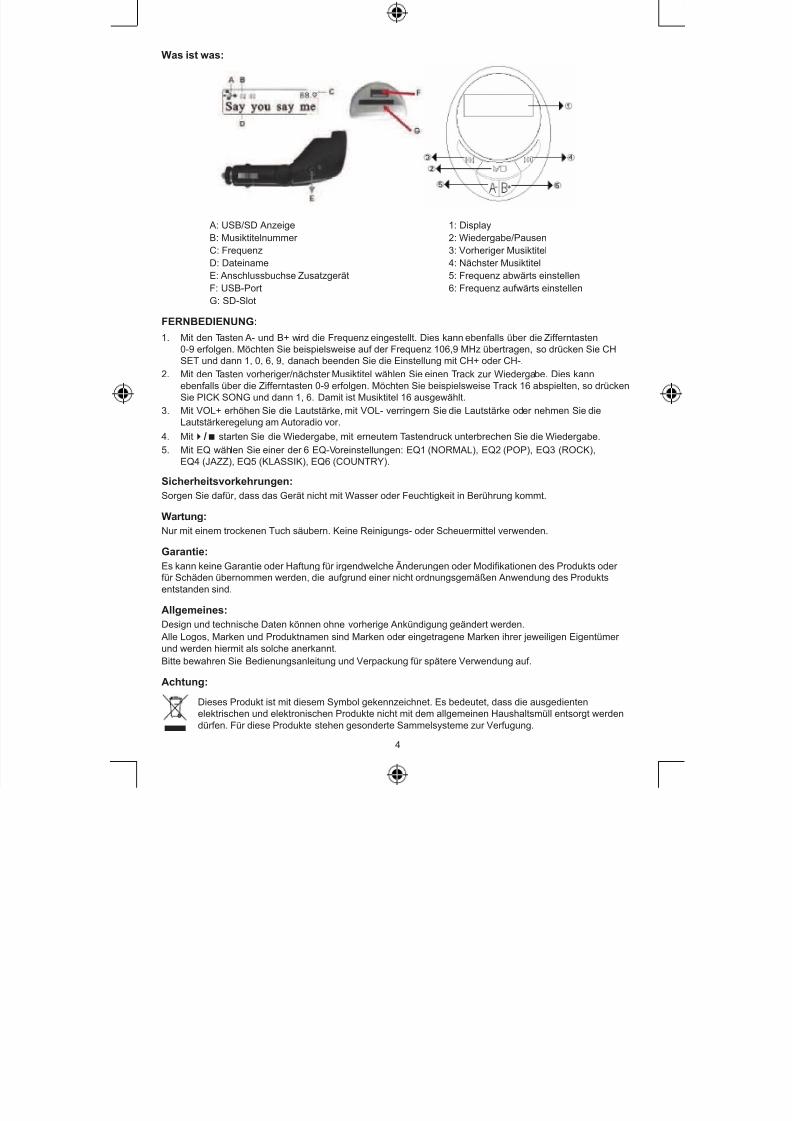
Audio-Eingang
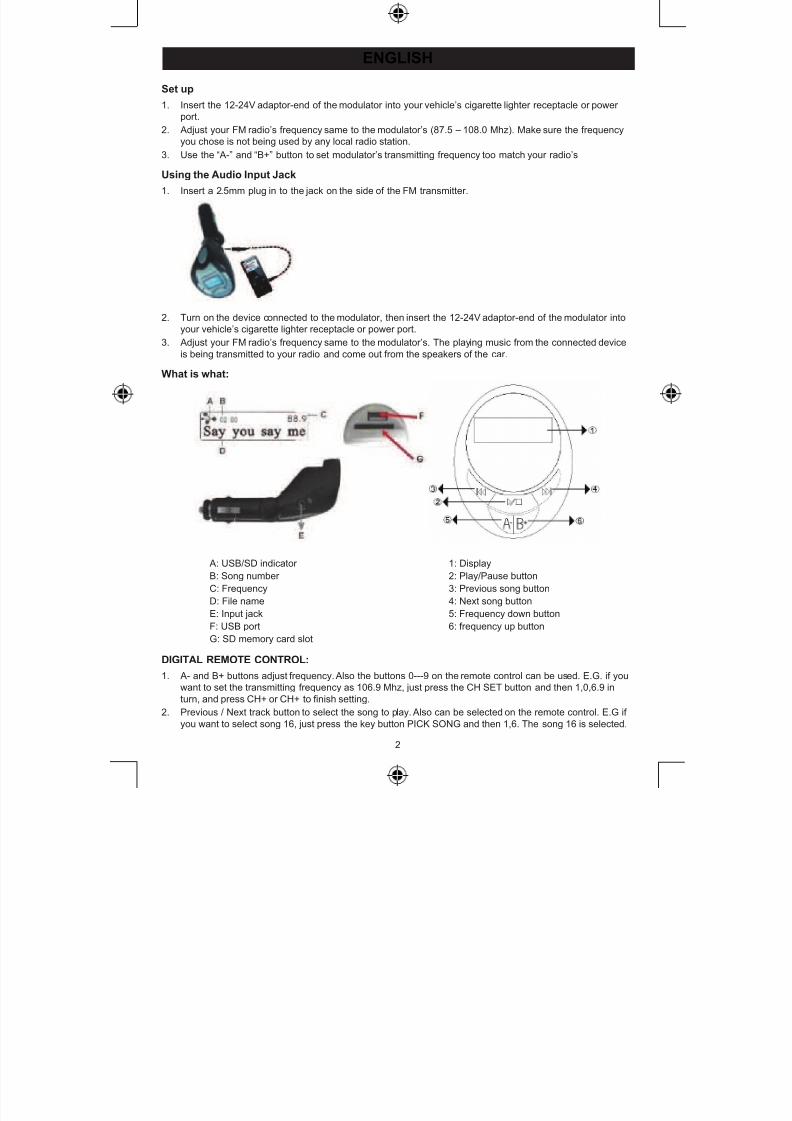
1. Schließen Sie ein weiteres Gerät über 2,5 mm Klinkenstecker auf der Seite des Geräts an.
2. Schalten Sie das angeschlossene Gerät ein, dann stecken Sie den 12-24V-Adapterstecker des Geräts in
den Zigarettenanzünder oder einen anderen Stromanschluss Ihres Fahrzeugs ein.
3. Stellen Sie das Autoradio auf die Frequenz des Geräts ein. Die Musik vom angeschlossenen Gerät wirdauf Ihr Autoradio übertragen und kommt aus den Fahrzeuglautsprechern.
1. Mit den Tasten A- und B+ wird die Frequenz eingestellt. Dies kann ebenfalls über die Zifferntasten
0-9 erfolgen. Möchten Sie beispielsweise auf der Frequenz 106,9 MHz übertragen, so drücken Sie CH
SET und dann 1, 0, 6, 9, danach beenden Sie die Einstellung mit CH+ oder CH-.
2. Mit den Tasten vorheriger/nächster Musiktitel wählen Sie einen Track zur Wiedergabe. Dies kann
ebenfalls über die Zifferntasten 0-9 erfolgen. Möchten Sie beispielsweise Track 16 abspielten, so drücken
Sie PICK SONG und dann 1, 6. Damit ist Musiktitel 16 ausgewählt.
3. Mit VOL+ erhöhen Sie die Lautstärke, mit VOL- verringern Sie die Lautstärke oder nehmen Sie die
Lautstärkeregelung am Autoradio vor.
4. Mit / starten Sie die Wiedergabe, mit erneutem Tastendruck unterbrechen Sie die Wiedergabe.
5. Mit EQ wählen Sie einer der 6 EQ-Voreinstellungen: EQ1 (NORMAL), EQ2 (POP), EQ3 (ROCK),
EQ4 (JAZZ), EQ5 (KLASSIK), EQ6 (COUNTRY).
Sicherheitsvorkehrungen:Sorgen Sie dafür, dass das Gerät nicht mit Wasser oder Feuchtigkeit in Berührung kommt.
Wartung:Nur mit einem trockenen Tuch säubern. Keine Reinigungs- oder Scheuermittel verwenden.
Garantie:Es kann keine Garantie oder Haftung für irgendwelche Änderungen oder Modifikationen des Produkts oder für Schäden übernommen werden, die aufgrund einer nicht ordnungsgemäßen Anwendung des Produkts
entstanden sind.
Allgemeines:Design und technische Daten können ohne vorherige Ankündigung geändert werden.
Alle Logos, Marken und Produktnamen sind Marken oder eingetragene Marken ihrer jeweiligen Eigentümer
und werden hiermit als solche anerkannt.
Bitte bewahren Sie Bedienungsanleitung und Verpackung für spätere Verwendung auf.
Achtung:
Dieses Produkt ist mit diesem Symbol gekennzeichnet. Es bedeutet, dass die ausgedienten
elektrischen und elektronischen Produkte nicht mit dem allgemeinen Haushaltsmüll entsorgt werden
dürfen. Für diese Produkte stehen gesonderte Sammelsysteme zur Verfugung.