+ All Categories
Home > Documents > Cargo Surveyor Tool User Manual 2015 · PDF fileCargo Surveyor Tool User Manual 2015 Copyright...

Cargo Surveyor Tool User Manual 2015 · PDF fileCargo Surveyor Tool User Manual 2015 Copyright...

Date post: 13-Mar-2018
Category:
Upload: nguyenkhuong
View: 220 times
Download: 1 times
Share this document with a friend
71
Cargo Surveyor Tool User Manual 2015 Copyright @ MooringMarineConsultancy 2015 Page 1 Table of Contents: Foreword page 3 The tank configuration screen Concept and layout page 5 Selecting tank configuration page 6 Creating a new ullage report page 7 Opening existing ullage reports page 7 The tank editor screen Screen layout and control descriptions page 8 Using the conversion buttons page 10 The tank details screen Selecting a tank after entering data page 11 The Time Sheets Screen Creating a new time sheet page 12 Opening a time sheet page 13 Selecting a time sheet entry page 14 Editing a time sheet entry page 15 The Ship Particulars Screen Creating a new particulars sheet page 16 Opening existing reports page 16 Editing a ship particulars entry page 17
Transcript

Cargo Surveyor Tool User Manual 2015

Copyright @ MooringMarineConsultancy 2015 Page 1

Table of Contents:

Foreword page 3

The tank configuration screen

Concept and layout page 5

Selecting tank configuration page 6

Creating a new ullage report page 7

Opening existing ullage reports page 7

The tank editor screen

Screen layout and control descriptions page 8

Using the conversion buttons page 10

The tank details screen

Selecting a tank after entering data page 11

The Time Sheets Screen

Creating a new time sheet page 12

Opening a time sheet page 13

Selecting a time sheet entry page 14

Editing a time sheet entry page 15

The Ship Particulars Screen

Creating a new particulars sheet page 16

Opening existing reports page 16

Editing a ship particulars entry page 17

Cargo Surveyor Tool User Manual 2015

Copyright @ MooringMarineConsultancy 2015 Page 2

The more screen: access to all other tools / utilities

Description page 18

Wedge Formula

Concept and layout page 18

The various entries required page 19

Options page 19

Tank Totals

Viewing totals for a specific grade page 21

Viewing totals for all grades page 23

Conversion tool

Possible entries page 23

The Settings page

Precision settings page 24

Imperial System page 25

Metric System page 25

Use Table 56 page 26

Use dens – 11 page 26

ASTM 1980 page 26

ASTM 2004/2007 page 26

Reports: Access to all reports and report settings

Reports Screen page 27

Report Settings page 27

The available reports page 29

Cargo Surveyor Tool User Manual 2015

Copyright @ MooringMarineConsultancy 2015 Page 3

Reports in detail: An explanation of all reports

How it works page 30

Ullage reports page 31

Txfer reports page 35

Time sheets page 39

Pumping Logs page 40

OBQ/ROB reports page 44

ROB reports page 44

OBQ reports page 46

Slop reports page 48

Ref Heights / Raw Measurements page 50

Bunker reports page 52

VEF reports page 54

Preloading reports page 56

Sampling reports page 58

Protests, NOD, SOF: Ship shore difference page 60

Protests, NOD, SOF: Ship figs – B/L, In transit difference page 62

Protests, NOD, SOF: Tanks under Inert Gas page 63

Protests, NOD, SOF: H2S in cargo tanks page 64

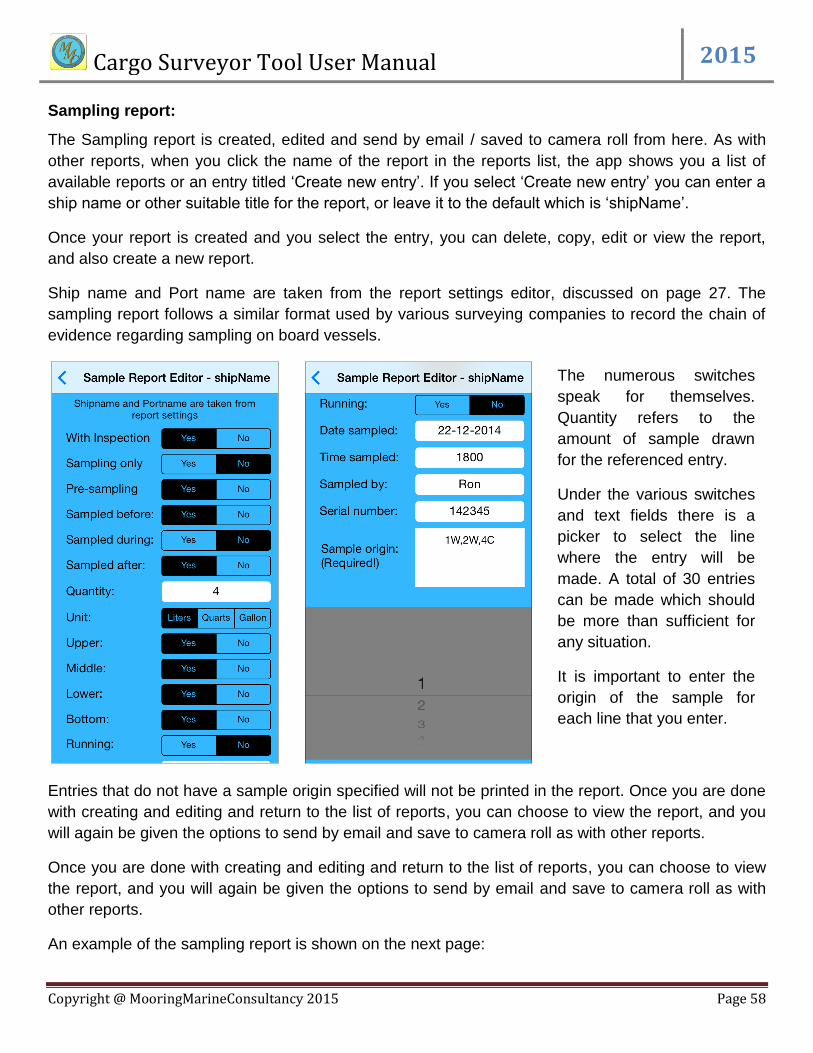
Protests, NOD, SOF: Hydrocarbons in cargo tanks page 65

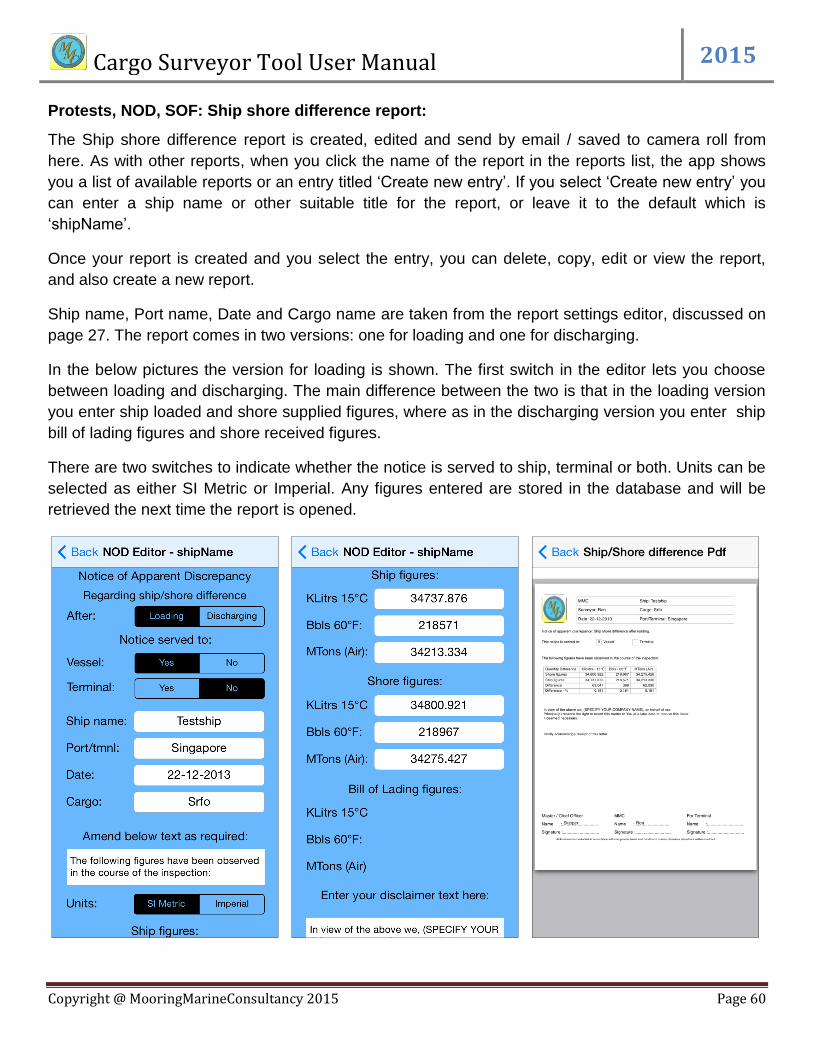
Protests, NOD, SOF: (De)Ballasting page 66

Protests, NOD, SOF: General NOD (customizable) page 67

Protests, NOD, SOF: General SOF (customizable) page 69

Index page 70

Cargo Surveyor Tool User Manual 2015

Copyright @ MooringMarineConsultancy 2015 Page 4

Foreword

This user manual attempts to explain all utilities and functions of CargoSurveyor Tool in detail, and

provides the user with enough background information to enable efficient and comfortable use of the

app.

Although most of the functionality is intuitive enough and designed with an aim towards intuitivity, the

underlying algorithms and the way the settings work and affect the outcome of calculations are

considered to be sufficiently complex that they justify more detailed explanation.

This is the first version of this user manual, and it is the intention of the author to publish future

updates as necessary, based on feedback received from customers and readers.

To this end, you are invited to submit any queries, comments and / or criticism either as a comment

on our website (hhtp://mooringmarineconsultancy.wordpress.com), or through a review in the Apple

appstore.

Cargo Surveyor Tool User Manual 2015

Copyright @ MooringMarineConsultancy 2015 Page 5

The tank configuration screen

Concept and layout:

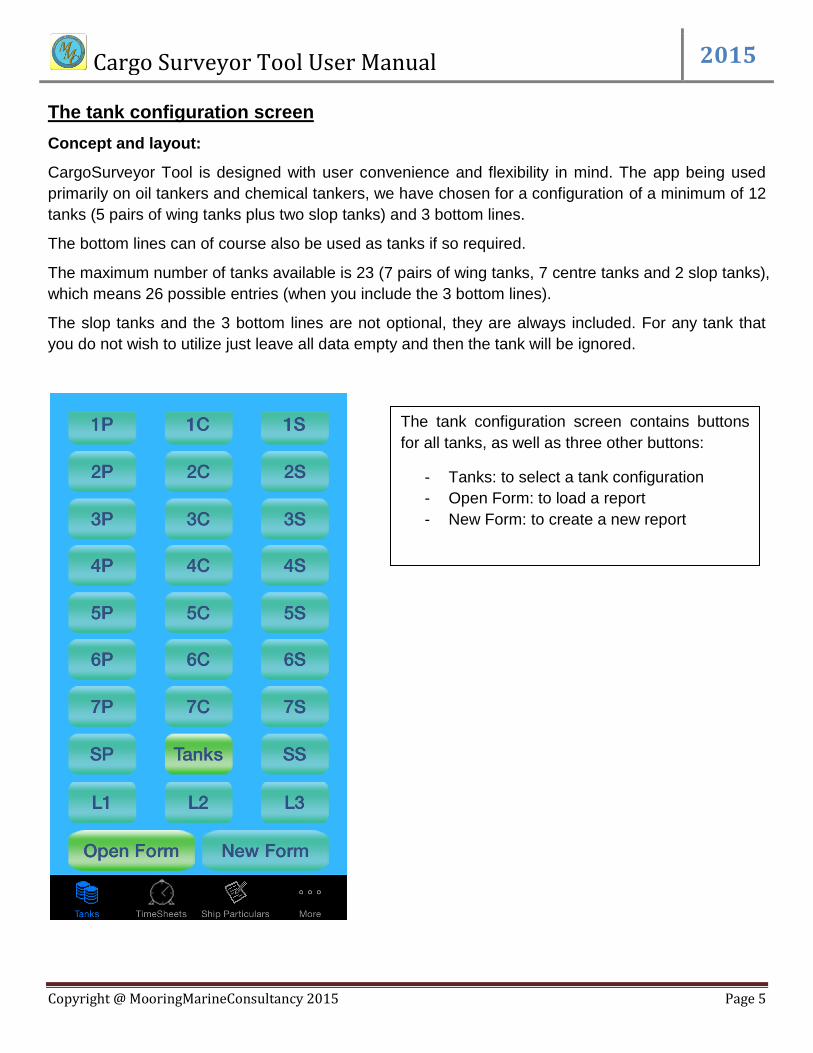
CargoSurveyor Tool is designed with user convenience and flexibility in mind. The app being used

primarily on oil tankers and chemical tankers, we have chosen for a configuration of a minimum of 12

tanks (5 pairs of wing tanks plus two slop tanks) and 3 bottom lines.

The bottom lines can of course also be used as tanks if so required.

The maximum number of tanks available is 23 (7 pairs of wing tanks, 7 centre tanks and 2 slop tanks),

which means 26 possible entries (when you include the 3 bottom lines).

The slop tanks and the 3 bottom lines are not optional, they are always included. For any tank that

you do not wish to utilize just leave all data empty and then the tank will be ignored.

The tank configuration screen contains buttons

for all tanks, as well as three other buttons:

- Tanks: to select a tank configuration

- Open Form: to load a report

- New Form: to create a new report

Cargo Surveyor Tool User Manual 2015

Copyright @ MooringMarineConsultancy 2015 Page 6

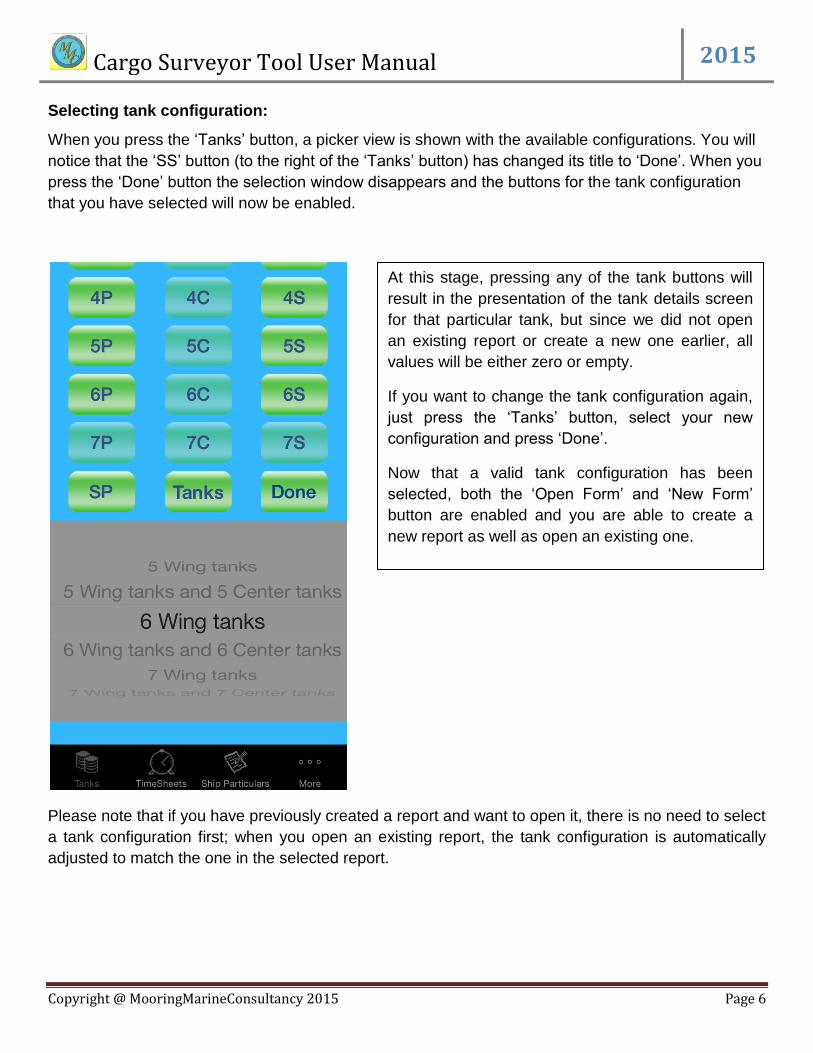
Selecting tank configuration:

When you press the ‘Tanks’ button, a picker view is shown with the available configurations. You will

notice that the ‘SS’ button (to the right of the ‘Tanks’ button) has changed its title to ‘Done’. When you

press the ‘Done’ button the selection window disappears and the buttons for the tank configuration

that you have selected will now be enabled.

Please note that if you have previously created a report and want to open it, there is no need to select

a tank configuration first; when you open an existing report, the tank configuration is automatically

adjusted to match the one in the selected report.

At this stage, pressing any of the tank buttons will

result in the presentation of the tank details screen

for that particular tank, but since we did not open

an existing report or create a new one earlier, all

values will be either zero or empty.

If you want to change the tank configuration again,

just press the ‘Tanks’ button, select your new

configuration and press ‘Done’.

Now that a valid tank configuration has been

selected, both the ‘Open Form’ and ‘New Form’

button are enabled and you are able to create a

new report as well as open an existing one.

Cargo Surveyor Tool User Manual 2015

Copyright @ MooringMarineConsultancy 2015 Page 7

Creating a new report:

After selecting your desired tank configuration, press the ‘New Form’ button; A dialog will appear

where you can enter a suitable file name for your report. File names should not begin with a number,

and any spaces will automatically be replaced with underscores. This is due to the requirements

imposed by the database file handling.

If you don’t enter a file name, the name ‘shipName’ will automatically be assigned to the file. After

pressing ‘OK’ you will be taken to the tank editor screen, where you can start entering your data. This

will be explained in detail on page 8.

Opening an existing report:

If you press the ‘Open Form’ button the list of available reports appears; In this screen you can also

delete reports by pressing ‘Edit’ in the top right corner. A red minus sign appears in front of all existing

files and after pressing the minus sign the word ‘Delete’ appears in a red box on the right side of the

report and you will be asked to confirm deletion. Once deleted, the report can no longer be retrieved.

To open an existing report, press on its name, and you will be given the option to either Load or Copy

the file. If you select ‘Copy File’ a dialog will appear where you can enter a file name, and the new

report will be an exact copy of the original.

After pressing ‘Copy File’ or ‘Load File’ you are taken to the tank details editor where you can view

and edit the various details.

Cargo Surveyor Tool User Manual 2015

Copyright @ MooringMarineConsultancy 2015 Page 8

The tank editor screen

Screen layout and control descriptions:

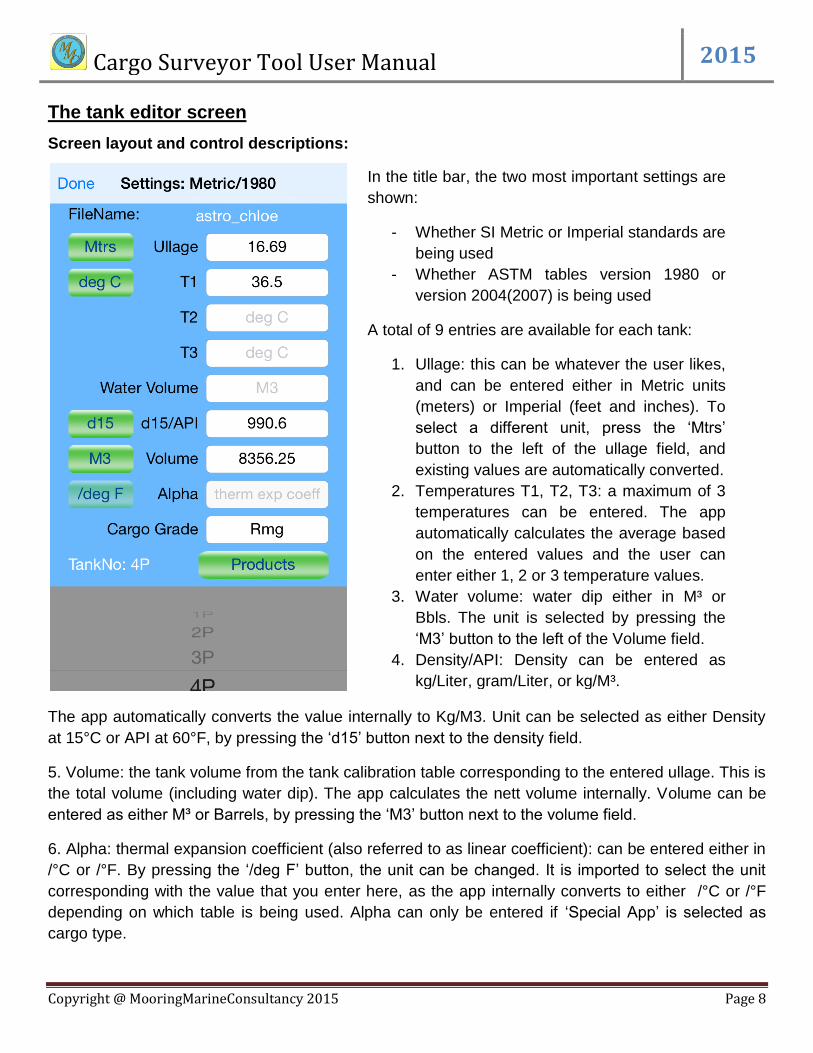
The app automatically converts the value internally to Kg/M3. Unit can be selected as either Density

at 15°C or API at 60°F, by pressing the ‘d15’ button next to the density field.

5. Volume: the tank volume from the tank calibration table corresponding to the entered ullage. This is

the total volume (including water dip). The app calculates the nett volume internally. Volume can be

entered as either M³ or Barrels, by pressing the ‘M3’ button next to the volume field.

6. Alpha: thermal expansion coefficient (also referred to as linear coefficient): can be entered either in

/°C or /°F. By pressing the ‘/deg F’ button, the unit can be changed. It is imported to select the unit

corresponding with the value that you enter here, as the app internally converts to either /°C or /°F

depending on which table is being used. Alpha can only be entered if ‘Special App’ is selected as

cargo type.

In the title bar, the two most important settings are

shown:

- Whether SI Metric or Imperial standards are

being used

- Whether ASTM tables version 1980 or

version 2004(2007) is being used

A total of 9 entries are available for each tank:

1. Ullage: this can be whatever the user likes,

and can be entered either in Metric units

(meters) or Imperial (feet and inches). To

select a different unit, press the ‘Mtrs’

button to the left of the ullage field, and

existing values are automatically converted.

2. Temperatures T1, T2, T3: a maximum of 3

temperatures can be entered. The app

automatically calculates the average based

on the entered values and the user can

enter either 1, 2 or 3 temperature values.

3. Water volume: water dip either in M³ or

Bbls. The unit is selected by pressing the

‘M3’ button to the left of the Volume field.

4. Density/API: Density can be entered as

kg/Liter, gram/Liter, or kg/M³.

Cargo Surveyor Tool User Manual 2015

Copyright @ MooringMarineConsultancy 2015 Page 9

7. Cargo Grade: the name given by the user to this particular grade. The grade name is used to

distinguish the different segregations on board, and to enable calculating totals per grade. If you omit

entering a grade name, totals for that particular grade cannot be calculated.

8. Cargo type button: has ‘Products’ as title by default. Repeatedly pressing this button changes the

title from ‘Products’ to ‘Crude’ to ‘LubOil’ to ‘Special App’. The setting of cargo type determines which

table (A, B, C or D) is used within a particular table number (e.g. 54A, 54B, 6C etc).

9. Tank number label: shows the tank currently selected (in the above picture it is 4P).

10. Tank picker: the tank picker shows all tanks available, as configured in the tank configuration

screen. To add / change data in any tank, just swipe the tank picker to the tank that you wish to edit.

After entering the data, all tank data is saved:

- Upon swiping the tank picker to go to a different tank - When pressing the ‘Done’ button in the top left corner of the view

11. Done button: when you press this button, data of the tank being edited is saved, and you are

returned to the tank configuration screen.

Cargo Surveyor Tool User Manual 2015

Copyright @ MooringMarineConsultancy 2015 Page 10

Using the conversion buttons:

We already mentioned in the previous page that the conversion buttons in the tank details editor can

be used to:

- Convert between Metric and Imperial distance (Meters Feet, Inches) - Convert between °C and °F for the temperatures - Convert between Metric and Imperial volume (M³ Barrels) for both water dip and volume - Convert between density at 15 °C and API at 60 °F - Convert between alpha /°C and alpha /°F

Any existing values are converted when you press the conversion button. You can use either Metric

or Imperial units for each entry independently and regardless of your chosen setting.

Weights and volumes are calculated according to your chosen settings in the settings screen (more

on this later), not according to the units used for entering your data in the tank details editor.

In other words, if you have opted for Imperial units in the settings screen, and you have entered some

of your data in the tank details editor in Metric units, the app will internally convert the values to

Imperial units when the time comes to present tank data, ullage reports or calculate totals.

This makes the app very flexible and it makes it very easy to deal with mixed standard situations such

as:

- The vessel you are attending has Metric ullage tables and UTI, but the vessel is discharging

her cargo in the US, and the client has requested a report using Imperial units. The Bill of

lading only contains a density at 15°C.

Cargo Surveyor Tool User Manual 2015

Copyright @ MooringMarineConsultancy 2015 Page 11

Selecting a tank after entering data:

Once you press ‘Done’ in the tank details editor, the app returns you to the tank configuration screen,

where you can now press any tank button and confirm the values that you have entered, and also you

can see all calculated weights and volumes in the tank that you select.

Cargo Surveyor Tool User Manual 2015

Copyright @ MooringMarineConsultancy 2015 Page 12

The Time Sheets screen

Creating a new time sheet:

The first time when you select the Time Sheets tab, the list of time sheets obviously does not contain

any saved reports, and the only entry available reads ‘Create new entry’. If you select this entry a

dialog will show, where you can enter a file name. Spaces in the file name will automatically be

converted to underscores, and if the file name contains a number as the first character, this number

will be removed, as announced in the dialog:

If you don’t enter a filename, automatically the

name ‘shipName’ will be allocated. After pressing

‘OK’, the app returns you to the list of available

reports, and now the newly created report shows in

the list.

Cargo Surveyor Tool User Manual 2015

Copyright @ MooringMarineConsultancy 2015 Page 13

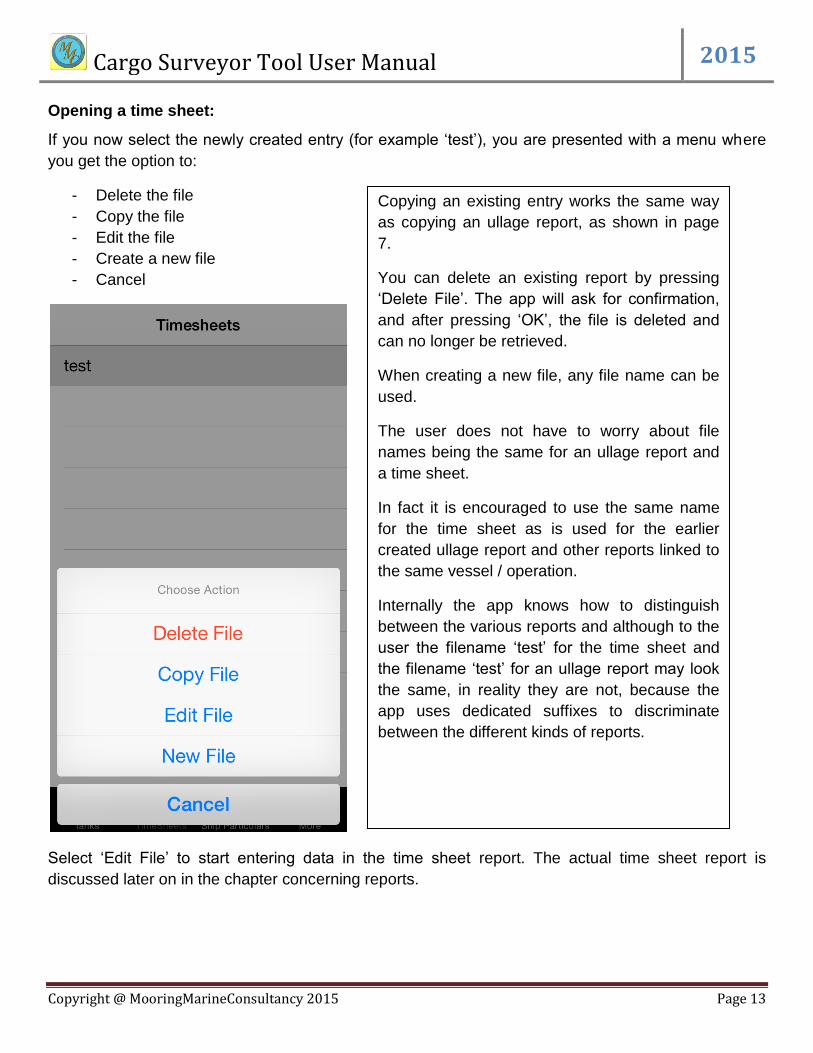
Opening a time sheet:

If you now select the newly created entry (for example ‘test’), you are presented with a menu where

you get the option to:

- Delete the file

- Copy the file

- Edit the file

- Create a new file

- Cancel

Select ‘Edit File’ to start entering data in the time sheet report. The actual time sheet report is

discussed later on in the chapter concerning reports.

Copying an existing entry works the same way

as copying an ullage report, as shown in page

7.

You can delete an existing report by pressing

‘Delete File’. The app will ask for confirmation,

and after pressing ‘OK’, the file is deleted and

can no longer be retrieved.

When creating a new file, any file name can be

used.

The user does not have to worry about file

names being the same for an ullage report and

a time sheet.

In fact it is encouraged to use the same name

for the time sheet as is used for the earlier

created ullage report and other reports linked to

the same vessel / operation.

Internally the app knows how to distinguish

between the various reports and although to the

user the filename ‘test’ for the time sheet and

the filename ‘test’ for an ullage report may look

the same, in reality they are not, because the

app uses dedicated suffixes to discriminate

between the different kinds of reports.

Cargo Surveyor Tool User Manual 2015

Copyright @ MooringMarineConsultancy 2015 Page 14

Selecting a time sheet entry:

After selecting ‘Edit File’, the time sheet report list appears and shows you a standard template list of

possible entries. About 36 standard entries have already been prepared and there is room for another

30 (currently blank) entries.

All standard entries can be edited and given new titles as desired, inside the time sheet editor. In

order to edit an entry, simply select it; the time sheet editor will show up and let you change the

details as shown in the next page.

Cargo Surveyor Tool User Manual 2015

Copyright @ MooringMarineConsultancy 2015 Page 15

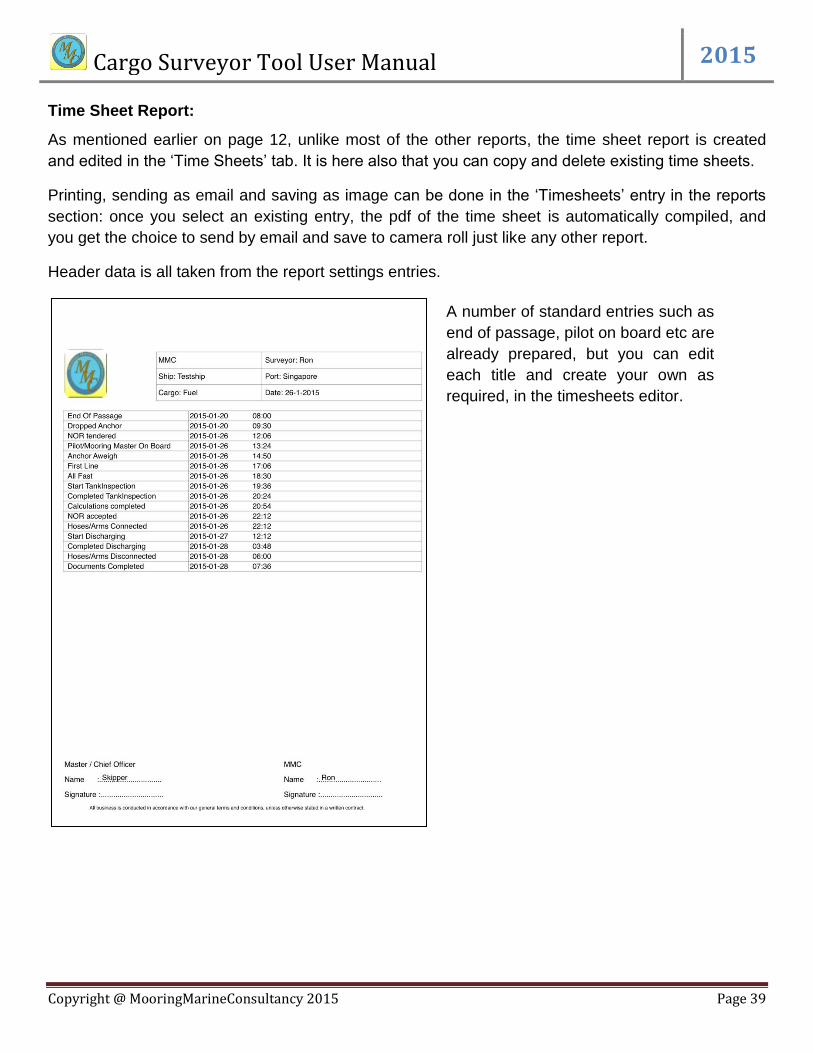
Editing a time sheet entry:

After selecting an entry, for example ‘End of Passage’, the details of this entry are shown in the time

sheet editor:

In the time sheet editor the title of the entry is

shown at the top. This title can be edited to

whatever you want it to be.

The date and time automatically shows as the

current date time, and you can enter the desired

date and time by selecting either on using the

picker.

If you press ‘Cancel’, no changes will be made.

If you press ‘Clear date/time’, then the title

remains as is, but date/time information is

removed from the entry.

Date / time entries can be made in any order you

wish, the app automatically sorts all entries

chronologically when preparing a time sheet

report.

Cargo Surveyor Tool User Manual 2015

Copyright @ MooringMarineConsultancy 2015 Page 16

The Ship Particulars screen

Creating a new ship particulars report:

The first time when you select the Ship Particulars tab, the list of reports obviously does not contain

any saved reports, and the only entry available reads ‘Create new entry’. If you select this entry a

dialog will show, where you can enter a file name. Spaces in the file name will automatically be

converted to underscores, and if the file name contains a number as the first character, this number

will be removed, as announced in the dialog. This works exactly the same as the time sheet reports

section.

Opening a ship particulars report:

After opening a file, the particulars report entry list appears:

Unlike in the time sheet editor, the title of

each entry cannot be changed, only the

underlying details can be changed.

A ship particulars report cannot be produced;

this is merely a tool for data collection.

Cargo Surveyor Tool User Manual 2015

Copyright @ MooringMarineConsultancy 2015 Page 17

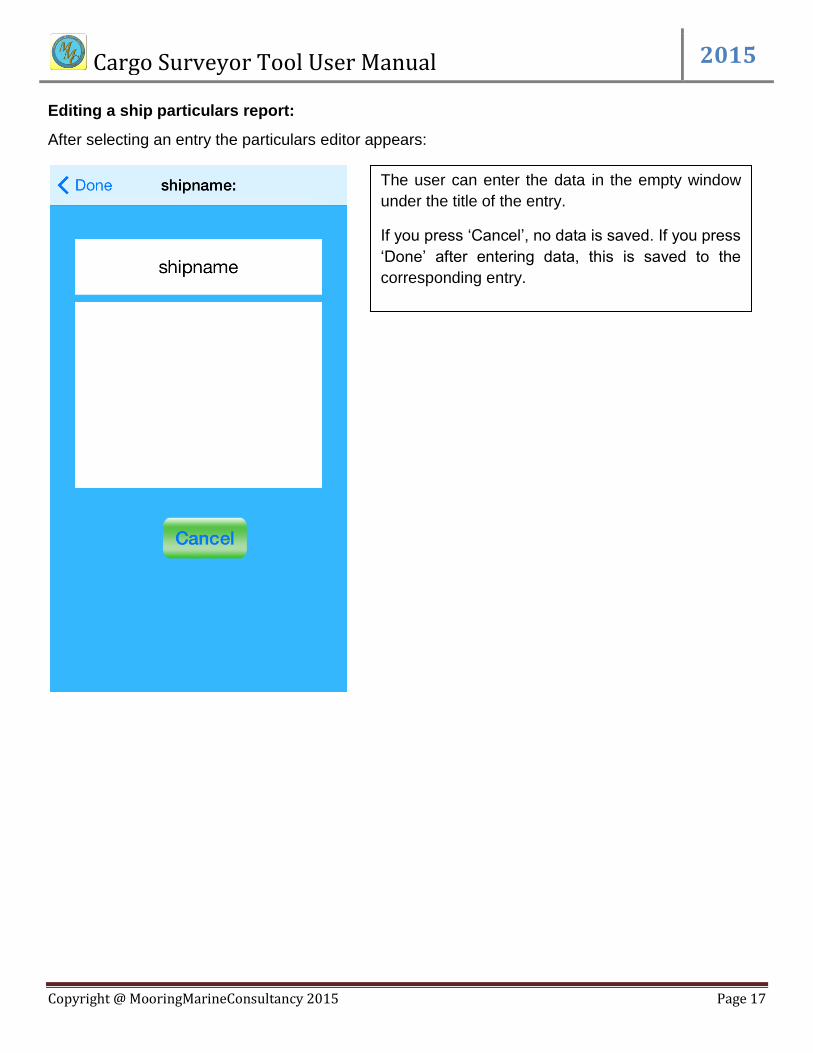
Editing a ship particulars report:

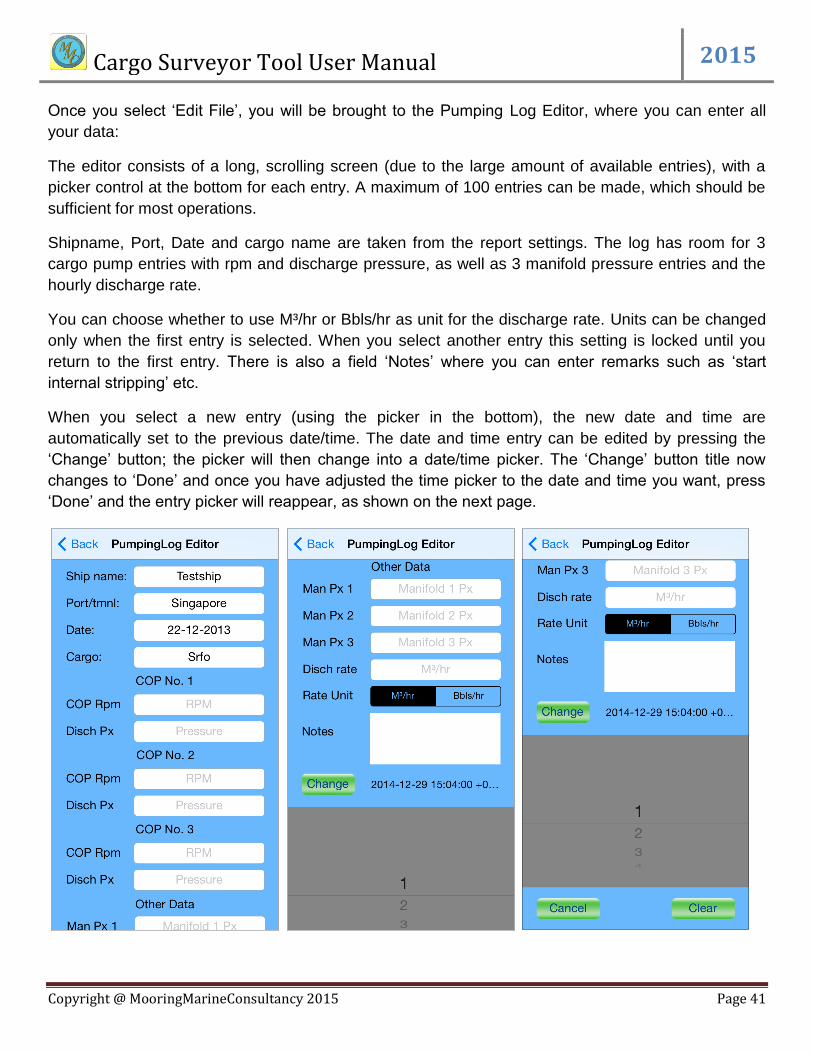
After selecting an entry the particulars editor appears:

The user can enter the data in the empty window

under the title of the entry.

If you press ‘Cancel’, no data is saved. If you press

‘Done’ after entering data, this is saved to the

corresponding entry.

Cargo Surveyor Tool User Manual 2015

Copyright @ MooringMarineConsultancy 2015 Page 18

The More screen: access to all other tools / utilities

Description:

The ‘More’ tab is the gateway to all other tools. On here you will find buttons that lead you to:

- Wedge Formula

- Tank Totals

- Reports

- Conversions

- Settings

- About screen

Wedge Formula: Concept and Layout

The wedge calculator can be used to calculate ROB or OBQ based on tank dips taken. The

calculation is done either based on the dimensions of the tank, or based on the volume as per the

tank calibration table.

The wedge volume is calculated continuously, as

the user inputs data.

Data can be entered either in SI Metric or Imperial

units.

When the user enters any data, this data is stored in

the app’s settings so that the next time the user

opens the app, that data is still available. When you

enter new data however, the previously stored data

is overwritten with the new data.

When a text field is cleared, it shows the required

unit to be used, for example in SI Metric mode

centimeters are used for the tank sounding and

meters for all other distance units, as shown in the

picture on the left.

Cargo Surveyor Tool User Manual 2015

Copyright @ MooringMarineConsultancy 2015 Page 19

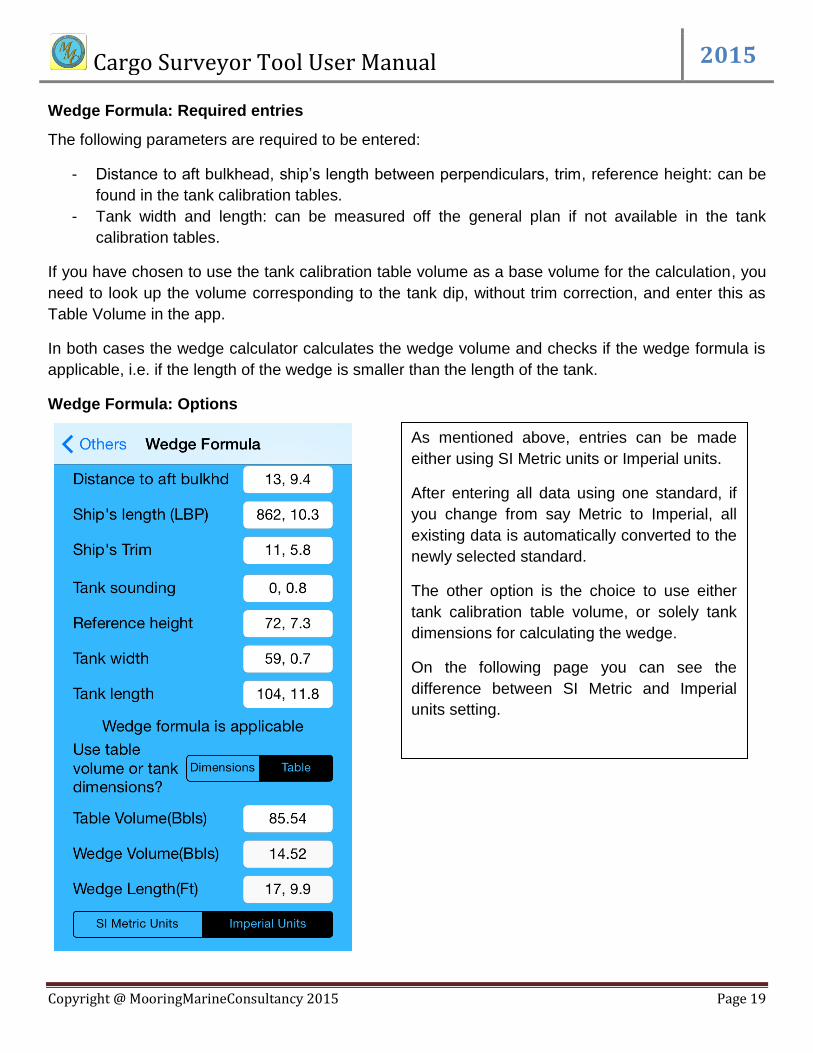
Wedge Formula: Required entries

The following parameters are required to be entered:

- Distance to aft bulkhead, ship’s length between perpendiculars, trim, reference height: can be

found in the tank calibration tables.

- Tank width and length: can be measured off the general plan if not available in the tank

calibration tables.

If you have chosen to use the tank calibration table volume as a base volume for the calculation, you

need to look up the volume corresponding to the tank dip, without trim correction, and enter this as

Table Volume in the app.

In both cases the wedge calculator calculates the wedge volume and checks if the wedge formula is

applicable, i.e. if the length of the wedge is smaller than the length of the tank.

Wedge Formula: Options

As mentioned above, entries can be made

either using SI Metric units or Imperial units.

After entering all data using one standard, if

you change from say Metric to Imperial, all

existing data is automatically converted to the

newly selected standard.

The other option is the choice to use either

tank calibration table volume, or solely tank

dimensions for calculating the wedge.

On the following page you can see the

difference between SI Metric and Imperial

units setting.

Cargo Surveyor Tool User Manual 2015

Copyright @ MooringMarineConsultancy 2015 Page 20

Using Imperial settings: Using SI Metric settings:

Cargo Surveyor Tool User Manual 2015

Copyright @ MooringMarineConsultancy 2015 Page 21

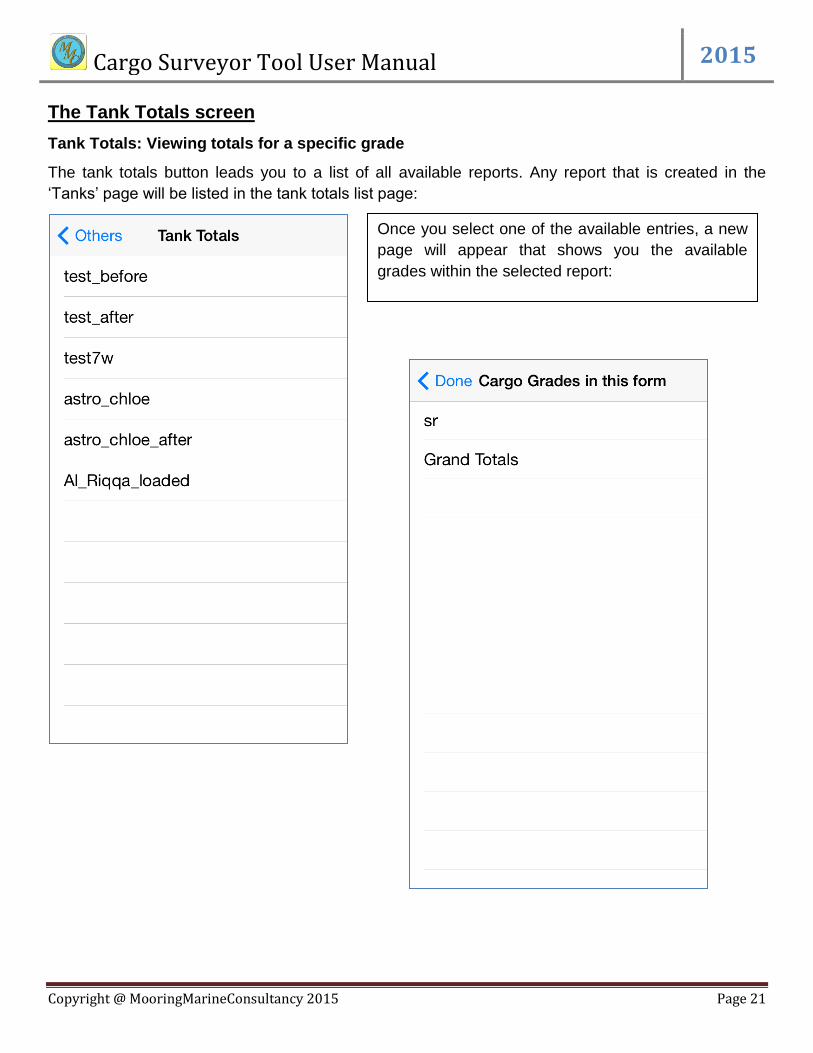
The Tank Totals screen

Tank Totals: Viewing totals for a specific grade

The tank totals button leads you to a list of all available reports. Any report that is created in the

‘Tanks’ page will be listed in the tank totals list page:

Once you select one of the available entries, a new

page will appear that shows you the available

grades within the selected report:

Cargo Surveyor Tool User Manual 2015

Copyright @ MooringMarineConsultancy 2015 Page 22

After selecting a specific grade, the weights and volumes belonging to this grade appear in a new

screen. Depending on whether you have selected SI Metric units or Imperial units in the settings page,

the weights and volumes will be shown accordingly. To illustrate this, the two pictures below show the

same grade, in SI Metric units and Imperial units:

Imperial units SI Metric units

You will have noticed that there is a difference between tons and Barrels for both, since not only are

the results presented in either SI Metric or Imperial units, the calculation method and the ASTM table

used are different.

Cargo Surveyor Tool User Manual 2015

Copyright @ MooringMarineConsultancy 2015 Page 23

Tank Totals: Viewing totals of all grades

If you select the ‘Grand Totals’ entry, instead of a specific grade name such as ‘sr’ on page 21, you

will be shown the totals of all grades available in the report.

It should be noted here that when you create an ullage report, it is important to fill in a grade name in

every tank that is being used; tanks that do not have a grade name will not be counted in a grade

specific total, but will be counted in the grand totals.

The Conversions screen

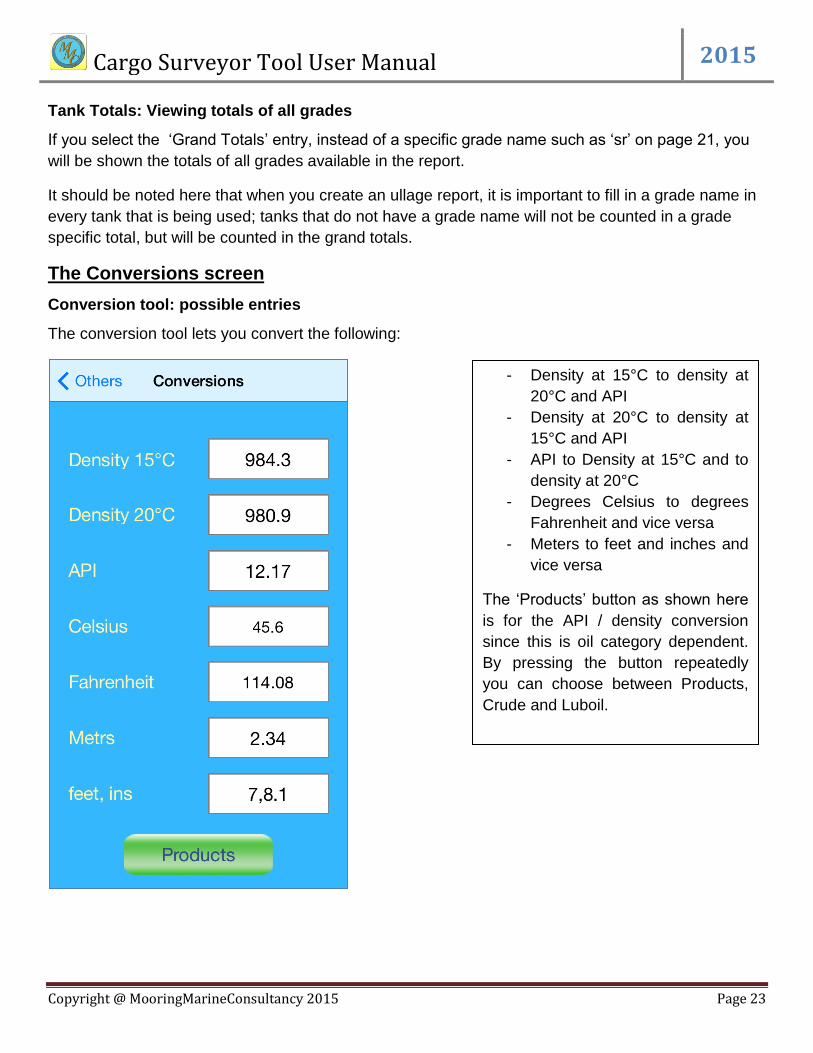
Conversion tool: possible entries

The conversion tool lets you convert the following:

- Density at 15°C to density at

20°C and API

- Density at 20°C to density at

15°C and API

- API to Density at 15°C and to

density at 20°C

- Degrees Celsius to degrees

Fahrenheit and vice versa

- Meters to feet and inches and

vice versa

The ‘Products’ button as shown here

is for the API / density conversion

since this is oil category dependent.

By pressing the button repeatedly

you can choose between Products,

Crude and Luboil.

Cargo Surveyor Tool User Manual 2015

Copyright @ MooringMarineConsultancy 2015 Page 24

The Settings page

The settings page provides user settings that are applicable throughout the app. They are saved

within the app whenever the user makes a change to them, and changes take effect immediately.
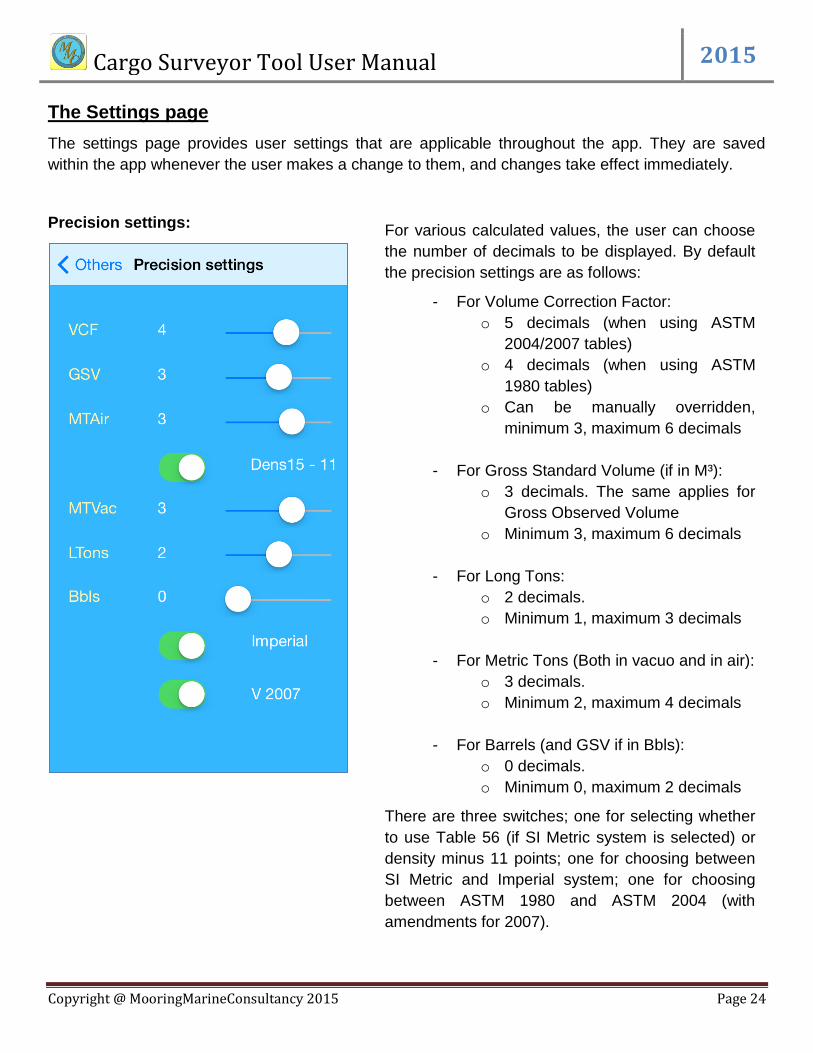
Precision settings:

For various calculated values, the user can choose

the number of decimals to be displayed. By default

the precision settings are as follows:

- For Volume Correction Factor:

o 5 decimals (when using ASTM

2004/2007 tables)

o 4 decimals (when using ASTM

1980 tables)

o Can be manually overridden,

minimum 3, maximum 6 decimals

- For Gross Standard Volume (if in M³):

o 3 decimals. The same applies for

Gross Observed Volume

o Minimum 3, maximum 6 decimals

- For Long Tons:

o 2 decimals.

o Minimum 1, maximum 3 decimals

- For Metric Tons (Both in vacuo and in air):

o 3 decimals.

o Minimum 2, maximum 4 decimals

- For Barrels (and GSV if in Bbls):

o 0 decimals.

o Minimum 0, maximum 2 decimals

There are three switches; one for selecting whether

to use Table 56 (if SI Metric system is selected) or

density minus 11 points; one for choosing between

SI Metric and Imperial system; one for choosing

between ASTM 1980 and ASTM 2004 (with

amendments for 2007).

Cargo Surveyor Tool User Manual 2015

Copyright @ MooringMarineConsultancy 2015 Page 25

Imperial System:

When selected, all volume correction calculations for oil are carried out using US Imperial standards,

meaning that for calculating the VCF for crude oil, table 6A is used, for products table 6B is used etc.

Also the temperature, density and volume units are set accordingly; volume units will be set to Barrels,

temperature will be set to Fahrenheit and density unit will be set to API as long as we are dealing with

crude, products and lubricating oils.

Please note that any such default settings can at any time be overridden, however the calculations

are performed using the appropriate set of tables based on this setting.

Metric System:

When selected, all volume correction calculations for oil are carried out using SI Metric standards,

meaning that for calculating the VCF for crude oil, table 54A is used, for products table 54B is used

etc.

Also the temperature, density and volume units are set accordingly; volume units will be set to M³,

temperature will be set to Celsius and density unit will be set to density 15 as long as we are dealing

with crude, products and lubricating oils.

Cargo Surveyor Tool User Manual 2015

Copyright @ MooringMarineConsultancy 2015 Page 26

Use Table 56:

This setting is only applicable when using SI Metric system; it gives the user the choice to calculate

Metric Tons in air using Table 56, or simply using density @ 15 minus 11 points. The reason for this

option is that there are numerous locations in the world where surveyors actually use density @ 15

minus 11 points instead of Table 56.

The preferred option is obviously to use table 56.

Use dens – 11:

See use table 56: using this setting, density in air is calculated as (dens in vacuo – 11 points).

Example: d15(vac) = 986.5 => d15(air) = 985.4.

ASTM 1980:

When this setting is selected, all VCF calculations, API / density conversions and density / API

reductions to 60F/15C are carried out using 1980 version tables.

Also when ASTM 1980 is selected, any API / density conversions and API / density reductions are

carried out using 1980 tables.

Precision setting for the VCF calculation is automatically set to 4 decimals, although this can be

overridden by the user to any other value, in the settings page.

ASTM 2007:

This is the opposite of the 1980 settings. All calculations are carried out using 2004/2007 table

versions;

Precision for the VCF calculations is automatically set to 5 decimals, but can be overridden manually.

Cargo Surveyor Tool User Manual 2015

Copyright @ MooringMarineConsultancy 2015 Page 27
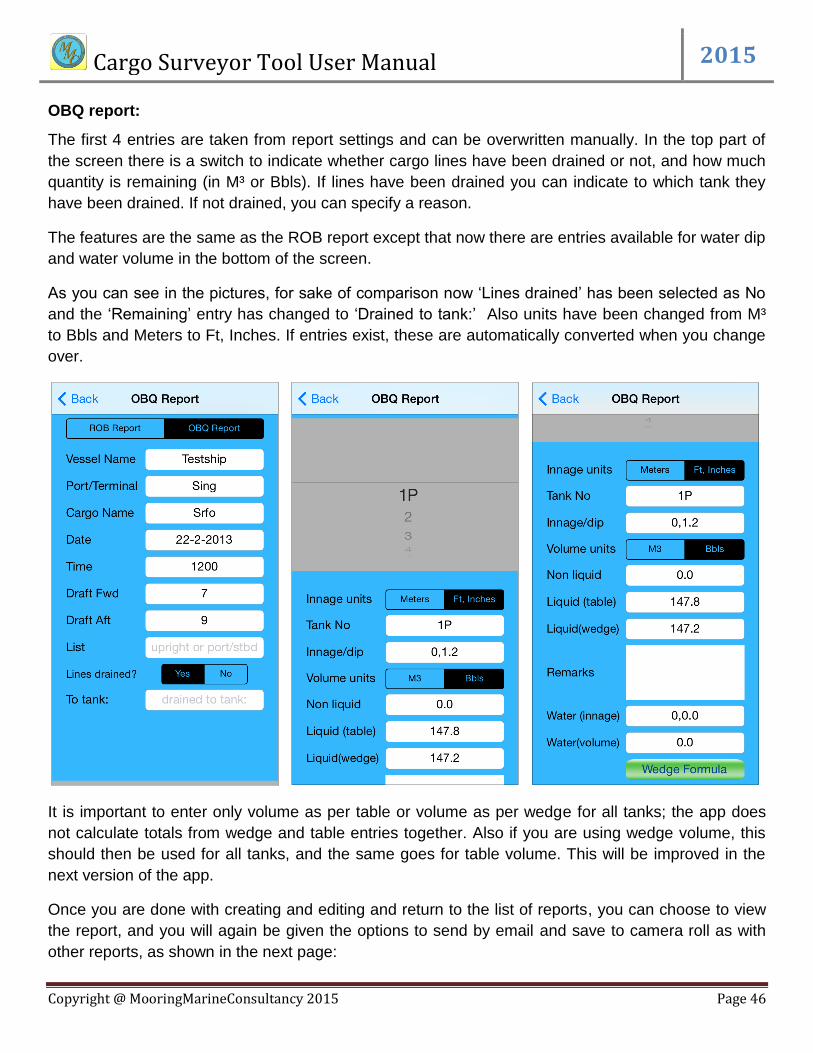
The Reports screen

The reports screen gives you access to primarily two features:

- The report settings screen: this is where you can enter your company logo and company name,

default email addresses to use when sending reports, your business legal disclaimer etc. This

will be discussed in detail on the following pages

- The various reports such as ullage reports, cargo transfer report, bunker report, pumping log,

time sheet, VEF report etc.

Report Settings:

The report settings screen is a fairly long screen

that scrolls in order to be able to access all details.

When you first open the report settings screen the

picture on the left shows an empty logo picture

with the text ‘your logo here’. You can either take

a picture and use that, or open the gallery and

choose a picture from there to use.

If you want to use your company custom logo

here, an easy way to do that is to email the logo

(preferable in .png format) to your phone as an

attachment, and save the attached png in the

gallery. Then you can select if from the gallery.

If you touch the logo, a text will show that says to

swipe right to set a selected picture as default, or

to load the default picture previous chosen, or to

swipe left to remove a logo. Removing it does not

delete it if the picture was set as default earlier.

The various fields speak for themselves mostly.

Company header, Surveyor, Master/CO, Ship

Name etc will be used as default headers in the

various reports unless otherwise stated in the

different report editors.

Cargo Surveyor Tool User Manual 2015

Copyright @ MooringMarineConsultancy 2015 Page 28

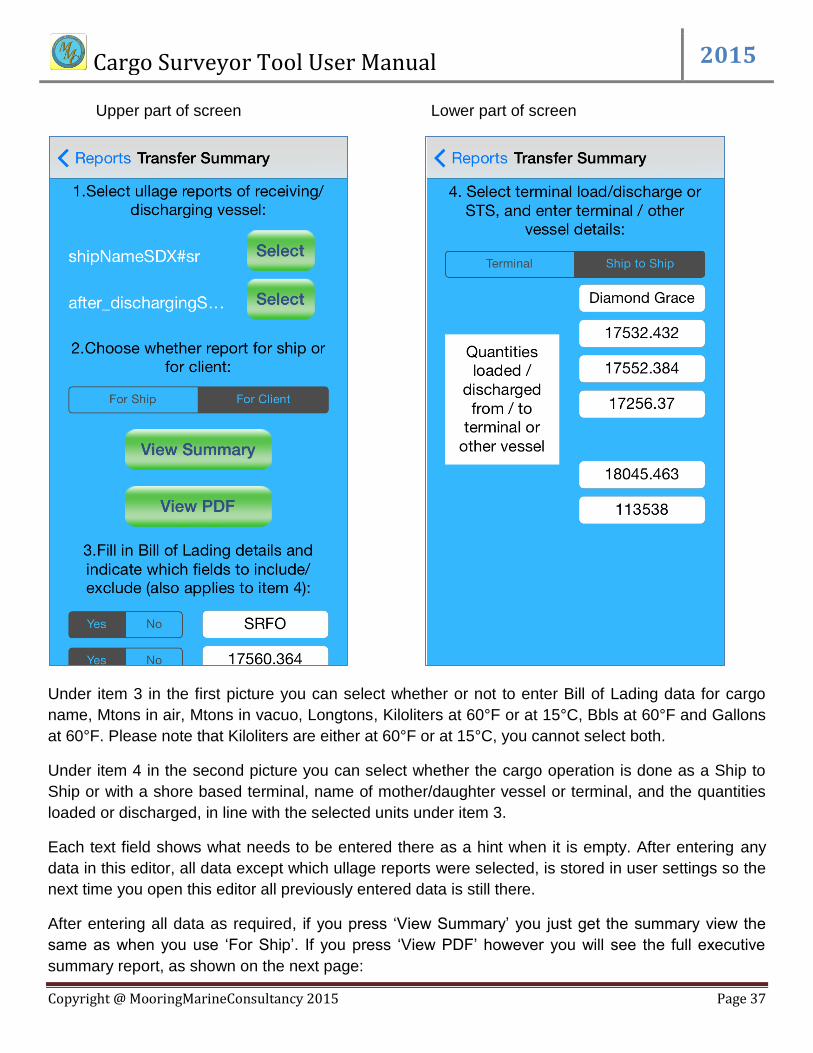
The lower part of the screen shows settings for choosing Before/After and Loading/Discharging,

current drafts, the two default email addresses to which reports will be sent if you choose to send

them from within the app, and a field where you can specify your business legal disclaimer.

The Before/After and Loading/Discharging switch

are used for ullage report and transfer report, but

can be set in the transfer report editor as well; the

same goes for the name of mother / daughter

vessel in case of Ship to Ship operations.

To add a default email address you can either

press the address book button and select an

entry from the address book, or you can enter the

email address manually.

If you leave the text in the legal disclaimer as

shown here, it will not be printed in any reports,

and a warning message will be displayed when

you leave the report settings screen.

If you do configure your own business legal

disclaimer it will automatically be printed at the

bottom of each report.

Cargo Surveyor Tool User Manual 2015

Copyright @ MooringMarineConsultancy 2015 Page 29
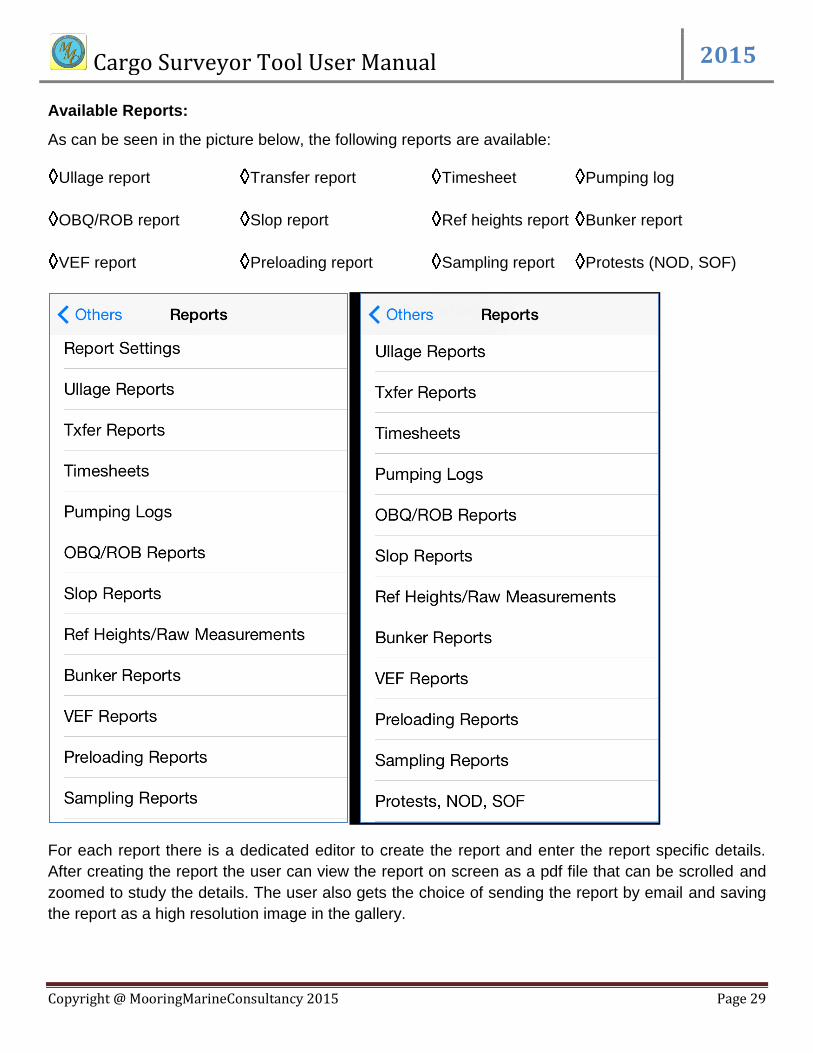
Available Reports:

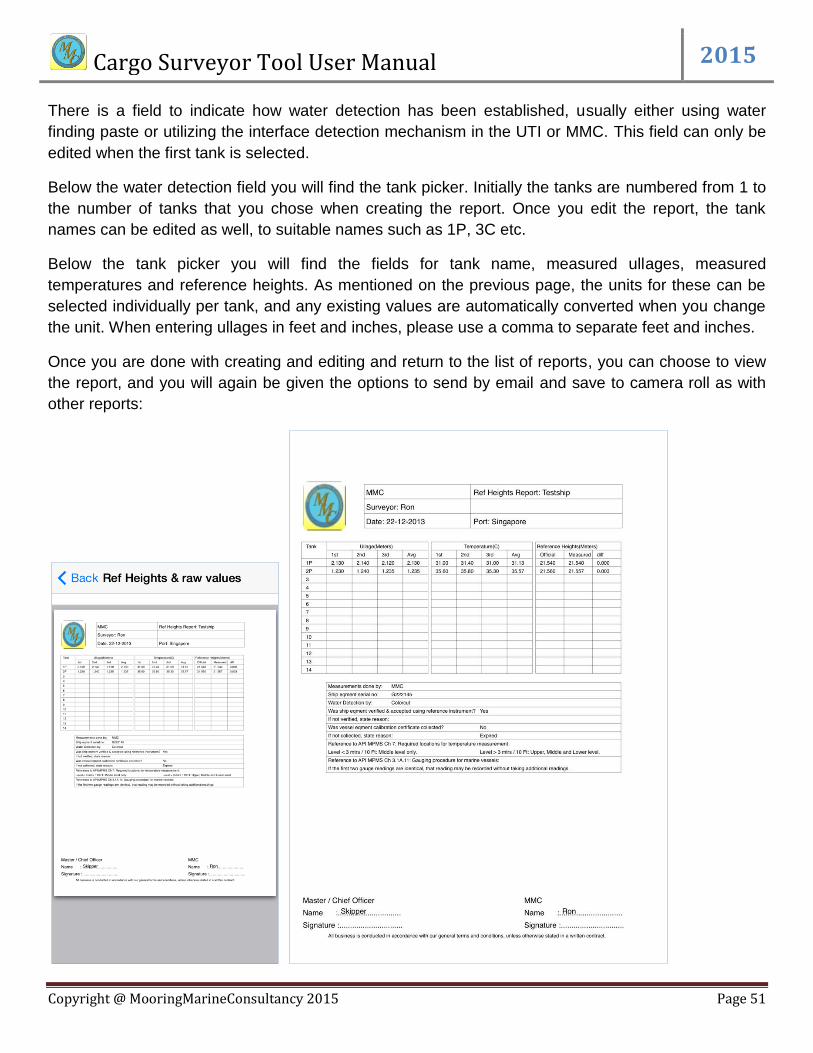
As can be seen in the picture below, the following reports are available:

Ullage report Transfer report Timesheet Pumping log
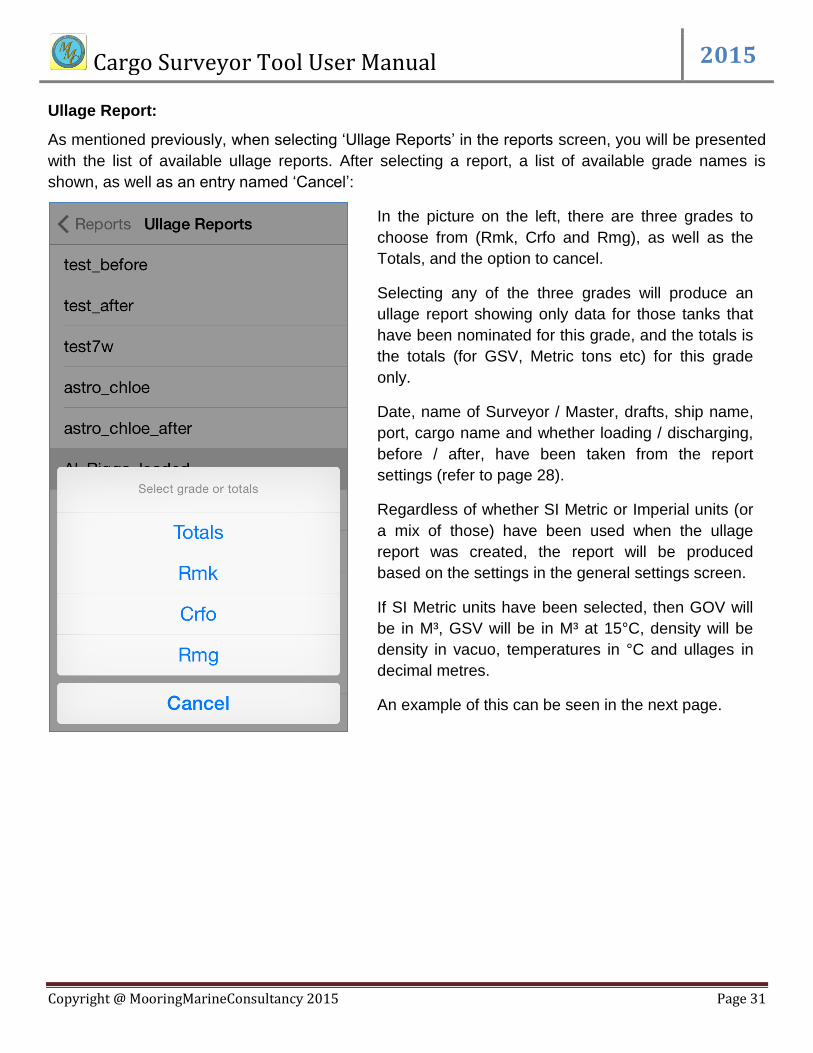
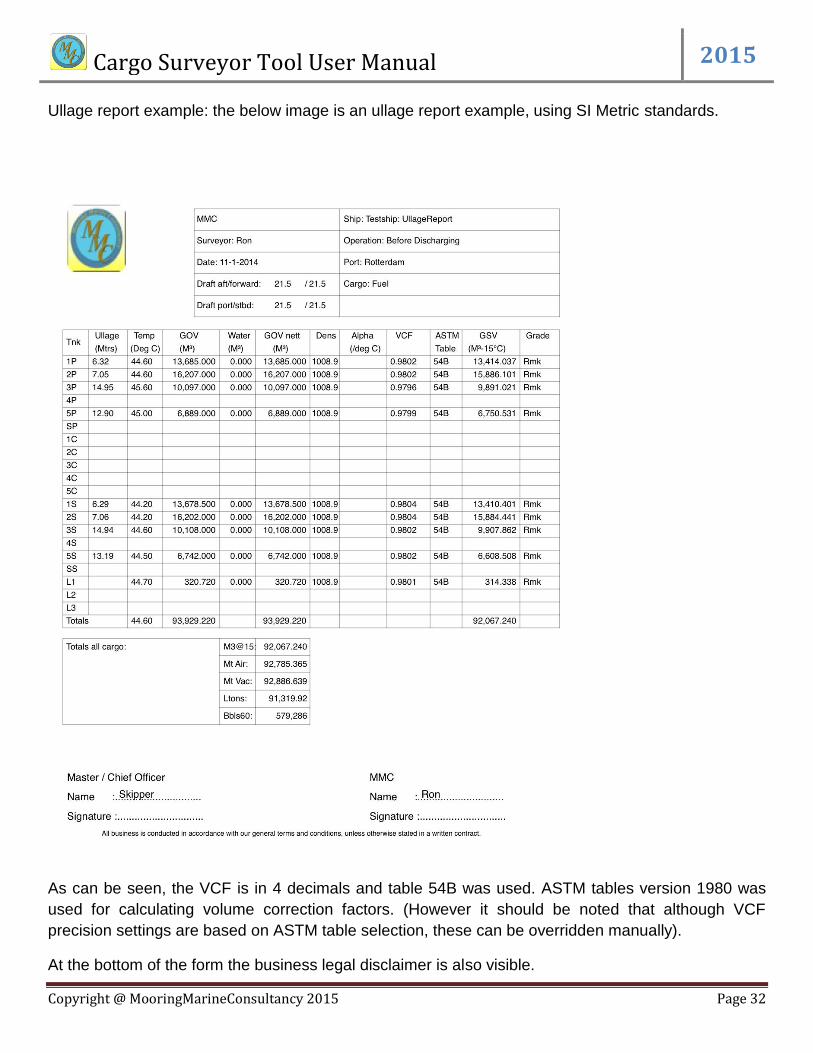
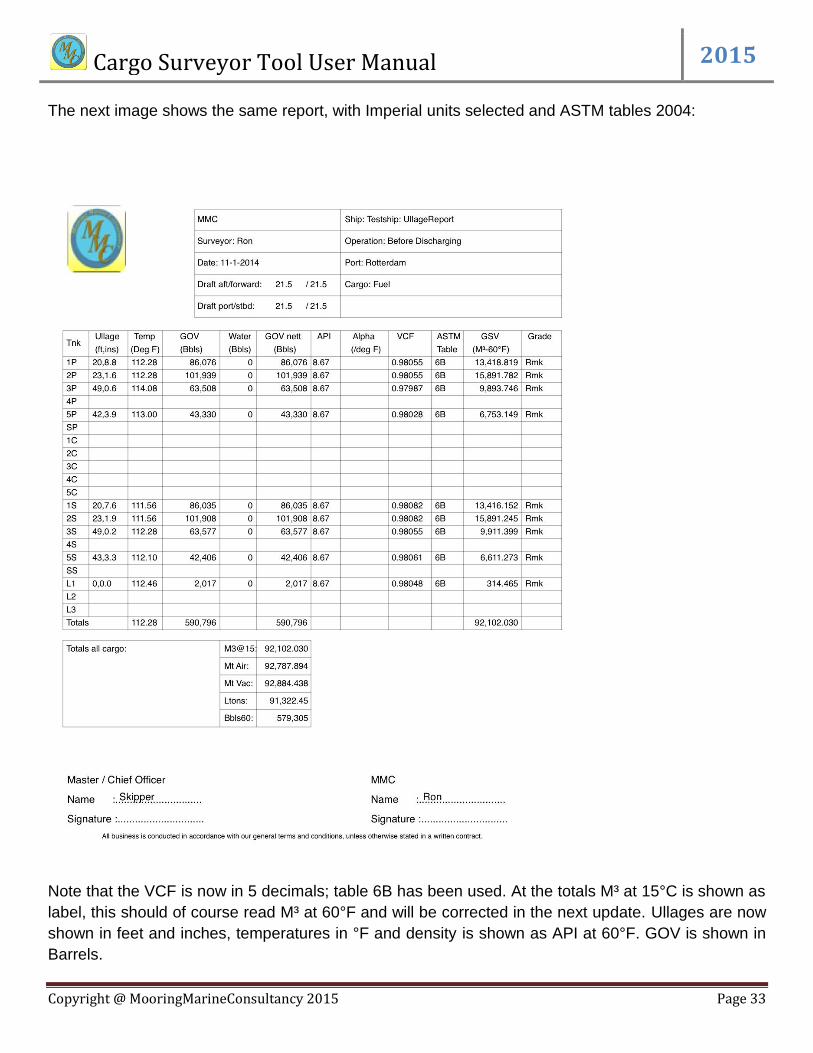
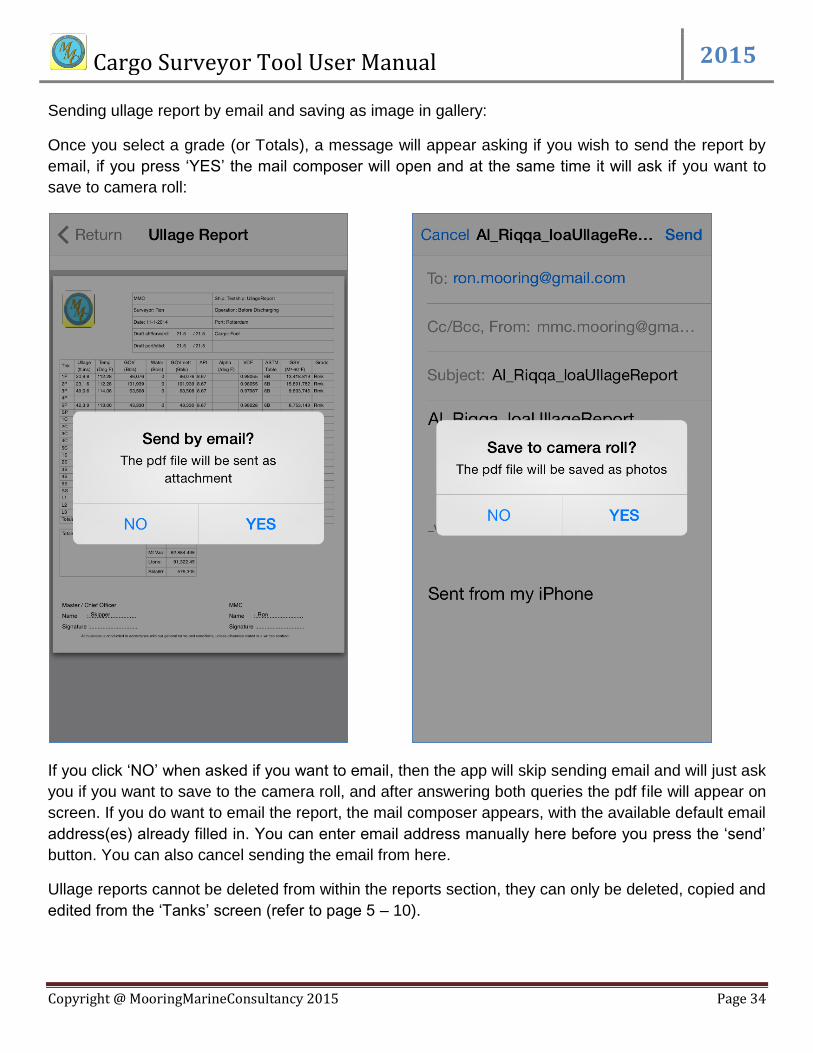
OBQ/ROB report Slop report Ref heights report Bunker report

VEF report Preloading report Sampling report Protests (NOD, SOF)

For each report there is a dedicated editor to create the report and enter the report specific details.

After creating the report the user can view the report on screen as a pdf file that can be scrolled and

zoomed to study the details. The user also gets the choice of sending the report by email and saving

the report as a high resolution image in the gallery.

Cargo Surveyor Tool User Manual 2015

Copyright @ MooringMarineConsultancy 2015 Page 30

All Reports in detail:

Prior to discussing all reports in detail, let me first explain the basics of report management:

When selecting a certain type of report in the reports screen, for example bunker report, a list of

available reports is shown. If no reports are available the only available entry will show ‘Create new

entry’.

The exceptions to this are ullage reports, timesheet reports and transfer reports. The first two show

as entry ‘No entries’ if there are no reports available, since new ullage reports are created within the

‘Tank’ screen and new timesheet reports are created within the ‘TimeSheets’ screen. The transfer

report operation will be discussed later.

When you select an ullage report or a timesheet report, no options such as ‘Delete’, ‘Copy’, ‘Edit’,

New File’ are available.

For all reports except the three reports mentioned

above, if no entries are available the first entry shows

‘Create new entry’. If you select that entry you will be

presented with a small dialog that asks you for a file

name and in some cases for the number of tanks

(more on that when discussing the individual

reports). If you don’t fill in anything but just click ‘OK’,

the app will enter ‘ShipName’ as the default name

and a default number if required.

Once you press ‘OK’ the name of the new entry is

added to the list and the entry named ‘Create new

entry’ has now disappeared.

If you now select the newly created entry you will be

given the option to either:

- Delete the file: remove the file from the list

- Copy the file: create a new file with the same

contents as the existing file

- Edit the file: open the selected file in the

dedicated editor

- View the report: view the report as a pdf, and

send it as email or save as picture

- Create a new file

- Cancel: abort the operation and return to the

list

Cargo Surveyor Tool User Manual 2015

Copyright @ MooringMarineConsultancy 2015 Page 31

Ullage Report:

As mentioned previously, when selecting ‘Ullage Reports’ in the reports screen, you will be presented

with the list of available ullage reports. After selecting a report, a list of available grade names is

shown, as well as an entry named ‘Cancel’:

In the picture on the left, there are three grades to

choose from (Rmk, Crfo and Rmg), as well as the

Totals, and the option to cancel.

Selecting any of the three grades will produce an

ullage report showing only data for those tanks that

have been nominated for this grade, and the totals is

the totals (for GSV, Metric tons etc) for this grade

only.

Date, name of Surveyor / Master, drafts, ship name,

port, cargo name and whether loading / discharging,

before / after, have been taken from the report

settings (refer to page 28).

Regardless of whether SI Metric or Imperial units (or

a mix of those) have been used when the ullage

report was created, the report will be produced

based on the settings in the general settings screen.

If SI Metric units have been selected, then GOV will

be in M³, GSV will be in M³ at 15°C, density will be

density in vacuo, temperatures in °C and ullages in

decimal metres.

An example of this can be seen in the next page.

Cargo Surveyor Tool User Manual 2015

Copyright @ MooringMarineConsultancy 2015 Page 32

Ullage report example: the below image is an ullage report example, using SI Metric standards.

As can be seen, the VCF is in 4 decimals and table 54B was used. ASTM tables version 1980 was

used for calculating volume correction factors. (However it should be noted that although VCF

precision settings are based on ASTM table selection, these can be overridden manually).

At the bottom of the form the business legal disclaimer is also visible.

Cargo Surveyor Tool User Manual 2015

Copyright @ MooringMarineConsultancy 2015 Page 33

The next image shows the same report, with Imperial units selected and ASTM tables 2004:

Note that the VCF is now in 5 decimals; table 6B has been used. At the totals M³ at 15°C is shown as

label, this should of course read M³ at 60°F and will be corrected in the next update. Ullages are now

shown in feet and inches, temperatures in °F and density is shown as API at 60°F. GOV is shown in

Barrels.

Cargo Surveyor Tool User Manual 2015

Copyright @ MooringMarineConsultancy 2015 Page 34

Sending ullage report by email and saving as image in gallery:

Once you select a grade (or Totals), a message will appear asking if you wish to send the report by

email, if you press ‘YES’ the mail composer will open and at the same time it will ask if you want to

save to camera roll:

If you click ‘NO’ when asked if you want to email, then the app will skip sending email and will just ask

you if you want to save to the camera roll, and after answering both queries the pdf file will appear on

screen. If you do want to email the report, the mail composer appears, with the available default email

address(es) already filled in. You can enter email address manually here before you press the ‘send’

button. You can also cancel sending the email from here.

Ullage reports cannot be deleted from within the reports section, they can only be deleted, copied and

edited from the ‘Tanks’ screen (refer to page 5 – 10).

Cargo Surveyor Tool User Manual 2015

Copyright @ MooringMarineConsultancy 2015 Page 35

Transfer Report:

As mentioned previously, when selecting ‘Transfer Reports’ in the reports screen, you will be

presented with the txfer report editor immediately. Inside this editor you can select the two ullage

reports to use for producing the transfer report. When you press ‘Select’ next to the ‘Choose Before’

label, the list with available ullage reports will appear. You can select the one you want to use,

choose whether you want to use the totals of all grades or one particular grade, and after that the

name of that ullage report appears instead of the ‘Choose Before label’. The same goes for the

‘Choose After’ selection:

As can be seen in the above pictures, there is also a switch with two choices: ‘For Ship’ and ‘For

Client’: When selecting ‘For Ship’ you only need to select the two ullage reports ‘Before’ and ‘After’

and select either all grades or a specific grade for each report, and after that the two buttons ‘View

Summary’ and ‘View PDF’ are enabled. ‘View Summary’ simply shows you the transfer calculation

results on screen, whereas ‘View PDF’ will show you the pdf form for the transfer calculation.

Cargo Surveyor Tool User Manual 2015

Copyright @ MooringMarineConsultancy 2015 Page 36

In below two pictures you can see the difference between the two:

View Summary View PDF

When using ‘View Summary’, the label ‘Discharged’ indicates whether cargo was loaded or

discharged, this is determined by the app based on the two selected ullage reports.

Just like with ullage reports, the results displayed depend on whether you have choosen SI Metric or

Imperial units in the general settings page, and whether you have selected ASTM tables 1980 or

2004.

If you select ‘For Client’ in the transfer report editor, several switches and text fields become visible to

enable you to enter data required to produce an executive summary which includes comparisons with

Bill of Lading quantities, which units to show, terminal name or ship name (when involved in Ship to

Ship operations), as shown on the next page:

Cargo Surveyor Tool User Manual 2015

Copyright @ MooringMarineConsultancy 2015 Page 37

Upper part of screen Lower part of screen

Under item 3 in the first picture you can select whether or not to enter Bill of Lading data for cargo

name, Mtons in air, Mtons in vacuo, Longtons, Kiloliters at 60°F or at 15°C, Bbls at 60°F and Gallons

at 60°F. Please note that Kiloliters are either at 60°F or at 15°C, you cannot select both.

Under item 4 in the second picture you can select whether the cargo operation is done as a Ship to

Ship or with a shore based terminal, name of mother/daughter vessel or terminal, and the quantities

loaded or discharged, in line with the selected units under item 3.

Each text field shows what needs to be entered there as a hint when it is empty. After entering any

data in this editor, all data except which ullage reports were selected, is stored in user settings so the

next time you open this editor all previously entered data is still there.

After entering all data as required, if you press ‘View Summary’ you just get the summary view the

same as when you use ‘For Ship’. If you press ‘View PDF’ however you will see the full executive

summary report, as shown on the next page:

Cargo Surveyor Tool User Manual 2015

Copyright @ MooringMarineConsultancy 2015 Page 38

Sending the report by email, and saving in

the camera roll works the same as all

reports, as explained previously in page

34.

Cargo Surveyor Tool User Manual 2015

Copyright @ MooringMarineConsultancy 2015 Page 39

Time Sheet Report:

As mentioned earlier on page 12, unlike most of the other reports, the time sheet report is created

and edited in the ‘Time Sheets’ tab. It is here also that you can copy and delete existing time sheets.

Printing, sending as email and saving as image can be done in the ‘Timesheets’ entry in the reports

section: once you select an existing entry, the pdf of the time sheet is automatically compiled, and

you get the choice to send by email and save to camera roll just like any other report.

Header data is all taken from the report settings entries.

A number of standard entries such as

end of passage, pilot on board etc are

already prepared, but you can edit

each title and create your own as

required, in the timesheets editor.

Cargo Surveyor Tool User Manual 2015

Copyright @ MooringMarineConsultancy 2015 Page 40

Pumping Logs:

The pumping log report is created, edited and send by email / saved to camera roll from here. As with

other reports, when you click ‘Pumping Logs’, the app shows you a list of available reports or an entry

titled ‘Create new entry’. If you select ‘Create new entry’ you can enter a shipname or other suitable

title for the report, or leave it to the default which is ‘shipName’.

Once your report is created and you select the entry, you can delete, copy, edit or view the report,

and also create a new report:

Cargo Surveyor Tool User Manual 2015

Copyright @ MooringMarineConsultancy 2015 Page 41

Once you select ‘Edit File’, you will be brought to the Pumping Log Editor, where you can enter all

your data:

The editor consists of a long, scrolling screen (due to the large amount of available entries), with a

picker control at the bottom for each entry. A maximum of 100 entries can be made, which should be

sufficient for most operations.

Shipname, Port, Date and cargo name are taken from the report settings. The log has room for 3

cargo pump entries with rpm and discharge pressure, as well as 3 manifold pressure entries and the

hourly discharge rate.

You can choose whether to use M³/hr or Bbls/hr as unit for the discharge rate. Units can be changed

only when the first entry is selected. When you select another entry this setting is locked until you

return to the first entry. There is also a field ‘Notes’ where you can enter remarks such as ‘start

internal stripping’ etc.

When you select a new entry (using the picker in the bottom), the new date and time are

automatically set to the previous date/time. The date and time entry can be edited by pressing the

‘Change’ button; the picker will then change into a date/time picker. The ‘Change’ button title now

changes to ‘Done’ and once you have adjusted the time picker to the date and time you want, press

‘Done’ and the entry picker will reappear, as shown on the next page.

Cargo Surveyor Tool User Manual 2015

Copyright @ MooringMarineConsultancy 2015 Page 42

After pressing the ‘Change’ button: After pressing ‘Done’:

After entering Rpm and discharge pressure for the pumps that you want to use (no need to enter

anything if the pump is not being used), when you choose the picker to select the next entry, rpm and

discharge pressure are automatically copied to the new entry and you can delete or edit them as

required. The same goes for the manifold discharge pressure.

There are two buttons in the bottom of the editor, ‘Cancel’ and ‘Clear’: ‘Cancel’ lets you return to the

previous screen (the list of pumping logs) without effecting any changes that you just may have made.

‘Clear’ clears out all fields for the selected entry except the top 4 entries (ship name, port, date and

cargo name).

Once you are done editing, if you return to the pumping logs list and select a report for viewing, you

will be given the option to send by email and save to camera roll, and you can view the pdf on screen,

as shown in the next page:

Cargo Surveyor Tool User Manual 2015

Copyright @ MooringMarineConsultancy 2015 Page 43

Cargo Surveyor Tool User Manual 2015

Copyright @ MooringMarineConsultancy 2015 Page 44

OBQ/ROB report:

The OBQ/ROB report is created, edited and send by email / saved to camera roll from here. As with

other reports, when you click ‘OBQ/ROB reports’, the app shows you a list of available reports or an

entry titled ‘Create new entry’. If you select ‘Create new entry’ you can enter a ship name or other

suitable title for the report and specify the number of tanks, or leave both to the default which is

‘shipName’ and 14 tanks. It is important to separate ship name and number of tanks by a comma only

(e.g. testShip,10) and NOT to use a space in between. This will be fixed in the next version.

Once your report is created and you select the entry, you can delete, copy, edit or view the report,

and also create a new report.

In the top of the report editor you can select whether this is an ROB or an OBQ report, the difference

is that in the OBQ report you can specify both water and oil residues whereas in the ROB report you

can only specify oil residue. Once again this editor is presented in a long scrolling screen due to the

many entries available.

ROB report:

The first 4 entries are taken from report settings and can be overwritten manually. In the top part of

the screen there is a switch to indicate whether cargo lines have been drained or not, and how much

quantity is remaining (in M³ or Bbls). If lines have been drained you can indicate to which tank they

have been drained. If not drained, you can specify a reason.

Cargo Surveyor Tool User Manual 2015

Copyright @ MooringMarineConsultancy 2015 Page 45

In the second part of the screen there are two switches for distance and volume units, and here you

can enter remaining liquid for the selected tank. You only need to enter one volume, either liquid

volume as per cargo tank calibration table or liquid volume as per wedge calculation. Distance and

volume unit can be selected for each tank individually.

In the bottom of the screen there is a button ‘Wedge Formula’, which brings you quickly to the wedge

calculator and lets you calculate wedge volume for each tank if required.

Above the switch for the distance units you can see the tank picker, which is initially numbered from 1

to .. whichever number of tanks you have chosen when you created the initial report. The name for

each tank can be changed into actual tank names, such as 1P etc.

Whether the report is an ROB or an OBQ report, and whether lines have been drained or not, can

only be chosen when the first tank is selected. Once you select another tank, these entries are locked,

until you return to the first tank entry.

Cargo Surveyor Tool User Manual 2015

Copyright @ MooringMarineConsultancy 2015 Page 46

OBQ report:

The first 4 entries are taken from report settings and can be overwritten manually. In the top part of

the screen there is a switch to indicate whether cargo lines have been drained or not, and how much

quantity is remaining (in M³ or Bbls). If lines have been drained you can indicate to which tank they

have been drained. If not drained, you can specify a reason.

The features are the same as the ROB report except that now there are entries available for water dip

and water volume in the bottom of the screen.

As you can see in the pictures, for sake of comparison now ‘Lines drained’ has been selected as No

and the ‘Remaining’ entry has changed to ‘Drained to tank:’ Also units have been changed from M³

to Bbls and Meters to Ft, Inches. If entries exist, these are automatically converted when you change

over.

It is important to enter only volume as per table or volume as per wedge for all tanks; the app does

not calculate totals from wedge and table entries together. Also if you are using wedge volume, this

should then be used for all tanks, and the same goes for table volume. This will be improved in the

next version of the app.

Once you are done with creating and editing and return to the list of reports, you can choose to view

the report, and you will again be given the options to send by email and save to camera roll as with

other reports, as shown in the next page:

Cargo Surveyor Tool User Manual 2015

Copyright @ MooringMarineConsultancy 2015 Page 47

Cargo Surveyor Tool User Manual 2015

Copyright @ MooringMarineConsultancy 2015 Page 48

Slop report:

The Slop report is created, edited and send by email / saved to camera roll from here. As with other

reports, when you click ‘Slop reports’, the app shows you a list of available reports or an entry titled

‘Create new entry’. If you select ‘Create new entry’ you can enter a ship name or other suitable title

for the report and specify the number of tanks, or leave both to the default which is ‘shipName’ and 2

tanks. It is important to separate ship name and number of tanks by a comma only (e.g. testShip,10)

and NOT to use a space in between. This will be fixed in the next version.

Once your report is created and you select the entry, you can delete, copy, edit or view the report,

and also create a new report.

The slop report has two switches in the top, ‘Loading’/’Discharging’ and ‘Before’/’After’. The report is

either a report made before and after a loading operation or before and after a discharging operation,

so the ‘Loading’/’Discharging’ switch is only enabled when the first tank is selected.

Once you have selected either Loading or Discharging, you can enter the data for each tank before

and after. Ullage, volume, temperature and density unit can be selected for each tank individually and

existing values are automatically converted if you change the unit. Also cargo type can be selected

individually. If you select ‘Special’, table 54C or 6C is used for calculating the volume correction factor,

based on the thermal expansion coefficient entered.

Cargo Surveyor Tool User Manual 2015

Copyright @ MooringMarineConsultancy 2015 Page 49

Once you are done with creating and editing and return to the list of reports, you can choose to view

the report, and you will again be given the options to send by email and save to camera roll as with

other reports.

In the above picture on the right the temperature unit is shown incorrectly as deg F, this has been

fixed in the current version of the app.

Cargo Surveyor Tool User Manual 2015

Copyright @ MooringMarineConsultancy 2015 Page 50

Reference Heights / Raw Measurements report:

The Ref Heights/Raw Measurements report is created, edited and send by email / saved to camera

roll from here. As with other reports, when you click the name of the report in the reports list, the app

shows you a list of available reports or an entry titled ‘Create new entry’. If you select ‘Create new

entry’ you can enter a ship name or other suitable title for the report and specify the number of tanks,

or leave both to the default which is ‘shipName’ and 14 tanks. It is important to separate ship name

and number of tanks by a comma only (e.g. testShip,10) and NOT to use a space in between. This

will be fixed in the next version.

Once your report is created and you select the entry, you can delete, copy, edit or view the report,

and also create a new report.

The first 3 entries are taken from report settings and can be overwritten manually. In the top part of

the screen there is are two switches to which let you choose mtrs or Ft,inches for ullage, and °C or °F

for the temperature unit. These can be set for each tank individually. If an entry exists, this entry is

automatically converted when you change the unit setting.

The next switch let you choose whether measurements were taken using MMC, UTI or tape. This will

be reflected in the report. Also the serial number of the instrument can be entered.

Next there are two switches for indicating whether the instrument has been verified by the surveyor

(against his own calibrated equipment), and whether the calibration certificate for the vessel’s

instrument is available, has been sighted and found acceptable, and if not, the reason.

Cargo Surveyor Tool User Manual 2015

Copyright @ MooringMarineConsultancy 2015 Page 51

There is a field to indicate how water detection has been established, usually either using water

finding paste or utilizing the interface detection mechanism in the UTI or MMC. This field can only be

edited when the first tank is selected.

Below the water detection field you will find the tank picker. Initially the tanks are numbered from 1 to

the number of tanks that you chose when creating the report. Once you edit the report, the tank

names can be edited as well, to suitable names such as 1P, 3C etc.

Below the tank picker you will find the fields for tank name, measured ullages, measured

temperatures and reference heights. As mentioned on the previous page, the units for these can be

selected individually per tank, and any existing values are automatically converted when you change

the unit. When entering ullages in feet and inches, please use a comma to separate feet and inches.

Once you are done with creating and editing and return to the list of reports, you can choose to view

the report, and you will again be given the options to send by email and save to camera roll as with

other reports:

Cargo Surveyor Tool User Manual 2015

Copyright @ MooringMarineConsultancy 2015 Page 52

Bunker report:

The Bunker report is created, edited and send by email / saved to camera roll from here. As with

other reports, when you click the name of the report in the reports list, the app shows you a list of

available reports or an entry titled ‘Create new entry’. If you select ‘Create new entry’ you can enter a

ship name or other suitable title for the report, or it to the default which is ‘shipName’.

Once your report is created and you select the entry, you can delete, copy, edit or view the report,

and also create a new report.

The first 4 entries are taken from report settings and can be overwritten manually. The report consists

of two sections: Fuel Oil and Diesel Oil. For each section there are two sets of data: Before and After.

In the top part of the editor you can enter date and time for the ‘Before’ section or ‘After’ section as

selected by the setting of the ‘Stage’ switch, as shown in the picture in the centre below.

Also data concerning last port, date/time sailed, and ROB for Fuel and Diesel Oil can be entered here.

These can only be entered when the ‘Before’ stage is selected. Below these entries you can enter the

daily bunker consumption as advised by Chief Engineer, for days at sea, in port or at anchor. Also

you can select here whether these are specified in Metric tons or Long tons.

Below the daily bunker consumption are the two switches that you use to select either Fuel Oil or

Diesel Oil, and the Before or After stage.

Cargo Surveyor Tool User Manual 2015

Copyright @ MooringMarineConsultancy 2015 Page 53

Regardless of which tank you are editing, you can at any time switch between Fuel Oil and Diesel Oil

and between Before and After. Whenever you change one of these, the tank picker automatically

goes back to the first tank.

Initially the tank name entries are all called ‘enter tankname’. Once you start editing the report you

can change the names into an appropriate designation. Tank names can only be changed when the

‘Before’ stage is selected.

For each tank you can enter ullage, volume, temperature and density. For all of them except ullage

the unit can be changed, and existing values will be converted automatically. The app will calculate

and display volume correction factor, GSV and Metric tons in air as you type in values. Once a unit is

chosen, this will be used for all tanks.

Once you are done with creating and editing and return to the list of reports, you can choose to view

the report, and you will again be given the options to send by email and save to camera roll as with

other reports.

Cargo Surveyor Tool User Manual 2015

Copyright @ MooringMarineConsultancy 2015 Page 54

VEF report:

The VEF report is created, edited and send by email / saved to camera roll from here. As with other

reports, when you click the name of the report in the reports list, the app shows you a list of available

reports or an entry titled ‘Create new entry’. If you select ‘Create new entry’ you can enter a ship

name or other suitable title for the report, or leave it to the default which is ‘shipName’.

Once your report is created and you select the entry, you can delete, copy, edit or view the report,

and also create a new report.

The first 4 entries are taken from report settings and can be overwritten manually. The VEF editor

has two settings: Units that are used for the quantities – Bbls, M³ or Mtons, and Operation – either

loading or discharging. Normally the VEF is calculated for loading operations.

Once you are done with creating and editing and return to the list of reports, you can choose to view

the report, and you will again be given the options to send by email and save to camera roll as with

other reports.

The report calculates the qualifying range, automatically excludes voyages with a gross ratio of more

than 1.02 or less than 0.98 and voyages which deviate more than 0.3% from the average. If any other

voyages need to be excluded you need to omit them from the list of entries (for reasons such as first

voyage after drydock etc).

On the next page you can see an example of the VEF report:

The units can only be

changed when the top entry

(‘Last’) is selected.

Under the two unit switches

you can see the voyage

picker. There are altogether

20 voyage entries available.

For each voyage entry the

data shown in the right hand

picture should be entered.

Cargo Surveyor Tool User Manual 2015

Copyright @ MooringMarineConsultancy 2015 Page 55

Cargo Surveyor Tool User Manual 2015

Copyright @ MooringMarineConsultancy 2015 Page 56

Preloading report:

The Preloading report is created, edited and send by email / saved to camera roll from here. As with

other reports, when you click the name of the report in the reports list, the app shows you a list of

available reports or an entry titled ‘Create new entry’. If you select ‘Create new entry’ you can enter a

ship name or other suitable title for the report, or leave it to the default which is ‘shipName’.

Once your report is created and you select the entry, you can delete, copy, edit or view the report,

and also create a new report.

The first entry is taken from report settings and can be overwritten manually. The next entry is the

time of the report, followed by two fields for remarks, such as ‘Found traces of water in 4P but not

enough to warrant disqualify’ etc.

The next field is a disclaimer which is normally customized by the surveying company, and can be

freely edited by the user. Any changes made to these fields are stored in user settings and will be

retrieved the next time the user opens the report.

The report is designed as a long scrolling screen, due to the many entries and information shown.

Under the first 5 text fields you can see a picker which is used to enter a maximum of 6 lines of data

regarding tanks to which the information applies, the cargo to load, cargo history etc. The last item is

a switch that lets you select the cleaning method used, with a text field below the switch that explains

all letters used.

Cargo Surveyor Tool User Manual 2015

Copyright @ MooringMarineConsultancy 2015 Page 57

This text can be edited by the user to suit individual needs. If you select ‘H’ (Crude Oil Washing) as

cleaning method, additional text fields will be visible to enter COW details.

Finally, below the COW details fields there are three switches to indicate certain Inert Gas system

details.

Once you are done with creating and editing and return to the list of reports, you can choose to view

the report, and you will again be given the options to send by email and save to camera roll as with

other reports.

Cargo Surveyor Tool User Manual 2015

Copyright @ MooringMarineConsultancy 2015 Page 58

Sampling report:

The Sampling report is created, edited and send by email / saved to camera roll from here. As with

other reports, when you click the name of the report in the reports list, the app shows you a list of

available reports or an entry titled ‘Create new entry’. If you select ‘Create new entry’ you can enter a

ship name or other suitable title for the report, or leave it to the default which is ‘shipName’.

Once your report is created and you select the entry, you can delete, copy, edit or view the report,

and also create a new report.

Ship name and Port name are taken from the report settings editor, discussed on page 27. The

sampling report follows a similar format used by various surveying companies to record the chain of

evidence regarding sampling on board vessels.

Entries that do not have a sample origin specified will not be printed in the report. Once you are done

with creating and editing and return to the list of reports, you can choose to view the report, and you

will again be given the options to send by email and save to camera roll as with other reports.

Once you are done with creating and editing and return to the list of reports, you can choose to view

the report, and you will again be given the options to send by email and save to camera roll as with

other reports.

An example of the sampling report is shown on the next page:

The numerous switches

speak for themselves.

Quantity refers to the

amount of sample drawn

for the referenced entry.

Under the various switches

and text fields there is a

picker to select the line

where the entry will be

made. A total of 30 entries

can be made which should

be more than sufficient for

any situation.

It is important to enter the

origin of the sample for

each line that you enter.

Cargo Surveyor Tool User Manual 2015

Copyright @ MooringMarineConsultancy 2015 Page 59

Cargo Surveyor Tool User Manual 2015

Copyright @ MooringMarineConsultancy 2015 Page 60

Protests, NOD, SOF: Ship shore difference report:

The Ship shore difference report is created, edited and send by email / saved to camera roll from

here. As with other reports, when you click the name of the report in the reports list, the app shows

you a list of available reports or an entry titled ‘Create new entry’. If you select ‘Create new entry’ you

can enter a ship name or other suitable title for the report, or leave it to the default which is

‘shipName’.

Once your report is created and you select the entry, you can delete, copy, edit or view the report,

and also create a new report.

Ship name, Port name, Date and Cargo name are taken from the report settings editor, discussed on

page 27. The report comes in two versions: one for loading and one for discharging.

In the below pictures the version for loading is shown. The first switch in the editor lets you choose

between loading and discharging. The main difference between the two is that in the loading version

you enter ship loaded and shore supplied figures, where as in the discharging version you enter ship

bill of lading figures and shore received figures.

There are two switches to indicate whether the notice is served to ship, terminal or both. Units can be

selected as either SI Metric or Imperial. Any figures entered are stored in the database and will be

retrieved the next time the report is opened.

Cargo Surveyor Tool User Manual 2015

Copyright @ MooringMarineConsultancy 2015 Page 61

The below set of images shows the report for discharging. Also units have been set to Imperial to

show the difference with the SI Metric setting on the previous page. As you can see here the notice

has been served both to the vessel and the terminal.

Also the disclaimer at the bottom of the editor is shown completely. This disclaimer is different from

the general disclaimer in report settings. It can be edited as required, just like the disclaimer in report

settings.

Once you are done with creating and editing and return to the list of reports, you can choose to view

the report, and you will again be given the options to send by email and save to camera roll as with

other reports.

Cargo Surveyor Tool User Manual 2015

Copyright @ MooringMarineConsultancy 2015 Page 62

Protests, NOD, SOF: Ship figs – B/L, In transit difference report:

The Ship shore difference report is created, edited and send by email / saved to camera roll from

here. As with other reports, when you click the name of the report in the reports list, the app shows

you a list of available reports or an entry titled ‘Create new entry’. If you select ‘Create new entry’ you

can enter a ship name or other suitable title for the report, or leave it to the default which is

‘shipName’.

Once your report is created and you select the entry, you can delete, copy, edit or view the report,

and also create a new report.

Ship name, Port name, Date and Cargo name are taken from the report settings editor, discussed on

page 27. The report can be configured for two discrepancies: difference between bill of lading and

ship arrival figure, and in transit difference of ship figures.

Both can be incorporated in the same notice. If you select both discrepancies, then data for ship

figures after loading, before discharging and bill of lading figures need to be entered. As with the

previous notice, there is an option to change units between SI Metric and Imperial, and the disclaimer

can be customized. This notice is always served to the vessel only.

Once you are done with creating and editing and return to the list of reports, you can choose to view

the report, and you will again be given the options to send by email and save to camera roll as with

other reports.

Cargo Surveyor Tool User Manual 2015

Copyright @ MooringMarineConsultancy 2015 Page 63

Protests, NOD, SOF: Tanks under Inert Gas report:

The Tanks under Inert Gas report is created, edited and send by email / saved to camera roll from

here. As with other reports, when you click the name of the report in the reports list, the app shows

you a list of available reports or an entry titled ‘Create new entry’. If you select ‘Create new entry’ you

can enter a ship name or other suitable title for the report, or leave it to the default which is

‘shipName’.

Once your report is created and you select the entry, you can delete, copy, edit or view the report,

and also create a new report.

Ship name, Port name, Date and Cargo name are taken from the report settings editor, discussed on

page 27. This notice is always served to the vessel only. The editor shows several customizable text

fields, and one field where you can enter the names of the tanks involved.

Several of the text fields offer the option to save a text as default. This is the case in most of the

reports. If you answer YES to the query, the comment is saved in user settings and will be used in

future new reports as well.

Once you are done with creating and editing and return to the list of reports, you can choose to view

the report, and you will again be given the options to send by email and save to camera roll as with

other reports.

Cargo Surveyor Tool User Manual 2015

Copyright @ MooringMarineConsultancy 2015 Page 64

Protests, NOD, SOF: H2S in cargo tanks report:

The H2S in cargo tanks report is created, edited and send by email / saved to camera roll from here.

As with other reports, when you click the name of the report in the reports list, the app shows you a

list of available reports or an entry titled ‘Create new entry’. If you select ‘Create new entry’ you can

enter a ship name or other suitable title, and the number of tanks for the report, or leave it to the

defaults which is ‘shipName’ and 2. It is important to separate ship name and number of tanks by a

comma only (e.g. testShip,10) and NOT to use a space in between. This will be fixed in the next

version.

Once your report is created and you select the entry, you can delete, copy, edit or view the report,

and also create a new report.

Ship name, Port name, Date and Cargo name are taken from the report settings editor, discussed on

page 27. This notice is always served to the vessel only. The editor shows several customizable text

fields for comments, as well as two fields for entering the tank name and measured H2S content.

Below the text fields there is a tank picker to select the tank for which you want to enter H2S data.

Initially the tanks are numbered 1 to … the number of tanks that you entered when you created the

report. Once you start editing the tank names can be changed into meaningful names such as 1P etc.

Once you are done with creating and editing and return to the list of reports, you can choose to view

the report, and you will again be given the options to send by email and save to camera roll as with

other reports.

Cargo Surveyor Tool User Manual 2015

Copyright @ MooringMarineConsultancy 2015 Page 65

Protests, NOD, SOF: Hydrocarbons in cargo tanks report:

The Hydrocarbons in cargo tanks report is created, edited and send by email / saved to camera roll

from here. As with other reports, when you click the name of the report in the reports list, the app

shows you a list of available reports or an entry titled ‘Create new entry’.

If you select ‘Create new entry’ you can enter a ship name or other suitable title, and the number of

tanks for the report, or leave it to the defaults which is ‘shipName’ and 2. It is important to separate

ship name and number of tanks by a comma only (e.g. testShip,10) and NOT to use a space in

between. This will be fixed in the next version.

Once your report is created and you select the entry, you can delete, copy, edit or view the report,

and also create a new report.

Ship name, Port name, Date and Cargo name are taken from the report settings editor, discussed on

page 27. This notice is always served to the vessel only. The editor shows several customizable text

fields for comments, as well as two fields for entering the tank name and measured HC content.

Below the text fields there is a tank picker to select the tank for which you want to enter HC data.

Initially the tanks are numbered 1 to … the number of tanks that you entered when you created the

report. Once you start editing the tank names can be changed into meaningful names such as 1P etc.

Once you are done with creating and editing and return to the list of reports, you can choose to view

the report, and you will again be given the options to send by email and save to camera roll as with

other reports.

Cargo Surveyor Tool User Manual 2015

Copyright @ MooringMarineConsultancy 2015 Page 66

Protests, NOD, SOF: (De)Ballasting report:

The (De)Ballasting report is created, edited and send by email / saved to camera roll from here. As

with other reports, when you click the name of the report in the reports list, the app shows you a list of

available reports or an entry titled ‘Create new entry’.

This report is a more or less obsolete remnant from the time before ships were fitted with segregated

ballast tanks and is nowadays seldom issued.

If you select ‘Create new entry’ you can enter a ship name or other suitable title, or leave it to the

default which is ‘shipName’.

Ship name, Port name, Date and Cargo name are taken from the report settings editor, discussed on

page 27. This notice is always served to the vessel only. The editor shows several customizable text

fields for comments, including the disclaimer used in other NODs.

Once your report is created and you select the entry, you can delete, copy, edit or view the report,

and also create a new report.

Several of the text fields offer the option to save a text as default. This is the case in most of the

reports. If you answer YES to the query, the comment is saved in user settings and will be used in

future new reports as well. Once you are done with creating and editing and return to the list of

reports, you can choose to view the report, and you will again be given the options to send by email

and save to camera roll as with other reports.

Cargo Surveyor Tool User Manual 2015

Copyright @ MooringMarineConsultancy 2015 Page 67

Protests, NOD, SOF: General NOD (customizable) report:

The General NOD (customizable) report is created, edited and send by email / saved to camera roll

from here. As with other reports, when you click the name of the report in the reports list, the app

shows you a list of available reports or an entry titled ‘Create new entry’.

If you select ‘Create new entry’ you can enter a ship name or other suitable title, or leave it to the

default which is ‘shipName’.

Ship name, Port name, Date and Cargo name are taken from the report settings editor, discussed on

page 27. This notice is can be served to either vessel, terminal or both. The editor shows several

customizable text fields for comments, including the disclaimer used in other NODs. The header is

customizable, as shown in the below images

Once your report is created and you select the entry, you can delete, copy, edit or view the report,

and also create a new report.

In the report shown above (right hand image), there is an additional line of comment that should not

be there, this will be fixed in the next version.

Several of the text fields offer the option to save a text as default. This is the case in most of the

reports. If you answer YES to the query, the comment is saved in user settings and will be used in

future new reports as well.

Cargo Surveyor Tool User Manual 2015

Copyright @ MooringMarineConsultancy 2015 Page 68

Once you are done with creating and editing and return to the list of reports, you can choose to view

the report, and you will again be given the options to send by email and save to camera roll as with

other reports.

Cargo Surveyor Tool User Manual 2015

Copyright @ MooringMarineConsultancy 2015 Page 69

Protests, NOD, SOF: General SOF (customizable) report:

The General SOF (customizable) report is created, edited and send by email / saved to camera roll

from here. As with other reports, when you click the name of the report in the reports list, the app

shows you a list of available reports or an entry titled ‘Create new entry’.

If you select ‘Create new entry’ you can enter a ship name or other suitable title, or leave it to the

default which is ‘shipName’.

Ship name, Port name, Date and Cargo name are taken from the report settings editor, discussed on

page 27. This notice is can be served to either vessel, terminal or both. The editor shows several

customizable text fields for comments, including the disclaimer used in other NODs. The header is

customizable, as shown in the below images

Once your report is created and you select the entry, you can delete, copy, edit or view the report,

and also create a new report.

In the report shown above (right hand image), there is an additional line of comment that should not

be there, this will be fixed in the next version.

Several of the text fields offer the option to save a text as default. This is the case in most of the

reports. If you answer YES to the query, the comment is saved in user settings and will be used in

future new reports as well.

Cargo Surveyor Tool User Manual 2015

Copyright @ MooringMarineConsultancy 2015 Page 70

Once you are done with creating and editing and return to the list of reports, you can choose to view

the report, and you will again be given the options to send by email and save to camera roll as with

other reports.

Cargo Surveyor Tool User Manual 2015

Copyright @ MooringMarineConsultancy 2015 Page 71

Index:

A

Alpha, 8

ASTM, 2, 22, 26, 32, 33, 36

B

Bunker, 3, 29, 52

C

configuration, 1, 5, 6, 7, 9, 11

conversion, 1, 10, 23

Convert, 10

D

density, 8, 10, 25, 26, 33, 48, 53

E

email, 27, 28, 29, 34, 39, 40, 42, 44, 46, 48, 49, 50, 51, 52, 53, 54, 56,

57, 58, 60, 61, 62, 63, 64, 65, 66, 67, 68, 69, 70

I

Imperial, 2, 10, 20, 22, 25, 33, 36, 60, 61, 62

M

Metric, 2, 10, 20, 22, 25, 26, 32, 36, 52, 53, 60, 61, 62

O

OBQ, 3, 18, 29, 44, 45, 46

P

particulars, 1, 16, 17

Products, 9

pumping, 27, 40, 42

Pumping, 3, 29, 40, 41

R

Reference Heights, 50

reports, 1, 2, 3, 7, 10, 12, 13, 16, 21, 27, 28, 29, 30, 31, 34, 35, 36, 37,

39, 40, 44, 46, 48, 49, 50, 51, 52, 53, 54, 56, 57, 58, 60, 61, 62, 63,

64, 65, 66, 67, 68, 69, 70

S

Settings, 2, 18, 24, 27

Slop, 3, 29, 48

T

temperature, 25, 48, 49, 50, 53

thermal, 8, 48

time sheet, 1, 12, 13, 14, 15, 16, 27, 39

Totals, 2, 18, 21, 23, 34

Transfer, 29, 35

V

VCF, 25, 26, 32, 33

VEF, 3, 27, 29, 54

W

Wedge, 2, 18, 19, 45


Recommended