Forward This manual explains the layout and basic operations of the Catalog Explorer, a visual tool that allows quick and easy access to the names and part numbers of all individual service parts used on a particular model. Before you use this document and the software itself, please take the time to read the disclaimers mentioned below. Thank you very much in advance for your cooperation. We hope this tool will be of use to you in your field service activities.
Ricoh Americas Corporation
Please note the following disclaimers: 1. The contents of this document are subject to future revision without prior
notification. 2. Ricoh Americas Corporation does not accept responsibility for any
consequences that may result from the usage of the software described in this document, and/or any operations or action that is taken based on the contents of this document.
3. This document may not be modified, quoted, distributed, copied or reproduced in any way. These actions are expressly forbidden without the prior written consent of Ricoh Americas Corporation.
Catalog Explorer User Manual ______________________________________________________________________________
________________________________________________________________________________ Page 3 of 36
1. What is the Catalog Explorer?..........................................5 2. Visual Overview of the GUI..............................................6 3. Installing, Removing & Updating the Catalog Explorer .8 Installing the Catalog Explorer...............................................8 Removing the Catalog Explorer ..............................................8 3.2.1 From the Setup Wizard...................................................8 3.2.2 From the Windows Control Panel ..................................9 3.3 Updating the Catalog Explorer to a Newer Version .........9 4. Updating the Catalog Data.............................................10 4.1 To update the Parts Catalog data for a given model.......11 5. Pull-down Menus ............................................................12 5.1 File Menu .........................................................................12 5.2 Help menu........................................................................13 6. Opening Parts Catalog Files...........................................14 6.1 Selecting the .rpcv File ....................................................14 6.2 Selecting the Model Code.................................................14 7. Closing Parts Catalog Files ............................................15 8. Searching for Parts .........................................................16 8.1 Selecting the Machine Unit/Section ................................16 8.2 Selecting the Search Method...........................................16 8.2.1 Specify physical area ....................................................17 8.2.2 Click search...................................................................18 8.2.3 Enter keyword...............................................................19 8.2.4 Select part/keyword ......................................................20
Catalog Explorer User Manual ______________________________________________________________________________
________________________________________________________________________________ Page 4 of 36
8.2.5 Other .............................................................................21 9. Viewing Parts Information .............................................22 9.1 Unit name, part number, part name ...............................22 9.2 Thumbnail images of individual parts ............................22 9.2.1 Part number..................................................................22 9.2.2 Parts modified previously .............................................22 9.2.3 Deleted parts.................................................................23 9.3 Rotating the main image .................................................23 9.4 Enlarging or reducing the main image ...........................23 9.4.1 Enlarge/Reduce .............................................................23 9.4.2 Set as center for zoom...................................................24 9.5 Highlighted display..........................................................25 9.6 Viewing smaller parts contained within a part (assembly) ..26 9.7 The “Favorite Parts” List.................................................27 9.7.1 Adding a part to the Favorite Parts list .......................27 9.7.2 Deleting a part from the Favorite Parts list ................28 9.7.3 Copying the text to the Windows clipboard..................28 9.8 Viewing parts modification information..........................28 9.8.1 Modification number and title......................................28 9.8.2 Modification details ......................................................29 10. Other Functions ..............................................................31 10.1 Internal views of units...................................................31 10.2 Viewing the harness diagram........................................33 10.3 Viewing the harness modification history.....................34 10.3.1 Displaying a tabled overview......................................34 10.3.2 Displaying the modification details............................35 11. System Requirements .....................................................36
Catalog Explorer User Manual ______________________________________________________________________________
________________________________________________________________________________ Page 5 of 36
1. What is the Catalog Explorer? Using actual data from the Parts Catalog, this 3D viewing tool displays images of the units/sections and individual parts used on a particular model. This tool is particularly useful in that it allows the user to search for a specific part used on that model by specifying a unit/section of the machine, and then performing a search to narrow down the results. Search methods include entering a keyword (e.g. part name, part number), selecting a keyword from a pull-down menu (e.g. type of part, physical section of the unit selected), specifying a physical area of the mainframe with the mouse, and other methods.
Catalog Explorer User Manual ______________________________________________________________________________
________________________________________________________________________________ Page 6 of 36
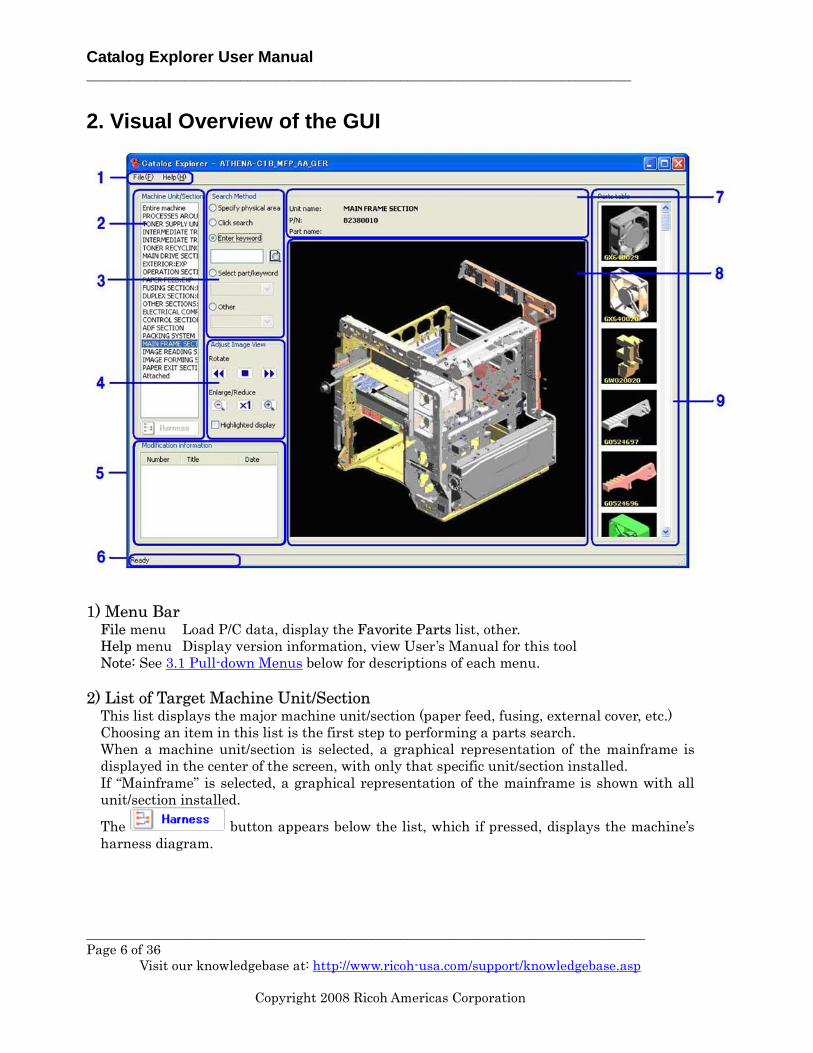
File menu Load P/C data, display the Favorite Parts list, other. Help menu Display version information, view User’s Manual for this tool Note: See 3.1 Pull-down Menus below for descriptions of each menu.
2) List of Target Machine Unit/Section
This list displays the major machine unit/section (paper feed, fusing, external cover, etc.) Choosing an item in this list is the first step to performing a parts search. When a machine unit/section is selected, a graphical representation of the mainframe is displayed in the center of the screen, with only that specific unit/section installed. If “Mainframe” is selected, a graphical representation of the mainframe is shown with all unit/section installed.
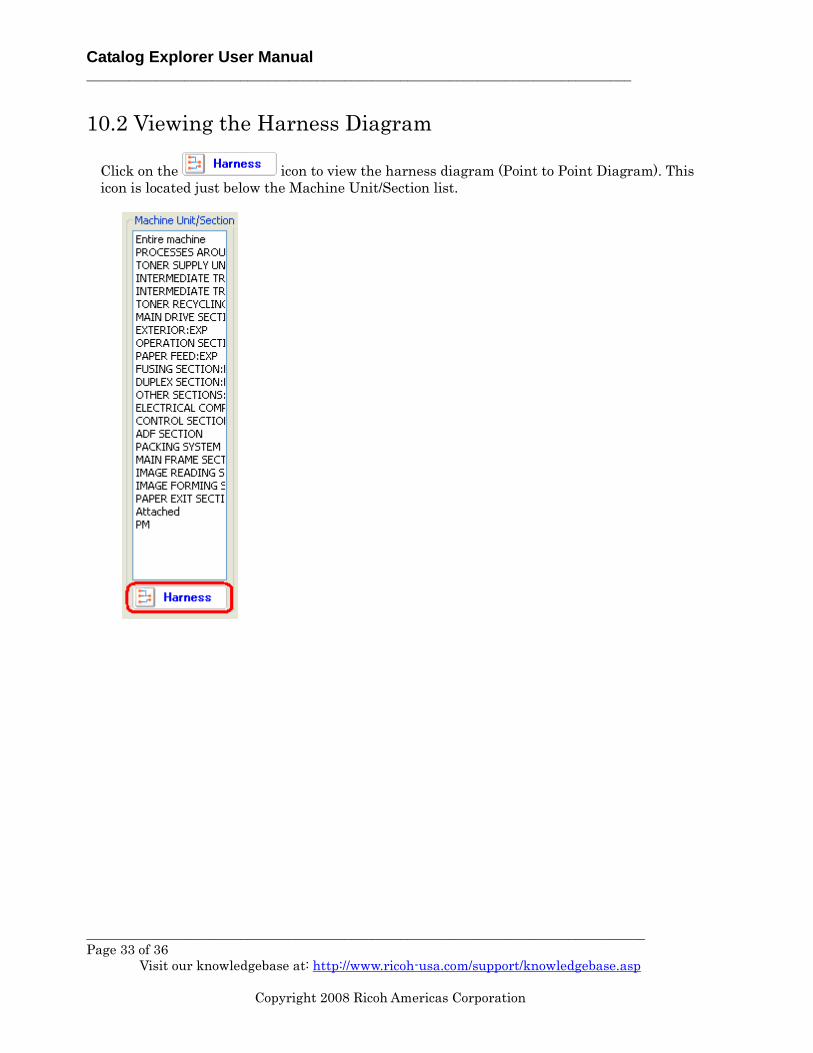
The button appears below the list, which if pressed, displays the machine’s harness diagram.
Catalog Explorer User Manual ______________________________________________________________________________
________________________________________________________________________________ Page 7 of 36
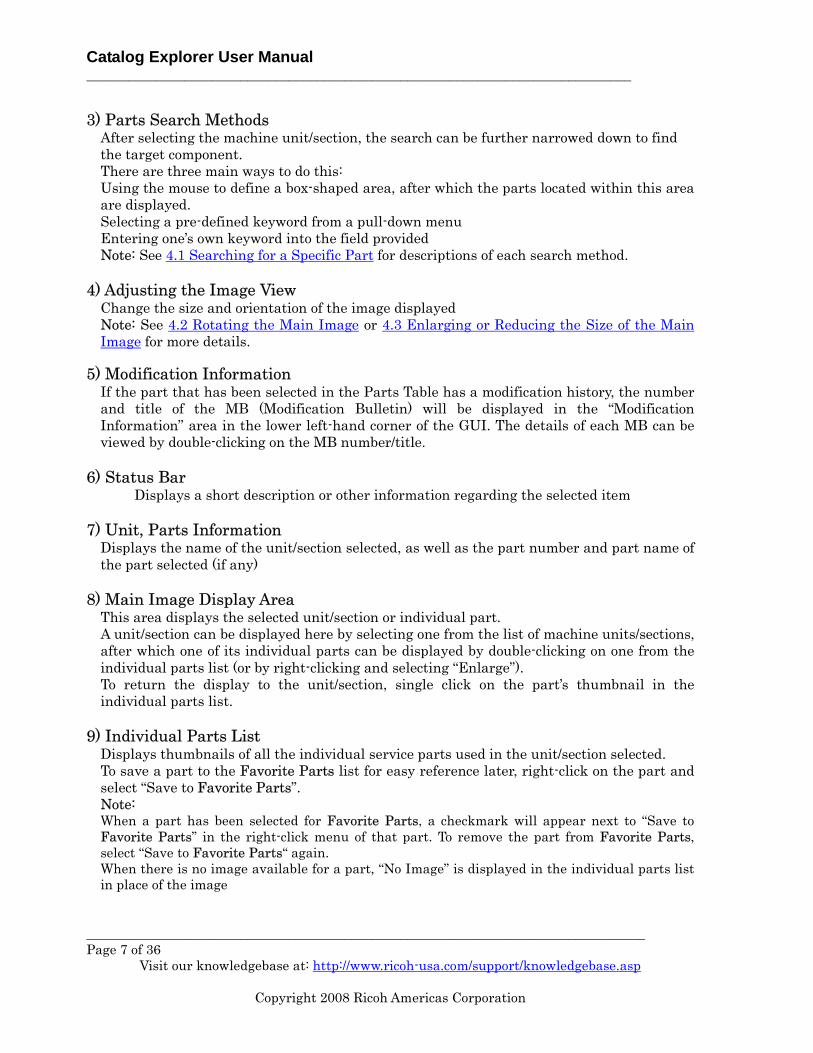
After selecting the machine unit/section, the search can be further narrowed down to find the target component. There are three main ways to do this: Using the mouse to define a box-shaped area, after which the parts located within this area are displayed. Selecting a pre-defined keyword from a pull-down menu Entering one’s own keyword into the field provided Note: See 4.1 Searching for a Specific Part for descriptions of each search method.
4) Adjusting the Image View
Change the size and orientation of the image displayed Note: See 4.2 Rotating the Main Image or 4.3 Enlarging or Reducing the Size of the Main Image for more details.
5) Modification Information
If the part that has been selected in the Parts Table has a modification history, the number and title of the MB (Modification Bulletin) will be displayed in the “Modification Information” area in the lower left-hand corner of the GUI. The details of each MB can be viewed by double-clicking on the MB number/title.
6) Status Bar Displays a short description or other information regarding the selected item 7) Unit, Parts Information
Displays the name of the unit/section selected, as well as the part number and part name of the part selected (if any)
8) Main Image Display Area
This area displays the selected unit/section or individual part. A unit/section can be displayed here by selecting one from the list of machine units/sections, after which one of its individual parts can be displayed by double-clicking on one from the individual parts list (or by right-clicking and selecting “Enlarge”). To return the display to the unit/section, single click on the part’s thumbnail in the individual parts list.
9) Individual Parts List
Displays thumbnails of all the individual service parts used in the unit/section selected. To save a part to the Favorite Parts list for easy reference later, right-click on the part and select “Save to Favorite Parts”. Note: When a part has been selected for Favorite Parts, a checkmark will appear next to “Save to Favorite Parts” in the right-click menu of that part. To remove the part from Favorite Parts, select “Save to Favorite Parts“ again. When there is no image available for a part, “No Image” is displayed in the individual parts list in place of the image
Catalog Explorer User Manual ______________________________________________________________________________
________________________________________________________________________________ Page 8 of 36
3. Installing, Removing and Updating the Catalog Explorer
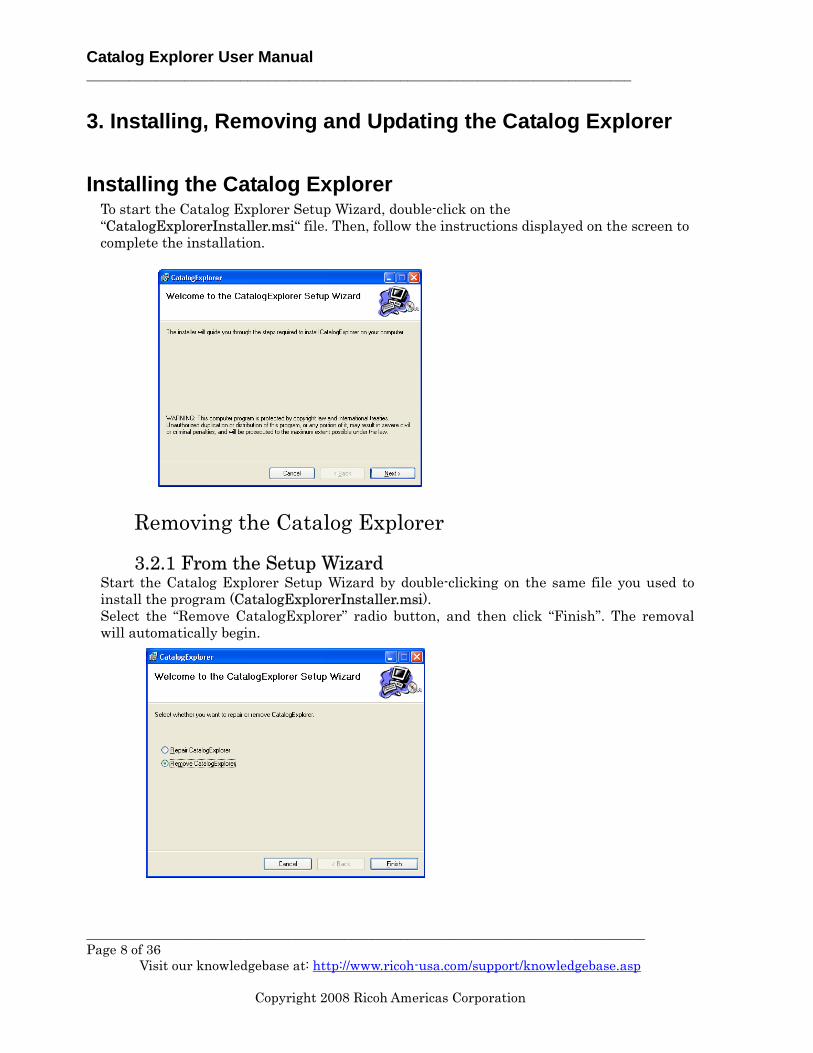
Installing the Catalog Explorer To start the Catalog Explorer Setup Wizard, double-click on the “CatalogExplorerInstaller.msi“ file. Then, follow the instructions displayed on the screen to complete the installation.
Removing the Catalog Explorer
3.2.1 From the Setup Wizard
Start the Catalog Explorer Setup Wizard by double-clicking on the same file you used to install the program (CatalogExplorerInstaller.msi). Select the “Remove CatalogExplorer” radio button, and then click “Finish”. The removal will automatically begin.
Catalog Explorer User Manual ______________________________________________________________________________
________________________________________________________________________________ Page 9 of 36
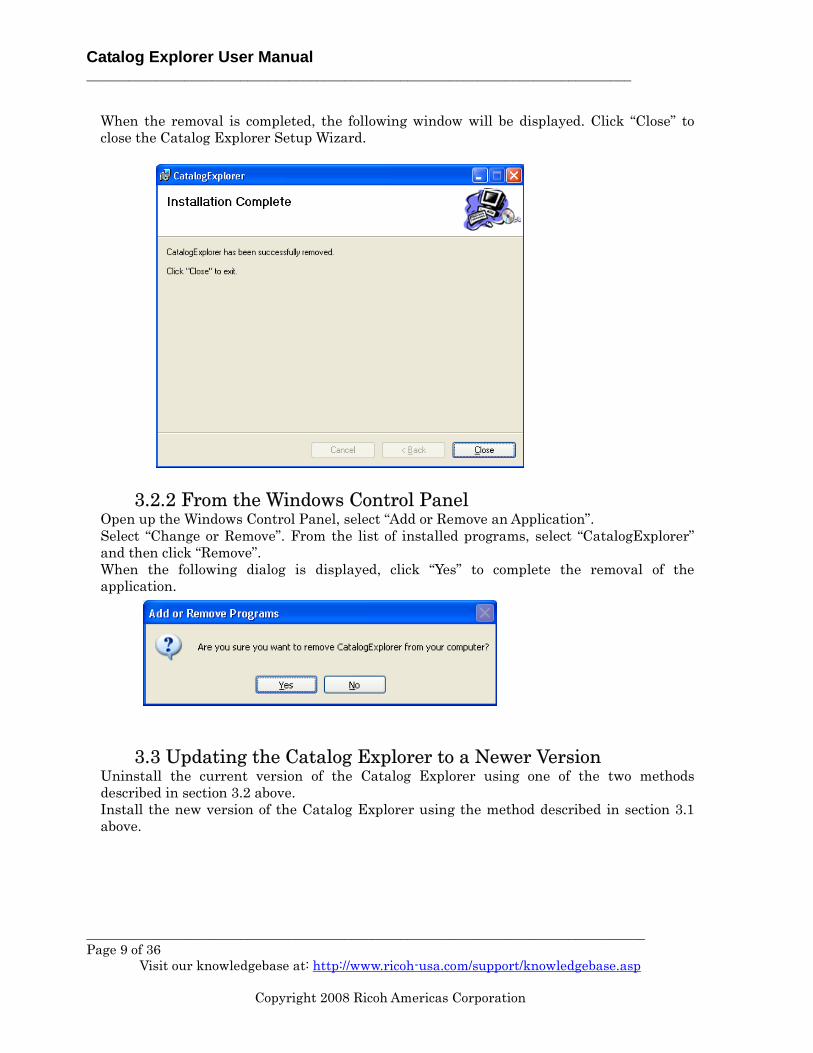
When the removal is completed, the following window will be displayed. Click “Close” to close the Catalog Explorer Setup Wizard.
3.2.2 From the Windows Control Panel
Open up the Windows Control Panel, select “Add or Remove an Application”. Select “Change or Remove”. From the list of installed programs, select “CatalogExplorer” and then click “Remove”. When the following dialog is displayed, click “Yes” to complete the removal of the application.
3.3 Updating the Catalog Explorer to a Newer Version Uninstall the current version of the Catalog Explorer using one of the two methods described in section 3.2 above. Install the new version of the Catalog Explorer using the method described in section 3.1 above.
Catalog Explorer User Manual ______________________________________________________________________________
________________________________________________________________________________ Page 10 of 36
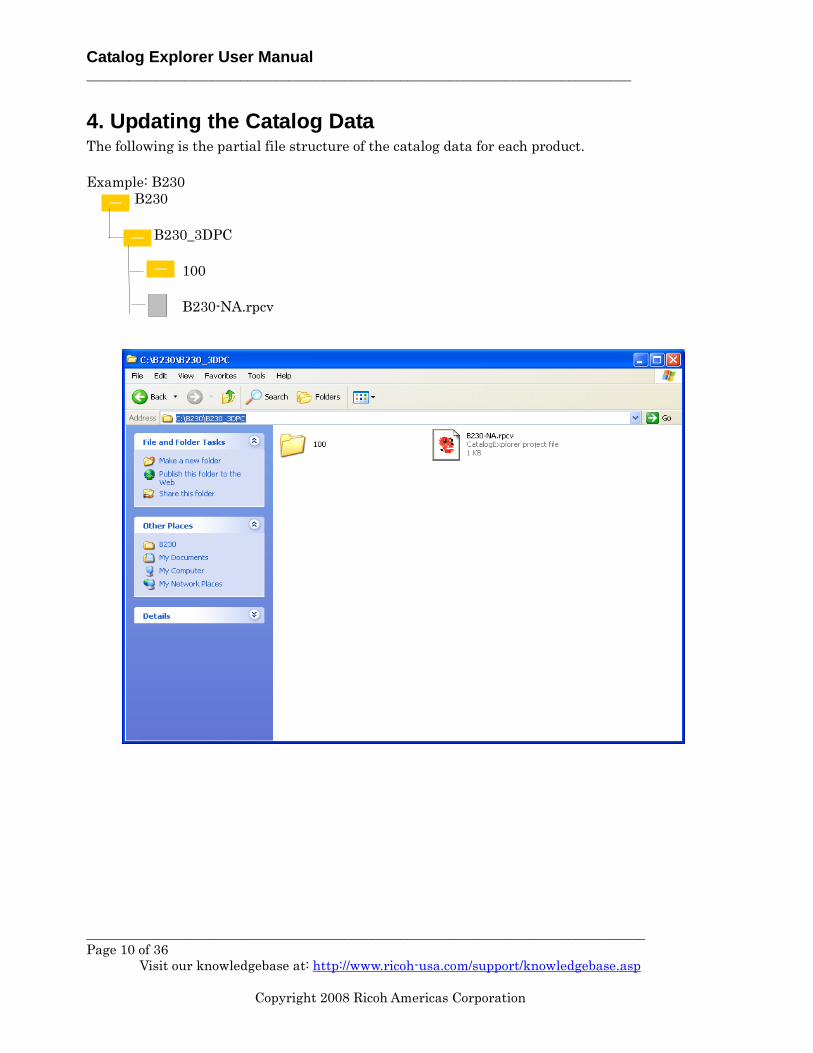
4. Updating the Catalog Data The following is the partial file structure of the catalog data for each product. Example: B230 B230 B230_3DPC 100 B230-NA.rpcv
Catalog Explorer User Manual ______________________________________________________________________________
________________________________________________________________________________ Page 11 of 36
4.1 To Update the Parts Catalog Data for a Given Model There are two types of catalog update files:
1) “Differences”: Contains only the changes made with respect to the previous catalog file (essentially, a “patch” file).
2) “Full”: Contains all changes made since the release of the original catalog file. Therefore, depending on which type of file you wish to use, download the zip file for the model in question. After unzipping the file, replace the “Catalog Data” file on your PC for that model with the one contained in the zip file you downloaded. Note: If you have downloaded the “Full” file, the entire catalog data file will be overwritten.
If you have downloaded the “Differences” file, the new changes will be applied to the existing file in your PC (the unchanged content remains intact).
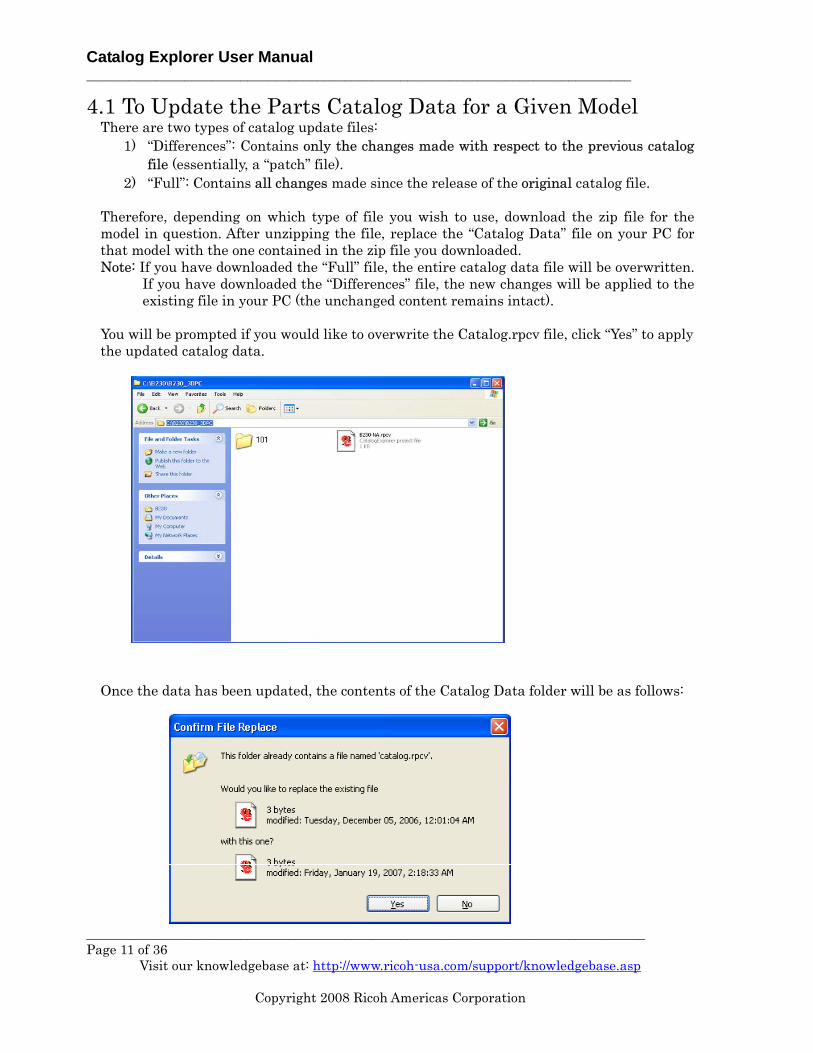
You will be prompted if you would like to overwrite the Catalog.rpcv file, click “Yes” to apply the updated catalog data.
Once the data has been updated, the contents of the Catalog Data folder will be as follows:
Catalog Explorer User Manual ______________________________________________________________________________
________________________________________________________________________________ Page 12 of 36
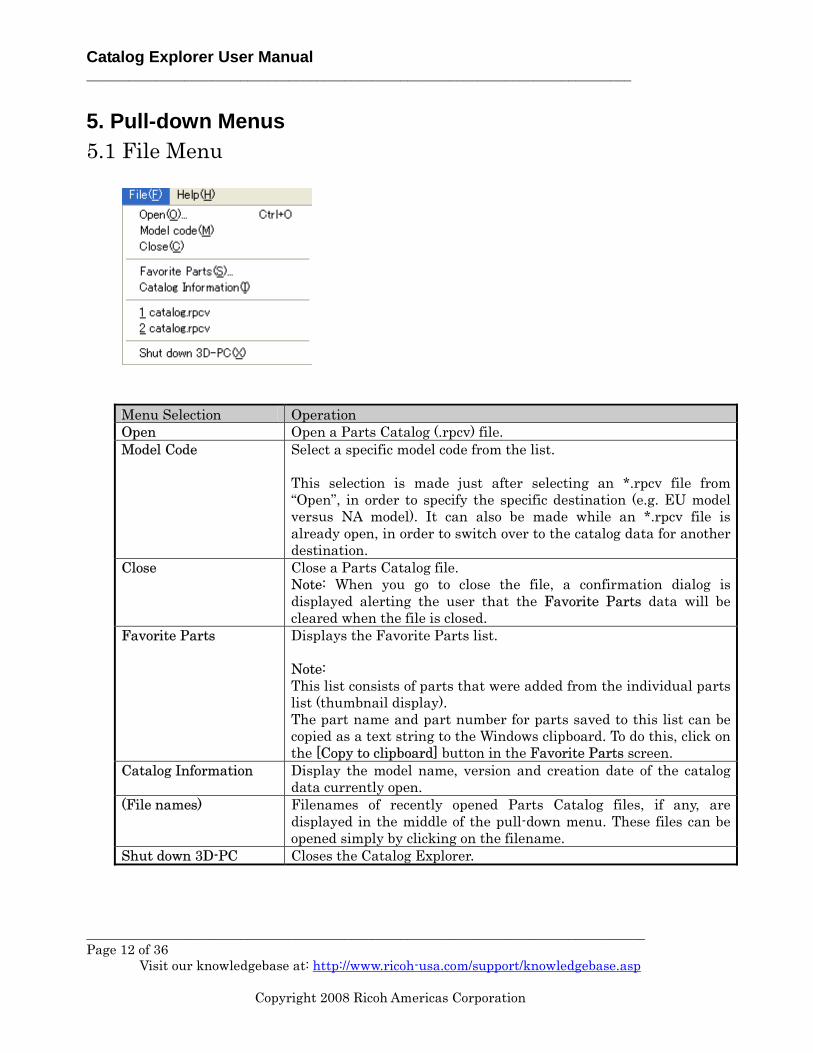
Menu Selection Operation Open Open a Parts Catalog (.rpcv) file. Model Code Select a specific model code from the list.
This selection is made just after selecting an *.rpcv file from “Open”, in order to specify the specific destination (e.g. EU model versus NA model). It can also be made while an *.rpcv file is already open, in order to switch over to the catalog data for another destination.
Close Close a Parts Catalog file. Note: When you go to close the file, a confirmation dialog is displayed alerting the user that the Favorite Parts data will be cleared when the file is closed.
Favorite Parts Displays the Favorite Parts list. Note: This list consists of parts that were added from the individual parts list (thumbnail display). The part name and part number for parts saved to this list can be copied as a text string to the Windows clipboard. To do this, click on the [Copy to clipboard] button in the Favorite Parts screen.
Catalog Information Display the model name, version and creation date of the catalog data currently open.
(File names) Filenames of recently opened Parts Catalog files, if any, are displayed in the middle of the pull-down menu. These files can be opened simply by clicking on the filename.
Shut down 3D-PC Closes the Catalog Explorer.
Catalog Explorer User Manual ______________________________________________________________________________
________________________________________________________________________________ Page 13 of 36
6. Opening Parts Catalog Files 6.1 Selecting the .rpcv File
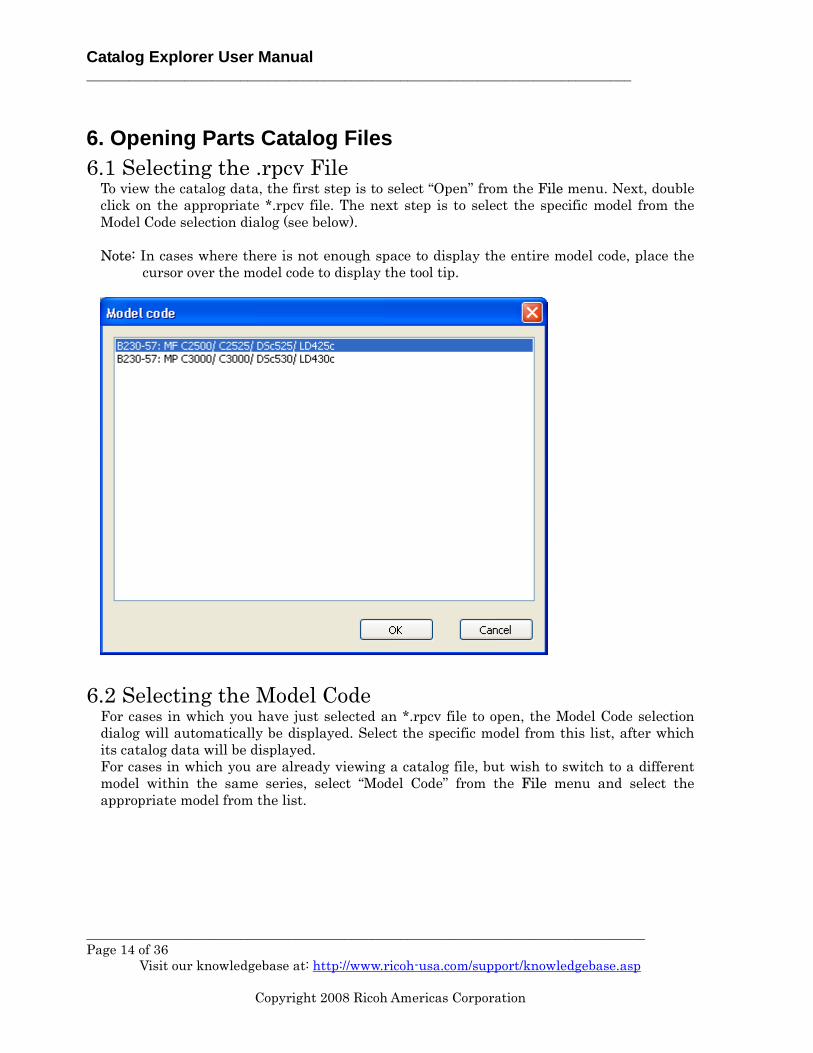
To view the catalog data, the first step is to select “Open” from the File menu. Next, double click on the appropriate *.rpcv file. The next step is to select the specific model from the Model Code selection dialog (see below). Note: In cases where there is not enough space to display the entire model code, place the
cursor over the model code to display the tool tip.
6.2 Selecting the Model Code
For cases in which you have just selected an *.rpcv file to open, the Model Code selection dialog will automatically be displayed. Select the specific model from this list, after which its catalog data will be displayed. For cases in which you are already viewing a catalog file, but wish to switch to a different model within the same series, select “Model Code” from the File menu and select the appropriate model from the list.
Catalog Explorer User Manual ______________________________________________________________________________
________________________________________________________________________________ Page 15 of 36
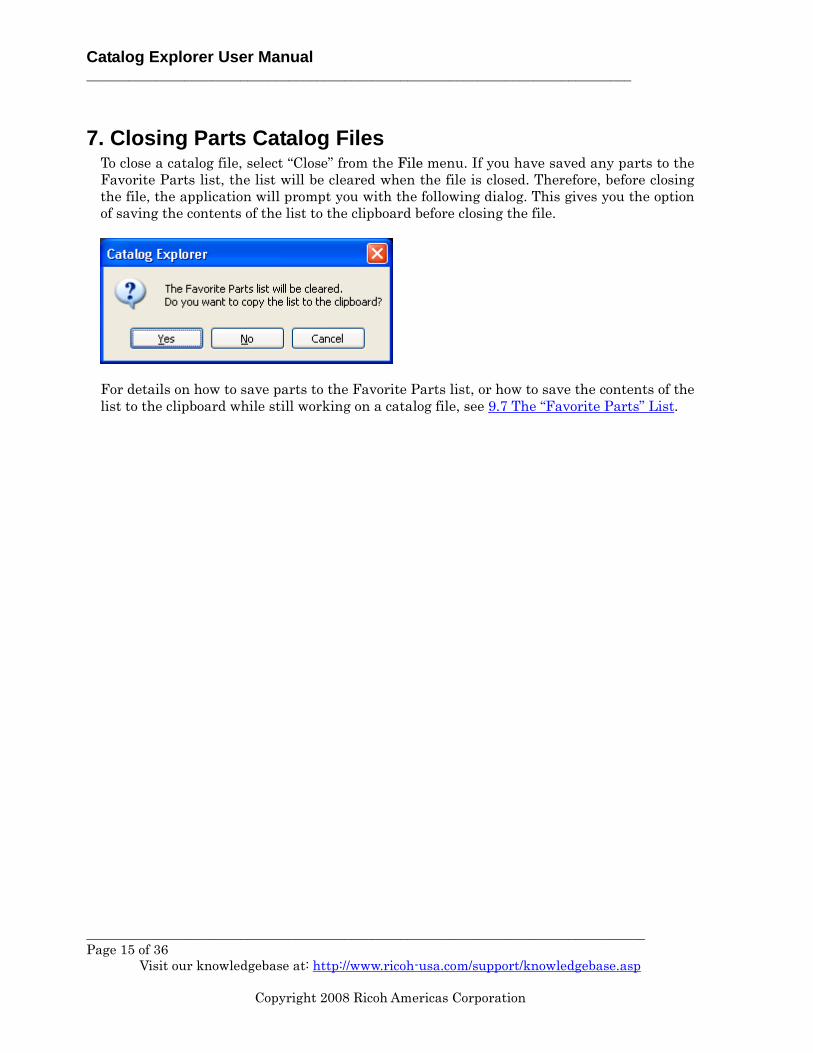
7. Closing Parts Catalog Files To close a catalog file, select “Close” from the File menu. If you have saved any parts to the Favorite Parts list, the list will be cleared when the file is closed. Therefore, before closing the file, the application will prompt you with the following dialog. This gives you the option of saving the contents of the list to the clipboard before closing the file.
For details on how to save parts to the Favorite Parts list, or how to save the contents of the list to the clipboard while still working on a catalog file, see 9.7 The “Favorite Parts” List.
Catalog Explorer User Manual ______________________________________________________________________________
________________________________________________________________________________ Page 16 of 36
8. Searching for Parts 8.1 Selecting the Machine Unit/Section
To search for a specific part, the first step is to specify the machine unit or section in which this part may be located. To do this, click on one of the selections listed in the Machine Unit/Section area, on the far left of the GUI. The specific unit/section is then displayed in the main image area, and all parts contained within that unit/section are displayed as thumbnails in the individual parts list. Note: In cases where there is not enough space to display the entire machine unit/section, place the cursor over the machine unit/section to display the tool tip.
8.2 Selecting the Search Method
With the operation described above, the scope of the search can be narrowed down to the machine unit/section. Use the following search methods to narrow down the results to the specific part you wish to locate.
Catalog Explorer User Manual ______________________________________________________________________________
________________________________________________________________________________ Page 17 of 36
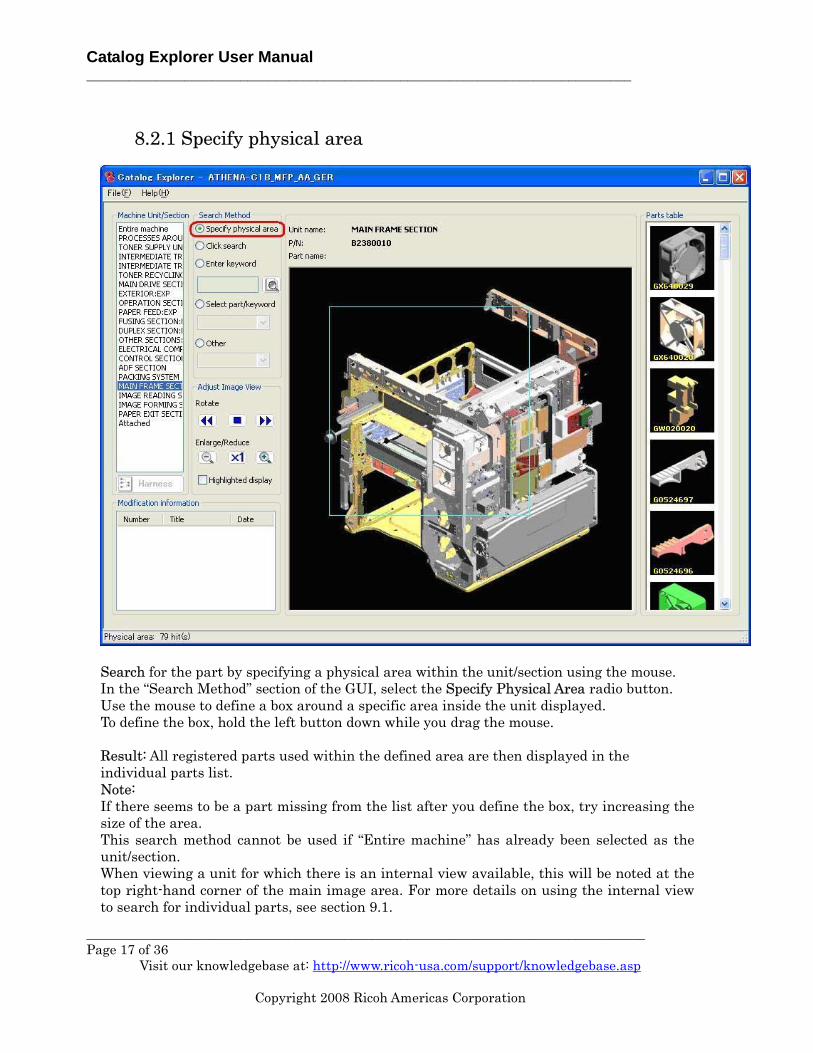
Search for the part by specifying a physical area within the unit/section using the mouse. In the “Search Method” section of the GUI, select the Specify Physical Area radio button. Use the mouse to define a box around a specific area inside the unit displayed. To define the box, hold the left button down while you drag the mouse. Result: All registered parts used within the defined area are then displayed in the individual parts list. Note: If there seems to be a part missing from the list after you define the box, try increasing the size of the area. This search method cannot be used if “Entire machine” has already been selected as the unit/section. When viewing a unit for which there is an internal view available, this will be noted at the top right-hand corner of the main image area. For more details on using the internal view to search for individual parts, see section 9.1.
Catalog Explorer User Manual ______________________________________________________________________________
________________________________________________________________________________ Page 18 of 36
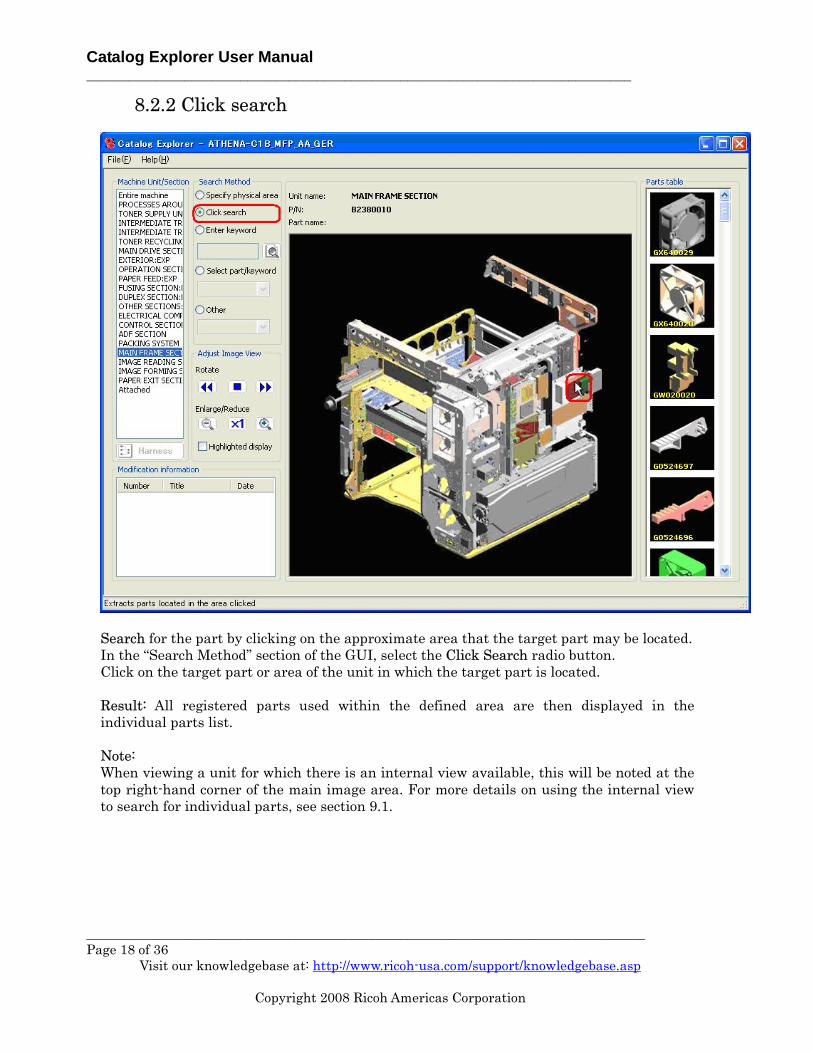
Search for the part by clicking on the approximate area that the target part may be located. In the “Search Method” section of the GUI, select the Click Search radio button. Click on the target part or area of the unit in which the target part is located. Result: All registered parts used within the defined area are then displayed in the individual parts list. Note: When viewing a unit for which there is an internal view available, this will be noted at the top right-hand corner of the main image area. For more details on using the internal view to search for individual parts, see section 9.1.
Catalog Explorer User Manual ______________________________________________________________________________
________________________________________________________________________________ Page 19 of 36
8.2.3 Enter keyword Search for the part by entering a keyword, such as a part name or part number.
Select the Keyword radio button.
Enter your keyword(s) in the field provided, and then click the button. Result: All registered parts whose part names contain these keyword(s) or whose part number matches the one entered are then displayed in the individual parts list.
Catalog Explorer User Manual ______________________________________________________________________________
________________________________________________________________________________ Page 20 of 36
8.2.4 Select Part/Keyword Search for the part by selecting from a list of registered part names.
Select the Select part/keyword radio button. Select a part name from the list. Result: All registered parts with that part name are then displayed in the individual parts list.
Catalog Explorer User Manual ______________________________________________________________________________
________________________________________________________________________________ Page 21 of 36
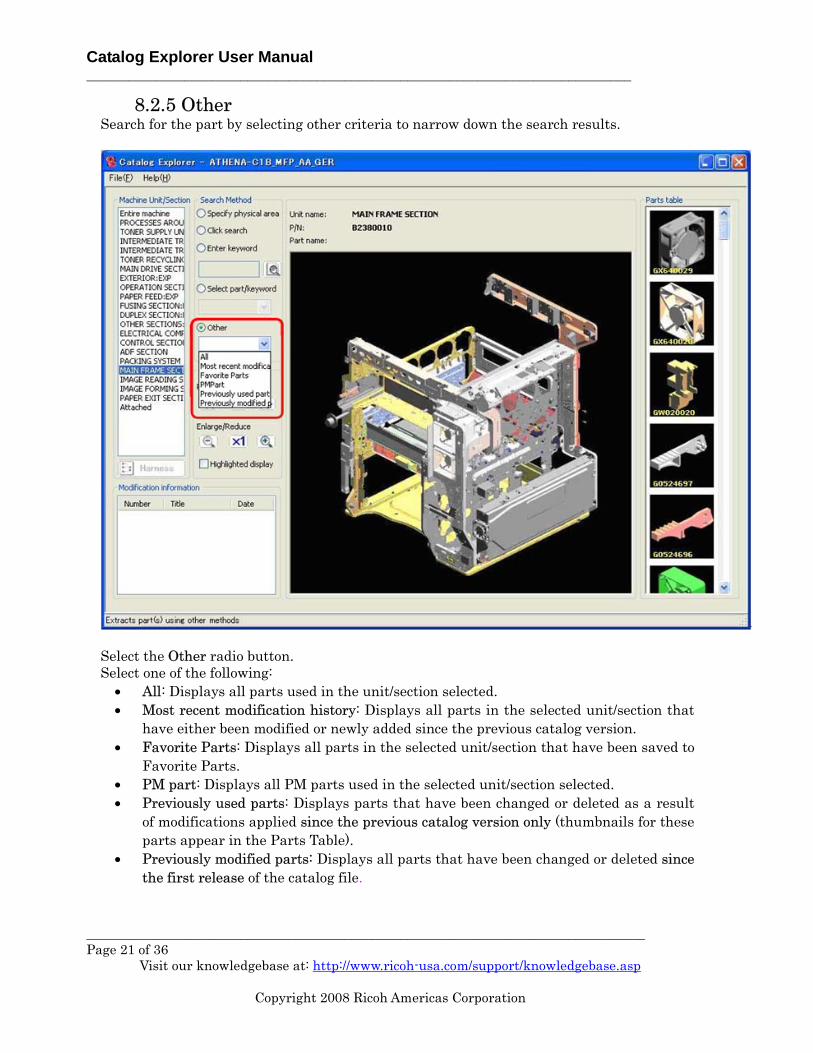
8.2.5 Other Search for the part by selecting other criteria to narrow down the search results.
Select the Other radio button. Select one of the following:
• All: Displays all parts used in the unit/section selected. • Most recent modification history: Displays all parts in the selected unit/section that
have either been modified or newly added since the previous catalog version. • Favorite Parts: Displays all parts in the selected unit/section that have been saved to
Favorite Parts. • PM part: Displays all PM parts used in the selected unit/section selected. • Previously used parts: Displays parts that have been changed or deleted as a result
of modifications applied since the previous catalog version only (thumbnails for these parts appear in the Parts Table).
• Previously modified parts: Displays all parts that have been changed or deleted since the first release of the catalog file.
Catalog Explorer User Manual ______________________________________________________________________________
________________________________________________________________________________ Page 22 of 36
9. Viewing Parts Information 9.1 Unit Name, Part Number, Part Name
The following information about the selected part appears above the main image area: The name of the unit to which the selected part belongs The part number of the selected part The name of the selected part
9.2 Thumbnail Images of Individual Parts
Thumbnail images in the parts table contain the following information: The part number Design changes: A mark indicating that the part has been modified at some point in the past, OR A mark indicating that the part has been modified or newly added since the previous version of the catalog
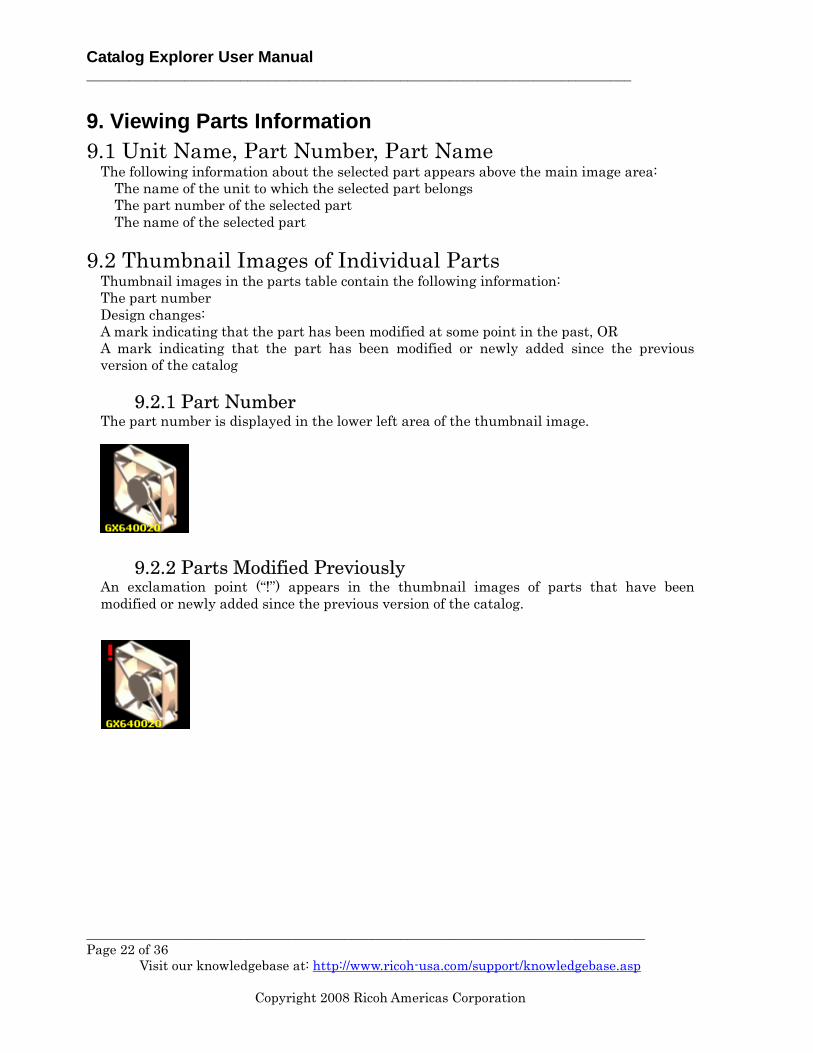
9.2.1 Part Number The part number is displayed in the lower left area of the thumbnail image.
9.2.2 Parts Modified Previously
An exclamation point (“!”) appears in the thumbnail images of parts that have been modified or newly added since the previous version of the catalog.
Catalog Explorer User Manual ______________________________________________________________________________
________________________________________________________________________________ Page 23 of 36
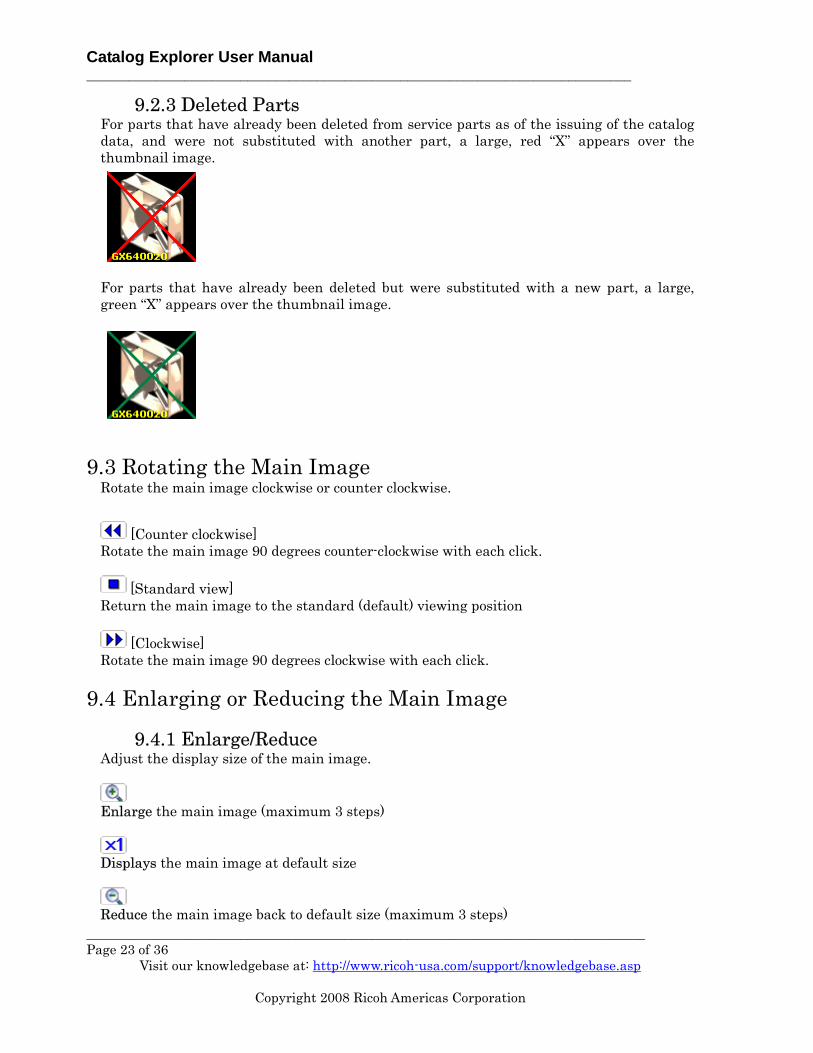
9.2.3 Deleted Parts For parts that have already been deleted from service parts as of the issuing of the catalog data, and were not substituted with another part, a large, red “X” appears over the thumbnail image.
For parts that have already been deleted but were substituted with a new part, a large, green “X” appears over the thumbnail image.
9.3 Rotating the Main Image
Rotate the main image clockwise or counter clockwise.
[Counter clockwise]
Rotate the main image 90 degrees counter-clockwise with each click.
[Standard view] Return the main image to the standard (default) viewing position
[Clockwise] Rotate the main image 90 degrees clockwise with each click.
9.4 Enlarging or Reducing the Main Image
9.4.1 Enlarge/Reduce Adjust the display size of the main image.
Enlarge the main image (maximum 3 steps)
Displays the main image at default size
Reduce the main image back to default size (maximum 3 steps)
Catalog Explorer User Manual ______________________________________________________________________________
________________________________________________________________________________ Page 24 of 36
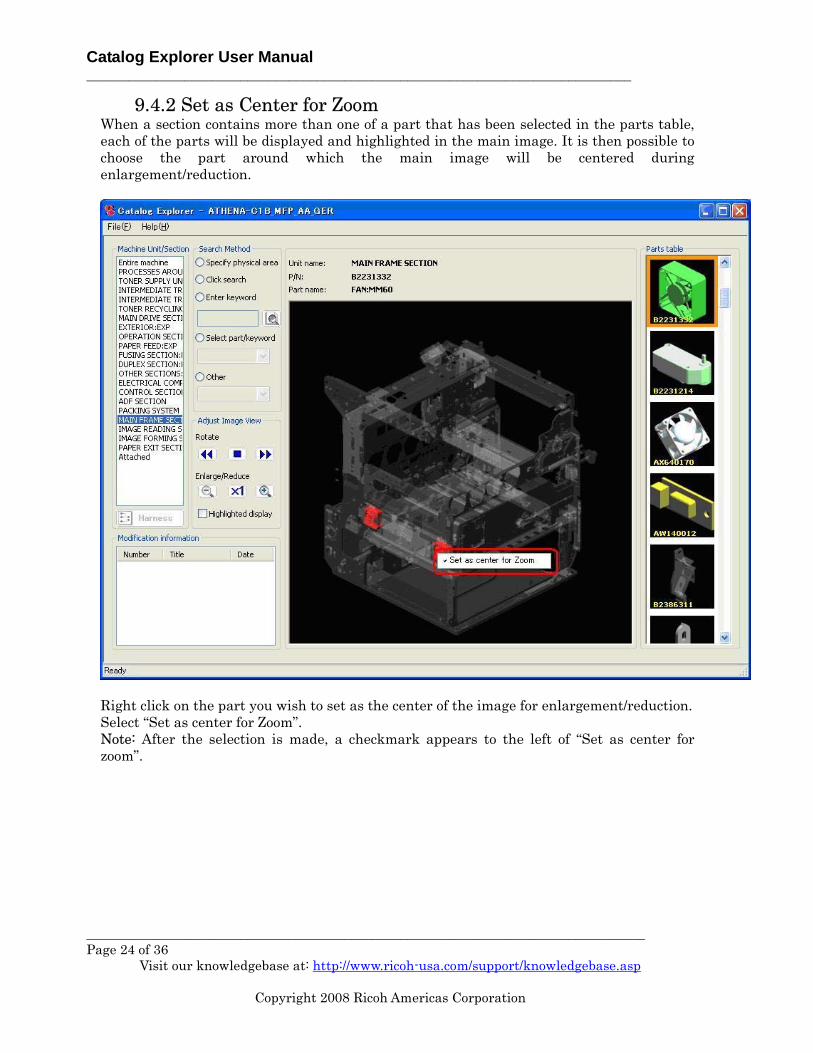
9.4.2 Set as Center for Zoom When a section contains more than one of a part that has been selected in the parts table, each of the parts will be displayed and highlighted in the main image. It is then possible to choose the part around which the main image will be centered during enlargement/reduction.
Right click on the part you wish to set as the center of the image for enlargement/reduction. Select “Set as center for Zoom”. Note: After the selection is made, a checkmark appears to the left of “Set as center for zoom”.
Catalog Explorer User Manual ______________________________________________________________________________
________________________________________________________________________________ Page 25 of 36
This feature is used to make the selected unit more visible in the main image. Select the “Highlighted display” checkbox. Select a part from the parts table. The part will then be circled in yellow in the main image. Note: - When this checkbox is “unchecked”, the image returns to the normal view. - “Highlighted display“ cannot be used for old parts that have either been replaced or
deleted as a result of a parts modification (i.e. those marked by a green or red “X”).
Catalog Explorer User Manual ______________________________________________________________________________
________________________________________________________________________________ Page 26 of 36
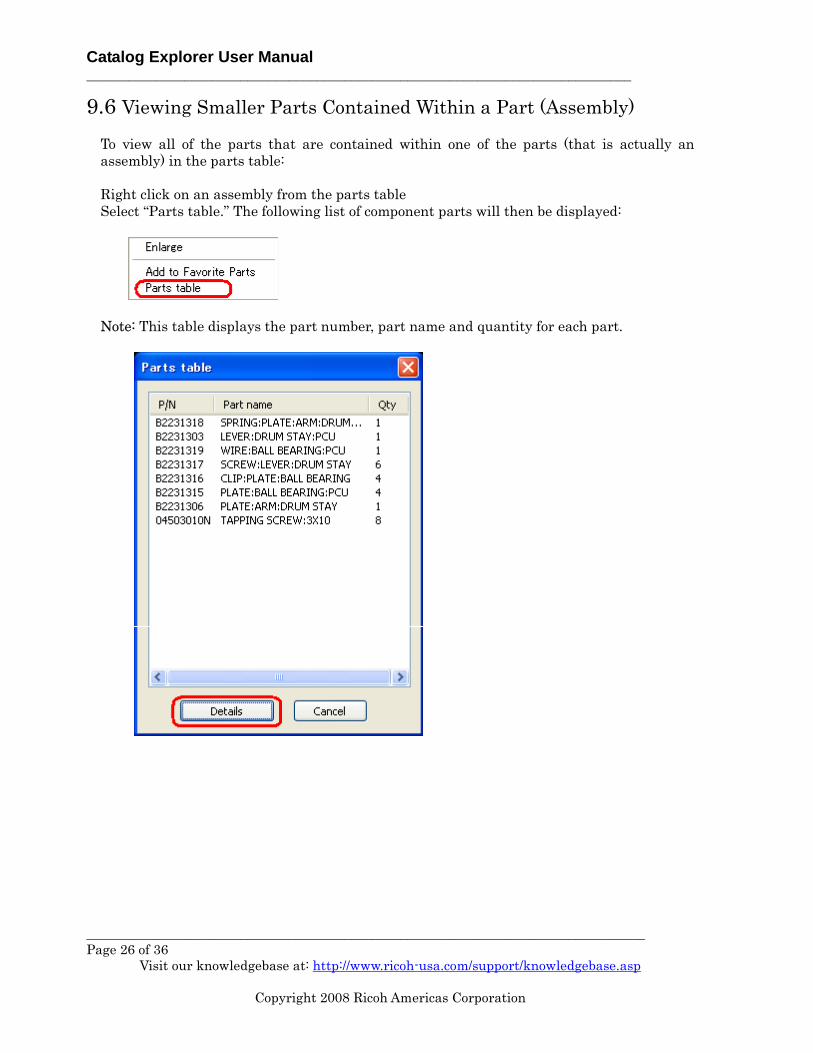
9.6 Viewing Smaller Parts Contained Within a Part (Assembly)
To view all of the parts that are contained within one of the parts (that is actually an assembly) in the parts table: Right click on an assembly from the parts table Select “Parts table.” The following list of component parts will then be displayed:
Note: This table displays the part number, part name and quantity for each part.
Catalog Explorer User Manual ______________________________________________________________________________
________________________________________________________________________________ Page 27 of 36
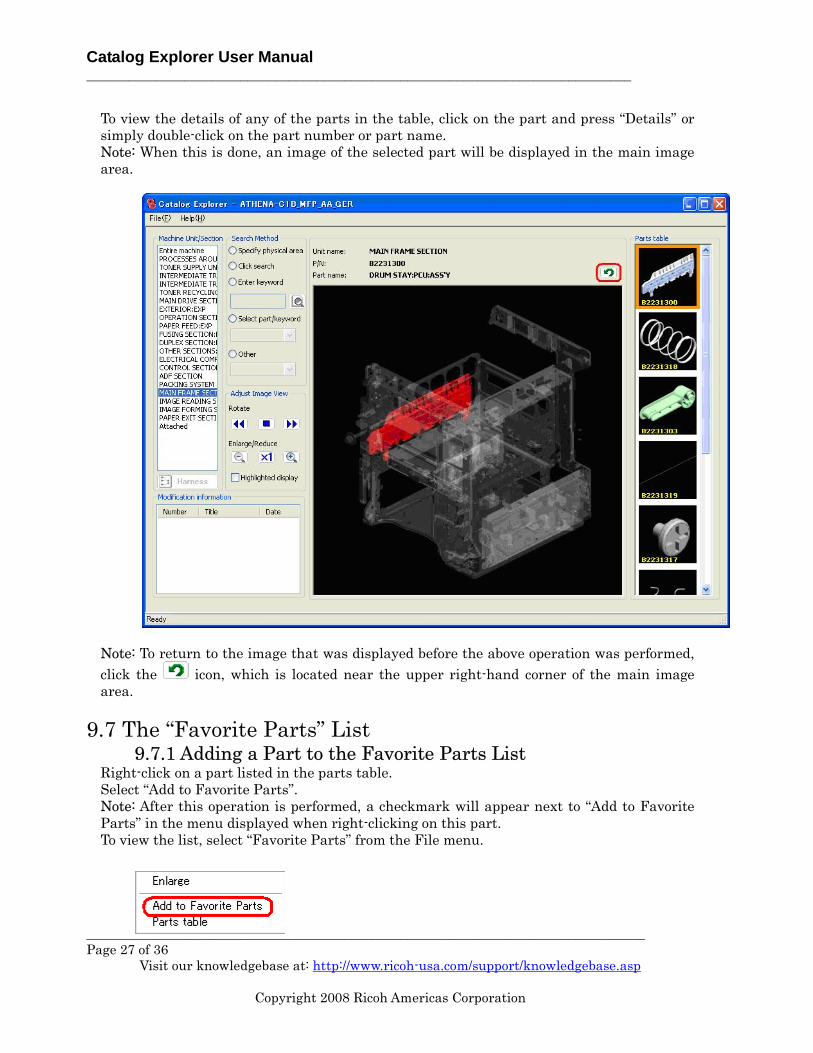
To view the details of any of the parts in the table, click on the part and press “Details” or simply double-click on the part number or part name. Note: When this is done, an image of the selected part will be displayed in the main image area.
Note: To return to the image that was displayed before the above operation was performed, click the icon, which is located near the upper right-hand corner of the main image area.
9.7 The “Favorite Parts” List
9.7.1 Adding a Part to the Favorite Parts List Right-click on a part listed in the parts table. Select “Add to Favorite Parts”. Note: After this operation is performed, a checkmark will appear next to “Add to Favorite Parts” in the menu displayed when right-clicking on this part. To view the list, select “Favorite Parts” from the File menu.
Catalog Explorer User Manual ______________________________________________________________________________
________________________________________________________________________________ Page 28 of 36
9.7.2 Deleting a Part from the Favorite Parts List Right click on a part listed in the parts table that has already been added to the Favorite Parts list. Select “Add to Favorite Parts” again, as described above. This will remove the checkmark and also remove the part from the list.
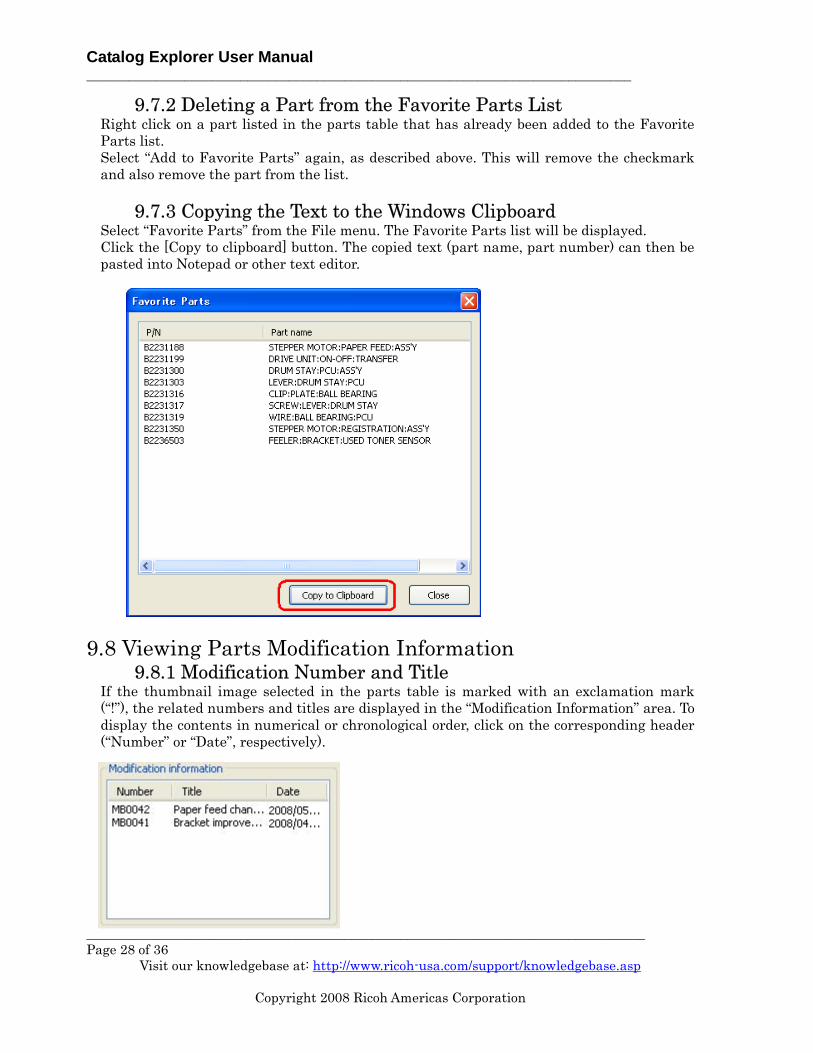
9.7.3 Copying the Text to the Windows Clipboard Select “Favorite Parts” from the File menu. The Favorite Parts list will be displayed. Click the [Copy to clipboard] button. The copied text (part name, part number) can then be pasted into Notepad or other text editor.
9.8 Viewing Parts Modification Information
9.8.1 Modification Number and Title If the thumbnail image selected in the parts table is marked with an exclamation mark (“!”), the related numbers and titles are displayed in the “Modification Information” area. To display the contents in numerical or chronological order, click on the corresponding header (“Number” or “Date”, respectively).
Catalog Explorer User Manual ______________________________________________________________________________
________________________________________________________________________________ Page 29 of 36
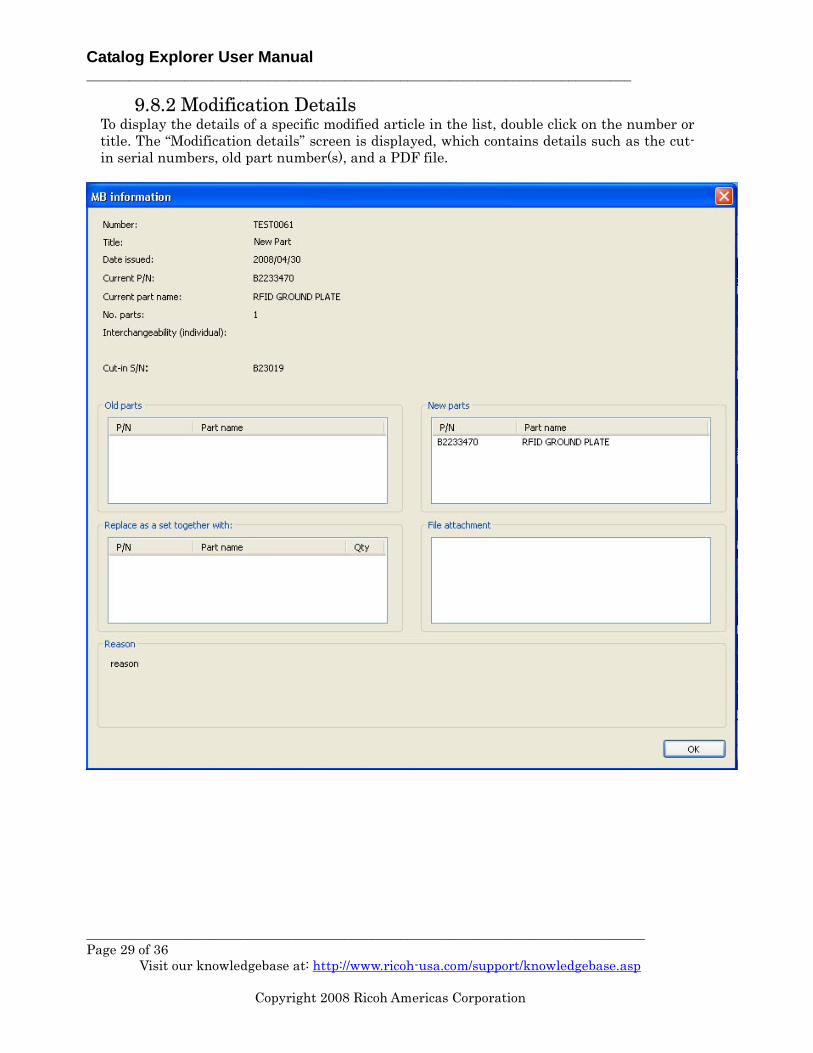
9.8.2 Modification Details To display the details of a specific modified article in the list, double click on the number or title. The “Modification details” screen is displayed, which contains details such as the cut-in serial numbers, old part number(s), and a PDF file.
Catalog Explorer User Manual ______________________________________________________________________________
________________________________________________________________________________ Page 30 of 36
Viewing old parts information Double click on the part whose information you wish to view. Note: The thumbnail for the old part is then displayed in the parts table, and the main image area shows the location of the old part. Viewing new parts information If the catalog file being viewed contains new parts modification information, the information for the desired part can be viewed by double-clicking on that part (listed under “New parts”). The thumbnails for these part(s) are then displayed in the Parts Table, and can be viewed in the Main Image Area by double-clicking on them. To return the main image area and parts table to the previous view, click the icon located near the top right-hand corner of the main image area.
Viewing the contents of the PDF file When available, more details on the modification are included in the form of a PDF file, listed in the “File Attachment” area on the bottom right-hand corner of the “Modification details” screen. Double click on the filename to view the contents of the file.
Catalog Explorer User Manual ______________________________________________________________________________
________________________________________________________________________________ Page 31 of 36
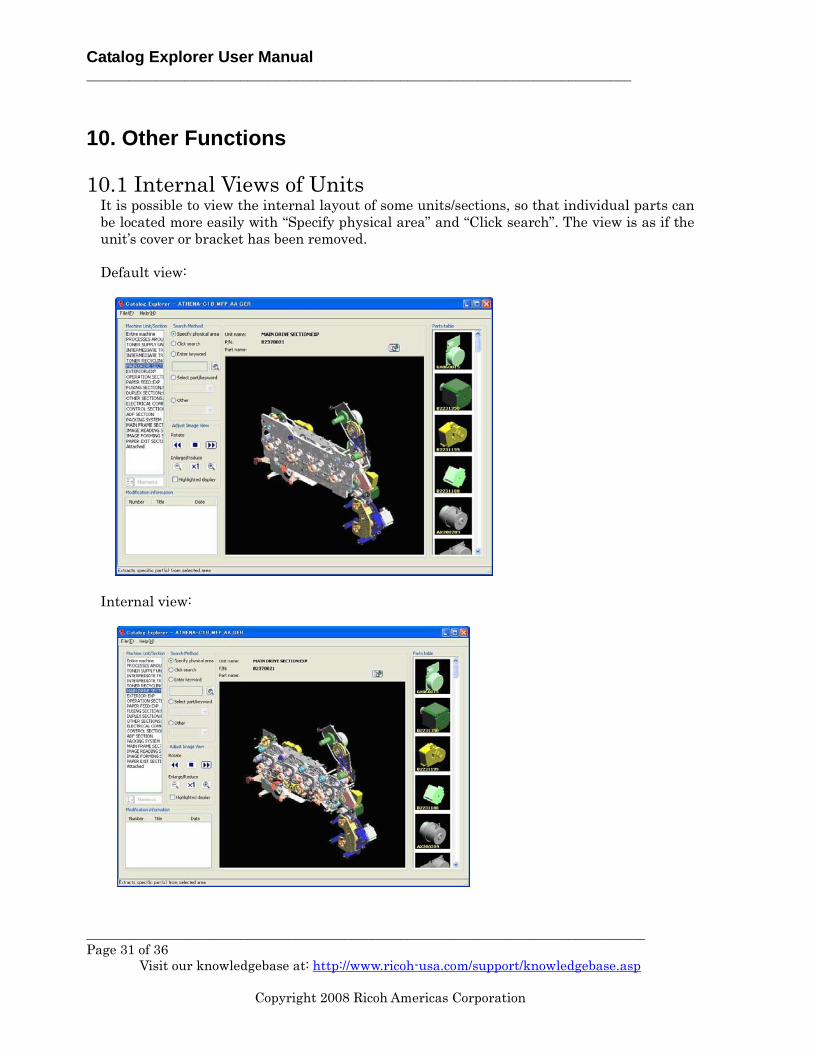
It is possible to view the internal layout of some units/sections, so that individual parts can be located more easily with “Specify physical area” and “Click search”. The view is as if the unit’s cover or bracket has been removed. Default view:
Internal view:
Catalog Explorer User Manual ______________________________________________________________________________
________________________________________________________________________________ Page 32 of 36
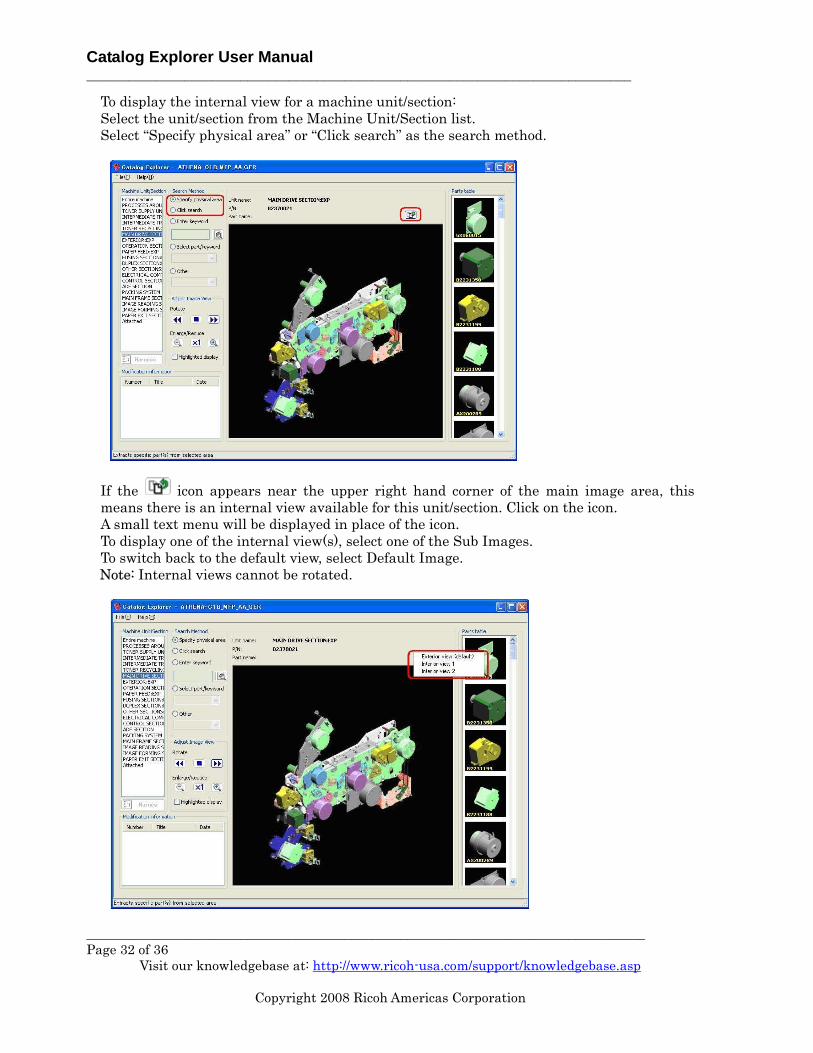
To display the internal view for a machine unit/section: Select the unit/section from the Machine Unit/Section list. Select “Specify physical area” or “Click search” as the search method.
If the icon appears near the upper right hand corner of the main image area, this means there is an internal view available for this unit/section. Click on the icon. A small text menu will be displayed in place of the icon. To display one of the internal view(s), select one of the Sub Images. To switch back to the default view, select Default Image. Note: Internal views cannot be rotated.
Catalog Explorer User Manual ______________________________________________________________________________
________________________________________________________________________________ Page 33 of 36
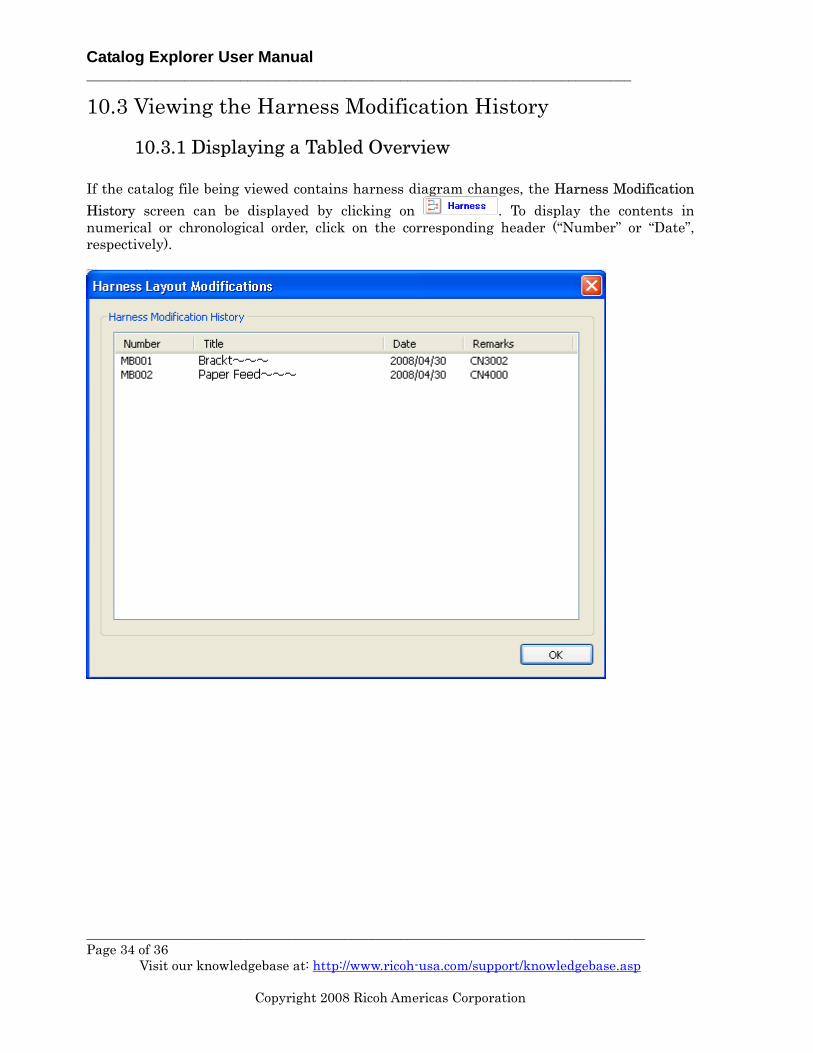
If the catalog file being viewed contains harness diagram changes, the Harness Modification History screen can be displayed by clicking on . To display the contents in numerical or chronological order, click on the corresponding header (“Number” or “Date”, respectively).
Catalog Explorer User Manual ______________________________________________________________________________
________________________________________________________________________________ Page 35 of 36
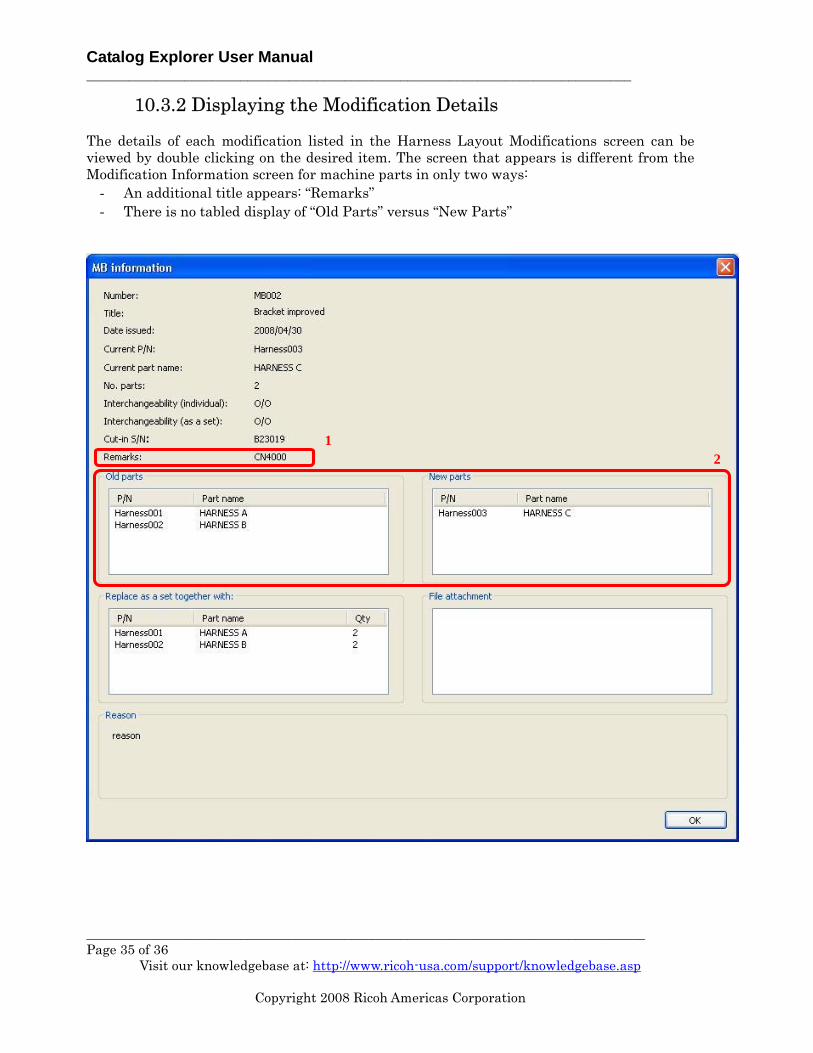
10.3.2 Displaying the Modification Details The details of each modification listed in the Harness Layout Modifications screen can be viewed by double clicking on the desired item. The screen that appears is different from the Modification Information screen for machine parts in only two ways:
- An additional title appears: “Remarks” - There is no tabled display of “Old Parts” versus “New Parts”
1 2
Catalog Explorer User Manual ______________________________________________________________________________
________________________________________________________________________________ Page 36 of 36
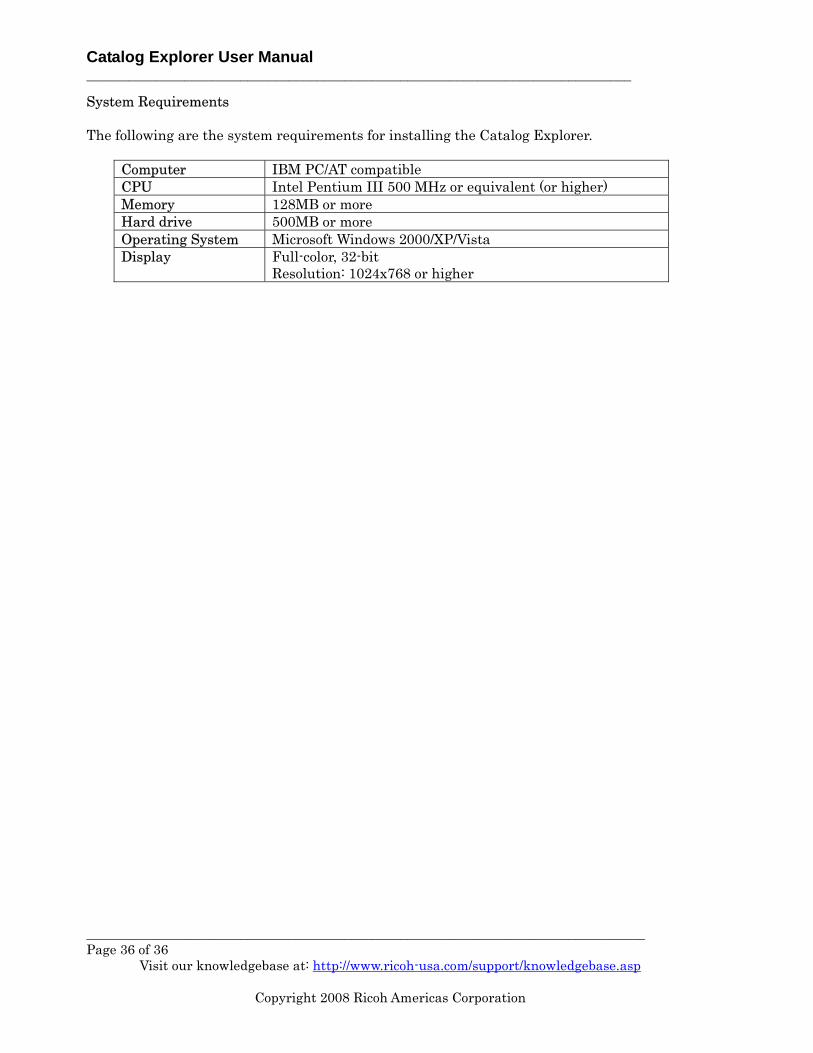
System Requirements The following are the system requirements for installing the Catalog Explorer.
Computer IBM PC/AT compatible CPU Intel Pentium III 500 MHz or equivalent (or higher) Memory 128MB or more Hard drive 500MB or more Operating System Microsoft Windows 2000/XP/Vista Display Full-color, 32-bit