CDR search CAR provides reporting capabilities for three levels of users: administrators, managers, and individual users. Only CAR administrators can use CDR Search. • CDR search, page 1 • Generate CDR search by user, page 3 • Generate CDR search by gateway, page 4 • Generate CDR search by cause for call termination, page 5 • View call termination details, page 11 • Generate CDR search by call precedence, page 12 • Generate CDR search for malicious calls, page 13 • Generate CDR search for call types, page 15 • Related topics, page 16 • Additional documentation, page 16 CDR search In all CDR Search reports, the system only displays the oldest 100 records that fall into the time and date range that you configure. The CDR Search reports generate only in HTML format. You can configure CDR searches to verify the details of a call. The search forms groups of all the related legs of a call, which can be useful if the call involves a conference or transfer. This method helps you track the progress and quality of each part of an entire call. This section describes the following features: • CDR Search by User/Phone Number/SIP URL - Available for CAR administrators. You can search CDRs by user or directory number (calling, original called, final called, or bridge number) to analyze call details for the first 100 records that satisfy the search criteria. You can search for calls by using specific numbers for the period that you specify, which helps you trace calls that are placed from or to any specific numbers for diagnostic or informational purposes. All associated records, such as transfer and conference calls, appear together as a logical group. If you do not specify the phone number or SIP URL, the system returns the first 100 CDR records that match the date range that you specify. Cisco Unified CDR Analysis and Reporting Administration Guide, Release 9.1(1) OL-28261-01 1
Transcript
CDR search
CAR provides reporting capabilities for three levels of users: administrators, managers, and individual users.Only CAR administrators can use CDR Search.
• CDR search, page 1
• Generate CDR search by user, page 3
• Generate CDR search by gateway, page 4
• Generate CDR search by cause for call termination, page 5
• View call termination details, page 11
• Generate CDR search by call precedence, page 12
• Generate CDR search for malicious calls, page 13
• Generate CDR search for call types, page 15
• Related topics, page 16
• Additional documentation, page 16
CDR searchIn all CDR Search reports, the system only displays the oldest 100 records that fall into the time and daterange that you configure. The CDR Search reports generate only in HTML format.
You can configure CDR searches to verify the details of a call. The search forms groups of all the related legsof a call, which can be useful if the call involves a conference or transfer. This method helps you track theprogress and quality of each part of an entire call.
This section describes the following features:
• CDR Search by User/Phone Number/SIP URL - Available for CAR administrators. You can searchCDRs by user or directory number (calling, original called, final called, or bridge number) to analyzecall details for the first 100 records that satisfy the search criteria. You can search for calls by usingspecific numbers for the period that you specify, which helps you trace calls that are placed from or toany specific numbers for diagnostic or informational purposes. All associated records, such as transferand conference calls, appear together as a logical group. If you do not specify the phone number or SIPURL, the system returns the first 100 CDR records that match the date range that you specify.
• CDR Search by Gateway - Available for CAR administrators. You can search CDRs by gateways toanalyze the call details of calls that are using specific gateways. This method helps you trace issues oncalls through specific gateways.
• CDR Search by Cause for Call Termination - Available for CAR administrators. You can search CDRsby cause for call termination to get information about the cause for the termination of a call. You canchoose from a list of causes for call termination and can generate the report for a particular date range.The generated report contains the report criteria, along with the total number of calls that were placedin the given time. In addition, a table displays with the fields Call Termination Cause Value anddescription, the total number of calls, and the percentage of calls for each Call Termination Cause, andan option to choose the CDRs.
• CDR Search by Call Precedence Level - Available for CAR administrators. You can search CDRs bycall precedence level. The report that generates allows you to view the CDRs on the basis of precedence.You can choose the precedence level and date range for which to generate a report. The report displaysthe number of calls and the percentage of these calls for each precedence level that you choose. Reportcriteria display the precedence levels and date range for which the report generated information in theCall Precedence Details window. You can view the media information and the CDR-CMR dump fromthe CDR Search by Precedence Levels Result window. The media information and CDR-CMR dumpinformation display in separate windows.
• CDR Search for Malicious Calls - Available for CAR administrators. You can search CDRs to getinformation about malicious calls. You can choose phone number or SIP URL and the date range forwhich to generate a report. The report displays the CDRs for all the malicious calls for a chosen phonenumber or SIP URL and date range. Report criteria display the phone number or SIP URL and the daterange for which the report generated information. You can view the media information and CDR-CMRdump from the CDR-CMR search results window. The media information and CDR-CMR dumpinformation display in separate windows.
• Export CDR/CMR - Available for CAR administrators. With this feature, you can export CDR/CMRdump information, for a given date range in the CSV format, to a location that you choose on yourcomputer. You can also view the file size of the dump information and delete CDR/CMR files.
Before You Begin
Make sure that you set the Cisco Unified Communications Manager service parameters CDR Enabled Flagand Call Diagnostics Enabled to True (enabled), so the system can generate CDR/CMR data. By default, thesystem disables these service parameters. For more information about these service parameters, see the CDRservice parameters.
All CAR reports use CDR data. Be sure to have the most current CDR data from which to build your reports.By default, CDR data loads continuously 24 hours a day, 7 days a week. However, you can set the loadingtime, interval, and duration as needed. See CAR system scheduler for more information.
After you log in to the CAR main window, the following warning may display if Cisco UnifiedCommunications Manager is also activated: “Warning: In some servers in this cluster the CDR EnabledFlag is false and so CDR entries may not be generated for all the calls made in this cluster.”Some clustershave multiple nodes where some of the nodes do not run Cisco Unified CommunicationsManager services.This warning checks all nodes in the cluster regardless of Cisco Unified CommunicationsManager serviceactivation status. Ignore the warning after manually checking the CDR Enabled Flag parameter settingsfor all the Cisco Unified Communications Manager service subscribers. If you have a Cisco UnifiedCommunications Manager Business Edition 5000 installation, ignore this warning message.
Note
Generate CDR search by userOnly CAR administrators use the CDR Search by User/Phone Number/SIP URL feature.
This section describes how to show the details of CDR data based on a user or phone number or SIP URLfeature. You can search CDR data by user or directory number (calling, original called, or final called) toanalyze call details for the oldest 100 records that satisfy the search criteria. If more than 100 records arereturned, the system truncates the results. You can search for calls by using specific numbers for the periodthat you specify, which helps you trace calls that are placed from or to any specific numbers for diagnosticor informational purposes. All associated records, such as transfer, mobility, silent monitoring and recording,and conference calls, appear together as a logical group.
You can enter a wildcard pattern like “!” or “X” to search on phone number or SIP URL. The “!”represents any n digit that has 0-9 as each of its digits, and the “X” represents a single digit in therange 0-9.
Note
Step 2 Perform one of the following tasks:a) To search CDRs based on Internal Phone Number/SIP URLs, enter the value in the Phone Number/SIP
URL field and click the Add Phone Number/SIP URL button.b) To search CDRs based on user, click the Search Internal Phone Number/SIP URL based User link,
enter the first few letters of the first and/or last name in the First Name and/or Last Name fields, and clickthe Search button. When the results display, click the Select link next to the result that you want to include.Click the Close button.The phone number or SIP URL displays in the Phone Number/SIP URL(s) box.
To delete an item from the Report Criteria box, click the Remove Phone Number/SIP URL(s)button. You can delete all items from the Report Criteria box by clicking the Remove All PhoneNumber/SIP URL(s) button.
Note
Step 3 Choose the date and time range of the period for which you want to see CDR data for the specified user orphone number or SIP URL. Current time displays in both Coordinated Universal Time (UTC) and local timeand uses the following rules:a) The UTC and local time comprises a numeric string of mmddyyyy hhmmss, as in January 15, 2007
b) The default FromDate and ToDate values display in UTC time.c) The default ToDate specifies the current time of the server in UTC time.d) The default FromDate value specifies the ToDate value minus 1 hour. For example, if ToDate = January
15, 2007 12:00:00, the FromDate default value = January 15, 2007 11:00:00 (all times in UTC).
Step 4 Choose whether to run the CDR Search report with grouping or without grouping. If you choose with grouping,check the check box besideWith Grouping. The default value specifies Without Grouping.
With Grouping choice means that the system returns CDR records that match the date and time rangefor the search, and groups them with their associated records. Without Grouping returns all the CDRrecords that match the date and time range without grouping together all the associated records foreach call.
Note
Step 5 Click the OK button.The CDR-CMR Search Results window displays. The system only displays the oldest 100 records that fallinto the date range that you configured in Step 3, on page 3.
Step 6 To view the CMR data, click the Others button. To view both the CDR and CMR data fields, click the Viewbutton.
Step 7 To mail the report to e-mail recipient(s), follow the steps in the Mail reports.
Related Topics
Related topics, on page 16
Generate CDR search by gatewayOnly CAR administrators use the CDR Search by Gateway feature.
This section describes how to search CDR data based on a specific gateway type or on those gateways thatuse a chosen route pattern.
Procedure
Step 1 Choose CDR > Search > By Gateway.The CDR Search by Gateway window displays.
Step 2 Perform one of the following tasks:a) To display all the gateways that are configured in the system, clickGateway Types in the Gateway Types
and Route Patterns pane.b) To expand the tree structure and display the type of gateway from which you can choose, click the icon
next to Gateway types.c) To choose a gateway that uses a particular route pattern/hunt pilot, rather than a gateway type, clickRoute
Patterns/Hunt Pilots in the Gateway Types and Route Patterns pane. The gateways that are associatedto the configured Route Patterns/Hunt Pilots display.
d) To expand the tree structure and display route pattern/hunt pilot for you to choose, click the icon next toRoute Patterns/Hunt Pilots.
You can also search for specific route patterns/hunt lists by entering part of the name of the routepattern(s)/hunt pilot(s) in the Route Patterns/Hunt Pilots box in the column on the left side of thewindow. CAR searches for the route pattern(s)/hunt list(s) that matches the search string.
Step 3 Choose a gateway type from the list.The gateway name displays in the List of Gateways box.
The List of Gateways box will display up to 200 gateways that are configured for the chosen gatewaytype.
Note
Step 4 In the List of Gateways box, choose the gateways that you want to include in the report.You can generate a report for up to 15 gateways at a time. If you choose more than 15 gateways, youwill receive a message that states “Select 15 or fewer gateways to generate new report.”
Note
Step 5 To move the chosen gateway to the list of Selected Gateways box, click the down arrow.The gateway that you chose displays in the Selected Gateways box.
Step 6 Choose the date and time range of the period during which you want to search CDR data. Current time displaysin both Coordinated Universal Time (UTC) and local time and uses the following rules:a) The UTC and local time comprise a numeric string of mmddyyyy hhmmss, as in January 15, 2007 12:00:00.b) The default FromDate and ToDate values display in UTC time.c) The default ToDate specifies the current time of the server in UTC time.d) The default FromDate value specifies the ToDate value minus 1 hour. For example, if ToDate = January
15, 2007 12:00:00, the FromDate default value = January 15, 2007 11:00:00 (all times in UTC).
Step 7 Choose whether to run the CDR Search report with grouping or without grouping. If you chose with grouping,check the check box besideWith Grouping. The default specifies Without Grouping
With Grouping choice means that the system returns CDR records that match the date and time rangefor the search, and groups them with their associated records. Without Grouping returns all the CDRrecords that match the date and time range without grouping together all the associated records foreach call.
Note
Step 8 Click the OK button.The CDR-CMR Results window displays. The system only displays the oldest 100 records that fall into thedate and time range that you configured in Step 6, on page 5. If more than 100 records are returned, thesystem truncates the results.
Step 9 To view the CMR data, click the Others button. To view both the CDR and CMR data fields, click the Viewbutton.
Step 10 To mail the report to e-mail recipient(s), follow the steps in the Mail reports.
Related Topics
Related topics, on page 16
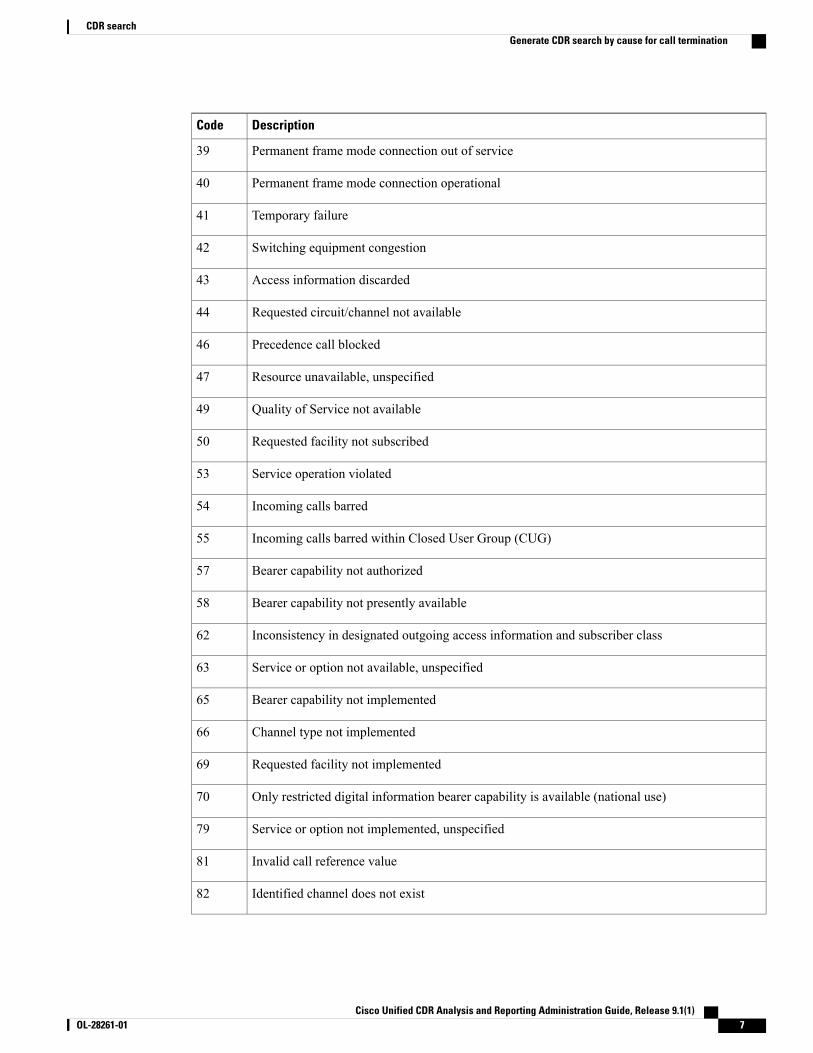
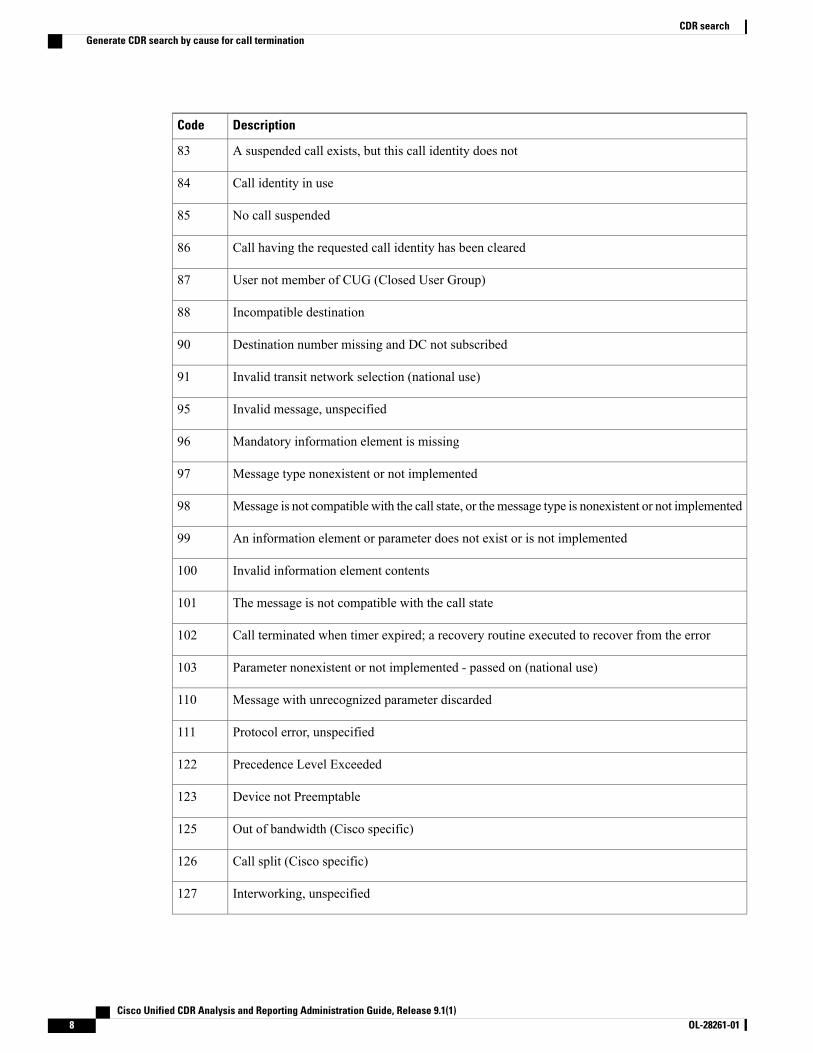
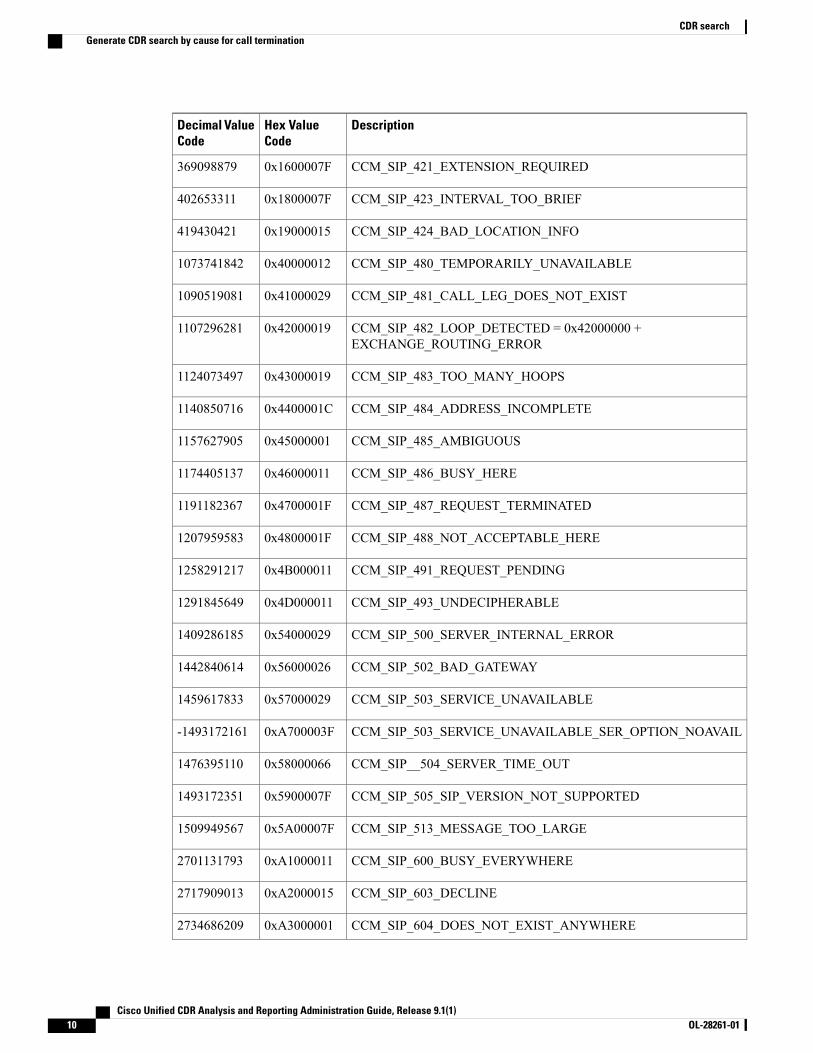
Generate CDR search by cause for call terminationOnly CAR administrators use the CDR Search by Cause for Call Termination feature. The following tablescontain the call termination cause codes by which you may search.
CDR searchGenerate CDR search by cause for call termination
DescriptionCode
Precedence out of bandwidth129
Table 2: Cisco-Specific Call Termination Cause Codes
DescriptionHex ValueCode
Decimal ValueCode
Conference Full (was 124)0x40000262144
Call split (was 126)This code applies when a call terminates during atransfer operation because it was split off and terminated (was not part ofthe final transferred call). This can help determine which calls terminatedas part of a feature operation.
0x60000393216
Conference drop any party/Conference drop last party (was 128)0x70000458752
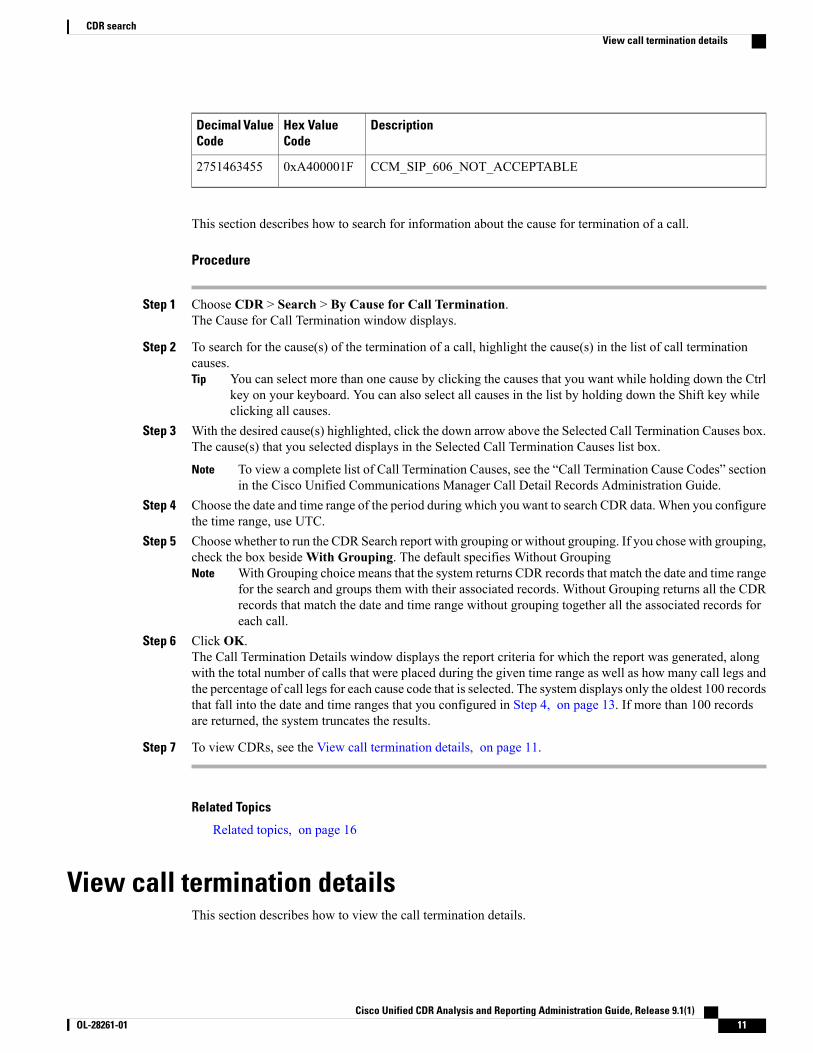
CDR searchGenerate CDR search by cause for call termination
DescriptionHex ValueCode
Decimal ValueCode
CCM_SIP_606_NOT_ACCEPTABLE0xA400001F2751463455
This section describes how to search for information about the cause for termination of a call.
Procedure
Step 1 Choose CDR > Search > By Cause for Call Termination.The Cause for Call Termination window displays.
Step 2 To search for the cause(s) of the termination of a call, highlight the cause(s) in the list of call terminationcauses.
You can select more than one cause by clicking the causes that you want while holding down the Ctrlkey on your keyboard. You can also select all causes in the list by holding down the Shift key whileclicking all causes.
Tip
Step 3 With the desired cause(s) highlighted, click the down arrow above the Selected Call Termination Causes box.The cause(s) that you selected displays in the Selected Call Termination Causes list box.
To view a complete list of Call Termination Causes, see the “Call Termination Cause Codes” sectionin the Cisco Unified Communications Manager Call Detail Records Administration Guide.
Note
Step 4 Choose the date and time range of the period during which you want to search CDR data. When you configurethe time range, use UTC.
Step 5 Choose whether to run the CDR Search report with grouping or without grouping. If you chose with grouping,check the box besideWith Grouping. The default specifies Without Grouping
With Grouping choice means that the system returns CDR records that match the date and time rangefor the search and groups them with their associated records. Without Grouping returns all the CDRrecords that match the date and time range without grouping together all the associated records foreach call.
Note
Step 6 Click OK.The Call Termination Details window displays the report criteria for which the report was generated, alongwith the total number of calls that were placed during the given time range as well as how many call legs andthe percentage of call legs for each cause code that is selected. The system displays only the oldest 100 recordsthat fall into the date and time ranges that you configured in Step 4, on page 13. If more than 100 recordsare returned, the system truncates the results.
Step 7 To view CDRs, see the View call termination details, on page 11.
Related Topics
Related topics, on page 16
View call termination detailsThis section describes how to view the call termination details.
Follow the steps in the Generate CDR search by cause for call termination, on page 5 to display the CallTermination Details window.
Procedure
Step 1 In the Select CDRs field, check the check box beside the individual CDRs that you want to view or, if youwant to view all CDRs in the list, check the Select CDRs check box.
Step 2 After you have chosen the CDRs that you want to view, click View CDRs.The CDR-CMR Search Results window displays.
To view the media information and the CDR-CMR dump records, click the Others and View links.
Step 3 To print information that displays on the window, click theEdit button in your browser. Right-click the SelectAll button to highlight the section of the report that you want to print. Click the Print button.
Step 4 To mail the report in an e-mail, click Send Report and follow the procedure that is described in the Mailreports.
Related Topics
Related topics, on page 16
Generate CDR search by call precedenceOnly CAR administrators use the CDR Search by Call Precedence Levels feature.
This section describes how to search for calls according to call precedence.
Procedure
Step 1 Choose CDR > Search > By Call Precedence Level.The CDR Search by Precedence Levels window displays.
Step 2 In Select Precedence Levels, check the check box(es) for the call precedence level(s) on which you want tosearch as described in the following table.
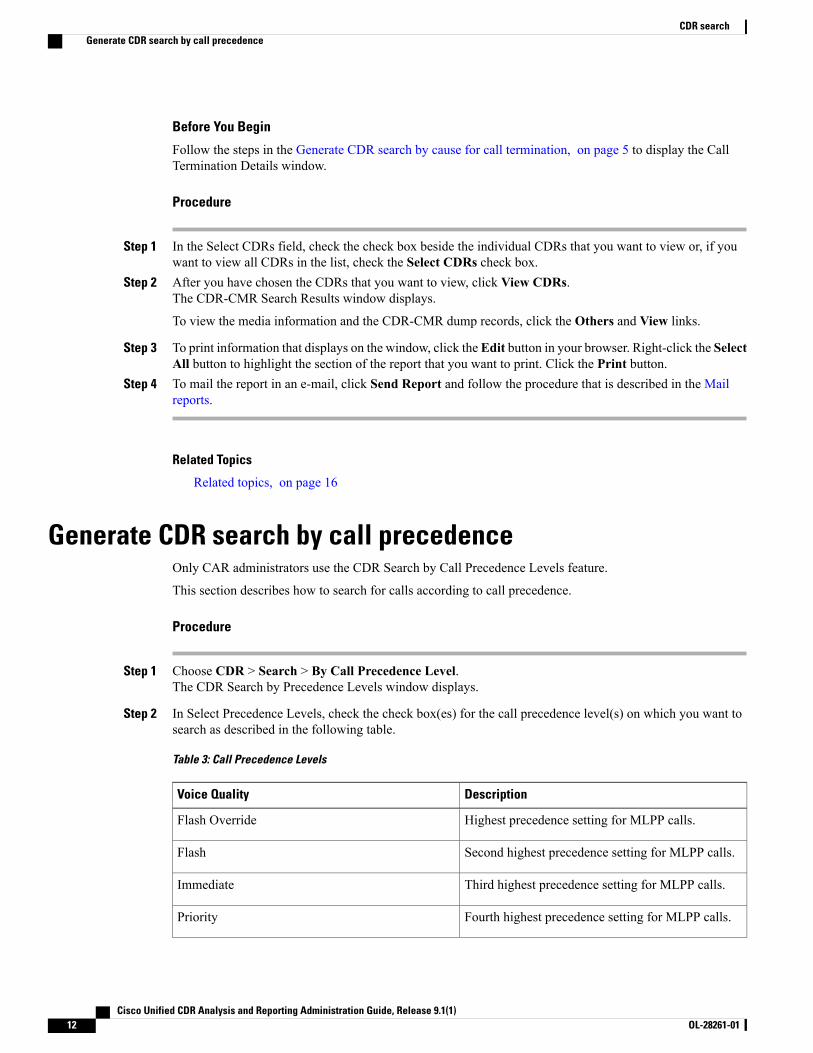
Table 3: Call Precedence Levels
DescriptionVoice Quality
Highest precedence setting for MLPP calls.Flash Override
Second highest precedence setting for MLPP calls.Flash
Third highest precedence setting for MLPP calls.Immediate
Fourth highest precedence setting for MLPP calls.Priority
To check the check boxes of every precedence level, click Select All. To clear the check boxes, clickClear All.
Note
Step 3 In the From Date field, choose the date and time from which you want CDRs searched. Current time displaysin both Coordinated Universal Time (UTC) and local time and uses the following rules:a) The UTC and local time comprises a numeric string of mmddyyyy hhmmss, as in January 15, 2007
12:00:00.b) The default FromDate and ToDate values displays in UTC time.c) The default ToDate specifies the current time of the server in UTC time.d) The default FromDate value specifies the ToDate value minus 1 hour. For example, if ToDate = January
15, 2007 12:00:00, then the FromDate default value = January 15, 2007 11:00:00 (all times in UTC).
Step 4 In the To Date field, choose the date and time to which you want CDRs searched.Step 5 Choose whether to run the CDR Search report With Grouping or Without Grouping. If you chose With
Grouping, check the check box besideWith Grouping. The default value specifies Without GroupingWith Grouping choice means that the system returns CDR records that match the date and time rangefor the search and groups them with their associated records. Without Grouping returns all the CDRrecords that match the date and time range without grouping together all the associated records foreach call.
Note
Step 6 Click OK.The Call Precedence Details window displays and shows the call precedence levels and values, number ofcall legs, and percentage of call legs.
Step 7 In the Select CDRs column, check the check box(es) of the CDR(s) at which you want to look.Step 8 Click View CDRs.
The CDR-CMR Search by Precedence Levels - CDR-CMR Search Results window displays. The systemdisplays only the oldest 100 records that fall into the date and time ranges that you configured in Step 3, onpage 13 and Step 4, on page 13. If more than 100 records are returned, the system truncates the results.
Step 9 To view the CMR data, click the Others button. To view both the CDR and CMR data fields, click the Viewbutton.
Step 10 To mail the report to e-mail recipient(s), click Send Report and follow the steps in the Mail reports.
Related Topics
Related topics, on page 16
Generate CDR search for malicious callsOnly CAR administrators use the CDR Search for Malicious Calls feature.
This section describes how to search for malicious calls.
Step 2 Perform one of the following tasks:a) In the Select Phone Number/SIPURL(s) box, enter the phone number or SIPURL in the Phone Number/SIP
URL field and click Add Phone Number/SIP URL.The phone number or SIP URL of the user displays in the Selected Phone Number/SIP URL(s) box.
b) To search for a user phone number or SIP URL, click the Search Internal Phone Number/SIP URLbased User link, enter the first few letters of the first and/or last name in the First Name and/or Last Namefields, and click the Search button. When the results display, click the Select link next to the result thatyou want to include. The phone number or SIP URL that is associated with the user displays in the SelectedPhone Number/SIP URL(s) box. Click the Close button.
To remove the phone number or SIP URL, highlight the phone number or SIP URL that you wantto remove and clickRemove Phone Number/SIP URL(s). To remove all phone numbers or SIPURL(s), click Remove All Phone Number/SIP URL(s).
Note
Step 3 Choose the date and time range of the period when you want to search CDR data. Current time displays inboth Coordinated Universal Time (UTC) and local time and uses the following rules:a) The UTC and local time comprises a numeric string of mmddyyyy hhmmss, as in January 15, 2007
12:00:00.b) The default FromDate and ToDate values display in UTC time.c) The default ToDate specifies the current time of the server in UTC time.d) The default FromDate value specifies the ToDate value minus 1 hour. For example, if ToDate = January
15, 2007 12:00:00, then the FromDate default value = January 15, 2007 11:00:00 (all times in UTC).
Step 4 Choose whether to run the CDRSearch reportWith Grouping orWithout Grouping. If you chose with grouping,check the box besideWith Grouping. The default value specifies Without Grouping
With Grouping means that the system returns CDR records that match the date and time range forthe search and groups them with their associated records. Without Grouping returns all the CDRrecords that match the date and time range without grouping all the associated records for each calltogether.
Note
Step 5 Click OK.The CDR-CMR Search Results window displays. The system only displays the oldest 100 records that fallinto the date and time ranges that you configured in Step 3, on page 14. If more than 100 records are returned,the system truncates the results.
Step 6 To view the CMR data, click the Others button. To view both the CDR and CMR data fields, click the Viewbutton.
Step 7 To mail the report to e-mail recipient(s), follow the steps in the Mail reports.
Generate CDR search for call typesOnly CAR administrators use the CDR Search for Different Call Types feature.
This section describes how to search for different call types.
Procedure
Step 1 Choose CDR > Search > By Call Types.The CDR Search for Different Call Types window displays.
You can enter a wildcard pattern like “!” or “X” to search on phone number or SIP URL. The “!”represents any n digit that has 0-9 as each of its digits, and the “X” represents a single digit in therange 0-9.
Note
Step 2 Choose the call type from the Select Call Type drop down list.The following is a list of the call types:
• Successful IME Call: Calls that were successfully routed through IME trunks.
• Failed IME Calls: Calls that tried to route through the IME trunk, but failed.
• IMECalls with Fallback to Alternate Route: Calls which were initially routed through the IME trunk,but due to some reason (for example, poor QoS), the fallback mechanism was initiated and these callswere re-routed mid-call to an alternate route. The alternate route is typically a PSTN route.
• Successful Fallback Calls to Alternate Route: Calls which successfully fell back to the alternate route.The alternate route is typically a PSTN route.
• Failed Fallback Calls to Alternate Route: Calls which failed to fall back to the alternate route.
• Calls on Alternate Route due to IME Redirection: Calls that tried to route (at call setup) to IME, butfor some reason were routed to an alternate route. The alternate route is typically a PSTN route.
Step 3 Perform one of the following tasks:a) To search CDRs based on phone numbers/SIP URLs, enter the phone number or SIP URL in the Phone
Number/SIP URL field and click the Add Phone Number/SIP URL button.b) To search CDRs based on user, click the Search Internal Phone Number/SIP URL based User link,
enter the first few letters of the first and/or last name in the First Name and/or Last Name fields, and clickthe Search button. When the results display, click the Select link next to the result that you want to include.Click the Close button.The phone number or SIP URL displays in the Selected Phone Number/SIP URL(s) box.
To delete an item from the Report Criteria box, click the Remove Phone Number/SIP URL(s)button. You can delete all items from the Report Criteria box by clicking the Remove All PhoneNumber/SIP URL(s) button.
Note
Step 4 Current time displays in both Coordinated Universal Time (UTC) and local time. The UTC and local timecomprises a numeric string of mmddyyyy hhmmss, as in January 15, 2007 12:00:00.
Step 5 From the Select TimeZone field, choose the time zone that you want to use to search the CDRs. Optionsinclude your local time zone and Greenwich Mean Time (GMT).
Step 6 In the From Date field and the To Date field, choose the date and time from and to which you want to searchthe CDRs, respectively. The times in the From and To fields use the following rules:
a) The default FromDate and ToDate values displays in UTC time.b) The default ToDate specifies the current time of the server in UTC time.c) The default FromDate value specifies the ToDate value minus 1 hour. For example, if ToDate = January
15, 2007 12:00:00, then the FromDate default value = January 15, 2007 11:00:00 (all times in UTC).
Step 7 Click OK.The CDR-CMR Search Results window displays. The system displays only the oldest 100 records that fallinto the date and time ranges that you configured in Step 3 and Step 4. If more than 100 records are returned,the system truncates the results.
Step 8 To view the CMR data, click the Others button. To view both the CDR and CMR data fields, click the Viewbutton.
Step 9 To mail the report to e-mail recipient(s), click Send Report and follow the steps in the Mail reports.
Related Topics
Related topics, on page 16
Related topics• Generate CDR Analysis and reporting
• CDRs
• CDR and CMR records
• CDR search
Additional documentation• Cisco Unified Communications Operating System Administration Guide


![ChangestotaxonomyandtheInternationalCodeofVirus ... · Parvoviridae Parvovirinae Bocaparvovirus Chiropteran bocaparvovirus 1 Newspecies [28] Unassigned Parvovirinae Bocaparvovirus](https://static.documents.pub/doc/80x56/5f88467350c3e135ce6959cb/changestotaxonomyandtheinternationalcodeofvirus-parvoviridae-parvovirinae-bocaparvovirus.jpg)


![Case [[UNASSIGNED]] U.S. Patent No. 7,856,360 … [[UNASSIGNED]] U.S. Patent No. 7,856,360 6. Claim 27, Branch (A) 80 i. Preamble: A system for providing a service to venues where](https://static.documents.pub/doc/80x56/5ac468f07f8b9a333d8d471b/case-unassigned-us-patent-no-7856360-unassigned-us-patent-no.jpg)